By Selena KomezUpdated on March 22, 2018
“Hi. Last week I updated my phone to iOS 11.3. Recently my iPhone get into the headphone mode suddenly, it always prompt me that the phone is in the headphone mode. Is it possible to get it out of the headphone mode?”
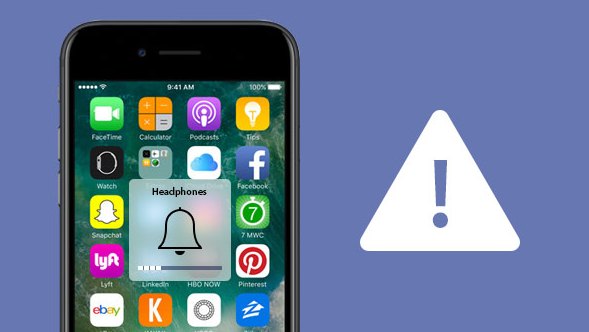
Have you ever had your iPhone get stuck in Headphone mode? When your iPhone is stuck in Headphone mode, and you intend to volume up or volume down the ringer, the volume bar shows “Headphones” instead of “Ringer”. What’s more, you can’t hear any sound for calls, music, videos without plugging in earphones. Had your iPhone stuck in headphone mode? The cases are quite common in daily life.This situation always happen on iPhone especially after performing iOS 11 update on iPhone. It can be frustrating, but it’s usually pretty easy to fix. This tutorial mainly shows you how to fix iPhone headphone mode after iOS 11 update with easy steps.
Fixing iPhone headphone mode after iOS 11 update, we suggest you to use iOS System Recovery. It’s a popular data recovery program that help to fix iPhone abnormal system to normal for different situations, like iPhone stuck in headphone mode, iPhone stuck in recovery mode, iPhone stuck at black screen of death, iPhone stuck at Apple logo screen, etc,. You can use it to fix iPhone headphone mode without data loss after iOS 11 update. This wonderful program can solve all iOS bricked issues with only a few clicks. All models of iPhone are compatible with iOS System Recovery, including iPhone X, iPhone 8, iPhone 7, iPhone 6S/6, iPhone 5S/5.


Step 1.Run the iOS System Recovery on the Computer
To get started,please download and run iOS System Recovery on the computer,you will get the windows as below.
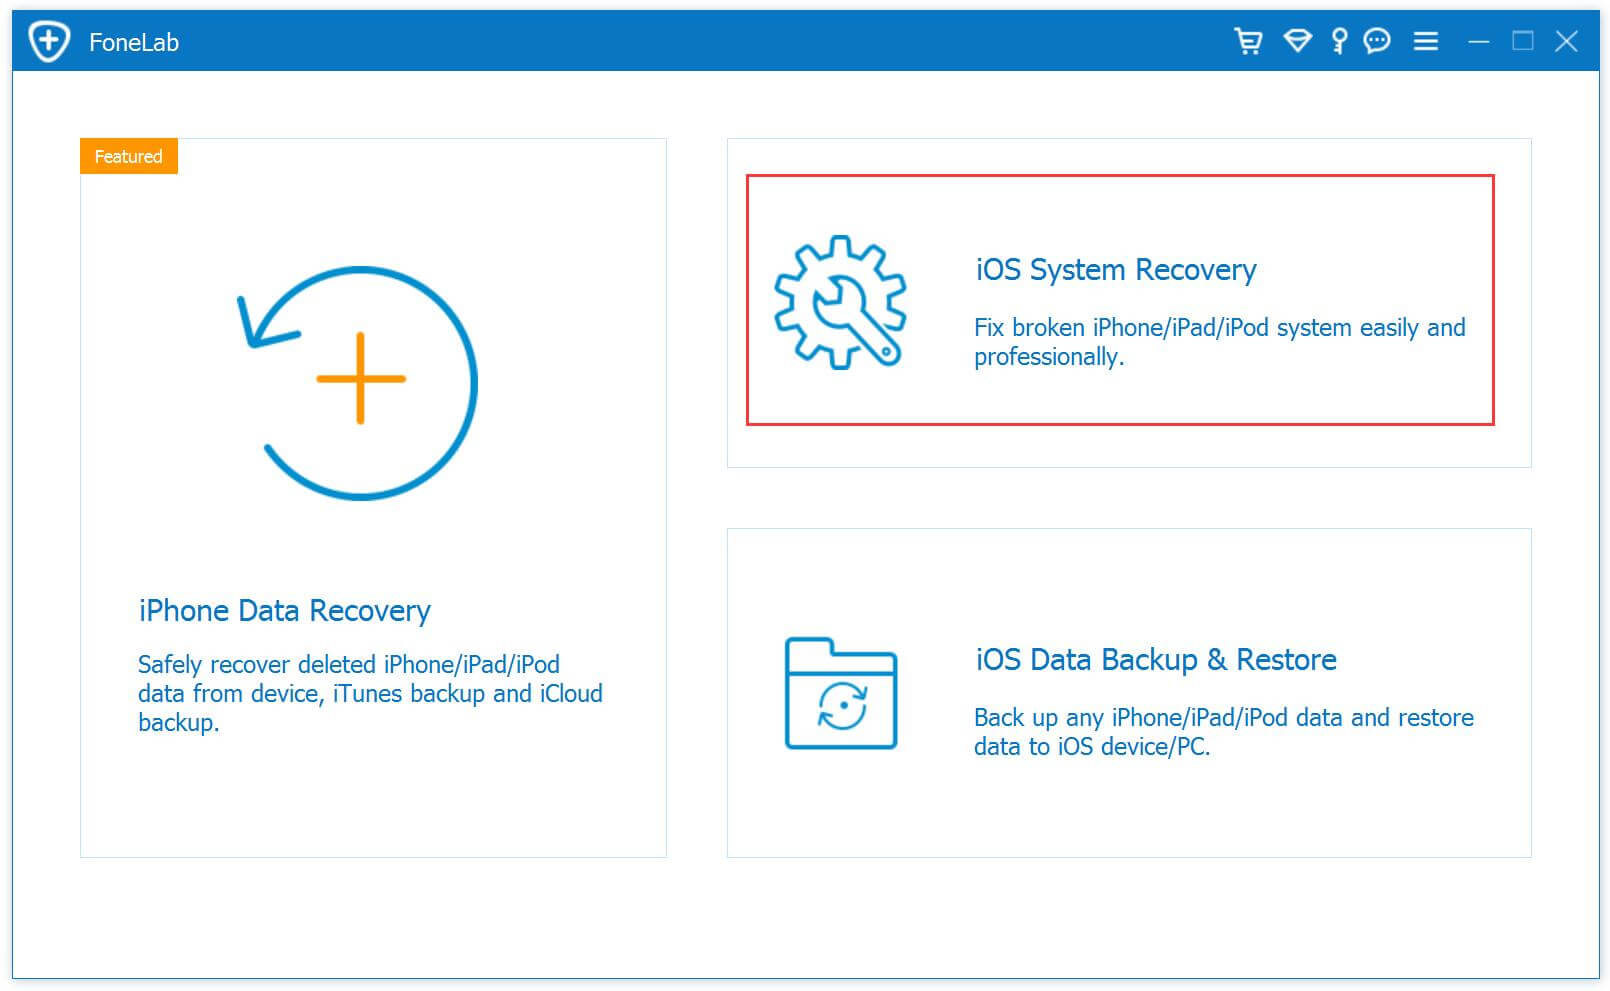
Step 2.Connect iPhone and Select Fixing Mode
Select the “iOS System Recovery”mode in the primary window under “More tools“.Connect your iPhone to the computer via USB cable. After a few seconds,the iPhone will be detection by program and display it on its screen. Now, click on the button “Start“.

Step 3. Select the iPhone Model and Latest Version of the iOS System
Now you should select the iPhone model and iOS system version which fit your device.Then click “Repair” to enter the next step.

Step 4.Download the Latest iOS Firmware for iPhone
iOS System Recovery tool will download the latest iOS firmware for restoring you device,you will see that the program is offering you the latest version of the iOS to download,it will display the progress of the download process as shown in the picture below. Please keep your iPhone and the computer connection.

Step 5.Fixing iPhone Headphone Mode to Normal
When the program is finished downloading the latest firmware for your iPhone, it will continue to fix the abnormal iPhone without 10 minutes.

Done.Only five steps,your iPhone has been restored to normal state,now you can restart the device.
Free download the iOS System Recovery:
Related Articles:
How to Fix iPhone that Won’t Turn on after iOS 11 Update
How to Fix iPhone Blue Screen of Death after iOS 11 Update
How to Fix Bricked iPhone iPad after iOS 11 Update
How to Fix iPhone Stuck in Apple Logo after iOS 11 Update
How to Fix iPhone Stuck in Recovery Mode after iOS 11 Update
How to Backup and Restore iPhone Data
iPhone Manager – How to Transfer and Manager Files on iPhone 8/7/6S/6/SE
Prompt: you need to log in before you can comment.
No account yet. Please click here to register.
 (No Ratings Yet)


No comment yet. Say something...