By Selena KomezUpdated on March 30, 2023
“iPhone stuck in Recovery Mode and won’t restore” during/when iOS 15 upgrading, recently, many iPhone users have encountered similar problems, some users may ask how to get iPhone out of recovery mode, you can find an effective solution to fix iPhone stuck in recovery mode after iOS 15 update. When you get a corrupted iOS operating system during software update, you may try to restore it by putting your iPhone in Recovery Mode. If your iPhone 12/11/SE/XS/XR/XS Max/X/8/7/6S upgraded to iOS 15 is stuck in Recovery Mode, you can’t miss this article which covers the potential solutions to the problem “iPhone stuck in Recovery Mode in iOS 15”. By the ways, you can also fix “iPhone stuck on Apple logo in iOS 15” without data loss, read it for reference if you get the same problem.
You May Like:
Recover Lost Data after iOS 15 Update
Fix iOS 15 Stuck on Recovery Mode/Apple Logo/Boot Loop, etc.
When your iPhone is stuck in Recovery Mode, you can try to force restart your iPhone and get it out of recovery mode. The way to force restart your iPhone varies according to the iPhone you are using. Choose one of the three ways below to reboot your iPhone.
For iPhone 6 or earlier, hold and press both Sleep/Wake button and Home button until you see the Apple logo. (Sleep/Wake button is also called Side button.)
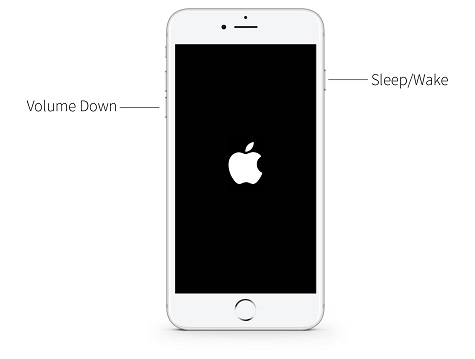
For iPhone 7/7 Plus, hold and press both Sleep/Wake button and Volume Down button until the Apple logo appears.
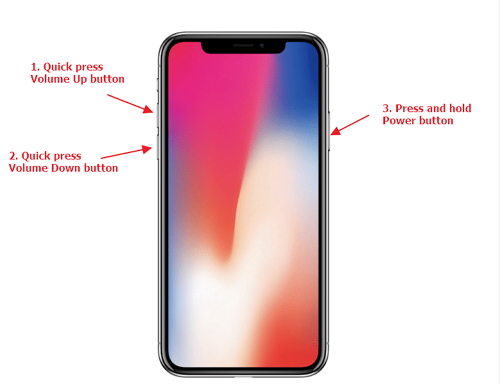
For iPhone 11/XR/XS/X, iPhone 8 and iPhone 8 Plus, quickly press and release the Volume Up button, quickly press and release the Volume Down button and then press and hold the Sleep/Wake button until you see the Apple logo.
If your iPhone stuck in Recovery Mode after iOS 15 update failed, you can also use iTunes to restore your iPhone, but this method will erase all data and settings on your iPhone, f you don’t care about the data on your phone, you can restore your iPhone by using iTunes.
What should you need to do before using iTunes to restore iPhone?
Download and install the latest version of iTunes application on your PC or Mac computer.
To avoid problems like “iPhone not connecting to iTunes”, so you need to update your iTunes to the latest version.
Please go to iTunes > Help > Check for Updates on your Windows PC or App Store > Update > Install on your Mac to update your iTunes to its latest version.
When your iPhone stuck in Recovery Mode, then follow the steps below to restore your iPhone by using iTunes:
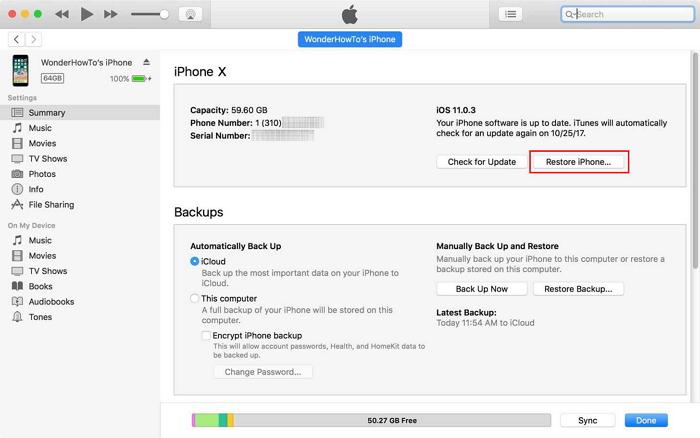
Step 1: Connect your iPhone to your computer and launch iTunes.
Step 2: Then you may see a window in iTunes telling you “iTunes has detected a device in Recovery Mode”. If so, tap on Ok in the window.
Step 3: Tap on the iPhone Device button in iTunes and choose Summary.
Step 4: Click Restore iPhone > Restore to reset your iPhone to factory settings. After that, your iPhone will be set up as new.
Note: The iTunes will erase all data and settings on your iPhone, if you looking for a safely method to fix iPhone stuck in recovery mode in iOS 15/iOS 14, we recommend you use a safe iOS System Recovery tool, please keep reading the below iOS system fixing solution.
Put your iPhone in DFU mode at first
If you iPhone in iOS 15 is stuck in Recovery Mode and you don’t want to fix it with the help of some third-party software, the last solution you can try to use the 3 best iOS System Recovery to fix iOS system to normal after putting your iPhone in DFU mode, which enables you to fix the iOS 15 software issus without data loss.
Then, fix iPhone Stuck in Recovery Mode by using iOS System Recovery
This iOS 15 System Recovery is designed to fix your iPhone and iPad back to normal status without data loss, it not only can help you fix frozen, disabled or bricked iOS devices to normal, but also enables you fix iPhone from DFU mode, recovery mode, Apple log, etc. This professional iOS System Recovery is easy to use & 100% safe without any data loss, so you can fix iPhone stuck in recovery mode at home.
iOS System Recovery For Any Situations:
Now, you can download the free trial version to have a try. Please choose the right version for your computer.


What’s more, this program also can help you recover lost data from iPhone and iPad, and back up your important data regularly to protect your data. You can follow our step by step guide on how to recover lost data from an iPhone, it works well with all iOS devices, including iOS 13, iOS 12, iOS 11, iOS 10, etc.
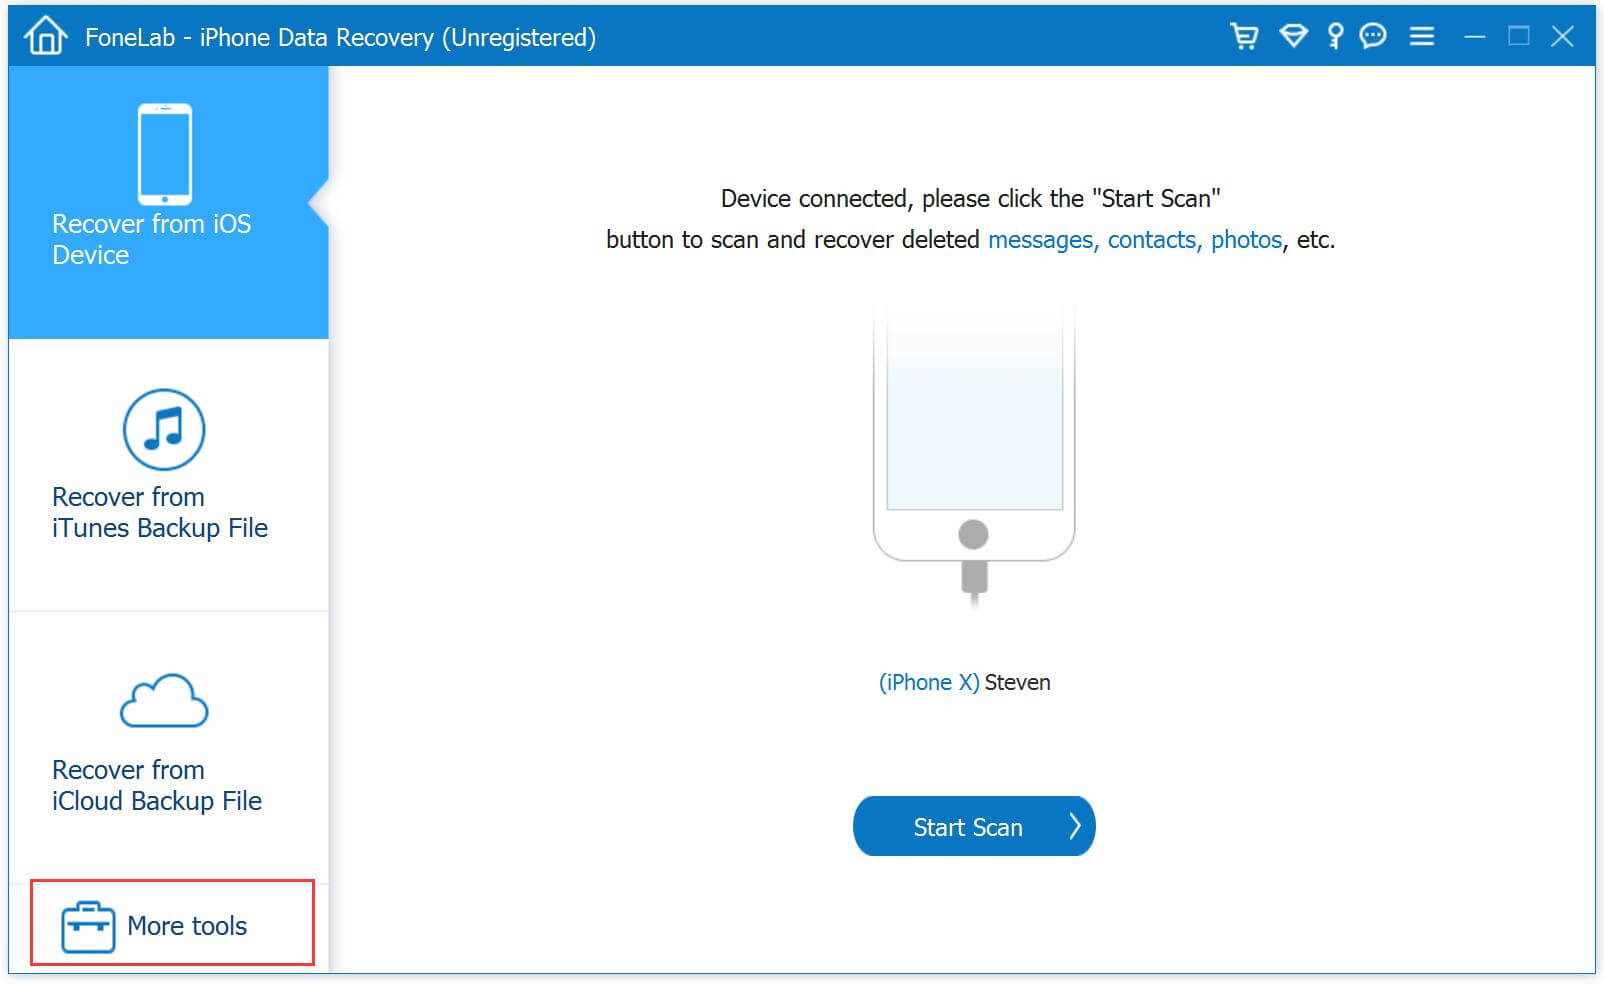
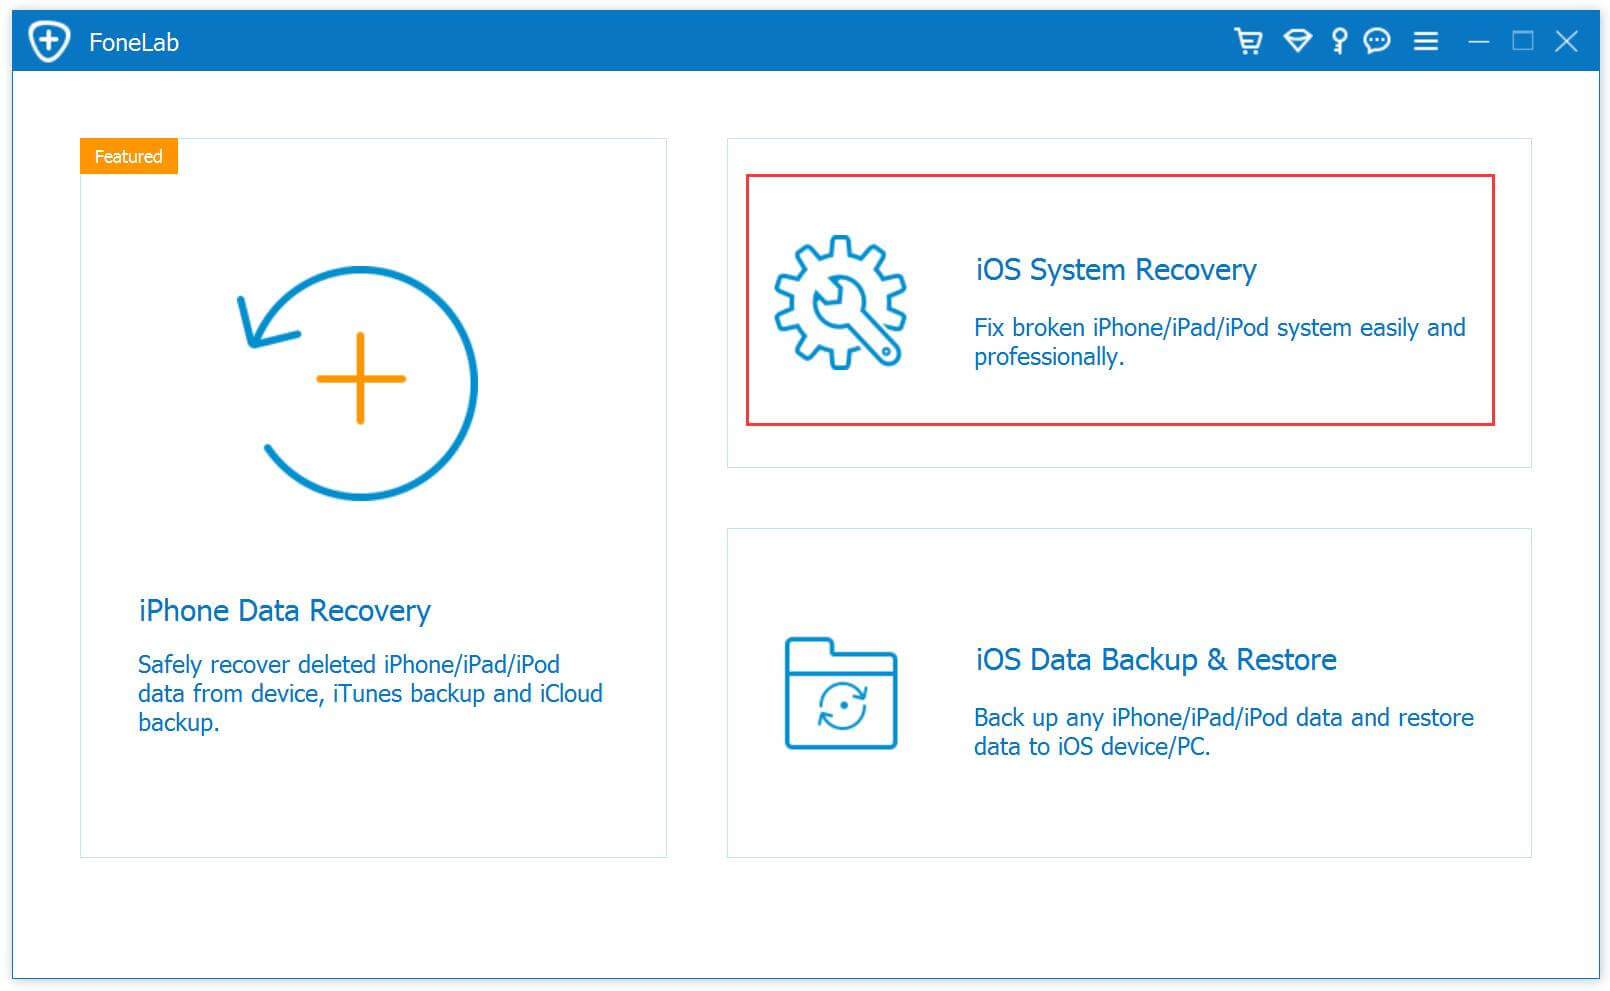
Step 1: Launch the iOS Toolkit and Connect iPhone to Computer
Open the iOS Toolkit and click the “More tools” option at the bottom left of the interface. Then, connect your iPhone with the computer via USB cable.
A new window pops up, offering you three options to choose from. Since we’re going to fix iPhone stuck in recovery mode, choose the “iOS System Recovery” option to proceed.
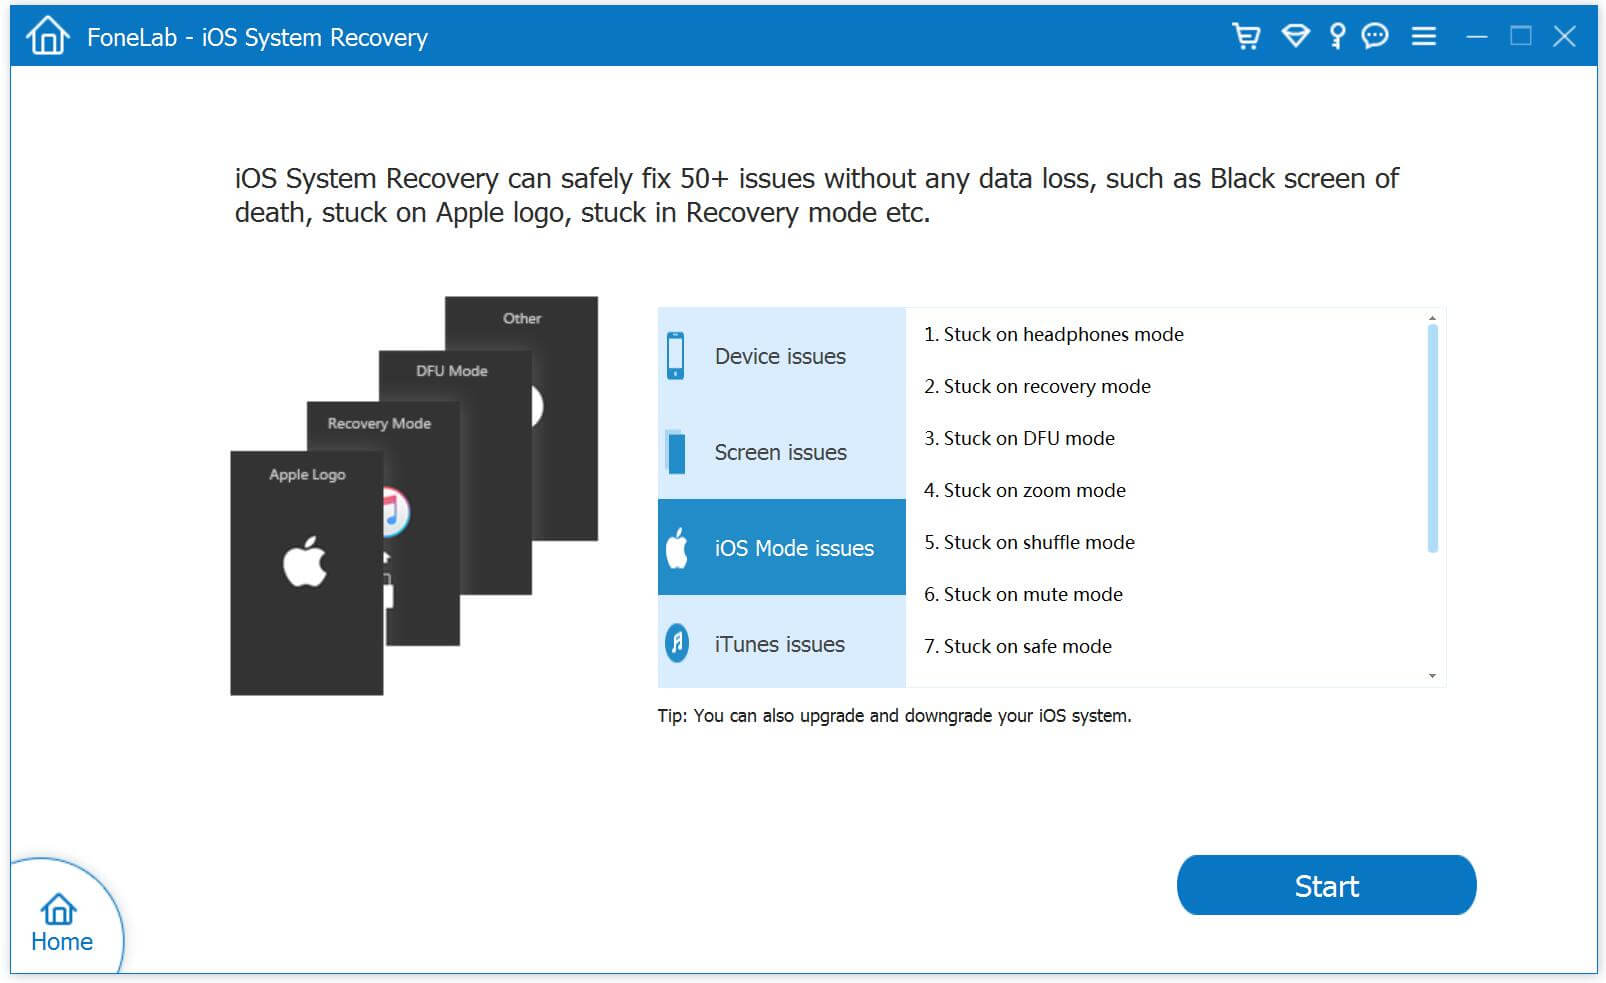
The software will pops up an new window, then click “iOS Mode issues”, you can see the program can fix iOS device stuck on recovery mode, headphones mode, DFU mode, etc. Then, hit the “Start” button at the lower right corner to go on.
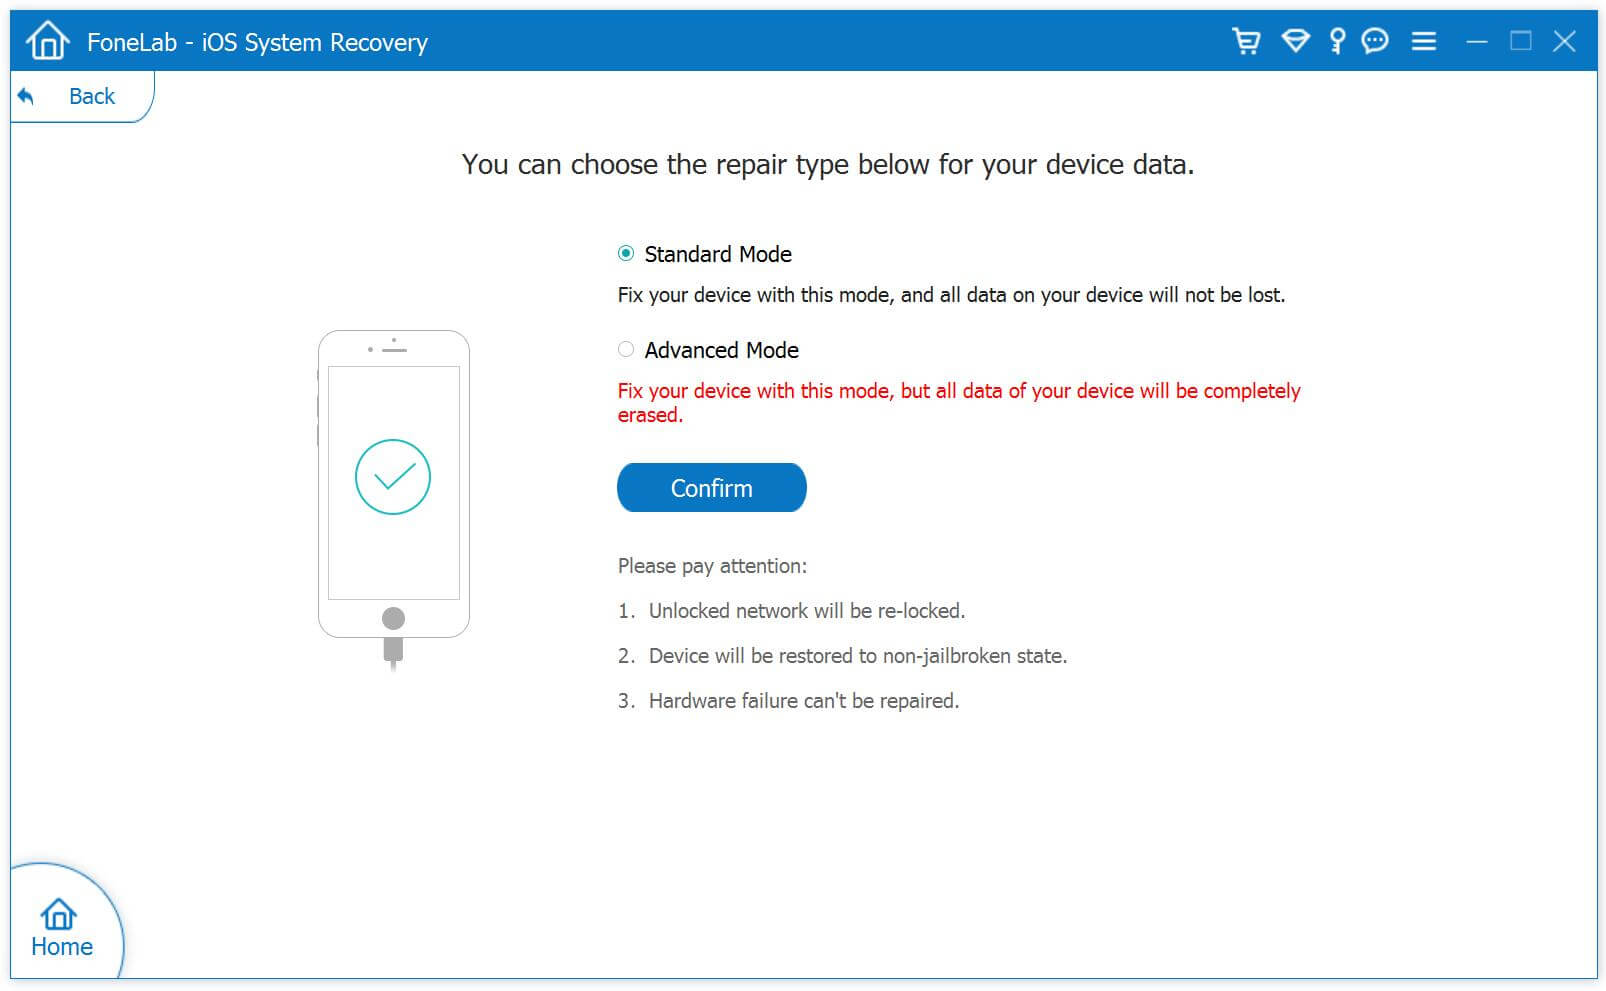
Step 2: Select a Fix Mode
You then will get into a new window, like the screenshot below. Please select “Standard Mode” or “Advanced Mode” to fix your iPhone device, then click “Confirm” to go on.
“Standard Mode” – Fix your device with this mode, all data on your device will not be lost.
“Advanced Mode” – Fix your device with this mode, it will erase all data on your device.
Suggest that you go to the advanced mode only if the standard mode fails.
You then will be prompted to set up a connection between your iPhone and the computer with a USB cable. Do it as required
Step 3: Optimize iOS System(Option)
The software will detect and analyze your iPhone device and shows all information of the device, if your iPhone is working properly, you will get the screenshot as below:
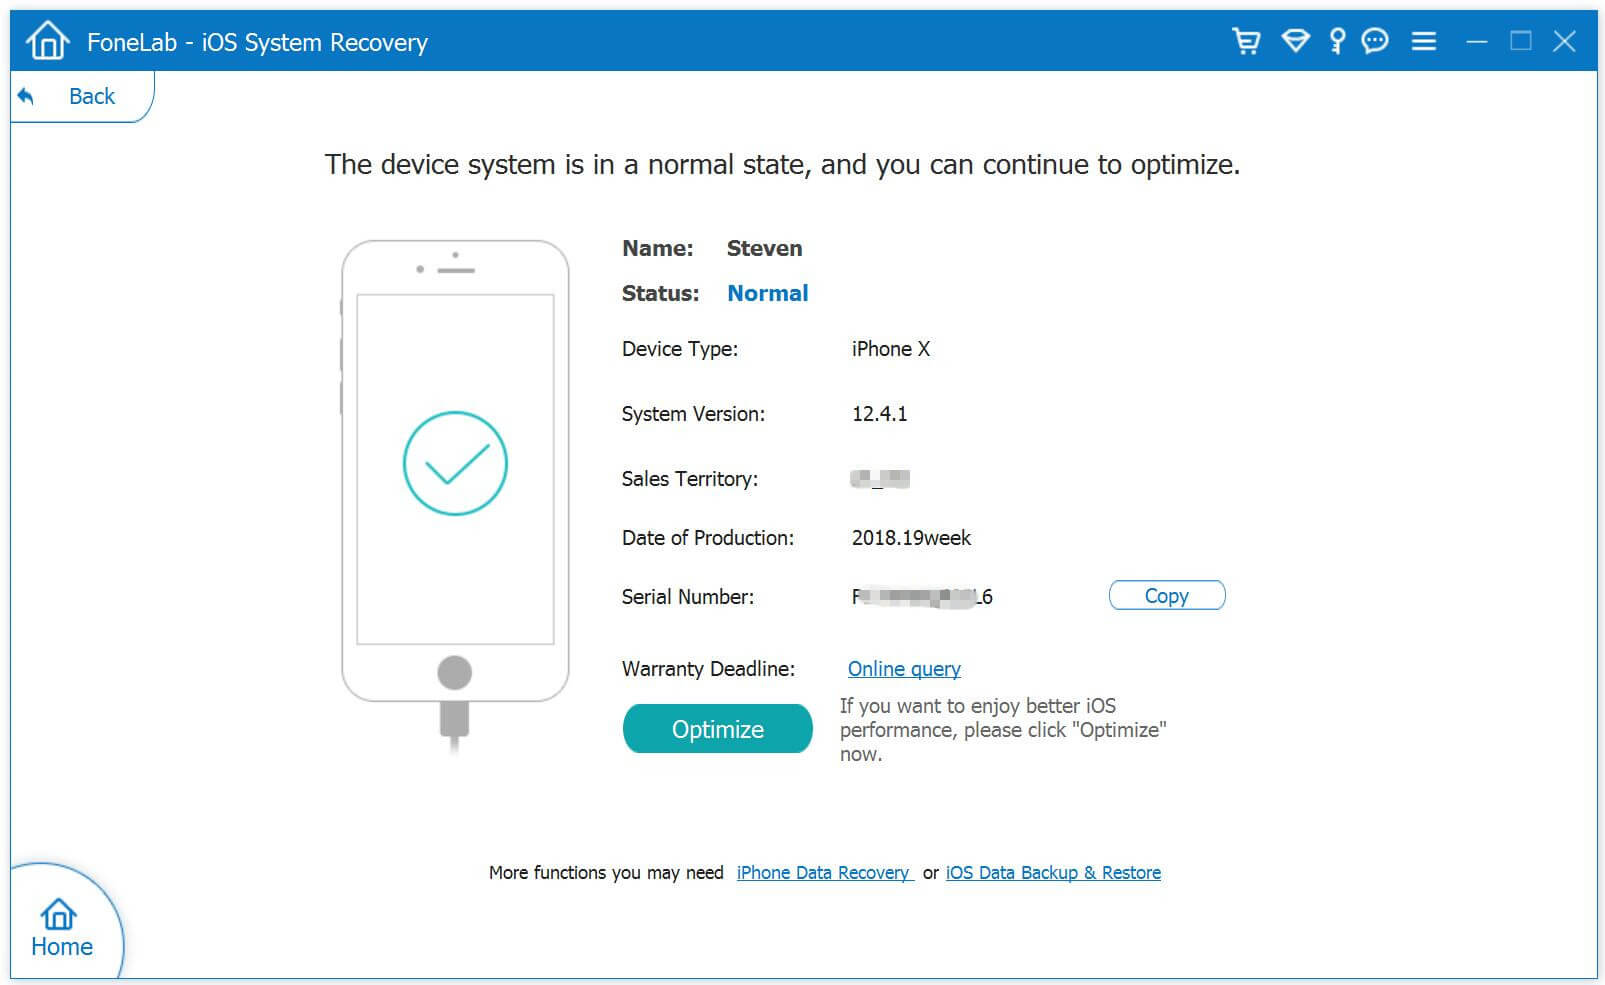
Tips: If you want to enjoy better iOS performance, you can continue to optimize your iPhone, please click “Optimize” button to go on. So, this iOS System Recovery can help you update or downgrade iPhone/iPad/iPod Touch without data loss.
If your phone is working abnormal, you need to put your iPhone into DFU mode or recovery mode at first, then the software will detect it and download the suitable firmware to fix iOS system to normal, please keep reading the below steps.
Step 3: Enter DFU Mode or Recovery Mode(Skip)
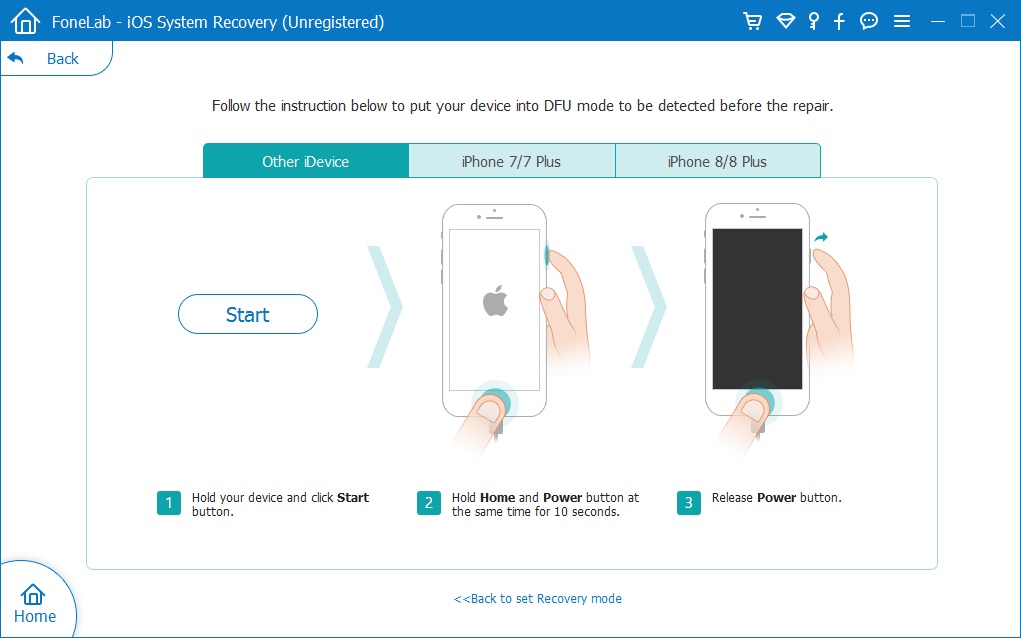
Just follow the on-screen instructions to put your iPhone into DFU mode.
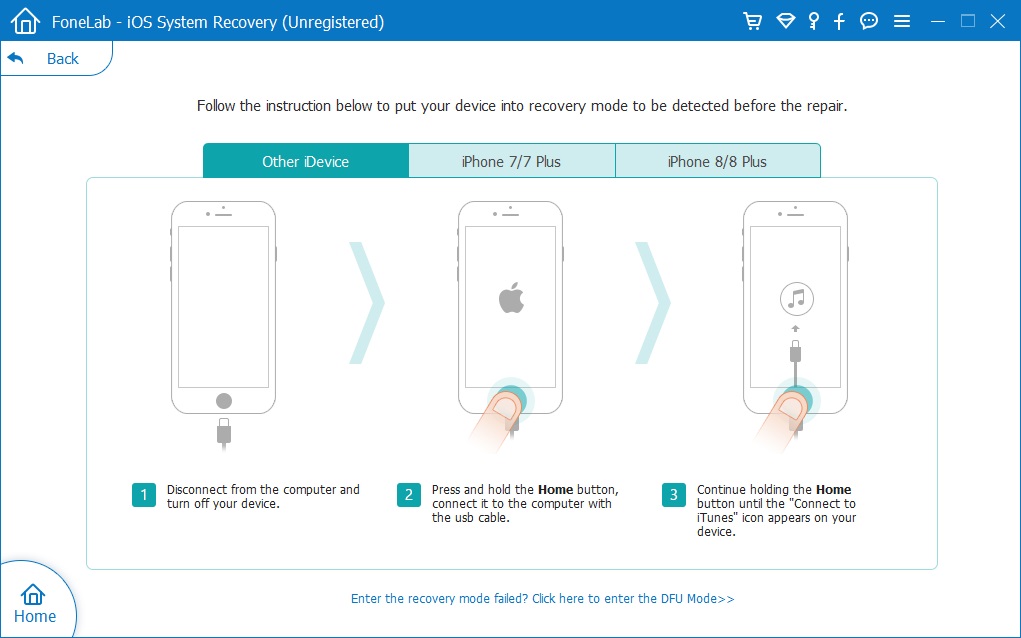
Or, put your iPhone into Recovery mode, just follow the on-screen instructions to put your iPhone into Recovery mode.
This case teach you how to fix iPhone to normal when it stuck on recovery mode, so you don’t need to put your iPhone into recovery mode or DFU mode, the software can detects it.
Step 4: Select Firmware Package
In this step, you need to select a suitable firmware package for your iPhone, the software provides the latest iOS 13 for iPhone 11/XS/XS Max/XR/X/8/7/6S(Plus).
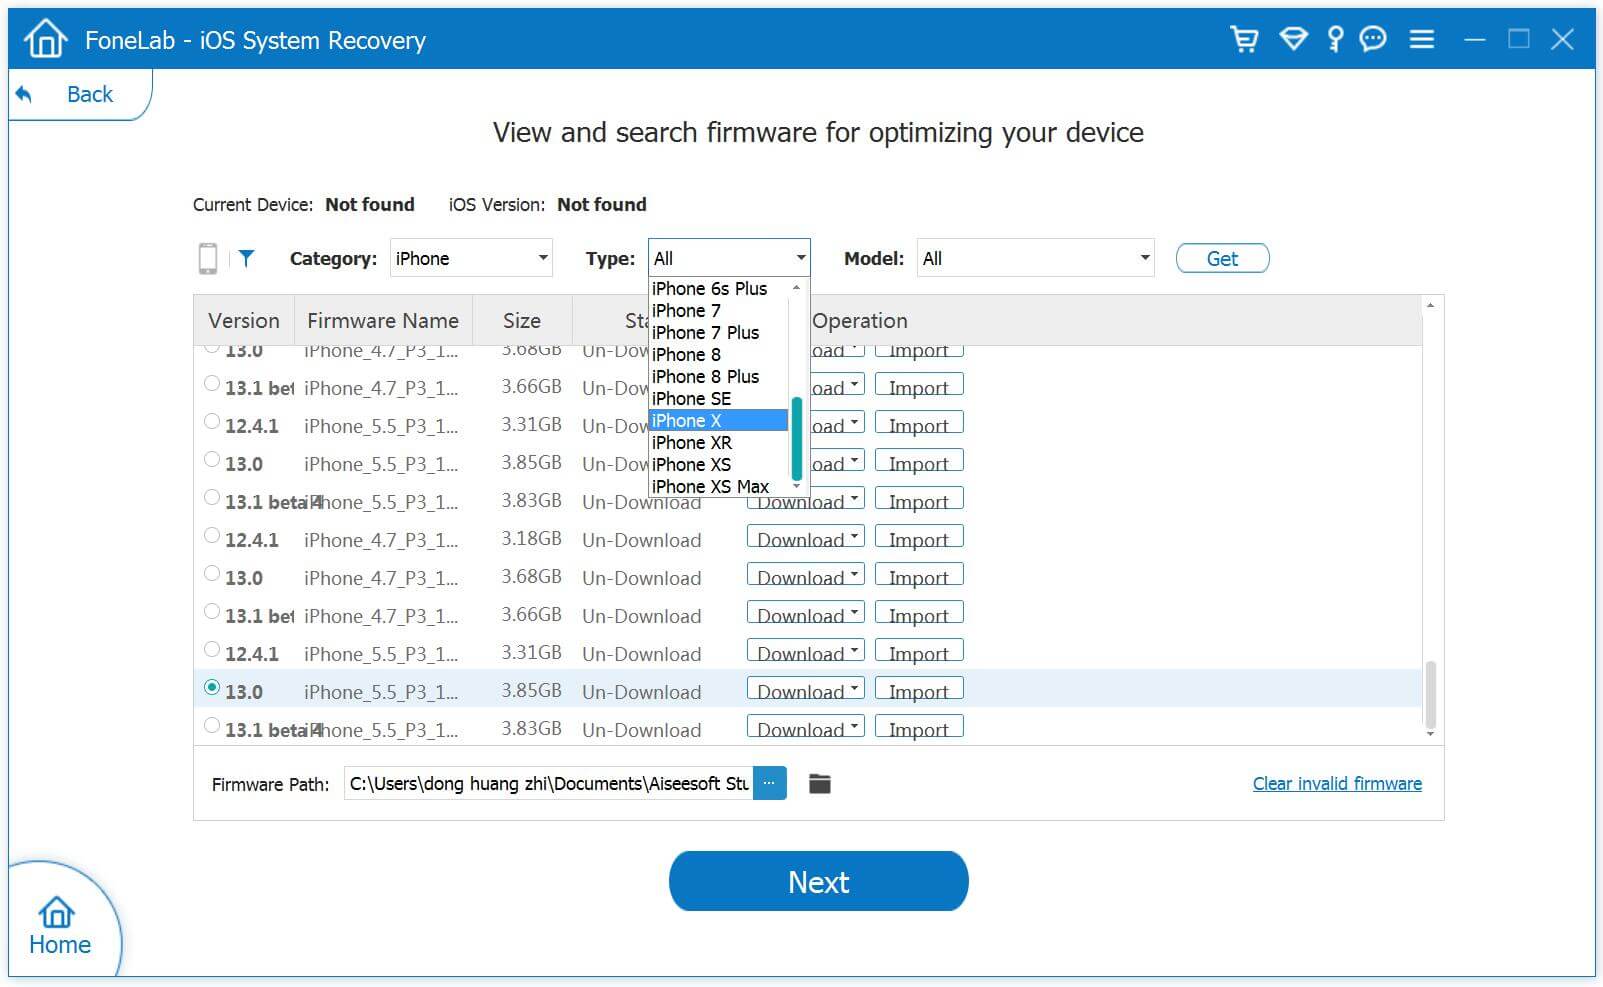
Step 5: Download Firmware Package for Fix your iPhone
The software automatically detects the model type of your iPhone and displays available iOS system versions. Select a version and click on “Next” button start downloading Firmware package for repair your iPhone device.
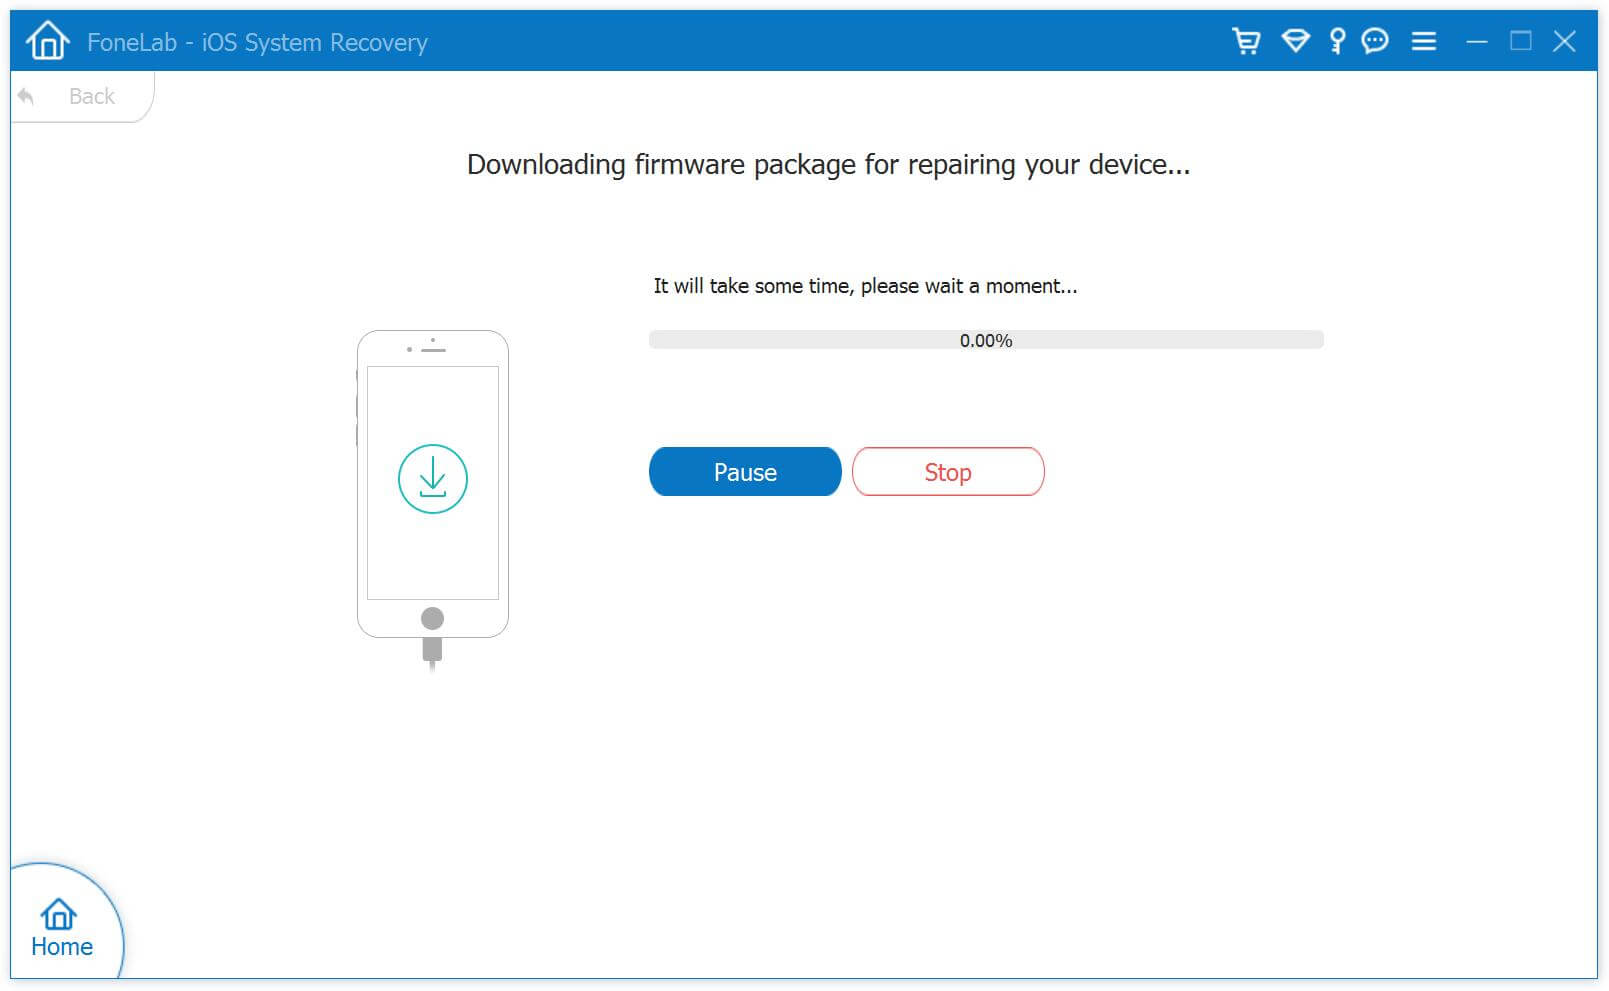
Do not disconnect or operate your device during the download processing.
Tips: Then the iOS firmware will be downloaded. Since the firmware we need to download is large, it will take some time to complete the download. Make sure your network is stable during the process. If the firmware is not download successfully, you can also click on “Download” to download the firmware using your browser, and click on “Import” to button to import the downloaded firmware package to the software, it will help you install the downloaded firmware without erase your iPhone data.
Step 6. Start Fixing the iPhone in Recovery Mode
After downloading the Firmware package completed, then click the “Repair” button at the lower right corner. The software start to fix iOS system to normal, please keep connecting your iPhone device with the computer during the fixing processing.

When it’s done, your iPhone will restart automatically and get back to normal.
Why not download this powerful iOS Toolkit – iOS System Recovery to fix your iPhone device to normal status, or optimizing iOS system to enjoy better iOS performance.
No matter your iPhone stuck in the loop of restarting, stuck on Apple logo, stuck in black screen, or screen locked, this iOS System Recovery can help you fix iOS system to normal without data loss. Additionally, the powerful “iPhone Data Recovery” can help you recover deleted iPhone data such as photos, contacts, text messages, notes, reminders, etc.
Before fix iOS system to normal by using this iOS System Recovery, if the software can detect your device, you need to put your iPhone into DRU mode firstly. Let’s learn how to put iPhone in DFU mode and read it for reference no matter you are using an iPhone 11/XR/XS, iPhone 8, iPhone X, iPhone 7 or iPhone 6.
1)Put iPhone 8/X/XR/XS/11 in DFU mode
Step 1: Connect your iPhone 8/X/XR/XS/11 to your computer and launch iTunes.
Step 2: Press and quickly release the Volume Up button, press and quickly release the Volume Down button and then press and hold the Side button (Sleep/Wake button) until you get a black iPhone screen.
Step 3: When your iPhone screen goes black, release Side button only and then quickly press and hold both Side and Volume Down Buttons for 5 seconds.
Step 4: Then release Side button only and hold the Volume Down button for another 5 seconds.
Step 5: During the process, pay close attention to iTunes. When you see a small window in iTunes telling you iTunes has detected an iPhone in recovery mode, release the Volume Down button and check your iPhone screen. If it’s black, fortunately, you have put your iPhone 8/8 Plus/X in DFU mode successfully. While if it’s not, for example, it’s the “connect to iTunes” screen, you have to repeat the steps above to enter DFU mode again.
Step 6: If you have put your iPhone 8/X/XR/XS/11 in DFU mode successfully, click OK and then choose to Restore iPhone. When it’s completed, your iPhone will exit DFU mode automatically.
2)Put iPhone 7/iPhone 7 Plus in DFU mode
Step 1: Connect your iPhone 7/7 Plus to your computer and launch iTunes.
Step 2: Press and hold Sleep/Wake button (Side button) until a slider appears. Drag the slider to shut down your iPhone.
Step 3: Then hold and press both Sleep/Wake button and Volume Down button for 10 seconds.
Step 4: Keep holding Volume Down button only for 5 seconds after the 10 seconds.
Step 5: If your iPhone screen remains black, you are now in DFU mode. And iTunes will tell you that it has detected your iPhone. (To exit DFU mode, you just need to turn off your iPhone.)
3)Put iPhone 6 or earlier in DFU mode
Step 1: Connect your iPhone 6 or earlier to your computer and run iTunes.
Step 2: Hold and press Sleep/Wake button (Side button) until you see a slider on the screen. Drag the slider to switch off your iPhone.
Step 3: Press and hold both Sleep/Wake button and Home button for 10 seconds.
Step 4: Then keep holding Home button only for another 5 seconds.
Step 5: If your iPhone screen stays black, your iPhone is in DFU mode now. At the same time, a window in iTunes will pop up and tell you iTunes has detected your device. (To exit DFU mode, you just need to turn off your iPhone.)
Prompt: you need to log in before you can comment.
No account yet. Please click here to register.
 (No Ratings Yet)
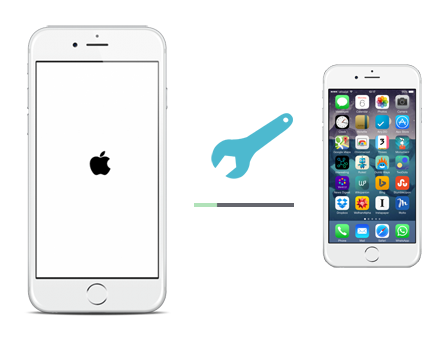


No comment yet. Say something...