By Selena KomezUpdated on July 20, 2018
[Summary]: Looking for a safe way to downgrade your iPhone, iPad, iPod Touch from iOS 12 beta to iOS 11.4? This article will teach you two effective methods to downgrade iOS 12 to iOS 11.4/11.3/11.2/11 with iTunes or iOS system recovery. No data loss.
Recently, Apple released the latest iOS 12 public beta at the WWDC 2018 Developer Conference. I did a simple start-up experience with this newly released iOS 12 public beta. I found that this iOS 12 is different from the system that Apple released in the past. The new iOS 12 system’s optimization of the iPhone is beyond my understanding.
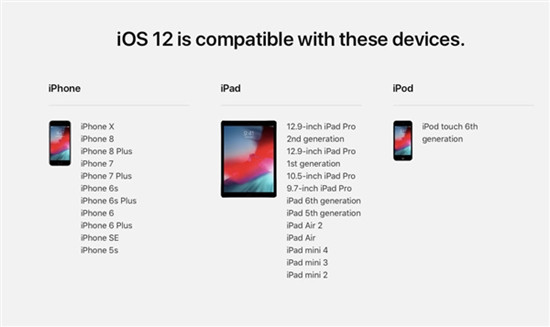
iOS 12 has been designed to make the iPhone and iPad faster, more responsive, and more pleasantly surprised. iOS gives you a comprehensive optimization and enhancement. Whether it is iPhone or iPad, it will be faster and more sensitive to use. A variety of everyday operations, such as opening the camera app and typing text on the keyboard, are faster than ever. In addition, when you work on multiple tasks at the same time on the device, the performance increase will be more significant. The performance of all applicable devices will benefit from these optimizations, even the iPhone 5s and iPad Air. Apple’s latest iOS 12 system is consistent with the devices supported by iOS 11, with support down to iPhone 5s and iPad mini 2. Specific support model as shown below:
Some Apple users have installed iOS 12 on iPhone, there will be bugs, but the first beta version of iOS 12 is quite stable as far as I can tell so far, and battery life isn’t taking any hits. While iOS 12 seems pretty safe to use on your main iPhone, you should know you can always dial things back if you want to. It’s easy to safely downgrade to iOS 11.4, which is the latest public iOS 11 release. That means you won’t lose any data even if you haven’t backed up your iPhone or iPad before jumping on iOS 12.
Before updating, you should back up all your data and settings. For the beta, Apple advises that you should back up to iTunes specifically (rather than to iCloud) and then archive the backup.
People also read: Safely Backup iPhone Data before iOS 12 Update
Here’s how to archive an iTunes backup and prepare for iOS 12:
Step 1.Plug in your iPad or iPhone and start up iTunes on your Mac.
Step 2.Click “Summary“, then “Back Up Now“.
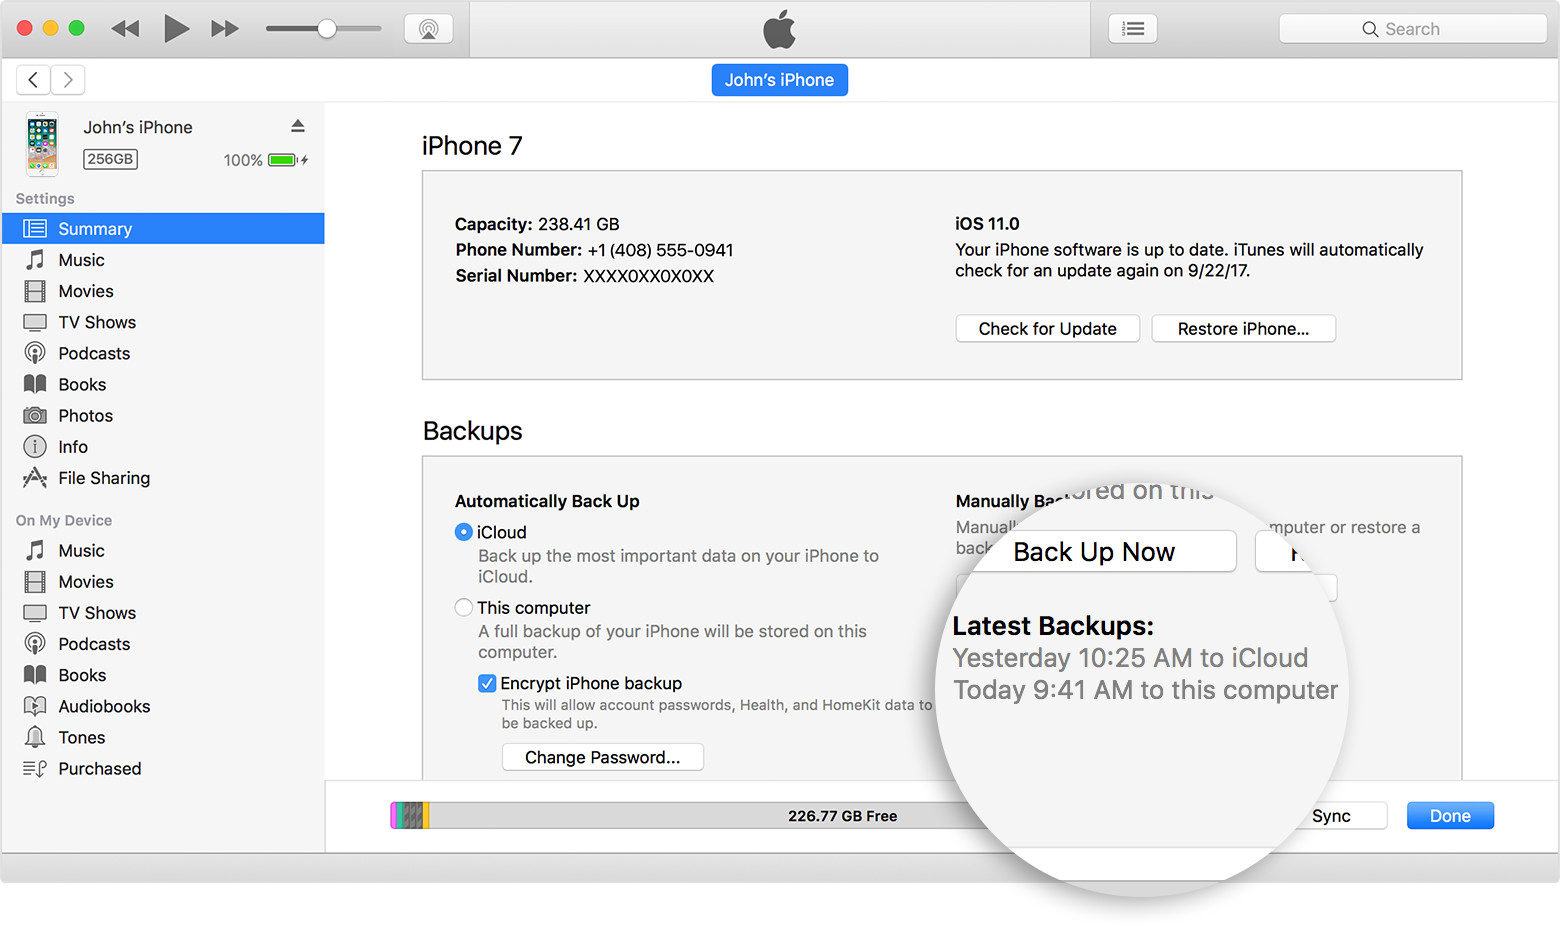
Step 3.Wait for the backup to finish.
Step 4.Now select iTunes > Preferences > Devices and look for your device’s backup.
Hold the Ctrl key and click on the backup. Finally, select the option Archive.
This creates a safe backup that we can return to after trying out iOS 12. By archiving or copying iTunes backup, you can ensure the iOS 11 backup won’t be covered by the new iOS 12 backups so that after going back to iOS 11, you can still restore the device from iOS 11 backup. Remember that you cannot restore an iOS 11 device from backup that was made when the device was on iOS 12 beta.
If you worry about data loss during the iOS 12 beta downgrade, you can use an thrid party iOS Data Exporter to back up photos, text messages, contacts, videos, audio, WhatsApp messages, and other App data from iPhone to computer.
Next, we’ll look at how to go back to a previous version of iOS 11 (and restore the backup we just created) from iOS 12.
Above guide, you have make your iPhone backup with iTunes or thrid-party iPhone data backup & restore tool, the only issue is that you’ll have to restore from a pre-iOS 12 backup (here’s how to back up an iPad or iPhone), so any data or preferences you’ve saved since then will be lost – and if you haven’t got an archived backup from your iOS 11 (as Apple suggests doing before upgrading), you won’t be able to restore your data at all. Let’s teach you how to downgrade iOS 12 to iOS 11 with iTunes.
Step 1.Enter Recovery mode by holding the Power and Home buttons until your iPhone or iPad turns off, then continue holding the Home button. This can take a while, so don’t give up after a few seconds.
Step 2.When it says ‘Connect to iTunes’, do exactly that – plug it into the computer and open up iTunes.
Step 3.Download the proper IPSW file of iOS 11.4 according to your device model.
Download iOS 11.4 IPSW files in HERE.
Step 4.Open iTunes and choose your device. Press Option button on Mac (Shift button on Windows) while clicking on the Upgrade button.
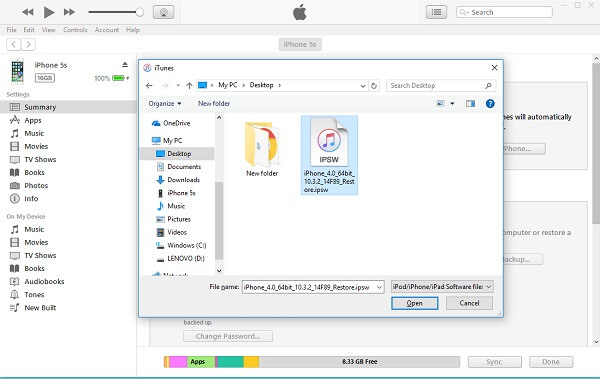
Note: Do Not select Restore iPhone. Otherwise, iTunes will erase all data on your iPhone after downgrading to iOS 11.
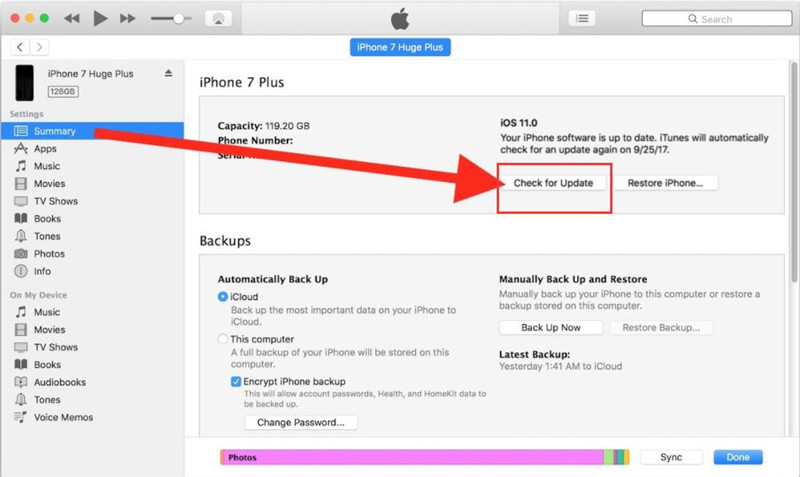
Step 5.iTunes will tell you that it’s detected an iPhone or iPad in Recovery Mode, and that this needs to be restored – click OK to agree to this, and then Upgrade iPhone or Upgrade iPad (as appropriate).
Step 6.Finally, choose the option to Restore and Update. iTunes will begin to download iOS 11.4 to your iPhone or iPad device. After the download is complete, your device will restore to iOS 11.4 and restart.
Step 5. Now, you iPhone downgraded to iOS 11.4, if you want to restore the iTunes backups to your devices, please keep your device connected iTunes, once iTunes has reinstalled a fresh version of iOS 11, and then click Restore from this backup in iTunes and choose the archived iOS 11 backup you made before the iOS 12 beta (remember, your iOS 12 backup won’t work) or setting it up as a new iPhone.
Well done, you have success downgrade iOS 12 to iOS 11 with iTunes, but you should backup your iPhone data at first.Next, we will teach you how to downgrade iOS 12 to iOS 11 without backup, no data loss at all, too.
Some people say it is very troublesome to using iTunes to upgrade or downgrade iOS 12 on iPhone, iPad, iPod Touch, because it takes a lot of time to back up the data, the processing is very slow, and there is a high-risk of data loss.For example, some users couldn’t downgrade from iOS 12 to iOS 11 with iTunes and get stuck at recovery mode, Apple logo screen, black screen; a few users reported that their iDevices cannot turn on or got frozen.
Don’t worry, iOS System Recovery can help you fix all kinds of iOS system issues, such as fixing frozen or dead iPhone on iOS 12 beta; fix iPhone black screen of death after iOS 12 update; fix iPhone stuck at Recovery mode/DFU mode after iOS upgrade/downgrade. In additional, iOS System Recovery for Windows or Mac, both can help you downgrade iOS without iTunes, it won’t erase the device’s data. Let’s shows you how to use the iOS System Recovery program to install OS on the iPhone, iPad or iPod without data loss.
Free download the easy-to-used and safe to iOS System Recovery to downgrad iOS 12 to iOS 11.4 without erasing data on your device.


Tips: If your iPhone X/8/7/6/5/4 has been disabled after iOS 12 upgrading or downgrading, the program can helps you fix a disabled iPhone with or without connecting to iTunes.
Step 1.Install and Launch iOS System Recovery on your PC or Mac
Launch this iOS System Recovery on your computer. Then connect your iPhone to it with USB cable. Click “More tools” on the left column and then tab the “iOS System Recovery” on the preview window.
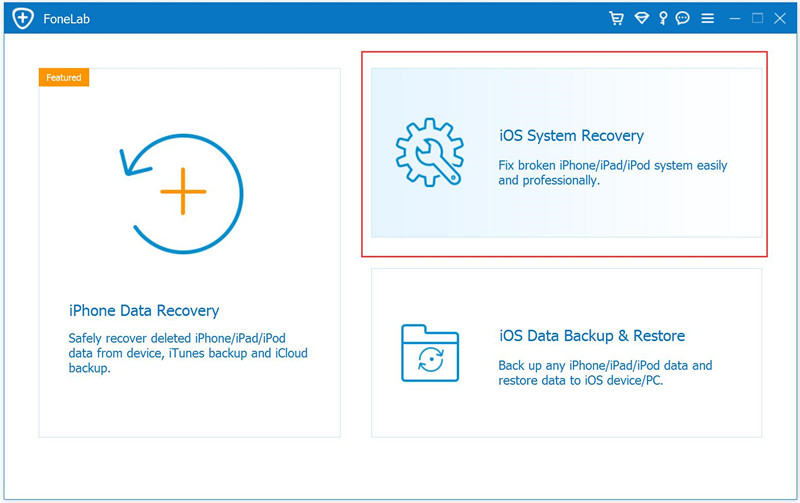
After that, click “Start” button to begin the process.

Tips: In order to downgrading iOS 12 to iOS 11.4, you need to download the iOS 11.4 firmware first, the iOS System Recovery program will help you download the latest firmware package and fix it, but you need to put your iPhone in recovery mode for detecting by the iOS System Recovery tool.
Situation 1: If your iPhone is working and you want to get back to iOS 11, click Start and select question mark below “Device is connected but not recognized“, the program will guide you how to get the devices into recovery mode as below step.
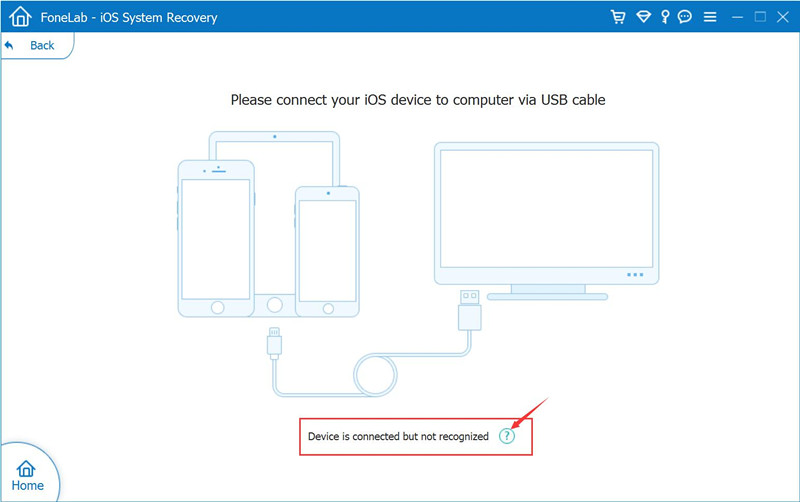
Step 2. Boot iPhone into Recovery or DFU mode
Then follow the on-screen guide to connect your device to computer and put it in recovery mode.
Led iPhone into DFU
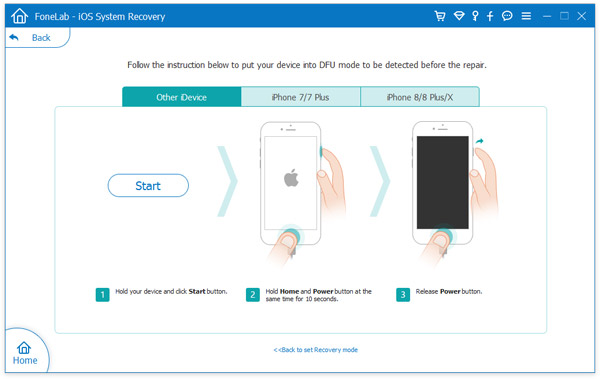
Click “Question” button and follow the guide to turn your iPhone into Recovery or DFU mode. Here we put disabled iPhone into DFU mode:
For iPhone 6S and older version:
1)Power off your iPhone.
2)Press and hold the Power button and the Home button together for 10 seconds.
3)Release the Power button and keep holding the Home button until the device is in DFU mode.
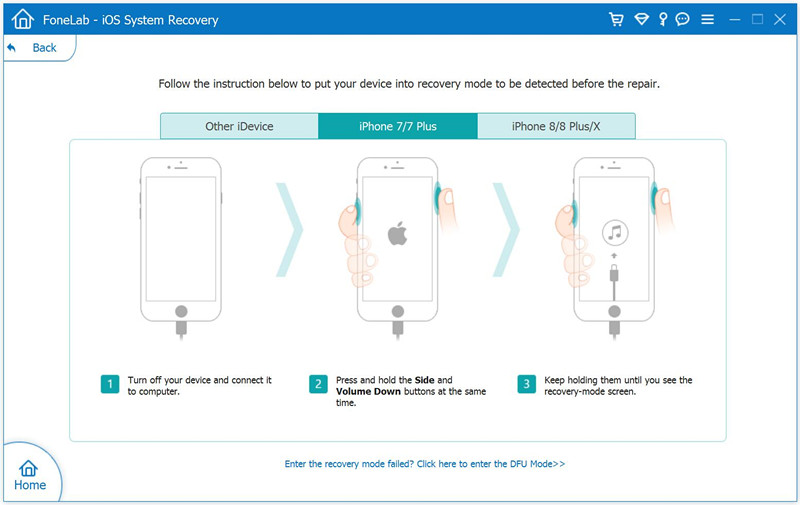
For iPhone 7/7 Plus: Put the iPhone 7/7 Plus into recovery mode to be detected before fix it
1. Turn off the iPhone 7 device and connect it to computer.
2. Press and hold the Side and Volume Down buttons at the same time.
3. Keep holding them until you see the “connect to iTunes” screen, it mean device be putted into recovery mode, at this time the program will detect it.
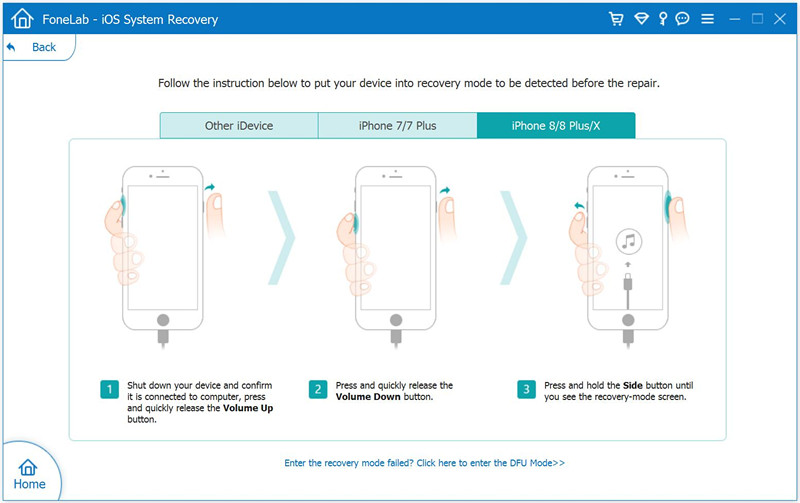
For iPhone 8/8 Plus and iPhone X:
1. Shut down your device and confirm it is connected to computer, press and quickly release the Volume Up button.
2. Press and quickly release the Volume Down button.
3. Press and hold the Side button until you see the screen shows iTunes logo screen appear(recovery-mode screen status)
Situation 2:If your iPhone/iPad works abnormal because of the iOS 12 beta, for example, your device stuck at black screen, Apple logo screen, recovery mode, etc. Just connect the iPhone to computer and click Start,the program will recognize that your device is in the abnormal status. Click “Confirm” and follow the step 3 begin download the IPSW firmware and installing it by this program.
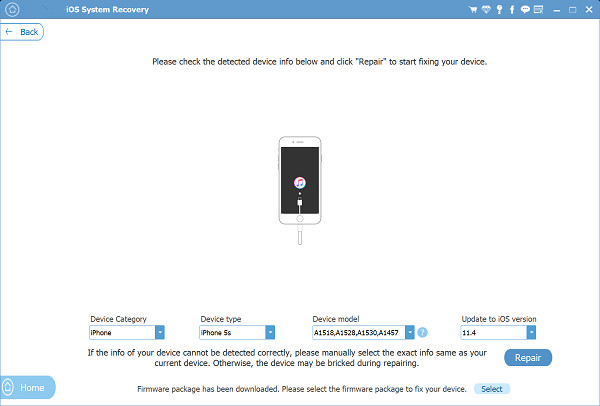
Step 3.Select Device Model and Download the iOS 11.4 Firmware
In this step, please select the correct iPhone device model and iOS 11.4 firmware files, then click “Download” button, the software will detect your phone model and download the suitable iOS 11.4 IPSW files for your device.
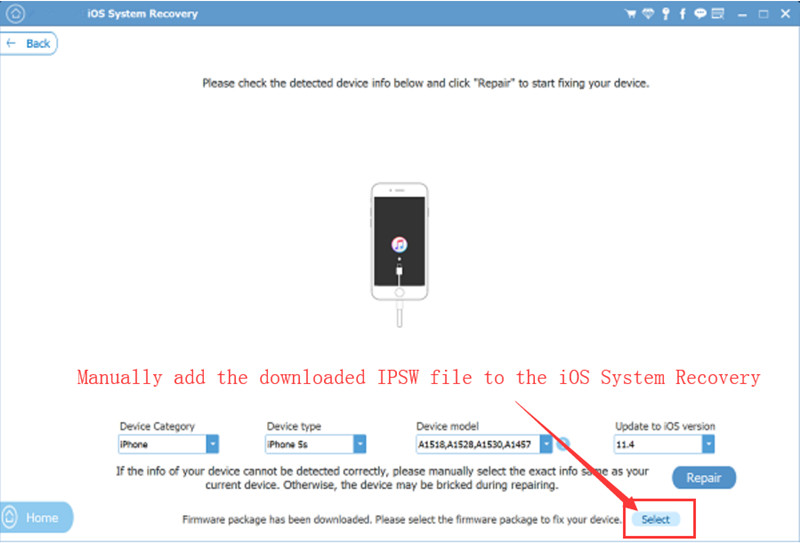
Manually add the downloaded iOS 11.4 IPSW file to iOS System Recovery software
If you have downloaded the IPSW file before, please select the IPSW file you just download and let the iOS System Recovery program install the iOS 11.4 IPSW files onto your iPhone/iPad device without data loss.
Add IPSW files to the program
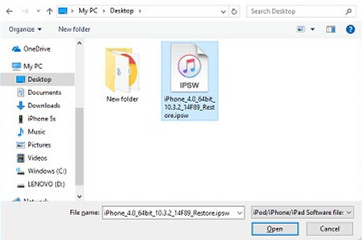
Tips: To download the iOS 11.4 IPSW file for your specific iPhone or iPad model, and place the .ipsw file somewhere easily accessible (you can get other IPSW files here but only the most recent versions are signed and possible to use)
Step 4.Begin Install iOS 11.4 on iPhone and Restore it Back to Normal
When the iOS 11.4 plug-in download is finished, this software can automatically downgrade iOS 12 beta to iOS 11.4 on iPhone/iPad/iPod Touch and fix disabled iPhone back to normal.

Well done, above easy guide helps you downgrade iOS 12 beta to iOS 11.4 successfully, at this time,the device will boot up automatically. You can check on Settings > General > About and see if your iPhone device downgraded to iOS 11, you can find the previous data and setting still on the device.If you found lost data after iOS 12 upgrading or downgrading, check this guide about how to recover lost data after iOS 12 update.
Recover Lost Contacts from iPhone after iOS 12 Update
How to Restore Lost Photos from iPhone after iOS 12 Update
Get iPhone Out of Apple Logo after iOS 12 Update
How to Fix iPhone System to Normal after iOS 12 Update
Prompt: you need to log in before you can comment.
No account yet. Please click here to register.
 (No Ratings Yet)


No comment yet. Say something...