All posts by DHZ

How to Recover Data from Samsung Galaxy Alpha

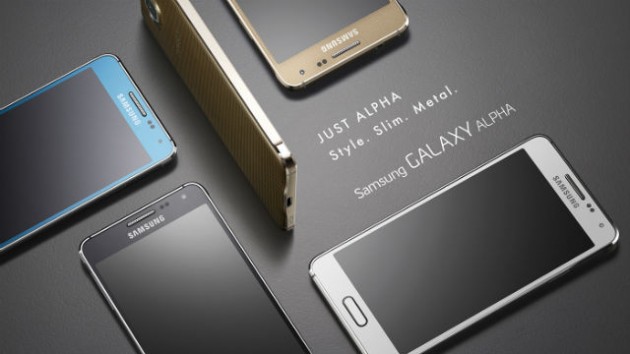
When a company names one of their products after the first letter of the Greek alphabet, it means business.Take Samsung’s Galaxy Alpha:The name alone exudes confidence. Although the term typically signifies the first in a series, the Alpha obviously isn’t Samsung’s inaugural Android phone; rather, it ushers in a completely new design direction for the company. It’s not a top-of-the-line flagship device on the inside, but what matters is that it actually looks like one on the outside, thanks to its premium aesthetics, metal frame and sleek body.

samsung galaxy alpha

Just like other Android phones, data on your Samsung Galaxy Alpha might get deleted or erased after deleted accidentally,Android rooting, factory reset, flashing ROM, etc,.How to recover data from Samsung Galaxy Alpha or other models of Samsung phone,such as,Galaxy A3/A5/A7/A8/A9?Want to recover Samsung data directly without backup?Here is our the best solutions which is offered for you to solve the Samsung data recovery issue.To increase the possibility of recovering deleted data from Samsung mobile,you’d better stop using your phone when your files missing.

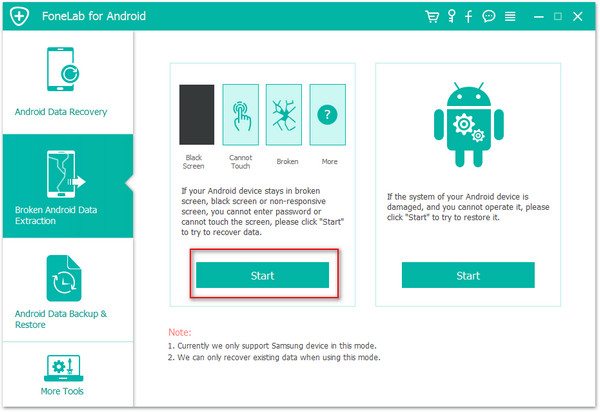
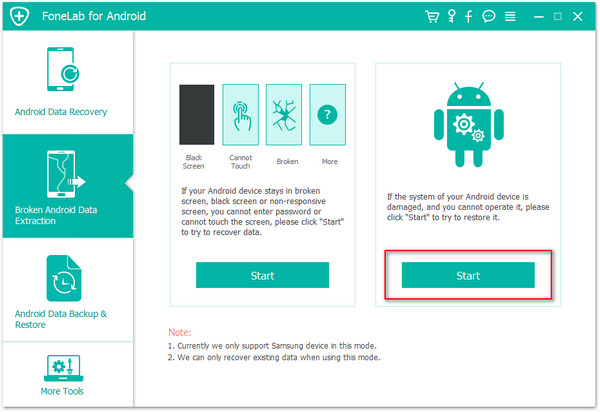
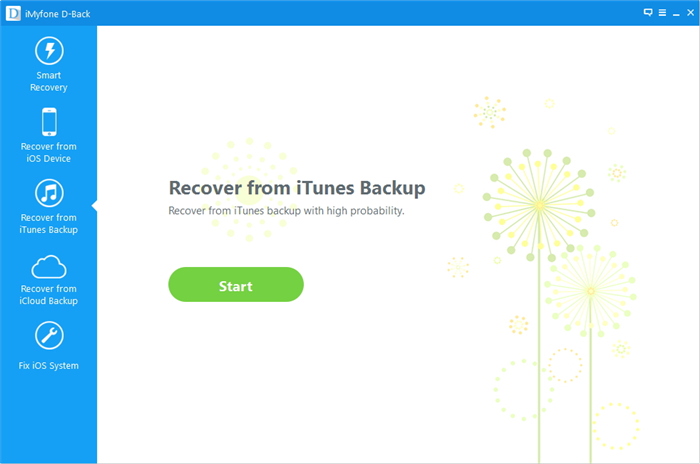
Directly Restore Data from Samsung Galaxy Alpha
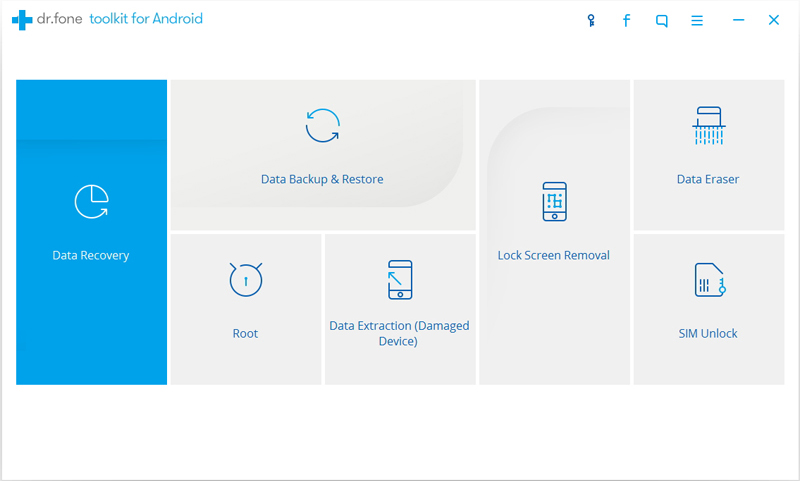
Samsung Data RecoveryAndroid Data Recovery can help you to do the Samsung data recovery easily.With Android Data Recovery,you could directly recover deleted data from Samsung Galaxy Alpha like a piece of cake.It works well for recovering various of Android data,including contacts,messages,photos,video,audio,call logs,documents and more.There are all sorts of Android phones are supported to restored by this program,for instance,Samsung (Galaxy A9/A8/A7/A5/A3,Galaxy S7/S6/S5,Note 5),Huawei(Mate 9/P9),Google(Pixel,Nexus 6),Xiaomi(Mi Mix,Mi Note 2),Lenovo(K5 Plus,K5 Note),Vivo(V5,Y66,Y55).

d_win d_mac

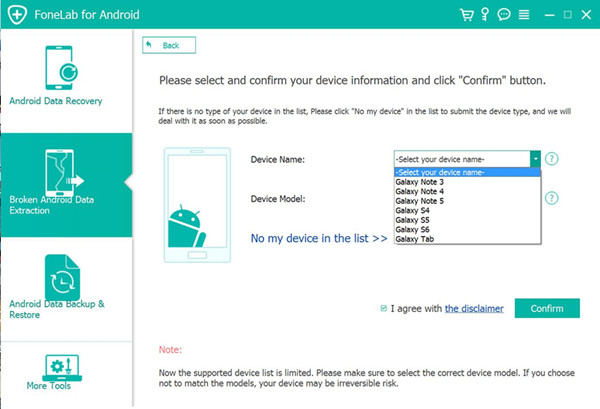
How to Directly Restore Data on Samsung Galaxy Alpha

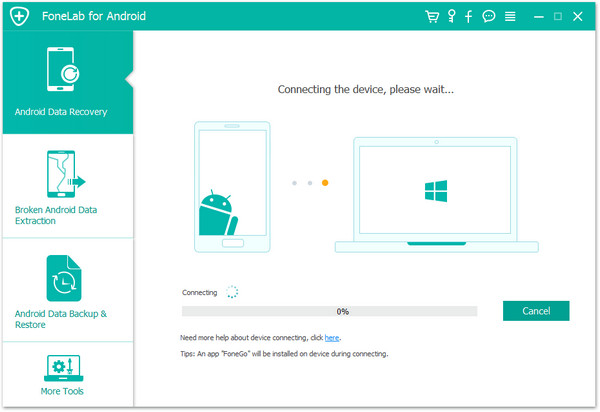
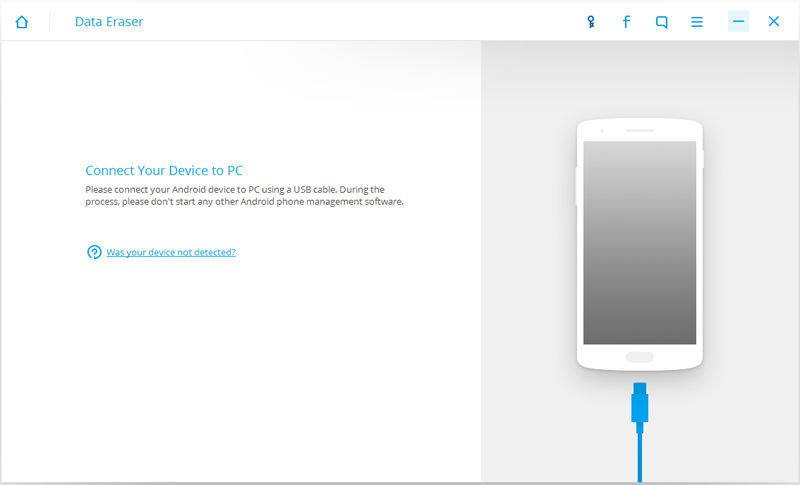
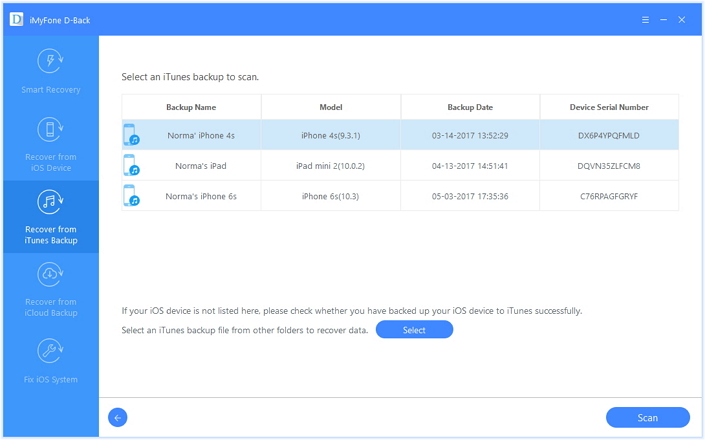
Please install Android Data Recovery on computer,run it and connect Samsung Galaxy Alpha phone to the computer.It will take  few seconds to detect your phone automatically by Android Data Recovery.

connect samsung to the computer

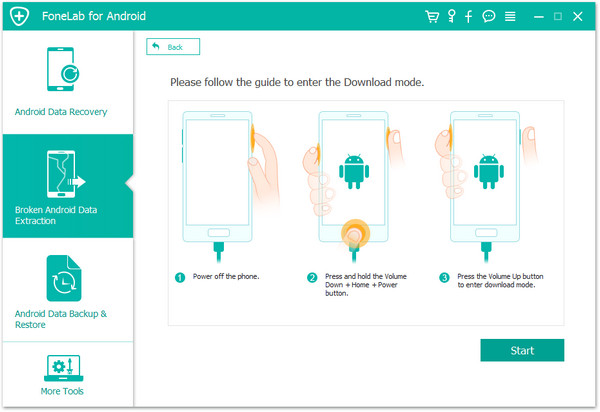
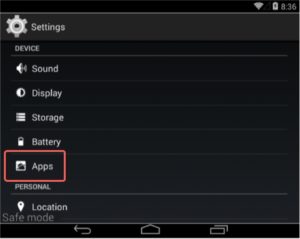
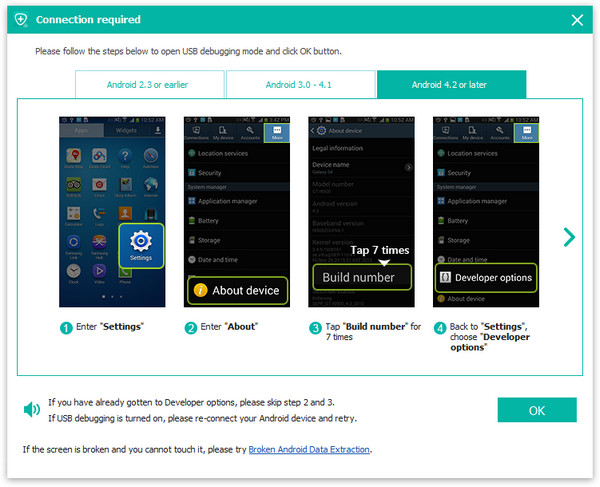
Step 1.Enable USB Debugging on Samsung Galaxy Alpha
Unlock your phone,go to Settings > Developer options > Allow USB debugging mode.If you have already allowed the USB debugging mode,you will see a pop-up window on the screen,mark Always allow from this computer and click OK.

usb debugging samsung phone

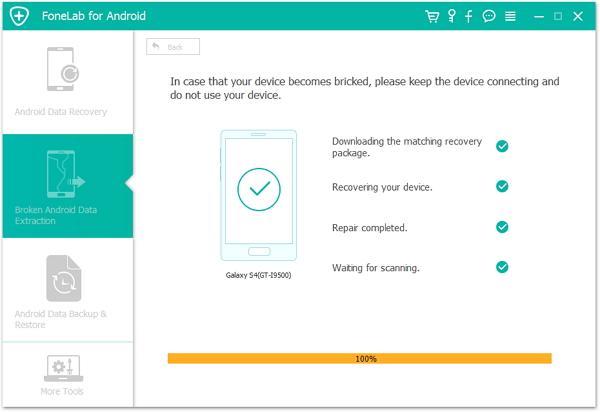
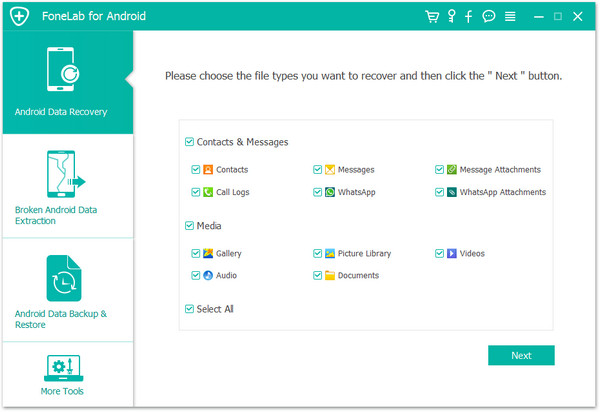
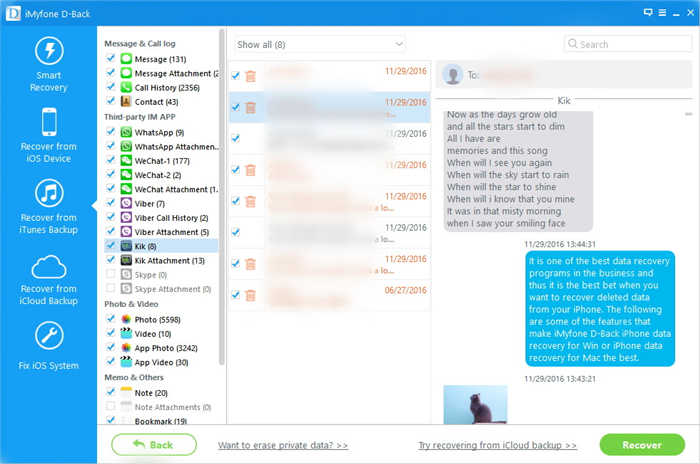
Step 2.Select Deleted Data to Recover from Samsung Galaxy Alpha
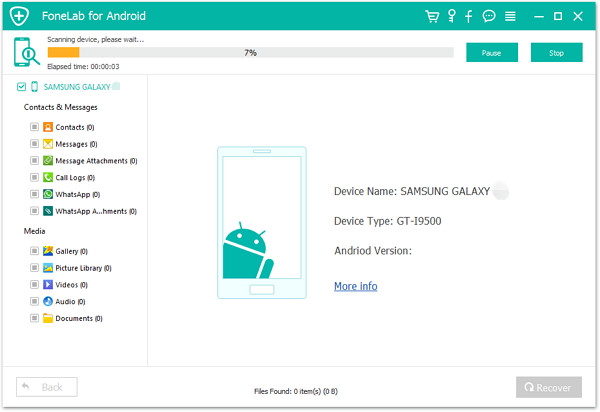
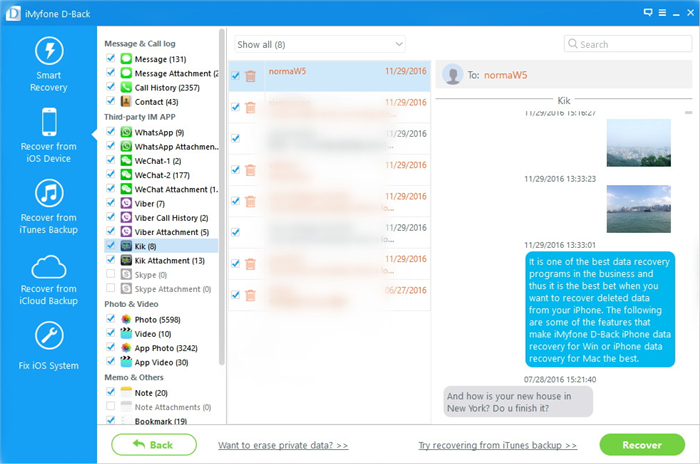
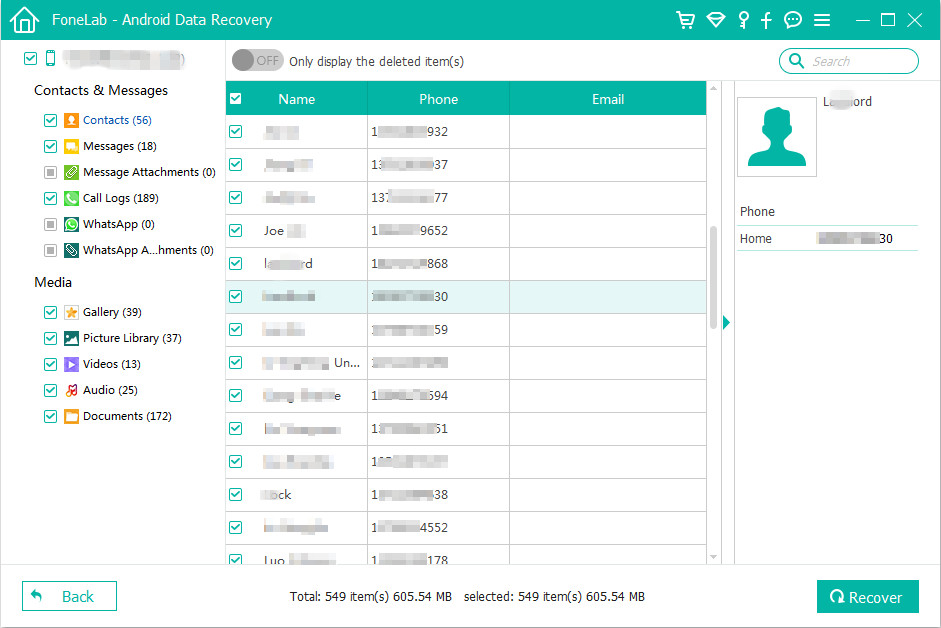
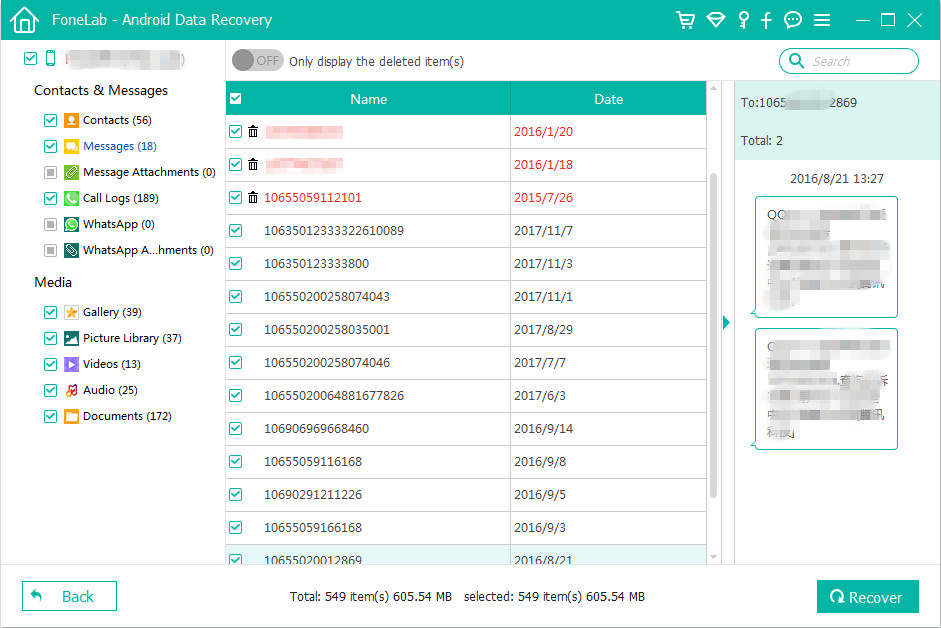
Once the connecting successfully,all types of Samsung Galaxy Alpha files will be displayed in the interface of program.Select your wanna files and then tab Next.It will take several minutes to analyze the deleted and existent data on your Samsung.

select samsung data to recover

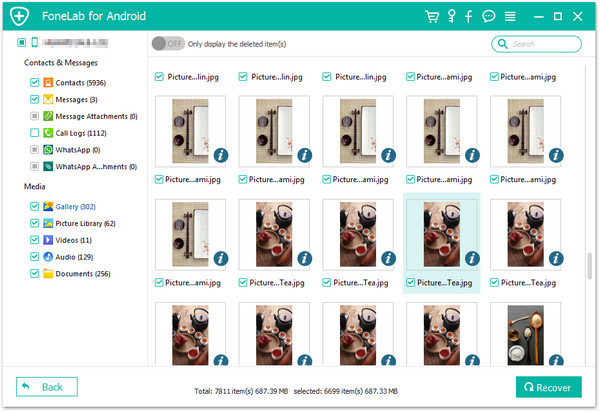
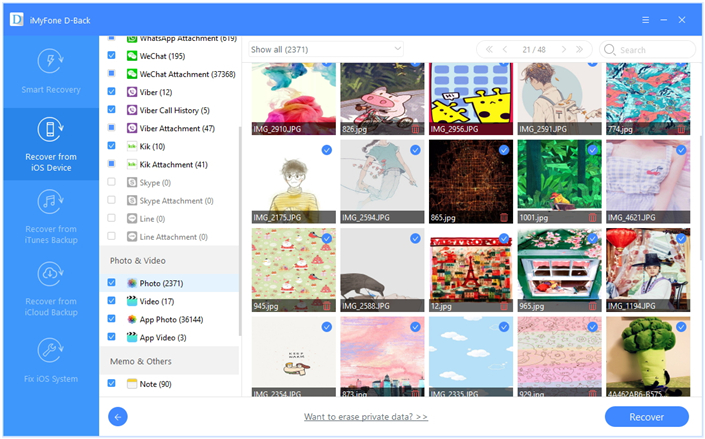
Step 3.Preview and Restore Deleted Data from Samsung Galaxy Alpha
Once the scanning is completes,you are allows to preview and select the detail data to recover from your Samsung Galaxy Alpha phone directly.Click Recover to recover your desired data to your computer.

Recover Deleted Contacts from Samsung Galaxy Alpha:

recover deleted contacts from samsung

Recover Deleted Photos from Samsung Galaxy Alpha:

recover deleted photo from samsung

Recover Deleted Messages from Samsung Galaxy Alpha:

recover deleted sms from samsung

d_win d_mac

Related Article:

How to Recover Deleted Data from Samsung Galaxy A9/A8/A7/A5/A3

How to Recover Deleted Files from Samsung Galaxy

How to Recover Deleted Photos from Samsung Galaxy

How to Recover Deleted Contacts from Samsung Galaxy

How to Recover Data from System Crash Android

As we know,there are many circumstances that system crash on your Android device,for example,download the incompatible applications,get a virus attack,run too many applications at the same time or more others.When you encounter the similar situations that get system crash of a sudden on your Android device,how to fix?Now is the full solutions to fix system crash on Android and restore Android system to normal state.

How to Fix Android Crash System to Normal

1.Fix Useless Apps on Android
The useless apps on your Android mobile phone can crash as soon as you launch it or while you using it.Here is how you can do to fix crash system to normal.

▪ Update apps on your Android
▪ Clean app cache when they are freezing, rebooting or running slow.
▪ Uninstall the useless apps from your Android device.

2.Flash a ROM to Android Device
Flash a ROM on your Android device.Lots of phones are still stuck at 2.1 and earlier, it’s time to update your phone and save it from freezing and crashing.

3.Enter Recovery Mode
If the problem is caused by virus attack, you should try entering Recovery mode.You can boot directly into recovery mode and perform the factory reset on the device, delete the cache partition, or apply software updates.

4.Reformat Android SD Card
Errors caused by SD Card are possible.Take out your SD card and put it into your computer using SD card reader, and format it. Note:You should do a backup job of your Android SD card before reformat it.

Recover Data from System Crash Android

If you can’t fix the system crash issue on your Android,you may ask that how to recover data from system crash Android,now the tutorial is showing you the best ways to extract data from Android which get system crash.To recover files from system crash Android,you can try this Broken Android Phone Data Extraction,it can help to fix Android system crash problem and extract data from system crash Android effectively.In addition,Broken Android Phone Data Extraction enables to fix various of abnormal Android circumstances and extract data from these kinds of abnormal Android,including phone frozen,system crash,black screen,phone drown,password forgot,etc,.Supported Samsung Android devices:Galaxy(S4/S5/S6/S7),Note 3/4/5 and so on.

d_win d_mac

How to Extract Data from System Crash Android

Step 1.Run Broken Android Phone Data Extraction Program
Firstly,please run Broken Android Phone Data Extraction on your computer,click “Broken Android Phone Data Extraction” function,then click “Start“.

broken phone data recovery

Step 2.Select the Android Model
On the new window,choose the device name and model of your Android phone.Currently,the program works with Samsung devices in Galaxy S, Galaxy Note and Galaxy Tab series.Click the “Confirm” button.

select phone medel

Step 3.Enter Android into Download Mode
Now you should follow the simple guide to enter your device into the Download Mode.Power off the phone > press and hold three buttons: “Volume Down”, “Home” and “Power” > press the “Volume Up” button to enter the “Download mode”.

enter download mode

Step 4.Fix System Crash Android to Normal

The program will begin to download the recovery package for fixing your System Crash Android to normal state.

fix android to normal

Note:Please keep connection with your device and the computer, don’t use your device during the fixing process.

fix android completed

Android system crash issue fixing completed.Now your Android has back to the normal state as usual.After that,you could switch to the “Android Data Recovery” mode to scan your phone data including the deleted and existent items for data backup/recovery.

Step 5.Extract Data from Android for Backup or Recovery
1)Select Data to Scan by Program
When you switch to the “Android Data Recovery” mode.Click the types of file which you want to recover and click “Next” to begin the scanning process.

select files to scan

Now program will start to scan data stored on your Android,including the deleted data and the existent data.

scan android

2)Preview and Extract Data from Android
The scanning process will take you few minutes and you will find the files you choose will be listed here. Click the file type and you are able to preview the detailed information of the file.Select the ones which you want to restore and click “Recover” to extract the data from your Android phone to computer.

extract data from android

d_win d_mac

Related Article:

How to Fix Bricked Android

How to Fix Android Stuck in Recovery Mode

How to Remove Virus Attack from Android

How to Recover Data from Broken Android Phone

How to Fix Frozen Samsung to Normal


Best Android Data Recovery Software for Windows 10/8/7 in 2019

Summary: Need the best Android data recovery software to recover deleted data from Android device on Windows computer? This tutorial is good for you, we will introduce an easy solution to solve the Android data recovery issue on the Windows 10/8/7 in 2019.

Which is the best Android data recovery software for Windows 10? I am looking for an Android data recovery software for windows 10 to recover deleted photos, contacts and messages from Samsung Galaxy S7, my laptop is Windows 10, how to recover deleted data from Android Samsung phone without backups?

My HP computer is Windows 7, whichis the best Android data recovery for Windows 7? I need to connect my Huawei P20 Pro to the PC and using a thrid-party Android data recovery software to recover lost data from it, is there some valid Android data recovery software recommended?

In the recent years, more and more people give up their iPhone and get a new Android for taking place of. For example, HTC phone, Lenovo phone, Google Pixel phone, Motorola phone, Huawei phone, ZTE phone, Xiaomi phone, etc,. Smartphone plays a more and more important role in our daily life. It is not merely because the uses of making phone calls, sending messages, taking photos, shopping. And much more than those, it keeps a large number of important files that we don’t want to lose, including photos, contacts, messages, notes, videos, some personal info as well as other valuable data.

As a matter of fact, Android phone users are troubled with data loss on device since several circumstances, such as accident deletion, formatting, virus attack, Android OS updated and other causes. No matter how cautious you are, such situations do happen on Android phone oftenly. In this tutorial, we will share you with the best Android data recovery software for Windows in 2018. If you are looking for the most reliable & efficient Android data recovery software to restore Android data, then read this guide to make the best choice based on your demand.

The Best Android Data Recovery in 2019

U.Fone Android Data Recovery is the best Android data recovery software for Windows 10/8/7 in 2018, to get back your valuable data in minutes under any circumstance. Recover text messages and contacts from Android SIM and internal memory. Easily recover photo/video/music and other documents from any Android smartphone. What’s more, it is capable of previewing before exporting data from Android. Additionally, this software could help to recover deleted Android data lost due to broken screen, black screen or damaged phone; backup & restore Android data on Windows safely. 100+ Brands and 1500+ Android devices are supported, for instance, Samsung, HTC, Lenovo, Motorola, Huawei, Google Pixel, ZTE, OPPO, Xiaomi, etc,.

d_win d_mac
d_win d_mac

Part 1: Recover Android Lost Data with U.Fone Android Data Recovery

Step 1.Run Program & Connect Android
To begin with, run U.Fone Android Data Recovery on the computer, click “Android Data Recovery” option. Use a Android USB cable to connect your Android to the computer, the program will detect your device when it successfully connects.

Note: Before using the program to recover data from your Android, make sure the battery of the device no less than 20%.

connect Android phone

Step 2. Enable USB Debugging on Android
This step will guide you to enable USB debugging on the device, just click “OK” on it.

allow to detect Android

Step 3. Select the File to Scan
Here, the program listing all kinds of files for you to restore, including contacts, message, gallery, videos, WhatsApp messages, etc,. Select the items contain the data you need to restore from.

select files to scan

Step 4. Allow to Scan your Android
Now, click “Next” to begin analyzing and scanning your Android. And then you should tap “Allow” on your Android to get privilege.

allow to scan Android

Step 5. Begin to Scan Android for Deleted Data
After that, U.Fone Android Data Recovery will begin to scan all deleted files from your Android device.

scan deleted Android data

Step 6. Preview and Restore Deleted Data from Android
The scan results show that all photos, messages, contacts, videos, call logs, WhatsApp chat records, etc,. Please click items, and the recoverable data will be displayed in the preview window. Preview and mark those data you want to restore, and click the “Recover” button to retrieve the deleted data from Android on the Windows computer.

recover deleted data from Android

d_win d_mac
d_win d_mac

Part 2: Recover Deleted Data on Windows with Data Recovery

Accidentally deleted important files from the Windows computer? Or losing photos, documents, emails, audio, videos and more from computer, hard drive, flash drive, memory card, digital camera, or other storage device? Whatever situation you are suffer from, this excellent data recovery software can help to get back your lost data in 5 minutes.

It’s the best choice to recover deleted data on Windows with Data Recovery. It is designed for recovering lost data for mistake deletion, formatted partition, hard drive problem, RAW hard drive, crashed computer or other causes. Recover deleted files from computer or any other removable storage media, like external hard drive/flash drive/USB drive, memory card, digital camera, etc,. Data Recovery provides you with a full solution for data recovery on the computer, features with Deleted Files Recovery, External Device Recovery, Recycle Bin Recovery, Hard Drive Recovery, Lost Partition Recovery, Virus Attack Data Recovery, System Crash Data Recovery, and All-Around Recovery.

d_win d_mac
d_win d_mac

data recovery home page

More Android Data Recovery Guides:

How to Recover Deleted Data on Android

How to Restore Lost Data from Rooting Android

How to Recover Lost Data from Android SD Card

How to Transfer iPhone Data to Samsung/Android

How to Backup & Restore Android Safely

How to Manage Android on Computer

2019 The Best Android Data Recovery

Android Data Recovery

Recover Your Lost Data from Android
Now, Even Device Broken

Compatible with Android 8.0 Oreo/7.0, etc.

Recover Lost Data Now

How to Remove Virus Attack from Android

Hi.My Samsung seem to get inflected with a virus,now the device just get into the download mode screen loop.I can’t do any thing on it.How to remove the virus attack from my Samsung Android phone?Are there any ways to restore it to the normal state?I am not considering to buy another phone so far.Thanks.”-Nicky

As we know,install the untrusted software on Android mobile may get chance to lead to get the virus attack on device unluckily.The lawbreakers look for old and new ways to get their malicious software installed on your devices.The best recommendation is still to think twice before installing untrusted software or clicking on strange-looking links.When your device get the virus attack,your personal data stored on phone will be leak for others,such as,the bank account,the account password and more privacy data.So you need to remove the virus from your Android as soon as possible.

Part 1:Remove Virus Attack from Android in Common Way

Android phone may get infected with viruses from a malicious app that is installed on the smartphones.In this first step,we will try to identify and uninstall the malicious app that might be installed on your Android phone.

To uninstall the malicious app from your Android device,go to the Settings menu,then click on Apps or Application manager (this may differ depending on your Android device).

android settings menu

This will bring up a list of installed apps,including the malicious app.In our case the malicious app is “BaDoink” however this will most likely be different in your case.These are some known malicious apps: BaDoink,Porn-player, Browser update 1.0,Flash Player, Porn Droid or System Update.

If you cannot find the malicious app,we advise you to uninstall all the recently installed applications.

list apps

Touch the app you’d like to uninstall.This won’t start the app, but will open up the program’s App Info screen. If the app is currently running press the Force stop button.Next we will clear the cache and data, and we will uninstall the unwanted app.

First tap on the Clear cache button to remove the cache.
Next,tap on the Clear data button to remove the app data from your Android phone.
And finally tap on the Uninstall button to remove the malicious app.

uninstall malicious app android

If the Uninstall button is grayed out (this may happen if your phone is infected with the Android Screen Locker malware) then go to:
1. Settings > Security > Device administrators.
2. Tap the app that you cannot uninstall.
3. Choose “Deactivate” > “OK” and immediately shutdown your device.
4. Start your device again and then uninstall the malicious app.

A confirmation dialog should be displayed for the malicious app,click on “OK” to confirm removing the malicious app from your Android phone.

remove malicious app

Restart your Android device.

Done.

Part 2:Remove Virus Attack from Android Completely

To remove virus attack from Android completely,you are strongly recommended this Broken Android Phone Data Extraction,which is an useful tool help for fixing virus attack on Android,removing virus attack from Android totally,then restoring Android to normal state.Furthermore,Broken Android Phone Data Extraction enables to fix various of broken Android circumstances,including phone frozen,system crash,black screen,phone drown,password forgot,etc,.Supported Samsung Android devices:Galaxy(S4/S5/S6/S7),Note 3/4/5 and so forth.

d_win d_mac

Step 1.Run Broken Android Phone Data Extraction Program
Firstly,please run Broken Android Phone Data Extraction on your computer,click “Broken Android Phone Data Extraction” function,then click “Fix Device“.

fix android main page

Step 2.Select the Abnormal State of Android
Select the abnormal state of your Android device,click “Next” to go on.There are five states for selection:stuck in the Start loop screen,stuck in the Download mode,stuck in the FoneGo interface,black screen,others.In this virus attack case,you should choose ”stuck in the Download mode” option.

select android mode

Step 3.Select the Android Model
On the new window,choose the device name and model of your Android phone.Currently,the program works with Samsung devices in Galaxy S, Galaxy Note and Galaxy Tab series.Click the “Confirm” button.

select phone medel

Step 4.Enter Android into Download Mode
Follow the simple guide to enter your device into the Download Mode.Power off the phone > press and hold three buttons: “Volume Down”, “Home” and “Power” > press the “Volume Up” button to enter the “Download mode”.

enter download mode

Step 5.Remove Virus Attack from Android to Normal

Now the program will begin to download the recovery package for fixing your virus attack Android to normal state.

fix android to normal

Note:Please keep the device connected and don’t use your device during the fixing process.

fix android completed

Virus attack removed completed.Now your Android has back to the normal state as usual.After that,you could switch to the “Android Data Recovery” mode to scan your phone data including the deleted and existent items for data backup/recovery.

Step 6.Extract Data from Android for Backup or Recovery
1)Select Data to Scan by Program
When you switch to the “Android Data Recovery” mode.Click the types of file which you want to recover and click “Next” to begin the scanning process.

select files to scan

Now program will start to scan data stored on your Android,including the deleted data and the existent data.

scan android

2)Preview and Extract Data from Android
The scanning process will take you a little while and you will find the files you choose will be listed here. Click the file type and you are able to preview the detailed information of the file.Select the ones which you want to restore and click “Recover” to extract the data from your Android phone to computer.

extract data from android

d_win d_mac

Related Article:

How to Fix Bricked Android

How to Fix Android Stuck in Recovery Mode

How to Recover Data from Broken Android Phone

How to Fix Frozen Samsung to Normal

How to Fix Bricked Samsung Phone

How to Fix Samsung Galaxy Stuck in Download Mode

How to Fix Frozen Samsung to Normal

Help.My Samsung Galaxy S7 phone frozen at the Samsung logo screen after rooting.How to get out of the frozen screen on my device?I have no idea at all.”-Jess

It is a very common issue that most Samsung Android devices occur.Your Samsung device just get into the rebooting,stuck at the Samsung logo screen,stuck in the download mode,stuck at black screen or others.At this moment you are unable to make anything work on the device.It is even more troublesome when you don’t know how to fix the problem.Fortunately for you we have a full solution that help to fix and restore your device to normal without data loss.

Fix Frozen Samsung to Normal without Losing Data

Broken Android Phone Data Extraction is your best helper to fix frozen Samsung Android to normal without data loss,fix crashed/frozen/locked Samsung Android phone to normal and extract data from broken device for backup/recovery.Broken Android Phone Data Extraction works well for fixing several abnormal states of Samsung Android,such as,phone frozen,virus Attack,system crash,black screen,phone drown,password forgot,etc,.Supported Samsung Android devices:Galaxy(S4/S5/S6/S7),Note 3/4/5 and so on.

d_win d_mac

More Features of Broken Android Phone Data Extraction:
-Fix frozen/crashed/black-screen/virus-attack/screen-locked phone to normal.
-Extract messages/contacts/call history/WhatsApp/photos,etc,. from broken Android.
-Support almost all Samsung phones like Samsung Galaxy S,Samsung Galaxy Note,etc,.
-Extract data both from damaged phone internal storage and SD card.
-Recover deleted data from Android devices.

How to Fix Frozen Samsung to Normal without Data Loss

Step 1.Run Broken Android Phone Data Extraction Program
First of all,please run Broken Android Phone Data Extraction on your computer,click “Broken Android Phone Data Extraction” function,then click “Fix Device“.

fix bricked android main page

Step 2.Select the Abnormal State of Samsung
Select the abnormal state of your Samsung device,click “Next” to go on.There are five states for selection:stuck in the Start loop screen,stuck in the Download mode,stuck in the FoneGo interface,black screen,others.In this frozen case,you should choose ”stuck in the Start loop screen” option.

select abnormal mode

Step 3.Select the Samsung Model
On the new window,choose the device name and model of your Samsung phone.Currently,the program works with Samsung devices in Galaxy S, Galaxy Note and Galaxy Tab series.Click the “Confirm” button.

select phone medel

Step 4.Enter Samsung into Download Mode
Follow the simple guide to enter your Samsung into the Download Mode.Power off the phone > press and hold three buttons: “Volume Down”, “Home” and “Power” > press the “Volume Up” button to enter the “Download mode”.

enter download mode

Step 5.Fix Frozen Samsung to Normal

Now the program will begin to download the recovery package for fixing your frozen Samsung to normal state.

fix samsung to normal

Note:Please keep the device connected and don’t use your device during the fixing process.

fix samsung completed

Repaired completed.Now your Samsung has get out of the frozen screen and back to the normal state.After that,you can switch to the “Android Data Recovery” mode to scan your phone data including the deleted items for data backup/recovery.

Step 6.Extract Data from Samsung for Backup or Recovery
1)Select Data to Scan by Program
When you switch to the “Android Data Recovery” mode.Click the types of file which you want to recover and click “Next” to begin the scanning process.

select files to scan

Now program will start to scan data stored on your Samsung,including the deleted data and the existent data.

scan samsung

2)Preview and Recover Data from Samsung
The scanning process will take you a little while and you will find the files you choose will be listed here. Click the file type and you are able to preview the detailed information of the file.Select the ones which you want to restore and click “Recover” to recover the data from your Samsung phone to computer.

recover data from samsung

Tips:You can click this link to read detail tutorial about recovering data from frozen/broken Samsung.

Guide:How to Extract Data from Frozen Samsung

d_win d_mac

Related Article:

How to Fix Bricked Samsung Phone

How to Fix Samsung Frozen on Samsung Logo

How to Fix Samsung Galaxy Black Screen of Death

How to Fix Samsung Galaxy Stuck in Download Mode

How to Recover Deleted Files from Sharp Phone

I was deleted some photos on my Sharp Aquos Crystal phone accidentally,are there any easy ways available to recover these deleted data from my Android?”-Steve

sharp phone

Sharp Corporation is a Japanese multinational corporation that designs and manufactures electronic products. Founded in September 1912, the company was named after an invention of one of its founders Tokuji Hayakawa. The invention was called Ever-Sharp mechanical pencil. Sharp is known for its LCD panels.The company manufactures TVs and monitors,and is one of the biggest players in the display business.It has also made smartphones for the Japanese market.Sharp’s latest mobile launch is the Basio 2.The smartphone was launched in July 2016.The phone comes with a 5.00-inch touchscreen display with a resolution of 720 pixels by 1280 pixels.

Directly Recover Deleted Files on Sharp Phone

In order to recover deleted data on Sharp phone(Sharp Basio 2,Sharp Aquos 507SH,Sharp Aquos Crystal),you can try this Sharp Data RecoveryAndroid Data Recovery.As its name,which is a data recovery designed for recovering deleted data from Sharp phone directly.The recoverable data including contacts,messages,photos,video,audio,notes,call logs,apps & apps data,documents,etc,.Android Data Recovery works well for most of Android phone,for instances,Samsung(Galaxy S7/S6/S5,Note 5),Huawei(Mate 9,P9),Google(Pixel,Nexus 6),Xiaomi(Mi Mix,Mi Note 2),Lenovo(K5 Plus,K5 Note),Vivo(V5,Y66,Y55),HTC,Sony,ZTE and so on.

d_win d_mac

How to Directly Restore Deleted Data from Sharp Phone

Firstly,please install Android Data Recovery on your computer,run it and connect your Sharp phone to the computer.It will take a few seconds to detect your phone automatically by Android Data Recovery.

connect sharp to the computer

Step 1.Enable USB Debugging on Sharp
Unlock your phone,go to Settings > Developer options > Allow USB debugging mode.If you have already allowed the USB debugging mode,you will see a pop-up window on the screen,mark Always allow from this computer and click OK.

usb debugging sharp phone

Step 2.Select Deleted File to Recover from Sharp
Once the connecting successfully,all types of Sharp files will be displayed in the interface of program.Select your wanna files and then tab Next.It will take several minutes to analyze the deleted and existent data on your Android.

select sharp data to recover

Step 3.Preview and Restore Deleted Files from Sharp
Once the scanning is completes,you are allows to preview and select the detail data to restore from your Sharp phone directly.Click Recover to recover your desired data to your computer.

recover deleted data from sharp

d_win d_mac

Related Article:

How to Recover Data from Android Phone

How to Recover Deleted Photos on Android Phone

How to Recover Data after Android 6.0,Android 7.0/7.1/7.1.2 Update

How to Recover Data from Android Phone after Factory Reset

How to Recover Deleted Data from Oppo Android Phone

OPPO Electronics Corp. is an electronics manufacturer based in Guangdong, China. Known for its smartphones, the company also makes MP3 players, portable media players, LCD-TVs, and DVD/Blu-ray players. It was founded in 2004. The company is also a smartphone maker. It has launched a whole range of Android powered smartphones. Oppo’s latest mobile launch is the A57. The smartphone was launched in November 2016. The phone comes with a 5.20-inch touchscreen display with a resolution of 720 pixels by 1280 pixels.

recover deleted data oppo

No matter how great Oppo phone is,you would not be able to avoid data loss on Oppo phone under several unexpected circumstances.Here are some data loss situations you may encounter:

1.Delete accidentally.
2.Factory reset.
3.Android OS system update.Android OS system update usually provides you with better performance.However, there is a chance that you may lost important data when the Android OS system update failure.
4.Android OS system rooting.You could get a more useful Android OS version by flash a new ROM. But if you failed to do so, you may encounter data loss.
5.Virus attack.You are highly suggested to run anti-virus program at Android device to avoid virus attack.
6. Other unknown reasons.

Directly Recover Deleted Data from Oppo Phone

Oppo Data RecoveryAndroid Data Recovery is your ideal data recovery to directly recover deleted data from Oppo phone even without backup,including contacts,photos,videos,audio,notes,call logs,apps & apps data,documents and so on.Supported most models of Oppo phone,such as,R9s,A39,F1s,F1 Plus,F1,R7 Plus,R7s,R7,etc,.In addition,this Android Data Recovery allows to restore most of Android phone after losing data,including Samsung (Galaxy S7/S6/S5,Note 5),Motorola,HTC,Lenovo,Huawei,Xiaomi,ZTE,LG,Sony.

d_win d_mac

How to Directly Recover Deleted Files from Oppo Phone

Step 1.Connect Your Oppo Phone to Computer
First of all,please install Oppo Data Recovery-Android Data Recovery on your computer,run it and connect your Oppo phone to the computer.It will take a few seconds to detect your phone automatically by Android Data Recovery.

connect oppo to the computer

Step 2.Enable USB Debugging on Oppo Phone
Unlock your phone,go to Settings > Developer options > Allow USB debugging mode.If you have already allowed the USB debugging mode,you will see a pop-up window on the screen,mark Always allow from this computer and click OK.

usb debugging oppo phone

Step 3.Select Data you want to Restore from Oppo
After enabling USB debugging, connect your oppo phone to the computer via USB cable, you’ll see this window,different types of files can be chose to be scan here.If you lost almost all types of Oppo data, you can tick “Select all” to have all your Oppo data scanned.

select file tpye to recover from oppo

Step 4.Allow to Scan and Analyze Data on Oppo
You’ll get a window as follow on your device after your device is detected by the program.Tap “Allow” to enable the program to scan your phone for deleted data.

allow scan oppo

Note:Before starting,please make sure that your phone battery is more than 20% charged.

Step 5.Scan Oppo for Deleted Data
The scanning process will take some time due to your request.When everything is done, you will see a list of deleted files, including your gallery,contacts,and other data, appear on the software screen as below,preview them one by one before recovery.

scan oppo for deleted data

Step 6.Preview and Recover Deleted Data from Oppo
After finishing the scanning process, a list of recoverable files that the deleted data have been found from your Oppo will be shown.Additionally,there will be a preview window of files where you can preview(contacts, SMS and gallery,etc)from Oppo.Mark those you want and click “Recover“ to restore them to your computer.

recover deleted data from oppo

d_win d_mac

Related Article:

How to Recover Data from Android Phone

How to Recover Deleted Photos on Android Phone

How to Recover Data after Android 6.0,Android 7.0/7.1/7.1.2 Update

How to Recover Data from Android Phone after Factory Reset

How to Wipe Cache Partition on Galaxy S7/S6/S5

I deleted the apps I don’t used from my Samsung Galaxy S6 phone,but the phone still running slowly.How to clean the system cache to free up space and get better performance on my device?”-Chris

For many Samsung users,they likely to clean the system cache to free up space for device,clean cache for better performance.Clearing the system cache on Samsung device is an useful standard way for fixing bugs,troubleshooting system performance and taking good care of  Android device.What’s more,clearing cache on device regularly help to improve the general performance of your device by clearing out unwanted data or stuff from older versions that causes problems after you’ve updated to a newer version.There are several ways you can clean the cache and free up space on your Samsung mobile phone,make it running more efficiently.Here are some tips to help you.

Part 1:How to Wipe Cache Partition on Samsung Galaxy

Step 1.Powering off Samsung device.
Step 2.Press the VOLUME UP + HOME + POWER buttons at the same time and HOLD THEM DOWN.
Step 3.Release only the POWER button when the device vibrates.
Step 4.Release the other buttons when the ANDROID SYSTEM RECOVERY screen appears.
Step 5.Using the VOLUME DOWN / UP buttons to navigate, select WIPE CACHE PARTITION.
Step 6.Press the POWER button, which will act the ENTER key on your keyboard.
Step 7.You will see some progress notes (at the bottom of the screen in small print) and after about 20 seconds it will likely show DONE.
Step 8.Done.Now the system cache was clean completely.Now you can then reboot the device.

how-to-wipe-cache-partition-android-samsung

Part 2:How to Erase All Data on Samsung Galaxy Permanently

To wipe cache on Samsung Galaxy completely,you could try this Android ToolkitAndroid Data Eraser,which is a data eraser offer the best ways for you to erase all data,settings and system cache from Samsung Galaxy permanently.With Android Data Eraser,you are allow to clean cache on Samsung Android device to free space on it.Android Data Eraser enables to erase photos, contacts, messages, call logs and all private data from device without restoring.Supports all Android devices available in the market,such as,Samsung (Galaxy S7/S6/S5,Note 5),Google (Pixel,Nexus),Vivo,HTC,Lenovo,Motorola,ZTE,etc,.

d_win d_mac

Step 1.Connect Samsung Phone to the Computer
Launch Android Toolkit-Android Data Eraser on your computer.Select “Data Eraser” among all the toolkit.

android-data-eraser--more-tools

Connect your Samsung phone to computer using an USB cable.Make sure you have enabled USB debugging on your phone.If the Android OS version is above 4.2.2, there will be a pop-up message on your phone asking you to allow USB debugging.Tap on “OK” to continue.

android-data-erase-connect-phone

Step 2.Start Cleaning Cache and Erasing Your Samsung Phone
Android Data Eraser will automatically connect and detect your device.Click on “Erase All Data” button to start erasing all your data and settings (including the system cache) from Samsung.

android-data-erase-phone-connected

Since all the erased data are not recoverable,make sure you have backed up all needed data before the proceeding.Then key in “delete” in to box to confirm your operation.

android-data-erase-confirm-erase

Then Android Data Eraser will start erasing all data and settings on your Samsung phone.The whole process takes only a few minutes.Please don’t disconnect the phone or open any other phone management software on the computer.

android-data-erase-erasing-samsung-sms

Step 3.Perform Factory Data Reset on Your Phone
After all privacy data have been completely erased,the program will ask you to tap on factory Data Reset on your phone.This will help you completely wipe all the settings and cache on the phone.

android-data-erase-factory-reset-samsung

Now your Samsung phone has been completely wiped and it’s like a brand new one.

android-data-erase-complete

d_win d_mac

Related Article:

How to Permanently Erase Samsung Data before Selling

How to Erase Android Data before Selling

How to Delete SMS on Samsung without Restoring

How to Get More Internal Storage from Android

How to Recover Deleted Kik Chat History on iPhone 7/6S/6

I wanna recover the deleted Kik chat messages from my iPhone 7,but the Kik app doesn’t offer the backup service.So how to perform the restore job without backup?Appreciated.”-Halsey

Kik Messenger is a popular application for instant messaging developed for mobile devices.There are a lot of mobile users like to chat with others via Kik app around the world.Most of us are accustomed to do a backup for the chat history.However,Kik app doesn’t provide users the backup function.If you need to backup iOS Kik conversation,you must rely on the third-party app for help.Losing Kik chat messages can be a troublesome experience because Kik doesn’t store the messages on their servers automatically.It was an easy thing to restore Kik messages from backup,but how to restore deleted Kik chat history when you have no backup unfortunately?

Extra Tips:How to Safely Backup Kike Messages on iPhone

Restore Deleted Kik Chat History on iPhone

iPhone Data Recovery is a great data recovery tool for recovering deleted data from iPhone with/without backup,it can do you a favor for restoring deleted Kik messages from iPhone.Not only Kik and WhatsApp,Wechat data can be restored,but also other types of iPhone data can be restored by program,such as,contacts,messages,photos,video,audio,notes,call logs,documents and more.Supported iOS devices including iPhone 7(Plus),iPhone 6S(Plus),iPhone 6(Plus),iPhone 5S/5C/5,iPad and iPod.

d_win d_mac

Part 1:Directly Recover Deleted Kik Messages from iPhone

Step 1.Run Program and Choose Kik to Scan from iPhone
Run iPhone Data Recovery program,click “Start” from the tab “Recover from iOS Device”,and then check “Kik” and click on “Next” button,the program will prompt you to connect your iPhone to the computer.

select file to recover

Step 2.Scan and Preview Kik Messages
After connecting the iPhone,click “Scan” to search for the deleted Kik messages.

scan iphone for lost data

Step 3.Recover Deleted Kik Messages and Store them on your PC
Now you are allow to choose and preview the Kik messages from the results and click “Recover”.Select a folder on your computer to save the recovered messages.

recover kik from iphone

d_win d_mac

Part 2:Recover Deleted Kik Messages on iPhone via iTunes Backup

Step 1.Run Program and Choose iTunes Recovery Mode
Run iPhone Data Recovery on the computer you sync your device with and on the “Recover from iTunes Backup” window click “Start”.(If you want to extract Kik messages from iCloud backup,simply choose “Recover from iCloud Backup”.)
recover kik itunes backup mode

Step 2.Choose iTunes Backup File to Extract
Choose the backup which includes your deleted Kik messages and wait for the program to scan for the Kik messages.

extract backup file from itunes

Step 3.Preview and Extract Kik Messages from iTunes Backup
Once the scan is complete,you could preview all the Kik messages and attachments in your iTunes backup files and choose the messages you want to recover.

recover deleted kik itunes backup

Done.

d_win d_mac

Related Article:

3 Best Ways to Recover Deleted Data from iPhone

3 Solutions to Recover Lost iPhone Data after iOS 9/iOS 10 Update

How to Restore Deleted WeChat History from iPhone

How to Restore Deleted Skype History from iPhone

How to Recover Lost Data from iPhone after iOS 10.2.1 Update

I need some help.A part of the contacts and the photos just gone for no reason after I updated iOS 10.2.1 on my iPhone 6S.What was happened to me?Have any safe solutions to get back these lost files on my iOS 10 device?Thanks.”-Andy

Apple has released iOS 10.2.1 after four betas and almost six weeks of public testing.iOS 10.2 introduces new features including the TV app (US Only), a new and unified experience for accessing your TV shows and movies across multiple video apps. Emoji have been beautifully redesigned to reveal even more detail and over 100 new emoji have been added including new faces, food, animals, sports, and professions. This update also includes stability improvements and bug fixes.iOS 10.2.1 is for all iOS 10 compatible devices. This means the iPhone 5 or later, iPad 2 or later, iPad mini 2 or later, iPad Pro range and the 6th generation iPod touch or later.

ios 10.2.1

Have you update your iOS device to the newest iOS 10.2.1?You may be glad to complete your iOS device update task and begin to enjoy the new iOS system on your device.However,there are a few people reflected that they lost data on iOS device after iOS 10.2.1 update,the files were suddenly disappeared after updating.To be honest,data loss after iOS system update is a common problem among iOS devices.This tutorial is going to show you the best ways to recover lost personal data from iPhone/iPad/iPod after iOS 10 update completely.

Restore Lost Files from iPhone after iOS 10.2.1 Update

To recover lost data from iPhone after iOS 10.2.1 update,you can rely on this iOS 10 Data Recovery,it’s a famous data recovery which designed for restoring lost data from iPhone after iOS 10.2.1 update,as well as iOS 10.1/iOS 10.3.iOS 10 Data Recovery allows to recover lost data from iPhone/iPad/iPod with three different recovery modes:directly recover from iOS device,recover from iTunes backup,recover from iCloud backup.The recoverable files including contacts,messages,photos,videos,audio,call logs,calendars & reminders,notes,apps & apps data,documents and more.iOS 10 Data Recovery works well for most of iOS devices,such as,iPhone 7,iPhone 6S(Plus),iPhone 6(Plus),iPhone 5S/5C/5,iPad 4/3/2,iPad Air,iPad Mini 4/3,etc,.

d_win d_mac

Directly Recover Lost Data from iPhone after iOS 10.2.1 Update

First of all,please install and run iOS 10 Data Recovery on your PC/Mac.

Step 1.Connect iPhone and Select Recovery Mode
Connect your iOS 10 iPhone to the computer,select “Recover from iOS Device”mode.Click “Start” to begin the data recovery process.

connect iphone with computer

Step 2.Select Lost File to Scan by Program
To directly recover lost data from iPhone after iOS 10.2.1 update,you should select the type of lost data to be scanned by program.You are allows to select more than one files to be scanned by program,then click “Next”.

select file to recover

Now the program will begin to scan your device automatically for lost data in a short time.

scan iphone for lost data

Step 3.Preview and Directly Recover Lost Data from iOS 10 iPhone
Once the scanning is completes,you are allows to preview and directly recover the lost iPhone data.Select the data you want and click “Recover” to save the selected data to the computer.

directly recover lost data from iphone

d_win d_mac

Related iOS 10 Data Recovery Tutorial:

How to Safely Backup iPhone/iPad before iOS 10/iOS 10.2.1 Update

Three Ways to Restore Lost iPhone Files after iOS 10/iOS 10.2.1 Update

How to Restore iPhone Photos after iOS 10/iOS 10.2.1 Update

How to Recover iPhone Text Messages after iOS 10/iOS 10.2.1 Update

How to Recover Lost Contacts on iPhone after iOS 10/iOS 10.2.1 Update