All posts by DHZ

How to Backup and Restore Android Data

Summary
Want to backup your Android data and restore it later? U.Fone offers the best solution for you to backup data from Android mobile devices to Windows and Mac computer, follow this guide to backup your Android data and restore data to device without data loss.

U.Fone Android Data Backup &Restore can help to selectively backup and restore Android data, including contacts, messages, call Logs, photos, videos, audio, documents and so on. It enables to backup data from Android to the computer, and restore backup files to Android on the computer. It is compatible to almost all brands of Android device: Samsung, HUAWEI, HTC, LG, Motorola, Nokia, Sony, Xiaomi, Pixel, Lenovo, etc.

d_win d_mac
d_win d_mac

See more Features of Android Data Backup &Restore:

  • One click to back up and restore Android data to your computer.
  • Preview data in detail before you restore data from backup.
  • Selectively back up and restore Android data without hassle.
  • supports a large number of Android phones and tablets.
  • Easy to use, 100% Security, efficient and fast.

Step 1. Launch the Software and Select the Mode
Firstly, run Android Data Backup & Restore tool on the computer and select “Android Data Backup &Restore” mode. Then click “One-click Backup” feature. Now connect your Android to the computer using a USB.

android backup restore interface

Step 2. Select the File Type to Backup
Select the file or more than one file to backup, contacts, messages,gallery, and more are included. Then click “Start“.

choose data type

Note: The program will prompt you to set a password for the backup to continue encrypted backup. You can set it or not depend on your situation. After setting the password for the backup file, click “OK” to go on.

encrypted backup

Step 3. Begin to Backup Data for Android
The program will begin to backup data for your Android on the computer efficiently, please don’t disconnect the device or use it during the process.

backup android to pc

Done. Now you could view the backup file for Android on your computer.

view android backup

Part 4: How to Restore Data to Android from Backups

Step 1. Run Android Data Recovery on the Computer and Select the Mode
Firstly, run Android Data Recovery on the computer and select “Android Data Backup &Restore” mode. Then click “One-click Restore” feature. Now connect your Android to the computer using a USB, click “Start”.

android backup restore interface

connect android to pc

Step 2. Select Backup File to Restore
The program will list several backup files for selecting to restore.Select the backup file that you want to restore to the device. Then click “Start” button to preview and restore data from the backup.

select backup file to restore

Step 3. Begin to Restore Backup File for Android
The program will begin to restore backup file for your Android on the computer efficiently, please don’t disconnect the device or use it during the process.

restore backup file to android

Restored completed. You’ve managed to restore your backup. Click “OK” to end the process.
Now you could view the file for Android on your computer.

android restore completed

d_win d_mac
d_win d_mac

How to Remove Screen Time Passcode from iPhone/iPad without Passcode

Summary
It’s easy to forget the Screen Time passcode you set on your or your child’s device, especially if it hasn’t been used for a while. When that happens, you won’t be able to change settings or turn Screen Time off. In this article, we’ll show you how to remove Screen Time on your iPhone or iPad without passcode.

You might have enabled Screen Time and set a passcode on your iPhone or your child’s device to manage app usage, set time limits, or block certain content. But over time, it’s easy to forget that Screen Time passcode, especially if you don’t use it often. Once forgotten, you won’t be able to turn off Screen Time or change any of its settings, which can be frustrating.

The good news is that there are ways to remove or reset the Screen Time passcode, even if you don’t remember it. In this article, we’ll walk you through step-by-step solutions to help you remove Screen Time on your iPhone or iPad without passcode. Whether you’re a parent managing a child’s device or just trying to regain control of your own, this guide will make the process simple and stress-free.

CONTENTS

Part 1. What is Screen Time on iPhone/iPad

Screen Time on iPhone and iPad is a useful feature that helps you monitor and manage how you or your child use the device. It provides weekly reports and lets you set limits on app usage, screen time, and content access. Here are four main ways Screen Time can help:

  • See weekly activity reports with insights into how much time you spend on your device.
  • Set daily time limits for specific app categories and schedule downtime to take breaks from the screen.
  • Control settings and privacy options, including app downloads and purchases.
  • Manage your child’s device remotely using a Screen Time passcode, so you can set limits and block content as needed.

With Screen Time, you can better understand and improve your digital habits. If you’re using it for your child, it’s a great way to control how long they use the device, what apps they access, and when they should take a break—like setting downtime during bedtime or homework hours.

Part 2. How to Remove Screen Time Without Passcode

Whether you know the Apple ID password or not, there are three different ways to remove Screen Time without passcode. We will show you the detailed operations in the following paragraphs.

Method 1. Remove Screen Time without Passcode with iOS Unlocker [Best]

If you get a second-hand iPhone/iPad with Screen Time enabled or you are the child who wants to get rid of Screen Time set by parents, you can use the third-party application – iOS Unlocker. It not only helps to unlock iPhone without a password but also works to turn off Screen Time without passcode and Apple ID. iOS Unlocker is the right and handy tool for you. iOS Unlocker can help you remove the Screen Time Passcode set on your iPhone/iPad. Then you can easily turn it off. Within several steps, you can disable Screen Time on your iPhone and iPad without knowing the password.

Key features of iOS Unlocker

  • Remove Apple ID and wipe 4/6-digit password, Face ID, and Touch ID.
  • Remove Apple ID if you forgot Apple ID or password.
  • Recover and remove Screen Time passcode without data loss.
  • Remove MDM (Mobile Device Management) from iPhone/iPad quickly.
  • Remove iTunes backup encryption settings from iPhone/iPad with one click.

d_win d_mac
d_win d_mac

Steps to Remove Screen Time without Passcode with iOS Unlocker

Step 1. Launch iOS Unlocker
Open iOS Unlocker on your computer and select the “Screen Time” mode from the main interface.

ios unlocker main interface

Step 2. Connect Your iPhone or iPad
Use a USB cable to connect your iOS device to the computer. Make sure your device is recognized by the program.

Step 3. Start Removing the Screen Time Passcode
Click the “Start” button to begin the removal process.

start remove screen time

Scenario 1. For iOS 12 or Later (with Find My iPhone Off)
If your device is running iOS 12 or newer and Find My iPhone is turned off, the program will automatically start removing the Screen Time passcode. Wait a few moments while the software unlocks the device.

Once done, follow the on-screen instructions to re-set up your device to ensure the Screen Time passcode is completely removed.

remove screen time passcode ios 12 or later

Scenario 2. For iOS 11 or Earlier
If your device is running iOS 11 or earlier and your iTunes backup is not encrypted, the program can retrieve the Restrictions passcode directly.

If your iTunes backup is encrypted, you’ll need to enter the encryption password to proceed. The process will take just a few seconds. Once the Restrictions passcode is recovered, you can reset it as needed.

turn off screen time passcode iphone

Method 2. Remove Screen using ” Erase All Content and Settings”

Using the “Erase All Content and Settings” option is one way to remove Screen Time restrictions, especially if they were set by a parent. This method works only if you know the Apple ID and password currently signed in on the device, but not the passcode used to set up Screen Time.

Important: This process will erase everything from your iPhone, including photos, videos, and apps. To avoid losing data, make sure to back up your iPhone first. You can refer to a guide on how to back up your iPhone without using iTunes.

Here’s how to erase all content and remove Screen Time:

Step 1. Open your iPhone and go to Settings > General > Transfer or Reset iPhone.

Step 2. Tap Erase All Content and Settings, then choose Erase Now.

Step 3. Confirm by tapping Erase iPhone. Enter your Apple ID and password if prompted, and tap Erase again.

Once the reset is complete, Screen Time will be turned off, and your iPhone will be restored to its factory settings. You can then follow the on-screen instructions to set it up as new.

erase an iphone

Method 3. Remove Screen Time by Resetting Screen Time Passcode

When setting up a Screen Time passcode on your or your child’s iPhone or iPad, you’re asked to enter an Apple ID and password. This step helps you recover or reset the passcode if you ever forget it. If you completed this step, you can easily remove the Screen Time passcode using your Apple ID.

Follow these steps to reset and remove the Screen Time passcode:

Step 1. Open the Settings app and tap Screen Time.

Step 2. Scroll down and select Change Screen Time Passcode, then choose Turn Off Screen Time Passcode.

Step 3. When prompted, tap Forgot Passcode? Then enter your Apple ID and password to verify.

Step 4. After the passcode is removed, scroll to the bottom and tap Turn Off Screen Time to fully disable the feature.

reset screen time passcode

Conclusion

These are three effective methods to turn off Screen Time on your iPhone if you’ve forgotten the passcode. If you still remember your Apple ID and password, you can simply reset or remove the Screen Time passcode through your device settings. However, if you don’t have access to the Apple ID credentials, you can use a third-party tool like iOS Unlocker to remove the Screen Time passcode without erasing any data. This offers a quick and secure solution when other methods aren’t available.

d_win d_mac
d_win d_mac

Remove Screen Time without Passcode

How to Remove iTunes Backup Encryption without Password

Summary
Are you trying to remove iTunes backup encryption but forgot the password? Don’t worry—you’re not alone. Many users set a backup password and later forget it, especially since iTunes doesn’t ask for it every time. In this guide, we’ll walk you through a few effective and easy ways to turn off or remove iTunes backup encryption, even if you no longer remember the password.

After you set a password to encrypt your iPhone backup in iTunes, all future backups will be encrypted automatically. Over time, it’s easy to forget that password. Unfortunately, there’s no way to reset it. So, how can you turn off iTunes backup encryption or remove the backup password? This guide will show you how to remove iTunes backup encryption without password. Keep reading to find out how.

CONTENTS

Part 1. Why Is Your iPhone Backup Encrypted with a Password?

When you check the ‘Encrypt local backup’ option while backing up your iPhone using iTunes or Finder, your backup will be protected with a password. Encrypted backups include extra sensitive data, like saved passwords, Health data, Wi-Fi settings, call history, and browsing history, which isn’t saved in regular backups.

Once you set an encryption password, all future backups for that device will be encrypted automatically. If you ever want to restore your iPhone from an encrypted backup, you’ll need to enter the password. In short, encrypting your iPhone backup helps you save more personal data and adds extra security to your backup.

Part 2. How to Remove iTunes Backup Encryption without Password [Hot]

The encrypted backup password is essential, without it, you won’t be able to restore your iPhone from an encrypted backup. But since it’s rarely used and future backups are encrypted automatically without needing to re-enter the password, it’s easy to forget if you didn’t write it down.

Unlike other passwords, there’s no ‘Forgot Password’ option to reset it. So, what can you do if you’ve forgotten it? In this part, we’ll show you two ways to remove the iTunes backup encryption password from your iPhone. After that, you’ll be able to back up your iPhone without encryption.

Method 1. Remove iTunes Backup Encryption without Password using FoneLab iOS Unlocker

FoneLab iOS Unlocker is a trusted tool for unlocking iPhones without a password and removing iTunes backup encryption. Once your iPhone is connected to a PC via USB, you can easily remove the backup password in just a few simple steps—without any risk of data loss. Beyond removing encryption, FoneLab iOS Unlocker includes a range of helpful features to solve common iOS issues. It can unlock a locked iPhone without a passcode, bypass Activation Lock, and even disable Screen Time when you’ve forgotten the password. Check out its full list of features below.

Key Features of FoneLab iOS Unlocker

  • Unlock your iPhone, supporting 4/6-digit password, Touch ID, and Face ID
  • Erase all data and settings
  • Remove Apple ID without a password
  • Disable Screen Time on iPhone and iPad
  • Remove MDM from iPhone
  • Remove the encrypted backup password from iPhone

Guide: How to Remove iTunes Backup Encryption without Password

Step 1. Download and Install FoneLab iOS Unlocker
Begin by downloading and installing FoneLab iOS Unlocker on your computer. Click the Download button below to get started.

d_win d_mac
d_win d_mac

Step 2. Select “Remove iTunes Backup Password”
Launch the program and choose the “Remove iTunes Backup Password” option. Connect your iPhone or iPad to your computer using a USB cable. When prompted on your device, tap “Trust” and enter your screen passcode.

choose remove itune backup password

Step 3. Erase All Content and Settings
If Find My iPhone is turned on, go to Settings > General > Transfer or Reset iPhone > Erase All Content and Settings. If not, you can simply click the Start button in the software.

click start button

Step 4. Remove the iTunes Backup Password
The software will now begin removing the iTunes backup password from your device.

removing itunes password

Step 5. Restart Your Device
Once the process is complete, click OK to restart your iPhone or iPad.

restarting device

Method 2. Turn off iTunes Backup Encryption with the Option “Reset All Settings”

If your iPhone is running iOS 11 or later, there’s a simple way to turn off iTunes backup encryption by resetting all settings on your device. This method removes the backup encryption password without deleting your data. However, keep in mind that it will reset some settings, such as display brightness, wallpaper, and Home Screen layout.

Follow these steps:

Step 1. On your iPhone, go to Settings > General > Transfer or Reset iPhone > Reset.

Step 2. Tap Reset All Settings, enter your device passcode, and confirm.

reset all settings

Once done, the iTunes backup encryption will be turned off. This method only works on iOS 11 or later. If you’re using iOS 10 or earlier, you’ll need to try another solution.

Part 3. How to Turn Off iTunes Backup Encryption with Password

If you no longer want to encrypt your iPhone backups, you can easily turn off the encryption setting in iTunes. Just follow the steps below:

Step 1. Connect your iPhone to your computer and launch iTunes. Click the phone icon to access your device.

Step 2. In the ‘Backups’ section, uncheck the ‘Encrypt local backup’ option and enter your encryption password.

encrypt backup in itunes

That’s it! You’ve now disabled backup encryption for your iPhone in iTunes.

Conclusion

In this article, we’ve put together 3 effective methods to turn off iTunes backup encryption, making it easy for you to create unencrypted backups on your PC. One of the recommended tools is FoneLab iOS Unlocker, which can help you remove the backup password without losing any data if you’ve forgotten it.

Remove iTunes Backups Password

How to Remove MDM from iPhone/iPad Without Password

Summary
There are several reasons why you may need to remove MDM lock from iPhone/iPad. Check out this post! This guide covers three proven methods to bypass MDM lock with/without password, including DFU mode, professional MDM Lock Removal tool, and iOS Settings Reset.

MDM (Mobile Device Management) is used by organizations to control company-owned iPhones and iPads. There are several times you need to remove DRM profiles. For example, you purchased a second-hand iPhone or iPad with MDM still enabled. The MDM profile was misconfigured or remained after a factory reset. Or, you left a company but still have a device enrolled in MDM. Or, you forgot the MDM password can can’t access the features, etc.

Whatever the reason, if you’re stuck with an MDM profile you can’t bypass, you’ve come to the right place. This guide will show you how to remove MDM from iPhone/iPad with/without password in three effective methods, by using DFU Mode, a powerful MDM Lock Removal tool, and iOS Settings Reset. Let’s explore!

What Is MDM on iPhone/iPad?

MDM (Mobile Device Management) is a security protocol used by businesses, schools, and institutions to remotely manage Apple devices (including iPhones, iPads). It allows administrators to control app installations, enforce security policies, restrict device functions, and even remotely lock or wipe data with ease.

However, like the situations we mentioned above, if you’re stuck with an MDM profile you can’t bypass, you need to completely remove MDM from iPad/ iPhone. Now, explore the three methods to learn how to bypass MDM lock on your iPhone or iPad, even without password.

Method 1. Remove MDM from iPhone/iPad through DFU Mode

DFU allows you to completely restore or downgrade iOS without loading the current operating system. Unlike standard Recovery Mode, DFU mode bypasses the bootloader, making it a powerful troubleshooting tool. Using it, you can remove MDM from iPhone, iCloud lock or passcode, fix various iOS issues, or even downgrade iOS version.

Note: The DFU mode performs a full factory reset, it will wipe all apps and data on your device. You’d better backup your device before getting started.

Step 1. Backup Your Data (Optional)
Connect your iPhone/iPad to your computer using USB cable, and use iTunes or Finder to create a backup.

Step 2. Install the Latest Version of iTunes
Download and install the latest version of iTunes on your computer, then launch iTunes.

Step 3. Put Your Device in DFU Mode
Enter DFU Mode on your iPhone.

iPhone 8 & Later:

Press Volume Up → Volume Down → Hold Side Button (10 sec).

Release the Side Button but keep holding Volume Down (5 sec).

iPhone 7/7 Plus:

Hold Side + Volume Down (10 sec).

Release Side Button but keep holding Volume Down (5 sec).

iPhone 6s & Earlier:

Hold Home + Power (10 sec).

Release Power Button but keep holding Home (5 sec).

enter DFU Mode on your iPhone

Step 4. Restore the Device
Open iTunes (Windows/macOS Mojave) or Finder (macOS Catalina and later). iTunes/Finder will detect a device in recovery mode. When prompted, click “Restore“.

restore iPhone on iTunes

iTunes will erase MDM, and download the latest firmware and reinstall iOS.

Step 5. Reactivate and Check for MDM
After restoring, skip MDM enrollment during setup.

Note: This method does not guarantee complete MDM removal if your device is supervised via Apple School Manager or Apple Business Manager. If it doesn’t work, you can ask help from a professional MDM removal. Keeping reading to learn more effective methods to unlock MDM lock.

✅ Pros:

  • Works without MDM password.
  • Removes all restrictions.

❌ Cons:

  • Erases all data (full reset required).
  • Works with the latest version of iTunes/Finder.

Method 2. Remove MDM from iPhone/iPad Without Password

If DFU mode doesn’t work or you want a guaranteed solution, a dedicated MDM Lock Removal Tool like iOS Unlocker is highly recommended. This powerful software is designed specifically to remove MDM from iPhone/iPad without password in just a few clicks. It supports all iOS devices & iOS/iPadOS versions, from iPhone 6 to iPhone 16, iPad (A16, 2025), and the lasted iOS 26/18 or iPad OS. It can also be used to remove iPhone screen passcode, Apple ID, iCloud Activation Lock, etc.

Key Features of iOS Unlocker:

  • Remove MDM from iPhone/iPad without password
  • Remove Apple ID & Screen Passcode from iPhone/iPad
  • Fast and secure – no jailbreak required
  • Retains complete access to full functionality after removal
  • Remove iTunes Backup Password and erase the forgotten password
  • Works with supervised and non-supervised devices
  • Supports iOS 7 – iOS 26/18, including iPhone 17 and iPads

Whether your device is stuck on the MDM Remote Management screen or restricted from accessing basic features, the iOS Unlocker can bypass MDM lock quickly and safely. Here’s how it works:

Step 1. Download and Install iOS Unlocker
First, download and install the iOS Unlocker on your Windows or Mac. You can click the Download button below.

d_win d_mac
d_win d_mac

Step 2. Choose Remove MDM Mode
Fire up the iOS Unlocker, and select “Remove MDM” function in the main interface.

select Remove MDM mode

Step 3. Connect Your iPhone/iPad
Connect your iOS device to your computer via a USB cable. Tap “Trust” on your iOS device.

connect iPhone to computer

Step 4. Begin MDM Bypass Process
When connected successfully, click “Start” button to initiate the MDM removal bypass.

remove iphone MDM without password

Step 5. Remove MDM from iPhone Successfully
If Find My iPhone is already disabled on your iOS device, removing the MDM is straightforward, no password is required. Within minutes, MDM will be removed from your iOS device, and your device will restart with full access.

remove MDM successfully

Note: If Find My iPhone is enabled on your iOS, you need to turn off Find My iPhone first, follow below instructions to disable it, then you can continue use the iOS Unlocker to erase MDM.

turn off find my iphone

✅ Pros:

  • Easy to use, safe.
  • Remove iPhone MDM without password.
  • No data loss (if MDM doesn’t enforce a wipe).
  • Works on bypassed iCloud devices.
  • Remove screen passcode, Apple ID, etc.

❌ Cons:

  • Requires a paid license.

Method 3. Remove MDM from from iPhone/iPad Without Computer

If you don’t have access to a computer, you might still be able to remove MDM from iPhone or iPad without computer, but only if you know the correct MDM username and password. This method works directly on the device, but access MDM credentials are required.

Step 1. Open your iPhone/iPad, go to “Settings” > “General” > “VPN & Device Management“.

iPhone Device Management

Step 2. Locate the “MDM Profile“.

Step 3. Then tap “Remove Management“.

remove Remove Management on iPhone

Step 4. Enter the MDM password or admin credentials.

Step 5. Wait a few seconds for the MDM profile to be removed.

✅ Pros:

  • No computer needed.
  • Keeps all data intact.

❌ Cons:

  • Requires the MDM password.

Conclusion

In short, more iPhones and iPads are being managed remotely using Mobile Device Management (MDM). After reading this guide, have you got the method to remove iPhone MDM when you don’t have the correct MDM password? Whether you need to remove MDM from iPhone/iPhone without password or you’re trying to bypass MDM lock after a factory reset, these methods and iOS Unlocker tool can help you regain full access. Give it a try right now!

d_win d_mac
d_win d_mac

Remove iPhone Passcode

TunesBank Hulu Video Downloader Helps You Download Hulu Videos to MP4 HD

Summary
If you want to download Hulu video to MP4 HD, TunesBank Hulu Video Downloader is ready to help. This review introduces all details of TunesBank, allowing you to better judge whether it is worth buying.

TunesBank Hulu Video Downloader stands as a robust desktop solution, enabling hassle-free downloads of Hulu videos to HD MP4 format, ensuring seamless offline viewing without the need for an internet connection. Its rapid and user-friendly download capabilities have facilitated an enhanced viewing experience for countless users. For those seeking a comprehensive understanding of TunesBank Hulu Video Downloader, this review provides an in-depth analysis of its functionalities, pros & cons, limitations, and pricing details. Let’s delve into the comprehensive overview.

Hulu Download Limitations

You can download up to 25 items on five different mobile devices simultaneously. These download limits apply to your entire account, not each separate profile or device. If you go over any of these limits, you’ll receive a notification with further instructions.

Your downloaded content will be available for 30 days as long as the episode or movie hasn’t been removed from our streaming library before that time. Once you begin watching, you’ll have 48 hours to finish before the download expires. If a download expires before you finish watching, you might have the option to renew it.

What is TunesBank Hulu Video Downloader

TunesBank Hulu Video Downloader is a robust software designed for both Windows and Mac users, enabling direct downloads of movies or TV shows from Hulu for offline viewing. This versatile downloader offers the choice of saving videos in MP4 or MKV format, ensuring the best quality in HD 720P for a seamless offline viewing experience. With TunesBank Hulu Video Downloader, there’s no need for the Hulu app to download and enjoy your favorite content. It also safeguards against unexpected playback errors during offline viewing and allows users to keep their Hulu downloads indefinitely without any expiration.

Amazing Features of TunesBank Hulu Video Downloader

For a more user-friendly experience, TunesBank Hulu Video Downloader is equipped with several appealing features, designed to enhance your video downloading process. Let’s now explore the benefits that TunesBank Hulu Video Downloader has to offer.

Most Commonly Used Formats:
To make Hulu downloads playable on all devices and players such as Windows Media Player, VLC, and so on, TunesBank Hulu Video Downloader has offered the most commonly used options, MP4 or MKV to save the downloaded Hulu videos for keeping offline. Once the download is finished, you can transfer the files to all devices to enjoy without a network connection outside the Hulu app!

HD Quality to Save Hulu Videos:
To make sure that everyone can enjoy the Hulu downloads after saving them offline, the software will provide HD quality at up to 720P for you to keep the videos. As a result, you will have an enjoyable Hulu playback experience with the powerful TunesBank Hulu Video Downloader.

Save All Subtitles and Audio Tracks:
For Hulu videos that have subtitles and audio tracks of different languages, TunesBank Hulu Video Downloader can detect them and provides options for you to download along with the videos. You just need to select the options you need. For subtitles download, there are 3 types you can choose from, internal subtitles, external subtitles, and also hardcode subtitles.

Skip Ads and Keep Hulu Downloads Forever:
When Hulu has set limitations for every subscriber while streaming movies and TV shows within the app, you can completely skip them by using TunesBank Hulu Video Downloader. Also, you can keep Hulu downloads offline forever as they have been stored in your local storage. With TunesBank Hulu Video Downloader, you will not need to worry about the time validity of the downloaded Hulu videos. Thus, you can enjoy them offline to the fullest.

Fast Speed to Download Hulu Videos:
To make sure to run the video download function at a fast speed, TunesBank Hulu Video Downloader has used acceleration techs to speed it up. You will get a batch of Hulu videos downloaded at once instead of waiting a long time for it to be finished.

d_win d_mac

How to Use TunesBank Hulu Video Download

Step 1. Launch TunesBank Hulu Video Downloader
To begin, download and install TunesBank Hulu Video Downloader on your PC. Open the application and sign in to your Hulu account. Next, choose your desired option from hulu.com, hulu.jp, or hulu.jp/store.

sign on hulu account

Next, select a user profile.

select hulu site

Step 2. Search for Hulu Video to Download
You can find the content you want to download using either of the following two methods:

Method 1: Type the video title in the search bar.

search hulu movies

Method 2: Alternatively, copy and paste the link from the Hulu website, then click the Search icon.

copy paste hulu video

Step 3. Select Video Format to MP4
Select the Settings icon to customize the output settings. Pick the MP4 format as the output. You can also adjust other preferences such as video codec, audio language, subtitle language, and more.

hulu video mp4

Step 4. Start the Download of Hulu Videos
Choose the download icon beside your selection, and the download will start immediately. After the movie has been successfully downloaded, just click the ‘History’ button to locate it effortlessly.

download hulu movies

For downloading TV shows, select the download icon next to your chosen show, then pick the specific episodes you wish to download. To initiate the download, click the ‘Download’ button.

download hulu tv

Step 5. View the Downloaded History
Once the download is complete, you can locate your downloaded Hulu movies and TV shows in the ‘History’ section. To find the folder on your computer where these downloaded videos are stored, simply click the ‘Blue Folder’ icon.

hulu download history

Pros & Cons

Pros:

  • Downloads all Hulu shows and movies in HD quality
  • Offers popular MP4 and MKV formats
  • Keeps subtitles and multiple languages
  • Easy keyword or URL search
  • Skips ads and keeps videos forever
  • Fast download speed
  • Allows transfer to any device for playback

Cons:

  • Free version downloads only 6 minutes of each video
  • Only works on Windows & Mac computers

Price of TunesBank Hulu Video Downloader

TunesBank Hulu Video Downloader is available for free, allowing you to install and explore its features without any charges. However, the free version has a limitation that permits downloading only the first 6 minutes of each Hulu video. To enjoy unrestricted downloading and improve the success rate of your downloads, you can upgrade to the paid version. You can check the pricing of the premium version to unlock these limitations.

1-Month Subscription – USD 15.95
Single Lifetime Plan – USD 89.95

price

Conclusion

By going through the comprehensive TunesBank Hulu Video Downloader review, you have gained a better understanding of the software and the advantages it brings. TunesBank Hulu Video Downloader does an excellent job which helps you download Hulu videos to MP4 HD, and move them to other devices for offline playback. TunesBank proves to be a valuable and economical program, potentially resolving the limitations faced by users due to Hulu’s download restrictions.

Download Hulu Videos to MP4 HD

Download HBO Max Movies & Shows in MP4 with TunesBank HBO Max Video Downloader

Summary
There are some limitations to be aware of when it comes to downloading videos from HBO Max. You can download HBO Max movies and shows in MP4 with TunesBank HBO Max Video Downloader. Thus, you’ll be able to keep HBO Max video after subscription ends and enjoy them everywhere!

When it comes to enjoying your favorite movies and shows, HBO Max is a great streaming video platforms due to its varied content library. You can access unlimited popular movies, classic shows, anime, live news and sports, and TV all on the HBO Max app using your mobile devices. But sometimes, HBO Max does not perform well with poor network. Hence, you can download HBO Max movies and shows to watch offline by upgrading to ad-free plan.

However, HBO Max has some downloading restrictions. For example, it has banned the download feature for desktop users. You can download a maximum of 30 titles across your account. The downloaded titles have 30-days/48 hours viewing duration. To overcome it, you need the best HBO Max Video Downloader, such as TunesBank HBOMax Downloader. Read to explore this full review on this tool, and learn how to use it to download HBO Max movies and shows in MP4 format for backup and flexible playback.

How Can TunesBank HBOMax Downloader Help You?

TunesBank HBOMax Downloader is the best tool to download and save your HBO Max videos. It can download any movie and TV show from HBO Max to your computer in a compatible MP4 or MKV format. Your downloads through TunesBank HBOMax Downloader will be saved on your local drive permanently for repeated playback or editing.

Simply sign with your Max account on the downloader, you can use the built-in HBOMax browser to search and add multiple HBO Max videos in a convenient and efficient way. In addition, it can also intelligently identify different audio track languages and subtitle languages, and save videos with HD quality. No matter what your subscription tier is, you can download HBO Max movies and shows in MP4 with TunesBank, including Max Ad-Free plan.

What Are the Best Features of TunesBank HBOMax Downloader?

Popular Output Format: By downloading HBO Max videos to MP4 or MKV formats, TunesBank ensures compatibility with all kinds of devices and media players.

Support Ad-Supported Plan: It is able to download any HBO Max movies and shows on Mac & PC with both ad-supported and ad-free account. Thus, you can watch HBO Max offline even with ad-supported subscription.

High-Quality Resolution: When downloading HBO Max video in MP4, the software provides resolution of up to 720p and can download videos from HBO Max in the best video quality to enhance your viewing experience.

Enjoy Unlimited Downloads: TunesBank HBOMax Downloader supports download HBO Max videos to MP4 in batches. You can add multiple movies and shows to the program simultaneously.

Built-In Browser: The program has embedded the official HBO Max website to access the video library easily. Users only need to sign in with HBO Max account, then they can search any video using keyword or URLs.

Fast Download Speed: TunesBank utilizes advanced technology to boost efficiency, saving your time and effort. You can even set up to put your computer into sleep mode after converting.

Multiple Languages: The HBOMax downloader not only preserves subtitles and audio tracks while downloading, but also lets you choose different languages for your downloads.

Keep 5.1 Surround Sound: To ensure users have an immersive and excellent audio-visual experience, it allows to select Dolby Digital 5.1 surround sound and audio description in the settings window.

How to Download HBO Max Movies & Shows in MP4 with TunesBank?

TunesBank HBOMax Downloader is highly compatible with Mac OS X 10.11 and later, and Windows 11/10/8.1/8/7 (32/64 bit). You can download it on your desktop for free.

d_win d_mac

Step 1. Launch TunesBank HBOMax Downloader
Once you download and install TunesBank HBOMax Downloader on your computer, start the program. Then log into your HBO Max account to access its video library.

login hbo max account

Step 2. Add Movies or TV Shows from HBO Max
You can copy and paste the video URL from HBO Max website to TunesBank program. Or enter the video name into the search box for fuzzy search.

search hbo max movies

Step 3. Select Video Format as MP4
You can set up your video parameter by clicking the “Gear” icon at the upper right corner. In the pop-up settings window, you can choose MP4 format, adjust the video quality, video codec, output folder, download speed, and select the language of audio tracks and subtitles at will.

select mp4 format

Step 4. Start Downloading HBO Max Videos to MP4
If everything is ready, hit on the “Download” icon next to the title to start downloading HBO Max movies to MP4. You may also click the “Gear” to open the advanced setting window before downloading.

download hbo max movie to mp4

For TV show, please select your needed seasons and episodes. Yhen click on the “Download” icon.

download hbo max show to mp4

Step 5. Find the Downloaded HBO Max MP4 Videos
After the download is over, you can find the well downloaded HBO Max videos by clicking “History” tab. Click the blue folder icon to watch your MP4 HBO Max videos offline!

view downloaded hob max videos

How Much Does TunesBank HBOMax Downloader Cost?

TunesBank HBOMax Downloader is a paid software. But it also provides free trial version. New users can use it to download the first six minutes of each video. To access all features, you can choose a subscription or license. Currently, it offers a 1-month subscription, which works on 1 PC/Mac for only US$15.95. Or US$89.95 for a single lifetime license on 1 PC/Mac. Once you purchase, you will receive a license key from TunesBank via email. Then you can enter the code to the software and start unlimited downloads.

Conclusion

HBO Max is one of the most popular on-demand streaming video platforms, which offers rich of hot movies, TV series, live news, sports and Max Originals. However, due to several limitations, you can only watch HBO Max content offline on its mobile app for a limited time. TunesBank HBOMax Downloader is dedicated to helping Max Ad-Supported and Max Ad-Free users download movies & shows from HBO Max in MP4 or MKV format so that users can enjoy HBOMax offline without limitations. Now, freely download the software on your Windows/Mac computer and try to process the 720P HBOMax to MP4 download with very simple clicks.

Download HBO Max Movies in MP4

TunesBank Helps You Download Disney Plus Movies & Shows to MP4, MKV

Summary
Want to download your favorite Disney+ movies and shows to watch offline? Try the most popular Disney+ downloader – TunesBank Disney Plus Downloader, which can help you download disney Plus movies and TV shows in MP4/MKV format. Read this detailed review to learn about all aspects of this tool.

Normally, your downloads on the official Disney+ app will expire. Luckily, there are quite a few powerful Disney Plus downloads can help you download your favorite Disney+ videos forever. TunesBank Disney+ Downloader acts as a helpful tool, allowing you to store Disney Plus movies from various locations worldwide, including the US, Japan, France, Germany, Spain, and more. It’s designed for easy use, even for those not well-versed in computers. No Disney Plus app is required; simply sign in your Disney+ account in its built-in web browser, then you can access the whole library. Browse, open, add, and download the Disney+ video in just a few clicks! That’s it!

Moreover, this useful tool is able to help you download Disney Plus movies and shows to MP4 or MKV files on your computer. You can then transfer them to a USB drive, SD card, external hard drive, or any other device to enjoy them as much as you like. TunesBank simplifies the process of downloading almost any Disney Plus video, even in locations without internet access. Rest assured, it’s a secure and dependable program, ensuring your computer remains safe from any harmful viruses or threats.

Key Features of TunesBank Disney+ Downloader

TunesBank Disney+ Downloader can help you bypass official download limits on Disney+, and save Disney Plus videos in MP4 or MKV formats for convenient offline viewing on various devices like mobile phones, tablets, or Windows/Mac computers. Its robust downloading capabilities are the result of a range of features, making it one of the leading Disney Plus video downloaders. Let’s explore these features together!

Save Almost All Disney+ Content as Local Files:
Love Marvel and Star Wars? TunesBank lets you download your favorite superhero epics and galactic adventures from Disney+ as permanent local MKV or MP4 files to build your offline collection. No need to worry about streaming expiration or internet connection any more!

Download Unlimited Disney+ Videos to Computer Locally:
TunesBank Disney+ Downloader allows users to download an unlimited number of Disney+ movies and TV series directly to their local computer, ensuring that they can enjoy their favorite content without any limitations or restrictions.

Built-In Web Browser to Simplify Download Process:
TunesBank features an embedded browser that lets you browse Disney+ library directly within the app. Just log into your account, find the TV series or movie you want, and click to +” to add it to your download queue. No more copying and pasting URLs – everything happens seamlessly in one place.

Download Disney Plus Movies and TV Series to MP4/MKV (720P):
Users can save their favorite Disney Plus movies and TV series in high-quality MP4 or MKV formats, ensuring an optimal viewing experience at 720P resolution, with vivid and crisp visuals that capture the essence of the original content.

Keep Audio Tracks and Subtitles in Multiple Languages:
TunesBank Disney+ Downloader ensures that all audio tracks and subtitles are preserved during the download process, allowing users to enjoy their favorite Disney Plus content in their preferred language, fostering inclusivity and accessibility for a diverse audience.

Remain 5.1 Audio & AD Audio for Superior Playback:
The software maintains the integrity of the original audio quality, including the immersive 5.1 audio and AD (Audio Description) audio, enabling users to experience superior playback that fully captures the immersive sound design and storytelling elements of the Disney Plus content.

Download Subtitles In Three Formats:
Choose exactly how you want subtitles embedded! This smart tool also supports soft subtitles (toggle on/off), external SRT files (editable and shareable), or hard subtitles (permanently burned into the video). This flexibility ensures you enjoy DisneyPlus movies and shows in any language, on any device, without hassle.

100% Safe and Stable, User-Friendly Interface, No Ads:
TunesBank Disney+ Downloader prioritizes user safety and satisfaction, providing a secure and stable downloading environment. With its user-friendly interface, users can navigate the software effortlessly, without any intrusive advertisements, ensuring a seamless and uninterrupted downloading experience.

d_win d_mac

Tutorial: How to Download Disney Plus Movies & Shows to MP4/MKV

Here is a comprehensive step-by-step guide for downloading Disney Plus movies onto your Windows PC or laptop using the TunesBank Disney+ Downloader. Let’s dive right in and get started.

Step 1. Run TunesBank Disney+ Video Downloader & Log In
Commence the process by downloading, installing, and launching the TunesBank iMovieTool Video Downloader on your Windows PC or Mac. On the main screen, select “DISNEY”

select disney plus

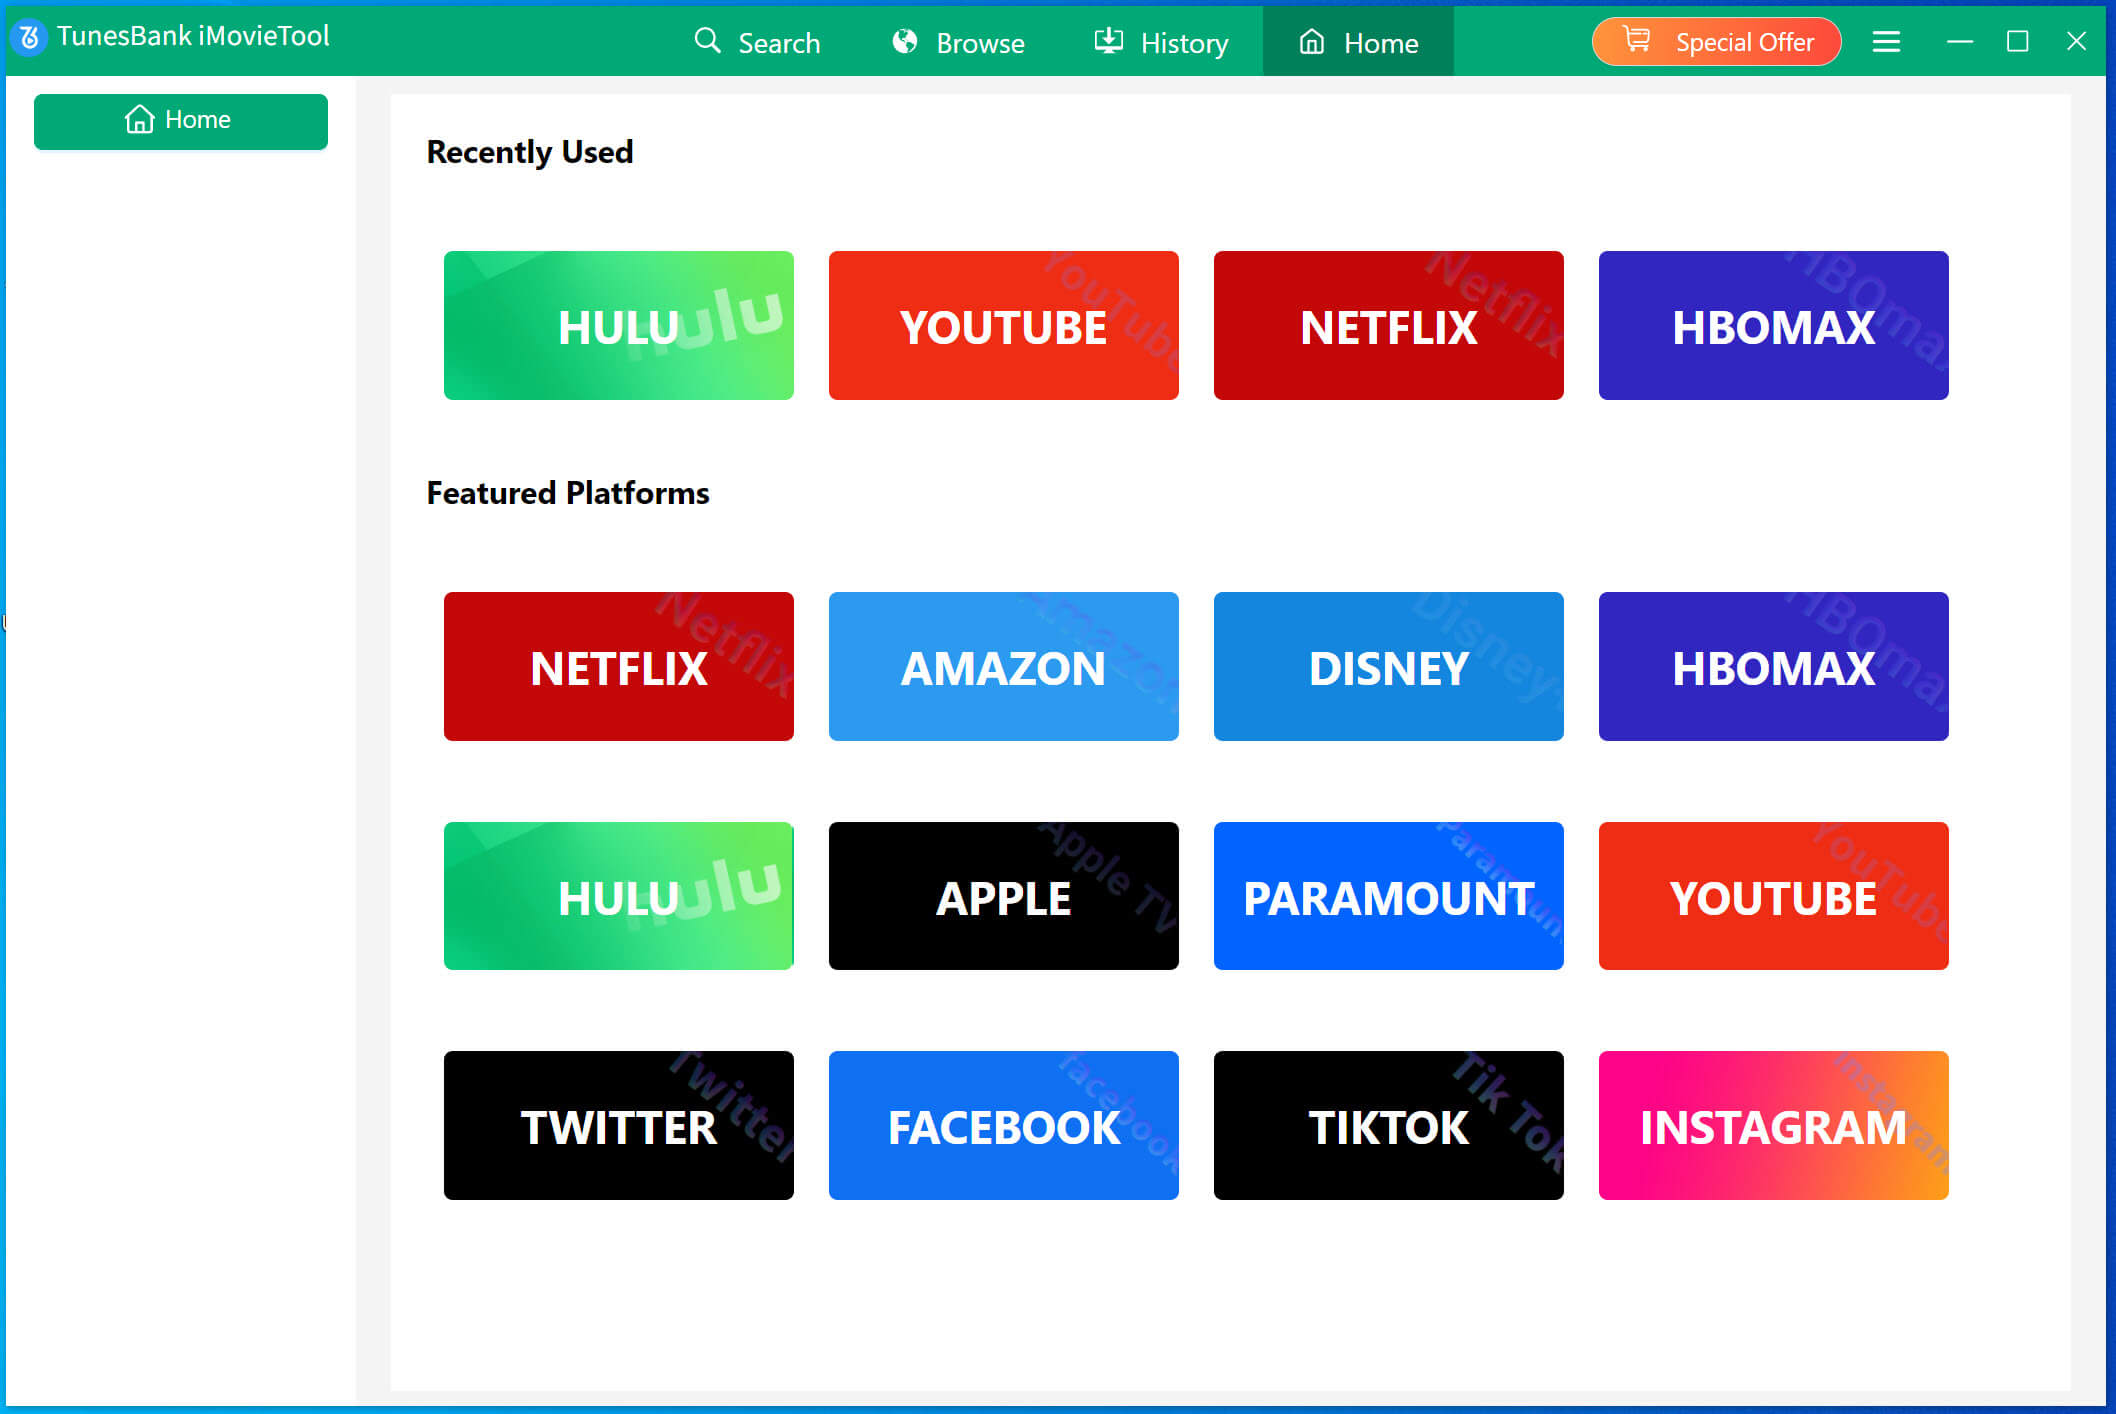
TunesBank iMovieTool is an All-In-One Video Downloader that integrates 8 major streaming platforms (including Netflix, Disney+, Amazon Prime, HBO Max, Apple TV+, Hulu, YouTube TV, Paramount+) and 4 social media platforms into a single program. Instead of juggling multiple tools, you can download unlimited HD movies, TV shows, documentaries, TV dramas, and Originals from all your subscribed services in one place, with batch downloads, 50X speed, and MKV/MP4 output. Plus, it also lets you download HD videos from Facebook, X/Twitter, Instagram, and TikTok for free!

Then, you will enter the TunesBank Disney+ Downloader.

Disney+ video downloader

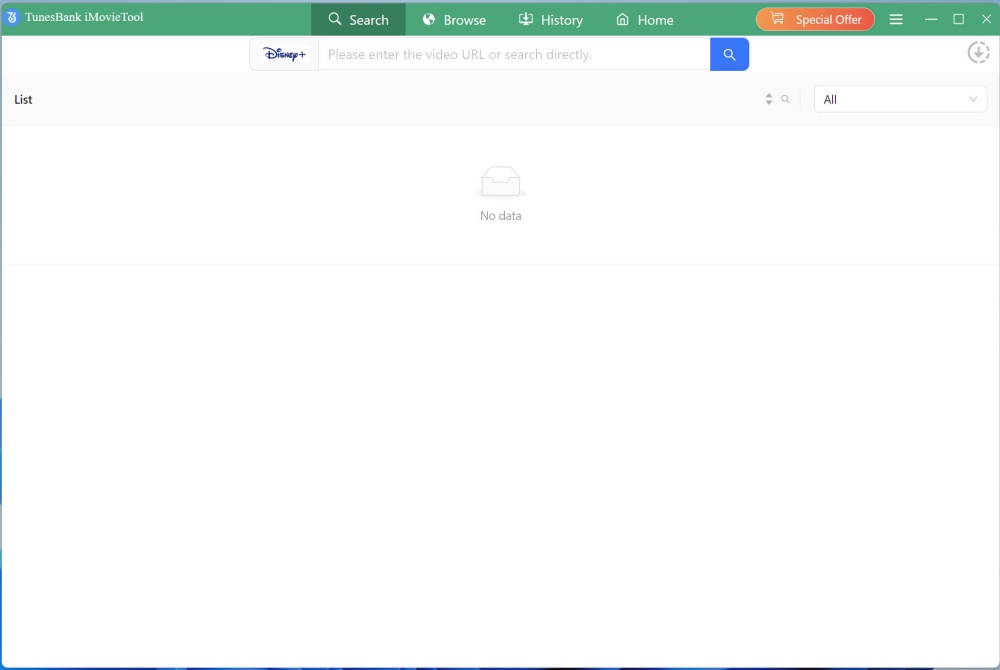
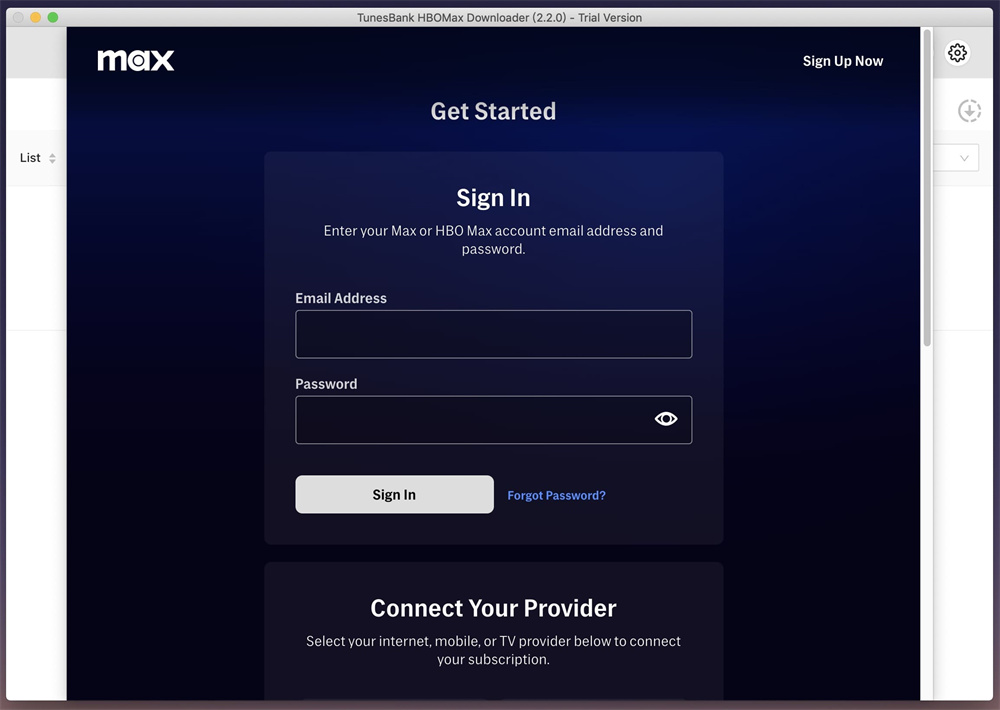
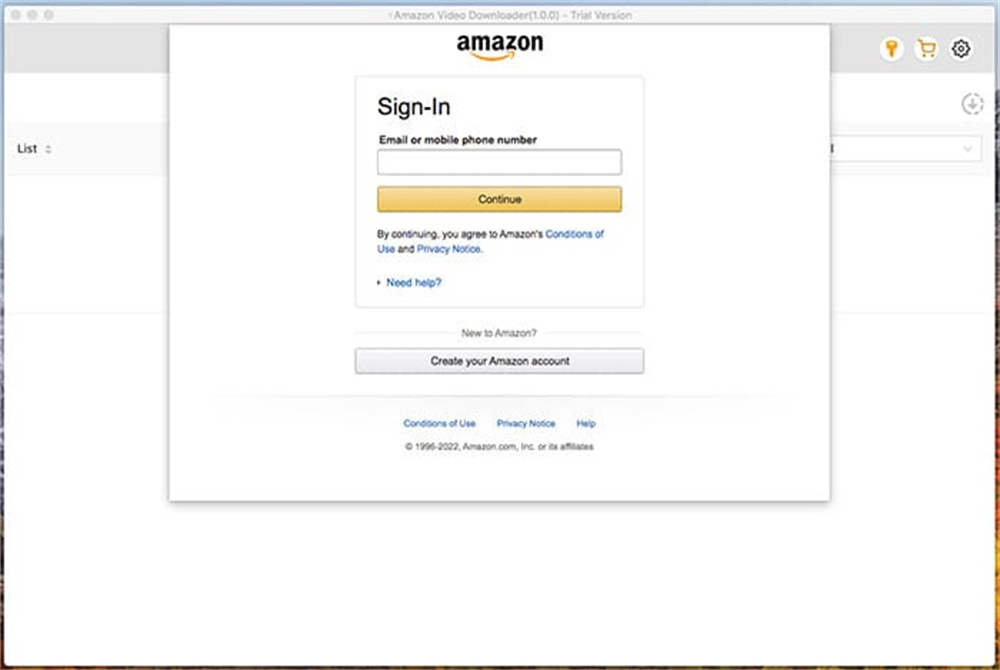
Following that, proceed by logging into your Disney+ account.

login disney plus account

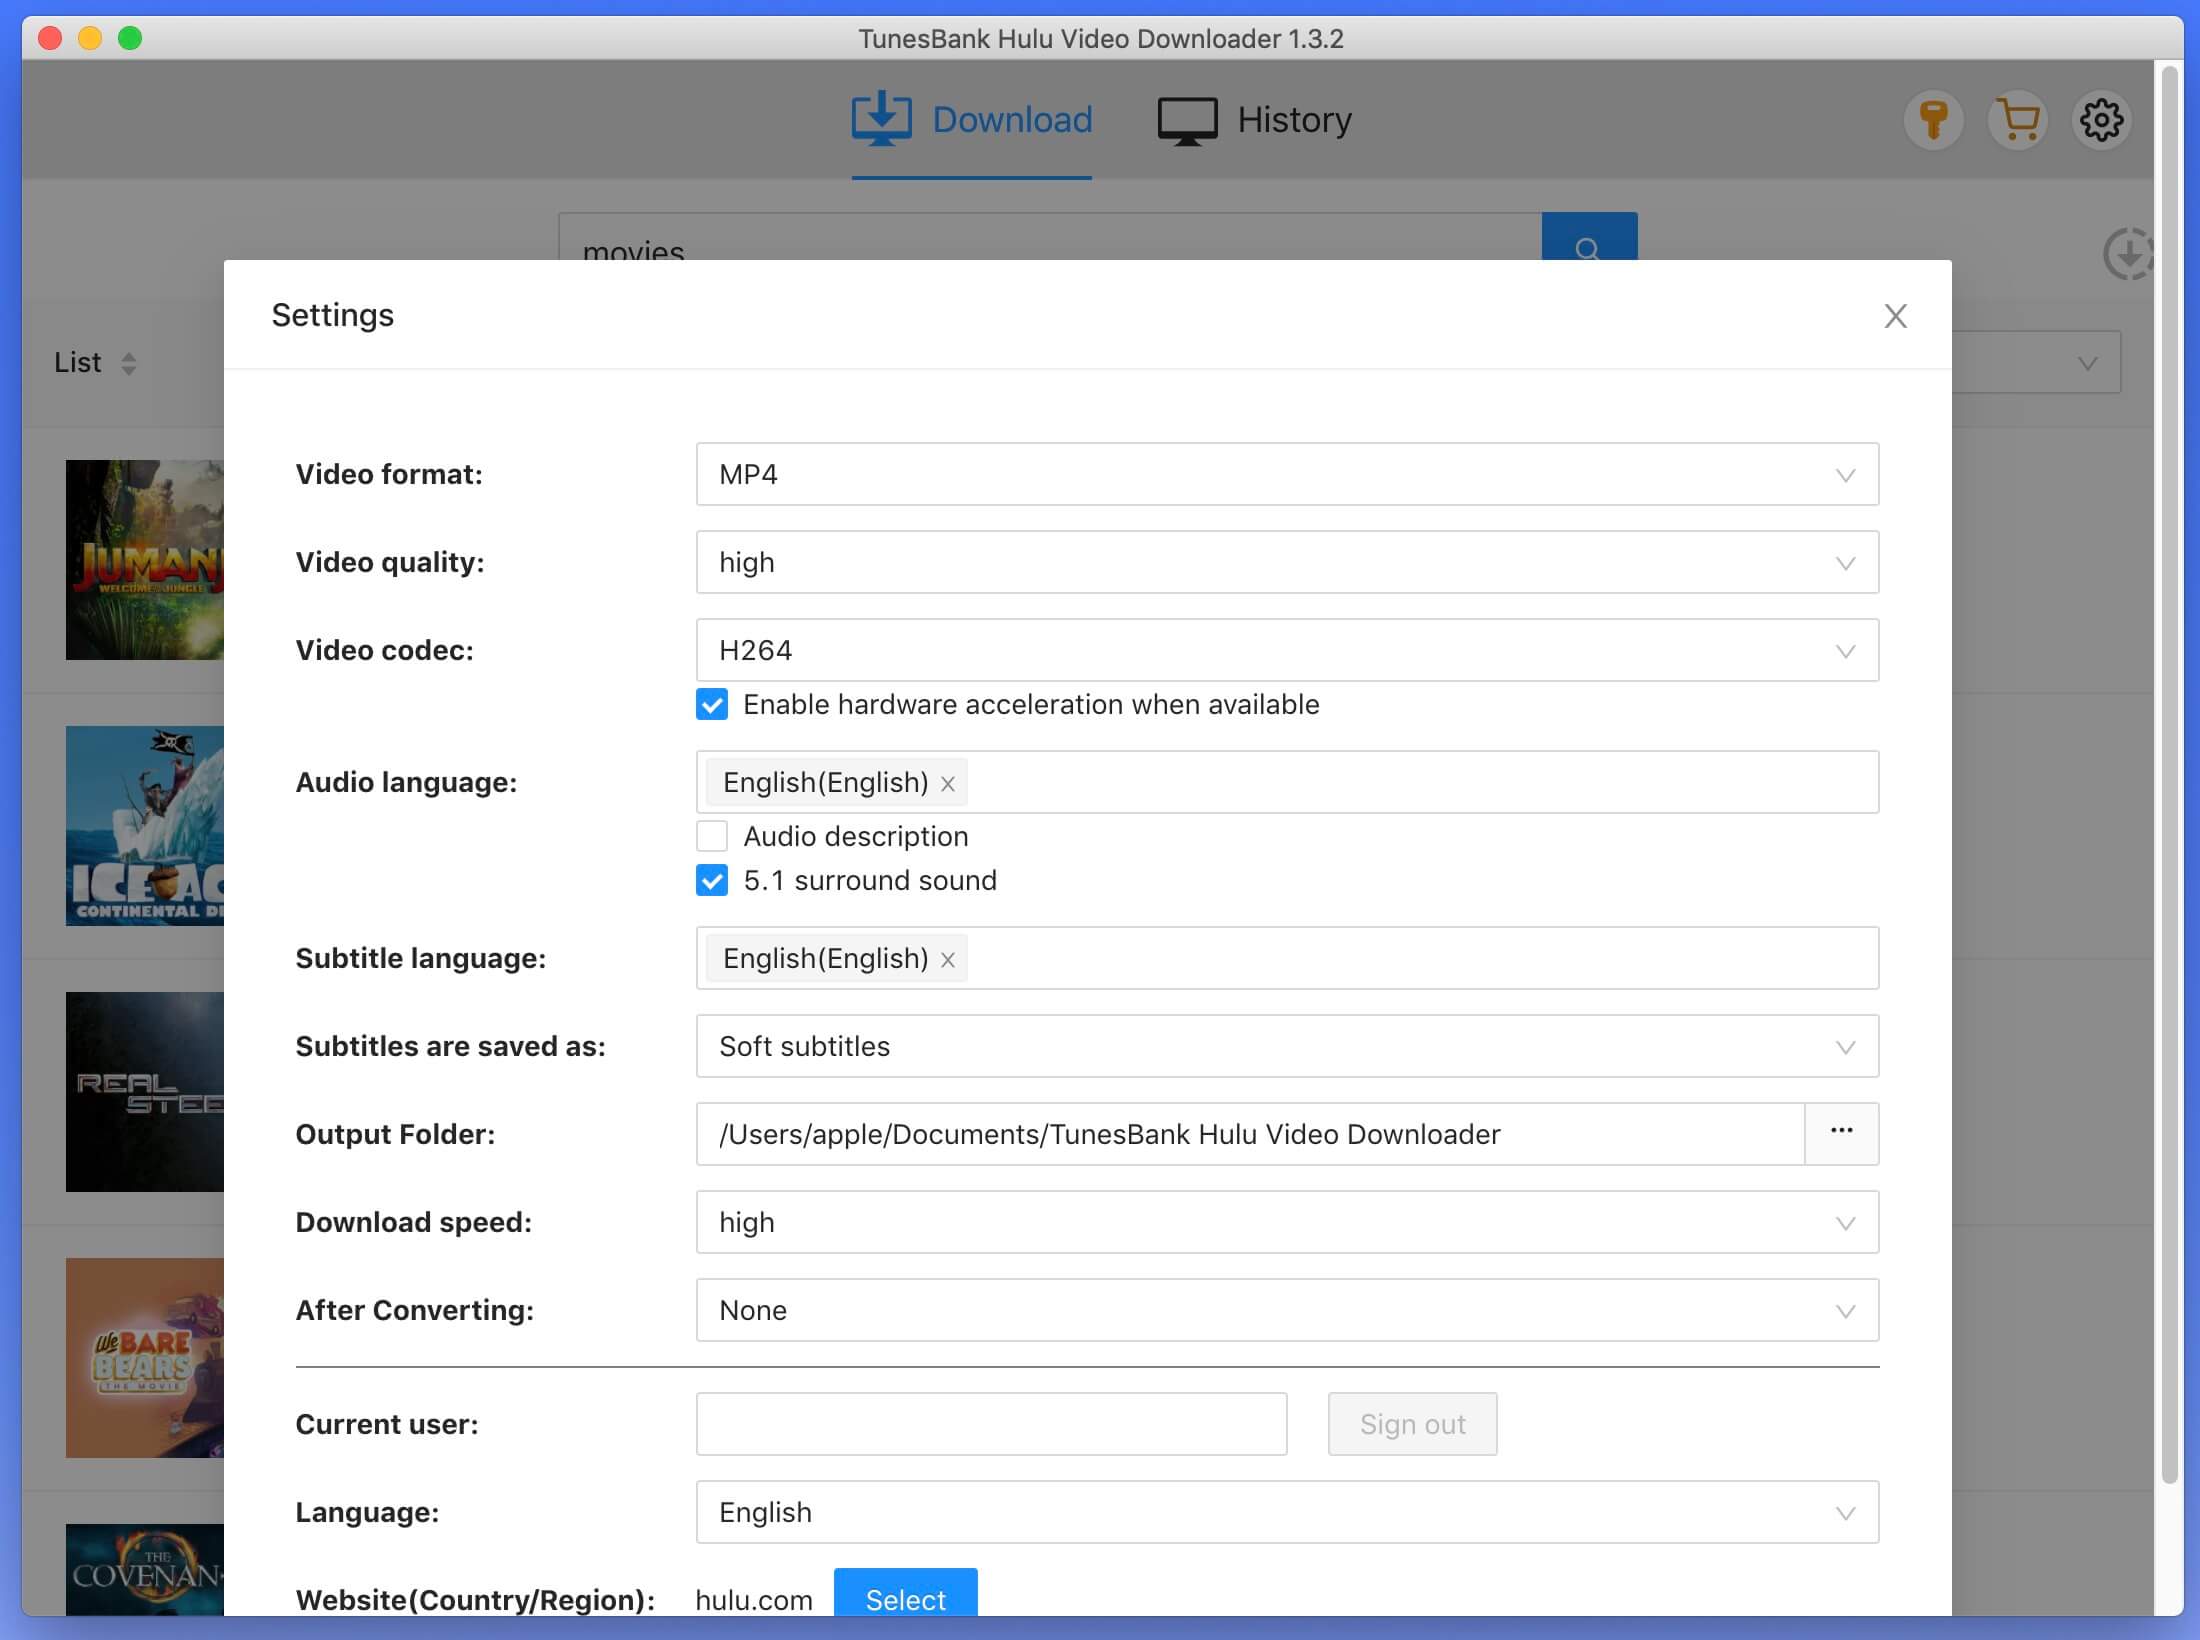
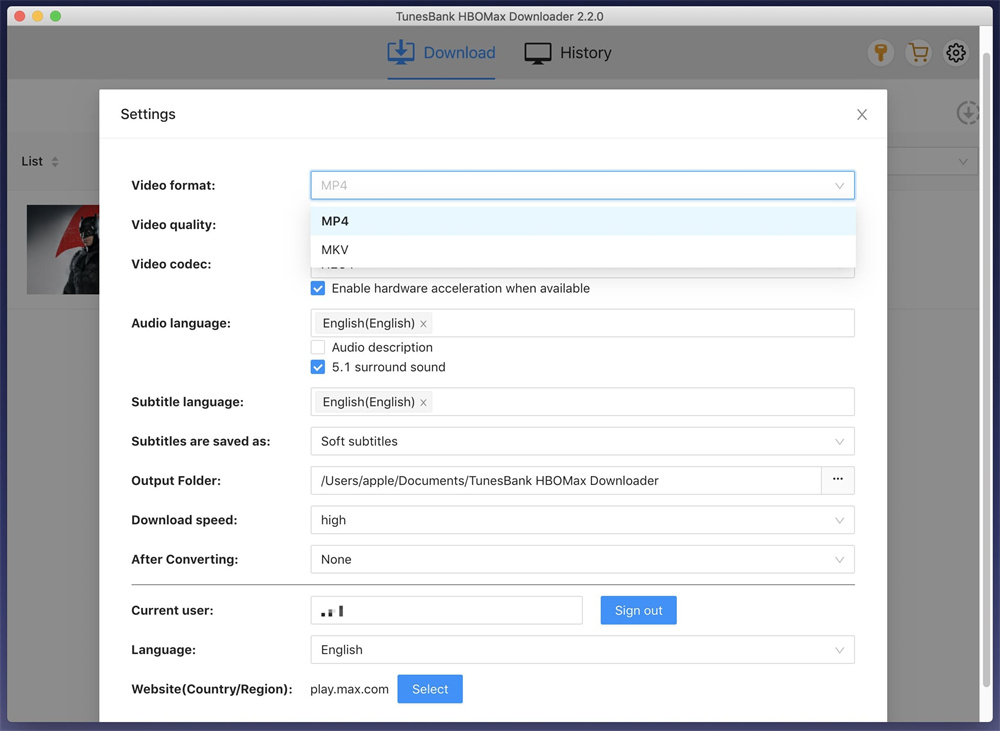
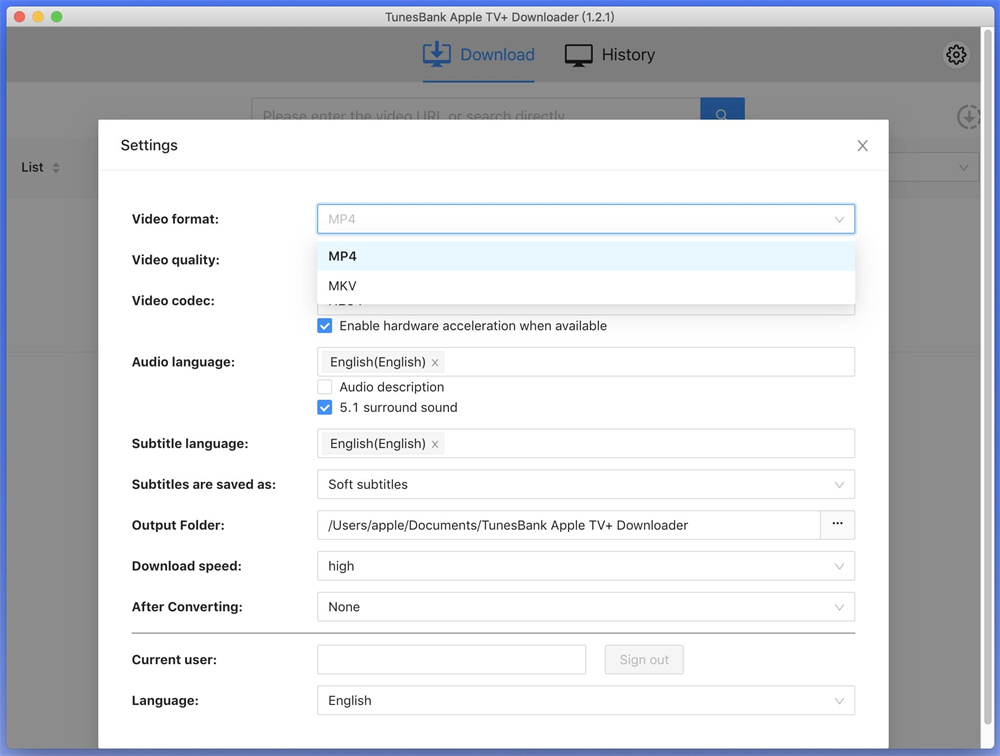
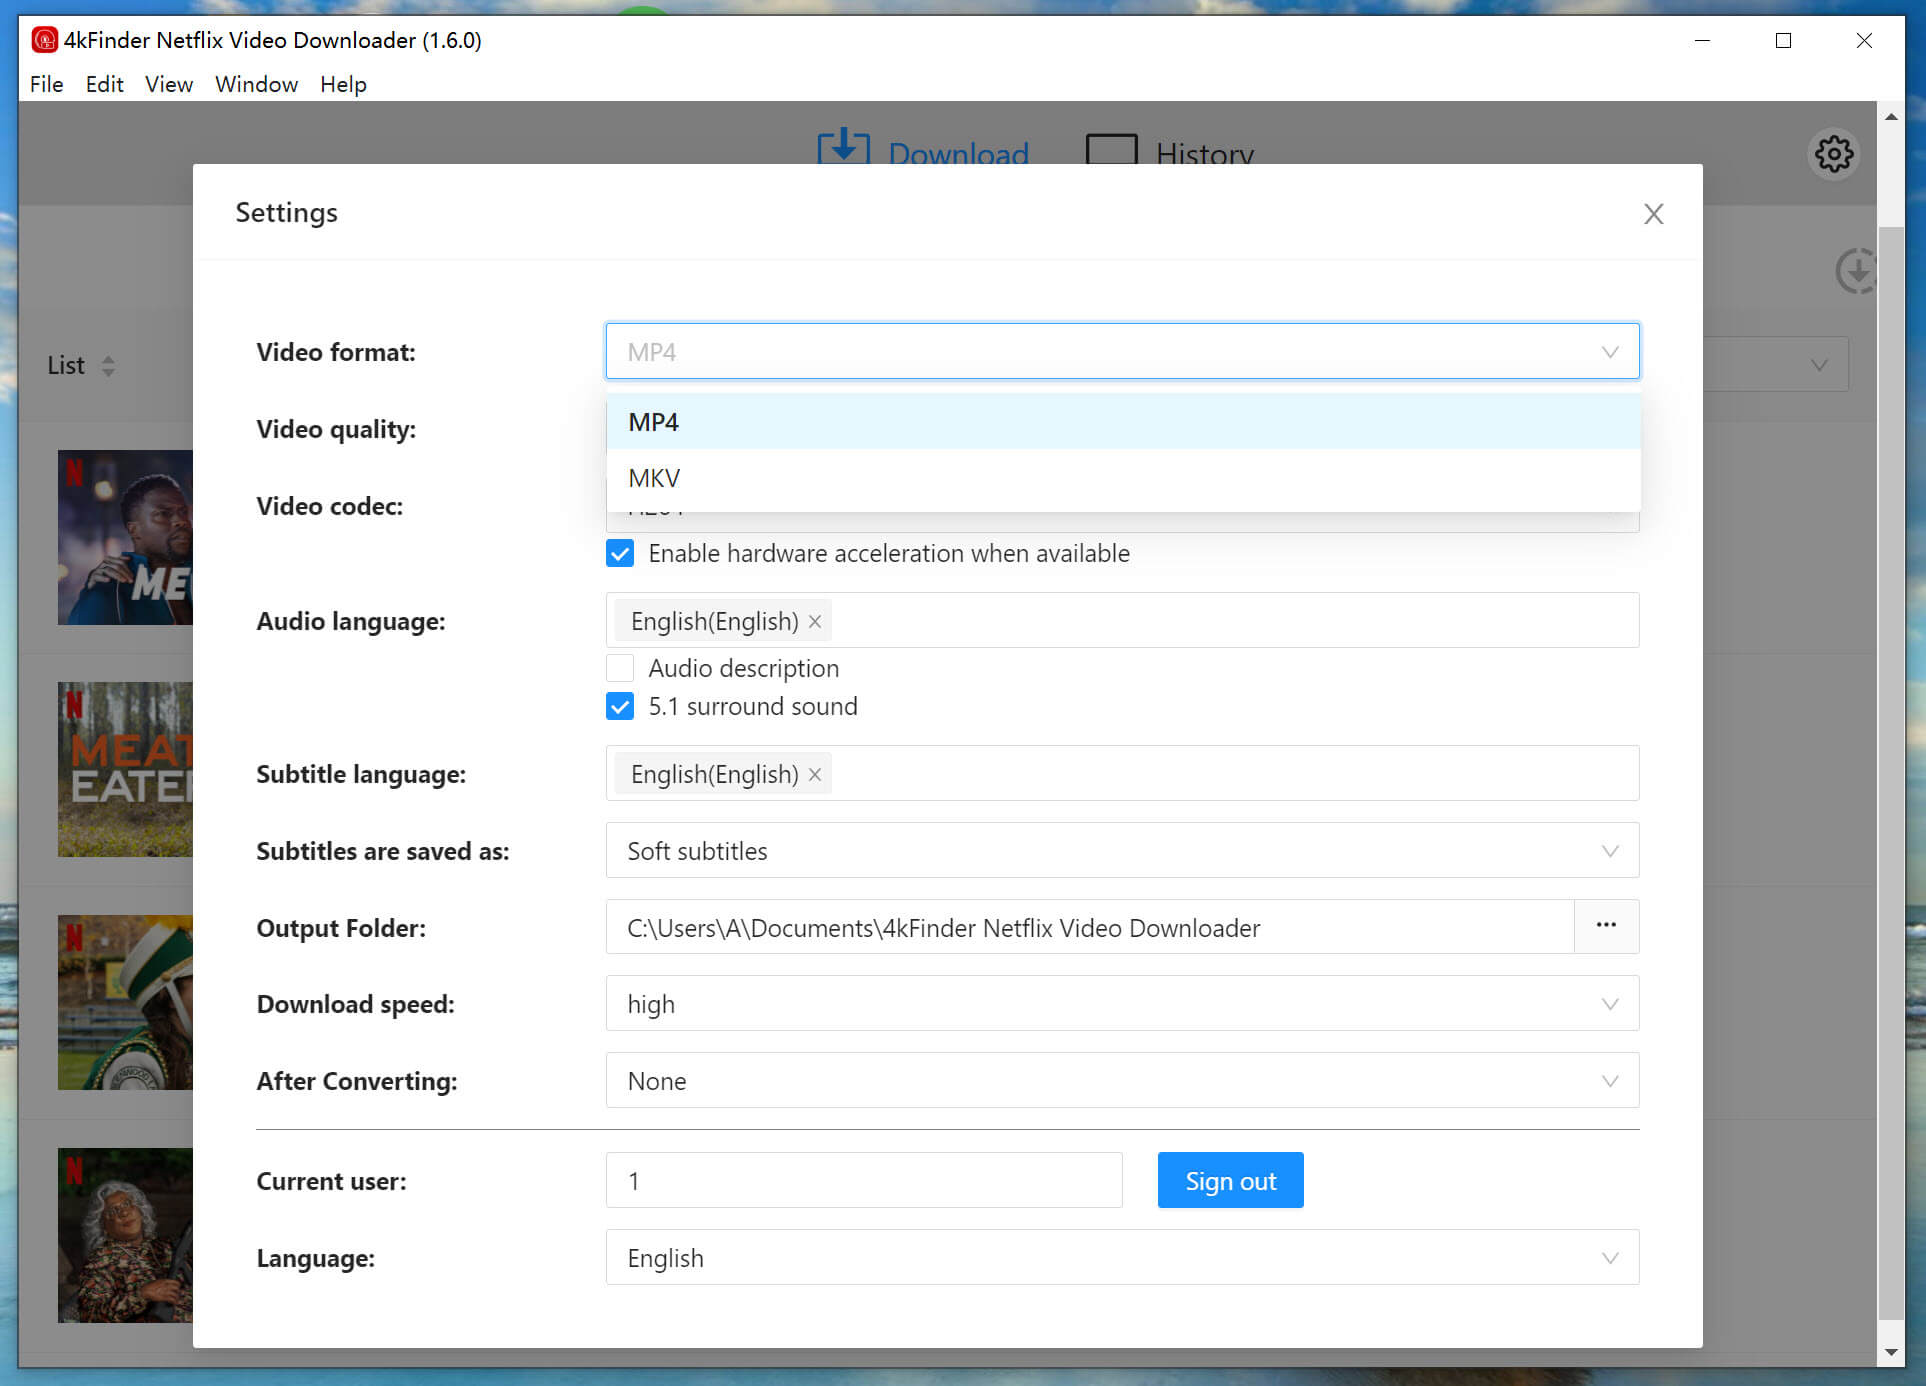
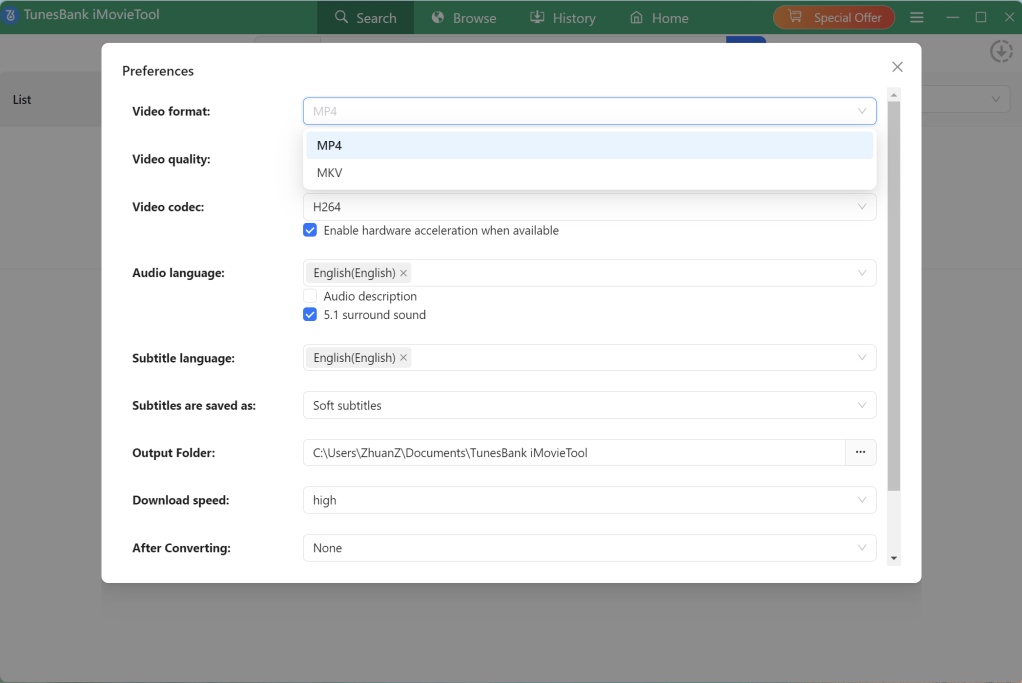
Step 2. Customize Output Settings
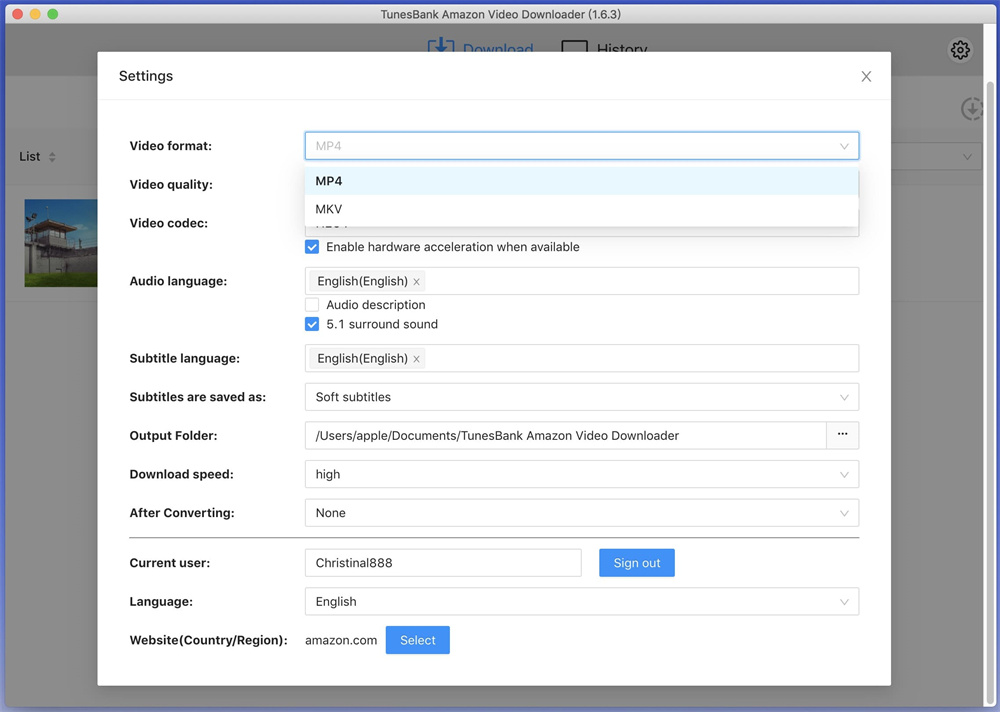
Before downloading, click the “Menu” bar, conveniently positioned in the upper right corner. And choose “Preference” option. You can define your preferred video format (MP4/MKV), video codec (H264/H265), video quality, set the output destination, and personalize your desired audio track and subtitle language.

customize output settings

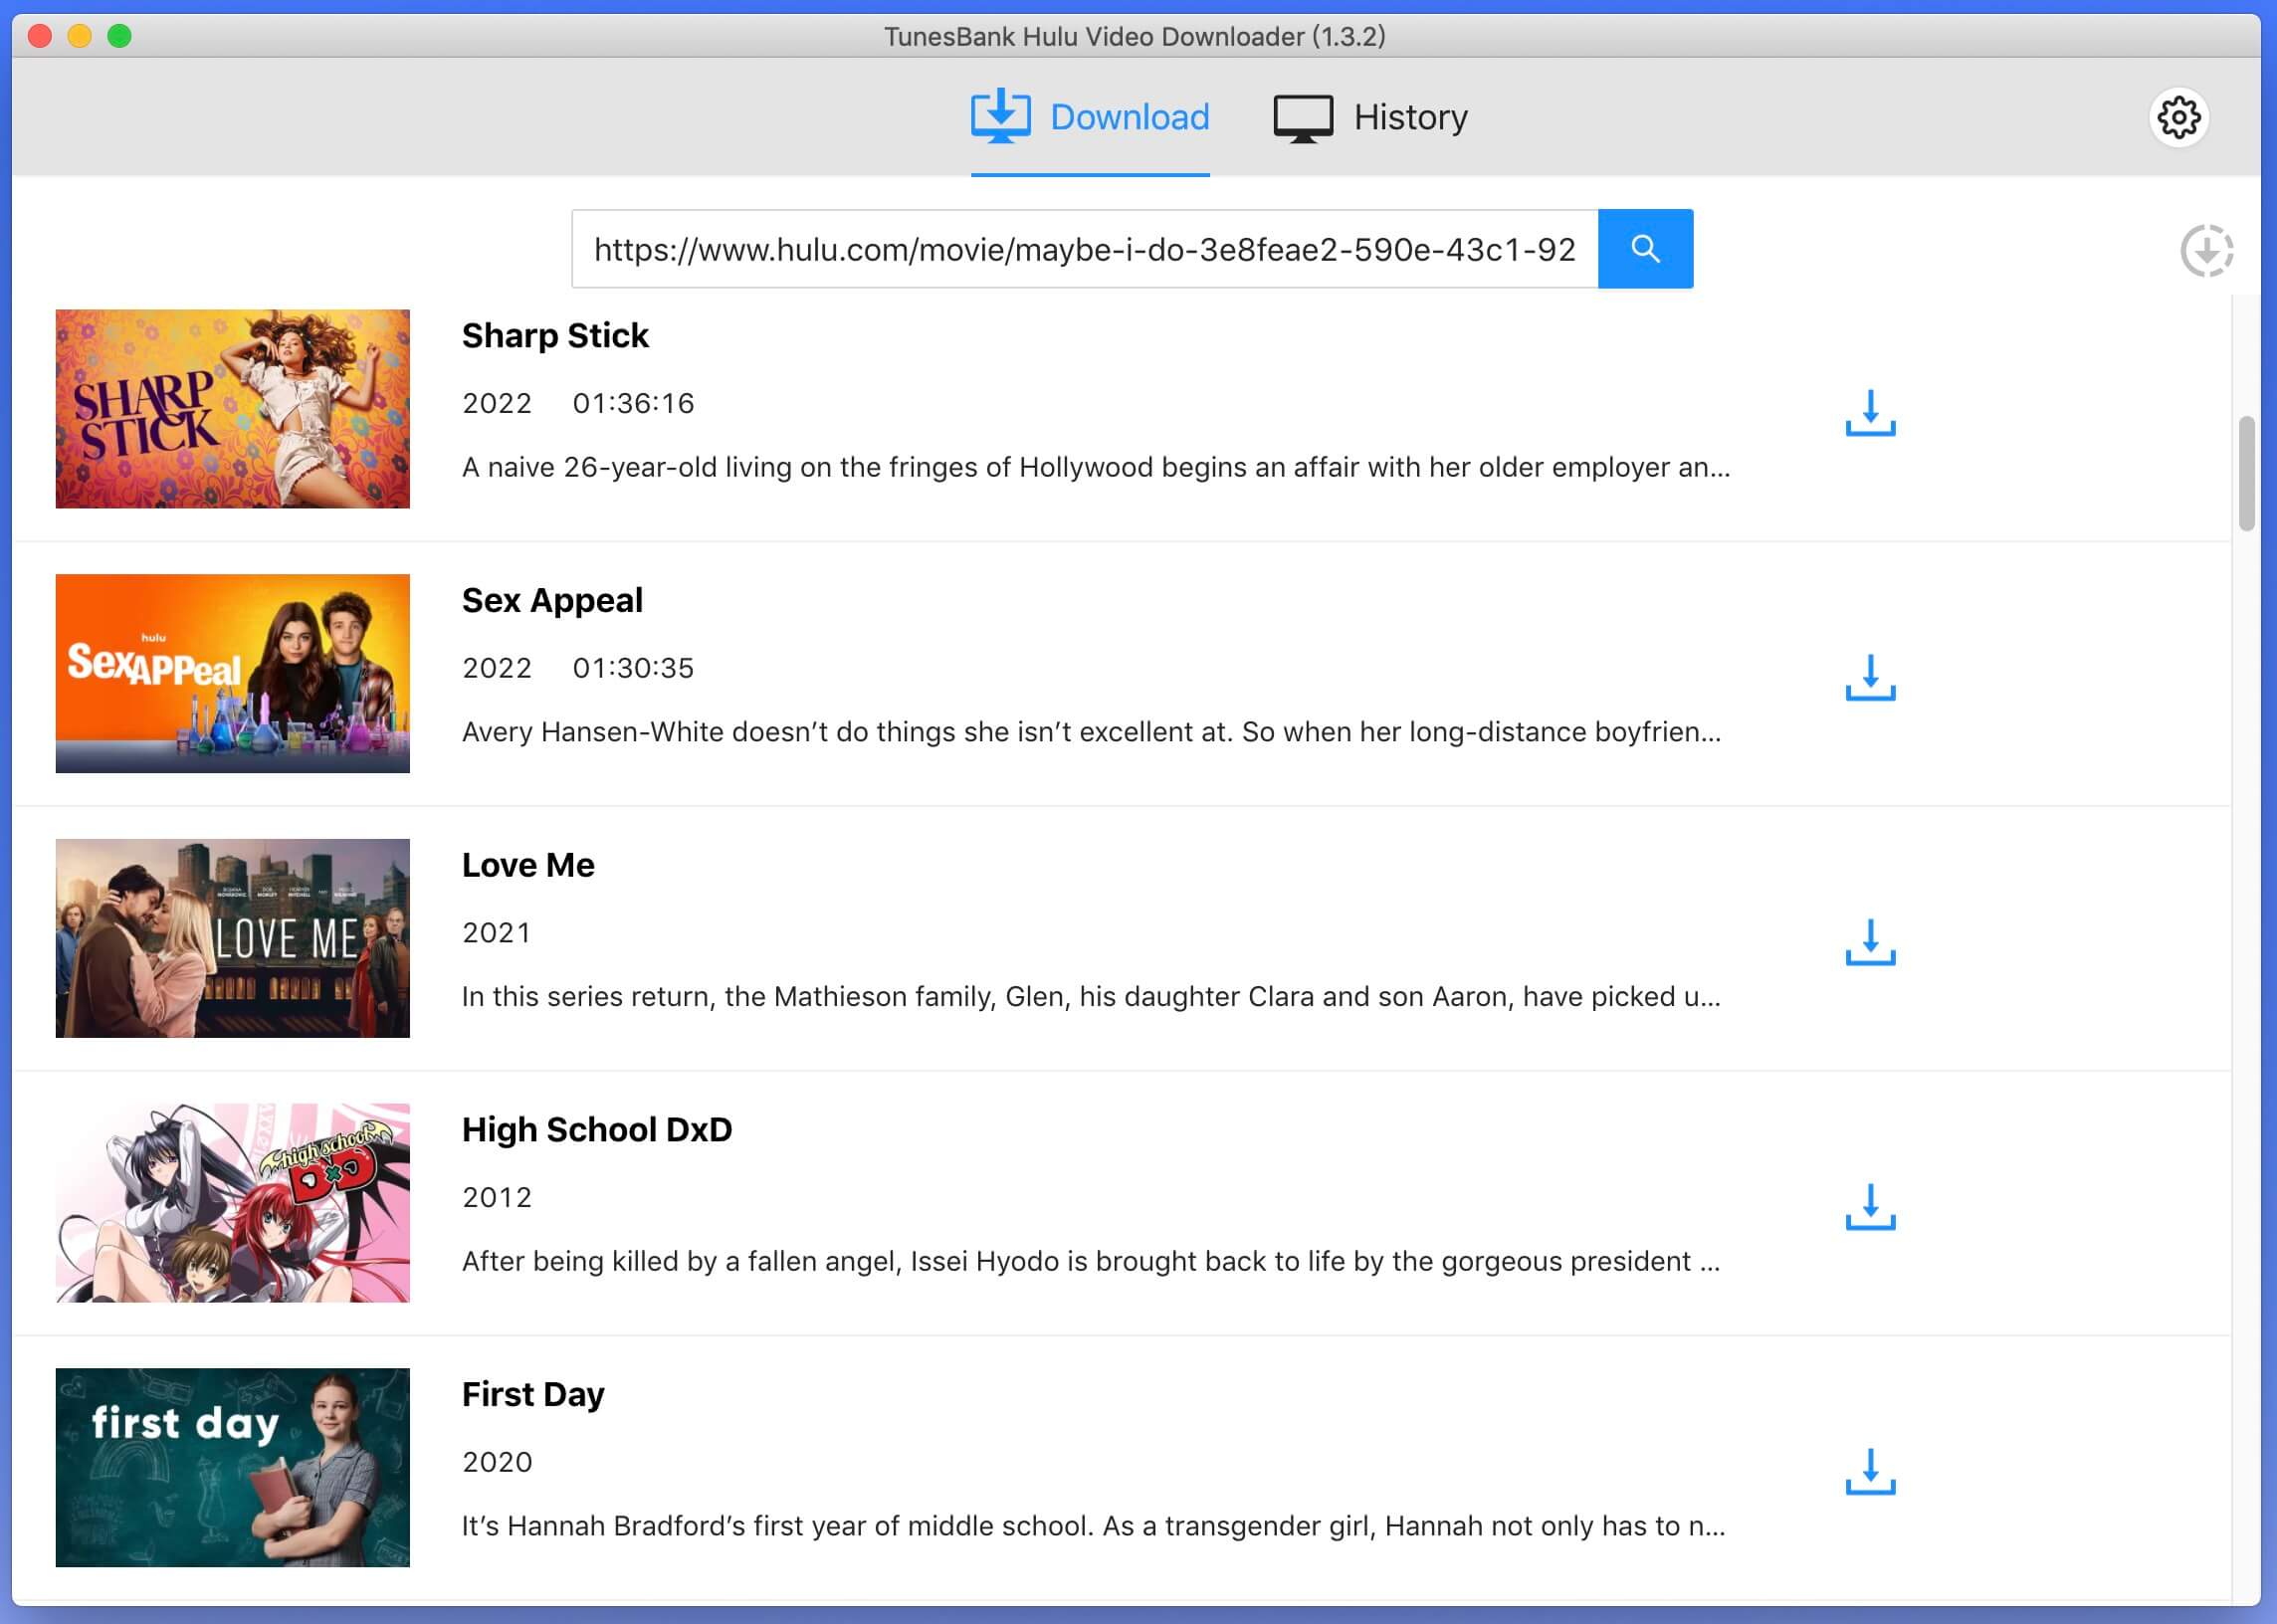
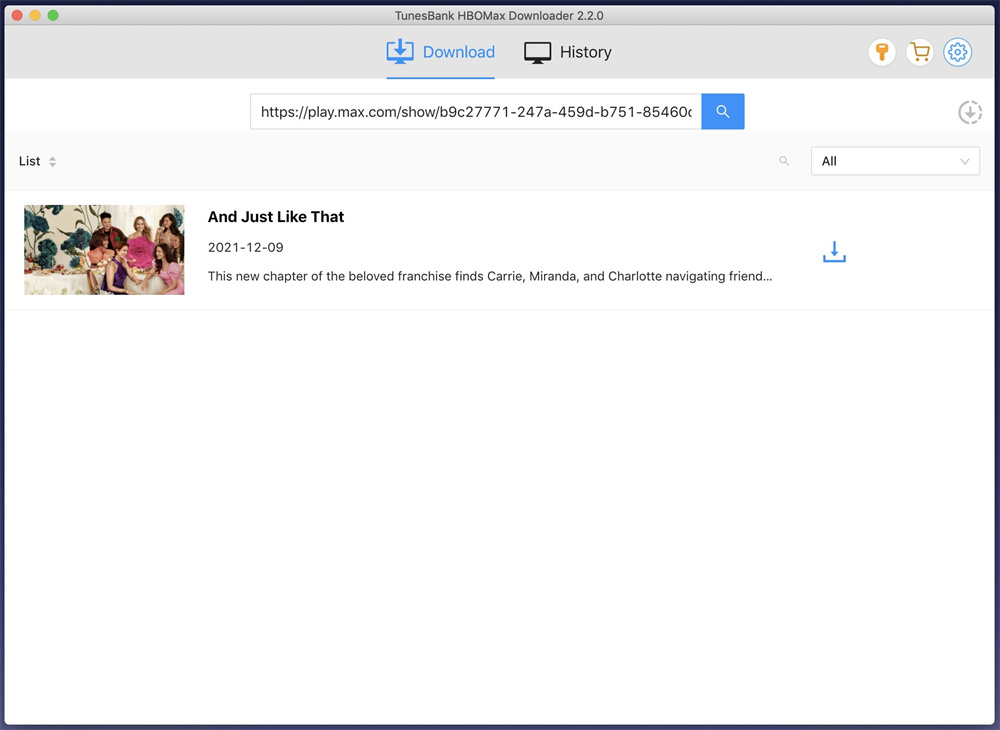
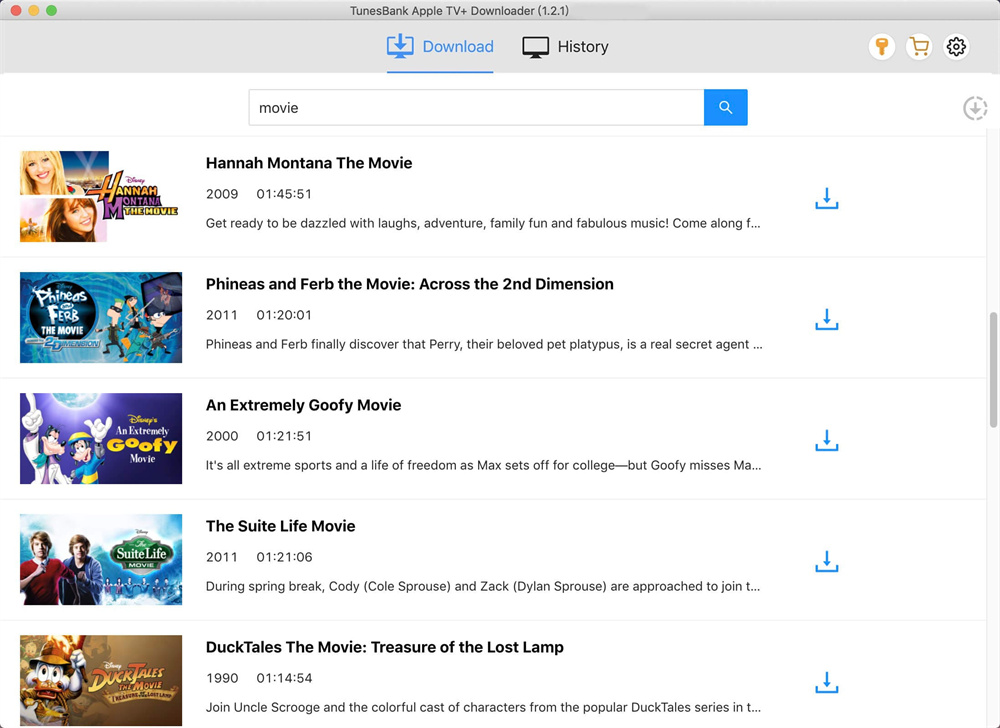
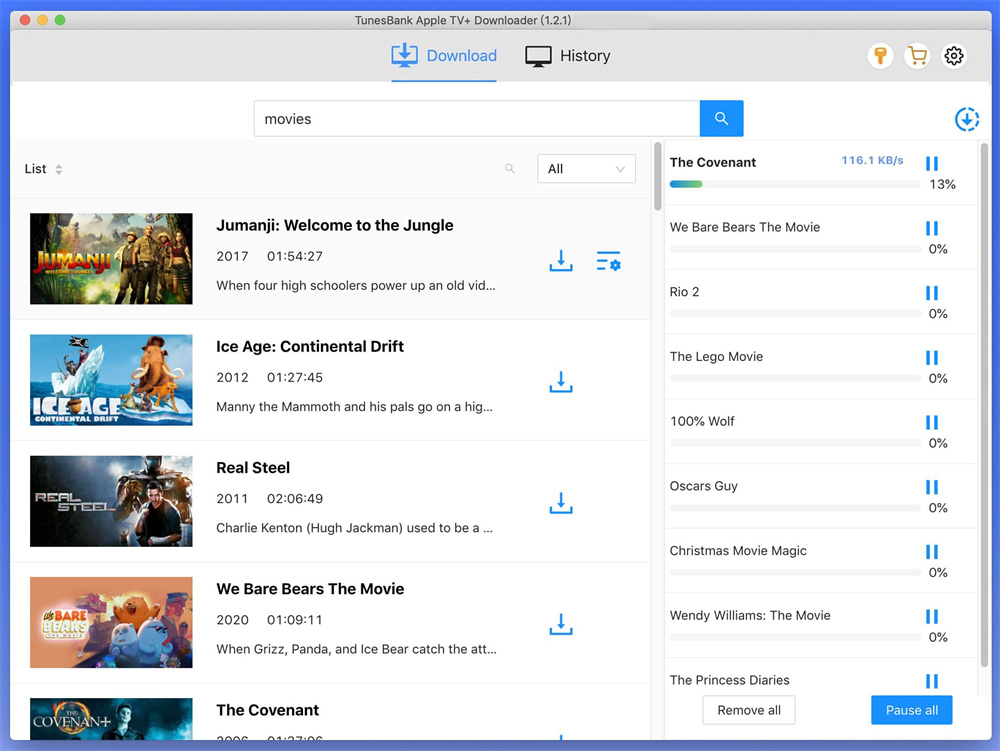
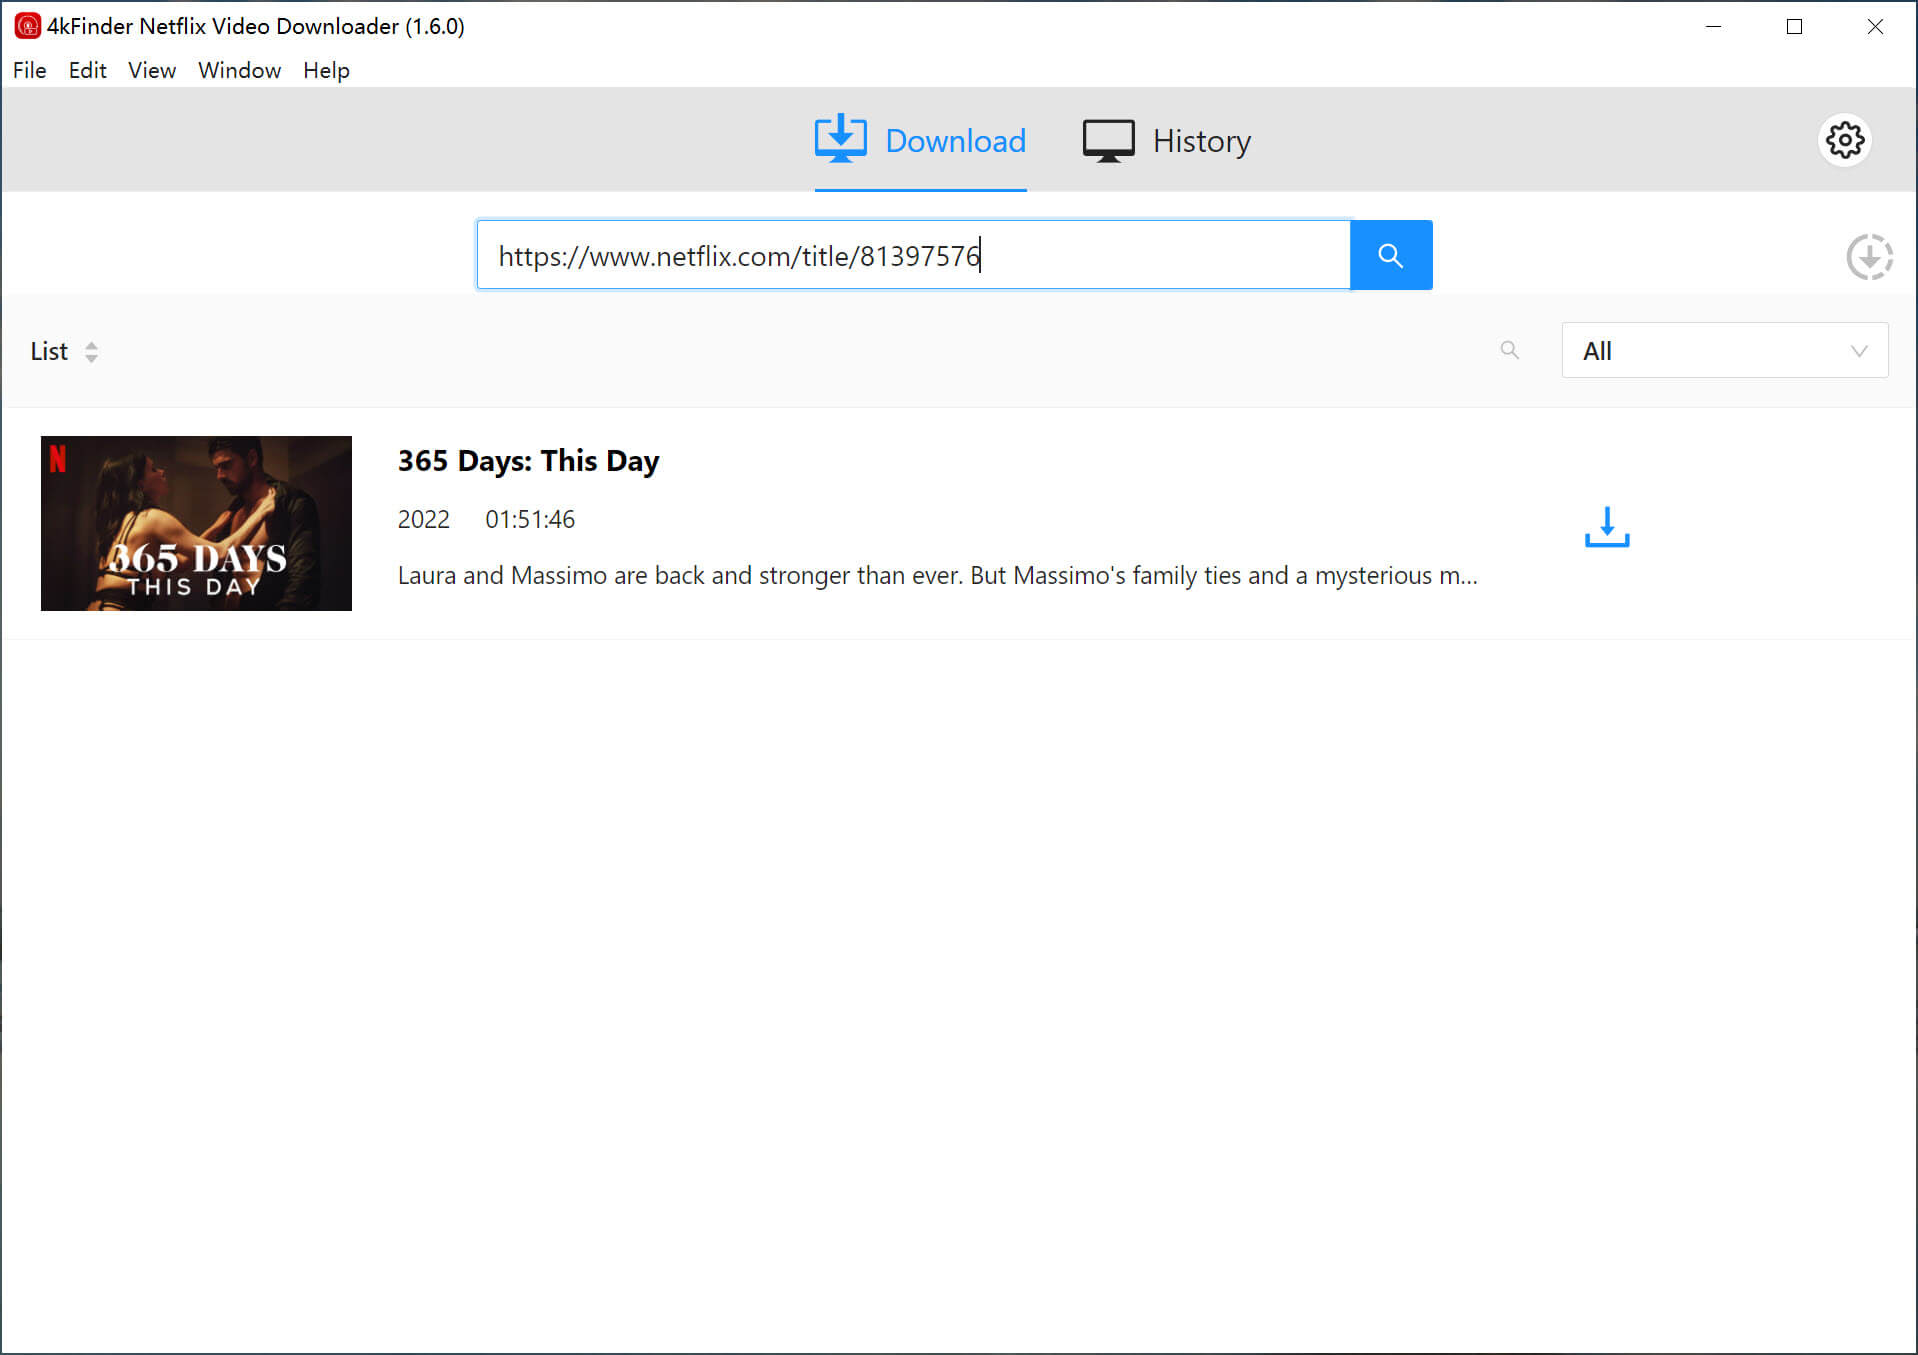
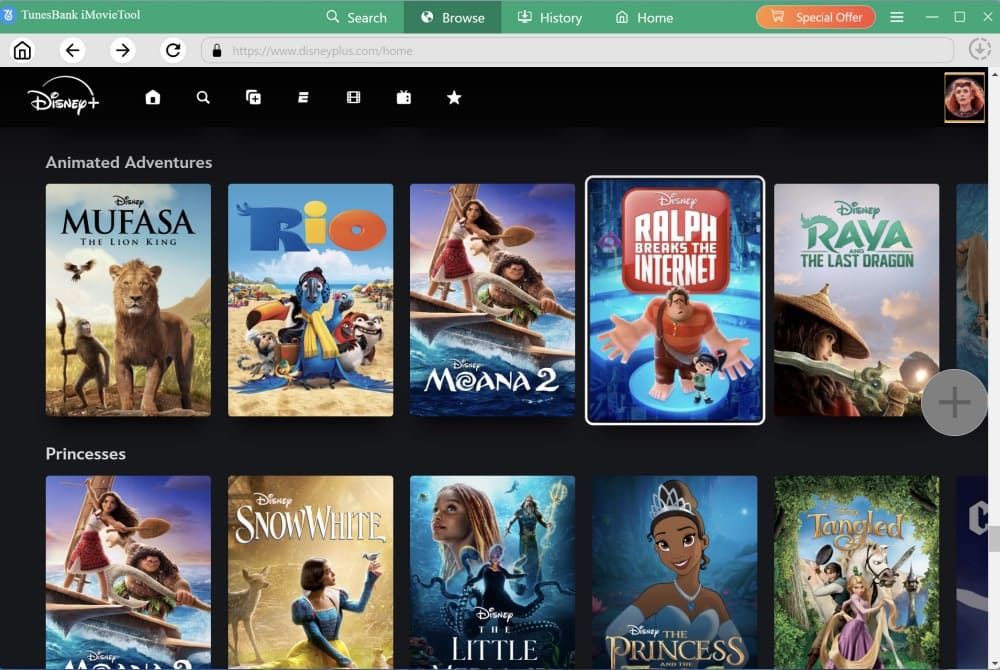
Step 3. Browse Disney+ Videos Online
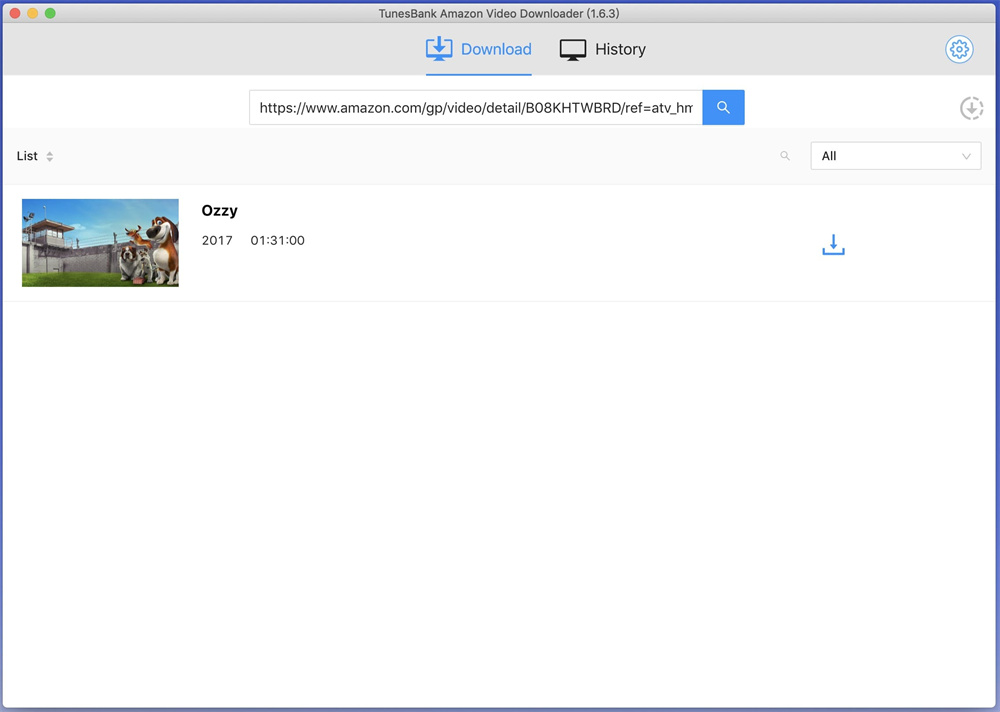
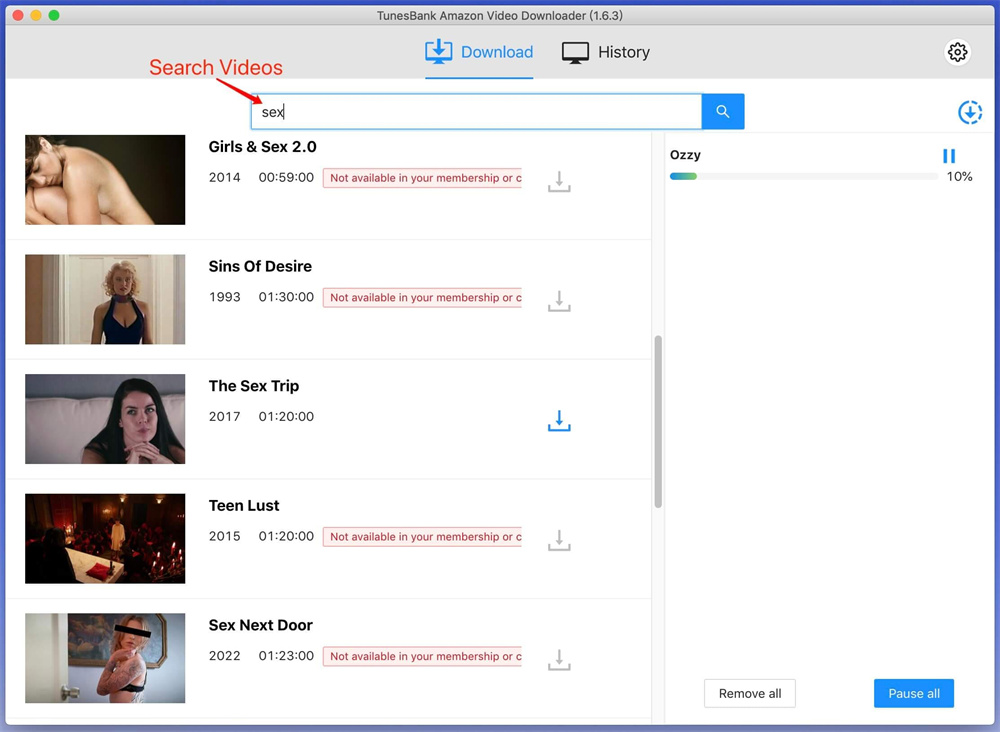
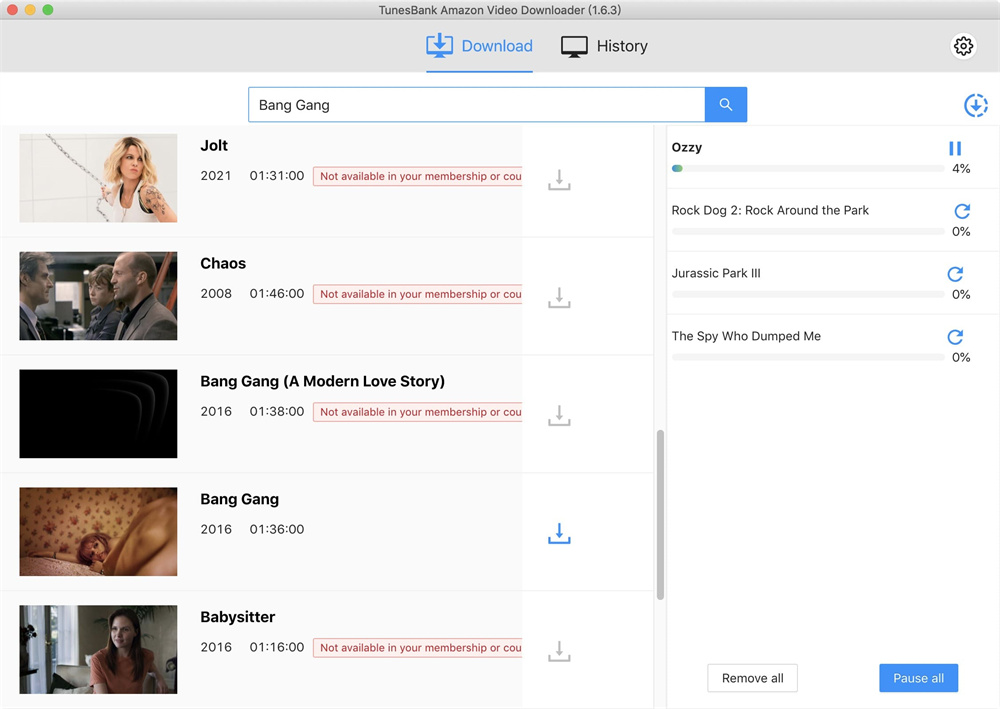
TunesBank provides users with a smart methods for adding Disney+ movies and series to the application for download. Tap “Browse” tab, you can browse the whole library and see different catalog.

browse library

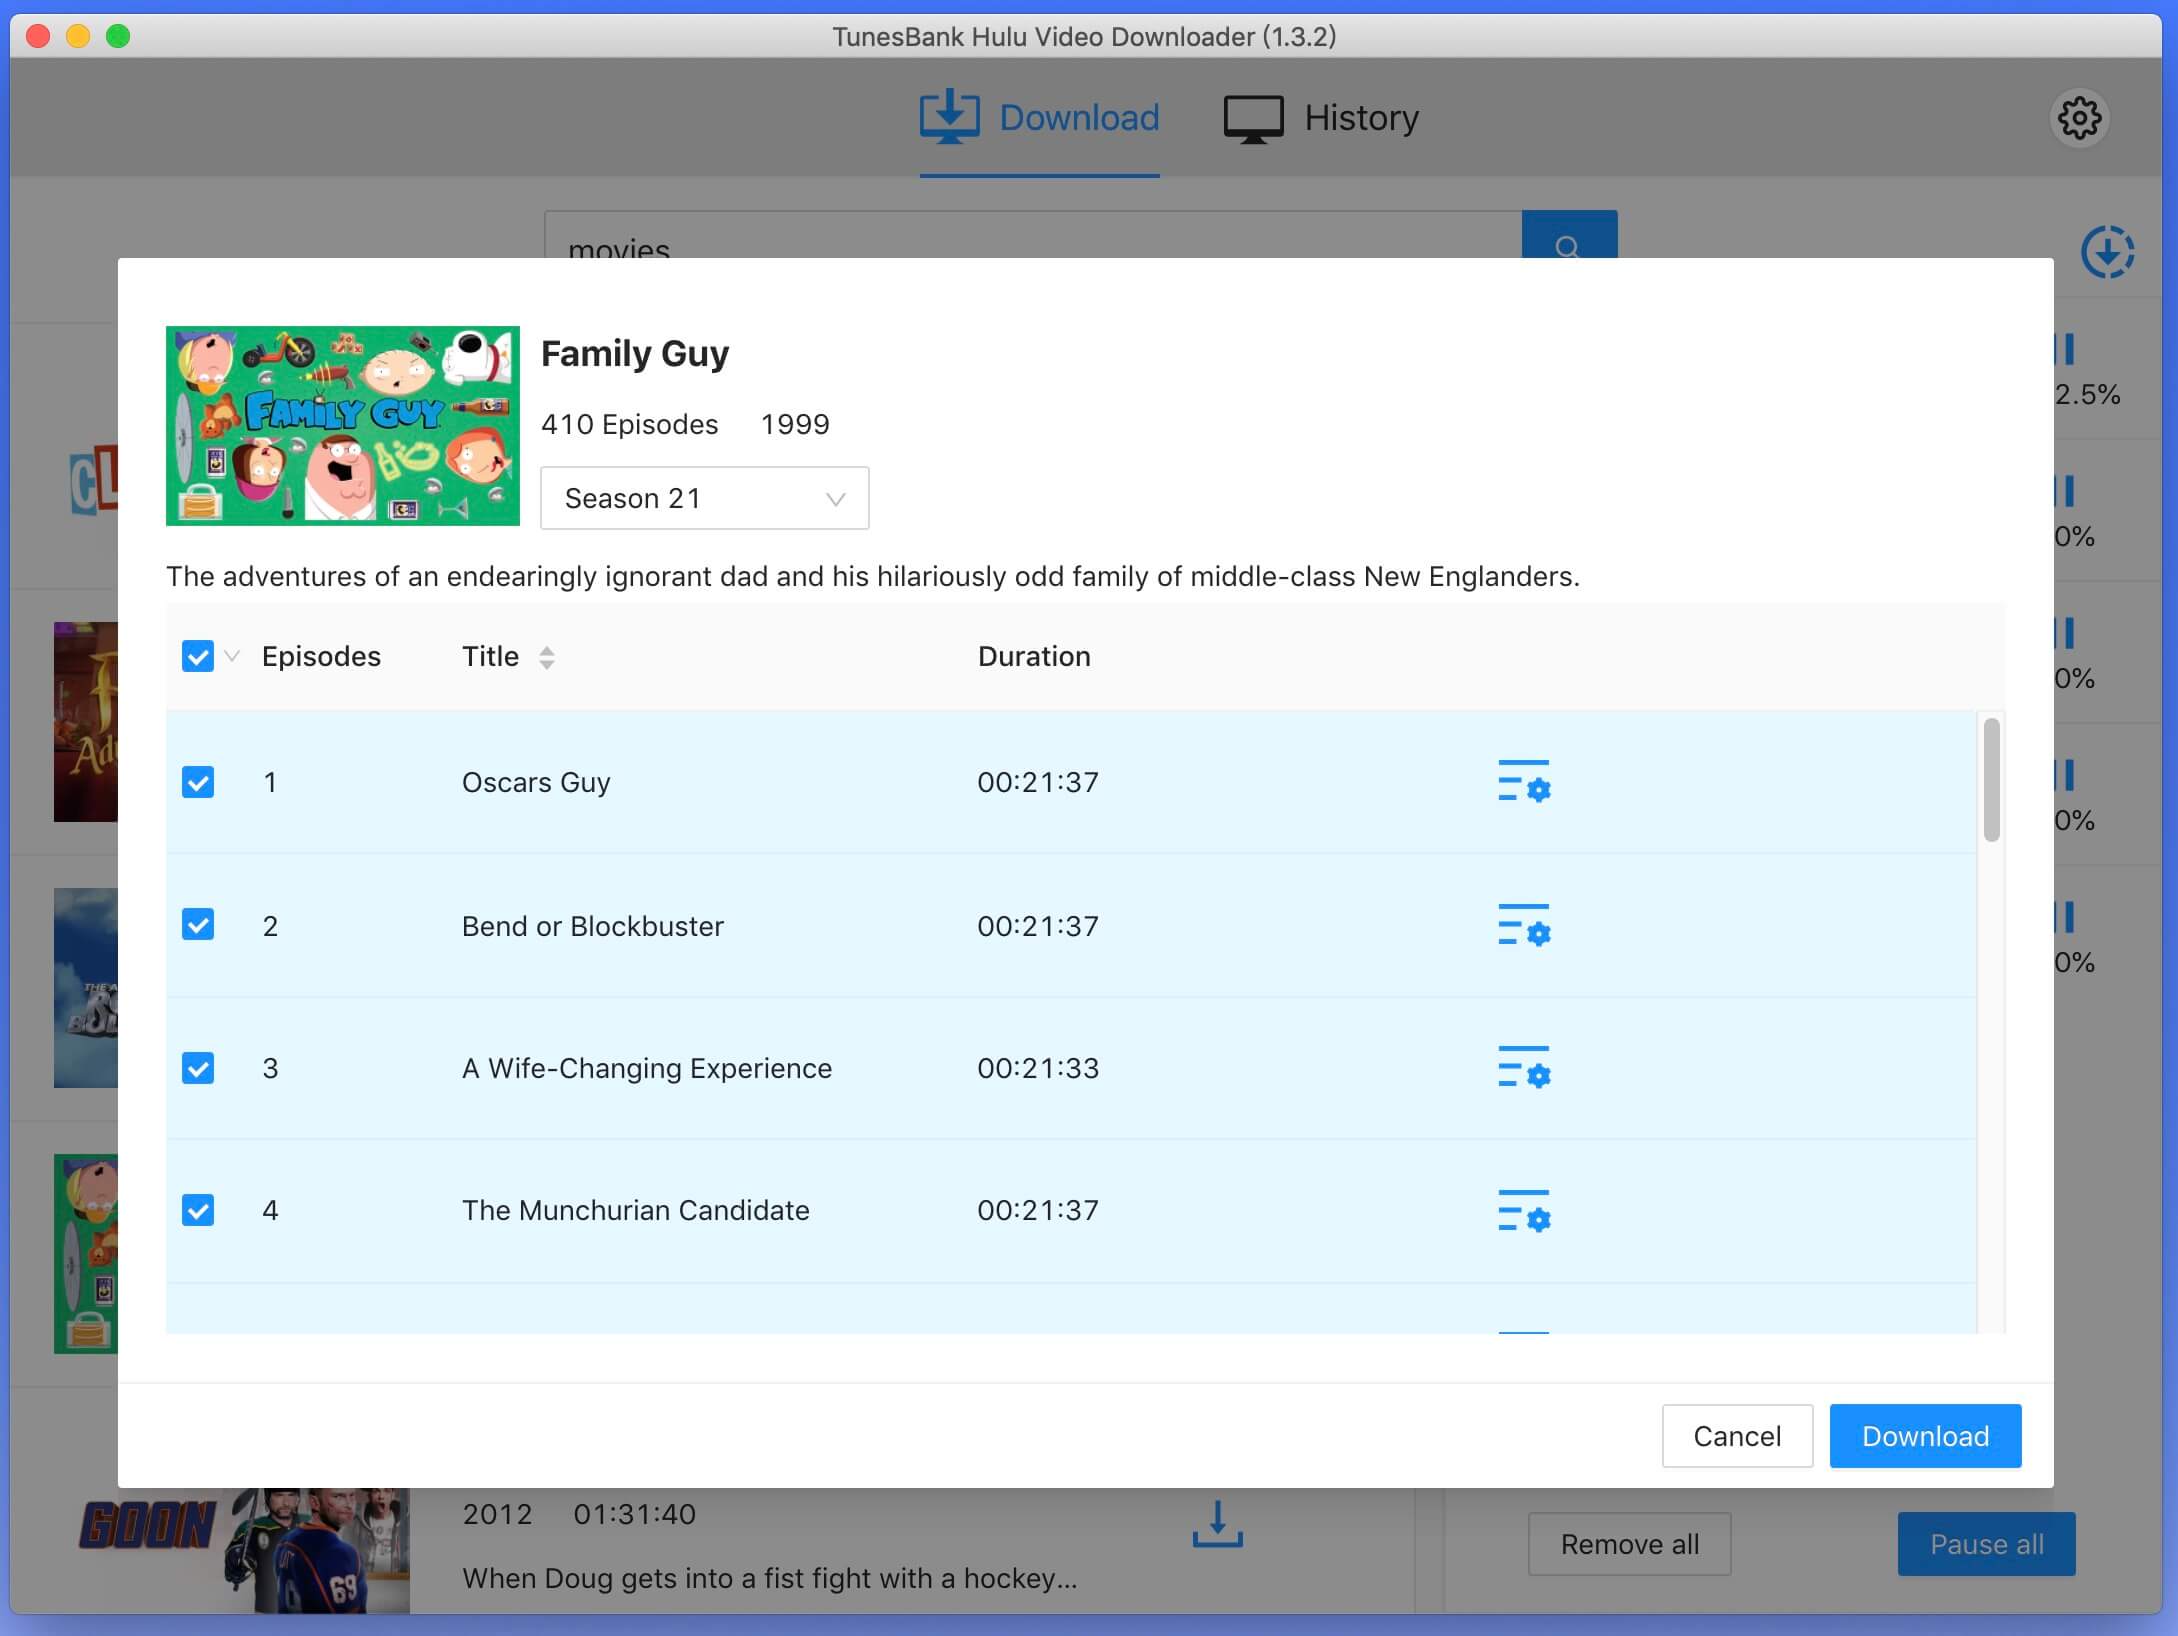
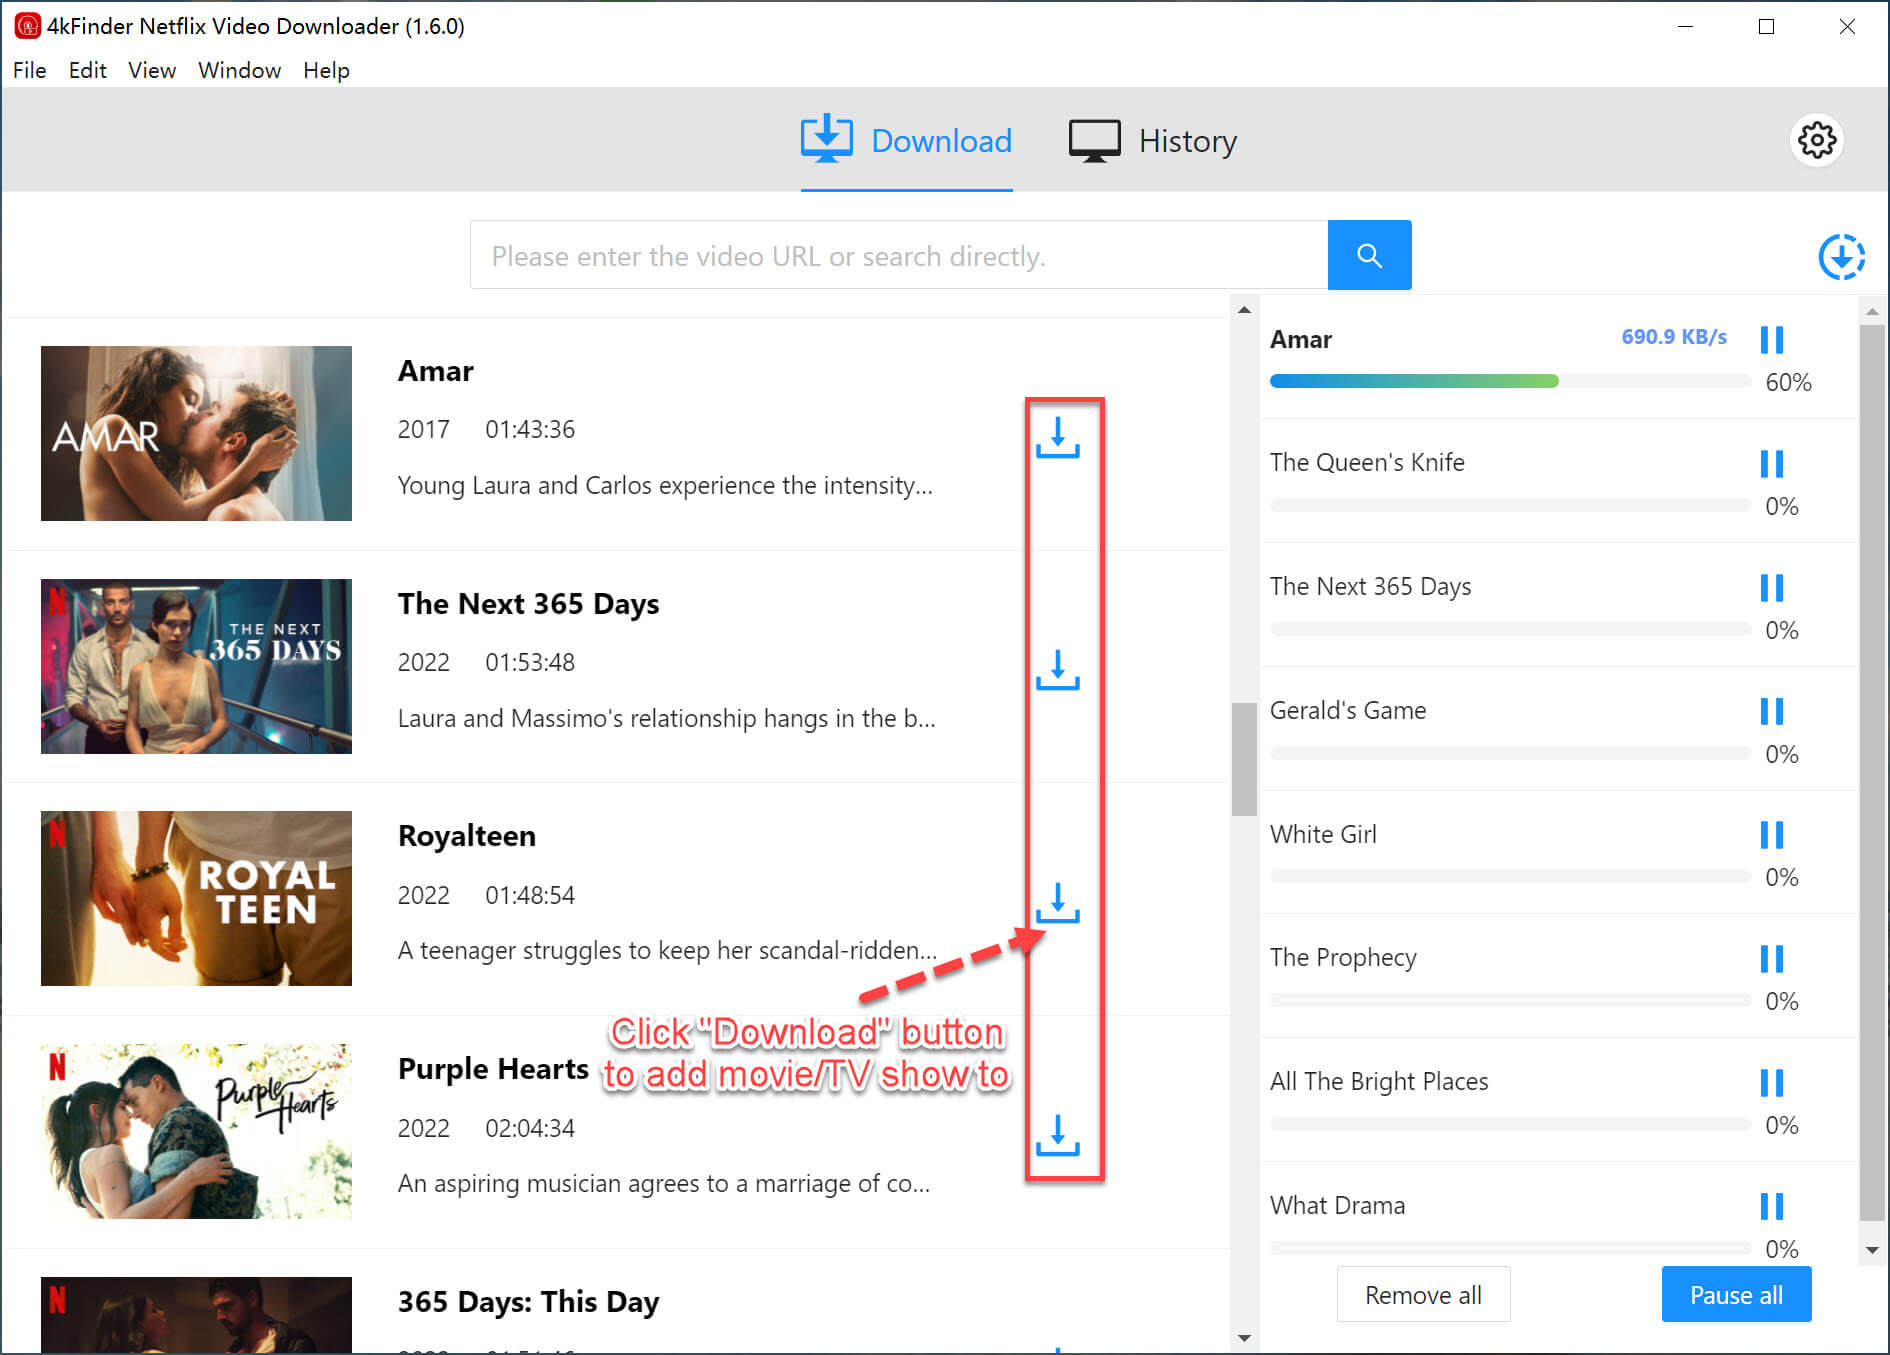
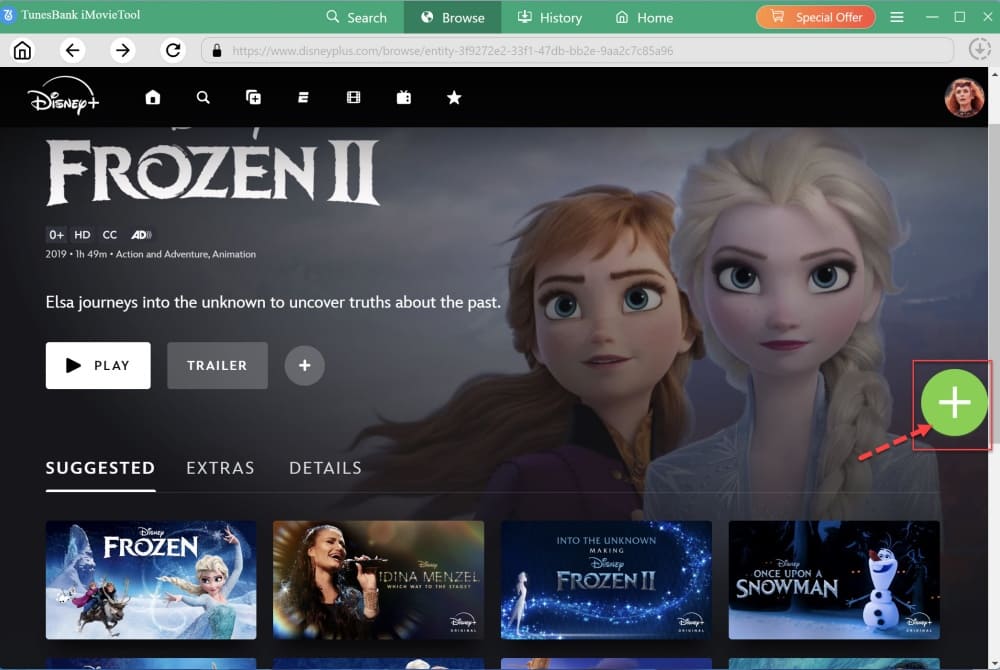
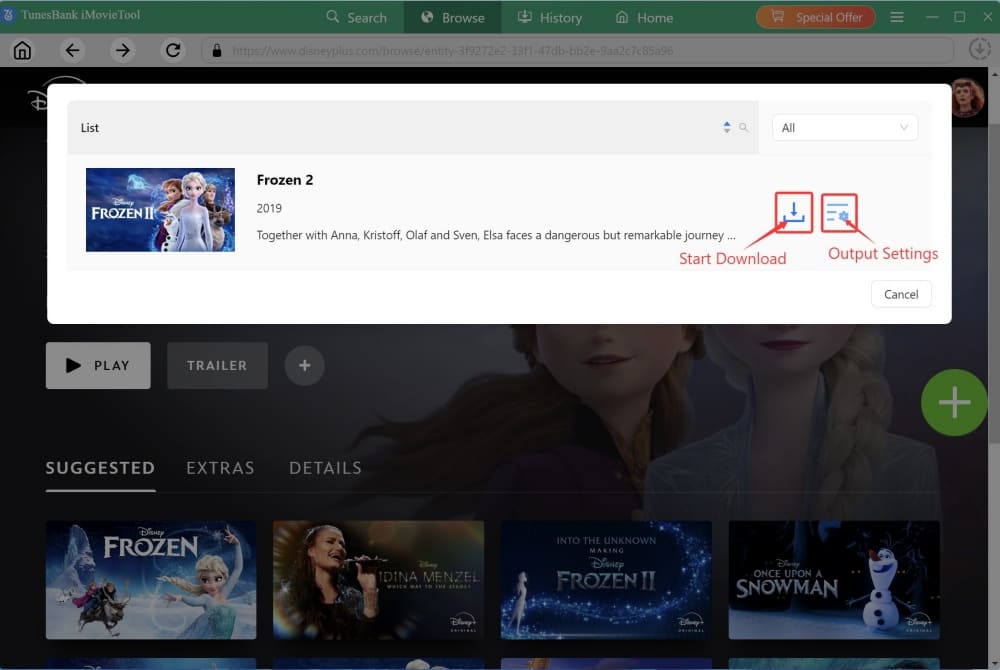
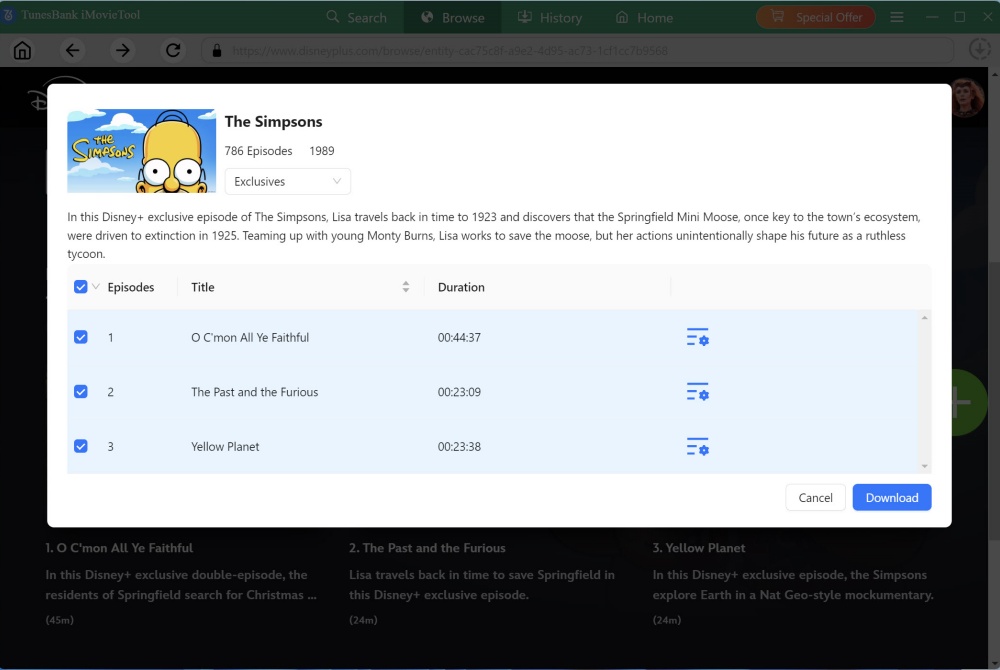
Step 4. Add Disney+ Video
Browse online until you find the target movie or show. Then open the video detail page, a green “+” icon will appear in the right side. Click it.

add video

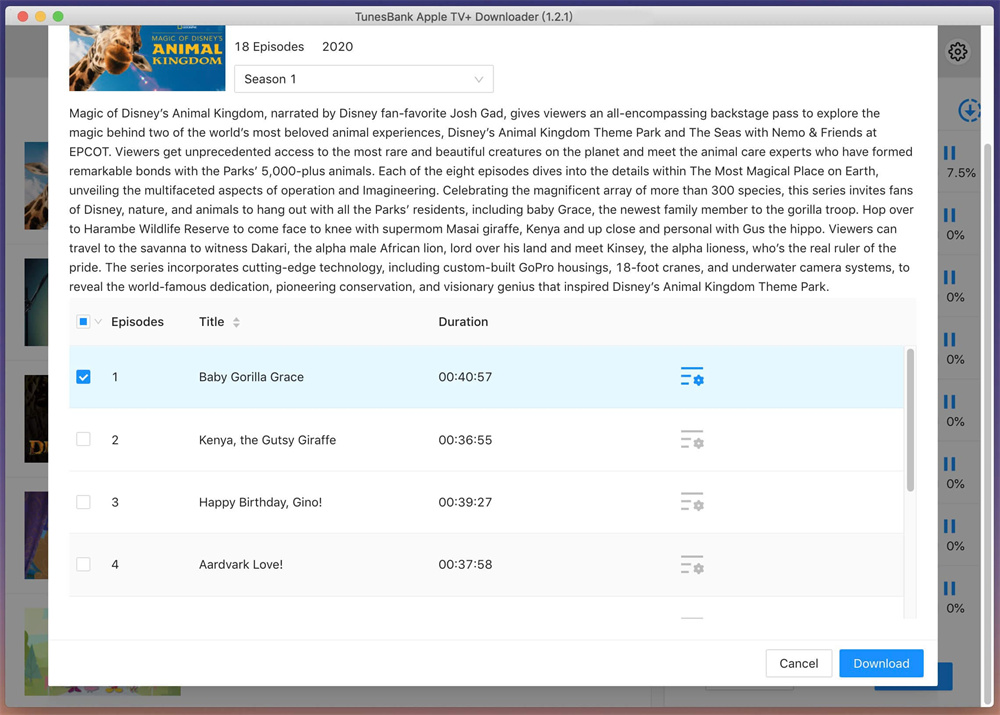
Step 5. (Optional) Set Single Video Output Settings
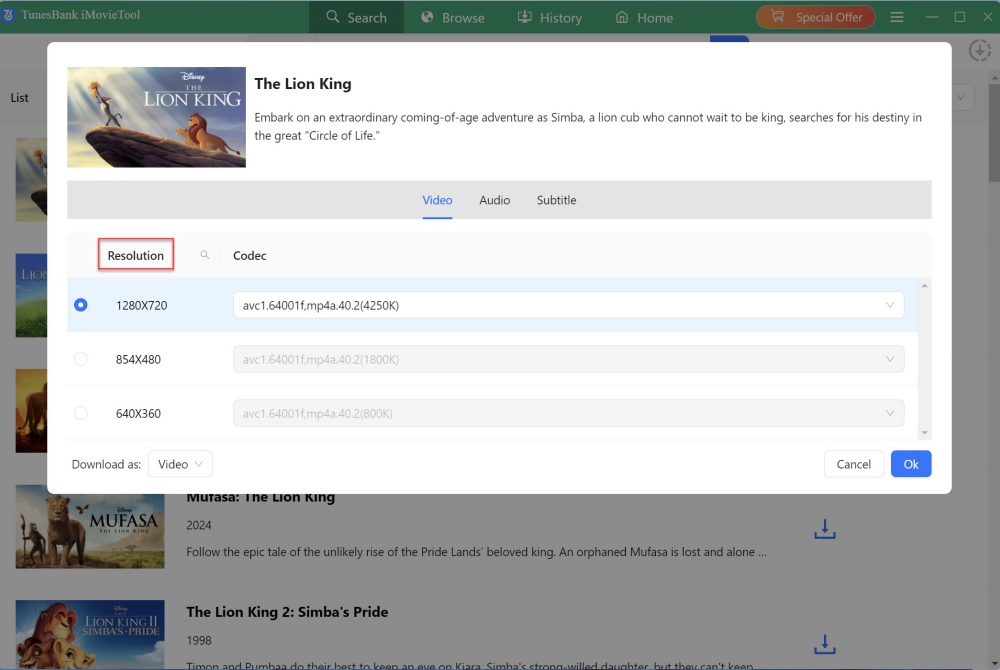
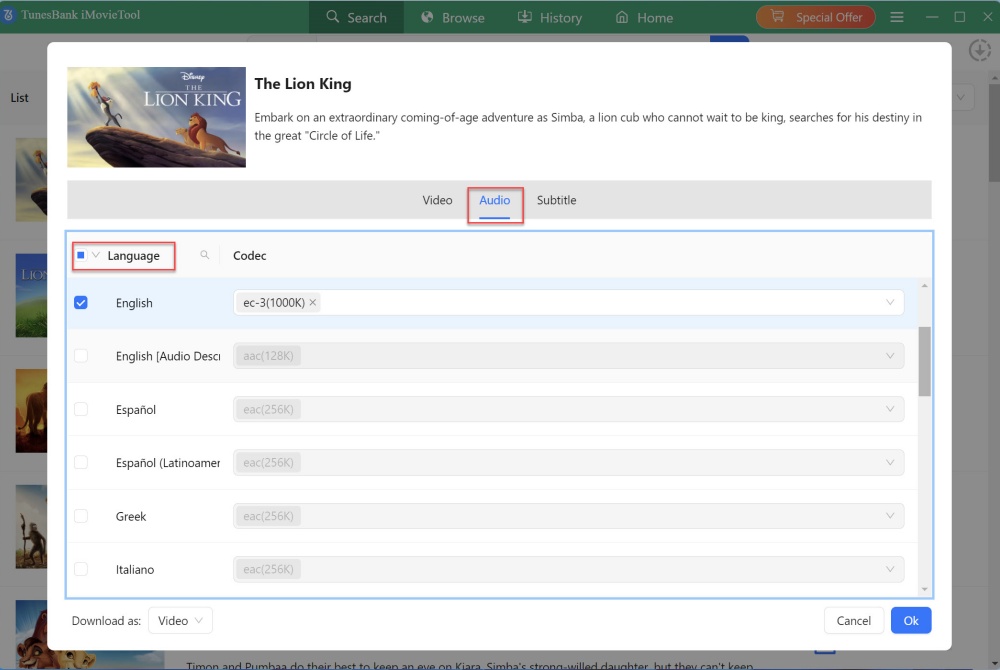
A pop-up window will pop up, click the “Gear” icon, this lets you adjust single video settings (resolution, audio, subtitles). Confirm your choices.

set video parameters

For example, tap “Video” tab, choose the highest video resolution to download Disney+ video.

set video resolution

Or, switch to “Audio” tab, here you can choose English or other audio languages to output the video.

set audio language

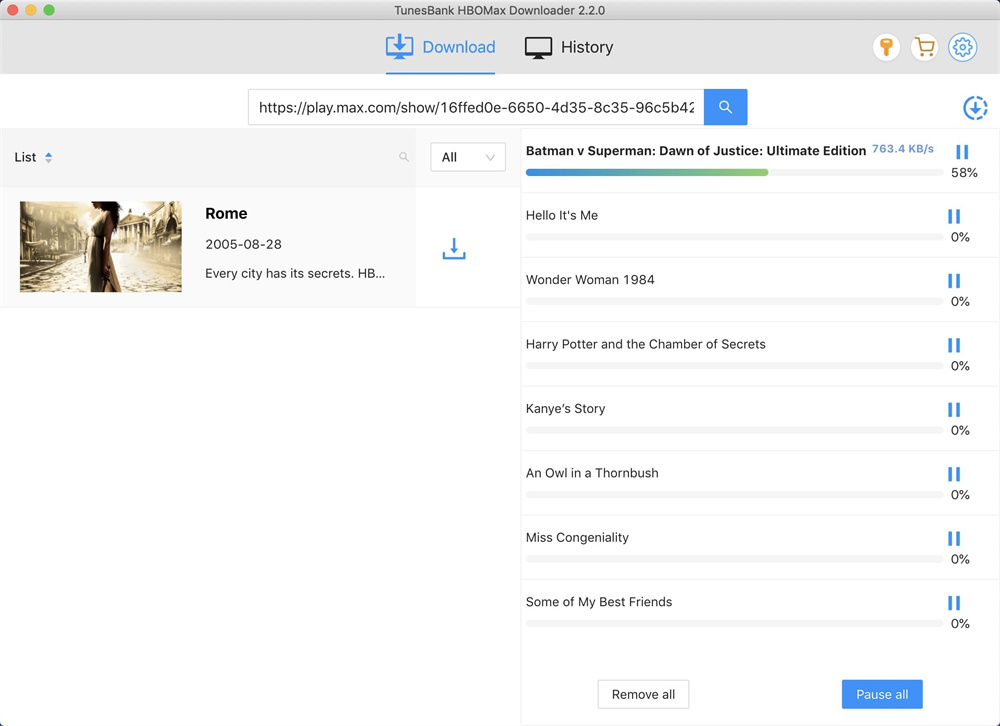
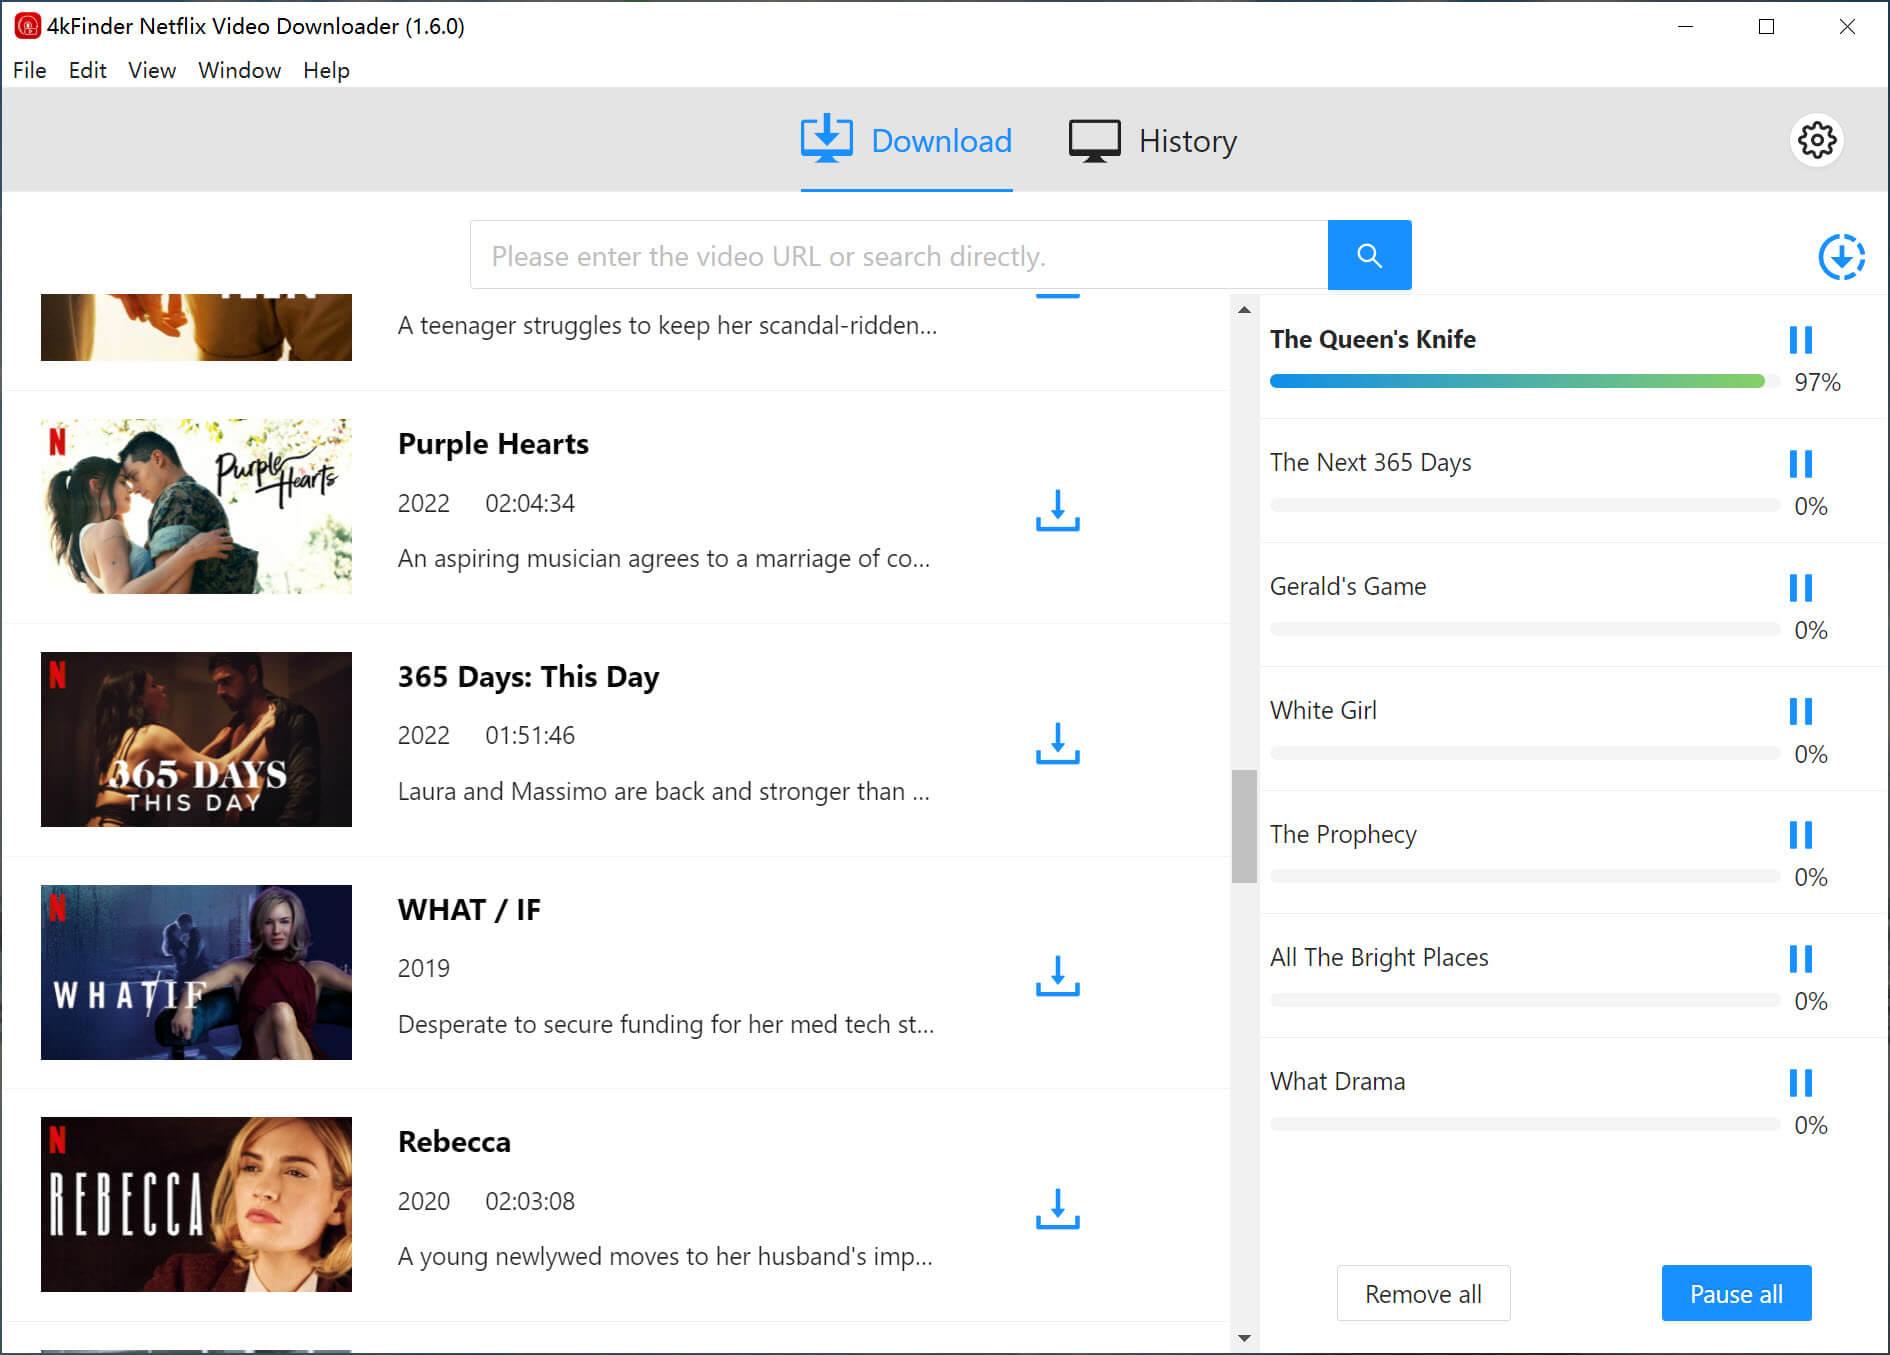
Step 6. Start to Download Disney+ Video to MP4 on PC
Then commence the download process by selecting the “Download” icon. During the process, you can pause, resume, or batch add more movies or shows.

download disney plus video

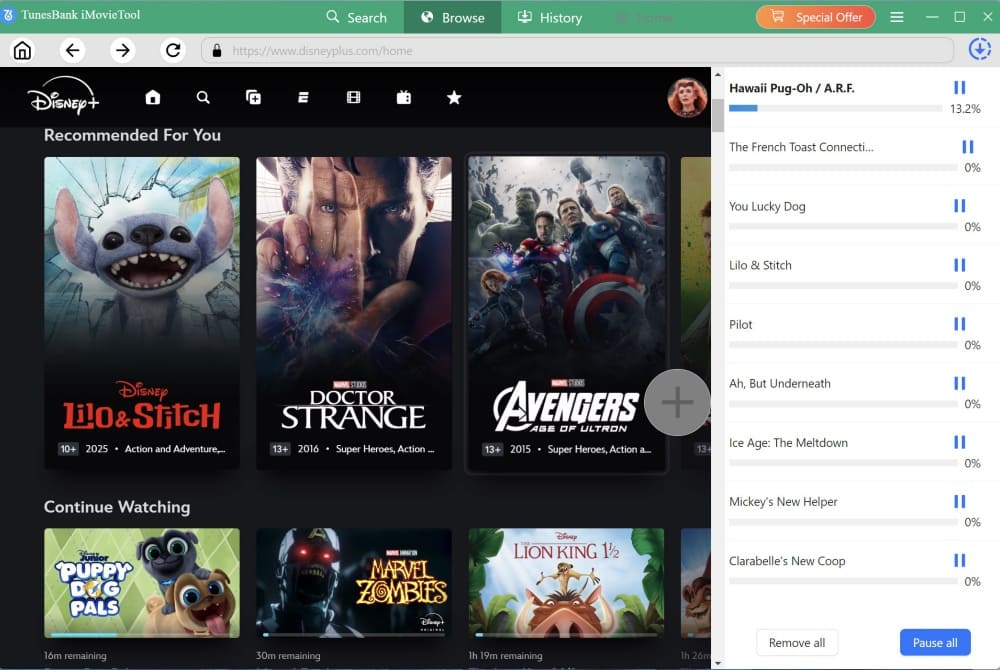
When dealing with TV shows, the program will showcase a detailed roster of all seasons and episodes. You can choose specific episodes as per your liking or opt for a bulk download of the entire series. The hit on “Download” button.

download disney plus series

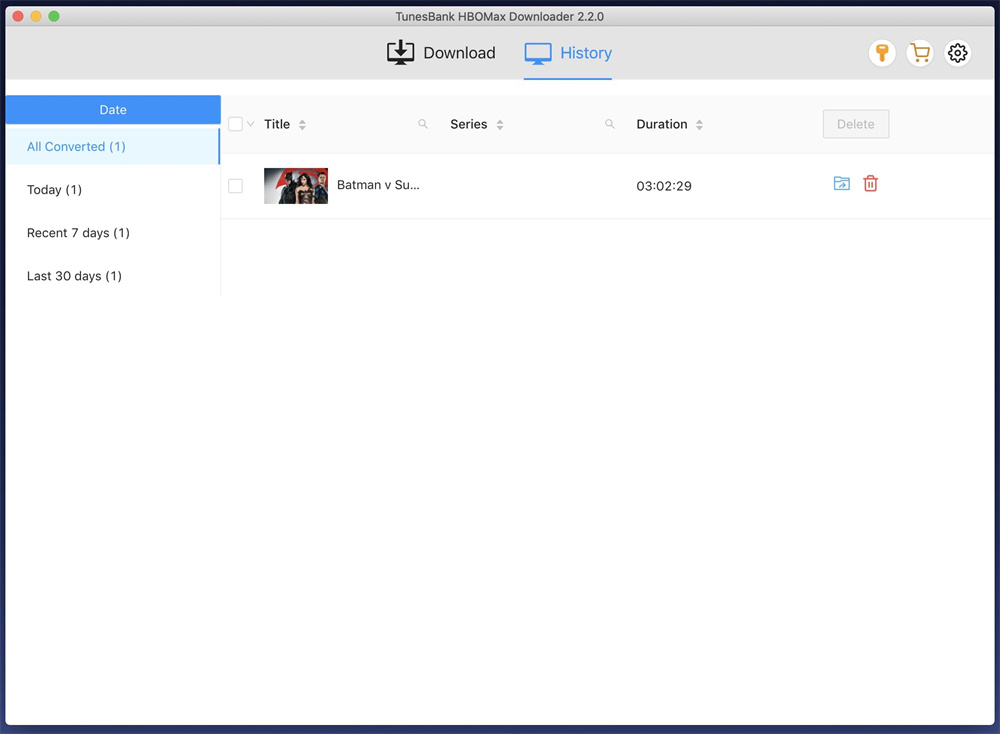
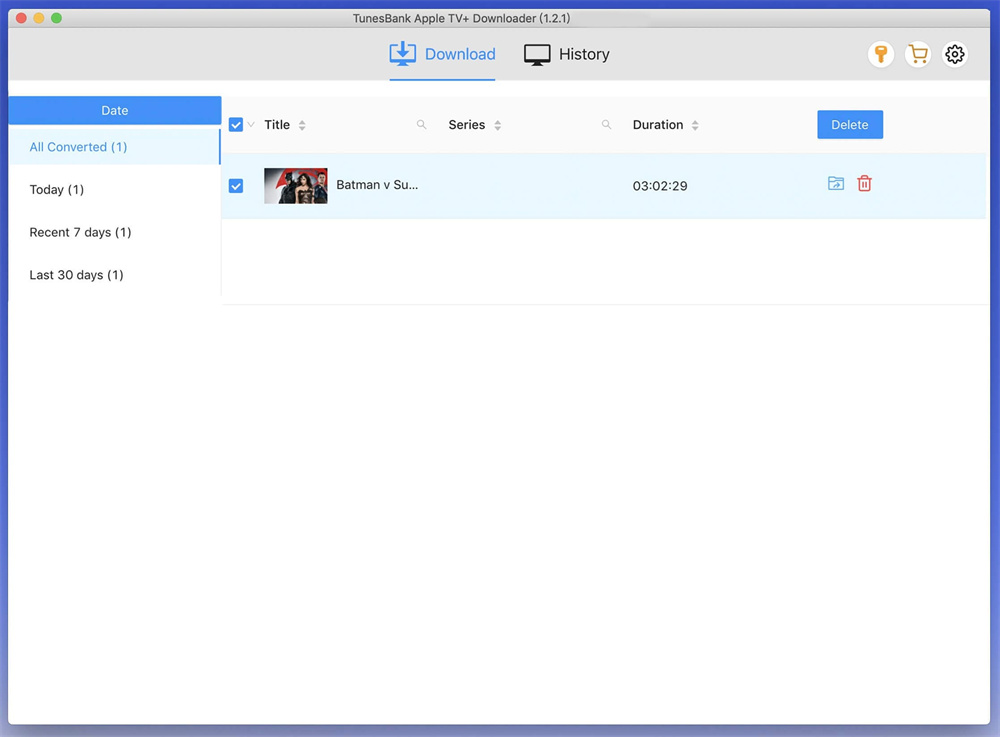
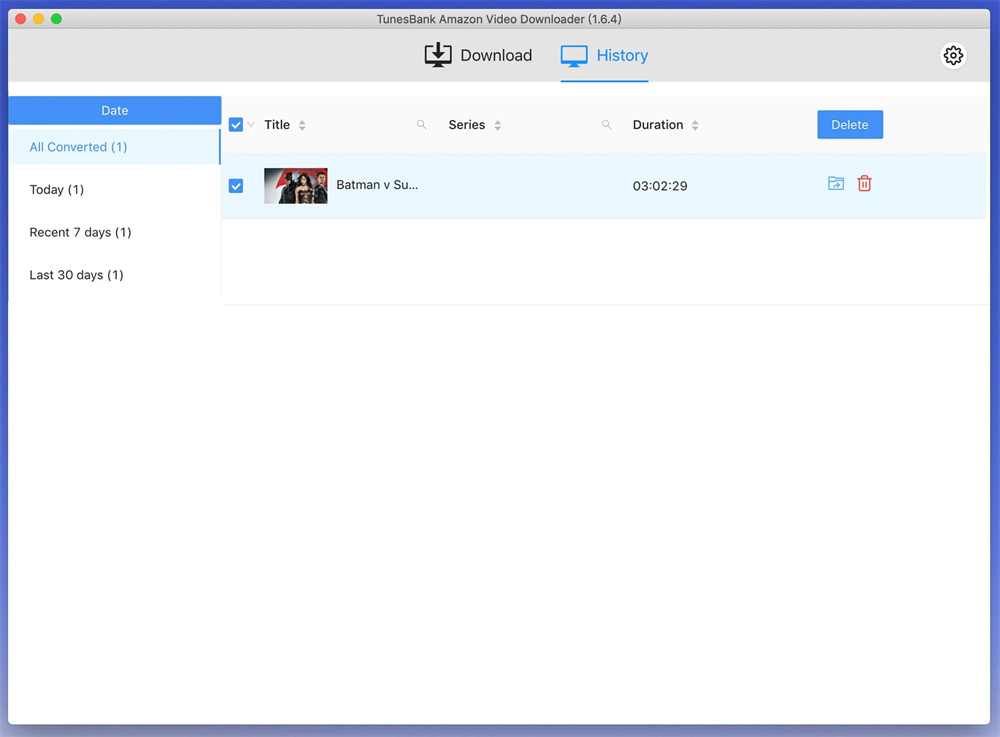
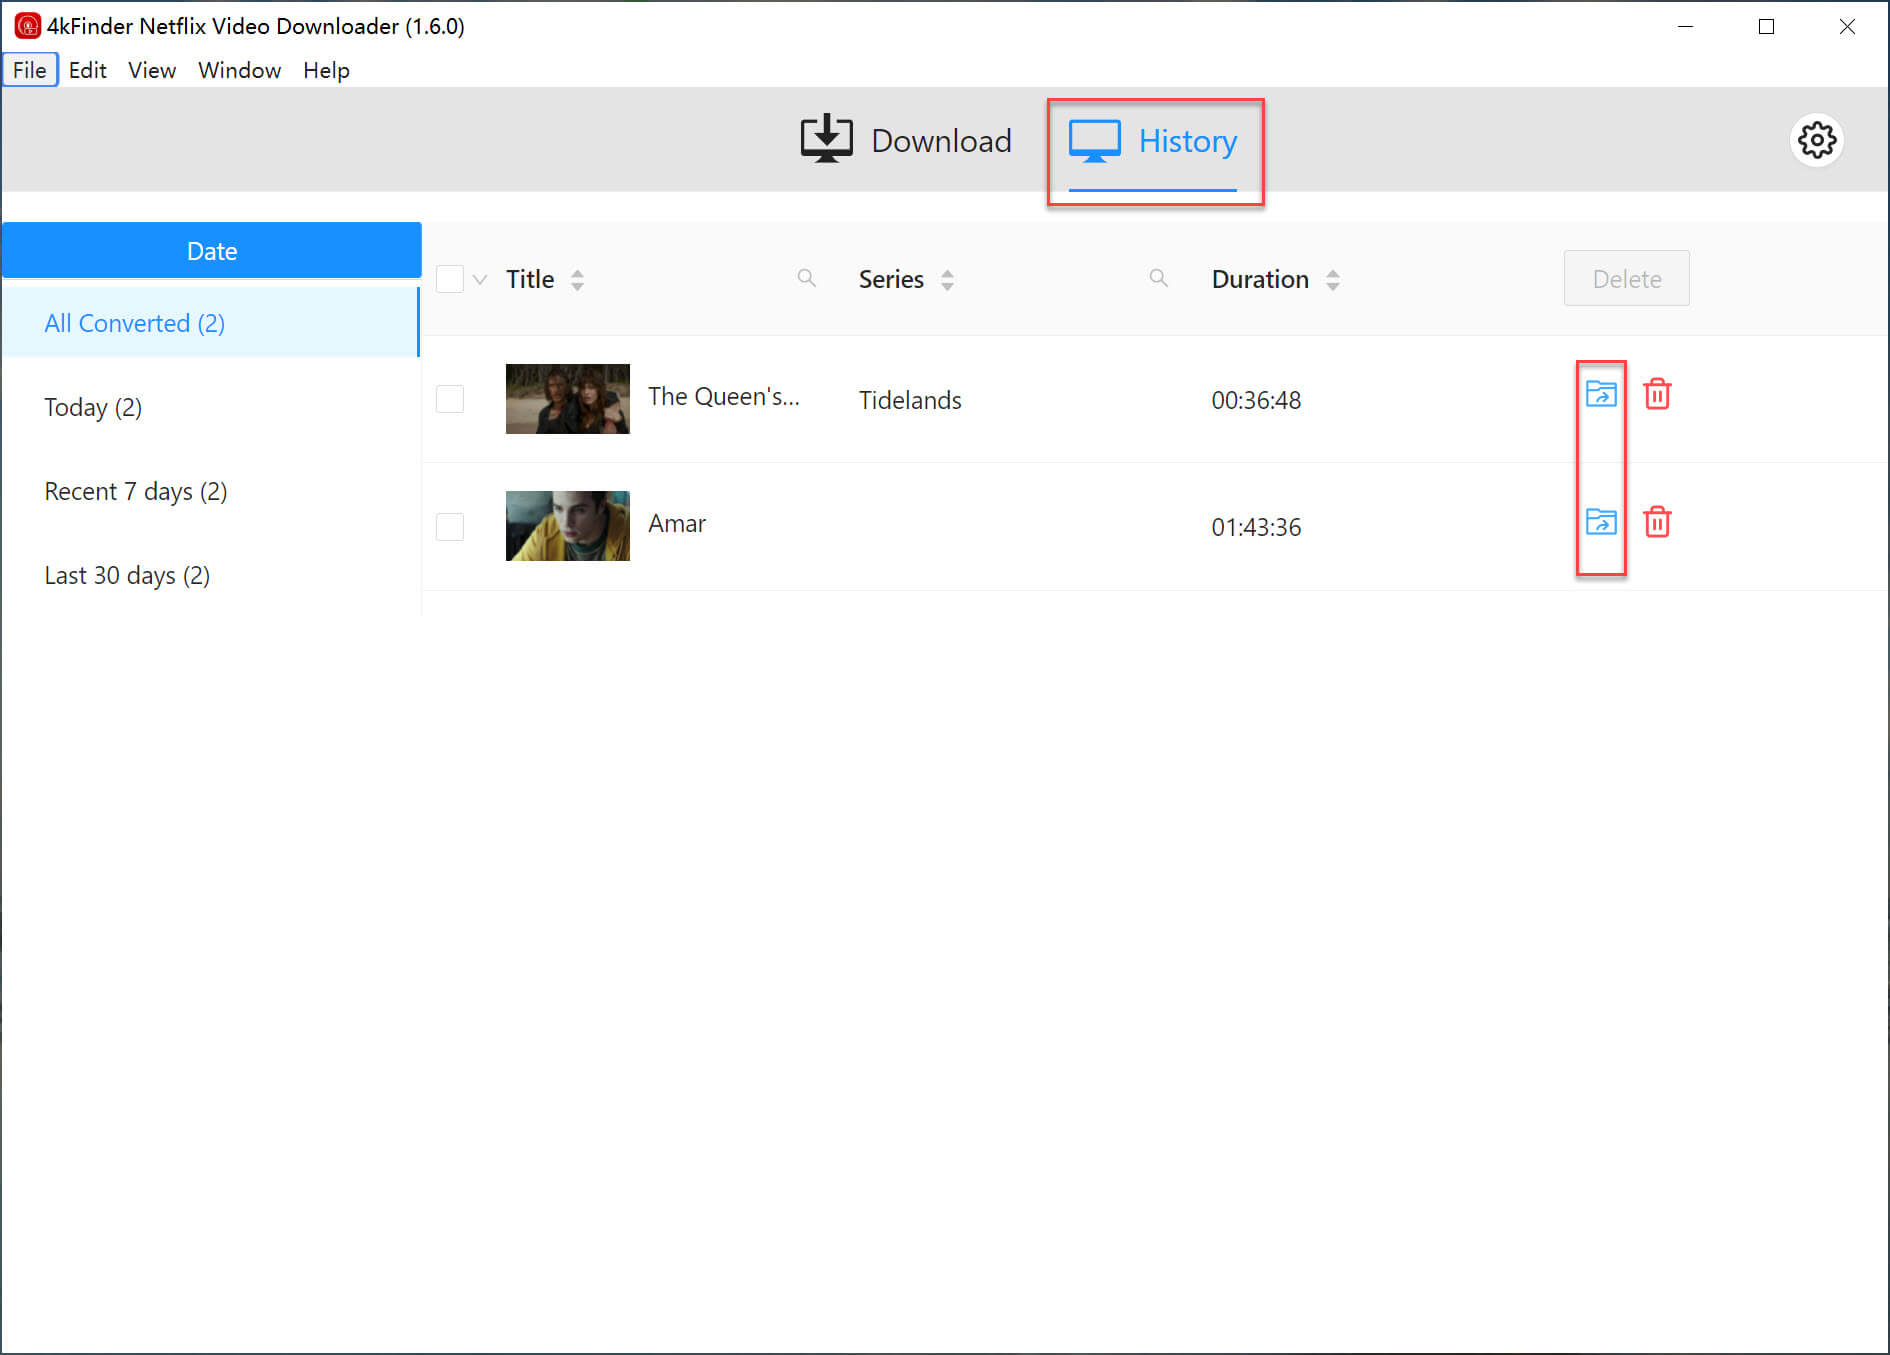
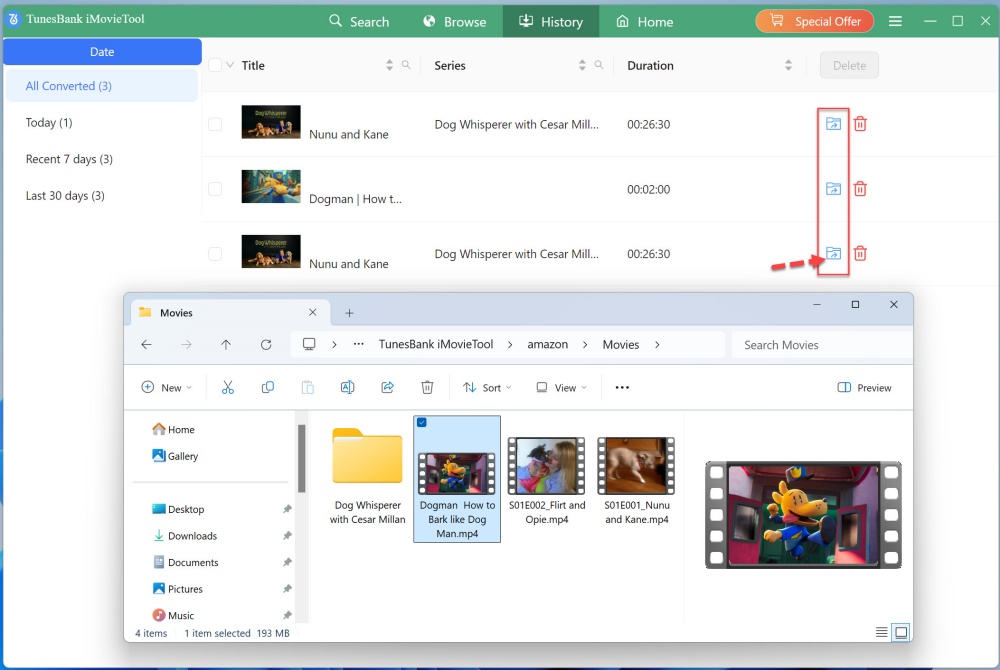
Step 5. View the Downloaded Disney+ Videos
Once the download process is finished, you can navigate to the “History” section to review the Disney+ movies that have been successfully downloaded in either MP4 or MKV format. To access the output folder, simply click on the “Blue Folder” icon located next to the title.

disney plus video history

Pros & Cons of TunesBank Disney+ Downloader

Pros:

  • Downloading of all Disney Plus content without limitations.
  • Support download videos in MP4 and MKV formats.
  • Retains high-definition quality at 720P and preserves the original audio effects.
  • Offers multiple language options for saving soundtracks and subtitles.
  • Efficient batch downloads.
  • Comprehensive preservation of ID3 information along with the downloaded videos.

Cons:

  • Available only for Windows and Mac systems.
  • The free version restricts downloads to the first 6 minutes of each Disney Plus video.

Price of TunesBank Disney+ Downloader

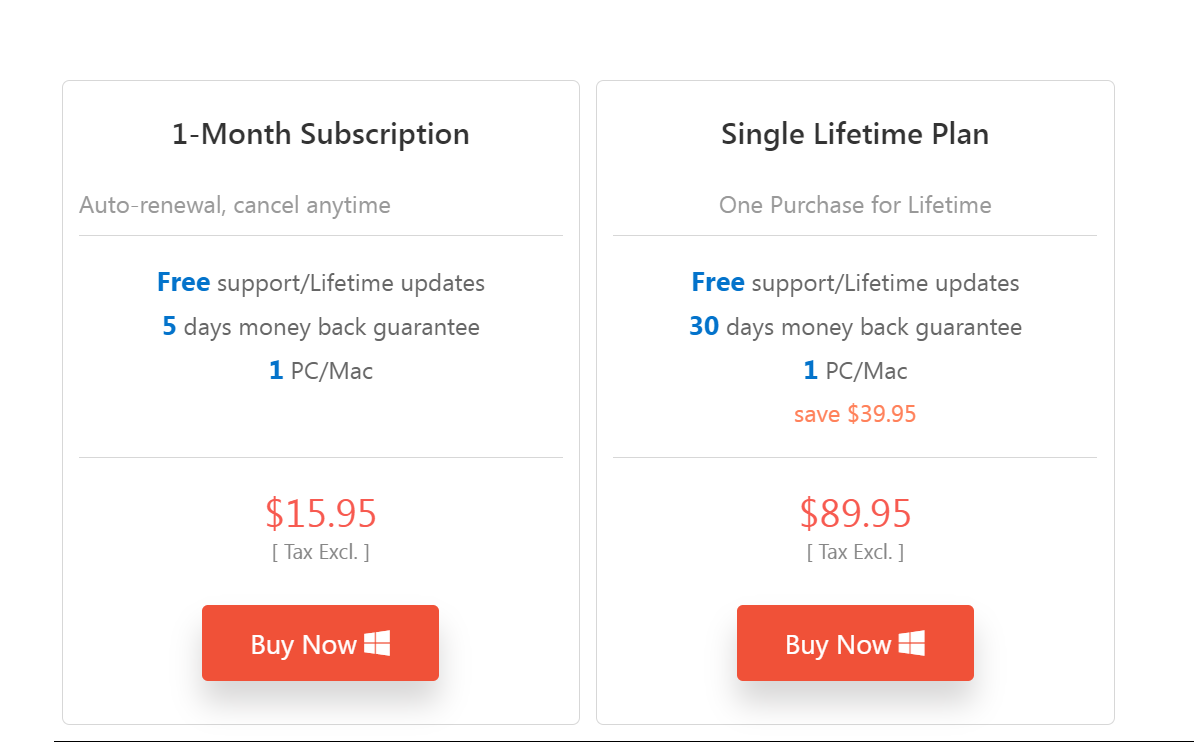
TunesBank Disney+ Downloader lets you download Disney Plus without any restrictions. It has a free version that allows you to try all its features. But the free version only lets you download the first six minutes of each video. To get the full videos, you need to buy a paid license.

Monthly Plan: US$29.95 per month (with a 15-day Money-Back Guarantee)

Yearly Plan: US$59.95 per month (with a 15-day Money-Back Guarantee)

Single Lifetime Plan: US$89.95 for a lifetime (with a 30-day Money-Back Guarantee)

price

Conclusion

In conclusion, with its high-quality outputs, reliable performance, efficient operation, and diverse output features including multilingual options, TunesBank Disney+ Downloader provides a simple and user-friendly solution for downloading Disney Plus movies and shows to MP4/MKV. Considering these factors, it is a sensible choice if you want to overcome the downloading limitations imposed by the official platform and enjoy a more seamless Disney Plus video playback experience offline. Begin your exciting Disney journey by using TunesBank Disney+ Downloader today!

Download Disney Plus Movies & Shows

Apple TV Plus Downloader: Your Best Tool to Get Original Shows and Movies Offline

Summary
Apple TV Plus is a popular streaming video platform to stream original movies and shows. Explore this review to get the best Apple TV Plus Video downloader for Windows & Mac. You can use it to download your favorite shows and movies for backup and flexible playback.

Apple TV+ is a famous streaming video service, created by Apple Inc. It offers a wide selection of Apple Originals, movies, shows for its subscribers. Whether it’s your favorite movie or TV series, sports, compelling dramas, or groundbreaking documentaries, you can enjoy them all on the Apple TV app using your Apple devices, streaming devices, smart TVs, or gaming consoles. If your device doesn’t support the Apple TV app, you can access video content on official Apple TV+ website. Additionally, you have the option to download movies and shows on Apple TV+ to watch offline.

However, the download feature is only restricted to the app Apple TV on iOS and Mac. And it also set some limitations, such as device limit, playback limit, expiration date, etc. That’s where TunesBank Apple TV+ Downloader comes into play, a smart Apple TV Plus video downloader for Windows or Mac that will help you download and save Apple Originals locally with just a few clicks. Here is a comprehensive review of TunesBank Apple TV+ Downloader.

Overview of TunesBank Apple TV+ Downloader

Because of such limitations set by Apple TV Plus, it would more convenient and flexible if we use a desktop tool to get Apple TV+ movies and shows offline. TunesBank Apple TV+ Downloader is your best tool to helps get movies and shows offline without limitations. It enables you to download Apple TV+ movies and shows to MP4/MKV with up to 720p high quality. What’s more, you can also modify the video quality, video codec (H264 or H265), select audio track and subtitle language, etc. With it, you can enjoy your favorite Apple TV content on any device or player without compromising visual fidelity.

This tool is well acknowledged by its stable performances, fast download speed, high-quality output and excellent after-sales service.

Top Features of TunesBank Apple TV+ Downloader

Walk through these outstanding features to learn about how the tool helps you get original movies and shows from Apple TV Plus easily.

Download Apple TV+ Videos in MP4/MKV
As the top-ranking Apple TV Plus video downloder, TunesBank Apple TV+ Downloader assists you to download and save your Apple TV+ videos in the two widely used video formats – MP4 and MKV, which makes it effortless to watch Apple TV+ videos offline across devices without limitations.

High-Speed Download & Batch Download
TunesBank Apple TV+ Downloader features a super-fast download speed to improve productivity. Besides that, you can add multiple movies and entire TV episode of Apple TV Plus to, the downloader will quickly download them from Apple TV Plus in batches, which saves your efforts and time.

Remain Multi-language Audio Tracks and Subtitles
The software will help you preserve the original audio of Apple TV+ videos, including audio description and 5.1 surround sound. In addition, it also offers audio tracks and subtitles in different languages to fit your needs. You can choose your preferred language for an Apple TV+ movie or show.

Built-in Browser, Intelligent Searching Function
With the embedded Apple TV+ browser, simply sign in your Apple TV account on the downloader, then you can search any video content by entering keyword/name or pasting video links. You can download Apple TV+ to MP4 with ease and enjoy them offline.

Save Apple TV+ Videos in HD Quality
TunesBank enables you to download and save movies and shows from Apple TV Plus to your computer in up to HD 720p resolution. It provides three video quality options ranging from low to high for you to choose from. To download HD Apple TV+ videos, please choose high option.

How to Download Apple TV+ Movies & Shows to MP4 with TunesBank?

Step 1. Launch TunesBank Apple TV+ Downloader
Click the “Download” button below, get the tool downloaded on your computer. Install and launch it. You need to log into your Apple ID to access its library.

sign in apple tv+ account

Step 2. Add Apple TV+ Movies or TV Shows
Enter the video keyword or paste the video URL to the search field. Then it will display the result in the screen.

search apple tv+ video

Step 3. Customize Output Settings
Click the “Gear” icon at the upper right corner. You can change the video format, video quality, video codec, audio language, subtitle language, output folder, download speed and interface language and more based on your needs.

customize output settings

Step 4. Start Downloading Apple TV+ Videos to PC/Mac
Hit the “Download” icon next to the movie, then the program will start downloading movie from Apple TV+ to your Mac or PC as local MP4 file.

start downloading Apple TV+ movie

If you are downloading TV shows, when clicking the “Download” icon, it will pop-up a new window. Select the seasons and episodes you need. Click the “Gear” icon for advanced settings. Then click on “Download” button.

start downloading Apple TV+ shows

Step 5. Watch Apple TV+ Videos Offline
When finished, tap “History” tab to check the downloaded Apple TV+ videos. Click the blue folder icon to open the output folder, and you can watch the Apple TV+ videos offline on computer using other players!

find downloaded Apple TV videos

System Requirements

TunesBank Apple TV+ Downloader supports both Windows and Mac computer. You can install the software on Windows 11/10/8.1/8/7 (32/64 bit), and Mac OS X 10.11 or above.

d_win d_mac

Price & Plans

When you first download TunesBank Apple TV+ Downloader, you can get its free trial. Note that the free trial only allows to download the first six minutes of each video. To unlock all features and download unlimited videos from Apple TV Plus, you can upgrade a subscription account.

  • US$15.95 for one month, on 1 PC/Mac
  • US$89.95 for single lifetime, on 1 PC/Mac

Conclusion

Even though Apple TV+ has brought limitations and inconvenience for users to enjoy Apple TV+ across devices, the powerful TunesBank Apple TV+ Downloader introduced in this post can bring help to break the limitations and get Apple Originals offline easily. You can use it to download movies and shows from Apple TV+ to your Mac/PC in HD MP4/MKV format for backup and flexible offline playback! Free download this tool and have a try!

Apple TV Plus Downloader

How to Download Amazon Prime Videos to MP4

Summary
Wondering how to download Amazon Prime video as MP4 file? In this post, we will introduce a powerful Amazon to MP4 downloader. You can use it to download Amazon Prime movies and TV shows in MP4 format with full HD quality.

“I’m looking for an Amazon video downloader or recorder to extract a video from Amazon Prime. Can I download videos from Amazon Prime to my computer? Is it possible to download Amazon video in MP4 format?

Amazon Prime Video is an excellent on-demand video streaming services, Amazon’s answer to popular video streaming platforms like Netflix and Hulu. It offers a wide range of movies, TV shows, sports, Originals, Channels, as well as rentals and purchases. You can access the extensive Prime video titles with a standalone Amazon Video subscription ($8.99 a month) and an Amazon Prime subscription ($14.99 a month).

It is increasingly commonplace to download or convert Amazon Prime to MP4 because of the download limits on Amazon Prime Video (such as device and playback limits, video viewing duration, etc.). To help you out, this article will guide you how to download Amazon Prime videos to MP4, so that you can keep the Amazon Prime downloads forever or transfer them to all kinds of devices you want.

Why Need to Download Amazon Prime Video to MP4?

Like other video streaming services, there are several limitations to be aware of when it comes to download movies and shows from Amazon Prime Video. Even though you pay for the Amazon Video subscription or Amazon Prime subscription, you can only watch the downloaded titles within Amazon Prime Video app. Generally, when you travel abroad, you may find your downloaded Prime titles become inaccessible there. Moreover, the downloaded titles will be removed after 30 days and no more than 48 hours once you start watching it. You can download 15-25 movies or shows on Amazon Prime.

Wanna keep Amazon video downloads forever on your local drive? Do you expect to watch Prime Video on all your favorite devices? Downloading Amazon Prime Video to MP4 is the best solution for backup and flexible playback. You can turn to a third-party Amazon to MP4 downloader – TunesBank Amazon Video Downloader. Below we will show you an easy workaround to get Amazon Prime movies downloaded as MP4 with this tool.

Best Amazon Prime to MP4 Downloader

TunesBank Amazon Video Downloader is the best and most reliable Amazon to MP4 Downloader used to get any content from Prime Video to MP4 in up to full HD 1080p quality. Specifically, it supports to download Prime Video movies, shows, rentals and purchases to MP4 or MKV format with audio tracks and subtitles kept. With its built-in browser, you can search and add any Amazon Prime content by entering keyword or URLs. After that, you can save Amazon Prime videos forever on your local drive, you can binge-watch your favorite Prime videos on any device or player without restrictions.

d_win d_mac

Outstanding Features of TunesBank Amazon Video Downloader:

Popular Formats: The widely used video formats, including MP4, MKV are supported to download Amazon videos so that the Amazon video files can be playable on all kinds of devices you want.

HD Quality Output: When downloading Prime video to MP4 on your computer, the software provideos resolution of up to full HD 1080p. And 720p, 480p, 360p are also selectable.

Built-in Browser Embedded: With a built-in Amazon Prime video player, TunsBank Amazon Video Downloader is connected with the Amazon Prime video library. Users can directly enter keywords or paste URLs to the search field.

Multiple Languages: TunesBank has the ability to detect the full audio tracks and subtitles, and provides different options for audio tracks and languages.

Fast Download Speed: Enjoy a high efficient download speed, making it quick and convenient to download multiple Prime movies and episodes at once.

Save Video Metadata: It retains original video metadata information for better organization, including cover, video title, video codec (H264, H265), dimension, season number, duration, etc.

Guide: How to Download Amazon Prime Video in MP4 Format?

Compared with other Amazon Prime video downloaders in the industry, TunesBank Amazon Video Downlaoder it the safest and most efficient tool to download Amazon video in MP4 format. Check the detailed guide below!

Step 1. Launch TunesBank Amazon Video Downloader
Once TunesBank Amazon Video Downloader is installed on your desktop (Windows PC or Mac), log into your Amazon account and password to access its built-in browser.

log into amazon prime

Step 2. Search and Add Amazon Videos
You can copy the URL of movie or show from Amazon Prime Video app or website, and paste the URL into the search box of the downloader.

paste amazon prime viedo url

Or enter the name/keyword of Prime movie or show in the search field.

search amazon prime video name

Step 3. Adjust Amazon Prime Video Settings
Click the gear “Settings” icon at the upper right corner, where you could select the MP4 format, adjust video quality, video codec, language and more freely.

select mp4 format for amazon prime

Step 4. Start Downloading Amazon Prime Videos to MP4
Next, go back to the main interface, and click the the “Download” icon next to the title, and the software will begin to download movies and TV show from Amazon Prime as local MP4 files.

start downloading prime video to mp4

Step 5. Find Downloaded Prime Videos on PC
When the download is finished, you can go to the “History” section to find the downloaded Prime video files. Open them using other players!

get downloaded prime videos

Download Amazon Videos to MP4

Best Netflix Video Downloaders

Summary
In this review, we present a selection of the best Netflix video downloaders. We will compare their pros and cons, enabling assist you in selecting the most suitable option for your requirements, allowing you to download Netflix videos on both Windows and Mac computers for unrestricted playback.

The ability to download Netflix videos for offline viewing has been available since late 2016. However, it is important to note that this feature is only accessible on certain devices, such as Android, iOS, Windows 10 devices, and Fire tablets. For individuals with a Windows 7, 8, or Mac computer or who want to watch Netflix offline on PS4 or similar devices, this feature may not be available.

Fortunately, there are a variety of Netflix downloaders available that can assist in downloading Netflix videos as local MP4 files. With the assistance of professional Netflix video downloader, you can download any movie or TV show from Netflix to your computer and play it on a variety of devices or share it with others. Although selecting the best option may seem overwhelming, we are here to help by providing a list of the best three Netflix video downloaders so that you can avoid the time-consuming task of testing each downloader yourself.

#1. 4kFinder NetFlix Video Downloader

4kFinder Netflix Video Downloader is a powerful software designed to help Netflix users download and convert Netflix videos to MP4/MKV format with up to 1080 HD quality. With its intuitive interface, users can easily download their favorite TV shows, movies, and documentaries from Netflix and save them for offline viewing on various devices, including TVs, smartphones, tablets, and game consoles. One of the standout features of 4kFinder Netflix Video Downloader is its ability to preserve the original video quality and audio tracks, including AC3 5.1 audio and subtitles in multiple languages. The software also supports batch downloading, allowing users to download multiple videos at once, which can save a lot of time.

Furthermore, 4kFinder Netflix Video Downloader is equipped with advanced technology that enables it to bypass the encryption and download restrictions imposed by Netflix. This means that users can download any video from Netflix, regardless of its availability for offline viewing.

d_win d_mac

How to Use 4kFinder to Download Netflix Video

Step 1. Run 4kFinder Netflix Video Downloader on Computer
After the installation of 4kFinder Netflix Video Downloader on your computer, the built-in Netflix web player will automatically open. To proceed, sign in to your Netflix account.

login netflix account

Step 2. Search Movies or TV shows
4kFinder Netflix Video Downloader provides two options for locating video content on Netflix. The first is a direct search within the software by entering the video’s name. Alternatively, you can copy and paste the video URL into the search box.

Option 1: Enter the name of any movie or TV show into the search box.

search netflix video

Option 2: Simply copy & paste the video URL that you want to download.

copy paste netflix url

Step 3. Choose Ouput Format
To adjust the output settings, click on the “Gear” icon located at the top right corner of the interface. From there, you can customize various options including the output format, quality, and other preferences.

choose output format

Step 4. Start to Download Netflix Movies and TV Shows
Once you have adjusted the settings, initiate the download process by clicking on the ‘Download’ button for your selected TV shows or movies. The 4kFinder Netflix Video Downloader will start downloading and converting the content into MP4 or MKV format.

start downloading nf video

While downloading your selected movies or TV shows, you can add more content to download simultaneously.

add netflix video download

Step 5. View Download History

After the download is finished, you can check the download history by going to the “History” tab.

view history

d_win d_mac

Pros

  • User-friendly and simple interface.
  • Download Netflix video in MP4/MKV format.
  • Search video by typing its title or copy the video’s link.
  • Support keeping audio tracks and subtitles.
  • Keep audio description, 5.1 audio.
  • Supports Batch Download & 6X Faster Speed.
  • Download Netflix video in HD video quality (up to 1080P).
  • Support Windows & Mac operation system.

Cons

  • No mobile app.
  • Trial version only download the first 6 minutes of each video.

#2. 4kFinder Video Downloader

4kFinder Video Downloader offers a wide range of features to download videos from popular streaming sites like Netflix, YouTube, Facebook, Vimeo, Veoh, Dailymotion, and more than 1000 other sites. Apart from downloading videos, it also allows users to download YouTube music and convert YouTube videos to MP3/M4A. With 4kFinder, users can download videos in different resolutions like 4K, 8K, 2K Quad HD, 1080p Full HD, 720p HD, and even 3D, and save them as MP4 format for offline playback on any device.

select mp4 format

Step 1. Click the download button and install 4kFinder Video Downloader on your computer.

d_win d_mac

Step 2. Launch the video downloader, copy and paste the URL link of the video. Afterwards in the textbox, then click “Analyze” button to analyze the video source.
Step 3. You’ll need to select MP4 and choose the quality, then click onto the “Download” button.
Step 4. After the download finished, you can click the ‘Finished’ tab at top to view and play the downloaded video files on your computer.

Pros

  • Download Netflix video without subscription.
  • Download videos from Netflix, YouTube, Vevo, Dailymotion, Vine and up to 1000+ websites.
  • Runs up to 6 times faster than normal speed.
  • Supports downloading 4K 1080p Full HD, 720p HD, etc.
  • Supports batach downloads that allows you to download multiple videos at a time.

Cons

  • The trial version only allowed download 5 UHD full videos in 8k, 4k, 2k, 1080p or 720p in 15 days.
  • Only work for Windows and Mac, but no mobile version.

#3. ClipGrab

ClipGrab is a standalone video download software that enables users to easily download and convert videos from popular video-sharing sites such as Netflix, YouTube, Vimeo, DailyMotion, College Humor, Sevenload, Clipfish, and MyVideo. With its user-friendly interface and browser-independent operation, it is an ideal choice for those looking for a hassle-free video downloader. In addition to supporting video downloads from various websites, it also offers conversion to a variety of formats for your downloaded videos.

clipgrab

Pros

  • Built-in search bar allows for easy video searching.
  • Simple video download process.
  • Provides various download quality and format options.

Cons

  • Download speed is relatively slow compared to similar applications.
  • Downloaded video and audio quality may not be high.
  • User interface is not user-friendly.

Conclusion

The article discusses the availability of Netflix video downloads for offline viewing, as well as the limitations of this feature on certain devices. It recommends best three Netflix video downloaders, with a detailed review of the top one: 4kFinder Netflix Video Downloader. Which allows users to download and convert Netflix videos to MP4/MKV with up to 1080 HD. While 4kFinder Video Downloader and ClipGrab can download Video from various website. We hope you can get some ideas of how to choose your Netflix video downloader after reading this post.

Best Netflix Video Downloaders