All posts by DHZ

How to Backup Huawei P9 on Computer

“How to backup Huawei P9 on computer with an easy way?I need to sync the photos,videos,music to the computer.But I found many ways just seem to complicated and cost time.Any simple solutions?” A Huawei fans

Three months on since the Huawei P9 launched, I’ve been using the handset as my main phone day in and day out. It’s meant I’ve gotten a real feel for the good and bad parts of Huawei’s current flagship smartphone.The camera is still the best part of the package, even if Huawei has been caught being rather misleading in just how good it is.I’ve taken photos that have rivalled the best handsets out there.Unfortunate,one day it didn’t fare quite so favourably for me when dropped onto the hard tile surface of a swimming pool changing room.Then I found that it is something wrong on it,some data just gone for no reason.I am regret that I haven’t do a backup of it.

Backup Huawei P9 Data on Computer

To complete the backup job simply and efficiently,you should rely on Android Manager,which is a perfect data manage tool to backup Huawei P9 data on computer,transfer data from computer to Huawei,transfer data between Android and iOS device.The transferable data including photos,videos,music,contacts,SMS.Not only Huawei,but also almost all Android device are compatible with Android Manager,like Google(Nexus,Pixel),Samsung (GalaxyS7/S6/S5,Note 5),HTC,Lenovo,Motorola,ZTE,Sony,LG.

d_win d_mac

Part 1:How to Backup Huawei P9 Photos on Computer

Step 1.Select Photos to Export to PC
In the photo management window,choose your desired photos and click Export > Export to PC.

transfer photos from huawei to pc

Step 2.Backup Selected Photos from Huawei to PC
It brings up your file browser window. Select a save path to store the photos from your Huawei P9 to computer.You could transfer the whole photo album from Huawei to PC.

transfer photo huawei to pc

d_win d_mac

Part 2:How to Backup Huawei P9 Music on Computer

Step 1.Select Music Tab
Once your media loads,choose your wanted songs and click Export > Export to PC.
select music from huawei to pc

Step 2.Backup Music from Huawei to Computer
This brings up your file browser window,choose a save path to save songs from your Huawei to computer.

You can simply Drag and Drop music files from Huawei phone to computer.You can also transfer the whole music playlist from Huawei to PC in one click.

export huawei music to pc

d_win d_mac

Part 3:How to Backup Huawei P9 Videos on Computer

Step 1. Select Videos Tab
Once your media loads, choose your desired videos and click Export > Export to PC.

transfer videos from huawei to pc

Step 2. Backup Videos from Huawei to Computer
This brings up your file browser window. Select a save path to store the videos from your Huawei to computer.You can simply Drag and Drop videos from Huawei to computer.

d_win d_mac

Related Article:

How to Recover Deleted Data from Huawei P9(Plus)

How to Recover Deleted Contacts on Huawei P9(Plus)

How to Backup & Restore Huawei Mate 9

How to Manage Android on Computer

How to Recover Deleted Contacts on Huawei P9(Plus)

The Huawei P9 features a 5.2-inch display with a 1920×1080 resolution, resulting in a very decent 423 pixels per inch. As such, the handset is pretty much the same size as last year’s P8. According to Android Authority, Huawei remained committed to its opinion that going above and beyond a 1080p resolution is just isn’t worth the additional hit to battery life.P9 Plus, on the other hand, has a 5.5-inch display, making it a slightly larger handset compared to P9. It also swaps out the LCD panel for an AMOLED alternative and boasts a display capable of 500 nits peak brightness and 96 percent saturation.

As you know,there are many circumstances will encounter in our daily life and lead to lost contacts on Android,it is not exception on Huawei P9.The contacts should be one of the most important information on your mobile device.What should you do if you remove contacts from Android accidently?When you delete contacts on Huawei P9 carelessly,the way mentioned in this article following will help you solve the problem and help you get away from the upset.

Restore Deleted Contacts from Huawei P9

It’s highly recommend to restore deleted contacts on Huawei P9 with Android Data Recovery.According to our text, it has evolved to the best Android recovery solution in the past few years.It is such an useful data rescue software comes to help that recover deleted data from Android without hassle,including contacts,gallery,messaging,videos,audios,call logs,WhatsApp messages & attachments,documents and so on.This powerful data recovery allow to recover deleted data under several circumstances,such as deleted carelessly,restore device to factory resetting,Android system update,Android system rooting,etc,.Most Android brands are applicable to Android Data Recovery,like Huawei(P9/Mate 9),Google(Nexus,Pixel),Samsung (GalaxyS7/S6/S5,Note 5),HTC,Lenovo,Motorola.

d_win d_mac

How to Recover Deleted Contacts from Huawei P9(Plus)

Step 1.Run Android Data Recovery and Connect Huawei to the Computer
Download and install Android Data Recovery on your computer.Run it and then connect your Huawei P9 phone to the computer via an USB cable.

connect huawei to the computer

Step 2.Enable USB Debugging on Huawei
Once you get a message pop up on your phone,click “OK” to enable USB debugging.If you had enabled USB debugging before,just skip this step.Then click on “Development” and click “USB debugging”.

enable usb debugging on huawei

Step 3.Select Deleted Contacts to Scan
Choose the file type you need to restore from Huawei.Then click on “Next”.If you just need to restore contacts,just click on “Contacts”.

select data to scan on huawei

Step 4.Scan the Data on Huawei P9
Click “Start” to allow the program to scan your phone.And then you will see the following window.Choose the “Standard Mode”.(For the “Advanced Mode”,it will take you more time.)

scan huawei p9

When you see the window below,it is time for you to move to your device and tap on the “Allow” icon,then turn back to the computer and click on the “Start” button to go on.

allow the super user request on huawei

Step 5.Preview and Restore Deleted Contacts from Huawei P9
In this step you could preview data before recovery.Preview and mark those you wanted contacts and click “Recover” to save them to your computer.

recover deleted contacts on huawei p9

d_win d_mac

Related Article:

How to Recover Deleted Data from Huawei P9

How to Restore Data from Huawei Mate 9

How to Backup & Restore Huawei Mate 9

How to Recover Deleted Data from Android

How to Recover Deleted Data from Huawei P9

“I just did the stupid thing you may be tease me I am foolish,I delete all my photos on Huawei P9 by pressing the delete key carelessly.How can I recover the deleted files from my new Huawei phone?Any suggestions?Appreciated!”-Coco

huawei p9

Huawei P9 smartphone was launched in April 2016. The phone comes with a 5.20-inch touchscreen display with a resolution of 1080 pixels by 1920 pixels at a PPI of 423 pixels per inch.The Huawei P9 is powered by 1.8GHz octa-core HiSilicon Kirin 955 processor and it comes with 3GB of RAM.The phone packs 32GB of internal storage that can be expanded up to 256GB via a microSD card.As far as the cameras are concerned,the Huawei P9 packs a 12-megapixel primary camera on the rear and a 8-megapixel front shooter for selfies.

Recover Deleted Data on Huawei P9

Accidentally deleting data from Huawei Android device can easily happen among most of Android users.Here comes the Android Data Recovery for you,which is a reliable data recovery tool to recover deleted data from Huawei Android directly even if you haven’t backup.You don’t need to worry about losing data from Android under any circumstances after you own this useful data recovery.It works well for recovering various of Android data,for instance,contacts,messaging,photos,videos,audios,call logs,WhatsApp messaging & attachments,documents and so on.Almost all brands of Android are compatible with Android Data Recovery,like Huawei (P9,Mate 9),Google (Pixel,Nexus),Samsung(Galaxy S7/S6/S5,Note 5),HTC,Motorola,Lenovo,ZTE,LG,Xiaomi,etc,.

d_win d_mac

How to Recover Deleted Data on Huawei P9

Step 1.Run Android Data Recovery and Connect Huawei to the Computer
Download and install Android Data Recovery on your computer. Run it and then connect your Huawei P9 phone to the computer via an USB cable.

connect huawei to the computer

Step 2.Enable USB Debugging on Huawei
When you see a message pop up on your phone, click “OK” to enable USB debugging. For different Android version, the steps are various. If you had enabled USB debugging before, just skip this step. Then click on “Development” and tick “USB debugging”.

enable usb debugging on huawei

Step 3.Select Deleted Data to Scan
Choose the file type you need to recover from Huawei.Then click on “Next”.

select data to scan on huawei

Step 4.Scan the Data on Huawei P9
Click “Start” to allow the program to scan your phone. And then you will see the following window. Choose the “Standard Mode”. (For the “Advanced Mode”, it will take you more time.)

select scan mode

When you see the window below,it is time for you moving to your device and tap on the “Allow” icon,then turn back to the computer and click on the “Start” button to continue.

allow the super user request on huawei

Step 5.Preview and Restore Deleted Data from Huawei P9
Android Data Recovery enable to restore data including text messages, contacts, photos and videos,etc, from your Huawei device.You can preview messages, contacts and photos data before recovery.

Preview and mark those you want and click “Recover” to save them to your computer.

recover deleted data from huawei

d_win d_mac

Related Huawei Data Recovery Tutorial:

How to Restore Data from Huawei Mate 9

How to Recover Photos from Huawei Mate

How to Backup & Restore Huawei Mate 9

How to Recover Deleted Data from Android

How to Recover Data from iPhone that Won’t Turn on

“My iPhone 6S is something wrong,I am crazy about it.Last night I turn it off when I went to sleep.This morning I waked up and try to turn it on but failed.Now I am urgent to get the messages which sent from my partner,or it will make a big loss for my business.Please help!”-Carson

Most iPhone users have ever encountered the circumstance that iPhone won’t turn on.Now we are going to conclude the causes of iPhone can’t power on as usual.

The Common Cases that Lead to iPhone won’t Turn on:
1.iPhone is simply frozen in power-off or sleep mode.In which case,it fails to switch itself on or wake itself up when you initiate it.
2.It is possible that your phone’s battery is out of charge.
3.The operating system or an installed software is corrupted.The tell-tale sign if this is that if you manage to switch on your phone,it freezes or crash soon after.
4.The hardware error for example the power button of iPhone is broken.

Recover Files from iPhone which won’t Turn on

If you don’t have a choice yet,here is my recommendation: iOS System&Data Recovery,which is a data recovery for restoring iOS system to normal and recovering data from iPhone completely.It isn’t be easier than using iOS System&Data Recovery to recover files from iPhone that won’t turn on,the recoverable files including contacts,messages,photos,videos,apps & apps data,calendars,notes,documents and more.iOS System&Data Recovery works well for repairing iOS system issues such as iPhone can’t turn on as usual,iPhone stuck in Recovery Mode,iPhone stuck at Apple logo screen,etc,.

d_win d_mac

How to Recover Data when iPhone Won’t Turn on

Step 1.Run Program and Select System Recovery Selection
Launch and run iOS System & Data Recovery and click on the “iOS System Recovery” function from “More Tools” in the program main page. Connect your iPhone to the computer via USB cable. The program would detect your iPhone soon. Click “Start” to initiate the process.

ios system recovery main page

Click the “Start” button to begin the fixing process.

connect iphone to the program

Step 2.Select and Download Firmware for iPhone
You should download the firmware which match your iPhone to fix the abnormal system of it.iOS System & Data Recovery will detect the model of your iPhone, suggest the best iOS version for your iPhone to download.

select iphone model

Click on “Download” and wait until the program finishes downloading and installing it on your iPhone.

download firmware for iphone

Step 3.Fix iPhone that can’t Turn on
When the download is completed, the program will begin to restore device to normal state with only a few minutes.

fix iphone won't turn on

Step 4.Switch Data Recovery Mode to Get Back Lost Data
Now your iPhone have returned to the normal state.Now you could recover data from device with the help of iOS System& Data Recovery. Switch to “iPhone Data Recovery”.

iPhone data recovery

Choose “Recover from iOS Device” mode in the main page of program to switch to data recovery mode.

iPhone data recovery

Step 5.Select Files Types for Scanning
Select the files types for scanning on iPhone.The data you can select including contacts,messaging,photos,videos,call logs,notes,documents and so forth.

select and scan iPhone lost data

Click on the “Start Scan” button to begin to scan your iPhone for lost/deleted or existing data. The program will take a little time to complete the scanning. While it is finished, you will be able to see recoverable data in a list.

Step 6.Preview and Recover Data from iPhone
You could preview each file contains, click on the file name to see what it is.Select the data you need and then recover to your device or computer.

select and scan iPhone lost data

After selecting all that you need, click the “Recover” button. To recover it directly to your iPhone, click on “Restore to device” and if you’d like to recover them to your computer, you can just click on “Export to PC”.

d_win d_mac

Related Article

How to Recover Data when iPhone Won’t Slide to Unlock

How to Recover Data when iPhone Stuck at Black Screen of Death

How to Recover Data when iPhone Stuck on Apple Logo

How to Recover Data from iPhone in Recovery Mode

How to Restore iPhone System to Normal

How to Transfer Android Data to Huawei Mate 9

Huawei’s Vice President has just announced that the company has managed to sell 140 million smartphones in 2016 (thus far), and by doing that, they’ve not only hit their goal for this year, but have set a new record. A couple of months ago,it reported that the company had managed to sell 100 million smartphones,and back then it seemed quite possible that Huawei might hit the magic 140 million mark, well, that has just happened.

Are you one of the Huawei fans?Are you planning to buy the new Mate 9 phone or you may be have bought one?You may experience this situation of switching from an old Android to the new Huawei phone, like this awesome Huawei Mate 9,what comes with the new phone is that your data on the old phone needs to be synced to the new device,what puzzles you is how to move all your data between the two Android easily and safely.The following method comes to help.

Transfer Files between Android and Huawei Mate 9

Phone Transfer is your ideal tool to transfer data from Android to Huawei 9 with easy steps,including contacts,SMS,photos,videos,call logs,music,calendars,apps & apps data.Phone Transfer is use for switching data among Android device and iOS device.With the help of Phone Transfer,you are allow to transfer data between two mobile devices even though they are running different OS system.Supported Android devices for instance,Huawei(Mate 8,Mate 9),Google(Nexus,Pixel),Samsung(Galaxy S5/S6/S7,Note 5),HTC,Motorola,Lenovo,Xiaomi,ZTE,LG,Sony,and so on.

d_win d_mac

How to Transfer Data between Android and Huawei Mate 9

Step 1.Run Program and Connect Two Phone to Computer
To begin with,please run Phone Transfer and connect Android and Huawei Mate 9 to the computer at the same time,then select the “Phone to Phone Transfer” mode in the main page of program.

phone transfer main page

Step 2.Select File Type for Transferring
Select the file type to transfer,here contacts,photos,videos,music,text messages,call logs,calendars,apps are available.You can select one or more than one file to transfer between Android and Huawei.To switch Android data to Huawei,the Android should be on the left and the Huawei should be on the right.You are allow to click “Flip” to exchange the position of them.

select data to transfer from android to huawei

Step 3.Begin the Data Transfer Process
Once selecting all file you need to transfer,you could begin the transfer anytime if you already ready,just simply click “Start Copy” to begin the data transfer process.

transfer android data to huawei

d_win d_mac

Related Article:

How to Transfer Android Media Files to Huawei Mate 9

How to Transfer Samsung Files to Huawei Mate 9

How to Transfer iPhone Data to Huawei Mate 9

How to Transfer Data to Huawei Mate 9

How to Backup & Restore Huawei Mate 9

How to Restore Data from Huawei Mate 9

How to Recover Data when iPhone Won’t Slide to Unlock

“My iPhone get wrong after I updated iOS 10 on it,it stuck at “Slide to Unlock” screen,now I can’t use it as usual.I try to power it off but it still unresponsive.Now I just want to extract the client number from my iPhone,which relate to my business.How?”-Ling ling

It’s not an uncommon issue that the slide to unlock feature does not work on iPhone. Recently a part of iPhone users have reported that it’s very slow to respond to unlock iPhone screen or the slide bar is totally unresponsive.That’s means iPhone freezes on the lock screen.There are many reasons can cause an unresponsive lock screen of iPhone.Perhaps the sensors there are dead.Bumps and liquids can sometimes break the touchscreen in parallel stripes across the display.Or it is possible that device get the software error and lead to iPhone won’t slide to unlock,due to the iOS update or iOS jailbreak.

Recover Files when iPhone Won’t Slide to Unlock

You can stop feeling frustrating when you get the iOS System&Data Recovery.With iOS System&Data Recovery,you are able to fix iPhone won’t slide to unlock and restore data from iPhone without data loss.iOS System&Data Recovery perfectly help to fix with various iOS system issues like stuck in Recovery Mode,white Apple logo, black screen, looping on start, etc,.You can get your iPhone back to normal state without data loss in minutes with this powerful tool.What’s more,iOS System&Data Recovery allow to recover deleted data from iPhone after losing data under any circumstances.It’s a multi-function data recovery.All models of iOS devices are compatible with this program,including iPhone 7(Plus),iPhone 6S(Plus),iPhone 6(Plus),iPhone 5S/5C/5,iPad Air,iPad Pro,iPad Mini,and so on.

d_win d_mac

How to Recover Files when iPhone Won’t Slide to Unlock

Step 1.Run Program and Select iOS System Recovery Option
Launch iOS System & Data Recovery and click on the “iOS System Recovery” tab from “More Tools” in the program main page. Connect your iPhone to the computer via USB cable. The program would detect your iPhone soon. Click “Start” to initiate the process.

ios system recovery main page

fix iphone won't slide to unlock

Step 2.Download and Select Firmware for iPhone
You should download the suitable firmware for your iPhone to fix the device.iOS System & Data Recovery will detect the model of your iPhone, suggest which iOS version that is best for your iPhone for you to download.

download ios firmware package

Click on “Download” and wait until the program finishes downloading and installing it on your iPhone.

download the firmware for iphone

Step 3.Fix your iPhone can’t Slide to Unlock
When the download is completed, the program will continue to restore your iPhone to normal. It will take you only a few minutes.

fix iphone won't slide to unlock

fix iphone won't slide to unlock

Step 4.Switch Recovery Mode for Data Recovery
Your iPhone have get out of the stuck of “Slide to unlock” screen.Now you should recover data from device with the help of iOS System& Data Recovery.Please switch to data recovery mode.Choose “Recover from iOS Device” mode in the main page of program.

Step 5.Select Files Types for Scanning
Select the files types for scanning on iPhone.The data you can select including contacts,messaging,photos,videos,call logs,notes,documents and so on.

scan data on iphone

Click on the “Start Scan” button to begin to scan your iPhone for lost/deleted or existing data. The program will take several minutes to complete. While it is finished, you will be able to see recoverable data in a list. If you found a specific data that you want during this process, just click “Pause” to stop the process.

Step 6.Preview and Recover Data from iPhone
You should be able to see a list of retrievable items after the program has finished scanning your iPhone.There are several filter options to help you find data that you want. To have a look at what each file contains, click on the file name to see what it is.

restore data from iphone

Once you have identified the data that you want to recover, check on the boxes next to the filenames. After selecting all that you need, click the “Recover” button. To recover it directly to your iPhone, click on “Restore to device” and if you’d like to recover them to your computer, you can just click on “Export to PC”.

d_win d_mac

Related Article:

How to Recover Data from iPhone in Recovery Mode

How to Recover Data when iPhone Stuck on Apple Logo

How to Recover Data when iPhone Stuck at Black Screen of Death

How to Restore iPhone System to Normal

How to Recover Deleted or Lost Data from iPhone 7/7 Plus

[Summary]: Don’t worry when you lost contacts, messages, photos, music or videos etc data on your iPhone. Here we’ll offer you 3 effective methods to help you restore lost data from iPhone 7/ iPhone 8/ iPhone X/ iPhone XS/ XR directly; restore from iCloud backups or iTunes backups. Follow and find the best solution to recover your iPhone 7 lost data now.

Part 1:The Most Common Causes of Losing Data on iPhone

1.Deletion Mistaken
The most common cases of losing data on iPhone 7 is deleting files by mistaken without having any backup available.Most iPhone users delete photos,messaging,contacts,etc,.from iPhone by pressing the wrong button.

2.iOS Update or iOS Jailbreak
Many users may have encountered the data loss during/after iOS update or iOS jailbreak, especially the failed one would cause data loss of your iPhone.Moreover,the failure iOS system operating may lead to iOS system error on your device,such as stuck in Recovery Mode,stuck at “connect to iTunes” screen,stuck at Apple logo screen or stuck at black screen,etc,.

3.More other Occasion of Data Loss
For example the Hardware or System Malfunctions. According to a survey of data loss’s causes, more than two-fifth of users lose data because of hardware or system malfunctions.It is a common cause of data loss on iPhone 8/7/6S/6/SE.Absolutely, the hardware or system malfunctions can be shown in many forms, such as electrical failure, head crash, controller failure,etc,.

iTunes and iCloud can help you backup iPhone data to locals and cloud, if you want backed up your iPhone with iTunes and iCloud. Below are the most common free way to restore iPhone 7(Plus) lost data.

First Free Way: Free restore iPhone lost data from iTunes backup

If you have backed up iPhone data to iTunes before, you can follow the below simple steps to free restore lost from iTunes backup:

1. Launch iTunes on PC or Mac that you used to backup iPhone data;
2. Using an Apple USB cable to connect iPhone to the computer.
Follow the onscreen steps to enter iPhone 7 pass-code or to trust This Computer.
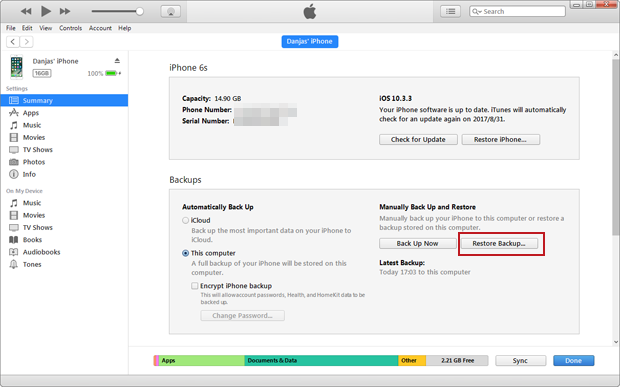
3. Click the iPhone ico when it appears in iTunes.
4. Choose Restore Backup in iTunes and look at the date and size of each backup and select the most relevant.
5. Click Restore and start to restore data back to your iPhone from iTunes backups.

restore iPhone data from itunes

Second Free Way: Free iPhone lost data from iCloud backup

If you have synced iPhone data to iCloud for backup before, learn this guide to download, extract or restore the iCloud backups to iPhone with ease:

1. Please go to Settings > General > Reset on iPhone 7 (Plus).
2. Tap “Erase all content and settings” and then “Erase Now“. It will erase all data on your iPhone and reset to factory settings.
3. When it comes to the Apps & Data screen, tap Restore from iCloud Backup, then sign in to iCloud account.
4. Tap to “Choose backup,” then choose from a list of available archives you made in iCloud.

You iCloud backups will restore to iPhone. When it done, you can find the lost data on your iPhone 7 (Plus) again.

Part 2: Best iPhone Data Recovery – Recover Lost Data on iPhone Completely

Thankfully, this iPhone Data Recovery makes the data recovery task becomes so easy.With the help of iPhone Data Recovery,you can simply restore lost data on iPhone 7/8/XS/XR with three recovery modes. This iPhone data recovery can help your recover lost files on iPhone 7/7 Plus with only a few clicks in minutes, including contacts, text messages, photos, videos, notes, call logs, WhatsApp messages & attachments,and more.

d_win d_mac
d_win d_mac

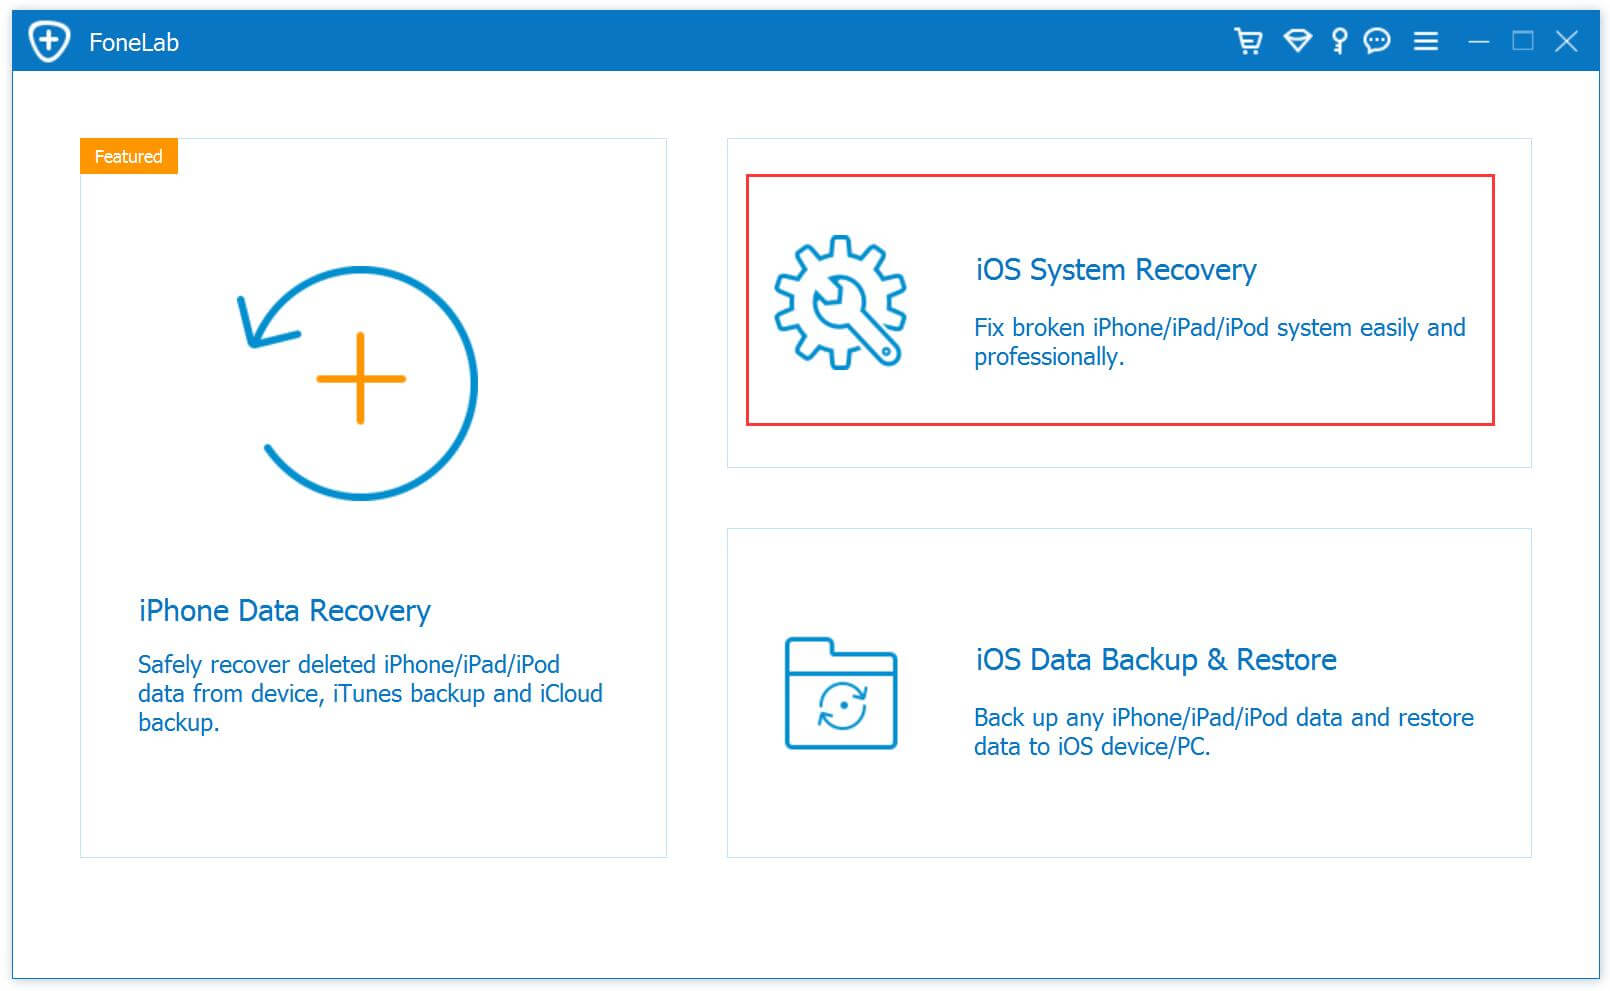
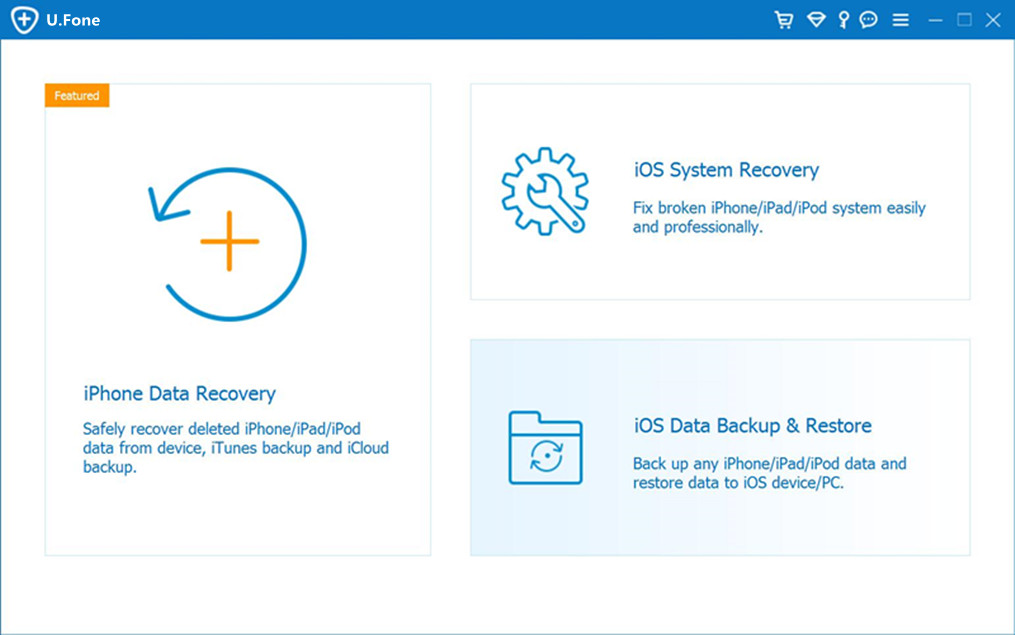
Highlight the Features of iPhone Data Recovery:

  • 3 iPhone data recovery modes: Directly recover from iPhone, restore from iTunes backup files, and restore from iCloud backup files.
  • Recover various of data such as photos, video, contacts, messages, notes, app & app data,etc,.
  • Backup iOS data to computer safely.
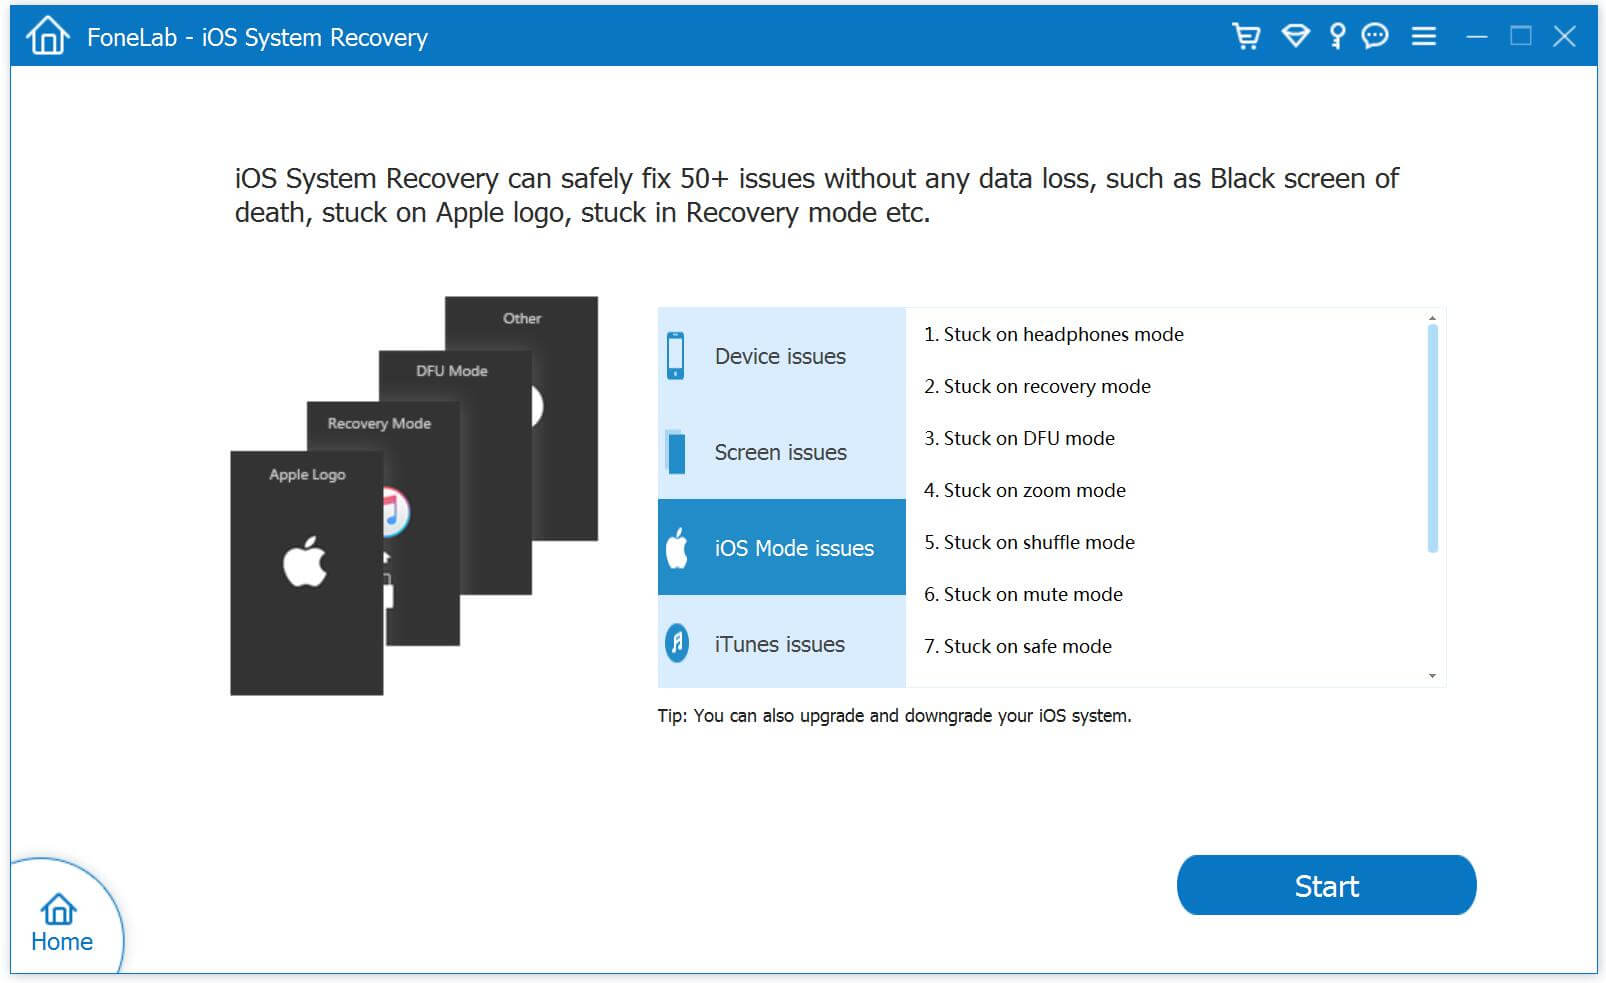
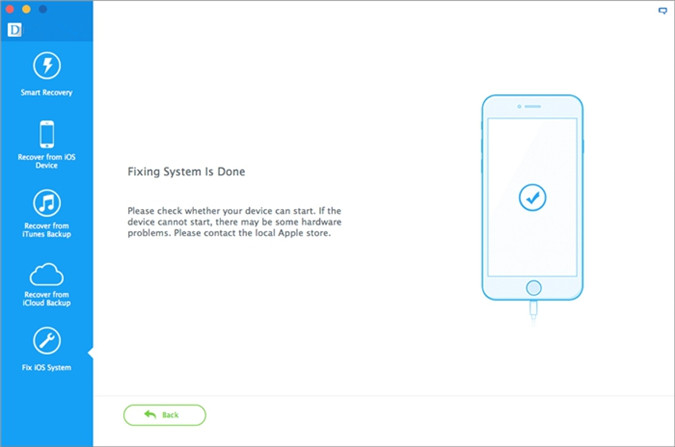
  • Fix iOS system issues,for instance,stuck in Recovery Mode,stuck at “connect to iTunes” screen,stuck at Apple logo screen or stuck at black screen,etc,.
  • Preview before recovery,selectively restore what you want on device.
  • Compatible with latest iOS 12.3

Part 3:Directly Recover Lost Data from iPhone 7 and iPhone 7 Plus

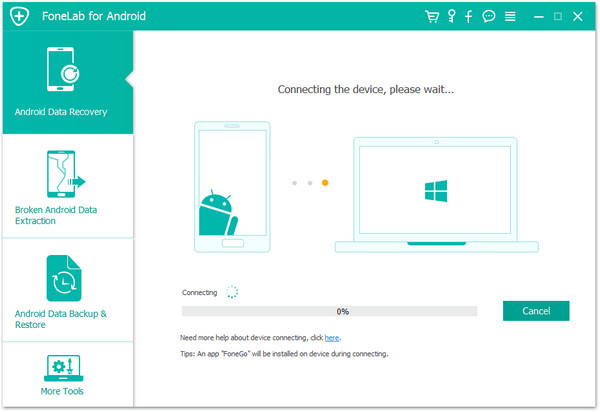
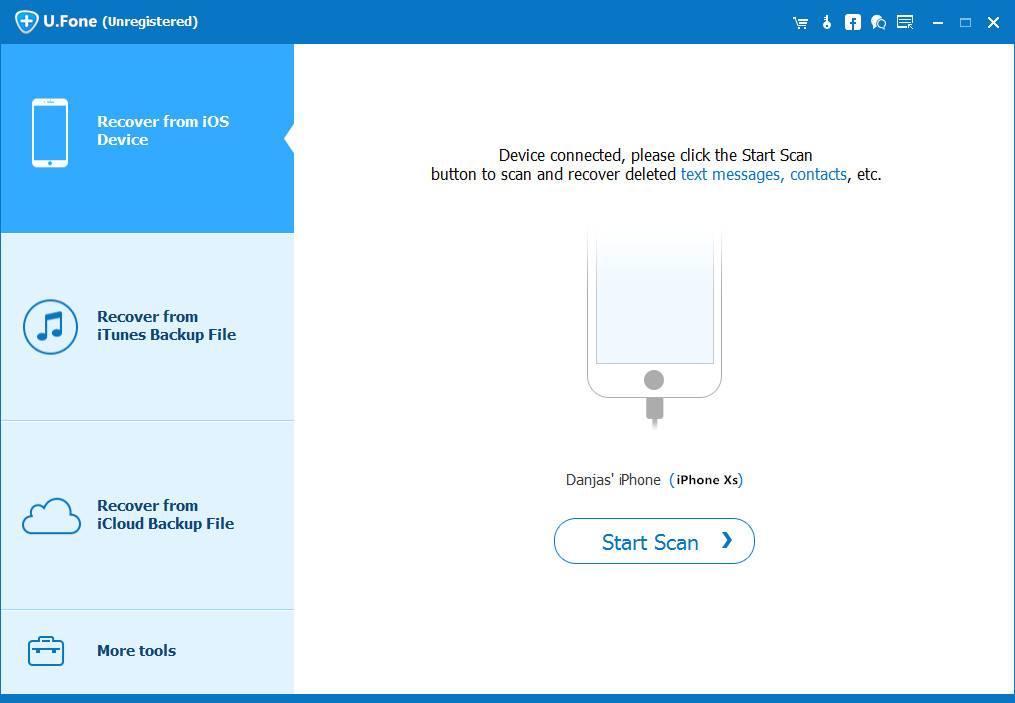
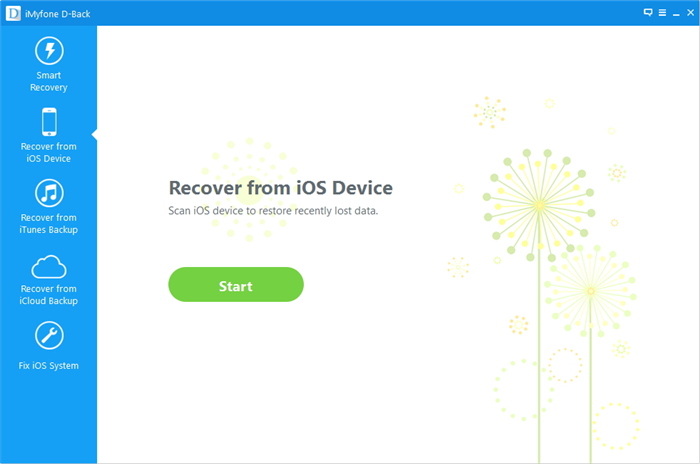
Step 1.Launch iPhone Data Recovery and Connect iPhone
Downloaded iPhone Data Recovery on your computer,launch it. Then and select “Recover from iOS Devices“, and connect iPhone to your PC/Mac with the USB cable.

connect iphone to computer

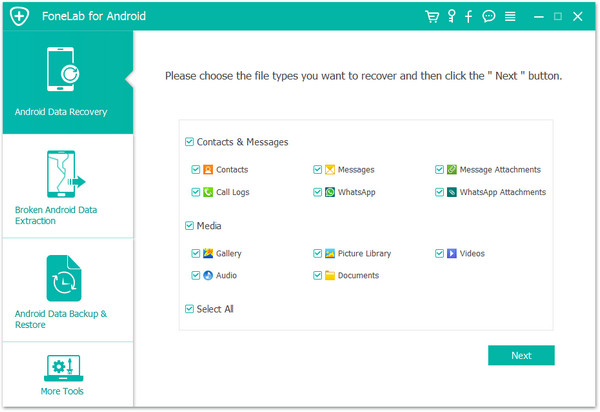
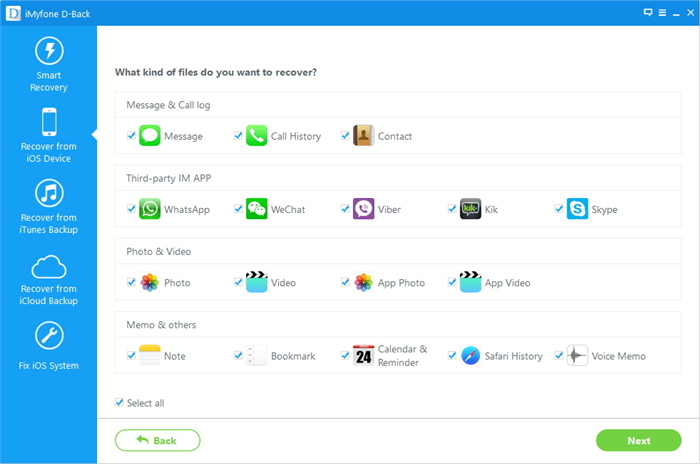
Step 2.Scan Lost Files from iPhone
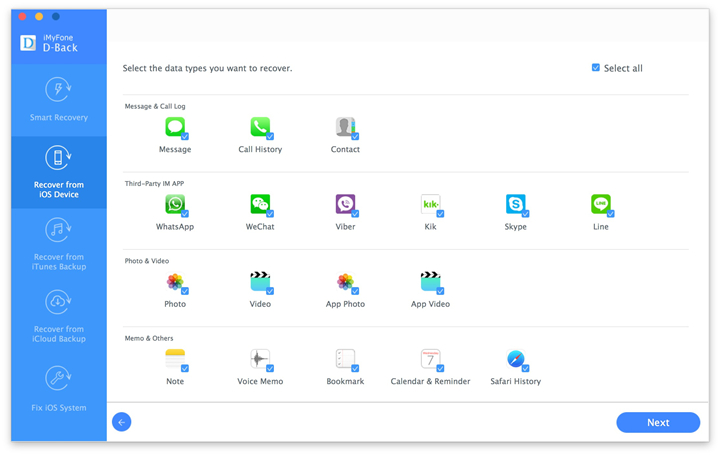
Click “Start Scan” to begin scanning your lost iPhone 7 data after selecting the data need to scan.For example,to scan lost photos,you should click “Photos”.

scan data on iphone 7

Note: Make sure the USB cable is well connected in the whole process.

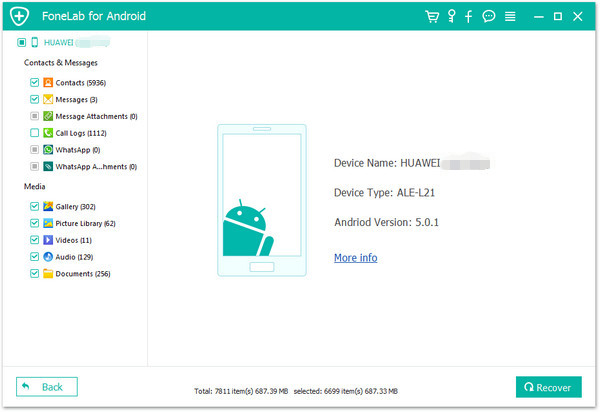
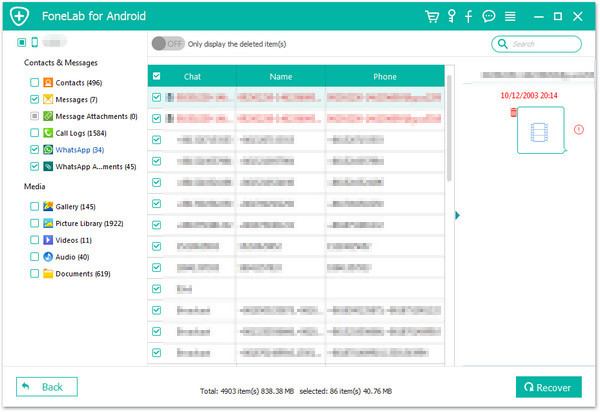
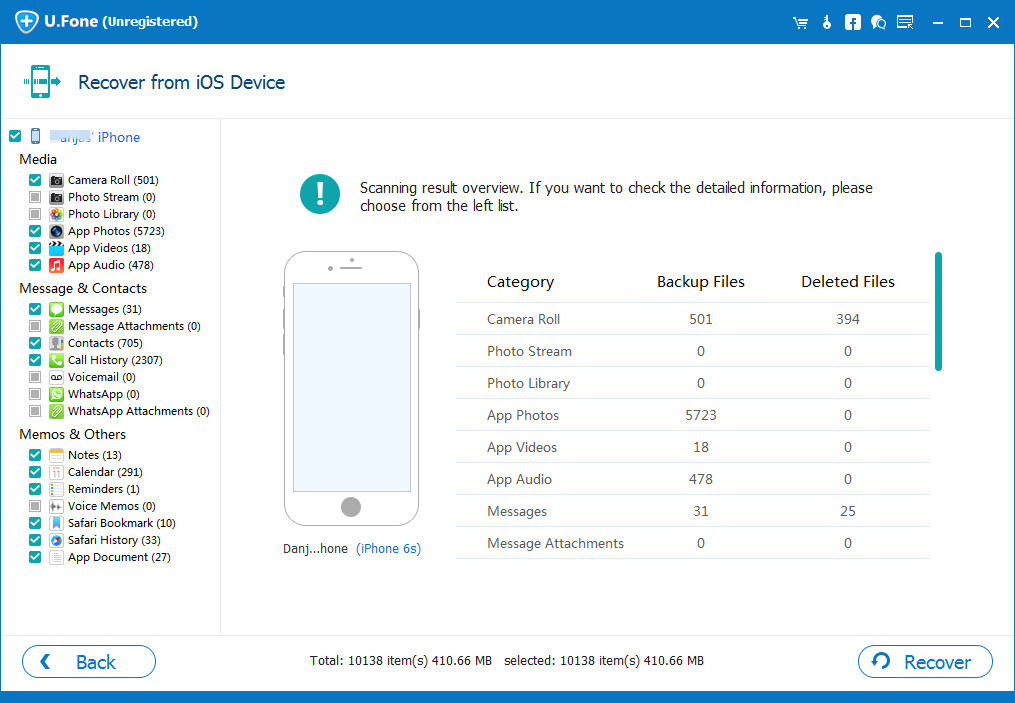
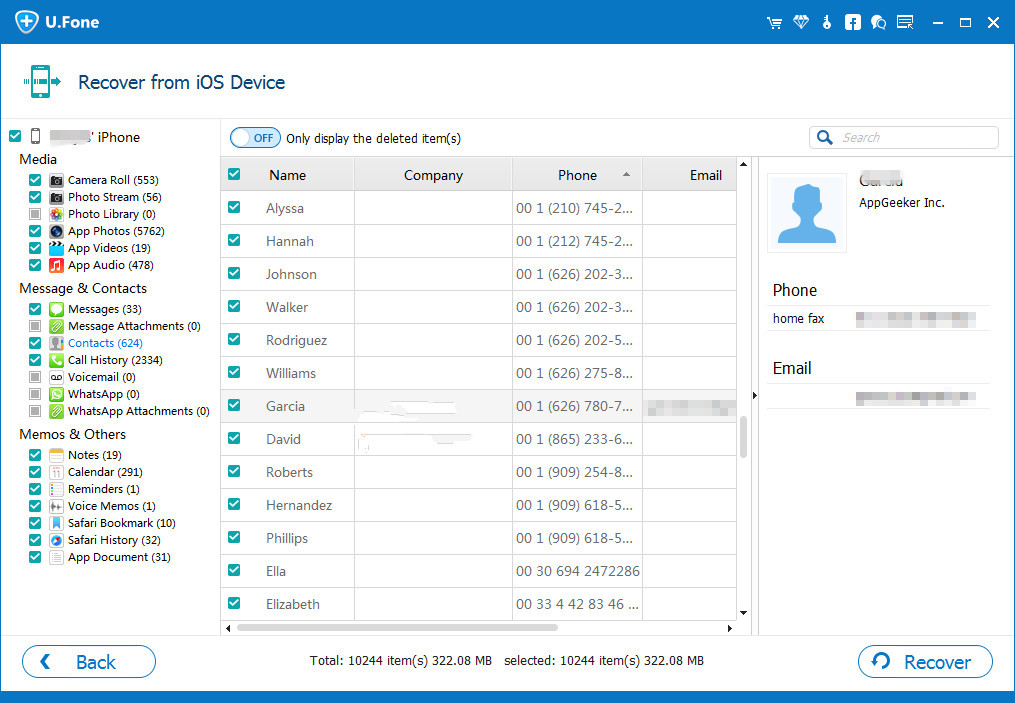
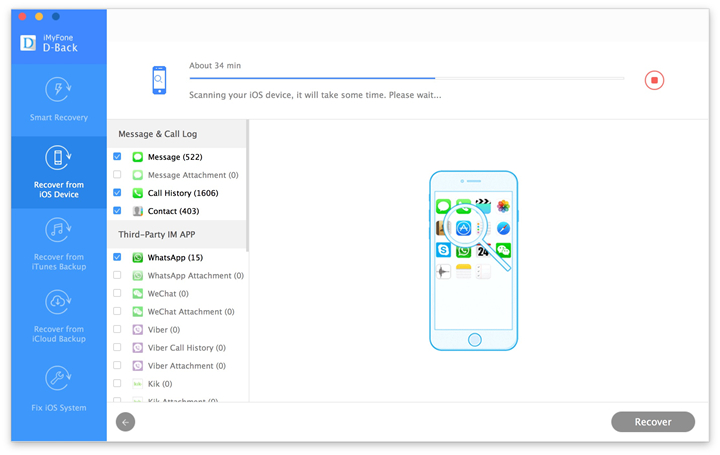
Step 3.Preview and Recover Lost Data from iPhone 7
Now you could choose the detail data you want to recover after previewing that,mark you want click “Recover” button on the lower right corner of the interface.Then select to save the recovered data to the computer or your device.

recover data on iphone 7

Note: This mode fits the situation if you didn’t backup your iPhone before losing files.If you have backed up your device,you can choose the second or the third mode mentioned below.

Part 4:Recover Lost iPhone Data from iTunes Backups

Step 1.Choose the iTunes Backup File and Scan
Launch iPhone Data Recovery and choose the second mode “Recover from iTunes Backup“. Connect iPhone 7 with computer.Choose the backup file you want and click “Start Scan”.

scan itunes files

Step 2.Preview and Restore Lost Data from iTunes
A few seconds will be taken to scan your iTunes backup files.And you are allowed to preview all the content from the backup files.Choose the files you want and click “Recover” to complete the recovery.Then save the data to the computer or device.

recover iphone data from itunes

Part 5:Recover iPhone Lost Data from iCloud Backups

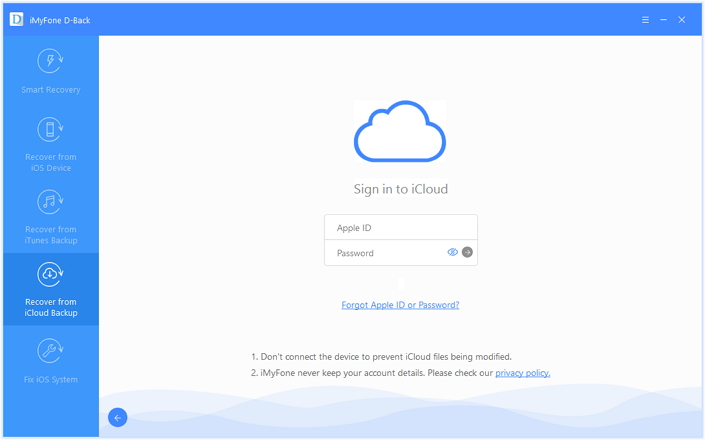
Step 1.Choose the iCloud Recovery Mode and Log into iCloud Account
Choose “Recover from iCloud Backup File” after launching iPhone Data Recovery. Then,sign in your iCloud account.

log in icloud account

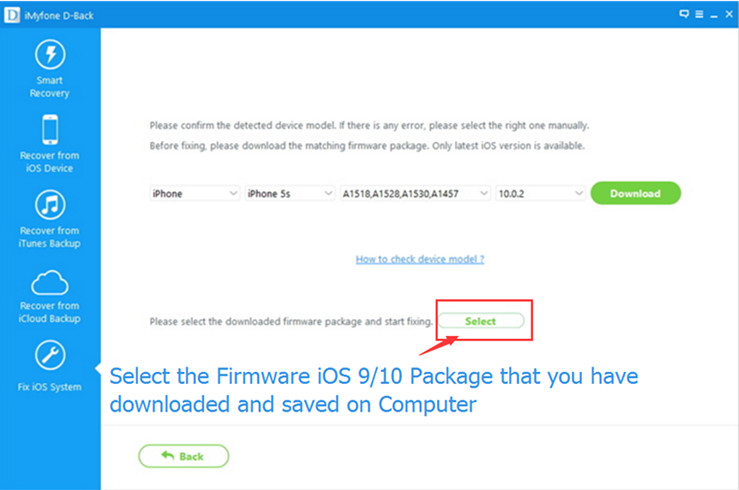
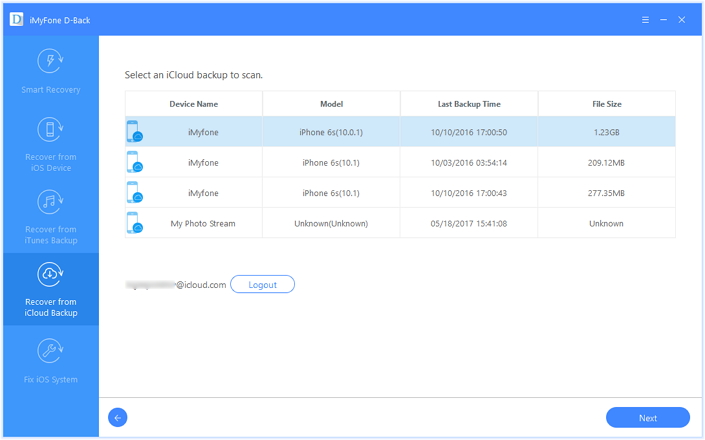
Step 2.Choose the iCloud Backup File and Download
You would see the iCloud backup files that you backed up with this account listed.Choose the one you want to recover and click “Download” to download the backup file.

choose icould files and download

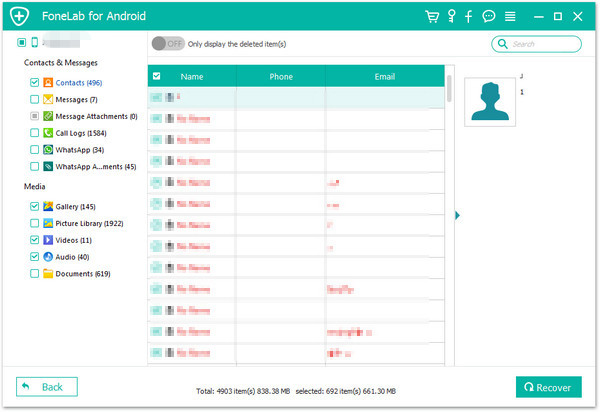
Step 3.Preview and Restore Lost Data from iCloud Backup
When the backup file is downloaded,preview them one by one and then save to either the computer or your device.

recover iphone data from icloud files

recover iphone data from icloud files

d_win d_mac
d_win d_mac

Related iPhone Data Tutorial

How to Recover Lost Data on iPhone 7/6S

How to Recover Deleted Data from iPhone 7/6S/6/SE

How to Recover Lost Contacts on iPhone 7/6S/6

How to Backup and Restore Data on iPhone 7

How to Recover Data when iPhone Stuck at Black Screen of Death

[Summary]:Your iPhone stuck in black screen of death after update/downgrade or jailbreaking? This guide will teach you how to fix a black screen iPhone and recover all the lost data including text messages, contacts, photos, call history, notes, etc. from the device after fix ios system to normal.

“This morning I try to upgrade iOS 11.3 on my iPhone 6S.However,the unfortunate thing happened,my device was turn into black screen of death.I don’t know why.I tried rebooting a few times and had the same issue.Any useful ways to get my iPhone out of the black screen and return it to normal?In addition,I am desire to restore my personal data from it.It’s so important for me.Thanks advance.”-Jerry

You may want to know:

* How to Fix iPhone black screen of death issues

* How to Recover Deleted or Lost Data from iPhone

iphone stuck at black screen

iPhone black screen is also known as iPhone black screen of death.iPhone black screen appears when there is physical damage or software damage on device,or it may appear after iOS jailbreak/update.Compare with fixing iPhone system to normal state,iPhone users are more eager to recover data when iPhone get black screen of death,especially contacts,messaging,photos.In the coming part of passages,we are going to discuss the best solution to recover data when iPhone stuck at black screen of death and other similar cases.

Recover Files when iPhone Stuck at Black Screen of Death

iOS System&Data Recovery fit your needs to solve iOS system stuck issues and return iPhone to normal state,help to repair iPhone stuck at black screen of death and restore data effectively.

d_win d_mac

More Features of iOS System & Data Recovery:

-Fix with various iOS system issues like recovery mode,white Apple logo, black screen, looping on start,won’t slide to unlock,etc,.
-Fix iOS to normal without any data loss.
-Recover lost data on iPhone with three recovery modes:Directly recover from iOS device,recover from iTunes backup files,recover from iCloud backup files.
-Recover various of data on iOS device,like contacts,messaging,photos,videos,call logs,notes,documents and so on.
-Fully compatible with iOS 11.3, Windows 10 or Mac 10.11 and iOS 10 system or lower.
-Work for all models of iPhone, iPad and iPod touch,such as iPhone X, iPhone 8, iPhone 7(Plus),iPhone 6S(Plus),iPhone 6(Plus),iPhone 5S/5C/5,iPad Air,iPad Pro,iPad 4/3/2,etc,.

scan data on iphone

Steps to Fix iPhone Black Screen and Recover Data

Step 1.Run Program and Select iOS System Recovery Option
Launch iOS System & Data Recovery and click on the “iOS System Recovery” tab from “More Tools” on the program interface. Connect your iPhone to the computer via USB cable. The program would detect your iPhone soon. Click “Start” to initiate the process.

ios system recovery main page

fix iphone stuck at black screen

Step 2.Download the Selected Firmware for iPhone
You will need to download the right firmware for your iPhone to fix the device.iOS System & Data Recovery should be able to detect the model of your iPhone, suggest which iOS version that is best for your iPhone for you to download.

Click on “Download” and wait until the program finishes downloading and installing it on your iPhone.

download the firmware for iPhone

Step 3.Fix your iPhone Stuck at Black Screen of Death
Once download is completed, the program will continue to repair your iPhone, return it to the normal state. It will take you a few minutes.

fix iphone stuck at black screen

Step 4.Switch Data Recovery Mode

Your iPhone have get out of the stuck of black screen.Now you should recover lost data from device with the help of iOS System& Data Recovery.Please switch to iOS Data Recovery mode.Choose “Recover from iOS Device” mode in the main page of program.

fix iphone stuck at black screen

Step 5.Select Files Types for Scanning
Select the files types for scanning on iPhone.The data you can select including contacts,messaging,photos,videos,call logs,notes,documents and so on.

If you want to select the lost data to scan by program,you could click the items of ”Deleted Data from the Device”,if you want to select all data to scan you should click “Select All”.Then click “Start Scan”.Then the program will start to scan data for iPhone.

Step 6.Preview and Recover Lost Data from iPhone
You will see a list of recoverable files after the program has finished scanning process.There are several filter options to help you find data that you want.Once you have identified the data that you want to restore,check on the boxes next to the files name.After selecting all that you need, click the “Recover” button. To recover the selected data directly to your iPhone,click on “Restore to device” or if you’d like to recover the selected data to your computer, just click on “Export to PC”.

recover data from iPhone with black screen

d_win d_mac

Video Guide: How to use iOS System Recovery to Fix a black screen iPhone

Related Article

How to Recover Data when iPhone Stuck on Apple Logo

How to Recover Data from iPhone in Recovery Mode

How to Fix a Jailbroken iPhone Stuck on Black Screen

How to Restore iPhone System to Normal

Watch 3D Videos/Movies in Google Pixel with Google Daydream VR

“My father bought a Google Daydream VR for me as the Christmas gift,I am glad about it.I am looking for the performing that watch 3D movies on Google Daydream VR with my Google Pixel XL phone.But now the puzzle is I can’t transfer the videos to 3D format and play on my Google device.Can you tell me the correct solution?”-A girl comes from UK.

watch 3d movies with google daydream vr

Like Samsung Gear VR,Google Daydream VR is a VR headset and controller by Google that lets you explore new worlds, kick back in your personal VR cinema, and play games that put you at the center of action.Google Daydream VR,mobile virtual reality made to take you on incredible adventures.Simple, high-quality virtual reality.With this powerful Google Daydream VR,you could freely watch 3D videos besides 3D movies in it with your Google Pixel(XL) phone,enjoy the creditable films with high quality of audio and video effects.You are allow to watch the 3D videos on the new released Google Daydream VR with several mobile devices,including Google Pixel XL,Google Pixel,LG V20,ZTE Axon 7,Asus Zenfone 3 Deluxe,Huawei Mate 9 and Mate S2.

Convert 3D Videos for Google Daydream VR and Play on Google Pixel XL

The 2D to 3D Converter-the best Google Pixel 3D videos converter,which provide the best 3D videos conversion solutions for you,help to convert 3D videos for Google Daydream VR and play on Google Pixel XL smoothly.With this useful 2D to 3D Converter,you are able to rip videos to 3D videos with different suitable formats,like AVI,MOV,MKV,WMV,MP4,FLV,etc,.To be honest,Google Pixel phone only support limited formats,Google Pixel (XL) supported format: H.264 MP4.Google Pixel (XL) best video format: H.264 MP4.Google Pixel (XL) not supported format: Blu-ray, DVD, ISO, MKV, WMV, M4V, MTS, MOV, M2TS, VOB, FLV, etc,.2D to 3D Converter is compatible with almost all brands of Android device and all models of iOS device,such as Samsung(Galaxy S7/S6,Note 5/),LG Optimus 3D P920, HTC EVO 3D, Sharp SH-12C Aquos 3D,iPhone 7(Plus) and so forth.

d_win d_mac

Part 1:Rip 3D Videos for Google Daydream VR with Google Pixel XL

Step 1.Select the 3D Convert Option of Program
Please run the 2D to 3D Converter on your PC/Mac,click “2D to 3D” option to open settings interface of program.

click convert 2d to 3d option

Step 2.Select a 2D Video to Convert
Select and add a 2D video on the 2D to 3D Converter.

add 2d video

Import a 2D video you wanna convert in the video file list.

select 2d videos

Step 3.Set the 3D Format for Converting
The 2D to 3D Converter program support to different 3D format for videos,such as Side-by-Side 3D and Top and Bottom 3D,please click “Anaglyph (Red/Cyan)”, “Side by Side”, “Side by Side (Half-Width)”, “Top and Bottom” or “Top and Bottom (Half-Height)” to select an output mode under the preview area.

set 3d format

Now please setting the 3D Depth of the video.

set 3d depth

Tips:
1.You could drag the “3D Depth” control slider to set the depth.
2.Check the “Swap L/R Image” option, you could switch left and right eye’s image.
3.To return to the main window,click “Finish”.

After finish setting the preferred 3D format for video,then click “Convert” button and go on,the program will pop up a new output setting windows.

Step 4.Setting Output Format for Google Pixel XL
You could see the program support to convert 2D video to 3D for any mobile devices in the output settings interface,such as iPhone, iPad, Apple TV, Android phones,Android Pad, TV/Mac/PC with 3D player and other devices.To convert 2D to 3D for Google Pixel XL,please click “Android” then the model of Android device for example “Google Pixel XL” under the “Profile” options,then select the profile optimized for Google devices.You can also setting the output “video size” and “video quality” in this windows,then click “OK” button begin to created and convert the 2D video to 3D for Google Pixel XL.

output 3d video google pixel

Step 5.Converting 2D Video to 3D for Google Pixel XL
The program will take you a little time to complete the video conversion process within minutes.When it is done,you could export the 3D video from computer to your Google phone,then you could freely play 3D Videos on Google Daydream VR with Google Pixel XL.

begin convert 2d to 3d for google pixel

d_win d_mac

Part 2:Transfer 3D Videos from Computer to Google Pixel XL

One of the simplest ways to sync 3D videos from computer to Google Pixel XL is with the help of Android Manager,which enable to transfer 3D videos from computer to Google Pixel Android phone directly in easy steps.Thanks to Android Manager,you are able to transfer & manage Android data simply besides conveniently,which is helpful to transfer files between computer and Android,transfer files between iTunes and Android,transfer files between iOS and Android device.

d_win d_mac

Detail guide:How to Transfer Videos/Music from Computer to Google Pixel XL

Step 1:Run Program and Connect Google Pixel XL to the Computer
Step 2:Select 3D Videos on the Computer
Step 3:Export 3D Videos from Computer to Google Pixel XL

add videos from pc to google pixel

Now you could enjoy your loved 3D videos on your Google Pixel XL phone with the Google Daydream VR anywhere anytime.

Related Article:

How to Play 3D Videos on Gear VR with Samsung Galaxy

How to Convert 2D Video to 3D for Android

How to Convert 2D Movies to 3D on Mac

How to Convert 2D Movies to 3D

How to Transfer Music from Computer to Pixel Phone

How to Manage Android on Computer

Convert 3D Movies for Google Daydream VR