By Selena KomezUpdated on August 13, 2019
[Summary]: Step by Step guides on how to backup and restore Samsung Galaxy Note 10/Note 10+(5G) data. Four different ways to help you save data on Samsung phone before reset to factory settings.
“My Samsung Galaxy Note 10 is a little glitchy and I do have Reset as a security measure but I am not sure how to save the data to computer before I attempt to reset, especially for the contacts, text messages, photos, videos and WhatsApp data, I also want to restore the backups to the phone after doing factory reset complete.”
General Android data backup and restore solutions:
If you just want to backup videos, photos, music, contact phone number, etc. You can backup data by using Samsung Cloud, Google Cloud, Google Drive; or transferring the media files from the Samsung phone to a folder after connecting the device to a computer; or using Samsung Kies to backup and restore the data. But, this will not work for apps, or data in apps. If you want to Contacts, Messages, Call History, Calendar, Gallery, Photos, Audio, Video, Documents, Application and even Application data (for rooted devices), you need to this Android Data Backup & Restore or Android Toolkit – Backup & Restore(Android).
Looking for a best Samsung Note/Note 10+ Backup & Restore Software to replace the Samsung Kies, Samsung Cloud and Google Cloud Backup service?
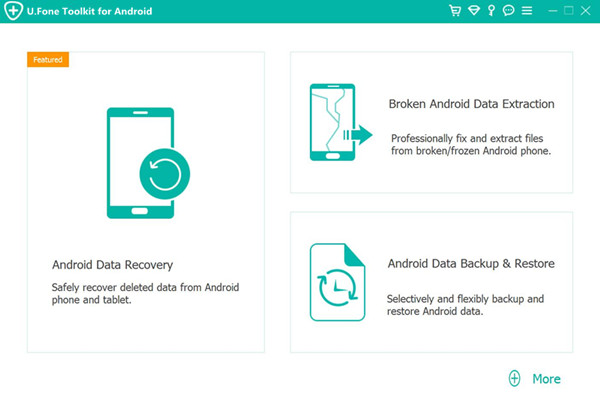
Android Data Backup & Restore is your best choice, it can help you easily backup Galaxy Note 10 or Note 10 Plus data to PC/ Mac and later you can use that backup file to restore data to any Android phone or Samsung Galaxy phone or tablet. You can selectively back up data from Android devices to PC and Mac easily, and then preview the data in detail before restoring data from backup.
More Features:


Step 1.Download and Run Android Toolkit on Computer
After downloading and launching Android Toolkit on PC or Mac, then click on “Android Data Backup & Restore” option to go on.
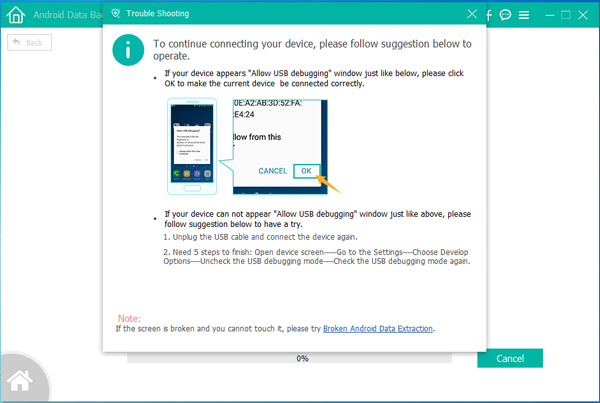
Step 2.Connect Note 10 to Computer
Connect your Galaxy Note 10 to the computer with a USB cable. If you are prompted to enable the USB debugging mode on the device,you can follow the
Step 3.Allow the USB debugging on Samsung Note 10
In this section you must allow the USB debugging on your phone for the process,then you should tap “OK“when it shows up on the device screen.
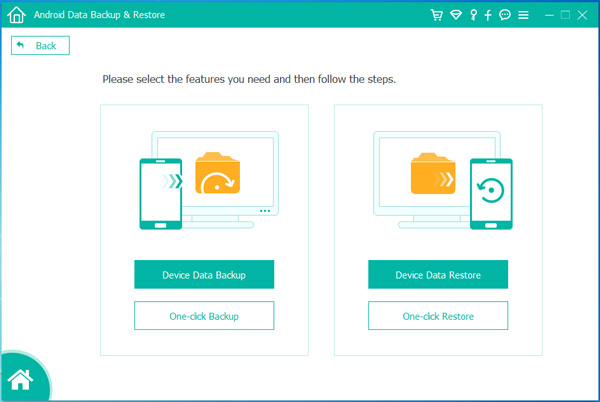
Step 4.Select Data to Backup from Device to Computer
Now you can select data you would like to either backup or restore when it is successfully connected . To do a selective backup click “Device Data Backup” option to go on.
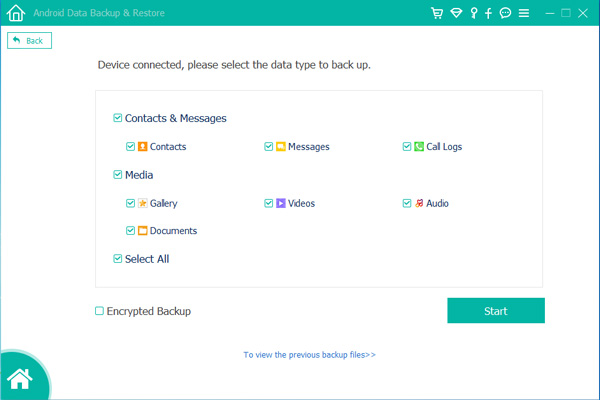
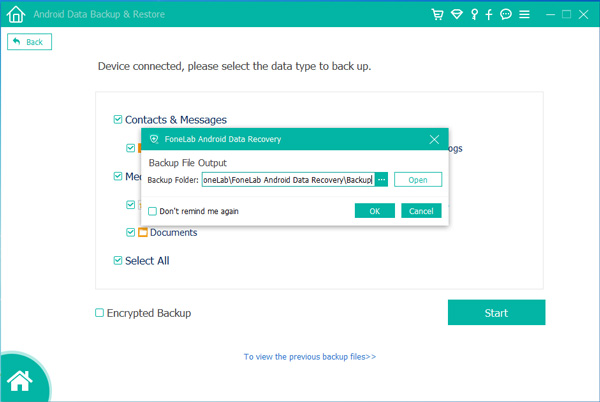
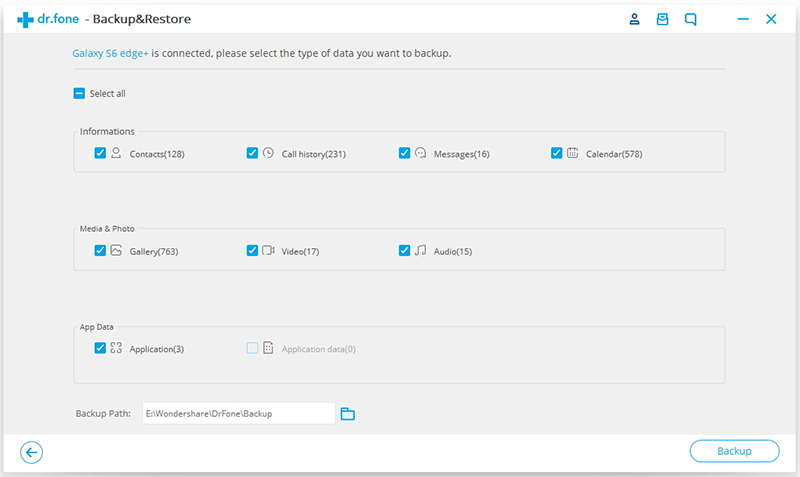
Step 5.Choose File Types to Backup
In this step you can choose the file types to backup,such as Contacts, Messages,Photos,Videos, etc,. and click “Start”.
Step 6.Select the Folder for the Output Files
Select a location to store your backed up data and click “OK” to continue.
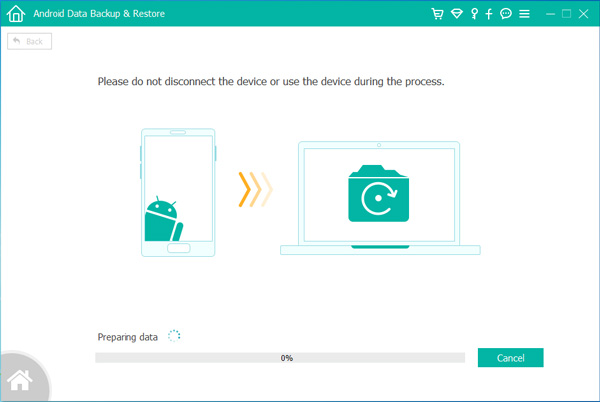
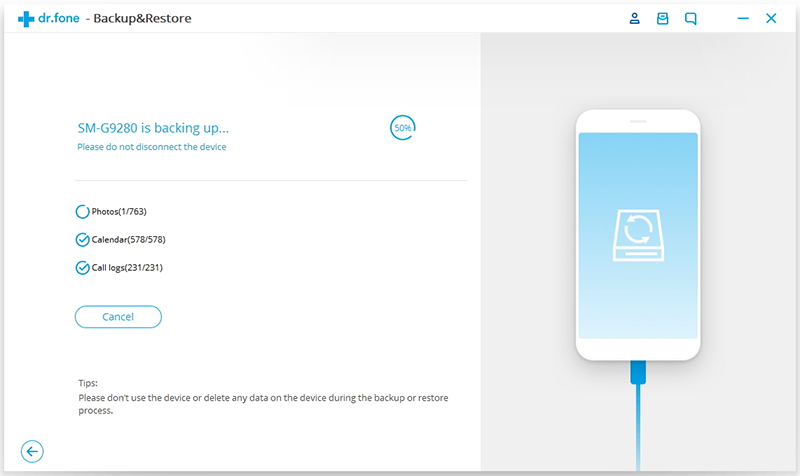
Step 7.Start to Backup Your Samsung Galaxy Note 10 to Computer
Last but not least,just simply click “Start” button to backup the selected data from Galaxy S9 to computer.
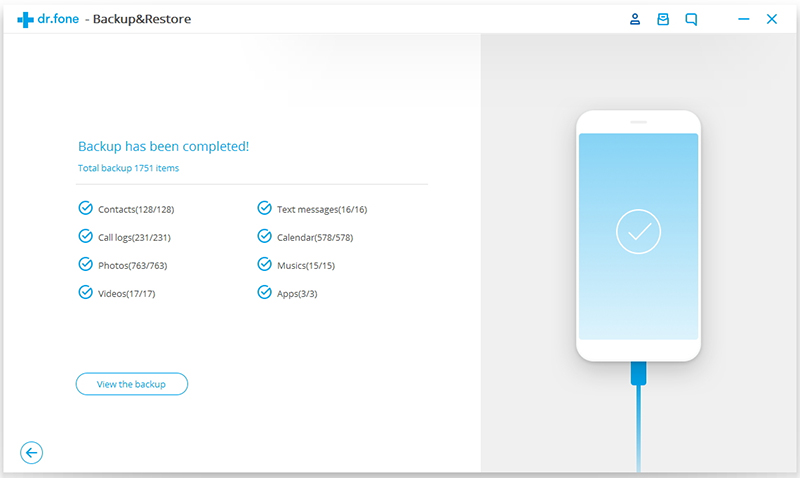
Above steps, you have backed up data from Galaxy Note 10 to the computer, after factory reset your phone successfully, then you can follow these quick steps to restore your data to Galaxy Note 10 or other Android devices safely and easily, including contacts, messages, call history, photos, videos, songs, documents and so on.
Step 1. Connect Samsung Galaxy Note 10 to the Computer
Step 2. click “Device Data Restore” selection, the program will pop up an new windows, then click “Restore” button to transfer the backups to Galaxy Note 10.
Free download the U.Fone Android Toolkit – Android Data Backup & Restore and try to backup your phone.
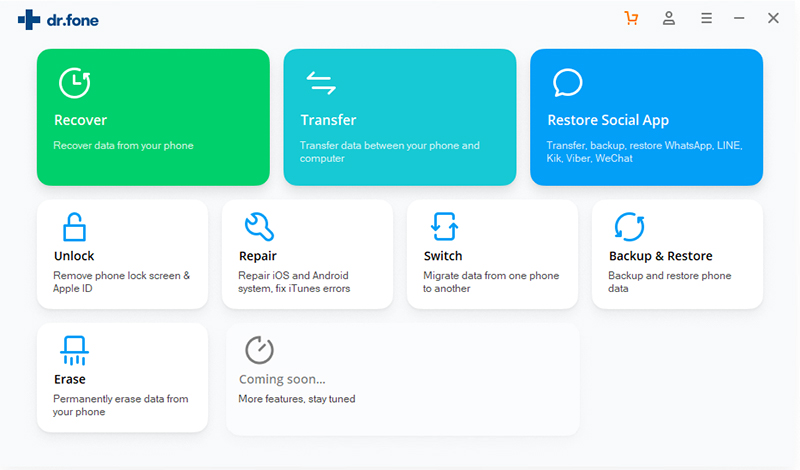
Android Toolkit – Android Data Backup & Restore allows you to easily backup almost all types of data from Samsung Galaxy Note 10/Note 10+/Note 9/Note 8/Note 5/Note 4, including calendar, call history, gallery, video, messages, contacts, audio, applications and even application data. You can also preview and selectively export any type of data you want. The program also allows you to easily restore the data to any Android/iOS devices whenever you need to.
Key Features:
Download the Android Toolkit for Windows or Mac and try to backup your Galaxy Note 10.
Step 1. Launch Android Toolkit on PC or Mac
Launch the Android Toolkit on your Mac or PC and go to the “Backup & Restore” section.
Step 2. Connect Samsung Galaxy Note 10 to Computer
Then, please connect the Note 10 to computer and wait for it to be detected. Make sure that its USB debugging option is enabled beforehand. Afterward, you can choose to “Backup” your data.
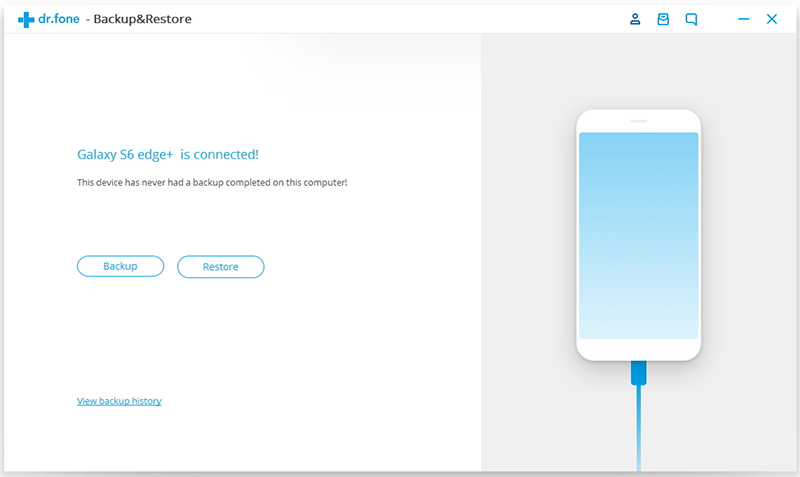
Step 3. Select Data to Backup
The interface will ask you to select the data files you wish to backup. You can manually select the type of data or enable the “Select all” option as well. You can also change the path where the backup would be saved.
Step 4. Start to Backup Data from Samsung Galaxy Note 10 to Computer
As soon as you would click on the “Backup” button, the application will automatically start taking a backup of your data. Make sure that your Note 10 stays connected to the system till the process is completed.
Once the application completely backup Note 10 to PC, you will be notified. Now, you can view the backup data or can remove the device safely as well.
In this way, you can easily use this Samsung Galaxy Note 10 backup software to keep your data safe. You can follow the same drill to restore your data as well. Just go to “Restore” section, load a backup file, and restore your data back to your Galaxy Note 10 and more Android/iOS smartphone.

Before factory reset your Android device, you can use Google Backup and Restore service to backup photos, videos, contacts, Wi-Fi® passwords, Browser bookmarks, User dictionary, a list of installed Market applications and other customized settings, this Google free service also can help you restore data and settings to applications utilizing the backup service upon reinstallation.
Step 1. From a home screen, select Apps Applications icon (located in the upper-right).
Step 2. From the Apps tab, select Settings.
Step 3. Select Backup and Restore.
Step 4. From the Backup account field, ensure the appropriate account is listed.
Note: To change accounts, please select Backup account, then select Google account. Enabled when a check mark Checkbox icon is present. In addition, if Back up my data is disabled, existing backups are deleted from Google’s servers.
Step 5. Finally backup the device and all the selected data to Google Cloud.
Step 6. Go to Backup and Restore setting on your phone and login with the same Google account that you have used to backup your files.
Step 7. After you logged-in, you will see your backed up history. You can then restore the data and settings from there. It’s very easy and simple.
Part 1: Backup Samsung Galaxy Note 10 Data to Samsung Cloud
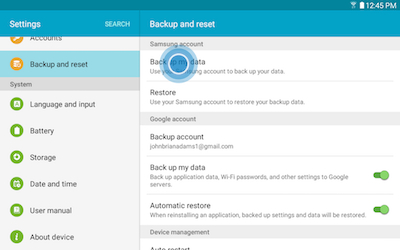
Step 1 : From the Home screen, touch Apps > Settings > Backup and reset. Touch Back up my data.
Step 2 : If prompted, touch SIGN IN to log into your Samsung Account or CREATE ACCOUNT.
Step 3 : Select the Content(s) you want to back up. Touch the slider to turn Auto back up on. Touch OK.
Step 4 : Touch BACK UP NOW to complete.
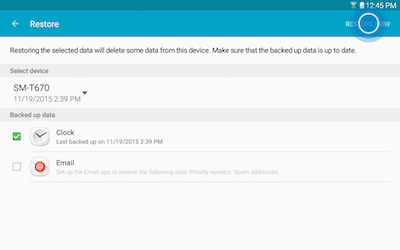
Part 2: Restore Back up Data from Samsung Cloud to Note 10
Step 1 : Touch Restore.
Step 2 : Select the content(s) you want to restore and touch RESTORE NOW to complete.
NOTE: Restoring the selected data will delete some data from this device. Make sure that the backed up data is up to date.
Samsung Galaxy Note 10 Backup & Restore
Prompt: you need to log in before you can comment.
No account yet. Please click here to register.
 (No Ratings Yet)


No comment yet. Say something...