All posts by DHZ

How to Recover Deleted or Lost Data from iPhone

Summary
U.Fone iPhone Data Recovery tool is a professional data recovery for iPhone users, it can recover photos, contacts, text messages, notes, calendar, WhatsApp, App document, etc.

How to recover deleted data from iPhone? I deleted photos on iPhone X, is it possible to recover deleted photos from iPhone? I never backed up my iPhone to iTunes or iCloud, so I need to use an iPhone data recovery software to recover deleted files on iPhone. Thanks.

After upgrading iPhone to iOS 13.4. 1, the photos, contacts and messages was losing, how to restore lost data from iPhone after iOS 13 update?

My girlfriend deleted some important photos and videos on iPhone 11, I can’t find them even in the Recently Deleted album, how to recover deleted video and photos from iPhone 11?

If your iPhone data has been deleted because you or someone else has accidentally pressed delete
Alternatively, if you may encounter the other data lost situations such as upgrade your iPhone to the newest iOS system, jailbreak iPhone, or your iPhone wa stolen/broken, etc,. Believe it or not there still is a effective way to recover deleted data on iPhone. The article below covers three iPhone data recovery solution. If you want to recover deleted or lost data from iPhone. Read on to discover the best way to retrieve your iPhone data.

U.Fone iPhone Data Recovery is used for recovering deleted file on iPhone/iPad/iPod touch in three iPhone data recovery modes, the iPhone data recovery allows you recover contacts, photos, SMS, WhatsApp messages, videos, call logs, calendars, notes and app documents from iPhone/iPad/iPod. To increase your chances of recovering all the data you need, it is recommended that you stop using your device until the deleted data is recovered. You are allow to recover deleted data directly from iPhone device or from iTunes/iCloud backup files. This reliable data recovery program also can help you fix iOS to normal if your iPhone stuck in recovery/DFU mode, stuck on Apple logo or has a blue/black/red screen of death,etc.

Focus on the Features of iPhone Data Recovery:

  • Recover iPhone text content: Messages, Contacts, Call History, Calendar, Notes, Reminders, Safari Bookmark, Safari history, WhatsApp History, App Documents.
  • Recover iPhone media files: Camera Roll, Photo Library, Photo Stream, Voice memos, Message attachments, WhatsApp Attachments, Voicemail, App Photos, App Videos.
  • Support to Restore Data for Any Circumstances:accidental deletion,restore to factory resetting,formatting,iOS upgrade, iOS jailbreak, or iOS system crash(broken/water damaged),attacked by virus and so on.
  • Three Recovery Mode: Recover Data from iPhone Directly; Restore Data from iTunes Backup; Restore Data from iCloud Backup.
  • iOS System Recovery: Fix iPhone stuck in recovery/DFU mode,stuck on Apple logo or has a blue/black/red screen of death,or other stuck issues.
  • Preview files before recovery.
  • Compatible with All iOS Device: iPhone 11, iPhone XS, iPhone XR, iPhone X, iPhone 8/8 Plus, iPhone 7/7 Plus, iPhone SE/6S/6/5S/5C/5/4S,iPad 4/3/2,the new iPad Pro,iPad Air,iPa Mini,iPod touch,etc,.

Let’s free download the iPhone data recovery and try to recover deleted data from iPhone devices.

d_win d_mac
d_win d_mac

Part 1: How to Recover Deleted Data from iPhone Directly

Step 1.Connect iPhone with Computer and Run Program to Scan
Connect your iPhone with computer and then select “iPhone Data Recovery” after launching the program.

run ios 11 data system recovery

connect device to computer

When your phone is detected,you should click the “Start” button to activate the scanning process.

scan iPhone for lost data

Step 2.Preview and Recover Deleted Data from iPhone
Once the scanning is finish,you are allow to preview the scanned out data one by one in the category.Then mark the files you want to recover and then click “Recover” to save the recovered data to your computer.

recover data from iPhone

Part 2: How to Recover Lost iPhone Data By Extracting iTunes Backup

This solution is helpful even when your iPhone is not in hand or your iPhone is broken/damaged.You only need a previous iTunes backup file for your iPhone on your computer.

Step 1.Run Program and Scan iTunes Backup File
Run the iPhone Data Recovery and select “Recover from iTunes Backup File” mode from the top menu.The program will display all the previous iTunes backup files.Select the backup file you need and then click the “Start Scan” button.The program will begin to scan the selected iTunes backup file for recovery.

scan itunes backup

Step 2.Recover Deleted File from iTunes Backup
After the scanning is complete,the program will scan out all the data from the selected iTunes backup file.You are allow to preview the result and choose the files you need to recover by clicking the “Recover” button.

restore iphone data from itunes backup

Part 3: How to Recover Lost iPhone Data By Extracting iCloud Backup

If you have backed up your iPhone data to iCloud, you can also use the “Recover from iCloud Backup” feature to get your data back,even when your iPhone was lost or stolen.

Step 1.Run the Program and Select the Recovery Mode
Launch the program and then connect your iPhone with computer.Then hit on the “Recover from iCloud Backup File” tab on the top menu.Sign in your iCloud account.

login icloud

Step 2.Download and Scan iCloud Backup
After you’ve logged in your account,you will see all the backup files you have crested with iCloud.Select the backup you need and then click “Download”.When the downloading is complete,you should click the “Scan Downloaded” button.The program will immediately start the scanning process.

choose icloud backup

Step 3.Recover iPhone Data from iCloud Backup
When the scanning is complete,you can then preview the result and choose the files you want to recover.Finally click “Recover” to get the deleted data back.

recover data from icloud

Free download and install it on your PC/Mac below. This free trial version allows you to extract and preview all the iPhone content in details.

d_win d_mac
d_win d_mac

iPhone Data Recovery

iOS Data Recovery

Recover Your iPhone iPad Lost Data
Now, Even without Backups

Compatible with iOS 13 & iPhone 11(Pro)

Recover Lost Data Now

How to Recover Lost Data from iPhone, iTunes and iCloud

Summary
Lost data on your iPhone? Deleted photos on your iPhone 14 Pro? Don’t worry, U.Fone iPhone data recovery will helps you easily to recover photos, SMS, contacts, videos & more from iPhone, iPad, iPod, iTunes and iCloud.

In our daily life, we may often encounter such similar situations that iPhone lost data due to several unexpected circumstances,for example iPhone jailbreak, update iPhone to iOS 16 and case data loss, wrong deletion, get iPhone stolen/broken/damaged, viral infection,restore iPhone to factory resetting,etc. Lost iPhone data is such an unluckly thing and I think you must be anxious when you are facing this trouble. There is always a way out. Here is our strongly recommendation, in order to help your recover iPhone lost data efficiently and satisfactorily.

U.Fone iPhone Data Recovery is a powerful and user-friendly data recovery for iPhone/iPad/iPod.iPhone Data Recovery perfectly help to retrieve lost/deleted contacts,photos,SMS/MMS/iMessaged/WhatsApp messages,videos,call logs,notes,calendars, reminders,safari bookmarks,voice memos, voice mail, document on iPhone/iPad/iPod touch with easy steps.Easy-to-use interface is designed to guide iOS users through the iPhone data recovery procedure in 3 recovery:directly recover from device,recover from iTunes backup,recover from iCloud backup.

Free download the iPhone data recovery to recover your lost iPhone data:

d_win d_mac

Sum Up the Top Features of iPhone Data Recovery:
-Free recover up to 16+ types of files,including contacts, SMS, photos, etc,.
-Recover photos from Camera Roll and Photo Stream.
-Recover WhatsApp Messages and WhatsApp attachment.
-Restore data from iOS devices directly or from iTunes and iCloud backup.
-Support various data loss situations:Recover data on device lost due to iOS upgrade/jailbreak, accidental deletion, device lost or broken,etc,.
-Fix stuck loop:stuck in recovery/DFU mode,stuck on Apple logo,stuck at black/white screen,etc,.
-Import files to iPhone,iPad:Transfer recovered files to iPhone from computer.
-Support all the latest iPhone,iPad and iPod Touch.( iPhone 14, iPhone 13, iPhone 12, iPhone 11, iPhone XS, iPhone XR, iPhone X, iPhone 8/8 Plus, iPhone 7/7 Plus, iPhone SE,iPhone 6S/6,iPhone 5S/5C/5,iPad Pro,iPad Mini,iPad Air)
-Preview function available and flexible recovery.

Part 1:How to Directly Restore Lost Data from iPhone

Step 1.Run iPhone Data Recovery and Select the Recovery Mode
Run iPhone Data Recovery,connect your iPhone to the computer,and click “iPhone Data Recovery” option.

run iPhone data recovery

If you want to directly scan and recover lost files from your iPhone device, please click “Recover from iOS Device”.The main interface is displayed as shown below.

recover data from iPhone

Note: You can connect multiple devices and software will list all the connected devices.

Step 2.Scan and Analyze Data on iPhone
Click “Scan Device” option on the main screen of program.The program begin to analyze the connected iPhone.You can see an “Analyzing device. Please wait…” message with a progress bar moving from 0% to 100 % as shown below.

Once the analysis is complete,the program will list all the content of connected device as shown below.

scan iPhone lost data

Step 3.Select File to Preview and Recover
In this step,you are allow to choose the desired file types from the left hand side tree view,and see the list of items contained within them.The items in red color are the deleted ones whereas the others are blue in color.

select-data-recover

Make a selective operation by making use of the check boxes present in front of the items.Click on ‘Save’ button to save the recovered content.Choose your preferred location and click on ‘OK’ button to save the items.

recover iPhone lost data

Part 2:How to Recover iPhone Data from iTunes Backup File

Step 1.Run iPhone Data Recovery and Select Recovery Mode
Please firstly run iPhone Data Recovery,the main screen of the software is displayed as shown below.Select the “Recover from iTunes Backup” option to restore data from iTunes backup.

restore iTunes data

Note:Scan iTunes backup to recover data of a lost/stolen/damaged iPhone device or if data recovery is not possible from the device.

Step 2.Select the iTunes Backup File to Scan
The program will list entire iTunes backup files listed.Select an iTunes backup from which you want to recover data.

Soon it will list all the iTunes backup files that are available as the scanning goes on as shown below.

Step 3.Select File to Preview and Restore
Choose the desired backup file and preview the data from iTunes backup files,as shown below.Select the files that you want to recover and click “Save”.Provide a desired location to save the data.

recover iphone from iTunes

Part 3:How to Restore iPhone Data from iCloud Backup File

Step 1.Run iPhone Data Recovery and Select Recovery Mode
Select “Recover from iCloud Backup” option from the main interface of the iPhone Data Recovery to restore data from iCloud backup.

restore iPhone data from icloud

Step 2.Enter Apple ID and Password to Log in
Enter the Apple ID and Password to get a list of all available backup files from iCloud.

choose icloud backup

Note:Please take it easy,we make the reassurance for you that your privacy is always well protected by program,it is not disclose or steal possible.

Step 3.Select the Backup File from iCloud
The iPhone Data Recovery program will list all the iCloud backup files.Select which one you want to recover and start scanning process.

select-icloud-backup

Step 4.Preview and Recover Data from iCloud Backup
After finish scanning the backup contents from iCloud,you can preview and select the backup contents,extract and save the selected data by clicking “Save” on computer.

recover data from icloud

Part 4:Import the Recovered Files from Computer to iPhone

The files are retrieved to the PC/Mac, so to switch the recovered data back to iPhone/iPad/iPod, iOS Manager & Transfer is a great partner to cooperate with iPhone Data Recovery.
Learn the guide:
How to Import Files from Computer to iPhone/iPad/iPod

Step 1.Connect iPhone to Computer and Select Import File to iPhone
If you want to backup and restore your iPhone data on Windows/Mac computer, or transfer the restored data from computer to iPhone, please go back to the software main interface, then click “iOS Data Backup & Restore” feature. And connect your iPhone to computer via USB cable. Now select “iOS Data Restore” option to import data to your connected iPhone.

ufone restore backup data to iphone

Step 2.Select the File Type to Transfer from Computer
Click on desired item browser button to transfer the item from your computer to iPhone.For example-if you want to transfer photos from computer to your iPhone,click Browse button in front of the “Photos” box.

ufone-scanning-result-restore

Step 3.Confirm the Files to Transfer
If you have connected multiple iOS devices with computer,the program will prompt you to select the desired device to which you want to transfer the data to.Finally,click on “Transfer to iPhone” to start the transferring process.

ufone-restore-contacts-iphone

ufone-restore-photos-to-pc

After selecting data, choose to tap on “Restore to Device” or “Restore to PC” option.

ufone-restore-notes

The next window you can choose an output folder to save your restore files on the computer if you want to restore backup data to a computer. Click “Restore” and go on.

ufone-restore-pc-path

Just in a short time,the select data will be all transferred to your iPhone from completely.

ufone-restore-photos-to-device

Free download the iPhone Data Recovery and try to recover your iPhone lost or deleted data in three recovery modes:

d_win d_mac

Get Back the iPhone Data Lost in Various Scenarios

Everything on your iPhone is not lost, you can recover files from many common scenarios by this iPhone Data Recovery software.

– Lost data after factory reset
– ios upgrade
– Lost data due to iOS update
– iphone stuck
– Device stuck and not responding
– data lost after jailbreak
– Data missing after jailbreak or ROM flashing
– iphone locked
– Device locked or forgotten password
– iphone unable to sync for backup
– Unable to synchronize backup

Related Article

Top 5 Best iPhone Data Recovery Software Review

How to Recover Lost Data from iPhone 6S/6/5S/5

How to Recover Deleted Data from iPhone 7/SE/6S/6

How to Recover Data from Broken iPhone 7/SE/6S/6

How to Recover Data from Water Damaged iPhone

iPhone Data Recovery


iOS Data Recovery

Recover Your iPhone iPad Lost Data
Now, Even without Backups

Compatible with iOS 16 & iPhone 14 (Pro/Plus)

Recover Lost Data Now

25 Best Android Tips to Make Your Phone More Useful

Android is the most popular computing platform in the world thanks in part to how fast it has evolved over the years. Google is always adding new features and making changes to existing ones, and OEMs like Samsung and LG can add their own stuff on top of that. It can be hard to keep up, but we’ve got the 25 best tips for Android right here.

1

Configure a secure lock screen
Android phones all offer various forms of secure lock screens. Most phones will prompt you to do this during setup now, and you should. The defaults are PIN, pattern, and password. Some devices also offer fingerprint security and device-specific things like LG’s Knock Code. To control your lock screen, head to the system settings, and find the Security menu. Some phones have a separate lock screen menu instead. You will need to have a secure lock screen to use features like Android Pay and factory reset protection.

Disable/uninstall bloatware
Most phones come with some apps pre-installed that you won’t want to keep around. Luckily, they can be dealt with these days. Some pre-installed bloat can be uninstalled normally by using the Play Store or finding it in the app settings menu. However, anything that’s part of the system image is non-removable. What you can do is disable it by opening the app menu from the main system settings and finding the app in your list. Right at the top will be a “Disable” button that removes it from your app drawer and prevents it from running in the background.

Set up adoptable storage (on some devices)
One of the cooler additions to Android 6.0 Marshmallow was adoptable external storage. It finally makes microSD cards first-class storage by merging them with the internal storage. To do this, you need a phone running Marshmallow with a card slot.

2

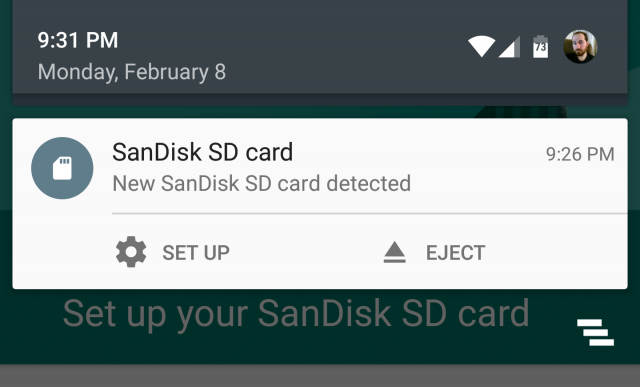
When you insert the card, you’ll be presented with the option of portable or internal storage. Internal storage will adopt the card as a part of the system, so important data can be stored there automatically and expand your total internal storage. The only drawback is that the card will be formatted and encrypted such that it only works in that device. To use it for anything else, you have to completely reset it and move all data back to your phone’s internal flash.

Add mobile data tracking
Data caps are common across mobile carriers, and data rates just keep getting faster. To make sure you don’t blow through your monthly allotment, visit the data usage menu in the system settings. Some phones call this something a little different, but it’s always right near the top. Here, you can set your plan reset date, create a warning threshold, and even have data automatically disabled when you’re about to incur an overage.

Choose Do Not Disturb settings
Android’s notification settings are a bit of a mess right now. Not only do OEMs often change the terminology, but Google itself has revamped it a few times in recent updates. You’ll find this feature either in your volume popup when you hit the toggle or by going into the system settings for notifications (usually Sound and Notification). It will be called Do Not Disturb on most devices. In this menu, you can choose when DND is toggled on automatically, what is blocked, and if any contacts are allowed to ring through anyway.

Enable Smart Lock
Turning on a secure lock screen as explained above is important to keep your data safe, but it can be a pain to input a code every single time you pick up the phone. You can avoid that with Smart Lock. You’ll find this feature tucked away in the security menu on most devices. It includes different methods of bypassing the secure lock screen automatically. You can keep your phone unlocked when you’re in a certain place (like home), when a device like a smartwatch is connected, or when the phone sees your face with the front-facing camera.

3

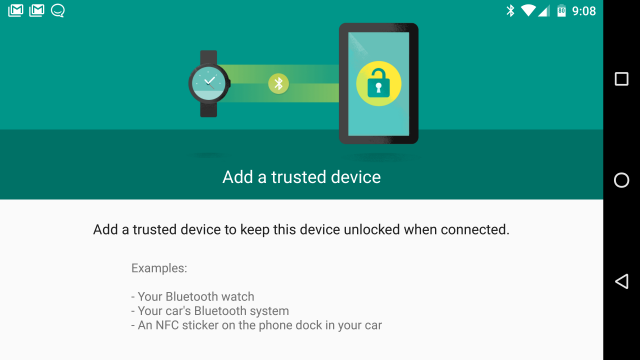
You can even have multiple Smart Lock modules active at the same time. So for example, you could force the secure lock method only when you’re away from home and the phone gets far enough away from your smartwatch to disconnect.

Make sure your photos back up automatically
There’s nothing worse than losing or breaking a phone only to realize your photos aren’t backed up. You can avoid this by simply opening the Google Photos app and following the prompts to enable auto-backup. The default mode is “high quality” and unlimited space. This compresses your photos, but they look surprisingly good. If you want to save the original image, you can opt to use your Drive storage space. You get 15GB free and can buy more.

Get started with “OK Google”
Google search is at the heart of all Android phones, and you can start searching at any time just by saying “OK Google.” This works on the home screen and in the search automatically, but if you go into the search settings, you can get OK Google working everywhere. In the search settings, go to Voice > OK Google detection.

4

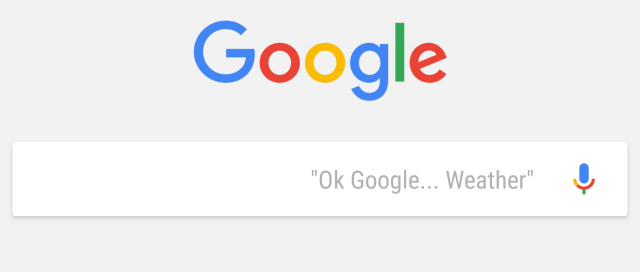
Just turn on the “From any screen” option and the phone will have you say “OK Google” a few times to learn your voice. Now you can use the hotword any time the device ID awake from any screen. Note: Some Nexus phones also support this when the screen is off.

Google Now on Tap (Marshmallow and higher)
If you’ve got a Marshmallow phone, you have Google Now on Tap. This is Google’s attempt to bring the power of Google Now out of the search UI. When you long-press the home button, On Tap reads the text on the screen and offers contextual actions. It might help you make a calendar appointment, look up restaurant reviews, or just perform a Web search. Give it a shot before you jump into another app to take care of things manually.

Try a different home screen
Most Android devices have a custom UI created by the device maker (eg. Samsung’s TouchWiz). That includes the home screen. This is an important part of the experience, and the default home often isn’t very powerful. Installing an alternative like Nova Launcher or Action Launcher can make your device much easier to use. You can use these apps to change the icons, assign navigation gestures, organize apps, and so much more. Any time you want to change between your installed home screens, just go to the Home menu in the system settings.

Use screen pinning
If you need to hand your phone to someone else, you don’t necessarily want them snooping around in other apps. This is easy to prevent — just pin the screen. This should be enabled by default on most devices, but if it’s not, check the security menu.

5

Tap the pin icon on any app in the multitasking interface and you can lock the screen to just that app. If you have a secure lock screen, you can require that unlock method to leave the pinned app.

Swipe input on the keyboard (most devices)
Tapping with your thumbs is okay as an input method, but most phones have swipe input built-in too. Give it a shot by dragging across the letters for each word. The accuracy varies by device, but you can also install a different keyboard that might suit you better. There’s the Google Keyboard for a clean but somewhat limited experience, and then more complex and powerful options like SwiftKey.

Use power saving modes
All Android phones have power saving modes of some sort — sometimes two or three of them. Head to the battery menu (usually just Settings > Battery) on most phones to see these settings. For example, Samsung offers a regular power saving mode that reduces screen brightness and slows the CPU, then there’s also an ultra power saver that locks the device to just a few essential applications. Most phones offer basic power saving modes like the former that can be turned on automatically when the device reaches a certain battery level. This is definitely something you should set up.

Enable system UI tuner (stock Android Marshmallow)
If you have a stock Android phone on Android 6.0 like a Nexus or Motorola device, you have a particularly cool new toy to play with called System UI tuner. This is an experimental feature of Android that lets you make changes to the Status bar and Quick settings. To activate, long-press on the settings icon at the top of your Quick Settings panel. This will add a new item in the main settings for the UI tuner.

6

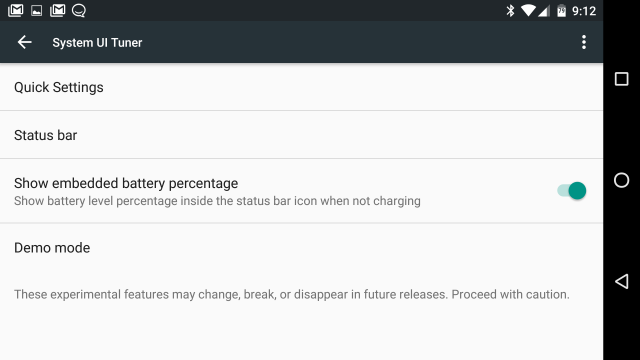
You can use it to hide items like signal, clock, alarm, and so on from the status bar. You can also add a battery percent to the battery icon. There’s even an option to rearrange the tiles in Quick Settings. Some of this already exists on skinned versions of Android like TouchWiz, but this is the first time pure Android has supported it.

Manage default apps
Many actions on Android will ask you to set a default app, but what if you decide you don’t like that default anymore? Some phones have a dedicated default app settings menu (e.g. Samsung), but the surest way to clear out those defaults is to find the app in the app menu under the main system settings. When you look at the info page for an app, there will be a button toward the bottom to view and clear the defaults. That will let you select a new default the next time you perform an action.

Turn on Developer Options
Google hides some of the more advanced tools in a special Developer Options menu that you’ll have to enable to get at things like animation speed, USB debugging, and app standby (which I’ll get to momentarily). To turn on Developer Options, open the “About phone” menu at the bottom of the system settings and find the build number. Tap on that seven times and you’ll get a message that you are a developer. The dev options will now be at the bottom of your main system settings.

Activate guest mode for shared devices
If you want to let someone borrow your phone for a bit and screen pinning is too restrictive, you may have the option to enable Guest mode. All stock Android devices have this, as well as most phones running 5.0 or higher from OEMs like Samsung and LG. To switch to a guest account, tap the profile icon in the upper right corner of the notification shade and select the guest profile.

7

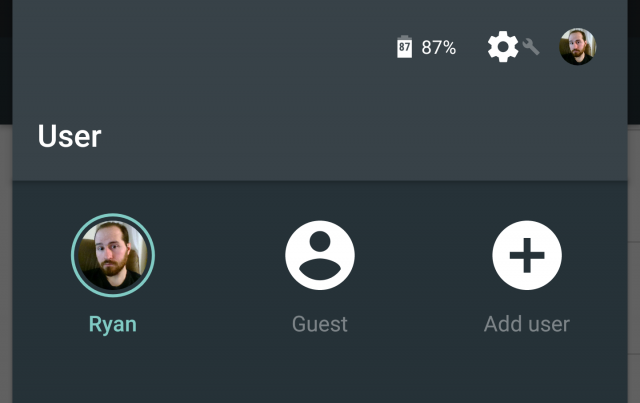
All your data, accounts, and apps will be hidden from the guest account. There’s also a Users menu in the settings of most devices to control what guests can and cannot do. Note, some carriers remove this option from the phones they sell for some (probably stupid) reason.

Make tweaks to App Standby and Doze mode (Marshmallow and higher)
Google introduced two new battery saving features in Android 6.0 called Doze and App Standby. Doze mode puts your device into deep sleep and blocks most apps from waking it up when it’s been sitting unused for a little bit. Meanwhile, Standby blocks apps you haven’t used recently from running background tasks. These both work fine on their own, but you can tweak things if you want.

Doze mode is accessible in Settings > Battery > (menu) Battery optimization on most phones. From here, you can make apps exempt from Doze, allowing them to operate even when the phone sits unused. This is only necessary if the app isn’t working right under Doze mode. Standby is found at the very bottom of the developer options menu where it’s labeled Inactive apps. This has a list of all apps on the device, some of which will probably be marked as inactive. Tap on any of them to toggle between active and inactive. Don’t worry — inactive apps become active again once you’ve opened them.

Screen casting
Do you have a $35 Chromecast or Android TV? If so, you can do more than stream video to it. Android devices can mirror the entire display onto your TV, and it’s essentially foolproof. On stock Android devices (and a few more) there is a Cast icon in the Quick Settings. Tap that and pick an output device to start mirroring your display. On other phones, just download the Chromecast app and use the screen casting feature included there.

Identify which app sent that notification
Android’s notification system is great, but sometimes it’s not clear which app produced a notification. Should you ever be confronted with a mysterious notification that you can’t identify, there’s an easy way to figure out where it came from.

8

Simply long-press on the notification and the parent app will be revealed. Tap the info icon to head to the app’s notification settings to disable it if you like.

Manage apps on the Web Play Store
Google includes the Play Store client on Android devices, but there’s also a version of the Play Store accessible online. For some people this is a no-brainer, but not everyone thinks to use the Web-based Play Store. You can do all the same things here that you do on your phone, but faster. Apps and games can be purchased and pushed over the air to Android. You can queue up multiple installs in a fraction of the time it takes on Android. If you’ve got more than one device on your account, you can pick where the app goes.

Adjust animation speed
Android Lollipop and higher includes a lot of flashy animations that help to cover some of the load times as you tap around, and can also help direct your attention to the right areas of the screen. If, however, you’ve got a fast phone and you don’t want the animations slowing you down, you can speed them up. You’ll need Developer Options enabled (see above), then just open that menu and find the settings for Window animation scale, transition animation scale, and animator duration scale. They all default to 1x, but you can turn them down to 0.5 for a snappier experience. Shutting them off is an option too, but I think that makes things look a little busted.

Use (and remove) factory reset protection
Android 5.1 added factory reset protection to Android, which is nice should your phone ever be stolen. The thief won’t be able to reset and log into the phone without first knowing your Google password. However, you might also accidentally lock the new owner out of your phone (or even yourself) if you sell it.

9

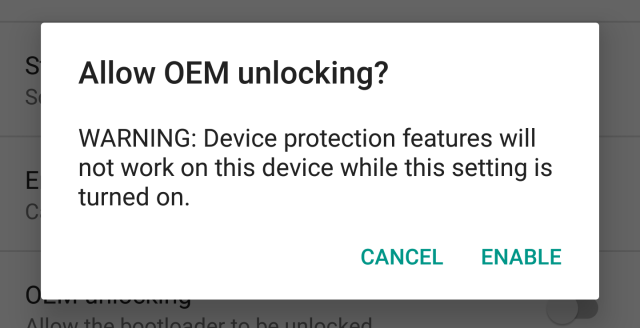
Factory reset protection is enabled automatically when you have a secure lock screen enabled in Android 5.1 or higher. Make sure you don’t reset your phone less than 24 hours after changing your Google password, or you’ll trigger a 72-hour anti-theft lockout. To disable reset protection for a new user to log into the phone, just disable the secure lock screen, enable OEM unlock in the Developer Options, or manually remove your Google account in the Accounts menu (this also factory resets the phone).

Sideload (safe) apps
The Play Store has plenty of apps, but if you want to branch out a little, there are safe ways to do that. First, head into the security settings on your device and enable “Unknown sources.” That will let you install APKs downloaded from outside the Play Store. Some of the popular ones are the Amazon Appstore, F-Droid, and APK Mirror. Amazon offers a fair number of paid apps for free, and F-Droid is for free and open source software. APK Mirror re-hosts free APKs so you don’t have to wait on staged rollouts and can get old versions of software.

Save offline maps
Google Maps includes support for saving maps offline, and the feature was recently expanded to be more powerful. It’s not easy to find, though. Find the area you want to save offline, then tap in the search bar at the top of the screen. Close the keyboard and scroll the the bottom and you’ll see the option to download.

10

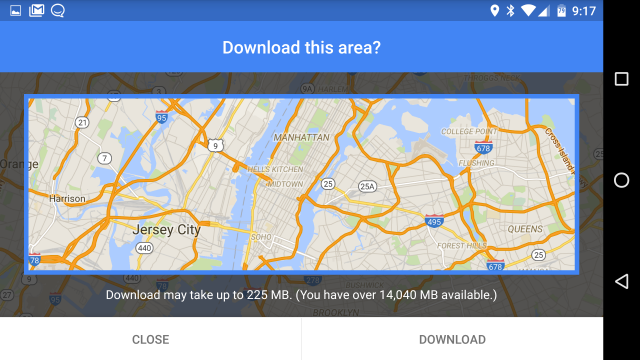
The app will bring up an outline to indicate the area that will be downloaded and estimate how much space it will take up. The offline data will include streets, basic points of interest, and the ability to use turn-by-turn navigation.

And much more…
After all that, you should be a pro at using Android. This is just the beginning, though. There’s a lot more to discover in Android, and every device is a little different. So, don’t be afraid to poke around in the deep, dark corners of the settings and see what you can find.

Read more:

Samsung Pay:What You Need to Know

How to Fix An Wet Android Phone

How to Fix Top 5 Android Problems

How to Get More Internal Storage from Android

How to Delete Apps from Android Phone

How to Restore Data from Bricked Samsung

“I just root my Samsung Galaxy S5.However, it has been bricked since then.I am eager to restore all data from my bricked Samsung” Familiar situation and similar problem,right?Just follow our guide, and we will show how to retrieve data when Samsung/Android device get bricked.

Installing a custom ROM can bring big benefits but it may lead to brick your phone.The rewards of rooting your phone and installing a custom ROM can be worth the risky, heart-in-mouth process of wiping your mobile’s officially sanctioned software. But if you’re one of the unlucky few for whom it all goes wrong, leaving you with a bricked Samsung phone, what do you do next?

While the severity of how badly bricked your phone is varies, the symptoms are often the same — a reboot loop, switching itself off after the Samsung logo or never getting into the operating system.For the purposes of this article, as long as you can get back data from a bricked phone, there’s hope.I’m going to guide you through the process of recovering a bricked Samsung phone.

Retrieve File on Bricked Samsung Device

Broken Android Data Recovery enable to download recovery package for bricked Samsung and fix bricked Samsung device and restore data from bricked Samsung/Android device, including contacts,SMS/MMS/iMessages,call history,WhatsApp messages,gallery,videos,audio,and documents,etc,.This program allow to restore data from bricked Samsung device under several unexpected circumstances:black scree/white screen,stuck on Samsung logo,stuck in download mode/recovery mode,or other bricked issues.

d_win d_mac

How to Recover Data on Bricked Samsung Phone

First of all you need to come across and it can be done by installing the Android recovery on your computer and then going for the scan option. When it has completed scan, you should click “Broken Android Data Extraction” to enter the restoring process.

Step 1.Run Program and Connect Bricked Samsung to PC
Run Android Data Recovery program on computer.Then connect the bricked Samsung phone(Samsung Galaxy S5 for example) to the computer.When the following interface occurs,select “Data Extraction(Damaged Device)”.

run android data recovery

Step 2.Choose the File Types to Recover
Now you need to select the file type to restore from bricked Samsung. The recoverable data includes contacts, text messages, photos, gallery, music, video, documents,etc,.

select the data type to restore from bricked samsung

Step 3.Select the Broken Type of your Samsung
You should select the broken situation that match your device.

bricked choose fault type

Step 4.Select the Phone Fault Type for your Samsung
The program will enter the interface as the screenshot shows.Please select a kind of problems that matches your Samsung state,for example,mobile phone black screen,stuck in the start screen or other,and then click on NEXT.

Step 5.Choose the Phone Name and Model
Select the proper Android system version of the Samsung as well as the exact model you are using.

select the bricked samsung model

Step 6.Get Bricked Samsung into Download Mode
Now follow the guide to enter the Download mode: Power off the phone > Press the volume down + Home button + Power button > Press the volume up to enter download mode.

get bricked phone enter download mode

After that,your phone will enter “Download Mode” successfully.

download recovery package for samsung

Step 7.Restart Samsung Device
Android Data Recovery program will download the recovery package for repairing your bricked device,which helps you enable it back to the normal state.Several seconds later,the bricked phone will restart as the normal one.Then you need to check whether the device works or not.

restart samsung phone

Step 8.Restore Data from Samsung Phone
Since your phone is normal now,you can recover files from Samsung phone.Just select the data and save on your computer.

recover data from samsung

Done.Note that recovered files are stored on the computer.If you would like to send the recovered data to Samsung, you should use the excellent Android Transfer.Click to see how to transfer data from computer to Samsung device.

d_win d_mac

Related Article:

How to Recover Data from Broken Samsung Phone

How to Retrieve Lost Data from Broken Samsung Galaxy

How to Recover Data from Samsung with Broken Screen

How to Fix Samsung Frozen on Samsung Logo

How To Fix Samsung Galaxy Black Screen Problem

iOS 10 Public Beta Now Available

The beta version of Apple’s upcoming mobile operating system, iOS 10, is now available to the general public.iOS 10 BetaIf you’re thinking about trying it out before the final version is released this fall, you’ll have to sign up for Apple’s beta program, which will also provide Mac owners access to the public beta of macOS Sierra, also released today.

ios-beta

Though the developer preview is limited to those enrolled in the Apple Developer program, the iOS 10 beta is available to anyone with a compatible iOS device. Navigate to the beta website, log in with your Apple ID, accept the terms, and download a configuration file that will install iOS 10 on you gadget.

QQ图片20160809154852

Be aware that beta software—even from Apple—means bugs and occasionally more serious headaches. If you have an older iPhone or iPod touch kicking around that you don’t use for day-to-day activities, consider using that instead of your main iPhone.

That said, there are some compelling reasons why you might want to get a head start on using iOS 10’s features, besides the ability to give Apple pre-release feedback.

iOS 10 BetaPerhaps the biggest change is to Apple’s Messages app, which gains the ability to send animations, invisible messages that only appear once tapped, and handwritten notes. There are also rich links for viewing videos and photos directly in the app, as well as emoji suggestions. Other notable app redesigns include a new Music app, which Apple is trying hard to position as an alternative to Spotify (something Spotify is understandably not too happy about).

QQ图片20160809154912

For a more complete overview of new iOS 10 features, check out our recap of WWDC 2016. You’ll also want to browse 9to5Mac’s full list of the more than 50 new features available in iOS 10 beta 2, which is the version released for the public beta program today. Most of them are subtle, like a redesigned bounce effect when invoking Control Center, although Apple has also added a dedicated feedback app.

If you decide you want to switch back to iOS 9, you’ll first have to erase the beta software, then re-install the latest shipping version of iOS, and finally restore your device from an iTunes backup.

Read more:

How to Delete Built-In iOS Apps on iOS 10 Device

iPhone 7:Everything You Need to Know

iOS 9.3.3 :The Things You Need to Know

Apple Pay:Everything We Should Know

14 Things You Didn’t Know Your Apple Headphones Can Do

25 Hidden iPhone Features that are Really, Truly Hidden

You Can Delete Built-In iOS Apps on iOS Device

You Can Finally Delete Built-In iOS Apps, but Should You?With iOS 10, it’s possible to remove 23 pre-installed apps from your iPhone or iPad. Doing so frees up space, but also has some drawbacks.

Apple recently announced that iPhone and iaPad users can finally delete pre-installed Apple apps. That means you can get rid of superfluous apps you never use, such as Compass and Tips, perhaps. It’s as simple as pressing and holding an app icon until it jiggles, and then tapping the ‘x’ that appears on it, but it only works after you install iOS 10.

delete apple apps

iOS 10 is out now in beta release, although many people will likely wait until September or October for the final build before they get it. Either way, there are a few things to know before you chuck those apps.

Ditch the App, Lose App Access
Get Organized When you delete one of the pre-installed apps from your iPhone or iPad, you’ll lose it from the Home screen, the Notifications panel, and any connected devices and services you might use, such as CarPlay and Apple Watch. You also might delete data stored in it, unless that data is saved to a related cloud account.

What I mean by that is if you delete, say, the Music app, and you have purchased songs in the app through iTunes, you’ll still be able to access your music through iTunes. But the songs will be gone from your iOS device when you remove the app.

You can always reinstall apps that used to be on your phone at no cost. So, if you change your mind and want to reinstall an app, it’s just a matter of downloading it and tailoring it again to how you use it.

Which Apps Can You Delete?
Once you have iOS 10 installed onto your device, you can remove up to 23 apps that you couldn’t before. Some are fine to remove if you have never used or rarely used them. Others require a little more explanation about what will happen if you delete them before you decide to do it. The apps I recommend removing if you have never (or rarely) used them are:

-Calculator
-Compass
-Find Friends
-iBooks
-Music
-Notes
-Podcasts
-Reminders
-Stocks
-Tips
-Watch
-Weather

Beyond those, there are 10 more apps you might delete, but they require a little more knowledge and thought. They are: Calendar, Contacts, FaceTime, iCloud Drive, iTunes Store, Mail, Maps, News (this one is not yet available to delete in iOS 10 beta, but it will be in a later release), Videos, and Voice Memos.

You might be thinking, “Why would I delete my Contacts app?” It’s pretty scary to think about eliminating your entire address book. Well, it turns out that won’t happen. If you delete the Contacts app, all the phone numbers and other information contained in that app will still be accessible from the Phone app. In other words, the information in your Contacts app isn’t solely relegated to that app. It’s elsewhere, too.

There are other apps that might also have important information that won’t necessarily disappear for all time if you wipe the app from your phone. For example, if you use Calendar on a Mac and sync your calendar entries across devices, you can delete the app from your phone without losing the calendar appointments from your other devices. Just make sure all the data has synced properly before doing it.

FaceTime is an app I’ve used only once or twice…until my sister started using it. Because I want her and other friends and family members to be able to get in touch with me by whatever means is most convenient for them, I will keep FaceTime on my phone. Put another way, even though FaceTime isn’t my first choice in communication apps, it might be for other people, and that’s reason enough for me to keep it around.

Tip: If you also want to be sure people can reach you via FaceTime, make sure you can get calls on it when you are not connected to Wi-Fi by enabling 3G/4G/LTE data use. Go to Settings > Cellular and scroll down until you see FaceTime. Make sure the green button appears.)

How Much Space Can You Reclaim?
The amount of space you can reclaim by deleting pre-installed Apple apps varies, although Apple estimates it’s only about 150MB for all 23 apps. It’s a little misleading, though, because the amount of space changes dramatically based on the data is associated with each app.

Let’s say you used the Music app some time ago, but then switched to a streaming service, like Spotify. If you have old music still downloaded onto your phone, it will all be deleted when you remove the Music app, and that could free up a huge amount of space.

The Videos app is great example, too. This app stores movies and TV shows you’ve downloaded to watch, not videos you’ve shot. Maybe you downloaded a movie to watch on a flight long ago and never remembered to delete it. It could be taking up a huge amount of space without you even knowing it, because when you go poking around the iOS settings to manage your storage, the Videos app doesn’t even show up! You can only see how much space videos are taking up when you plug your phone into a computer and view the space in iTunes.

If you’re still short on storage, read How to Free Up Space on Your iPhone or iPad for more tips. And if you’ve reclaimed space and are looking for new apps, be sure to check out our lists of the best iPhone apps and iPad apps.

Read more:

News about iOS 10 Public Beta

iOS 9.3.3 :The Things You Need to Know

iPhone 7:Everything You Need to Know

Apple Pay:Everything We Should Know

14 Things You Didn’t Know Your Apple Headphones Can Do

25 Hidden iPhone Features that are Really, Truly Hidden

How to Recover Text Messages from Broken Samsung Phone

Summary:If you suddenly broken or damaged your Samsung phone,you find yourself staring on a blank screen or broken screen when you open your device?Any other worse?You cannot open your files on the broken Samsung anymore?If you encounter it by accident,just read this tutorial for reference to easily recover data from broken Samsung phone.

SMS is one of the most important convenient communication way for each other.Text messages play an useful role in everyone personal and business life.However, you may carelessly delete a text message of great importance while trying to delete the old ones.Or it’s not your fault,but your Samsung phone is broken under any circumstances.Under normal conditions,damage due to operator misuse including;water;infusion.All files that you have stored cannot be opened anymore, if you do it by accident, and that original data could be gone, it makes it difficult to recover the SMS or more data from broken Samsung phone.

How to Restore SMS on Broken Samsung Phone/Tablet

In this case,you still have a chance to get back you messages from the broken device.Here is the solution for you.A recovery program can help you retrieve SMS from broken Samsung phone/tablet.

Samsung Broken Screen Data Recovery,a strong Samsung data recovery software,will be your reliable and trustworthy helper to restore all lost or existing data from broken Samsung,including SMS,contatcs,photos,call logs,document and so on.With the help of this wonderful program,you are allow to restore data from broken Samsung device,like broken screen Samsung,black screen Samsung, locked screen, can’t enter the system of Samsung,non-responsive of Samsung,etc,.Try it,it must do a geat help for you all Samsung users.

d_win d_mac

Easy Guide to Recover SMS from Broken Samsung Galaxy

After running Broken Samsung Data Recovery – Android data recovery on your computer,you will get the following main window.Then you should select the “Broken Android Data Extraction” option in the main interface of program.

Step 1.Connect Broken Samsung to Computer
Connect the broken Samsung phone to computer,and click the “scan it” button next to in the bottom of the interface.

connect broken samsung to pc

Step2.Select the File Need to Restore
The scanning will take you a few minutes to waiting.After that,you can preview all recoverable data found in the scan result one by one.Actually,the current including the deleted/lost or existing messages, contacts, photos and video are also scanned out in the result.You can distinguish them by different color.Now you can click the option which is the type data name.If you want to recover all files at once,please click “Select All” item.If you only need to restore SMS,just select “Messaging”.

scan broken samsung

Step 3.Select the Fault Types of Broken Samsung
In this step,the program will guide you to another screen,you will see the following screen. There are two fault types of phone choices: “touch screen can not be used or can not enter the system” and “black or cell phone screen is broken”.Select it depend on your phone situation.

choose broken types

Step 4.Select the Model of Broken Samsung
According to option to select the brand and model of your Samsung device,click”Next”.If you are not sure what model of your Samsung device,please click the “How to confirm the device model”option.

broken select device model

Step 5.Enter Download Mode for Broken Samsung
Now you should follow different steps to enter download mode depends on broken Samsung.

broken samsung download mode

Then,please click the “Start” button,the countdown will display on the phone screen that in the program to let you know how to enter download mode for the device.

Note:During process of getting into “Download mode” process,do keep connecting your broken Samsung device to computer via USB cable.

Step 6.Analyze your Broken Samsung Galaxy S/Note for Lost Data
Once entered the “Download mode”,the program will start downloading “recovery package” for device,it will take you a little time,please wait a while.

scanning text messages on broken samsung phone

When the downloading finish,the selected data item stored on the device will scanned out.

Step 7.Preview and Recover Selected SMS from Broken Samsung
When scanning is complete,you are allow to preview the lost or existing SMS by selecting,including the detailed messages,photos,videos and more document.Just click “Recover” button at the lower-right corner and save them on the computer or recover to your Samsung device.

recover sms from broken samsung phone

Free download the Android tool kit and try to extract SMS files from your Samsung phone with broken or black screen.

d_win d_mac

The Samsung Broken Recovery program is versatile since it can do wonderful things except retrieving data from broken Samsun.If the operating system of Samsung encounters a problem, the program will help to fix the Samsung system issues and fix it right away. If you want to create a back up for Samsung, you can easily export all data to computer for backup,it can save text messages as a HTML or text file.

Related Article:

How to Recover Data from Broken Samsung Phone

How to Recover Lost Data from Broken Samsung Galaxy

How to Recover Data from Samsung with Broken Screen

How to Recover Data from Water Damaged Samsung Phone

How to Recover Lost Data from Samsung

How to Improve Wi-Fi Signal in Five Minutes

Wi-Fi is just radio waves, and many things can cause interference. But a strong Wi-Fi signal can give you faster performance and better coverage distance, so it’s important to properly position and configure your router for optimal signal strength. I’ll show you how; it just takes a few minutes.

wi-fi

Point the Antenna Up

Routers generally have physical antennas that are adjustable. The antenna often comes pointed horizontally to fit the router inside its box. For maximum signal strength, position your router’s antenna vertically, pointing straight up. If you have two antennas, you won’t get better performance by pointing them in different directions.

Position Your Router Properly

Consider where you put your router. If you have a large home or office, place the router close to the center to maximize coverage. If you position the router at one end of the building, you may have poor (or no) signal at the other end.But keep in mind that if you already have your router positioned at one end of your home and the signal strength is just fine on the other side, you don’t need to move it.

For maximum coverage, the router should also be high up. Placing it on the floor is the worst location possible – place it on a high shelf, if possible.

Don’t place the router on or near large metal objects, such as metal shelves or filing cabinets. These can block the signal. Metal or stone walls can also block Wi-Fi, while wood and plaster walls won’t cause any problems.

You might be able to root out other sources of interference. For example: microwave ovens, 2.4 GHz cordless phones, and 2.4 GHz baby monitors all have the potential to interfere with a Wi-Fi signal. I’ve personally experienced a Wi-Fi signal to my laptop dying every time a microwave oven was turned on. The microwave oven was in direct line-of-sight between my  laptop and the router. The solution? Move any one of them so that the microwave isn’t in between. If you get interference from a cordless phone, you might want to purchase newer 5.8 GHz cordless phones; these  workon a frequency band other than Wi-Fi and don’t cause any interfere.

Choose the Best Wi-Fi Channel

If you’re in an area with many different Wi-Fi networks — such as an apartment complex or even just a house close to other homes — your neighbors’ Wi-Fi networks are probably interfering with yours.

To minimize this, move your router further away from the other Wi-Fi access points, if you can. For example, if you’re in an apartment and have a router in the corner of your room, your neighbor’s router might be right on the other side of the wall.

But the best thing you can do is switch to a different Wi-Fi channel. You access this option on your router’s settings page — check your router’s instruction manual for instructions on how to do that. (If you don’t have the instruction manual, you can almost certainly find the instructions online.) Locate the Wi-Fi channel option in the router’s web interface and change it to a different channel with less interference.

It might take a little experimentation to find the best one, but you can get help choosing a Wi-Fi channel using the Wi-Fi Analyzer app for Android phones and tablets, which will monitor the Wi-Fi networks near you and recommend the least-cluttered Wi-Fi channel for your network. Unfortunately, similar apps aren’t available for iPhone or iPad due to the limitations Apple places on app developers.

That’s it — all you really have to do is position your router well and choose the ideal Wi-Fi channel to optimize your network. Of course, buying a new router that supports modern, improved Wi-Fi standards may also offer you a signal strength and speed boost.

Read more:

How to Set the Smart Lock of Samsung Phone

Tips to Make Full Use of Samsung Galaxy S7(Edge) Camera

How to Connect Android Phone to Car Audio

25 Hidden iPhone Features that are Really, Truly Hidden

14 Things You Didn’t Know Your Apple Headphones Can Do

25 Hidden iPhone Features that are Really, Truly Hidden

How many times have you seen posts on tech sites about “hidden iPhone features” and thought to yourself, these tricks aren’t really hidden at all. We’ve even had a few articles here on BGR with tips that were indeed unknown to most users, but the savvy iOS device owners out there were undoubtedly familiar with at least a few of them.

Well, in this piece we’re going to tell you about 25 hidden features on iPhone that are really, truly hidden. As in, you could look through your iPhone from now until the end of time and you wouldn’t find any of these tricks unless you know what you’re looking for.

iphone-plus

In the past, many of the hidden tips we’ve seen on sites and even covered here are simply things that are buried in the Settings app in places people normally wouldn’t look. These are great things to know — plenty of people would make their camera flash blink with incoming messages if they knew that they could, for example — but they’re not really “hidden” or “secret,” per se.

Each of the tips that follow below, however, are completely hidden. There is no indication that these functions exist in iOS, and we guarantee that most users don’t know about them. In fact, we also guarantee that even the savviest iPhone owners among you will find at least one or two things you didn’t already know. In fact, ran this list past a friend who works at Apple and there were a few things that even he didn’t know.

Enjoy.

Redial: In the Phone app, press the green call button on the keypad screen to make the last dialed number appear.

Clear cache: Make your iPhone run faster by clearing out the cache in several of Apple’s apps using a secret trick. In the App Store, Podcasts, Music, Game Center, iMessage and Phone apps, tap on any single tab icon at the bottom of the screen 10 times in a row.

Make TouchID work faster: Save the same fingerprint multiple times as different entries and TouchID will work much faster. This is especially useful on older phones like the iPhone 6 and iPhone 5s.

Spotlight conversions: Remember when we told you how easy conversions are in our post on Google search tricks? It’s even easier for iPhone users — just open Spotlight and type something like “20 euros in GBP,” and it will instantly perform the conversion.

Spotlight math: Want to do a quick math problem? No need to open the Calculator app, just pull down to open Spotlight and type it right there.

Delete numbers in the Calculator: Speaking of the Calculator, you can delete single digits when you tap the wrong number by swiping left or right on the screen where the numbers appear.

Clear RAM to make your phone run faster: Hold down the power button until you see “Slide to power off,” then let go and hold down the home button until the screen goes blank and your home screen reappears.

Burst mode: Hold down the camera’s shutter button to shoot in burst mode.

Remote shutter: Use the volume up or down button on your headphones to snap a photo in the Camera app.

Turn the flashlight off: How many times have you turned your flashlight on and wished that you didn’t have to swipe open the Control Panel again to shut it off? We’ll save you a step: simply swipe up on the camera icon on your lock screen and the flashlight will turn off.

3D Touch while drawing: All of the drawing tools and the eraser are pressure sensitive in the Notes app.

Close multiple apps at once: Double-tap the home button to open the app switcher and you can use two, even three fingers to slide multiple apps closed with one swipe.

Recently closed tabs: Want to reread this article on your phone but you forgot what site you were reading it on in the first place? Simply tap and hold on the + symbol in Safari on the tab carousel view to open a screen that lists all of your recently closed tabs.

Desktop version of a site: We all know you can request the desktop version of a mobile site in Safari but it’s easier to do than you think. Just hold down the reload button in the URL bar.

Peek at tabs: Not sure you want to open that tab in the Safari tab carousel? A 3D Touch will let you Peek at it first.

Peek at bookmarks: Did you know you can use 3D Touch to Peek at bookmarks before you open them?

Edit reminders: 3D Touch an item in your Reminders app to edit the time or add a location.

View only unread emails: So you don’t practice “inbox zero” like I do but you only want to see unread emails in your inbox. Tap the Mailboxes link in the top right corner of the Mail app and then tap Edit. Tap the circle next to “Unread” and you’ll have a new folder that contains only your unread emails.

Save a draft with one swipe: In the Mail app, tap on the subject line and swipe down to the bottom of the screen to save a draft.

Quick Reply: When you get a notification at the top of the screen that you have a new iMessage or SMS, pull the notification downward to reply without leaving the screen you’re on.

Hidden level(s): Slide to the left in the Compass app open the level. Then place your phone flat with the screen facing away from the ground to reveal a bubble level.

Artist Peek: 3D Touch an artist in the Music app to Peek at their music.

Reenable Low Power Mode: When Low Power Mode automatically shuts off as you charge, you’ll get a notification on your lock screen that it has been disabled. Swipe left on that notification to turn it back on.

Find an iPhone’s owner: Did you find a lost iPhone in a bar? Simply ask Siri, “whose phone is this?” and it will show you so you can get in touch with him or her and return it.

Reachability: This is one of the new iPhones’ best features and there are still SO many people who don’t know about it. Double-touch (don’t tap, touch) on the home button and the entire screen will shift down so you can reach the top without shifting your grip.

Related Article:

14 Things You Didn’t Know Your Apple Headphones Can Do

Apple Pay:Everything We Should Know

iPhone 7:Everything You Need to Know

iOS 9.3.3 :The Things You Need to Know

14 Things You Didn’t Know Your Apple Headphones Can Do

Two days ago I accidentally stomped on the EarPods that came with my iPhone 6, shattering the left bud, and sending my morning commute into total disarray. I lamented. I yelled. I thought about calling in sick. A little dramatic? Maybe. But the loss wasn’t just about missing my morning podcasts.

You see, in typical Apple style, an intuitive remote control hides within the ubiquitous white headset that I unwittingly demolished — offering users so much more than the obvious headphone capability. Here are 14 things you might not realize your Apple EarPods can do, from sending unwanted calls straight to voicemail with one click (sorry mom), to effortlessly fast-forwarding to the best part of “Mambo No. 5.”

hidden features of iPhone headphone

1. Play/pause songs
How: Click center button

If you want to start playing the song you left off on—or to pause it midstream—simply click the center button to get the ball rolling (or stopping). In addition to songs, this (and the rest of the music-related tricks) will work with videos and podcasts, and applies to streaming services like Spotify as well as your iTunes library.

2. Skip to the next song
How: Double-click center button

To skip over the filler in your favorite albums, or to reach “Eye of The Tiger” and give your stamina a much needed boost at the tail end of your morning jog, a quick double click will do the trick.

3. Start a song over
How: Triple-click center button

If you just can’t listen to “Uptown Funk” enough times, you can triple click the center button to repeat the funk over, and over, and over again. Don’t believe me? Just click (thrice).

4. Fast-forward
How: Double-click, and hold (during a song/video)

Because sometimes, you just want to skip to the good part.

5. Rewind
How: Triple-click and hold (during a song/video)

Because sometimes, you just want to experience the good part all over again.

6. Take a picture
How: Click either volume button (with camera app open)

If you need to swiftly snap an incriminating photo of your best friend at 4 AM, but need to keep your hands steady, an ideal way to get shot you want, without your fingers messing up the action is by clicking the volume button, which is effectively a shutter when your camera is open.

7. Use it as a microphone
How: Um, just talk into it

Okay, so this might be the most “obvious” inclusion on this list, but you’d be surprised as to how many people don’t realize that little volume control is also an effective microphone (it has a lil’ microphone emblem, on the back you know). As someone who spends a lot of time on the phone for work inside an occasionally noisy open office, I can personally attest that this is the best way to clearly communicate over your phone or take down a voice memo.

QQ图片20160806181008

8. Answer the phone
How: When getting an incoming call, click the center button once

Simple enough, but not having to take your phone out of your pocket when you get a call is surprisingly cool, though you can’t screen your calls with your phone in your pants…

9. Hang up the phone
How: Click the center button once (while on the phone)

If you want to end the call you’ve started (probably because you didn’t see who was calling, in the first place) just hit the center button again and get on with your life. If you are getting another call, and want to hang up on the one you are on, this works, too.

10. Hold one call, and switch to another line
How: Click center button once (while on the phone, and getting another call)

When your on the phone with your mistress, and then your other mistress calls, you can put her on hold and answer the other call, just by holding down the center button for a second. No one gets hung up on; everything is cool.

11. Hang up on someone on the other line
How: Click and hold down on center button for two seconds (while on the the phone, and getting another call)

If your mistress is calling, and you definitely don’t want to talk to her, just click and hold down the center button for two seconds, to send them packing.

12. Send an incoming call straight to voicemail
How: Hold down center button (while receiving an incoming call)

Nobody checks/cares about voicemail anymore. But if you just want to avoid someone, this is the best way to do it.

13. Talk to Siri
How: Press and hold center button (if you aren’t on the phone with anyone)

To get in front of Siri in the quickest way possible, just hit and hold down the center button till she pops up. Then, you can boss her around. Also, once you’ve already opened Siri up, you can hold your center button down again to ask her another question.

14. Use these tricks with your Mac and iPad
How: The same way you did everything on your iPhone!

With any modern Apple product (sorry “White Mac” users), you can use your EarPods to accomplish any of these shortcuts on your other devices along with controlling volume (duh). Who knew you could accomplish so much with just a finger and thumb?

Read more:

Apple Pay:Everything We Should Know

iPhone 7:Everything You Need to Know

iOS 9.3.3 :The Things You Need to Know

How to Factory Reset an Locked iPhone