All posts by DHZ

How to Backup and Restore WhatsApp Messages for Android

[Summary]: Want to backup WhatsApp messages from Android phone to PC or Mac computer? This tutorial will show how to backup whatsApp chats and restore WhatsApp messages on Android, such as Samsung Galaxy S/Note, HUAWEI, LG, Google Pixel/Nexus, Sony, HTC, Xiaomi, OnePlus, ZTE, Oppo, Motorola, etc.

According to the report,WhatsApp Messenger is the most popular chat apps among the mobile users,not except the Android.WhatsApp has announced that there are more than 800 million monthly active users up from over 700 million users in January of 2015. The friends,families,colleagues around me are using WhatsApp Messenger to communicate with each other.They consider that this apps is convenient and efficient enough and more useful than other apps.

Since we are too often to chat with Backup WhatsApp Messenger,you should know the importance of have a backup of WhatApp chat history for Android.For example,avoid losing WhatsApp data after Android system upgrade,restoring Android to factory resetting,Android Rooming,Android damaged/broken/lost,even Android stolen.I think you must be a strong incentive to backup your precious Android WhatsApp messages,please read on then you will get the tips on how to backup WhatsApp chat history on Android.

How to Backup and Restore WhatsApp Messages on Android

Android Data Backup & Restore -a pretty good data manager for Android, which lead you to smoothly backup WhatsApp messages(text,sticker,photo,voice and video messages) from Android to computer,and restore WhatsApp messages to Android from backed up.Not only the WhatsApp data are supported to backup and restore,but also the other applications data,such as SCR Pro,AASTOCKS.Almost all brands of Android are available,including Samsung Galaxy S10/S9/S8/S7/S6/S5/S4, Samsung Galaxy Note Note 9/Note 8/5/Note 4/Note 3, HTC One M9/M8, LG, Lenovo, Motorola, Google Pixel, Nexus and so on.

d_win d_mac

Part 1:How to Backup WhatsApp Messages from Android to Computer

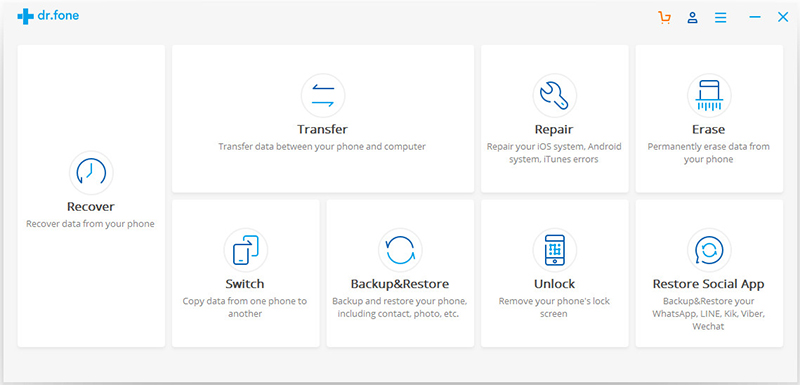
Step 1.Run Android Data Recovery and Connect Android to Computer
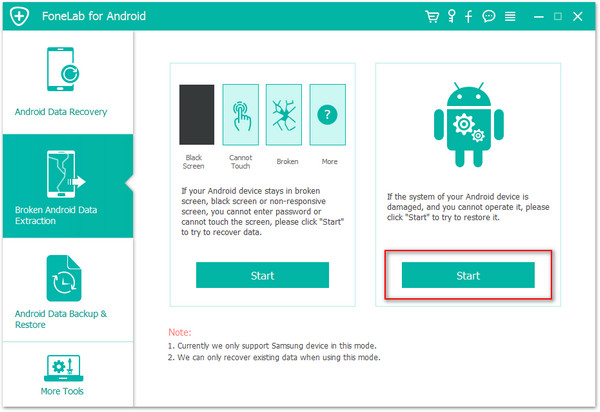
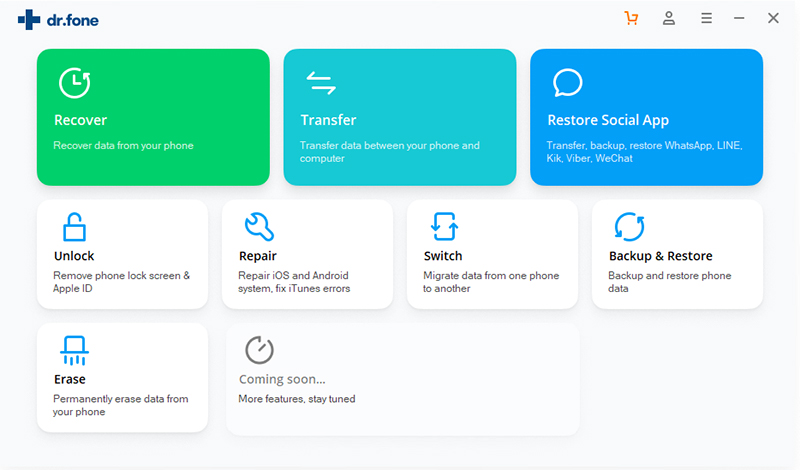
Please run Android Data Recovery on computer,connect Android with computer and go on allowing debugging on Android.Click “Backup & Restore“.

Android WhatsApp backup restore

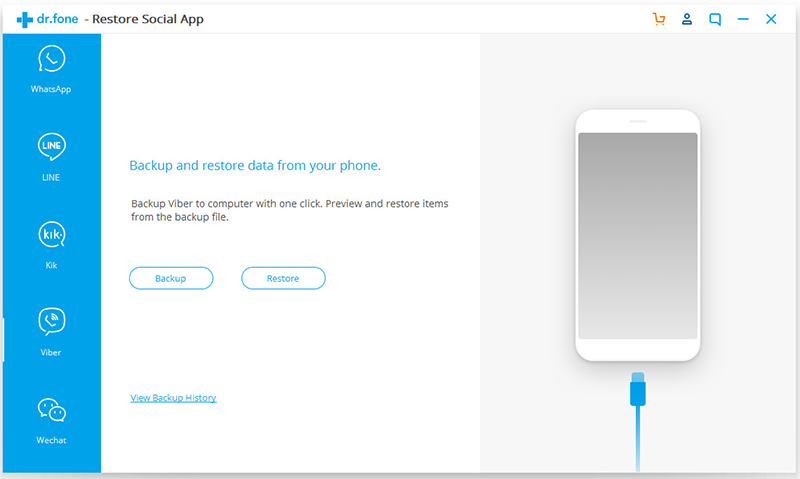
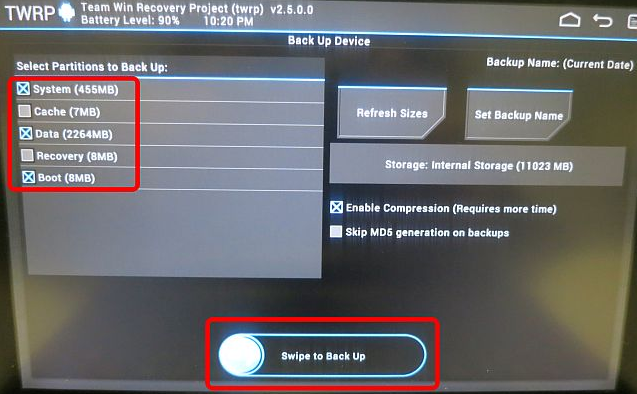
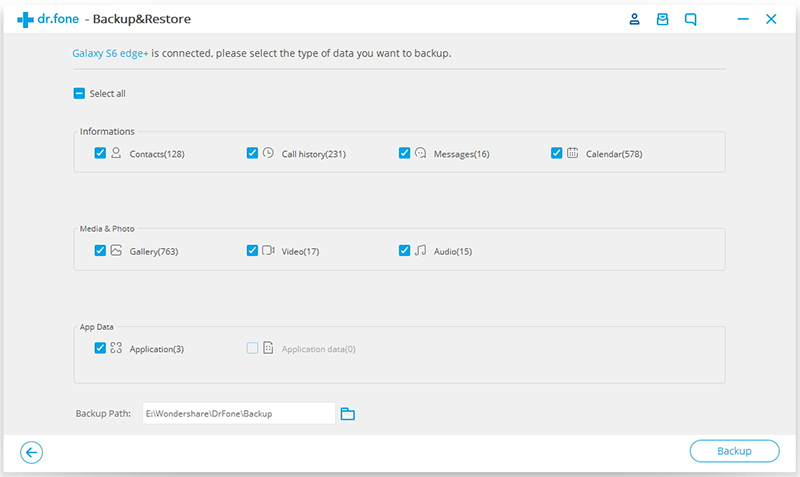
Then, please click “Backup” and select “Application” and “Application data“.

backup restore select app data

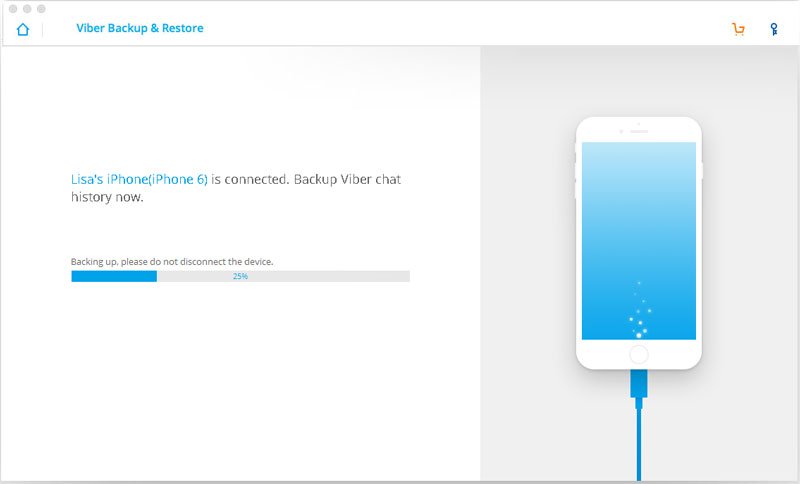
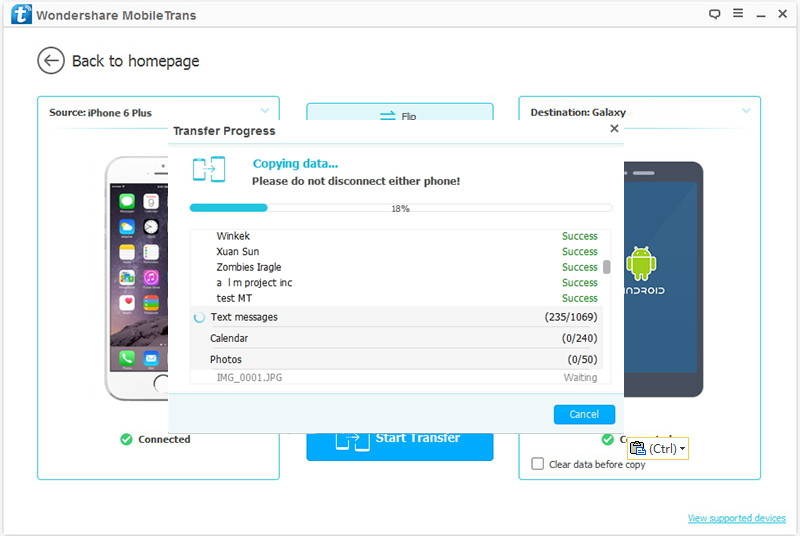
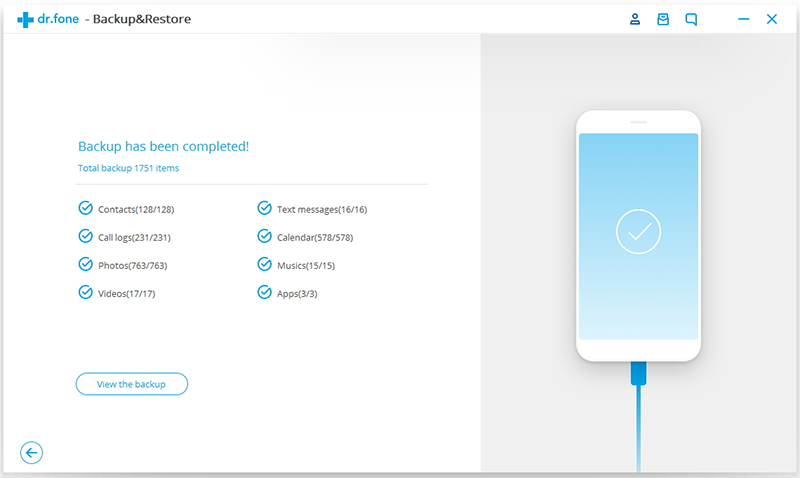
Step 2.Backup WhatsApp Chats from Android to PC/Mac
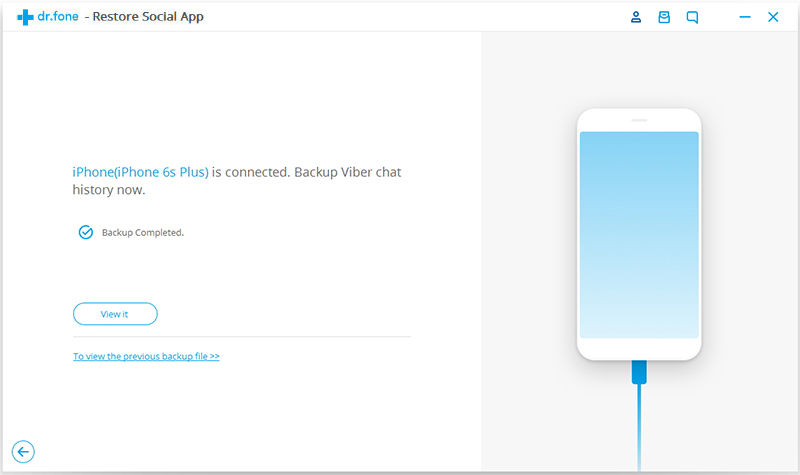
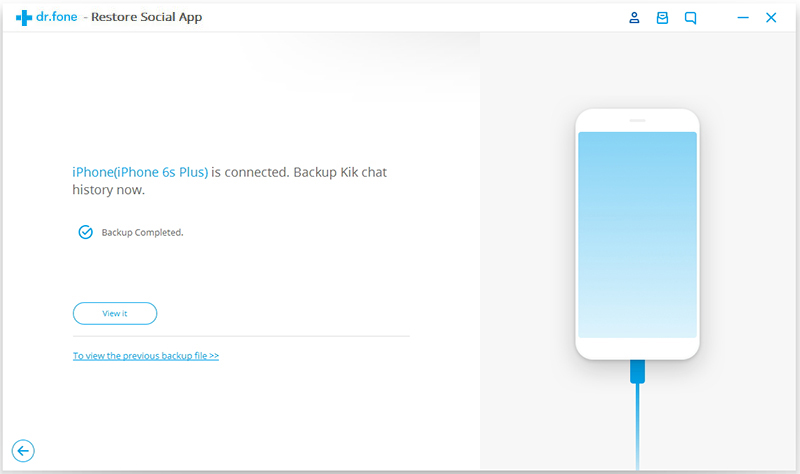
Once clicking the “Backup” button,program will begin the backup process.After the processing bar shows you the ending of backing up,you can move to view on the backup history and view the app.Although you can’t see the details about the WhatsApp data but you can know the size of it.

backup whatspp data

d_win d_mac

Part 2:How to Restore WhatsApp Messages from Backed up to Android

Note:Here you are allow to restore the backed up file to the previous backup Android or another Android as you like.

Step 1.Run Android Backup Resotre and Connect Android to Computer
Please run the Android Backup Resotre on computer,connect Android with computer and go on allowing debugging on Android.Then, continue with “Restore” button under “Backup & Restore”.

Step 2.Extract Backup File for Android
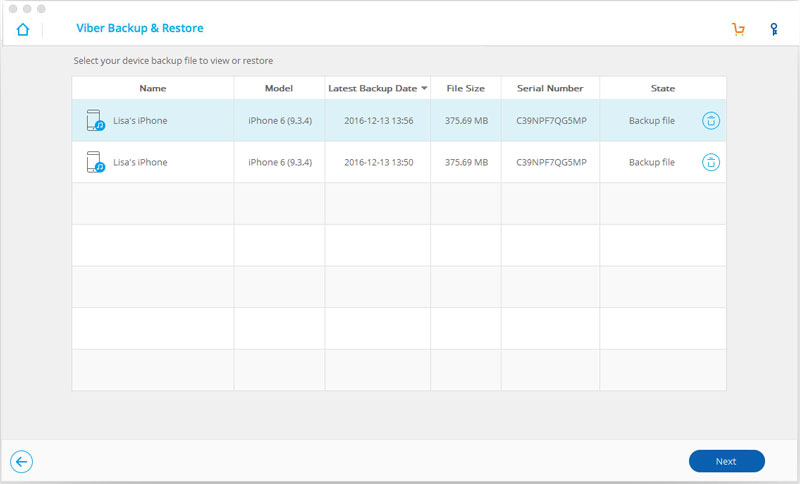
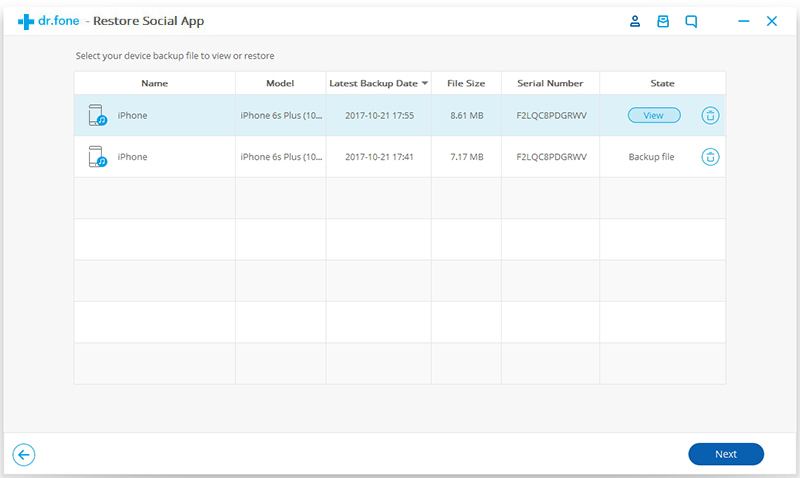
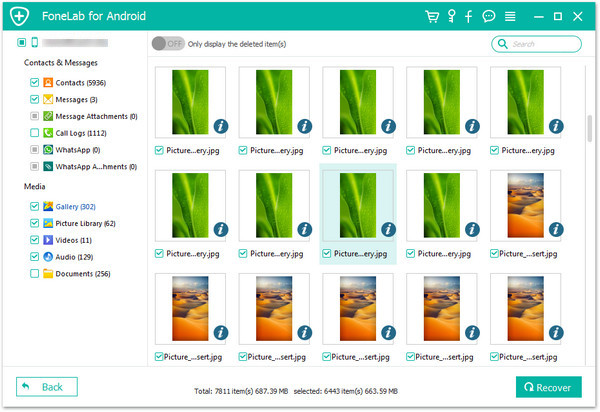
Here you will see all backup files of your Android,choose one you want to check and click on the “View” button.

view-android-backup

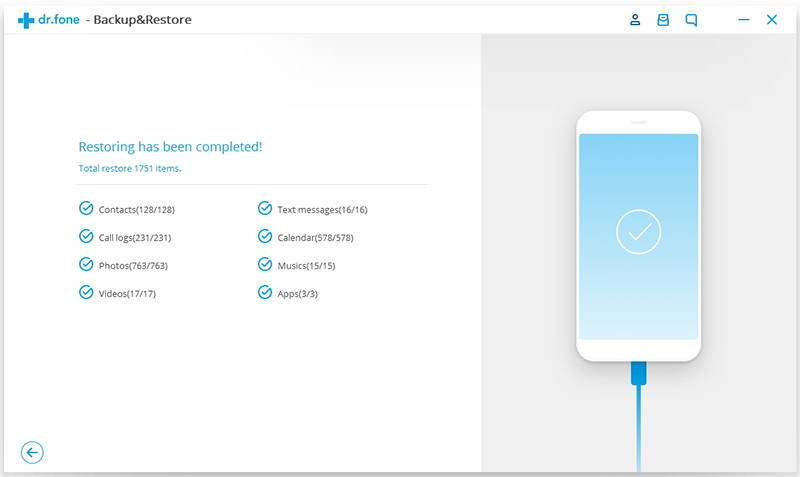
Step 3.Restore WhatsApp Backup to Android
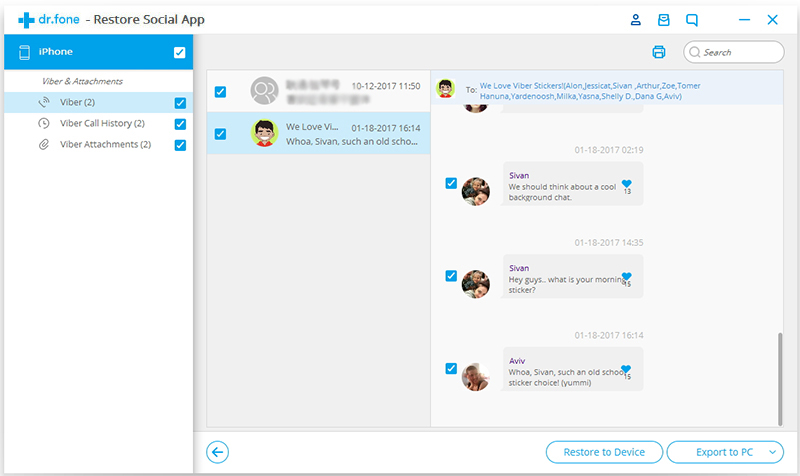
When the scan stops,you can click “Restore” to restore the backed up file to Android.Now you can open WhatsApp on your Android device. Then log into your WhatsApp account and restore WhatsApp messages to the Android phone.

restore-backup-android

d_win d_mac

Related Article:

How to Recover Deleted Text Messages from Samsung

How to Recover Deleted Text Messages from Android Phone

How to Restore WhatsApp Messages Backup to Android Devices

How to Backup/Restore and Transfer WhatsApp Messages

How to Fix WhatsApp Programs on Android Phones

Android WhatsApp Backup Restore

How to Backup and Restore Viber Messages on iPhone

[Summary]: In this article, we will share you a easy and fast method to backup Viber messages from iPhone XS/XR/X/8/7/6S/6, etc. to PC/Mac, as well as restore Viber messages to iPhone and iPad from backups.

What is Viber
Viber-A communication application on mobile device for sending free messages and making free calls on any network.Viber lets you make free phone calls and send text, sticker, photo, voice and video messages for free to anyone who also has the application installed.Viber integrates with the iOS to give you the best experience and performance.It syncs with your contacts, detecting which ones already have Viber. Simply select a contact and talk for free.

viber-logo

The Features of Viber:
-Best quality video and audio calls using 3G/4G or WiFi
-A complete redesign for a new look and feel
-Free text, photo and video messages with location-sharing
-Call non-Viber mobile or landline numbers at low rates with Viber Out
-Support for iPhone/iPad-use your iPhone and iPad at the same time
-Group messaging with up to 100 friends
-Add friends easily by entering their Viber number or scanning their QR code

The Importance of Have a Backup of Viber Messages
Like WhatsApp,Wechat,Line,Viber is one of the most popular instant messaging apps that allows to send free messages,photos,videos to anyone,make call to anyone who also have Viber installed.However,unlike the other apps,Viber doesn’t keep a copy of your chat history in the server or on mobile device.Many people now use Viber quite a lot on iPhone/iPad and the message history means a lot to them.What if mistakenly hit the clear data button on Viber app?Or Just lost all the data when you are selling your phone or buy the new device to replace?Now you will be advise to backup the viber messages on iOS device.

How to Backup iPhone/iPad Viber Chat History

Recently, I find that iOS Viber Backup & Restore Tool – iOS Toolkit – Social App Restore released on the mobile market, I try this program and I’m satisfied with this wonderful tool function that complete the Viber backup and restore task on my iPhone.Now I am ready to introduce it to you all who need to backup/restore Viber chat history.iOS Viber Backup & Restore Tool is work well for backing up Viber chat history from iPhone/iPad to computer perfectly,as well as restoring backed up Viber messages from computer to iOS device completely,including the Viber text,sticker, photo,voice and video messages.iOS Viber Backup & Restore Tool is provided through the Viber app and creates a backup file with your chat history data on iOS device,which is an option to backup and restore your iOS Viber chat history indeed.The supported iOS device:iPhone 7,iPhone SE,iPhone 6S(Plus),iPhone 6(Plus),iPhone 5S/5C/5,iPad Air,iPad Pro,iPad Mini,etc,.It’s applicable to iOS 10,iOS 9 or lower.

d_win d_mac
d_win d_mac

Part 1:How to Have a Backup of iPhone Viber Chat History on Computer

After launching the iOS Viber Backup & Restore Tool on your Computer,choose “More Tools” on the left side and you’ll see the screen as follows.

Step 1.Run Program and Connect iPhone to the Computer
To backup Viber chats history on your iPhone,you should choose “iOS Viber Backup & Restore” option in the main page.Then connect your iPhone to the computer.Once your device is detected,you will see the screen below.

more-tools

viber-backup

Step 2.Begin to Backup iPhone Viber Chats History
Click on the “Backup” button,and the program will start the backup process automatically.Wait until the process is complete.keep your iPhone connected all the time during the whole process.

backup-viber-messages

When the backup process ends,you will see the screenshot below.

viber-backup-finish

If you want to check the backup file and export the content,you can continue reading.

Part 2:How to Selectively Restore Backed up Viber Messages to iPhone from Computer

After launching the iOS Viber Backup & Restore Tool on your Computer,choose “More Tools” on the left side and you’ll see the screen as follows.

Step 1.View iPhone Viber Backup Files
To check the backup file’s content,you should click on the “To view the previous backup file >>” on the first screen under “iOS Viber Backup & Restore” option.

more-tools

viber-backup

Step 2.Extract Backup File for iPhone
Here you will see all backup files of your Viber chats history,choose one you want to check and click on the “View” button.

viber-backup-file

Step 3.Restore or Export Viber Messages from Backup
When the scan stops,you can preview all contents in the backup file,including text chats,call history and viber attachments.You can check any item you want and click “Restore to Device” or “Export to PC” for recovery.

restore-iphone-viber-backup

d_win d_mac
d_win d_mac

Viber Messages Backup and Restore

Related Article:

How to Backup and Restore iOS Kik Messages

How To Backup and Restore iPhone WhatsApp Messages

How to Backup and Restore Contacts/SMS/WhatsApp Messages on iPhone

How to Restore Deleted SMS/iMessages/MMS on iPhone

How to Transfer SMS/MMS/iMessage from iPhone/iPad/iPod to Computer

How to Backup and Restore Kik Messages on iPhone

What is Kik Messenger
Kik Messenger is the totally free, crazy-fast, cross-platform messenger app that connects you to your friends in real-time.Use Kik to chat,share pictures privately, plan outings with groups,and stay connected to the people who matter most to you.You’re going to fall in love with Kik Messenger and here’s why:-Hands-down the fastest,most life-like chat experience for your smartphone.

Can I save my Kik messages to computer?From Kik’s help center,you can find this answer: “There isn’t currently a perfect way to save or backup your Kik chats.You may be able to use your smartphone’s built-in features to ‘screenshot’ of your chats.”Don’t be depressed.If you are looking for a way to backup iPhone/iPad Kik messages to computer,here you have came to the right place.

* How to Export Kik Messages from iPhone to PC

* How to Recover Deleted Kik Chat History on iPhone

For now,you can find a lot of iOS data software on the web that claim to backup and restore Kik messages on iOS device with 100% success rate.Unfortunately, most of them failed to do so. And that is why we wrote a post on this topic because we came across the same situation a while go and spent hours to find a reliable solution.

Backup and Restore iPhone/iPad Kik Messages

Searching an easy way to backup and restore iOS Kik Messages on computer without taking a screenshot?

iOS Kik Backup & Restore Tool – iOS Toolkit – Social App Restore, which offers a good solution for all iPhone and iPad users.It not only enable to backup Kik Messages from iOS device to computer,but also empower users to restore Kik messages from backup file to iOS device.What’s more,iOS Data Exporter also allows you backup and restore WhatsApp messages, Viber messages, contacts, text messages, iMessages, photos, videos and more.This program is available for iPhone XS, iPhone XR, iPhone X, iPhone 8/8 plus, iPhone 7,iPhone SE,iPhone 6S(Plus),iPhone 6(Plus),iPhone 5S/5C/5,iPad Air,iPad Pro,iPad Mini,etc,.It’s applicable to iOS 12 and iOS 11/iOS 11.2.1/iOS 10 or lower.

d_win d_mac
d_win d_mac

Part 1:How to Backup iOS Kik Messages to Computer

Step 1.Run Program and Connect iOS Device to the Computer
Choose “iOS Kik Backup & Restore“option on the “Social App Restore” feature of program.Then connect your iPhone/iPad to the computer.When your device is detected by computer,you will see the screenshot below.

more tools option

Step 2.Begin to Backup iOS Kik Chats
Click on the “Backup” button,and the program will start working automatically.During the whole process,you only need to keep your device connected all the time,and then wait.

backup kik chats

When the backup process is finish,you will see the prompt message below.Which reminding you the backed is completed.

finish kik chats backup

If you need to check the backup file and restore/export the iOS backup Kik chats,continue to read.

Part 2:How to Restore Kik Messages to iOS Device from Backup File

Step 1.Run Program and Connect iOS Device to the Computer
To check the backup file’s content,you can click on the “To view the previous backup file >>” on the first screen after choosing “iOS Kik Backup & Restore” option on the “More Tools” feature of program.Then connect your iPhone/iPad to the computer.Once your device is detected by computer,you will see the screenshot below.

more tools

kik backup restore main

Step 2.Extract iOS Kik Chats File from Backup
Here you will see all backup files of your Kik chats,choose one you want to check and click on the “View” button.

extract kik backup file

Step 3.View and Restore/Export Kik Chats from Backup
When the scan stops,you are allow to preview all contents in the backup file,including Kik text chats and Kik attachments.

restore kik backup to ios

You can check any item you want and click “Restore to Device” or “Export to PC” for recovery.

ios-kik-backups-restore

d_win d_mac
d_win d_mac

In Conclusion,you know how easily it is to backup and restore Kik messages on iPhone/iPad with iOS Kik Backup & Restore Tool.It supports all Apple devices like iPhone, iPad and iPod touch. Besides Kik message recovery, it can use for recovering all kinds of deleted data on iOS device like Whatsapp messages/SMS/MMS/iMessages,contacts or photos.Those tools are shown on the left side bar of the section of iOS Kik Backup & Restore Tool.There are also step-by-step tips on iOS data recovery topics, you can find more tutorial in the homepage.

Related Article:

How To Backup and Restore iPhone WhatsApp Messages

How to Backup and Restore Contacts/SMS/WhatsApp Messages on iPhone

How to Restore Deleted SMS/iMessages/MMS on iPhone

How to Transfer SMS/MMS/iMessage from iPhone/iPad/iPod to Computer

How to Backup Contacts from iPhone to Computer

Backup and Restore Kik Messages

How to Fix Bricked Android Phone or Tablet

“Rooting my Android phone went well, but I’ve tried to flash a custom ROM and now I think I’ve bricked my phone.Is there anything I can do?How to fix my bricked Android phone?Please help.”Grace tong

fix bricked phone

One of the best things about being an Android user is the ability to play around with new ROMs, kernels and other new tweaks.However, things can go severely wrong sometimes. This may cause your Android device to brick.A brick Android is a situation where your Android device turns into a “dead” phone,for example stuck at the black/white screen,stuck in recovery mode,stuck in download mode,struck at the start screen,etc,.However,all may seem lost in this situation but the beauty is that it is easy to fix bricked Android devices.This guide will introduce you the best way to unbrick a bricked Android.

Part 1:What to Do on An Rooting Android Device

Six Things to Do after Rooting Your Android Device:
1.Install a Custom Recovery
2.Familiarize Yourself with Fastboot or ADB
3.Make a Backup of Your Device

make a backup of android

4.Keep a Full Android Backup On Your Device
5.Keep Another Backup on Your Desktop PC
6.Learn How to Hard-Reset Your Device

Conclusion
The most important thing you can do with your rooted Android handset is prevent it from getting broken.One of the best ways is to have a backup on hand.To this end,you will want six things:

(1)custom recovery,
(2) know ADB and Fastboot commands;
(3) keep a factory image on your device;
(4) keep a Android backup on your device;
(5) keep copies of both backups on a computer;
(6) if you can’t replace your battery, know how to hard reset your device.

If you take the necessary precautions,the chances of bricking your device drop dramatically.

Part 2:How to Fix Bricked Android Phone or Tablet

Broken Android Data Extraction & Fix Tool is your ideal tool to restore Android system on your brick Android device.With the help of this excellent fixing tool,you can efficiently download recovery package for Android and fix bricked Android to normal and set it to normal status as usual.Besides restore Android system to normal,this program also allows to recover deleted contacts, text messages,call logs, WhatsApp messages,photos,videos,music and more from Android device with one click.

Several Situations of Bricked Problem Can be Solved by Android Fix & Data Recovery Tool:
-Android Device with Black/white screen
-Android Device stuck in recovery mode
-Android Device stuck in download mode
-Android Device struck at the start screen
-Other bricked issues

d_win d_mac

Before beginning the fixing process,you should download and install the Android Data Recovery on your computer. Once it has completed scan, you fill find a button named with “Broken Android Data Extraction” which you need to click

Step 1.Connect Bricked Android to PC
The first step,please connect your bricked Android with the computer.

fix bricked android

Step 2.Choose the File Types to Restore
You now should select the files and the items you actually want to restore. The recovery option however includes contacts, text messages, photos, gallery, music, video and documents among others from Android.

select bricked type of android

Step 3.Select the Bricked Type of your Android
You should select the bricked situation that match your device.

bricked choose fault type

The program will enter the following interface.Please choose a kind of situation depends on your bricked Android,for example “Stuck in the start screen”.

Step 4.Get Android into Download Mode
Then the program will ask you get the phone into “Download Mode” manually.To get the phone into download mode,you need to power off your device completely.Then hold “Volume Down + Home + Power” on your phone together for a few seconds till the phone enter “Download Mode”.

fix bricked android

Step 5.Detect Android with Android Fix & Data Recovery Tool
Once the device enters download mode successfully,Android Fix & Data Recovery tool will detect it and display the device model,Android version etc,.

fix bricked android

Step 6.Repair Android and Fix to Normal
Android Fix & Data Recovery tool will download the recovery package to help you fix the device automatically and return it to normal status.After the download is completed,your device will return to normal as usual.Now, you can check your Android and make sure whether it can work or not.

fix bricked android

Step 7.Preview and Restore Data from Android
Now you should select data to preview and restore the selected data to your computer.

recover data from android

d_win d_mac

Related Article:

How to Fix Bricked Samsung Phone

How To Fix Samsung Galaxy Stuck in Download Mode Problem

How To Fix Samsung Galaxy Black Screen Problem

How to Fix Samsung Frozen on Samsung Logo

How to Unlock Android Lock Screen

How to Fix Samsung Frozen on Samsung Logo

You Can Now Message The President On Facebook

You can officially send a Facebook message to President Barack Obama himself using the social network’s messenger tool, the White House announced Wednesday.

Sending letters to the president is nothing new — in fact, people have been doing it since the age of Thomas Jefferson, the White House noted in a press release. But with the rise of Facebook Messenger, which hit 900 million users in 2016, the executive branch has decided to take advantage of the accessibility of instant messaging.

sent sms to white house

“Face-to-face time is a little harder to come by these days,but technology makes it possible for anyone with an internet connection to send a message to the President and his Administration,” Jason Goldman, chief digital officer of the White House, wrote in the press release.It’s “as easy as messaging your closest friends.”

Goldman worked with Joshua Miller,the White House’s director of product management,to create a Messenger bot specifically for the president’s Facebook,according to Fast Company.

Here’s how it works:Once you open a chat box to message the White House,the bot will greet you.After you hit “Let’s go!” you’ll be prompted for your message to the president.Once you compose your message and hit send,the bot will forward your message to the White House’s Office of Presidential Correspondence.

talk to white house

Unfortunately,there’s no guarantee that Obama will read your message.But there is a small chance that it could be one of 10 the president plans to read each night.

Since 2009,the Office of Correspondence has sifted through all of the president’s letters each day,choosing 10 for him to read that night.The Office of Correspondence has even posted some of their favorite letters to their “Letters to President Obama” Tumblr account.

The creation of the Messenger bot is just one of the many ways the White House has been using social media to connect with American citizens.The executive office runs accounts across multiple sites,including Facebook,Twitter and Instagram.The First Lady even created her own Snapchat account.

On digital platforms,”people expect to have a conversation about the things that matter to them as opposed to just receiving press releases or just receiving talking points,” Goldman said in a White House Q&A. “People expect more human moments,more conversational moments,less being talked to and more being talked with.”

Of course you can still send handwritten letters to the Oval Office,but if you’re averse to snail mail (or you just don’t want POTUS to see your terrible handwriting),sending a message on Facebook might just be the most convenient way to get in touch with the president.And who knows,you might even get a response.

Read more:

How to Enable USB Debugging Mode on Samsung Galaxy

25 Best Android Tips to Make Your Phone More Useful

25 Hidden iPhone Features that are Really, Truly Hidden

How to Transfer SMS&MMS&iMessage from iPhone/iPad/iPod to Computer

“Lots of iPhone users have the same trouble that is they can’t backup the SMS to anywhere when the SMS box is full,then they have to delete all of them to prevent iPhone rejecting new SMS receiving.Who can introduce an useful tool for backing up iPhone SMS to computer?THS”Tolbert

Not only iPhone,but also iPad/iPod have been one of the more popular device choices for sending messages a very long time. Very rarely does an individual who purchases an iPhone come to regret that they did so.Unfortunately,there are certain limitations on iDevice.Transferring iPhone/iPad/iPod SMS&MMS&iMessage in suitable format to a computer seems next to impossible.

Backup iPhone messages on computer so you can easily transfer and restore the backup messages to your iPhone, a new iPhone or just protect your privacy after backing up and delete it before selling the phone.Even if your iPhone was ever lost,damaged or stolen,your messages are still safe.iPhone messages transfer tool helps you keep a safe messages backup on your computer, just in case anything might happen or just free up space on device.Have you ever encounter a similar situation?Are you eager to know how to transfer messages from iPhone to PC for backup or any other purpose?If yes,then your request will probably end here.We are going to give you a step-by-step process on how to transfer SMS&MMS&iMessage from iPhone/iPad/iPod to PC and manage them on it easily.

How to Backup iPhone Messages to Computer

It’s really simple to back up iPhone SMS&MMS&iMessage to computer with iPhone/iPad/iPod SMS&MMS&iMessage Transfer.Back up all kinds of messages complete with emoji,web links and attachments:photos,videos and contact files.With this excellent program,you are allow to freely transfer SMS&MMS&iMessage from device to computer in easy steps.In addition,iPhone/iPad/iPod SMS&MMS&iMessage Transfer enable to retrieve deleted messages on iPhone/iPad/iPod.

Download the iPhone/iPad/iPod SMS&MMS&iMessage Transfer for free:

d_win d_mac

If you want to backup all files from iPhone/iPad/iPod to comptuer,you can free download the iPhone Message + Contact + Music&Video + Photo&Camera Transfer below:

d_win

Let’s focus on the full features of iPhone/iPad/iPod SMS&MMS&iMessage Transfer:

-Backup SMS&iMessage &MMS(Photos&Video & Audio) from iPhone/iPad/iPod to computer.
-Print SMS&MMS&iMessage out and list the messages by date and “sender” and “receiver”.
-Restore deleted messages directly from iPhone/iPad/iPod without iTunes backup.
-Restore deleted messages by extracting iTunes backup files (Photos&Videos &Audios ).
-Support all models of iPhone(iPhone 7,iPhone SE,iPhone 6S(Plus),iPhone 6(Plus),iPhone 5S/5C/5, iPhone 4S/4.
-Support all models of iPad(iPad Pro,iPad Air,iPad Mini,iPad 4/3/2).
-Support all models of iPod Touch.
– Support to iOS 10 or lower.
– Print SMS&MMS& iMessage (HTML & JPG & TEXT & MHT file) .
– Support Group Message.
– Edit SMS&MMS&iMessage(ANTS file only).
-Password protection (ANTS file only).

How to Sync SMS&MMS&iMessage from iPhone to Computer

Step 1.Download and Install iPhone/iPad/iPod SMS&MMS&iMessage Transfer on PC
Download,install iPhone/iPad/iPod SMS&MMS&iMessage Transfer on computer.Note:Please install the latest version of iTunes on PC at the same time,make sure iTunes successfully detect your iPhone.

Step 2.Run iPhone/iPad/iPod SMS&MMS&iMessage Transfer on PC
Connect iPhone to computer,and then all the messages will be displayed automatically.(Please wait.If you have lots of apps or photos in messages,it will take longer time to read data on iPhone)

Step 3.Backup Messages from iPhone
Click the button “Copy” which can be found at the bottom of the screen.You are allow to choose to save your all iPhone SMS&MMS&iMessages to PC in TEXT or ANTS format.You can set password to protect your messages database for personal privacy by choosing .ants format.

backup-iphone-sms-main

backup-iphone-sms-step1

Click the single contact,iPhone/iPad/iPod SMS&MMS&iMessage Transfer will display all messages with the messages that come from this single person.And you are allow to choose to copy all messages to computer in Text or MHT format.

Print Tips:
A:Click the button “Print” which can be found at the bottom of the screen.
B:Save SMS&MMS&iMessage as .mht file format. And open the .mht file by IE,click “tools”-“internet options”-“advanced”-check “print background colors and images”,and print .mht file.

backup-iphone-sms-step2

iPhone/iPad/iPod SMS&MMS&iMessage Transfer can automatically read and display all your backup message on iTunes.

iphone-message-itunes-backup-step3

Edit Messages:Open ants file,and click Edit.
Click the single contact,and then click Edit.

backup-iphone-sms-step4

Note:Advanced Settings:

backup-iphone-sms-step5

iPhone/iPad/iPod SMS&MMS&iMessage Transfer offers all solutions for all serious iPhone/iPad/iPod users.It not only supports iDevice messages to computer transfer&export,but also enables iDevice users to retrieve deleted messages from backup to device or even to a new device.No other iPhone/iPad/iPod data manager software does more.Auto-scans your iPhone/iPad/iPod,and auto-indexes.You can easily and quickly backup and restore SMS/MMS/iMessage on iPhone/iPad/iPod with this outstanding program.

Free download the iPhone/iPad/iPod SMS&MMS&iMessage Transfer and try to backup your iPhone messages:

d_win d_mac

Free download the iPhone Message + Contact + Music&Video + Photo&Camera Transfer to backup all iPhone data to computer:

d_win

iPhone to Computer Transfer main interface:

transfer iphone data to computer

Related Article:

How to Backup Contacts from iPhone to Computer

How to Backup and Restore Contacts/SMS/WhatsApp Messages on iPhone

How to Backup,Restore and Transfer WhatsApp Messages

How to Backup iPhone/iPad Data

How to Backup Contacts from iPhone to Computer

Summary
Do you want to backup contacts from iPhone to computer? This article tells you a simple way for you to transfer contacts from iPhone to computer, after backing up contacts, you can also restore them back to your iPhone for using.

Almost all iPhone user have a habit to record the phone number,E-mail or even the house address on contacts list on iPhone.However,things always comes when you are not ready.This tutorial is for iPhone users to transfer iPhone contacts to computer in case lossing. Sometimes, you may lost contacts when these circumstances happen:

Reasons for Contacts Loss

-Accidental deletion;
-Restore iPhone to factory resetting;
-Device formatting;
-iOS upgrade/iOS jailbreak,
-iOS System Crash;
-iPhone get broken/water damaged;
-iPhone was stolen;
-Attacked by virus;
-Other.

iPhone users are relay on backing up contacts via Internet service accounts,like Outlook, Exchange,Yahoo and Gmail,etc,.However,not all things are perfect enough as you imagine.You’re looking for some better methods for how to backup iPhone contacts without iTunes?When you input “How to back up iPhone contacts” in Google search,there comes millions of methods recommended.

backup iphone contacts

iPhone/iPad/iPod Contact Transfer is an easy and high efficient iOS backup program,which helps to backup and restore iPhone contacts on computer completely,enable to retrieve deleted contacts by extracting iTunes backup files on computer.It is easier and more convenient than backing up iPhone contacts via Internet service accounts.Let’s see the features list of iPhone/iPad/iPod Contact Transfer:

Download the iPhone/iPad/iPod Contact Transfer for free:

d_win d_mac
d_win d_mac

iPhone/iPad/iPod Contact Transfer Features:

– Backup contacts on iPhone/iPad/iPod to Windows computer.
– Export full screen of iPhone/iPad/iPod contact.
– Retrieve deleted contacts directly from iPhone/iPad/iPod.
– Retrieve deleted contacts by extracting iTunes backup files to Windows computer.
– View contacts in Text file format (.txt) or ANTC file format (.antc) on PC.
– Password protection support (ANTC file).

Just follow the simple step-by-step instructions given below to learn how to backup and restore iPhone contacts with iPhone/iPad/iPod Contact Transfer.

Part 1:Backup iPhone Contacts on Computer with iPhone/iPad/iPod Contact Transfer

Step 1.Download and Run Program on Computer
Download,install and run iPhone/iPad/iPod Contact Transfer on computer.Please install the latest version of iTunes,make sure iTunes can read your iPhone.

Then connect iPhone to your computer via an USB cable,and then all the messages will be displayed automatically the iTunes contacts included.(If it is reading data,please wait a little while.That might because you have lots of contacts,it will take longer time to read your phone data.)

run iPhone/iPad/iPod Contact Transfer
Step 2.Copy the iPhone Contacts to Computer
Please click the button “Copy”,then you are allow to choose to save your all iPhone Contact including the contact photo to your PC in Text or ANTC format.

copy iphone contacts to pc

iPhone/iPad/iPod Contact Transfer will begin to automatically read and display all your backup contact from iTunes.

display iTunes backup contact

Part 2:Restore Contact from CSV file to iPhone with iPhone/iPad/iPod Contact Transfer

Step 1.Backup iPhone Contacts
Backup all your contacts from iPhone to computer as .csv file format using iPhone/iPad/iPod Contact Transfer.

Step 2.Run iPhone/iPad/iPod Contact Transfer on Computer
Please run iPhone/iPad/iPod Contact Transfer on your computer.

Step 3.Import Contacts to Address Book
Click on Start-All Programs-Accessories,click to open Address Book. In Address Book,click File- Import -Other Address Book…,select “Text File (Comma Separated Values)”,click Import,then browser the CSV file,click Next,map the fields you wish to import,click finish.

When it is finish,you had import the contacts to your Windows Address Book.

Step 4.Sync Contacts from Address Book to iTunes
Run iTunes,connect iPhone with computer,click to select the iPhone on iTunes,choose Info tab, in Contact section,check “Sync contacts with Window Address Book”,click apply.

When it is complete,all contacts have been transferred to your iPhone.

Part 3:Restore Contact from CSV file to Outlook with iPhone/iPad/iPod Contact Transfer

Step 1.Backup iPhone Contacts
Backup all your contacts from iPhone to computer as .csv file format using iPhone/iPad/iPod Contact Transfer.

Step 2.Run iPhone/iPad/iPod Contact Transfer on Computer
Please run iPhone/iPad/iPod Contact Transfer on your computer.

Step 3.Import Contacts to Windows Address Book
Click on Start -All Programs -Accessories, click to open Address Book. In Address Book, click File-Import-Other Address Book…,select “Text File (Comma Separated Values)”,click Import, then browser the CSV file, click Next, map the fields you wish to import, click finish.

After all this, you had import the contacts to your Windows Address Book.

Step 4.Sync Contacts from Address Book to Outlook
Open Outlook;Open the File menu;Choose “Import and Export”;In the “Import and Export Wizard” dialog box choose “Import Internet email and address”,then choose “OUTLOOK EXPRESS 4.X 5.X 6.X”,click “Next”.

When it is complete,all contacts have been transferred to Outlook.

iPhone/iPad/iPod Contact Transfer is simple to install and easy to operate with a user friendly interface.You can easily and quickly backup and restore your contact from your iOS device on PC.iPhone/iPad/iPod Contact Transfer step by step user guide available.Just follow the steps above,easy sync iPhone/iPad/iPod contact on computer in just a coffee time.

Free download the iPhone/iPad/iPod Contact Transfer and try to backup your iPhone contacts:

d_win d_mac
d_win d_mac

Read More:

How to Move Contacts from old iPhone to iPhone 7/6S/6/SE

How to Transfer Contacts from iPhone to Samsung Galaxy

How to Backup iPhone/iPad Data

How to Backup and Restore Files on iPhone 7/SE/6S/6/5S

How to Backup and Restore Contacts/SMS/WhatsApp Messages on iPhone

How to Recover Deleted Contacts from iPhone 6(Plus)/6S (Plus)

How to Enable USB Debugging Mode on Samsung Galaxy

Most of the time whenever you would like to flash or upgrade your Samsung device via flash tool or whenever you want to root your device you need to enable USB debugging mode in order to connect and communicate with your device.By default the USB debugging mode is disabled for any brand new device to avoid unintentional modifications on your device.But you need to enable debugging option manually for your Samsung development process.For different Android versions of Samsung device there will be different configurations to turn the USB debugging mode.

* How to Recover Deleted Data from Samsung Galaxy

* How to Manage Samsung Galaxy Data on Computer

Part 1:How to Enable USB Debugging Mode on Samsung Galaxy S8/S7/S6/S5/S4

Step 1.If you haven’t enabled the option already, go to “Apps” > “Settings” > “About phone” and tap “Build number” repeatedly until it says “You are now a developer“.

Step 2.You will now have an option under “Apps” > “Settings” called “Developer options” where you can enable or disable the “USB debugging” option.

enable USB debugging mode on Samsung

Part 2:How to Enable USB Debugging Mode on Samsung Galaxy Note 7/5/4/3

Step 1.Unlock Samsung phone and go to Settings > About Device

enable USB debugging on Samsung

Step 2.Tap on Build number repeatedly until it says “You are now a developer” and then you will get the access to the Developer menu through Settings > Developer options

enable USB debugging on Samsung2

Step 3.Under “Developer option”,scroll down to find USB debugging option and enable it.

enable USB debugging on Samsung3

Part 3:A Professional Data Manager-Samsung Galaxy Data Transfer Tool

Samsung Galaxy Data Transfer is a professional data manager tool,which enable to transfer data between iOS,Android,Symbiam devices and computer with only one click,including contacts,SMS,photos,videos,call logs,music,calendars,apps.Moreover,this program allow to backup phone data and restore data from backup without any data loss.Multiple brand phones supported:Apple,Samsung,HTC,Sony,MOTOROLA,LG,HUAWEI,ZTE,Xiaomi and more.

phone transfer

d_win d_mac

Read more:

How to Enter,Use and Exit Recovery Mode on Android

25 Best Android Tips to Make Your Phone More Useful

How to Backup and Restore Samsung

How to Transfer Samsung Data to Computer

How to Transfer iPhone Data to Samsung Galaxy Note 7/5/4/3

Transfer Contacts,Messages,Photos to Samsung Galaxy Note 8

The Samsung Galaxy Note 8 is official, and we’ve got everything you need to know about Samsung’s brand new phablet right here.Samsung took to the stage in New York at its latest Unpacked event to take the covers off the Galaxy Note 8 – revealing a big screen smartphone complete with dual cameras and an updated S Pen.

samsung galaxy note 8

The Samsung Galaxy Note 8 continues the phablet tradition of boasting the biggest screen in the South Korean’s handset line-up, but only just.It comes equipped with a 6.3-inch Super AMOLED Infinity Display, which is only a touch bigger than the 6.2-inch offering on the S8 Plus.The resolution is the same as the S8 duo, with the Galaxy Note 8 coming with a QHD+ (2960 x 1440) resolution which produces a pixel density of 521ppi and a widescreen 18.5:9 aspect ratio.While that’s still eye-poppingly brilliant, it means it does pack fewer pixels per inch than the S8 Plus (529ppi) and S8 (570ppi).

Transferring files from old mobile phone to your new Samsung Galaxy Note 8 can sometimes be difficult,especially if it include too much data on the previous phone.Surely,sync old phone data to computer and then transfer data from computer to new Samsung is such a complex task.Mobile users prefer to have a more convenient,reliable, and easier way which means to freely transfer files from old phone to Samsung Galaxy Note 8.

Sync Data from Old Phone to Samsung Galaxy Note 8

Let’s focus on the excellent data manager-Phone Transfer,with it you are able to entirely transfer data from old phone to Samsung Galaxy Note 8/5/4/3,Galaxy S8/S7/S6/S5 with only one simple click,including contacts,SMS,photos,videos,call logs,calendars,music,apps.Comparing with other data transfer tool,Phone Transfer is qualified enough to transfer file between iPhone,Android phone,Nokia,Blackberry.The wonderful program works perfectly in most of popular Android brands,such as Samsung,HTC,Motorola,LG,Sony,Google Nexus,Huawei,etc,.

d_win d_mac

How to Transfer Data from Old Phone to Samsung Galaxy Note 8

Step 1.Connect Phones to Computer and Install,Run Phone Transfer
Connect both your old phone and Samsung Galaxy Note 8 to computer and run the Phone Transfer on computer.You will see the main screen shows connecting devices is required.

phone transfer home page

There are 3 modes:Phone to Phone Transfer,Restore from Backups,Backup Your Phone,Erase Your Old Phone.Click the “Start” button under “Phone to Phone Transfer” mode.

Step 2.Transfer Data from Old Phone to Samsung Galaxy Note 8
The program will detect two connected phones very soon.Make sure your source phone is on the left side while Samsung Galaxy Note 8 on the right.If not,click “Flip” to exchange the source device and target device.

select file to transfer

On the middle panel,click file(contacts,SMS,photos,videos,call logs,calendars,music,apps) to transfer from old phone to new Samsung Galaxy Note 8 as your like.Press the blue button “Start Transfer” and the details will be shown in the interface.After a while,all of content will be saved on your Samsung Galaxy Note 8.

transfer old phone data to galaxy note 8

d_win d_mac

The last but not least,Phone Transfer is a multifunctional data manage tool,which provide you the function that backup and restore data on Samsung Galaxy Note 8, more Samsung devices are available,such as Samsung Galaxy S8,Samsung Galaxy S7,Samsung Galaxy S6,as well as backup Android data to computer.

Related Article:

How to Transfer iPhone Data to Samsung Galaxy Note 8

How to Transfer Android Data to Samsung Galaxy Note 8

How to Transfer Samsung Data to Samsung Galaxy Note 8

How to Backup and Restore Samsung Data

How to Transfer Samsung Data to Computer

Apple iOS 9.3.4 is Now Available:What is Included in the Update

Apple has recently released iOS 9.3.4, which is a minor update. Apple did not release any new features as part of the software update, but I highly recommend that you upgrade as soon as you can because it contains an “important” security patch.

iOS 9.3.4

Why is iOS 9.3.4 essential? It addresses an issue where “an application may be able to execute arbitrary code with kernel privileges.” The description in the Apple support page says: “A memory corruption issue was addressed through improved memory handling.” MacRumors pointed out that iOS 9.3.4 also fixes the Pangu iOS 9.3.3 jailbreak exploit. And Apple credited Team Pangu for discovering the memory corruption vulnerability.

Apple iOS 9.3.4 follows the release of iOS 9.3.3 from a few weeks ago. iOS 9.3.4 is the fourth update to iOS 9.3 since it was released in March. Some of the new features that were added to iOS 9.3 in March included the Night Shift feature, Touch ID support for Notes, new Health app categories, additional News app personalization features, new Education apps and enhancements to the Music app via CarPlay.

Apple iOS 9.3.4 will most likely be the last iOS update before the release of iOS 10 next month — which is around the same time that the iPhone 7 should be announced. Many of Apple’s stock apps will be overhauled in iOS 10. For example, the lock screen will be more interactive. The response options in the QuickType keyboard will be more contextual based on the type of content being written. There will be a new Memories feature in the Photos app and it will make better use of facial recognition. And the Maps and Messages applications will support third party app integration.

You can download Apple iOS 9.3.4 by opening Settings > General > Software Update from your device. The update is available for iPhone 4s and later, iPad 2 and later and iPod touch (5th generation) and later. You can also connect your device to iTunes and install the update after downloading it through your computer. The download size appears to be somewhere between 20 and 30 megabytes for most devices so you will not likely need to allocate much storage space for the update.

Have you upgraded to iOS 9.3.4? Did you have any issues upon upgrading to iOS 9.3.4? Please leave a comment!

Related Article:

iOS 10 Public Beta Now Available

How to Delete Built-In iOS Apps on iOS 10 Device

iOS 9.3.3 :The Things You Need to Know

Apple Pay:Everything We Should Know

25 Hidden iPhone Features that are Really, Truly Hidden