All posts by DHZ

How to Fix Android Won’t Turn on Issue

“I have a habit that power off my Samsung Galaxy S6 phone before I went to sleep.However,today morning I try to power on my phone and the phone won’t turn on for no reason.I really have no idea what suppose to do and how to fix the disabled Android phone.Anybody tell me the available way to turn the Android on and access it?In addition,the data stored on my phone are important for me indeed,especially the contacts and the text messages.How to extract the data from my dead phone?Thanks a lot.”-Ivy Bruce

There are many reasons may cause to a disabled Android phone,such as the power button is broken,the Android screen is broken,the Android internal memory is damaged,this problem can also be caused by hardware damage or so on.If your device refuses to turn on, you may immediately worry about how you can rescue data from the Android which isn’t turn on.In this post, we are going to discuss what you can do to turn on the no response Android and extra data from disabled Android with easy steps.

Part 1:Fix Android Won’t Turn on Issue

1.Charge Android For a Few Minutes
If your Android device battery is almost dead, you’ll often see an “empty battery” indicator on the screen when you try to turn it on. But, if you let the battery completely die, your phone won’t respond at all when you press the Power button.

To fix this problem, just plug your Android phone into a wall charger and let it charge. You can’t just plug it in and try to turn it on immediately — you’ll need to give it a few minutes to charge first.

Plug it in and let it charge for fifteen minutes or so. Come back later and try to power it on with the Power button. If the problem was caused by a dead battery, it should boot up normally.

If it doesn’t work at all, try plugging the device in with a different cable and charger. The charger or cable could be broken and preventing an otherwise-good device from charging.

2.Perform a Factory Reset From Recovery Mode
In some cases,your phone might begin booting, but the Android operating system might crash or freeze immediately.

To fix this, Android can boot straight to a recovery mode menu, where you can perform a factory reset on device.If your device is booting up before freezing or experiencing other serious problems,try to use recovery mode to perform a factory reset.

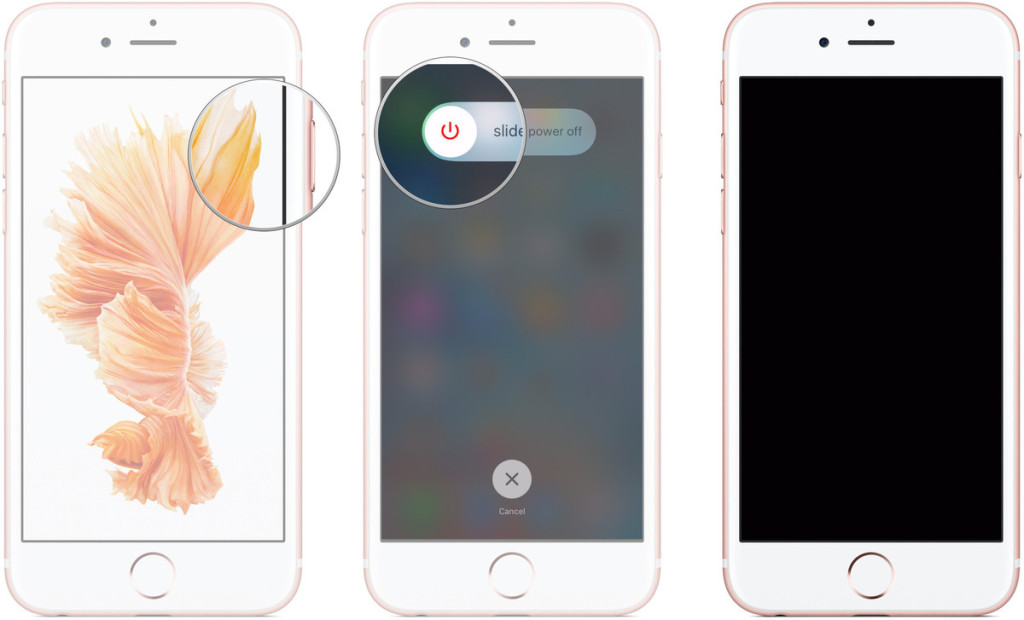
To do this, you’ll first need to power down your phone or tablet and then boot it up by holding down several buttons at the same time. The exact combination of buttons you need depends on your device. Perform a web search for the name of your device and “recovery mode” to find the buttons it needs. For example, the Samsung Galaxy S6 requires you to hold Volume Up + Home + Power.

Note:Restore Android to factory resetting will ease all data and settings on Android,remind you backing up Android data before restoring.

3.Maybe It’s Just Broken for Hardware Damage
No one likes hearing this, but if your device refuses to boot even after you hold the power button, swap out the battery, and charge it fully — or if it’s still malfunctioning after a factory reset — it may be broken for hardware damage.

If you have a cellular contract for Android, you’ll want to take the device to the repair store. If you purchased it directly from the manufacturer and it’s still under warranty, you should contact the manufacturer’s support department. If you’re not on contract and are out of your warranty period — well, you may need to get a new phone. If the device has a removable battery, it’s possible only the battery is bad and needs to be replaced.

Part 2:How to Restore Data from Android which Won’t Turn on

Broken Android Data Recovery is an superior data recovery program to download recovery package for Android and restore data from Android which won’t turn on,available for Android users suffering from different broken Android situations:dead Android,black screen Android,screen crashed Android,water damaged Android,can’t have USB debugging enabled on Android and more.No matter which fault type happens to your Android, you can recover contacts,photos,videos,SMS,call logs,notes and other types of file from broken Android with this program.

d_win d_mac

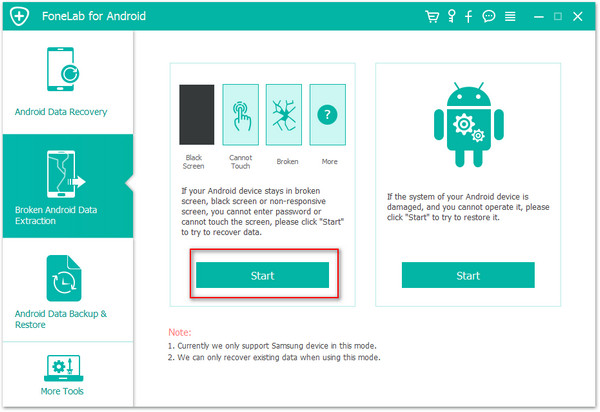
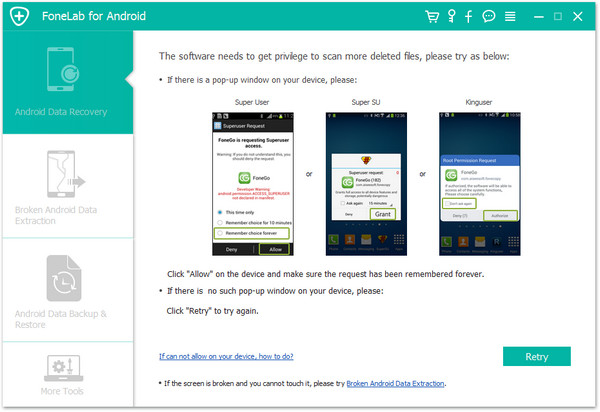
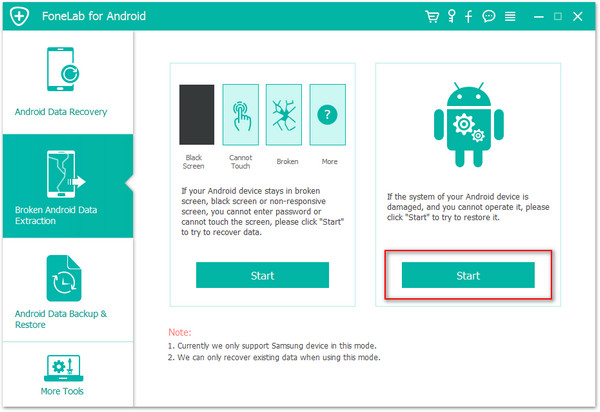
First of all,you should download and install the Android Data Recovery on your computer. Once it has completed scan, you fill find a button named with “Broken Android Data Extraction” which you need to click

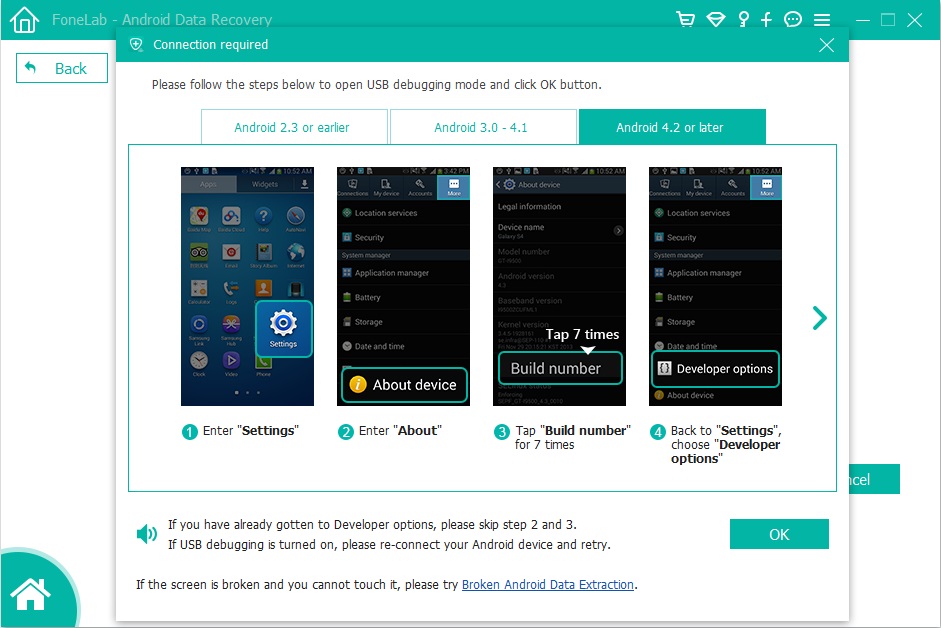
Step 1.Launch Broken Android Data Recovery and Connect Android
Download Broken Android Data Recovery on computer and install it.After the installation,launch it and choose “Android Broken Data Recovery” which aims to recover data from dead phone.

connect broken android to pc

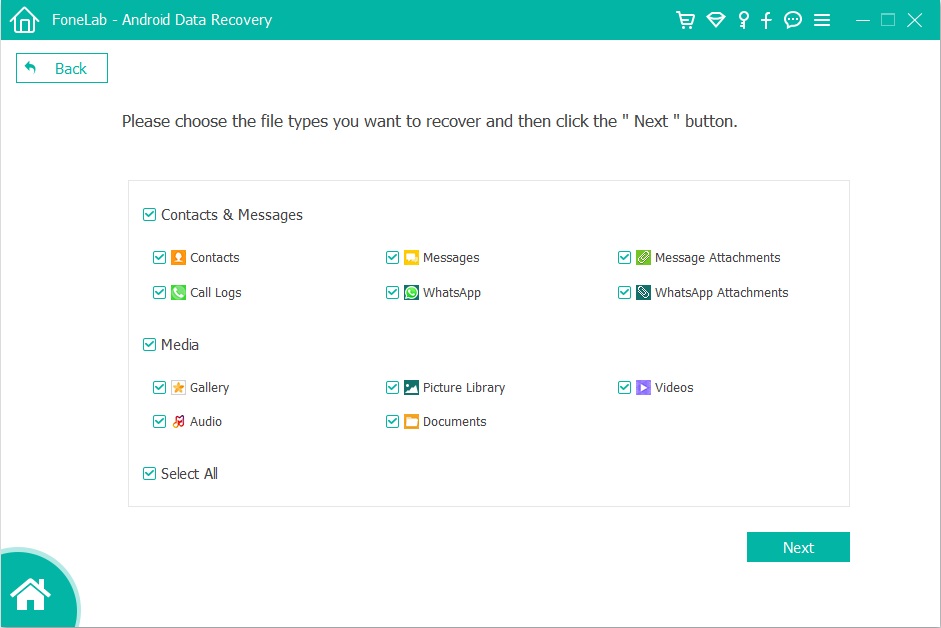
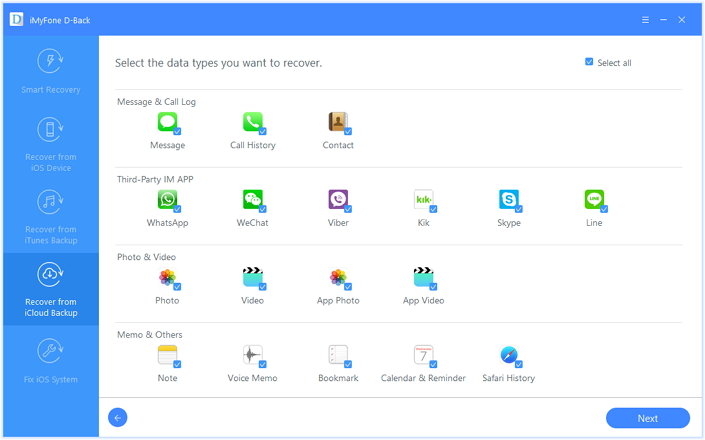
Step 2.Choose Data Type from Android
Click the data type you want to recover from your disabled Android,such as contacts,messaging,call history,WhatsApp messages&attachemets,etc,.You can also click “Select all” to recover all Android data.Just tap “Next” to continue.

scan data on android phone

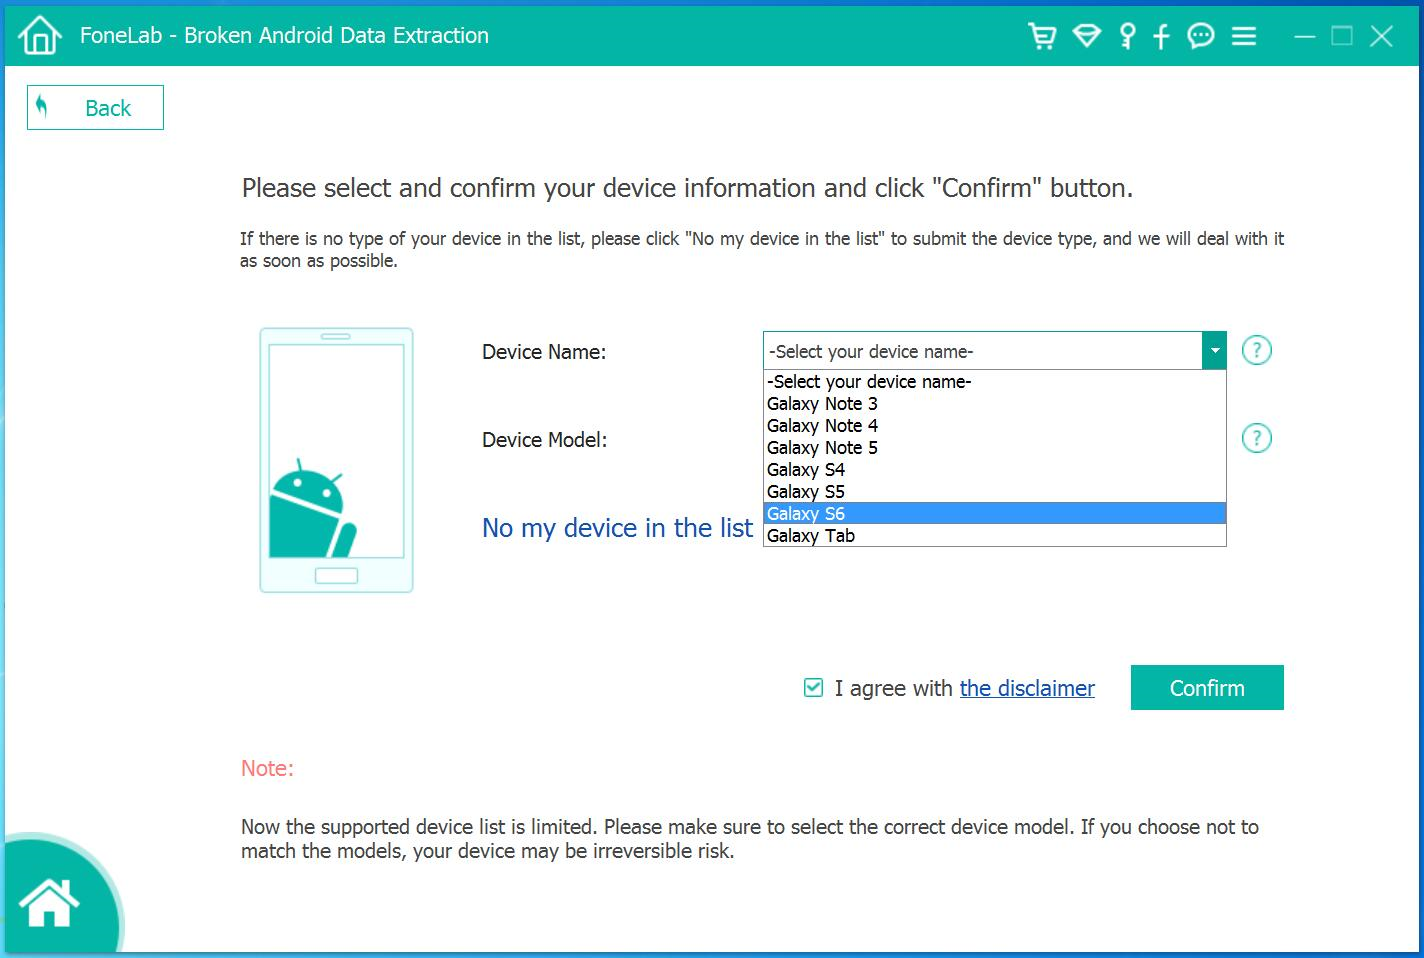
Step 3.Select the Broken Type of your Android
You should select the broken situation that match your device.

broken choose fault type

Step 4.Choose Fault Type for Android
Choose either fault type below according to what happens to your Android:
1.Touch cannot be used or cannot enter the system.
2.Black screen (or the screen is broken).

If you cannot access system,to choose the left one is suggested for you.

choose broken type of android

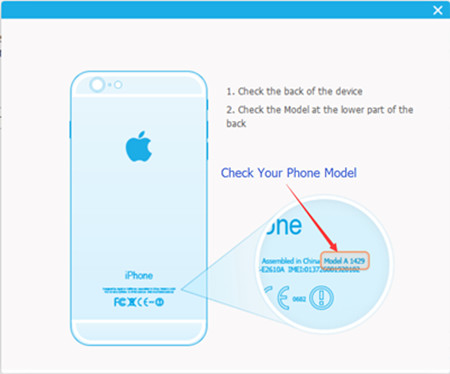
Then,just choose the phone model and device name of your Android phone.Choose the device name from the drop-down list as shown below.Then, tap “Next” to move on.

recover data from broken android

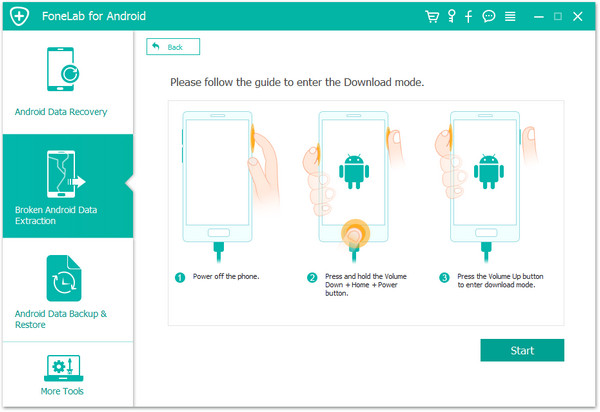
Step 5.Enter Download Mode on Android
Please enter the download mode on Android as the interface below shows:
1. Power off Android phone if it is on.
2. Press “Volume -“, “Home” and “Power” at the same time.
3. Press “Volume +”.

recover data from broken android

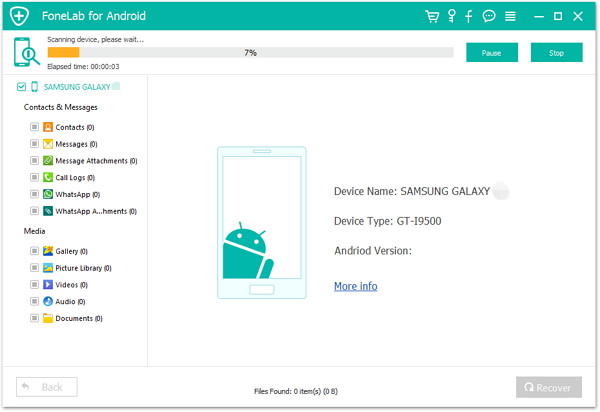
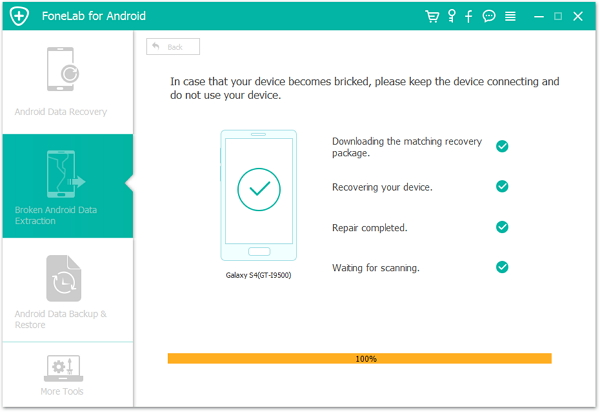
Step 6.Analyzing Data on Dead Android Phone
After entering Android download mode,you will see the interface as below which are downloading recover package for Android,just wait for seconds.

recover data from broken android

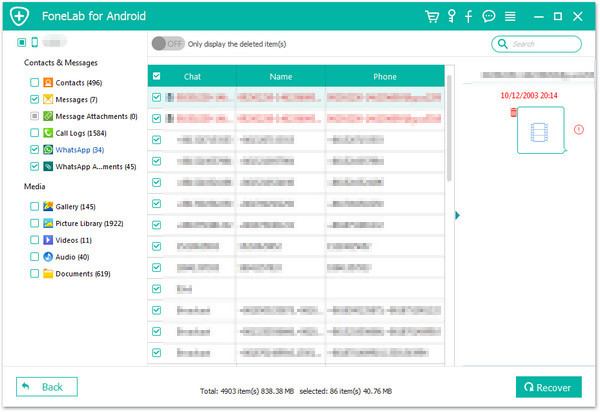
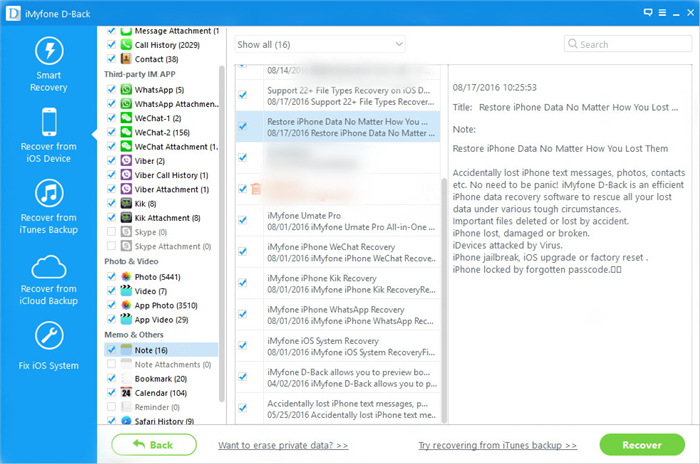
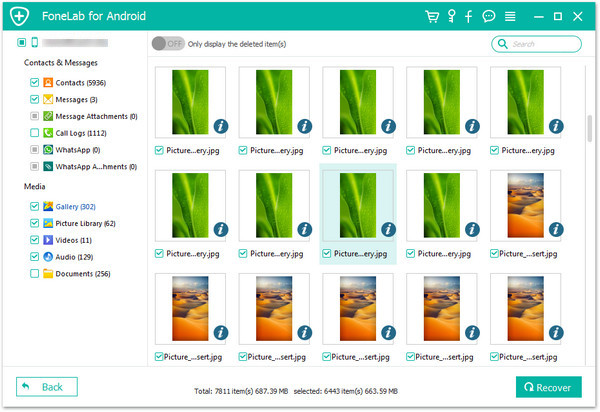
Step 7.Recover Data fromAndroid
In this step,you will see all the data type in the interface below,like contacts, messaging, call history and more listed in the left panel with its amount.Just choose the data type you want,for example, “Gallery”. Then, you will see all the contacts on your Android listed in the interface.Preview and click those you want to recover and tap on “Recover” for recovery.

recover data from broken android

With the help of Broken Android Data Recovery,you are allow to restore data even if your Android is dead/broken,get water damaged and other case.The recover process of other data types are similar with this tutorial above,just download and try it for broken Android recovery.

d_win d_mac

Part 3:Tips to Protect Android Device

• Keep your device in a protective case to prevent damage to the power button in case of a fall.
• Keep your device out of reach of children who may play and touch the device without your permit.
• Uninstall any third party apps that you may think could be causing viral infection.
• Regularly clear the system cache on your device. It can magically improve your device’s performance not to mention avoid future problems.
• Check your device from time to time to ensure it is working correctly.

Related Article:

[Recovery]Samsung Touch Screen Cannot be Used

How to Fix Bricked Android Phone or Tablet

How to Enter,Use and Exit Recovery Mode on Android

How to Recover Files from Broken Screen Android Phone

How to Recover Data from Broken Android Phone

How to Recover Files from Water Damaged Android Phone

How to Extract and Backup Data from Locked/Disabled iPhone

Your iPhone that won’t turn on? Forget phone screen passcode? Your iPhone with broken screen or can not entering passcode on a broken iPhone screen?Don’t worry,you can recover data from a disable iPhone with locked screen,please keep reading.

How Can I Recover Data from Disabled iPhone 6S?

“My mother forgot the iPhone password.She entered the possible password several times, but now her iPhone 6S is knocked.How to fix the disabled iPhone without losing data?She want to recover the data from locked iPhone.Thanks advance.“-Vivian

recover data from disabled iPhone

Sometimes we will encounter the circumstance that forget iPhone password under unexpected situations.The only way to unlock your iPhone with a lock password,other than entering the password,is to restore your iPhone to factory resettings.However,all data on your iPhone will be erased after the restoring.In order to avoid data loss,you’d better back up your iPhone data when you plan to do it.How to backup data on locked screen iPhone?If you do forget your password for some reason and you’re locked out of your iPhone, this guide below will go over two methods that’ll available to recover data from locked iPhone completely in easy steps.Contacts,photos,videos,SMS,document and more other kinds of iPhone data included.

Part 1: How to Recover Data from Locked/Disable iPhone

The first method we recommend for you is to extra data from locked iPhone via iCloud backup.In this case,you can use iPhone Data Recovery to extract data on locked iPhone from iCloud backup to your computer,Such as contacts,photos,videos,call logs,notes,document and so on.This software is an outstanding data recovery tool,which allows to preview and selectively restore locked iPhone data from iCloud backup as well as iTunes backup.Applicable iPhone device: iPhone X, iPhone 8, iPhone 7,iPhone SE,iPhone 6S/6,iPhone 5S/5C/5.

d_win d_mac

Step 1.Download and Install iPhone Data Recovery Program
Please firstly download and install iPhone Data Recovery then run it on computer.

recover iphone data with icloud backup

Step 2.Select the Recovery Mode and Sign in
Select “Recovery from iCloud Backup File” option and sign in iCloud.

Step 3.Extra File from iCloud Backup
When you sign in iCloud,the program will list your iCloud backups in the interface.You can choose anyone you want and click “Download” to extra previous file from the iCloud backup.

recover iphone data with icloud backup

Step 4.Select and Retrieve Data from iCloud
When the download process is completed,you can preview and click the items to export them to your computer.

recover iphone data with icloud backup

Free download the iOS Data Recovery for Mac and Windows and try to recover data from your disable/locked iPhone:

d_win d_mac

Tips:If your iPhone screen is broken, disable or locked but it can be detected by computer,you can try scan and recover data from locked iPhone directly without iTunes/iCloud backup,or try to backup data from your locked iPhone to computer easily.

Part 2: How to Backup Data from Locked/Disable iPhone

If you had did a iCloud backup of the locked iPhone before you can use the first way to extra data from locked iPhone.How about having no backup for locked iPhone?The second section we are going to introduce to you is to backup data on locked iPhone with iOS Backup & Restore Tool.Which is a perfect data manager tool to directly backup locked iPhone data to computer efficiently.The program is work well for iPhone with iOS 10,iOS 9 or lower.

Free download the iOS Data Backup & Restore tool for Mac and Windows:

d_win d_mac

Step 1.Run Program and Connect iPhone to the computer
To backup locked iPhone,launch the program after installing it,and connect your iPhone to the computer.When your device is detected by the program, you’ll see the window shown as follows.

backup data from locked iphone to computer

Step 2.Choose “iOS Data Backup & Restore” Option
After select the “iOS Data Backup & Restore” mode,you need to select the type of data to backup.Then click “Backup”.

backup locked iphone data with ios backup&restore recovery

Step 3.Backup Data on Locked iPhone
Now the program is backing up the data of the locked iPhone,please don’t disconnect your device with computer.

backup locked iphone data with ios backup&restore recovery

Step 4.Backup Data from Locked/Disable iPhone to Computer
When the backup is completed,you are allow to check all contents of the backup file in categories.Check any of them for exporting/restoring just need click on the button “Restore to device” or “Export to PC” at the right lower corner of the window.

backup data from locked iPhone to mac

Free download the iOS Tool Kit and try to extract data from your disabled iPhone to computer for backup.

d_win d_mac

Part 3: How to Fix a Disabled iPhone to Normal?

After backup data on your locked iPhone,it’s the time to unlock your device now.Apple’s official instructions to restore iPhone to normal and unlock your phone screen by iTunes.

Step 1.Connect the iPhone to your computer.
Step 2.Select iPhone in the iTunes sidebar,and click the “Summary” tab.
Step 3.Click “Check for Update“. iTunes will prompt you if there’s a newer version of the iPhone software available.

Check for Update disabled iPhone

-Click “Restore“.Follow instructions on the screen to complete the restore process.During the process,it will recommend you to back up your iPhone.When the iPhone software has been restored,you can choose to set up iPhone as a new iPhone,or restore your videos, music,app data,and other contents from a backup.

Note:Even though you send the locked iPhone to the Apple service center,you will be told to restore your iPhone to unlock it.That’s to say,you need to erase everything on the locked iPhone.

Worry about data lossing after restore devices by iTunes,you can use a iOS System Recovery to fix ios to normal without data loss.
Learn the guide: How to fix a disabled/locked iPhone

fix a disabled iPhone

Part 4:Access the Locked/Disable iPhone without Data Loss

iOS Toolkit Locked Screen Removal is a reliable program to unlock and access locked or disabled iPhone without data loss.It is a poweful program enable to bypass locked screen without password and let you access your broken iPhone without restoring to factory reset or performing Recovery Mode on it.It is compatible with all iPhone and any iOS system, including iPhone X, iPhone 8, iPhone 7, iPhone 6S/6 and iOS 11.

d_win d_mac

Step 1. Connect your Locked iPhone to the Computer
Step 2. Get iPhone into the DFU Mode
Step 3. Confirm the Information of iPhone
Step 4. Unlock iPhone with Unresponsive Screen without Data Loss

unlock iphone without data loss

You may be want to see the full guide:

How to Access the Locked/Disabled iPhone without Data Loss

Related Article

How to Backup and Restore iPhone/iPad Files after iOS 10 Upgrade

How to Backup and Restore Files on iPhone 7/SE/6S/6/5S/5

How to Backup and Restore Contacts/SMS/WhatsApp Messages on iPhone

How to Extract iTunes Backup for iPhone/iPad

How to Fix iOS 10 iPhone Running Slow Issue

After I updated my iPhone 6S to iOS 10 it was not in the good way.My iPhone was running slower and sometime it was suddenly get bricked for no reasons.How to Fix this trouble?-Daniel Tong

Why is my iPhone 6 get slower after installing iOS 10 ?Is it a conspiracy by Apple to convince users to buy the new iPhone 7 or iPhone 7 Plus?But I just wanna keep using my device until the next iPhone is released.So I’m asking help to fix the iPhone running slower with iOS 10 issue.-Sophia Huang

speed-up-your-iphone

Do you often get the prompt that your iPhone storage is nearly full and suggest you clear up device to free up space on it?It is no a secret that your iPhone will eventually become slower after updating to iOS 10 on it for some time due to various reasons.This significant reduction in performance is likely to affect how you use your device if you do not act in time to solve it.You have probably realized that this unfortunate case often occurs when you decide to install a newly launched iOS upgrade version,for example the iOS 10 update.We have received a lost of the complained that came from iPhone users like the iPhone 6 and and iPhone 6S after iOS 10 update.Join us for a look at the complaints about a slow iPhone with iOS 10 and how you can try to fix slow iOS 10 performance without buying a new iPhone 7 or iPhone 7 Plus.This following passages is going to give you some advice of the top tips on how to fix iOS 10 iPhone running slower issue,to optimize iPhone performance and speed up iPhone after iOS 10 update.

Part 1:Reset the Settings of iPhone after iOS 10 Update

This optimization technique is guaranteed to provide your iPhone,iPad,iPod Touch with the much-needed speed boost.Like doing a “Factory Reset” on device,restoring your iOS device’s settings will erase any of your data.Doing this reset will return all your device’s general settings to the state they were when you first bought it.Kindly note that you will be required to reset your Wi-Fi setting on device, create a new passcode and rejoin your previous WI-FI networks among other activities after doing this.

To do it, you can simply go to the settings of your iDevice,select the “General” option, tap on “Reset” option once prompted and then activate the “Reset All Settings” feature.

Part 2:Turn Off Automatic Updates on iPhone after iOS 10 Update

There are numerous benefits that can be realized when you keep your applications continuously up to date.However,it is recommended that you off this automatic updates feature and instead opt to manually update all your favorite applications. Leaving your applications to automatically update themselves is known to not only affect the battery life but also slow the performance of your iPhone/iPad/iPod Touch. Disable this unnecessary feature by selecting the “iTunes & App Store” option found in main settings on device and then turning off the “Automatic Download” feature,everything is OK.

Part 3:Erase Data and Setting on iPhone to Optimize iPhone for Best Performance

Permanently erase data and setting from iPhone can help to remove the rubbish from iPhone and free up space of it.The conventional deletion can’t wipe the data from iPhone without restoring.After deleting iPhone data by tapping the “Delete”button,the deleted seem to gone,however,the deleted data still can be restored by the data recovery.

Here you should try this iOS Data Eraser,this program works well for permanently erase data and setting from iPhone to free up space on device after iOS 10 upgrade,including contacts,photos,SMS,call logs,videos,notes,document and more.The applicable iOS devices list here:iPhone 7,iPhone SE,iPhone 6S(Plus),iPhone 6(Plus),iPhone 5S/5C/5,iPad Pro,iPad Air and so on.iOS Data Eraser provide you four erase modes for selection,you are allow to delete all data from device,delete private data from device,erase the deleted data from device or optimize the performance on device.Read more tips about how to optimize iPhone for best performance.

d_win d_mac

erase data on iphone after ios 10 update

Part 4:Downgrade iOS 10 to iOS 9 on iPhone

You can still go back to iOS 9 for a limited time.This normally only lasts a week or more so if you are concerned,now is the time to downgrade your iPhone to iOS 9.You can go back to iOS 9.3.5,and wait for iOS 10.0.1 or iOS 10.1.

How to Downgrade iOS 10 to iOS 9 on iPhone Without Data Loss

iOS System Recovery,which is a wonderful iOS data manager tool to restore iOS 10 to iOS 9 on iPhone without any data loss,perfectly help to downgrade your iPhone /iPad from iOS 10 back to iOS 9.3.5 smoothly.iOS 10 System Recovery rolls out the feature “Fix iOS to normal” for restoring iPhone system to normal after downgrading iOS 10 to iOS 9.3.5,making it easy for users to get iPhone,iPad out of white/black screen,recovery mode,Apple logo,connect to iTunes screen,etc;help to fix the issues on iOS device perform abnormally.

d_win d_mac

Easy Steps to Restore iOS 10 to iOS 9.3.5 on iPhone

Step 1.Run the iOS 10 System Recovery and Connect iPhone to PC/Mac
Download and install iOS 10 System Recovery(Windows&Mac) on computer.When the installation is complete,connect your iPhone to computer with USB cable and launch the program.

iOS 10 System Recovery

Step 2.Select “iOS System Recovery” Option
From the main window,please select “Fix iOS to Normal” located at the top right of the screen.Wait for iOS 10 System Recovery to detect your iPhone.Click “Start” once the device has been detected.

restore iPhone from ios 10 system to ios 9

Step 3.Put iPhone into Recovery Mode
1)First, disconnect the cable. Shut down the iPhone
2)After the shutdown, press the “HOME” button to remain intact, connect your iPhone to Mac or Windows PC and make sure iTunes is running.
3)Release the HOME button,and you can see the “Connect to iTunes screen” on the iPhone,it means you have enter iPhone to recovery mode successfully.

enter iphone into recovery mode

Tips: Run the iTunes software,at this point iTunes should display an alert saying it’s detected an iPhone in recovery mode, and will let you restore your iPhone device.

Othe way enter recovery mode:If you are unable to set the iPhone,iPad into recovery mode,please learn as below tutorial to enter DFU mode.

enter iPhone into DFU mode

Step 4.Download the iOS 9.3.5 Firmware Package for iPhone
In this step,you need to confirm your iPhone model and select the iOS 9.3.5 firmware to download.
To downgrade iPhone from iOS 10 to iOS 9.3.5,iOS 10 System Recovery will offer the latest version of iOS firmware package for your selection.Choose “iOS 9.3.5”,then click “Download” and wait for the download to complete.

download iOS 9.3.5 Firmware to iPhone

How to check and comfirm your iPhone model?Please see as below:

check and comfirm iphone model

Start to Download iOS 9.3.5 Firmware Files for iPhone

downgrade ios 10 to ios 9.3.5

Step 5.Start to Restore iPhone to iOS 9.3.5 from iOS 10 and Return to Normal
As soon as the download completes,iOS 10 System Recovery will start begin the iOS downgrade process without any data loss and restore your iPhone to normal state.In less than 10 minutes,you will get a message prompt that your iPhone is restarting to normal mode,your iPhone now is running iOS 9.3.5 as your like.

restore iphone from ios 10 to ios 9

Extra tips:iOS 10 System Recovery support to fix iPhone stuck issues and restore iPhone system to normal under various of unexpected circumstances.In addition,it also can help you recover deleted data from iPhone after iOS 10 update in three recovery modes.

d_win d_mac

Related Article:

How to free Up Space on iPhone/iPad/iPod

How to Permanently Delete Photos off iPhone/iPad to Free Up Space

How to Erase All Content and Settings on iPhone Permanently

How to Clean Junk Files from iPhone/iPad/iPod

How to Downgrade iPhone from iOS 10 to iOS 9 without Data Loss

Did you get caught up in all of the WWDC 2016 excitement and decided to upgrade your main iPhone, iPad or iPod touch to the newest iOS 10 beta?Many developers are currently enjoying iOS 10 on iOS device,and I suspect that not less than a few non-developers are enjoying it as well.But with the news that an iOS 9.3.4 jailbreak might soon be released,it may be time for some of you currently on iOS 10 to start thinking about downgrading.Here’s how you can downgrade iOS 10 beta back to iOS 9 public release on iPhone, iPad, iPod touch with easy steps below.

downgrade ios 10 to iOS 9

Part 1: Guide on Downgrade from iOS 10 To iOS 9

Note:Before downgrade your iPhone 7/6S/6/6 Plus/SE/5S, iPad Pro, iPad Air/mini, iPod Touch 4 from iOS to to iOS 9,you must to make your iPhone/iPad data backup at first.

Step 1. Download the latest public iOS 9.x firmware file which Apple is still signing. At the time of writing it’s iOS 9.3.4/iOS 9.3.3. Also be sure to download the correct file that is tailored for your iOS device. Once the download is complete,save the file to your desktop for easier access later in the downgrade iOS 10 beta guide.
If you want to downgrade from iOS 10 to iOS 9.3.5,here downloading the iOS 9.3.5 IPSW file for your device.

iphone-Firmware-Files

iOS firmware file for iPad
iOS firmware file for iPod touch

Step 2. Download and install iTunes on your PC or Mac if you haven’t already. Go to apple.com/itunes to learn more.Once installed, launch it.

Step 3. Connect your iPhone, iPad, iPod touch to your computer using an USB cable. Let your computer install the necessary drivers if prompted for them.

Step 4. You’ll see your iOS device pop up at the top left hand corner of iTunes, click on it.

Step 5.See that “Restore iPhone” button at the center of iTunes.Click on it while holding down the left “Option” key (Mac) or the left “Shift” key (Windows).

Step 6.A new pop-up box will come into view,asking you to select an IPSW firmware file.Simply double click on the iOS 9.x firmware file you saved on the desktop in step 1.

Please learn the detailed tutorial:2 Ways Downgrade iOS 10 to iOS 9.3.5

The downgrade iOS 10 beta process will now begin, and it will barely take a few minutes depending the speed of your Internet connection as well. Please make sure you do not touch your computer or iOS device when the downgrade iOS 10 beta process isn’t finish.You absolutely don’t want to mess around with anything at this point.

Once the downgrade iOS 10 beta process is complete you’ll boot straight into the fresh site of iOS 9.x. Also, it should be worth mentioning here that you will lose every single file and data on your iOS device once you downgrade. Lastly, you cannot restore a backup you made on iOS 10 beta on a device that’s running iOS 9.x.

iOS 10 beta is quite buggy at this point, and we will not give it a slight go ahead for use as a daily driver. If you’re planning to use it on a daily routine, then be vary of the issues that you might stumble across, with the top one being battery life.

We recommend iOS users to upgrade to iOS 10 beta once three or four builds are out, ensuring things are much more smoother for you compared to how they are today.

Part 2:Restore iPhone Lost Data after Downgrade from iOS 10 to iOS 9

As you know,downgrade iPhone from iOS 10 to iOS 9 may lead to data loss on iPhone,for rescuing iPhone data,you are suggest to try this iOS Data Recovery,which is a special data recovery for iOS,in order to help to complete the data recovery from iPhone/iPad/iPod after iOS downgrade,restore lost data from iPhone after iOS 10 downgrade,as well as restoring lost data on device after iOS upgrade even though have no a backup of device.All iOS models are supported:iPhone 7,iPhone SE,iPhone 6S(Plus),iPhone 6(Plus),iPhone 5S/5C/5,iPad Air,iPad Pro,iPod Touch 4,etc,.Just click to know more about recover data from iPhone after iOS downgrade.

d_win d_mac

recover iPhone data ios 10 downgrade

Related Article:

How to Download & Install iOS 10 Beta 7 On iPhone

How to Restore Deleted Data on iPhone/iPad in iOS 10

How to Upgrade iOS 9.3.2 to iOS 10 Beta on iPhone and iPad

How to Safely Backup iPhone/iPad before Upgrading to iOS 10

How to Recover Lost Data after Android 7.0 N Upgrade

Android 7.0 Nougat Review: An Android Version for Android Fans
Android 7.0 Nougat is Google’s way of refining what we already have, and adding some essential features to an operating system they were already happy with.Android Nougat doesn’t make major changes to the way your phone looks or the way it “feels.” But what Google has done under the hood brings some new features -and much needed polish – to our favorite smartphone operating system.

android-n

Android Nougat is here and it’s a thing of beauty. It may not have the same dramatic visual overhaul we were first treated to in Android Lollipop two versions ago, but Nougat provides a lot of major improvements and refinements over Marshmallow, along with quite a few nice new usability changes.

* How to Transfer Contacts from iPhone to Android

* How to Manage Android on Computer

Android N Upgrade Lead to Data Loss
Now as the arrival of the Android N with the new features,some of you may can’t wait to update your Android device to the latest system?In fact,there are lots of Android users wonder if they should do it,because of the data loss disaster is possible to happen to them.As we know the newest means not perfect enough,and still have bugs need to be fixed.Upgrade Android device to Android N may lead to Android data loss after upgrading.So the problem is here:How to restore deleted data from Android after Android 7.0 Nougat update.If you have the job adequately prepared for the upgrade,you are allow to restore deleted Android data from backup.However,how to recover deleted data from Android in Android N without backed up file?

Android N Data Recovery to Restore Data with Android N

It’s possible for you to recover deleted data from Android after Android 7.0 Nougat upgrade with Android N Data Recovery.This program allows you to restore deleted Android data including contacts, text messages,pictures,videos,call logs,documents and more after android N upgrade from all popular Android devices ,like Samsung, LG, Motorola,Lenovo,HTC, Huawei, Sony, ZTE, etc,.Android N Data Recovery enable to retrieve deleted data from Android after losing data due to Android system upgrade,Android rooting,restore Android to factory resetting,deleted accidentally,Android get broken/damaged and so on.It’s available for Android 7.0,Android 6.0 or lower.

d_win d_mac

How to Recover Deleted Data After Android 7.0 Nougat Update

Step 1.Run Program and Connect Android to computer
Run Android N Data Recovery software and connect your Android to the computer with USB cable.The program will detect your device very soon.

recover android data after android n upgrade

Step 2.Enable USB Debugging on Android
If you have not opened the USB debugging option on your Android previous,this program will ask you to do it.And there are ways to enable USB debugging for different Android OS version.

recover android data after android n upgrade

Step 3.Select the File Type for Scanning
Now you should select the file to scan for Android,such as contacts,messaging,call history.click “Next” button to go to the next step.

recover android data after android n upgrade

Step 4.Scan Android for Deleted Files
After detecting your Android,the program will quickly scan the device to find all the existing and deleted data from Android.Then the program will analyze your Android,a pop-up will ask whether allow or not to proceed.Here you need to move to your device and tap on “Allow” to enable the Superuser Request.

recover android data after android n upgrade
Now the program will begin to analyze data stored on Android.

recover android data after android n upgrade

Step 5.Preview and Recover Deleted Data from Android
Preview all the recoverable files one by one and then select the data for recovery.Finally,you are allow to click “Recover” button to get back the selected files to computer

recover android data after android n upgrade

Done.Just enjoy your trip on Android device with Android 7.0 Nougat.

d_win d_mac

Note:After restoring data on Android,you’d better do a routine backup of Android frequently.Know more about the tips to backup Android file to computer is help to protect Android data and avoid android data loss happened.

Read more:

How to Recover Data from Android Phones

How to Restore Lost Data from Rooting Android

How to Recover Data from Broken Android Phone

How to Recover Data from Samsung after Upgrading to Android 6.0

How to Recover Data from Android Phone after Upgrading to Android 6.0

How to Clear Facebook Cache on iPhone

Facebook is a social networking site that makes it easy for you to connect and share with your family and friends online. Originally designed for college students,Facebook was created in 2004 by Mark Zuckerberg while he was enrolled at Harvard University.By 2006,anyone over the age of 13 with a valid email address could join Facebook.Today,Facebook is the world’s largest social network,with more than 1 billion users worldwide.

facebook-notifications

How iPhone Facebook Cache Produced
Have you ever wondered why people like using Facebook?After all,there are already a lot of other ways to communicate online,such as email,instant messaging,and so on.What makes Facebook unique is the ability to connect and share with the people you care about at the same time.However,Many users have noticed that various apps such as Facebook produce caches and it goes on increasing over time.iPhone users find that their device is occupied by large amount of caches and need to free up space on phone by clearing the caches,so many users just search for some ways on the Internet to clear the Facebook cache from iPhone.Though users apply several ways to clear cache on Facebook but they failed because they don’t know how to deal with it correctly.

facebook

How to Clear Facebook Caches on iPhone with One Click

Here I have to strongly recommend this Facebook cache clear up tool for you,which is named-iOS Data Eraser,which enable to clear the Facebook cache on iPhone completely.With the help of this software,you are allow to easily clear all caches which are generated by various applications like Facebook,YouTube and Twitter etc,.As it’s name,with the help of this software,you can also permanently delete photos,messages,call history, contacts, apps, notes etc,. from iPhone.This software is famous for erasing data from iPhone such as device rubbish or the file you need to deleted without restoring,to speed up space on iPhone.This is one of the reliable software which is used for erasing iPhone data permanently and it is applicable to almost all models of iOS devices, like iPhone 7/SE/6S/6/5/5S/5C/4/4S,iPad Air,iPad Pro,iPad Mini.

d_win d_mac

Let’s have a look at main features of iOS Data Eraser:
-Support to erase all types of data from iOS devices:contacts,messages, photos, videos, apps, account info, passwords and other personal data stored on iPhone/iPad/iPod.
-Permanently erase iPhone/iPad/iPod data,prevents personal data from being recoverable(no data recovery can restore the deleted data).
-5 powerful data wiping models available for choice.
-Quickly clear junk files, invalid files, cache files & more.
-An intuitive and easy-to-follow user interface.

Clean Junk Files from iPhone

Welcome to add us or follow us on Facebook:Click here to link our Facebook.Please leave your recommendation
messages for us,Thank you.

Related Article:

How to Clean Junk Files from iPhone/iPad/iPod

How to Permanently Erase Data from iPhone/iPad without Recovery

How to Permanently Delete Photos from iPhone/iPad to Free Up Space

How to Erase All Content and Settings on iPhone Permanently

How to Backup and Restore Line Chat History on iPhone iPad

[Summary]: Looking for a way to backup Line messages from iPhone to computer? This article teach you how to backup and LINE chats history, pictures and videos from iPhone and iPad to Windows or Mac comptuer, you can also restore Line backups file to iPhone, iPad easily.

“Hello,I used the iPhone 5 for 2 years,recently I am planning to buy the new iPhone SE,but now I stuck in the trouble.How can I restore my phone Line chat history to my new iPhone?Anybody give me some suggestion?Thanks a lot.”-Beverly

Line app

LINE is available for a variety of smartphone devices and mobile devices(iPhone/iPad,Android, Windows Phone,BlackBerry, and Nokia) and even your PC.As a LINE messenger user,you may want to backup and restore your LINE chat history on mobile device, switching it to a new device or just as a backup in case the data is lost under any circumstances for example deleted accidentally.It may seem an impossible task to restore the data and the latest LINE chat history on device.What’s more even worse,where the history is deleted automatically when there is a login detected on another device,which means the data would be lost forever if there is no backup performed.

How to Backup and Restore Line Messages on iPhone

If you are the iPhone/iPad users are you looking for an apposite way to backup Line chat history from iOS device to computer and keep them safe? iOS ToolKit – Restore Social App –  iOS Line Backup & Restore Tool, which provides a simple and effective solution to backup Line chat messages with attachments from iPhone/iPad to PC in only a few clicks. All these Line chat messages will be saved in a readable database on computer,the Line text,video messages,photos are included.In addition,this program also help to restore backed up Line messages from computer to iOS device freely.Here list the applicable iOS device: iPhone XS(Max), iPhone XR, iPhone X, iPhone 8(Plus), iPhone 7,iPhone SE,iPhone 6S(Plus),iPhone 6(Plus),iPhone 5S/5C/5,iPad Air,iPad Pro,iPad Mini,etc,.

d_win d_mac
d_win d_mac

Part 1:How to Backup Line Chat History from iPhone to Computer

Step 1.Run Program and Connect iPhone to the computer
Firstly,launch the iOS Line Backup & Restore Tool on computer and select “Restore Social App” on main interface,you will see a list of tools as follows: Select “iOS LINE Backup & Restore” from the tool list.Then connect your iPhone to the computer with an USB cable.The excellent program will automatically detect your device very soon.

line-backup-restore-tools

backup-line-messages

Step 2.Backup iPhone LINE Data to Computer
When your phone is detected by iOS Line Backup&Restore Tool,you are allow to click “Backup” to begin the data backup process.

backup-iphone-line-messages

Once the backup process is complete,you should click “View it” to preview your LINE backup files.

Part 2:How to Restore Backed up Line Chat History from Computer to iPhone

Step 1.Run Program and Connect iPhone to the computer
Firstly,launch the iOS Line Backup & Restore Tool on computer and select “More Tools” on the left side of the interface,you will see a list of tools as follows:Select “iOS LINE Backup & Restore” from the tool list.Then connect your iPhone to the computer with an USB cable.The excellent program will automatically detect your device very soon.

line-backup-restore-tools

backup-line-messages

Step 2.View and Extract LINE Backup Files
To check the LINE backup files,you should click “To view the previous backup file >>” on the first screen.Here you will see a list of LINE backup files,choose the one you want and tap on “View”.

view-line-backup-file

Step 3.Preview to Restore/Export LINE Backup
Once the scanning is finished,you are allow to preview all LINE chats history including attachments,and then restore or export the backed up by clicking “Restore to Device” or “Export to PC”.

preview-line-backup-data

Note:Currently,iOS Line Backup&Restore Tool allow you to restore or export the whole Line data.You can’t do it selectively.

If you would like to roll back, please restart iOS Line Backup&Restore Tool, open the preview window and click “Undo the Restore” to proceed. Please be noted that you could only undo the latest restore.

restore-line-data-backup

iOS Toolkit perfectly help to backup and restore iOS Line chat history on computer. More than 3,000s of satisfied users. Easy to use software and no technical knowledge required.Just download and have a try right now.

d_win d_mac
d_win d_mac

Related Article:

How to Backup and Restore iOS Kik Messages

How to Backup and Restore iOS Viber Messages

How to Backup and Restore iOS WhatsApp Messages

How to Backup and Restore Contacts/SMS/WhatsApp Messages on iPhone

How to Restore Deleted SMS/iMessages/MMS on iPhone

How to Transfer SMS/MMS/iMessage from iPhone/iPad/iPod to Computer

Backup & Restore Line Messages

How to Enter & Exit iPhone Recovery Mode

Many iOS users do not know what is the difference of the iPhone recovery mode and DFU mode, here I’m going to introduce the details to you all on the following passages.

Recovery-vs-DFU-Mode

What is Recovery Mode
Recovery mode allows iTunes to restores your iPhone to its original factory settings but with the latest iOS and firmware.When your device is in recovery mode, the iTunes logo and the icon of your USB cable will appear at the same time and iTunes will inform you that an iPhone/iPad/iPod touch in recovery mode has been detected.

What is DFU Mode
DFU mode is short for device Firmware Update mode. It skips the iBoot bootloader for jailbreak fascinates. When your device is in DFU mode, the device screen will be totally black. DFU mode can be used in different situations including upgrading firmware, downgrading firmware, and even rebooting your tethered jailbroken device.

What is the Difference of iPhone Recovery Mode and DFU mode
The biggest difference of iPhone recovery mode and DFU mode is that whether or not to start the iBoot.In iPhone recovery mode,the system uses iBoot to restore and upgrade the firmware,while in the DFU mode,the system will not start iBoot,so you can downgrade the firmware in DFU mode.iBoot is on IOS devices boot loader,when you in recovery mode for system recovery or upgrade,iBoot will lead you to upgrade the firmware version detection to ensure you want to upgrade the firmware version than the current system firmware version(to the new version number higher).If you want to upgrade the firmware version is less than the current installed version of the system,then iBoot will prohibit the recovery of the firmware.

So the degradation of the firmware must be switched to DFU mode. This also means that if you need to restore the current firmware version,only need to enter device to the recovery mode, iTunes will over the next restoration work; if you need the firmware downgrade, you need to enter DFU mode on device.For example, in the absence of access to the DFU mode, you can not downgrade your firmware from 7.04 to 7.02, of course, apple now officially released a new firmware, the firmware will soon be closed to verify. Of course, the firmware is closed to verify what way the firmware is not activated, DFU is not.

What You Should Do before Entering iPhone to Recovery/DFU Mode
Charge your device to 100% and last for a few minutes,which can help to solve the problem of partial power display error.

Part 1:How to Enter iPhone Recovery Mode

When your iOS device fail to reset,stuck during/after upgrading,software error,stuck at white screen,can not open the device, forget the password of device,stuck on the cycle loop issues,etc,. you should enter device to recovery mode.

Step 1.Turn Off your iPhone/iPad/iPod if it isn’t off already.Press and hold down the On/Off button on the right side (iPhone 6 or later) or top (all other iPhone/iPad/iPod) for 3 seconds.

Step 2.Swipe the slide to power off confirmation slider to the right.

how-to-iphone-power-off-screens

Step 3.Press and hold down the Home button on your device.

Step 4.Plug your device into your Mac or Windows PC and make sure iTunes is running.

Step 5.Release the Home button when you see the Connect to iTunes screen.

how-to-iphone-recovery-screens2

At this moment iTunes should display an alert saying it’s detected an iPhone/iPad/iPod in recovery mode,and will allow you to restore your device.

Part 2:How to Exit iPhone Recovery Mode and Restore iPhone to Normal

However,you may encounter the especial circumstance,for example your device stuck in recovery mode and can’t get it out of this mode.Over the years we’ve had a few customers contact us asking how to fix iPhone stuck in recovery mode.As it appears to be a common problem (even among some of us here in the office), we thought we’d share the best solution of how to solve an iPhone stuck in recovery mode issue.

What You Can Do When Your iPhone is Stuck In Recovery Mode
DO NOT do anything if your iPhone goes into Recovery Mode.The official way to exit Recovery Mode is to restore your iPhone with iTunes.However,sometimes you may fail to get iPhone out of recovery mode with iTunes,or you just wanna another better method to fix it.

Note:Trying to fix iPhone stuck in recovery mode in the common way may lead to data loss.Remind you doing this especially after backing up your iPhone regularly because restoring your iPhone will wipe all data and content on device.Tips:How to backup iPhone data to computer.

Here is our strongly recommendation-iOS System Recovery.iOS System Recovery can perfectly solve this program completely,enable to get iPhone out of recovery mode without losing data,get iPhone out of DFU mode without losing data and restore iPhone system to normal status as usual.It gains highly assessment from iOS users widely.While there is guarantee that definitely help to excellently fix iPhone system stuck issues after the restoring process.What’s more,this program provide an available way to recover deleted data from iPhone/iPad/iPod as well.

d_win d_mac

Step 1.Run Program and Connect iPhone to Computer
Run iOS System Recovery on computer and connect your iPhone to the computer with an USB cable.Select the “iOS System Recovery” from “More Tools” on program,and then click “Start” to begin the process.(The restoring errors happen mostly because the operating system on your iPhone performs abnormally.)

get iphone out of recovery mode

get iphone out of recovery mode

Step 2.Download the Firmware for iPhone Restoring
You’ll see that the program detects your iPhone,confirm it and “Download” the firmware for your device.

get iphone out of recovery mode

get iphone out of recovery mode

When it finished,iOS System Recovery will continue to get your iPhone out of Recovery Mode in a few minutes.

get iphone out of recovery mode

get iphone out of recovery mode

d_win d_mac

Read more:

How to Restore iPhone System to Normal

How to Get iPhone Out of Recovery Mode after iOS 10 Upgrade

How to Fix iPhone Stuck in Recovery Mode after Jailbreaking

How to Get iPhone SE/6S/6/5S/5 Out of Recovery Mode

How to Fix iPhone Stuck in DFU Mode

4 Ways to Recover Deleted Note from iPhone with iOS 10

Upon updating iOS 10.3.2 on my iPhone 6s,then I try to open the notes app.I was prompted with an informational screen about the changes,however after clicking “ok”,it only lists the notes that I’ve created in the last two days.Everything prior to that is gone.I still have a copy of all them on my Mac,I want to know how to recover lost notes from iPhone after iOS 10.3.2 update?-GaryNoine

recover iphone note ios 10

iOS 10 Upgrade Lead to Notes Data Loss
Apple announced the latest version of iOS 10.3.2 Since then the company has been pushing a lot of beta releases for the OS. With the official launch set for this fall, till now we have seen seven beta releases for the same and he seventh one being the most recent one.However,iOS 10 still have bugs and now it’s limit to solve completely,the most common program is lost data after upgrading to iOS 10.It’s lucky that you have a backup for iPhone so you can’t retrieve data from backup to iPhone.However,please not be depress if you haven’t backup file of your iPhone.If you also meet similar situation with the with Gary, read the guides below.

How to Check the “Recently Deleted Notes” on iPhone

If your iPhone, iPad running iOS 9, iOS 10 above,there are a “Recently Deleted” Folder in Notes app,so you can check the recently deleted notes in this folder.

Step 1.Tap Notes app on iPhone
Step 2.Tap “Recently Deleted” Folder.Here,you can see all recently notes within 30 days.
Step 3.Click Edit button in the upper right corner of the screen
Step 4.Select the note(s) you want to restore
Step 5.Tap Move To… button to move the recently deleted note(s) to the default Notes.

recover recently deleted notes on iOS 10 devices

Notes:These deleted note(s) will be deleted after 30 days,if you can not find the note(s) you need,please use a iPhone data recover to recover deleted notes from iPhone 7/6S/6/SE/5S with/without backup.

Get Back Lost Note from iPhone iPad with iOS 10.3.2

iOS Data Recovery will help in this situation.It supports to recover deleted notes on iPhone after iOS 10 upgrade,it also allow to restore deleted contacts,SMS,photos,videos,call logs,WhatsApp messages, document and more on iPhone/iPad after iOS update.Three recovery mode is available:directly recover from device,recover from iTunes backup,recover from iCloud backup.Suitable for losing data due to iOS upgrade,iOS jailbreak,device damaged/broken,deleted mistaken and so on.Supports almost all the models of iPhone such as iPhone 7/7 Plus, iPhone SE, iPhone 6S/6(Plus),iPhone 5S/5 on iOS 10/iOS 10.3.2.

You can download it on your computer first. Both Windows and Mac versions are available.

d_win d_mac

Part 1:Restore iPhone Note by Extracting iTunes Backup

The iOS Data Recovery provides the “Smart Recovery” feature for you recover your data quickly and easily.If you don’t know your device lost data under any circumstances,we suggest you click the “Smart Recovery” feature to choose How You Lost Your Data,which will solve your problem and improve the rate of data recovery.

smart iphone data recovery

This recovery mode allows you to scan your iOS device directly to find all the lost files lately, or recover lost data from your inaccessible device.

Step 1.Run iOS 10 Data Recovery and Select Recovery Mode
Run iOS Data Recovery on computer,choose “Recover from iTunes backup” mode among 3 recovery modes.Connect iPhone to computer.

Step 2.Select and Extract the iTunes Backup
Choose an iTunes backup which may contain the deleted notes and let program scan it for the lost file.

extract files from itunes backup

Step 3.Restore iPhone Note from iTunes Backup
When the scan is finished,all the found notes will be displayed in the interface.Simply choose the desired notes from them and tap on “Recover” button to extract them to the computer.

restore iphone deleted notes from itunes backup

You can download the iOS 10 data recovery on your computer first. Both Windows and Mac versions are available.

d_win d_mac

Part 2:Restore Lost iPhone Note by Extracting iCloud Backup

Step 1.Choose the Mode and Log on iCloud Account
Choose “Recover from iCloud Backup File” after launching iOS Data Recovery.Then,sign in your iCloud account.

sign in icloud account to login

Step 2.Select the Files to Retrieve from iCloud Backup
The program can help you selectively recover data from iCloud backups,including photos, App photos, videos, notes, contacts, SMS, iMessages.Just click your desire files and then click “Next”.

select the file types

Step 3.Select the iCloud Backup File and Download
You will see the iCloud backup files that you backed up with this account previously listed.Choose the one you want to recover and click “Download” to download the backup file.

download icloud files

Step 4.Preview and Restore Deleted Note from iCloud Backup
Once backup file downloaded,preview the lost notes data one by one by selecting the “Notes” item,then choose the notes you decide to get back.After that,save to either the computer by click “Recover” button.

recover deleted notes from icloud

d_win d_mac

Part 3:Regain Missing Notes from iOS 10 Devices without Backup

Note:The mode is available for losing data from iPhone and have no backup.This recovery mode is helping you to directly retrieve deleted data from iPhone.

Step 1.Run iOS Data Recovery and Connect iPhone to Computer
Firstly choose “Recover from iOS Device” option in the homepage of program and then connect iPhone to computer.

connect iphone with computer

Step 2.Select Notes
Select the “Notes&Attachments” for scanning.The program will start to scan your iPhone for the deleted notes by clicking “Next” button.

select file to recover

Step 3.Scan Your iPhone for Deleted Note
Click “Scan” to search for your lost data,then the program begins scanning your device automatically for deleted notes.

scan iphone and search deleted data

Step 3.Preview and Recover Deleted Notes from iPhone
After scanning,all your iPhone data will be listed orderly.You are allowed to preview them one by one,which includes notes,contacts, videos,music,photos,text messages,calendars,bookmarks and more.You should choose “Notes” only for previewing to save time.At last,click “Recover” button to get iPhone notes back on computer.

recover deleted notes on iphone

Free download the iOS 10 Data Recovery and try to get your missing notes back.

d_win d_mac

Related Article:

How to Restore Deleted Notes on iPhone 7/SE/6S/6/5S/5

How to Recover Lost Data on iPhone after iOS 10 Upgrade

How to Recover Lost Contacts on iPhone after iOS 10 Upgrade

How to Recover Lost Text Messages on iPhone after iOS 10 Upgrade

How to Recover Lost Photos on iPhone after iOS 10 Upgrade

How to Download & Install iOS 10 Beta 7 On iPhone

Update August 19, 2016: Apple has just released iOS 10 beta 7 for developers. If you already have iOS 10 beta installed, proceed to Settings > General > Software Updates and download away. If you’ve been waiting for beta 7 to get in on iOS 10, keep reading and we’ll walk you through the set up!

ios-10-beta-7

iOS 10 is coming this fall with a ton of new features, several that require lots of third-party developer input. As such, the company is releasing developer betas so that software engineers can get a head start on making great software for you.

Apple’s 2016 software updates- iOS 10, watchOS 3, tvOS 10, and macOS Sierra – are currently available as closed developer previews or as public betas for iPhone,iPad,and Mac.(Sadly, no public beta for the Apple Watch or tvOS this year.) While the betas contain new features, they also contain pre-release bugs that can prevent the normal use of your iPhone, iPad, Apple Watch, Apple TV, or Mac, and are not intended for everyday use on a primary device. That’s why we strongly recommend staying away from the developer previews, and using the public betas with caution. If you depend on your devices, wait for the final release this fall.

How to Download and Install iOS 10 Beta 7 On iPhone

To install the iOS 10 beta,you’ll need to visit Software Update on your iPhone or iPad.

Step 1.Launch Settings from your Home screen,tap on General,then tap on Software Update.
Step 2.Once the update appears,tap on Download and Install.
Step 3.Enter your Passcode.

install-ios-10-1

Step 4.Tap Agree to the Terms and Conditions.
Step 5.Tap Agree again to confirm.

Step Your iPhone or iPad will reboot to install iOS 10. There will be a couple progress bars going across the screen. Sit tight, and let everything finish.

Although there has been no confirmation as to how many betas the company will release before working on finalizing the Gold Master version of the software, Apple released the final beta for iOS 9 around this time last year. If beta 7 isn’t the final version, we’re certainly getting close.

Related Article:

iOS 10 Public Beta Now Available

Apple iOS 9.3.4 is Now Available:What is Included in the Update

iOS 9.3.3 :The Things You Need to Know

How to Backup iPhone/iPad Data before iOS 10 Upgrade

How to Restore Deleted Data on iPhone/iPad with iOS 10