All posts by DHZ

iOS 10 Data Recovery: Recover Lost iPhone/iPad Data on iOS 10

Summary:Finding a solution to recover lost data from your iPhone after iOS 10.3/iOS 10.2 update?Want to recover deleted data from iPhone 7/7 Plus on iOS 10? The iOS 10 Data Recovery not only can help you recover lost photos, contact,SMS, videos, call logs, notes and more from iPhone/iPad after iOS 10/10.1/10.2/10.3 update,but also can helps you fix iPhone stuck in Recovery Mode,iTunes logo,white Apple logo or other iOS system problem while iOS 10 upgrading failure.

ios 10 data recovery for iphone ipad

Data and Setting Erased after iOS 10 Updated

Before going ahead with installing iOS 10 on your iDevice, it is important to note that backing up your data, either using iTunes or iCloud, is highly recommended before installing a major upgrade such as iOS 10. This is so that you can always restore back to your old setup incase anything goes wrong during or after the update. In order to avoiding data erased during installing iOS 10 / 10.1 / 10.2 / 10.3 on your iPhone.However,we have prepared a separate guide on backup your iPhone/iPad before iOS 10 update,which you can follow here: backup iPhone data before updating to iOS 10.
Please (Check tutorial here), might cause data loss without proper backup.

Recover Lost Data on iPhone/iPad after iOS 10 Update Failure

Even if you have made full preparation for the coming iOS 10,you may lose some important iOS data after iOS update.What if you are stuck on this situation?It will drive iOS users crazy,especially the lost data mean a lot for them.In order to get out of this terrible situation,here we recommend iOS 10 Data Recovery and iOS 10 Data Recovery for Mac for you all.This superior program supports to recover lost data from iPhone/iPad/iPod after iOS 10 upgrade,data including contacts,photos,videos,messages,WhatsApp history,call logs,notes,calendar,document and more.No matter whether you have made an iTunes or iCloud backup,you can get a way to retrieve what you lost on device.iPhone SE,iPhone 6S/6S Plus,iPhone 6/6 Plus,iPhone 5S/5C/5 are applicable with iOS 10 Data Recovery,as well as iPad and iPod.In additional,if you have got an new iPhone 7/ 7 Plus,when you deleted data on your iPhone 7 by accidentally,this iOS 10 Data Recovery also allows you recover deleted data from iPhone 7 with iOS 10,as well.

d_win d_mac

Part 1:Directly Recover Data from iPhone After iOS 10/9 Update

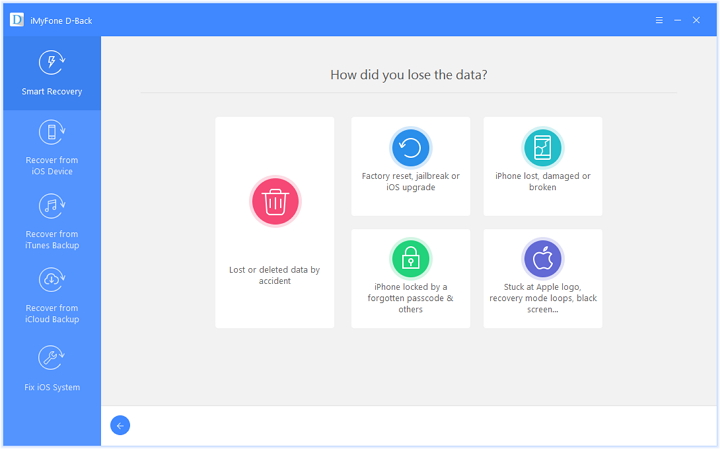
The iOS 10 Data Recovery provides the contains several data recovery modes,including “Recover from iOS Device”,”Recover from iTunes Backup”,”Recover from iCloud Backup”,”Smart Recovery”.The “Smart Recovery”help to recover data when you don’t know which is your data loss circumstance.

smart iphone data recovery

Note:This recovery mode allows to scan device directly to find and restore all the lost lost data from your lost/broken device also.

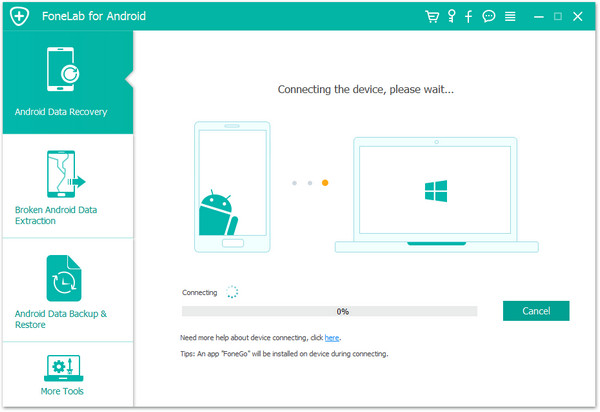
Step 1.Run iOS 10 Data Recovery and Connect iPhone/iPad/iPod to PC/Mac
Open installed iOS 10 Data Recovery and connect your device to computer.Then you should choose “Recover from iOS Device”

connect iphone with computer

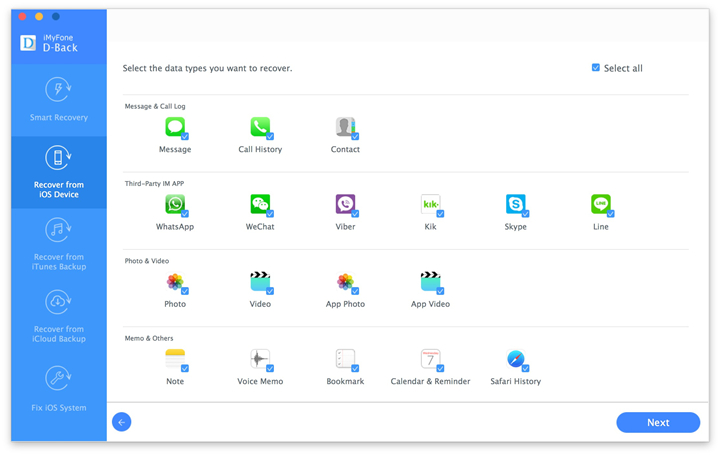
Step 2.Select Files to Scan from iPone Devices Directly
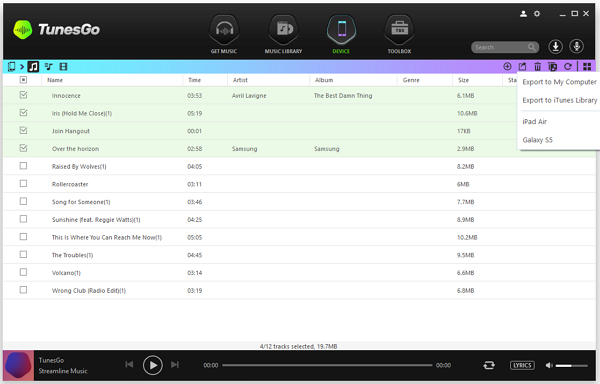
Now you can select the files types to let the program scanning,such as “Contacts”,”Photos”,”Call history”etc(Here including both the deleted data and existing data).Then tap on “Next”.

select file to recover

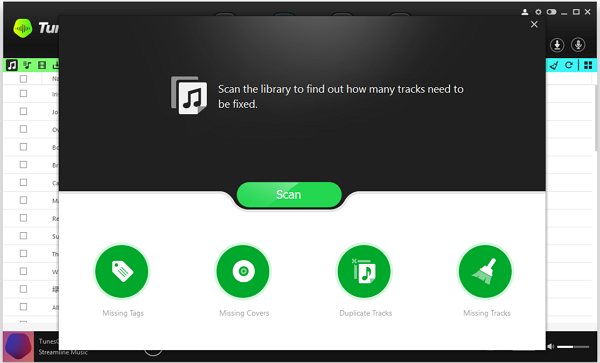
Click “Scan” to search for your deleted data,then the program begins scanning your device automatically for lost/deleted data.

scan iphone and search lost data

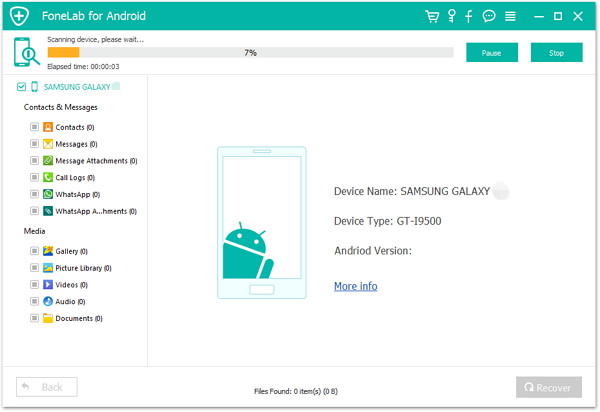
Step 3.Begin Scanning Lost Data from iPhone with iOS 10
Wait for the program scanning your iPhone devices for all lost data and already existing files,in this steps,please keep connecting your iPhone to computer,only few minutes,the scanning process will complete,you can found all lost data display for you.

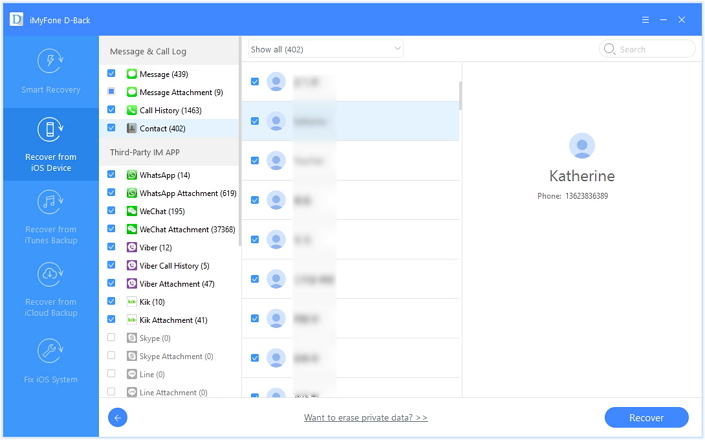
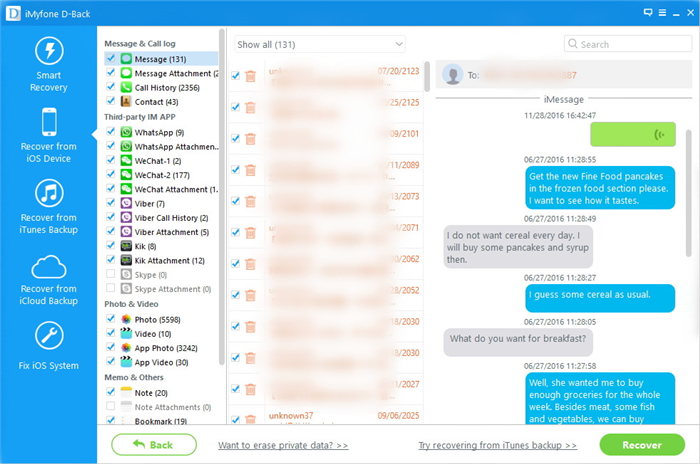
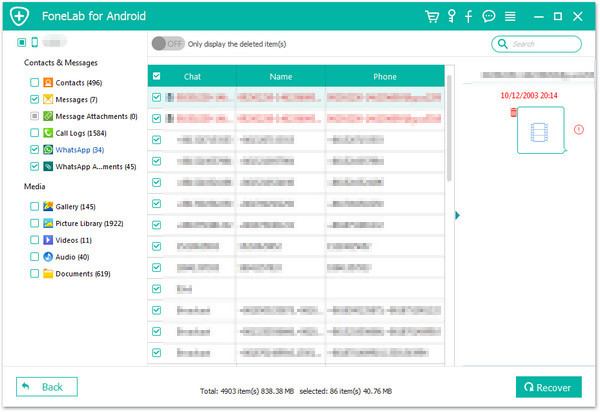
Step 4.Preview and Recover Lost Data from iPhone Device with iOS 10
Begin to Recover Lost Files from iPhone After iOS 10 Upgrade,or directly retrieve deleted data from from iPhone,iPad on iOS 10

recover deleted photos on iphone

Now you can preview the detail data after scanning finished and click “recover” to get back lost data from device.”Recover to device”or “Recover to computer” is feasible.

d_win d_mac

Tips:If you have sync your iPhone,iPad to iTunes before iOS 10 upgrading,you can also use this iOS 10 Data Recovery to extract/recover lost iPhone data from iTunes bacup files,let’s learn how it do:

Part 2:Recover Lost Data on iPhone from iTunes Backup after iOS10/9 Upgraded

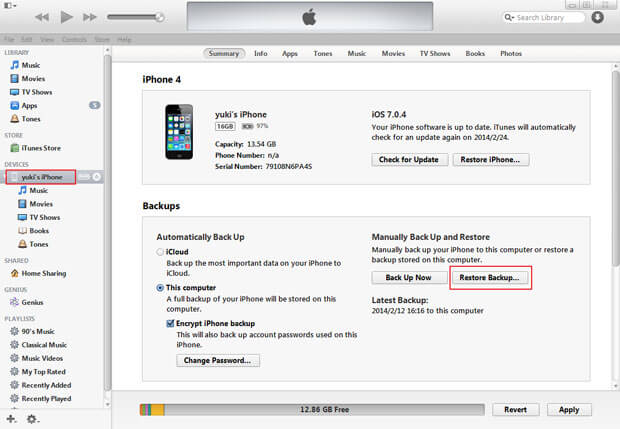
Step 1.Run iOS 10 Data Recovery and Select the iTunes Recovery Mode
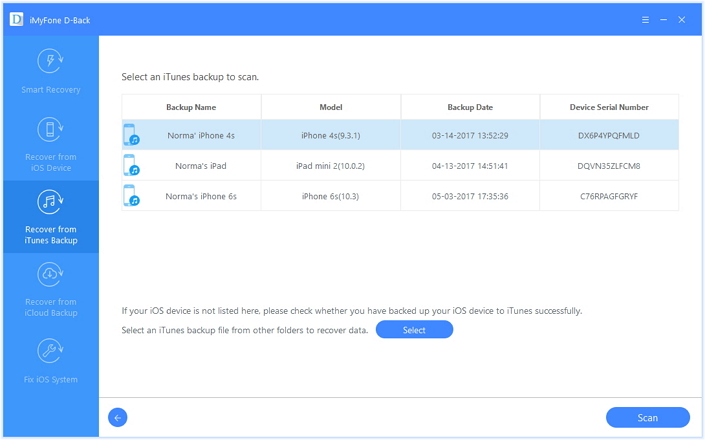
iOS 10 Data Recovery provide the option for restoring your data from iTunes backup files.The procedure is very simple and similar to previous alternative.Connect your device with your computer and launch iOS 10 Data Recovery.Choose “Recover from iTunes backup file”mode and the program will show you all backups that are available.

restore iphone data from itunes backup

Step 2.Extract iTunes Backup Files
Choose the backup file you want and click on “Start scan”.After the scan is complete,you will have a complete list of files that are available for recovering.All files will be divided in categories.For most users restoring messages,call history,photos and videos is the most important.Luckily,all of these categories are supported.

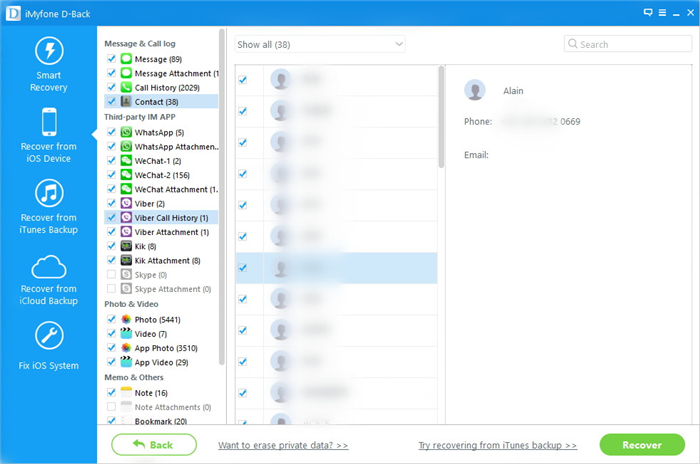
Step 3.Preview and Recover iPhone Files from iTunes Backup
Now,you can select files you want to preview and recover.If you want to recover all files,just check all categories where the files are and click on “recovery” button.Recovering usually last several minutes.When it is done,you will have your data in your computer or device.Only when it is done,you can disconnect your device from computer.

restore iphone photos from itunes backup

d_win d_mac

Part 3:Recover Lost iPhone Data from iCloud Backup after iOS10/9 Upgrade

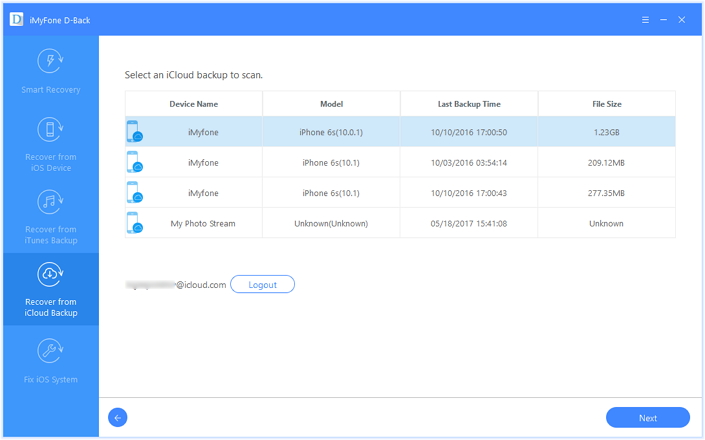
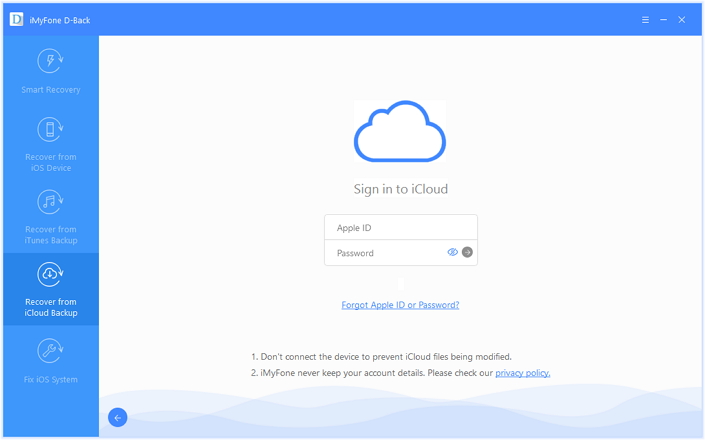
Step 1.Run iOS 10 Data Recovery and Select the iCloud Recovery Mode
You can also use iOS 10 Data Recovery to recover data from iCloud backup.As you know,you must download and install iOS 10 Data Recovery first.You will need a couple of minutes in order to finish it.Connect your iPhone/iPad/iPod with your computer and launch the iOS 10 Data Recovery.Sign in to your iCloud account.You should know that your apple ID and password are protected and nobody can know them.

sign in icloud account to login

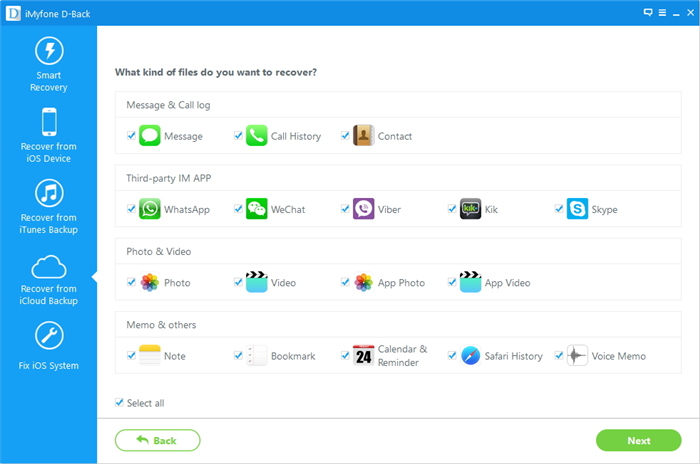
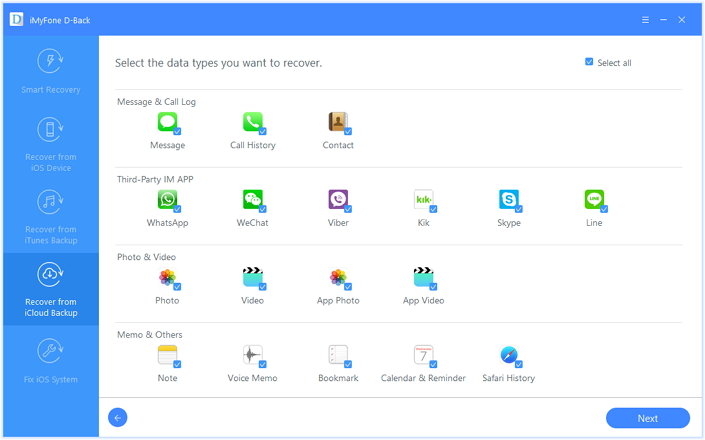
Step 2.Extract iCloud Backup Files
Click the files you need to get back and then click “Next”to extract files from iCloud backup files.

aelect the file types

Step 3.Download Select iCloud Backup Files
Click “Download” button to download all the backup files from iCloud, and move on to the next step.

download icloud files

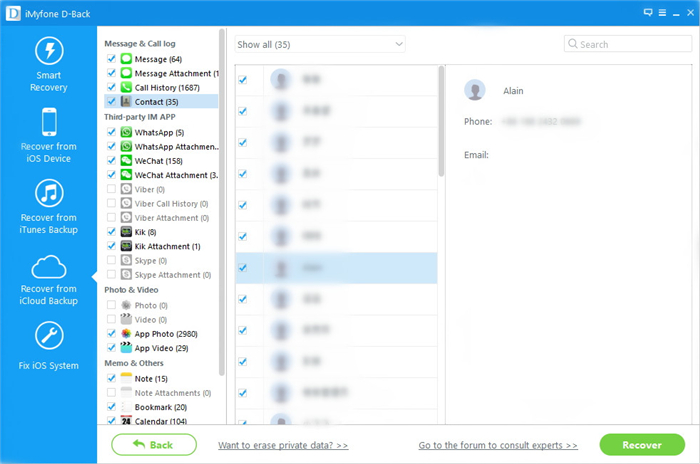
Step 4.Preview and Recover iPhone Files from iCloud Backup
During the process,you can preview certain files.All data found in the iCloud backup can be restored.Downloading and extracting time depends on a size of the backup.If you don’t have enough time,or your internet connection is slow,just uncheck files you don’t want to recover.When you are done,just click on “recover” then select to save the recovered data to computer or device.

recover photo from icloud

Free download the iOS 10 Data Recovery and have a try!

d_win d_mac

Backup iPhone/iPad Data Before iOS 10 Upgrade

Note:Before upgrading your iPhone,iPad to iOS 10/iOS 9,to avoiding data loss or erased due to iOS 10 update failure,we strong recommend you should backup data and restore to iPhone after iOS 10 upgrade complete and successfully,this all-in-one iOS Data Recovery, Backup & Restore, System Recovery program can help you solve any problem,you can free download and have a try before purchase it

Download the iOS Toolkit for Windows or Mac:

d_win d_mac

backup restore iPhone data on iOS 10

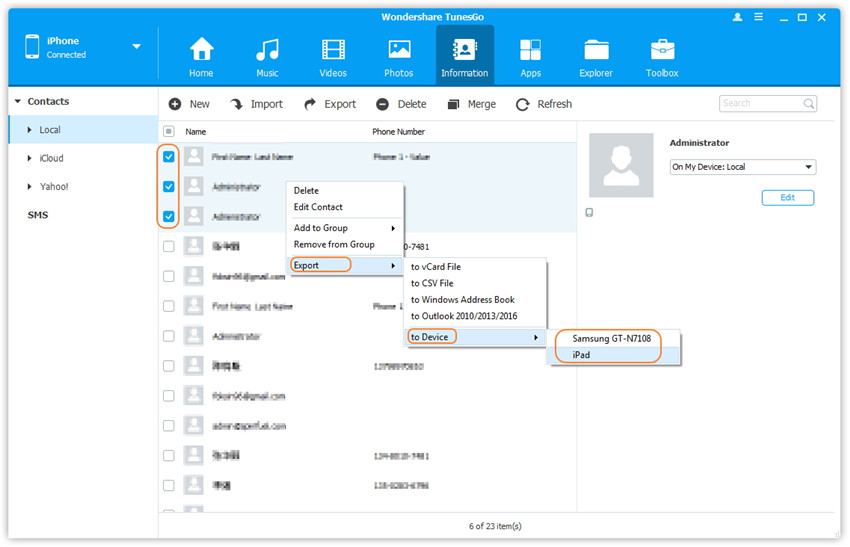
Extra Tips:How to Safely Backup Data on iPhone/iPad before iOS 10 Update

Read More iOS 10 Data & System Recovery Tutorial

How to Downgrade iPhone or iPad from iOS 10 to iOS 9.3.5

How to Recover iPhone/iPad/iPod Data After iOS 10/9.3 Upgrade

How to Recover Lost iPhone Data after iOS 10/9 Upgrade

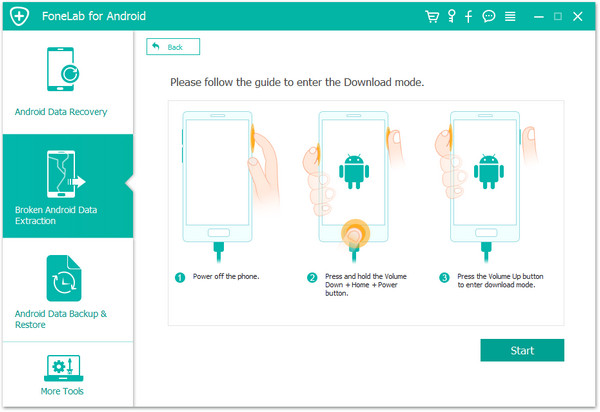
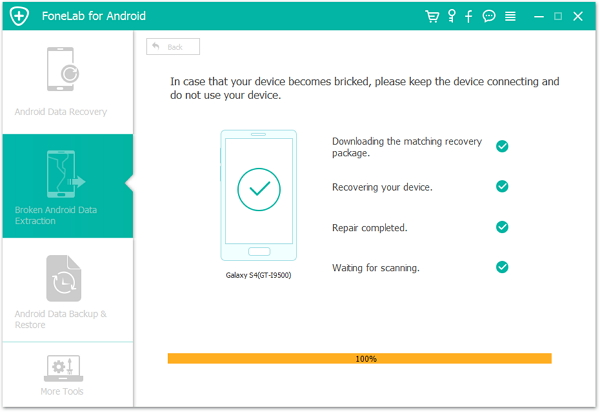
How to Fix Bricked iPhone,iPad after iOS 10,iOS 9 Upgrade

How to Recover iMessages after iOS 10(iOS 9.3) Update

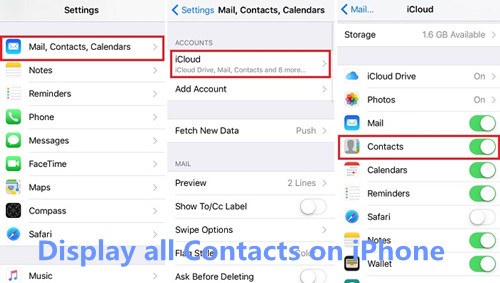
How to Recover Lost Contacts from iPhone after iOS 10 Update

How to Transfer Samsung Data to Galaxy S8/S8+

Summary:The Galaxy is coming to the world in 2017 finally.It’s essentially a Galaxy S8,but with a curve over the right side.Planning on make the switch from old Samsung to new powerful Samsung Galaxy S8(Plus)?This page shows you how to transfer contacts,photos,messages and other data from Samsung to new Galaxy S8 with two simple ways.

s8

That wouldn’t be a good idea unless you have to transfer lots of personal data such as your contacts,SMS,photos,etc. from the old Samsung to Samsung Galaxy S8.It means that you not only need to transfer the files from one mobile device to the other one,but also need to identify some special types of files,which are complicate to view directly on computer,and then copy them from computer to new device.Best solution could be turning to the data transfer tools.This article describes how to use a one click data transfer tool to migrate data between two phones.

* How to Manage Samsung Galaxy S8 on Computer

*How to Stream Apple Music to Samsung Galaxy

Phone Transfer and Samsung to Samsung Phone Switch,both enables to switch data between two mobile phones,no matter they are running the same operating system or not.It provide the function that supports to transfer files among Android phones,for example copy files from Samsung to Samsung Galaxy S8/S7/S6/S5,transfer files between iPhone and Android phones,such as sync files from iPhone to Samsung or in contrast.Almost all kinds of brands of Android phones as well as iPhone models are applicable with Phone Transfer,like Samsung,HTC,LG,Lenovo,Xiaomi,Huawei;iPhone 7/SE/6S/6/5S/5,etc.

d_win d_mac

Part 1:Transfer Samsung Files to Samsung Galaxy S8 via Phone Transfer

Step 1.Run Phone Transfer Tool
The first thing is to install and run Phone Transfer on PC.When its primary window appears,click “Start”to show the “Phone to Phone Transfer” window.

transfer samsung files to Samsung Galaxy S8

Step 2.Get Both Samsung Devices Connected
Connect your two Samsung phones to the computer via USB cables.After recognized,your devices will be listed on both sides of the window.(One Samsung phone is shown on left side,Galaxy S8 phone is shown on right side.)

Step 3.Transfer Samsung Data to Samsung Galaxy S8
It will display all the contents you can transfer between the two Samsung phones.You can uncheck any content you dislike to transfer.Then,click “Start Copy“.

copy samsung files to samsung galaxy s8

transfer files from samsung to Samsung Galaxy S8

d_win d_mac

Part 2:Transfer Samsung Files to Samsung Galaxy S8 via Samsung Smart Switch

Samsung Smart Switch makes it easy to transfer contacts, photos, messages and more from your old phone to your new Galaxy S8.With Smart Switch, you can bring your information with you whether you have an Android OS or iOS device,including contacts, photos, videos, apps, settings, messages, music, calendars and more.

samsung smart switch transfer files to s8

Step 1.Connect Galaxy S8 to your old Samsung using the included USB connector and the cable from your old phone.
Step 2.Select the items you want to transfer to your new Galaxy S8.
Step 3.Enjoy all your favorite apps,music,contacts and more without skipping a beat.

Part 3:Transfer Samsung Files to Samsung Galaxy S8 via Gmail

If you have backed up the old Samsung with a Google account. Lucky to you. You can simply sync data from your old Samsung to Samsung Galaxy S8 using the same Gmail account. Please check the following steps:

Step 1. Tap “Settings” app on old Samsung phone.
Step 2. Tap “Account” and “Add account” if the account is not logging in.
Step 3. After you sign in your Google account, please tap the account.
Step 4. Touch the file you need to upload to the cloud service, “Sync App Data”, “Sync Calendar”, “Sync Contacts”, “Sync Drive”, “Sync Gmail” are available, here take contacts for an examle.
Step 5. Now, tap “Settings” and select “Account” on your Samsung Galaxy S8.
Step 6. Add your Google account and tap the account after signing in.
Step 7. Select the files to download to your new Samsung.

sync files via google account

Read more:

How to Transfer Android Files to Samsung Galaxy S8

How to Transfer iPhone Files to Samsung Galaxy S8

How to Backup and Restore Samsung Galaxy S8

How to Root Samsung Galaxy S8 on Computer Safely

How to Transfer iPhone Files to Samsung Galaxy S8

It’s never too early to gear up the rumour mill when it comes to smartphones,with Samsung’s Galaxy S8 already receiving the treatment just a few months after the company launched its current flagship model,Digital Spy said.“But we know that tech never sleeps,with Samsung already appearing to have nailed down some specifications for the successor to the Galaxy S7,” Digital Spy said.

You were an iPhone users and ready to buy a new Samsung Galaxy S8 to take a place.However, making the switching between iPhone and Samsung is not a simple process,due to the different platforms of Android and iPhone.As the saying goes:More than one road leads to your goal.

* How to Recover Data from Samsung Galaxy S8

* How to Manage Samsung Galaxy S8 on Computer

Copy iPhone Data to Samsung Galaxy S8

You can transfer data between Android phones and iPhone via third-party tools here I recommend for you-Phone Transfer software.It’s a reliable software to transfer files from iPhone to Samsung Galaxy S8,like contacts, text messages, calendar, music, photos, videos.What’s more,other brands of Android are supported,such as HTC, LG, Sony, Motorola and more.iPhone 7(Plus)/SE/6S (Plus)/6 (Plus)/5S/5C/5 are applicable with Phone Transfer.Here is a full guide about how to transfer iPhone Files to Samsung Galaxy S8 easily and safely.

d_win d_mac

Part 1:Transfer iPhone Files to Samsung Galaxy S8 via Phone Transfer

Step 1.Run Phone Transfer on Computer
Launch the Phone Transfer on PC.You’ll see the primary window as follows.Click “Phone to Pone Transfer“option in the main page.

transfer files from iphone to galaxy s8

Step 2.Connect iPhone and Samsung to Computer
Connect your iPhone as well as Galaxy S8 to computer by using USB cables.After recognizing,Phone Transfer will display the two phones in the primary window.

Note:In order to transfer iPhone files to Samsung,you ought to install iTunes.Only in this way can you transfer files smoothly.

Step 3.Sync iPhone Files to Samsung Galaxy S8
By default,all contents you can transfer are checked.You can uncheck the files you don’t want to transfer,just check the ones you need.

Then,go to click “Start Transfer” to begin to sync files like contacts from iPhone to new Samsung.Be sure not to disconnect either of the phones during the whole transfer process.

Transfer Content from iPhone to Samsung Galaxy S8

Transfer files from iPhone to galaxy S8

Tips:Supported Samsung Models

From Android 2.1 to Android 7.0:Samsung Galaxy S8,Samsung Galaxy S7,Samsung Galaxy S6,Samsung Galaxy S5,Samsung Galaxy S4,Samsung Galaxy S3,Samsung Galaxy S2,Galaxy Note 4,Galaxy Note 3, Galaxy Note 2,Galaxy S,Galaxy Ace,Galaxy Nexus,Galaxy Grand Duos,and more.

d_win d_mac

Part 2:Transfer iPhone Files to Samsung Galaxy S8 via Samsung Smart Switch

Samsung Smart Switch is the second way to transfer contacts, photos, messages and more from your old phone to your new Galaxy S8.With Smart Switch, you can bring your information with you whether you have an Android OS or iOS device,such as,contacts, photos, videos, apps, settings, messages, music, calendars and so on.

Step 1.Connect Galaxy S8 to your old iPhone using the included USB connector and the cable from your old phone.
Step 2.Select the items you want to switch to your new Galaxy S8.
Step 3.Enjoy all your favorite apps,music,contacts and more without skipping a beat.

samsung smart switch transfer iphone data to s8

Read more:

How to Transfer Android Files to Samsung Galaxy S8

How to Transfer WhatsApp Chat History from iPhone to Samsung Galaxy

How to Sync Calendar from iPhone to Samsung Galaxy S7/S7 Edge

How to Transfer iPhone Files to Samsung Galaxy S7

How to Transfer Music from Android to iPhone/iPad/iPod

It’s nWhat is the must-to-do thing when you move to a new iPhone 7/6S/6S Plus and sell your old Android phone? For me,the songs stored on my phone are such necessary for me to keep on the the new device.Transferring songs from Android to iPhone is the most troublesome task.You can waste lots of time to move the media files to PC and copy them to the new iPhone. But if you prefer to a time-saving and efficient method,here is an amazing software to fix it- TunesGo.

transfer music from android to ipod/iphone

With the help of TunesGo,you can directly copy and transfer music from Android to iPhone/iPod/iPad (songs, play counts, ratings, and more info) without any complicate steps.TunesGo not only can helps you transfer music,videos and photos from Android to iOS device,but also but also can helps you transfer media files from iOS devices to iTunes;transfer media files from Android to iTunes;sync music, videos from iTunes to Android/iOS devices.TunesGo is fully compatible with majority of hot Android phone brands and iPhone,such as Samsung Galaxy S7/S6/S5/Note 5/4, HTC, LG, Sony, Lenovo,XiaoMi,HUAWEI,etc;iPhone 7/SE/6S/6/5S/5/4S/4.

d_win d_mac

How to Sync Music from Android to iOS Device

Step 1.Download and Install TunesGo on PC
Download and launch TunesGo program on computer and click to enter its homepage,you can see the screen of TunesGo displays its functions on the left side.Pay attention,iTunes needs to be launched on the computer at the same time.

tunesgo-homepage

Step 2.Connected to PC
In this step,you just need to connect both the Android device and iPhone/iPod with computer,now you are allowed to manage the music on the phone with this program as you like.

tunesgo-android-homepage

Tips:You should allow USB debugging mode on Android phone.

enable-usb-debugging

Step 3.Sync Android Music to iOS Device
Here the left list has shown the data types allow to transferred and the devices that connected to PC,so simply click “Music” under the name of the Android phone.Next,turn to press “Export” button on the top and choose “iPhone/iPod” which will list the name of the device.

export-music-pc-device-itunes

Note:You can preview the results on TunesGo if you choose the destination device on the top left side when the songs are transferred.What’s more,it also supports to fill the tags of the songs when the details are not completed,such as the genre,album,artist,etc.

clear up iTunes music

You can search a lots of methods to transfer music between Android and iOS device.All these ways are quite helpful.You can opt to the most suitable one to move music from Android to iPhone/iPad/iPod.TunesGo is a nice option.

d_win d_mac

Read more:

How to Backup Android Phone or Tablet Data to Computer

How to Transfer Android Files to Samsung Galaxy S8

How to Transfer Data from Android to iPhone

How to Transfer Android Files to Samsung Galaxy S8

Samsung has been pushing the envelope in terms of the technology for its flagships,and the Galaxy S8 won’t be any different as specs and features have already been leaked this early ahead of its planned 2017 release date.According to the rumors,the Samsung Galaxy S8 will come with a 4K display on the AMOLED screen.There’s no news yet on the size of the screen,although the Galaxy S7 is already 5.5 inches so it’s hard to envision the South Korean company to go smaller again.

Samsung is the most well-known Android brands on the world.If you were a user of Android users in the past and now get another new Samsung Galaxy S8,the first thing occurs in your mind may be “Android to the new Samsung Galaxy phone data transfer”.Have no idea about it?Continue reading,you will the efficient solution about how to transfer files from Android to Samsung Galaxy S8 effortlessly.

Phone Transfer works for almost all kinds of Android phones,it helps transferring files from Android to Samsung Galaxy S8 in a coffee time.Contacts,photos,videos,SMS,notes,WhatsApp messages,call logs,and more are included.Not only Samsung models,but also various of Android brands are applicable with Phone Transfer,like HTC,Lenovo,Motorola,Huawei,etc.Moreover,this software allows to backup phones files to computer,as well as restore backup from computer to phones.

d_win d_mac

Part 1:Transfer Android File to Samsung Galaxy S8 via Phone Transfer

Step 1.Install and Run Phone Transfer
Connect your both your old Android phone and Samsung Galaxy S8 to your computer and launch the Phone Transfer.You will see the main screen shows connecting devices is required. Click the “Start” button under “Phone to Phone Transfer” mode.

transfer android files to Samsung Galaxy S8
Step 2.Transfer Files from Android to Samsung Galaxy S8
It will be just a second before the program recognize them.Make sure your target phone is on the right side while the another phone on the left.If not,click “Flip” to exchange the source device and target device.

copy android files to samsung galaxy s8

On the middle panel,check data (contacts,text messages,call logs,music,videos,etc) to transfer from Android phone to new Samsung Galaxy S8.Press the blue button “Start Copy”.After a while,all of content will be synced on your Samsung Galaxy S8.

transfer files from android to Samsung Galaxy S8

d_win d_mac

Part 2:Transfer Android File to Samsung Galaxy S8 via Android Manager

Android Manager would be one of the best ways for you to transfer data from your old Android to Samsung Galaxy S8(Plus).Android Manager is an ideal tool to transfer & manage data for Samsung Android device,including music,videos,photos,contacts,SMS.With this data manager program,you are allow to transfer files between Android devices,transfer files between iOS and Android device,transfer files between Android device and iTunes,transfer files between iOS & Android device and computer.Various brands of Android devices are compatible Android Manager,such as Samsung (Galaxy S8/S7/S6,Note 5),Google(Nexus,Pixel),HTC,Xiaomi,Motorola,Sony,Lenovo,etc,.

d_win d_mac

Step 1.Run Android Manager and Connect Devices to the Computer
Step 2.Select the Source Device on Program
Step 3.Select the Transfer Option
Step 4.Select the Target Device
Step 5.Transfer Files from Android to Samsung Galaxy S8(Plus)

transfer android files to s8

d_win d_mac

Read more:

How to Transfer Everything from Android to Samsung Galaxy S5/S6/S7

How to Transfer Photos from Android to Samsung Galaxy S6/S7

How to Transfer Messages from Android to Samsung Galaxy S6/S7

How to Transfer iPhone Data to Samsung Galaxy S7

How to Recover Lost Contacts on iPhone 7(Plus)

Summary:Lost contacts on iPhone 7 after iOS 10.3 update?Delete some contacts on iPhone 7 with iOS 10 by careless?Contacts disappeared from iPhone in iOS 10/9?Don’t upset,you can get missing contacts back on your new iOS 10 device with the below tutorial.

Contacts are always playing an import role in our daily life.We rely on iPhone contacts to call, message and email to keep in touch with others.However,unexpected bad things may happen accidently.You may lost data from iPhone due to deleted mistaken,iOS jailbreak/upgrade,device damaged/broken, factory reset,etc,.Well, when God closes a door, somewhere he opens a window. If you encountered such situations, just take it easy, since this tutorial will guide you to recover lost contacts on iPhone 7/6S/6/6 Plus with ease step by step.

How to View all Contacts on iPhone 7?

If you are not sure if the contacts are missing,you need to display all existing contacts and check them.

Step 1.Tap Settings on your iPhone home screen.
Step 2.Slide the screen to the Contacts option and tap it.
Step 3.Tap Accounts,then tap the preferred account(default iCloud account).
Step 4.Find “Contacts” and turn it “ON” if it is “OFF.”.

Display all Contacts on iPhone 7

Now,you see all existing contacts, phone numbers on iPhone.Then open the Contacts app and find/search the contacts you want on the contact lists.If you can not find the contact(s) on iPhone,please follow the tutorials below learnning about how to recover missing contacts from iPhone 7/7 Plus easily.

4 Ways to Recover Lost or Deleted Contacts on iPhone 7(Plus)

Recover Lost Contact from iPhone 7/7 Plus with/without Backup

iPhone Contacts Recovery has always been a life saver for iPhone users to recover iPhone contacts with or without backups,including numbers, names, emails, job titles, companies, etc.The iPhone Data Recovery is designed to restore lost contacts from iPhone 7/7 Plus with iOS 10,as well as iPhone 6S(Plus), iPhone 6(Plus), iPhone SE, iPhone 5S/5/4S/4 and other devices with iOS 10/9 easily.Besides,the iPhone Data Recovery also supports to recover iMessages, SMS,call logs,notes,WhatsApp history and more data from iPhone 7 in three recovery modes:directly recover contacts from iPhone,you should choose this mode for data recovery if you haven’t backup;restore contacts from iTunes backup;download and extract/recover iPhone contacts from iCloud backup files.Using this powerful iOS 10 Data Recovery software to restore your lost data is almost as easy as getting your hair done-just sit still and watch the magic hands. Directly recover lost contacts, phone numbers on iPhone 7 tutorials are available below. Keep reading in case you need it.

d_win d_mac

Tips:The iPhone Data Recovery can help you recover contacts and other data lost due to deletion, device loss, jailbreak, iOS upgrade, etc.

Part 1:How to Recover Deleted Contact from iPhone 7/7 Plus without Backup

Tips:If you do not know where to find your lost contacts data?Please switch to “Smart Recovery” mode,this function can help you find your data quickly.

smart data recovery for iPhone 7

Step 1.Run iPhone Data Recovery and Connect iPhone 7 to PC/Mac
First of all,please download and run the iPhone Data Recovery on your Windows comptuer or Mac,we also provide iPhone Contacts Recovery for Mac version.An then connect iPhone to your computer,Select the “Recover from iOS device” mode.

connect iphone with pc

Step 2.Choose “Contacts “Your Want to Recover and Start Scanning
Here you could choose the files type to scan,for contacts and photos recovery,you need to click “Contacts” and click “Next” button.

Then click “Start Scan” to scan your device.

scan iPhone for lost contacts

The scanning process will takes you a little time,depending on the amount of the data being scanned.

Step 3.Preview and Restore Lost Contact from iPhone 7
When the scanning is finished,it’s time for choosing detail data you would like to preview and recover.After that,hit “Recover” to restore your lost data and save it to computer or device.

preview and directly recover lost contacts from iphone

Free download the iOS 10 iPhone 7 Data Recovery and have a try!

d_win d_mac

Part 2:How to Restore Lost Contacts from iPhone 7/7 Plus via iTunes Backup

Way 1:Restore Previous Contents from iTunes backup file

Step 1.Run iTunes and Prevent your iPhone from Syncing Automatically
Note: Please disable auto sync your iPhone to iTunes first, in order to preventing your iPhone be synced automatically and erase the deleted data,and you can’t get those lost data forever.

For Windows users: Run iTunes, go to < Edit < Preferences… < Devices.
For Mac users: Run iTunes, go to < iTunes < Preferences… < Devices

Step 2.Connect iPhone to Computer
Then connect your iPhone to the computer via USB cable.

Step 3.Start to Restore the whole iTunes Backup File(Contacts Included)
Go to the “Devices” again, choose the backup file of your iPhone and click on the “Restore” button. Wait for the restoring process until complete and keep connect your iPhone with it, your iPhone will restart and all the contacts in the backup is on your iPhone now.

restore lost contacts from itunes backup

Way 2: Selectively Restore iPhone 7 Lost Contacts from iTunes Backup

Step 1. Switch “Recover from iTunes Backup File” Recovery Mode
Run the iPhone Data Recovery and click “Recover from iTunes Backup File” on the top of the program’s window.

iTunes recovery

Step 2.Select and Scan the backup file
Choose the one for your iPhone and click “Start Scan“.

Step 3. Preview and Restore iPhone 7 Backed Up Contacts from iTunes
The scan only takes you a few seconds. All the contents from the backup file will be displayed in details,including contacts, SMS, photos, notes, videos and more.If you want to recover contacts,please select the “Contacts” items and check it before recover them, and click the “Recover” button to extract contacts from iTunes,or restore to iPhone 7.

recover iphone contacts from itunes backup

Download the iPhone data recovery for Windows or Mac and try to restore contacts from iPhone:

d_win d_mac

Part 3: How to Retrieve Lost Contacts from iPhone 7/7 Plus via iCloud Backup

Tips:If you have’t backed up your iPhone with iCloud before you lost the contacts,you can use the iPhone Data Recovery to download all backed up contents from iCloud,then extract contacts and restore back to your iPhone 7 easily.Let’s teach you how to selectively recovering iPhone contacts from iCloud backup.

Step 1. Switch Recover from iCloud Mode and Sign in your iCloud account
Switch to the recovery mode of “Recover from iCloud Backup File” on the left side of the program’s window.
First of all, enter your iCloud account and the password to sign in. Once you’re in, you can begin the downloading and extracting work.

log in icloud account

Tips:You never need to worry about your the security of your account. We won’t keep any information of your account or data during your sessions.

Step 2. Download and Extract your iPhone 7 backups from iCloud
Once you’re in, you can see a list of all your iCloud backup files under this account. Choose the one for your iPhone, the latest one will be the best. Check ‘message’ and ‘message attachments’ on the pop-up window if you don’t want to download all data there. By doing this, it only download text Contacts and the attachments, saving you time. Of cource, you can choose all if you have a need.

select icloud backup file to download

When the download is complete, continue to extract the downloaded backup file by clicking on the “Scan” button appearing on it. Since the backup file is unreadable, you have to extract it for reading and recover deleted iPhone Contacts from it.

extract icloud backup file

Step 3. Preview and Restore iPhone 7 Lost Contacts from iCloud
Once the scan stops, you can preview all the Contacts in the iCloud backup file. Choose the text Contacts you need and click “Recover“. Both “Recover to iPhone 7” and “Recover to Computer” are available.

selectively recovering iphone lost contacts from icloud backup

Tips:I suggest you connect your iPhone with your computer through a USB cable and choose the “Recover to Device”‘. It’s more convenient for you to view the contacts on your iPhone than on your computer.

d_win d_mac

Part 4:How to Restore Lost iPhone Contacts from Google Account

If you have make iPhone contacts backup with Google account,you can restore contacts from the backups easily.Please be sure all of your contacts are visible.

Step 1.From the home screen,tap Settings.Scroll to and tap Contacts.Tap Accounts, then tap the preferred account.

Step 2.Next to Contacts,slide the toggle switch to ON.Repeat this process for any other accounts.Now you can see all of your contacts.

Step 3.From the home screen,tap Settings.Scroll to and tap Contacts.Tap Accounts, then tap Add Account>Google.

Step 4.Enter your Google email address,and password.Tap Sign in.

log in google account

Step 5.Ensure that the Contacts switch is ON.Tap Save.Done.

tap save contacts on google account

Tips:If you’re switching from Android/Samsung to iPhone,just go to your new iPhone: Open the Settings > Mail,Contacts,Calendars > Add Account > Google. Enter your Google login info and your iPhone 7 will automatically sync the contacts with your Google account.If you want it to stay synced and include any new contacts you add,then you’ll also need to go to Settings > Mail,Contacts,Calendars > Contacts > Default Account and select your Google account.

Transfer Contacts from iPhone to Computer without Lost

Above tutorials we have teach you how to recover lost contacts from iPhone,if you are worried that your important contacts data is lost again,we suggest your should backup your iPhone to computer.
Here,we recommend you use this iPhone Manager tool to transfer contacts, SMS, photos, music, videos and notes between between iPhone and other phone directly, between PC and iPhone.What’s more,it also allows you manage/delete/add/transfer iPhone contacts with free and easy ways.

backup iPhone 7 contacts

Related Guides:

Best iPhone 7 Manager – Manage and Transfer Files on your iPhone 7/ 7 Plus

How to Recover Lost Files on iPhone 7/7 Plus

How to Recover Lost SMS on iPhone 7/7 Plus

How to Transfer Contacts from iPhone 7 to Computer

Two Ways to Transfer Contacts from old iPhone to iPhone 7/7 Plus

How to Backup and Restore Data on iPhone 7

Recover Deleted Text Messages and iMessages from iPhone 7/7 Plus

We can free send and receive message on the iPhone and iPad using iMessage, Facebook Messenger, Whatsapp, Kik, Line, Viber,etc.However,the Messages app is a commonly used app on iOS devices,you can use Messages send and receive text messages, iMessages, photos, MMS between iPhones and iPads,we use Messages app to communicate with others every day,with a long accumulation, you will find a lot of SMS stored on the phone,therefore,some users can not find some important text messages on iPhone 7/7 Plus/6s/6.

imessages on iPhone 7

If you do not know how to search message conversations on iPhone 7/6S/6/6 Plus,you can quickly search the messages through the Messages app Search function or Spotlight Search box on iPhone,you can also recover missing messages from iPhone with the help of iPhone Data Recovery.

Way 1:Search Message Conversations on iPhone via Messages app Search

You can easily search all existing iMessages conversations and text messages on the iPhone on the Messages app Search function by name, word, phrase, or other search terms.Let’s teach you how to use the Messages app search feature for iPhone and iPad.

Step 1.Tap the “Messages” app on iPhone or iPad.
Step 2.After open the Messages app,just pull down on the screen,the hidden Search feature will appear.
Step 3.Tap into the Search bar and type the name, phone numbers, or word to messages search box for.
Step 4.The searching (messages)results list will automatically appear below, tap the messages you wish and view the detail.

search text messages on iPhone

Way 2: Search Text Messages on iPhone via Spotlight Search

First of all,to make sure text messages is available for Spotlight Search, you need to check in Settings> General> Spotlight Search, and make sure the existing Message is checked.

On the iPhone Home screen,just tap and pull down on the screen,then the hidden Spotlight Search will appear.Then, tap the search bar and enter the words/messages/name/information you are searching for. When the search results appeared, swipe down to scroll through the list to view the Messages section,just tap the messages you want to find and view the deail information.

Spotlight Search messages on iPhone 7

Notes:Do you have no clue where to find your messages?If you can not find the text messags or iMessags you want, it is likely that you accidentally deleted or lost the text messages on iPhone.Please do not be nervous,you can use a iPhone SMS Recovery to recover deleted messages from iPhone 7/7 Plus/6S/6.

Lost SMS on iPhone 7 or iPhone 7 Plus
In wrong cases,such as jailbreak,iOS devices crash,delete information from your iPhone by touching the screen in the wrong way etc., your data is gone.You may lost precious data from iPhone due to several circumstances,especially the important SMS.

Recover Deleted or Lost SMS on iPhone 7/7 Plus

iPhone 7 Data Recovery-Make the recovery easy,which is a data recovery that enables you to quickly recover deleted text messages on iPhone 7,as well as iPhone 6S/6/SE/5S/5/4S/4, iPad or iPod touch.It provides three modes to recover lost SMS, contacts, photos, videos, notes, WhatsApp messages, Kik messages, call logs and more from iPhone 7/7 Plus:Recover from device,recover from iTunes backup,or recover from iCloud backup.iPhone 7 Data Recovery makes it more intuitive to preview lost data in the program.Norm preview allows you to view data with detail information,besides it supports to preview particular information like a text message or iMessages by entering a keyword or phrase.

d_win d_mac

Way 3:How to Recover Deleted SMS from iPhone 7/7 Plus without Backup

Step 1.Connect iPhone 7 to Computer
Connect your iPhone 7 with your computer and run iPhone 7 Data Recovery.Select “Recover from iOS Device“option,then you’ll see an interface which informs you that your device is connected.

connect iPhone 7 to PC or Mac

Step 2.Scan Messages from iPhone
Select the files type you need to recover,click “Start Scan” to continue.If you just want to recover lost SMS from iPhone,you could only click”Messages&Attachments”.The program will begin to scan data on your iPhone automatically.Now you need to wait till the end of scanning and check for the scanning result.

scan sms on iphone 7

Step 3.Preview and Recover Lost SMS from iPhone 7/7 Plus
When the scan finishes,all found data will be list in categories.You can preview the Messages before recover them,please click “Messages” item to check the detail,and then select the one or all lost messages you want to get back.Finally,recover the messages and save them on your computer by click “Recover” button.

recover sms from iphone 7

d_win d_mac

Way 4:Restore Messages on iPhone 7 via Previous iTunes Bakup Files

Step 1.Select iTunes Recovery Mode
Launch iPhone 7 Data Recovery in the first step,connect your iPhone 7 to computer and select the “Recover from iTunes Backup File” recovery mode.

Step 2.Select iTunes Backup File and Extract it
Select the backup file (usually the latest one) and click “Start Scan“.Then you will see all backup contents well categorized in the left sidebar.

extract itunes backup

Step 3.Previe and Restore Lost SMS from iTunes Backup File
Press “Messages” to show all lost and existing messages from iPhone.Click the detial data of messages list and click “Recover” to restore them.At last,you will be asked for selecting to save the selected data to computer or device.

restore messages from itunes backup file

Free download the iPhone data recovery and try to retrieve deleted SMS from iPhone.

d_win d_mac

Read More:

How to Recover Lost Files on iPhone 7

How to Backup and Restore Files on iPhone 7

How to Recover Data from Broken iPhone 7

How to Recover Deleted Data from iPhone 7

How to Recover Data from Samsung Galaxy C7

About Samsung Galaxy C7
Recently,there is a rumor that Samsung will release the new version that called Samsung Galaxy C7.The Samsung Galaxy C7 smartphone features a 5.7-inch full HD (1920*1080 pixels) Super AMOLED display,and is powered by an Qualcomm’s Snapdragon 625 octa-core chipset paired with 4GB of RAM.The smartphone also features 32 GB or 64 GB internal storage,16-megapixel rear camera with dual LED flash support,8-megapixel selfie camera,and a 3,300mAh battery.

Lost Data from Samsung Galaxy C7
There are lots of reasons lead to Samsung Galaxy data loss.Here make some example main reasons to see if you have ever met before.
-Deleted the important files by mistake.
-Android operating system upgrade.
-Device Rooting.
-Device damaged/broken.
-The sudden power off of the device when you are using them.This may lead to data loss,too.
-The virus infection.

Retrieve data on Samsung Galaxy C7

Samsung Data Recovery is a secure and powerful tool that can be used to restore data from Samsung Galaxy C7,including photos,videos,contacts,messages,call logs,etc.Android Data Recovery supports to all kinds of Samsung device,including Samsung phones and tablets,Samsung Galaxy Ace,Samsung Galaxy Note,Samsung Infuse,Galaxy Nexus,Samsung Epic 4G Touch,and more.This powerful program allows to recover data from SIM card,Internal memory,SD cared,as well as Samsung device.

d_win d_mac

How to Restore Data on Samsung Galaxy C7

Step 1.Connect Samsung Galaxy C7 to Computer
Run the Samsung Data Recovery program on your computer after downloading and installing,you should connect your Samsung C7 to computer with an USB cable.

recover samsungh data

Step 2.Enable USB Debugging on Galaxy C7
The program may require that you debug your Galaxy C7 before scanning process begin.Simply follow the instructions in the next window to complete the process.

recover samsung data

Step 3.Scan Samsung Galaxy C7 Data
When your C7 is detected,the program will scan the device for all data.You can choose the files you want scanned in the next window.Such as “Contacts”, “Messages Attachment”, “Call Logs”, “Gallery”,and so on.You can choose the one you want to recover and click “Next” button.

samsung data recovery

If there is a prompt on your Samsung phone as follow,tap “Allow” and permit the program to access and scan the selected files on your Samsung Galaxy C7 smart phone.

recover samsung data
Now the program will begin to analyze data stored on Samsung Galaxy C7.

recover samsung data

Step 4.Preview and Recover Data from Galaxy C7
When the scanning process is complete,all the files will be displayed as shown below.Choose the ones you want to recover and click on “Recover” button to save them to your PC.

recover samsung data

d_win d_mac

Read more:

How to Recover Data from Samsung Galaxy C5

How to Recover Data from Samsung Galaxy S8

How to Recover Data from Samsung Galaxy S6/S7/S7 Edge

How to Recover Lost Data from Locked Samsung Phone

How to Recover Data from Samsung Galaxy C5

Samsung’s products are taking a nosedive in terms of upgrading and improving its tech gears.For Samsung Galaxy C5,it has been speculated to integrate a 5.2-inch FHD.As for Galaxy A5,A7 and A8,these segments have been rumored to upgrade to Android 6.0 Marshmallow and would not get the Android N.According to a post by Maktechblog,the new series of smartphones comes in Metallic body,and Samsung Galaxy C5 SM-C5000 comes with a 5.2-inch FHD screen along with a fingerprint scanner under home button feature.However you may inevitably lost data from Samsung phone due to sundry reasons,such as rooting,restore device to factory resetting,deleted data by mistaken.

samsung galaxy c5

How to Recover Data from Samsung Galaxy C5?An ideal android data recovery tool can fix your problem-Samsung Data Recovery,supports to recover data from Samsung Galaxy C5 perfectly,including contacts,messages,call logs,photos,notes,document and so on.Additionally,it empowers to recover data from almost all models of Samsung phone,for example Galaxy S7/S6/S5,Note 5/4/3,A 9/8/7.Samsung Data Recovery allows to restore data lost due to deleting, restoring factory settings, flashing ROM, rooting, etc., from SD cards inside Samsung devices as well as Samsung phones.This amazing program is applicable with Android 2.3-5.0 operating system or newer.

d_win d_mac

How to Restore Data on Samsung Galaxy C5

Step 1.Connect Samsung Galaxy C5 to Computer
Launch the Samsung Data Recovery tool on your computer after downloading and installing,you need to connect your Samsung C5 to computer via an USB cable.

connect samsung with the computer

Step 2.Enable USB Debugging on Galaxy C5
The program may require that you debug your Galaxy C5 before scanning process begin.Simply follow the instructions in the next window to complete the process.

enable usb debugging on samsung

Step 3.Scan Data on Samsung Galaxy C5
Once your C5 is detected,the program will scan the device for all data.You can choose the files you want scanned in the next window.Such as “Contacts”, “Messages Attachment”, “Call Logs”, “Gallery”,and so on.You can choose the one you want to recover and click “Next” button.

select file tpye to recover from samsung

If there is a prompt on your Samsung phone as follow,tap “Allow” and permit the program to access and scan the selected files on your Samsung Galaxy C5 smart phone.

allow scan the samsung

Now the program will begin to scan data stored on your Galaxy C5.

scan samsung for lost files

Step 4.Preview and Recover Data from Galaxy C5
When the scanning process is complete,all the files will be displayed as shown below.Choose the ones you want to recover and click on “Recover” button to save them to your PC.

recover samsung lost data

d_win d_mac

Read more:

How to Recover Data from Samsung Galaxy S8

How to Recover Lost Data from Locked Samsung Phone

How to Recover Data from Samsung Galaxy S6/S7/S7 Edge

How to Recover Data from Water Damaged Samsung Phone

How to Recover Pictures from Broken Android Tablets

We all know somebody who dropped their Android tablet too many times with disastrous results. A cracked or broken screen is annoying enough,what should do if the screen is unresponsive when you try to unlock it?When your Android tablet get broken what is the first thing you wanna do?Buy a new one to replace?Send it to repair shop?Or restore data from the broken Android tablet?For me,the precious pictures saved on my tablet are more important than the tablet itself.I am crazy about losing the pictures from it indeed.

Here comes the Broken Android Data Recovery,which is a strong data Android data recovery to rescue your data saved on Android tablets,especially be powerful to recover pictures from broken Android tablets.Beside,it is able to recover various of data from broken Android tablets,such as contacts,messages,call logs,document and so on.Android Broken Recovery helps to recover data from broken Android tablet as well as phones with broken screen,black screen, touch screen can’t be used,or lock screen.Most Samsung tablet models are supported,insist of Galaxy Tab 2.7,Galaxy Tab Pro 10.1,Galaxy Tab Pro 8.4,Galaxy Tab S 8.4,Galaxy Tab2 10.1.

d_win d_mac

How to Restore Pictures on Broken Android Tablets

Step 1.Connect Android Tablet to PC
After you install and launch the Android Broken Recovery system,you need to select “Android Broken Data Recovery” to enter the recovery process.

connect android to pc

Step 2.Select the File Type from the Broken Tablet
Once you have selected the data that need to be recovered,you should click “Next”button and go on.

scan-android

Step 3.Choose Fault Type on Android Tablet
From the interface below,you can see two different types of broken device.On the left is for “Touch cannot be used or cannot enter the system” while the right is for “Black screen or broken screen”. You should choose the suitable one depends on your Android Tablet.

Choose-Broken-Types

When you get to the next window,choose the proper “Device Name” along with “Device Model” that matches your tablet.Afterwards,click the “Next” button.

broken-android-tablets-recovery

Step 4.Enter Download Mode
From here,you can follow the instructions to take the Android tablet into a download mode:

-Turn off your device
-Press and hold “Volume-“,”Power”,and “Home” button
-Press “Volume +” and then enter the download mode

android-download-mode

Step 5.Analyze&Scan Pictures Stored on Android Tablet
The program will automatically perform an analysis on your Tablet for lost/existing data.And the software will start downloading “recovery package”, please wait a while.

scanning-broken-android

Step 6.Restore Files from Broken Android Tablet
Once the program has analyzed and scanned the device,it will display all the different files that can be recovered.Select the detail data you want to recover and click the “Recover” button for the recovery process.And then you can save all the selected data from Android Tablet to computer.

recover-picture-broken-android

d_win d_mac

Read more:

Recover Photos from Samsung Tablet with Broken Screen

How to Recover Data from Broken Screen Android Phone

How to Recover Deleted Files from Android Phone or Tablet

How to Unlock Android Lock Screen

How to Recover Lost Data from Android Phone or Tablet