All posts by DHZ

How to Transfer Photos from Samsung Android to Nokia 8/7/6

[Summary]:If you buy Nokia 8, you can learn about how to transfer data including photos, pictures, videos, music, contacts and SMS from Samsung/Android to Nokia 8 in this guide.You can also transfer data from any Android phone such as Motorola, LG, Huawei, Oppo, Google Pixel, Sony to Nokia 8/7/6 with an Android to Android transfer tool.

In recent years, NOKIA has launched several smartphones the Nokia 7/6/5 and Nokia 8. These new mobile phones continued the quintessence of the brand design and the exquisite workmanship bought a lot of competitive power to a great number of mobile phones at the same price. What’s more, it is pretty good for us to use these smartphones because their application support at home is fantastic. Meanwhile, the new Nokia phones continue a lot of the features of the previous generation in appearance with high quality. Therefore, many mobile phone users have been keen on these new Nokia smartphones with their high quality.When you have got an new Nokia 8,you may want to know how to transfer photos and move data from Samsung to Nokia 8.

So are you a fan of Nokia smartphone? If you are, may be you don’t know how to transfer photos to Nokia 8/7/6/5. For example, you have stored lots of photos on your old Samsung, now you want to switch all the photos to your new Nokia because you don’t want to lose all the photos with a great number of happy memories. So you have tried many ways to solve the problem but they didn’t work and was very complicated. However, your confusion will be eliminated after reading this passage.

Eventually, Samsung to Nokia Transfer is to your liking. Phone transfer helps smartphone users transfer photos when changing into phone with simply two or three steps. It’s a good choice for you if you need to get all important photos copied to your new Nokia.

For example, if you want to transfer photos from Samsung phone to Nokia 8, Nokia 7, Nokia 6 and Nokia 5, you can download this Samsung to Nokia Transfer in order to solve your confusion. Furthermore, Phone Transfer not only can switch photos from Samsung to Nokia, but also can switch all files including contacts, photos, messages, photos, videos, call logs, calendar, apps, and music and so on from phone to phone. And though the user feedback, Phone Transfer is a trustworthy application which can solve their transfer problem effectively without any data left or missed.

d_win d_mac

Steps to Transfer Samsung Photos to Nokia 6/8

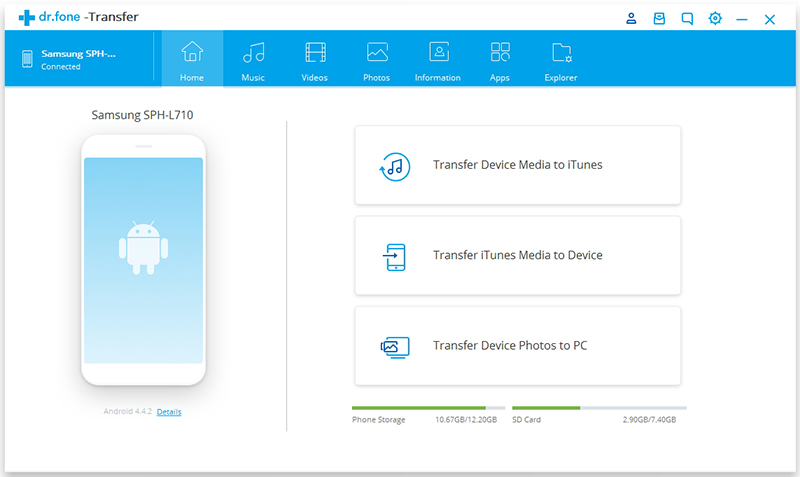
Step 1. Open Program and Connect Samsung and Nokia 6 to PC
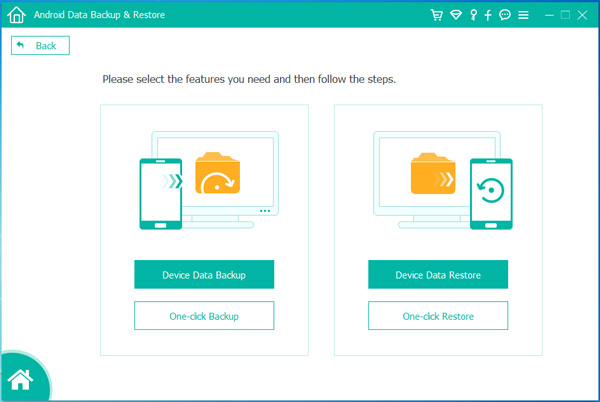
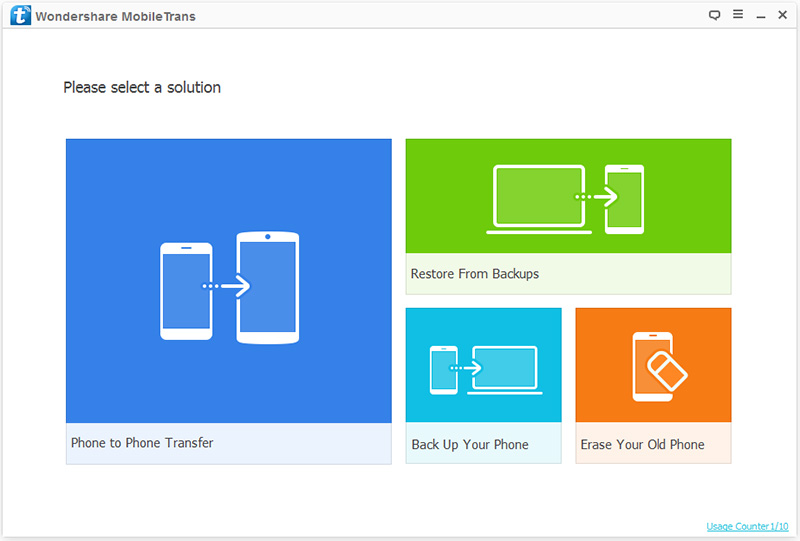
After downloading the Phone Transfer, you open the program and connect your old Samsung and new Nokia. And then Phone Transfer can search them automatically. Now you should select “Phone to Phone Transfer” option in all options.

Samsung to Nokia Transfer

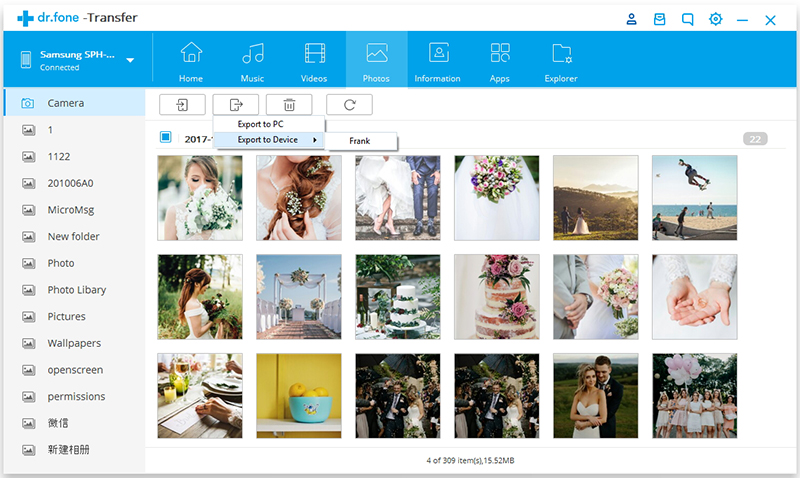
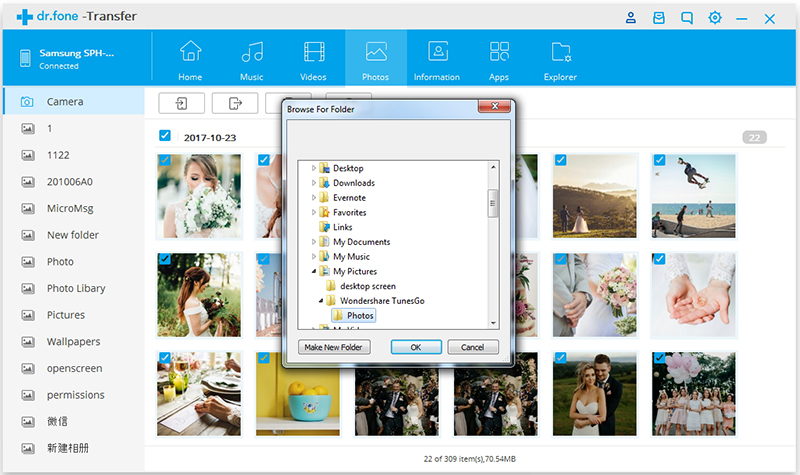
Step 2. Choose Photos and Transfer from Samsung to your new Nokia

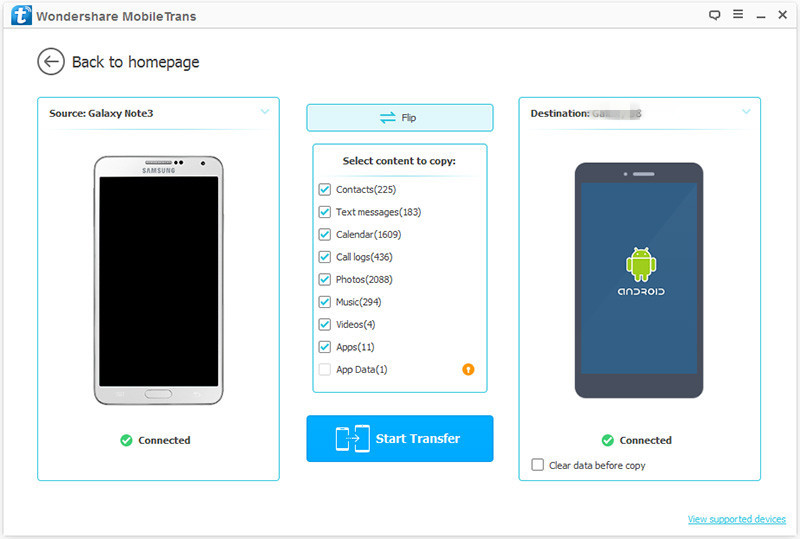
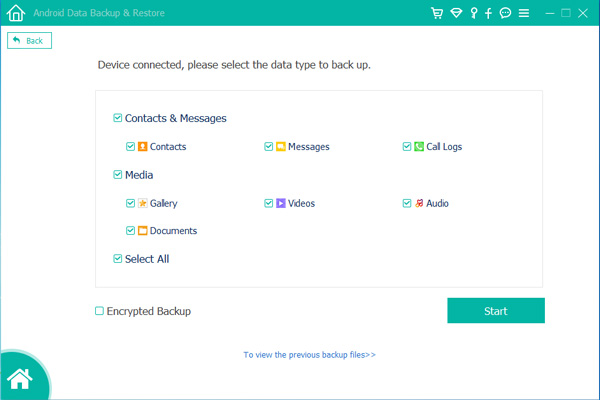
Come to this step, you can see what content can select to transfer including contact, text messages, calendar, photos, music and so on. Therefore, if you only want to switch photos from your old Samsung to your new Nokia, you can click the “Photos” option instead of choosing other options. Moreover, you can choose all options to transfer from phone to phone.

transfer samsung data to Nokia 6

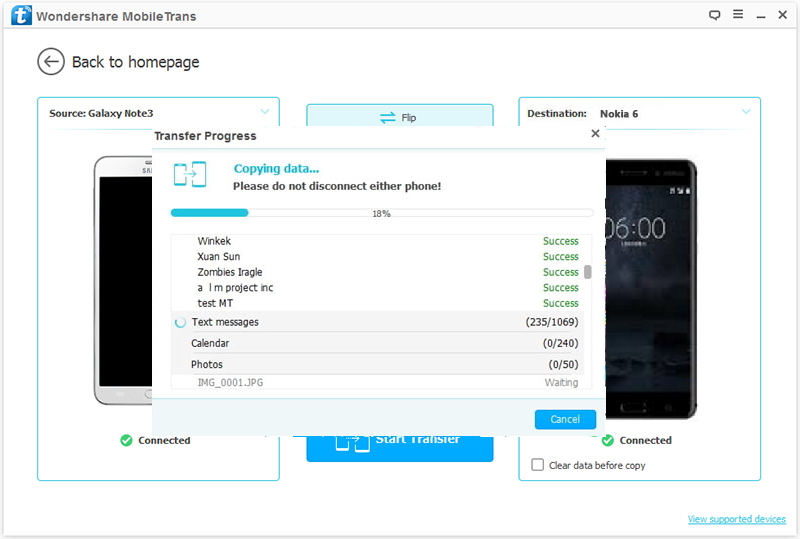
Note: In order to transfer photos from Samsung to Nokia 8/7/6, Samsung should be on the left as the source phone and the Nokia 8/7/6 should be on the right as the target phone. When the situation is not like this, you can click “Flip” to change it.

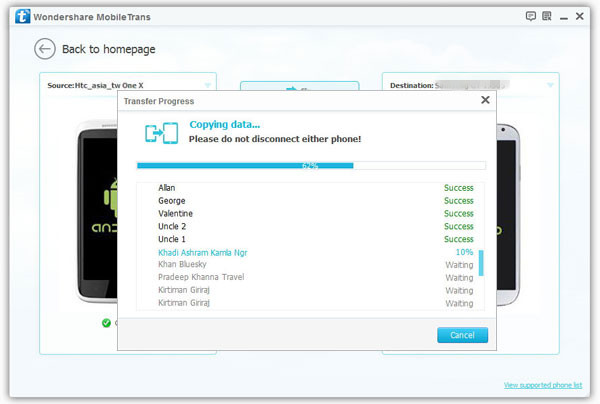
Step 3.Begin Transfering Photos from Samsung to Nokia 6

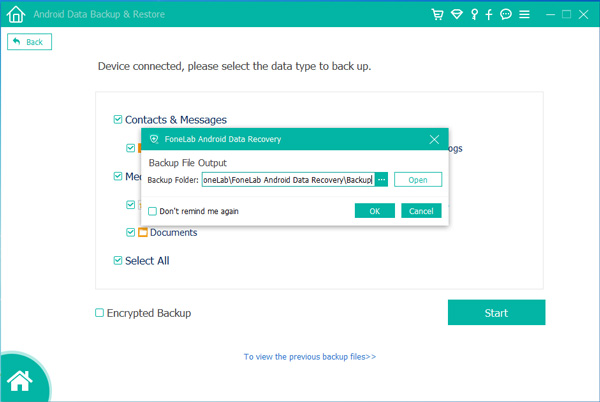
And then, you should click “Start Transfer” to begin the transfer process. After the end of the process, you should click “Ok”.

move data from Samsung to Nokia 6

d_win d_mac

Related Article

How to Transfer Data from Android to Samsung

How to Transfer Data from iPhone to Android

How to Transfer WhatsApp Data from iPhone to Android

How to Transfer Contacts from Samsung to Nokia 8/7/6

How to Sync iPhone Data to Nokia

How to Transfer Files Between Android and Computer

[Summary]: Looking for an Android Transfer software to manage Android files on PC/Mac? This article recommend you a best Android manager tool to manage/transfer/import files to Android phone, you can easily transfer photos, videos, music, contacts and messages from Android to computer, from PC/Mac to Android.

How to transfer photos from Samsung Galaxy S10 to computer?
How to export my music and photos from Galaxy S10 to computer for backup? I need a reliable tool for helping.

How to import video to Galaxy S9?
How to transfer my favorite videos from computer to Samsung Galaxy S9? I can’t complete this with the normal way. Any recommend Android transfer tools for help? Thanks.

How to manage/transfer photos and videos on HUAWEI P30 Pro?
I have capture lots of pictures and videos on Huawei 30 Pro, these files take up most of the memory space, I want to backup photos, videos from HUAWEI P30 Pro to Windows 10, any quickly methods helps me transfer files from HUAWEI P30 Pro to the computer?

In these modern days, it is very important to sync our mobile device frequently. Contacts, SMS and especially photos, videos, music and more other media files are the most import files you should focus on. Backing up Android data on computer is an essential thing to protect our personal data and avoid leaking to anyone. There could be a trouble situation when you can’t transfer files between Android and computer through USB cable normally. How can we move the data from Android to computer with another safer way? if you are searching for the solution then this article is the right one for you.

The Best Solution to Transfer Files between Android and Computer

A quick and safe way to transfer files between Android and computer is using Android ToolKit Android Transfer tool. It is one of the best file managers for Android, it is capable of exporting files from Android to computer, as well as transferring files from computer to Android. It is an all-in-one data manager tool for media files, and contacts, apps are included. What’s more, Android Manager enables to transfer files between iTunes and Android, transfer files between Android and iOS/Android device. You can easily use it to manage your Android files on computer via this Android Transfer by transferring, editing, adding and deleting. It compatible with almost all Android models, such as, Samsung, HTC, LG, Lenvo, Huawei, Huawei, Google Pixel, ZTE, OPPO, Motorola, Xiaomi, etc,.

d_win d_mac
d_win d_mac

In the follow parts we will take “Photos” as an example to explain how to do the files transfer between Android and computer via Android Transfer.

Part 1:How to Export Photos from Android to Computer

Step 1. Run Program and Click on “Photos” Option
Run Android Transfer on computer, Click “Transfer“in the home page of program.

android toolkit home page

android transfer main page

In the “Photos” management window, choose your desired photos and click “Export” > “Export to PC“.

export photos from android to other device

Step 2. Export Photos from Android to Computer
This brings up your file browser window. Select a save path to store the photos from your Android device to computer.

You can also transfer the whole photo album from Android to PC.

transfer photo files from android to pc

export photos from android to pc

Note: Except for exporting the photos to PC, it also supports to export the photos to another iOS or Android device. Connect the target device to the computer and select it as the export path, all selected photos will be transferred to the target phone.

d_win d_mac
d_win d_mac

Part 2:How to Transfer Photos from Computer to Android

Step 1. Run Program and Click on “Photos” Option
Run Android Transfer on computer, Click “Transfer“in the home page of program.

android toolkit home page

android transfer main page

Click “Photos” tab. All the albums will be displayed on the left. Select one folder to store new added photos on your Android device.

select folder to store added photos on android

Step 2. Transfer Photos from Computer to Android
Click “Add” > “Add File” or “Add Folder“.

If you only want to select some photos, then click “Add File“. You can create new albums and add photos in it. Simply right-click the photos category on the left panel, then click “New Album“.

add folder to save android photos

If you want to transfer all the photos in one folder, then click “Add Folder“.

Now select photos or photo folders and add to your Android device. Hold down “Shift” or “Ctrl” key to choose multiple photos.

transfer photos from computer to android

d_win d_mac
d_win d_mac

Related Articles:

How to Recover Data from Android Phones

How to Restore Data from Broken Android

How to Transfer Android Data to Computer

How to Transfer iTunes Music to Android Device

How to Manage Android on Computer

Import Files to Android

How to Transfer Samsung Contacts to Nokia 8/7/6/5

[Summary]:Have got a new Nokia Android phone and want to transfer data from your old Samsung phone to Nokia phone?Here,methods of transfer contacts from Samsung to Nokia 8. You can one click to directly transfer contacts and switch files from any Android phone including Samsung, HTC, LG, Huawei, OPPO, ViVo, Motolora, Sony, Google Pixel and so on to Nokia 8/7/6/5.

I would like to buy a mobile phone to my son for a birthday gift. I am satisfied with Nokia 8 which owns a double lens with the certification of Zeiss camera and it configured the 3040mAh capacity battery. I think my son will like Nokia 8 because he is keen on photography and wants to use a super long standby mobile phone. However, here comes a problem, how to copy all files from my son’s old Samsung to his new Nokia 8? I prefer some simple ways but I haven’t found it yet.” –Said by John.

The appearance of Nokia 8 is popular with many electronic fans. Because the Nokia 8’s fuselage is a full metal texture, and the upper and lower antenna belts are moved to the top and bottom of the fuselage, which makes the back of its back look better. Moreover, Nokia 8’s back is polished, which looks a bit more than the abrasive metal spray. What’s more, Nokia 8 joined the fashionable double lens, using a 5.3 inch IPS screen with a good overall sense. And Nokia 8 equipped with a Snapdragon 835, 4/6GB of RAM, Android 7.1.1 and so on.

To find that kind of simple transfer ways, Android to Nokia Transfer can help you. This Phone Transfer is an almighty transfer tool and it allows you to transfer between phones even if the phones are different brands or models. For example, you can transfer contacts from Samsung Galaxy S4/S5/S6/S7/S8/Note/A/J to Nokia 8/7/6/5. Meanwhile, the steps to transfer data are very simple. First, download the Phone transfer; Second, connect your phones; Finally, click “Start Transfer” button.

d_win d_mac

Tips:Phone Transfer works well with the latest Android 8.0 OS.

How to Move Contacts from Samsung to Nokia 8

Step 1. Connect your Samsung and Nokia 8
When you download the Phone Transfer, you can see the homepage of Phone Transfer on PC. After that, please choose “Phone to Phone Transfer” in order to transfer Samsung Contacts to Nokia 8.

Android to Nokia transfer

Step 2.Select Contacts to transfer between Samsung and Nokia 8
In this step, you are supposed to choose the files which you want to transfer. In Phone Transfer, you can click the option contacts, photos, videos, music, text messages, call logs, calendars, apps to switch between Samsung and Nokia 8.

samsung to nokia transfer

Attention: To make sure the transfer process successfully, the export device Samsung should be on the left and the import device should be on the right. If not, please click the “Flip” button to exchange the position

Step 3.Begin Transfer Contacts from Samsung to Nokia 8
Finally, you only need to click “Start Transfer” in order to complete the transfer process. And it takes only a few minutes, the Samsung contacts are transferred to Nokia 8/7/6 by Phone Transfer.

transfer contacts from Samsung to Nokia 8

Free download the Phone Transfer and try to transfer all data from Android to Andorid.

d_win d_mac

Related Article

How to Transfer Data from Nokia to Samsung Galaxy S8/S7/S6

How to Move Data from Android to iPhone X

How to Transfer WhatsApp Messages from Samsung to Samsung

How to Transfer Data from Nokia to iPhone

Transfer Contacts,SMS,Photos,Videos from Samsung to HTC U11 EYEs

My old Samsung phone screen is broken, HTC U11 EYEs can be a good choice for me to replace my old Samsung phone. But I need to move the contacts,SMS,photos,videos from my old Samsung phone to my new HTC U11 EYEs. The question is, how can I transfer these important data from my old Samsung phone to HTC U11 Plus? Is there any quick and easy way to help me quickly transfer the data I need?”—-Ben

It is said HTC released the new machine HTC U11 EYEs on the afternoon of January 15.The HTC U11 EYEs can be understood as the flagship U11 + “youth version”. The new machine uses double-sided glass + metal frame as the fuselage material, glass and metal are not exposed plastic wrap, the gap control is also in place, superior to the HTC U11 and Samsung Galaxy S8; compared to U11 + again full screen shape Rounded into a rectangle, the whole machine more sense of unity.So for many people, HTC U11 EYEs are configured to exactly match their phone needs and preferences.However, the question of how to switch the precious data like contacts,SMS,photos,videos from the old Samsung to the new HTC U11 EYEs also plagues many people.Now you are fortunate to see this article, as we will provide the simplest three steps to help you move all the contacts,SMS,photos,videos at one-click process.

The Samsung to HTC U11 EYEs Transfer is a full-featured transfer tool. It can move almost all files, including messages, contacts, photos, music,videos and more. More importantly, you do not have to wait a long time to protect your data, your personal information will not be stored in the program, so you do not have to worry about privacy leaks. This Samsung to HTC U11 EYEs Transfer can help you transfer contacts,SMS,photos,videos or more from Samsung to HTC U11 EYEs.On the other hand, you can use this program transfer data from iPhone to HTC U11 EYEs, Nokia to HTC U11 EYEs, Android to Android, iPhone to iPhone,etc,. How to transfer contacts,SMS,photos,videos from Samsung to HTC U11 EYEs?You only need three simple steps to solve the problem.

d_win d_mac

Simple Steps to Transfer Data from Samsung to HTC U11 EYEs

Step 1. Install the Samsung to HTC U11 EYEs Transfer
Download the Samsung to HTC U11 EYEs Transfer on your personal computer (Windows or Mac),launch it to get the primary windows.As you can see, it has four functions, including phone-to-phone transmission, data recovery, data backup and data erasing.Then you should select the “Phone to Phone Transfer” option to start transfer process.

phone transfer home page

Step 2. Connect Your Phone Devices
Now you should connect Samsung and HTC U11 EYEs to the same computer via USB cable.Two devices will be displayed as “Source” and “Destination”, you must pay attention to guarantee the Samsung as the source device and the HTC U11 EYEs as the target device.Otherwise you can click the “Flip” to change their position.

select files to transfer

Step 3. Choose File Types to Transfer
Now you can select the contents types you need to transfer to the HTC U11 EYEs.Just as you see,there are many file types supported ,such as “Contacts”, “Text messages”, “Photos”, “Videos”, ”Call logs”,”Photos”,”Music”,”Apps”.Then if you want to transfer contacts,SMS,photos,videos,you should choose “Contacts”, ”SMS”, ”Photos”, ”Videos” in the directory. Then click the “Start Transfer” button to start the process.

transfer Samsung data to HTC

Note:In this part you must make sure that the connection under no accident.

d_win d_mac

This mobile transfer is a powerful mobile transfer tool which can help you transfer everything you want from your old mobile phone to your new mobile phone. When you need to replace your old phone, this one-click program can be you first choice tool.

Supported Operating Systems: Android 2.0-7.0 N, iOS 3.0-iOS 11, Symbian 5.0-9.0

Supported Files: contacts, text messages,call logs, photos, videos, music,calendars,apps.

Related Articles:

How to Transfer iPhone Data to HTC U11 EYEs

How to Switch Everything from Android to iPhone

How to Recover Deleted Data from HTC U11 EYEs

How to Restore Deleted Contacts from HTC U11 Eyes

How to Restore Deleted Photos from HTC U11 Eyes

How to Manage Android on Computer

How to Backup and Restore Text Messages from iPhone on Mac

[Summary]:Worry about your important text messages is lost?Backing up SMS from iPhone to a Mac computer regularly is the best way to protect iPhone messages from losing. This article will show you how to transfer SMS from iPhone to MacBook Air, MacBook Pro, iMac without iTunes.Then you can restore backup files to your iPhone X/8/7/6S/6(plus),etc. for using and reading again.

I want to update my iPhone to iOS 11.2,but I want to transfer my text message from iPhone 7 to Mac at first.How can I backup my iPhone SMS to Macbook Pro without data losing?

““I want to restore my iPhone to factory reseting,before that I need to backup SMS from iPhone to Macbook Air,is is possible to backup SMS and restore to iPhone after factory reset?””

Text messages on the iPhone are a quick and easy way to communicate with family, friends and colleagues in this fast-growing society. The text on your iPhone contains important information from your customers, your boss, your dear, your family, etc. It may be one of the most valuable files on your device.Thus,backing up your iPhone as a regular habit is a great way to prevent data loss by unexpected virus attack, improper operation, files deleted or lost.In the other hand, sync you files to computer before factory reset, iOS update, jailbreaking so that you would not worry about SMS lost anymore. However, iTunes can not help us to select one file type we want to transfer from iPhone to Mac,which will result in missing some files or backing up data you do not need.

But don’t worry, here’s a powerful tool can help you transfer SMS from iPhone to Mac more efficiently without iTunes.

U.Fone iOS Data Backup & Restore(Mac) as a wonderful software is designed to iPhone owner who want to back up all data (photos, video, contacts, text messages, iMessages, call logs, WhatsApp messages, Notes, Calendar, Reminder, App pictures & videos,etc.) from your iPhone to the Mac. It supports recover deleted messages from iPhone(include iPhone X/8/7/6S/6/5) to computer(windows or Mac).A software you deserve to choose because it can:

-Preview the relevant contents of the backup file in detail
-Avoid losing new stored data when you backup files.
-Supports all iPhone models running iOS, including the latest versions of iOS and iPhone X.
-Guarantee no data loss during the backup and restore process.
-Compatible with Mac OS 10.13/10.12/ 10.11 / 10.10 / 10.9 / 10.8 / 10.7

Now there is the trial version of U.Fone iOS Data Backup & Restore for you to download on your Windows PC or Mac.

d_win d_mac

We will show some pictures to help you understand the process, and there will be tips during the text instructions.

Part 1:Backup Text Messages from iPhone to Mac without iTunes

Step 1.Launch the U.Fone iOS Data Backup & Restore(Mac)

Download the U.Fone iOS Data Backup & Restore(Mac) from third party company to your Mac.After it is installed successfully.

iPhone SMS backup restore

Then choose “iOS Data Backup & Restore” button and then locate on “iOS Data Backup”.You should tick it to go on the next step.

back up iPhone SMS to Mac

Step 2.Connect Your Device to Mac

Please connect your iPhone X/8/7/6S/6 to Mac and the program will pop up the following interface:

transfer iPhone SMS to Mac

There are two options on the screen: Standard backup and Encrypted backup. You can tick “Standard backup” if you don’t need to encrypt the text message,then click Start button to enter the process.

export iPhone SMS to Mac

Note:The “Encrypted backup” button is designed for those who want to encrypt their data,and if you choose it ,you should set the password.

Step 3. Backup SMS Messages

Then you can see many data are supported, including Messages, Notes, Contacts, Call History and more, will be showed on the window.If you just want to backup your iPhone messages, you can only select “Messages” item and click “Next” to start backing up your SMS.

transfer iPhone contacts to Mac

Now the U.Fone iOS Data Backup & Restore(Mac) is backing up your SMS,please be patient until it is finished.

d_win d_mac

Note:You can easily check out the backup information after the backup is finished.The information include backup time, backup size, device name and so on.

Part 2: Restore Text Messages to iPhone X/8/7/6S/6/5S/5,etc. on Mac

If you want to easily retrieve important SMS, check out this tutorial for details, as shown below.

Step 1.Choose iOS Data Restore Option

Different from the first part, you need to run the toolkit and choose “iOS Data Restore” Option instead of “iOS Data Backup” .

iPhone messages backup restore

Step 2. Select A Backup

As you see,all backups will be set out on the screen,then you can select a backup type you would like to transfer.

restore iPhone text messages to iPhone

Step 3. Choose SMS to Restore to Computer or iPhone

You just need to tick “Messages” item to check and preview in detail. Mark those you need and save them on your Mac then choose to tap on “Restore to Mac” option. .

transfer contacts from mac to iPhone

Note: if you want to restore backup data to a computer,just click “Restore” and go on.

restore SMS to iPhone from Mac

Now, download U.Fone iOS Data Backup & Restore(Mac) to backup your SMS files or get your deleted SMS back!

d_win d_mac

More about U.Fone iOS Data Backup & Restore(Mac)

Back up your iPhone / iPad / iPod quickly and securely

iOS data backup and recovery lets you quickly and securely make iOS backups from your iPhone / iPad / iPod. It overcame the shortcomings of backing up new data would cover old backups and, in addition, encrypting backups based on your needs. Compared with iTunes, iOS Data Backup & Restore can be your best iOS data management tool.

Restore backup data to iOS devices or Windows / Mac computer

You can selectively retrieve data to your iPhone / iPad / iPod or Windows or Mac PC as needed. If you want to restore your iOS data to your computer, various kinds of files such as contacts, photos, messages, call history, memos, etc. can be transfered to your computer without any hassle. If you need to restore iOS data to the device, you can get the current contact and notes.

Related Article

How to Recover Lost SMS from iPhone 8

How to Export iPhone Data to Computer

How to Export iTunes Data to Computer

How to Download and Extract Data from iCloud to Computer

How to Backup and Restore iPhone Contacts on Mac

Have you ever wondered if your iPhone is accidentally lost or if iOS updates are wrong,however, you do not save your phone number from iPhone to Mac in advance.Once you have found the contacts disappear, you will have a huge impact on your life , isn’t it?

Learn to back up contacts is definitely a good habit ! Many people choose to back up and restore their files using iTunes or iCloud, but you should know that iTunes can not back up your data selectively and your original data may be replaced by the new data you backup. Is it possible to simply back up and restore iPhone contents without using iTunes?If you do not have iTunes installed on your computer and do not want to recover data from iTunes or iCloud, you can try to use alternative software from third-party company.

U.Fone iOS Data Backup & Restore can be a perfect program for you to backup and restore iPhone contacts on MacBook Air, MacBook Pro, iMac. All file types can be transferred to your computer as a backup, such as photos, messages, contacts, whatsapp messages, call logs, and more.This powerful tool can overcome iCloud’s flaws:

-Allows you to select the data you needs to be backed up.
-Preview the iPhone backup before restoring.
-Restore the backup to your iPhone without data losing.
-A iPhone backup software available on Mac OS and Win systems.

d_win d_mac

It supports iOS systems such as iPhone 5/6/7/8 / X or iPad / iPod to help you back up your data quickly and securely.The tool can also be applied to Mac OS 10.13/10.12/ 10.11 / 10.10 / 10.9 / 10.8 / 10.7.

Part 1: Backup Contacts from iPhone 5/6/SS/7/8/X to Mac

Step 1. Launch U.Fone iOS Data Backup & Restore

Firstly, please install the program to you computer (windows or Mac).Run it and there are some options for you to select on the screen.

iPhone contacts backup restore

Choose “iOS Data Backup & Restore” feature from the interface.Click “iOS Data Backupstar” to start the backup process.

unfone-ios-backup-restore-connect

Step 2. Connect Your iPhone to Mac

Now you should connect you iPhone to computer and wait a minute. There are two backup for you to select: Standard backup and Encrypted backup. Tick “Standard backup” then click “Start” button .

backup iPhone contacts to Mac

Tip:Of course you can choose Encrypted backup if you need. If you tick the Encrypted backup button, you will need to enter the password you created when you want to restore the backup.

Step 3.Select Contacts to Backup

As you see, there are many different kinds of data types shown on the screen.Just click the contacts you need and check the files you would like to backup.Then press “Next” button.

ufone-select-file-type

Step 4.Back Up is Finished

Now you just wait a few minutes until the backup process completed.

transfer iPhone contacts to Mac

After the backup is completed ,the program will jump to the next interface automatically, where you can see all the information about the backup data, including backup time, backup size, device name and so on.

export iPhone contacts to Mac

Part 2:Restore Backup Contacts to iPhone from Mac

In this part,if you want to take out your backup contacts,you must retrieve backup contacts from iPhone to Mac.The U.Fone iOS Data Backup & Restore can selectively restore your backup data to your iPhone / iPad / iPod or Mac/PC when you needed.

d_win d_mac

Step 1.Choose iOS Data Restore Option

Run the program and select “iOS Data Restore” on the screen of this feature in “iOS Data Backup & Restore”.

iPhone data backup restore

Step 2. Click A Backup

There are various backups displayed on the page and you should select the “Contacts” button you want to restore.

restore iPhone data

Step 3. Restore your contacts to Computer or Device

Now you are able to preview the detailed backup contacts. Choose items that you want to restore.

transfer contacts from mac to iPhone

On the next step you should choose to tap on “Restore to Device” or “Restore to PC” option as long as you have finished.

restore contacts to Mac

Step 4. Start Restoring Contacts from Backup

The last step is very easy.Just click “OK” after the contacts restore process is complete.

restore contacts to iPhone from Mac

Now you can download the trial version- U.Fone iOS Data Backup & Restore of iOS Data Backup & Restore for Mac or Windows. Try to backup your iPhone data to Mac without data losing.

d_win d_mac

Related Articles

How to Transfer Data from iPhone to Computer

How to Export Data from iTunes to Computer

How to Export Data from iCloud to Computer

How to Recover Lost Data from iPhone

How to Recover Deleted Contacts from HTC U11 Eyes

Q: I lost half of my contact numbers on my new HTC U11 Eyes due to the mistake operation of a factory setting by my little kid. And I don’t have a backup. These deleted contacts is very important for me, so I need a serious help now. Is there any good ideas for me to solve the data lost problem? Thanks.

HTC held an official announcement of the smartphone U11 EYEs, which, as expected, greatly upset its retail value. Middle-class, it is more expensive flagship OnePlus 5T. The HTC U11 EYEs was estimated at 512 USD, and that’s when you order in China – in Russia the price will be even higher. The start of sales will take place at the end of the current month in black, red and silver shades metal casing that hides a Qualcomm processor 652 and 4 gigabytes of RAM.

Comparing to the popular Android brands, HTC will comes into our mind. In the past years, HTC made several excellent smart phones: the HTC One S, the HTC One V, the HTC X, the HTC One and the HTC One X. Lately HTC announced a new model called U11 Eyes, which attractive a lot of Android users. As an old HTC fan, I ever mistakenly deleted contacts on my phone carelessly. Many person back up the phone with Google account constantly. However, not all of Android users have a habit to do this. How to get back deleted contacts from HTC Android phone? In the follow passages I will share the best data recovery program with you who get the same trouble as me. Here I will take HTC U11 Eyes model for an example to explain the recovery process clearly.

Directly Restore Deleted Contacts from HTC U11 Eyes

What I want to share with you is the U.Fone Android ToolkitAndroid Data Recovery, a must-have excellent data recovery program for Android phone and tablet. It is a well-known recovery program, which works for recovering deleted Android files, including contacts, SMS, photos, videos, call logs, documents, apps data, etc,. You can use to get back all Android data under any data loss situations, for example, recover deleted contacts from HTC U11 Eyes, insist of the phone numbers, E-mail address and other personal information. Android Data Recovery works perfectly for almost all Android models, for instance, HTC, Samsung, LG, Motorola, Google Pixel, Lenovo, ZTE, OPPO, etc,.

d_win d_mac

How to Restore Deleted Contacts from HTC U11 Eyes

Step 1. Run the Program and Connect HTC Phone
First of all, run U.Fone Android Toolkit – Android Data Recovery on computer. Select “Android Data Recovery” selection in the interface of program to go on. Connect your phone to the computer with an USB cable.

connect HTC to the computer

Step 2. Enable USB Debugging on HTC Phone
Enable USB debugging on HTC phone to allow program to access device in a more advanced manner for further operations. Tap “OK” on your phone to enable USB debugging on it when the program prompt your to do.

Note: Please follow the instruction below if you are not sure how to do it.

usb debugging on HTC

Step 3. Select Data for recovery from the HTC Phone
Select the files you need to recover. For contacts recovery, you should click “Contacts“. Then clicking the “Next” button to let the program scan the data you stored on your phone.

select contacts file to recover from HTC

Tips: Please make sure the battery capacity is more than 20% as it takes some time to complete the scanning. When it needs you to grant super user permission to proceed to go on, please tap “Allow” on your phone.

allow scanning HTC

Now the program will begin to analyze data stored on your HTC phone.

scan HTC for deleted data

Step 4. Preview and Recover Contacts from HTC U11 Eyes
When the scan is completed, a list of files will be displayed with different files of program. Click the files on the left menu bar, and then it will list all of the data stored on your device, including the current list and deleted ones. Click “Recover” button to restore the selected contacts under “Contacts” file and save it to the computer.

recover deleted contacts from HTC U11 Eyes

d_win d_mac

Related Articles:

How to Recover Deleted Data from Android

How to Recover Deleted Data from HTC U11 Eyes

How to Recover Deleted Photos from HTC U11 Eyes

How to Transfer iPhone Data to HTC U11 EYEs

How to Root Android on Computer with One Click

How to Manage Android on Computer

How to Backup iPhone Data to Mac without iTunes

As we know, backup our iPhone data to computer before factory reset, iOS update, jailbreaking is very important.Avoiding your iPhone get lost or stolen, virus attack, improper operation, files deleted or lost by accidentally,you must back up your iPhone data to MacBook Air, MacBook Pro, iMac regularly.

Backing up your iPhone’s data with iTunes is easy, but one of the drawbacks of iTunes is that you can not back up files selectively. For example, when you need to back up iPhone photos to a Mac, it does not allow you to selectively back up only the photos you need. There are many ways to back up your iPhone data to Mac except iTunes, but not every one is useful and easy to use. So, this will result in you missing some files or backing up data you do not need. But don’t worry, here’s a powerful tool to help you back up your iPhone Data to Mac without iTunes more efficiently without iTunes.

U.Fone iOS Data Backup & Restore(Mac) is designed to back up all content (photos, video, contacts, text messages, call logs, WhatsApp messages, Notes, Calendar, Reminder, App pictures & videos,etc.) from your iPhone to the Mac. Not only does it perfectly support the iOS operating system, it also allows you to select only the data you need to back it up; you can preview the iPhone backup before restoring; you can restore the backup to your iPhone without deleting your current data.This U.Fone iOS Data Backup & Restore is a better tool than iTunes for backing up iPhone data to the Mac.Why it’s a best iTunes alternative to backup & restore your iPhone/iPad/iPod data?Because:

-One click to transfer everything from iOS devices to Windows/Mac PC without iTunes.
-After make your iPhone backup,you can preview and use those data on Mac,before restoring data without hassle.
-Selectively restore the backup to your iPhone/iPad/iPod or PC/Mac computer.
-No data loss on your iPhone during the backup and restore process.
-Supported All iOS Devices,including iPhone X, iPhone 8 Plus/8, iPhone 7 Plus/7, iPhone SE, iPhone 6s/6s/6, iPhone 5s/5c/5, iPhone 4s/4, iPad Pro, iPad Air, iPad Mini, iPod touch,etc.

d_win d_mac

The tool is compatible with Mac OS 10.13/10.12/ 10.11 / 10.10 / 10.9 / 10.8 / 10.7.

Here we will attach some pictures to help you understand the tutorial, and there will be tips during the text instructions.

Part 1:How to Backup iPhone Data to Mac without iTunes

Step 1. Download U.Fone iOS Data Backup & Restore
Launch the U.Fone iOS Data Backup & Restore on your computer until the download is successful.

backup restore tool main page

Then you should select“iOS Data Backup & Restore” icon from the interface.

select backup restore option

Step 2. Connect Your iPhone to Mac
In this section you should connect your iPhone 5/6/SS/7/8/X to PC (Windows or Mac). There are two options on the screen: Standard backup and Encrypted backup. If you intend to protect the data on your iDevice, here you can to click “Encrypted Backup” which will require you to set a password for the backup.Otherwise you can tick Standard backup. Now you should click “Start” button to start the backup process.

connect iphone to computer

Step 3. Choose Data to Backup
The data you can deal with is showed on the screen and you can see many data types are supported.Now you are able to select data to back up.Then click “Next”and wait a few minutes.

select file type

Step 4. Back Up is Finished
Wait for a moment, the software is backing up your data.

backup iphone data

As long as the backup is done, you can see the name and the size of the backup file.

view backup files

Now everything you want to back up has been saved on your computer, you can check the data you have backed up on the Mac whenever you need it.

d_win d_mac

Part 2: How to Restore Backup Data to iPhone on Mac

After you have finished backing up the data and wanting to retrieve backup data to iPhone on Mac, you need to transfer the data to your computer. U.Fone iOS Data Backup & Restore can restore your backup data from your iPhone to Mac. Once installed, you can selectively restore your backup data to your iPhone / iPad / iPod on Windows or Mac PC when you needed.

d_win d_mac

The usage method is very simple, you only need the following several steps.

Step 1.Run the Program and Choose iOS Data Restore Option
In this part you can see two options —“iOS Data Backup”and“iOS Data Restore” on the screen,then you should select “iOS Data Restore”in order to restore you data.

restore backup to iphone option

Step 2. Select A Backup
There are many backup files on the list.You should choose a certain one you want to restore.

select a backup to restore

Step 3. Choose Files to Restore
Next the program will analyze the backup data automatically and then you can preview all the files. Once you have confirmed the data, select the items you want to restore, such as contacts, messages, photos, videos, etc.

Choose Contacts from Backup

restore backed up contacts

Choose Pictures from Backup Files

choose pictures to restore

Choose “Restore to Device” or “Restore to PC” option.

select restore option

Note: you can save the restored file to the path below, click “Restore” and go on.

confirm to restore

Step 4. Start Restoring Files from Backup
The data is being restored now and just wait a moment until it is completed, you can check the detailed information on the screen. Click “OK” to finish this process.

restored completed

Free download the U.Fone iOS Data Backup & Restore for Mac or Windows and try to backup your iPhone data to Mac without data losing.

d_win d_mac

Related Articles:

Recover Data from iPhone, iPad and iPod
This guide teach you three ways to recover lost or deleted contacts, messages, photos, notes, etc. from iPhone/iPad/iPod.

Manage and Transfer Files on iPhone
Transfer data between iPhone, iPad and iPod and PC or from iOS to iOS/iTunes,sync music, playist from iTunes to iOS, backup music from iPhone/iPod to iTunes library.

Transfer Data from between iPhone and Android
When you have got a new iPhone Xor new Samsung S8,this tutorial will teach you a easy way to transfer data between Android and iPhone, from Android to Andorid, iOS to iPhone directly.

Transfer WhatsApp Messages from iPhone to Samsung
Lots of WhatsApp chat history stored in your old iPhone and want to transfer them to your new Samsung Galaxy S8,S7,S6 or Note 8?Learning this guide to move WhatsApp messages from iPhone to Android without data loss.

How to Backup and Restore Data on OnePlus Phone

There are too many examples of data loss in life. As an OnePlus phone user, you data and files can be lost due to various reasons, such as mistakenly deletion, accidentally formatted, Android OS 8.0 Oreo/7.0 Nougat update failed, virus attack, rooting, water damaged and so on.

Therefore, more and more users gradually have a sense of protection. They will take the initiative to find ways to back up important information to a place, such as a computer. There are many ways to back up your data, and here we suggest you choose a time-saving, simple but effective method. That is using a third-party software named U.Fone Android Toolkit Android Data Backup & Restore to backup and restore OnePlus data. Why?

If you normally copy your data from OnePlus 5/5T, OnePlus 3/3T, OnePlus X, OnePlus 2, OnePlus One to a PC , you may not be able to do it properly, especially with some kinds of data such as messages, contacts, and apps. In that case, you need a powerful data backup and restore software that can let import, export, transfer all your data properly without damage or data loss. Apart from OnePlus phone, the toolkit supports other Android devices brand like Samsung, HTC, LG, Lenovo, Sony, Huawei, Nokia, etc. With the help of U.Fone Android Toolkit – Android Data Backup & Restore, you can:

Backup your OnePlus data in a single click.
Preview and selectively backup data, such as contacts, SMS, images, videos, call logs, whatsApp and documents.
Export all kinds of data and restore it to your device without overwriting the existing data of your phone.

d_win d_mac

Part 1: How to Backup Data from OnePlus to A Computer

Step 1. Launch the Program on A Computer

Free download, install and launch U.Fone Android Toolkit – Android Data Backup & Restore on your computer. Connect OnePlus device to PC then choose “Android Data Backup & Restore” option.

OnePlus data backup restore

Before doing a backup, you should allow the USB debugging on your OnePlue phone. Click OK if you see the below screen.

allow usb debugging

Step 2. Select Device Data Backup

Here are four features provided by this software. If you want to select data to back up to your PC, please choose “Device Data Backup” feature to check what you want.

choose device data backup

Step 3. Choose File Type to Backup

It can backup all kinds of data such as calendar, gallery, call history, video, contacts, audio, messages, and applications if you like. Select file type you want to backup and click “Start”.

Choose Backup Content

Step 4. Start Backing Up Data to PC

If the required data has been selected, then there will be a small window pops up, you need to choose to save the backup data path.

Choose Output Directory

After all the steps are done, it will automatically back up your data to your computer. Do not disconnect the device from the computer during this process.

backup oneplus data to computer

d_win d_mac

Part 2: How to Restore Data from Backup to OnePlus Phone or Other Device

Step 1. Choose Restore Feature

Run the toolkit and connect your device to PC. From Android Data Backup & Restore option, you can easily find that your backup data can be restored by two methods. One is that you are free to choose to restore the data from backup, the other is that you can restore the entire backup in one click.

choose device data restore

Step 2. Choose Backup to Restore

Select “Device Data Restore” feature then you are able to choose a backup to scan and select data to retrieve to your OnePlus phone or other device. Click “Start” to begin the process..

At last, you can selectively restore data from backup to device by clicking “Restore” button.

d_win d_mac

Related Articles:

How to Recover Lost and Deleted Files from OnePlus Phone

How to Restore Deleted Photos from OnePlus Phone(5/3/3T/X)

How to Transfer iPhone Data to OnePlus Phone

How to Root Android on Computer with One Click

How to Manage Android on Computer

How to Completely Ease Your Android Phone and Tablet

I need to wipe my old Android smartphone completely before selling it. Is there a good idea to do this with minutes?

How to remove all personal data and settings from my Android without restore it to factory reset?

Is it time to empty your Android device? Maybe you want to sell it, give it away to someone or just want to free up space on the device. When we need to completely erase all content on the Android phone or tablet, the most common way that people will take is restoring device to factory reset. However, the deleted data can be easily recovered by some data recovery programs. The default data wipe tool – factory reset, in Android may not be enough to permanently eliminate data on your Android device. How to properly wipe an Android phone or tablet? We will show you the best way to remove all data and settings from an Android device to keep your privacy safe.

Completely Wipe Android without Restoring

To overcome these drawbacks and to erase everything from Android without recovery, you should ask help for a professional data erasing tool : Android ToolKitData Eraser. It is a proficient and effective data wiping software that will erase all data and settings from your Android device with a single click on your mouse, contacts, SMS, photos, videos, call logs, documents are included. Moreover, Android ToolKit is an all-in-one data manage for Android device, it enables to recover deleted data from Android device, backup&restore Android device safely, root Android device with one click. Currently it is supported in all Android devices that are available in the market, including Samsung, HTC, Huawei, Google Pixel, Lenovo, LG, ZET, OPPO, OnePlus, Xiaomi, etc,.

d_win d_mac
d_win d_mac

How to Completely Delete Android Data without Restoring

Step 1. Run Program and Connect Android
Firstly, run Android ToolKit – Data Eraser on the computer. Select “Erase” among all the tools.

android toolkit home page

Connect your Android to computer with a USB cable. You should enable USB debugging on your phone. If the Android OS version is above 4.2.2, there will be a pop-up message on your phone asking you to allow USB debugging. Tap on “OK” to continue.

connect android to the android toolkit

Step 2. Completely Erase Android Permanently
Then the program will automatically recognize and connect your Android device. Click on the “Erase All Data” button to start erasing all data on your Android.

click on the erase all data button

Since all the erased data are not recoverable, make sure you have backed up all needed Android data before you proceeding. Then key in “delete” in to box to confirm the data erasing operation.

confirm to wipe android

Then the program will start removing all data from your Android. The whole process takes you only a few minutes.

Note: Please don’t interrupt the connection between the device and the computer, don’t run any other phone management software on the computer at the same time.

erasing android data

Step 3. Perform Factory Reset on Android
After all personal data have been completely erased, Android ToolKit – Data Eraser will ask you to tap on “Factory Data Reset” or “Erase All Data” on the device. This will help you completely wipe all the settings on the device.

perform factory reset on android

Finished. Now your Android device has been completely wiped and it’s like a brand new one.

android data erased completed

d_win d_mac
d_win d_mac

Related Articles:

How to Delete Everything on Android without Factory Reset

How to Erase Android Data before Selling

How to Permanently Erase Android Data before Selling

How to Get More Internal Storage from Android

How to Permanently Erase Samsung Data before Selling

How to Manage Android on Computer