[Summary]: If you deleted or lost important photos, videos on Galaxy Note 9 due to false operation, don’t worry, this article will show you the ways to recover deleted photo and videos from phone internal memory with U.Fone Android data recovery, and also the most effective solution to recover deleted photos, videos and files from Android phone SD card with Data Recovery.
According to the rumour, the newest model of Samsung Galaxy Note 9 is exposed. The Galaxy Note 9 could sport a slightly larger, 6.3-inch Infinity Display and an S Pen stylus. Samsung company might hold off 4K Infinity Displays till next year with Galaxy Note 9 when the processors that are powerful enough to properly drive 4K resolution screens are made available. The Galaxy Note 9 like Galaxy S9(Plus), is also expected to retain many features of their predecessors such as IP68 certification for dust and water resistance, Adaptive Fast Charge for rapid wired charging, fast wireless charging through Qi and PMA standards, and dedicated 3.5 mm headphone ports.
However, data loss on Samsung Galaxy phone may happen a lot more than we imagine. In such cases occur, we often find ourselves scouring the internet for “Samsung photo recovery”, “how to recover deleted photos from Samsung Galaxy Note 9” or “how to find recently deleted photos on Galaxy Note 9“. If you accidentally deleted precious photos or videos from Samsung phone, don’t feel frustrated, you should know that the deleted files are not completely erased. You can try to restore photos in Galaxy Phone’s Recycle Bin, let’s teach you how to restore recently deleted pictures on Samsung Galaxy Note 9 phone’s Recycle Bin.
Part 1: Recover Deleted Photos on Samsung Galaxy Phone’s Recycle Bin
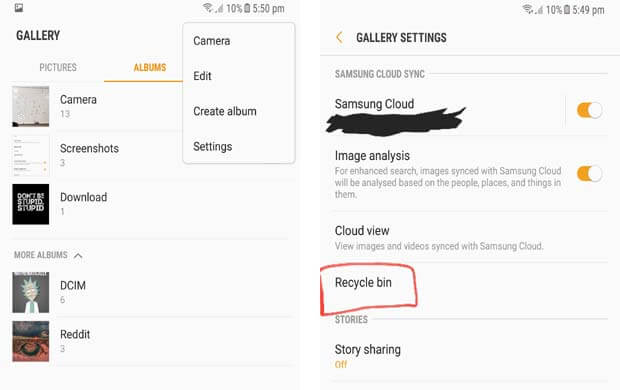
As we all know that the Samsung Galaxy Note 9 has recycle bin just like recycle bin in Windows computer and MacBook. If you accidently deleted photos/pictures/images on your Galaxy Note 9, you still have change to find those recently deleted photos from recycle bin in Gallery Setting.
Step 1. Open “Gallery” app on your Galaxy Note 9 .
Step 2. Tap on “three dots” -> “Settings”, and finding to click on “Recycle bin”.
Step 3. In the trash folder you will find your recently deleted pictures.
Step 4. Just touch and hold the photos that you want to recover.
If you can’t get back the picture in this way. Don’t worry, Instead, those deleted photos and videos are still there but being invisible and can be recovered with the Android data recovery software or Android SD card data recovery software. Please keep reading, let’s shows you two different methods to retrieve deleted photos and videos from Galaxy Note 9 by U.Fone Android Data Recovery and U.Fone Data Recovery.
Part 2: Recover Deleted Photos from Galaxy Note 9 Internal Memory
U.Fone Android Data Recovery is a wonderful data recovery specialist for Android device. In fact, it’s the best tool for recovering deleted photos and videos from Samsung Galaxy Note 9. Not only photos and videos, but also various file types are supported to restored, including contacts, text messages, WhatsApp messages, audio, call logs, documents. Android Data Recovery empowers to restore deleted Android data under any data loss circumstances, such as, mistake deletion, factory reset restoring, Android OS system updated, Android OS system Room, etc,. It applicable to all Android brands, like Samsung, HTC, Lenovo, LG, Motorola, Huawei, Google Pixel, ZTE, OPPO, OnePlus, Xiaomi, and more.
An Professional Android Samsung Data Recovery Software to Use
As a professional Samsung Data Recovery software, it can be used to recover your deleted/lost photos, videos, contacts and messages from all kinds of Samsung device, including Samsung phones and tablets, Samsung Galaxy S10/S9/S8/S7/S6/S5/S4, Samsung Captivate, Samsung Galaxy Ace, Samsung Galaxy Note, Samsung Infuse, Galaxy Nexus, Samsung Epic 4G Touch, and more.
1. Recover photos, videos, contacts, messages, messages Attachments, call history, audios, whatsApp, documents from samsung phone or SD card.
2. Preview and selectively recover deleted files from samsung Galaxy phone before recovery.
3. Recover data from dead/broken samsung phone internal storage, fix samsung phone system problem such as frozen, crashed, black-screen, virus-attack, screen-locked and get it back to normal.
4. Works well with almost all Samsung phones like Samsung Galaxy S, Samsung Galaxy Note, Samsung Galaxy A, Samsung Galaxy C, Samsung Galaxy Grand, etc.
5. Get back lost data from samsung phone missing due to mistaken deletion, factory reset, system crash, forgotten password, flashing ROM, rooting, ect.
Now, download the free trial version of Android data recovery tool to recover Samsung data.


How to Retrieve Deleted Photos from Samsung Galaxy Note 9
Step 1.Run the Android Data Recovery and Connect Your Samsung to Computer
First of all,please download and run the U.Fone Android ToolKit – Android Data Recovery on your PC or Mac computer.
After running the program on the computer,you will see there are three key features in the main interface: Android Data Recovery, Broken Android Data Extraction and Android Data Backup & Restore,please click “Android Data Recovery” function,which can help you directly scan and recover deleted data on Samsung phone easily.

Then, connecting your Samsung Galaxy Note 9 phone to your computer via the USB cable.
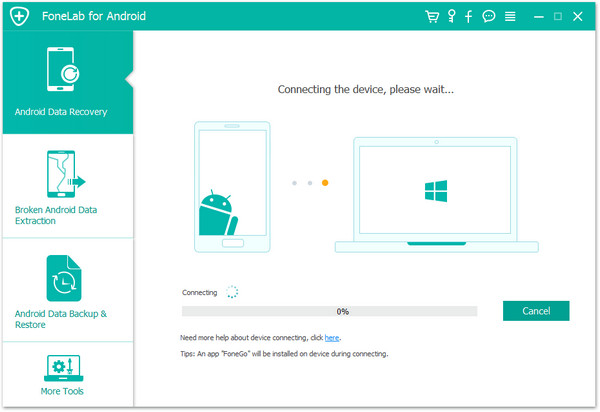
Step 2.Allow Program Connect Samsung to the Computer
Click “OK” on the phone to allow the program detect your device on the computer.

Step 3.Select File Types to Scan
After connecting your phone to the computer and detected by the program. You can choose file types to scan, such as gallery, videos, contacts, messages, etc,. Then click the button “Next”.

Step 4.Allow the Program to Access Your Phone
Before scanning, the program will try to access your phone. Please turn to your phone screen and tap “Allow/Grant/Authorize” when an Superuser Request pops up,allowing the software scan your phone’s data.

Step 5.Begin Analyze and Scan Samsung Phone
In this step,the program begin analyzing and scanning your phone for all deleted files,please wait patiently for the entire scan until it is completed and keeping connect your phone with the computer.
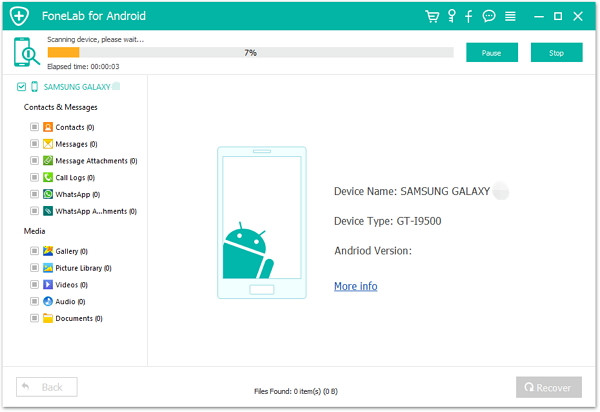
Tips:You can “Pause” to stop the scanning at any time if you see the data you need during the scanning process.
Step 6.Preview and Recover Photos, Videos from Samsung Phone
Once the scanning is complete, all the recoverable files will be showed in the window as below,please check file types you want to restore at the left pane. Detailed content of the category will be displayed in the right table.You could preview them one by one before decided to recover them. Click “Recover” to save the selected data on your computer.

Part 3: Recover Deleted Photos from Android SD Card
If you stored photos, videos, audios and other files to your Galaxy Note 9’s SD card before, once you deleted a photo album by mistake, accidentally deleted photos and video from Android gallery, or phone gets broken/damaged/black screen/water-damaged. If you carry a SD card as internal storage, you still have chance to recover lost and deleted photos, videos from Android phone SD card, what you need is an Android SD Card Data Recovery.
This U.Fone Data Recovery also is a professional Android SD Card Data Recovery, it can help you recover lost or deleted files, photos, videos, audio, music, emails from Android SD card effectively, safely and completely. This data recovery software supports recover data from all kinds of SD card, such as Transcend, PNY, Lexar, Transcend, SanDisk, Samsung, Kingston, , PQI and more. It allows users recover deleted/lost/formatted files, photos, videos from SD card for camera, mobile phone, GoPro camera, etc.
More That A SD Card Data Recovery Software
– Recover data from recycle bin, hard drive, memory card, flash drive, digital camera and camcorders.
– Recover data for sudden deletion, formatting, hard drive corruption, virus attack, system crash under different situations.
– Recover photos, videos, audios, email, and office document from internal hard drive, external devices and USB flash devices.
– Recover recycle bin and retrieve deleted files from emptied recycle bin.
Step-by-Step Guide to Recover Deleted Photos, Videos from Android SD Card
Step 1. Launch Data Recovery and Select Recovery Mode
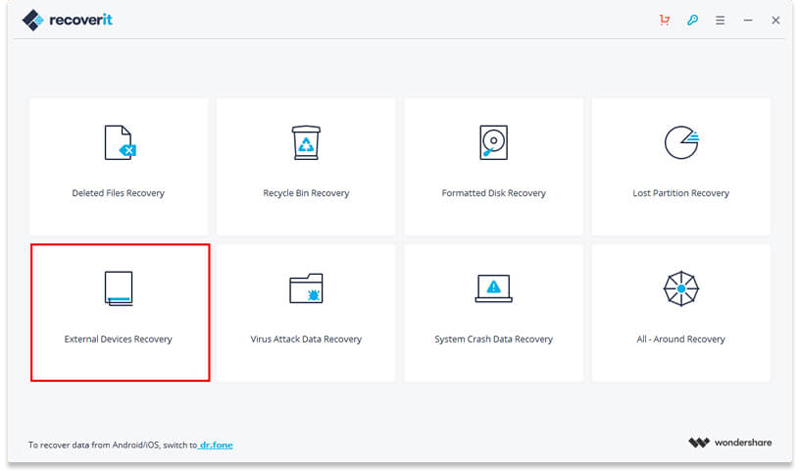
First of all, please free download the Data Recovery for Windows or Data Recovery for Mac on PC/Mac computer. If you want to recover deleted photos, videos, audios and other documents from Android phone’s SD card, please select “External Devices Recovery” data recovery mode and go to next step.
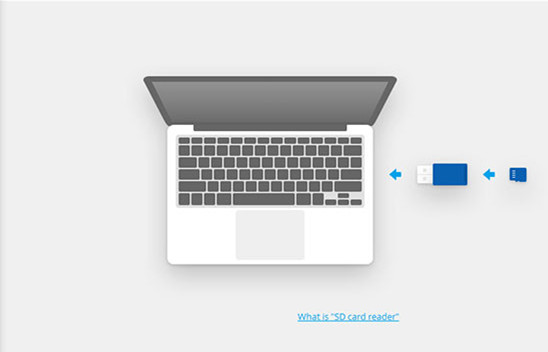
Step 2.Inset Android SD Card to Computer
Then, please remove SD card from your Android phone and inset the SD card to the computer.
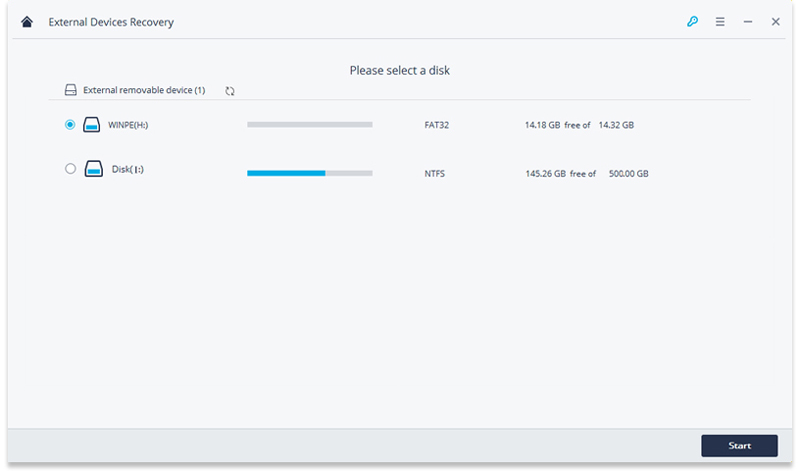
Step 3. Select Android SD Card to Scan
After inset the Android SD card to the computer and it will be detected by the program automatically. Please select your Android phone SD card, then click “Start” button to process.
Step 3. Scan Photos and Videos from Android SD Card
In this step, the data recovery software start a quick scan to search your deleted photos from SD card. After the scan, you can preview some recovered picture, video files.
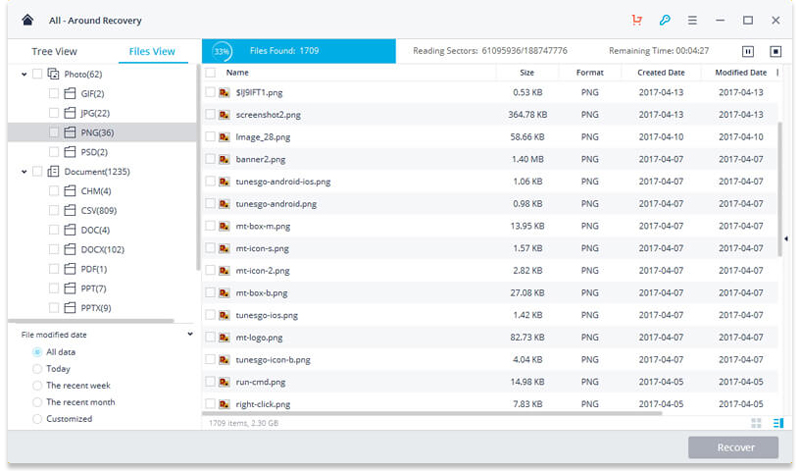
Tips: If you cannot find photos and video that you want, please go to “All-Around Recovery” mode to scan the SD card again, this recovery mode will help you deep scan Android SD card to search more files, but it will takes a longer time during the scanning process.
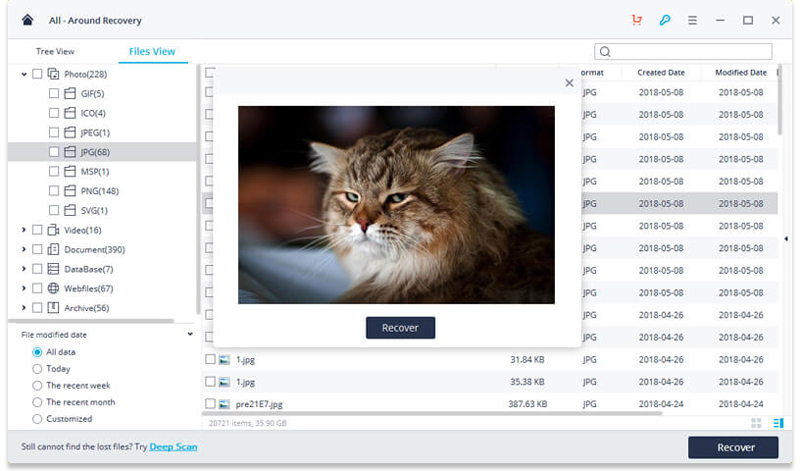
Step 4. Preview and Recover Deleted Photos from Android SD Card
After the deep scan, you can find deleted pictures on Android in the results menu, please preview the recoverable photo, video files and click “Recover” button to save your recovered photos onto the computer.
Note: We suggest you should save your all recovered files on the computer, in case of data loss again.
Download the Data Recovery for Windows or Data Recovery for Mac to recover files from Android SD card easily.
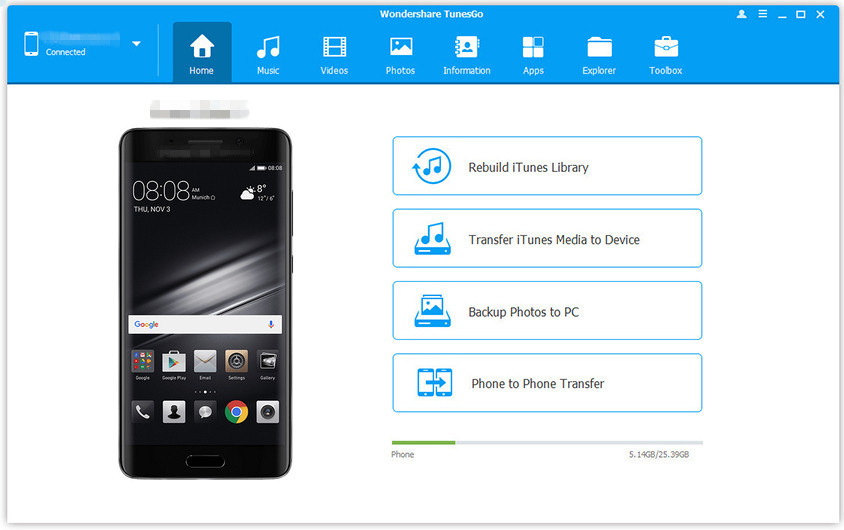
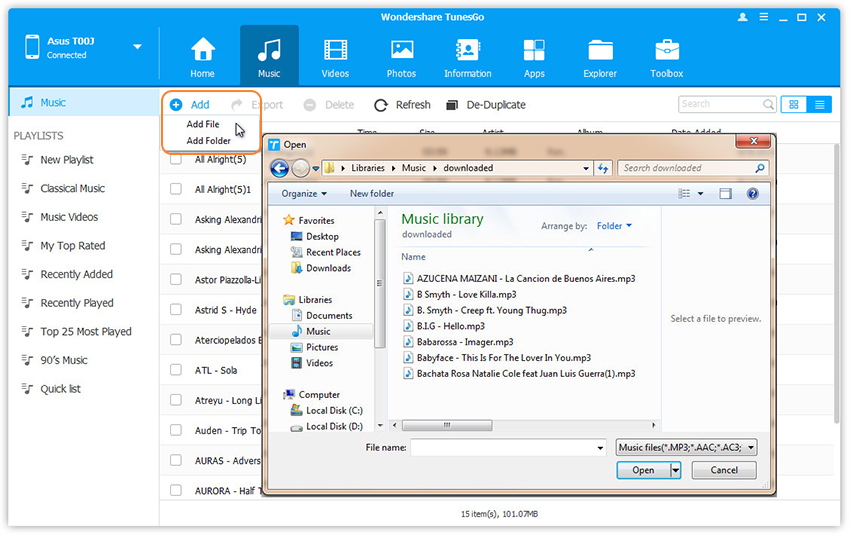
Above, we teach you two effective and easy methods to retrieve deleted photos, videos and other files from Samsung Galaxy Note 9, from Android SD card. After getting back all deleted files and save onto the computer, you can use this iOS & Android Manager tool to transfer files from computer to Samsung Galaxy Note 9 or other Android/iOS devices, this is an all-in-one phone manager tool for user transfer photos, videos, music, contacts and messages between Android, iOS and computer easily.
Related guide: Manage and Import Files to Samsung Galaxy Note 9
Related Articles
How to Recover Deleted Data from Samsung Galaxy Note 9
How to Transfer iTunes Music to Samsung Galaxy Note 9
How to Transfer iTunes Videos to Samsung Galaxy Note 9
How to Root Android on Computer with One Click
How to Manage Android on Computer
How to Backup & Restore Samsung Safely