All posts by DHZ

How to Recover Deleted Data from Motorola Z

Moto Z was announced in 2016, September. It weighs 136g, 5.2mm thickness, runs on Android 6.0.1 OS, up to 7.0 OS. The Motorola Moto Z is powered by 1.8GHz quad-core Qualcomm Snapdragon 820 processor and it comes with 4GB of RAM. The phone packs 64GB of internal storage that can be expanded up to 2000GB via a microSD card. As far as the cameras are concerned, the Motorola Moto Z packs a 13-megapixel primary camera on the rear and a 5-megapixel front shooter for selfies.

It has been a long time since Motorola released its first Android mobile phone, and the popularity still does not fade. The newest Motorola phones, like Moto Z and Moto Z2, are popular over the market for its best camera and big storage. However, while you are enjoy the happiness while using Motorola phone, enough attention should be given to data safety. Let’s assume that you lost precious data on Motorola accidentally unfortunately, you can take a reference on how to restore deleted data from Motorola Android phone with Android Data Recovery.

Restore Deleted Data from Motorola Z

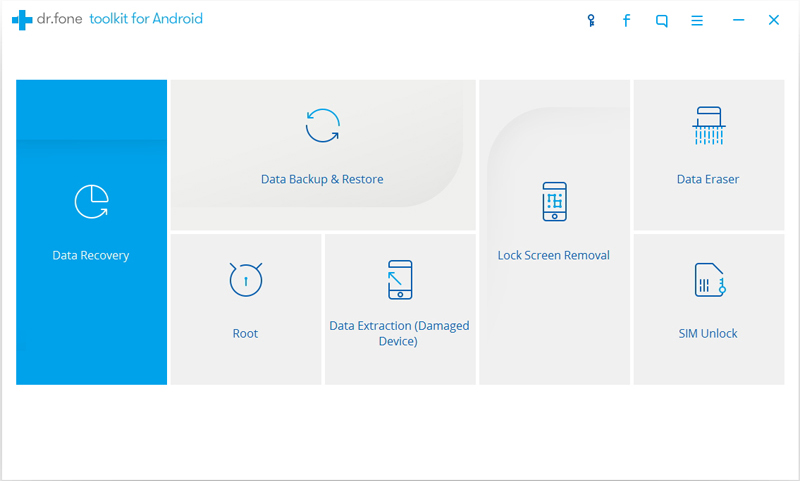
Android Data Recovery can be a Motorola Z data recovery to restore deleted data from Motorola Z. It can recover deleted contacts, text messages, videos, gallery, documents,whatsapp, etc,. from Android device directly. Android Data Recovery works well under any Android data loss circumstances, such as, Android OS system update, Android OS system rooting, deleted by mistake. Support all Android devices including tablets and phones from Motorola, Samsung, Sony, Huawei, Xiaomi, LG, HTC, and so on.

d_win d_mac

How to Retrieve Deleted Data from Motorola Z

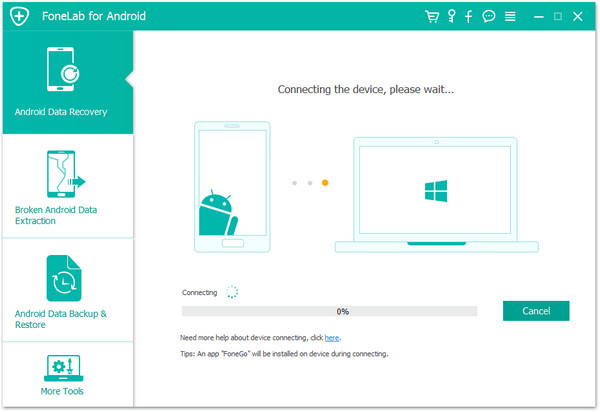
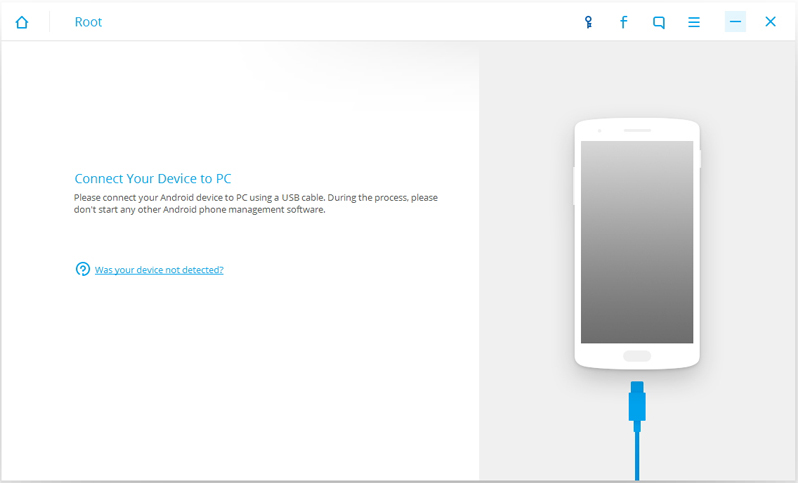
Step 1.Connect Motorola Z Phone to Computer
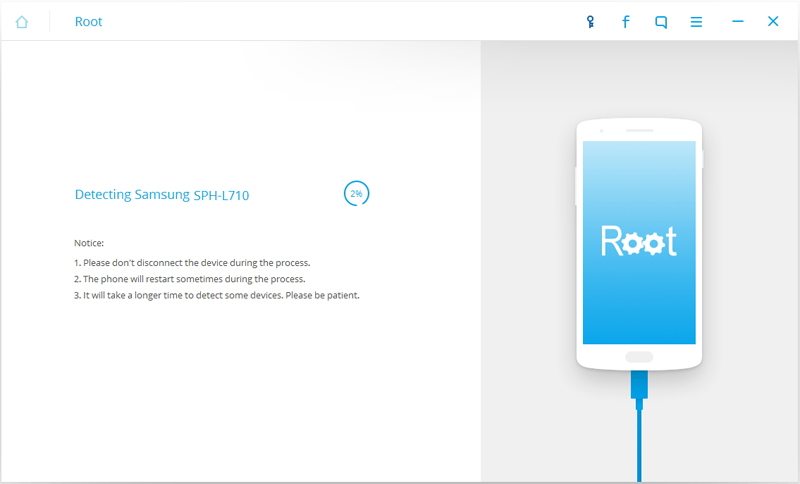
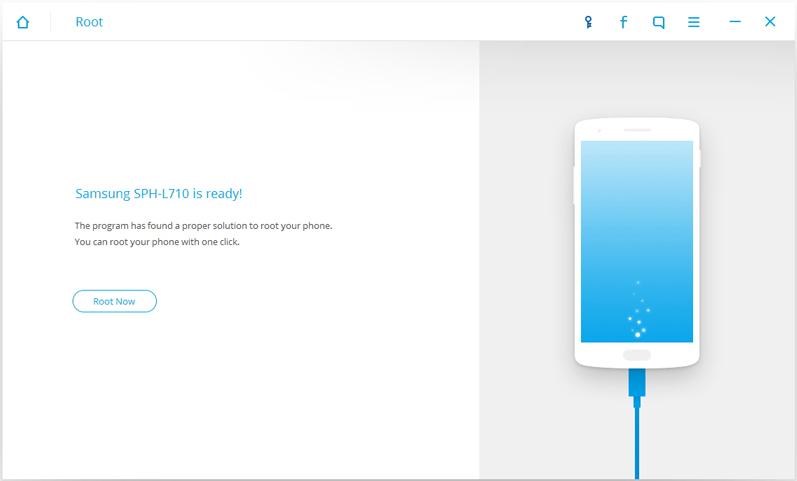
Firstly,please install Android Data Recovery on your computer,run it and connect your phone to the computer.It will take a few seconds to detect your phone automatically by Android Data Recovery.

connect moto to the computer

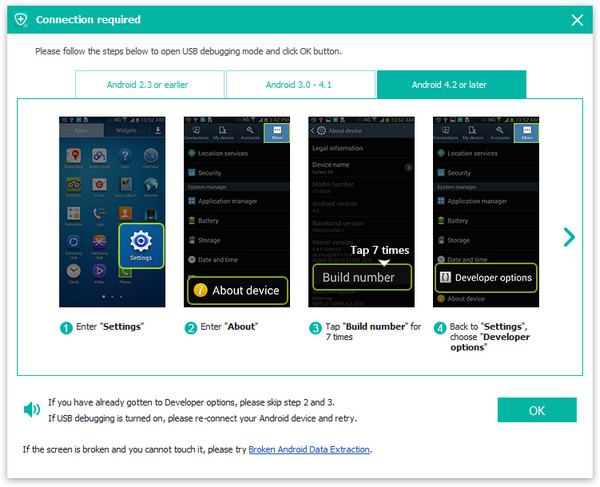
Step 2.Enable USB Debugging on Moto Phone
Unlock your phone,go to Settings > Developer options > Allow USB debugging mode.If you have already allowed the USB debugging mode,you will see a pop-up window on the screen,mark “Always allow” from this computer and click “OK“.

usb debugging moto phone

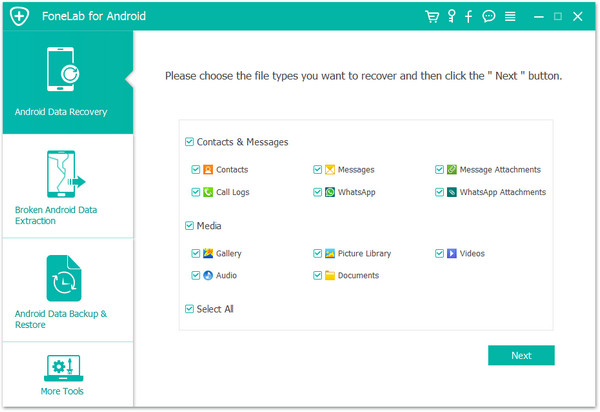
Step 3.Select Data to Restore from Moto Phone
In the next window,there are different types of files can be chose to be scan here.If you lost almost all types of Android data, you can click “Select all” to have all your Android data scanned.Then click “Next” to go on.

select file to recover from moto

Step 4.Allow to Scan and Analyze Data on Moto Phone
You’ll get a window as follow on your device after your device is detected by the program.Tap “Allow” to enable the program to scan data for your phone.

allow scanning moto

Note:Before starting,please make sure that your phone battery is more than 20% charged.

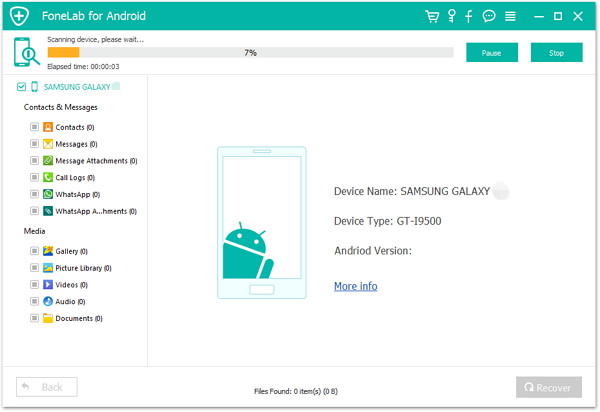
Step 5.Scan Moto Phone for Deleted Data
It will take some time to finish the scanning.After that, you will see a list of deleted and existent files, including your gallery,contacts,messages and other types of data, you are allowed to preview them one by one before recovery.

scan moto for deleted data

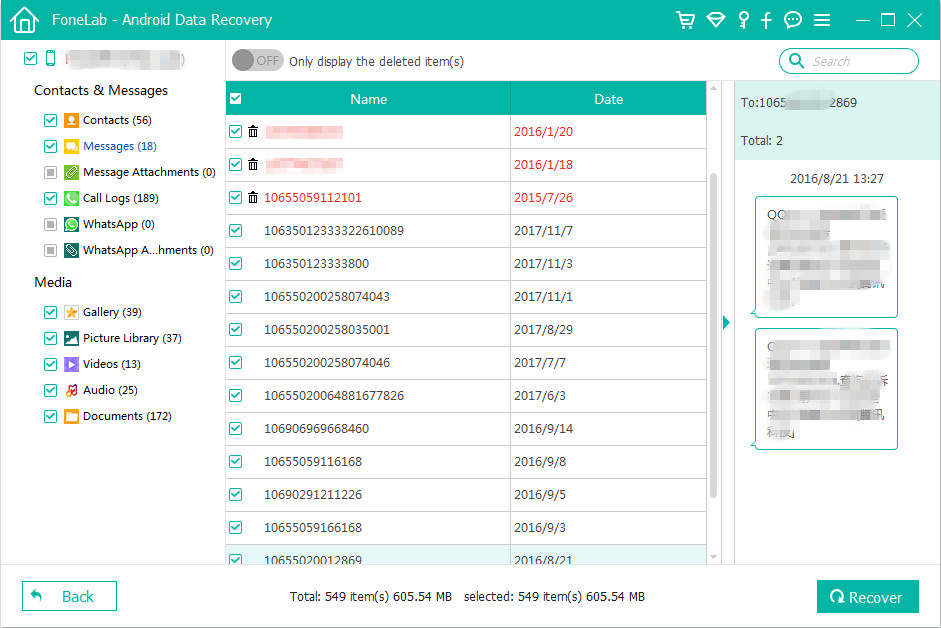
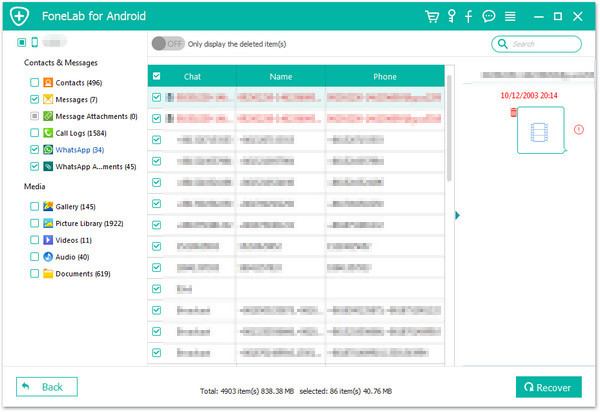
Step 6.Preview and Recover Deleted Data from Moto Phone
After the scanning process is finished, a list of recoverable files that the deleted data have been found from your Android will be shown.In addition,there will be a preview window of files that you can preview(contacts, SMS and gallery,etc)from Android.Mark the data you want and click “Recover“ to restore them to the computer.

recover deleted data from moto

d_win d_mac

Related Article:

How to Backup and Restore Motorola Phones

How to Recover Data from Water Damaged Motorola

How to Recover Lost Data from Android

How to Recover Deleted Photos from Android

How to Root Android on Computer with One Click

How to Manage Android on Computer

How to Recover Deleted Data from HTC 10

Hewn entirely from aluminum and glass, the HTC 10 is about as well built a smartphone as you’ll find. Phone nerds of a certain vintage will remember the thrill that came from picking up the HTC One M7. The 10’s design won’t be for everyone, especially with strong competition from the likes of Samsung’s Galaxy S7 Edge. It’s a bit nondescript when viewed from the front: There’s the 5.2-inch Super LCD 5 screen, swathed in a sheet of Gorilla Glass 3, with a fast fingerprint sensor/home button underneath. Flanking the home button are two capacitive navigation buttons.

htc 10

HTC is one of the most popular Android smartphones. However, have you ever deleted important data accidentally from your HTC phone? These bad things happened and even worse you didn’t back up your data. All the terrible situations may make you depression. Now you can stop feeling annoy after losing data from HTC under any data loss cases, Android Data Recovery can absolutely help you. With the help of Android Data Recovery, you can easily restore deleted files from HTC and other Android device directly.

Android Data Recovery – Recover Deleted Data on HTC 10

Android Data Recovery is a smart data recovery tool for you guys who delete their important data from Android smart phones or tablets. No matter you use which brand of Android phone, HTC, Samsung, LG, Sony, Motorola, and so on, you can download this recovery tool and restore data that you like within simple steps with Android Data Recovery. With the help of Android Data Recovery, you are able to restore deleted data on HTC 10 directly, including contacts, SMS, gallery, call logs, notes, documents, WhatsApp and so on.

d_win d_mac

How to Retrieve Deleted Data from HTC 10

Step 1.Run the Android Data Recovery on Computer
Install the program on your computer and run it, you will be asked to connect your HTC 10 device to the computer via USB.

connect htc with computer

Step 2.Enable HTC 10 to USB Debugging
Once connecting your HTC phone to the computer,now your should enable USB debugging on it.Here you have different ways to do it according to different Android OS version:

enable usb debugging on htc phone

Step 3.Select File to Scan by Program
After you enabling USB debugging for your Android phone,it will be detected by the program soon.In the latest version of Android Data Recovery,you are allow to selectively choose which type of files to be scanned by program.If you need to recover all type of files,you can just skip it and move on.Then click “Next” to go on.

select data to scan on htc phone

Step 4.Start to Scan HTC Phone for Deleted Data
When you see the window below,you should move to your device again,tap on the “Allow” icon,then turn back to the computer and click on the “Start” button to continue.

allow the super user request on htc phone

Then Android Data Recovery will analyze the data of your HTC 10 phone.

analyze data on htc

Step 5.Preview and Restore Deleted Data fron HTC 10
Android Data Recovery enables to restore data from HTC including text messages, contacts, photos and videos,etc,.You are allowed to preview messages, contacts and photos data before recovery.

In the last step,select and mark data you want and click “Recover” to save them on the computer.

Recover Deleted Photos from HTC 10

recover deleted photos from htc

Recover Deleted Messages from HTC 10

recover deleted sms from htc

Recover Deleted Call Logs from HTC 10

recover deleted call logs from htc

d_win d_mac

Related Article:

How to Recover Deleted Data from HTC 

How to Recover Deleted Contact from HTC

How to Recover Data from Water Damaged Android 

How to Recover Lost Data from Android

How to Recover Deleted Photos from Android

How to Root Android on Computer with One Click

How to Manage Android on Computer


How to Switch iPhone Data to Sony Xperia XZ

My iPhone 5 always get stuck while I was playing game, so last week I bought a new Sony Xperia XZ phone to replace my old iPhone. Now the question is how to transfer the data from iPhone to my new Sony phone. Any suggestions?

We always heard something like this “Android OS system and iOS system, which is better?”. Of course now there is not a perfect answer of it. So most of us change the mobile phones between iPhone and Android phone. But there are a lot of people will ask how to switch data from iPhone to Android. However, it is really not as so hard as you think to transfer data between iPhone and Android due to the different OS systems of it. This tutorial is going to describe how to transfer iPhone data to Sony Xperia XZ directly with a famous data manager- Phone Transfer.

Migrate Data from iPhone to Sony Xperia XZ

Phone Transfer is a useful program which enables you to transfer data between iPhone and Sony Xperia XZ, contacts, messages, photos, videos, call logs, calendars, music, apps are included. Phone Transfer works well in transferring data between two devices running Android, iOS, Symbian, Windows, Blackberry OS systems. In addition, Phone Transfer allows to backup or restore data for mobile device on the computer safely. Not only Sony phones, other brands of Android phones are supported by Phone Transfer, such as, Samsung, HTC, Lenovo, Motorola, LG, Sony, Huawei, Xiaomi, etc,.

d_win d_mac

How to Transfer iPhone Data to Sony Xperia XZ

Step 1. Download and Install Phone Transfer on PC
Install and run Phone Transfer on PC. Select “Phone to Phone Transfer” mode after running it.

phone transfer main page

Plug iPhone and Sony Xperia XZ into the computer via USB cables. When the two devices are detected, the software will start scanning the phones.

Step 2. Transfer Data from iPhone Data to Sony Xperia XZ
Select the data that you want to transfer in the middle column of software. After selection, hit the “Start Transfer” button in blue. The chosen content will begin to transfer from iPhone to Sony Xperia XZ.

Note: If you want to transfer data from Sony Xperia XZ to iPhone, you can click the “Flip” button at the top-middle to change the position of source and destination phones.

select file to transfer

transfer iphone data to sony

As you see, with Phone Transfer, you can directly transfer data between iPhone and Android with only 2 steps.

d_win d_mac

Related Article:

How to Transfer Android Data to Sony Xperia XZ

How to Recover Deleted Data from Sony Xperia XZ

How to Transfer iPhone Data to Android

How to Recover Deleted Photos from Android

How to Root Android on Computer with One Click

How to Manage Android on Computer

How to Restore Deleted Data from OnePlus 3T

My OnPlus 3T shut down in a sudden yesterday, and most of data were gone. And when I am suppose to restore the deleted data from it. But I have no idea on how to recover my Android data. Can anybody help me please?

one plus 3t

OnePlus 3T was announced in 2016, November. Its size is 158g, 7.4mm thickness, runs Android 6.0 OS. Android data can be lost because of different reasons. They might be lost because of your accidental or intentional deletion, system crash, hard drive formatting, virus infection or other unknown reasons. However, most of people don’t know how to deal with recovering deleted data after losing data from Android. This article is going to talk about a reliable way to restore your deleted data from OnePlus 3T with Android Data Recovery.

Recover Deleted Data from OnePlus 3T Directly

One of the reliable solutions that you can try is Android Data Recovery, it is a data recovery program that helps you to recover deleted files from OnePlus 3T directly. You can effortless retrieve data like pictures, videos, contacts, SMS, notes, call logs, documents and more on Android with Android Data Recovery. Additionally, Android Data Recovery supports to restore deleted data on other models of OnePlus phone, such as, OnePlus 3, OnePlus ONE, OnePlus 5, OnePlus X, OnePlus 2.

d_win d_mac

How to Restore Deleted Data on OnePlus 3T

Step 1.Connect OnePlus 3T to the Computer
Firstly please install Android Data Recovery on your computer,run it and connect your OnePlus to the computer.It will take seconds to detect your device automatically by software.

connect oneplus to the computer

Step 2.Enable USB Debugging on OnePlus Phone
Unlock your phone,go to Settings > Developer options > Allow USB debugging mode.If you have already allowed the USB debugging mode,you will see a pop-up window on the screen,mark “Always allow” from this computer and click “OK”.

usb debugging oneplus phone

Step 3.Select Data you want to Restore from OnePlus
You’ll see this window,different types of files can be chose to be scan here,such as,contacts,messages,gallery.If you lost almost all types of Android data, you can tick “Select all” to have all your Android data scanned.If not, you can select one file or more than one files for scanning by software.

select file tpye to recover from oneplus

Step 4.Allow to Scan and Analyze Data on OnePlus
In this step,you’ll get a window as follow on your device after your device is detected by the program.Tap “Allow” to enable the program to scan your phone for deleted data.

allow scan oneplus

Note:Before starting,please make sure that your phone battery is more than 20% charged.

Step 5.Scan Deleted Data of OnePlus
The scanning process will take some time.When everything is done, you will see a list of files for your phone(the deleted one and the existent one), including your messages,gallery,contacts,and other types of data, appear on the software screen as below,preview them one by one before recovery.

scan oneplus for deleted data

Step 6.Preview and Recover Deleted Data from OnePlus
Once the scanning process is finished, a list of recoverable files that including the deleted data have been found from your Android will be shown.Additionally,there will be a preview window of files where you can preview(contacts, SMS and gallery,etc)from Android.Mark the data you need to restore and click “Recover“ to restore them to your computer.

Recover Deleted Photos from OnePlus

recover deleted photos from oneplus

Recover Deleted Messages from OnePlus

recover deleted sms from oneplus

d_win d_mac

Related Article:

How to Transfer Samsung Data to OnePlus 3T

How to Transfer iPhone Data to OnePlus 3T

How to Transfer Android Data to OnePlus 3T

How to Recover Lost Data from Android

How to Recover Deleted Photos from Android

How to Root Android on Computer with One Click

How to Manage Android on Computer

How to Recover Deleted Data from LG G6

I accidentally deleted all my data on my LG G6, but I haven’t did any backup for it. Now I want to get back the deleted data from my Android device. Are there any ways to recover the deleted data on my LG phone?

Have you ever encounter the similar situation like it that you accidentally deleted all data on your Android phone and there’s no available backup for recovery. When this happen, what will you do to recover the important deleted files? Actually, it is quite easy to recover your deleted files if you find a powerful Android data recovery tool. Here what you need is Android Data Recovery, it is a famous data recovery for Android. Let’s introduce the features of Android Data Recovery to you.

Restore Deleted Data from LG G6 Directly

Android Data Recovery is a powerful data recovery for Android. With Android Data Recovery, you can freely restore deleted data from LG G6 directly, including contacts, SMS, photos, call logs, notes, WhatsApp, documents, and more types of Android data. Android Data Recovery supports to recover deleted data from Android under any data loss cases, for example, deleted accidentally, Android OS system update, Android OS system rooting, restore to factory reset, and more. Android Data Recovery compatible with almost all Android phones, like LG(G6, G5, V20), HTC, Sony(Xperia XZ, Q6, K20 V, V20), Samsung(Galaxy S8/S7/S6), Lenovo, Huawei(P10/P9), Xiaomi, etc,.

d_win d_mac

How to Recover Deleted Data on LG G6 Directly

Firstly,please install Android Data Recovery on computer,run it and connect your LG phone to the computer.It will take seconds to detect your phone automatically by the software.

connect lg phone to the computer

Step 1.Enable USB Debugging on LG G6
Unlock your phone,go to Settings > Developer options > Allow USB debugging mode.If you have already allowed the USB debugging mode on it,you will see a pop-up window on the screen,mark “Always allow” from this computer and click “OK“.

usb debugging lg phone

Step 2.Select Deleted File to Recover from LG
Once the connecting successfully,all types of data will be displayed.Select the the file(s) you want to recover and then tab “Next“.It will take minutes to analyze the deleted and existing data on your LG.

select lg data to recover

Step 3.Scan and Analyze Data of LG G6
The first time you connect your phone with this software, it will be a request popping up to ask you for getting privilege of your device.With safety,you should click “Allow” on the interface of your phone.

allow scan data on lg

The program will begin to scan and analyze the data of your phone.

scan data on lg

Step 4.Preview and Restore Deleted Data from LG G6
Once the scanning is completed,you are allowed to preview and select data to recover from your LG G6 phone directly.Click “Recover” to save the recovered data to the computer.

recover data from lg

d_win d_mac

Related Article:

How to Transfer Samsung Data to LG G6

How to Transfer Android Data to LG G6

How to Transfer iPhone Data to LG G6

How to Transfer Music to LG G6

How to Root LG G6 on the Computer Safely

How to Backup and Restore LG Phone

How to Recover Deleted Data from LG Phone

How to Recover Data from Water Damaged LG Phone

How to Recover Deleted Data from Sony Xperia XZ

It’s the middle of the year, and now that we’ve seen the big phones from Samsung, from HTC, and from LG, it’s time to see what Sony has in store. When it comes to smartphones, we’re all spoiled for choice, but if you haven’t quite fallen in love with what’s been offered this year, Sony could have something special on the way. According to the report, Sony Xperia XZ is the No 7 of the top 10 popular in 2017.

sony xperia xz

As we know that Sony is a famous company and its Android devices are highly reliable devices. But data loss has become common cases and many of the users who use Sony smartphones encounter data loss in daily. Nevertheless, data recovery has become easy with the help of Android Data Recovery software. But we should also know why android data losing takes place always. For instance, deleted accidentally, Android OS system update, Android OS system rooting, factory reset restore, device broken, etc,.

Restore Deleted Data from Sony Xperia XZ

In order to recover deleted data from Sony Xperia XZ, you can take help of this Android Data Recovery Software, which is a perfect data recovery software for Sony phones, such as Sony Xperia XZ Premium, Sony Xperia XZs, Sony Xperia XA1, Sony Xperia XA1 Ultra, Sony Xperia L1 and so forth. Nomatter what reasons lead to data loss on Sony, Android Data Recovery is capable of retrieving most types of files from it, including text messages, contacts, photos, videos, call logs, notes, document files and many other files. In addition to Sony, Android Data Recovery enables to restore deleted data from almost all brands of Android, Samsung, HTC, Sony, Lenovo, Motorola, LG, ZTE, Huawei, and more are included.

d_win d_mac

How to Recover Deleted Data on Sony Xperia XZ

To begin with,please install Android Data Recovery on computer,run it and connect your Sony phone to the computer.It will take seconds to detect your phone automatically by software.

connect sony to the computer

Step 1.Enable USB Debugging on Sony Xperia XZ
Unlock your phone,go to Settings > Developer options > Allow USB debugging mode.If you have already allowed the USB debugging mode on it,you will see a pop-up window on the screen,mark “Always allow” from this computer and click “OK“.

usb debugging sony phone

Step 2.Select Deleted Data to Recover from Sony Xperia XZ
Once the connecting successfully,all types of Sony data will be displayed in the interface of software.Select your want data and then tab “Next“.It will take minutes to analyze the deleted and existent data on your Android.

select sony data to recover

Step 3.Scan Data of Sony Xperia XZ
The first time you connect your phone with this software, it will be a request popping up to ask you for getting privilege of your device.With safety,you should click “Allow” on the interface of your phone,so that the program will begin to scan and analyze your phone data.

allow scan data on sony

scan data on sony

Step 4.Preview and Restore Deleted Data from Sony Xperia XZ
Once the scanning is completed,you are allowed to preview and select data to recover from your Sony phone directly.Click “Recover” to save your selected data to the computer.

recover data from sony

d_win d_mac

Related Article:

How to Transfer Android Data to Sony Xperia XZ

How to Recover Deleted Data from Android

How to Recover Deleted Photos from Android

How to Root Android on Computer with One Click

How to Manage Android on Computer

How to Transfer Android Data to Sony Xperia XZ

I bought a new Sony Xperia XZ phone last weekend, now I wanna transfer all data from my old Android phone to the new Sony. But I don’t want to transfer with the tradition way. Are there any other ways complete the transfer task?

sony xperia xz

Sony Mobile (previously known as Sony Ericsson Mobile) is a subsidiary of the electronics giant Sony Corporation. Sony Xperia XZ smartphone was launched in September 2016. Xperia XZ perfects the fundamentals of a great smartphone. Packed with innovations in technology, it boasts a photo-pro’s camera, an intelligent battery and smart features that adapt to you. And it’s all delivered in a stunning, evolved design. It packs a 4K HDR display and can capture ultra-slow-motion video at 960 frames per second.

Transfer Android Data to Sony Xperia XZ Directly

What you need to transfer data from Android to Sony Xperia XZ Directly is Phone Transfer. As its name, it can be used for transferring files between two mobile devices, no matter it run on the same OS systems or not. The transferable types of files including contacts, text messages, photos, videos, music, call logs, calendars and apps. Phone Transfer works for most of mobile devices, insist of Android device, iOS device, Symbian device, and Blackberry device. Besides Sony Xperia XZ, other models of Sony phones are supported, such as, Sony Xperia XZ Premium, Sony Xperia XZs, Sony Xperia XA1, Sony Xperia XA1 Ultra, Sony Xperia L1 and so on.

d_win d_mac

How to Switch Android Data to Sony Xperia XZ

Step 1. Install and Launch Phone Transfer
Connect both of your old Android device and Sony Xperia XZ to your computer and launch the Phone Transfer. To switch data from Android to Xperia XZ, select “Phone to Phone Transfer” on the panel.

phone transfer main page

Step 2. Select Files to Transfer
On middle checkbox, you can select contacts, text messages, photos, videos, music, call logs, calendars and apps to switch from Android to Sony. Android as the source phone should be on the left, Sony as the target phone should be on the right.

select data to transfer to sony

It enables you to exchange the source phone and target phone by clicking “Flip” button. Then, click on “Start Transfer“.

Step 3. Transfer Android Data to Sony Xperia XZ
The syncing process might take you minutes, depending on how many data you’ve selected. Once it done, all of your phone data would be saved on the new Sony Xperia XZ.

transfer android data to sony

d_win d_mac

Related Article:

How to Transfer iPhone Data to Android

How to Recover Deleted Data from Android

How to Recover Deleted Photos from Android

How to Root Android on Computer with One Click

How to Manage Android on Computer

How to Transfer Music to LG G6

LG G6 is an Android phone developed by LG Electronics Company. It was announced during Mobile World Congress on 26 February 2017 as the successor to the 2016 LG G5. The G6 is due to be released in South Korea in March 2017, with worldwide release expected throughout April and May 2017. The LG Electronics Company produced LG phones with outstanding features. Some of the hot LG phones that you may be interested in, include LG G2, LG G3, LG G4, LG G5, LG V10, LG Nexus 5X, LG V20 and of course the new LG G6.

Music play an important part of our life. People play different types of music for different purposes. Some songs can help in entertaining us when we are bored. Some are supposed to cheer us when we are sad. For the Christians, music is a form of worship. So most of us like to enjoy music anywhere anytime when we need. When you search on the Internet about “How to import music to LG G6”, there might be several answers will appear. However not all of them are work for you. Since the introduction of the Android OS system on Android phones, the method for transferring music to your Android has changed. Follow this guide for step-by-step  on how to get the favorite music to your phone.

Android Manager is the best apps which could help you manage, transfer and backup music, videos, photos, contacts, SMS and apps on LG and more brands of Android. The tool helps manage files in almost every Android devices. It supports the transfer music from computer to LG G6 as well as transferring music from iTunes to LG G6 directly. To sum up, Android Manager can help to transfer files between Android and computer, transfer files between Android and iTunes, transfer files between Android and iOS device. What’s Android brands are supported by program, including LG, Lenovo, HTC, Sony, Samsung, Motorola, Huawei, etc,.

d_win d_mac

Part 1: How to Import Music form Computer to LG G6

Step 1. Run Android Manager on PC and Connect LG G6
Run Android Manager on your PC and connect your LG phone to the PC via USB.
android manager home page

Step 2. Transfer Music from Computer to LG G6
To transfer music from PC to LG, from the menu displayed on the top, click the “Music” tab. Once the media loads, hit “Add” and then click “Add File” or “Add Folder” to add more music or songs to transfer.

The option above will bring you to a browser window where you can select the songs that you need to import to your computer. You can select as many files you want, or you can still choose a whole album. Once you are okay with the list, you can click “Open” and pick a location to save the music to your phone. Alternatively, you can just drag and drop music from your PC to the LG phone.

add music from pc to lg

d_win d_mac

Part 2: How to Import Music form iTunes to LG G6

Step 1. Run Android Manager on PC and Connect LG G6
Run Android Manager on your PC and connect your LG phone to the PC via USB. The Phone will be detected and displayed in the primary window. On the main window, click “Transfer iTunes Media to Device”.

android manager home page

Step 2. Transfer Music from iTunes to LG G6
Check options and then start copying your music from the iTunes to the LG device. All files in the iTunes will be scanned and will be shown under different categories such as movies, music podcasts and others. All files are selected by default, but you can uncheck all of them to make sure that you only transfer the music files. Then click “Transfer” to begin transferring the music from iTunes on PC to your LG phone. Android Manager can detect duplicate content, and it enhances the transfer of exclusive content from iTunes.

transfer itunes music to lg

d_win d_mac

Related Article:

How to Transfer Music from Computer to Android

How to Transfer Samsung Data to LG G6

How to Transfer Android Data to LG G6

How to Transfer iPhone Data to LG G6

How to Backup and Restore LG Phones

How to Recover Data from Water Damaged LG Phone

How to Recover Lost Data from Android

How to Root Android on Computer with One Click

How to Transfer Samsung Data to OnePlus 3T

OnePlus 3T smartphone was launched in November 2016. The phone comes with a 5.50-inch touchscreen display with a resolution of 1080 pixels by 1920 pixels at a PPI of 401 pixels per inch. The OnePlus 3T is powered by 1.6GHz quad-core Qualcomm Snapdragon 821 processor and it comes with 6GB of RAM. The phone packs 64GB of internal storage cannot be expanded. As far as the cameras are concerned, the OnePlus 3T packs a 16-megapixel primary camera on the rear and a 16-megapixel front shooter for selfies.

With the new OnePlus One in hand, you may be surprised at its low price, high-end performance, brilliant fingerprint sensor and high resolution as well. If you were an Samsung user and had switched to OnePlus 3T, you may need to transfer data from your old phone to the new OnePlus, such as, Samsung Galaxy S2/S3/S4/S5. While talking about transfer data between two devices, most of us will backup the data for old phone on the PC then transfer backed up to the new one. To be honest, you don’t have to do it complicatedly. This article will show you how to do the transfer job with an easy way, to switch data from Samsung to OnePlus 3T directly.

Switch Samsung Data to OnePlus 3T

Phone Transfer, which is specially designed for you to transfer data between mobile phones, such as contacts, text messages, photos, videos, music, call logs, calendars and apps. With the help of Phone Transfer, you are allowed to switch data from Samsung to OnePlus 3T. Besides transfer data between mobile data, Phone Transfer supports to backup & restore data for mobile device on the computer. Phone Transfer works for all brands of Android device, for instance, OnePlus, Samsung, Lenovo, LG ,Sony, Motorola, Huawei, HTC, etc,.

d_win d_mac

How to Copy Samsung Data to OnePlus 3T

Step 1. Install and Run Phone Transfer
Connect both of your Samsung and OnePlus 3T to PC with USB cables, launch the Phone Transfer program and you will see its main interface like the following picture. Click on the “Phone to Phone Transfer” option to continue.

phone transfer main page

Step 2. Copy Samsung Data to OnePlus 3T
It will be just a second before the program detect the Samsung and OnePlus phone. Make sure your target phone is on the right side while Samsung phone on the left. If not, click “Flip” to exchange the source device and target device.

On the middle panel, check the items you want to transfer, here contacts, text messages, photos, videos, music, call logs, calendars and apps are supported. Press the blue button “Start Transfer” to start transferring process.

select data to transfer to oneplus 3t

transfer samsung data to oneplus 3t

d_win d_mac

Related Article:

How to Transfer iPhone Data to OnePlus 3T

How to Transfer Android Data to OnePlus 3T

How to Recover Lost Data from Android

How to Recover Deleted Photos from Android

How to Root Android on Computer with One Click

How to Manage Android on Computer

How to Root LG G6 on the Computer Safely

News about LG G6
LG G6 has been announced at MWC in Barcelona 2017.The LG G6 is the flagships device of 2017 from LG.It is powered by a Qualcomm Snapdragon 821 chipset coupled with 4GB RAM.It comes with 32GB onboard storage with the option to expand the storage using a microSD card up to 2 TB. It runs on Android 7.1 Nougat along with the LG skin atop it called UX 6. Google Assistant will come baked in with LG G6.

Why need to Root LG G6
What is Android Root? Rooting is the Android device of jailbreaking, a means of unlocking the operating system so you can install unapproved apps, deleted unwanted bloatware, update the OS, replace the firmware, overclock (or underclock) the processor, customize anything and so on. All in all rooting can make your Android become more funny and more useful. Of course, for most of Android users, rooting Android sounds like a scary process. Any wrong rooting operation will make your Android get bricked, that is really a terrible thing and lead to Android user stop to do it.

Root LG G6 on the Computer Safely without Data Loss

Android Toolkit has launched a rooting function for Android calls Android Root, which provides a universal one-click Android root solution for Android users. It is easy to use and saves the trouble to root LG G6 on the computer with only 2 steps, without any data loss. Android Root enables to root Android on the computer without destroying its system, protect your data on device completely. It’s easy to use and not costing time. All brands of Android devices are supported by Android Root, like LG, OnePlus, Lenovo, HTC, Sony, Motorola, ZTE, Samsung, and so on.

d_win d_mac

How to Root LG G6 on the Computer with One Click

To begin with,please download and run Android Toolkit- Android Root on the computer then click on “More Tools” in the home page of program. Select “Android Root” option on it.

android root mian page

Step 1.Connect LG G6 Phone to the computer
Connect LG G6 phone to the computer with an USB cable.You should enabled the USB Debugging mode on your Android device first.Then Android Root will automatically detect your device.

connect lg g6 phone to pc

Once your phone is detected,Android Root will offer a proper solution to root your phone.Click on “Start” to go on.

detect lg g6 phone with android root

Notes:
1.Please don’t interrupt the connection of the device and computer until the whole process is end.
2.The phone will restart sometimes when detecting.
3.It may take you some time to detect your device.Please be patient.

Step 2.Root LG G6 Phone on Computer without Data Loss
It will take you seconds for the program to detect your phone.Then it will be ready for you to root your device.Just click on “Root Now” to safely root your LG G6 phone on the computer.

ready root lg g6 phone

Note:While rooting your phone,the phone will pop up a message to prompt whether you would like to root the phone.Tap on “Confirm” to continue the rooting process.Your phone will be complete rooting in just minutes.

lg g6 rooted

d_win d_mac

Related Articles

How to Transfer Samsung Data to LG G6

How to Transfer Android Data to LG G6

How to Transfer iPhone Data to LG G6

How to Backup and Restore LG Phones

How to Recover Data from Water Damaged LG Phone

How to Recover Lost Data from Android

How to Root Android on Computer with One Click

How to Manage Android on Computer