All posts by DHZ

How to Backup and Restore Xiaomi Mi 5/4/3/2

Summary:If you’re looking for a simple and easy way to do a backup or to restore data on Xiaomi Mi5/4/3/2 phone,you are in the right place here.This article will show the best solutions to backup and restore your Xiaomi mobile phone safely.

Xiaomi is a privately owned company that designs, develops, and sells smartphones, an Android-based OS, and other consumer electronics. Xiaomi also makes fitness trackers, TVs, air purifiers, and tablets. It has a skin for its Android phones and tablets – MIUI.It’s no double that more are more people get a Xiaomi phone to have a try and replace for other Android,especially Xiaomi Mi5/4/3/2,gain the most interested among Android users.This page is aim to teach you how to safely backup & restore Xiaomi Mi5/4/3/2 on computer efficiently.

Backup and Restore Xiaomi Mi 5/4/3/2 on Computer

With Android ToolKit,a terrific and powerful phone backup and restore program,you are allowed to backup & restore Xiaomi Mi 5/4/3/2 on computer quickly and easily.More than 10 types of data can be supported including contacts,gallery,video,messages,calendar,audio,applications and application data(WhatsApp,Line,Viber,Kik,etc,.).With this useful tool,you are able to backup Xiaomi Android data to computer completely,restore data to Xiaomi Android from backup on computer.Android ToolKit works well for various of Android devices,including Samsung (Galaxy S7/S6/S5,Note 5),Google (Pixel,Nexus),Huawei (Mate 9,P9),ZTE,Motorola,HTC,Sony,and so on.

d_win d_mac

How to Backup & Restore Xiaomi Mi 5/4/3/2 on Computer

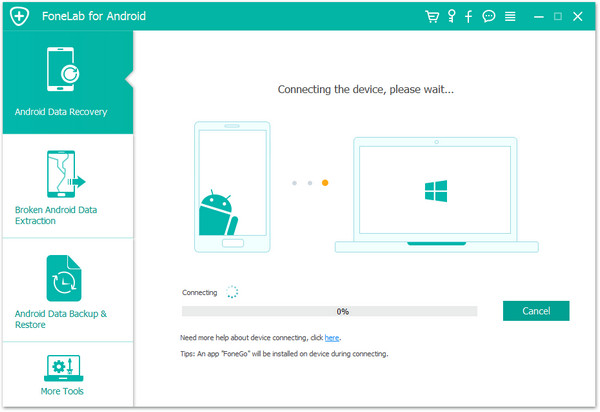
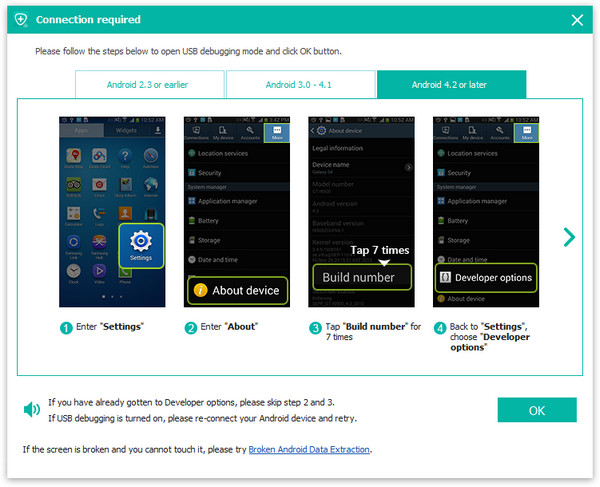
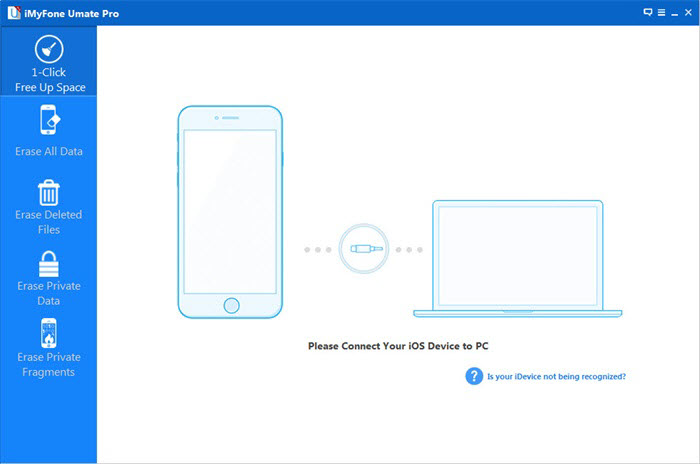
Step 1. Connect Xiaomi Phone to the Computer
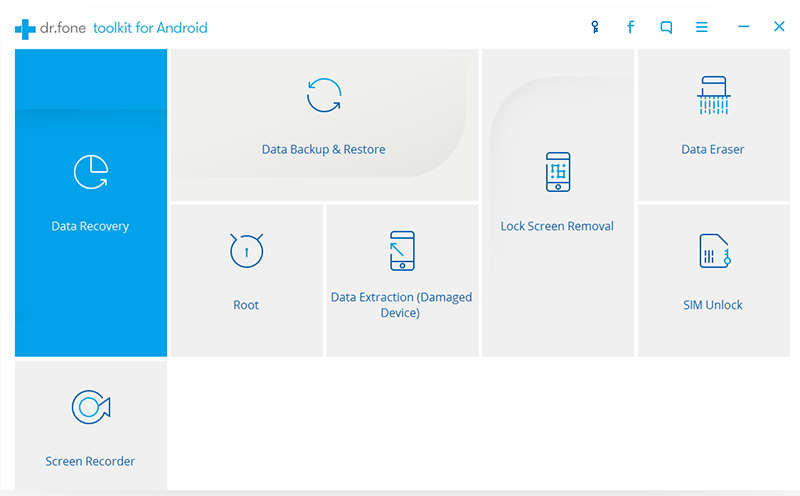
Launch Android ToolKit on the computer and from the “More Tools” section,select “Data Backup & Restore” option.Then connect your Xiaomi Android device to your computer using USB cable.

android tool kit-backup &restore

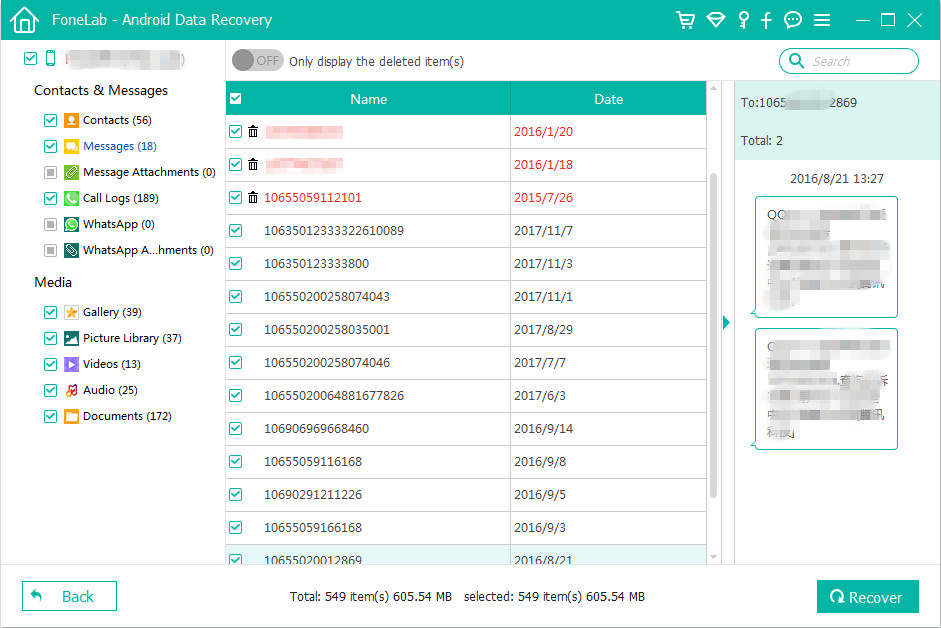
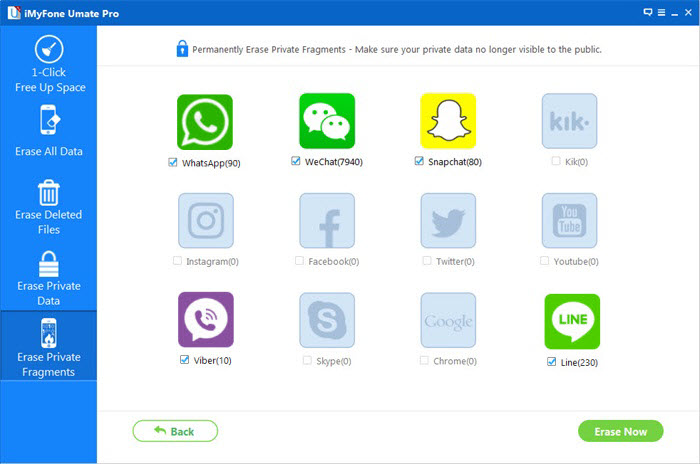
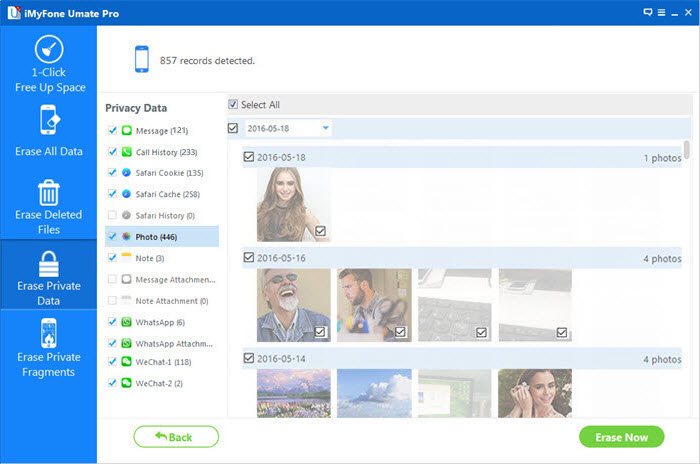
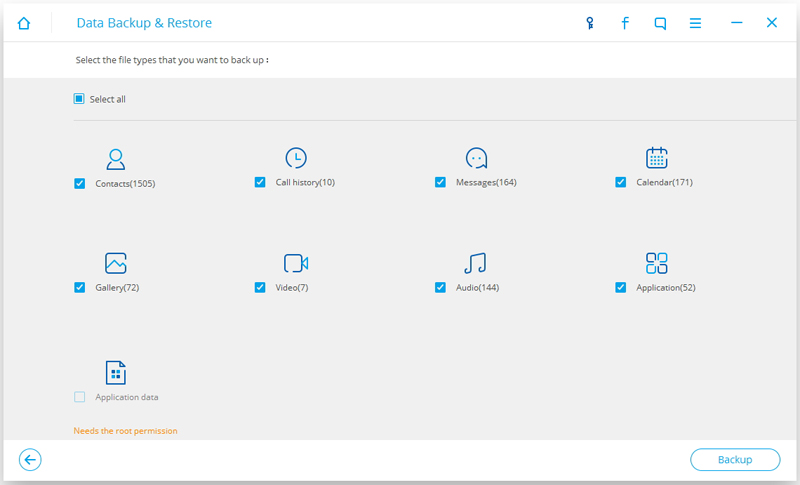
Step 2.Select File Types to Backup
Android ToolKit can be used to back up 9 different file types including messages, call history, calendar, gallery, audio, video, Applications and Application data(WhatsApp,Line,Viber,Kik,etc,.).Please note that to backup app data requires your Android device to be rooted.

select xiaomi data to backup

When the backup is complete, you could click on “View the backup” on the lower left corner of the window to see the contents of the backup file.

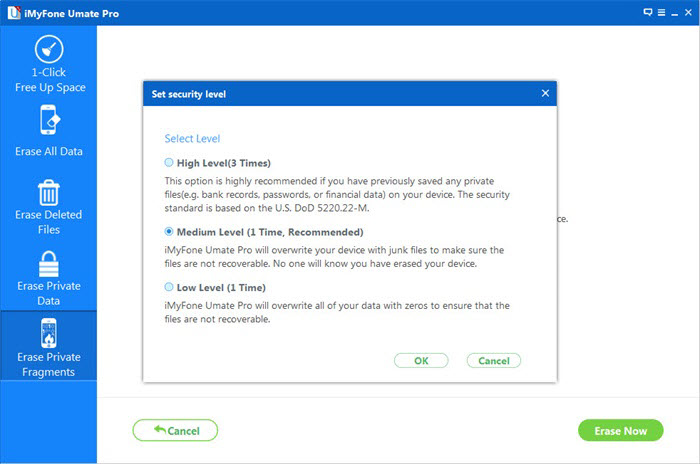
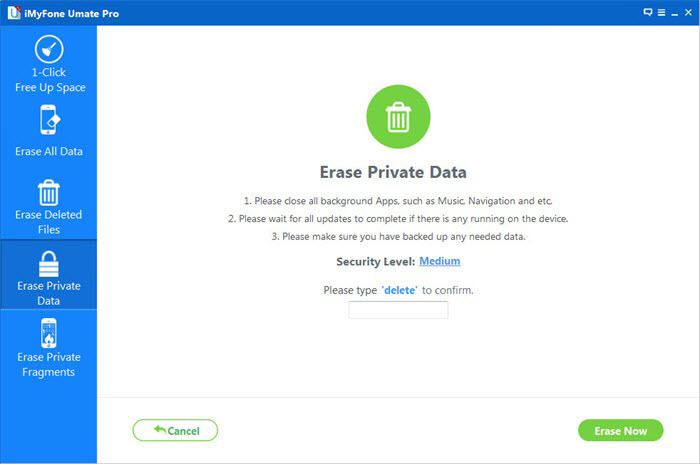
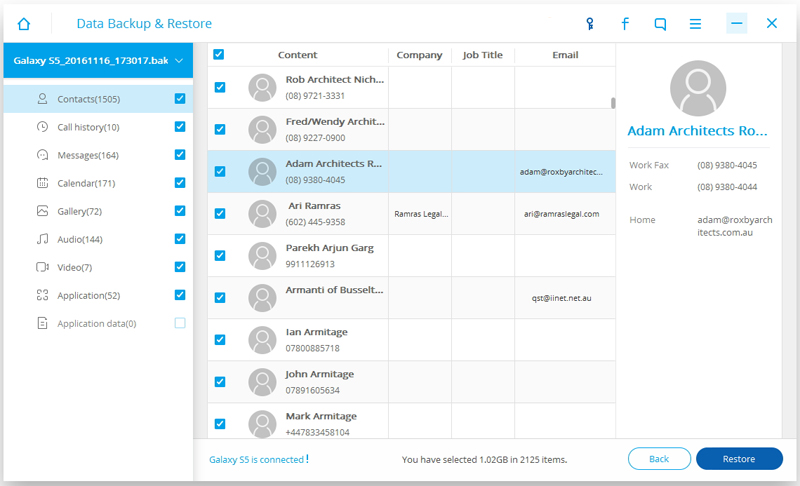
Step 3.Selectively Restore Backup Data to Device
You are allow to choose the data you want to restore.Select the different file types on the left and then select the files you want.Click on “Restore” to start.

restore backup files to xiaomi

d_win d_mac

Related Article:

4 Ways to Backup and Restore Android Phone or Tablet

How to Backup and Restore your Android on Computer

How to Backup and Restore Media File on Android

How to Backup and Restore App Data on Android Phone

How to Backup and Restore WhatsApp Messages for Android

How to Recover Deleted Photos from Xiaomi Phone

How to Recover Deleted Files from Xiaomi Phone

How to Recover Lost Data after Android 7.2 Update

I updated Android 7.2 on my Nexus 5X phone and then I lost the contacts and some messages from the device.Is it possible to recover lost data after Android system update without backup?Thanks.”-Aiden

A new Android update started seeding on Google Pixel and Nexus 5X devices, which brings new maintenance update for their Android Nougat firmware, such as the fingerprint gestures on the Nexus users.Announced on Jan. 30, the Android 7.2.1 OTA update came on selected Pixel and Nexus 5X owners participating in the Android Beta Program.The said latest update includes “incremental maintenance update focused on polishing and refinements,” according to Google.

Directly Recover Lost Data after Android 7.2 Update

The keys to recover lost Android data after Android 7.2 update is using Android Data Recovery.The recoverable data including contacts,messages,gallery,video,audio,call logs,apps & apps data,documents,and more.You can use this amazing tool to get the satisfied solution to solve Android data recovery problems.With Android Data Recovery,you are able to recover lost data from Android under any data loss circumstances,including Android system update,Android system rooting,factory reset,deleted mistaken,device damaged/broken,and so on.Most of Android phones are applicable to Android Data Recovery,such as,Samsung(Galaxy S7/S6/S5,Note 5),Huawei(Mate 9,P9),Google(Pixel,Nexus 6/5X),Lenovo(K5 Plus,K5 Note),Vivo(V5,Y66,Y55),Xiaomi(Mi Mix,Mi Note 2),HTC,Sony,ZTE.How to Recover Lost Contacts on iPhone after iOS 10 Upgrade.

d_win d_mac

How to Recover Lost Data after Android 7.2 Update

Step 1.Connect Android to the Computer
To begin with,please install Android Data Recovery on your computer,run it and connect your Android to the computer.It will take a few seconds to detect your device automatically by Android Data Recovery.

connect android to the computer

Step 2.Enable USB Debugging on Android Phone
Unlock your phone,go to Settings > Developer options > Allow USB debugging mode.If you have already allowed the USB debugging mode,you will see a pop-up window on the screen,mark Always allow from this computer and click OK.

usb debugging android phone

Step 3.Select Data you want to Restore from Android
After enabling USB debugging, connect your phone to the computer via USB cable, you’ll see this window,different types of files can be chose to be scan here,such as,contacts,messages,gallery.If you lost almost all types of Android data, you can tick “Select all” to have all your Android data scanned.

select file tpye to recover from android

Step 4.Allow to Scan and Analyze Data on Android
You’ll get a window as follow on your device after your device is detected by the program.Tap “Allow” to enable the program to scan your phone for lost data.

allow scan android

Note:Before starting,please make sure that your phone battery is more than 20% charged.

Step 5.Scan Android for Lost Data
The scanning process will take some time due to your request.When everything is done, you will see a list of lost files, including your messages,gallery,contacts,and other data, appear on the software screen as below,preview them one by one before recovery.

scan android for lost data

Step 6.Preview and Recover Lost Data from Android after Updating
After finishing the scanning process, a list of recoverable files that the lost data have been found from your Android will be shown.Additionally,there will be a preview window of files where you can preview(contacts, SMS and gallery,etc)from Android.Mark the data you want and click “Recover“ to restore them to your computer.

Recover Lost Android Photos after Android 7.2 Update

recover lost photos from android

Recover Lost Android Messages after Android 7.2 Update

recover lost sms from android

d_win d_mac

Related Article:

How to Recover Data from Android Phone

How to Recover Deleted Photos on Android Phone

How to Recover Data after Android 6.0,Android 7.0/7.1/7.1.2 Update

How to Recover Data from Android Phone after Factory Reset


How to Recover Lost iPhone Contacts after iOS 10.2.1 Jailbreak

Hacker teams like Pangu, PPJailbreak and TaiG, and individual hackers like Luca Todesco and Marco Grassi has yet to release an official version of a jailbreak tool intended for iOS 10.2.1.Currently, the latest iOS jailbreak tool available was the semi untethered Yalu Jailbreak released by Luca Todesco and Marco Grassi back in January 26th.This too can jailbreak Apple devices running 10.0.1 – 10.2 (depends on device). Take note that this cannot jailbreak iPhone 7 running iOS 10.2.

ios 10.2.1 jailbreak

Most of us like to jailbreak our iPhone (iPad or iPod touch),because it gives you the ability to add non-Apple applications and functions on the device. It also has the potential to cause a lot of problems: the jailbreak process might damage the system and make in unbootable or the system freezes at startup.What’s worse, you may not access your personal data and lead to data loss situations occur.

Recover Lost iPhone Contacts after iOS 10.2.1 Jailberak

iOS Data Recovery is a reliable data recovery to recover lost contacts from iPhone after iOS 10.2.1 jailbreak,as well as other types of lost data,like messages,photos,videos,audio,call logs,apps&apps data,documents,and so on.Here we’d like to recommend you to try this iOS Data Recovery which is fully compatible with all iOS system such as iOS 10.2.1/iOS 10/iOS 9 etc,. And it supports to restore lost data on iOS devices with three recovery modes: directly recover from iOS device,recover from iCloud backup or recover from iTunes backup.iOS Data Recovery enables to recover lost data from iOS devices under any data loss circumstances,such as,iOS jailbreak,iOS update,deleted mistaken,device damaged/broken,factory reset.Supported most of iOS devices including iPhone 7(Plus),iPhone 6S(Plus),iPhone 6(Plus),iPhone 5S/5C/5,iPad and iPod.

d_win d_mac

Directly Recover Lost Contacts from iPhone after iOS 10.2.1
Jailbreak

To begin with,please install and run iOS Data Recovery on your computer.

Step 1.Connect iPhone and Select Recovery Mode
Connect your iPhone to the computer,select “Recover from iOS Device”mode.Click “Start” to start the data recovery process.

connect iphone with computer

Step 2.Select Lost File to Scan by Program
To directly recover lost contacts from iPhone after iOS 10.2.1 jailbreak,you should select the type of lost data to be scanned by program.You are allows to select more than one files to be scanned by program,then click “Next”.For contacts recovery,you should click “Contacts“.

select file to recover

Now the program will begin to scan your device automatically for lost data with a little time.

scan iphone for lost data

Step 3.Preview and Directly Recover Lost Contacts from iPhone after iOS 10 Jailbreak
Once the scanning is completes,you are allows to preview and directly recover the lost iPhone data.Select the data you want and click “Recover” to save the selected data to the computer.

recover iphone contacts

d_win d_mac

Related iOS Data Recovery Tutorial:

How to Restore iPhone Data after iOS 10 Jailbreak

How to Safely Recover Lost iPhone Data after Jailbreaking

How to Restore Lost iPhone Photos after iOS 10 Jailbreak

How to Restore Lost iPhone Data after iOS 10/iOS 10.2.1 Update

How to Recover Lost Contacts on iPhone after iOS 10/iOS 10.2.1 Upgrade

How to Recover Lost Contacts from iPhone 6S/6 after iOS 9 Jailbreak

How to Jailbreak iOS 10 on iPhone without Losing Data

How to Recover Lost iPhone Data after iOS 10.2.1 Jailbreak

iOS 10.2 was released and finally, 10.2.1 was released six weeks later.More than six weeks after the release of iOS 10.2.1, Apple has yet to officially release the next iOS, why?No one knows why, perhaps it could be attributed to the CIA doings. But the main point is, hacker teams like Pangu and TaiG, and individuals like Luca Todesco and Marco Grassi, should have enough time to figure out how to jailbreak iOS 10.2.1 by now.So maybe Pangu or Luca would soon release a jailbreak tool for iOS 10.2.1 which is compatible to all latest Apple devices including iPhone 7, or maybe not.

jailbreak ios 10.2.1 iphone

Generally,when you perform iOS 10.2.1 jailbreak, there is a great risk that you may lose valuable data on your iPhone/iPad,like contacts, messages, photos, notes, calendars, etc,.Are you looking for ways to get back lost data from device after iOS device?Especially iOS 10/iOS 10.2.1 jailbreak?This article focuses on teaching you how to recover lost data from iPhone after iOS update.Read on to get the solutions with iOS Data Recovery.

Restore Lost Data from iPhone after iOS 10 Jailbreak

In a word,iOS Data Recovery can perfectly solve your problem,help to recover lost data from iPhone after iOS 10.2.1 jailbreak,as well as iOS 10/iOS 9 jailbreak.Contacts,messages,photos,videos,audio,call logs,apps &apps data,documents and more types of lost iOS data are included.What’s more,iOS Data Recovery empower to recover iPhone data after losing data under any circumstances,like iOS jailbreak,iOS update,deleted mistaken,factory reset,device broken/damaged,etc,.There are three recovery modes for selection:directly recover from iPhone without backup,recover from iTunes backup file,recover from iCloud backup file.

d_win d_mac

Directly Recover Lost Data from iPhone after iOS 10 Jailbreak

To be begin with,please install and run iOS Data Recovery on your PC/Mac.

Step 1.Connect iPhone and Select Recovery Mode
Connect your iOS 10 iPhone to the computer,select “Recover from iOS Device”mode.Click “Start” to begin the data recovery process.

connect iphone with computer

Step 2.Select Lost File to Scan by Program
To directly recover lost data from iPhone after iOS 10.2.1 jailbreak,you should select the type of lost data to be scanned by program.You are allows to select more than one files to be scanned by program,then click “Next”.

select file to recover

Now the program will begin to scan your device automatically for lost data with a little time.

scan iphone for lost data

Step 3.Preview and Directly Recover Lost Data from iPhone after iOS 10 Jailbreak
Once the scanning is completes,you are allows to preview and directly recover the lost iPhone data.Select the data you want and click “Recover” to save the selected data to the computer.

Recover Lost Contacts from iPhone after 10.2.1 Jailbreak:

recover iphone contacts

Recover Lost Photos from iPhone after 10.2.1 Jailbreak:

recover lost photo from iphone

Recover Lost Messages from iPhone after 10.2.1 Jailbreak:

recover lost sms from iphone

d_win d_mac

Related iOS Data Recovery Tutorial:

How to Restore iPhone Data after iOS 10 Jailbreak

How to Safely Recover Lost iPhone Data after Jailbreaking

How to Restore Lost iPhone Photos after iOS 10 Jailbreak

How to Jailbreak iOS 10 on iPhone without Losing Data

How to Restore Lost iPhone Data after iOS 10/iOS 10.2.1 Update

How to Recover Lost iPhone Contacts after iOS 10.2.1 Update

Help please! I just updated my iPhone 6S to iOS 10.2.1 this morning and lost all contacts after that.The worse that I haven’t backed up my phone recently.I don’t want to lose the important phone number on the phone.How can I recover the wanted data without backup?Thank you so much!”-Etta

Apple iOS 10.2.1 admits to serious problems.It has taken three months, two software updates, warnings from the Chinese government,over 100 pages of customer nagging and numerous articles by publications around the globe since November but Apple has at last confessed.The Apple stated not only did it know iPhone 6S and iPhone 6 models have been shutting down at random for some time but that it also hid a fix into iOS 10.2.1 which it believes mostly fixes the problem.There are a lots of users reported that lost private data from iPhone after iOS 10.2.1 update,now we are going to describe how to recover lost contacts from iPhone after iOS 10.2.1 update.

Directly Recover Lost Contacts from iPhone after iOS 10.2.1 Update

It’s not a big deal with the help of iOS Data Recovery after losing iPhone data,which is an amazing program help to recover lost contacts from iPhone directly after iOS 10.2.1 update.It is a practical data recovery tool to restore deleted data on iPhone after iOS update with three different recovery modes:directly recover from iPhone,recover from iTunes backup file,recover from iCloud backup file.The recoverable data including contacts,messages,photos,videos,audio,call logs,apps &apps data,documents and more.iOS Data Recovery work well for most of iOS devices,insist of iPhone 7,iPhone 6S(Plus),iPhone 6(Plus),iPhone 5S/5C/5,even iPad and iPod.

d_win d_mac

Directly Recover Lost Contacts from iPhone after iOS 10.2.1 Update

First of all,please install and run iOS Data Recovery on your computer.

Step 1.Connect iPhone and Select Recovery Mode
Connect your iOS 10 iPhone to the computer,select “Recover from iOS Device”mode.Click “Start” to begin the data recovery process.

connect iphone with computer

Step 2.Select Lost Contacts to Scan by Program
To directly recover lost contacts from iPhone after iOS 10.2.1 update,you should select the type of lost data to be scanned by program.You are allows to select more than one files to be scanned by program,then click “Next”.For contacts recovery,you should click “Contacts“.

select file to recover

Now the program will begin to scan your device automatically for lost contacts for a little while.

scan iphone for lost data

Step 3.Preview and Directly Recover Lost Contacts from iOS 10 iPhone
Once the scanning is completes,you are allows to preview and directly recover the lost iPhone data.Select the data you want and click “Recover” to save the selected data to the computer.

recover iphone contacts after ios update

d_win d_mac

Related iOS Data Recovery Tutorial:

How to Safely Backup iPhone/iPad before iOS 10/iOS 10.2.1 Update

How to Restore Lost iPhone Data after iOS 10/iOS 10.2.1 Update

How to Restore iPhone Photos after iOS 10/iOS 10.2.1 Update

How to Recover iPhone Text Messages after iOS 10/iOS 10.2.1 Update


How to Erase Private Fragments from iPhone 7/6S/6

I need to erase the private fragments from my iPhone 7,to solve the device running slow issue properly.How to remove the cache data from device cleanly?”-Jennifer

As times goes on,it will make cache appear on your iPhone device,especially when you run apps/safari too often in daily.If you don’t clean the private fragments from iPhone in time,it can make out the funk files on device and slow your iPhone down.Give your iPhone a private fragments clean job:delete junk files on iPhone,remove unwanted cache from apps/safari,and free up space your device,get more storage on device.Here we are going to describe how to erase private fragments from iPhone 7/6S/6,to get your iPhone running faster than ever.

Erase Private Fragments from iPhone 7/6S/6 Permanently

With iPhone Data Eraser,you can safely erase incomplete private fragments from iPhone 7/6S/6 permanently without losing private data,to find out all private traces produced by third-party apps and permanently destroy them.iPhone Data Eraser will show you the detail data about private fragments of the apps from your iPhone,such as WhatsApp, WeChat, Snapchat, Kik, Line, Instagram, etc,.Expect erasing private fragments from iPhone,iPhone Data Eraser enables to free up space on iPhone with one click,erase all data from iPhone,erase iPhone deleted files,and remove private data from iPhone.Supported iOS devices including iPhone 7,iPhone 6S(Plus),iPhone 6(Plus),iPhone 5S/5C/5,even iPad and iPod.

d_win d_mac

How to Erase Private Fragments from iPhone 7/6S/6

Step 1.Run Program on Computer
Please connect your iPhone to the computer via an USB cable.If it is the first time your device connecting to the computer,you need to trust the computer first on your device.

connect iphone

Step 2.Select the Erasing Mode
When your device is connected successfully,choose the “Erase Private Fragments” tab.Click “Scan” button and iPhone Data Eraser will start to scan your device.It will take a few minutes to finish the process.

scan private fragments from iphone

Step 3.Preview the Private Fragments from iPhone  
When the scanning process is finished,iPhone Data Eraser will show you how many private fragments left of every third-party app,such as WhatsApp, WeChat, Snapchat, Kik, Line, Instagram, etc.Then click “Erase Now” button to erase the selected fragments.

preview private fragments from iphone

Note:All the third-party apps which have private fragments are selected by default.You can uncheck the ones which you do not want to erase before clicking “Erase Now” button.

Step 4.Confirm to Erase Private Fragments from iPhone  
Type “delete” into the box to confirm.Of course,if you want to change the “Security Level“, you can click the link to change the level.(Please read the security level explanations carefully.)

select easing level

Step 5.Begin to Erase Private Fragments from iPhone
After you manually type “delete” into the box to confirm, click “Erase Now” button. It will remind you how much time would be needed to finish the erasing process. Click “Continue” button to go on.

begin to erase private fragments iphone

Note:

1.Please keep your device connected with your computer and do not use the device during the whole process to ensure the program is operating properly.

2.Your data or your device may be damaged if you stop the process when the program is erasing data or your device is restarting.

d_win d_mac

Related Article:

How to Free Up Space on iPhone 7/6S/6

How to Delete Junk Files from iPhone or iPad

How to Optimize Slow iPhone For Best Performance

How to Delete Data from iPhone without Recovery

How to Erase Deleted Data from iPhone 7/6S/6

How to Erase Private Data on iPhone 7/6S/6

How to Erase Deleted Data from iPhone 7/6S/6

I need to wipe the deleted data from my iPhone 7 completely.Do you know how to make deleted iPhone data unrecoverable by any data recovery software before selling it or sending it away?Please let me know.Thanks advanced.”-Lewis

In many times when we deleting files from iPhone, we will always expect it to be permanent either for secure reason or space clean purpose.But the result turns to be the reverse of our wishes.As a matter of fact, the deleted photos,messages, and other important personal data won’t be removed from iPhone permanently.On the contrary, they are likely to stay for a very long time on device.The worse is,all those deleted files are easily to be accessed for someone who steals the deleted personal data from device by applying some professional iPhone data recovery tools.This page is going to show you how to erase deleted data from iPhone 7/6S/6 without restoring.

Wipe Deleted Data from iPhone 7/6S/6 Permanently

iPhone Data Eraser enables to erase deleted files from iPhone 7/6S/6 without restoring,make sure that the files you previously deleted are no longer accessible or recoverable.If you want to ensure previously deleted data is unrecoverable then this option will suits you.With the help of iPhone Data Eraser,you can remove deleted data from iPhone permanently,including messages,contact,calendars&reminder,call logs,notes,safari history,bookmark,photo,voice memo,WeChat data and so on.iPhone Data Eraser provides five powerful functions to you: One Click to Free Up Space,Erase All Data,Erase Deleted Files,Erase Private Data,Erase Private Fragments.

d_win d_mac

Remove Deleted Data from iPhone 7/6S/6 without Restoring

Step 1.Connect iPhone 7/6S/6 to the Program  
Please connect your iPhone to the computer via an USB.If this is the first time you are connecting to the computer, you need to Trust the computer first on your iPhone.

connect iphone

Step 2.Select Erasing Mode
Choose the Erase Deleted Files tab,click “Scan” and then iPhone Data Eraser will start to scan the device and list all of the deleted files.This process would take several minutes.

erase deleted iphone data mode

analyze deleted iphone data

Step 3.Preview Deleted Files from iPhone
After the scanning process is finished, iPhone Data Eraser will list all the deleted files.You can click them one by one to preview and tick off the file types which you don’t want to erase in the box.Then click “Erase Now” button to erase the selected deleted files.

preview deleted iphone data

Of course,multiple selections are supported,also.Normally iPhone Data Eraser will select all by default.

Step 4.Confirm the Deleting Operation
Next you should type “delete” into the box to confirm.

confirm erase deleted iphone data

Of course if you want to change the security level, you can click the link to change the level. Please read the security level settings carefully.

select delete level

Step 5.Begin to Erase Selected Deleted iPhone Files Permanently
After you manually type “delete” into the box to confirm your action, click the Erase Now button to erase all data on your device.

begin erase deleted iphone data

Note:

1.iPhone Data Eraser supports previewing and erasing the deleted files, but it is not able to help you recover them. If you want to retrieve the deleted files, please use iPhone Data Recovery instead.

2.Please keep your device connected with your computer and do not use the device during the whole process to ensure the program operates properly.

3.Your data or device may be damaged if you stop the process while the program is erasing data or your device is restarting.

d_win d_mac

Related Article:

How to Erase Private Data on iPhone 7/6S/6

How to Permanently Erase Data from iPhone/iPad without Recovery

How to Permanently Erase Data from iPhone Before Selling

How to Delete Data from iPhone without Recovery

How to Free Up Space on iPhone 7/6S/6

How to Erase Private Data on iPhone 7/6S/6

I wanna wipe the messages,photos and other private data on my iPhone 7,how to perform it without restoring?Can you give me some ideal suggestions?”-Kate

Sometimes you may need to remove private data from your device in order to protect the privacy and avoid leaking for others.One of the most common operation is deleting data on device permanently.Generally speaking,when you delete something on your iPhone by pressing the “Delete” button,it’s not mean that the deleted data was gone forever,actually it can be restored by some professional data recovery tools.In this tutorial we are going to introduce an easy way to you to ensure erasing private data on iPhone 7/6S/6 permanently.

Wipe Private Data Selectively on iPhone without Restoring

iPhone Data Eraser provides a safe solution to you to remove private data from iPhone 7/6S/6 permanently,including the contacts,messages,private photos,notes,call logs,account information, browsing history, emails, apps data or other personal information,ensure your iPhone data will never be revealed to others.iPhone Data Eraser provides five powerful functions to you: One Click to Free Up Space,Erase All Data,Erase Deleted Files,Erase Private Data,Erase Private Fragments.iPhone Data Eraser enables to delete all of this residual information completely.It can make sure the private data will be rendered unrecoverable.

d_win d_mac

How to Remove Private Data from iPhone 7/6S/6 Permanently

Step 1.Connect iPhone 7/6S/6 to the Program
Connect the iPhone 7/6S/6 to the computer and run iPhone Data Eraser.If this is the first time you are connecting to the computer,you need to Trust the computer first.

connect iphone

Step 2.Select Erasing Mode
Click the Erase Private Data tab, click “Scan” and then iPhone Data Eraser will start to scan the device.It will take several minutes to finish the process.

private data erasing mode

Step 3.Preview the Private Data from iPhone
After scanning,iPhone Data Eraser will list all your private data including photos, messages, contacts etc,. You can click to preview them.

preview private data on iphone

Step 4.Begin to Delete Private Data from iPhone
After you’ve selected private files which you want to erase, click the Erase Now button. Then a warning pop-up window will show you warnings.

Step 5.Confirm Deleting Private Data from iPhone
Type “delete” into the box to confirm. Of course if you want to change the security level, you can click the link to change the level. Please read the security level settings carefully.

confirm delete operation

set the erasing level

After you manually type “delete” into the box to confirm your action, then click the Erase Now button to erase the private data.

begin to delete private data from iphone

Note:

1.Please keep your device connected with your computer and do not use the device while the whole process to ensure the program is operating properly.

2.Your data or device may be damaged if you stop the process during the program is erasing data or your device is restarting.

d_win d_mac

Related Article:

How to Permanently Erase Data from iPhone/iPad without Recovery

How to Permanently Erase Data from iPhone Before Selling

How to Delete Data from iPhone without Recovery

How to Free Up Space on iPhone 7/6S/6

How to Free Up Space on iPhone 7/6S/6

The prompt message always appear on My iPhone 7 with 16GB storage,which tell me that my phone is full.I puzzle about how to free up space the phone.Any good ideas?”-Bill

You may get an “out of memory” message prompt you that you should release more storage on your device,especially for a 16 GB iPhone,actually you can’t use all 16 GB of storage.You may need to free up space on iPhone for different reasons,for example,get more storage to perform iOS update,get more space to save photos/apps,and others.In these similar cases,how can you do?Simply say,you could remove the junk files,delete unwanted apps,manage data,or clean the apps running cache.In this page we offers you an efficient way to free up space on iPhone and protect privacy on your device.

One Click to Free Up Space on iPhone 7/6S/6

iPhone Data Eraser is your ideal tool help to one click to free up space on iPhone 7/6S/6,and use for erasing data completely from device.iPhone Data Eraser allows you to release space iOS device easily.It provide five powerful functions to you: One Click to Free Up Space,Erase All Data,Erase Deleted Files,Erase Private Data,Erase Private Fragments.With over 25 analysis technologies, you can securely delete useless data, free up space and speed up your iPhone, iPad and iPod Touch via the powerful iPhone Data Eraser.

d_win d_mac

How to Free Up Space on iPhone 7/6S/6

Step 1.Run Program on Computer
Run iPhone Data Eraser and connect your iPhone via an USB.

connect-iphone

Step 2.Scan iPhone for a Full Space-Saving Analysis
This program integrates more than 25 analyzing technologies,and it support to scan and analyze data of device accurately.Click “Quick Scan” for a full space-saving analysis on how much space can be saved by cleaning up junk files,clearing temporary files,compressing photos,deleting large files and removing apps.

analyze-iphone-data

Then the program starts scanning.

scanning

Step 3.Begin to Free Up Space on iPhone 7/6S/6
After scanning,it will show that the storage could be freed up.Now you can click “Clean” button to release space for iPhone.

free-up-space-iphone

After cleaning,you will see how much space has been released and how much more can be released by the other items as the below interface shows.Choose any part to continue.

free-up-space-iphone-completed

You can show off the results with your friends on Twitter or Facebook;or check out your backup files in backup folder.

Note:

1.There are two releasing modes you can choose to free up space on iPhone.First, all the space-releasing procedures can be done after you click the Quick Scan button, which is a full space-saving analysis. They can be done individually in each tab at the bottom of the interface according to their different functions. That means you can start with junk cleaning, photo compression or managing apps as you prefer.

2.Please keep your device connected with your computer and do not use the device until the whole process is end to ensure the program operates properly.

d_win d_mac

Read more:

How to Free Up Space on iPhone/iPad/iPod

How to Optimize Slow iPhone For Best Performance

How to Clean iPhone and iPad Junk Files to Free Up Space

How to Delete and Erase Data from iPhone Permanently to Free Up Space

How to Recover Deleted Documents from Android

[Summary]: How to restore deleted Document files on Android? The article guides you to recover lost or deleted documents from Android phones/tablets no matter you have made a backup or not.

My little brother deleted my documents from my Huawei P20, these documents files related to my business, it will make me lost a lots of money if I can’t find them back. Can you tell me how to recover the deleted documents from Huawei phone? I will highly appreciate if anybody can give me the helpful suggestions.Thanks.”-Bruce

Everyone who has the experience of losing important data on his mobile phone which is really terrible experience.These lost data may closely related to their business,interpersonal relationship or more.So you need to find a reliable data recovery to help you complete the data recovery job in a safe way.In this tutorial,you will get the easy steps about how to recover deleted documents and other kinds of deleted data from Android smartphone or tablet.

Android File Recovery: Recover Deleted Documents from Android

Android Data Recovery is a great data recovery help to recover deleted documents from Android directly. It can perfectly recover different kinds of data on Android, including contacts, photos, text messages, videos, audios, call logs, apps & apps data. Android Data Recovery enables to recover deleted Android data after losing data under any circumstances,such as,deleted accidentally,factory reset,Android system update,Android system rooting,etc,.Android Data Recovery support to more than 6000 models of Android phone and tablet, such as Samsung Galaxy, Huawei, LG, HTC, Sony, Google Pixel, Nexus, OnePlus, Motorola, Xiaomi, Redmi, Oppo, Meitu, Windows Phone, Sharp phones and more.

d_win d_mac
d_win d_mac

Part 1. Recover Word Document Files from Google Drive

Google Drive is a great and reliable file storage and management application by Google. If you have synced a Google account to your phone, you might have used this application for backing up your files and data. You can try restoring deleted Android documentsfrom Google account.

Part 2. Recover Word Documents from Android Memory Card

Actually, it is also possible to recover documents from Android memory card that were just moved or copied from your phone memory to the external memory card. If you are in the case, there’s no need for you to recover them at all, unless you have separation of concerns when it comes to storages, and that you mostly prefer having your files on phone memory.
Related guide: How to Recover Lost Data from Android SD Card

To check, go to the application where you can view and manage all the files and data on your phone (for Samsung Galaxy series, it’s the “My Files” application). Then, each file is organized per type – Images, Videos, Audio, Documents, and Download History.

There’s also a section showing the storages you have on your phone – Device storage and SD card. Select SD card and try to look for the word document files that went missing from your phone memory. If you have found nothing, it is now time to use a recovery tool to help you get more options in recovering them.

Part 3. Recover Deleted Documents from Android Phone or Tablet

Step 1.Connect Your Android Phone to Computer
First of all, please download and install Android Data Recovery on your computer.

d_win d_mac
d_win d_mac

Rn it and connect your phone to the computer.It will take a few seconds to detect your phone automatically by Android Data Recovery.

connect android to the computer

Step 2.Enable USB Debugging on Android Phone
Unlock your phone,go to Settings > Developer options > Allow USB debugging mode.If you have already allowed the USB debugging mode,you will see a pop-up window on the screen,mark Always allow from this computer and click OK.

usb debugging android phone

Step 3.Select Data you want to Restore from Android
After enabling USB debugging, connect your phone to the computer via USB cable, you’ll see this window,different types of files can be chose to be scan here.If you lost almost all types of Android data, you can tick “Select all” to have all your Android data scanned.For documents recovery,you should click “Documents“.

select document file to recover from android

Step 4.Allow to Scan and Analyze Data on Android
You’ll get a window as follow on your device after your device is detected by the program.Tap “Allow” to enable the program to scan your phone for deleted data.

allow scan android

Note:Before starting,please make sure that your phone battery is more than 20% charged.

Step 5.Scan Android for Deleted Data
The scanning process will take some time due to your request.When everything is done, you will see a list of deleted files, including your documents,gallery,contacts,and other data, appear on the software screen as below,preview them one by one before recovery.

scan android for deleted data

Step 6.Preview and Recover Deleted Documents from Android
After finishing the scanning process, a list of recoverable files that the deleted data have been found from your Android will be shown.In addition,there will be a preview window of files where you can preview(documents,contacts, SMS and gallery,etc,.)from Android.Mark the documents you want under “Documents” file and click “Recover“ to restore the selected data on the computer.

recover deleted documents from android

d_win d_mac
d_win d_mac

Related Articles:

How to Recover Data from Android Phone

How to Recover Deleted Photos on Android Phone

How to Recover Lost Contacts on Android Phone

How to Recover Data after Android System Update

How to Recover Data from Android Phone after Factory Reset

How to Manage Android Phone on Computer