All posts by DHZ

How to Transfer Data from Android to iPhone 7/iPhone 7 Plus

The iPhone 7 is expected to be announced by Apple officially later in the year, around September. Apple’s iPhone 7 will feature a dual speaker and a bigger camera,if the latest round of leaked images is legit.2016 will break Apple’s usual tick-tock cycle of major chassis design changes every other year.Clobbered by falling iPhone sales,Apple needs to coax consumers into purchasing the iPhone 7.But reports claim the 2016 model will offer only minor enhancements and that Apple is saving new, bigger feature updates for next year’s edition.

sync Android to iPhone 7

iOS system and Android system are the most popular mobile operating system around the world.More and more mobile phone users are likely to buy an iPhone instead of using Android phone.A new iPhone 7 is coming,I guess many Android users will jump ship to the new version iPhone.If you are one of them,or just have an Android phone and an iPhone at the same time, you will definitely need to know to copy data.The problem is, how?

1 Click Move your Photos, Contacts,SMS and more from Android phone to iPhone 7/7 Plus

Luckily,the Android to iPhone 7 TransferPhone Transfer meets all our requirements.No professional knowledge need,no complicated steps need,it’s a perfect magic data manage tool to transfer everything from Android to iPhone 7 easily.With it,you can switch data between Android phones and iPhone as easy as tapping a few buttons.Almost all kinds of data are supported,such as contacts,photos,videos, SMS,call logs,WhatsApp messages,document and more.Applicable devices:iPhone 7,iPhone SE,iPhone 6S(Plus),iPhone 6(Plus),iPhone 5S/5C/5,iPad,iPod Touch;and various Android brands phone:Samsung,HTC,LG,Lenovo,Huawei,Xiaomi,Motorola,etc.

d_win d_mac

Part 1:Transfer Android Data to iPhone 7 with Phone Transfer

Step 1.Launch Phone Transfer on PC or Mac
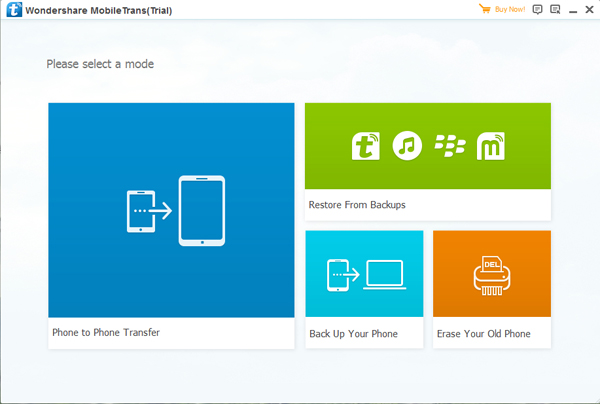
Run Phone Transfer on computer and click “Phone to Phone Transfer” feature,then connect both Android phone and the new iPhone 7 to the computer via USB.

android to iPhone 7 data transfer

Tips:We also program Phone Transfer for Mac for MacBook,MacBook Air/Pro,iMac usrs switch data between Android phone and iPhone on Mac directly.

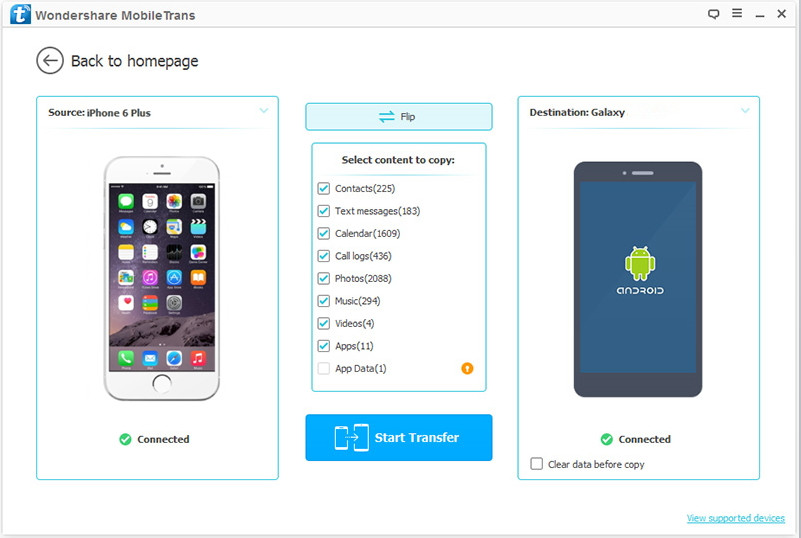
Step 2.Select the Contents to Copy from Android to iPhone 7

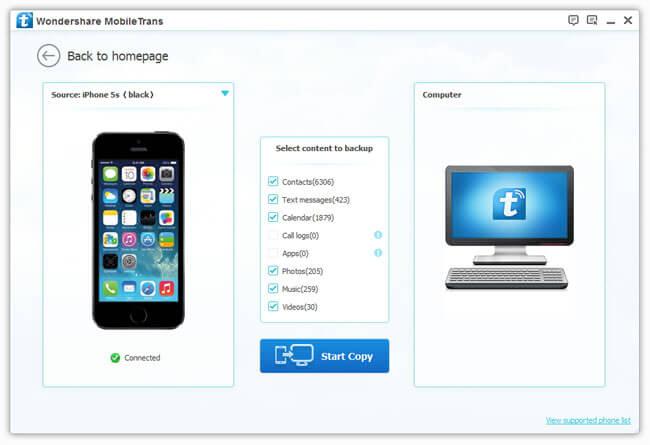
On the next window,make sure that the “Source” and “Destination” positions have Android and iPhone displayed respectively.Then select the file type you want to move between Android phone and iPhone,including contacts,text messages, calendar, call history,pictures,songs,videos,App and App data,like WhatsApp messages, Kiki chat history, Line messages,Facebook Messager,ect.

Transfer Data from android to iPhone 7

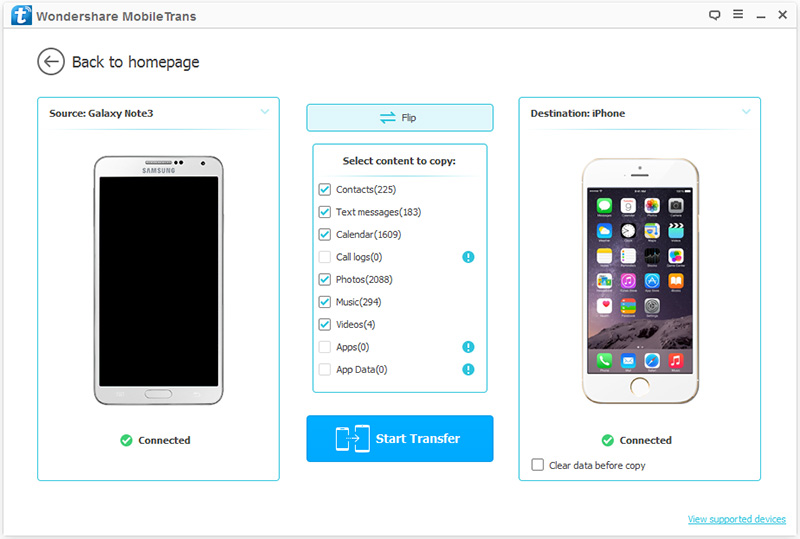
Note:If the source and destination phones are placed under the wrong panes,click the Flip button from the top-mid section to swap the phones.

Once confirmed that both the phones are under the right categories,wait until they are detected and connected by Phone Transfer.

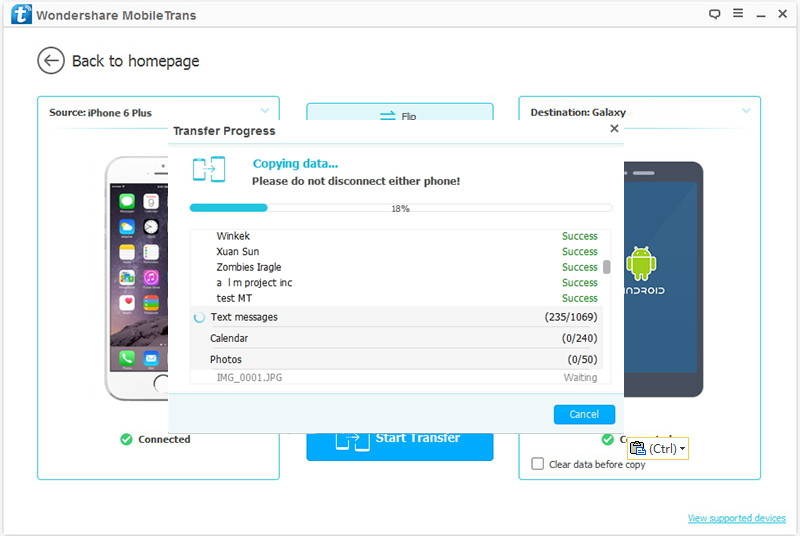
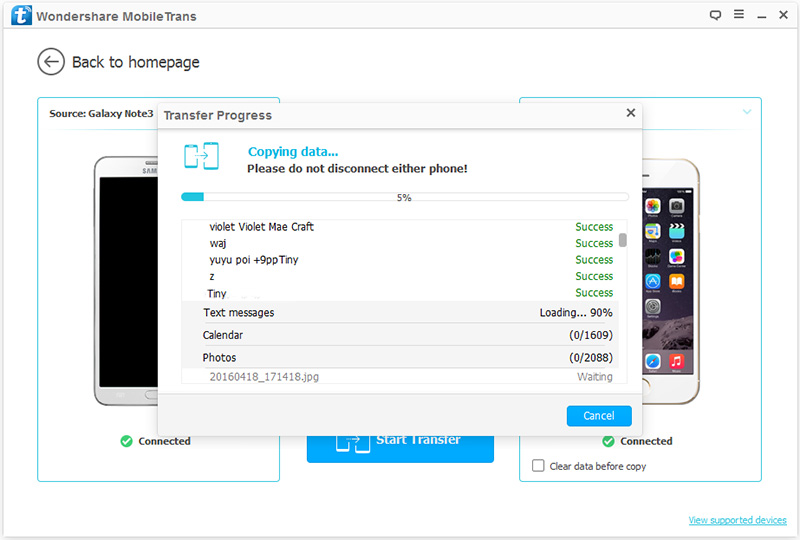
Step 3.Start to Move Android Data to iPhone 7
After both the phones are connected,from the middle pane,check the checkbox representing the type of files that you want to transfer from your Android phone to iPhone.Then click the “Start Copy” button,it will begin the data transferring task in a short time.

Transfer data from android to iPhone 7

d_win d_mac

Conclusion:

With an efficient third-party tool like Phone Transfer,things like transferring data between your old phone and the new one,backing up and restoring data on mobile phone,and even clearing all data from your phone permanently before selling become extremely simple and fun.

Extra tips:
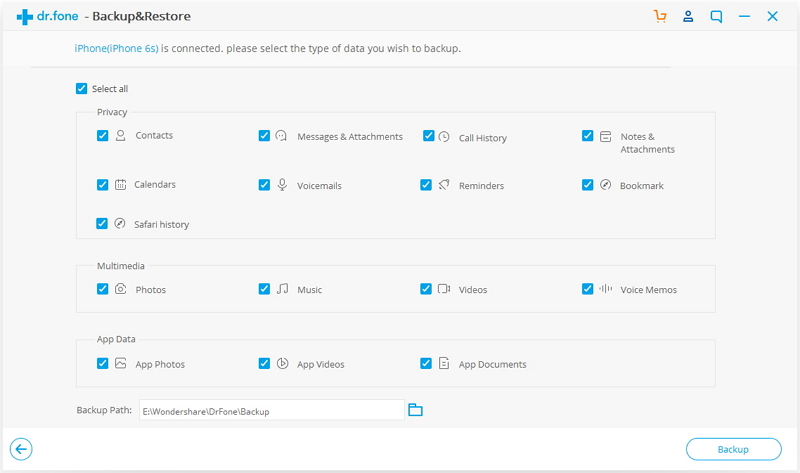
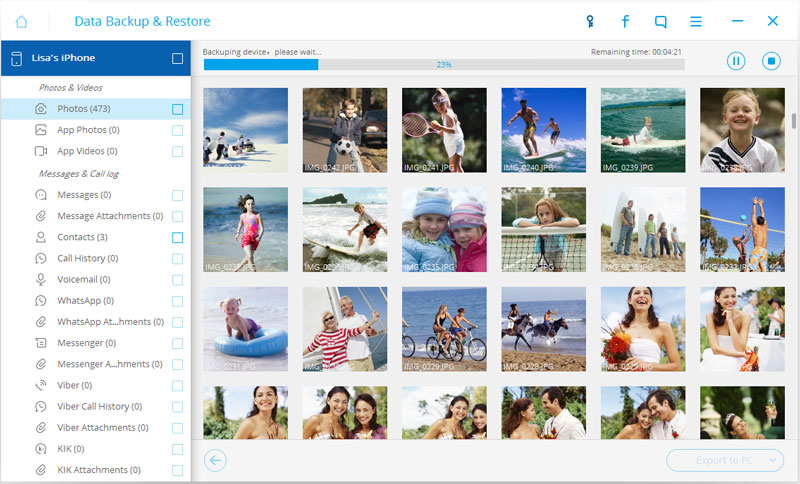
How to Backup iPhone/iPad Data
How to Erase iPhone/iPad Data Permanently before Selling

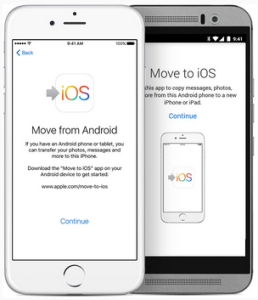
Part 2:Transfer Android Data to iPhone 7 with with Move to iOS

Move to iOS is Apple’s first Android app, which is created to help you transfer data from Android to iPhone in an easy way.

-Supports phone running Android 4.0 and later.
-Allow you to transfer contacts, messages, cameral photos and videos, web bookmarks, mail accounts, calendars, wallpaper.
-The free apps used on Android will be suggested as downloads on App Store, and the paid apps will be added to user’s iTunes wish list.

Detailed Steps to Transfer Data from Android to iPhone 7:

Step 1. Set up your iPhone 7 until reach the Apps & Data screen > Choose Move Data from Android. If you have already set up your iPhone as new, then you can go to Settings > General > Reset > Erase All Content and Settings to restart.

Step 2. On your Android phone, go to Google Play to download and install Move to iOS app > Open it.

Step 3. Tap Continue on Android and iPhone 7 > Tap Agree and Next on your Android phone.

Step 4. Enter the 10-digit code on your Android phone displayed on the iPhone. Then your Android phone will connect your iPhone 7 via a private Wi-Fi network.

Step 5. Select the data you want to transfer on Android > Tap on Next option to start the transfer.

move to ios

Related Articles:

Transfer Everything from Old iPhone to iPhone 7/7 Plus

How to Transfer iPhone Contacts to Galaxy S7/S6

How to Transfer iPhone Data to Samsung Galaxy S7

How to Transfer WhatsApp Messages to New iPhone 7

How to Backup and Restore iPhone Data

How to Transfer Data from iPhone to Samsung Galaxy Note 8

Summary: Through reading this post you will learn how to transfer data from iPhone to Samsung Galaxy Note 8 with two solutions.

After all,amount of Apple’s iPhone uses are intend to purchase the new Galaxy Note 8 to replace their iOS device.However,just alleviating one of our biggest fears when switching over from iOS to Android.Upon acquiring a new Android, you not only need to learn Android’s operating system, data transfer from iPhone to Galaxy Note 8 is yet another thing that users need to get good hands on.Remember that iPhone and Note 8 run on a different operating systems making data transfer trickier than what you could imagine.

Luckily,there are tools and applications you can use to make things much easier.If you are an iPhone user currently in search for an efficient,practical and convenient app that can help you transfer data from iPhone to Samsung Galaxy Note 8 without complicated steps,please patiently read the passages below.

2 Methods to Transfer Files from iPhone to Samsung Galaxy Note 8

Method 1:Directly Transfer Data from iPhone to Samsung Galaxy Note 8 via Phone Transfer

The Phone Transfer and Phone Switch,both are specially designed application that makes data transferring between mobile devices indeed easier.It supports major smartphone brands and latest operating systems among Android,Symbian,iOS,Blackberry.Phone Transfer allows you to transfer iPhone files to Samsung Galaxy Note 8, simply and safely,moving music,photos,call logs,videos,SMS,contacts, calendars, apps only a few clicks.Not only Samsung Galaxy Note 8,but also other Samsung models are supported,like Galaxy Note 5/4/3,Galaxy S7/S6/S5, Galaxy J2,J5,etc,.Additionally Phone Transfer helps to backup phone data to computer,as well as restore backup from computer to mobile device.

d_win d_mac

Step 1.Run the Phone Transfer and Connect iPhone and Note 8 to PC/Mac
Install the Phone Transfer on computer.Connect your old iPhone and Samsung Galaxy Note 8 with your computer via 2 USB cables.After running the program,you will see the primary window as follows.Click the “Phone to Phone Transfer” feature in the main window.

phone transfer main page

Step 2.Select Files type to Transfer
Now you can choose types of file to transfer,such as photos, music, video, calendar, messages and contacts.Just click the files you wanna transfer from iPhone to new Samsung,or select all.

select file to transfer

Tips:The guide also offers another different option for making the data switching from Samsung to iPhone,if you need,tap”Flip” to change the positions of two phones in the program.

Step 3.Start Data Transfer Task from iPhone to Samsung Galaxy Note 8
Just start the data transferring by clicking “Start Transfer”.In the pop-up dialog,you can check the transfer progress.It will take you a few minutes.When it’s finished,the data on your old iPhone will be transferred to your new Samsung completely.

transfer iphone data to galaxy note 8

Tips:Please do remember not to disconnect the USB between two phones and computer.

Phone Transfer is a safe and reliable data manage tool,you are the only one who can access your information,existing files will not be overwritten unless you choose to delete them.Moreover,Mac users have the option of permanently deleting all of the transferred data from the original device by Phone Transfer.

d_win d_mac

The Phone Transfer only only can help you transfer everything from Android,iPhone,Nokia,Blackberry,Windows phone to Samsung Galaxy Note 8/Note 5,S7,S7 Edge,S6,S6 Edge with 1 click without data loss,but also allows you backup and restore phone data; erase phone data permanently.

Method 2: Transfer Data from iPhone to Samsung Galaxy Note 8 via iCloud and Smart Switch

Step 1.Backup Your iPhone to iCloud
First of all,please login your iCloud account to backup your iOS data to iCloud,you can follow the steps below to backup your iPhone data to iCloud:

Here,we teach you how to manual backup your iPhone data to iCloud over Wi-Fi: Click “Settings“>”iCloud” > “Backup” and tapping on the “Back Up Now” button to start syncing data from iPhone, iPad, iPod Touch to iCloud.

backup iPhone data to icloud

Step 2.Download and Open the Smart Switch app on your Samsung Galaxy Note 8
Then open the Smart Switch App on your Galaxy Note 8 on Samsung tool, if you haven’t download Smart Switch App,please download Samsung Smart Switch Mobile on Google Play,and then click “Settings“> “Cloud and accounts” > “Smart Switch

smart switch transfer iphone to samsung Galaxy Note 8

Here,you can see the tips: Smart Switch transfer contents,such as images, contacts and messages,from your old device wirelessly or via a USB cable.

Step 3. Select the method of transferring data from iOS to Samsung through Wireless or USB cable
Here,we suggest you select “Wireless” as the data transferring method,please do not disconnect the phone and wifi connection.

smart switch iphone galaxy

Step 4. Select old device – iOS

smart switch iphone to galaxy note 8

Tips: You can also transfer data to Samsung Galaxy Note 8/S7/S6 from BlackBerry, Windows Phone and other Android phone via Smart Switch.

Step 5. Sing in to iCloud with Apple ID and password
Key in your Apple ID and password for the iCloud account that you have backed up your iPhone data to iCloud recently.

smart switch sync icloud to Samsung Galaxy note 8

Step 6. Select the file type you want to transfer from iPhone to Samsung Galaxy Note 8
The Smart Switch can transfer Contacts, Calendars, Memos, Messages, Pictures, Videos, Paid Music, Alarm Settings Bookmarks, Call Logs, WiFi Profiles,

Documents, App List from old iPhone 4/4S/5/5S/5C/SE/6 to new Galaxy Note 8,please select the contents you want to switch over from the iPhone.

Step 7.Start to transfer iPhone data to Samsung Galaxy Note 8

Related Article:

How to Transfer iPhone Contacts to Samsung Galaxy S7

How to Transfer iPhone Files to Samsung Galaxy S8

How to Transfer iPhone Data to Samsung Galaxy S7

How to Transfer Everything from Android to Samsung Galaxy S5/S6/S7

How to Recover Lost Data from Samsung Galaxy Note 7

The coming months will seemingly see Samsung release the Galaxy Note 7,ahead of its most obvious rival the iPhone 7 Plus.This decision is seen as being essential to clear up confusion caused by the consecutive release of the Galaxy S6 Edge+ and Galaxy Note 5.Branding the phablet as the Galaxy Note 7 will also help keep marketing in line with the existing Galaxy S7 range.It also sets up something of a seventh generation battle between the Galaxy Note 7 and the forthcoming iPhone 7.With the clock ticking towards the expected release date of this device, a wealth of media rumors have emerged outlining possible features to be included in this phablet.So here is a rundown of all the latest leaks, rumors and information regarding the Galaxy Note 7.

galaxy note 7

If you believe everything you read,Samsung’s upcoming new Galaxy Note 7 are going to be boring in August.The phones will reportedly feature a design that is strikingly more powerful than the precious Galaxy Note series phones.Samsung Galaxy Note is a superior series of mobile devices which use the Android operating system.It is popular accepted by users for the exquisite design as well as multiple functions.However,in the process of using Samsung phone,deleted vocation pictures or loss crucial documents for your business meeting are not uncommon stuff.If that happens,how can you recover the vital data from Samsung Galaxy Note 7?

It is a recovery example tutorial for Samsung Galaxy Note 7 via Samsung Data Recovery step by step,guide you to directly recover lost data from Samsung Galaxy Note 7.Samsung Data Recovery empower to restore lost data on Samsung Galaxy Note phone completely and efficiently,like contacts,photos,SMS,call logs,WhatsApp messages,document and so on.Supported devices:Galaxy Note 7/5/4/3,Galaxy S8/S7/S6/S5,A9/A8/A7,etc.Samsung Data Recovery work well for restoring data from internal memory,SD card,SIM card as well as Samsung phone.Android 2.3 to Android 6.0 or more new version are applicable to this excellent data recovery.

d_win d_mac

Restore Lost Data on Samsung Galaxy Note 7

Step 1.Connect Samsung Galaxy Note 7 to Computer
Launch Samsung Data Recovery software on computer and then connect the Samsung phone using USB cable.

connect Samsung phone

Step 2.Enable USB Debugging on Galaxy Note 7
if you hadn’t enables USB debugging on Galaxy Note 7,you may be required to do so now.If you had,just skip this step.

allow to detect Samsung phone

Step 3. Select File to Recover
Select the files contain the data you need to recover from Samsung Galaxy Note 7.

select file to scan

Step 4.Scan Lost Data on Galaxy Note 7
The program will detect your Samsung device and you can now select the type of data you would like to recover from the next window.Click “Next” to continue the next step of recovering data from Samsung devices.

If there is a prompt on your Samsung phone,tap “Allow” and permit the program to access and scan the lost data on your Samsung Galaxy Note 7 smart phone.

allow to scan Samsung phone

Now the program will immediately begin scanning the device for analyzing data stored on it.(Including the lost part.)

scan deleted Samsung data

Step 5.Preview and Restore Lost Data from Galaxy Note 7
Once the scan is complete,you will see all the data found.Select the files you want to recover and then click “Recover”,and save all the data you want to your computer.

recover data from Samsung Galaxy Note 7

d_win d_mac

Extra Tips:
Common scenarios you may lost data from your Samsung devices:
-Upgrading to the latest version of the Android OS can cause data to be erased from the device.
-Your device stolen or even suffer physical damage especially when it is dropped and breaks.
-Accidental deletion is also one of the most common ways to lose the data on your device.
-A rooting attempt that goes wrong can result in data loss.

Related Articles:

How to Recover Lost Data from Samsung Galaxy S8

How to Recover Lost Data from Samsung Galaxy C7

How to Recover Lost Data from Samsung Galaxy S6/S7/S7 Edge

How to Recover Data from Water Damaged Samsung Phone

How to Recover Data from Samsung after Upgrading to 6.0

Recover Lost Data from Galaxy Note 7

Android Data Recovery

Recover Your Lost Data from Android
Now, Even Device Broken

Compatible with Android 8.0 Oreo/7.0, etc.

Recover Lost Data Now

iOS Data Recovery for Mac:Restore Deleted Data on iPhone/iPad in iOS 10

iOS 10 is coming on the way,before the public announce of iOS 10,there are a lots of rumor on the Internet which is about the description of its new features.What the functions attractive you most?The 3D touch?The newly added emoji?Or the updated Apple play?

With iOS 10 beta in the wild, literally anyone can install the iOS 10 beta on their iPhone, iPad, or iPod touch right now with little effort.All you need to do is download the iOS 10 beta IPSW file or get the beta profile to download it through an OTA update,there are no checks or requirements beyond that.Essentially this means if you’re an Apple dev or not,or have a friend in the developer program,or just have some access to the appropriate files,it’s that easy to install the beta right away on any device that supports iOS 10.

But just because anyone can technically install iOS 10 beta right now,that doesn’t mean they should.We’ll just go ahead and state the obvious;the vast majority of people should not run an iOS 10 beta build.The current iOS 10 beta is intended for developers only,it is an early beta,and it is buggy,some users reported to us that they encounter the circumstances that data will be deleted on iPhone/iPad after upgrading to iOS 10,then ask for helping of recovering deleted data from device with iOS 10 on Mac.

iOS Data Recovery for Mac:Support to recover deleted data from iPhone/iPad with iOS 10 on Mac,iOS deleted,formatted and lost data can be efficiently retrieved by this powerful data recovery.Documents,images,videos,contacts,call logs,document and more data can be completely done.Besides,iOS Data Recovery empower to restore data from iOS device due to iOS 9 upgrade/jailbreak,iOS 10 jailbreak.Supported devices:iPhone 7;iPhone SE;iPhone 6S/6S Plus; iPhone 6/6 Plus;iPhone 5S/5;iPhone 5C;iPad Pro 12.9-inch;iPad Pro 9.7-inch;iPod touch 6th generation;iPad Air 2; iPad Air; iPad 4th generation;iPad mini 4; iPad mini 3;iPad mini 2,etc,.

d_win d_mac

Part 1:Directly Restore Deleted Data from iPhone after iOS 10 Update on Mac

Step 1.Connect your iPhone/iPad with Computer
Run iOS 10 Data Recovery for Mac on your Mac,connect iPhone/iPad with computer.Select “Recover from iOS Device”option in the homepage of program.

connect iphone with computer

Choose the file types to begin scanning and ready for recovery in the next step.Click “Start Scan” button,then the program will accordingly start scanning your device.

select file to recover

Click “Scan” to search for your deleted data,then the program begins scanning your device automatically fordeleted data.

scan iphone and search deleted data

The program will scan all lost/deleted or existing data on your iDevice with iOS 10.It takes a little while.

Step 2.Preview and Recover Data from Device on Mac
Check the scanned content and restore the item you need to your computer or device by clicking “Recover” button.You can select to restore the selected data to your device or to the Mac.

directly recover deleted data from iphone

d_win d_mac

Part 2:Restore iPhone Deleted Data with iTunes Backup after iOS 10 Update on Mac

Step 1.Scan the iTunes backup File
If you have synced different iOS devices with iTunes before,more than one backup files will be displayed on Mac after you click “Recover from iTunes Backup File”mode of iOS 10 Data Recovery.Just choose the one for your device and click “Scan” after select the recovery file types for scanning.

extract backup file from itunes

Step 2.Preview and Recover Data from Device with iOS 10
It only take you a few seconds to scan.All contents from the backup file including contacts,messages,call history,notes,photos and videos will be displayed in detail.Tick items on the checkbox of backup file,then all contents will show up,just choose those data you would like to recover,and click “Recover” button.

recover deleted text messages from itunes

d_win d_mac

Part 3:Restore iPhone Deleted Data with iCloud Backup after iOS 10 Update on Mac

Step 1.Sign in iCloud
After you click “Recover from iTunes Backup File” of the primary page of program,you will be prompted to sign in to Cloud.Please sign in iCloud.

sign in icloud account to login

Step 2.Select the Files you Want to Recover from iCloud
The program can help you selectively recover the data from iCloud backups,including photos, App photos, videos, notes, contacts, SMS, iMessages and more,please select the file types you need.

select the file types

Step 3.Scan iCloud Backup File
Similarly if you have synced different iDevices with iCloud previous,more than one backup files will show up after you sign in iCloud.Just choose the one for your device and click “Download” button.

download icloud file

Step 4.Preview and Recover Deleted Data from iCloud Backup
In this step,you can preview files from the extract backup.All data found in the iCloud backup can be restored.It enables you to select the data you would like to restore to iOS device or Mac.

recover iphone sms from icloud

You will get two options after you choose to recover the data,recover to computer or recover to device.Currently,iOS 10 Data Recovery can only support recovering notes and contacts back to device,we will continue to support more file types.

d_win d_mac

Read more:

How to Restore iPhone Lost Files after iOS 10 Update on Mac

How to Recover Data from iPhone/iPad with iOS 10

How to Restore Deleted iMessages on iPhone/iPad in iOS 10

How to Safely Backup iPhone/iPad before Upgrading to iOS 10

How to Restore iPhone Lost Photos after iOS 10 Jailbreak

“I had a friend jailbreak iOS 10 on my iPhone 6S.When finished,I found all pictures stored on my iPhone were losing. How can I restore jailbroken iPhone 6S lost files?Is it possible to recover data from a jailbroken iOS 10 devices?Thank you so mush.”-Fiona

IOS 10 jailbreak release date: iOS already jailbroken ahead of public release
Apple hasn’t even had the chance to roll out the highly anticipated iOS 10 in its very first beta from,but a jailbreak tool for it has already been developed.Popular jailbreak enthusiast iH8sn0w developed the iOS 10 jailbreak on his iPhone 5.The best part is that the device appeared to be running Cydia without a hitch.

iOS jailbreak may lead to data loss on iPhone
Good news,now we can jailbreak iOS devices including iPhone 7, iPhone SE,iPhone 6S,iPhone 6,iPhone 5S/5 and more by using jailbreak tools.After jailbreaking on device,we can customize iOS device in every way possible.To be specific,we can install themes to change the look and feel of iPhone/iPad/iPod.However,iOS jailbreak may result in a series of problems like data loss on iOS device.There are some other true stories about data loss caused by iOS jailbreaking.And if we Google “recover data after jailbreak”,we will get about 498,000 results.Although jailbreaking iPhone or iPad will give you the ability to add non-Apple free applications and functions onto the device,it is a risk process.

Restore Lost Photos on iOS 10 jailbroken iPhone

To recover lost photos on iPhone after iOS 10 jailbreak,you can try using iOS 10 Data Recovery.With this iOS data recovery software,you are not only allowed to directly recover lost data from iPhone,but also permited to recover lost data from iTunes backup as well as iCloud backup.The supported recover files insist of photos,videos,text message,WhatsApp attachments,contacts,call history, calendar,notes,safari bookmark and app documents,etc.iPhone,iPad and iPod touch are all applicable to iOS 10 Data Recovery.Next,you can read to learn the detailed steps to restore lost data on iPhone after iOS 10 jailbreak.

d_win d_mac

Part 1:Directly Recover Lost Photos and Videos from iPhone after iOS 10 Jailbreak

Step 1.Connect iPhone to Computer and Scan it
Launch iOS 10 Data Recovery on computer,and connect your iPhone to the computer with a digital cable.Select the “Recover from iOS Device”mode.Then select the file type “Photos” to scan,then click button “Start Scan”.

recover iphone data after ios 10 jailbreak

scan data on iphone

Step 2.Preview and Recover Lost Videos from iPhone
After the scanning,all your data on iPhone or lost from iPhone are found and listed in organized categories.To find your Photos,check “Photos&Videos”,which contains captured pictures and videos.Mark those you want and click the “Recover” button at the bottom to save them all to your computer or device with one click.

recover iphone data after ios 10 jailbreak

recover iPhone data after iOS 10 jailbreak

Note:Besides recovering lost/deleted data on your iPhone,iOS 10 Data Recovery can also export the existing data on iPhone.If you only wanna get back your lost ones,you can refine the scan result by using the button on the middle-top of the window to only display deleted items.

d_win d_mac

Part 2:Recover iPhone Lost Photos and Videos with iTunes Backup after iOS 10 Jailbreak

Step 1.Select the iTunes Backup to Scan
When running the program on your computer,click “Recover from iTunes Backup File”option of it,and you’ll see the window below.Connect iPhone with computer.Just choose the one of iTunes backup for your iPhone and click “Start Scan” to extract the content.

recover iphone data after ios 10 jailbreak

Note:The number of backup files you get here depends on how many Apple devices you’ve synced with iTunes previous.

Step 2.Recover Lost iPhone Photos from iTunes Backup
When the scan is over,the whole backup content are extracted and also displayed.You can check the photos in detail,and click “Recover to computer” on the bottom menu to store it on your computer.

recover iphone data after ios 10 jailbreak

d_win d_mac

Part 3:Recover iPhone Lost Photos and Videos with iCloud Backup after iOS 10 Jailbreak

Step 1.Download and Scan iCloud Backup
Choose “Recover from iCloud Backup File”option after launching the program.Then sign in your Apple ID.You’ll see the program showing all iCloud backup files in your account of a list.Choose the one you want to extract to download it by clicking”Download”tap.

recover iphone data after ios 10 jailbreak

recover iphone data after ios 10 jailbreak

After that,you can directly scan and extract the selected file types from the downloaded backup.
Click”Next” after selecting the file type for scanning.

recover iphone data after ios 10 jailbreak

Note:When you’re doing this,do keep your internet is connected.

Step 2.Recover Lost iPhone Photos from iCloud Backup
When the scanning stops,you can check photos in the categories of “Photos&Videos”.Tick them and click on the “Recover” button to save them on your computer with one click.

recover iphone data from icloud backup

d_win d_mac

To avoid losing your iPhone data,immediate backup is very important and useful.Every time when you update data on iPhone,do remember to backup them first.

Read more:

How to Restore iPhone Lost Data after iOS 10 Jailbreak

How to Restore iPhone Lost Contacts and SMS after iOS 10 Jailbreak

How to Backup and Restore iPhone/iPad Files after iOS 10 Upgrade

How to Restore iPhone Lost Files after iOS 10 Upgrade on Mac

How to Restore iPhone Contacts and SMS after iOS 10 Jailbreak

According to TechTimes, respected hacker iH8sn0w has already found an iOS 10 jailbreak. The hacker found the jailbreak for iOS 10 beta 1 and also released a video of it on YouTube. So at least we know now that iOS 10 can be jailbroken, and if iH8sn0w can do it, then so can Pangu and TaiG. It is possible that some of these exploits might get fixed in the first public release of iOS 10 as developers have a lot of time to find and pluck out these vulnerabilities.

But with some effort and patience,we are sure that a jailbreak team will be able to give us an iOS 10 jailbreak right after the firmware is released in September.Though please remember one thing- it is no one’s job to release jailbreaks, and hackers do it out of sheer passion. It has been seen that Luca Todesco,Pangu,and others have been receiving hate on social media for not releasing jailbreaks.Chill guys!

Anyone who has used iPhone may jailbreak on the newest iOS version for a better experience.What made me upset,when I finished iOS 10 jailbreaking,everything is OK except for the phone numbers and the text messages get lost on iPhone.I can’t find them.I synced my phone with iTunes once a week.Now can I restore the lost data on iPhone after iOS jailbreak with iTunes backup?-Jan Tse

iOS 10 Data Recovery help you extract data from iTunes backup to preview and selectively recover in two steps after jailbreaking to iOS 10.If you lost data on iPhone after iOS jailbreak/upgrade,this data recovery is the reliable tool to restore lost data on iPhone after iOS 10 jailbreak,it supports to restore contacts,text messages,WhatsApp messages,photos,videos,notes and other data on iPhone.What’s more,iOS Data Recovery allow to recover data on iPhone with iCloud backup,as well as directly recover data from iPhone.Not only iPhone,but also iPad,iPod touch are applicable to this wonderful data recovery,such as iPhone 7,iPhone SE,iPhone 6S,iPad Pro,iPad Mini,iPod touch 4.

d_win d_mac

Part 1:Directly Restore Contacts and SMS from iPhone after iOS 10 Jailbreak

Step 1.Select Recovery and Connect iPhone with Computer
Download and install iOS 10 Data Recovery on your computer.Launch it and connect your iPhone with computer.After that,you can see the program detects your iPhone soon.Select the “Recover from iOS Device”mode.

recover iphone data after ios 10 jailbreak

Step 2.Scan for Lost Files
Select the file types to scan and ready for recovery.Click “Start Scan” to let this program to scan your iPhone for lost files.You can see the option “Deleted Data from the Device”.Swipe the option to ON.It can save your time to search the lost files on it.

scan data on iphone

Step 3.Recover Lost Contacts and SMS from iPhone
It might take a few minutes to finish this scanning process.It depends on the amount of your lost files.After that,you can see all lost files are sorted into category.You can click the left sidebar corresponding item to check out your files.Select the detail data and click “Recover” to restore the selected data.Save the restored data to computer or device.

preview and recover iPhone lost contacts

recover iphone messages

d_win d_mac

Part 2:Restore iPhone Contacts and SMS after iOS 10 Jailbreak with iTunes Backup

Step 1.Download iTunes Backup File
After launching iOS Data Recovery,click “Recover from iTunes Backup File”mode.And then all iTunes backup files will be displayed.Choose the one that contains the files you’ve lost on your iPhone and click “Start Scan”.It will begin to download the selected file.

recover iphone data after ios 10 jailbreak

Step 2.Extract Lost Contacts and SMS from iTunes Backup
After downloading iTunes backup file,later you can see all the files are sorted into category.Find the lost files to preview and click “Recover” to restore them.It will begin to extract the selected file from iTunes backup.

recover iphone data after ios 10 jailbreak

d_win d_mac

Part 3:Restore iPhone Contacts and SMS after iOS 10 Jailbreak with iCloud Backup

Step 1.Launch iOS 10 Data Recovery and Select the Mode
Run iOS 10 Data Recovery program,switch to “Recover from iCloud Backup File” mode,enter your Apple ID and password to sign in your iCloud account,then you can access the iCloud backup files.

recover iphone data after ios 10 jailbreak

Step 2.Download and Extract iCloud Backup
You will see all iCloud backup files after login iCloud,choose one backup and click “Download” button.When the download is complete,you can select the type of files you want to download in the pop-up,then click the “Next” button to start scanning the backup file.

recover iphone data after ios 10 jailbreak

recover iphone data after ios 10 jailbreak

Step 3.Restore iPhone Lost Contacts and SMS
After that,you need to wait a few minutes for the program to complete the scanning.Then you will see all contacts and SMS backup display in scan result,you can filter the results of the scan,select to displays the deleted items only,choose the lost contacts and SMS by clicking the “Recover” button,save them to computer or transfer them to device.

recover imessages from iphone after ios 10 upgrade

d_win d_mac

Read more:

How to Restore iPhone Lost Data after iOS 10 Jailbreak

How to Restore iPhone Lost Data after iOS 10 Update on Mac

How to Recover Data from iPhone/iPad with iOS 10

How to Backup iPhone Data before iOS 10 Upgrade

How to Upgrade iOS 9.3.2 to iOS 10 Beta on iPhone and iPad

Apple’s brand new iOS 10 beta 1 software is available to download and install immediately, and it’s packed full of exciting new features and refinements that iPhone, iPad and iPod touch users have been going crazy over on social media. So now, it’s time to stop talking about all those new features and start trying them out.You can already install the iOS 10 beta and a public beta is coming next month ahead of a fall iOS 10 release date that will likely arrive alongside a new iPhone.

upgrade-to-ios-10

iOS 10’s hottest feature was just found hiding in beta 1.Did you download the first iOS 10 beta? You’re certainly not alone.Amount of iOS users were interested in the new version iOS 10 for its attractive functions.However,a majority of them just stop their steps due to lack technical skill to finish the iOS upgrade task.

In this guide,we will lead you safely upgrade iPhone/iPad from iOS 9.3.2 to iOS 10 beta as easy as possible beyond your imagination by the detail steps.Just keep reading the passages below and try to complete the update job on your own and then enjoy the funny trip on your iOS 10 device.

Part 1:Upgrade from iOS 9.3.2 to iOS 10 Beta on iPhone and iPad

This method involves the installation of a verified Apple Configuration Profile that triggers an OTA update to the beta firmware.As is the wise thing to do before any and all beta build installations, backup your device to iCloud or iTunes before starting. I can’t stress this enough. Make sure you have secured your data in case something goes wrong or you decide to go for a fresh restore later on. Also, you might want to check if your device is compatible with the latest iOS 10 from Apple.

Note:The upgrade process may erase all data on your iPhone/iPad,so you’d better backup data before updating.(How to Safely Backup iPhone/iPad before Upgrading to iOS 10)

Tutorial to Upgrade iOS 10 Beta on iPhone and iPad
Step 1.On your iOS device,launch Safari,and open this link: bit.ly/1sE8gZa.

Step 2.Download the profile to your device by tapping the Download Now button.

Step 3.When asked on which device would you like to install this profile?Select iPhone.

Step 4.In the screen that follows,hit Install.After the profile is installed,your device will be rebooted.

iOS-10-beta-1-OTA-profile
Step 5.Once your device is done rebooting,launch the Settings app,navigate to General > Software Update and you should find the iOS 10 Developer Beta OTA update waiting for you there.

iOS-10-beta-1-dev
Step 6.Hit Download and Install.

Once your device is done updating,it should reboot into the first beta of iOS 10.Test away.

Part 2:How to Restore iPhone/iPad System to Normal after iOS 10 Upgrade

iOS 10 claimed to be the biggest ever iOS update by Apple,the latest iOS ecosystem has been appreciated by both users and experts.Are you can’t wait to upgrade you iPhone iPad to the latest iOS 10 beta?It sounds really exciting for everyone.However,so many examples told us that lots of users encounter the bad situation that iPhone/iPad get into the abnormal mode during or after iOS 10 upgrade.

Lets’ see the bugs with iOS 10 on iPhone/iPad:
BUG 1.iOS 10 beta battery die fast

BUG 2.Hands-free mode error on iPhone/iPad

BUG 3.iOS 10 running on iPhone/iPad very slow

BUG 4.iPhone get into recovery mode after/while iOS 10 upgrade

BUG 5.iPhone stuck in updating mode during the iOS 10 upgrade process

While users are pleased to update device from iOS 9.3.2 to iOS 10 for a new experience,many of them are reporting iOS 10 update problems like an error occurred,one or more bug/bugs appear,and they get the state of being annoyed about it.Fortunately,there are some tried and tested tricks which have worked pretty well in fixing the app crashing issue in iOS 10 on my iPhone.If you have also run into the same problem, you need to check out the handy trick.In part two of this article,we are going to look at the best way to restore iPhone/iPad system to normal after iOS 10 upgrade even without iTunes.

Fix iOS 10 Bugs on iPhone and iPad

The ideal tool – iOS System Recovery it is specifically designed to restore iPhone/iPad system to normal after iOS 10 upgrade without having to rely on iTunes,help to fix bugs with iOS 10 on iPhone/iPad.It is the outstanding system recovery&data recovery software for fixing any problems you may encounter after iOS system upgrade/jailbreak or other reasons on iOS device.(How to Get iPhone Out of Recovery Mode after iOS 10 Update)

d_win d_mac

Some of the features that make iOS System Recovery so reliable include:
-Fix with various iOS system issues on iOS device like stuck in iOS system upgrading screen,recovery mode,DFU mode,white Apple logo,black screen,looping on start screen, etc.
-Recover data from iOS device,including the lost data and existing data.
-Three 3 ways to recover data on iOS device:directly recover from iOS device,recover from iTunes backup,recover from iCloud backup.
-Without any no data loss.
-Support to iOS 8,iOS 9.3 and the latest iOS 10 fully.
-Work for all models of iPhone, iPad and iPod touch,including iPhone 7/SE/6S( Plus)/6 (Plus)/6/5S/5C/5/4S/4,iPad Air,iPad Pro,etc.

d_win d_mac

Tutorial on Fix iPhone/iPad System to Normal after iOS 10 Upgrade

Step 1.Run iOS System Recovery
Launch iOS System Recovery on your computer.In the Primary interface window,click “More Tools”,choose “iOS System Recovery” and then connect your iPhone/iPad to your computer using USB cables.Your device will be detected soon.Click on “Start”to begin.

iphone-system-fix-tools

fix iPhone system to normal after ios 10 upgrade

Step 2.Download the Firmware for Device
In order to fix the iOS system on device,you need to download the latest firmware for device.iOS System Recovery will offer the latest iOS version for downloading.Just click on “Download”and the software will download the latest firmware automatically.

select your iPhone model

download the firmware and saved on iPhone

Step 3.Restore Device System to Normal after iOS 10 Upgrade
Once the download is complete,iOS System Recovery will repair the iOS system on device and easily get your device out of abnormal mode.

fix iPhone system to normal after ios 10 upgrade

fix iPhone system to normal after ios 10 upgrade

Then the device will restart in normal mode after completing the fixing process.The whole process is very easy and doesn’t take you more than 10 minutes.

d_win d_mac

Note:If you lost data on device due to forget to backup data on device before upgrading to iOS 10,just follow this useguide to recover data from iPhone/iPad/iPod after updating to iOS 10.

Read more:

Restore iPhone/iPad System to Normal without Firmware Upgrade to iOS 10

How to fix Bug on iPhone/iPad after iOS 10 Upgrade

Backup and Restore iPhone/iPad Files after iOS 10 Upgrade

How to Restore iPhone/iPad Lost Files after iOS 10 Update on Mac

Recover iPhone/iPad Data after Downgrading iOS 10 Beta to iOS 9.3

How to Restore iPhone/iPad Data after iOS 10 Jailbreak

How to Restore iPhone Data after iOS 10 Jailbreak

Apple iOS 10 jailbreak possible to be released soon?
iOS 10 jailbreak update may announce around for a few months following the release of Apple iOS 10 Beta in public.Apple’s latest operating system,iOS 10, is still in its infancy, but that hasn’t stopped a member of the jailbreak community from hacking away at the new OS.iOS 10 isn’t even in public beta, yet it has already been exploited by regular jailbreaker iH8sn0w.In other words, all we can see is an iPhone 5 running Cydia on the iOS 10 developer preview, so it’s mostly noteworthy for proving that jailbreaking more recent versions of iOS is still very much possible.

ios 10 jailbreak

Lost iPhone data after iOS 10 jailbreak
Jailbreaking is basically the process of freeing your device (thus the term jailbreak) from the limitations that are imposed by Apple.While the iOS is one of the most stable and secure mobile operating systems around,it can become too restrictive due to Apple’s “closed” mantra. Admittedly, jailbreak is very useful for Apple users,especially for iPhone users.As the iOS 10 jailbreak is releasing,a amount of iPhone users must can’t wait to jailbreak iOS 10 on iPhone.However, it may be a system security risks on iOS 10 jailbreak which cause the phone problems.Lost data on jailbroken iPhone could be a disaster for iPhone users.

Recover Lost iPhone Data after jailbreaking on iOS 10

iOS Data Recovery enable to recover iPhone data after iOS 10 jailbreak,as well as iOS 9.3 jailbreak.Almost all types of data are supported,such as SMS,photos,videos,contacts,notes, reminders,call logs,WhatsApp messages,safari bookmarks,and so on.Apart from iOS jailbreak,iOS Data Recovery helps to restore data from iPhone after losing data for any reasons,like iOS upgrade,device damaged,factory resetting,deleted mistaken,etc,.iPhone 7(Plus),iPhone 6S(Plus),iPhone 6(Plus),iPhone 5S/5C/5,iPhone SE,iPhone 4S/4;iPad Air,iPad Pro,iPad Mini,iPod touch 4 and more iOS models are applicable to iOS Data Recovery.

d_win d_mac

Part 1:Directly Restore iPhone Data after iOS 10 Jailbreak

Step 1.Connect Jailbroken iPhone to Computer and Run iOS Data Recovery
Once get your device connected successfully,you will see the home page as below.Click “Recover from iOS Device”option.

connect iphone with computer

Tips:If you have backed up your iPhone before jailbreking,you can simply choose the other two modes:Recover data from iTunes backup;Recover data from iCloud backup.

Step 2.Scan iPhone Data
When your device get recognized and connected successfully,select file type to scan and recover,then click “Start Scan” button to begin scanning before recovery.The scanning progress will take you some time,please be patiently waiting.

select file to recover

Click “Scan” to search for data from iPhone,then the program begins scanning your device automatically for lost/deleted and existing data.

scan iphone and search lost data

Step 3.Preview and Recover Data from Jailbroken iPhone
Once the scanning finished,the found data on your iPhone will be displayed according to file types.Just select detail data you would like to recover,and press the “Recover” button to save them to your computer or device.

recover lost photos on iphone

d_win d_mac

Part 2:Restore iPhone Data after iOS 10 Jailbreak with iTunes Backup

Step 1.Select Recovery Mode
iOS Data Recovery has another option for restoring data on iPhone which restoring data from iTunes backup.Connect your device with your computer and launch iOS Data Recovery. Choose “Recover from iTunes backup file”option and the program will show you all backups that are available.

extract itunes backup file

Step 2.Scan iTunes Backup File
Choose the backup file you want and click on “Start scan”.After the scan is complete,you will have a complete list of files that are available for recovering.All files will be divided in categories.

Step 3.Preview and Recover Data from iTunes Backup
Now,you can select files you want to recover.If you want to recover all files,just check all categories of files and click on “Recover” button.Recovering usually last several minutes.When it is done,you will have your data on your computer or device depend on your selecting by clicking “Recover to Computer” or “Recover to Device”.You can use “Search” option to search for the specific file.In addition,you must remember not to disconnect iPhone with computer while recovery is in progress until it is done.

restore iphone photo from itunes backup file

d_win d_mac

Part 3:Restore iPhone Data after iOS 10 Jailbreak with iCloud Backup

Step 1.Select the Recovery Mode
Run iOS Data Recovery and click the “Recover from iCloud Backup File” option.Sign in to your iCloud account.

sign in icloud account to login

Step 2.Select the Files you need to Restore
The program can help you selectively recover different types of data from iCloud backups,including photos, App photos, videos, notes, contacts, SMS, iMessages and more,please select the file types you need.

select the file types

Step 3.Download iCloud Backup File
The software will find all iCloud backups you ever synced.All you need to do is selecting the iCloud Backup File and click the “Download” button,then it will begin the download task on computer.It is recommended to download the latest backup and the one with most files.When the downloading is end,click on the same button to extract files you need.

download icloud file

Step 4.Preview and Recover Data from iCloud Backup File
After extracting data from iCloud Backup File,you can preview the detail data of the extracting data from iCloud Backup File.Then simply click “Recover” button,save the selected data to computer or device.

recover photo from icloud backup file

d_win d_mac

It’s highly recommended for you to try the professional iOS Data Recovery software to get back all your precious data on iPhone/iPad/iPod after iOS jailbreak with three different modes according to your situations.

Read more:

How to Recover iPhone Lost Data after iOS 9 Jailbreak

How to Recover iPhone Lost Data after iOS 9 Upgrade

How to Recover Data from iPhone/iPad with iOS 10

How to Restore iPhone Lost Files after iOS 10 Update on Mac

How to Safely Backup iPhone/iPad before Upgrading to iOS 10

Backup and Restore iPhone/iPad Files after iOS 10 Upgrade

Recover iPhone Data Lost after Downgrading iOS 10 to iOS 9.3

Apple released the developer preview version for the iOS 10 at the WWDC and many enthusiasts have already managed to get hold of the build.The new iOS 10 add new features on Siri and Messages, ability to remove default apps, updates Music,Photos and many more.However, the first beta version always comes with a certain degree of risk and is likely to make the system unstable for your Apple device.While users are flocking to update to iOS 10 for a new experience,many of them are reporting iOS 10 update problems and bugs.So,those of you who have downloaded the iOS 10.1 or iOS 10.2 update but are experiencing severe issues with it can always go back to the publicly released stable iOS 9.3 version.

downgrade-ios-10

Are you running iOS 10.1,iOS 10.2 or iOS 10.3 on iPhone but have decided you’d like to downgrade and revert back to a stable iOS 9.3 release? That’s understandable since iOS 10 is sort of buggy,and it’s not intended for a prime time audience yet.So if you have had finished testing iOS 10 beta or are just done with the bugs,you can quickly return back to iOS 9.3 on any iPhone,iPad or iPod touch.However,downgrade iOS 10.2/iOS 10.1 to iOS 9.3 may lead to inevitably lost data from device sometimes.Have you lost iOS device data after making downgrading iOS 10 beta and looking for the solution on how to get it back?If yes,then you are at the right place that this useful passages can help you to restore iPhone lost data after downgrading to iOS 9.3.x.

Uninstall/Downgrade iOS 10 to iOS 9 Without Losing Data

The best solution to downgrade iOS 10 to iOS 9. Try it to reinstall iOS 9 on your devices,like iOS 9.3.5, iOS 9.3.3 or other previous iOS versions.However,how to downgrade iOS 10 to iOS 9 without losing data?We recommend you shuld backup your iPhone data before uninstalling iOS 10 to iOS 9,then use IPSW File to restore iPhone without iTunes,the iOS System Recovery can help you download and reinstall iOS 9 IPSW file on iPhone without data losing.

If you forgot backup your iPhone data before downgrading iOS 10 and cause data lost,don’t worry,you still have chance to get missing data back from iPhone,please keep reading:

3 Ways to Retrieve Lost Data After Downgrade iOS 10 to iOS 9

If you lost data from iPhone due to operating system downgrade,what you need is absolute software like iOS Data Recovery.This software is well built with three recovery modes that helps to perfectly recover iPhone data after downgrading iOS 10 beta to iOS 9.3,such as contacts,photos,text messages,videos,call logs,document and more.iOS Data Recovery allows to restore data from iPhone whether iOS upgrade/downgrade,iOS jailbreak,iPhone get damaged,virus attacks,factory resetting,etc.This outstanding data recovery support to almost all models iOS device,not only iPhone 7,iPhone SE,iPhone 6S(Plus),iPhone 6(Plus),iPhone 5S/5C/5,iPhone 4S/4;but also iPad Air,iPad Pro,iPad Mini,iPod touch 4,and so on.

d_win d_mac

Part 1:Directly Recover iPhone Data after Downgrading iOS 10 to iOS 9.3

The wonderful iOS Data Recovery provides the “Smart Recovery” feature for you recover your data quickly and easily.If you don’t know where to find the missing data under what circumstances,you could click the “Smart Recovery” feature to choose How You Lost Your Data,which will improve the rate of data recovery.

smart iphone data recovery

This recovery mode allows you to scan your iPhone/iPad/iPod devices directly to find all the lost files recently, or recover lost data from your inaccessible device.

Step 1.Connect iPhone with Computer
Launch iOS Data Recovery on your computer.Use the USB cable that comes with your iPhone to your computer.By default,iOS Data Recovery will detect your iPhone automatically and show you the window for “Recover from iOS Device”.

connect iphone with computer

Step 2.Scan iPhone for Lost Data
Now you can select the file type to scan and recover.Then simply click the “Start Scan” button to let this program scan your iPhone for lost data.The scanning process may last a few minutes,depending on the amount of data on your device.During the scanning process,if you see that the data you’re looking for,then you can click the “Pause” button to stop the process.

select file to recover

Click “Scan” to search for your deleted data,then the program begins scanning your device automatically for lost/deleted data.

scan iPhone and search lost data

Step 3.Preview the Scanned Data
The scanning will take you some time.Once it’s completed,you will see a scan result list by the program appear.Data both lost and existing on your device are displayed in categories.To filter out the lost data on your device,you can swipe the option “Only display the deleted items” to ON.By clicking the file type in the left side, you can preview the found data in detail.(There is a search box on the top right of the window.You can search for a specific file by typing a keyword in the search box.)

Step 4.Recover Data from iPhone after Downgrading
When you find the data you need,just put the check mark in front of the box to select them.After then,click the “Recover” button at the bottom right of the window.By default, the recovered data will be saved to your computer.As for text messages,iMessage,contacts,or notes,when you click “Recover” button,a pop-up will ask you to “Recover to Computer” or “Recover to Device”.

recover deleted photos on iphone

d_win d_mac

Part 2:Recover iPhone Data after Downgrading iOS 10 to iOS 9.3 with iTunes Backup

Step 1.Choose Recovery Mode
Launch iOS Data Recovery and click “Recover from iTunes Backup File”option.After that,the data recovery tool will detect all iTunes backup files on this computer and display them in the window.You can confirm which one you need according to the date it has been created.

extract files from itunes backup

Step 2.Scan Data from iTunes Backup File
Choose the iTunes backup file that contains the data you want to recover and click “Start Scan”.It will take a few minutes to extract all data from the iTunes backup file.

Step 3.Preview and Recover Data from iTunes Backup
After a few seconds,all data in the backup file will be extracted and displayed in categories.You can preview them one by one before recovery.Then you can selectively mark and recover the data you want by pressing the “Recover” button at the bottom.Now contacts,notes and messages can be directly recovered to your iOS device if you keep your iOS device connected with your computer via an USB cable during the recovery process.

restore iphone photos from itunes backup

d_win d_mac

Part 3:Recover iPhone Data after Downgradeing iOS 10 to iOS 9.3 with iCloud Backup

Step 1.Choose Recovery Mode
After running iOS Data Recovery and choose the recovery mode of “Recover from iCloud Backup Files”option.Enter your iCloud account and password to login.iOS Data Recovery takes your privacy seriously.

sign in icloud account to login

Step 2.Select the Files you Wanna Recover from iCloud Backup
The program can help you selectively recover the data from iCloud backups,including photos, App photos, videos, notes, contacts, SMS, iMessages and more,please select the file types you need.

select the file types

Step 3.Download iCloud Backup File
When you logged into iCloud,the program will find all iCloud backup files in your account.Choose the one you’re going to recover data and click on the “Download” button.

download icloud files

Step 4.Preview and Recover Data from iCloud Backup File
The scanning will be complete in a few minutes.Once it stops,you can preview all data in your iCloud backup file,like contacts, messages, photos, and more.Check them one by one and tick the item you need.Then click on the “Recover to Computer” or “Recover to Device” button to save them on your computer or your device with one click.

recover photo from icloud backup

d_win d_mac
Read more:

How to Safely Backup iPhone/iPad before Upgrading to iOS 10

Backup and Restore iPhone/iPad Files after Upgrading to iOS 10

How to Backup iPhone Data before Upgrading to iOS 10

How to Restore iPhone Lost Files after iOS 10 Update on Mac

How to Recover Data from iPhone/iPad with iOS 10

How to Safely Backup iPhone/iPad before Upgrading to iOS 10

iOS 10 beta 1 download links are now available to install on iPhone 6s, 6s Plus, 6, 6 Plus, SE, 5s, 5c, 5, iPad 4 and over, and iPod touch 6th-generation.It’s currently available to those users who are registered on Apple Developer Program.Announced at WWDC 2016, iOS 10 is Apple’s latest major update for iPhone, iPad and iPod touch devices, bringing in a number of new features to one of the world’s most popular mobile platform.Public beta for testers is due in July,with final version of iOS 10 set for release for all consumers this coming fall.

Backing up iPhone is not only recommended when you want to upgrade iOS system,jailbreak iOS system with the newest version,transfer data on iPhone and more data management,but also essential to save files for some reasons,like lost data due to deleted by mistaken,iPhone get damaged/broken,restore iPhone to factory resetting.What’s the easiest way to back up iPhone data before upgrading to iOS 10?Today,I’d love to share with you two easy ways to backup your iPhone data to PC with iOS ToolKitiOS Backup & Restore and Phone Transfer.As people always said,better prepare then regret,act now and backup iPhone data on computer.

Part 1:Backup iPhone before iOS 10 Update with iOS Backup&Data Recovery

iOS Backup & Restore has the newest-released function that allow to safely backup iOS data before upgrading to iOS 10 as well as iOS 9.3.With its help,you can quickly backup all data on your iPhone after iOS update/jailbreak completely,including SMS,iMessages,WhatsApp messages,contacts,photos,notes,call logs,videos,document and so farth.Additionally,iOS ToolKit have the key features of recover lost data from iPhone/iPad/iPod with iOS 10,moreover fix iOS operating system to normal after iOS 10 update.

d_win d_mac

Step 1.Run iOS Backup & Restore and select Mode
The first step,please download and run iOS Backup & Restore on computer,then click “More Tools” function in the main page of iOS Backup&.Select “iOS Data Backup &Restore” option from the tool list.Then connect your iPhone to computer.By default,iOS Backup & Restore will automatically detect your device.

backup-tools

Step 2.Select File Types to Backup
After your iPhone is connected successfully,iOS Backup & Restore will detect the file types on your device automatically and you can select what file types to backup.Then click on “Backup”.

backup-device

Tip:If you have used iOS Backup & Restore to backup previous,you can click on “To view the previous backup file” to view the previous backup file list.

The whole backup process will take a few minutes,depending on the data storage on your device.Then it will display all the supported data,like Photos & Videos, Messages & Call Logs, Contacts, Memos and other data.

Step 3.Select Data to Export or Restore
When the backup is completed,you can check all contents of the backup file in categories.At last,you can check detail data for exporting or restoring.You are allow to export the selected files to your computer or restore to iPhone/iPad/iPod touch.

backup data from before iOS 10 upgrade

backup data from before iOS 10 upgrade

d_win d_mac

Part 2:Backup iPhone before iOS 10 Update with Phone Transfer

Phone Transfer is a powerful third-party software that has won the reliance of iOS users, especially iPhone and iPad.It is designed to help backup contacts,photos,SMS on iPhone before iOS 10 upgrade,other files are also supported to backup for iDevice users who want to sync their multiple data between iPhone,iPad,iPod and PC/Mac.One more key feature of Phone Transfer,is transferring files among two mobile devices even when they are running different operating systems.For instance,transfer Android data to iPhone.Let’s check how to use Phone Transfer backup iPhone before iOS 10 upgrade in steps.

d_win d_mac

Step 1.Connect iPhone to Computer
After running the program on your computer,get your device connected to the computer.Then click “Back Up Your Phone” in the primary window.Then the program will detect your device soon.

backup-mode

It supports to iOS,Android,Symbian and WinPhone devices.

Step 2.Choose File to Backup on iPhone
The file types that you can backup from iPhone to your computer are displayed in the middle of the window.Contacts,SMS,calendar,photos,music,videos are allow to choose.Check the files and then click “Start Copy”.The data backup task begins.It will cost you a little time.Just wait till it’s complete.

backup-iphone-to-pc

d_win d_mac

To prevent iPhone/iPad/iPod from losing files because of careless operation,we suggested to back up iOS data regularly.There are the two useful ways to do backup job on iPhone before iOS system upgrade.One is to backup iPhone with iOS Backup & Restore,the other is to backup iPhone with Phone Transfer.Just simply check the details in the previous passages.

Read more:

Backup and Restore iPhone/iPad Files after iOS 10 Upgrade

How to Backup iPhone Data before iOS 10 Upgrade

How To Backup and Restore iPhone WhatsApp Messages

Backup and Restore Contacts,SMS,WhatsApp Messages on iPhone