All posts by DHZ

How to Recover Contacts from Samsung Galaxy S6/S6 Edge

Summary: If you delete contacts on Samsung Galaxy S6 by careless,or lost contacts due to factory reset Samsung Galaxy S6, or erase Samsung contacts after Android OS upgrade.Don’t worry,the Samsung Galaxy S6 Data Recovery can help you scan and recover deleted contacts from Samsung Galaxy S6/S6 dege/S7/S7 edge/S8/S8+ easily and safely,whether your android phone is damaged, dead or intact.

The deleted contacts and messages on Samsung Galaxy S6 are still intact as long as they are not overwritten. At first, you should stop doing any operation as soon as possible. Then find an efficient Android Data Recovery program which can help you to recover deleted contacts and messages from both Samsung Galaxy internal memory and Samsung Galaxy SD card.

* How to Restore Contacts from Broken Samsung Phone

* How to Manage Samsung Data on Computer

Accidently Deleted Contacts on Samsung Galaxy S6

My phone is the Samsung SM-G920F Galaxy S6, alll address book (contacts) stored on my S6 mobile phone,yesterday,boyfriend delete all contacts (150 people phone numbers) by accidently. I was all stored in the sim card. Has not backed up, is there any way I can recover it contacts? I went to the places where they repair the phone to Samsung Service Center said they saw no way to recover. Members experts to help me find a way, OK? Or recommend a software restore contacts from Samsung phone, I am really impatient to these contacts. Thank you!” — Ask by Sundly.

Part 1: Retrieve Deleted Contacts on Samsung Galaxy S6 via Google

If you have saved the contact to your Google account, you can restore deleted contacts from Samsung Galaxy S6 via Google.

From the home screen, click the application.
Scroll to and tap Settings.
Scroll to and click Account.
Tap on Add Account.
Select Google.
Enter your Google account email and click NEXT.
Enter your Google account password, and then click NEXT.
View the terms of service and privacy policy, and then click “Accept“.
Click to select or deselect your preferred Google services, and then click on the “Next” button.

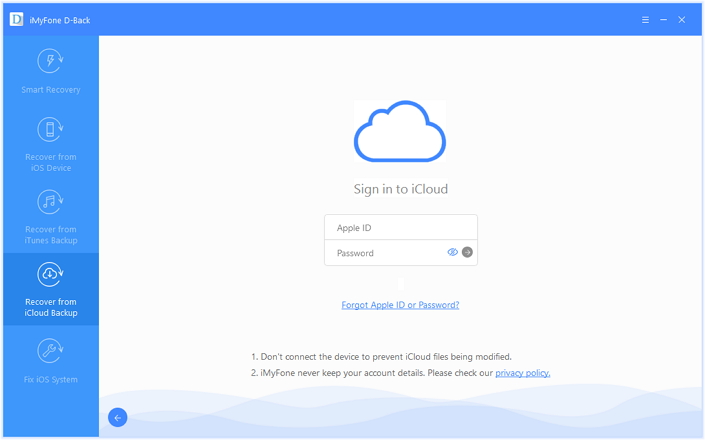
Part 2: Recover Deleted Contacts from Samsung Galaxy S6 Directly

No matter you have backed up or not, there must be an useful method to help you recover Samsung Galaxy S6 lost data with the third-party Samsung Data Recovery software tool, I have ever use a android data recovery tool. You can easily recover your lost or deleted contacts, text messages, notes, videos, photos and more from Samsung Galaxy S6 with Samsung Data Recovery. Learn more from restore deleted contacts from Samsung Galaxy S6/S6 Edge,if you use other Samsung models,you can follow the same steps to recover contacts from Galaxy S8/S7/S5/S4/S3, Galaxy Note 7/5/4/3, Samsung Galaxy A9/A8/A7/A5, Galaxy Ace, Galaxy C7/C5, etc,.In additional,if you miss the same problem,it can help you get back Galaxy S6 lost data easily, congratulations!

Restore Deleted Contacts on Samsung Galaxy

You can recover contacts from Samsung Galaxy with this Android Data Recovery software,it not only allows you not only can restore deleted contacts on Samsung, but also can help you restore SMS, pictures, videos, whatsapp, call logs, documents and WhatsApp from Samsung smart phones directly. As the world’s first Android data recovery software, it’s completely safe and reliable.In additional,if you forgotten the Samsung phone’s lock,this all-in-on Android Lock Screen Removal & Data Recovery also can help you remove Samsung Lock Screen Pattern, PIN or Passwordwithout losing your data on Android devices.

Download the free trial version of this software on your computer.

d_win d_mac

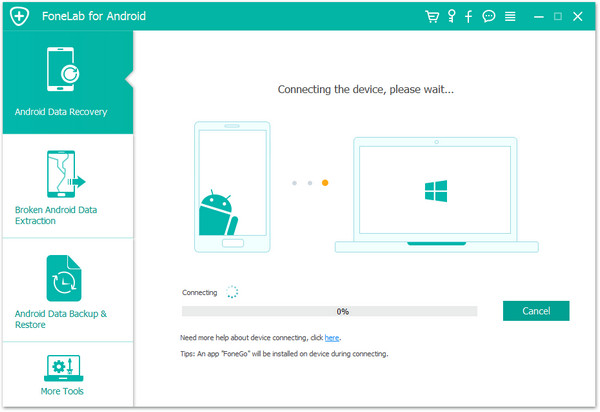
Step 1. Connect your Samsung Galaxy S6 to the computer
Download, install and run the program. Then connect your Samsung phone to PC via USB.

connect Samsung with computer

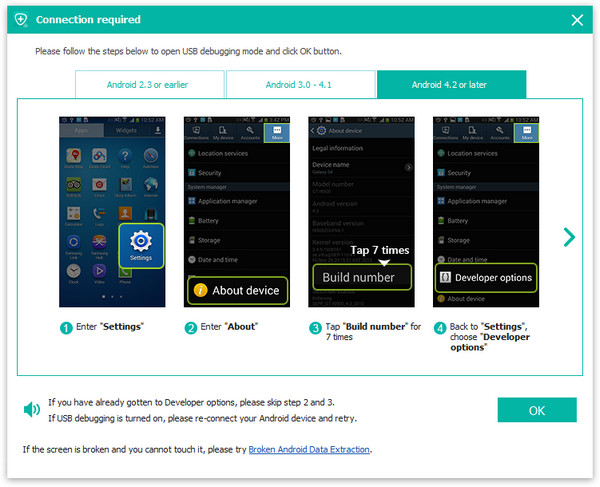
Step 2. Enable USB debugging on your Samsung Galaxy S6
If you have not opened the USB debugging option yet, this program will ask you to do it. If you’ve done it already, just skip this step.

usb debugging samsung phone

Step 3. Seletively Choose “Contacts”you want to Scan
Select the “Contacts” type you want to get back from S6
Now the program needs to analyze your device before scanning it, you can click “Contacts” item on the window below,and click “Next” button to continue.

select file tpye to recover from samsung

Step 4. Analyze Data on Samsung Phone
You’ll get a window as follow that prompt your device is detected by the program.Tap “Allow” to enable the program to scan your Samsung for deleted contacts.

allow scan the samsung

Then the program will begin to anayze the data on your Samsung phone.

scan android samsung for deleted contacts

Note:Before starting,please make sure that your phone battery is more than 20% charged.

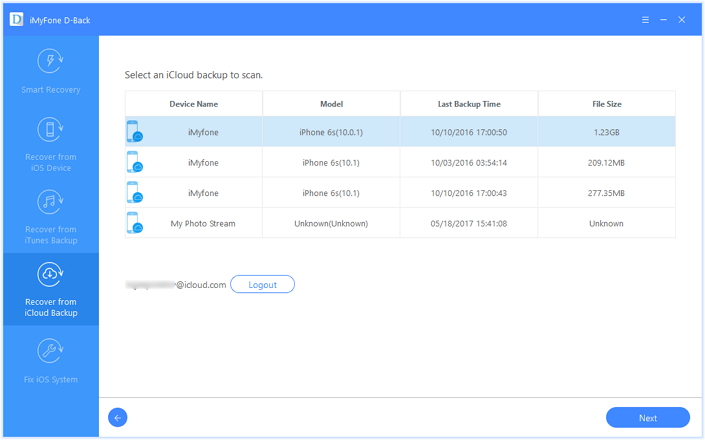
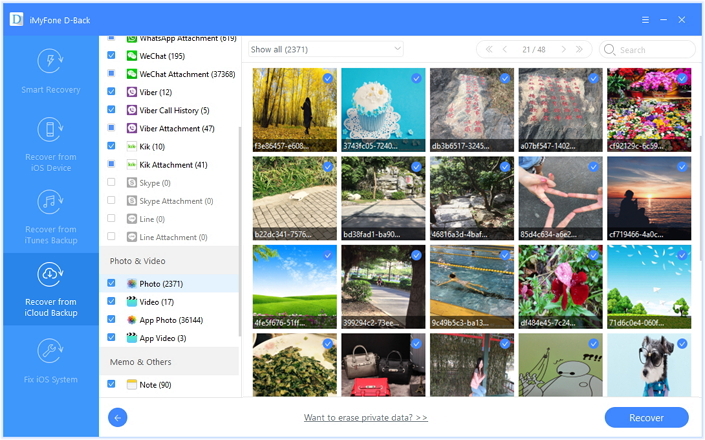
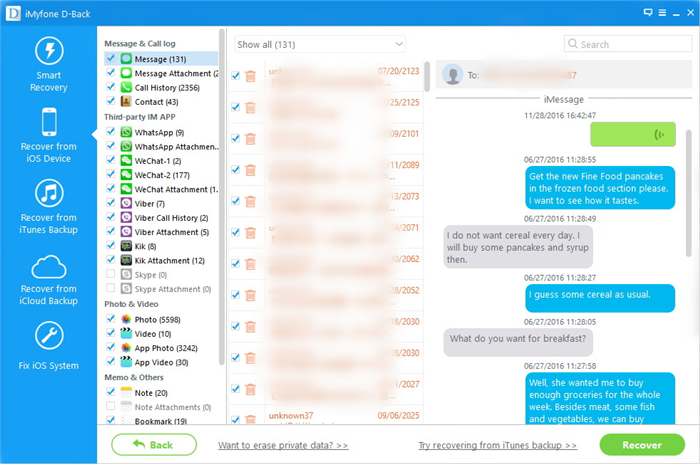
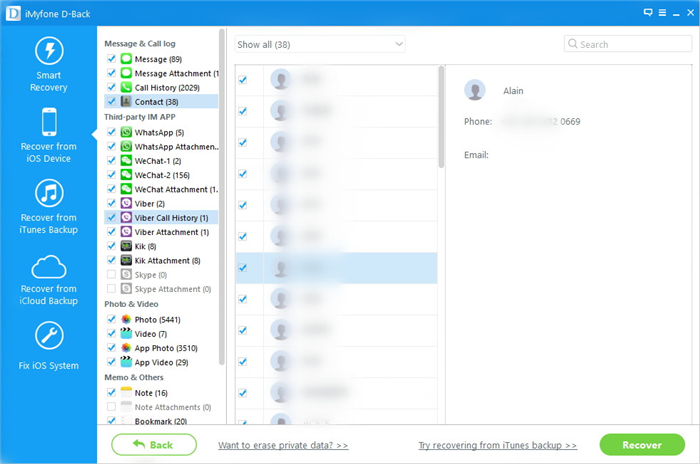
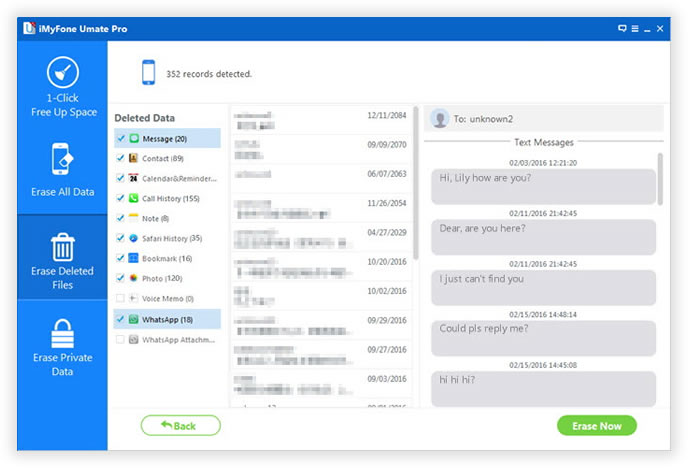
Step 5: Preview and Restore Deleted Contacts from Galaxy S6
When the scan finishes, you can preview the whole message contents in the scan result as a list. You can preview them one by one and choose those you want to recover and click “Recover” button to save them as a HTML file on your computer.

recover deleted samsung contacts

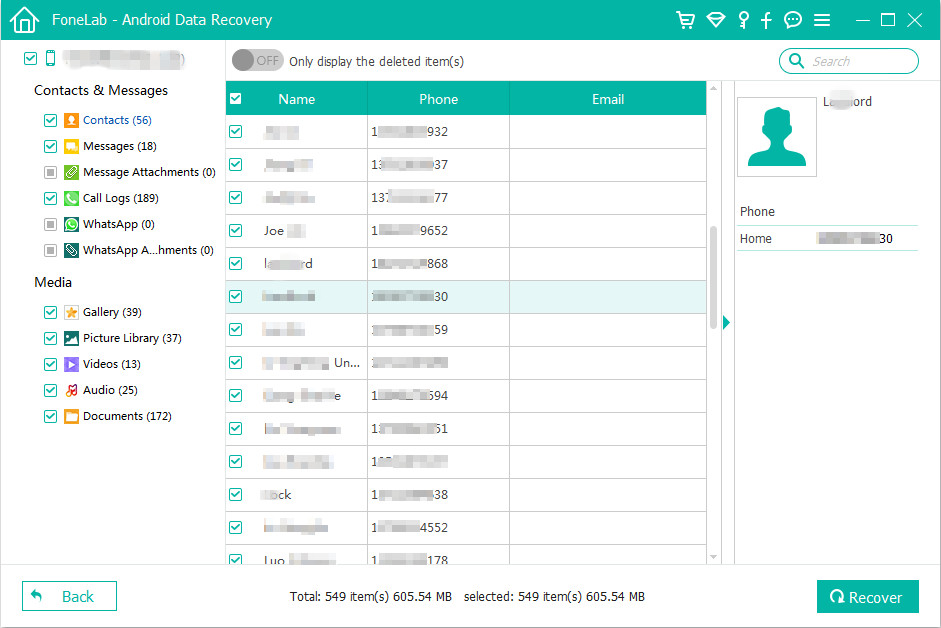
Note: You can see that contacts found here contains those you deleted recently (displayed in red) and those existing on your Samsung (displayed in black). You can separate them by using the button above: Only display the deleted items.

Moreover, you can preview and restore contacts, photos and videos (no preview), as well as you do with the messages. Contacts can be saved as CSV, VCF and HTML files on your computer.
Now, download this powerful program to have a try!

d_win d_mac

Tips: No matter why you want to recover deleted text messages from Samsung devices, the Samsung Data Recovery allows you access and recover deleted text messages from Samsung without hassle.

Though the deleted data can be retrieve back from Samsung Galaxy S7/S7 Edge/S6/S6 Edge+/S5/S4/Note 7/Note 5/Note 4 by Android Data Recovery easily.To avoid data loss again, we will strongly suggest that you should backup and restore Samsung data on computer regularly.

Related Articles:

How to Recover Contacts from Water Damaged Samsung

How to Recover Data from Broken Samsung Galaxy S6/S5/S4

How to Recover Text Messages from Samsung Galaxy S6

How to Restore Contacts from Android Phone Memory Card

How to Recover Deleted Files from Samsung Galaxy S6/S6 Edge

Are you use Samsung Galaxy S6/S6 Edge and often sharp photos with your phone?But What if you carelessly deleted or formatted the precious photos you take on your Samsung Galaxy S6/S6 Edge+,how can you recover deleted or lost pictures on your Samsung Galaxy S7/S7 Edge/S6/S6 Edge/S5/S4/Note 5/Note 4?Don’t worry,if you accidentally deleted your photos, videos, contacts and text messages on your Samsung Galaxy phone, you have a chance to recover deleted files from Samsung Galaxy S6 smart phone.In order to prevent it from being overwritten and recover your data successfully, you have to stop using your Android phone after deleting the data by mistake. You can get the help of Android Data Recovery, which will be your best choice and help you recover deleted data from Galaxy S7/S6/S6 Edge/S5/S4/S3 in a simple way.

The Samsung Galaxy S6 Data Recovery – Android Data Recovery allows you to recover deleted data from Samsung Galaxy without a backup file lost after accidental deletion, factory restore, formatting, rooting, flashing ROM, or Android system crash. It also recover other data ,like Photos, Messages, Contacts, Videos, Call Logs, WhatsApp,etc. And supports any other Android phones and tablets running Android L, 4.4, Android 5.0 and newer, Android 6.0, Android 7.0 N.What’s more,the Andorid data recovery also apply to any other Android devices like HTC, LG, Sony, Motorola, Google Pixel, Nexus, HuaWei, ZTE and other Android phones or talbes.

d_win d_mac

According to this step by step tutorial to recover accidentally deleted videos and photos of my wife’s Galaxy S6. The tool is so powerful that you can recover from broken phone,like Samsung Galaxy S7/S6/S5/S4/S3/Note 5/Note 4/Note 3..What’s more, you can extract/recover data from broken Samsung with black/broken screen.

The Way to Retrieve Deleted Photos from Samsung Galaxy S6

Step 1. Connect Your Device to Computer and Run the Software
Then connect your Samsung Galaxy S6 to the computer via USB cable.

connect samsung with computer

Step 2. Enable USB debugging on Samsung Galaxy S6
When the program detects your phone, it requires you to enable USB debugging. There are three options. Please choose the one for your phone’s Android OS.

1) For Android 2.3 or earlier: Enter “Settings” < Click “Applications” < Click”Development” < Check “USB debugging”
2) For Android 3.0 to 4.1: Enter “Settings” < Click “Developer options” < Check “USB debugging”
3) For Android 4.2 or newer: Enter “Settings” < Click “About Phone” < Tap “Build number” for several times until getting a note “You are under developer mode” < Back to “Settings” < Click “Developer options” < Check “USB debugging”

usb debugging Samsung phone

Note: If you still get this window after enabling USB debugging on your device, please try to click “Open? Next…”, or try to disable and reset it again.For Samsung Galaxy S7/S6 and other Android devices base on Android 4.2.2 or above, your phone will appear a message, please just tap on “OK” to allow USB debugging.

allow to continue connect samsung

Step 3.Select the Type of Files You Want to Recover from Samsung S6
In this step,please select which type of files you want to get back,including contacts, messaging, Gallery, videos, whatsapp messages,call history and documents.

select file tpye to recover from Samsung

To save you time of course,we suggest you seletively choose which type of files you want.And you can also choose “Select all” and go to next step.Then click “Next”.

Step 4.Allow to Scan and Analyze Samsung Galaxy S6
Later, tap on the “Allow” button to let the program scan your phone for lost messages, contacts, photos and video on your Samsung Galaxy S6.

allow scan the samsung

Step 5. Analyze and Scan Samsung Galaxy S6 for Deleted Files
The scanning process will take you a little time.

scan samsung for deleted data

Step 6. Preview and Recover Deleted Photos from Galaxy S6/S6 Edge
After the scanning, the recoverable files will be list on the Samsung Galaxy S6, and you can preview the recoverable Samsung contacts, messages, videos, photos, notes, call logs, WhatsApp messages and more before the recovery. Please select the data you lost and click the “Recover” button to save them on your computer.

recover samsung deleted data

Free download the Samsung Data Recovery to restore your Galaxy S6 lost data directly:

d_win d_mac

Step 7.Form a Habit of Backup your Samsung Data Regularly
Though our Android tool kit – Data Recovery can help you restore lost/deleted files on Android devices easily, we suggest you should to back up your Android data from time to time to avoid your important contents lost or deleted again,even your phone is broken/damaged and you can’t get data back anymore.

Related Articles:

How to Recover Deleted Photos from Samsung Galaxy S6

How to Recover Deleted Contacts from Samsung Galaxy S6

How to Recover Deleted SMS from Samsung Galaxy S6

4 Ways to Recover Lost Photos from iPhone after iOS 10 Update

Photos and Videos Disappeared after iOS 10/9 Update

As the iPhone 7, iPhone 6S, iPhone 6, iPad Pro and iPad mini 4 running iOS 10/10.1/10.2/10.3 or iOS 9 OS system,if you updated your iPhone to iOS 10 and lost photos/videos by accidentlly,or deleted pictures on iPhone in iOS 10/9 by careless,you also can follow this tutorial to recover lost photos from iPhone with iOS 10.2/10.3 update.

Missing Pictures After Updating iPhone to iOS 10

Some people may ask does the Apple software update deleted photos?More and more iPhone, iPad users upgrading their ios devices to iOS 10.2 or iOS 10.3,but after updating your ios devices to iOS 10,you may found all photos, contacts, text messages, videos are lost,because every iOS update may cause erase photos,videos and other files on iPhone, iPad.This article teach you how to recover lost photos and other data from iPhone, iPad after upgrading to iOS 10.

* iPhone Photo Recovery: How to Restore Lost Photos from iPhone

* How to Manage iPhone on Computer

recover lost iphone photos after ios 10 update

Updating to iOS 10 on your iPhone is a hard choice, because the new update will definitely fix some bugs but the familiar Camera Roll and Photo Stream Pictures are gone. Just like you lost data after iOS 8 update, if you update iPhone from iOS 8 to iOS 9, iOS 7 to iOS 8,you may suffer data loss, such as losing photos  on iPhone with iOS 10 update( even iTunes not detected your iPhone).

Part 1: Recover Deleted Photos from iPhone on iOS 10/iOS 9

If your iPhone, iPad, iPod Touch running iOS 8, iOS 7 or older version,it is hard to recover these deleted photos on devices. But now with iOS 10 or iOS 9, it’s extremely easy to recover the deleted photos. The good news is that iOS 10/9 allows users recover deleted photos and videos from the “Recently Deleted” folder.If you found the pictures disappearance on the “Camera Roll”,you can go to “Recently Added” folder or “Recently Deleted” folder in the Photos app to recover all recently deleted photos in iOS 10.

Easy Steps to Recover Recently Deleted Photos and Videos from iPhone in iOS 10

Step 1.Open up the “Photos” app on iPhone and select “Albums” in the lower-right corner.
Step 2.You’ll see two folders appear – “Recently Added” folder and “Recently Deleted” folder.
Step 3.Click and to enter the “Recently Added” folder,you will find all your recently deleted photos from the past 30 days still here.
Step 4.In the upper right corner of the touch screen, click “Select” button,then Select the photos you want to recover.Finally click “Recover” button in the lower right corner of the screen.
You will find those photos be moved back to the “Camera Roll” in Photos app, where they’ll be stored until you delete them again.

iphone recently deleted photo recovery

If you can’t find those deleted photos in “Recently Deleted” folder for over 30 days,it is likely that these pictures have been cleared.But please do not worry,today we’ll teach you how to recover deleted or lost photos from iPhone/iPad in iOS 10,you also can retireve deleted App photos from iOS 10/iOS 9 devices.

How to Recover Lost Photos from iPhone with iOS 9/iOS 10 Update

The iOS 10.2 offer you more wonderful experiences. But many users have reported that photo stream folder, camera roll album, or other pictures in apps disappeared after installing the new iOS 10.2 IPSW firmware. In this article, we will introduce the top-tier methods to restore lost photos from iPhone after iOS 10 update, the photos including the ones lost from iPhone camera roll, photo library, photo stream, as well as from apps like WhatsApp, Tango, Viber, Instagram, Flickr, iPhoto, iMovie, Kindle, etc,.

3 Ways to Recover Lost Pictures in iOS 10/iOS 9

To restore lost photos from iPhone after updating to iOS 10/9,you can use this iOS 9/iOS 10 Data RecoveryiPhone iPad Data Recovery, which supports recover deleted or lost photos from iPhone 7(Plus), iPhone SE, iPhone 6S(Plus), iPhone 6 (Plus), iPhone 5S, iPhone 5C, iPhone 5, iPhone 4S with iOS 10. If you lost iPhone photos after iOS 9.3.5 or iOS 10.2 update failing,this iOS Data Recovery provides you three ways to recover lost iPhone photos, videos, SMS, iMessages, contacts, notes, call logs, WhatsApp messages, Kik, Viber, Wechat chat history: directly scan and recover deleted photos from iPhone; restore iPhone backup photos from iTunes/iCloud. With iPhone Data Recovery you can also fix iOS 10/9 system to normal for iPhone,as well as iPad and iPod,if you need to repair the system,please switch to “Fix iOS System” function to get your iPhone out of recovery mode, black/white/blank screen, red iTunes sreen, Apple logo without data loss.

Free download the iPhone Data Recovery to restore your iPhone lost photos:

d_win d_mac

Note: Currently, iOS 9/10 Data Recovery (Windows and Mac versions) allow you to scan iPhone lost data and restore media contents directly, such as voice memos, photo library, photo stream, message attachments, and camera roll. The others only let you to retrieve text contents incorporating contacts,messages, notes, calendar, call logs, reminders, bookmarks and Safari.What’s more,the iPhone Data Recovery also works well with iPhone, iPad with iOS 7, iOS 8, iOS 9 and the latest iOS 10/10.1/10.2.

Part 2: Recover Lost Photos from iPhone After iOS 10/10.2/10.3 Update

Download the iOS 10/9 Data Recovery at first.

d_win d_mac

The iOS Data Recovery provides the “Smart Recovery” function for you to restore lost data from iPhone without data loss.The “Smart Recovery”function of program provide different features to choose-to get back lost data on device after losing data under several circumstances,which will make the data recovery efficiently.

smart iphone data recovery

Note:This recovery mode allows you to scan your device directly to find all the lost files, or restore lost data from your lost/broken device.

Step 1. Run the Program and Connect iPhone to Computer
You’ll get the the main window below after installing and launching the iPhone Data Recovery program on your computer.And then switch to “Recover from iOS Device“,connecting your iPhone to computer via USB cable.

connect iPhone with computer

After you got into the scanning mode sucessfully, the iPhone Data Recovery program will scan your iPhone automatically.

Step 2. Select Photo and Video Files you Want to Recover
If you just want to restore the picture and videos,please select “Photo”, “App Photo”, “Video” and “App Video” and click “Next” button go to next step.

select photos file to scan

Step 3. Begin Scanning iPhone Device
Click “Scan” to search for your lost data,then the program will start to scan your device automatically for lost data.

scan iphone and search lost data

Step 3. Preview and Recover Deleted iPhone Photos and Videos
While the program is scanning, you can start to preview data, or you can do it when the scan finished. It’s a well-organized scanning report. The program allows you to preview and check all data by the category. If you want to recover your iPhone photos, please choose “Photo” or “Video” to preview them first. Then mark the data you want and save on your computer by clicking “Recover” button.

directly recover deleted photos from iPhone

Download the iPhone data recovery for Windows or Mac for free:

d_win d_mac

Part 3: Restore Missing Photos from iTunes Backup after iOS 10 Update

Step 1. Choose the iTunes Backup of iPhone to Extract it
After downloading and installing the iPhone Data Recovery program, run it on the computer. And then choose “Recover from iTunes Backup” on the top of the window. Then all iTunes backup files will be found and displayed on your computer automatically. Here you need to mark the one for your iPhone (the one with a recent date) and click “Scan” button to extract it.

select iTunes backup file to extract

Step 2. Preview and Recover iPhone Lost Photos
After the scan, now you can preview the files found in the scan result. To view your photos, you need to click Camera rollor or Photo Stream. And then choose waht you want and click “Recover” button to save them on your computer effortlessly.

restore iphone photos from itunes backup

If you have sync your iPhone to iCloud before,you can selectively recover data from iCloud backups,please keep reading as below tutorial.

Part 4: Retrieve Photos from iCloud Backup to iPhone after iOS 10 Update

Before upgrading your iPhone to iOS 10.1/10.2,you have make your iPhone backed up with iCloud,you can easily download backed up contents from iCloud and recover photos from iCloud. Read this post to useing a iCloud backup extracting tools to retrieve disappeared/lost/missing/deleted photos from iCloud to iPhone/iPad/ iPod touch without erasing your device.

d_win d_mac

Easy Steps to Recover Lost Photos on iOS 10/10.1/10.2/10.3 with iCloud Backup

Step 1: Choose “Recover from iCloud Backup” option
Above tutorial,we have teached you how to recover deleted photos from iOS Devices or iTunes backups.In this part will teach you how to use iPhone Data Recovery download and extract photos from iCloud backups selectively,please choose “Recover from iCloud Backup” option.

icloud photo recovery

Step 2: Select Photo File Type You Want to Get Back
Then click the “Start” go to next step and select the file type that you plan to recover.To get back missing photos from iCloud back up files,please select the “Photo” and “App Photo” item. Then, click the “Next” button at the bottom of the screen.

recover photos from iCloud

Step 3: Enter Your iCloud Account
In this step,please log into your iCloud account by entering your username and password.

Retrieve Photos from iCloud Backup

Tips:Please note that we does not record any of your login credentials.

Step 4: Download the History of the iCloud Backup
After logining into your iCloud account,the program will search all the backup contents that you have sync with iCloud. From the last, we suggest you select the most recent updated and click “Next” button begin downloading your iCloud contents.

Recover Lost Data on iOS 10/10.1/10.2 with iCloud Backup

From “Categories” tab, select “Last Back Time” then click on the “Download” button. The data from the iCloud is downloaded on computer.

Step 5: Preview and Recover Lost or Deleted iPhone Photos from iCloud
Only few mintures,all the data was already downloaded on your computer,then click on “Photos” options on the left menu bar,and select the photos you want to get back before recover them.You can even look for deleted files by choosing “show only deleted files” option.Finally,please click “Recover” button to recover iPhone photos from iCloud backups,only few seconeds,all of photos you want will be save on computer,you can also restore iCloud photos to iPhone by click “Recover to Devices” when you connect the iPhone to computer before the recovery process.

icloud restore photos ios 10 update

Download the iOS 10/9 Data Recovery for Windows or Mac to recover data from ios devices/iTunes/iCloud:

d_win d_mac

Notes: To avoiding photos and other data loss after update your iPhone to iOS 10.3, iOS 10.2 or iOS 10.1,we recommend you should backup your iPhone data to computer by this iOS Manager Tool,after upgrading the iPhone to iOS 10 successfully,you can restore data back to your iPhone 7/6S/6/SE/5S easily.

Tips: The iOS Data Recovery not only allows you recover lost photos from iPhone after iOS 10/9 upgrade/downgrade,but also supported restore contacts, notes, photos, apps, whatsapp messages or SMS/imessages from iPhone lost due to jailbreaking, factory reset, viral infection, system crash(like Apple logo, recovery mode, black screen, connect to iTunes scree,etc.). In additional,if you deleted files on your iPhone, iPad by careless,you can free download this ios data recovery program to scan and restore files on iPhone directly; if your lost iPhone devices or the devices was stolen,you can restore lost data from iPhone/iPad/iPod devices or iTunes/iCloud backup files.

Related Articles:

How to Backup Data and Restore to iPhone iPad after iOS 10 Update

How to Recover Deleted Photos from iPhone 7/7 Plus

How to Recover Lost iPhone Data After iOS 10/9 Jailbreak

Recover Lost Data After Factory Reset iPhone

How to Transfer Data from iPhone to iPhone SE/6S/6

Backup and Restore WhatsApp Messages from iPhone

How to Recover Lost Messages from iPhone after iOS 10 Upgrade

New iMessage Features in iOS 10

iOS 10 operating system’s Messages app added many new features,Messages app in iOS 10 brings iMessage apps, emoji suggestions, and visual effects overload.With the iPhone update, coming this fall for free, comes a mess of new features for the trusty old Messages app,including adding more and more interesting in the larger emoji expressions, providing a bubble effect, supports handwritten text messages, Apple Music embed music. There iMessage application drawer, there are gifts, labels, and so on a variety of expressions. You can even send a red envelope, this is not iMessage, which is the WeChat app of Apple’s version.

Lost Text Messages on iPhone with iOS 9/ iOS 10 Update

Every iOS update may cause lost data on your iPhone,if you upgrade the iPhone 5S, iPhone 5C, iPhone 5, iPhone 6 to iOS 9,update iPhone 6S, iPhone SE to iOS 10,it may cause erase all text messages stored in your iPhone,you can’t preview all of messages on your iPhone after the iOS 9, iOS 10 update,because the ios sysptem update and cause erase all messages. But you can restore lost messages from iPhone after upgrading to iOS 9, iOS 10.However,how to recover lost SMS/MMS/iMessages from iPhone after iOS 9/iOS 10 upgrade? Today we teach you detailed guide to recover lost SMS from iPhone with iOS 9 and iOS 10.

To recover lost text messages from iPhone, iPad in iOS 9 or iOS 10,we recommend you use this iOS 9/iOS 10 Data Recovery for Mac or Windows – iPhone SMS Recovery,which is a professional iPhone deleted text recovery tool,it can help you scan and recover iPhone lost text messages after iOS iOS 10/iOS 9.3/9.2/9.1/9 upgrade on Macbook or Windows computer. It offers you 3 recovery modes to recover lost text messages on iPhone after iOS update: recover messages directly from iPhone, extract iPhone messages from iTunes backup and retrieve iPhone text messages from iCloud backup (iOS 8 iCloud backup file is not supported yet currently. This iPhone Data Recovery works well with the latest iPhone 7, iPhone 7 Plus, iPhone 6S, iPhone 6S Plus, iPhone 6,iPhone 6 Plus, iPhone SE, iPhone 5S/5C/5, iPhone 4S/4 and iPad Pro,etc,.

Now,you can free download the professional iOS 9 Data Recovery to restore lost iPhone messages on windows computer or Macbook:

d_win d_mac

Part 1:Directly Recover Lost Messages from iPhone after iOS 10 Upgrade

The -iPhone SMS Recovery-iPhone Data Recovery provides the “Smart Recovery” function for you to restore lost data from iPhone completely.The “Smart Recovery”function of program provide different features to choose-to get back lost data on device,which will make the data recovery efficiently.

smart iphone data recovery

Note:This recovery mode allows you to scan your device directly to find all the lost files, or restore lost data from your lost/broken device.

Step 1. Run the Program and Connect iPhone to Computer
After downloading the program, you need to connect your iPhone to PC/Mac with USB cable. Then the primary window will come up if it detect your iPhone , follow its order to click “Start“.

connect iphone with computer

Step 2. Start to Scan iPhone for Lost Messages
After step 1, you are allowed to start scan with iPhone Data Recovery. Wait for few minutes, the result will come out as picture below.

select file to scan

Click “Scan” to search for your lost data,then the program will begin to scan your device automatically for lost data.

scan iphone and search lost data

Step 3. Preview and Recover SMS from iPhone
All your documents is on the left of interface. Open and preview each file you may need, select and check those you want to backup or recover. For example, if you want to recover text Messages, tap “messages” on the left side of the interface to preview and choose them, which contain names, phone numbers, chat contents, and attachments.

After you select what you want, click “Recover” button, then the program will begin the recovering process. When it finishes, all the data you choose are saved on your computer.

recover lost sms from iphone

Free download the ios data recovery to restore iPhone lost messages after iOS update:

d_win d_mac

Part 2:Recover Lost iPhone Messages after iOS 10 Upgrade with iTunes

Step 1.Select iTunes Backup File to Scan
When launching the program, you’ll be lead to the “Recover from iOS Device” mode (the default mode). Select “Recover from iTunes Backup” mode to extract previously backed up data from iTunes.

extract backup file from itunes

All your iTunes backup data of your iOS devices which has ever synced with iTunes on your computer will be automatically found and listed here. Select the one of yours and click “Scan” button to begin iTunes backup extracting.

Step 2.Preview and Restore iPhone Data from iTunes Backup
When the scan finishes, all your files backed up by iTunes can be found and displayed in categories. You can preview them one by one and complete data recovery.

For SMS recovery,please choose “Messages” item and click “Recover” button to recover the selected messages to your computer or iPhone.

recover text messages from itunes

d_win d_mac

What’s more about iPhone SMS Recovery:

The iPhone data recovery supports retrieve SMS and other data lost due to the following reason:
1. Wrong operation, delete iPhone messages accidentally.
2. iPhone got broken, crashed, smashed, water damaged.
3. iOS upgrade, jailbreaking failure or factory settings restore on your iPhone.

You can use this iOS Data Recovery software to retrieve iPhone lost messages: Recover deleted messages from iPhone directly, Recover messages from iTunes backup and Recover them from iCloud backup.Now,you can free download and have a try!

Read More:

How to recover lost contacts from iPhone after iOS 9 upgrading

How to recover lost data from iPhone after update to iOS 9

How to recover lost data from iPhone after iOS 10

How to Recover Contacts from iPhone after iOS 15/14 Update

Problem:”Yesterday,I have upgraded my iPhone 12 to iOS 15 and now my contacts data are gone,is it possible to recover lost contacts on my iPhone 12 in iOS 15? Thank you!” –Asked by Lula in Apple discussions

Answer: To avoid data loss during to iOS 15 upgrade failure or data erased after the OS system installation,we strongly recommended that you should back up your iPhone to computer at first,and then restore your iPhone, iPad, or iPod touch from a backup after the latest iOS system upgrade is complete.

More and more iPhone users upgrading their iPhone to 15, but after iOS 15update, it may cause erase all contacts (phone numbers) stored in iPhone, many iPhone users may ask is it possible to restore lost contacts on iPhone after iOS 15update? Any way to retrieve deleted contacts from iPhone in iOS 10? Actually,those lost or deleted contacts on iPhone iOS 15 still stored in the device, you still have chance to retrieve iPhone lost contacts back after upgrading to iOS 9.3 or iOS 10. However,how to recover iPhone lost contacts after update to iOS 15? This article mainly teach you a easy way to retrieve contacts from iPhone in iOS 15.

Recover Lost Contacts after iOS 15 Update

Today,we recommend your use this iPhone Contacts RecoveryiOS 15 Data Recovery,which allows you restore lost contacts from iPhone after upgrading to iOS 15.What’s more, the iOS 15 Data Recovery allows you restore other lost data on iPhone after iOS 15 jailbrak,such as contacts, notes, photo, apps, videos, whatsapp messages or imessages, text messages. Let’s show you the use guide to recover lost contact and sms back from iPhone with iOS 15.

d_win d_mac

Part 1:Directly Retrieve Lost Contacts from iPhone after iOS 15 Update

Let’s take recover lost contacts from iPhone 6 as example after upgrading to iOS 15.

Step 1: Run iOS Data Recovery and Connect iPhone 6

iphone contacts recovery

After downloading and installing the program, then run it on your computer. Connect your iPhone to the computer.

Step 2: Analyze and Scan Contacts from iPhone 6
Once your iPhone is recognized, you can see the information of your device on the primary window, now you can click on “Next” to let the program analyze and scan the lost data from your iPhone.

scan contacts for iphone

Step 3: Preview and Recover Lost Contacts from iPhone 6
You can preview all found data before recovery after the scanning. Choose “Contacts” to preview, then mark the ones you wanted and click “Recover” butto to save them on your computer easily.

restore iphone contacts after ios 10 update

Free download the iOS Data Recovery to restore iPhone lost contacts:

d_win d_mac

Part 2:Retrieve iPhone Lost Contacts from iTunes Backup after iOS 15 Update

Precondition: You need to have your iPhone synced with iTunes before you deleted the contacts.
What you need: iTunes
You can restore your iPhone contacts from iTunes backup in two ways: directly restore the entire backup via iTunes, or selectively recover contacts from the backup via iPhone Contacts Recovery. You can choose one the most suitable for you.

Restore the whole iTunes backup file
Disable auto synchronization first, preventing your iPhone from syncing automatically:
For Windows users: Run iTunes, go to < Edit < Preferences… < Devices.
For Mac users: Run iTunes, go to < iTunes < Preferences… < Devices
Then connect your iPhone to the computer. Go to the “Devices” again, choose the backup file of your iPhone and click on the “Restore” button.

restore iphone data with itunes backup

When the restore is complete, your iPhone will restart and all the contacts in the backup is on your iPhone now.

Part 3:Recover Contacts from iTunes Backup via iPhone Contacts Recovery

Step 1.Run iPhone Contacts Recovery and Scan the Backup File
Run iPhone Contacts Recovery,then connect iPhone with computer.There will be a list of backup files displayed, after you click “Recover from iTunes Backup” on the top of the program window. Choose the one for your iPhone and click “Scan”.

extract itunes file

Step 2.Preview Contacts and Select to Recover from iTunes Bakcup
The scan only takes you a few seconds. All the contents from the backup file will be displayed in details. You can read them all. Then check the box in front of any item you want, and click the “Recover ” button.

restore contacts from itunes backup

d_win d_mac

This iOS Data Recovery software is used for recovering deleted or lost files from iOS devices and iTunes backups, and the software also helps users backup iPhone, iPad and iPod touch files to computer. The software works perfectly with the latest iOS 15, so you no worries about lost data after upgrading iPhone to iOS 15. With the help of iOS Data Recovery,you can restore sms,contacts,photos,videos from iPhone after iOS 15 update.

Related Articles:

Transfer Contacts from Samsung Galaxy to iPhone 6S/6

Recover iPhone Lost Data after Upgrading to iOS 9

How to Recover iPhone Lost Data after iOS 10 Update

How to Recover Text Messages from iPhone 6S/6

How to Permanently Delete Photos off iPhone to Free Up Space

iPads and iPhones don’t have file systems you can see, but there are still apps and files,those video file takes up a lot of storage space, to free up space on your iPhone and iPad,the best way you can do is deleting Music, Videos, Photos, and Other Media Files Permanently.

Don’t Forget to Erase ‘Alreadly Deleted’ Photos from iPhone,iPad

Simple deletion is not enough to erase your iPhone files,because those deleted photos,videos files can be restored by some professional data recovery software. When you perform simple ‘Deletion’ action to deleted pictures, videos on your iPhone,iPad,it’s not actually deleted. Instead, iOS system will mark the space they occupy as free and waits new data to overwrite them, so it ‘s extremely easy for you and others to recover those already deleted photos,videos from iPhone,iPad.However,we need to use a professional iOS Data Eraser to wipe the already deleted photos, videos completely & permanently,only in this way,those already deleted pictures, videos files does not occupy memory space.

Permanently Delete your unwanted iPhone Photos At Once to Free Up Storage

In additional,before selling the old iPhone/iPad,to erase videos on iPhone permanently without restored is very necessary,many people take photos and videos with iPhone or iPad,it records your life everything.However,before selling or give away your ios devices,please remember to delete videos and photos on iPhone permanently,and no one can restore them with the professional iOS Data Recovery software in market after your selling them.

Backup iPhone Photos and Videos before Erasing
How many photos do you have in your phone? Hundreds? Thousands, even?I bet you’d hate to lose them.And yet phones get lost, stolen and broken every day.Are you playing it safe?We have to remind you do a backup of iPhone photos/videos on computer which you wanna keep expect the delete part.Due to wipe photos and videos from iPhone with iOS Data Eraser can be restored impossible.If you don’t want to lost your precious memory you should take the backup action before deleting task.

Easy Steps to Permanently Delete Photos from Your iPhone to Free Up Storage

To wipe all photos/videos on iPhone without restored,you must to use a third party iPhone iPad Video Eraser. Today,we recommend you use this iOS Data Eraser software,which not only can help you delete videos from iPhone 7/SE/6S/6/5S/5/4S/4, iPad permanently,but also allows you erase other data on ios devices,including contacts, photos, notes, call history, Apple ID, App cache,etc,.This iPhone data removal tool delete all selected data on your iPhone with only 4 clicks.

Free download the ios data eraser tool at first:

d_win d_mac

Part 1:Eraser iPhone Photos/Videos Permanently with iOS Data Eraser

This mode protects your privacy by cleaning the personal information such as photos, messages and so forth.

Step 1. Launch iPhone Data Eraser on Computer and Connect Your iPhone

Run the program on your PC and then get the iPhone connected to it. If this is first connection, you will see this interface, which means you can now go to the handset and tap “Trust”. After this the computer can get access to your data and phone settings.

delete photo from iphone permanently

Step 2. Select or “Erase Deleted Files” or “Erase All Data” option
The iOS Data Eraser program will list four feature for you: “iOS OPTIMIZER”,”SPACE SAVER”, “ERASE PRIVATE Data“, “ERASE DELETED FILES” and “ERASE ALL DATA”.

Then, choose “Erase Deleted Files” from the sidebar.

erase deleted photo on iphone

If you want to delete all “existing/already deleted” photos and videos stored on the iPhone permanently, please select “Erase All Data” from the sidebar, which leads to the next step.

erase photos from iphone

Step 3. Scan your iPhone for all deleted or existing Files

Click “Start Scan” in the middle so that iPhone Data Eraser can search the files stored on the devices. It will take a few minutes to fully delete all the data, depending on how many data and files on your device.The result can be seen like this.

erase delete video,photos from iphone

Preview the Scaned Result and Erase Private Photos,Videos from iPhone,iPad Selectively

erase photos from iphone to free up space

Please be aware that the images in the home directory can be previewed while those under “Deleted Data” can not. Tick both of them and click “Erase Now”. And when it is finished, press “Done”.

permanently delete iPhone photos to free up space

Free download the iOS Data Eraser to wipe all videos and photos on iPhone permanently:

d_win d_mac

Tips: The ios data eraser program allows you erase apps, music, videos, photo, contacts, SMS and other files stored on the device. It only takes a few minutes to complete the task.
Before erase data with this ios data eraser software,you can use this Phone Transfer to backup those important contents to the computer and keep safe.

Part 2:Eraser iPhone Photos/Videos Permanently with iOS Private Data Eraser

iOS Private Data Eraser totally erase anything you don’t want from iPhone/iPad/iPod,help to delete photos and videos from iPhone without restoring,prevent sensitive data on iOS device.The new version of iOS Private Data Eraser allows you to clean up the garbage content in order to make your device working as quickly as a new one.Besides,it only cost you less than one minute.Imagine how efficient this software it is.

Supported File Types:All Data Erased/Already Deleted Files
Messages/iMessage/MMS/WhatApp messages,Contacts,Mail,Calendar,Reminders,Notes,Voice Memos,Safari Bookmarks,Photos,Videos,Apps, System Settings,Voicemail,Apple ID,iCloud ID,Game Center History,Call History,etc,.

Supports All iPhone/iPad/iPod Ever Created:
iPhone 7,iPhone SE,iPhone 6S(Plus),iPhone 6(Plus),iPhone 5S/5C/5,iPad Air,iPad Pro,iPad Mini are included.

d_win d_mac

Run the iOS Private Data Eraser on your computer,and choose “More Tools” from the side menu.Then you’ll see all features inside as follows.

ios-private-data-eraser

Step 1.Connect iPhone to the Computer
Plug your iPhone to the computer with an USB cable.Then run the program and choose “iOS Private Data Eraser” from tools in the window above.When the program detect it,it will be displayed as follows.

connect-iphone-pc

Step 2.Scan the Private Data on iPhone
To erase photos/videos from iPhone,you should allow the program to scan the private data on your iPhone first.Click the “Start Scan” button to begin the scanning.

The scanning will cost you some time.Just wait until you can see all the found private data in the scan result.

scan-private-data-on-iPhone

Step 3.Start Erasing Photos/Videos from iPhone Permanently
You are allow to preview all found data in the scan result one by one,such as photos,videos,messages,contacts,call history and more.Check the item and select them which you want to delete,and then click on the “Erase from the Device” button to wipe it permanently.

Since the erased data can’t be recovered,you should confirm your operation carefully.Just enter “delete” and click “Erase now” to confirm it.

erase-iphone-photo

It will take you some time to wait until the erasing task is complete.

begin-erase-iphone-photo

Once the process is complete,you will see an “Erase Completed” prompt appear on the window of the program.

iphone-photo-erasing-done

d_win d_mac

Read more:

How to Erase iPhone Data before Selling

Backup Data and Restore to iPhone after Erasing

How to Backup SMS/iMessages from iPhone to Computer

How to Clean Junk Files on iPhone /iPad and iPod

How to Recover Deleted Data from iPhone,iPad

Erase All Content and Settings on iPhone Permanently

Before selling your old iPhone,you must to erase all contacts and setting on iPhone permanently,so as to avoid privacy by a third party data recovery software to get them back,and no once can get your personal information.

As we all know that it is really an important thing if you can protect the personal information from those who can restore iPhone data. Because your files and everything might be made use to hurt the ones that you love or simply to post ads. Now, you will know how to erase iPhone contents and setting permanently.

Here,we recommend you use this iOS Data Eraser,which is a profession data eraser tool for ios users to erase all content and settings on an iPhone without restore. This software allows you to get rid of the private files, the already-deleted ones and other documents. With no complex steps at all and some time spent, your iPhone will be wiped factory-new.The ios data easer works well with iPhone 6/6 Plus, iPhone 5s/5, iPhone 4s/4 and iPad/iPod Touch.

d_win d_mac

Tips: The iPhone Data Eraser which is developed with the aim to erase everything permanently on iPhone in a simple way.

How to Erase All Contents on iPhone Permanently?

Before you begin the process, perform a backup of you iPhone please, for there is absolutely no going-back–the text messages and everything will be gone.

Step 1. Install iOS Data Eraser and Open it

Click the button above to have the application. And then set it up in your “Program File” folder. When it is done, launch the software so that you can continue. Now, connect your iPhone with PC. The interface may say “Failed to connect”. Next, you go to the phone and press “Trust”.

Delete All iPhone 5s Data Forever

All done, you will have this window. Your phone information is shown.

Step 2. Confirm Your Order to Erase the Whole iPhone

First, choose “Erase All Data” on the side panel. After that, key in the word “delete” and press the button “Erase Now”. This is to make sure that you have make up your mind but not click it accidently.

Erase All Contents from iPhone

Note: You can change the “Security Level” by tapping “Medium”.

Step 3. Spend Your Time Doing Other Things When Erasure is in Process

iOS Data Eraser will first clean up your movies, songs, settings, any thing that is in iPhone 5. (If you are using the free version, only videos and music in apps will be deleted.) And then, your iDevice will shut down and start again for the second run.

Erase All iPhone Data Permanently
Delete All Files from iPhone

This time, the program is going to deal with the free space. It takes some time, as the whole phone is to be written with data. So, wait patiently. The last thing we do is to click “Done” at the end.

erase-all-data-free-space

iOS Data Eraser supports up to 28 types of file, such as Safari Bookmarks, photos and so forth. Sincerely hope that it can help you with this kind of difficulty. And if you want to share this article with your friends, please make use of the social platform by clicking the icons.

d_win d_mac

Tips: Before you use this ios data eraser to wipe everything on your iPhone,you must to backup those important data to computer at first with this Mobile Transfer,because once wipe your iPhone data with this data cleaner tool,you can’t get them back forever.

How to Permanently Erase Data from iPhone Before Selling

What to do before selling your old iPhone?One of most important thing you must to do is permanently erase all data from iPhone before selling it.As we all know that “Erase All Content and Settings” is not going to delete the data permanently. The data is still on your old iPhone unless it was overwritten by other data recovery softare in market.This old iPhone store a lot of important information,like contacts, text messages, photos, email address, my bank account, Apple ID, photos, videos, emails and more.If you want to keep your Pravite data safe before selling or donate,recycle.In order to avoid some of the important data exposed, you must permanently delete iPhone data permanently without restore,and then selling your old iPhone safely.

Recently, many iPhone fans want to buy a new iPhone 7 plus instead of old iPhone 6s/6/SE.However,the fist ting you need to do is transfer data from old iPhone to iPhone 6,and erase all data on the old iPhone permanently.
You may want to know:How to transfer data from old iPhone to new iPhone

Permanently Erase Your iPhone’s Data Before You Sell It

Many iPhone users will choose to simply delete, the upper surface of this approach is to erase all the data, but many recovery tools can be restored back, which is why a lot of deleted photos exposed on the network.So simple delete is not enough, how to permanently delete iPhone files before selling and can’t recovered?

Here You can use a best iPhone Data Eraser,which allows you to easily delete all data from iPhone 7/SE/6S/6/5S/5/5C/4S/4 permanently,including photos, videos, contacts, messages, notes, call history, Apple ID, personal information, apps and other private data,once you use this ios data eraser to wipe iPhone data,no one can recover any data from it with any recovery software.

d_win d_mac

Tips:Because this removal is permanent, unrecoverable,so you need to Backup your old iPhone first.You can use iTunes or iCloud to backup the data on your old iPhone, or directly transfer it to your new iPhone 6s/iPhone SE with Phone Transfer,which not only supports transfer data between ios, Android, Nokia,but also can help you backup data and restore to new phone.
Read more:
how to backup and restore data from iPhone

Part 1:Erase Deleted Data from iPhone before Selling

Step 1. Run iPhone Data eraser tool and Connect your iPhone with your computer

Download and install iPhone Data eraser on your computer,Launch it and connect your computer with your iPhone via the USB cable.If the connection is successful, your iPhone will appear in the software interface, as shown below.

erase-iphone-main

Step 2.Click “Erase All Data”Mode

In the software interface on the left, there are six delete mode, where you need to click ‘Erase All Data’.This deletion mode allow you to wipe all data, like Messages, Call History,Notes, Voice Memos, Safari Bookmarks, Photos, Videos, and more on your iPhone 5S.

erase-all-data-iphone
Note: The iOS Data Eraser provides you 4 key feautres: “iOS OPTIMIZER“,”SPACE SAVER“, “ERASE PRIVATE Data“, “ERASE DELETED FILES” and “ERASE ALL DATA“.Please select one of features you want to do,if you want to erase everything from iPhone permanently,please select “Erase All Data” ,and the the program pop up a new windows to the next step,the program ask you choose the security level to erase your iPhone data.

Step 3.Start Analyzing and Scanning all Files Stored in Your iPhone.

In this step,the program begin to scan all the files stored in your iPhone device,during the scanning process,it may takes you few minutes,because it depending on the file size. After scanning process complete,select the deleted data and preview them one by one,and then select what type of files you want to wipe.

erase-all-data-iphone

Step 4. Privew and Select What Type of Data Want to Delete

After scanning, all deleted data will be scanned out and presented as details, by default, all files will be selected. Unselect the files you wish to keep.

erase-all-data-iphone

Step 5.Finish Wipe All Data on iPhone and Set Your iPhone as a new one

Deletion process may take you some time, patience, mobile phones to stay connected with the computer.

erase-all-data-iphone

Free download the ios data eraser:

d_win d_mac

Tips:The iOS Data Eraser, a USB cord and, of course, a computer are all you need to erase all content and settings on an iPhone, say, iPhone 5. This software allows you to wipe the private files, the already-deleted data and other documents on iPhone,Andriod phone permanently. With no complex steps at all and some time spent, your phone will be wiped factory-new.

Part 2:Delete Existing Files from iPhone before Selling

The second choice here suggest to you is iOS Full Data Eraser,as its name,it’s a data totally wiper to erase all data and setting from iPhone without restoring and set it as a new iPhone.With iOS Full Data Eraser,you are allow to safely and completely wipe all files on iPhone permanently before selling,nobody can ever recover and view your deleted iPhone data.

d_win d_mac

Supported Devices:

-iPhone 7,iPhone SE,iPhone 6S Plus,iPhone 6S,iPhone 6 Plus,iPhone 6,iPhone 5S,iPhone 5C,iPhone 5,iPhone 4S,iPhone 4

-All models of iPad Pro,iPad Air,iPad mini,iPad 4/3/2

-iPod touch 5,iPod touch 4

Run iOS Full Data Eraser on your computer,choose “More Tools” on the left side and you’ll see all features inside as follows.Choose “iOS Full Data Eraser” from tools.

iOS full data eraser tool

Step 1.Connect iPhone to the computer

Step 2.Start Erasing iPhone Completely and Permanently

Step 3.Wait Until the Data Erasure is Complete

When the data erasure is complete,you will see a window disappearing as follows.

iphone-data-erase-complete

Now,your iPhone is fully erased and turns into a new device with no content,and you can begin to set it according to your need.

d_win d_mac

Related Articles:

How to Clean Junk Files from iPhone/iPad/iPod

Permanently Delete Messages from iPhone before Selling

How to Optimize Slow iPhone For Best Performance

How to Recover Deleted Data from iPhone

How to Delete Junk Files from iPhone or iPad

Summary:This article teach you a easy way to clean out your iPhone’s memory,delete junk and temporary files on iPhone or iPad and speed up your devices.

“Help! My iPhone 5 is running very slow,I notice that there are much useless files,junk files or app caches stored on my iPhone 5,and it makes my phone crashes more frequently than before. I have already deleted unwanted apps, photos and videos to free up some space but still the same problem exists. I want to speed up my iPhone by removing those junk files and app caches,is there any third-party iPhone speed up tool to erase the junk files permanently and speed up my iPhone 5?”–Ask bu Sueson

Browsing the internet, installing different applications, playing online games, downloading pictures, visiting streaming websites and all others will take up a lot of memory space, but also does not make sense to generate some data, such as cache, cookies, error logs, game files, temp files, etc.iPhone used for some time to accumulate more and more junk files, thus affecting the performance of the iPhone and the available memory, cause the iPhone to run slowly.
Delete Junk Files from iPhone
However, these are also the very reasons that piles up your memory with unwanted stuff. Bear in mind that iPhone stores every piece of things when you open a site, launch an app or do something else, generating files that take up memory. Things like cache, cookies, error logs, game files, temp files, etc. accumulate over time thus affecting the phone’s performance and available memory.

If you want to free up some valuable space on your phone and speed up your iPhoe, improve its performance and delete unwanted stuffs out from your device.

Here recommend a professional iPhone Junk File Eraser TooliOS Data Eraser,which can help you remove Junk Files on iPhone, iPad permanently,and free up a lot of space for your iPhone with one tap only,and remove all types of junk files, including caches, invalid files, cookies, corrupt files and so on.What’s more,this iPhone iPad Data Eraser tool removes not just junk files but also other stuffs such as photos, memos, SMS, reminders, notes, apps, saved IDs, account setting and many more.

d_win d_mac

Easy Way to Clean Up Large Junk Files from iPhone/iPad

Step 1:Launch iOS Data Eraser and connect your iPhone device to Computer

Launch the iOS Data Eraser after installation, and connect your device to computer via an Apple USB cable, once your device is detected, you can see a window as the picture below, there are five options on the menu bar on the left.

iphone data eraser main

Note:
Connect Your iPhone to Your Computer via USB cable
Please make sure iPhone USB driver and iTunes were installed correctly, as the iOS Data Eraser program based on iTunes software drive.

Step 2:Select “1-Click Cleanup” option from main interface

Click on the second option “1-Click Cleanup” in the left column. A “1-Click Cleanup” window will open on the right panel. On this panel you will be notified that how many days you have not clean up your device and the storage space available on your device. Now, you can click the “Start Scan” button which in the lower right corner to begin scanning the junk files from your device.

Clean Junk Files from iPhone

Step 3:Begin to Scan all Junk Files from iPhone Device

At this step, the iOS Data Eraser will deeply scan all juck files from your iPhone, iPad device,it will take you some time based on the size of the juck files. Please wait a minute.

clean iphone junk data

Tips:Please keep your connecting your iPhone to computer during the whole process. You can clicking the ‘Stop‘ button to pause the scanning process.

Step 3:Start to Wipe All Junk Files from iPhone or iPad Device

Once the scan is finish, the program will show your the total amount of junk files. Tick off the junk files those you want to clean up one by one. You can click the “blue file size buttons” behind the junk files and the expand icons to view more file details.

safe clean up iphone junk files

If done, click on “Erase now” to remove the selected junk files off your iPhone, iPad device.

sefewiper cleanup junk files

The whole cleaning process will not spend too much of your time, just wait a moment, when the cleanup is complete, the cleanup results will be displayed, you can click “Done” to return to the main window or “Rescan” to scan your device again after viewing the result.

Erase ‘Alreadly Deleted’ Files from Your iPhone,iPad to Free Up More Space

The iOS Data Eraser provides users 4 erasing option to erase data from iDevices : “iOS OPTIMIZER”,”SPACE SAVER”, “ERASE PRIVATE Data”, “ERASE DELETED FILES” and “ERASE ALL DATA”. Since sample deletion is not enough, instead, the iOS system will mark the space they occupy as free and waits new data to overwrite them,however,those deleted data can be restored by some data recovery software in market.However,you need to use the feature “Erase Deleted Files” to wipe all already deleted files from iPhone, iPad permanently,like photos, contacts, messages, videos,App data,ect.Let’s teach you how to erase all already deleted files from iOS devices permanently.

Note:Since the erased data can’t be recovered after wipe by this professional iOS Data Eraser tool,if you do not want to erase those useful data,you need to backup iPhone data to computer before the erasing process.

Step 1:Connect iPhone to a PC and Select “ERASE DELETED FILES” Option

erase deleted files from iPhone

Step 2:Start Analyzing and Scanning the Already Deleted Files from Your iPhone,iPad.

Step 3:Privew,Select the deleted files You Want to Erase and “Erase” them on iPhone,iPad

erase deleted sms from iPhone

Tips: This iPhone iPad Data Eraser provides the easy way to delete junk files from iPhone as well as left over junks and app caches.In additional,if you want to sell the old iPhone and buy a new iPhone 6,you can use this data eraser for iPhone to erase everything on iPhone permanently,even no data recovery in market can get them back.Since the deleted data can not be recovered again, you should make a backup of your iPhone data to computer with this Phone Transfer tool, for the sake of restoring any of them in the future.

d_win d_mac

How to Delete Photos from iPhone iPad Permanently

“I use iPhone 5S before, I recently bought a new iPhone 6 again, now I want to resell the old iPhone 5S, but there are stored a lot of photos on the iPhone 5s, these photos are a lot of personal privacy, I don’t want to be other people see, even if they are my friend.I want to know how to permanently delete these photos from iPhone without restore, so as to avoid privacy by a third party to get them back?”–ask by Ruson

When you change resell iPhone or give it away, The first thing want to delete all photos permanently,even the professional data can not be restore them again once they are deleted by iPhone Data Eraser. Since the deleted data can not be recovered again, you should make a backup of your iPhone data, for the sake of restoring any of them in the future.Here,we recommend you use this Phone Data Transfer tool,whcih allows you backup everything from iPhone to computer,or transfer data from old iPhone to new iPhone directly.

The iPhone Data Eraser tool allows you erase photos from iPhone 6,iPhone 5c, iPhone 5s, iPhone 5, iPhone 4S, iPhone 4 and iPad, you can use this iOS Data Eraser to wipe all Photos from your iOS device.What’s more, you can also wipe the other data on iPhone,Such as Messages, Call History, Facetime, Contacts, Mail, Calendar, Reminders, Notes, Voice Memos, Safari Bookmarks,ect.Now please free download the ios data eraser software and have a try!

d_win d_mac

How to Delete Photos from iPhone Permanently Before Selling

Step 1. Connect your iPhone to PC and Launch the iOS Data Eraser

First of all,you need to run the eraser tool on your computer after installation,then you must connect your iPhone to the computer with a USB cable.Once your device is recognized, the main window will pop up.

delete-iphone-photos

Tips::Please backup all images before all operations, because the delete mode is unrecoverable.

Step 2.Choose a erase mode and Scan for delete photos on iPhone

In the left sidebar,You can see five delete mode, here you can choose ” Erase Deleted Files”,then you need to Click ” Start Scan” to start to scan your iPhone deleted photos.It may cost you a few minutes.

Erase Photos from iPhone

Step 3. Wipe your photos from iPhone completely

After the scanning, you can see the results interface, many data will be displayed, such as Photos,messages, called iMessage, contacts, call history, facetime, calendar, reminders, and notes, safari bookmarks, videos and so on,here You only need to check ‘Photos’ and click ‘ Erase Now’. Then it has successfully does photos from your iPhone, software interface will immediately inform you.

Delete Photos from iPhone

Delete the above are Unrecoverable, before operation,You’d better backup all Photos to your Computer.This Phone Transfer is a powerful iPhone backup software and Phone to Phone Transfer tool,which can Backup Photos from iPhone to Windows computer/Mac without any hassle,In addition, Backup iPhone audio files and videos to Mac in different folders.
What’s more,the iPhone Data Eraser also can help you Free up Space on iPhone by Removing App Caches.

d_win d_mac