All posts by DHZ

How to Erase All Contacts from iPhone Before Selling

iPhone users may have stored lots of contacts on their iPhone. No matter some of the phone contacts that you are no longer contacts, or some friend have already changed their contact details. Before selling the old iPhone and buy a new iPhone 6s/iPhone 6 Plus, Samsung Galaxy S7/S6,the you must to delete all contacts on iPhone permanently without recovery,if you want to erase iPhone data thoroughly,even no data recovery can get them back in market, you may want to find a feasible way to deleted phone numbers, text messages, photos on iPhone permanently.

For mobile phone users, the old iPhone often contains so many your personal information in the memory card,especially SMS and contacts. Nowadays, more and more iPhone fans may want to buy the new iPhone 6/6 Plus, it is believe that there are many iPhone users have plan to sell their old iPhone in hand and then proceed with new equipment. So, before you resell your old iPhone device, after all, you must to delete multiple contacts at once from your iPhone before selling it safety,in ordering to protect the personal privacy going away.

The default settings can not permanently delete contacts

Maybe you have deleted many contacts on our iPhone you don’t want, but the deleted contacts still store in your iPhone but you can’t found them. Actually, if you have give away your iPhone to others, someone can also recover the deleted contacts and more other deleted data on your old iPhone by iPhone Data Recovery.However,if you want to permanently erase deleted contacts on iPhone before selling,you must to use third-party iPhone Data Eraser software tool.

Permanently Erase Deleted and Existing Contacts off iPhone at Once

If you have bought a new iPhone 6s and want to sell the old iPhone,you can use this Phone to Phone Transfer to copy all contacts from old iPhone to the new iPhone 6S/SE/6,Samsung Galaxy S7/S6/Note 6/A9 and other new phone directly,then erase all contacts from old iPhone with the help of professional iPhone Data Eraser tool,which can help you erase existing and already deleted contacts from iPhone permanently.This iOS Data Eraser not only can help you wipe contacts on iPhone,but also support delete text messages, photos, videos, notes, Apple ID, private data, ect, and 100% safety can’t be found forever.

Now, please download the free trail version and have a try.

d_win d_mac

How to Delete Multiple Contacts on iPhone at Once

Step 1. Run the program and connect your iPhone/iPad/iPod touch
After the installation, run iPhone Data Eraser on your computer. Then get your iOS device connected with a USB cable to the computer. When the program recognizes your device, you’ll see its main window as follows.

iPhone contacts eraser

Step 2. Choose a type of data erasing
From the main window, you can see some information about your device on the left side. On the right side, there are 4 kinds of data erasing ways:”Express Cleanup” “Erase Private Data” “Erase Deleted Files” and “Erase All Data” , select right one you need. This article will take “Erase Deleted Files” as an example:

Erase Deleted Files: Erase all already data on your ios devices permanently,only erase deleted/existing contacts, pictures, videos, call logs and messages, making them unrecoverable.

erase delete contacts from iphone

Please choose the first type (the other type is not available yet).

Step 3. Start to Scan Deleted Data on iPhone Device
There are three security levels to erase all data on your device:

Low: Overwrite all of your data with zeros to ensure that the files are not recoverable.
Medium: Overwrite your device with junk files to ensure that the files are not recoverable, and no one knows that you’ve erased your device. .
High: Erase and overwrite your device three times, and the security standard is based on the U.S. DOD 5220.22-M, more secure for confidential data destruction on your device.

wipe contacts off iPhone

You can choose any of them according to your requirement. Higher levels will ask for more time. Here, let’s choose the medium one. Then click on the Start button. To make sure that you’ve backed up your important data and still want to move forward, you need to type a word shown you in the input box and click Confirm. Now, the program begins erasing all data on your device as shown below.

delete contacts from iPhone

Note: Please don’t disconnect your device during the process. Or data on your device will not be completely erased.

Step 4. Use your iPhone device as a new one and sell it safety
When your device is erased completely, you’ll get a totally new device. You can set it as a new device or choose to restore it from iTunes/iCloud backup. If the backup contains the data you don’t want, you’re suggested not to restore from it.

delete iPhone contacts complete

Tips: The iPhone Data Eraser for (Mac&Windows) is the best iPhone data eraser to get your iDevice started with a clean slate before your resell, donate or trade it in. Now,you can free download and install it on your computer and wipe everyting on your iPhone, iPad.

d_win d_mac

Read More:

Permanently Erase Data from iPhone Before Selling

Erase All Content and Settings on iPhone Permanently

Permanently Delete Messages from iPhone before Selling

How to Optimize Slow iPhone For Best Performance

How to Recover Deleted Contacts from iPhone

How to Recover Deleted Notes on iPhone and iPad

If you deleted some important notes on your iPhone/iPad accidentally, lost notes on your iPhone after upgrading to iOS 8, iOS 9,what can you do to restore lost or deleted notes on iPhone? Do not worry, you still have chance to get lost notes back from ios devices. This article mainly teach you how to retrieve deleted notes on iPhone 6/5S/5/4S/4 with and without iTunes backup.

To recover deleted notes on iPhone,you must to use a third-part iPhone Note Recovery software: iPhone iPad Data Recovery, which can help you restore your valuable notes from iPhone. Once lost notes on your iPad,this Notes Recovery for iOS also can help you recover deleted notes on iPad in three ways. What’s more the iPhone Notes Recovery empowers you to restore notes as well as music, photos, videos, contacts, etc. of your iPhone, you can choose whatever you want to recover casually if you lost data on iPhone due to iOS update/iOS jailbreaking.

d_win d_mac

With the help of iPhone Notes Recovery, you are provided three ways to recover deleted notes on iPhone:

Way 3: Recover iPhone Notes from iCloud Backup

Both of these three ways are very easy, you can complete all the operation steps in seconds.Let’s show you how to recover notes on iPhone directly, and how to scan and restore iPhone notes from iTunes backup file.

Tutorials 1: How to Recover iPhone Notes from iTunes backup

Step 1. Select the Backup File to Scan
After downloading the program, install it and launch it on your computer. You will get a main interface as below. Select the backup files of your iPhone and start scan the specific contents of the backup file.

extract backup file from itunes

Step 2. Recover Deleted iPhone Notes
After the scan, check and preview your iPhone notes, and then you can save them on your computer with one click “Recover“.

restore iphone notes

According to the aforesaid information, this iPhone Data Recovery software also can help to get back lost photos, videos, contacts, messages and call history on your iPhone, and you can recover them all with one click at the same time, if you are in need.

Tutorials 2: Directly Recover Notes from iPhone 6 Plus/6/5S/5C/5/4S/4

Both Windows and Mac versions of iPhone Data Recovery admit you to scan your iPhone 6/6 Plus/5S/5C/5/4S/4/3GS to restore deleted notes on it directly.

Step 1. Choose the “Recover from iOS Device” Mode
After choosing your iPhone, you will get the interface below. Please choose “Recover from iOS Device“.

connect iphone with the computer

Step 2. Enter your iPhone System and Scan iPhone Notes
I. For iPhone 6/6 Plus/5S/5C/5/4S user, You can “Start Scan” button directly to scan your iPhone, then a scanning window will be shown.
II. For iPhone 4/3GS user, you need to enter into the iPhone’s system as the follow steps:
1. Hold your iPhone and click “Start” button on iPhone.
2. Pressing “Power” and “Home” buttons for 10 seconds.
3. After 10 seconds, release “Power” button, but still hold “Home” for another 15 seconds.
After entering your iPhone system, the program will start scanning your iPhone and find out all your lost and existing data.

restore iphone data

Step 3. Preview and Restore Deleted Notes from iPhone
After scanning, you can freely preview the found notes. Choose those you want to save and click “Recover” to save them on your computer with only one click.

recover notes from iphone

Note: Data found here includes deleted data and those still on your iPhone. If you only want back your deleted ones, you can refine the scan result by using the slide button at bottom to only display deleted items. Mark them and press “Recover” button to get them back.

d_win d_mac

iPhone iPad Data Recovery Works great for iOS 7, iOS 8 and all iPhones (iPhone 6 included), iPads & iPod touch.It’s a mighty recovery software designed for iDevice users to recover deleted data from iPhone, iPad, iPod touch, empowers you to recover deleted photos, text messages, contacts, notes, videos from your devices. Providing that you are in need of finding a suitable and practical software to help you recover photos, videos, contacts from your iPhone, iOS Data Recovery is your final appeal beyond doubt. For your more referance about the useful way to backup iPhone data, you can use this Phone Transfer to backup data from iPhone to computer or transfer data from old iPhone to new iPhone 6/6 Plus!

Related Article:

How to Recover Lost Notes after iOS 10 Update

How to Restore Deleted Notes on iPhone 6S and iPhone 6

3 Best Ways to Recover Deleted Data from iPhone

How to Transfer Data from Android to iPhone

iPhone operating system, we have to praise enough fast enough and concise, so many people abandon the android mobile phone, and buy a new apple mobile phones.Before you store photos, video, contacts, messages and other important data in the android mobile phone, now, if you want to move the data to iPhone from old Android phone, you can do!You might to transfer the data to the computer to the iPhone, this way is too much trouble, transfer format may not support in the past.Don’t worry, will introduce you to phone data transfer software.

Directly Transfer Data Between Android and iPhone 7/6S/6/iPhone SE

Android to iPhone Transfer is one of the best mobile transfer tools, with which you are allowed to transfer contacts, messages, photos and music from Android to iPhone 7(plus), iPhone 6s(plus), iPhone 6(plus), iPhone SE, iPhone 5s/5/4s/4. Just a few simple clicks would solve your data transfer problem between Android (Samsung Galaxy,HTC One, Huawei P9/P8/M9/M8, Google Pixel/XL, LG, Motorola, Sony,etc.) and iOS, two different platforms. It’s easy to use. You can easily transfer text messages, contacts, photos, videos, call history, ect from Android phone to iPhone 7/7 Plus directly.

Data transfer between iOS, Android and Symbian smartphones can be that easy! With only one click, all your files can be transferred perfectly without any damage.Just download the trial version and follow the steps below to have a try!

d_win d_mac

How to Transfer Contacts from Samsung to iPhone 7/6S/6/SE

Step 1. Run the Phone Transfer on your PC
After downloading and installing the Samsung to iPhone contacts transfer, you should run it. Then the primary window will be shown on your computer screen. As you see, there’re four modes available. To transfer Samsung contacts to iPhone 7/6/5S/5/4S/4 and iPhone SE, you ought to select “Phone to Phone Transfer” mode. Click Start.

Android to iPhone Transfer

Step 2. Connect your Samsung Phone and iPhone with PC
Next, connect your Samsung phone and iPhone, iPhone 7 for example to PC at the same time after you launch Wondershare MobileTrans. Then if you want to clear you iPhone, the destination phone, click the bar “Clear data before copy”.

transfer Android data to iPhone

Note: The rectangle button Flip allows you to change the place of phones.

Then, check whether you have installed iTunes on your computer or not. If not, Phone Transfer will remind you of installing it.

Step 3. Transfer Samsung Data to iPhone 7
In this step, you need to uncheck the items – text messages, music, and photos. Then click the green “Start Copy” button. This phone contacts begins to transfer contacts from Samsung to iPhone automatically. During this contacts transferring progress, you ought not to disconnect either of your phones.

transfer contacts from Android to iPhone

As a matter of fact, apart from transfer contact from Samsung to iPhone, Phone to Phone Transfer allows you to copy Samsung SMS and contacts to Android phone with one click too. Moreover, if you have any demand of moving your data, namely contacts, SMS, and text messages, from iOS to Android, it can be a good helper.

d_win d_mac

Tags: sync android to iPhone 7, transfer android to iPhone 7 plus, transfer android data to iPhone, transfer data from android to iPhone, copy data from data to iPhone, import data from Samsung to iPhone, transfer android data to iPhone 7,copy Android data to iPhone SE, transfer data from android to iPhone, sync android to iPhone 6s plus, android to iPhone transfer,move data from android to iPhone,move contents android to iPhone

Related Articles:

How to Sync Contacts from Android to iPhone

Move Contacts from iPhone to new Android phone

How to Transfer Data from old iPhone to New iPhone

How to Transfer Data from Samsung to iPhone

How to Permanently Delete Text Messages from iPhone

Summary:Simple deletion won’t really delete the iPhone text messages,finding a way to permanently delete SMS before selling or giving away your iPhone, iPad? Read this guide to know three ways to erase already deleted and existing messages on iPhone permanently.

Smartphone always played an important role in our life since the introduction of iPhone. According to leading industry statistics Analysis,nowadays iPhone has been the most successful smartphone . Today, around 1 out of 5 smartphone owner has an iPhone at hand. New features and functions are consistently added to the new models with nearly the same price, cause that users tend to change or upgrade their old iPhone or Samsung phone more frequently, iPhone is also not an exception. You can easy sell your old iPhone in a short period of time at online market place, like eBay and Craigslist. However, this actions should be taken before selling your iPhone to someone who you don’t know well previously.But,before selling your old iPhone,please remember erase SMS messages on iPhone permanently,make sure that your personal information will not be stolen.

Messages on iPhone Don’t Actually Get Deleted

I want to sell my old iPhone 5 and purchase a new iPhone 6s or iPhone SE,after delete all messages,iMessages on iPhone 5 by simple “delete” operating,i still search those text message(the deleted ones are included) in details.Now,I want to permanently delete all SMS on iPhone 5 without resotred by any data recovery,how can I do? “– Ask by Kindly

According to test explanation messages don’t get deleted Entirely. Even after you delete a conversation from iPhone, it can still be found when using Spotlight to enter some keyword and search. Is there a way to permanently delete iPhone text messages?

Backup iPhone Messages Which You Need Before Deleting

Text messages and iMessages on iPhone are important forms of communication with family,loved ones,friends and colleagues.Backing up your iPhone messages data before deleting is a good way to prevent data loss.You can backup messages on iPhone via iTunes or iCloud,but both of these ways require you backup entire messages file data instead of selecting.So how to save messages from iPhone to computer in a optional solution?Here we introduce you an helpful data manager tool to backup iPhone messages to computer.

Permanently Erase SMS from iPhone before Selling

This is because when you delete text messages from iPhone, they don’t actually get deleted. Instead, they’re marked for deletion by the operating system and hidden so that they appear deleted. But they’re still exist in iphone. Only when you sync your iPhone with iTunes are they truly deleted. As a result, if you want to permanently remove messages from iPhone, the first solution is to sync iPhone with iTunes. Today, I am gonna to introduce a iPhone SMS Eraser – iPhone Data Eraser, designed for iPhone users erase messages on iPhone, iPad permannately and it’s absolutely none recoverable.What’s more,the iPhone Data Eraser also can help you erase contacts, photos, videos, notes, call logs, whatsapp messages, Apple ID from iPhone permanently,you can use the program clean junk files on iPhone and optimize the slow iPhone for best performance easily.The iOS Data Eraser works well with iPhone 7,iPhone SE, iPhone 6S(Plus), iPhone 6(Plus), iPhone 5S/5/4S/4, iPad Pro, iPod Touch with iOS 10.iOS 9, iOS 8, iOS 7 or earlier.

Please download the trail version for free and have a try:

d_win d_mac

Now,follow guidance step by step to Permanently Delete Messages on iPhone 7/SE/6S/6/5S/5C/5/4S/3GS,etc,.

3 Ways to Delete Text Messages on iPhone Completely

Way 1: Delete Existing SMS and Private Data from iPhone Permanenlty

Note: Please remember backup iPhone data to computer before using this iOS Data Eraser to wipe your iPhone private data,such as contacts, sms, photos, videos, notes, call logs and more.It’s very necessary to make iPhone back up,because you will never get the deleted data back once eraser by this program,even some professional data recovery in market.

Step 1: Install and Run iPhone Data Eraser on PC or Mac
Download the software through above link and install it on a computer with built-in wizard. The software will be launched automatically when the installation is completed. Then plug your iPhone into the computer via Apple unique USB cable. The program recognizes the device immediately once it’s well connected. Make sure iTunes is pre-installed on the computer.

d_win d_mac

The main screen is shown like follows:

Currently, there are four earsing options available: “Express Cleanup”Erase Private Data” “Erase Deleted Files” and “Erase All Data“.

iPhone SMS Eraser

Step 2: Choose the Erasing Option and Start to Scan (Erase Private Data)
In most cases, you should choose the “Erase Private Data” method, which will erase all of the deleted data permanently. The “Erase All Data” option will remove all files including: existing and deleted files, like photos, SMS, videos and call logs. It will take a few seconds to finish the whole scanning process, please be patient.

erase iPhone private text messages

Begin to scan all text messages stored in your iPhone

delete sms on iPhone

Step 3: Select Messages or Other Contents, Start to Erase Data on iPhone Permanently
Once the scan is complete, all the existing private data will be organized by category, you can select items listed under private Data to view data details. You’re allowed to erase multiple data at a time by selecting check box. Erasing process will not have any impact on your current data and device, very safe!

delete sms on iPhone

Step 4: Start to Erase Selected Messages from iPhone Permanently
When the scaning process is complete, all the existing messages and other private data will be organized by category, you can select and preview the details before erase them. The iPhone Data Eraser allows you wipe multiple data at a time by selecting check box. If you only want to clean up all SMS on iPhone,please just select the “Messages” item,then type “delete” word in the box to confirm the erasing process.

clean up all sms on iPhone

Tips: The erasing process will not have any impact on your current data and device, very safe!

Way 2: Erase Deleted Messages from iPhone Permanently

You know simple deletion is not enough; “Erase Deleted Data ” optioin is the most effective and safest data erasing solution whih is captable of permanently wiping data from iPhone device. Even you select the lowest level, it’s still safe for you data in most cases.

d_win d_mac

Step 1.Select “Erase Deleted Data” Option, Analyze and Scan Your Device
Click the Start button to begin the erasing process. It takes some time to fully analyze and scan your phone. After that, all of your personal data and deleted data will be displayed on the panel.

wipe deleted sms from iPhone

Step 2.Preview Scaned Data and Completely Erase Them Now
Unlike other data wiping programs, This program offers extremely comprehensive preview feature and option that allow you to selectively erase unwanted data, hommization design and easy to use. You can select the “Messages” option and click “Erase Now”. It will deep erase all messages on your iPhone device without recovery possibility.

erase deleted sms from iPhone

By using this iPhone SMS Eraser Software, we need no longer worry about the privacy issue. It’s 100% safe to sell the device to another one, even he/she is a tech veteran. Personally, it’s a mush-have tool for people who change their mobile phone regularly. Privacy is un-breakable with the help of this iPhone Text Messages Eraser app.

d_win d_mac

What’s more about iOS Data Eraser:

The professional iPhone iPad Data Eraser for (Windows&Mac) can help you erase all data permanently and nobody can recover them any more. After the processing, you can rest your heart to deal with your iPhone or other device.In additional,it allows you clear caches, browsing history, unneeded files permanently to protect personal information effectively. And it supports for all iOS (iOS 9, iOS 8, iOS 7 included).

Main Features of iOS Data Eraser:

-Destroy all sensitive files completely
-Provide safe environment to prevent identity theft
-Delete all junk files permanently for you
-Browse iPad/iPhone/iPod Touch data directly
-Remove Data permanently before selling/trading your device
-Support almost all iPad/iPhone/iPod Touch files

Way 3: Permanently Erase Text Messages on iPhone via iOS Private Data Eraser

iOS Private Data Eraser provide the available way for you to selectively erase messages from iPhone permanently.You are allow to delete lots of iPhone messages at the same time with simply process.Photos, messages, contacts, notes, Safari bookmarks and your call history are among the things that can be efficiently deleted by this program.Almost all iOS devices are supported,including iPhone 7,iPhone SE,iPhone 6S(Plus),iPhone 6(Plus),iPhone 5S/5C/5,iPad Air,iPad Pro,iPad Mini,iPad 4/3/2.

d_win d_mac

Firstly run the iOS toolkit on your computer,and choose “iOS Private Data Eraser”hen you’ll see all features inside as follows.

ios-private-data-eraser

Step 1.Connect iPhone to the Computer
Connect your iPhone to the computer with an USB cable.Then run the program and choose “iOS Private Data Eraser” from tools in the window above.Once the program detect it,it will be displayed as follows.

connect-iphone-pc

Step 2.Scan the Private Data on iPhone
To erase your private messages from iPhone,please allow the program to scan the private data on your iPhone.Click the “Start Scan” button to begin the scanning.The scanning may last some time.Just wait until you can see all the found private data in the scan result.

scan-private-data-on-iPhone

Step 3.Begin to Wipe Messages from iPhone Permanently
Now you are allow to preview all found data in the scan result one by one,such as messages,photos,contacts,call history and more.Check and select the item which you need to delete,and then click on the “Erase from the Device” button to wipe it without restoring.

Since the erased data can’t be recovered,you should confirm your operation carefully.Just enter “delete” and click “Erase now” to confirm it.

erase-iphone-sms

It will takes you some time to wait until the erasing process is complete.

begin-erase-iphone-sms

Once the process is complete,you will see an “Erase Completed” prompt appear on the window of the program.

iphone-sms-erasing-done

d_win d_mac

Related Articles:

How to Delete Contacts from iPhone before Selling

How to Delete Photos from iPhone before Selling

How to Delete Data from iPhone Before Selling

How to Optimize Slow iPhone For Best Performance

How to Transfer Contacts between Samsung Galaxy and iPhone

“Help! I use Samsung Galaxy S4 before,no I want to copy all phone numbers from Samsung smartphone to iPhone 6s plus.How Can I Transfer Contacts between Samsung Galaxy and iPhone 6s? ”

As the replacement of electronic products faster and faster, people changing the mobile phone from Samsung S7/S6/S5/Note 5/Note 6 to iPhone 6s/iPhone 6s Plus,iPhone 6/6s and iPhone SE/5SE much more frequently. I use Samsung and now want to purchase the coming iPhone 6. What I can do to transfer my Samsung Galaxy contact to my new iPhone 6 without complex operation?Then you must be in need of a tool to transfer contacts from Samsung Galaxy to iPhone.

Phone Contacts Transfer, as the name implies, can help you transfer contacts between iPhone and Samsung. You can free download the phone transfer to move contacts from Samsung to iPhone 6s(plus), iPhone 6(plus) and the lastest iPhone SE/5SE easily without data loss.
What’s more,it also allows you copy other data from Samsung to iPhone,including photos, videos text messages, contacts, music, call logs, apps, etc. are all transferrable. No matter you use which phone brand, Samsung, HTC, LG, Sony, Motorola, iPhone, iPad, iPod touch, Blackberry and even Symbian phone such as Nokia. Sounds great, isn’t it?

Now, I should begin to show you the way this software functions. (Take Samsung Galaxy S5 and iPhone 6S Plus for examples.) But, first, download and install it by clicking the buttons below.

d_win d_mac

Tips: By using Phone Transfer, you can transfer contacts from Samsung Galaxy phone to iPhone and transfer contacts from iPhone to Samsung Galaxy fast and efficiently.
Now let’s check how to copy contacts between Samsung Galaxy and iPhone with this Phone Transfer tool in detailed steps.

How to Transfer Contacts from Samsung to iPhone 6S/6/iPhone SE

Step 1. Launch the program on computer

Download, install and launch the program on your computer. Then the following window will pop up, select “Phone to Phone Transfer”, click “Start”.

samsung-iphone-transfer

Note: Please make sure you have installed iTunes on your computer.

Step 2. Connect both Samsung phone and iPhone to PC

Connect both your iPhone and Samsung phone to PC via USB cables. After that, this transfer will display them on the main interface, named as “Source” and “Destination”. You can change the place of phones by pressing the rectangle button “Flip”.

transfer-contacts-iphone-samsung

Tips: Mobile Transfer is fully compatible with iPhone 5, iPhone 4S, iPhone 4, iPhone 3GS and iPhone 3G.

Step 3. Transfer contacts between Samsung and iPhone

copy-contacts-iphone-samsung

To sync the contacts from one phone to another, please mark the “Contacts”, then click the green button “Start Copy”. If you have a need, you also can mark “Text message”, “Photo”, “Music” , etc. to transfer them to another phone. Make sure neither of phones is disconnected during the data transferring process. After the transfer, click “OK” button.

d_win d_mac

How to Recover Lost iPhone Data after iOS 9/iOS 10 Update

[Summary]: Every iOS upgrade will erase all contents on your iPhone, iPad,If lose data on your iPhone after iOS 9 or iOS 10/iOS 10.3/iOS 10.3.2 update,how to can you get those erased data back? Please keep reading this articles,we will teach you 3 ways to recover lost data from iPhone, iPad and iPod Touch after update to iOS 9, iOS 10.In additional,you can follow the same steps to recover deleted data from iPhone 6S, iPhone 6, iPhone SE and iPhone 7 with iOS 10/iOS 10.3/iOS 10.3.2.

Please help! I lost all data on my iPhone 6 after updating to iOS 10.3.2, I try to restore data in iCloud. No luck,I never sync iPhone data to iCloud before,how do I restore lost iPhone data after updating to iOS 10?“-Jack

Retrieve Deleted Data on iPhone after iOS 9/10 Update

After updating to the latest version of iOS 10(iOS 10.3.2), it may cause erase contacts, text messages, photos, videos and other data on your iPhone. If you have lost contents on your iPhone with iOS 10, you can restore your iPhone lost data with the backup you have created with iTunes. After restoring the backup to your iPhone, you may get the lost iPhone data back. So no matter what happen and cause lost data after update iPhone to iOS 9/10.Many iPhone users lost data after update iPhone to iOS 10. However, If you want to restore lost data from iPhone 7/6S/6/5S/5/4S with iOS 9/iOS 10, you need to use a third iOS data recovery.

Restore Lost Data from iPhone after iOS 9 ,iOS 10 Update in 3 Ways

To recover lost or deleted iPhone data in three different ways – “Recover Contacts from iTunes Backup File” ,”Directly Scan and Restore Data from iPhone”and “Recover iPhone lost data from iCloud”.If you have sync iPhone to iCloud,you can get contents backup from iCloud.

If your want to restore lost data from iPhone 6/5S/5/4S after update to iOS 9/iOS 10, this article mainly teach you a easy way to get lost files back from iPhone after iOS update.Now,you can free download this iOS 9/10 Data Recovery software,which can help you recover lost data on iOS 10/9 devices,including contacts, text messages, photos, videos,etc,. This software is used for recovering deleted or lost files from iOS devices and iTunes backups, and the software also helps users backup iPhone, iPad and iPod touch files to computer. The software works perfectly with the latest version of iOS 10.3.2, so you take advantage of it with no worries. The following guidance will show you how to recover lost data on iPhone after iOS 10 update.

Now, please download the trail version for free and have a try:

d_win d_mac

Methods 1: Directly Recover Lost Data from iPhone after iOS 9, iOS 10 Upgrade

The professional iPhone data recovery is an efficient data recovery software for ios users to recover all your lost data under various tough circumstances.

-Lost or deleted data on your iPhone/iPad by accident.
-Your iPhone was water-damaged, stolen, lost, damaged or broken.
-Your iPhone device is attacked by viruses.
-Lost iPhone data due to jailbreak, iOS 10/iOS 9 upgrade or factory reset .
-iPhone locked by forgotten passcode.
-iPhone stuck in recovery mode, iTunes screen, Apple logo, black white screen of death, DFU mode,etc.

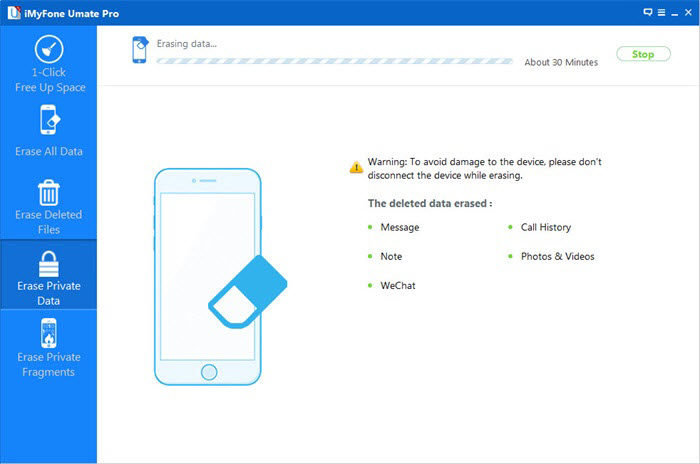
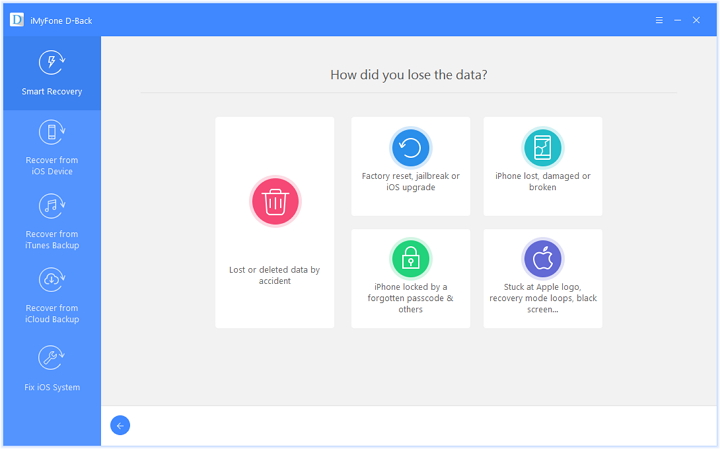
To recover lost data from iPhone, iPad after iOS 10 update,please run the iOS Data Recovery on your PC or Mac,then click “Smart Recovery” >> “Factory Reset, Jailbreak or iOS upgrade“.The iPhone data recovery software can find your missing data quickly, depending on the file type and the situation in which you lost it.

smart iPhone data recovery

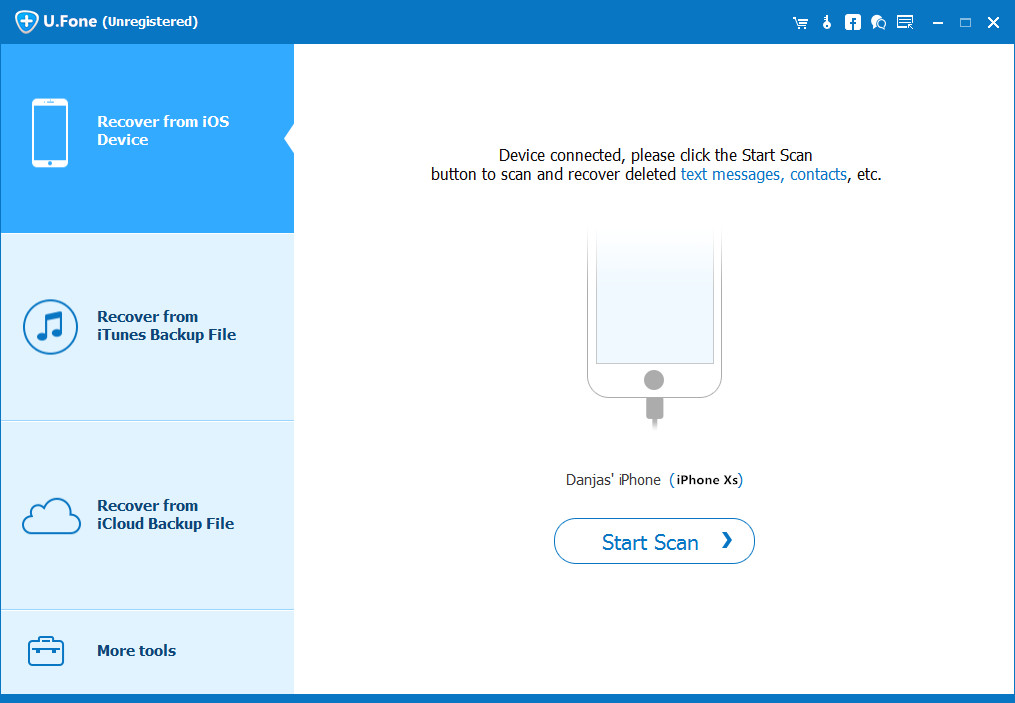
Step 1: Connect iPhone to Computer
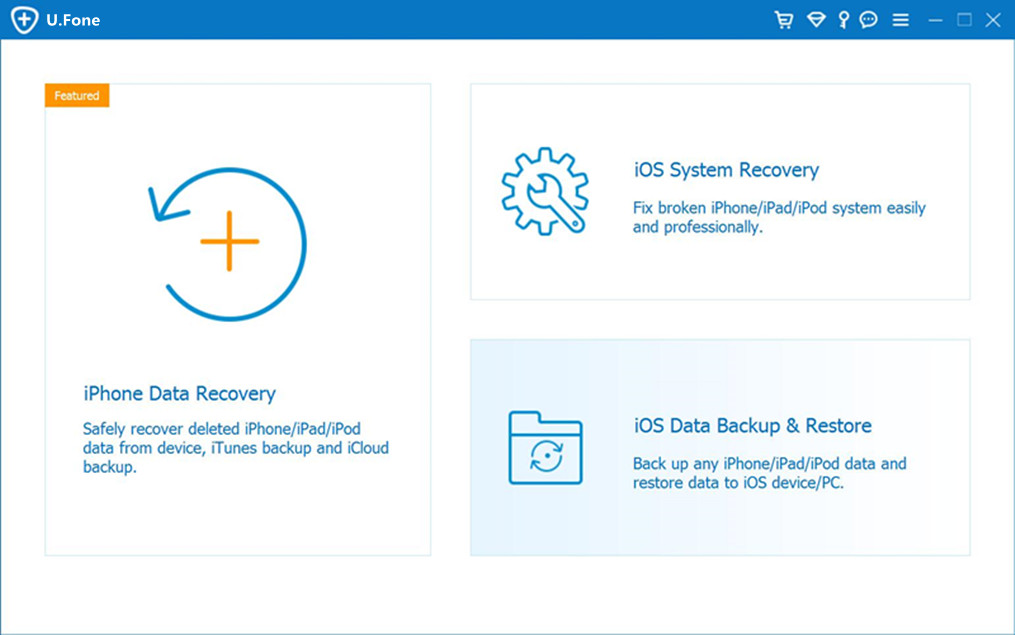
Choose your device to begin with,install the program on your computer and run it. Then connect your iPhone to the computer.If you want to directly retrieve deleted files from iOS devices,you should select “Recover from iOS Device” in the following interface.

connect iphone with computer

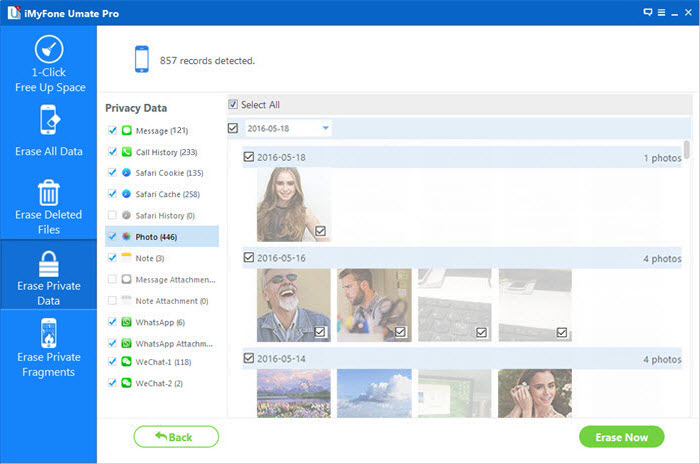
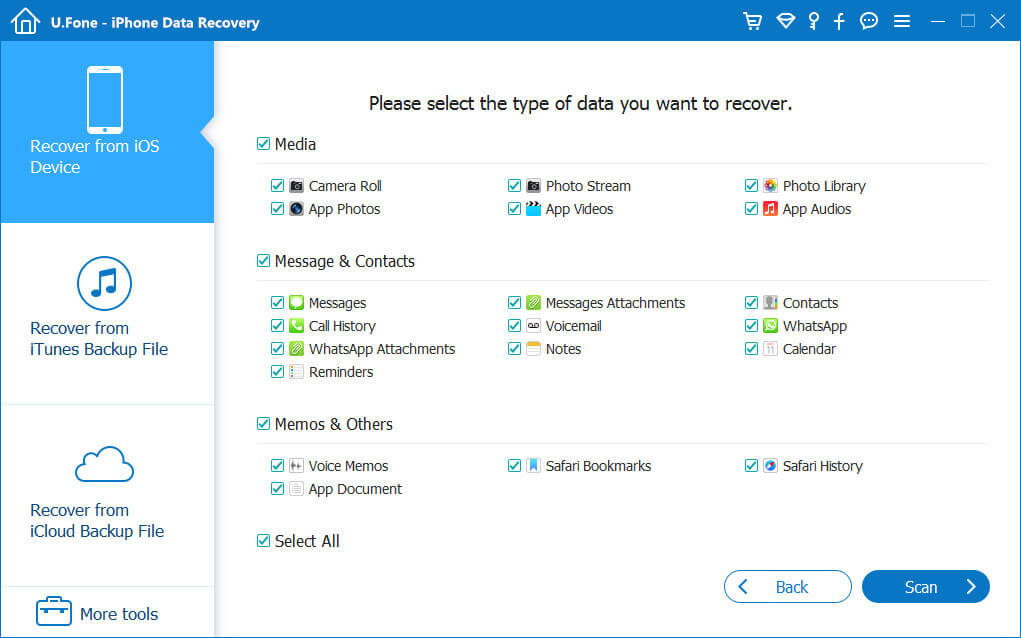
Step 2: Select the File Types You Want to Recover
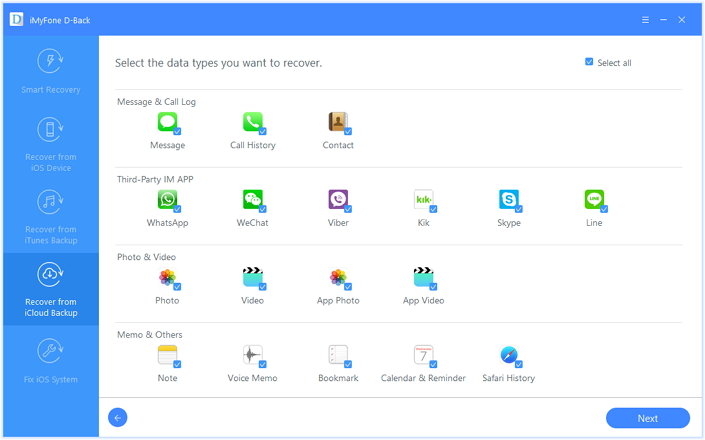
Select the file type you want to get back, the program provides you various recoverable file types for you select,like photos, videos, contacts, SMS, notes, WhatsApp messages, Kik messages, Viber chat history, Skype chat messages, Wechat chat record, call history and other media files and texts files.Please select the file type you need,then click “Next” button.

select file to recover

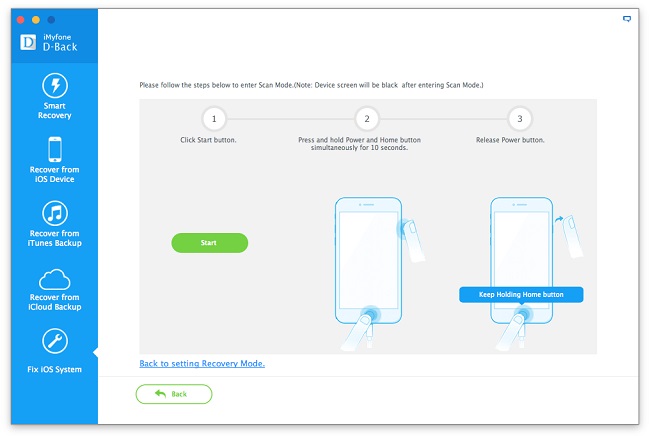
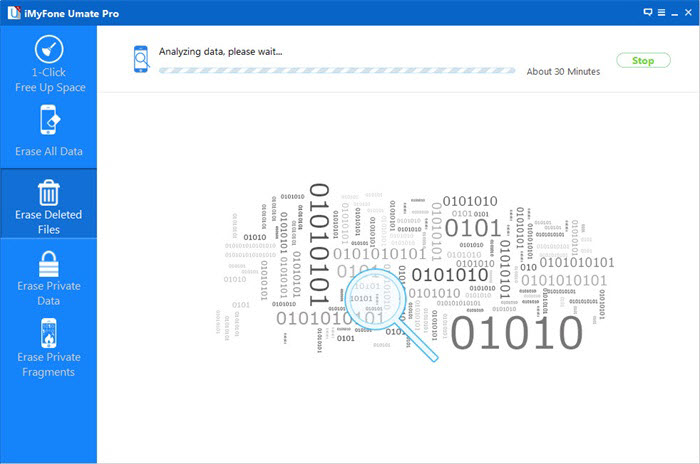
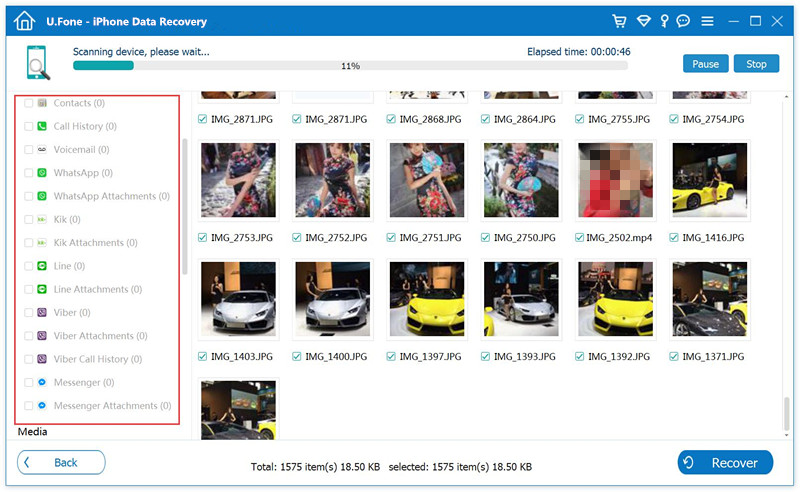
Step 3: Begin Scan Your iPhone for Lost Data
Now the program will begin to scan data from iPhone,including the lost data and the existing data.

scan iphone and search lost data

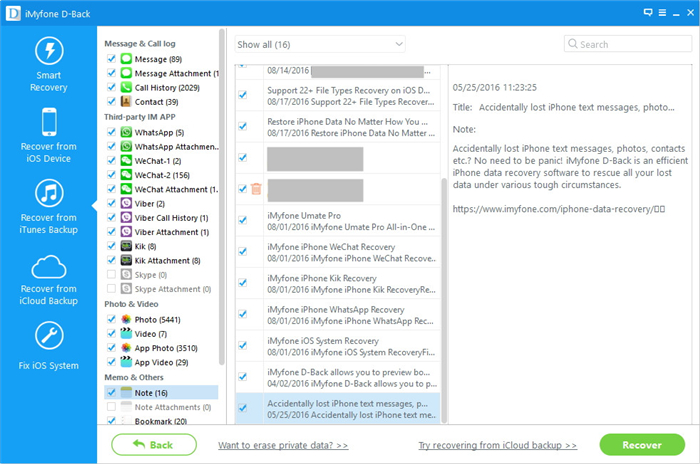
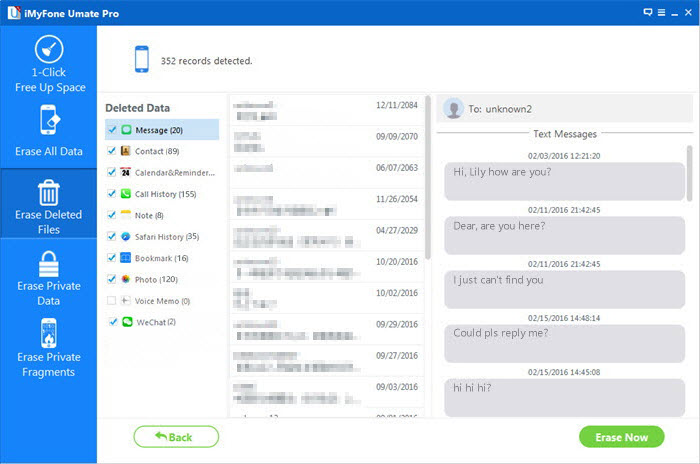
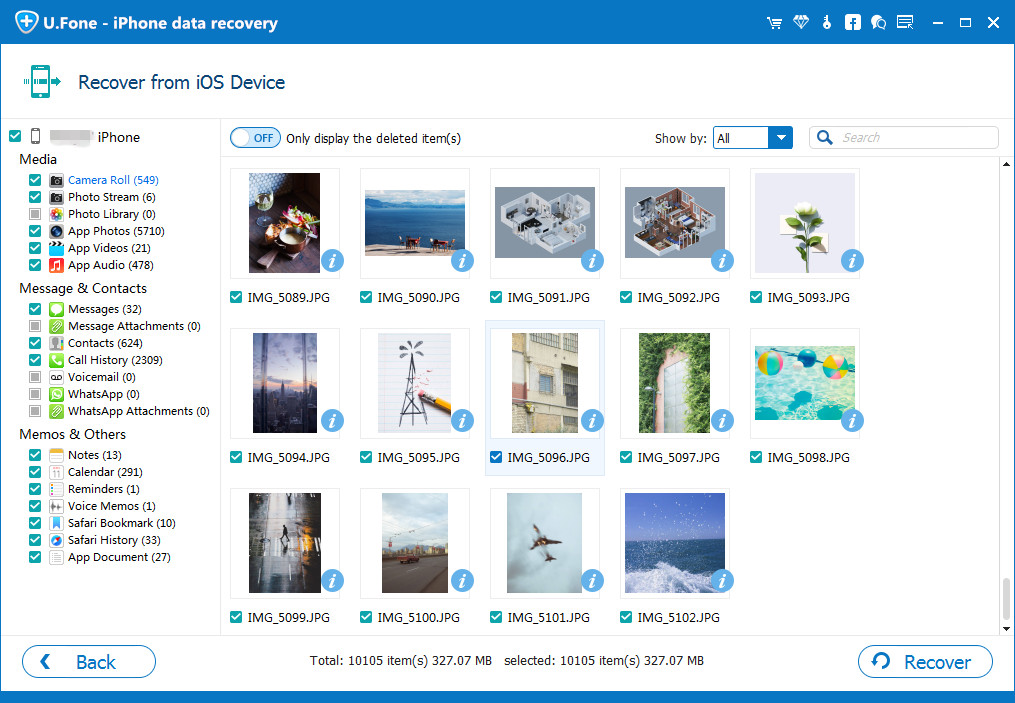
Step 4: Preview and Retrieve Lost Data from iPhone with iOS 9/iOS 10
Check the data you want to recvoer in the list of scanning results on the left. Choose those you’d like to get back and click “Recover” to recover lost files from iOS 10/iOS 9 devices,all missing data will be saved on your computer.

directly recover lost photos from iphone

d_win d_mac

Part 2: Extract and Restore Previous iPhone Data from iTunes Backup

If you have synce iPhone to iTunes before iOS 9 upgrading,you still have chance to restore lost iPhone data from iTunes backup files once lost files due to iOS 9 upgrade.This iTunes recovery mode allows you to recover your previous data by extracting iTunes backup. No matter your deleted/lost your iPhone data, or your iOS devices was lost or stolen, this recover mode can help you find your previous data back from iTunes backup files.

Recover iPhone Data from iTunes Backup Lost Due to iOS 9/iOS 10 Upgrade

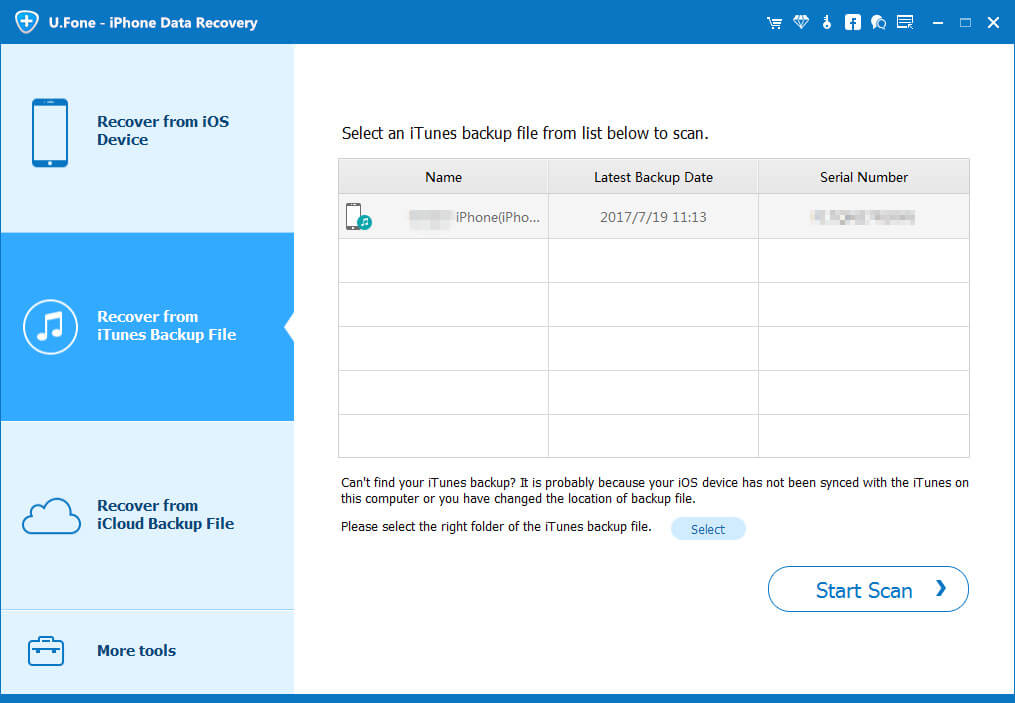
Step 1: Select iTunes Backup File to Scan
When launching the program, you’ll be lead to the “Recover from iOS Device” mode (the default mode). Select “Recover from iTunes Backup“.

select itunes backup file to scan

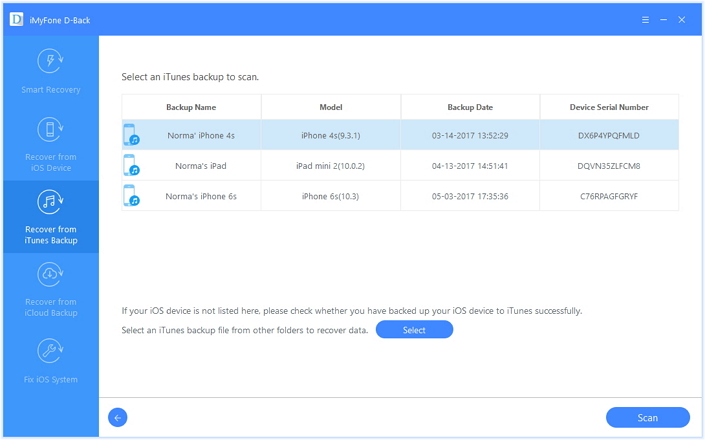
All your iTunes backup data of your iPad, iPhone or iPod touch which has ever synced with iTunes on your computer will be automatically found and listed here. Select the one of yours and click “Scan” button to begin iTunes backup extracting.

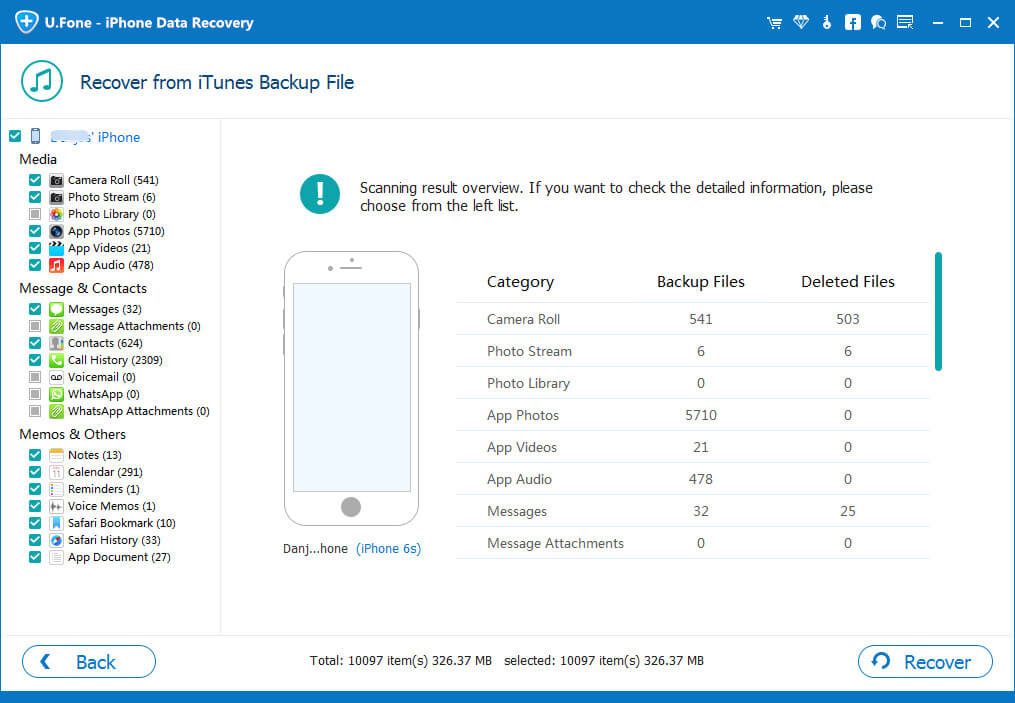
Step 2: Preview and Restore Data from iTunes Backup
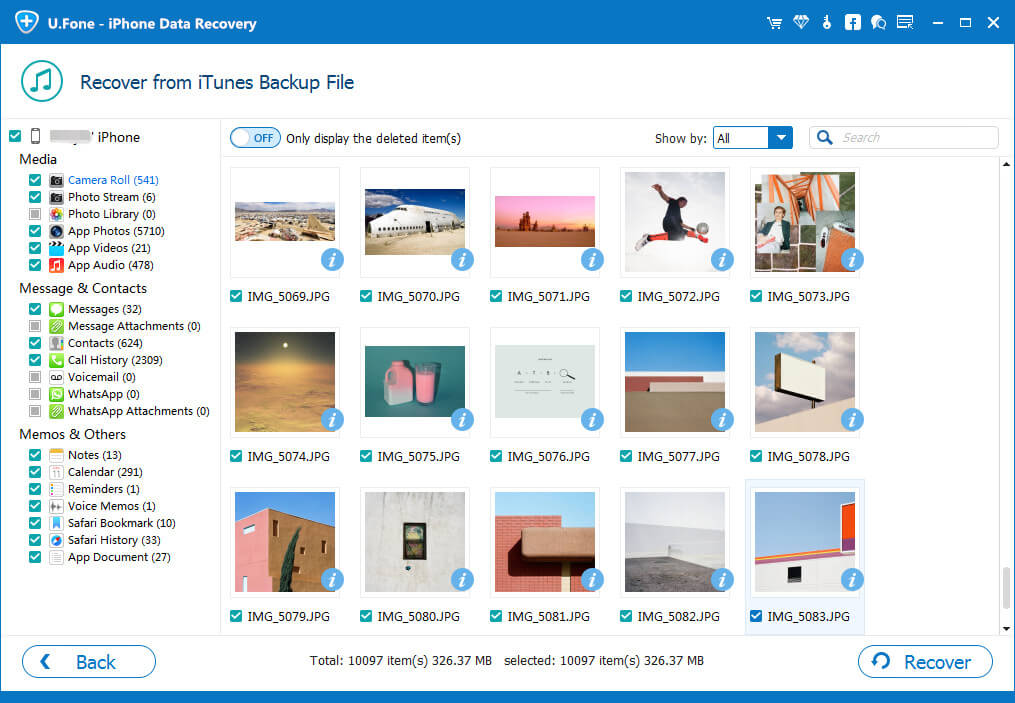
When the scan finishes, all your files backed up by iTunes can be found and displayed in categories. You can preview them one by one before recovery.

restore iphone photos from itunes backup

After the scan, you can check and preview details of your iPhone notes, and save it on your computer by clicking “Recover”.(You can selectively mark and recover those you want by pressing “Recover” button at the bottom.)

Note: If you want to recover them through this recovery mode, please remember not to sync your iPhone, iPad or iPod device with iTunes when you realize that you’ve lost data, or the iTunes backup file will be updated after the sync.

Now, download this powerful program to recover your lost iPhone/iPad/iPod data.

d_win d_mac

Methods 3: Recover Lost Data from iCloud Backup after iOS 9,iOS 10 Upgrade

With this iOS Data Recovery,you not only can extract your iPhone data from iTunes if you have backups,but also extract and restore data from the iCloud service(If you have synced all of your data to your iCloud before). To download and extract iPhone lost data from iCloud backup files,we recommend your use this iPhone iPad Data Recovery.

The iOS 9 Data Recovery will help you easily restore lost iPhone data from iCloud Backup aftr upgrading to iOS 9, whether you are planning to recover the whole iCloud backup or just one or two items from them. It also allows you read your backup data to make sure which items you like to restore.Let’s show you the use guide to restore data from iCloud backup files after update to iOS 9.

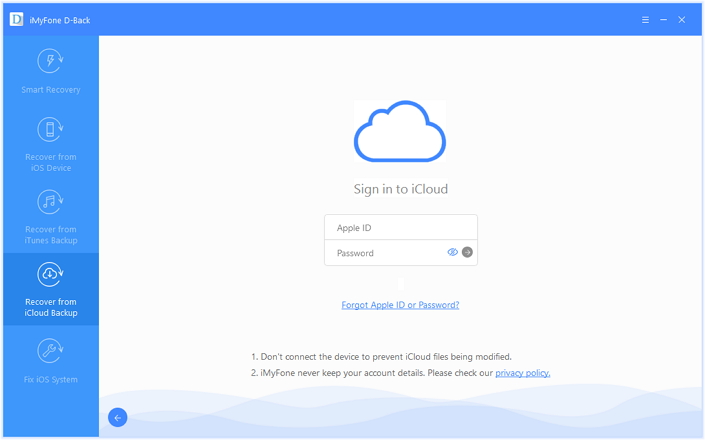
Step 1: Log on iCloud Account
After installing iPhone Data Recovery to your Mac or Windows PC, select Recover from iCloud Backup File method on the hompage. Enter your account username and password information. The program will begin scanning your backups from iCloud.

sign in icloud account to login

Step 2:Select File Type to Scan

select the file types

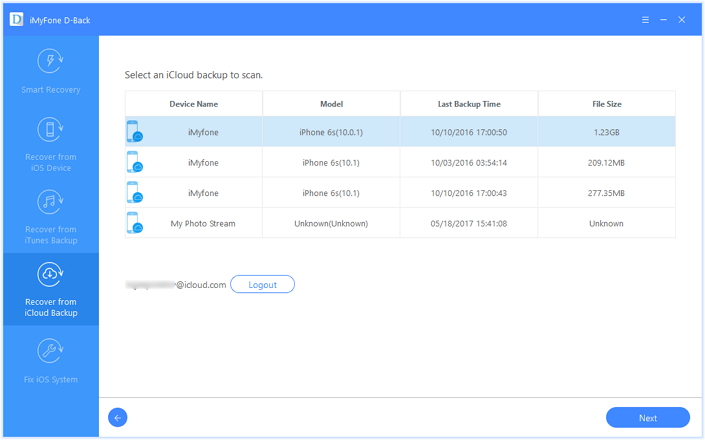
Step 3: Choose Backup to Download
In this step, you are asked to choose from up to three backups on a list as below, sorted by date. Once you made your choice, click Download button.

download icloud file

Step 4: Preview and Recover Lost iPhone Data from iCloud
On the left panel, you can click on any data to preview your previous stored backup data. Check the boxes in front of your wanted data and click Recover to restore iCloud from iPhone.

recover iphone photo from icloud backup file

Warm Tips:
iPhone Data Recovery also works when you don’t have a proper backup.This guide applies to all iDevice includes iPhone 6S, iPhone 6/ 6 Plus/5 on either Windows or Mac computer.What’s more,you also can use this iOS Data Recovery to Fix White Screen of Death iPhone during iOS 9 Upgrade.

Free download the iOS Data Recovery:

d_win d_mac

Tips: This iPhone iPad Data Recovery provides you the best way to recover deleted data on iPhone after iOS 9 upgrade is use a third party tool-iPhone Data Recovery.Which can not only recover lost data on your iPhone in iOS 9/iOS 8/iOS 10/iOS 7,but also recover photos,videos,call history,messages, attachments, WhatsApp messages, contacts, call history, reminders, notes, calendar, safari bookmarks, app documents and more on your iPhone device.

Read More Tutorial about iOS 9 Data Recovery:

Recover Text Messages from iPhone with iOS 9: Lost text messages on your iPhone after upgrading to iOS 9 from iOS 8? Don’t worry,once lost iPhone messages after iOS 9 upgrade,you still have chance to recover lost SMS from iPhone 6/5S/5/4S after update to iOS 9 on Mac or Windows computer,and then the iOS Data Recovery can help you restore back to your iPhone, iPad devices on iOS 9.

Recover Photos from iPhone after iOS 9 Upgrade: iOS 9 Photos Data Recovery allows your Restore Lost iPhone iPad iPod Pictures/Photos/Videos After iOS 9 Upgrade. Once lost photos after upgrading your iPhone to 9.0.1 and cause erase all photos,please follow this use guide to scan and restore lost iPhone photos after iOS 9 update. Only 3 stpes to get lost photos back on iOS 9 devices.Choose the files you want to recover after previewing that, mark which photos your need,and recover them easily.

Recover Lost Data from a jailbroken iPhone 6/6s:
Lost data on your iPhone 6, iPhone 6S after jailbreaking? Please learn more in this use guide,you can find a easy way to recover photos, contacts, SMS, notes, call history, etc directly from a jailbroken iPhone 6S/6, iPad Pro with the help of is a helpful iOS 9 Data Recovery freeware.

Recover Data from iPhone,iPad with iOS 10:
With the help of iOS 10 Data Recovery,you can recover lost or deleted data on your iPhone, iPad or iPod Touch with iOS 10.The iOS 10 iPhone Data Recovery provides you three ways to restore lost messages, notes, calendars, photos, videos, whatsApp messages on iPhone 6S/6/SE/5S/5, iPad Pro, iPad min 4, iPad Air devices with iOS 10 safely and without any quality loss.

Transfer Contacts from Samsung to Samsung Galaxy S6,S7

When you buy a new Samsung Galaxy S6,S6 Edge or Galaxy S7 mobile phone,the first thing you want to do is transferring contacts from old Samsung Galaxy to Galaxy S6,S7.However,how to transfer contacts from Samsung Galaxy S4/S3/S5/Note to Galaxy S6? This article maily teach you a easy way to transfer contacts from Samsung to new Samsung Galaxy S6 directly.

Many Samsung fans want to buy a new Samsung Galaxy S6,and the Samsung announced the Galaxy S6 at Mobile World Congress in Barcelona on March 1, 2015, as a fresh successor to 2014’s Galaxy S5. Aside from the general shape and size, there’s not much in common between the two models.

Samsung Galaxy S6 possible release date:
The world is waiting eagerly for the Galaxy S6 to release, and according to sources, it may release sometime early next year, around April 2015, although it may be available for preorder in around February next year.
transfer-samsung-s6-contacts
In one hand, we have the Samsung Galaxy S6. It’s the next iteration of the insanely popular Galaxy S line, and while some major changes in the battery and storage department have come along, it’s the “traditional” choice and an expected successor. People are gonna love it.

In the other hand, we have the Galaxy S6 edge (it kills me not to capitalize the e). Sleek, curvy and dare I say pretty, it’s the Galaxy S6 with a new style and a few cool side-a-licious things going on with it’s curved front display. Welcome to the future, baby. People are gonna love it, too.

Copy Contacts from old Samsung phone to Galaxy S6,S6 Edge(+)

Many people change their phones frequently and they are need to transfer contacts from from Samsung Galaxy to new Samsung Galaxy S6 phones.If you have bought a new Samsung Galaxy S6,the first thin you need to do is transfer contacts from Samsung to Galaxy S6. If you have a need to cope your old Galaxy phone contacts to the new Samsung Galaxy S6, you come to the right place.

The Galaxy to Galaxy S6 Contacts TransferPhone to Phone Transfer can help you transfer contacts between two Samsung Galaxy phones directly. It ont only allows you transfer phone numbers from old Samsung to new Samsung Galaxy S6 smart phone,but also can help you transfer other data such as music, photos, video, apps, text messages and call logs from between Samsung Galaxy mobile phone with retaining 100% quality.
Tips: If you use iPhone 4/4s/5/5s/6/6s before,you also use use this Phone to Phone Transfer to transfer contacts from iPhone to Galaxy S6/S7 easily.

Now, download the program for free and follow the steps below to have a try.

d_win d_mac

How to Copy Contacts from old Samsung Galaxy S5 to new Galaxy S6,S7

Step 1. Launch the program and connect both Galaxy phones to computer

To start with, launch this Mobile Transfer program after installing it. The primary window will pop up, select “Phone to Phone Transfer”, click “Start”. Connect both of your Galaxy phones to computer via 2 USB cables. This program will automatically detect your devices and shows it in the primary window.

samsung to samsung galaxy s6 contacts transfer

Step 2. Select the Contacts you want to transfer to the new Galaxy S6

In this step,please select the “Contacts” item that you want to switch between two Samsung Galaxy smart phone,if you want to copy all contents from old Galaxy to new Galaxy,please select “All” options.

transfer contacts from galaxy to galaxy s6,s7

Step 3. Transfer Contacts to your new Galaxy S6 from old Samsung Galaxy S5

As you see, this program allows you to transfer everything from your old Samsung Galaxy phone to the new one. For those who only want to cope contacts, please remove marks before the corresponding content. Then click “Start Copy” button to begin the transfer. When the transfer over, don’t forget to click “Completed” button.

transfer-samsung-contacts

You can click “Clear data before copy“, if you want to empty the phone book on your destination phone.

Free download the phone transfer to copy contacts to New Galaxy S6.

d_win d_mac

In additional,many people buy a new Galaxy S6,However,you need to transfer all value contacts from old Samsung galaxy phone to the new Samsung galaxy S6,or backup Samsung phone contacts to computer.If you want to transfer all contacts from Samsung Galaxy to Galaxy S6 directly,or backup contacts from Samsung galaxy S6 to computer,this Phone to Phone Transfer allows you transfer contacts from Samsung galaxy to new Samsung galaxy S6 or computer.

What’s more,before selling the old Samsung phone,you can use this powerful all-in-one Phone Transfer to delete Samsung data permanently without restore.

Read more:

How to Transfer SMS from Android to Galaxy S6,S7

How to Restore Lost Contacts from Samsung Galaxy S5

Recover Data from Samsung Galaxy S6

How to Delete Data from iPhone without Recovery

Before selling your old iPhone,please rememeber wipe all data on iPhone permanently without restore.
Deleting data from iPhone and other iOS devices become necessary when you want to sell it and protect your personal data from others. On iPhone we store lots of personal data like images, contacts iMessages etc so that before selling our old iPhone it is required to delete all the data permanently from old iPhone.But it is also necessary to create a backup file of the entire iPhone data before deleting it, because once you delete it permanently then you cannot access it without backup or without using iPhone data recovery tool. So to avoid botheration it is important to take a fresh backup of your iPhone. This will protect your data form inaccessibility.

Erase all Data on iPhone Permanently When You:

-Wish for to sell your old phone to any unknown person
-Recycle it to cell phone manufactures
-Want to deal it in for a new phone
-Want to donate your old phone
-To defend your privacy and precious data of your iPhone, iPad before selling your old ios devices, it is necessary to delete the entire data. You can erase iPhone data by many other options like “restore factory setting”, “Reset/Restore iPhone” or “upgrade to a new ios system” but it is not enough, because one can easily restore those data by using data recovery software available in the market.

So it is necessary to delete data on your iPhone permanently by the help of given iPhone data eraser tool,I am recommend you use this iPhone Data Eraser software,which can help you wipe all data on iPhone permanently without restore before selling it,the ios data eraser software can make you able to erase deleted files on iPhone permanently, so that one cannot recover it by using any recovery trick and third party iOS data recovery tool.

This iPhone iPad Data Eraser allows you to Eraser All Data/Already Deleted Files from iPhone, iPad and iPod, and it delete all types of contents permanently including:
Messages, Contacts, Mail, Calendar, Reminders, Notes, Voice Memos, Safari Bookmarks, Photos, Videos, Safari Favorites, Apps, System Settings, Keyboard Cache, Passbook, iTunes DB, iMessage, Call History, Safari History, Voicemail, Apple ID, iCloud ID, Game Center, Apple Maps, Weather, Stocks, Newsstand Facetime.

d_win d_mac

Note: Deleted Data, Safari Cache, Safari History, Safari Cookies ,Keyboard Cache, Messages, Messages Attachments, Call History and Notes, Photos are all deletable. Since the erased data can’t be recovered once wipe by this iPhone iPad Data Eraser, you need to backup data and restore to iPhone after erasing the device when you need,like contacts,text messages, photos, videos, notes,ect.If you have bought an new iPhone 7/6S/6/SE,you can also restore backed up data to new iPhone from computer easily.

Tutorial 1: How to Delete Private Data on iPhone,iPad Permanently

This erase mode can help you delete all private data (photos, messages, contacts,Apple ID,ect) from your iPhone,iPad permanently,then protecte your privacy data been stolen after selling the devices.

Step 1. Run the iOS Data Eraser and Connect iPhone to the Computer

Install iPhone Data Eraser first and open it. Connect through a USB cable and the software will automatically start to detect iDevice. Remember to click “Trust” on the screen of you iPhone.

erase private data from iPhone

Step 2. Select the Erase Mode “Erase Private Data

In the middle of the interface, you will see the button “Start Scan”. Click it and wait until the end of the analysis. When it is finished, the items are to be listed for you to choose. Tick the one that is to be gone forever.

delete private data from iPhone

Step 3.Begin Analyzing and Scanning all Private Data Stored on Your iPhone

In this step, the program will automatically analyze and scan all your private files in your iPhone device,like contacts, calendars, reminders, documents, photo streams and other private files; generally it takes few minutes to complete the process depending on the file. After scanning – select the deleted data to view detailed information on the file.

delete private photos on iPhone

Note: The data can all be previewed when you highlight one of them.

Step 4. Start Erasing Private Data on iPhone Permanently

After you’ve selected private files want to erase, then click the “Erase Now” button,the window will show you this process bar to confirm,please type “delete” to confirm the erasing process.

erase private data action confirm

This should cost you more than 20 minutes. When it is ended, press “Done”.

erase iPhone private files permanently

Free download the iOS Data Eraser:

d_win d_mac

Tutorial 2: How to Wipe Deleted Files on iPhone,iPad Permanently

The already-deleted contents are still be in the iDevice. To guarantee that they can not be retrieved, you can use this mode.

Step 1. Choose the “Erase Deleted File” Option to Get Rid of Deleted Files on iPhone

Plug iPhone into the PC first. Select “Erase Deleted Files”. Then, press “Start Scan” to proceed to the next step.

erase delete files from iphone

Step 2. Start Analyzing and Scanning Deleted Data Stored on Your iPhone
The program will automatically begin to analyze and scan the already deleted data on your iPhone device,including contacts, SMS, photos, videos, notes, call logs and other files that you have deleted them before.

erase deleted files from iPhone without restored

Step 3. View and Select the Files You Want to Wipe from iPhone Device
When the scanning process finish, all deleted files stored in your iPhone will be scanned out and show for you, by default, all files will be selected. Please select what file type you want to erase permanently,and unselect the files you don’t want to delete and keep them.

iphone data eraser to wipe deleted files

Preview the already deleted text messages before erasing them

erase deleted SMS from iphone

Step 4. Start Erasing Already Deleted Files on iPhone Permanently

There are a few minutes before the scanning process ends. Then, you can see the following interface. Tick the one you want and confirm by tapping “Erase Now”.

wipe deleted files on iPhone permanently

Press “Done” at the end.

Download the iOS Data Erase and try to erase already deleted data on your iPhone/iPad/iPod permanently

d_win d_mac

Tutorial 3: How to Erase All Data from iPhone, iPad and iPod Permanently

You should be careful when using this mode, because the whole phone will be erased, unlike the first two cases, and there is no coming back.However,you must to backup iPhone data to computer before the eraseing process begin.

Step 1. Run iPhone Data Eraser and Connect YOur iPhone to Computer

Click to open the software and then connect iPhone to PC. When the phone is detected, choose “Erase All Data” and you will come to the second step.

Erase All Data on iPhone

Step 2. Make Sure that You Really Want to Delete All the Files

What the title means is that you have to key in the word “delete” to confirm your order. The security level “Medium” is good enough for us. Press “Erase Now” and wait.

erase all data from iPhone

Note: A free version only allows you to clean the cache of the music apps and the video apps.

Have a try! You will find iPhone iPad Data Eraser worth every penny of it.

d_win d_mac

What’s More about iPhone iPad Data Eraser:

As we all know,the simple deletion can’t delete files on iPhone,iPad device permanently, many people still don’t know that the deleted data still can be recovered by iOS Data Recovery in market. If you want to sell or give away your iPhone, iPad or iPod device, you must to use a professional iPhone iPad Data Eraser to wipe everyting from iPhone,iPad,iPod completely and permanently,let’s learn the 6 features in iOS Data Eraser,select the features you need:

*Wipe Deleted Files: Permanently erase the “Already Deleted” files on your iPhone,iPad and iPod device without restore.
*Erase Private Data: Delete all private data stored on your iPhone,iPad permanently,if you want to selling the old devices
*Erase All Data: Permanently erase all already deleted data and existing files on your iOS device without restored.
*1-Click Cleanup: 1 click to clan up large junk files and release massive space on your iPhone/iPad/iPod touch.
*Photo Compressor: Directly Compress you photos on your iPhone,iPad devices to reclaim more space,or backup iPhone photos to computer to release more memory spcace.
*iOS Optimizer: Optimize Slow iPhone For Best Performance

How to Recover Deleted Video from iPhone

Summary
Do you want to retrieve deleted videos on iPhone? This iPhone data recovery program enables you to recover the deleted videos from iPhone and iTunes backup, also helps you recover photos, audios, contacts, sms, call history, WhatsApp messages and notes.

People love to record their colorful life of friends, lovers, and family in taking videos so that they can review those happy times. And iPhone is supposed to take high-quality videos, compared to other handsets. Have you just accidentally deleted a really precious video from your iPhone?Accidentally deleting videos from iPhone is quite a common blunder.After mistakenly “pressing delete” to wipe your photos from iPhone, you may be eager to recover deleted videos on iPhone. Here are two iPhone video recovery solution.

Two ways to recover deleted videos on iPhone

iPhone Data Recovery can be used as a video saver to recover deleted videos from iPhone. Just learn how to perform it. You are able to recover your videos and flash files with no complicated skills required. This is why iPhone Data Recovery is regarded as a powerful recovery software for iOS device users, you can recover almost all your iPhone data with the help of it, such as photos, call logs, WhatsApp data, text messages, contacts, voicemails, etc,. The iPhone data recovery program supports recovering video files from iPhone 11, 11 Pro, XR, XS, XS Max, X, 8, 8 Plus, 7, 7 Plus, SE, 6S Plus, 6S, 6, 6 Plus, 5S, 5C, 5, 4S, 4 or 3GS & iPad, iPod Touch. Morever, you can use it to directly scan and recover deleted videos from iPhone 3GS and iPhone 4, as well as iPad and iPod touch.

Please download the free trial version below to recover your deleted video on iPhone. Try it for free!

d_win d_mac
d_win d_mac

Note: If you want to recover other files on iPhone, you can read the guide: How to Recover Lost Data from iPhone.

Note: When you find that your video is lost, do not sync your iPhone with iTunes anymore. Otherwise, the bad new is that your backup file will be updated and then you can’t get back the lost video. And let your iPhone rest for a while, if you want to directly scan and recover videos on your iPhone.

Kind Tips: If you seek a reliable YouTube to MP3 Converter, 4kFinder YouTube Music Downloader is the tool that allows you to download YouTube videos and music as MP3 or M4A files faster with better quality. Then, you can offline enjoy YouTube music on any MP3 player, iPhones, Android phones.

Part 1: Scan and Extract iPhone Video from iTunes backup

The iPhone data recovery can help you recover lost data from iPhone, iTunes and iCloud. To recover your iPhone lost data, please launch the program on your computer, and then click “iPhone Data Recovery“. If you have synced iPhone video to iTunes before, you can use this iPhone data recovery directly scan and extract iTunes backup to recover iPhone video.

iPhone video recovery

Step 1. Choose “Recover from iTunes Backup File” Mode
When launching the program on your computer, click “Recover from iTunes Backup File” on the top, and all your iTunes backup files will be found and displayed. Choose the one for your iPhone and click “Scan” to extract it.

recover itunes videos

Note: The number of backup files you get here depends on how many Apple devices you’ve synced with iTunes before.

Step 2. Scan iTunes Library
After the scanning, all of the backup content are extracted and also displayed. You can find your videos in your Camera Roll.

scan iTunes

Step 3. Preview and Restore iPhone Video from iTunes
Mark those data you wanted and click “Recover” button at the bottom to save them all on your computer with one click. In order to avoid losing your iPhone video, it is of great important and useful to do immediate backup. Each time when you shoot videos with your iPhone, don’t forget to backup them on your computer first.

recover video from iTunes

Part 2: Directly Recover Deleted Videos from iPhone

Step 1. Launch the Program and Connect iPhone to the Computer

Download, install and run the iPhone Data Recovery on your computer, and use with a digital cable to connect your iPhone to the computer. A window as follows will appear when your iPhone is detected. you can choose “Recover from iOS Device” mode at the corner of the window, and then keep moving.

iPhone video recovery

Step 2. Select Files to Scan by Program
Please choose the file types you want to recover from iPhone device,including photos, vidoes, text messages, contacts, voice memos, notes, messages from Kik/WhatsApp/WeChat app data, etc. If you want to recover videos only, please click “Video” option,then click “Next”.

select video

Click “Scan” to search for your deleted data,then the program begins scanning your device automatically for deleted data.

scan iPhone videos

Step 3. Recover Deleted Videos from iPhone
When the scan is over, the whole backup content are extracted and displayed. Check the video and click “Recover” on the top menu to store it on your computer. Sign those you want and click the “Recover” button at the bottom to save them all on your computer with one click.

recover video from iPhone

Note: Apart from recovering deleted data from your iPhone, iPhone Data Recovery can also export the data still on your iPhone. If you only want back your deleted ones, you can refine the scan result by using the button on the middle-top of the window to only display deleted items.

Now, download this powerful program to have a try!

d_win d_mac
d_win d_mac

iPhone Video Recovery

How to Recover Data from iPhone in iOS 8/iOS 9/iOS 10

Have you ever lost your iPhone data after iOS 8/iOS 9(iOS 9.3.5)/iOS 10/iOS 10.3 update? Actually, you can restore your iPhone data after upgrading. As long as you’ve previously backed up your iPhone with iCloud or used iTunes as your iPhone manager, you can follow this article to get back your data from iPhone directly,even you iPhone with iOS 11.

Lost iPhone Data after iOS 8/iOS 9/iOS 10 Upgrade

I have updated my iPhone 6 to iOS 9.3.3, but I found all contacts, pictures, videos, text messages, bookmarks, notes and so on were erased. Then I search in google search to looking for the reasons,some friends say may be it is because I have updated my jailbroken iPhone from iOS 8 to iOS 9 without “Firmware Upgrade“. Now,how can I recover lost iPhone data after iOS 9/iOS 9.3.3 upgrade?”-Kate

Nowadays, as many iPhone users have upgraded their iPhone to iOS 8, iOS 9, there grows many problems at the same time as well. The most typical one is that the majority of iPhone users have a problem of losing their precious iPhone data after iOS 8 upgrade. They surfs the Internet for the answer to whether there is any way to restore iPhone data after upgrade their iPhone from iOS 8 to iOS 9 or iOS 10. They may feel disappointed, because they sometimes fail to find the effective method to this problem. But today, I will show you how to restore your iPhone lost data in iOS 8, iOS 9, iOS 10/iOS 10.3. I am sure you will find it useful and easy to use.

Tips: Please remember backup iPhone data before iOS upgrade or jailbreak,keep your important data safely after iOS update.

Retrieve Lost Data on iPhone after iOS Update

To restore lost data from iPhone with iOS 10/iOS 9 and iOS 8, you need a third-party program: iPhone iPad Data Recovery program,enable to restore lost data from iPhone after iOS update,which can not only can help you recover lost contacts, photos, text messages, notes, WhatsApp messages,etc,. from iPhone,iPad with iOS 8,but also from your iPad, iPod touch in iOS 9, iOS 10. Three different ways are offered to you: Directly recover lost data from your iPhone, use iTunes backup files to retrieve your lost data so long as you do backup before and enter iCloud account and recover from iCloud backup file. But remember not to connect and sync your device with iTunes on your computer to stop the backup file from being updated.The iPhone Data Recovery works well with iPhone 6S(Plus), iPhone 6(Plus), iPhone SE, iPhone 5S/5/4S/4 and iPad Pro, iPad mini 4,etc,.

iOS Data Recovery is now having a high reputation among iPhone users. Those iPhone users who have a problem of recover their lost iPhone data appreciate iPhone Data Recovery a lot after using it. And only in two steps can you retrieve all you want back. Now, why not download a free trial version to do it yourself. Both Window and Mac is compatible to this app.

d_win d_mac

Part 1:Recover iPhone Deleted Data after iOS Upgrade

The iPhone iPad Data Recovery provides the “Smart Recovery” feature for you recover iOS data quickly and easily.If you don’t know where to find the missing data under what circumstances,you could click the “Smart Recovery” feature to choose How You Lost Your Data,which will improve the rate of data recovery.

smart iphone data recovery

This recovery mode allows you to scan your iOS devices directly to find all the lost files recently,or help to recover lost data from your lost device.

Step 1. Connect iPhone to the Computer and Select the Recovery Mode

After download, install and start the ios data recovery software, you need to Connect your device to your computer with an USB cable.You can see the main interface of the software has three recovery mode, here you can choose to “Recover from iOS Device“, of course, you can also select other two modes, specific operation, please follow the steps.

run program and connect iphone to computer

Step 2. Scan Data from iPhone with a Click

In this step, you can directly click the “Next” button to scan your lost data. Now you just need few minutes to finish scanning.

select file to recover

Click “Scan” to search for your lost data,then the program will start to scan your device automatically for lost data.

scan iphone and search lost data

Step 3. Preview and Restore Lost Data from iPhone after iOS Update

After the scan is completed, all your data will be classified listed, you can click on the left column of the classification preview data you want to restore. Select the data you want to recover, and then click on the “recover” button.

recover deleted photos from iphone

Free download the ios data recovery software:

d_win d_mac

Part 2:Recover Lost iPhone Data after iOS Upgrade with iTunes Backup

Step 1.Extract iTunes Backup File to Scan

Run iPhone iPad Data Recovery on computer,you’ll be lead to the “Recover from iOS Device” mode (the default mode).Switch to the “Recover from iTunes Backup” mode to extract backup file from iTunes.

extract backup file from itunes

Select one backup file you need and click “Scan” to begin iTunes backup file extracting.

Step 2.Preview and Restore Data from iTunes

When the scanning completes,all your iTunes backup files can be found and displayed in categories.You are allow to preview them one by one before data recovery.

restore iphone photos from itunes backup

Now you could select the detail data to preview and click “Recover” to extract the selected data to your computer.

Tips: This iOS Data Recovery can help you solve the problem of Data loss, including Contacts,Photos,Videos, Songs, SMS, Call History, Calendar, Notes, Voice Memos, Reminders, Safari Bookmarks which provides specific iPhone Data Recovery guide to solve any Data loss the problems that have happened to the iPhone SE/6S/6/5S/5C/5.

Read More:

How to Recover Lost iPhone Data after iOS 9 Upgrade

How to Recover Deleted Data from iPhone 6S/6

How to Restore Lost Contacts from iPhone SE/6S/6