All posts by DHZ

How to Recover Data from Android Phone with Black Screen

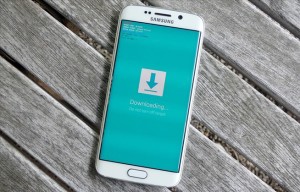
Why did the Android screen turn black
Are you using an Android Smartphone and do you know how certainly the screen will go black? Well,you cannot guarantee certain things with an electronic gadget as anything may get it damaged. But be the issues small or be them large, you need to resolve it when you really need it.It happens to be one of the most miserable times when your Android phone is under a black screen and you are helpless to get it back.Well, there might be many reasons why the Android smartphone has turned blackout of which some of the reasons are:

-Hardware:Not always,but sometimes due to the wear and tear of the phone might hamper the screen.Also,some severe physical damages may be another reason why the screen has turned black.Sometimes due to the low battery power, the screen may go off black as well.
-Software:Sometimes,due to the glitches found in software may turn the phone black.

Samsung Galaxy black screen

How to Recover Data from Android Phone with Black Screen

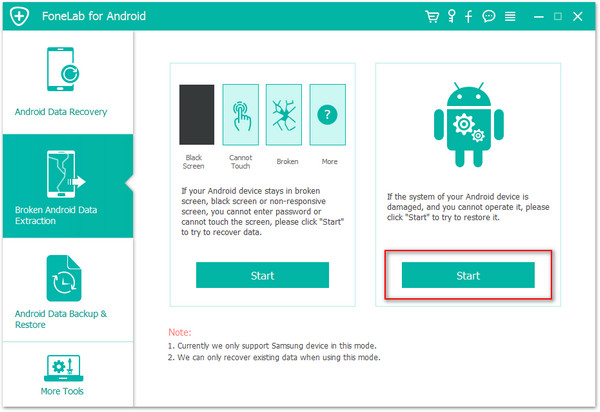
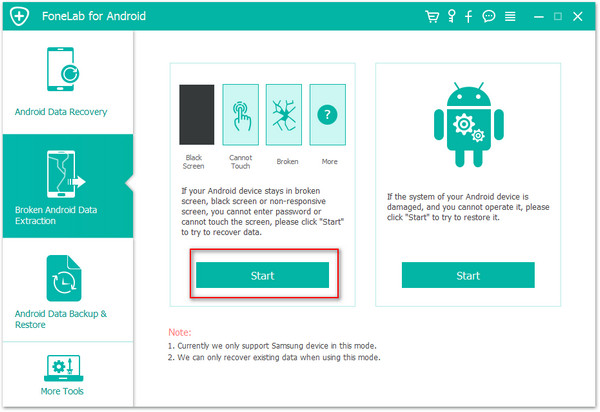
If your Android phone get a black screen,you need a mobile phone data recovery which name Black Screen Android Data Recovery to recover data from black screen of Android phone.Note that currently the data recovery from black screen phone supports to most Android phones,like Samsung,HTC, LG, Motorola, Nexus, Sony, Lenovo, Huawei, Xiaomi, ZTE,etc.You will be able to recover contacts, photos, messages, videos, music, call history, WhatsApp chats, documents from black screen Android phone.Generally speaking you should be able to recover data from broken Android phones by this program with broken screen, black screen, touch screen not work, can’t enter system or more circumstances.Check out this guide to recover files from black screen Android phones.

d_win d_mac

Recover Data from Android with Black Screen

Step 1.Run Android Data Recovery
The first step that you need to come across and it can be done by launching the Android Data Recovery with your PC and the going for the scan option.Once it has completed scan, you fill find a button named with “Recover data from broken phone” which you need to click.

connect black screen android to pc

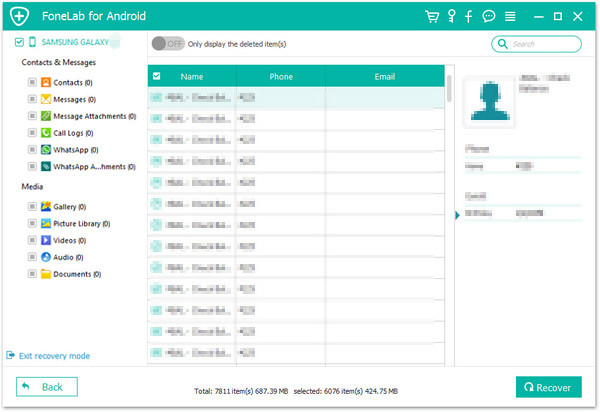
Step 2.Choose the File Types to Recover
Once it lands to another page,you need to select the files and the items you want to recover.The recovery option however includes all file from Android (Contacts,Call History, Gallery,Messaging,etc)you have.

scan black screen android phone

Step 3.Choose the Fault Type of Your Phone
To complete the black screen fault of your phone,you need to know how it happened.However,when you are recovering the phone,there are two options to choose from the system- “touch cannot to used or cannot enter the system” as well as “Black screen (or the screen is broken)”.You need to choose the appropriate one depends on your phone(here you should click the “2.Black screen”option and then click on “NEXT”.

choose broken types

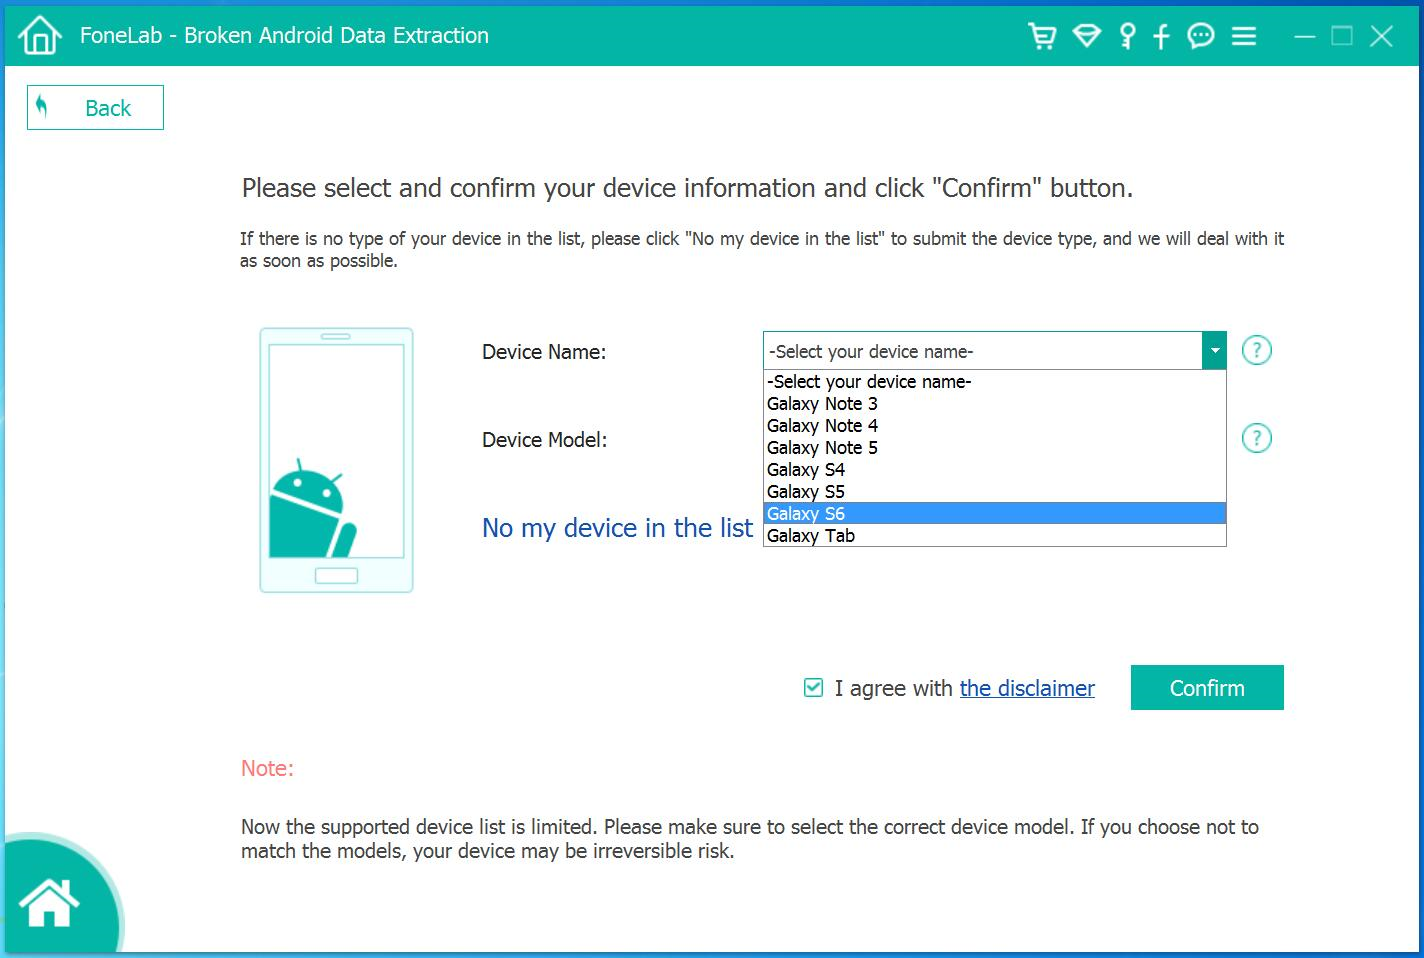
Step 4.Choose the Device Model
In this step you have to select the proper version of the Android as well as the exact model you are using.

select device model

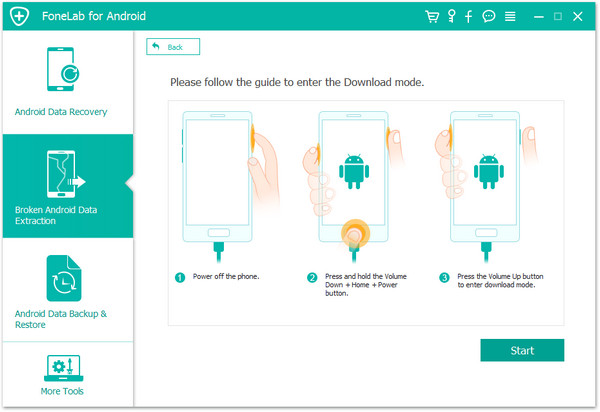
Step 5.Enter Download Mode on Android Phone
This is the step of entering the download mode of the phone and start on with the screen recovery.
Here you need to follow up three individual steps which include:
· Hold the Power key to power off the Phone
· You next have to press the volume down key,the Power key as well as the Home key at the same time
· Next up leave all the keys and press the volume up key to enter the download mode of the phone

broken black screen download mode

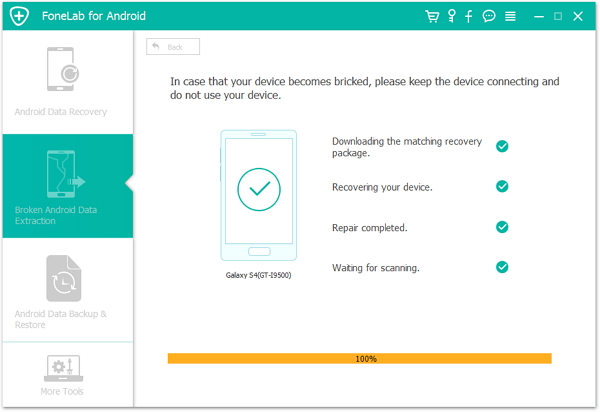
Step 6.Analysis of the Android Phone
You now need to connect the Android phone to the computer again and the Android Data Recovery will automatically analyze it.

After entered the “Download mode”, the software will start downloading “recovery package”,it will take you a short time,please wait a few minutes.

broken downloading recovery package

When the downloading finish,the selected data item stored on Android phone will be scanned out.

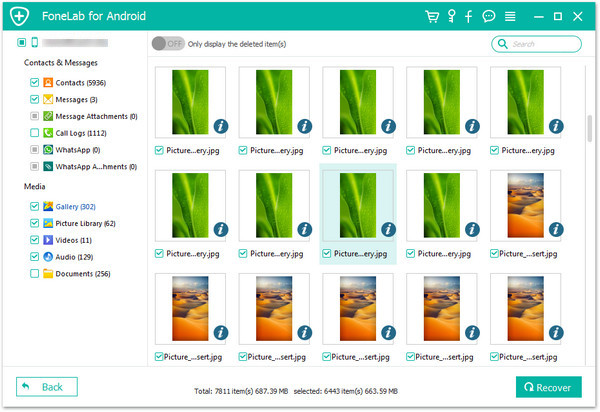
Step 7.Preview and Recover Data from Black Screen Android Phone
Before getting data back from Android you can preview all deleted/lost or existing data,including the detailed messages,photos,videos and more document.Then you should click the “Recover”Option to complete the data recovery process.

recover data black screen android phone

Android Data Recovery is such an useful application which will be helping you to recover files from Android phone conveniently and efficiently.With the assist of this app, you can save time to get data back on Android phone with almost all conditions of black screen, broken screen, broken devices as well as SD card recovery.

d_win d_mac

Read more:

How to Recover Data from Broken Android Phone

How to Recover Data from Android Phone

How to Recover Data from Samsung Phone

How to Fix Samsung Galaxy Stuck in Download Mode

What is download mode
Download Mode is a well-known term for Android users, especially for those who own a Samsung device. Download Mode is a term used when you flash a file to you device from a PC. It is to simple to enter on it but flashing a wrong file can cause soft bricking and your phone will stuck in download mode.

Stuck in download mode issue
Here come the solution for Samsung Galaxy stuck in download mode.This is the common issue reported by Samsung Galaxy users.They are saying that the phone was running normally but suddenly it turned of by itself and then turn on again but this time a black screen appears with the Android logo and a message saying “Downloading, do not turn off”.It seems like Samsung Galaxy is soft bricking.

samsung stuck in download mode

Samsung Galaxy stuck in download mode,how to fix
If this problem is happening to you, here are two methods to solve it. The first one consist one few simple steps and don’t require any special knowledge, while the second one consist on flashing a stock ROM and you need to read something about ROM and how to flash them. However below is a step by step guide which will make it easier for you to solve Galaxy stuck in download mode issue.

Fix Samsung Galaxy Stuck in Download Mode with Android Fix & Data Recovery Tool

Android Fix & Data Recovery Tool has newly released a new function to download recovery package for Samsung devices and fix Samsung Galaxy stuck in download mode issue without difficulty and technology.It’s an ideal data recovery program for you to fix Samsung Galaxy which can’t get out of download mode,and helps to get back contacts, messages, photos, videos and documents from your Samsung.Android Fix & Data Recovery Tool supports to fix most Android operating system issues,insist of phone stuck in start screen,phone stuck in black screen,or more.All kinds of Samsung phones are applicable with this program,including Galaxy S7/S6/S5,Note 7/5/4,A9/A8/A7,etc,.

d_win d_mac

Get Samsung Galaxy Out of Download Mode

Please firstly download and launch the Android tool kit on your computer and the going for the scan option. Once it has completed scan, you fill find a button named with “Broken Android Data Extraction” which you should click before starting the data recovery process.

Step 1.Connect Samsung Galaxy with Computer
Firstly,run Android Fix & Data Recovery Tool on computer.Connect your Samsung with the computer via USB cable.After that,click on “Data Extraction(Damaged Device)” on the lower right corner of Broken Android Data Recovery.

fix samsung phone stuck in downloa mode

Step 2.Choose the File Types to Restore
In this step, you should select the files and the items you want to extract, includes contacts, text messages, photos, gallery, music, video and documents,etc,.

fix samsung stuck in downloa mode

Step 3.Select the Broken Type of your Samsung
You should select the broken situation that match your device.

broken choose fault type

Here you should select “Stuck in the download mode” selection.

Step 4.Choose the Fault Type of Your Samsung Phone
Please choose your the fault type of your Samsung phone,there are two options to choose from the system – “Touch screen does’t work or cannot enter the system” and “Phone screen is turn Black (or the screen is broken)”.You need to choose the right option which depend on your device and then click on NEXT.

Step 5.Choose the Phone Name and Model
Select the proper model of the your Samsung.

retrieve data from Samsung

Step 6.Get Samsung into Download Mode
Once you connected your Samsung which is stuck in download mode to computer, Android Fix & Data Recovery Tool will pop up the window as below.Choose one from the displayed situations on the popup window to continue.

Then the program will ask you get the phone into “Download Mode” manually.To get the phone into download mode,please firstly power off your Samsung phone completely.Then hold “Volume Down + Home + Power” on your phone together for a few seconds till the phone enter “Download Mode”.

fix samsung stuck in download mode

Step 7. Detect the Device with Android Fix & Data Recovery Tool
After the phone enters Download Mode,Android Fix & Data Recovery Tool will detect it and display the device model, Android version etc,.

fix samsung stuck in download mode

Step 8.Restart Samsung Galaxy and Fix it to Normal
Android Fix & Data Recovery Tool will download the recovery package to help you fix the phone automatically and return it to normal state.After the download is completed, your phone will restart as a normal one.

fix samsung stuck in download mode

Step 9.Begin Extract Data from Your Samsung Phone
After installing the recovery package on your Samsung phone completed,the program will scan and extract all files from your device,click “Recover” button to extract and save all the selected Samsung data on computer.

fix samsung stuck in download mode

Well done.Now your Samsung phone should update without getting stuck in the download mode.No matter your phone is rooting, unrooting or installing a custom recovery and not updating, you can apply it on your phone after repairing Samsung phone with Android Fix & Data Recovery Tool.

d_win d_mac

Video Guide

Read More:

How to Fix Bricked Samsung Phone

How to Recover Data from Broken Android Phone

How to Restore Data from Samsung Galaxy

How to Transfer Contacts from Nokia to iPhone 7/6S(Plus)

Recently I buy a new iPhone SE to replace the Nokia,however,what’s suffer me is that sync the contacts to new iPhone from Nokia.I don’t wanna use the traditional method to copy them one by one which is such a time-consuming stuff.And now I must get help of somebody who can offer me a best convenient way to accomplish it.Thanks a lot.-Queenie

nokia-to-iphone-contacts

Having used Nokia for quite a while and now you are at the place of switching from Nokia to the new iPhone SE or iPhone 6s?If you recently bought a new iPhone, you may meet some trouble like Queenie above.Sync Nokia contacts to iPhone 7/6S/6/SE without complicate way, it seems no way available?

With the Phone Transfer, you can help yourself to migrate contacts from Nokia to new iPhone.Freely and safely.Other kinds of files also can be sync from Nokia to iPhone,comprise SMS,photos,call logs and more.Phone Transfer fully supports to Nokia(Symbian operating system),including Nokia N8, Nokia E6, Nokia N97, Nokia 5230, Nokia N97 mini, Nokia E63, Nokia E71,Nokia X6.The superior software is fully compatible with iOS 10, iOS 9, iOS 8 and iOS 7.In addition,with Phone Transfer,you can easily backup your phone data to computer and erase your old phone data with ease.

d_win d_mac

How to Transfer Nokia Contacts to iPhone 7/6S

Step 1.Launch Phone Transfer and Connect Nokia and iPhone 7/6S to Computer
First of all,install and run Phone Transfer on Computer.After you connected both your Nokia and iPhone with computer at the same time,they will be detected by this app automatically and you will find the main interface as below.Select “Phone to Phone Transfer”,click “Start”.

Transfer contacts from nokia to iphone

Your Nokia phone will be displayed on the left,while your iPhone on the right.Otherwise,you can simply click “Flip” to change the place when your Nokia phone is located on the right.

Step 2.Select “Contacts” to Copy from Nokia to iPhone 7/6S
In the window of this program,you can find that contacts, photos, videos, text messages and music are all available to transfer between your phones.If you only intend to copy contacts between Nokia and iPhone,you can uncheck text messages, photos, videos and music,and then go to the next.

transfer nokia contacts to iPhone 7

Step 3. Start to Copy Contacts from Nokia to iPhone 7/6S
To transfer contacts from old Nokia phone to new iPhone 7(plus) or iPhone 6s(plus),please just click “Start Copy” button to sync your contacts.When it’s done,click “OK” to finish the transfer process.

sync nokia contacts to iPhone

Note:Remember not to disconnect your phones during contacts transferring.

Finished!Your Nokia contacts have been already on your iPhone.Besides easily move data from Nokia to iPhone with Phone Transfer,it enables you to move data between Android and iPhone, iPhone and iPhone.

d_win d_mac

Phone Transfer supports below iOS and Symbian devices:

iPhone Devices: iPhone 7, iPhone 7 Plus, iPhone SE, iPhone 6S, iPhone 6S Plus, iPhone 6, iPhone 6 Plus, iPhone 5S, iPhone 5C, iPhone 5, iPhone 4S, iPhone 4, iPhone 3GS, iPhone 3G

Nokia Symbian Devices: Nokia N8/N9, E6, N73,N85,N 76,5230, 5800 XpressMusic, N97, N97 mini, X6, 5320 XpressMusic.

Read More:

How to Transfer Nokia Data to iPhone SE/6/6S/7

How to Transfer Nokia Data to Galaxy S7/S6

How to Transfer Samsung Data to iPhone 7/6S/6/SE

How to Transfer Samsung Data to iPhone 7/6S/6/SE

How to Transfer WhatsApp Messages to iPhone 7/6S/6/SE

How to Transfer Nokia Data to iPhone SE

nokia-to-iphone-transfer

As iPhone develops new features constantly, many mobile phone users begin to change their phone to the new iPhone,especially the Nokia(Symbian operating system) users.If you are the one who are tired of the Symbian and want to change a new taste, you can try the iPhone SE ore iPhone 6S.So when you get a cool iPhone like iPhone SE, you realized that it is difficult to find a direct way to transfer the data on your old Nokia to iPhone.However,don’t be nervous and just take it easy, since there is a best method here we are going to recommend for you to achieve this target, you can refer to the paper as shown below.

In order to enjoy your new phone as soon as possible,you will need something exactly like Phone Transfer.This excellent tool permits to sync contacts, SMS, music, photos and videos from Nokia to iPhone SE completely.And it is well designed that even when dealing with a large amount of data it still works perfectly.You can save all the troubles and risk of copying all the data by your own hands.Except iPhone SE,all models of iPhone are support by Phone Transfer,iPhone 6S/6/5S/5/4S/4 are include.

d_win d_mac

Know more about Phone Transfer:
1.It is easy to understand and supports many platforms such as iOS, Symbian, Android and BlackBerry.
2.You can backup files like contacts, messages, apps, photos, videos and music to computer.
3.It allows you to restore phone data from iCloud backup, BlackBerry backup and iTunes backup on phone.
4.It can wipe all deleted data or existing data permanently.

How to Sync Nokia Data to iPhone SE

Step 1.Download and Install Phone Transfer
Download and install the Phone Transfer to computer and then open the main window to start the program.

Step 2.Connect both Phones to Computer
Connect both Phones to your computer via USB cables.Wait for a moment,both phones will be recognized.After that,choose the option “Phone to Phone Transfer” of this program and make sure phones are shown on each interface.(You can click “Filp” to change the positions of them)

Transfer data from nokia to iphone

Step 3.Start Transferring Data from Nokia to iPhone SE
It is your turn to decide which files should be transferred(click the files you need to sync)and then press on the “Start copy” button.Wait for a minute and all of your data will be transferred to iPhone SE from Nokia successfully.

transfer-data-nokia-to-iphone

nokia-to-iphone-transfer

It is so powerful that can helps you to transfer all your data from Nokia to iPhone without any effort with Phone Transfer.With these hottest and latest functions as shown above, Phone Transfer becomes such popular among the phone users.(Extra transfer tips:How to Transfer Nokia Files to Galaxy S7)

d_win d_mac

Read more:

How to Transfer Nokia Files to Galaxy S7

How to Transfer iPhone Files to iPhone SE

How to Transfer Samsung Files to iPhone SE

How to Transfer Data Nokia to Galaxy S7/S8/S9

[Summary]: Need a Nokia to Android transfer tool to move data from Nokia to Samsung Galaxy phone? Would like to transfer Everything to your new Galaxy S7/S8/S9 from Nokia phone? This page will teach you the best way on how to transfer files (text messages, contacts, music, photos, ect) from Nokia to S7 as example.

Nokia smartphone which running the Symbian operating system has been gradually stepping away from our eyes since the increasing popularity of Android and iPhone. What the changed thing is that Nokia switched its own Symbian OS to Windows platform since the Microsoft’s acquisition made by 2013.It’s no doubt that amount of Nokia fans may replace the new generation mobile phone to instead the old Nokia.I’m one of them too,I ever used the Nokia N96 past 2 years,and nowadays I prefer the Android phones to try new operating system due to one of my friends recommended Samsung Galaxy series as a consideration.I did some research and finally agreed on the suggestion.Right now,I purchasing Galaxy s7 and the next principal stuff is that sync data stored on Nokia to the new Samsung.

Luckily enough, I found a professional tool, named Phone Transfer that enables to easily handle the data transfer task much more comfortable way.There is no skillfulness work involved from the entire process. It takes only a few minutes to fully transfer files from Nokia to Samsung Galaxy S7. Contacts, text messages, photos,videos, music and document are also allow to transferred to the new device at the same time.Nokia N series, E series and C series are well supported.Apart from Galaxy S7,most models of Samsung phones are applicable by this program,including Galaxy S9/S9 Plus, Gaalxy S8/S8 Plus, Galaxy S7/S7 Edge, Galaxy S6/S6 Edge/S6 Edge+, Note 9/Note 8, Galaxy A9/A8/A7,etc.

d_win d_mac

How to Sync Nokia Files to Galaxy S7

Step 1.Run Phone Transfer on Computer and Select the Mode
Launch the software from desktop after downloading Phone Transfer and then start menu after installation.The main screen is shown following.

Transfer data from nokia to samsung

There are four different modes here you can select.In this tutorial,you should select “Phone to Phone Transfer” mode.

Step 2.Connect Both Nokia Phone and Samsung Phone to Computer
Connect Nokia and Samsung Galaxy to computer at the same time.Once both phones are well connected,the software will detect them automatically and analyze the data stored on Nokia phone.After that,a list of items will be displayed on the center of the main screen.(Flip the position if the source and destination phone is shown wrongly in order).

nokia-to-samsung

Step 3.Start to Sync Nokia Files to Samsung
Uncheck other items that you don’t need.Then click “Start Copy” to begin the data transfer process.It just takes a few minutes to complete the task.However,if you want to transfer other items at the same, check them all before transferring.Make sure both devices are connected during the copying time.

nokia-to-samsung-transfer

With this Phone Transfer at your hand,there is no need to worry about the inconvenience when switching files between two mobile phones even if they are running different operating system,such as Android, Blackberry,Symbian,iOS.This intuitive user interface helps you to finish the data transfer job easily,though you are a beginner. Also, no additional software is required to fulfill the transfer task.Specifically,it’s the best Phone transfer software on the market.Phone Transfer not only empowers to transfer data between mobile phones directly,it also provide the functions that backup phone data to computer,as well as restore data from backup files on phone.

d_win d_mac

Read more:

How to Transfer iPhone Data to Samsung Galaxy S7

How to Transfer Android Data to Samsung Galaxy S7

How to Backup and Restore Files on Samsung Galaxy S7

How to Transfer Samsung Data to Computer

backup-samsung-data
Have you ever suffered from any data loss on your Samsung phone due to the situations below? It’s really a bitter experience to find all your important data from Samsung device.Avoiding such horrible thing happens to you,the principal stuff you should do is backup your Samsung phone.

Here, I offer some situations that you need to make Samsung backup.
-Once suffer some data loss, you will get used to making a regular backup to keep data safe.
– Decide to send, donate or sell your Samsung to somebody, but you dislike leaving data on it behind.
– Need a backup before giving your Samsung Note to AT&T, Verizon, etc for some service.
– Plan to format or root your Samsung, so backing up it becomes a necessity.
– Purchasing a new phone, like iPhone SE, so you want to backup Samsung for recovery.
– Some other reasons leads you to backing up your Samsung.

How to Backup Samsung Files to Computer
There are lots of Samsung backup software, among which Phone Transfer stands out for its simpleness and great usefulness.This software gives you the power to backup app, contacts, SMS, call logs, calendars, music, video, photos from Samsung to computer easily and smoothly.With the outstanding performance of this program, your device like Samsung is well protected from accidental or unintentional data loss.So choosing the program that provide you a complete solution of protect your Samsung data.All kinds of Samsung phones are supported by the program,insist of Galaxy S7/S6/S5,Note 6/5/4,A9/8/7 and so farth.(Android tips:How to backup Android files to computer)

d_win d_mac

Highlight the hot features of Phone Transfer:
-Backup Samsung to PC easily and conveniently.
-Backup apps,SMS,call logs,music,videos ,photos and various files effortlessly.
-Directly transfer Samsung data to iPhone,Android device or Nokia phone.
-Not just Samsung phones,it works well with other Android devices,for example HTC,LG,Lenovo,Motorola,Xiaomi,Huawei,etc.

Just read the following tutorial below to get understand how the software works.

Detail Steps to Backup Samsung Files to Computer

Step 1.Run the Phone Transfer and Select the Right Option
At the beginning,download and install the software on computer.Launch it to bring up the primary window.Select the “Backup and Restore” mode and click “Back Up Your Phone”.

Transfer data from Samsung to computer

backup-samsung-to-pc

Step 2.Backup Samsung Data to PC
Connect your Samsung phone to computer with an USB cable.After the software detects your Samsung,you can see it shown in the window.The contents that can be backed up are checked(Music, Videos, Photos, Contacts, SMS and Apps,etc).Just select the files you need to transfer from Samsung to computer,and then click “Start copy”.

backup-samsung-files-to-pc

transfer-samsung-to-pc

Phone Transfer is a powerful tool for backing up Samsung data.As long as it gives complete protection of your Samsung data,it’s a wonderful choice around the lots data manage software.Like support on Android devices,giving the backing up facility to Samsung as a great attribute of Phone Transfer.

d_win d_mac

Read more:

How to Backup and Restore Files from Samsung

How to Backup and Restore Samsung Data with Kies

How to Transfer Data from Samsung to iPhone SE/6S/6

How to Transfer Android Data to Computer

Summary
Want to transfer your data from Android phone computer for backup ? This article shows you a simple way to backup data from Android to computer, including calendar, call history, gallery, video, messages, contacts, audio, applications and even application data.

As you know,backup files is really an important stuff for mobile phones users,when you suddenly lost data under several unexpected situations you still have chance to recover the data from backup files if you do it ever. How do you back up Android phone? As for me, I prefer to transfer data from Android to computer, because it is a simple way and the computer has bigger storage space.

(Samsung phone backup tips: Backup and Restore Samsung Data on PC)

android data backup

Android to Computer Transfer

Here are several software available that enable to help you backup data from Android to computer. A summary of the tools provided by Android Phone Transfer, which is design for Android users to transfer data from Android to computer freely and completely. Whit the assist of Android Toolkit,saving you time and energy to finish the data sync task. The Android Data Backup tool is a worth-recommending tool that you can use to export files like contacts, text messages, pictures, audios, videos, App and App data. With the clean interface, simple operation, and high success rate of transfer, this application has gravitated a big amount of fans. This program supports to all kinds of Android phones, insist of Samsung, HTC, Lenovo, Motorola, LG, Xiaomi, Huawei, OnePlus, Redmi, Sony, etc.

You can download Phone Transfer on your computer and see how perfect it works.

d_win d_mac

How to Backup Data from Android to Computer

Step 1.Download and Install Phone Transfer
Click the buttons below to download and install the software on PC or Mac. You’ll be asked to select a mode, then click the item “Phone Backup” on the main page of Phone Toolkit.

backup android to pc

Step 2.Connect Android Phone to PC
Connect your Android phone to computer with an USB cable.Very soon the Phone Transfer program will detect your Android device.

android data backup

Step 3.Select file types to back up
In this step,you can see that all your Android data (Music, Videos, Photos, Contacts, SMS and Apps,etc) can be detected by Phone Transfer program and listed in the middle.

backup android data to pc

Step 4. Start Backup Android Data to PC
You can backup these data one-by-one or all at one time by checking the box and click “Backup”.

backup data from android to pc

After the backup is completed, you can click on View the backup button to see what’s in the backup file.

android data backup

You have a full backup to computer right now. If you want to restore your back up data from PC to Android, what you need to do is select “Restore Data from Backup Files” in the homepage of the program and click “Restore to Device” to get them back.

With this amazing tool, you can besides import data from PC to Android,transfer data between mobile phones,eraser phone data permanently before selling.Just download and enjoy all these features of Phone Transfer.

d_win d_mac

Transfer Android Data to PC

How to Backup and Restore iPhone Data on Windows or Mac

iOS 10 now is applies to the iPhone and iPad.So before you upgrade to the newest operating system, you need to perform a backup of iPhone.I’m sure that some of you must be perplexed about backing up your iPhone data,such as contacts,SMS,photos, videos, call history, notes, whatsapp messages, App data,etc, you’ve heard countless horror stories of backup data missing, and data loss over the backup process.Relax,if follow this process we are about outline following,you will have no issues with your back up case.It will take the least amount of time, and you will not lose any of your files in the process,even selectively restore backup data on iPhone.

backup restore iphone music, photos, videos

Backup Data and Restore your iPhone, iPad, or iPod touch from a backup

We recommend you should back up your iPhone, iPad, and iPod touch and restore after iOS reset, jailreaking, iOS upgrading; When you plan to buy an new iPhone 7/7 Plus,you may need to backup data from old iPhone,iPad and then restore them to new iPhone 7; you would not expect when your phone broken, damaged or stolen,it’s very necessary to back up your iPhone, iPad, and iPod touch,including iMessages, text messages, contacts, pictures, notes,App data and more!

2 Methods to Backup and Restore iPhone on Computer

Also for those of you who have or plan on purchasing the new iPhone 6s or iPhone SE models and want to transfer all your precious contents from your old phone to the new one,you’ll want to make sure to read this entire post as well as backing up is still the first step before moving content from one phone to another or restoring.

Method 1: Backup and Restore iPhone Data by iOS Backup & Restore Tool

iOS ToolKit – iOS Backup & RestoreTool permits to back up contacts,SMS,whatsapp messages from iPhone to computer safely,as well as restore data from backup files on iPhone directly.In addition,this predominate data manage program is useful for backup and restore various files on iPhone,photos,videos,notes,call logs and other personal document.It offers full support for iPhone 7, iPhone 6 and 6S,6 Plus and 6S Plus,iPhone SE/5S/5C/5/4S/4 and iPad,iPod.It works with all iOS versions, including iOS 9.3 and iOS 10.

d_win d_mac

Know more about iOS ToolKit:
-Restore backup content from BlackBerry, iCloud, iTunes, Kies and more to Android and iOS devices.
-Permanently erase all content from your old phone to protect your privacy being leaked.
-Works with 3,000+ phones including Droid, Symbian (Nokia), and all models of iPhones, including the newest iOS 9 devices.
-Transfers content between phones on different networks.
-Zero quality loss & risk-free: everything you transfer is 100% same as the original and can be only read by yourself.

Step 1.Run the iOS Backup & Restore program and Connect iPhone to Computer
After launching iOS Backup & Restore program on computer,click on “More Tools”from the left column,select “Device Data Backup & Export”option from the tool list.Then use the USB cable to connect your iPhone to computer.By default,iPhone Data Recovery will automatically detect your iPhone soon.

backup tools

Tip:If you have used iOS Backup & Restore program to backup your device before,you can click on “To view the previous backup file” to view the previous backup files list.

Step 2.Select File Types to Backup from iPhone
When your iPhone is connected successfully,iOS Backup & Restore program will detect the file types on your device automatically and you can select what file types to backup.Then click on “Backup”.

backup device

The whole backup process will take a few minutes,depending on the data storage on your device.Then iOS Backup & Restore program will display all the supported data,like Photos & Videos, Messages & Call Logs, Contacts, Memos and other data.

backup device 2

Step 3.Restore your iPhone, iPad, or iPod touch from a backup
After you select the files you need to backup by checking the box before them, please click “Export to PC “button to export the files to computer.When you click “Export to PC”, you will have two options:Only Export this file type and Export all the selected file types.Then you can customize the backup file save path on the popup window to successfully export your iPhone data.

backup data to computer

iOS ToolKit program enables to restore deleted files or lost data from iPhone completely even if you haven’t backed up iPhone,it provide the function that extract backup content from iTunes,iClouds files or computer with iPhone Data Recovery.Click here to see the detail steps to recover data from iPhone with 3 different ways.

d_win d_mac

Method 2: Backup and Restore iPhone by Phone Transfer

Phone Transfer is a reliable iPhone backup and restore tool.It can backup iPhone contacts,SMS,whatsApp messages without iTunes and iCloud on iPhone efficiently and conveniently.Moreover,you can use Phone Transfer to move backup files to a new device or to the same device after a restore.Click here to view the additional procedure:How to back up iPhone or iPad data before update.

d_win d_mac

Highlight the features of Phone Transfer:
-Most types of files are supports:contacts, SMS, call logs, photos, music, videos, apps, etc.
-Restore backup content from BlackBerry, iCloud, iTunes, Kies and more to Android and iOS devices.
-Permanently erase all content from your old phone to protect your privacy being leaked.
-Works with 3,000+ phones including Droid, Symbian (Nokia), and all models of iPhones, including the newest iOS 9 devices.
-Transfers content between phones on different operating system.

Step 1.Download and Run Phone Transfer

Step 2.Select the Backup Mode
Click “Back up your Phone“on the main page of this program.

Transfer data from iPhone to galaxy A9

PS:If you want to customize the location of your backup folder.Simply click the menu on the right top of the window and then choose “Settings” to do this.Once you are finish with the location folder, click “Ok”.

backup ios to pc
Step 3.Connect iPhone to Computer
Connect your iPhone to computer using an USB cable.Make sure that Phone Transfer recognizes your devic.

backup ios to pc

Step 4.Click the Files You need to Backup
Check the files you would like to backup.Such as “Contacts”,”Text Messages”,”Photos”,”Videos”,”Music”.

backup ios to pc

Step 5.Backup Data from iPhone to Computer
Click on “Start Copy” to begin the process.Keep the phones connected through the entire process.

backup ios to pc

If you need to restore files from iPhone with Phone Transfer,you should choose the mode of “Restore from Backups”on step 1 with Phone Transfer.

d_win d_mac

Accidentally delete important iPhone files? Jailbreak failure of iOS devices? Hardware or system Malfunction?No matter what reason you wanna make a protection of backing up iPhone data or restore iPhone data,iPhone Data Recovery and Phone Transfer are your best choice and worth you having a try.

Mobile Sync – iTunes Alternative, iOS Back & Restore Tool

Another terrific tool here we want to share you is Mobile Sync. It is the best tool for sync iOS data between iOS device and computer. With using Mobile Sync, you could backup iPhone data to the computer safely, restore backed up files from computer to iPhone completely. Additionally, it could be used to transfer files between two iOS devices directly. The supported types of iOS files including music, videos, photos, contacts, text messages, and others. What’s more, it features with Ringtone Maker & HEIC to JPEG/PNG Converter. All in all, Mobile Sync is the best iTunes alternative, a good iOS files transfer & manage tool for iPhone/iPad/iPod.

backup iPhone to PC

Read more:

How to Transfer Data from old iPhone to iPhone 7/6S/6(Plus)

How to Recover Lost Data from iPhone 6S/6(Plus)

How to Backup and Restore Files on Samsung

How to Recover Deleted Data on iPhone SE

How to Recover iPhone/iPad/iPod Data After iOS 9.3 Upgrade

Backup and Restore iPhone Data

How to Fix iPhone Stuck on “Welcome to iPhone” Screen

The iPhone stuck on “Welcome to iPhone”screen is not a common phenomenon that iDevices users meet in many occasions.You may come across it due to restore factory resetting,iOS upgrade,iOS jailbreak,etc:
“I had a iPhone 6 iOS 9.3 upgraded yesterday.When I restarted the iPhone after upgrading,the phone frozen to stay the “Welcome to iPhone” screen.I have tried a couple of times to restart it, but it wasn’t work at all.”-Gamble

There are a variety of reasons why your iPhone is freezing on “Welcome to iPhone”screen.In some cases, the freezing may be due to a hardware issue.In this case,basic troubleshooting process will not be enough to help your iPhone return to its normal working state.One of the best solutions is using a professional tool,like iPhone System Repair Tool.

iPhone System Repair Tool countenance fixing iPhone system issues by exiting stuck in “Welcome to iPhone”mode with one click.This perfect tool except helps to get iPhone out of “Welcome to iPhone”screen,it enables you to fix all of iOS stuck issues such as iPhone stuck in recovery mode, Apple logo, frozen screen and so on.How to fix iPhone get stuck on “Welcome to iPhone “screen?Stopping be frustrated please.Next this guide will show you the detail steps to repair iPhone stuck at welcome page.Now let’s check the possible and best way to solve it.

d_win d_mac

Easy Steps to Get iPhone Out of Stucking at Welcome Screen

Step 1.Tap the Proper Function of iPhone System Repair Tool
Click on the last button on iPhone System Repair Tool version of the main window “fix iOS system to normal”.Then make your iPhone which is stuck at welcome page to computer via USB cable.Then click”Start”when the tool detect your iPhone.

connect iPhone to PC

fix iPhone stuck in welcome to iphone screen

Step 2.Download and Select the Right Firmware for iPhone
To repair iPhone to normal,you need to download a firmware for it.iPhone System Repair Tool will recognize your iPhone and provides the latest iOS version for you to download.You just need to tap “download” and then wait a few minutes.The software will automatically accomplish it quickly.

select your iPhone model

Begin Download the Firmware to the iPhone device

download the firmware and saved on iPhone

Step 3.Get iPhone Out of “welcome to iPhone”Screen
The program will continue to fix your iPhone to normal when the download process is end.Just a moment later,it will tell you that your device is already normal as usual.The whole procedure of fixing operating system of iPhone only takes you no more than 10 minutes with 3 easy steps.During this fixing process,it don’t cause data loss.

fix ios to normal

You can get assist of iPhone System Repair Tool to solve iPhone operating system issues anywhere anytime,if you are the Apple users.Complementary,all models of iPhone are supported by this redoubtable repair tool,including iPhone SE/6S/6/5S/5/4S/4.

d_win d_mac

Read more:

How to Get iPhone Out of Recovery Mode

How to Fix iPhone Frozen on Apple Screen

How to Fix iPhone Turns to A Brick After Upgrade/Jailbreak

How to Fix iPhone Stuck in Recovery Mode after Jailbreaking

For millions of mobile users all over the world, iPhone is the best mobile phones. Whereas, there are still people who want to break the Apple restrictions and wanna get more function and application from it.So lots of them likely to jailbreak the iPhone their own.One of the most common issues,according to our study,is that iPhone stuck in recovery mode after the iOS jailbreak.It doesn’t help at all even though you try many times to turn to the iPhone on and off.Having the right tools is a crucial part of do-it-yourself repair. To fix iPhone stuck in recovery mode after jailbreaking,here I sincerely recommend a high-quality tool for you.

restore jailbroken iPhone stuck in recovery mode

Restore Jailbroken iPhone Stuck in Recovery Mode without iTunes

iPhone System Recovery & Data Recovery tool is an all-in-one tool to fix all kinds of issues of iPhone operating system.With this powerful tool, you can easily fix iPhone stuck in recovery mode after jailbreaking or upgrading and boot your iPhone again without data loss.Besides,it empowers to fix iPhone stuck at Apple logo screen,stuck in DFU mode,stuck at “connect to iTunes”screen,etc.While there is no guarantee that you definitely fix iPhone operating system issue and return it to normal,this iPhone data fix tool provide a way to recover deleted iPhone data from device or iPhone backup files, just in case.,Before you start the detail process,please make sure you have downloaded and installed it on your computer.

d_win d_mac

How to Get a Jailbroken iPhone 6 Out of Recovery Mode

Step 1.Download and Run iPhone System Recovery Tool on Computer

ios system recovery

Step 2.Connect iPhone 6 to Computer and Click the “iOS System Recovery” Features

Choose the fixing mode and then connect iPhone to your computer with an USB.After that the tool will detect your iPhone soon and you need to click “Start”to enter the next steps.

exit iPhone stuck in recovery mode

Step 3.Download and Select the Firmware which is Applicable to Your iPhone
To get iPhone out of recovery mode after iOS jailbreak,you need to download the suitable firmware for your iPhone.The iPhone System Repair Tool will recognize your iPhone, it provides the latest iOS version for you to download.You only need to click “download” and then wait a moment.The software will automatically complete it for you.

Select the model of your iPhone.

get iPhone out of recovery mode after jailbreak

Begin to download firmware for your iPhone.

restore jailbroken iPhone stuck in recovry mode

Step 4.Fix iPhone Stuck in Recovery Mode and Return it to Normal
When the download is finish,the program will continue to start fixing your iPhone,iPhone System Repair Tool allows you to exit recovery mode on your iPhone.After a few minutes,it will prompt you that your device is rebooting to the normal mode.It only consume you less than 10 minutes to fix your iPhone operating system during the total process.

fix iPhone system to normal

Hope this article can help you solve problems on iPhone stuck issues.You can fix iPhone operating system issues by these detail steps above with this iPhone System Repair Tool conveniently by yourself.

d_win d_mac

Read more:

How to Get iPhone Out of Recovery Mode

How to Get iPhone SE/6S/6/5S/5 Out of Recovery Mode

How to Get iPhone Out of DFU Mode