All posts by DHZ

How to Transfer Data from Samsung to iPhone 11/XS/XR/X

[Summary]: If you have moved from Samsung Android phone to a new iPhone iPhone 11/XS/XR/X, you may be concerned about transferring all your data – contacts, messages, music, photos, videos, call logs and so on. Take this solution to transfer data from Samsung Galaxy to iPhone 11/XS easily.

I need some help. Just purchased a new iPhone 11, but I don’t know how to transfer contacts, text messages and other data from my old Samsung Galaxy S8 to the new iPhone 11. Any simple solution to move data from Samsung Android phone to iOS 13 iPhone 11?.“- From Kimi

I used Samsung Galaxy Note 8 more that two years, I have purchased an new iPhone 11, but now I got some trouble that have no ideas on how to transfer contacts from Samsung Galaxy Note 8 to iPhone 11?” – Cindy

iPhone 11, iPhone 11 Pro and iPhone 11 Pro Max are launched at 10 o’clock of September 10 2019 in Apple’s Steve Jobs Theater. You have been a Samsung user and now you have purchased a brand-new iPhone 11 or iPhone XS/XR/X, how can you transfer data from your old Samsung phone to your new iPhone 11 or iPhone 11 Pro(Max)? Data transfer between Android phone and iPhone won’t be so easy even using iTunes or iCloud. In this article how to transfer contacts, messages and more data from Samsung to iPhone 11 easily without iTunes or iCloud.

To transfer contacts, messages, music, videos, photos, call logs and more from old Samsung Android Phone to new iPhone 11 effectively, we need a powerful Samsung to iPhone transfer tool, which helps save time to move Android data to iPhone directly. This post shows you a simple guide on transfer Samsung data to iPhone 11, you can also follow the same steps to transfer data from Android ( Huawei, HTC, Nexus, Google Pixel, ZTE, OnePlus, Xiaomi, Moto, Sony etc. ) to iPhone.

Transfer Data from Samsung to iPhone 11

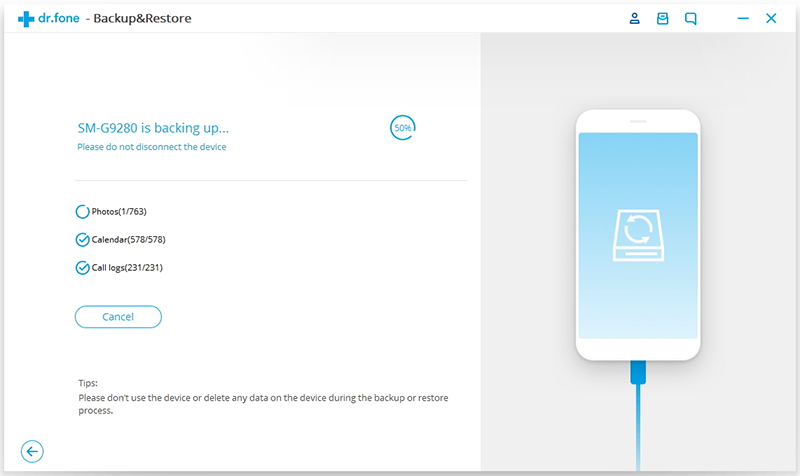
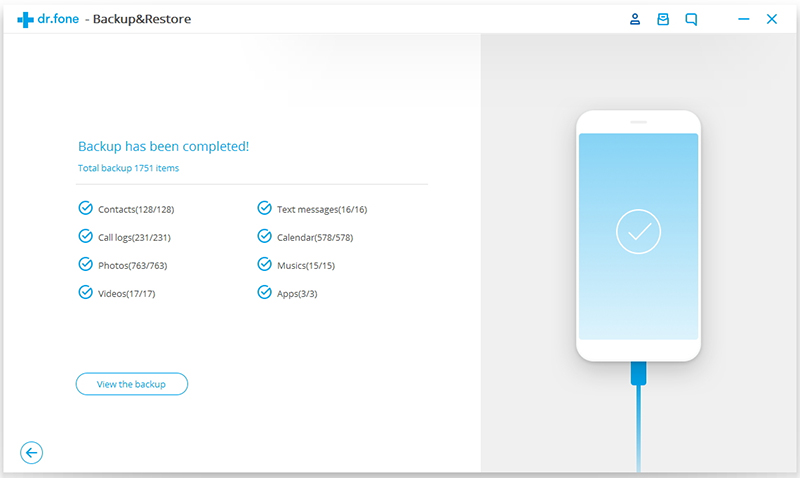
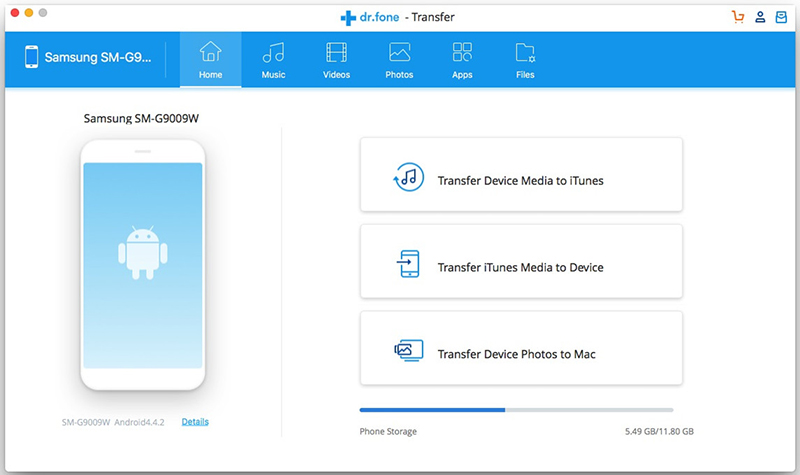
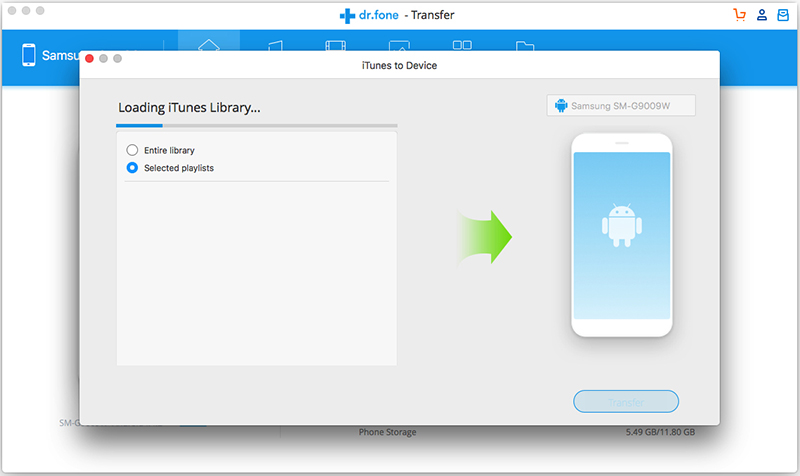
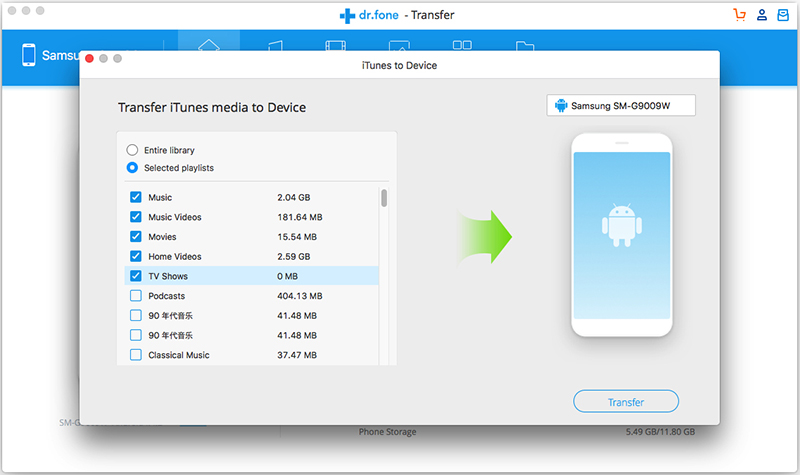
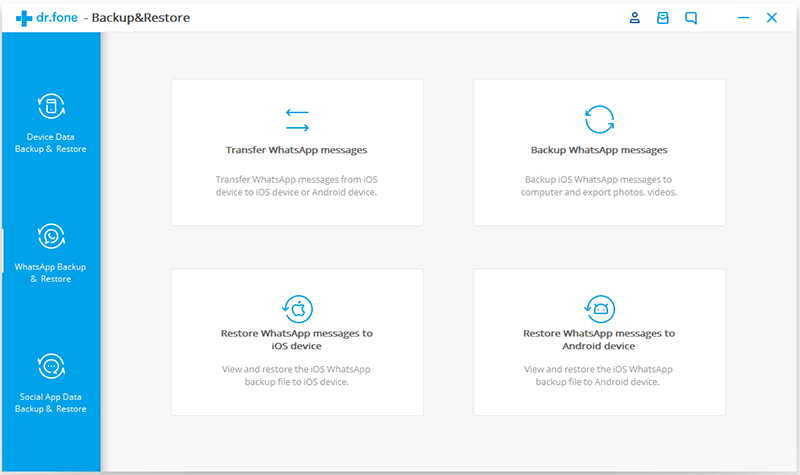
The iOS Toolkit – Phone Switch is an powerful Android to iPhone data transfer program for you to transfer photos, text messages, music, videos, call history and contacts from Android to iPhone in just three steps. So, you can easily transfer data from Samsung Galaxy S10/S9/S8/S7/S6/Note 9/Note 8/Note 5 etc. to iPhone 11/XS/XR/X. What’s more, this phone witch tool also allows you transfer data from Android to iOS, Android to Android, iOS to iOS, iOS to Android. Plus, it gives you ability to backup WhatsApp data and restore to iPhone with only one click. Besides, this one click data transfer solution enables you to backup Samsung data to computer and restore the backup file back to any Android phones or iPhone. Just download and install it to get started.

Features:

  • 1-Click to transfer Everything from Android to iPhone.
  • Easily, quickly and safely to transfer data from one phone to another.
  • Transfer data between devices with different operating systems, i.e iOS to Android.
  • Supports iOS devices that run the latest iOS 12.4 and iOS 13.
  • Transfer photos, videos, audios, text messages, contacts, call logs, and many other file types.
    Supports over 8000+ Android devices, such as Samsung, HTC, LG, Sony, Google, HUAWEI, Motorola, ZTE, Nokia and more smartphones and tablets.
  • Works for all models of iPhone, iPad and iPod.
  • Fully compatible with major providers like AT&T, Verizon, Sprint and T-Mobile.

d_win d_mac
d_win d_mac

How to Transfer Contacts from Samsung to iPhone 11/XS/XR/X

Step 1. Launch the Program and Select “Switch”
Click the above download button to free download the iOS Toolkit, then install and launch it on computer. If you want to switch data from one device to another, please select the option of “Switch” from its welcome screen.

android to iPhone 11 transfer

Now, connect the Samsung phone and iPhone 11 to the comptuer via USB cable and wait for them to be detected.

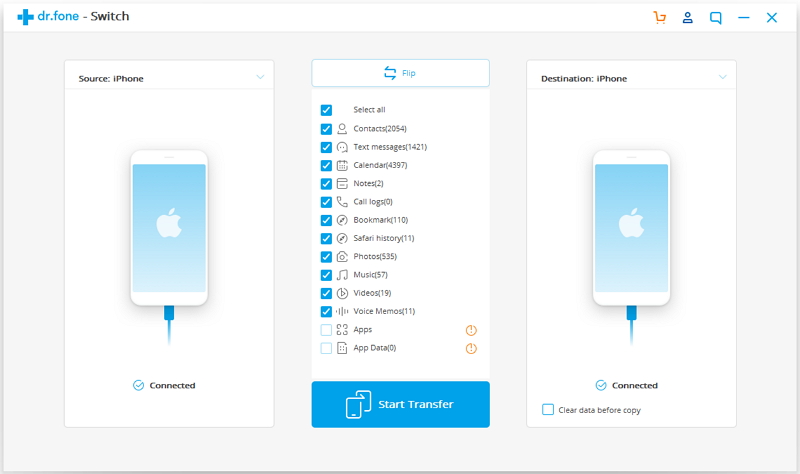
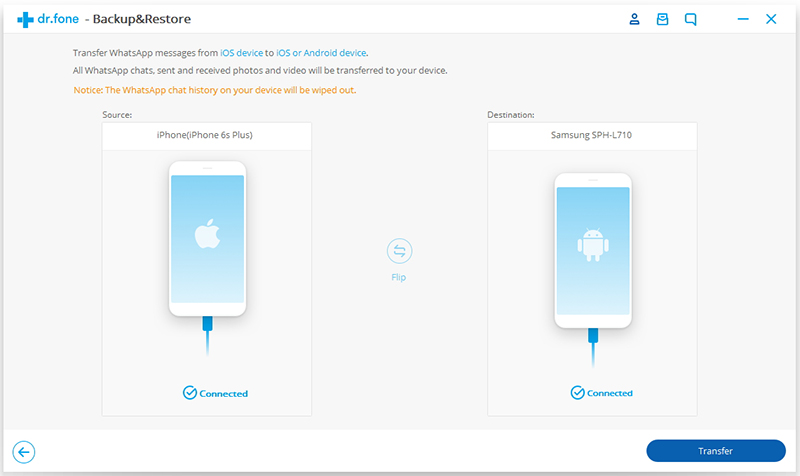
Step 2. Set iPhone as Target Device and Select Types of Data
Switch follows an intuitive process and will automatically list the devices as Source and Destination. Though, you can click on the “Flip” button to exchange their positions.

transfer samsung to iPhone 11

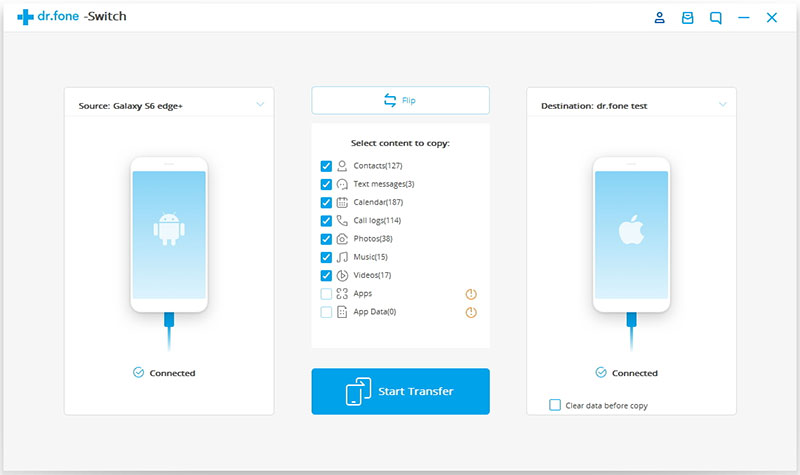
Note: You can select the option of “Clear data before copy” as well to delete the existing data on the target iPhone.

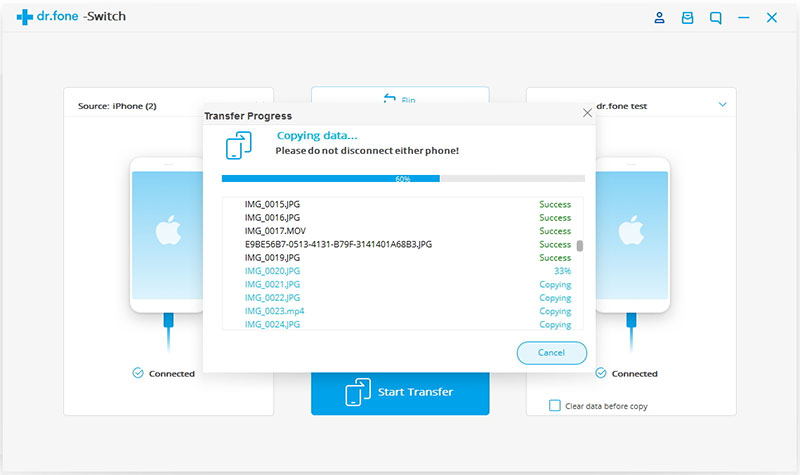
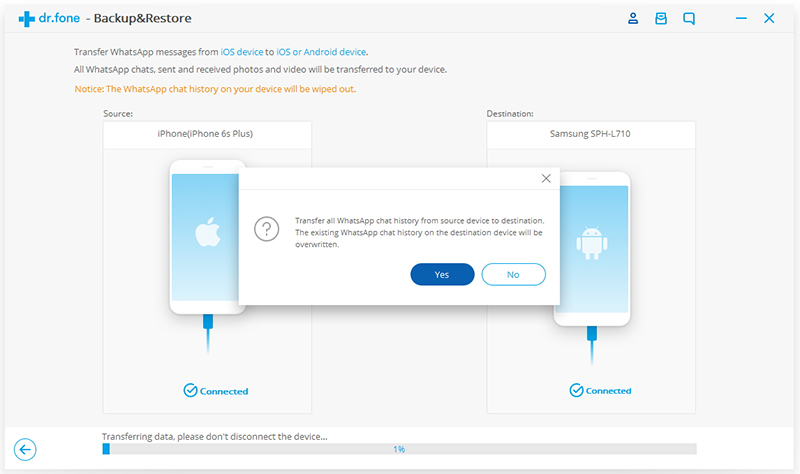
Step 3. Start to Transfer Samsung Data to iPhone 11
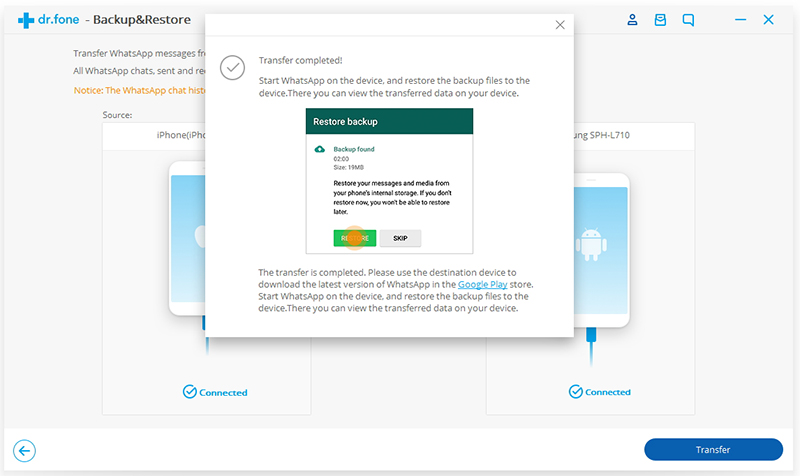
Just click on the “Start Transfer” button start transfering contacts from Samsung phone to iPhone, you can view the progress from the on-screen indicator. Once the transfering process is complete, you will be notified. Finally, you can safely disconnect both the devices with the computer and find all transfered contacts on your iPhone.

transfer data from Samsung to iPhone 11

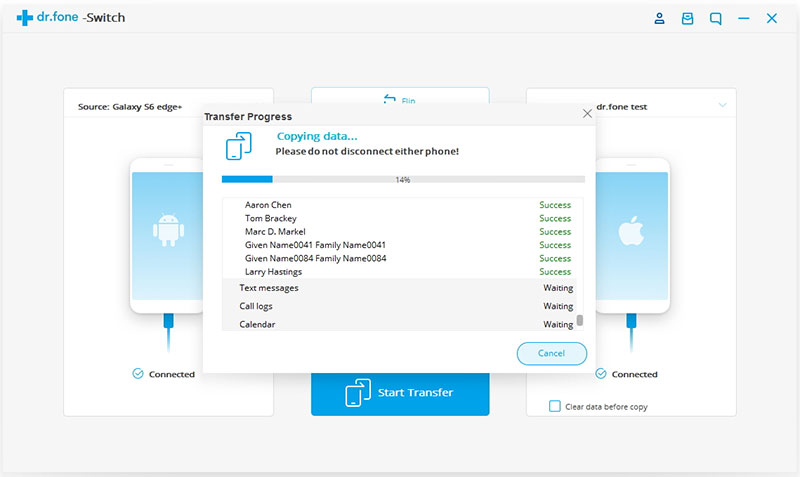
Note: Make sure that both the devices are connected during transferring process.

More about iOS Toolkit

This iOS Toolkit not only can help you transfer data from one phone to another, but also can help you transfer contacts, SMS, photos, music, video on your iPhone and iPad, Manage your iPhone data by exporting, adding, deleting, etc. Now, please download the iOS Toolkit and try to move your data between iPhone, Android and computer.

d_win d_mac
d_win d_mac

Upgrading your iPhone? Here’s how to transfer your data easily

[Summary]: This post is about how to transfer data from old iPhone to new iPhone 11/XS/XR/X/8 with a iPhone to iPhone tool. Below you will see a fast way to sync from iPhone to iPhone or iPad. You can transfer all types of data like contacts, messages, photos, music, calendar, etc. from between two iPhones seamlessly.

Apple likes to launch a new iPhone line every year, incorporating plenty of fresh benefits and improved features. iPhone 11/11 Pro/ 11 Pro Max will launch at 10 o’clock of September 10 2019 in Apple’s Steve Jobs Theater. But if you’re looking to upgrade from an older iPhone, how can you transfer your important data from your old iPhone to your new iPhone 11 or iPhone XS(Max), iPhone XR, iPhone X or iPhone 8(Plus)?

Fortunately, there are a number of ways that you can easily transfer your data from one iPhone to another. Most people using iCloud and iTunes to backup data and then restore data to the new iPhone from backups.

iCloud Backup and Restore: If you backup and restore data via iCloud, this method can only be used if you’re under a stable Wi-Fi environment. If you don’t have Wi-Fi at home.

iTunes Backup and Restore: By using iTunes to backup old iPhone data and restore them to a new iPhone, you will need to have iTunes installed and updated to connect your iPhone to it. To update iTunes, you will need to be connected to a stable Wi-Fi network. Worse, it will erase the current data and settings on your new iPhone.

This article shows you an way easily transfer your data from one iPhone to another with 1 click, you can learn how to transfer contacts, SMS and more from old iPhone to iPhone 11/Xs/Xr/X.

Phone Switch is a part of iOS Toolkit, which is a professional iPhone to iPhone transfer tool. In terms of Mobile Phone Data Transfer, you can connect your two iPhones to computer and use the software to transfer text messages, contacts, photos, videos, audio files, apps, apps data, call logs etc. from iPhone to new iPhone 11/XR/XR/X/8/8 Plus in one click. What’s more, You can transfer data between iOS, Android, WinPhone and Symbian with one click, it supports 6000+ mobile models across brands such as Sony, Apple, Samsung, HUAWEI, Google, Motorola, Xiaomi, Oppo, OnePlus, etc. In additional, if you want to transfer WhatsApp data from iPhone to iPhone or iPad, the “Restore Social App” build-in WhatsApp transfer, backup & restore function, so you can directly transfer WhatsApp messages from iPhone to iPhone effortlessly.

Please download and install the Phone Toolkit – Switch on your computer and follow the steps below to transfer data from iPhone to iPhone.

d_win d_mac
d_win d_mac

Fast Way to Transfer Everything from Old iPhone to Your New iPhone

Let’s see how to copy data from iPhone 7 to iPhone 11 with iOS Toolkit – Switch.

Step 1. Launch iOS Toolkit on PC or Mac
Download, install and launch the iOS Toolkit on your computer, if you want to transfer data between two phones, please click the ‘Switch’ tab.

launch iPhone to iPhone transfer

Then, connect your iPhone 7 and iPhone 11 to the computer with USB cables.

Step 2. Set Source Devices and Target Devices
To switch files from old iPhone 7 to iPhone 11, the iPhone 11 needs to be set as the target device(right side), you can make use of the ‘Flip’ button if you have altered the selection.

select data to transfer

Note: Check the ‘Clear Data before Copy’ checkbox if you want to erase data on the iPhone before transferring data.

Step 3. Select the Data and Transfer to New iPhone 11
Now, select the data you wish to transfer from old iPhone 7 to iPhone 11 and click on the “Start Transfer” button. The program start transferring the all selected data from old iPhone to the new one, please keep connecting both devices during the transferring process. After the data transferring complete and then click ‘OK’, then you allowed to disconnect the devices, you will find all selected data moved to your new iPhone.

transfer data to new iPhone

More about iOS Toolkit

iOS Toolkit not only can help you transfer data between two iPhones, It also is a complete iPhone manager and iPhone transfer tool that will greatly improve your iPhone experience. You can use it to manage your iPhone device on computer, transfer data between iPhone/iPad/iPod and computer, recover deleted data on iPhone, fix iPhone to normal, backup and restore iPhone data and do so much more. This powerful iPhone manager software will let you perform a selective transfer of data between different mobile phones.

d_win d_mac
d_win d_mac

iPhone Data Transfer

How to Transfer Data from Android to iPhone 11 at Once

[Summary]: Wondering how to transfer all the data from your previous Android phone to the new iPhone 11? Want to copy data from Samsung Galaxy, Huawei, LG, HTC, Sony, Google Pixel, Nexus, OnePlus, Motorola, Xiaomi, Redmi, Oppo, Meitu, Windows Phone, Sharp phones and more to iPhone? Read this tutorial and learn the simple and fast way to move data from Android to iPhone directly.

Apple officials will hold an autumn new product launch at the Jobs Theatre on September 10. According to rumors, Apple will release three new iPhones models: the 6.1-inch iPhone 11R, the 6.5-inch iPhone 11 Pro and the 5.8-inch iPhone 11, which will all retain the 3D structured light face unlocking function. The form of the screen is only due to the adoption of a more advanced COP packaging process

iPhone 11 will be upgraded to A13 bionic processor and equipped with the world’s first iOS 13 system. From GeekBench, a suspected Apple iPhone 11 running score was found. It is equipped with 4GB memory, using iOS 13.1 system, single core 5415 points, multi-core 11294 points. Performance has improved by nearly 20%. In addition, iPhone11 also added a dark theme mode. In addition, iPhone11 battery capacity upgrade to 3000mAh or more, and standard 18W fast charge.

Although it’s quite exciting to get a new iPhone 11, if you use Android phone before, it’s could be quite annoying if you don’t know how to transfer data from Android to iPhone 11 and other iOS 13/12 devices. If you are in the same situation, no worry, we’ll recommend you a powerful and useful Phone Switch software that can help you transfer data from Android to iPhone, from iPhone to Android, from iPhone to iPhone/iPad and vice versa as long as your iOS devices are in iOS 8 and later (including iOS 13).

The iOS ToolkitSwitch, which helps you transfer contacts, photos, video, photos, messages and music from Android to iPhone 11/X/8/7/6S/6 (Plus) with 1 click. In addition, the “Restore Social App” feature supports backup iOS/Android WhatsApp messages to computers, and restore iOS/Android WhatsApp backup to iPhone, iPad, iPod touch & Android.

Let’s shows you the way to transfer data from Huawei, HTC, Samsung, Nokia, Google Pixel, Motorola and more to iPhone 11 (Pro).

Download the iOS Toolkit on PC or Mac at first.

d_win d_mac
d_win d_mac

Transfer Data from Samsung Galaxy to iPhone 11 in 1 Click (< 10 MINS)

This guide shows you how to transfer contacts, messages, photos, videos and music from Samsung phone to iPhone 11 as example, you can also follow the same steps to copy data to your new iPhone 11 from other iOS/Android devices.

Step 1. Launch the Phone Toolkit and Connect Both Phones
First, you need to download Phone Toolkit on your computer and install it. Run the program and choose the “Switch” option, and then connect both of your iPhones to your computer with the data cables.

samsung to iPhone xs transfer

Step 2. Select Data to Transfer
The software will show your Samsung phone and iPhone 11 in your screen and you will have to choose the the types of data that you want to transfer, including Contacts, Text messages, Call logs, Photos, Videos, Music and Calendar.

select files to transfer

Step 3. Start to Transfer Data from Android Samsung to iPhone 11
Just click on “Start Transfer” button start to data transferring process. Within a very short time your Android data will be transferred to the iPhone 11.

switch data to new iPhone xs

d_win d_mac
d_win d_mac

How to Transfer Data from Old iPhone to iPhone 11

[Summary]: Want to transfer data from old iPhone to iPhone 11, iPhone 11 Pro and iPhone 11 Pro Max? Here is one click to transfer data from from old iPhone to iPhone 11 or iPhone XS/XR/X/8/8 Plus.

Apple will hold a new product launch conference at 10 am on September 10, US time, the new iPhone 11 will be released. The iPhone 11 series will on selling in about two months, and many Apple fans want to buy the newest iPhone 11, many of them upgrading from older iPhone models or Android phones. As always with hardware upgrades. When you have got the new iPhone 11, the first thing you have to do is transferring data from iPhone to iPhone or coping data from Android to iPhone. For old iPhone users, some people may backup data from old iPhone to iCloud or a computer and then restore the backups to iPhone 11, but this method is very cumbersome and even cause data loss; some users may move the data from an old iPhone (upgraded to iOS 12.4) to iPhone 11 (iOS 13) via wireless or wired transfer with iOS 12.4 it’s migration feature, but both two method will cost you a lot of time. So in this part, we will introduce you another quickly and easy way to transfer data from old iPhone to iPhone 11/XS/XR/X/8/8 Plus with 1 click.

Way 1: Migrate Data from iOS 12.4 to iPhone 11 via iOS 12.4 Data Migration Feature

Before using iOS 12.4 Data Migration feature to migrate between two iPhone models, make sure the source device upgraded to iOS 12.4 and the target device upgraded to iOS 12.4 or later(iOS 13).

Note: If you transfer the data wirelessly, please connect the two iPhone over the same Wi-Fi connection.

Step 1. Hold the two iPhones together, unlock them and over the same Wi-Fi connection.
Step 2. Sign in using your Apple ID and set up Face ID or Touch ID.
Step 3. The Quick Start screen appears on your old iPhone and offers the option of using your Apple ID to set up your new iPhone 11. Make sure that it’s the Apple ID that you want to use, then tap Continue. If you don’t see the option to continue on your current device, make sure that Bluetooth is turned on. Follow the instructions to set up Face ID or Touch ID on your new iPhone 11.
Step 4. Tap “Transfer from iPhone”, then you’ll be able to transfer all your data from old iPhone to iPhone 11 over Wi-Fi or cable.

ios 12.4 quick start setup

Way 2: Transfer Data from Previous iPhone to new iPhone 11 with 1 Click

If you looking for a quickly and simple way to move data from previous iPhone to new iPhone, Here is a powerful iPhone to iPhone transfer tool – iOS Toolkit – Phone Switch, which helps you transfer text messages, contacts, photos, video, photos and music from iPhone XS/XR/X/8/7/6S/6 (Plus) to iPhone 11/11 Pro/11 Pro Max with 1 click. In addition, it’s the first software in the world to support transferring data from Android to iOS, iOS to iOS, iOS to Android and Android to Android.

What’s more, this iOS Toolkit can also help you manage your iPhone data from computer by deleting, adding or editing items from computer; backup and restore iPhone data; recover lost data from iPhone; fix iOS system to normal; erase iOS data; transfer, backup & restore WhatsApp messages and unlock iPhone screen. Can’t wait to have a try? Follow the steps below to transfer data from old iPhone to iPhone 11 as example.

d_win d_mac
d_win d_mac

iOS Toolkit – (Phone Switch) Features:

  • 1 click to transfer data from old iPhone to iPhone 11 and iPhone XS/XR/X/8/7/6S/6 (Plus).
  • Easily transfer contacts between two iPhones with full contact info.
  • Transfer from Android to iPhone 11 and iPhone XS/XR/X/8/7S/7/6S/6 (Plus)/5s, etc.
  • Works well with Apple, Samsung, HTC, LG, Sony, Google Pixel, HUAWEI, Motorola, ZTE, Nokia and more smartphones and tablets./li>
  • Fully compatible with major providers like AT&T, Verizon, Sprint and T-Mobile.
  • Fully compatible with iOS 12.4, iOS 13 and Android 9.0
  • Fully compatible with Windows and Mac computer.

3 Steps to Transfer Data from Old iPhone to iPhone 11(Pro) in 1 Click

Be aware:

Contacts in account: Phone Toolkit – If you want to transfer contacts on Twitter, Facebook, Google and any account supported by your old iPhone device, please sign in the accounts on your old iPhone at first.

Backup and Restore iPhone data: You can also backup data from old iPhone to computer, and restore to your the new iPhone 11, including WhatsApp data, contacts, messages, music, photos, videos and more.

Restore Social App: Backup all your LINE/Kik/Viber/Wechat/WhatsApp chat history, including personal chats and group chats; text, voice and video chat history; images and stickers, etc. You can preview the LINE/Kik/Viber/Wechat/WhatsApp backup file and restore chat history or even selectively export any item to computer.
This function also allows you transfer WhatsApp from iPhone to iPhone, or transfer from iOS to Android directly.

Step 1. Run the Software and Connect two iPhones to Computer
Launch the iOS Toolkit on your PC or Mac and click “Switch”. After then, connect your old iPhone and new iPhone 11 with the computer via USB cables respectively. Make sure that both devices can be successfully detected by your computer.

iPhone to iPhone 11 transfer

Step 2. Select Types of Data
In the main window, you will see the program displays as follows. You can use the “Flip” button to switch the places of your phones and make sure that the iPhone 11 on the left side as target device, then select contents to copy.

select iPhone data to transfer

Step 3. Transfer SMS, Contacts, Calendar, Photos, Video and Music from iPhone to iPhone 11(Pro)
After then, you can see that all contents that can be transferred are listed in the middle of the window. Check the wanted files and click “Start Transfer“. A small dialog pops up, telling you the percentage of the progress bar. During the process, never to disconnect either device. Then all the data will be transferred from old iPhone to iPhone 11(Pro).

transfer iphone data to iphone 11

As mentioned above, this iOS Toolkit – Switch can also support data transfer between iOS device, Android devices and computer. For example, you can move data from Android to iPhone 11; transfer music, photos and videos from computer to iPhone 11; and back up iPhone contacts, messages, photos, videos, music to computer.

Please free download this powerful phone toolkit to transfer and manage your phone’s data with more ease.

d_win d_mac
d_win d_mac

iPhone to iPhone 11 Transfer

How to Recover Deleted Audio Files from Huawei Phone

[Summary]: Guide to recover deleted audio or music files from Huawei Android phone, get back deleted audio on Huawei phone with professional Android data recovery software, you can also retrieve your lost photos, videos, WhatsApp messages, document, messages and contacts.

How can I recover deleted songs on Huawei P20?
Hey, guys. I want to know how to recover deleted music on Huawei P20. I accidentally deleted a folder in the miscellaneous section that contained a few hundred MP3 music files, I want to get the deleted MP3 file back on Huawei phone. Any Android data recovery software can scan and retrieve deleted audio file from Huawei smart phone?

You may want to read:

* How to Recover deleted Photos/ Videos from Huawei

* Huawei Data Backup and Restore

If you had backup music by Huawei Backup app or Huawei HiSuite, then the solution is as easy as simply restoring the backup. But if you didn’t, you need an third-party HUAWEI Data Recovery software to recover deleted files from Huawei phone directly.

Part 1: Restore Deleted Audio to Huawei Phone from Backup

If you have backed up your device to protect your data with Huawei Backup app, when you deleted files on Huawei phone by accidentally, you can easily restore backup and get deleted audio back to Huawei phone. Here, you can learn how to restore lost audio files to Huawei phone from it’s Backup app.

Step 1. Open Backup app on Huawei phone, and tap Restore.

restore data from huawei backup app

Step 2. Choose the source of the data to be restored, and tap Next.

restore huawei audio

Step 3. Select Audio file type to restore.

restore audio to Huawei phone

Step 3. Tap Start restoration.
In the dialog box that pops up, choose a location to restore your backed up data from Videos, Photos, Audio, and other locations.
Step 4. Tap OK to begin restore the select Audio back to your Huawei phone.

Part 2: Recover Deleted Audio or Music Files with Huawei Data Recovery Software

If your can’t find a backup you made before to restore Huawei, or you haven’t backup your data before the file deleted. Don’t worry, you still have chance to scan and recover deleted files from Android device without backup.

Android Data Recovery is a professional data recovery tool for Huawei phones and tablets. It not only supports recover deleted audio or music files on Huawei phone, but also allows you recover photos, videos, WhatsApp messages, document, text messages and contacts from Huawei phone (Mate, P, Nova, Y, Honor, G, Ascend sries…), not matter data lost or deleted due to you accidentally clicking the delete button. In addition, it can recover deleted, lost or formatted files from SD cards inside your Android device.

This powerful Android data recovery tool supports you to recover your data from Samsung Galaxy, HTC, LG, Sony, Google Nexus, Google Pixel, Xiaomi, Motorola, Huawei, Sony, Sharp, OnePlus and and other brands with Android OS. Now you can download the software and try to use it to restore deleted data from your Huawei phone and tablets. The following guide will be much helpful.

d_win d_mac
d_win d_mac

Features:

  • Recover deleted/lost music files on Android smartphone/tablets.
  • Recover Android data by scanning your Android phone & tablet directly.
  • Preview and selectively recover what you want from your Android phone & tablet.
  • Supports various file types, including WhatsApp,Messages & Contacts & Photos & Videos & Audio & Document.
  • Extract data from dead/broken Samsung phone.
  • Fix Android system to normal like frozen, crashed, black-screen, virus-attack, screen-locked.
  • Supports 6000+ Android Device Models & Various Android OS.

Guide to Recover Deleted or Lost Audio Files from Huawei Phone without Backup

Step 1. Launch Android Toolkit on the Computer
Launch Android Data Recovery program after downloaded and installed it on the computer.

d_win d_mac
d_win d_mac

To recover deleted audio files from Huawei phone, please select “Android Data Recovery” option.

launch huawei file recovery

Step 2. Connect Huawei Phone to Computer and enable USB debugging
Use USB cable to connect your Huawei phone to the computer. Then the program will detect your Huawei phone automatically.
If the device can not be detected, turn to allow USB debugging. Follow the steps as below:

1. For Android 2.3 and earlier versions: Tap “Settings” app > “Applications” > “Development” > Check”USB debugging”.
2. For Android 3.0 – 4.1: Navigate to “Settings” > “Developer options” >  Check “USB debugging”.
3. For Android 4.2 and latter versions: Navigate to “Settings”, tab “Build number” for 7 times. Go back to “Settings” and select “Developer options” > Check “USB debugging”.
More details are included in this guide: how to enable the USB debugging on Android device.

After enable the USB debugging mode, continue to follow the next step.

enable usb debugging on huawei

Step 3. Choose Audio File Type to Scan
When you see the interface as below, tick “Audio” and click “Next” to allow the program scan your device. You can also “Select All” to scan and recover all data from Huawei phone. In order to saving time during the scanning process, we recommend you just select “Audio” item.

select audio to scan

Step 4. Allow Scan the Device
When the below windows appear, you can switch to your Huawei phone again, click “Allow” on the device and make sure the request has been remembered forever, then turn back to the computer and click on the “Start” button to continue.

allow scan Huawei phone

Step 5.Root the Huawei Phone to Deep Scan
When the below interface appear, a deep scan over the Huawei requires root permission. To do so, click the Advanced Root and download an Android Root tool (KingoRoot) on the computer, then install, launch and use it to root your Huawei phone at a fast speed.

Related article on how to root and unroot an Android device with KingoRoot.

root huawei phone

After rooting the phone complete, it will initiate a deep scan over your device. The process will take a few minutes (about 15 to 20 minutes). Please keep the connection between your Huawei phone and the computer during the scanning process.

Step 6. Preview and Recover Audio Files from Huawei Phone
After the scan, it will list all the audio files on the interface. If you only want to check the deleted data, you can turn on the button of “Only display the deleted item(s)” on top of the window. Please select the audio files you want and click “Recover” button to export and save them on the computer. After saving the deleted audio or music files on the computer, you can listen to the restored audio on computer.

recover deleted audio from Android

Step 7.Import the Restored Music to Android
Above simple steps, you have got back the deleted or lost audio files and save them on the computer. If you want to transfer the retrieved music files to Huawei phone or other Android devices for listening, you can use this useful Android Transfer tool, it can help you import music, video, photos, contacts to Android devices fast.
Related guide: How to Transfer Music, Video, Photos to Android

Not only Audio, this Android Data Recovery software can also help your recover your photos, videos, call logs, contacts, WhatsApp data and more from Android devices. You can give it a try and recover them in the similar steps.

d_win d_mac
d_win d_mac

HUAWEI Data Recovery Supported models:

Huawei Mate: Huawei Mate 20/ Mate 20 Pro, Huawei Mate 20 X(5G), HUAWEI Mate 20 RS Porsche Design, HUAWEI Mate RS Porsche Design, Huawei Mate 10/10 Pro, Huawei Mate 10 Porsche Design, Mate 10 lite, Huawei Mate 9, Huawei Mate 9 Pro, Huawei Mate 9 Porsche Design, Huawei Mate 8, Huawei Mate 7, Huawei Mate S and Huawei Mate RS Porsche Design.

Huawei P: Huawei P30/ P30 Pro, Huawei P20, Huawei P20 Pro, Huawei P10, Huawei P10 Plus, Huawei P9, Huawei P9 Plus, Huawei P8, Huawei P8max, Huawei P8 Lite, HUAWEI P smart+ 2019, HUAWEI P smart 2019, HUAWEI P smart

Huawei Honor: Huawei Honor V9, Huawei Honor 8,Honor 8 Pro, Huawei Magic,Huawei Honor 7/6, Huawei Honor 6, Honor 6X , Huawei Honor 5X,Huawei Honor 4c/3c, Huawei Honor 4x

Huawei Nova:HUAWEI nova 5 Pro, HUAWEI nova 5, HUAWEI nova 5i Pro, HUAWEI nova 4/nova 4e, nova 3/nova 3i, nova 2s, Huawei Nova 3e, Huawei Nova, Huawei Nova Plus

Huwei G: Huawei G9, Huawei G9 Plus, Huawei G9 Lite, Huawei G8, Huawei G7 Plus, Huawei GR5 2017, Huawei GT3, Huawei GR5, Huawei GR3, Huawei Ascend G7

Huawei Y: HUAWEI Y9 Prime 2019, HUAWEI Y7 2019, HUAWEI Y9 2019, HUAWEI Y6 2019, HUAWEI Y5 2019, HUAWEI Y6 Prime 2018, HUAWEI Y6 2018, HUAWEI Y9 2018, HUAWEI Y5 Prime 2018, Huawei Y5 2017, Huawei Y6II, Huawei Y5II, Huawei Y3II, Huawei Y6 PRO

Ascend:Huawei Ascend P8, Huawei Ascend G7, Huawei Ascend Mate 7, Huawei Ascend Mate 6

HUAWEI Audio Recovery

How to Recover Lost or Deleted Documents from Huawei Phone

[Summary]: If you lost your important Document files on Huawei phone, you can recover them from backup you made previously. If you don’t even have backup available, you can try to recover your Document files from Huawei phone internal memory.

I recently lost a word document on Huawei P20. Is there any way to recover it? Is Word file recovery possible? It is so important for me. Please help me retrieve deleted word documents from Huawei phone.

I deleted a important PDF document on my Huawei phone, how to recover deleted PDF document from Huawei Mate 20? I have made my phone data backup before, is it possible to recover PDF document from Android phone without backup?

Lots of Android users like to store valuable documents on Android device, hence it is important to ensure document security. Have you ever has the experience of losing important documents like TXT, DOC, DOCX, XLS, XLSX, PDF, etc. on your Android mobile phone? A reliable document recovery tool can get document back from Android phone/tablet. This tutorial is going to recommend the professional and powerful Android Data Recovery software for you.

Android Data Recovery not only can help you recover deleted photos, videos, contacts, audios, text messages, call logs from Android devices, but also allows you recover deleted or lost TXT, DOC, DOCX, XLS, XLSX and PDF document on Android internal memory and SD card. So, you can use this popular Android Data Recovery to recover deleted document from Huawei mobile like P30, P20, P10, P9, Mate RS, Mate 20/10/9, Honor 10/9/8, Nova 3e/2s, Y7/Y6, G9/G8, etc. The program can help you complete the Huawei Data recovery job in a safe way. It supports directly scan and preview deleted or lost data from Huawei phone. Before recovery, you are able to check and select the data which you want to get back.
If the document stored on your SD card, you can also use this Data Recovery software to recover TXT, DOC, DOCX, XLS, XLSX, PDF, photos and videos from SD card.

What’s more, the Android Data Recovery supports multiple Android phones and tablets, like Huawei Mate Series, P Series, Y Series, nova Series, Honor Series, Samsung Galaxy , HTC, LG, Motorola, and so on. This useful android recovery tool can help you get back lose data due to different issues, like accidentally deletion ,broken device, water damaged, virus attack, or have its system crashed.

In addition, if your Samsung phone is broken or death with frozen, crashed, black-screen, virus-attack, screen-locked, you also can use the “Broken Android Data Recovery” feature to fix Android system to normal and extract data from broken Samsung phone.

Now you can download the trial version to get your lost data back.

d_win d_mac
d_win d_mac

Recover Deleted Files from HUAWEI Phone

Step 1. Run this Huawei data recovery tool
First of all, please download, install and launch the Android Toolkit on computer. To recover deleted document from Android phone, choose the “Android Data Recovery” option to proceed.

launch huawei document recovery

Tips: The program is only read and recover your data one your computer, without any personal information leaking.

Step 2. Connect Huawei phone to computer and enable USB debugging
Connect your Huawei phone to the computer. The program will ask you to enable USB debugging on the Huawei phone. There are instructions on the screen that can guide you every step.

You can also read: how to enable the USB debugging on Android device.

enable usb debugging on huawei

Step 3. Choose Document to Scan
Here, you can see the software listes all types of data to retrieve, including contacts, messages, documents, videos, audios, etc. Generally, the more data types you have selected the longer scanning time it will take.If you only want to recvoer document, please select “Document” and click Next to go to next step.

select document to scan

Step 4. Root Android to Deep Scan
When you arrive at the screen shown as below, a deep scan over the Huawei requires root permission. To root the Android device, click the Advanced Root and download KingoRoot tool to root your phone at a fast speed.

If you want to know more about the root process, check out the article on how to root and unroot an Android device with KingoRoot.

root huawei phone to recover data

Once you’re rooted, it will initiate a deep scan over your device. The process will take a few minutes (15 mins around). Please keep the connection between your phone and the machine stable while it’s running.

Note: It might be a Superuser authorization appearing on your device during the scan. You just need to click “Allow” to continue. If not, skip this step.

Step 5. Preview and Recover deleted Document from Huawei
When the scanning process complete, you can see all existing, deleted and lost document files shown to you, you can preview them one by one. Check the data you want to get back and click “Recover” to recover the document on the computer.

recover documents from Huawei phone

Now, select the files you want to get back and click on the Recover button at the bottom corner. When a dialog pop-up, select a safe location to store your recovered data files on your computer.

Android Data Recovery is a powerful data recovery program for you to recover important data on Android devices. Download the free trial version of Android Data Recovery on your computer to have a try, and remember to share this useful tutorial with your friends.

d_win d_mac
d_win d_mac

Android Document Recovery

How to Recover Deleted Videos, Photos from HUAWEI Phone

[Summary]: If you looking for the most effective way to recover lost or deleted videos, photos from Huawei phone like P30/20/10, Mate 20/10/9, Honor 10/9/8, etc. This is a detailed guide on how to recover photos and videos from HUAWEI phone, including HUAWEI Mate, P, Nova, Y, Honor, G, Ascend series…

HUAWEI P30, Mate 20 is very popular, which is one of super Android smart phone in 2019. Since HUWEI is great, many users must have shot and stored tons of videos in the phone. However, Once data loss happens due to accidental deletion, factory reset, OS update, rooting, virus and other unknown causes. When you lost precious photos/videos on your Huawei mobile phone, how to recover lost videos/photos from Huawei Android phone? Especially haven’t backup data to computer, Google Photos or HUAWEI Mobile Cloud.

CONTENTS:

Way 1: Restore Photos to Huawei Phone from Google Photos

For Huawei P30/P20/Mate 20/Mate 10 users, you can backup photos to Google Photos app. If you enable “Backup and sync” option on Google Photos before deleting the photos, they should still be here and you can restore deleted photos on Huawei by follow these steps:

Step 1. Open the Google Photos app on your Huawei P30.
Step 2. Tap Menu at the top left, and tap Trash.
Step 3. Choose the photo(s) you want to retrieve.
Step 4. Tap Restore. Your photos will put back to Album they were in, you will find your lost photos restored to the Huawei phone.

Way 2: Retrieve Deleted Photos and Videos from Huawei Photo Directly

No backups in Google Photos? Don’t worry, since the deleted photos and videos overwritten by the new data, you still have a change to recover them from Huawei phone without backup file. So, you are required to stop using your phone once data loss occurs so that no data would be overwritten, then use a professional HUAWEI Data Recovery software, let’s show you the simple way to recover lost or deleted videos, photos from Huawei phone.

This Android Data Recovery is a professional Huawei data recovery tool that can help you retrieve pictures and videos from your HUAWEI, recoverable video format: JPG, JPEG, TIFF, GIF, PNG, BM and video format: MOV, M4V, MP4, AVI, 3GP, etc. Besides photos/videos, it allows you to restore deleted  audios, text messages, contacts, call logs, WhatsApp and more from Android devices, such as Samsung Galaxy, Google Pixel, HTC, OPPO, VIVO, LG, Sony, Motorola, Xiaomi, ZTE, OnePlus, Redmi etc.

In addition, the build-in Broken Android Data Extraction function can help you fix and extract photos, videos, contacts, messages and WhatsApp messages from broken/brozen Samsung phone. If your Samsung Galaxy S6/S5/S4/Note 5 stuck in black screen, system is damaged, screen-broken or non-responsive screen, you cannot enter password or cannot touch the screen, stuck in startup screen, stuck in the download mode. The Broken Android Data Extraction function can fix Android system to normal and recover existing data from the broken Samsung phone, but it currently only support some Samsung devices. For the broken Huawei phone, please wait for the software update.

Download and install Android Data Recovery software on the computer, and follow the step-to-step guide below to recover deleted videos and photos from Huawei phone.

d_win d_mac
d_win d_mac

Kind Tips: Looking for a way to download videos from YouTube? 4kFinder YouTube Video Downloader provides everything you expect. This is an excellent online video downloader dedicated to downloading 1080p 60fps videos, 720p HD, 1080p HD, 4K, 8K videos, etc. from YouTube to MP4 without image quality loss. In addition, extracting MP3 audio from YouTube is also one of its features. Apart from YouTube, it is also able to download videos from more than 1,000 popular online streaming sites, like Facebook, Instagram, Twitter, Bilibili, NicoNico, BBC, Vimeo, VLive, Tumblr, Fmovies, etc.

Here is how to directly recover deleted photos on Huawei phone by using Android Data Recovery program.

How to Recover Deleted Video/Photo Files from Huawei Phone

Step 1. Run the Android Data Recover on PC or Mac
The first step is to download the Android Toolkit, install and run it on your computer, retrieve deleted photos deleted from Huawei phone, please select “Android Data Recovery” tab in the main window.

launch huawei video/photo recovery

Tips: The program is only read and recover your data on your computer, without any personal information leaking.

Next, connect your Huawei phone to computer with USB cable.

connect Huawei phone to computer

Step 2. Allow USB Debugging on Huawe Phone
After connecting your phone with the computer complete, you will get prompt to enable USB debugging mode on the device to get access to the internal storage. You need to enable USB debug on your phone firstly.
Related article about: How to turn on USB debugging mode on Android
1. Android 2.3 or earlier: Go to “Settings < Applications < Development < USB debugging”.
2. Android 3.0 to 4.1: Go to “Settings < Developer option < USB debugging”.
3. Android 4.2 or newer: Go to “Settings < About Phone < Build number” for several times until you get a note about “You are under developer mode”. Then, you should go back to “Settings < Developer options < USB debugging”.

enable usb debugging on huawei

Step 3. Choose Videos and Photos to Scan
Next, select what data type to scan for deleted files. If you only want to recover deleted photos and videos, please select “Videos”, “Gallery” and “Picture Library” to continue.

select video and photos to scan

Step 4. Root Device to Deep Scan
The program will start analyzing the device and try to discover the deleted pictures. To be able to deep scan more deleted files inside the device storage, a root and in-depth search is required.

So you need to root the device firstly, please click the “Rooting Tools” to download an Android Root tool ( KingoRoot ), it helps root the device safely. Please don’t worry, you can also get the device back to it’s original status after data recovery complete.
Also check: Safely root and unroot an Android device with KingoRoot

root huawei device

Step 5. Recover deleted Videos/Photos on Huawei Phone
Once you’re rooted, the software will initial a full and complete scan on the internal memory or SD card on the Huawe phone. This might take a few minutes.

After the scan, it should display all detail information of deleted and existed data, you can view them one by one and mark all files you need, selectively restore and save them to computer for use. The software allows you preview photos before recovery, but it not allow you preview video before recover them, so you need to save the deleted videos on computer at first.

recover video, photos from Huawei phone

Finally, please mark the “Photos” and “Videos” that you want to retrieve and click “Recover” to export and recover the deleted pictures/videos on your computer.

d_win d_mac
d_win d_mac

Android Photo/Video Recovery

How to Backup and Restore Samsung Galaxy Note 10/Note 10+

[Summary]: Step by Step guides on how to backup and restore Samsung Galaxy Note 10/Note 10+(5G) data. Four different ways to help you save data on Samsung phone before reset to factory settings.

My Samsung Galaxy Note 10 is a little glitchy and I do have Reset as a security measure but I am not sure how to save the data to computer before I attempt to reset, especially for the contacts, text messages, photos, videos and WhatsApp data, I also want to restore the backups to the phone after doing factory reset complete.

General Android data backup and restore solutions:

If you just want to backup videos, photos, music, contact phone number, etc. You can backup data by using Samsung Cloud, Google Cloud, Google Drive; or transferring the media files from the Samsung phone to a folder after connecting the device to a computer; or using Samsung Kies to backup and restore the data. But, this will not work for apps, or data in apps. If you want to Contacts, Messages, Call History, Calendar, Gallery, Photos, Audio, Video, Documents, Application and even Application data (for rooted devices), you need to this Android Data Backup & Restore or Android Toolkit – Backup & Restore(Android).

Way 1. Backup Samsung Galaxy Note 10 to Computer and Restore via U.Fone Android Backup & Restore

Looking for a best Samsung Note/Note 10+ Backup & Restore Software to replace the Samsung Kies, Samsung Cloud and Google Cloud Backup service?

Android Data Backup & Restore is your best choice, it can help you easily backup Galaxy Note 10 or Note 10 Plus data to PC/ Mac and later you can use that backup file to restore data to any Android phone or Samsung Galaxy phone or tablet. You can selectively back up data from Android devices to PC and Mac easily, and then preview the data in detail before restoring data from backup.

More Features:

  • Backup and restore Android data to your computer easily.
  • Preview data in detail before you restore data from backups.
  • Backup and restore Android phone and SD card data Selectively.
  • Backup & Restore Files: Contacts, Messages, Call Logs, Gallery, Videos, Audio, Documents
  • Supported Devices: Samsung Galaxy, LG, HTC, Sony, Google Pixel, Nexus, OnePlus, Motorola, Xiaomi, Redmi, Oppo, Meitu, Windows Phone, Sharp phones and more.

d_win d_mac
d_win d_mac

Part 1: Backup Samsung Galaxy Note 10 to Computer

Step 1.Download and Run Android Toolkit on Computer
After downloading and launching Android Toolkit on PC or Mac, then click on “Android Data Backup & Restore” option to go on.

Galaxy note 10 data backup restore

Step 2.Connect Note 10 to Computer
Connect your Galaxy Note 10 to the computer with a USB cable. If you are prompted to enable the USB debugging mode on the device,you can follow the

Step 3.Allow the USB debugging on Samsung Note 10
In this section you must allow the USB debugging on your phone for the process,then you should tap “OK“when it shows up on the device screen.

allow usb debugging

Step 4.Select Data to Backup from Device to Computer
Now you can select data you would like to either backup or restore when it is successfully connected . To do a selective backup click “Device Data Backup” option to go on.

choose Android data backup

Step 5.Choose File Types to Backup
In this step you can choose the file types to backup,such as Contacts, Messages,Photos,Videos, etc,. and click “Start”.

Choose Backup Content

Step 6.Select the Folder for the Output Files
Select a location to store your backed up data and click “OK” to continue.

Choose Output Directory

Step 7.Start to Backup Your Samsung Galaxy Note 10 to Computer
Last but not least,just simply click “Start” button to backup the selected data from Galaxy S9 to computer.

backup Galaxy S9 to Computer

Part 2: Restore Data to Samsung Galaxy Note 10 or Other Devices

Above steps, you have backed up data from Galaxy Note 10 to the computer, after factory reset your phone successfully, then you can follow these quick steps to restore your data to Galaxy Note 10 or other Android devices safely and easily, including contacts, messages, call history, photos, videos, songs, documents and so on.

Step 1. Connect Samsung Galaxy Note 10 to the Computer

Step 2. click “Device Data Restore” selection, the program will pop up an new windows, then click “Restore” button to transfer the backups to Galaxy Note 10.

restore Android data to Samsung Galaxy Note 10

Free download the U.Fone Android Toolkit – Android Data Backup & Restore and try to backup your phone.

d_win d_mac
d_win d_mac

Way 2: Backup Samsung Galaxy Note 10 to Computer and Restore via Android Toolkit – Backup & Restore (Android)

Android ToolkitAndroid Data Backup & Restore allows you to easily backup almost all types of data from Samsung Galaxy Note 10/Note 10+/Note 9/Note 8/Note 5/Note 4, including calendar, call history, gallery, video, messages, contacts, audio, applications and even application data. You can also preview and selectively export any type of data you want. The program also allows you to easily restore the data to any Android/iOS devices whenever you need to.

Key Features:

  • Selectively backup data from Samsung to computer with one click.
  • Preview and restore backup to any Android/iOS devices.
  • Restore iCloud/iTunes backup to Android devices.
  • Supported Android Data: Messages, contacts, calendar, call history, gallery, video, audio, applications and even application data after rooting the devices.

Download the Android Toolkit for Windows or Mac and try to backup your Galaxy Note 10.

d_win d_mac
d_win d_mac

Simple Steps to Backup Samsung Galaxy S10/S10+ to Computer and Restore

Step 1. Launch Android Toolkit on PC or Mac
Launch the Android Toolkit on your Mac or PC and go to the “Backup & Restore” section.

android toolkit home page

Step 2. Connect Samsung Galaxy Note 10 to Computer
Then, please connect the Note 10 to computer and wait for it to be detected. Make sure that its USB debugging option is enabled beforehand. Afterward, you can choose to “Backup” your data.

android data backup restore

Step 3. Select Data to Backup
The interface will ask you to select the data files you wish to backup. You can manually select the type of data or enable the “Select all” option as well. You can also change the path where the backup would be saved.

select android files to backup

Step 4. Start to Backup Data from Samsung Galaxy Note 10 to Computer
As soon as you would click on the “Backup” button, the application will automatically start taking a backup of your data. Make sure that your Note 10 stays connected to the system till the process is completed.

backing up samsung galaxy note 10

Once the application completely backup Note 10 to PC, you will be notified. Now, you can view the backup data or can remove the device safely as well.

android backed up completed

In this way, you can easily use this Samsung Galaxy Note 10 backup software to keep your data safe. You can follow the same drill to restore your data as well. Just go to “Restore” section, load a backup file, and restore your data back to your Galaxy Note 10 and more Android/iOS smartphone.

restore samsung galaxy note 10

d_win d_mac
d_win d_mac

Way 3: Backup and Restore Samsung Galaxy Note 10 via Google Backup and Restore

Before factory reset your Android device, you can use Google Backup and Restore service to backup photos, videos, contacts, Wi-Fi® passwords, Browser bookmarks, User dictionary, a list of installed Market applications and other customized settings, this Google free service also can help you restore data and settings to applications utilizing the backup service upon reinstallation.

Step 1. From a home screen, select Apps Applications icon (located in the upper-right).
Step 2. From the Apps tab, select Settings.
Step 3. Select Backup and Restore.
Step 4. From the Backup account field, ensure the appropriate account is listed.

Note: To change accounts, please select Backup account, then select Google account. Enabled when a check mark Checkbox icon is present. In addition, if Back up my data is disabled, existing backups are deleted from Google’s servers.

Step 5. Finally backup the device and all the selected data to Google Cloud.

Step 6. Go to Backup and Restore setting on your phone and login with the same Google account that you have used to backup your files.

Step 7. After you logged-in, you will see your backed up history. You can then restore the data and settings from there. It’s very easy and simple.

Way 4: Backup and Restore Samsung Galaxy Note 10 via Samsung Cloud

Part 1: Backup Samsung Galaxy Note 10 Data to Samsung Cloud

Step 1 : From the Home screen, touch Apps > Settings > Backup and reset. Touch Back up my data.

Step 2 : If prompted, touch SIGN IN to log into your Samsung Account or CREATE ACCOUNT.

Step 3 : Select the Content(s) you want to back up. Touch the slider to turn Auto back up on. Touch OK.

Step 4 : Touch BACK UP NOW to complete.

Backup Samsung Galaxy S10 via Samsung Account

Part 2: Restore Back up Data from Samsung Cloud to Note 10

Step 1 : Touch Restore.

Step 2 : Select the content(s) you want to restore and touch RESTORE NOW to complete.

NOTE: Restoring the selected data will delete some data from this device. Make sure that the backed up data is up to date.

restore samsung by samsung cloud

Samsung Galaxy Note 10 Backup & Restore

Safely Backup & Restore Android

How to Transfer iTunes Music to Samsung Note 10 and Note 10+

[Summary]: Looking for a way to transfer iTunes music to Galaxy Note 10/9/8/5/4/3/Edge. Here is a solution for you to copy the non-DRM songs from iTunes to Samsung Galaxy Note 10/Note 10+/Note 10 5G/Note 10+ 5G without easily.

You may want to read:

* How to Transfer Apple Music to Samsung Galaxy

* 6 Ways to Import Music to Samsung Galaxy Note 10/9

Want to transfer music files from iTunes to the Samsung Galaxy Note 10 smartphone and enjoy listening to your music wherever you go? This article will share you the best way to transfer music to your new Samsung Galaxy Note 10/Note 10+ device from iTunes, as well as transferring from computer or other devices.

As you know, you can’t sync music to Android with iTunes as iPhone/iPad/iPod does. Also, songs downloaded or purchased from iTunes are under DRM protection and restrictions. That is to say, you can transfer the DRM protected and unprotected songs from iTunes library to Samsung Galaxy like that to transfer computer songs to Android. But in the following article, I will show you the way to a simple way to transfer the unprotected music from iTunes to Galaxy Note 10 at ease.

Useful Tips: If you want to transfer the downloaded Apple Music songs to Android devices for offline listening, you need to remove DRM from Apple Music at firstly.

To transfer unprotected songs and playlist from iTunes library to Android device directly, this iTunes to Android Transfer software is needed. It helps you sync songs from iTunes library to Galaxy Note Note 10/Note 10+/9/8/5/4 in three simple steps. What’s more, you can use it to transfer music, videos, photos, contacts and text message between iOS and iOS, iOS and Android, Android and Android, computer and mobile devices. This iOS & Android Manager can help you convert the media files into the suitable format, and then transfer to the devices directly, such as MP3, MP4, WMV, etc.

Download the iOS & Android Manager on your PC/ Mac computer at first.

d_win d_mac
d_win d_mac

The software requires PC and Mac running the following systems:
1. Windows 10/8.1(64bits)/8 (64&32 bits)/7 (64&32 bits)/Vista (64&32 bits)/XP (32 bit)
2. Mac OS X 10.10 (Yosemite), 10.9 (Mavericks), 10.8(Mountain Lion), 10.7, 10.6

Steps to Transfer Music from iTunes to Galaxy Note 10

Step 1.Run the Phone Toolkit on the Computer
After downloading, install the software on your computer. Then, launch it and you will get in to the interface as below and just click “Transfer“.

iTunes to Android transfer

Click “Transfer iTunes Media to Device“, then go to iTunes to Android transfer function, you will see the program will pop up an new windows.

sync iTunes music to galaxy s10

Step 2.Connect Samsung Galaxy Note 10 to PC/Mac
Connect Samsung Galaxy Note 10 to the computer via USB cable. The software will start analyzing the plug-in devices. When it’s successfully connected and recognized, you will see its model displayed on the main window.

After plugging Samsung Note 10 in the computer, you need to enable USB debugging on your Android device to make it detected and connected by the computer.

Step 3.Loading iTunes Library
The program will load all media of iTunes library, you can select Entire library or selected playlists to loading.

Load iTunes music

Step 4.Transfer iTunes Music to Samsung Galaxy Note 10
This “Transfer iTunes Media to Device” function allows you to move the songs to Galaxy Note 10 smart phone.

transfer iTunes music to samsung galaxy note 10

Move your mouse to the “Transfer” button and wait for some time. After it is done, you will get the completed signal.

Note: Apple Music songs downloaded or purchased from iTunes are under DRM protection, so this iTunes to Android Transfer tool can not helps you transfer Apple Music songs from iTunes to Android other other devices. If you want to transfer Apple Music to Android phones/ tablets, you should remove DRM from Apple Music and convert Apple Music M4P songs to MP3 firstly, after getting the DRM-free Apple Music tracks, you can use this Phone Manager tool to import songs from computer to Android.

Best Way to Transfer WhatsApp from iPhone to Samsung Note 10 and Note 10+

[Summary]: When you have got a new Samsung Galaxy Note 10, all the WhatsApp messages on your old iPhone can never let you rest assured. Follow this simple method to transfer WhatsApp chat history from iPhone to Galaxy Note 10/Note 10+/Note 10 5G/Note 10+ 5G directly.

For Samsung mobile phones, some people were more disgusted in the past two years, especially the explosion of Samsung Note 7. In a few years, the Samsung Galaxy Note series has undergone updates for Note 8 and Note 9. Today Samsung released the latest Note series Android phones – Note 10 and Note 10+. Then Samsung Note 10+ configuration is very powerful and comes with the the top Snapdragon 855 processor or Samsung Exynos 9825, the screen is the top 2K level Samsung dynamic AMOLED. Support wireless charging, support IP68 dust and water release, also comes with an upgraded S Pen, all configurations are very balanced and strong.

transfer WhatsApp Messages from iPhone to Samsung Note 10

When you have got an new phone, the first thing you want to dong is transferring previous data to the new phone, or import music to their new devices, or stream Apple Music on Samsung for offline listening. And some people are looking into how to transfer WhatsApp chat history to their new phones since almost everyone has a WhatsApp because of features like group chatting, attachment sharing, pictures, and voice calling nowadays.

If you transfer WhatsApp data from iPhone to a Samsung Note 10, and face data loss scenarios losing important WhatsApp text messages and media. You can combat such a situation, you got to learn how to transfer WhatsApp text messages from iPhone to Samsung Note 10, you can also backup WhatsApp media files from iPhone to computer and then restore to Samsung Note 10.

One click to transfer WhatsApp Messages from iPhone to Samsung Note 10

Android ToolkitRestore Social App, which is a part of Phone Toolkit, it not only can help you transfer WhatsApp messages from iPhone to Galaxy Note 10/Note 10+/Note 10 5G/Note 10+ 5G directly, but also allows you effectively backup and restore App data like chats and attachments of Viber, Kik, WeChat, WhatsApp, and LINE etc. You can back them up on your computer and later restore it to your Samsung Galaxy Note 10/Note 9/Note 8/S10/S9/S8/S7 or to another Android/iOS devices.

d_win d_mac
d_win d_mac

Key Features of Restore Social App:

  • Backup WhatsApp messages from iPhone, iPad, iPod Touch and Android to computer.
  • Restore iOS/Android WhatsApp backup to iPhone, iPad, iPod touch and Android.
  • Transfer WhatsApp chat history between iOS & Android.
  • Backup your LINE/Viber/Kik/Wechat chat history to computer with just one click.
  • Restore LINE/Viber/Kik/Wechat backup to new iPhone or Android.

How to Transfer WhatsApp Messages from iPhone to Samsung Note 10

Here is a quick guide to transfer WhatsApp chats from iPhone to Samsung Galaxy Note 10 and Note 10+ using Phone Toolkit – Restore Social App:

Step 1.Download and Launch Phone Toolkit
At first, run Phone Toolkit on your computer right after installing it. Tap over the ‘Restore Social App’ tab afterwards.

android toolkit - whatsapp transfer backup and restore

Step 2.Click ‘WhatsApp’
From the left panel, press the ‘WhatsApp’ over the following window. Now, you got to click over the ‘Transfer WhatsApp messages’ tab on the application interface.

whatsapp messages transfer

Step 3.Connect Samsung Galaxy Note 10 and iPhone to Computer
Next, plug in your iPhone to the PC using only an authentic lightning cable. Once the tool detects your iDevice, plug in your Samsung Galaxy Note 10 into another USB port. Let the tool recognize this device too.

connect iphone and samsung note 10 to the computer

Step 4.Start Transfer WhatsApp Data from iPhone to Galaxy Note 10
As soon as your devices are detected, they’ll be visible on your screen. Hit the ‘Transfer’ button on the bottom right of the interface.

Confirm Transferring

Lastly, you need to confirm your actions to proceed further by hitting ‘Yes’ button. This is because the transfer of WhatsApp chats from iPhone to Samsung Galaxy Note 10 will wipe off existing WhatsApp data on target device.

transfer iPhone WhatsApp messages to Samsung Note 10

That’s about it. Within a short span of time, process to transfer WhatsApp chats from iPhone to Samsung Galaxy Note 10 will get completed. You can then disconnect the devices from the computer and check for the transferred WhatsApp messages over your Samsung Galaxy Note 10.

d_win d_mac
d_win d_mac