All posts by DHZ

How to Transfer Contacts from iPhone to Samsung Galaxy Note 10 and Note 10+

[Summary]: Do you want to transfer contacts from iPhone to Samsung Galaxy Note 10/Note 10+/Note 10 5G/Note 10+ 5G, this article teach you how to transfer contacts from iPhone/iTunes/iCloud to Galaxy Note 10 and Note 10+.

You May Want to Know:

* Transfer WhatsApp Messages from iPhone to Galaxy Note 10/Note 9

* Transfer Music from iTunes to Galaxy Note 10/Note 9/Note 8

CONTENTS:

Samsung has released its latest big-screened flagships Android smart phones, the Galaxy Note 10 and Galaxy Note 10+. Both smartphones boast a number of new features; they pack Samsung’s newly-outed 7nm Exynos 9825 SoC, ship with an “all-new” S Pen stylus, feature triple and quad-camera arrays, respectively, and – in the case of the Note 10+, at least – bring 5G support to Samsung’s phablet lineup for the first time.The Galaxy Note 10 starts at $949 and comes in just one configuration: 8GB of RAM and 256GB of storage. The Galaxy Note 10 Plus starts at $1,099 with 12GB RAM / 256GB storage and you can spend $100 more to get 512GB of storage. Both are available for preorder today and will ship on August 23rd.

galaxy note 10 vs note 10 plus

Here, you can see the detail specs of Samsung Galaxy Note 10 and Note 10+

What’s the same specs of Samsung Galaxy Note 10 and Note 10+?

  • Processor: Snapdragon 855
  • S Pen: Bluetooth LE, accelerometer and gyroscope for motion controls
  • Wide-angle camera: 16 megapixels, f/2.2
  • Screen: Dynamic AMOLED with tone mapping
  • Main camera: 12 megapixels, f/1.5 and f/2.4 dual aperture, OIS
  • Selfie camera: 10 megapixels, f/2.2
  • Radios: LTE Cat 2.0, Wi-Fi, Bluetooth 5.0
  • Telephoto camera: 12 megapixels, f/2.1, 45-degree
  • In-screen fingerprint sensor

What’s the different specs between Samsung Galaxy Note 10 and Note 10+?

Samsung Galaxy Note 10 Plus Spaces

  • Screen: 6.8-inch, 3040 x 1440 pixels
  • RAM: 12GB
  • Storage: 256GB or 512GB UFS 3.0, microSD expansion
  • Battery: 4,300mAh
  • VGA depth-of-field camera

Samsung Galaxy Note 10 Spaces

  • Screen: 6.3-inch, 2280 x 1080
  • RAM: 8GB
  • Storage: 256GB UFS 3.0, no microSD expansion
  • Battery: 3,500mAh

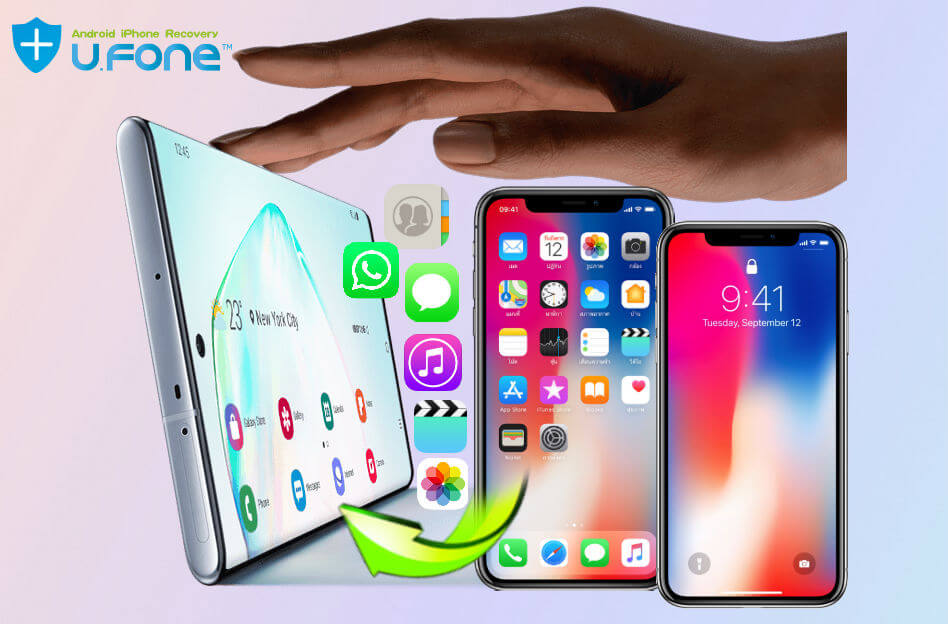
How to Transfer Data Contacts from iPhone to Galaxy Note 10(+)?

Have upgraded from iPhone to Samsung Galaxy Note 10(+)? If you’re looking for a way to transfer data from an old iPhone to the new Samsung Note 10 (+) phone, you will likely want to transfer the contacts, text messages, music, videos from iPhone to Samsung Android phone. It’s easy to transfer data from Samsung to Samsung by using Smart Switch, but if you want to transfer data contacts from iPhone to Android, you need to use a third-party iPhone to Android transfer tool to transfer iPhone contacts to Note 10 and Note 10+.

Powerful iPhone to Samsung Galaxy Note 10 Transfer Tool

The easiest method to transfer these contact phone numbers from iPhone to Galaxy Note 10 is using this Phone Switch, which is a part of Phone Toolkit. It not only can help you transfer data from iPhone/Android to Samsung Galaxy Note 10/Note 10+ easily, but also can help you backup phone to PC then restore data from PC, even more you can restore phone from iTunes backup and restore phone from iCloud backup easily. So, you can transfer contacts, text messages, photos, videos and more to Galaxy Note 10 from iPhone, Samsung, Huawei, Sony, HTC, Motorola, LG, Google Pixel, OnePlus, Oppo, Xiaomi, Redmi and more iOS/Android devices.

The app supports all kinds of Android devices and iOS devices, please download the software on your computer and try to move data between two phones directly.

d_win d_mac
d_win d_mac

Part 1: One-click to Transfer iPhone Contacts to Galaxy Note10(+)

Step 1. Download and Launch Phone Toolkit – Switch
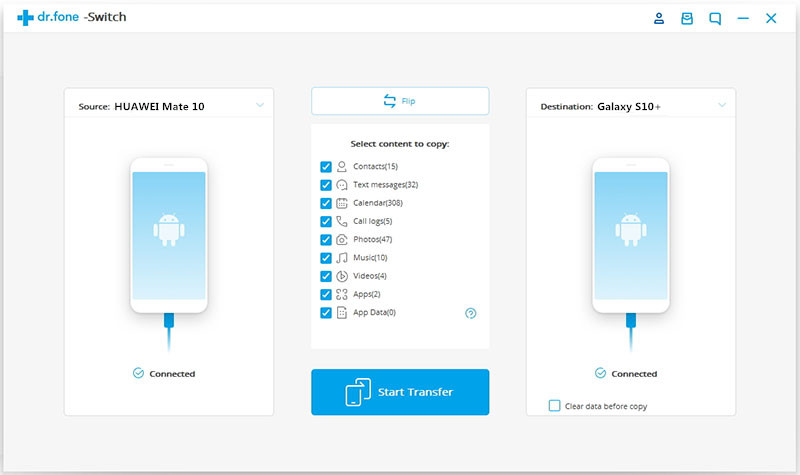
First of all, please download an launch the Phone Toolkit on your computer, and select “Switch” among the modules.

iphone to galaxy note 10 transfer

Step 2. Connect iPhone and Galaxy Note 10 to the computer
Then get both of your devices connected. The data will be transferred from the source device to the destination one. You can use the “Flip” button to exchange their position. Please make sure the Samsung Galaxy Note 10 on the right as target device and the iPhone on the left as source device.

transfer iphone contacts to galaxy note 10

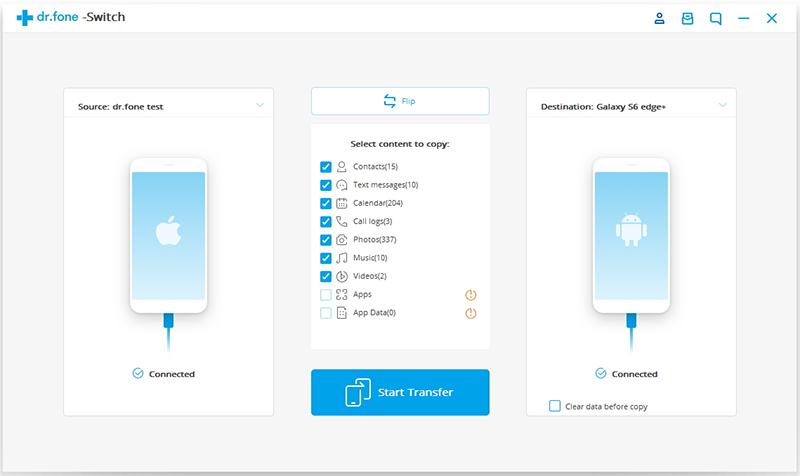
Step 3. Choose the File to Transfer from iPhone to Galaxy Note 10
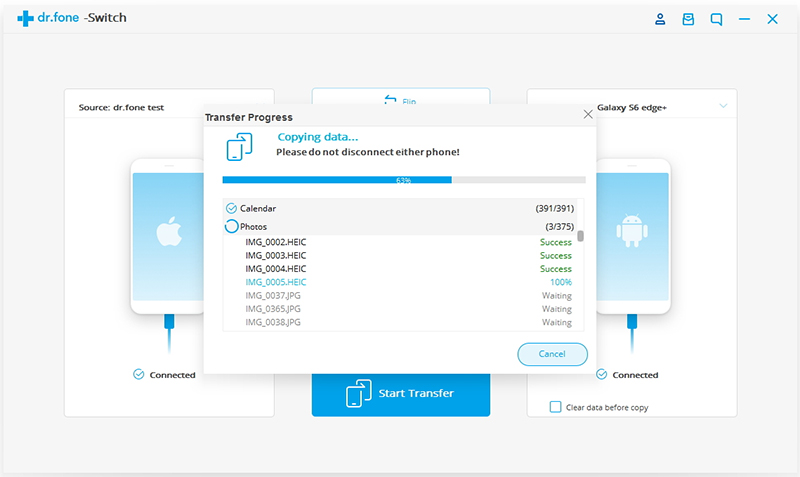
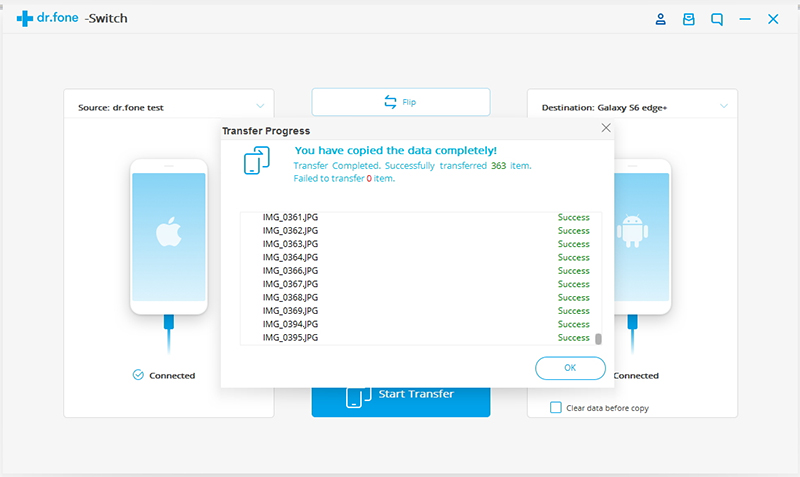
Here let’s take transferring contacts from iPhone to Samsung Galaxy Note 10 as an example, you can also transfer messages, photos, videos, contacts and call logs from iPhone to Galaxy Note 10 directly. Please select the file types you would like to transfer. Then click on “Start Transfer” to begin the process. For efficiency, don’t disconnect the devices until the process is complete.

transfer iphone data to samsung note 10

Tips: You can check the “Clear Data before Copy” box if you want to erase data on the destination phone before transferring the data to the target phone.

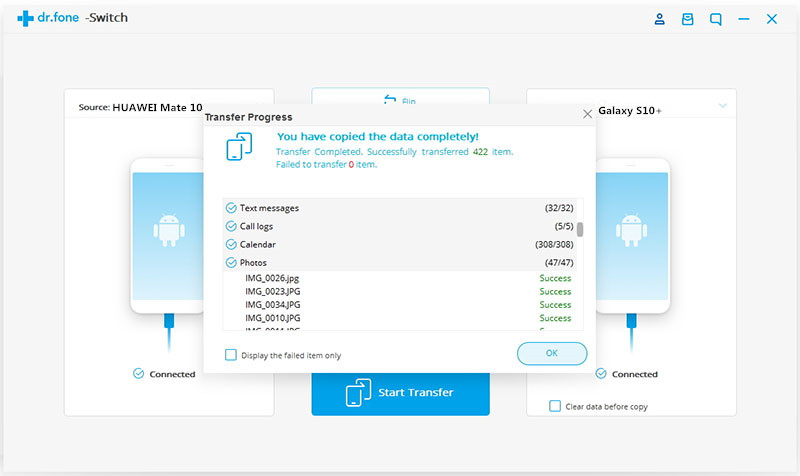
Within a few minutes, all selected files will be transferred to the Samsung Galaxy Note 10 successfully.

Transfer Data from iPhone to Galaxy Note 10

Part 2: Transfer Contacts from iCloud Backups to Samsung Galaxy Note 10/Note 10+

We have already mentioned above, the Phone Toolkit not only can help you transfer data between two phones directly, but also can help you restore phone from iCloud backup. If you’ve backup iPhone to iCloud before, you can restore iPhone data from iCloud Backup to Note 10 directly as long as you log in to your iCloud account.
Tips: Please be assured that we will protect your account information. Let’s shows you the simple guide on how to restore iCloud data to Android Samsung phone directly.

Phone Toolkit – Backup & Restore (Android) can help you download, preview, and restore iCloud backup to Samsung Galaxy Note 10/Note 9/Note 8/Note 5/S10/S9/S8/S7/S6, etc. in minutes, without affecting existing Android data and settings. Follow the steps below to restore iCloud backup to Samsung Galaxy Note 10 as example.

Step 1. Connect your Android device to PC
Download, install, and launch the Phone Toolkit on your PC.

d_win d_mac
d_win d_mac

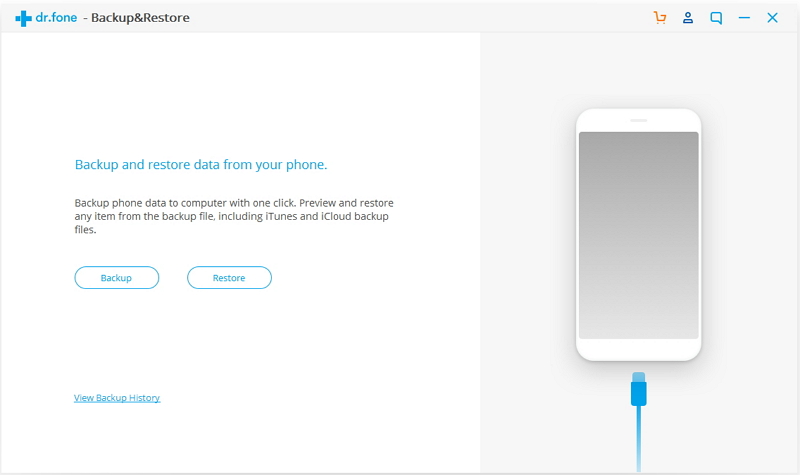
In the main screen, select “Backup & Restore“.

samsung galaxy note 10 toolkit

Step 2. Connect Samsung Galaxy Note 10 to Computer
Use the original USB cable of your Galaxy Note 10 to connect it to the PC. Then click the “Restore” button in the middle of the scren.

android device backup restore

Step 3. Sign in to your iCloud account
In the next screen that shows up, select “Restore from iCloud backup” from the left side.

sign in icloud

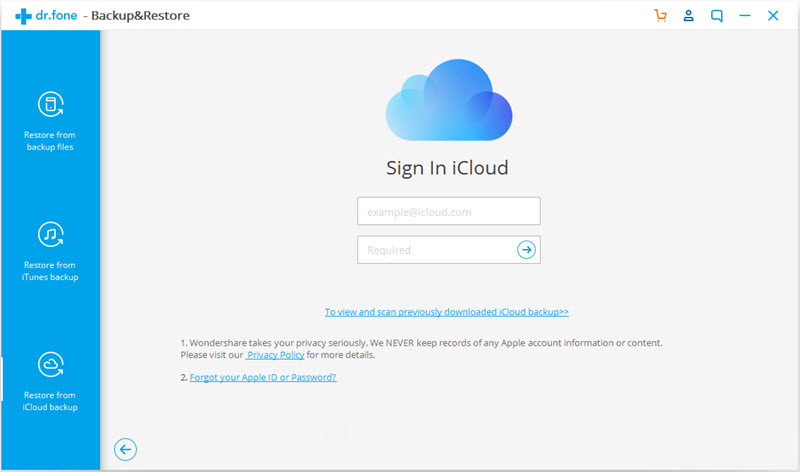
You may have enabled the two-factor authentication for your iCloud account. In this case, a verification code will be sent to your iPhone. Find the verification code and input it in in the following screen, and click “Verify”.

verification code of two factor authentication

Step 4. Restore Data from iCloud to Galaxy Note 10
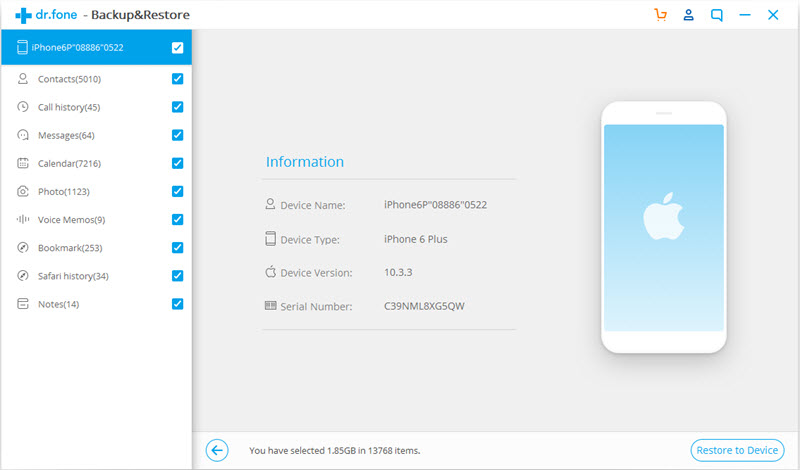
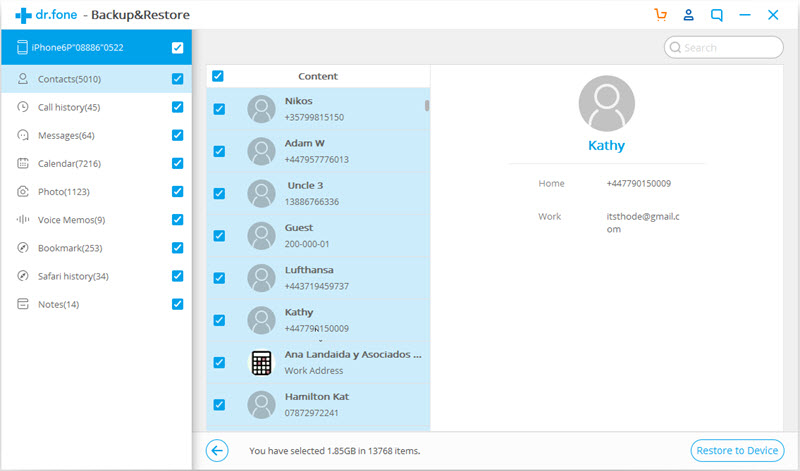
Now you have signed in to your iCloud. All the backup files are listed in the dr.fone screen. Select one of them and click “Download” to save the file to a local directory on your PC.

download icloud backup file to pc

Then Phone Toolkit will read and display all the data from the downloaded iCloud backup file. Click a data type and preview what information is stored in it. Then you can select some or all of the data items and click “Restore to Device“.

restore icloud backup data to samsung note 10

In the dialog box that is displayed, select an Android device in the drop-down list, and click “Continue”.

confirm to restore to samsung note 10

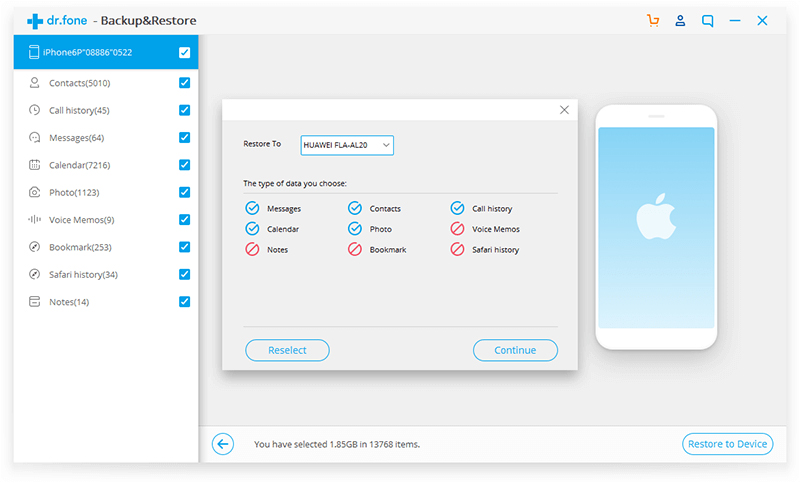
Note: Samsung Galaxy Note 10 does not support such data types as Voice memos, Notes, Bookmark, and Safari history, so those data won’t restored to the Android phone.

Part 3: Transfer Contacts from iTunes Backups to Samsung Galaxy Note 10/Note 10+

if your iPhone or iPad is unavailable, or if your old iPhone was lost, broken, damaged or stolen, but you’ve backed up your iPhone with iTunes before. Don’t worry, when you have got an new phone, you can restore iTunes backups data to the new phone.

Phone Toolkit – Backup & Restore (Android) not only allows you restore iCloud data to Android/iOS directly, but also can help you restore all the iPhone or iPad data backed up in iTunes to Android devices.

Step 1. Download and Run the Phone Toolkit
After downloading Phone Toolkit on your computer, install and start the tool. Then select “Backup & Restore” among all the features.

d_win d_mac
d_win d_mac

Step 2. Connect the Galaxy Note 10 to computer
Use a workable USB cable to connect your Android device to the computer. After the connection is set up, click “Restore” in the center of the screen.

start iTunes backup restore

Step 3. Detect iTunes backup files
In the next screen, select “Restore from iTunes backup” from the left column. dr.fone will detect the location of iTunes backup files on your computer, and list them one by one.

itunes backup files listed

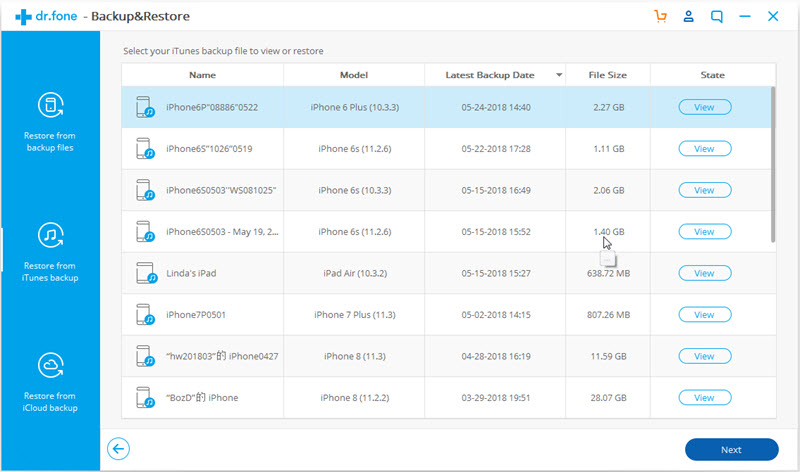
Step 4. Preview iTunes backup data, and restore to Galaxy Note 10
Select one of the iTunes backup files, and click “View”. The Phone Toolkit will read and display all details from the iTunes backup file by data type.

preview iTunes backup

Select all or some of the items, and click on “Restore to Device”

restore itunes backup to samsung note 10

In the new dialog box that pops up, select the desired Android device, and click “Continue” to confirm restoring iTunes backup to Samsung Galaxy Note 10.

confirm to restore to samsung galaxy s10

Note: The Voice memos, Notes, Bookmark, and Safari history cannot be restored, because Android phone does not support the corresponding data types.

Everything we know about transfer data from iPhone to Samsung Galaxy Note 10 and Note 10+ phone is here, contacts, messages, music, videos, photos, etc. One-click to transfer data from iPhone, iTunes and iCloud to Samsung Galaxy Note 10/Note 10+, as well as Galaxy Note 9, Note 8, Note 5 and Galaxy S10/S9/S8/S7/S6, etc.

Download the Phone Toolkit and try to transfer data contacts from iPhone/iCloud/iTunes to Android devices.

d_win d_mac
d_win d_mac

Related Articles

How to Transfer Data from Android to Samsung Galaxy Note 10/Note 10+

How to Transfer Data from Samsung to Galaxy Note 10/Note 10+

How to Recover Deleted Data from Samsung Galaxy Note 10/Note 10+

How to Recover Deleted Photos from Samsung Galaxy Note 10/Note 10+

Transfer iPhone Contacts to Note 10

How to Move Data from iPhone to OnePlus 7/7 Pro

[Summary]: Have you tried to transfer data between different mobile phones but you have no way to start? This tutorial will provide you with an excellent solution for moving important data from iPhone to OnePlus 7/7 Pro Android phone with just one click.

“I have already bought a new phone, but I am having trouble transferring data. I can’t find the storage place for the data. Can anyone provide me with a solution?”

The OnePlus 7 Pro is truly impressive for new buyers, with the right high-end hardware and software for the right price, making it popular and well-respected. As the OnePlus 7/7 Pro comes on the market, we may encounter problems with different phone types that can’t be transferred when we intend to move data from the iPhone to the OnePlus Android phone in the traditional way. In the traditional method of mobile transfer tools, we will find that some of the data can only be used in Android phones, while others only on the iOS iPhone. How to quickly and easily transfer data from iPhone to OnePlus phone completely?

This iPhone to Android TransferPhone Switch as one of the most popular applications on the web is noteworthy. It offers a comprehensive solution that will span different types of phones, iOS iPhone, Android, Windows Phone, Symbian etc. Under such conditions you can using this program transfer contacts you need from iOS to Android, Android to iOS, Android to Android, iOS to iOS, etc. On the other hand, it provides one-touch move data from iPhone to OnePlus 7/7 Pro, including contacts, WhatsApp messages, call history, photos, text messages, photos, videos, music, etc.

d_win d_mac
d_win d_mac

Another notable feature of the iPhone to Android Transfer is the ability to provide one-click backup, removal, and recovery options that not only ensure your important data can be smoothly transferred, but also guarantee your data will not be stolen by the user while the phone is being replaced. What’s more, the Phone Switch can also retrieve the important information you have lost from the backup via this program.

Tips: This  Phone Switch applies to HTC, LG, Apple, Motorola, ZTE, Samsung, Google, HUAWEI, Sony, Nokia, and many other tablets and smartphones.

Easy Steps to Move Data From iPhone to OnePlus 7/7 Pro

Step 1. Install and Run Program on PC

Download and install the iPhone to Android Transfer from below and start the program. Please select “Switch” section of the home page in the pop-up screen interface to transfer contacts, pictures, SMS, music and more from iPhone to OnePlus 7/7 Pro.

connect iphone and oneplus phone to pc

Step 2. Connect both Your Devices to the Computer

After the download shows success, connect both your iPhone and the OnePlus 7/7 Pro to the computer. The most important thing you should be aware of is that you should make sure the old iPhone as source device and the OnePlus 7/7 Pro as target device. Otherwise, you can click on “Flip” button to exchange them.

transfer iphone data to galaxy note 10

Step 3. Transfer Data from Old iPhone to OnePlus 7 and 7 Pro

In this part you can see many options like contacts, call logs, music, videos, calendars, apps, etc. in the middle checkbox. Choose what you want to move then click “Start Transfer” to begin the contacts transferring process.

transfer iphone data to oneplus 7 pro

d_win d_mac
d_win d_mac

Related Articles

How to Copy Data from Samsung to OnePlus 7/7 Pro

How to Transfer Data from Android to iPhone

Transfer Data to Huawei P30/P30 Pro from Old iPhone/Android

Ways Transfer Contacts between Samsung and iPhone 7/7 Plus

Move iPhone Data to OnePlus Phone

How to Copy Data from Samsung to OnePlus 7/7 Pro

[Summary]: This article is designed to help you easily copy contacts, text, pictures, videos, call history, and WhatsApp messages from your Samsung phone to OnePlus 7/7 Pro.

OnePlus 7Pro has a 90Hz refresh rate OLED screen, which allows gamers and mobile video movie viewers to have a smooth experience. 2K’s comprehensive screen design screen makes each angle look particularly round. More importantly, the world’s first UFS3 .0 storage, ultra-fast flash memory allows the CPU Snapdragon 855 processor to calculate the most extreme.

“I can’t wait to buy a new OnePlus 7 Pro phone instead of the old Samsung phone. But my old Samsung phone has a lot of precious data left, can anyone provide me with a way to copy mobile phone data?”

When you get a new OnePlus 7/7plus, the first thing you should do is copy the precious data from the old Samsung mobile phone to your new OnePlus 7/7plus phone. However, if you plan to copy data from your old Samsung Galaxy Note 2/Note 3/Note 4/Note 5, Galaxy S2/S3/S4/S5/S6/S7/S8/S9/S10 phone to OnePlus 7/7 Pro, but don’t know how to do, then you are in the right place.

Phone Switch is a simple and effective data copy tool for more than 6,000 smartphones and tablets, including Apple, Samsung, Huawei, OPPO, Sony, HTC, Google, LG, Motorola, ZTE and more. You can safely and reliably copy data between Samsung and OnePlus 7/7 Pro. You can also use this toolkit to copy data from different mobile platforms iOS and Android.

MAIN FEATURES OF ANDROID TOOLKIT – PHONE SWITCH

– Easy to copy contacts, pictures, videos, apps, photos, SMS, call logs, etc. between two phones.
– Works well with all Android phone such as HTC, LG, HUAWEI, Acer, Samsung, Motorola, ZTE, Sony and more other Android models.
– Support for transmission between various systems: iOS to Android, Android to iOS, iOS to iOS, Android to Android.

d_win d_mac
d_win d_mac

Easy Guide to Sync Data from Samsung to OnePlus 7/7 Pro

Step 1. Launch Phone Switch on PC

Firstly, free download the Phone Switch software on your computer. launch it and you will see different modules in the maintenance then select the “Switch” module to get started.

phone switch main page

Step 2. Connect Old Samsung Phone and OnePlus 7 Pro to PC

Secondly, connect your old Samsung Phone and OnePlus 7/7 Pro to your computer and you should enable USB debugging mode on your both Android devices. Phone Switch will detect the old Samsung Phone and New OnePlus 7/7 Pro and show all the transferable contents in the middle. Remember to make sure your old Samsung Phone listed on the left while the new OnePlus 7/7 Pro on the right.

connect samsung and galaxy note 10 to PC

Note: Click “Flip” button to change their positions if needed.

Step 3. 1-click Transfer Selected Data from Samsung to OnePlus 7/7 Pro

Simply check your desired items on the middle panel, then click on “Start Transfer” button to start copying everything from old Samsung to OnePlus 7/7 Pro. After a while, all your desired data would be synced to OnePlus 7/7 Pro successfully.

transfer data from samsung to galaxy note 10

d_win d_mac
d_win d_mac

Read More

How to Transfer Data from Android to OnePlus 7 Pro

How to Transfer/Switch Samsung Data to OnePlus 3T

Ways to Transfer Data from Samsung to Galaxy S10/Fold

2 Ways Transfer iOS/Android Data to Google Pixel 3A/3A XL

Sync Android Contacts and SMS to Samsung Galaxy Note 8/5/4/3

Android to Android Transfer

How to Sync Data from Samsung to Galaxy Note 10

[Summary]: Do you want to sync the data on your Samsung phone to the Galaxy Note 10 phone but can’t find a way? This tutorial will teach you how to sync data from Samsung phones to Samsung Galaxy Note 10, such as photos, contacts, SMS, call logs, WhatsApp, documents, etc.

What is the Samsung Galaxy Note 10?
The Samsung Galaxy Note 10 uses a 6.3-inch Dynamic AMOLED display with a screen refresh rate of 60 Hz. The core is equipped with Qualcomm’s latest Snapdragon 855+ processor, and is equipped with 8GB+256GB storage combination. The built-in 3600mAh capacity battery supports 25W fast charging specification.

“Samsung mobile phone Galaxy Note 10 series is about to be released, I plan to replace this phone, is there any way to sync all data files from my old Samsung mobile phone to the new phone?”

Maybe a lot of friends have encountered the same problem. When they change their new phone, they don’t know how to sync phone numbers, text messages, pictures, videos, music, call logs, WhatsApp, documents and more to the new phone. Now with the help of Phone Switch, you can easily sync everything between Samsung and Galaxy Note 10.

Phone Switch – Synchronize data from Samsung to Galaxy Note 10

Phone Switch is a powerful phone to phone transfer software for us to sync photos, contacts, text messages, call logs, applications, application data, music, video and more from Samsung Galaxy S5/S6/S7/S8/S9/Note 5/Note 4/Note 3/Galaxy J/ Galaxy Ace to Galaxy Note 10.In addition, the program can move data from iPhone to Galaxy Note 10,also can sync contacts ,text message, music and many other file types to another android phone, such as HTC, LG, SONY, OPPO, vivo, Google, OnePlus, Xiaomi, Nokia, BlackBerry, and so on. Phone Switch not only helps us to sync the data between different phone, but also helps to restore your lost data easily. Let’s take the example of sync data from Samsung to Galaxy Note 10.

d_win d_mac
d_win d_mac

Easy Guide to sync data from Samsung to Galaxy Note 10

Step 1. Download and launch the program

The first thing you need to do is download the software on your Windows PC or Mac. Then installing it, launch the Phone Switch toolkit and click on the “Switch” option to go on. Through this function, it can help you sync the data from Samsung to Galaxy Note 10.

phone switch main page

Step 2. Connect Samsung and Note 10 to PC or Mac

Then, you should use the authentic USB cable connect both your Samsung phone and Samsung Note 10 to the system at the same time, the program will detect both the devices, please wait for a while.

connect samsung and galaxy note 10 to PC

Once the devices are detected, the interface will provide their basic snapshot. Ideally, your Samsung should be listed as source and Galaxy Note 10 device as a destination device. If not, then click on the “Flip” button to interchange their positions.

Step 3. Sync Data from Samsung to Galaxy Note 10

Then, you can select the data which you need to sync from old Samsung. For example, like photos, videos, messages, music, etc. After selecting the data from old Samsung, click on the button “Start Transfer” to go on.

It will take you a minute to sync the data from your old Samsung device to Galaxy Note 10. During the process, don’t push out the USB cable. You can view its progress from an on-screen indicator.

transfer data from samsung to galaxy note 10

Note: In this way you need to wait patiently during the sync program and let your phones be connected to the computer before it was sync completely.

d_win d_mac
d_win d_mac

Read More

How to Sync Android Files to Samsung Galaxy Note 10

Smart Switch: Transfer Data to Galaxy 10/S9/S8/Note/Fold

How to Transfer Contacts & SMS from Samsung to Galaxy Note 9

How to Transfer Data from iPhone to Samsung Galaxy Note 10

Sync Android Contacts and SMS to Samsung Galaxy Note 8/5/4/3

Samsung to Samsung Transfer

How to Recover Deleted Pictures on Samsung Galaxy Note 10

[Summary]: Unexpectedly erased all the pictures on your Samsung phone? If you are suffering from image loss, follow this article to learn how to retrieve deleted photos from Galaxy Note 10.

Samsung Note 10 series mobile phones will be officially released on August 7. The two notebooks of the Samsung Note 10 series have a chin width of only 2.8mm, and have also upgraded the ultrasonic fingerprint unlocking, and the video anti-shake technology has added a new expansion mode. It will be better than the Samsung S10 series. The whole system is the Snapdragon 855 processor, while the Samsung Note 10+ that supports the 45w super- fast charge can fully charge the 4300 mAh battery in 65 minutes.

“I made a big mistake and deleted all the pictures. It contains a lot of precious beautiful photos. Can I get them back? Can anyone tell me how to recover deleted pictures on Samsung Galaxy Note 10?”

When you accidentally delete the picture, you should try to reduce the operation of the phone to avoid overwriting the image data. In fact, these pictures are not completely deleted, and the bottom layer of the system still retains the relevant data of the picture. Easily restore images by using Android Data Recovery.

U.Fone Android Data Recovery is a professional Samsung Pictures Recovery tool that aims to recover deleted pictures from Samsung Galaxy Note 10, Note 8, Note 5, Note 4, S10, S9, S8, S7, S6, S5, Galaxy Tab and so forth. Besides, other items like text messages, photos, videos, call logs, music, WhatsApp chat history and documents are all recoverable by using this recovery software.

d_win d_mac
d_win d_mac

In order to make you understand how easy it is to use the software to restore images, I have written a detailed tutorial below for your reference. You can start by downloading Android Data Recovery software on your computer.

Easy Steps to Recover Deleted Pictures on Samsung Galaxy Note 10

Step 1. Connect Samsung Galaxy Note 10 to PC
Connect your Samsung Galaxy Note 10 to computer with USB cable after running the program. It will take a while to install the device driver, and the U.Fone Android Data Recovery will automatically detect your phone. Choose “Android Data Recovery” feature.

ufone android data recovery main page

Step 2. Turn on USB Debugging on Samsung
In order to connect your device successfully, you need to allow USB debugging mode. Follow the on-screen instructions to turn on if you don’t know how to do it.

On your Samsung Galaxy Note 10: Click Settings > About phone. Tab Build number for 7 times till the dialogue box You are under developer mode occurs. Then return to Settings > Developer options > USB Debugging.

enable usb debugging

If you have already turned on the USB debugging mode, you will see a pop-up window on the screen, mark “Always allow from this computer” and click “OK”.

Step 3. Select Picture to Scan
All file types on Samsung phone will be displayed in the interface. Choose “Picture Library” and then tab “Next”.

select data to scan

Step 4. Scan Samsung Galaxy Note 10
A pop-up dialog box will be pop-up asking for permission to start the scanning process. Just press “Allow” button to authorize the program to scan and analyze your Samsung Galaxy Note 10.

allow to scan samsung galaxy note 10

The program will start analyzing your phone and it will take several minutes to analyze your deleted and existent pictures.

scan data

Step 5. Preview and Restore Deleted Pictures on Galaxy Note 10
After scanning, it will list all deleted and existing pictures it has found from Samsung Galaxy Note 10 on the window, just like the screenshot shown below. You can preview and select the ones you want to recover, then click on the “Recover” button to start the recovery process.

recover deleted pictures from samsung galaxy note 10

d_win d_mac
d_win d_mac

Related Articles:

How to Recover Deleted Files from Samsung Galaxy Note 10

Ways to Recover Deleted Photos from Galaxy S10/S10+/Fold

How to Recover Deleted Photos and Videos from Samsung Galaxy Note 9

How to Recover Deleted Photos and Videos from Samsung Galaxy Note 9

Best Way to Recover Deleted Photos on Samsung Galaxy Fold

Samsung Picture Recovery

How to Recover Deleted Files from Samsung Galaxy Note 10

[Summary]: Want to retrieve deleted files on Samsung Galaxy Note 10? This article describes how to use Android data recovery software to easily recover deleted contacts, text messages, pictures, call logs, videos, WhatsApp messages from Samsung Galaxy Note 10.

“I made a serious mistake and accidentally deleted a few business documents that were very important to me. My mobile phone is the latest Samsung Galaxy Note 10, how to recover deleted files on Samsung Galaxy Note 10 phone?”

If your data is lost or deleted on Samsung Galaxy Note 10 phone for some reason, including accidental deletion, formatting, factory reset, rooting, Android OS update, water damaged, virus attack, etc., then you are in the right place. In this tutorial, we will use Android data recovery software to help you retrieve deleted files on Samsung Galaxy Note 10 with just a few mouse clicks.

Samsung Files Recovery – Restore Deleted Files on Galaxy Note 10

U.Fone Android Data Recovery is a professional Samsung files Recovery tool that aims to retrieve deleted files from Samsung Galaxy Note 10, Note 9, Note 8, Note 5, Note 4, S10, S10+, S9, S8, S7, S6, S5, Galaxy Tab and so forth. Besides, other items like text messages, photos, videos, call logs, music, WhatsApp chat history and documents are all recoverable by using this recovery software.

d_win d_mac
d_win d_mac

To give you an idea of how the program works, we write the following instructions for your reference. You can download U.Fone Android Data Recovery software on your computer first.

Use Android Data Recovery to Recover Deleted Files on Galaxy Note 10

Step 1. Launch U.Fone Android Data Recovery

Download, install and launch U.Fone Android Data Recovery on your computer. Select “Android Data Recovery” feature. Next, connect your Samsung Galaxy Note 10 to computer with USB cable. The U.Fone Android Data Recovery will automatically detect your phone.

ufone android data recovery main page

Step 2.Turn on USB Debugging on Galaxy Note 10

In order to successfully connect your device, you need to allow USB debug mode. If you don’t know how to do this, follow the instructions on the screen to open it.

enable usb debugging

If you have already turned on the USB debugging mode, you will see a pop-up window on the screen, mark “Always allow from this computer” and click “OK”.

Step 3.Select Data Types You Want to Recover

All file types on Samsung Galaxy Note 10 phone will be displayed in the interface. Choose what you need to get back (Contacts, SMS, Photos, Videos, Call Logs, WhatsApp Messages, App and App Data and more) and then tab “Next”.

select data to scan

Step 4.Scan Samsung Galaxy Note 10

A pop-up dialog box will be pop-up asking for permission to start the scanning process. Just press “Allow” button to authorize the program to scan and analyze your Samsung Galaxy Note 10

allow to scan samsung galaxy note 10

The program will start analyzing your phone and it will take several minutes to analyze your deleted and existent files.

preview data

Step 5.Preview and Restore Deleted Files on Galaxy Note 10

After scanning, it will list all deleted and existing files it has found from Samsung Galaxy Note 10 on the window, just like the screenshot shown below. You can preview and select the ones you want to recover, then click on the “Recover” button to start the recovery process and save your deleted files to your computer in HTML, CSV and VCF format separately.

recover lost data from samsung galaxy note 10

d_win d_mac
d_win d_mac

Related Articles:

Restore Deleted Data From Samsung Galaxy S10e/S10/S10+

How to Recover Deleted Files from Samsung Galaxy S10/S9/S8(+)

How to Recover Deleted Photos from Galaxy S10/S10+/Fold

How to Recover Deleted Photos and Videos from Samsung Galaxy Note 9

How to Retrieve Deleted Contacts from Samsung Galaxy X

Recover Deleted Data on Samsung Galaxy Note 10

How to Transfer Data from iPhone to Samsung Galaxy Note 10

[Summary]: Do you want to transfer the data from iPhone to Samsung Galaxy Note 10? This is an effective way to transfer all data including contacts, SMS, photos, videos, call logs, calendar, music, Apps & app data etc. from iPhone to Samsung Galaxy Note 10/Note 10+/Note 10 5G/Note 10+ 5G.

Have got an new Samsung Galaxy Note 10, Galaxy Note 10+, Galaxy Note 10 5G or Galaxy Note 10+ 5G and looking for a way to transfer contacts from iPhone to the new Samsung Note 10 smart phone? Want to sync iCloud or iTunes data to Samsung Galaxy Note 10? Here, we will recommend you a powerful phone transfer & manager software to sync data from iPhone/iCloud/iTunes to Samsung Galaxy Note 10/Note 10+.

transfer iphone data to galaxy note 10

Seeing here, are you pursuing fashion and want to have such a high-performance Samsung mobile phone? But what bothers me is, what about the important data in my old iPhone? Don’t worry, Phone Switch can easily help you transfer iPhone files to Samsung Galaxy Note 10. It allows migration of almost all data files such as text messages, contacts, calendars, videos, photos, etc. As a versatile utility, it naturally supports most operating systems like iOS. Android, Blackberry, WinPhone and Symbian.

What are the characteristics of this Phone Switch:
– Phone Switch does not overwrite or interrupt existing data on iPhones and Samsung phones throughout the process.
– one-click sync all data and files from iPhone to Samsung Galaxy Note 10.
– Most data types are transferable, like contacts, SMS, photos, videos, call logs, calendar, music, Apps & app data etc.
– compatible with almost all iOS devices and Android devices.
– support Windows 10/8/8.1/7 / XP and Mac OS.

d_win d_mac
d_win d_mac

With Phone Toolkit – Switch, only 3 simple steps ahead to completely transfer multiple types of content including SMS, contacts, photos, music, videos and more from one device to another that’s running on iOS, Android and WinPhone.

Simple Guide on Copying Data from iPhone to Samsung Galaxy Note 10

Step 1. Install Phone Switch on PC
Download the Phone Switch program and install it on your machine(Windows PC or Mac PC). Start it and from the welcome screen, select the option of “Switch”.

iphone to samsung galaxy note 10 transfer

Step 2. Connect iPhone and Samsung Galaxy Note 10 to PC
Connect your old iPhone and Samsung Galaxy Note 10 to your computer with two USB cable. Ideally, your iPhone should be listed as a source and Samsung as a destination device. You can use the “Flip” button to interchange their positions.

transfer iphone data to galaxy note 10

Step 3. Transfer iPhone Files to Samsung Galaxy Note 10
Now, select the type of data you wish to move (contacts, text messages, calendars, music, videos, photos, call logs). And then click on the “Start Transfer” button.

transfer iphone data to samsung galaxy note 10

d_win d_mac
d_win d_mac

Related Articles

How to Transfer Data from iPhone to Samsung Galaxy S10

How to Transfer iPhone Data to Samsung Galaxy Note 8

How to Sync Android Files to Samsung Galaxy Note 10

Transfer Contacts/Photos/SMS from iPhone to Samsung Galaxy S9

Transfer Data from iPhone to Samsung

Apple Music Converter Android: Convert Apple Music to Android

[Summary]: How to play Apple Music on Android without installing the Music app? Here we will show you a practical way to remove DRM from Apple Music audio files and convert to DRM-free MP3, so that you can stream Apple Music on Android for offline playback without subscribing to Apple Music.

Playing Apple Music on an Android phone can be as simple as installing the Apple Music app for Android on your device and signing up for a subscription there. However, not all Android phone users can stream Apple music songs, playlists, and albums online. Do you want to play Apple Music on Android phone offline? How to download Apple Music on Android phone without the subscription? How to convert Apple Music to MP3 for playable forever? In this article, you will be shown What are the limitations of Apple Music for Android, the benefits and detailed steps on converting Apple music songs into MP3 for Android.

CONTENTS:

Part 1: Does Your Android Phone Support Apple Music app?

Can you download Apple Music to your Android phone? Apple Music, developed by Apple Inc., is a music streaming service. Since its launch in 2015, it has been a convenient way for people to listen to music on the go. With a huge music library of over 45 million songs, you can find favorite songs, albums, and artists here. Now that Apple Music is on the Android phone, you only need to download the Apple Music app from Google Play on Android device. However, if you encounter the following conditions, Apple Music Service is not available on Android phones:

1. Your phone’s Android OS is 4.3 or earlier. If so, I suggest you switch to the latest Samsung Galaxy S10, Huawei Mate 20/P30, Google Pixel 3a XL, and more Android-branded phones.
2. You plan to play Apple Music on your Android tablet as the Apple Music for Android app cannot be installed on the Android tablet.
3. The Apple Music app crashes on an Android phone, or it has a problem, you can’t play Apple music properly.
4. You have not registered an Apple Music account.
5. You are in an environment where the signal is very weak or there is no signal.
6. You did not create an Apple ID that you use with all Apple services.

Part 2: What’s Apple Music M4P & Pros of Converting Apple Music to MP3 for Android Users

What’s Apple Music M4P

M4P is the file extension of protected audio files encoded using the Advanced Audio Codec (AAC). Apple has been using FairPlay DRM technology to protect their music from copying to any non-Apple device, such as Android tablets MP3 player, PSP, PS4, PS3, Xbox One, Xbox 360, TV, Roku, and more. But since 2009, Apple has announced that it has removed DRM protection from 80% of music catalogs. The release of Apple Music witnessed the strong return of FairPlay DRM, and all Apple Music streams were encoded as protected M4P music. Apple Music relies on DRM encrypted files, which means that once an Apple Music subscription expires or is cancelled, you will no longer be able to access your library, including downloaded songs. Moreover, Apple Music’s M4P format is not friendly to Android devices. So if you want to stream Apple music to Android device without any restrictions, you’d better use a professional Apple Music Converter Android and convert Apple Music from M4P to plain audio format, such as MP3.

Pros of Converting Apple Music to MP3 for Android Users

1. You can play Apple music on Android tablets.
2. Listen to Apple music songs without paying for the subscription.
3. Keep songs downloaded from Apple Music forever even after unsubscribing.
4. Transfer and enjoy Apple music tracks on most unauthorized devices, such as MP3 players, iPod Shuffle, PS4, Chromecast, Xbox, Roku, etc.
5. Import Apple Music into a USB device for backup.
6. Apple music can be streamed even in environments without 4G or WiFi.
7. Easily burn Apple Music to a CD.
8. Set Apple Music as the ringtone for your Android phone.
9. Set Apple Music to an Android phone alarm.
10. Enjoy Apple Music on your PC or Mac off iTunes.

Part 3: Apple Music Converter Android: UkeySoft Apple Music Converter

UkeySoft Apple Music Converter is the gospel of removing DRM from Apple Music for playing on Android offline. If you get help with it, you can legally remove DRM protection from Apple Music songs and convert Apple Music DRM M4P to DRM-free MP3 and other popular audio formats such as AC, AC3, AIFF, AU, FLAC, M4A, M4R and MKA. The exported MP3 file will retain the original metadata of the M4P file, including title, album, artist, artwork, track number, and more. Amazingly, it can convert Apple music songs, playlists, and albums to your computer in batches at 16x speed. With this stunning UkeySoft Apple Music converter, you can keep your Apple Music stream forever and listen to Apple Music on any media player and device for playback, even if you’re not a subscriber, including iPod Nano, iPod Shuffle, PSP, Walkman, Android phones and tablets, Kindle Fire tablets and various MP3 players.

Key Features of UkeySoft Apple Music Converter:

Legally remove DRM protection from Apple Music tracks and old iTunes songs.
Convert DRM-ed M4P music files to MP3, AAC, WAV, FLAC, M4A, M4B, etc.
Keep original ID tags and metadata information & convert Apple Music files faster.
Built-in batch conversion, convert Apple music to Android phones within one click.
Download Apple music tracks to Android devices online.
Keep songs downloaded from Apple Music forever, even if you cancel the subscription service.
Transfer Apple Music files to iPod Nano, iPod Shuffle, PSP/PS3/PS4, Walkman, Android phones and tablets, Kindle Fire tablets, MP3 players, etc.

Part 4: Guide to Convert Apple Music to MP3 for Offline Playing on Android Phone

Step 1. Install UkeySoft Apple Music Converter on Computer
Click the “Try It Free” button to get the free trial version of UkeySoft Apple Music Converter. Then, install and launch it on your computer. Please make sure iTunes is pre-installed on your computer and sign in with your Apple Music account in iTunes.

d_win d_mac
d_win d_mac

Step 2. Launch UkeySoft Apple Music Converter
Launch Apple Music Converter and iTunes will be automatically launched. iTunes library will be loaded and displayed as playlists in the left panel.

Note: Aside from Apple Music, you can also convert, iTunes purchased music, iTunes M4B audiobooks and Audible AA/AAX audiobooks to MP3 for being playable on Android.

Apple Music Converter interface

Step 3. Select Apple Music Tracks
Choose any MP4 songs you want to convet. You can use built-in search box to locate songs quickly.

Select Apple Music Tracks

Step 4. Set MP3 as Output Format
In the bottom of “Output Settings”, you can choose MP3 as output format. You can also choose other output audio format as AC3, M4A, M4R, FLAC, MKA, AU and AC3.

choose MP3

Step 5. Convert Apple Music to MP3 for Android Phone
Now click “Convert” button to start removing DRM from Apple Music and converting Apple Music tracks to MP3.

Convert Apple Music to MP3

Step 6. Transfer Converted Apple Music to Android
You have get the DRM-free Apple Music songs in MP3 format, now you can transfer converted Apple Music songs to Android for playing offline. You can use Android Toolkit – Android Transfer, or, you can drag & drop the converted Apple Music files to the Music folder of your Android phone after connecting the device to computer via the provided USB cable.

transfer apple music to huawei mate 20

Note: A trial version of UkeySoft Apple Music Converter can be used to convert the first 3 minutes of each song for free. To break the time limit, it is recommended that you purchase the full version to unlock all features.

d_win d_mac
d_win d_mac

Related Solution for Remove DRM from Apple Music

How to Remove DRM Protection from Apple Music Streams

How to Convert DRM-Protected Apple Music to MP3

How to Play Apple Music on iPhone without DRM Protection

How to Remove DRM from iTunes M4B Audiobooks

Apple Music Converter Android

How to Data from Android to Samsung Galaxy Note 10 and Note 10+

[Summary]: An easy guide on how to transfer contacts, messages, call logs, music, photos, videos, app and app attachments to Samsung Galaxy Note 10/Note 10+/Note 10 5G/Note 10+ 5G from old Samsung, Huawei, Oppo, Motorola, Xiaomi, ZTE, Lenove, Vivo, OnePlus and more Android phones.

Latest Galaxy Note 10 News
The latest Samsung Galaxy Note 10 news
– Samsung insiders said that the latest Galaxy Note 10 will use UFS3.0 storage, which is an upgrade to the UFS2.1 standard used in the Galaxy S10.
– Use Exynos 9825 to reduce the performance gap with Apple’s iPhone.
– Galaxy Note 10+ flagship phone will support 45W charging.

Anyway, we have to say that the upcoming Samsung Galaxy Note 10 will set off a boom, despite a lot of speculation on the performance of the Samsung Galaxy Note 10 on the Internet. Maybe you also plan to buy a brand new Samsung Galaxy Note 10 phone, but worry about how to transfer all the files from the old Android phone to the newly purchased Galaxy Note 10 phone, such as Contacts, Pictures, SMS Texts, Call History, Videos, Music, Apps and Documents.

When it comes to sync Android files to Samsung Galaxy Note 10, it is highly recommended that you use the Phone Switch app which is the ideal file transfer tool to copy data from an old Android phone to Galaxy Note 10/Note 10+/Note 10 5G/Note 10+ 5G with a single click. And it supports a variety of data types including contacts, text messages, photos, videos, call logs, music, apps and more. Transfer everything at the same time in 3 easy steps. Last but not least, if you need to back up your phone data to your Mac or Windows PC, you can also use Phone Switch to backup all of phone data with one click and you are able to restore to your device from backed up files easily.

d_win d_mac
d_win d_mac

Phone Switch Main Features:

Move data between devices with different OSs, i.e iOS to Android.
1-click transfer contacts, SMS, pictures, videos, music, call logs, calendar and more types.
Copy data from iTunes or iCloud backup to Samsung Galaxy Note 10.
Easily backup and restore phone data.
Work perfectly with Apple, Samsung, HUAWEI, OPPO, Sony, HTC, Google, LG, Motorola, ZTE, and more.
Compatible with Android 9.0 and the latest iOS 13.

1-click Sync Data from Old Android Phone to Samsung Galaxy Note 10

Step 1. Download and Install Phone Switch

Firstly, free download and install this Phone Switch tool on your Mac or Windows PC. After launching it, simply click “Switch” option to start the data transfer process.

phone switch main page

Step 2. Connect Old Android Phone and Galaxy Note 10 to PC

Secondly, connect both of your Android phone and Samsung Galaxy Note 10 to the computer separately, and you should enable USB debugging mode on both phones. Phone Switch will detect both phones and display all transferable content in the middle of the window. Remember to make sure your old Android phone is listed on the left and the new Samsung Galaxy Note 10 is on the right.

connect android and Xiaomi Mi 9 to PC

Tips: You are able to click “Flip” button to change their positions.

Step 3. 1-click Sync Selected Data from Android to Galaxy Note 10

Simply check your desired items on the middle panel, and click on “Start Transfer” button to start syncing everything from old Android phone to Samsung Galaxy Note 10 device. After a while, all your desired data would be synced to Samsung Galaxy Note 10 successfully.

transfer data from android to samsung galaxy note 10

d_win d_mac
d_win d_mac

Read More

Best Ways to Transfer Android Data to Galaxy S10/S10+/S10e

Smart Switch: Transfer Data to Galaxy 10/S9/S8/Note/Fold

Transfer/Switch Android Data to Samsung Galaxy Note 8/5/4/3

How to Sync Android Contacts and SMS to Samsung Galaxy Note 8/5/4/3

How to Import Music to Samsung Galaxy Note 9

Sync Data from Android to Samsung Galaxy Note 10

How to Sync Data from Android to Xiaomi Mi 9

[Summary]: If you get a Xiaomi Mi 9 to replace the old Android phone, the first thing you would like to do may be to transfer contacts, texts, pictures, videos, call logs, WhatsApp messages, etc. from your old Android phone to Xiaomi Mi 8. Now, this article will show you the easiest way to achieve it.

Xiaomi Mi 9 uses Qualcomm’s strongest flagship mobile processing platform, Xiaolong 855. In terms of CPU, GPU, AI and other aspects, the performance has been improved by leaps and bounds to ensure continuous and stable output and strong performance. In addition, Xiaomi 9 has also developed two Turbo technologies to speed up the performance of mobile phones.
–Game Turbo
Game Turbo intelligently perceives game scenes, adjusts system resource allocation, and improves average frame rate and frame rate stability.
–MI Turbo
MI Turbo function can effectively reduce the generation of system fragments after long-term use!

“My old phone is running slower and more often crashes. After comparing the performance of the new phones in 2019, I decided to buy a new Xiaomi Mi 9. But there are still a lot of important files stored in my old Android device. How do I sync data from Android to Xiaomi Mi 9?” – From Smith

The higher the attention of Xiaomi Mi 9, the more sounds required to back up files from old phone to the Xiaomi Mi 9. Perhaps moving data from an old Android phone to Xiaomi Mi 9 in the past is a tricky problem for you, but after reading this article, you will get the easiest and most direct way to transfer Android files to Xiaomi Mi 9 at once, including contacts, text messages, pictures, videos, call logs WhatsApp messages, etc.

The Phone Switch program is recommended for you. Whether you want to sync data from Android to Xiaomi Mi 9, or copy data from an old iPhone to Xiaomi Mi 9, the Phone Switch can be easily solved, and it is guaranteed in terms of data security and transmission efficiency.

Main features of Phone Switch:

Transfer almost all types of data, including contacts, videos, SMS, photos, call logs, music, calendars and apps.
Easily transfer data between two smartphones.
Back up phone data to the computer.
Restore data from backup with one simple click.
Not only works well with iOS and Android devices, but also supports other devices like WinPhone, Symbian and Blackberry.
Works perfectly with the latest Android 9.0, iOS 13.

d_win d_mac
d_win d_mac

1-click Switch from Old Android Phone to New Xiaomi Mi 9

Step 1. Install and launch Phone Switch Software
Firstly, free download and install this Phone Switch tool on your computer. After launching it, simply click “Phone to Phone Transfer” option to start the data transfer process.

phone switch main page

Step 2. Connect Old Android Phone and Xiaomi Mi 9 to PC
Secondly, connect your old Android Phone and Xiaomi Mi 9 to your computer and you should enable USB debugging mode on your both Android devices. Phone Switch will detect the old Android Phone and New Xiaomi Mi 9 and show all the transferable contents in the middle. Remember to make sure your old Android Phone listed on the left while the new Xiaomi Mi 9 on the right.

connect android and Xiaomi Mi 9 to PC

Note: Click “Flip” button to change their positions if needed.

Step 3. 1-click Transfer Selected Data from Android to Xiaomi Mi 9
Simply check your desired items on the middle panel, and click on “Start Transfer” button to start copying everything from old Android to Xiaomi Mi 9. After a while, all your desired data would be synced to Xiaomi Mi 9 successfully.

transfer data from android to Xiaomi Mi 9

d_win d_mac
d_win d_mac

Related Articles:

How to Sync Android Files to Samsung Galaxy Note 10

How to Sync Android Data to Huawei Phone

How to Transfer Data from Android to Huawei Mate 20(Pro/X/RS)

How to Transfer Data from Old iPhone/Android to 5G Android Phones

How to Transfer/Backup Android Data to Computer

Copy Data from Android to Xiaomi Mi 9