As Samsung mobile phone develops new features constantly, many mobile phone users of iPhone begin to change their phone to the most popular Samsung Galaxy S7 Edge, S7, S6 Edge, S6 or Galaxy Note 7. So if you are the one who are tired of the iOS devices and want to change a new taste, you can try the Samsung Galaxy S7 (Edge).You must wonder how to transfer text messages from iPhone 4/4S/5/5S/6 to Galaxy S7(Edge) since there are many important personal communication still stored on the iPhone.However, don’t be nervous and just take it easy, since there are two methods for you to achieve this target, you can refer to the paper as shown below.
3 Ways to Sync iPhone SMS to Samsung Galaxy S7/S7 Edge
Part 1:Transfer SMS from iPhone to Galaxy S7 with the iPhone to Android Transfer
The iPhone to Samsung Galaxy S7 SMS Transfer – iPhone to Android Transfer can help you transfer SMS between iPhone and Samsung Galaxy S7/S7 Edge, Galaxy S6/S6 Edge, Galaxy Note 7 smart phones directly,it supports switch data between multiple phones even with iOS operating system and Android operating system.What’s more,it not only allows you transfer SMS between iPhone and Android Samsung phone,but also can help you transfer contacts, photos, songs, videos, call logs, apps,calendars and more other files between iPhone 6S/6/SE/iPhone 7 and Samsung Galaxy S8/S7/S6/S5/Note 7/A9, HTC One M9/M8, Motorola, Sony, LG, Nexus 6P, Nexus 5X, HuaWei P9/P8,HuaWei Note 8, etc,.
Step 1.Download and install the Phone Transfer
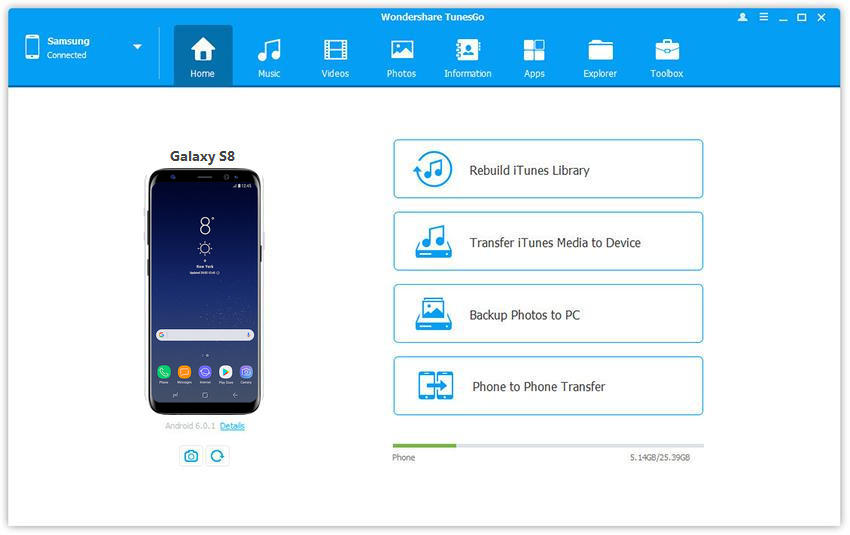
Download and install the Phone Transfer to computer and then you can see the main window to start the program.
Step 2.Connect the iPhone and Galaxy S7 to Your Computer
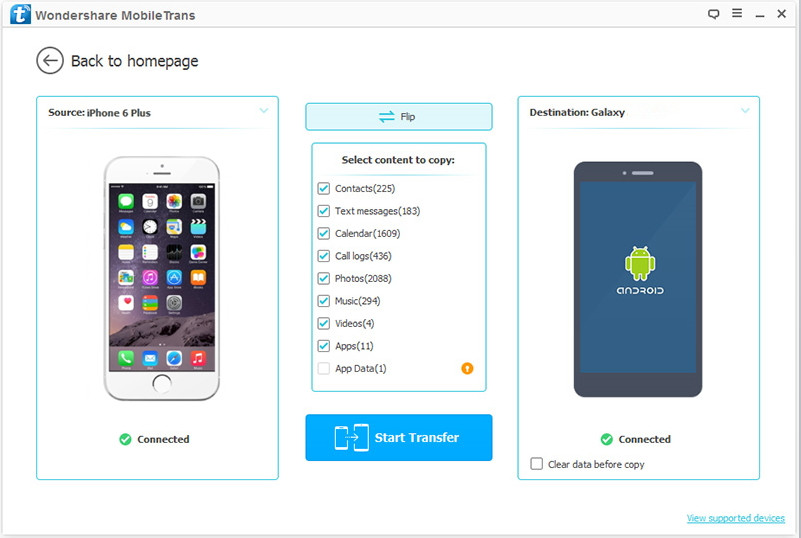
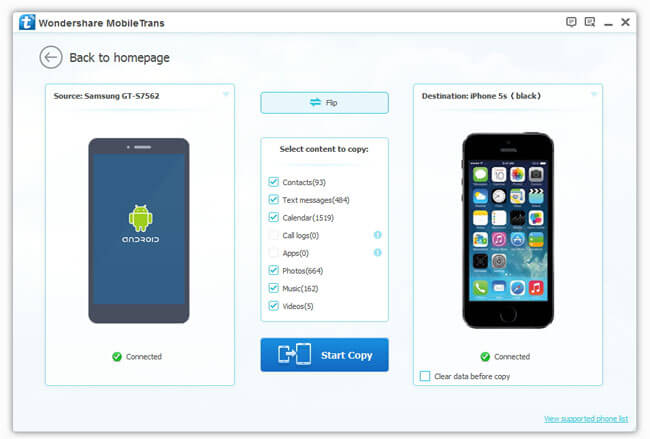
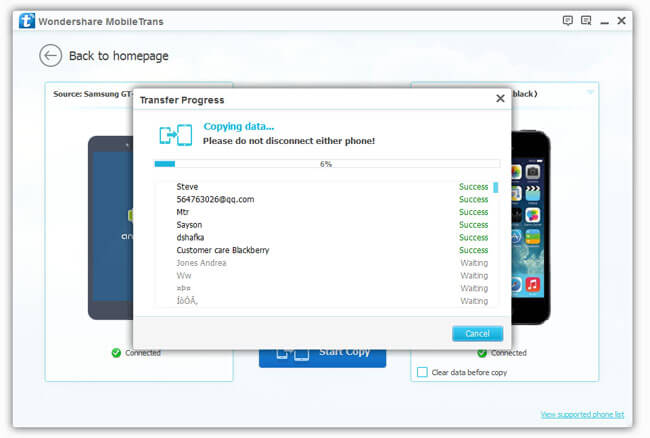
Connect both Phones to your computer with two USB cable.Wait for a moment,both phones will be recognize soon.After that,choose the tab of”Phone to Phone Transfer” .The Phone Transfer will display both of your iPhone and S7 Edge on both sides of the primary window. Your iPhone as the source phone is shown on the left,and the S7 Edge is on the right.
Now you should click “Start Copy”to going on.
Step 3.Start the Text Messages Transfer Process from iPhone to Samsung Galaxy S7
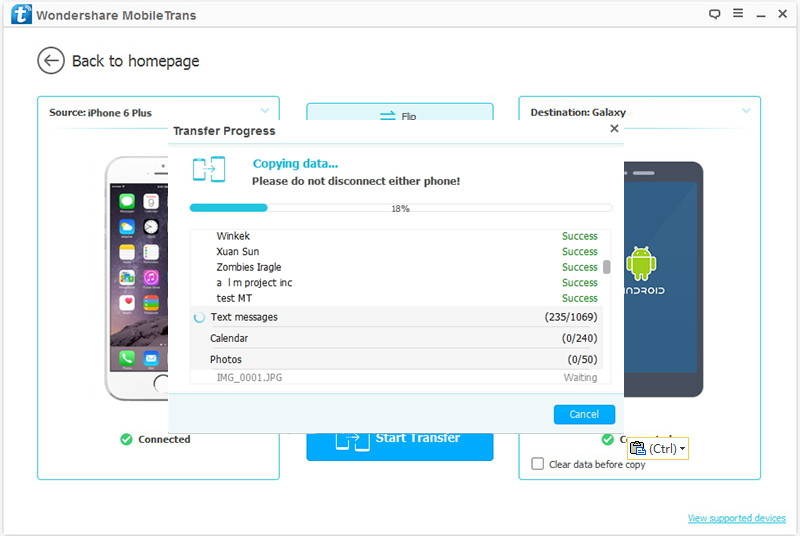
It is your turn to decide which files should be transferred and then press on the “Start copy” button.If you just need to switch text messages between iPhone and Samsung,just click the “Text messages”.Wait for a minute and all text messages from your iPhone will be transferred to Samsung Galaxy S7.
Furthermore,iPhone to Android Transfer is a multifunctional data manage tool worth you trying.Except for transferring data between mobile phones,which supports to back up your phone content,restore data to phone from backup files and erase your phone data permanently.
Part 2:Switch Text Messages from iPhone to Galaxy S7 with Samsung Smart Switch
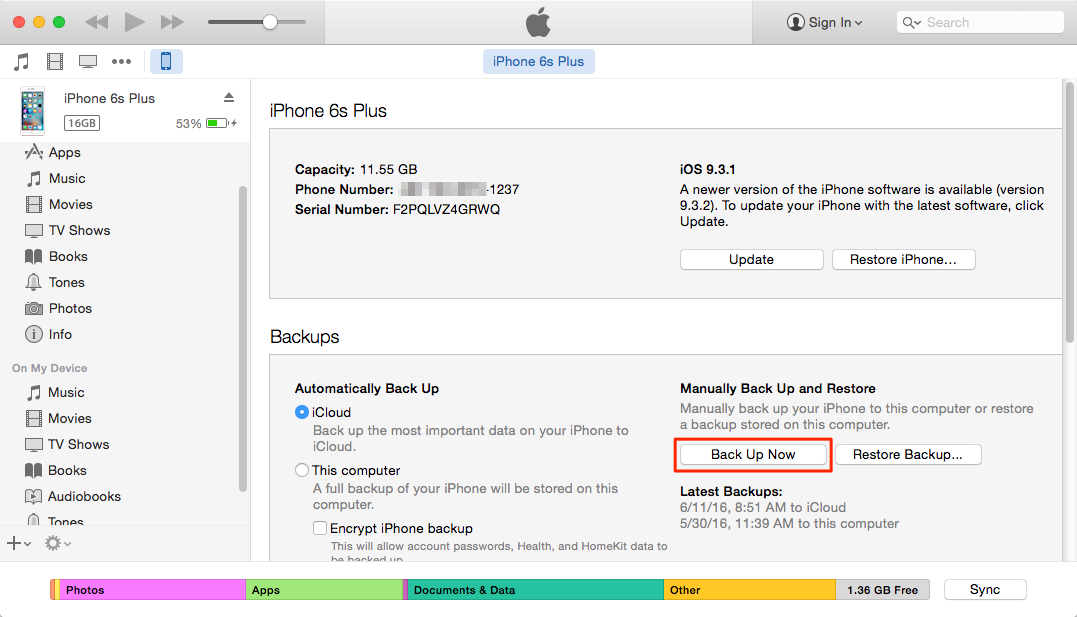
Step 1.Connect iPhone to the computer via USB cable. Create backup files with iTunes.
Step 2.Download and install Samsung Smart Switch, it is free on computer. After that, launch the program.
Step 3.On the opened app, check the data as you want to transfer from iPhone to the Samsung phone and then press on the button of “Start Transfer”.And then,it will start the text messages transfer task automatically.
Part 3:Transfer Text Messages from iPhone to Galaxy S7 with iOS & Android Manager
It’s no more better than using iOS & Android Manager to transfer SMS between iPhone and Samsung Galaxy S7,it’s an useful program to manage data for mobile device,transfer data between iOS device and Android device without hassle,including SMS,videos,music,photos,contacts.Furthermore,this program support to transfer data between computer and iOS/Android device,transfer data between iTunes and iOS/Android device.All the functions of iOS & Android Manager is applicable to all models of iOS and Android devices,such as iPhone 7,iPhone SE,iPhone 6S/6/5S/5,iPad & iPod;Samsung(Galaxy S7/S6/S5,Note 5/4/3),Google,ZTE,HTC,Motorola,Sony,etc,.
Step 1.Launch iOS & Android Manager and Connect Devices with the Computer
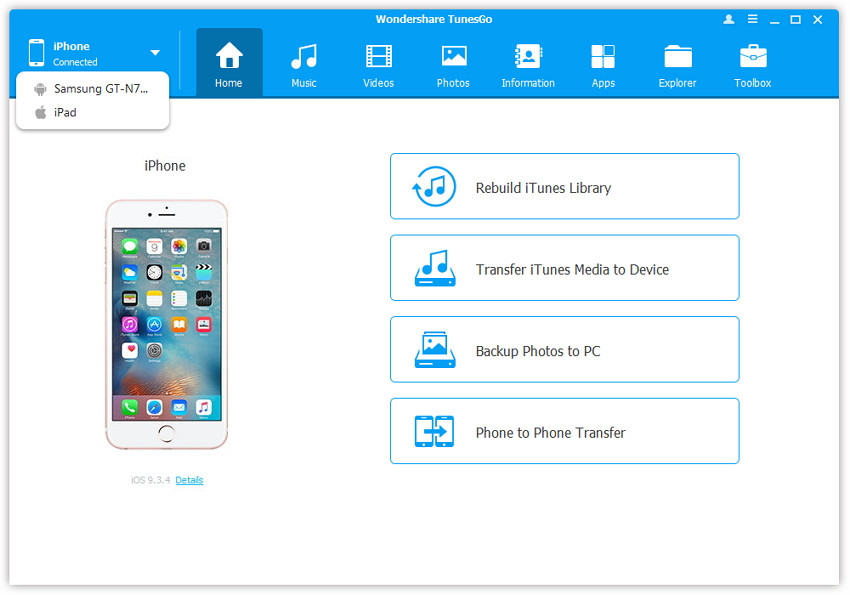
Launch iOS & Android Manager and connect both iPhone and Samsung Galaxy S7 or one more device with the computer, here we name the connected devices: A, B, C.
Step 2.Select the Source Device from which you want to Transfer Data
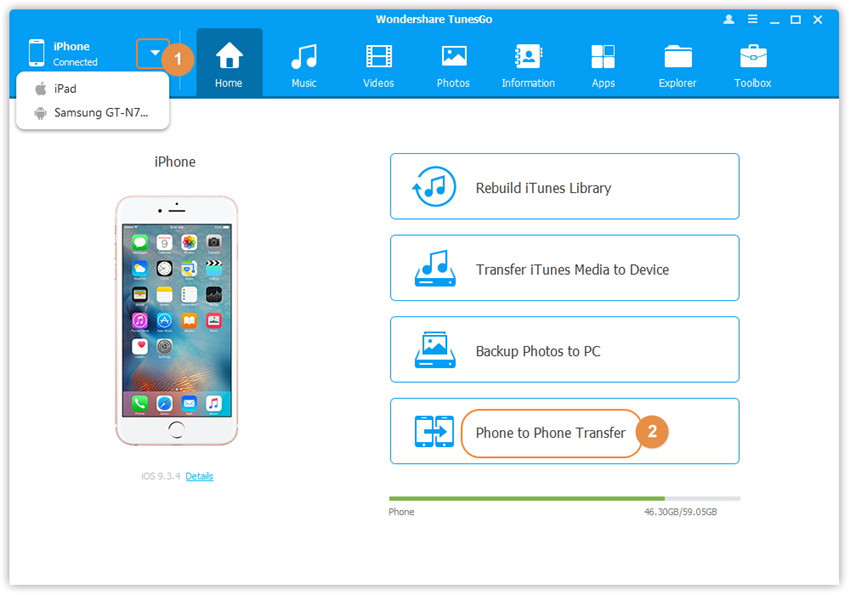
Select the source device A, and click Phone to Phone Transfer option on the main interface. Then a new window will pop up.
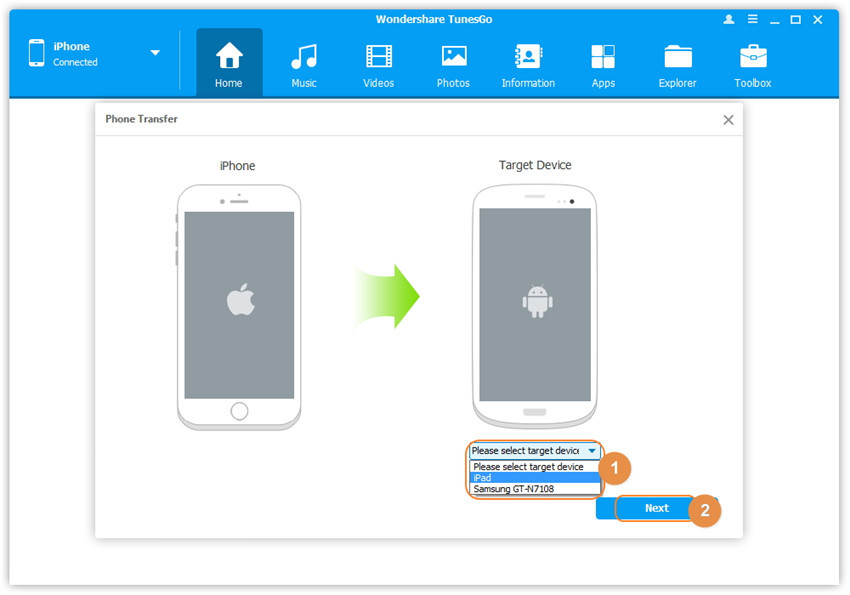
Step 3.Select the Target Device to which you want to Transfer Data
From the pop-up window, select the target device B or C from the drop-down list and click Next.
Step 4. Transfer SMS from one Device to another
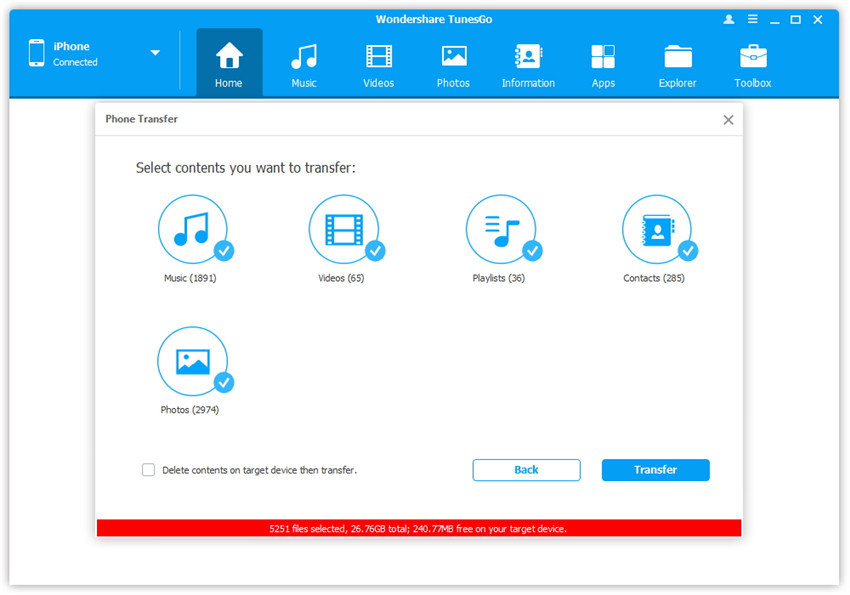
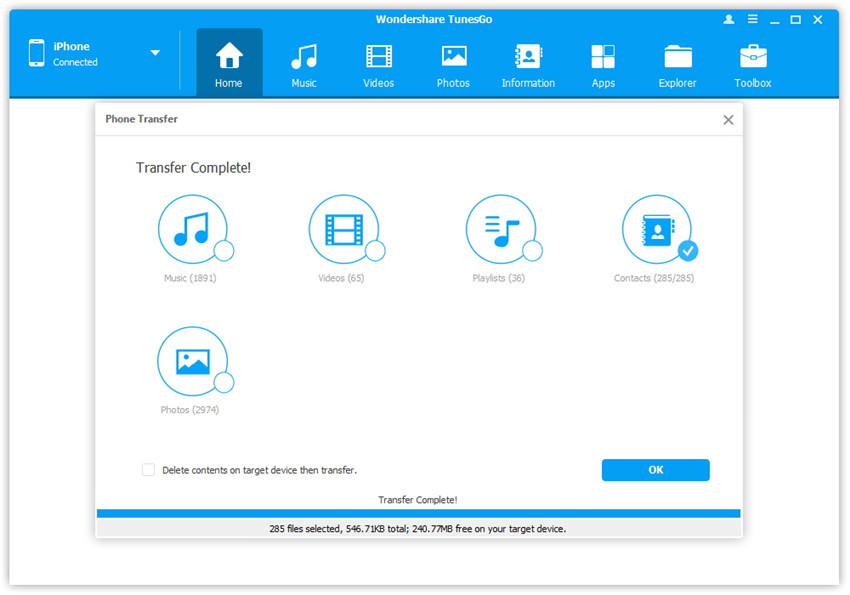
By default, all the content on your source device A that can be transferred are checked, namely Music and Videos, Playlists, Photos, Contacts( Note: Contacts are not supported by Mac version). You can uncheck the contents which you don’t want to transfer. Then, click Transfer. In the whole transfer process, DO NOT disconnect either of the devices. When the transfer completes, click OK.
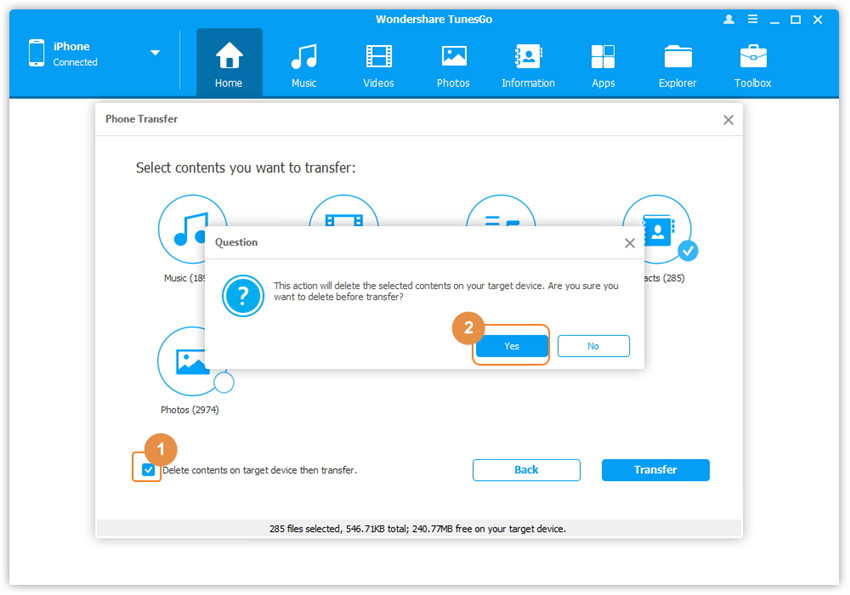
Note: Only for Windows version, you’re enabled to tick the option: “Delete contents on target device then transfer” before clicking Transfer button, then the selected contents on the target device will be deleted firstly before the transfer.
[Summary]: This article teach you 2 ways to transfer contacts from iPhone to Samsung Galaxy S7/ S7 Edge/S6/S6 Edge. The first way is using an iPhone to Android Contacts Transfer to sync contacts from old iPhone to S7,S7 edge directly without backup;the seconed way is switching contacts from ios devices to S7/S6 by Samsung Smart Switch for PC/Mac(you need to created a backup with iTunes or iCloud at first).
However,if you want to buy a new Samsung Galaxy S7 to replace your old iPhone,now the question is coming.How can you do to switch the files from old iPhone to new Samsung Galaxy S7 Edge?As we know,the data especially the contacts on our mobile phone is such important for the phone user,it is the most private part of information on mobile phone.In case the phone numbers,the name,E-mail expose to somebody,you need to transfer contacts from iPhone 4/4s/5/5s/6/6s to Galaxy S7,S7 Edge as fast as possible you can.
2 Ways to Transfer Contacts from iPhone to Samsung Galaxy S7/ S7 Edge
Solution 1: Transfer iPhone Contacts to Galaxy S7/S7 Edge via Phone Transfer
The iPhone to Galaxy S7 Contacts Transfer – Phone Transfer,which is a professional program to transfer data from different phone systems,such as iOS to Android, Android to iOS, Windows to iOS, Symbian to Android, etc., It helps to transfer contacts, text messages, calendar, photos, music, Apps, videos and call logs from iPhone to Samsung Galaxy Edge S7, Galaxy S6/S6 Edge, Galaxy S5/S4. In addtional,it also allows you copy contacts from Samsung to iPhone 7, iPhone 6S/6, iPhone 5S/5 and iPhone 4.
The Phone Transfer is a convenient and efficient data transfer program. Besides, it is try for free and easy to use. Now, let me tell you how to use this program to sync contacts from iPhone 4/4S/5/5S/6/6S/7 to Samsung Galaxy S7 Edge.
How to Transfer Contacts from iPhone 5S to Samsung Galaxy S7
Step 1.Install and Run the Phone Transfer on Your PC
Install and run the Phone Transfer on your PC,then you’ll see the primary window as follows on the desktop.Next,click “Phone to Phone Transfer” and press “Start” to go on.
Step 2.Connect Your iPhone and S7 to Computer
Connect your iPhone and S7 to computer by using theirs USB cables.After recognizing by the program,The Phone Transfer will display both of your iPhone and S7 on both sides of the primary window. Your iPhone as the source phone is shown on the left,and the S7 is on the right.
Tips: If you want to transfer data from Samsung to your iPhone, just simple press the “Flip” button to exchange theirs position without disconnected your phones.
Step 3.Transfer Contacts from iPhone to Galaxy S7
As the interface shows,all contents you can transfer are checked. You can uncheck the files you don’t want to transfer, just check the contacts if you only need them. Then, go to click “Start Copy”,then it begin to move files like contacts from iPhone to your Galaxy S7 Edge.In the process of transmission,be sure not to disconnect either of the phones. When the process is over,you should click “OK”.
By one click, you can clone your contact list from iPhone to Samsung easily.Data will be scanned, copied, and pasted in seconds.Moving contacts between iPhone and Samsung will be as easy as shooting fish in the barrel.Besides,the Phone Transfer is applies for every models of mobile phones,including Samsung(Galaxy S7/S7 Edge/S6/S5,Note 7/5/4/3),HTC,LG,iPhone(7/6S/6S Plus/6/6 Plus/5S/5/4S),etc,.
Solution 2: Switch Contacts from iPhone to Galaxy S7/S7 Edge via Smart Switch
Samsung offers a suite of tools –Smart Switch,which can help users transfer data and apps from older Samsung and iPhone and Nokia devices to your new Samsung Galaxy smart phone. Samsung Smart Switch consists of two tools that must be downloaded and installed separately.
To transfer iPhone contacts to Samsung Galaxy S7/S6 by Smart Switch,you may need to created a backup with iTunes or iCloud,then use the Smart Switch transfer your Contacts, Calendar, Photos, and Videos to new Galaxy S7/S6. To transfer your remaining content, please connect to your iPhone using an OTG cable or Smart Switch for PC/Mac.
With Samsung Smart Switch for PC/Mac®, you can upload the data and apps from your old device to a PC or Mac and transfer virtually all of them to your new Galaxy device.
Using the Smart Switch app you can move data from iPhone to your new Samsung Galaxy S7/S6(Edge ) using iTunes,but transfer may take time depending on strength of WiFi connection.Let’s teach you how to transfer contacts from iPhone to new Galaxy S7 via Desktop Smart Switch & iTunes.
Step 1: Backup iPhone to iTunes
First of all,please backup iPhone contents to iTunes.If you switched on the iMessage option when receiving text messages on your old iPhone, please opt out of this service.
Tips:If you don’t, you may stop receiving messages from contacts that are still using the service. Don’t panic, you can do this by using the official Opt out of iMessage service provided by Apple.
Step 2: Download and Run the Smart Switch on Computer
Before you can transfer your data, make sure you install the Smart Switch software to your Mac or PC,and launch Smart Switch on your computer.
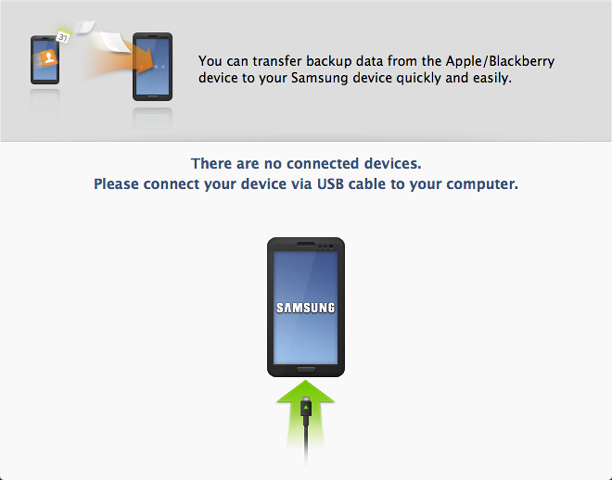
Step 3:Connect Samsung Galaxy S7 and iPhone to Computer
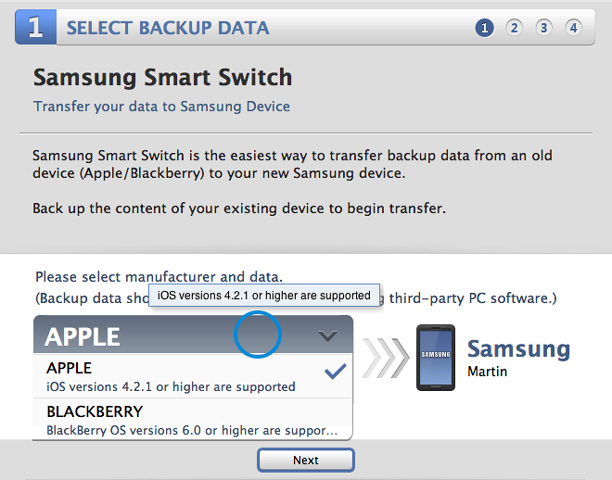
Step 4: Select the Name of iPhone Backups
This step,you need to select the source file(iPhone backup files),please select manufacturer and data,transfer backup data from an old iPhone/iPad,Blackberry to new Samsung Galaxy S7/S7 Edge.
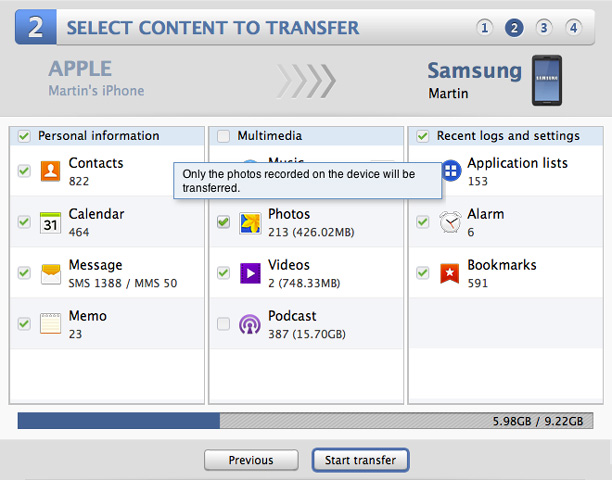
Step 5: Select the Content You Want to Transfer to Galaxy S7
Step 6: Begin to Transfer Select Content to Galaxy S7 from iPhone backups
Press “Start transfer” to switch data to new Galaxy S7,only few minutes you can transfer iPhone backup data to S7 complete.
Tips: We recommend you use the Phone Transfer to move contacts between iPhone and Samsung Galaxy,the Phone Transfer is a professional iPhone to Android Transfer tool,which not only can help you copy contacts from iPhone to Samsung Galaxy S7/S6/Note 7/A9 witho 1 click without data loss,but also supports backup and restore data from Samsung Galaxy S7, iPhone 7,iPhone 6S, iPhone SE, iPad Pro and other Android devices.
Solution 3:Transfer iPhone Contacts to Galaxy S7 with Android Manager
There is another data manage tool here I should introduce to you,Android Manager,as its name,it is used to manage & transfer data for Android.With this wonderful tool,you can freely transfer contacts from iPhone to Samsung Galaxy S7.Besides contacts,you are allow to transfer music,videos,photos,SMS between iPhone and Samsung.What’s more can Android Manager do for you?It help to transfer data between iTunes and Android,transfer data between computer and Android.
Step 1.Launch Android Manager and Connect iPhone and Samsung with the Computer
Step 2.Select the iPhone as Source Device from which you want to Transfer Data
Step 3.Select the Samsung as Target Device to which you want to Transfer Data
Step 4.Select and Transfer Contacts from iPhone to Samsung
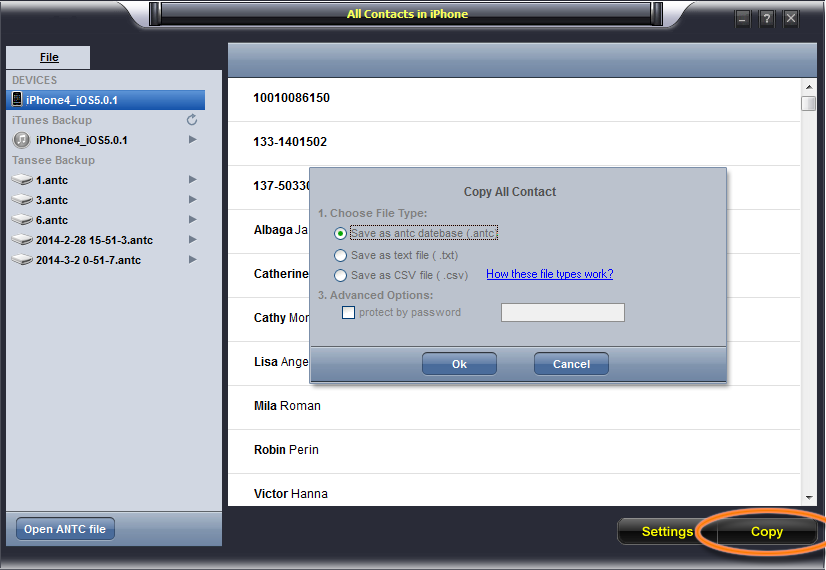
Data Protection:Backup iPhone Contacts with iPhone Contact Transfer
As we know,contacts are such important for everyone.Contacts are taking over phone number and e-mail even the house address.The contacts on your iPhone are now one of your most important forms of communication with your friends, family, loved ones and coworkers.Before transferring contacts between mobile devices or selling your phone,you’d better make a fully backup of iPhone contacts to protect your personal data.
Here we provide you the best solution to backup iPhone/iPad/iPod contacts to computer avoiding lost contacts under any unexpectedly circumstances.The program which is called iPhone/iPad/iPod Contact Transfer,is a perfect data manager program help to transfer and backup contacts from iPhone to computer efficiently as well as safely.Besides copy iPhone contacts to computer,you are allow to restore deleted contacts on iPhone with iPhone/iPad/iPod Contact Transfer in simple clicks.
Samsung Galaxy Note 8 itself is IP68 water and dust resistant, but so too is the S-Pen stylus. Internal specs include the expected 10nm Exynos 8895 or Qualcomm Snapdragon 835 octa-core CPUs depending on region (again just like the Galaxy S8 series) as well as 6GB of RAM. It carries Android 7.1 Nougat and the Bixby AI assistant, and the phone is compatible with the latest Gear VR and DeX accessories from Samsung.
So, you’ve been living in the Samsung world for a while and now you’re looking forward for a new Samsung Galaxy Note 8 which will release on the mobile phone market soon.Fortunately moving all your stuff from the old Samsung phone to the new one with you needn’t be a chore.
Switch Samsung Data to Galaxy Note 8/Note 5/Note 4 Without Smart Switch
If you used Samsung phone and now want to purchase the new coming soon Galaxy Note 7, what you can do to transfer everything the between the two Samsung phones without complex operation?
Phone to Phone Transfer and Samsung to Samsung Switch – both is an Android to Android operating system data transfer tool, is a such effective program you need.It allows to transfer sms, contacts, photos, videos, call logs, Apps, calendar and music from old Samsung phone to Galaxy Note 8 without any data loss. However,you can use this Android Transfer to switch everything between two Samsung phones directly without Samsung Smart Switch,because some users may think it’s very obsession to use Smart Switch to transfer data to new Samsung phone,because you must to do the backup and restore process,and the Smart Switch doesn’t support transfer Apps from Samsung to another. Now,you can free download the Android to Android Transfer directly transfer all contents,even Apps from old Samsung to Galaxy Note 8, Note 5/4/3/2/1,it works well with all Samsung devices,like Galaxy S7/S7 Edge, Galaxy S6/S6 Edge, Galaxy S5/S4/S3/S2, Galaxy A9/A8/A7/A5, Galaxy Ace/GT /Trend/Start/series,etc,.
Download and install the Phone Transfer to copy personal document from old Samsung phone to Note 8 by one click.
How to Transfer Samsung Files to Galaxy Note 8/Note 5/Note 4
Step 1.Connect the old Samsung Phone and New Note 8 to PC
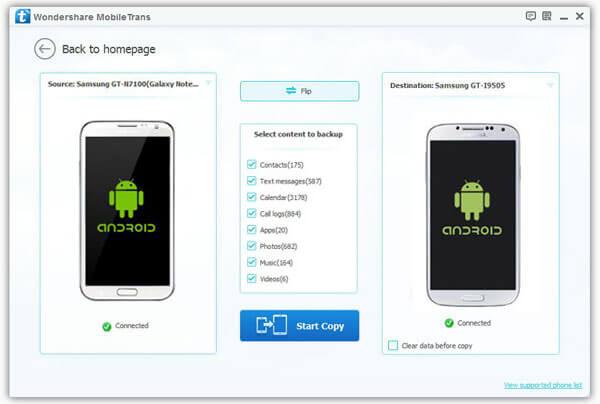
After installing,run the Phone Transfer Tool meanwhile connect your Samsung smartphone and Note 8 to computer. Click “Start” button to enter the next step.
The software will show all your files in the window. Please note that the source phone is on the left and the target phone is on the right.(If you would like to transfer data from Note 8 to Samsung someday, just simply click the “Flip” button to change positions of them).
Step 2.Select Files to Transfer to Note 8
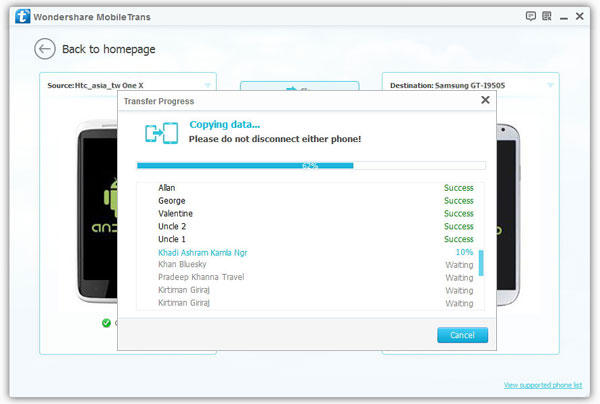
In this step,the Phone Transfer can automatically find all files on your Samsung old phone and list them in chronological order. If you do not want to transfer some items, please just uncheck them and click on “Start Transfer”. After a while, the selected files will be transferred to your new Note 8.
At last,just click”OK” the end the whole files transfer task.
Free downlad the Phone to Phone Transfer and have a try!
Well done,so easy? By the way, if you are afraid of losing data while transferring, you can back up your Samsung data with this program.Besides,if you want to donate or sell your old Samsung phone to the second hand market or someone,the Phone Transfer is the best choice to help you wipe data from your Samsung old phone permanently,then you can resell your old cell phone safely, do not worry about personal information being stolen.It is a multifunctional Android&iPhone Manager tool that prevent personal information from leaking.
Samsung is well set to make 2016 its biggest year ever. They are moving fast towards to launch their best Smartphone Galaxy S7/Note 8/A9 and certainly we got few more rumours of Samsung Smartphone here. According to reports Samsung is preparing Galaxy A9, Galaxy S7 and Note 8 for next year. So, expectation are on it heights as Samsung has produced so much variety in their Smartphone portfolio.The Samsung Galaxy A9 ,Galaxy S7,besides Note 8 are going to boast a premium quality body with perfect design. The mobile phone market sure that Samsung will bring its best this time.
As the quality of life has been largely improved these days, people tend to change their mobiles more frequently.It is true that in recent years a large number of mobile phone users, especially iPhone ones, have given away their iPhone and go for the Samsung smart phones. We guess that there will be more iPhone users buy the new Samsung phone to replace their old iPhone.Particularly focus on the coming Samsung Galaxy S7,Note 8 and A9.
Sync iPhone Contacts to Samsung Galaxy Without Smart Switch
Do you own an old iPhone?Do you know how to sync your contacts on your iPhone to new Samsung Galaxy?Now let me guide you to do this with the help of iPhone to Android Transfer. What you need is just an excellent data transfer tool with you,which allows you to copy data between iPhone and Samsung phone.
iPhone to Android Transfer is a professional phone to phone data transfer tool.It can enable you to sync your iPhone contacts to Samsung Galaxy S7/Note 8/A9 efficiently.Only with one click, you can soon transfer your contacts from iPhone to newly bought Samsung. In addition, nearly any model of mobile can be compatible with this software including iPhone, Nokia, Android phones like Samsung, Sony and so on.
How to Transfer Contacts from iPhone to Galaxy S7/Note 8/A9
Step 1.Download and Install Phone Transfer on PC
Download the software for free trial and install it,then click “Phone to Phone Transfer” options.
Step 2.Connect iPhone and Galaxy S7/Note 8/A9 to PC at the same time
Connect both the smart phones simultaneously.After connecting your iPhone and Samsung phone with PC via two USB cables, this app will detect them quickly.Then,a box named “Source” on the left will show your iPhone model, while Samsung phone will be at the place of “Destination”.
Note:By clicking the button “Flip”,this transfer will move contacts from Samsung back to iPhone.
Step 3.Begin Transferring iPhone Contacts to Samsung Galaxy S7/Note 8/A9
Tick the “Contacts”.Then, click the button “Start Transfer”.You must not disconnect any of your phones before the progress is ended.After the transfer task is done, you should tap “OK” to finish it.
With the steps above, you can sync your contacts quickly to new Samsung Galaxy S7/Note 8/A9 from iPhone 4/4S/5/5S/6/6S/7/8 easily.
What’s more, you are able to transfer other types of data such as photos,messages,notes and more from other models of smarthphones to nearly any mobiles by using Phone to Phone Transfer. The iPhone 7/iPhone 7 Plus, iPhone 6/6 Plus, iPhone 5/5S, iPhone 4/4S, Samsung S7/S6/S6 edge, Galaxy A9/A7/A5, Note 8/5/4,HTC M8/M9, LG G4/G3, Sony Z3, Motorola, iPhone 6S/6S Plus/6/6 Plus, etc are all supported by Phone Transfer.Sounds great, isn’t it?
“I can’t get into the phone because the Apple screen is frozen and nothing will move on the screen, so i cannot swipe to shutdown, or swipe to open the phone.”-Said by Lisa Tse
“My wife’s iPhone 5s phone, since we upgraded to iOS 8 and now iOS 8.1, has been having a multitude of issues. Today, my wife opened it and then it was abnormal the screen stuck on Apple logo and the phone cannot be shutdown.”-Said by Tomson Lee
Sometimes a frozen iPhone will not let you do any type of activity, and often you are stuck on-screen in an app or on a home screen even on Apple log. This can also help if your iPhone is stuck off and won’t turn on, but mainly you will use this when the iPhone is frozen on Apple Screen.
iPhone is Frozen with Apple Logo on Screen,How to Fix?
This guide will show you a easy guide to fix a frozen iPhone stuck on Apple screen without losing your data or visiting an Apple Store for help.Read the passages below patiently,you will learn the most effective ways to recover iPhone stuck on the Apple loading screen indefinitely.
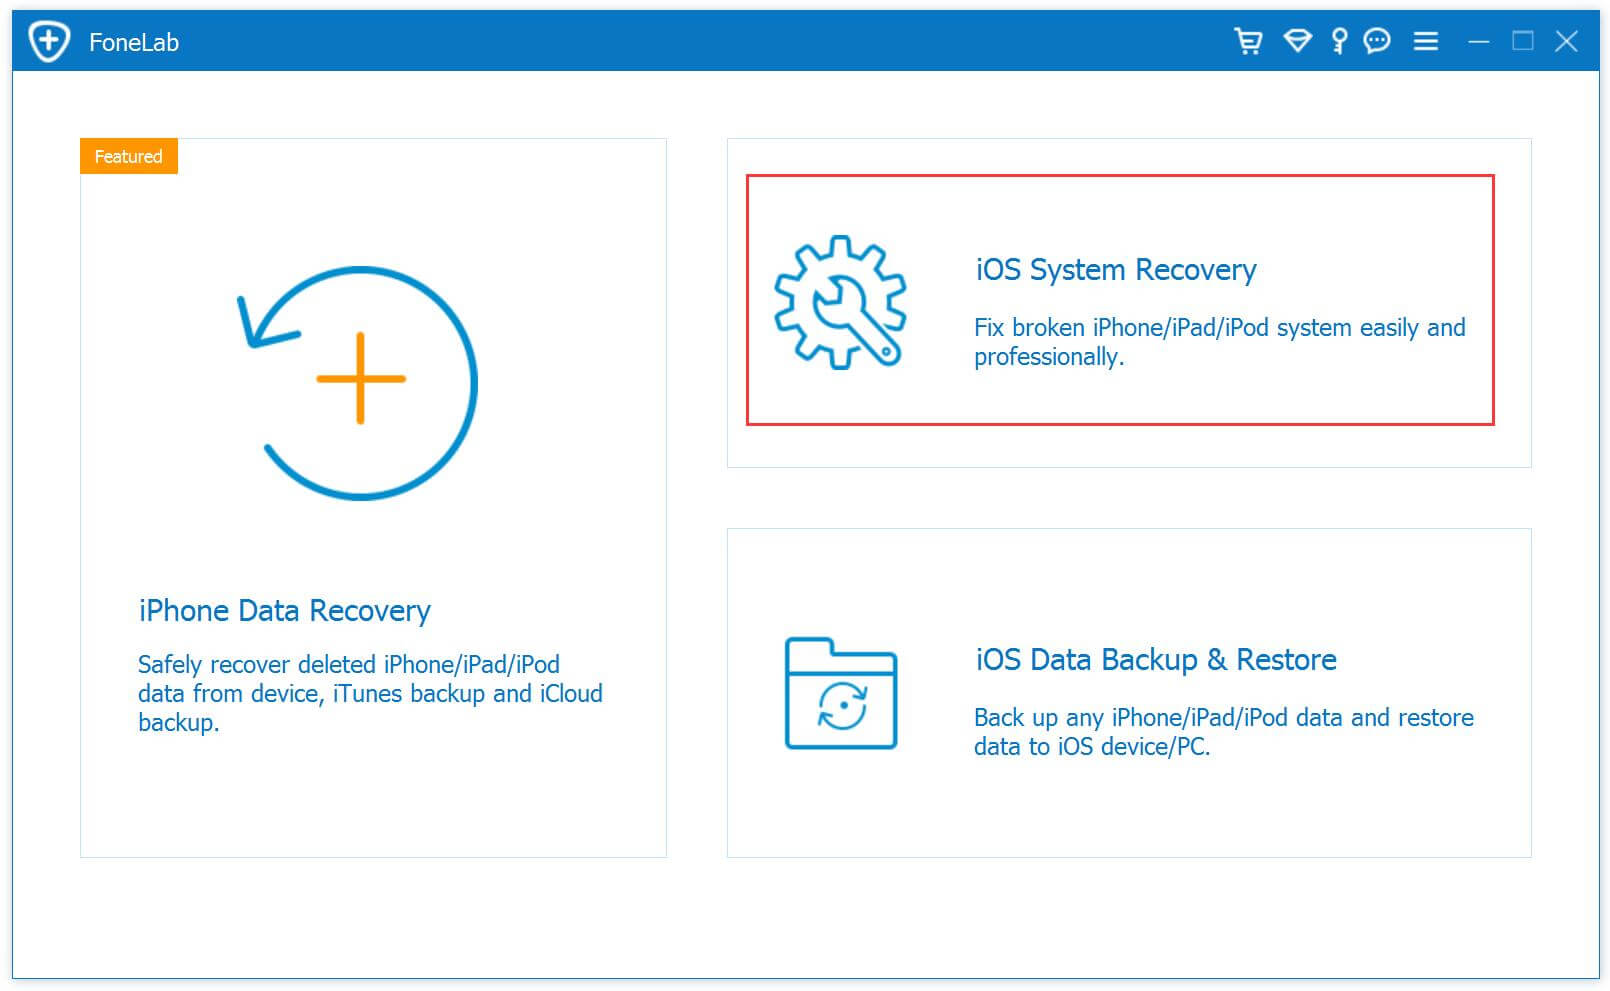
To repair operating system frozen on Apple screen of your iPhone, you can use this iPhone System Repair & Data Recovery Tool,which not only can help you fix ios to normal for your iPhone frozen on Apple screen,as well as iPad and iPod,but also supports to recover lost contacts, text messages, photos, videos and other data from iPhone.The new powerful function designed for several situations for example fix the iPhone stuck on black screen,iPhone stuck on recovery mode,etc.
Let’s teach you how to fix an iPhone 6S/6/5s/5/4s/SE frozen on Apple Screen,and repair iPhone system to normal:
Fix iPhone to Normal from Frozen Apple Screen
Step 1.Select the Proper Functioning of the System to Repair your iPhone
Click on the last tap on iPhone System Repair Tool version of the main window “fix iOS system to normal”. Then make your iPhone which is stuck on Apple Logo screen to your computer with an USB cable.When the magic tool discover your iPhone,just need to click” Start”, and going on the fixing process.
Step 2.Download and Select the Right Version Firmware for your iPhone
To repair the abnormal operating systems of your frozen iPhone, you need to download a firmware. iPhone System Repair tool will recognize your iPhone and provides the latest iOS version for you to download.Now tap “download” and then wait a few seconds.The software will automatically accomplish it very soon.
Step 3.Fix your iPhone Stuck on Apple Logo Screen Issue
When the download is finish, the program will continue to repair your iPhone.After a few minutes, it will tell you that your frozen iPhone is able to reboot as usual.The whole process of fixing the operating system for iPhone only takes you less than 10 minutes without complex steps.
If your iPhone has hung up on the Apple Screen when booting,you try to perform a battery-cycle reboot, or a “reset,” to get the device to fully shut down and load iOS again are useless.You can try the predominant iPhone System Repair Tool to repair it without any data loss.
Summary: This article mainly teach you a two methods to fix Jailbroken iPhone 4/4S/5/5S, iPhone 6/6S/7, iPad Pro, iPad mini 4, iPod Touch stuck on black screen of death,you can also follow the same steps to fix the stuck Gray Apple Logo and Blue or Black screen iPhone, iPad and iPod Touch easily.
For millions of happy users all over the world, the iPhone is fantastic just as it is. It’s beautiful, elegant and easy to use, and there are thousands upon thousands of apps and oodles of content for them to choose on the App Store.However,more and more iPhone users likely to jailbreak their loved iPhone in order to play more games and use more applications on iPhone.
How to Fix a Jailbroken iPhone Stuck on Black Screen
There are several reasons lead your iPhone stuck on black screen after jailbreaking;it could be that your iPhone battery has died halfway through the jailbreak.Your iPhone could be stuck on black screen after jailbreaking, Cydia or otherwise that is incompatible. Let’s have a look at some ways to try to fix a black screen iPhone after jailbreaking.
Method 1: Enter into DFU Mode to Get iPhone Out of Black Screen
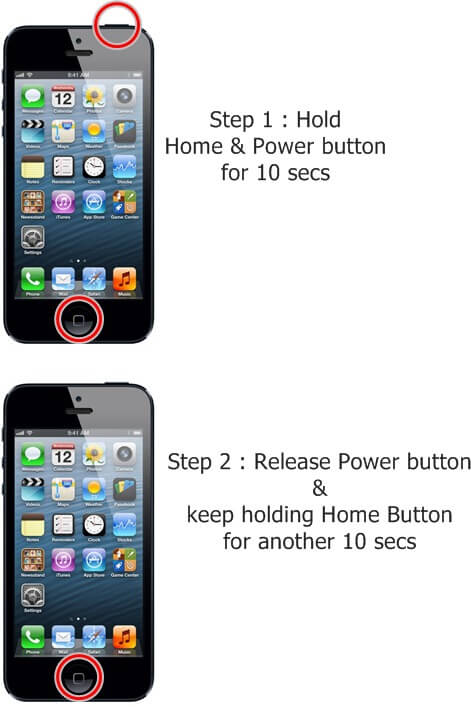
If you’ve had to place your iPhone into DFU mode or recovery mode for some reason you might find that you simply can’t get out of it.Try holding the Power and Home buttons at the same time for 10 seconds. Let go of the Home button and continue holding the Power button until you get the Apple logo. Your jailbroken iPhone should now reboot as usual.
However,the old way could not be work anytime.If you find this method is invalid,please follow the next solution to do and you will be surprise for it.One day last week I discover an iPhone users forum that introduce an terrific iPhone operating system fix software that helps to repair a few difficult issue about jailbrokn iPhone,such jailbroken iPhone stuck on black screen.Maybe it is another type of solution which you can solve it.
Method 2: Fix Jailbroken iPhone Stuck on Black Screen with iPhone System Fix Software
iPhone System Fix & Data Recovery software can help you fix ios to normal,it allows you fix iPhone stuck on black screen,get jailbroken iPhone out of recovery mode,fix jailbroken iPhone stuck on Apple logo screen,etc,.but also allows you to recover lost files from jailbreakon iPhone lost due to accidental or intentional deletion, device damage or upgrading, and more.What’s more,this powerful iOS Fix & Recovery tool allows you recover lost data from iPhone.
Easy Steps to Fix iPhone 4/5/6S/6 with Black Screen of Death
Step 1.Please Download and Run iPhone Operating System Fix Software on Computer firstly
Step 2.Choose the Bottommost “Fix iOS to Normal” option to Tap
Choose the fixing mode and then connect jailbroken iPhone to your computer with an USB.After that the amazing software will detect your iPhone and you need to click “Start”to enter the next step.
Step 3.Download and Select the Firmware which is Applicable to Your Jailbroken iPhone
You need to download the firmware to fix your jailbroken iPhone stuck on black screen. The iPhone Operating System Fix Software will recognize your iPhone, it provides the latest iOS version for you to download.Click “download” and then wait a few seconds.The software will automatically done for you.
Download Firmware Package for iPhone
Step 4.Repair Jailbroken iPhone Operating System and It will Work as Usual
When the download is finish,the program will continue began to repair your jailbroken iPhone.After a few minutes,it will tell you that your iPhone is restore to the normal mode.It only consume you less than 10 minutes to fix your iPhone operating system during the whole process.
Your jailbroken iPhone stuck on black screen or death?Don’t panic!This article gives you the best solutions to fix your iPhone operating system and allows it to return an normal mode.The iPhone Operating System Fix Software is applicable to every models of iPhone,including iPhone 7/iPhone 7 Plus,iPhone 6S/6S Plus,iPhone 6/6 Plus,iPhone 5S/5,iPhone 4S/4.
Free download the iOS System Recovery & Data Recovery:
[Summary]: When your ios devices stuck on Apple Logo screen,black screen or iTunes screen.Don’t worry! Today,we teach you how to fix ios system to normal for iPhone,iPad and iPod,and get your iPhone XS(Msx)/X/8/7/SE/6s/ 6s Plus, iPad Pro/ mini 4/ Air 2, etc. out of Apple logo screen easily.
Well, let you turn off your iPhone one night, and then you wake up the next morning, your iPhone is on, but stay on the Apple logo.Or your iPhone suddenly stuck on Apple Logo under your unexpected situations.I have the same exact problem.Do not worry,today I will tell you some steps that will help you solve the problem of fixing an iPhone stuck on Apple logo, you’ll get your beloved iPhone back and it running as usual.
Why your iPhone get stuck on the Apple logo, let us try to understand the possible reasons behind it. We will also fix this problems about iPhone stuck on Apple Logo later. First, here is a quick look at the reasons.
Check Out Reasons of iPhone Stuck on Apple Logo
Reason 1.Many users have found their iPhone getting stuck on Apple logo and not responding right after an iOS update.
Reason 2.Jailbroken iPhone are also meet this issue and end up getting frozen on Apple logo more often than the devices in factory condition since jailbreaking is more likely to mess something up in your iPhone.
Easy Step to Fix iPhone Stuck on Apple Logo
To fix iPhone stuck on Apple logo issue,the easiest way is to use iOS System Recovery Tool. This wonderful tool is free for you to put iPhone into recovery mode and then out of recovery mode, so that your device can get rid of the situation such as white Apple logo screen of death and reboot to normal.It will never cause data loss or damage on your precious iPhone.You will be able to fix iPhone stuck on the Apple logo issue just within 2 clicks with iOS System Fix Tool.
Free download the iPhone System Repair Tool and have a try!
Easy Steps to Fix An iPhone Stuck on Apple Logo
Step 1.Select the Proper Functioning of the System to Repair iPhone
Click on the last tap on iPhone System Repair Tool version of the main window “fix iOS system to normal.” Then make your iPhone which is stuck on Apple Logo screen to your computer with an USB cable.When the magic tool discover your iPhone,just need to click” Start”, and going on the fixing process.
Step 2.Download and Select the Right Version Firmware for your iPhone
To repair the abnormal operating systems, you need to download a firmware for your iPhone. iPhone System Repair software will recognize your iPhone and provides the latest iOS version for you to download.You just need to tap “download” and then wait a few seconds.Very soon the software will automatically accomplish it.
Begin to download the firmware package
Step 3.Fix your iPhone Stuck on Apple Logo
When the download is end, the program will continue to begin fixing your iPhone.After a few minutes, it will tell you that your device is rebooting to the normal mode as you hope.The whole process of fixing the operating system of iPhone only takes you less than 10 minutes without complex steps.
Free download the iPhone System Repair Tool to fix your iPhone system to normal:
You can do whatever you like with your iPhone now, like backup data, restore files from backup, transfer privacy document,etc. Don’t forget to share this smart iPhone System Repair Tool with your dear friends to help them fix problems like iPhone stuck on white Apple logo screen of death.The terrific iOS Operating System Fix Tool supports to repair iPhone to normal,as well as iPad and iPod.
Summary: This article teach you two ways to gets your iPhone SE, iPhone 6s/ 6s(Plus), iPad Pro/ mini 4/ Air 2, etc. out of recovery mode easily,the first way is fixing iPhone stuck in recovery mode status by third-party iOS System Repair tool,the seconed ways is getting out iPhone, iPad out of recovery mode with iTunes.
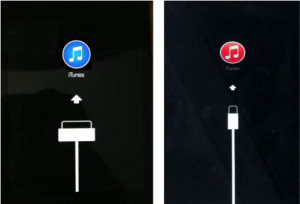
When will your iPhone stuck in recovery mode?iPhone will automatically go into recovery mode after an update or restore issue.For example,when your iPhone fail with the update job it should exit recovery mode, and either repeat the booting process in a continuous loop or get stuck on the screen that displays the iTunes logo.Now if you get this trouble issue and you must annoy to find a way to fix iPhone stuck in recovery mode.
Restore iPhone in Recovery Mode with or without iTunes
Here are the solutions that we will lead you below.You can use iTunes to get iPhone out of recovery mode, although your phone may be destroyed in the process such as a part data loss, forcing you to reload from backup. On the other hand ,you can also use third-party applications, such as the iPhone System Repair & Data Recovery Software,to exit the recovery mode for your iPhone.
iPhone Stuck in Recovery Mode – 2 Solution to Fix it
Solution 1: Fix an iPhone Stuck In Recovery Mode with iPhone System Repair Software
The iPhone System Repair & Data Recovery Tool can help you easily and completely fix iPhone to normal and get out of recovery mode.Moreover,it is a powerful iPhone Data Recovery software allows you to backup and restore all personal data from iPhone, iPad directly, such as contacts, text messages, photos, videos, call history, notes, WhatsApp history and more in iPhone recovery mode.The powerful tool helps to get iPhone out of recovery mode without any damage or data loss when your device stuck in recovery mode due to iOS upgrade,jailbreak or other reasons.
Free Download the iPhone System Repair Software and have a try!
Easy Steps to Get iPhone 6S/6/5S/5 out of Recovery Mode
Step 1.Connect iPhone to Computer and Click the “Fix iOS System” Tap on “More Tool”.
Choose the fixing mode and then connect iPhone to your computer using an USB.After the magic tool detect your iPhone and you need to click “Start”to enter the next step.
Step 2.Download and Select the Firmware which is Applicable to Your iPhone
To repair the abnormal operating systems, you need to download the firmware for your iPhone. The iPhone System Repair Tool will recognize your iPhone, it provides the latest iOS version for you to download. You only need to click “download” and then wait a little while.The software will automatically complete it for you.
Select the model of your iPhone
Begin to download firmware for your iPhone
Step 3.Fix iPhone to Normal as You want and get it out of recovery mode
When the download is finish,the program will continue to start fixing your iPhone, iPhone System Repair & Data Recovery Software allows you to exit recovery mode on your iPhone. After a few minutes,it will tell you that your device is rebooting to the normal mode.It only consume you less than 10 minutes to fix your iPhone operating system during the total process.
By the way, if you lost data before stuck in recovery mode,you can also use iPhone System Repair & Data Recovery Software to recover all the deleted or lost data from iPhone simply.
Solution 2: Get iPhone out of recovery mode by restoring it to factory settings with iTunes
This solution teach you how to use iTunes to get iPhone out of recovery mode by by restore iPhone to factory settings,but it may cause erase all iPhone data.However,before restoring iPhone to factory settings,we recommend you backup iPhone data to computer,and restore them back to iPhone after the processing done.Let’s teach you how to use your iTunes to restore your iPhone into factory settings.
Step 1.Connect iPhone to Computer and Run iTunes on Computer
Firstly,please use an USB to make connecting with the iPhone and computer.
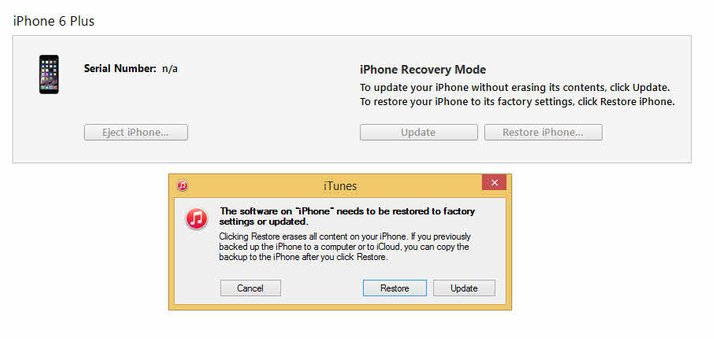
Open iTunes and confirm that your phone is properly connected and is in recovery mode. You should see a message now telling you that your phone is in recovery mode, it must be restored.
Step 2.Select iPhone Model to Repair
In the iTunes Summary tab, select the phone to restore the device bar, click on your iPhone, then go to the Summary tab. Then select recovery options.
Step 3.Backup iPhone Data before Get out the Recovery Mode of iPhone
Back up your iPhone settings by following the prompts in iTunes and selecting Backup.
Step 4.Restore the Resetting Factory of iPhone
Restore your iPhone when prompted by iTunes to select the recovery to restore your iPhone to the previous setting.
Note:Please not to interrupt the connecting with iPhone and computer.Keeping iPhone connected to computer until the restore setting factory process is completed.When it’s done, your phone will restart and Apple logo will appear.
Step 5.Restore the Backup Files to iPhone and Ending the Recovery Mode of iPhone
Select the backup document you need to restore to your iPhone and select the most recent backup date from the drop-down menu when iTunes prompts you to set up your iPhone. Click “ Continue “to complete the restoring process.Now your iPhone have been successfully get out of stuck to the recovery mode and have no any data loss.
Tips:To be honest,I suggest you not try this way because all your data will be erase.You can try the first method we talk about above.It will keep your data completely after get iPhone out of recovery mode with iPhone System Repair & Data Recovery.
Know More About Getting Out of Recovery Mode for iPhone When need to exit Recovery Mode:
-Restart iPhone to exit Recovery Mode when iPhone stuck into Recovery Mode (red iTunes logo/USB cable), DFU Mode (black screen).
-Fail update to iOS and stuck at the red iTunes logo.
-iTunes doesn’t recognize your device or says it’s in recovery mode.
-After iPhone, iPad and iPod jailbreak.
-Update to a new firmware, or update to an older firmware.
[Summary]: Lost data on your Samsung phone? Don’t worry, this Samsung data recovery solution helps you recover deleted photos, pictures, gallery, videos, music files, contacts, messages and WhatsApp data from any Samsung phone.
A Powerful Samsung Data Recovery
Photos and videos disappearing from Gallery on Samsung Galaxy phone? Accidentally deleted photos on Samsung phone? Lost contacts,SMS, App pictures or other files on your Samsung phone by carelessly? Don’t worry, the Samsung data recovery can help you recover deleted files from Samsung Galaxy S20/S10, Galaxy S9/S8/S7/S6/Note 8/Note 9/Note 10 internal storage and SD card inside easily and safely, all recoverable contents including photos, pictures, gallerys, videos, contacts, text messages, whatsapp and documents, it also enable you recover data from broken/damaged Galaxy S6/S5/S4 and Note 5/4/3/2,etc.
Recover Lost Photos on Samsung Galaxy S7
“Can someone help me? Yesterday,my brother deleted some important pictures on my new Samsung Galaxy S7, now I want to restore the deleted photos from my phone, is it possible to retrieve deleted photos on Samsung Galaxy S7? My Samsung S7 is not rooted before.” — Gusan
Recover Deleted Contacts and SMS on Samsung Galaxy S8
“I use Samsung Galaxy S8, my girlfriend deleted some important contacts and text messages that I do not want to delete, because those phone numbers including some of other girl friends I contact occasionally, I wonder it is possible to retrieve deleted contacts and text messages from Galaxy S8 directly? Thanks. ” — Kindy
Recover Lost Photos, Contacts,SMS from Galaxy S6 with Broken Screen
“I have a Samsung Galaxy S6 with a broken, black, screen. It is password protected. I can plug it in to my TV with a HDMI cable and get the screen to come up. However, when I touch the screen, on the phone, it does not seem to work. I know my password.Any broken Samsung data recovery software helps me retrieve photos, contacts and messages from Galaxy S6 with broken screen? My Samsung S6 model is SM-G9200. Thanks!” — Tramyli
Some people may ask how to recover deleted photos from samsung galaxy S7 without computer? How to undelete photos on Galaxy S7? In fact, we can not recover the picture in the phone itself, because those deleted files has been rewritten,and the data will be covered by new data, unless you have you backed up data to Samsung Cloud, Google Cloud,or bacup your Samsung with Samsung Kies.If you never backup your data,you need to connect your Samsung devices to computer and use a professional Samsung data recovery to scan and recover deleted files from Samsung device directly.
Samsung Data Recovery – Android Data Recovery,which is a professional data recovery program to recover deleted files from Samsung Galaxy, it allows users to recover deleted photos, videos, sms, contacts, WhatsApp messages, call history, notes, documents from the internal storage of the device and retrieve formatted/deleted/lost files from the Samsung SD card directly. Let’s show you the guide to recover deleted data from Galaxy S7 as example.
Below are the recoverable data types with the corresponding formats that the Android Samsung Data Recovery and Broken Android Data Extraction supports:
Download this Android Data Recovery software first and install it on your computer.
Good New: Now, the Android Toolkit supports to recover data from broken Samsung Galaxy, currently this “Broken Android Data Recovery” function only works for some of Samsung devices,such as Galaxy S6/S5/S4, Galaxy Note 5/Note 4/Note 3 with broken screen or black screen.In additional,the general Android data recovery supports almost all Samsung devices,such as Galaxy S9/S8/S7, Galaxy Note 8, Galaxy A9/A8/A7/A6/A5, Galaxy J1/J2/J3/J5/J7/J8, Galaxy C8/C7/C5 and Galaxy Tab series.
For iPhone XS/XR/X/8/7/6S/6/SE, iPhone Data Recovery is a powerful data recovery for iPhone users recover deleted files from iPhone.
How to Recover Deleted Files from Samsung Galaxy Phone
Just few simple steps to get deleted files back from Samsung Galaxy S7, you can also follow the same steps to get back your lost photos, videos, music, contacts, text messages from your Samsung Galaxy S10/S9/S8/S7/S6/S5/S4, Galaxy Note 9/8/5/4, Galaxy A9/A8/A7/A5, now, follow the steps below to perform the galaxy data recovery process.
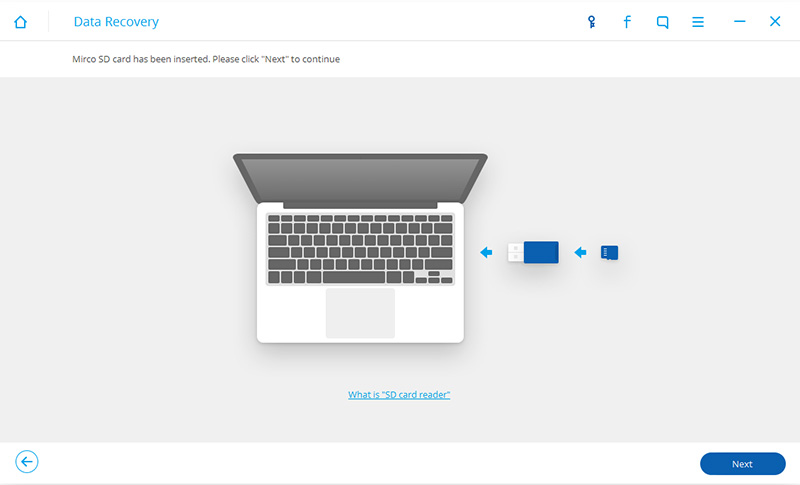
To get back missing photos from your Samsung phone internal memory.First of all,please free download the Android Data Recovery and connect your phone to scanned by the program.
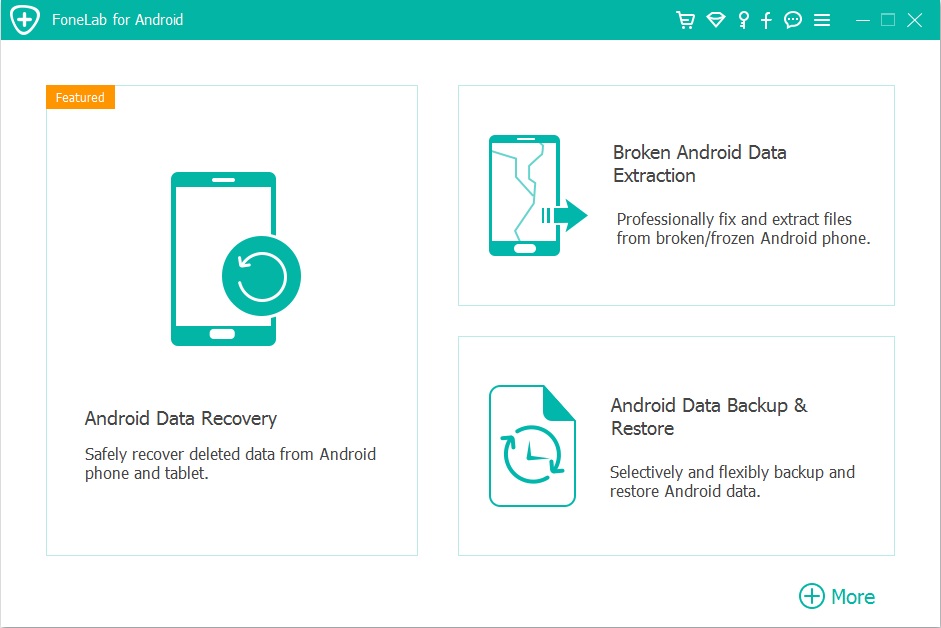
First of all,please download and run the Android Toolkit on your Windows or Mac computer,and click “Android Data Recovery” function to get Samsung deleted files back.
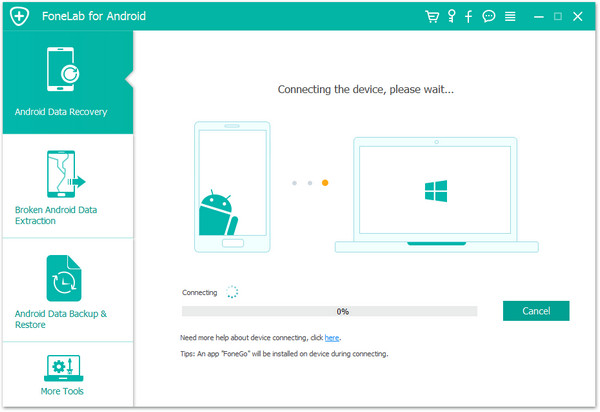
Step 1.Connect Samsung Galaxy S7 to Computer with a USB Cable
Then connect your Samsung Galaxy S7 to computer by a Samsung USB cable,the program will detect your Samsung phone connected successfully.
Note:Before using Android Data Recovery to recover lost files from your phone, make sure that your phone can be switched on and detected by your computer, and the battery is not less than 20%.
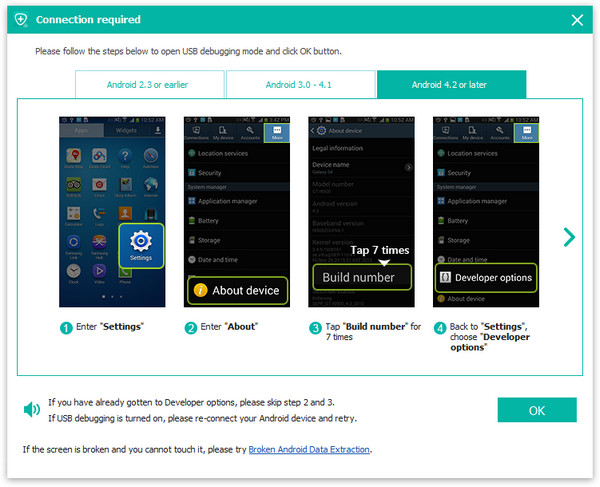
Step 2.Enable USB Debugging on Samsung phone
The steps will be very easy. To enable USB debugging, let the program to enable USB debugging the device.If you don’t know how to enable USB debugging on Android device, please learn more this: How to Enable USB Debugging on Samsung Device.
Turn on USB Debugging on Samusng devices,you can find the suitable ones according to your Android OS.
1) For Android 4.2 or newer: Enter “Settings” > Click “About Phone” > Tap “Build number” for several times until getting a note “You are under developer mode” > Back to “Settings” > Click “Developer options” > Check “USB debugging”
2) For Android 3.0 to 4.1: Enter “Settings” > Click “Developer options” > Check “USB debugging”
3) For Android 2.3 or earlier: Enter “Settings” > Click “Applications” > Click “Development” > Check “USB debugging”
4)For Android 5.0 or newer: Tap “Settings” > “About Phone” to tap “Build number” seven times for “You are now a developer!” signal. Then, move to “Settings” > “Developer options” to turn on “USB debugging” (For Samsung Galaxy S7 users enable USB debugging guide)
For Samsung Galaxy S7/S6 and other Android devices base on Android 4.2.2 or above, your phone will appear a message, please just tap on “OK” to allow USB debugging.
Step 3.Select the Photo File to Scan and Recover from the Samsung Device
Here,the program listing all kinds of files for you to get back,including contacts, message, Gallery, videos, whatsapp messages,ect.Let’s take recover Samsung photos for example, just select “Gallery” item only.
Step 4. Select the Scan Mode and Scan your S7 for Deleted Photos on it
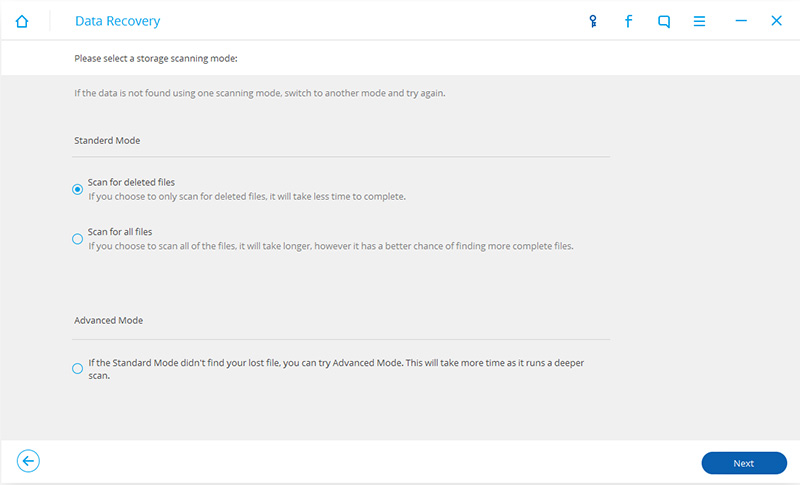
Now, select the scan mode “Standard Mode” or the “Advanced Mode”,and click “Start” to begin analyzing and scanning your Samsung Galaxy S7.And then you should tap “Allow>>Grant>>Authorize“on your Samsung phone to get privilege.
Tips: We recommend you to try the “Standard Mode” first, which works faster. If it doesn’t work, you can try the “Advanced Mode” later.
Step 5. Begin to Scan Samsung Galaxy S7 for Deleted Data
After that, Android Data Recovery will begin to scan all deleted files from your Samsung phone.
Step 6. Preview and Recover Deleted Photos from Samsung Galaxy Phone
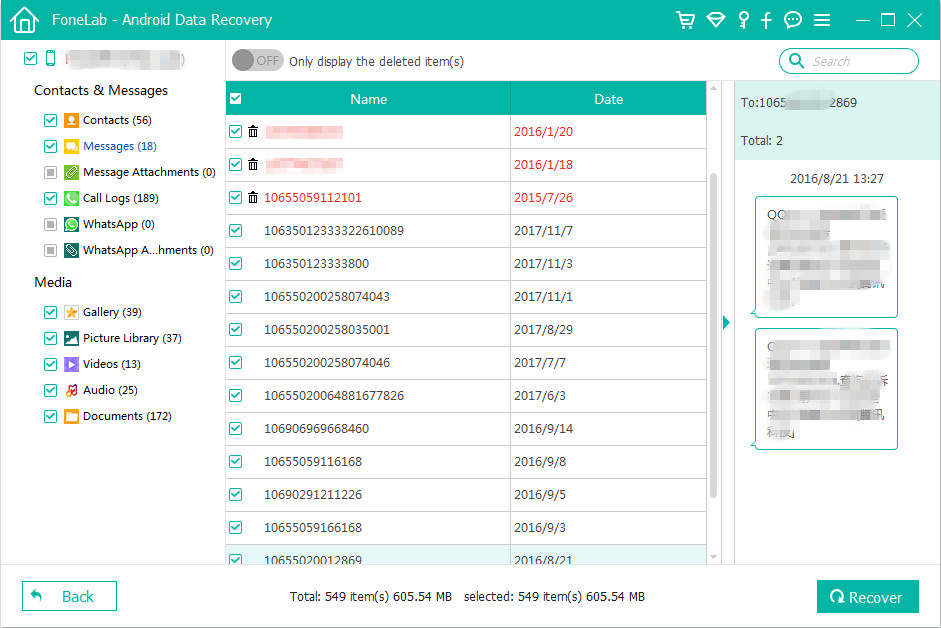
As the scanning result shows to you as below,all the found messages, contacts, photos, videos, audios, documents and WhatsApp chat history on the Galaxy S7 will be displayed, including the ones have never been deleted;the deleted messages, contacts and WhatsApp messages will be shown as red.
Retrieve Deleted Photos,Videos from Samsung Galaxy Phone
To recover deleted photos, videos from your Galaxy S7 directly,please click the “Gallery” and “Videos” item,and the deleted photos, videos will be displayed on the right. Preview and mark those you want to recover, and click the “Recover” button to retrieve deleted photos and other files from Samsung Galaxy S7/S7 edge.
Recover Deleted Messages from Samsung Galaxy
Once the scanning process is finished, a list of recoverable files that have been found from your Samsung S7 will be displayed in the left pane.To recover deleted SMS from the device,please click “Messages” item and check them one by one,before get your deleted messages back,you can preview them and then select those text messages you want to recover and save them to your computer by click “Recover“.
Note: The deleted files can be restored and saved in your computer from Samsung devices.
A Powerful Android Data Recovery Capabilities
Feature 1. Not only recover media files,but also allows you retrieve deleted contacts with full information such as contacts name, phone number, email, job title, address, companies and more which you fill on your Android phone.Extract and save the missing contacts as VCF, CSV or HTML to your computer for your use.After the recovery is completed,you can transfer the retrieved contacts from computer to your phone.
Feature 2. Directly regain deleted photos, videos, contacts, text messages, messages Attachments, call history, audios, WhatsApp messages, documents from Android or SD card inside your Android phone due to mistaken deletion, factory reset, system crash, forgotten password, flashing ROM, rooting, ect.
Feature 3. Not only support extract files from dead/broken samsung phone internal storage, but also enable you fix samsung phone system problem such as frozen, crashed, black-screen, virus-attack, screen-locked and restore it’s system back to normal.
Feature 4.Fix and back up broken frozen crashed Samsung phone.
Feature 5. Preview & selectively get back lost messages, contacts and photos before recovery.
Feature 6.Android Data Backup & Restore enables you to safely and selectively back up your Android data and restore Android data.
Feature 7. Support almost all Samsung phones and tablets like Samsung Galaxy S, Samsung Galaxy Note, Samsung Galaxy A, Samsung Galaxy J, Samsung Galaxy C, Samsung Galaxy Grand and so forth.
Feature 8. Support the latest Android 9.0, Android 8.0, and works well with almost all Android devices, such as as HTC, LG, Huawei, Sony, Windows phone, Google Pixel/2, Nexus, Sharp, Nokia 7/6/5 Android phone, etc.
Download the free trial version of this Android program to recover deleted files from Samsung Galaxy phone.
Well done! Just few click to scan and recover deleted photos, videos, contacts, text messages, whatsapp messages, call logs and other android documents from Samsung Galaxy S7/S7 Edge, Galaxy S6/S5/S8/S9/S10. In order to protect your Samsung data never lost again, we recommend you backup and restore Samsung Galaxy S7 regularly.
Part 2: How to Retrieve Files from Broken Samsung Phone
Broken Android Phone Data Extraction is one of key feature in Android Data Recovery,which can help you recover photos, SMS, contacts and more from all kinds of damaged Samsung Galaxy S/Note phone,including broken/dead/locked/crashed,/frozen Samsung phone or Samsung with cracked/broken-screen, black-screen, blank-screen, etc.
Step 1.Connect Broken Samsung phone to PC
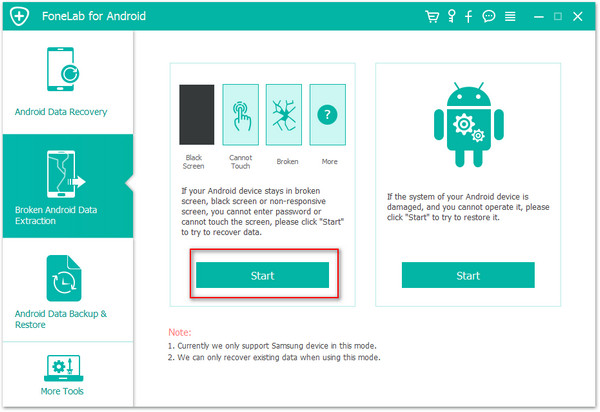
Run the program and click on the “Broken Android Data Extraction”.If you want to extract files from broken phone,please click “Start” button on the left option.
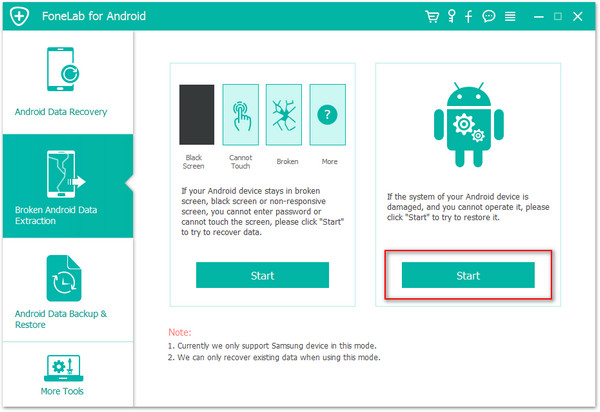
Tips:If your phone gets bricked,such as it stuck in the startup screen/Samsung logo screen/blank screen/download mode/FoneGo interface/black screen or others. Please click “Start” button on the right option,then click “Next” to start fix bricked Samsung phone to normal.
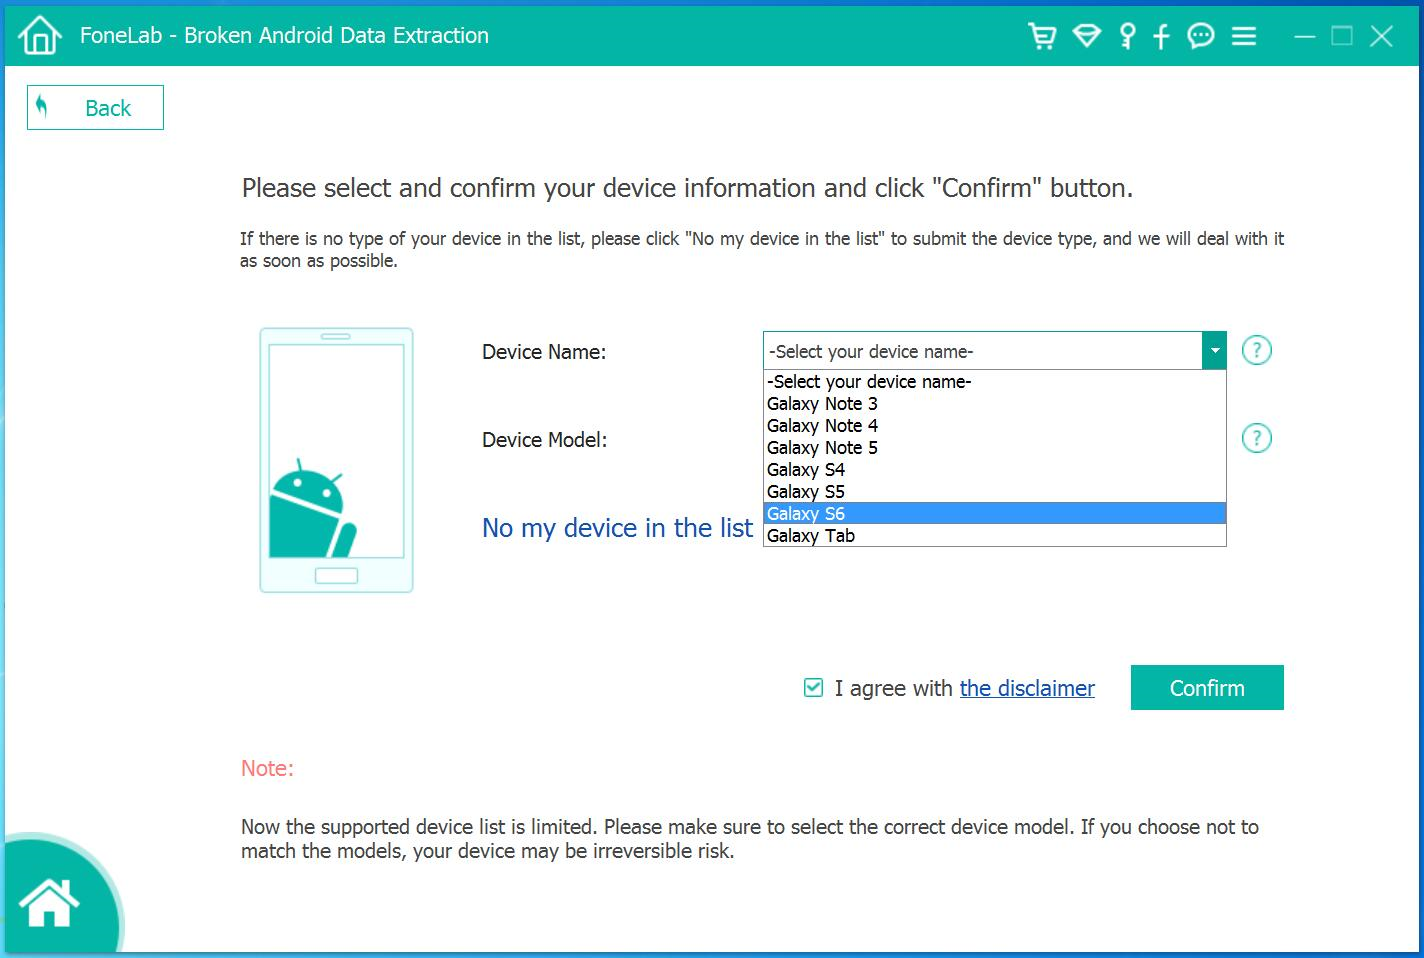
Step 2.Choose A Phone model
Please click on the “Start” button to start the broken phone data recovery process,please select the model and other information.
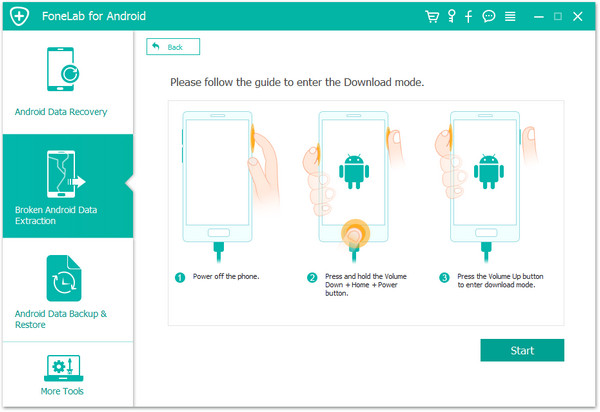
Step 3.Get Samsung Phone into Download Mode
Once you’ve confirmed your device model, you need to put your phone into Download mode for further steps.
1)Power off the phone.
2)Press and hold Volume “-“, “Home” and “Power” button on the phone.
3)Press “Volume +” button to enter download mode.
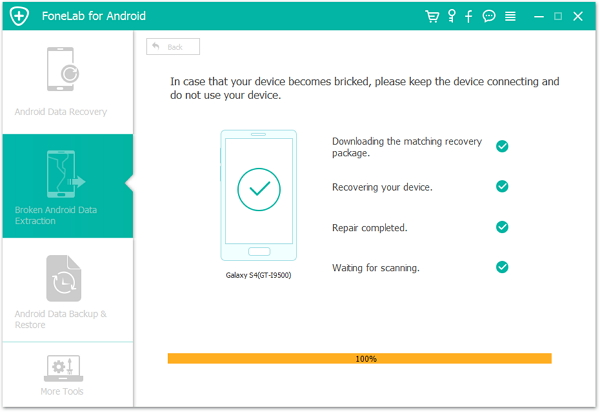
Step 4.Download Recovery Package and Fix it
After the broken Samsung phone got into Download mode, the program will start to analyze the phone and download the recovery package to fix it.
Step 5.Analyze, Scan and Preview Files Stored in Samsung Device
After fixing successfully, it will take a deep scan of all files stored in the device including photos, videos, contacts, messages, call history, WhatsApp chat history, and documents and so on.
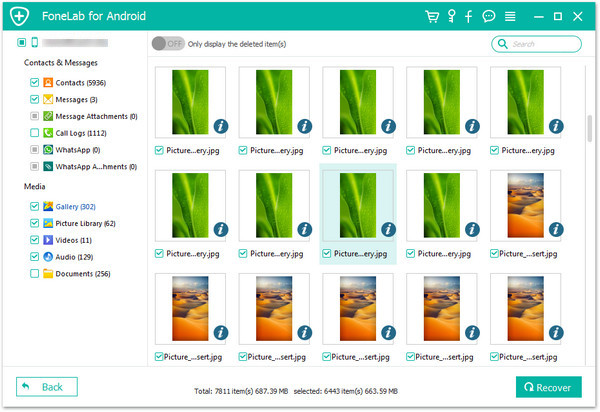
Step 6.Retrieve Photos and other Files from Samsung with Broken Screen
After choose and previewing the files you’d like to recover, for example to recover photos from broken Samsung Galaxy phone,please click “Gallery” and “Picture Library” item to view the detail,Finally,just click “Recover” button to save them on your computer.
Free download the Android Data Recovery and try to retireve files back easily.
If you have any question for using this program to get deleted files back from Samsung devices,please leave comments or contact us in Facebook: Android iPhone Recovery in Facebook.
Part 3:How to Recover Deleted Photos from Samsung Phone’s Memory Card
To effectively recover memory card data directly from your Samsung phone or tablet you will need a tool that is specifically designed for the job.That tool is Android Toolkit – SD Card Data Recovery.The extra feature that make Android Data Recovery become the multifunctional tool for the job include:Android SD Card Data Recovery/Android Memory Card Data Recovery.With it,you are able to recover media files from Samsung Memory card as well as Samsung SD card easily.
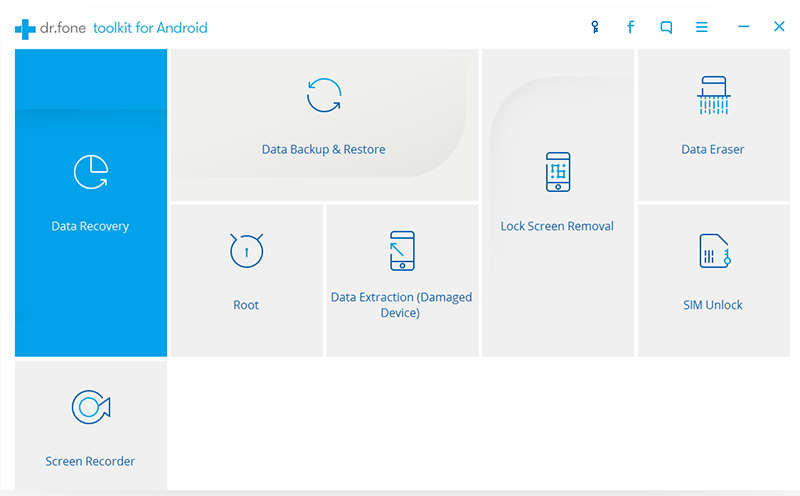
First of all,please free download the Android toolkit and run it on computer,the program offers 8 key features for your different demands:Android Data Recovery, Data Backup & Restore, Android Root, Broken Android Data Extraction(Damaged Device),Android Lock Screen Removal, Data Eraser and Android SIM Unlock.To get missing files on Samsung phone directly,please select “Data Recovery” and you can find the “Android SD Card Recovery” feature in this interface.
Tips:If you want to extract photos and other files from broken Samsung Galaxy S5/S4/Note 4/Note 3,etc,please choose “Data Extraction(Damaged Device)” feature.
Step 1.Run Android SD Data Recovery
Firstly,click “Android SD Card Data Recovery” option in the homepage of program.
Step 2.Plug SD Card Reader on the Computer
Insert your Samsung Memory Card into a card reader and connect the reader to computer.
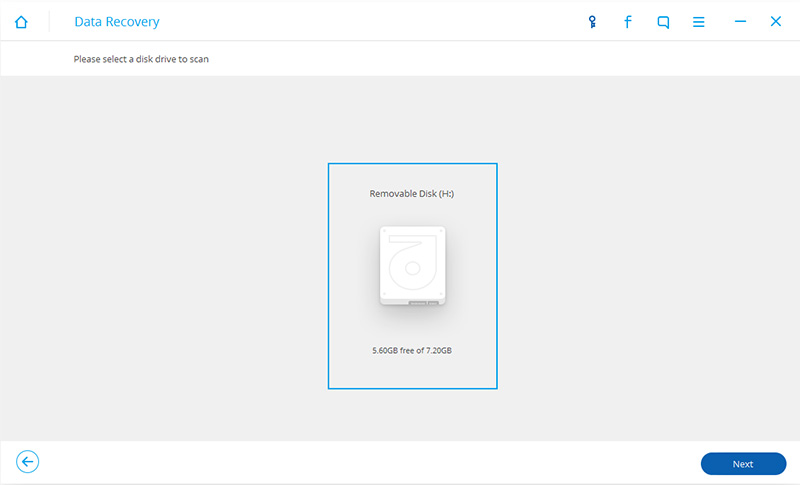
When your Samsung Memory Card is detected,it will show on the interface with the size and name.Select it and press “Next” button.
Step 3.Scan Samsung Memory Card for Media Data
The program will start scanning your Samsung Memory Card for the all media files.
Note:You can only restore photos, videos, audios and documents from Samsung Memory Card.If you want to recover other data, you should scan for Samsung phone.
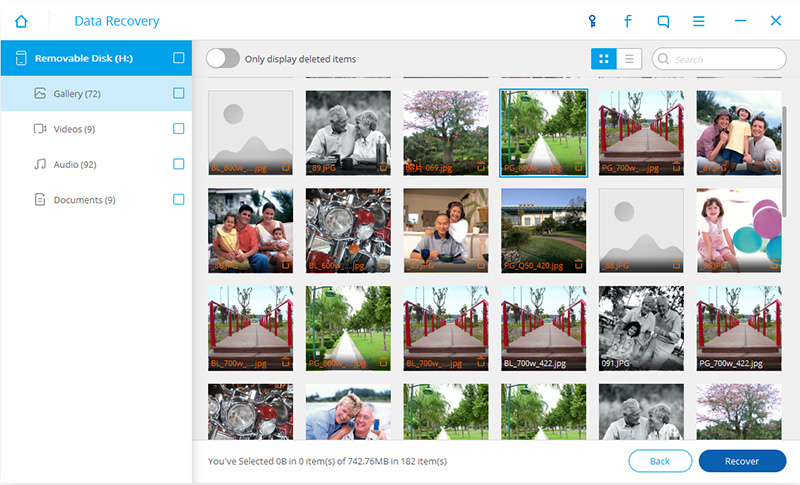
Step 4.Preview and Recover Photos from Samsung Memory Card
After scanning,the results will be listed in categories on the left.You can go to “Gallery“, “Audios”, “Videos” and “Document” files to preview the files.If only for pictures recovery,just selectively check the “Gallery” file you want to get back and click on “Recover” button.Choose a folder on your computer on save the recovered pictures and it finish the recovery successfully.
Download the Android Toolkit and try to get your Android data back.
Part 4:How to Automatic Restore Data on Samsung Galaxy Phone
Note When attempting to determine whether a third party app is the cause of an OS or app issue, ensure Automatic restore is disabled prior to a performing a hard reset.
Step 1.From a “Home” screen, tap Apps (located in the lower-right).
Step 2.Tap Settings.
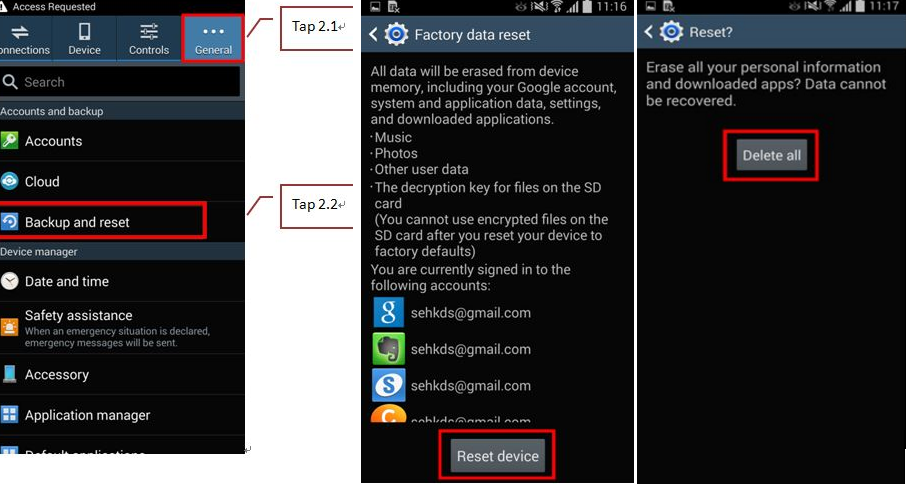
Step 3.Tap Backup and reset.
Step 4.Tap Back up my data.
Step 5.Tap the Back up my data switch to enable Switch On then tap the Back arrow (located in the upper-left).
Step 6.Tap the Automatic Restore switch to enable Switch On or disable Switch Off .
Tips to Increase the Success Rate of Recovering Files on Your Samsung Phone
The Samsung Galaxy S7 Files Recovery – Android Data Recovery, performs very well to recover deleted Contacts,SMS,Photos,Videos, Call Logs, WhatsApp Messages and other documents on Android devices. However, not all deleted files can be restored from your Samsung Galaxy device if you don’t deal with the recovery properly. Before getting down to the recovery process, you must do the prep work first:
1). Stop using your Samsung phone the moment you find you have deleted some important files accidently or the data loss without any reason. You know, the deleted or lost files are not gone right away from your Android device, but waiting to be overwritten by new data. Because of this, if you continue to use your phone to take photos or transfer data, then the deleted or missing data will disappear forever.
2). Connect your Samsung phone to computer and use a professional Android Data Recovery to scan the device for lost/deleted files. The sooner, the better. Download and install a professional Android Data Recovery on the computer and follow the instructions above to scan,extract and retrieve Samsung data directly.What’s more,you can use the key features “Broken Android Data Recovery” to recover already exists data from broken/dead Samsung phones or tablets.
3). If you saved photos,videos and other documents on the Android SD card,the program allows you recover files from Android SD Card easily.
Part 5: Backup Samsung Data to Computer Regulary
To prevent data loss, accidental deletion or the phone stolen/damage, we recommend that users should regularly back up data to the computer.The free Samsung Kies can help users backup contact, calendar, photos, videos and application to computer,but to back up messages, chat App messages to computer,we need to use third-party Android backup tool.
Here,we recommend you use an easy-to-used Samsung Desktop Manager tool,which not only supported transfer photos, videos, contacts, SMS and more between Samsung and PC/Mac,but also allows users transfer data between two phones(both Android and iPhone supported).What’s more,it allows new Samsung S7/S6 users sync music from iTunes to Galaxy S9/S8/S8 Plus/S7/S7 Edge/S6/S6 Edge directly.
Learn the guides: how to manage Samsung Galaxy on PC
Free download the Phone Toolkit – iOS & Android Manager for Windows or Mac:
Summary: Have bought a new iPhone 6S or iPhone 6? You used HTC One M9/M8 and want to transfer everything from HTC to the new iPhone? This article teach you how to switch contacts,sms,photos,videos,call logs and more from HTC/Android phone to iPhone 6S,iPhone 6 directly.
A number of people want their data to be transferred from their old HTC smart phone to iPhone 6S. Transferring is not as you think as difficult. You just follow some simple guidelines and that’s so easy.
No matter what kinds of Android phone you have, once you want to transfer data from an old mobile phone to another,for example transfer data from HTC One M9/M8/M7 to iPhone 6S/6S Plus, the process couldn’t be a bit trickier. Since you wanna transfer data to iPhone 6S from other devices running with Android operating systems directly,such as HTC,you might be looking for a solution for copying data from HTC phone to iPhone 6S. Here you come to the right place.
Switch from HTC to iPhone 6/iPhone 6S
The Android to iPhone Transfer is designed for you to directly transfer data from HTC to iPhone 6S, including contacts,music, videos, pictures, messages, call history,apps,calendars.With its easy steps to use interface, the software is a wonderful transfer tool for anyone who has been puzzled with copying data from phone to phone.If you have got a new iPhone 7,you can use this Android-iPhone-Transfer to switch data from HTC to iPhone 7, iPhone 7 Plus directly without data loss.
The Easy Way to Transfer HTC File to iPhone 6/iPhone 6S
Step 1. Download and Run the Mobile Transfer on your computer
You need to download, install Mobile Transfer on your computer first, then you can click “Phone to Phone Transfer” button when you see the main interface as follow. Connect both of your phones to the computer with USB cables.
Tips: You should make sure your computer is installed iTunes, or this tool will remind you to install.
Step 2 .Scan and Copy Data from HTC to iPhone 6S( Plus)
The program will delete your devices automatically,you can see the main interface as follow. And you should make sure that they are put on the right places. If not, click the “Flip” button to change their place.
The results will be listed in categories on the left after scanning. You can go to “Photos”, “Contacts” and other data files to preview the data files having been found.Selectively check the files you want to transfer and click on “Start Copy” option.
When the transfer progress is over, click “OK” to end it.
Step 3.Back up and save the data on your iPhone 6S
Back up your iPhone data as often as possible that prevent the data from being deleted permanently.
Mobile Transfer allows to transfer data between different operating systems—Android, iOS iPhone, BlackBerry and Symbian OS.It can also restore your phone data from backup and backup your phone data to computer.Moreover,Mobile Transfer supports to erase your Old phone permanently before selling.
How to Transfer Data from Android Phone to iPhone 6S:
Want to transfer your important files from Android phone to iPhone 6S? Try the excellent way by using an excellent data transfer tool on your computer and transfer all you want.Mobile Transfer helps you move files between Android and iPhone 6s with easy steps.
How to Transfer Data from old iPhone to iPhone 6S: Got a new iPhone 6s plus and want to copy everything from old iPhone to new one? This article teach you how to sync contacts,sms,photos,videos and more between old iPhone to new iPhone without iTunes/iCloud.
How to Transfer Contacts from Samsung to Galaxy S6/S7: Wanna transfer contacts between Samsung Galaxy S7/ S6/ S6 edge and Galaxy S3/S4/S5/Note 4/3? Learn more in this article,we will teach you a easy use guide to copy phone numbers between old Samsung Galaxy and Galaxy S6/S6 Edge and Galaxy S7/S7 Edge.