All posts by DHZ

How to Recover Lost SMS from Google Pixel 3

Summary: Deleted messages from Google Pixel 3 by accidental mistake and want to find them back? A tutorial takes you 6 steps with a few mouse clicks to restore lost SMS from Google Pixel phone via Android Data Recovery.

If your SMS messages are missing or deleted by mistaken, you must want to know this question: Is it possible to recover lost SMS from the phone?This is a question you should concern about. At first, you should make sure that your Pixel phone device is turned on. Second, the lost or deleted messages should not be overwritten by new data. Then, you can use a useful Android data recovery software to recover lost messages from Google Pixel phone.

Through Android Data Recovery, you can easily restore the deleted Android data, including SMS, contacts, photos, video, audio, call logs, documents, WhatsApp messages, and apps data. This program is capable of recovering deleted data regardless of data loss causes, such as, accidental deletion, Android operation system update, Android root, factory reset and so on. Android Data Recovery enables you to restore lost text messages on Google pixels 3. More importantly, it allows you to preview data before recovery with an easy-to-use interface. 100% read-only program, safe and reliable. It is compatible with all Android operating system versions and supports all brands of Android devices, including Google, LG, Motorola, Lenovo, Samsung, Sony, etc,.

d_win d_mac

How to Recover Lost SMS from Google Pixel 3

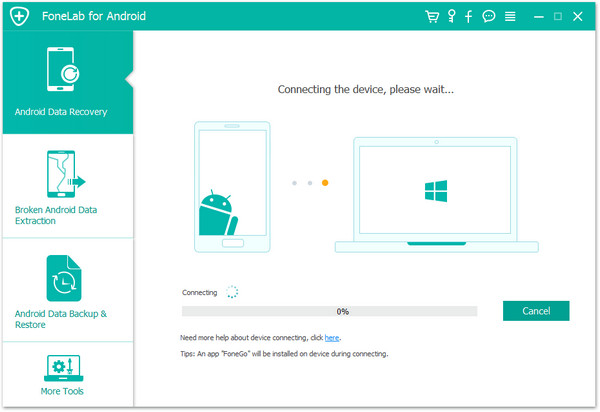
Step 1. Run Program and Connect Google Pixel 3
In the first step, run the Android Data Recovery on your computer and connect your Google Pixel 3 to the computer. It will automatically check your phone. Click the “Android Data Recovery” option in the home page program, which will guide you to the next step.

Android ToolKit home page

connect Google Pixel 3 phone

Step 2. Enable the Phone to USB Debugging
When the connection is successful, you should enable the USB debugging on phone. After you enable USB debugging for your Google Pixel phone, it will be detected quickly.

allow to detect Google Pixel 3

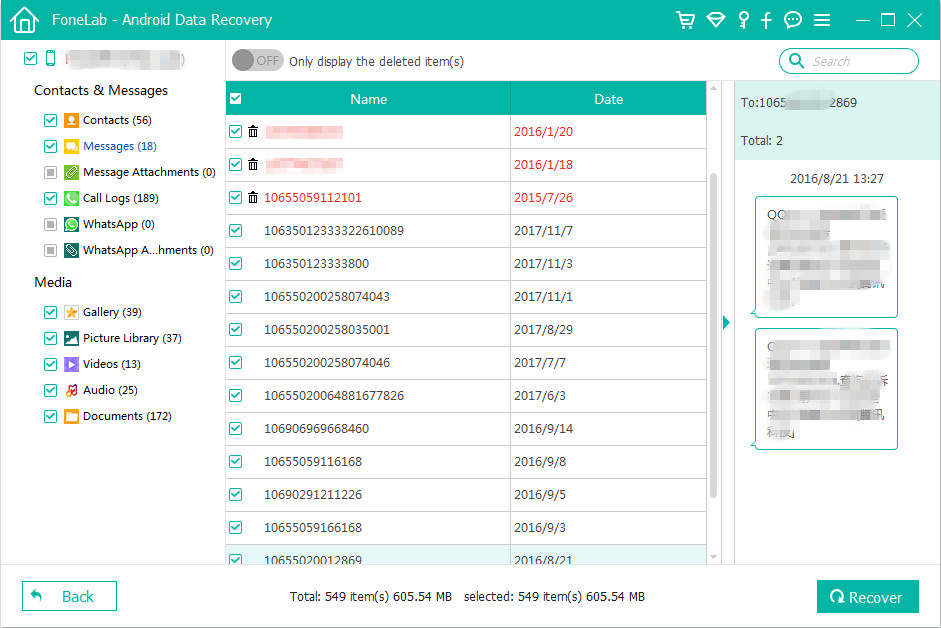
Step 3. Select SMS Files for Scanning
When the program detect your device on the computer, you will see this interface. Just check the type of files contain the data you need to restore for program scanning, or you can click “Select All” to scan all your Google Pixel data. Then click on “Next” to go to the next step. For SMS recovery, you should click “Messages & Messages Attachments“. Then click on “Next” to continue.

select SMS files to scan

Step 4. Allow Scanning and Analyzing Google Pixel Data
When the program detects your phone, it will pop up the dialog box on the phone. Click “Allow” to on the device to enable the program to scan your device for lost data.

allow to scan Google Pixel phone

Step 5. Scan Google Pixel for Lost Data
In this step the program will begin to scan data on your Google Pixel. The scan process will cost you some minutes.

scan Google Pixel data

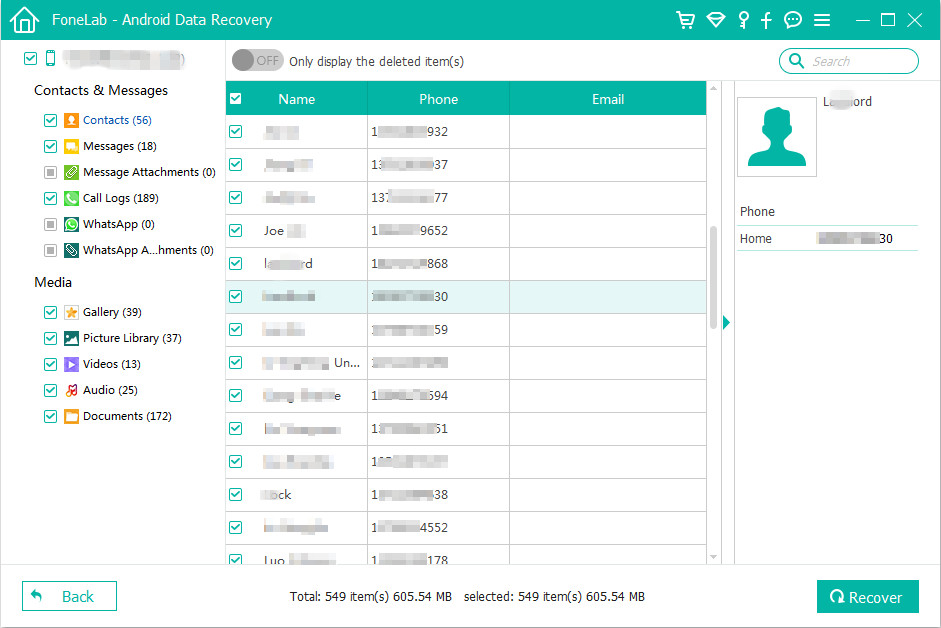
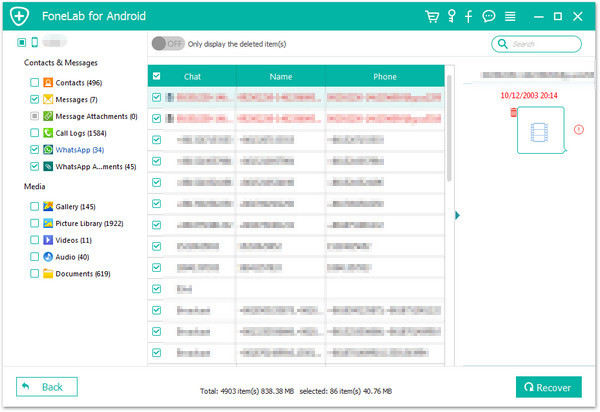
Step 6. Preview and Restore Lost SMS from Google Pixel
Android Data Recovery enables you to recover data from Google Pixel including text messages, contacts, photos, videos and more types of data. Here you can click “Messages & Messages Attachments” to preview them before recovery. Finally, select and mark the wanted data, then click “Recover” to save them to the computer.

recover lost SMS from Google Pixel 3

d_win d_mac

More Google Pixel Data Recovery Guides:

How to Recover Lost Data from Google Pixel 3

How to Recover Lost Contacts from Google Pixel 3

How to Recover Deleted Photos on Google Pixel 3

How to Transfer iPhone Data to Google Pixel

How to Transfer Samsung Data to Google Pixel

How to Transfer Android Data to Google Pixel

How to Backup and Restore Google Pixel

How to Manage Google Pixel on Computer

Recover Lost SMS from Google Pixel 3

Android Data Recovery

Recover Your Lost Data from Android
Now, Even Device Broken

Compatible with Android 8.0 Oreo/7.0, etc.

Recover Lost Data Now

How to Fix Various iOS Issues on iPhone/iPad

Summery: No matter your iPhone/iPad get into the normal state due to any causes, we will do a great help for you, to fix various iOS issues on iPhone/iPad via this excellent iOS Fix & Data Recovery.

Hi, please help. My iPhone stuck in the Recovery Mode and I try some ways but still can’t get it out of this mode. Any ideas for suggestion?

My iPad stuck at the black screen for unknown reasons. How to fix iOS system to normal on iPad without data loss? I haven’t backup all the data recently.

iOS system is the best mobile operating system in the world. For most people, they prefer using Apple iPhone than Android phone since iOS system is advanced and humanized. Nevertheless, sometimes iPhone, iPad may come across trouble, for example, get into the abnormal state. iOS device stuck in the Recovery Mode, stuck at black/white screen, stuck in Apple logo, are the most common iOS errors that happen on device. These issues will happen on iOS device after performing device to a new iOS version, doing the iOS jailbreak or other physical damaged. You should use the Recovery Mode to fix these iOS errors on device. However, for most system issues, you need to repair iOS system to restore the device completely.

Fix iOS System without Data Loss

iOS Fix & Data Recovery is the processional iOS system recovery tool that helps fix various iOS issues on iPhone/iPad within 10 minutes. It can fix all types of iOS errors, like stuck in the Recovery Mode, stuck at black/white screen, stuck in Apple logo, frozen screen, water damaged, etc,. More importantly, the entire fixing process will not lead to any data loss on device. It is safe, effective and efficient. iOS Fix & Data Recovery is capable of fixing iOS system to normal with three modes: Standard Mode; Exit Recovery Mode; Advanced Mode. Additionally, this all-in-one program enables you to recover iOS data for four modes, which are Smart Recovery; Recover from iOS Device; Recover from iTunes Backup; Recover from iCloud Backup.

The “Fix iOS System” solution can do a great help for someone whose device is stuck on various iOS issues. You will see the program offers three modes to fix various iOS issues. You can choose the “Standard Mode” to fix common iOS issues like device being stuck on white screen/black screen/Apple logo/DFU mode, restarting loops, bricked iOS devices, freezing screen, not turning on and more. It can be used to repair iOS device stuck on Recovery Mode with one click only. What’s more, you can use Advanced Mode if the Standard Mode cannot fix the iOS issues or you forget the password of your device.

d_win d_mac

Notice:

A.The iOS device will be updated to the latest iOS version after fixing via iOS Fix & Data Recovery;
B.Any Jailbroken device will be restored to the default mode after fixing via iOS Fix & Data Recovery;
C.It will be unlocked your phone without password after fixing via iOS Fix & Data Recovery.

Way 1. Fix iOS Issues without Data Loss using Standard Mode

Launch the iOS Fix & Data Recovery on the computer and click on “Fix iOS System” in the home page. Before choosing the mode, connect your device to the program via a USB cable. And then you will see the three modes under “iOS System Recovery” selection.

ios system recovery

Select the “Standard Mode” and the program will prompt you to enter DFU Mode/Recovery Mode to start the fixing process.

Step 1. Get iOS Device to DFU Mode/Recovery Mode
How to Get Device into DFU Mode:

Click “Start” button and the program will start to count down. Press and hold Sleep/Wake button and Home button simultaneously for 8-10 seconds. Then continue holding the Home button for about 5 seconds.

get iphone into the standard mode

If your device can’t enter into the DFU Mode, you can put it into the Recovery Mode to start the fixing.

How to Put Device to Recovery Mode:

Press and hold the Sleep/Wake and Home buttons at the same time. Don’t release the buttons when you see the Apple logo. Keep holding both buttons until you see the icon “Connect to iTunes” on your device.

put iphone into the recovery mode

Step 2. Download the Firmware for Fixing iOS Device
Once you have entered device into the DFU Mode or Recovery Mode successfully, you will need to download the new firmware for your device. The program will detect your device automatically and provides you with the latest iOS version suited for downloading it. You just need to click on “Download” to begin the downloading.

download firmware for iphone standard mode

Note: if the program can’t detect your device model, you can manually choose the model of your device to download the firmware.

Step 3. Fix System with Downloaded and Verified Firmware
After downloading the firmware, just click “Start to Fix” to verify the firmware and the program will start to fix your iOS automatically after that. Once the fixing process is finished, please check whether your device can start. If the device can’t start, please try again.

finished fixing system

If the fixing failed, you can retry the “Standard Mode” or use the “Advanced Mode” to fix the iOS issue.

d_win d_mac

Way 2. One Click to Exit Recovery Mode on iDevice

In the main window, connect your device to the computer, and then choose “Exit Recovery Mode” option.

Step 1. One Click to Start the Process
Simply clicking “Exit” button, the program will start getting out your iDevice of the Recovery Mode immediately.

exit recovery mode finished

Step 2. Wait until the Process Finishes
It will take seconds to exit the device of the Recovery Mode. After that, you device will start successfully.

exit recovery mode home page

Note: If your device can’t start after the fixing, please try again or use the “Standard mode” to exit the Recovery mode.

d_win d_mac

Way 3. Use Advanced Mode to Reinstall iOS System Completely

If the Standard Mode can’t fix the iOS issue on your device, you can try “Advanced Mode“. Just click “Advanced Mode” from the main window and the process is same with “Standard Mode“. Please pay attention that the “Advanced Mode” will reinstall iOS completely and erase all data from your device, please do this cautiously.

Step 1. Get iOS Device to DFU Mode/Recovery Mode
Please follow the instruction to get iOS device to DFU Mode or Recovery Mode.

get iphone to advanced mode

Step 2. Download the Firmware for Fixing Device
Once you have entered device into the Advanced Mode successfully, you will need to download the new firmware for your device. The program will detect your device automatically and provides you with the latest iOS version suited for downloading it. You just need to click on “Download” to begin the downloading.

download firmware advance mode

Step 3. Fix iOS System with Downloaded and Verified Firmware
Once the fixing process is finished, please check whether your device can start. If the device can’t start, it may be some hardware problems, you can try it again or send it to the local Apple repair store.

finished fixing system advanced mode

Tips:

For Mac users, please duplicate and install iOS Fix & Data Recovery in your Applications folder instead of double clicking the software after saving it on your Mac.

d_win d_mac

More iOS System Recovery Tutorials:

How to Repair iOS System Issues without Data Loss

How to Fix iTunes Connect Issue without Data Loss

How to Fix iPhone Stuck in Reboot Loop without Losing Data

How to Fix iPhone Stuck in Recovery Mode

Download and Install iOS 12 on iPhone without Data Loss

Restore Data from iPhone when Stuck in Recovery Mode

Fix Various iOS Issues on iPhone

iOS Data Recovery

Recover Your iPhone iPad Lost Data
Now, Even without Backups

Compatible with iOS 11 & iPhone X/8 (Plus)

Recover Lost Data Now

How to Recover Lost Contacts from Google Pixel 3

Summary: This guide will tell you what to do when lost contacts from Google Pixel 3 and how to recover them quickly. If you are a Google Pixel user you can focus on this post, and I hope it will do a great help for you.

In the past, Google relied on third party suppliers to help its smartphones become a reality. But after buying the HTC smartphone team last year, Google now has its own hardware department. Google pixel 3 will be launched by the end of 2018. This will be the first high-end mobile phone coming from this marriage. What will we see in the new Google pixel model? Smaller borders, customizable activity edges, improvements in camera applications, return of headphone jack, wireless charging, screen improvement, better waterproof, and features. At present, Google remains silent on its pixel 3 plan. Let’s look forward to it.

Nowadays, people like to keep their names and phone numbers on mobile devices for faster and more convenient contact with people. However, contacts stored on mobile devices can be deleted in different situations. Just like those phone numbers can be accidentally deleted in the wrong way, you can accidentally delete contacts on Google Pixel phone. if you are searching a solvable way to recover lost contacts from Google Pixel 3 phone, you could take this tutorial for reference.

Android Data Recovery is capable of recover lost Android data effectively. It has a feature that includes contacts, photos, videos, messages, call logs, files, applications data, and so on. It has the most advanced technology to restore the data on your Android device, regardless of any cause of data loss, such as accidental deletion, Android operating system update, Android root, factory reset recovery, and more. With this program, you can restore lost contact from Google pixel 3 easily. The software supports most brands of Android, such as Google Pixel, Samsung (Galaxy S8/S7/S6/S5, Note 5/4/3), LG, HTC, Motorola, Lenovo, ZTE, Xiaomi, HUAWEI and so forth.

d_win d_mac

How to Recover Lost Contacts from Google Pixel 3

Step 1.Connect Google Pixel 3 to Computer
Firstly please connect your Pixel phone to computer and run Android Data Recovery on computer.

Android ToolKit home page

connect Google Pixel 3 phone

Step 2. Enable USB Debugging on Pixel 3
After connecting your Pixel 3 to the computer, now your should enable USB debugging on Pixel. click “OK” on the phone and allow the program detect your device on the computer.

allow to detect Google Pixel 3

Step 3. Select the Scanned Contact File
When debugging is completes, you can select different types of files to scan here. If you want to restore all types of data, click “Select All” to scan all the phone data. In this case click “Contacts” and Click “Next“.

select contacts file to scan

Step 4. Allow Scanning and Analyzing Data on Pixel 3
When the program detects your Pixel 3, the phone will pop up the dialog box. On the device, click “Allow” to enable the program to scan your device for lost data.

allow to scan Google Pixel phone

Step 5. Scan Pixel 3 for Lost Contacts
In this step the program will begin to scan data on your Pixel 3. It will take you some time, please be patient.

scan Google Pixel data

Step 6. Recover Lost Contacts from Google Pixel 3
In the last step, select the data under “Contacts” file to restore them to the computer by clicking “Recover”.

recover lost contacts from Google Pixel 3

d_win d_mac

More Google Pixel Data Recovery Guides:

How to Recover Lost Data from Google Pixel 3

How to Recover Deleted Photos on Google Pixel 3

How to Transfer iPhone Data to Google Pixel

How to Transfer Samsung Data to Google Pixel

How to Transfer Android Data to Google Pixel

How to Backup and Restore Google Pixel

How to Manage Google Pixel on Computer

Recover Lost Contacts from Google Pixel 3

Android Data Recovery

Recover Your Lost Data from Android
Now, Even Device Broken

Compatible with Android 8.0 Oreo/7.0, etc.

Recover Lost Data Now

How to Recover Deleted Photos from Google Pixel 3

Summary:Want to restore the deleted photos of Google pixel 3? Coming here, this article will show you how to simply and quickly restore deleted photos from Google pixel 3.

Google will release the new model in the second half of this year, but there has been no previous exact date for the release of Pixel 3 and Pixel 3 XL. According to the data, the Pixel 3 series of mobile phones have a built-in 6GB RAM storage, and the two phones are designed with a rear camera, not a popular dual rear camera. Their screens are very different, Pixel 3 is said to use a 5.4 inch screen, and a 18:9 scale screen, and the XL version uses a 6.2 inch screen and uses a 19:9 screen. Let us wait for it to be announced later.

When you use this powerful Pixel phone to capture all the good times, record interesting moments anytime and anywhere, it may accidentally deleted a bunch of photos so that some storage space could be vacated. Whether the photos deleted on the device are accidental or for other reasons, for all Android users, missing photos can mean a lot, especially when you do not have a backup. Therefore, it is inevitable that when your photos are lost, you may be panic, but you have the opportunity to recover the deleted photos from the Pixel Android phone.

Android Data Recovery is the best Android data recovery program for Android users. With the most advanced technology to restore the data on your Android device, it can not only restore photos lost from Google Pixel 3(Google Pixel 2/1), but also restore contacts, messages, videos, call logs, calendars, and so on. Regardless of any reason for data loss, such as deletion, Android operating system update, Android root, factory reset and so on, it can do a great help for you to get back deleted data. It is compatible with all Android operating system versions and supports all models of Android devices, including Google, LG, Motorola, Lenovo, Samsung, Sony, etc,. Now, let us work step by step according to this detailed tutorial.

d_win d_mac

How to Recover Deleted Photos on Google Pixel 3

Step 1. Download the Program and Connect Google Pixel 3
In the first step, run Android Data Recovery on the computer, connect the Google Pixel 3 to the computer at the same time. The computer will automatically detect your mobile device soon. Click the “Android Data Recovery” option.

Android ToolKit home page

connect Google Pixel 3 phone

Step 2. Enable USB Debugging on Google Pixel 3
Follow the instructions to enable USB debug mode on your phone. At this time, it will pop up the a window on your phone screen and click on “OK” to enable USB debugging on it.

allow to detect Google Pixel 3

Step 3. Select the Data You Want to Scan
When it have completed enabling the USB debugging on the phone, you can choose different types of files to scan here. You can select the data you want to restore, and you can also choose to restore all types of data, and you can click “Select All” to scan all the phone data. Here we suggest that you click “Picture Library” & “Gallery”.

select files to scan

Step 4. Allows Data to be Scanned and Analyzed on Google Pixel 3
The phone screen will pop up a new dialog box, click “Allow” to allow the program scan your phone data.

allow to scan Google Pixel phone

The program will start scanning data from Google pixel 3. The scanning process will take you some time.

scan Google Pixel data

Step 5. Recover Deleted Photos from Google Pixel 3
When the scan is finished, you’ll see a list of recoverable files. Check “Picture Library” & “Gallery” files here, you can preview them one by one before restoring. Finally, select the data and click “Recover” to restore them to the computer.

recover deleted photos from Google Pixel 3

d_win d_mac

Related Google Pixel Data Recovery Guides:

How to Recover Lost Data from Google Pixel 3

How to Recover Deleted Photos on Google Pixel

How to Transfer iPhone Data to Google Pixel

How to Transfer Samsung Data to Google Pixel

How to Transfer Android Data to Google Pixel

How to Backup and Restore Google Pixel

How to Manage Google Pixel on Computer

Recover Deleted Photos from Google Pixel 3

Android Data Recovery

Recover Your Lost Data from Android
Now, Even Device Broken

Compatible with Android 8.0 Oreo/7.0, etc.

Recover Lost Data Now

Recover Lost Data from Samsung Galaxy S7 after Factory Reset

Summary: Restore your Samsung Galaxy S7 to factory settings and lost all your data? Android Data Recovery can help to recover the lost data from your Samsung Galaxy S7 with ease.

I had a problem when I accidentally clicked on the factory reset option, which caused me to lose all the data on my phone. I think I am not the only one who has encountered such a situation. Maybe many people have encountered the same problem as me. What should I do to restore the missing data? The deleted data is really important to me.

Factory reset is an operation that people usually do when the phone stops working or when it get into the abnormal state, such as smartphone freezing, which can be solved by performing factory reset. However, factory reset can lead to lost all data on the phone and return it to the default factory settings. If you don’t have a backup, it should be used carefully. Fortunately, we have this third party software called Android Data Recovery, Which is our good helper to solve this problem. What is Android Data Recovery? Here, let me give you a brief introduction.

Android Data Recovery, it is a powerful toolkit for Android users to recover lost data, including text information, photos, contacts, call history, video, WhatsApp messages, audio files, and more types of data on Android phones and tablets, which supports more than 6000 Android models. In addition to what I mentioned above, it can restore the data lost from the factory reset Android phone, for example, recover lost data from Samsung Galaxy S7 after factory reset. It supports the recovery of Android lost data in any data loss circumstances, such as accidental deletion, Android operating system updates, factory reset, Android root, lock screen, and Android operating system crash. So how to use this useful software. Please follow the instruction below.

d_win d_mac

Recover Lost Data from Samsung Galaxy S7 after Factory Reset

Step 1. Download and Run the Program
To begin with, download and run the Android Data Recovery on the computer and click on “Android Data Recovery” in the home page. Connect the Galaxy S7 to the computer using a USB cable.

Android ToolKit home page

connect Samsung phone

Step 2.Allow Program Connect Galaxy S7
Please click “OK” on the Galaxy S7 to allow the program detect your device on the computer. Then it will enable the USB debugging on the phone.

allow to detect Samsung phone

Step 3. Select the Files to Scan
When the connection is completed, the program will display all recoverable data types. Generally, you can choose some types of data instead of all files you need. Then click “Next” to let it scan the data from your Galaxy S7.

select files to scan

Step 4. Allow Scanned and Analyzed Data on Samsung
After the program detects the device, you will see this interface. Click “Allow” on the phone to enable the program to scan your device for lost data.

allow to scan Samsung phone

Step 5. Scanning Samsung for Lost Data
In this step the program will begin scanning the data on your Samsung Galaxy S7.

scan lost Samsung data

Step 6. Recover Lost Data from Galaxy S7
Once the scan is finished, you are allowed to preview all the data find from your phone, including photos, contacts, text messages, etc,. Recover the selected data to the computer by clicking “Recover”.

recover lost data from Galaxy s7

d_win d_mac

More Samsung Data Recovery Guides:

How to Recover Lost Data from Samsung Galaxy S7

How to Recover Lost Data from Samsung Galaxy S7 after Rooting

How to Recover Lost Photos from Samsung Galaxy S7

How to Recover Data from Broken Samsung Galaxy

How to Backup & Restore Samsung Galaxy

How to Manage Samsung Galaxy on the Computer

How to Stream Apple Music to Samsung Galaxy

Recover Data from Galaxy S7 Factory Reset

Android Data Recovery

Recover Your Lost Data from Android
Now, Even Device Broken

Compatible with Android 8.0 Oreo/7.0, etc.

Recover Lost Data Now

Recover Lost Data from Samsung Galaxy S6 after Factory Reset

Summary:Restoring data from a factory reset Samsung phone is no longer a difficult job. Please read this article to learn about the effective way to recover lost data from Samsung Galaxy S6 after factory setting.

Sometimes, we need to perform the factory reset to our Samsung mobile phone when the phone can not work and or work abnormally. Whatever the reason, the data on your Samsung phone may be lost after the factory reset. If you forget to back up your important data, including contacts, text messages, photos or more files from your Samsung device, you may lose them forever. Well, don’t worry! We have found a solution to help you recover the lost data from Samsung Galaxy S6 after factory reset.

The Best Solution – Android Data Recovery

Android Data Recovery is capable of restoring all types of Android data, including photos, videos, messages, contacts, call logs, WhatsApp messages, etc,. The lost data can be recovered from Samsung Galaxy S6 after factory reset, even if there is no backup. In addition to the factory reset, it even supports the recovery of Android lost data in any data loss cases, such as accidental deletion, Android operating system updates, screen disconnection, BRD Android, lock screen, Android operating system crash and others. It combines perfectly with Samsung, HTC, LG, Sony, Google, Huawei, OPPO, Xiomi, Motorola, ZTE and almost all Android models. The following tutorial guides you to restore the Samsung data after the factory reset.

d_win d_mac

Recover Lost Data from Samsung Galaxy S6 after Factory Reset

Step 1. Run Program and Connect Samsung Galaxy S6 to the Computer
Run and open the Android Data Recovery on the computer, click “Android Data Recovery” option among three modes. Then connect your Samsung Galaxy S6 to the computer via a USB cable.

connect Samsung Galaxy S6 with computer

Step 2. Allow Samsung Galaxy S6 to be Connected to the Computer
Now you should enable the USB debugging on the phone. Please click “OK” on the phone to allow the program detect your device on the computer.

allow to connect Samsung Galaxy S6

Step 3. Select Data Type to be Recovered from Samsung
When the program detect your device on the computer, you will see this interface. Just check the type of files contain the data you need to restore for program scanning, or you can click “Select All” to scan all your Samsung data. Then click on “Next” to go to the next step.

select files to recover from Galaxy S6

Step 4. Allow Scanning and Analyzing Samsung Data
When the program detects your Galaxy S6, the phone will pop up the dialog box. Click “Allow” to on the device to enable the program to scan your device for lost data.

allow scan the Samsung Galaxy S6

Step 5. Scan Samsung Galaxy S6 for Lost Data
In this step the program will begin to scan data on your Samsung phone. The scan process will cost you some minutes.

scan Galaxy S6 for lost data

Step 6. Recover the Lost Data from Galaxy S6
When the scan is over, you are allowed to preview all the recoverable data in the scan list. Preview and retrieve the data you want by clicking “Recover“, to save the lost data on the computer from Samsung Galaxy S6 after factory reset.

recover lost files from Samsung Galaxy S6

d_win d_mac

More Tutorial for Samsung Galaxy S6 Users:

How to Recover Lost Data from Samsung Galaxy S6

Recover Lost Data from Samsung Galaxy S6 after Rooting

How to Backup/Recover Data from Broken Samsung Galaxy S6

How to Safely Backup & Restore Samsung Galaxy S6

How to Manage Samsung Galaxy on the Computer

How to Stream Apple Music to Samsung Galaxy

Recover Data from Galaxy S6 Factory Reset

Android Data Recovery

Recover Your Lost Data from Android
Now, Even Device Broken

Compatible with Android 8.0 Oreo/7.0, etc.

Recover Lost Data Now

How to Recover Deleted Call Logs from Samsung Galaxy S6

A client called me but I missed. To make matters worse, I removed it mistakenly and now I feel regret. Is there any way to recover deleted call history from Android phone (My phone model is Samsung Galaxy S6)? If there is no backup of the call logs data, is there any third-party tool to get the lost call record back?

Call history is a special data entry on Android phone and unlike other data types such as photos, videos, call history is hard to backup. When someone who was not in your contact list called you and you just accidentally delete the call record, then you should find solution to restore it. Some tips you should take in mind: Stop saving new data to your smartphone. The deleted call records are still in the internal memory of your phone. But if you save new data to the memory, the deleted call history will disappear eternally. Choose a professional recovery program to help you. A safe, efficient and powerful data recovery tool which is with technical support can help you recover call logs from Android easily and safely.

Causes of Loss in Call History:
You can lose the call history from your Samsung phone due to the following reasons:
-Accidentally deleting the call logs due to mishandling of the phone;
-Android software update can cause loss of call logs among other data in your phone;
-Intentionally erasing the call logs not knowing you can need the number again;
-When you format your phone;
-When your phone get virus attacked.

Data recovery software is always important to every Android user. Any kind of data may be protected from getting lost with the help of the famous Android Data Recovery. You can recover deleted call history from Samsung Galaxy S6 easily. It is effective in getting back all the call logs, pictures, videos, SMS, contacts and many other types of files. It supports recover Android data due to any data loss causes, like accidental deletion, Android OS updated, virus attacked, Android root, etc,. But not limited to Samsung(Galaxy S6/S7/S8/S9), it is compatible with HTC, Google, LG, Sony, Motorola, OnePlus, Huawei and more Android models. What’s more, it allows you to preview data before recovery.

d_win d_mac

Restore Deleted Call Logs from Samsung Galaxy S6

Step 1. Run Program and Connect Samsung Phone
To get started, run the Android Data Recovery on the computer, click “Android Data Recovery”. Please connect your Samsung Galaxy S6 to the computer via a USB cable.

connect Samsung Galaxy S6 with computer

Here “Broken Android Data Extraction” & “Android Data Backup & Restore” are available.

Step 2. Allow Program Connect Samsung Phone
Before do the recovery, you should enable USB debugging on the phone. Please click “OK” on the phone to allow the program detect your device on the computer.

allow to connect Samsung Galaxy S6

Step 3. Select Call Log File to be Recovered
When it detect your device on the computer, you will see this interface. At this time, you can check each type of files for program scanning, or you can click “Select All” to scan all your Samsung data. For call logs recovery, you should click “Call Logs”. Then click “Next” to continue.

select call log file to recover from Galaxy S6

Step 4. Allow Scanning and Analyzing Samsung Data
When the program detects your Galaxy S6, the phone will pop up the dialog box. On the device, click “Allow” to enable the program to scan your device for deleted data.

allow scan the Samsung Galaxy S6

Step 5. Scan Samsung Galaxy S6 for Deleted Call Logs
The program will begin to scan data on your Samsung Galaxy S6. The scan process will take you some minutes, please be patient.

scan Galaxy S6 for deleted data

Step 6. Recover Deleted Call Logs from Samsung Galaxy S6
When the scan is completed, you can preview all the data you find from the phone, including call logs, photos, contacts, text messages, etc,. Lastly, click the data you want under “Call Logs” then click “Recover” to restore the selected data on the computer with one-click.

recover deleted call logs from Galaxy S6

d_win d_mac

More Guides for Samsung Galaxy S6 Users:

How to Recover Lost Data from Samsung Galaxy S6

Recover Lost Data from Samsung Galaxy S6 after Rooting

How to Backup/Recover Data from Broken Samsung Galaxy S6

How to Safely Backup & Restore Samsung Galaxy S6

How to Manage Samsung Galaxy on the Computer

How to Stream Apple Music to Samsung Galaxy

Recover Deleted Call Logs from Galaxy S6

Android Data Recovery

Recover Your Lost Data from Android
Now, Even Device Broken

Compatible with Android 8.0 Oreo/7.0, etc.

Recover Lost Data Now

Recover Lost Data from Samsung Galaxy S6 after Rooting

Summary:Rooting will make you have more control over your Samsung device, but it may lose data from the device at the same time. According to this article, you will get a reliable Android data recovery solution that tells you how to recover lost data from Samsung Galaxy S6 after rooting with simple steps.

I encountered this problem that lost some data from my rooted Samsung phone. How to recover the lost data from Samsung Galaxy S6 after rooting? Can you help me to solve it? Thanks very much.

Nowadays, more and more Samsung users like to root their own devices to get more settings, functions and performance on it, including Samsung Galaxy S6 users. However, you may have the risk of losing data. If you are the person who lost data and files after Samsung Galaxy S6 rooting task, how should you recover the lost data from the rooted Samsung phone? Here, Android data recovery provides you with the final solution to recover lost data from Samsung Galaxy S6 after rooting. Please continue to read.

Effectively Recover Lost Data from Samsung Galaxy S6 after Rooting

Android Data Recovery is one of the most reliable and effective data recovery for Android. It can restore all types of data, including photos, videos, messages, contacts, call logs, WhatsApp messages and so on. In addition to the root, it supports the recovery of Android lost data in any data environment, such as accidental deletion, Android operating system update, factory reset, broken screen, bricked Android, lock screen, Android operating system crash, etc,. With the help of this program, you can easily recover lost data from Samsung Galaxy S6 after rooting. More importantly, except recovery losing data, the program also has other functions: transfer, switch, repair, erase, unlock, backup&restore and root. It combines perfectly with Samsung, HTC, LG, Sony, Google, Huawei, OPPO, Xiomi, Motorola, ZTE and almost all Android mobile models. Now let’s see how to use this smart program to quickly recover Samsung data.

d_win d_mac

Recover Lost Data from Rooted Samsung Galaxy S6 after Rooting

Step 1. Run Program and Connect Samsung Galaxy S6 to the Computer
Firstly, run the Android Data Recovery on the computer, click “Android Data Recovery”. Then please connect your Samsung Galaxy S6 to the computer via a USB cable.

connect Samsung Galaxy S6 with computer

Step 2. Allow Program Connect Samsung Galaxy S6 to the Computer
Please click “OK” on the phone and go on, allow the program detect your device on the computer.

allow to connect Samsung Galaxy S6

Step 3. Select Data to be Recovered from Samsung
When it detect your device on the computer, you will see this interface. At this time, you can check each type of files for program scanning, or you can click “Select All” to scan all your Samsung data. Then click on “Next” to continue.

select files to recover from Galaxy S6

Step 4. Allow Scanning and Analyzing Data on Samsung Galaxy S6
When the program detects your Galaxy S6, the phone will pop up the dialog box. On the device, click “Allow” to enable the program to scan your device for lost data.

allow scan the Samsung Galaxy S6

Step 5. Scan Samsung Galaxy S6 for Lost Data
In this step the program will begin to scan data on your Samsung Galaxy S6. It will take you some time, please be patient.

scan Galaxy S6 for lost data

Step 6. Restore the Lost data of the Samsung Galaxy S6
When the scan is finished, you can preview all the data you find on your phone, including photos, contacts, text messages, etc,. Preview and retrieve the data you want, and click “Recover” to save the lost data of Samsung Galaxy S6 on the computer.

recover lost data from rooted Galaxy S6

d_win d_mac

More Guides for Samsung Galaxy S6 Users:

How to Recover Lost Data from Samsung Galaxy S6

How to Backup/Recover Data from Broken Samsung Galaxy S6

How to Safely Backup & Restore Samsung Galaxy S6

How to Manage Samsung Galaxy on the Computer

How to Stream Apple Music to Samsung Galaxy

Recover Lost Data from Rooted Galaxy S6

Android Data Recovery

Recover Your Lost Data from Android
Now, Even Device Broken

Compatible with Android 8.0 Oreo/7.0, etc.

Recover Lost Data Now

Recover Lost Data from Samsung Galaxy S5 after Rooting

Is there any way to recover lost data from Samsung phone after rooting? I forgot to backed up some important photos and contacts, how to restore the the lost data from this rooted device? My phone is Galaxy S5.

Why Need to Root Samsung Phone
Rooting your phone brings a lot of benefits. A rooted Android device support for themes and allows everything to be changed visually like the color of the battery icon and the boot animation; also it provides you with full kernel and application control, etc,. That is, you gain more rights to your Samsung phone. But not all rooting gone smoothly. Some users have a feedback that they lost data on the device after rooting.

Generally, rooting does not delete anything on your Android device if you done properly. However, in many cases, you could lose data during some improper rooting operations (prompt you that you need to wipe your phone), or even after successful rooting on your Samsung Galaxy phone. If you are one of those who have lost photos, contacts, text messages, call history, videos or other data after rooting your phone, you can try this easy and secure method below to restore lost data from Galaxy S5 after rooting.

Restore Lost Data from Galaxy S5 after Rooting

Samsung Data Recovery – also called Android Data Recovery is the best data recovery tool for you, ensures you the best and fastest experiencing in recovering contacts, messages, photos, videos, audios, documents, WhatsApp messages and other files from Samsung Android phone. It can do you a favor to recover lost data from Samsung Galaxy S5 after rooting. Addition to rooting, it help to restore lost data from Android under any data loss cases, like accidental deletion, Android system updated, factory reset restoring, etc,. Moreover, it has extra features like broken Android data extraction, Android data backup & restore. Samsung Data Recovery works well for all Samsung models, such as, Galaxy S5/S6/S7/S8/S9, Note 3/4/5/8/9.

d_win d_mac

How to Restore Lost Data from Rooted Galaxy S5

Step 1.Install Program & Connect Rooted Samsung
First of all, download and install Samsung Data Recovery on computer, then connect your rooted Samsung phone to the computer via its USB cable.

connect Samsung Galaxy S5 with computer

Step 2.Enable USB Debugging on Samsung
Unlock your phone, go to Settings > Developer options > Allow USB debugging mode. If you have already allowed the USB debugging mode, you will see a pop-up window on the screen, mark “Always” from this computer and click “OK“.

allow to connect Samsung Galaxy S5

Step 3.Select Files to Recover from Rooted Samsung
Now, select the files contain the data you want to scan and recover. If you not only want to scan and recover the lost part of data from your phone, please tap “Select All” and tap “Next” to continue.(If you just want to recover the lost data from device, you should click “Only display the deleted items”.)

select files to recover from Galaxy S5

Step 4.Scan & Analyze files on Rooted Samsung
When you get the window as below, please turn to your phone and tap the “Allow” button.

allow scan the Samsung Galaxy S5

Begin to scan data stored on your rooted Samsung phone.

scan Galaxy S5 for lost data

Step 5.Preview and Selectively Recover Lost Data from Rooted Samsung
After scanning, you’re supposed to click the items in the left sidebar to show all data, you’re allowed to preview the data and decide to which one for recovery. Click “Recover” to restore all selected data on the computer.

recover lost data from rooted Galaxy S5

d_win d_mac

More about Rooting
Rooting is jailbreaking for Androids, allowing users to explore more on a phone’s sub-system. You can access the whole operating system and customize anything on your Android. So more apps can be run, firmware replacement is also available.

You need to note that some potential cons also come along. After many attempts of rooting, your phone software would be damaged in some way. Also unknowingly install malicious software on rooted device is risky.

More Samsung Data Recovery Guides:

How to Recover Lost Photos from Samsung Galaxy S5

How to Recover Lost Contacts from Samsung Galaxy S5

How to Recover Lost Data from Samsung Galaxy S5

How to Recover Data from Broken Samsung Galaxy

How to Backup & Restore Samsung Galaxy

How to Manage Samsung Galaxy on the Computer

How to Stream Apple Music to Samsung Galaxy

Recover Data from Rooted Galaxy S5

Android Data Recovery

Recover Your Lost Data from Android
Now, Even Device Broken

Compatible with Android 8.0 Oreo/7.0, etc.

Recover Lost Data Now

Recover Deleted WhatsApp Messages from Samsung Galaxy S6

Summary:Are you looking for a simple and effective way to recover deleted WhatsApp message from Samsung Galaxy S6? By learning this article, you will learn how to easily recover deleted WhatsApp messages from Samsung Galaxy S6 step by step.

WhatsApp is one of the most popular applications. Using WhatsApp chat can easily send short messages, photos, voice and video with others. We have widely used this application in our daily life or work. However, sometimes you accidentally delete WhatsApp Messages on your smartphone. There are some important chatting data, chatting history are important to you, you will want to restore it back as soon as possible. Here, you could restore WhatsApp Messages deleted from Samsung Galaxy S6 by using a smart Android data recovery software.

Restore Deleted WhatsApp from Samsung Galaxy S6

Android Data Recovery is one of the most reliable and 100% secure software for restoring deleted Android data. It can help you recover lost or deleted Android data in different scenarios, such as factory reset, Android OS updates or rooting Android, wrong deletion, screen locked, broken screen, black screen, SD card issue, forget password, device failure/stuck, ROM flashing and so on. And it can not only restore WhatsApp, but also photos, contacts, messages, videos and other files. With the help of Android Data Recovery, you can recover deleted WhatsApp messages from Samsung Galaxy S6 with ease. This program supports all Samsung models, it even compatible with other Android devices, such as HTC, LG, SONY, Google, HUAWEI, OPPO, Xiomi, Motorola, ZTE, etc,.

d_win d_mac

Recover Deleted WhatsApp Messages on Samsung Galaxy S6

Step 1. Download and Run the Program
Firstly, download and run the Android Data Recovery on the computer, click “Android Data Recovery” in the home page. Connect the Galaxy S6 to the computer using a USB cable.

Android ToolKit home page

connect Samsung phone

Step 2.Allow Program Connect Galaxy S6
Please click “OK” on the Galaxy S6 to allow the program detect your device on the computer.

allow to detect Samsung phone

Step 3. Select the WhatsApp Files to Scan
When the connection is completed, the program will display all recoverable data types. In general, you can choose the some type of data instead of all files you need. For WhatsApp messages recovery, you should click “WhatsApp” & “WhatsApp Attachments” files. Then click “Next” to let it scan the data from your Galaxy S6.

select WhatsApp files to scan

Step 4. Allow Scanned and Analyzed Data on Samsung
After the program detects the device, you will see this interface. Click “Allow” on the phone to enable the program to scan your device for deleted data.

allow to scan Samsung phone

Step 5.Scanning Samsung for Deleted Data
Now the program will begin scanning the data on your Samsung Galaxy S6. It will take you some minutes.

scan deleted Samsung data

Step 6. Recover Deleted WhatsApp Messages from Samsung Galaxy S6
Once the scan is finished, you are allowed to preview all the data find from your phone, including WhatsApp, photos, contacts, text messages, etc,. Select the data you want to recover under “WhatsApp” & “WhatsApp Attachments” files. Clicking the “Recover” button to save the selected data on the computer.

recover deleted WhatsApp from Galaxy S6

Finished. All the deleted WhatsApp messages have been restored to the computer.

d_win d_mac

More Guides for Samsung Galaxy S6 Users:

How to Recover Data from Samsung Galaxy S6

How to Backup/Recover Data from Broken Samsung Galaxy S6

How to Safely Backup & Restore Samsung Galaxy S6

How to Manage Samsung Galaxy on the Computer

How to Stream Apple Music to Samsung Galaxy

Recover Deleted WhatsApp from Galaxy S6

Android Data Recovery

Recover Your Lost Data from Android
Now, Even Device Broken

Compatible with Android 8.0 Oreo/7.0, etc.

Recover Lost Data Now