All posts by DHZ

How to Remove DRM from Spotify Music

Summary: Users who listen to Spotify Music are under the DRM (Digital Right Management) protection. How to remove DRM from Spotify Music in an effective way still puzzles all the users in these days. You can easily remove DRM from Spotify Music right here from this post.

Spotify Music is a streaming service that adds DRM protection to its songs. What’s DRM protection? It is intended as a means to protect digital media from piracy. Spotify DRM restrictions may prevent you from sharing a copy of the songs downloaded even you have already been a subscriber. The best way to enjoy Spotify Music without limits is to remove DRM protection from it, for the purpose of keeping local files for playing back freely. A good news comes for you, you can remove DRM protection from Spotify Music via an excellent music converter – Spotify Music Converter.

Remove DRM from Spotify Music

Spotify Music Converter  is a wonderful Spotify Music downloader and speedy converter tool to easily remove DRM from Spotify Music with customizing output Spotify Music quality, convert Spotify Music to DRM-free format with its original quality. It could help to remove DRM and convert Spotify songs and playlist to MP3, M4A, WAV and FLAC. After the conversion, you could listen to Spotify Music offline for free; burn Spotify Music to CD, enjoy them outside Spotify app and web player. You can select the conversion speed for faster conversion with keeping ID3 tags.

d_win d_mac

How to Easily Remove DRM from Spotify Music

Step 1. Run Spotify Music Converter
First of all, download, install and run Spotify Music Converter on your Windows/Mac computer.

Spotify Music Converter home page

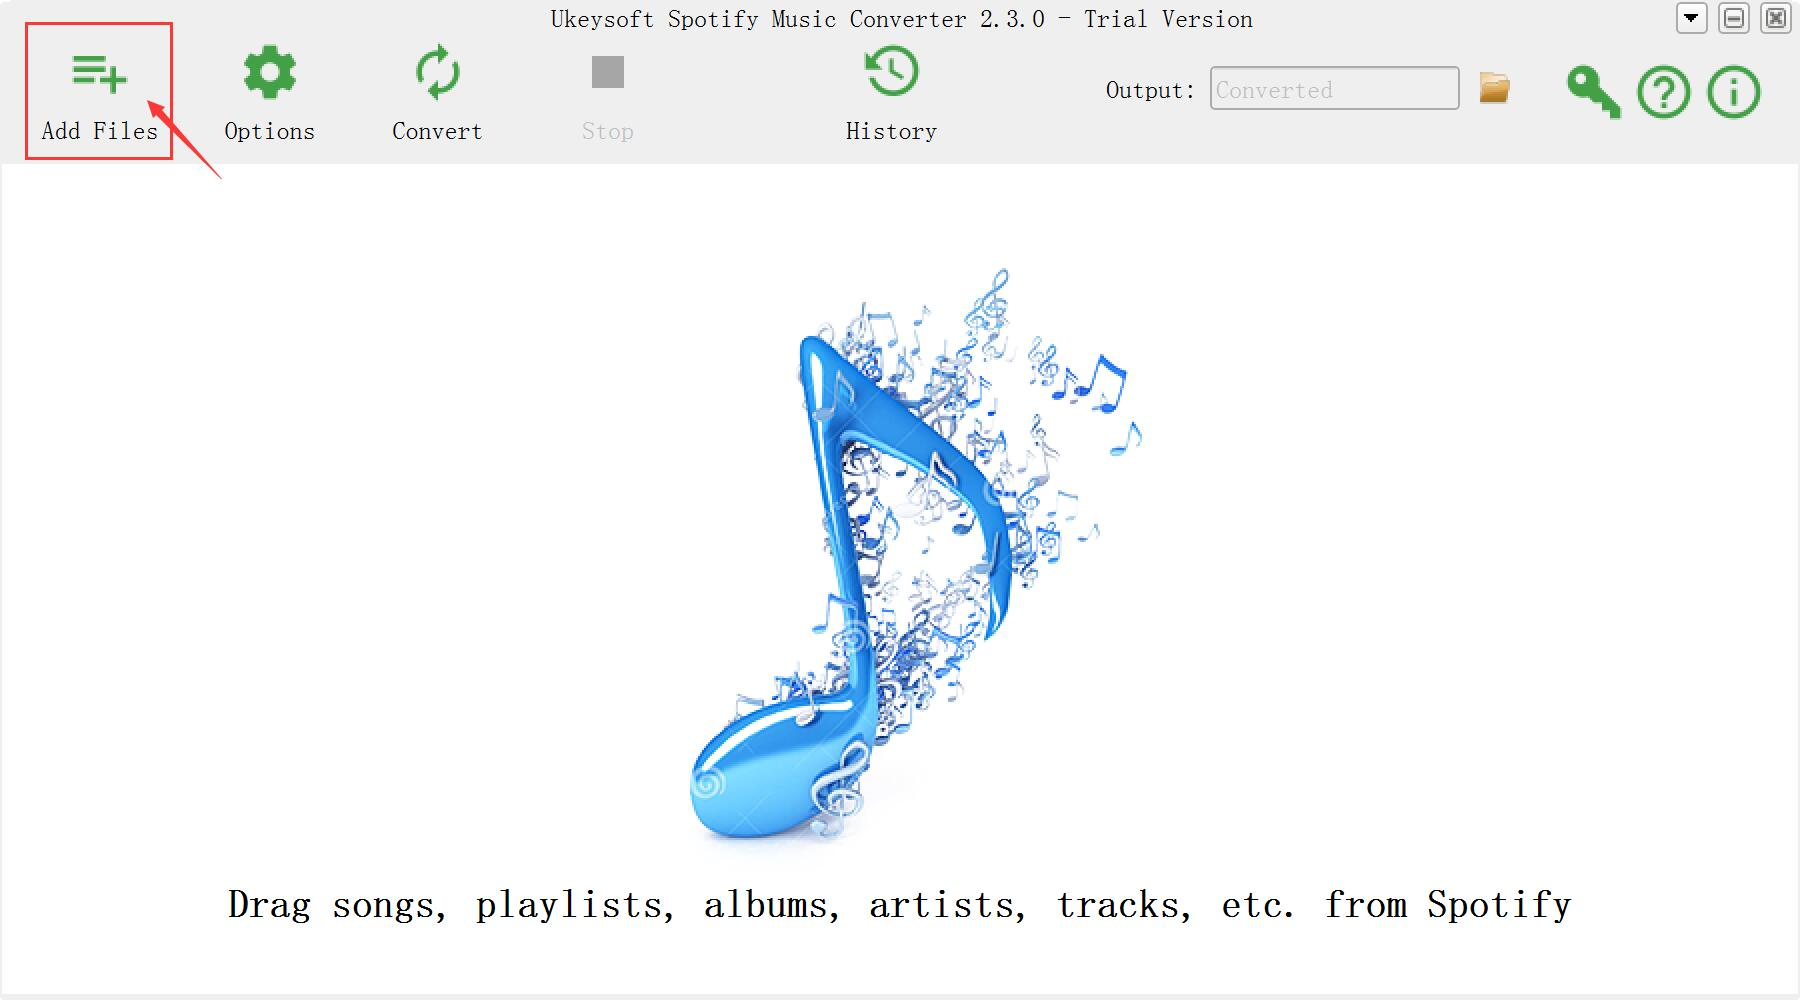
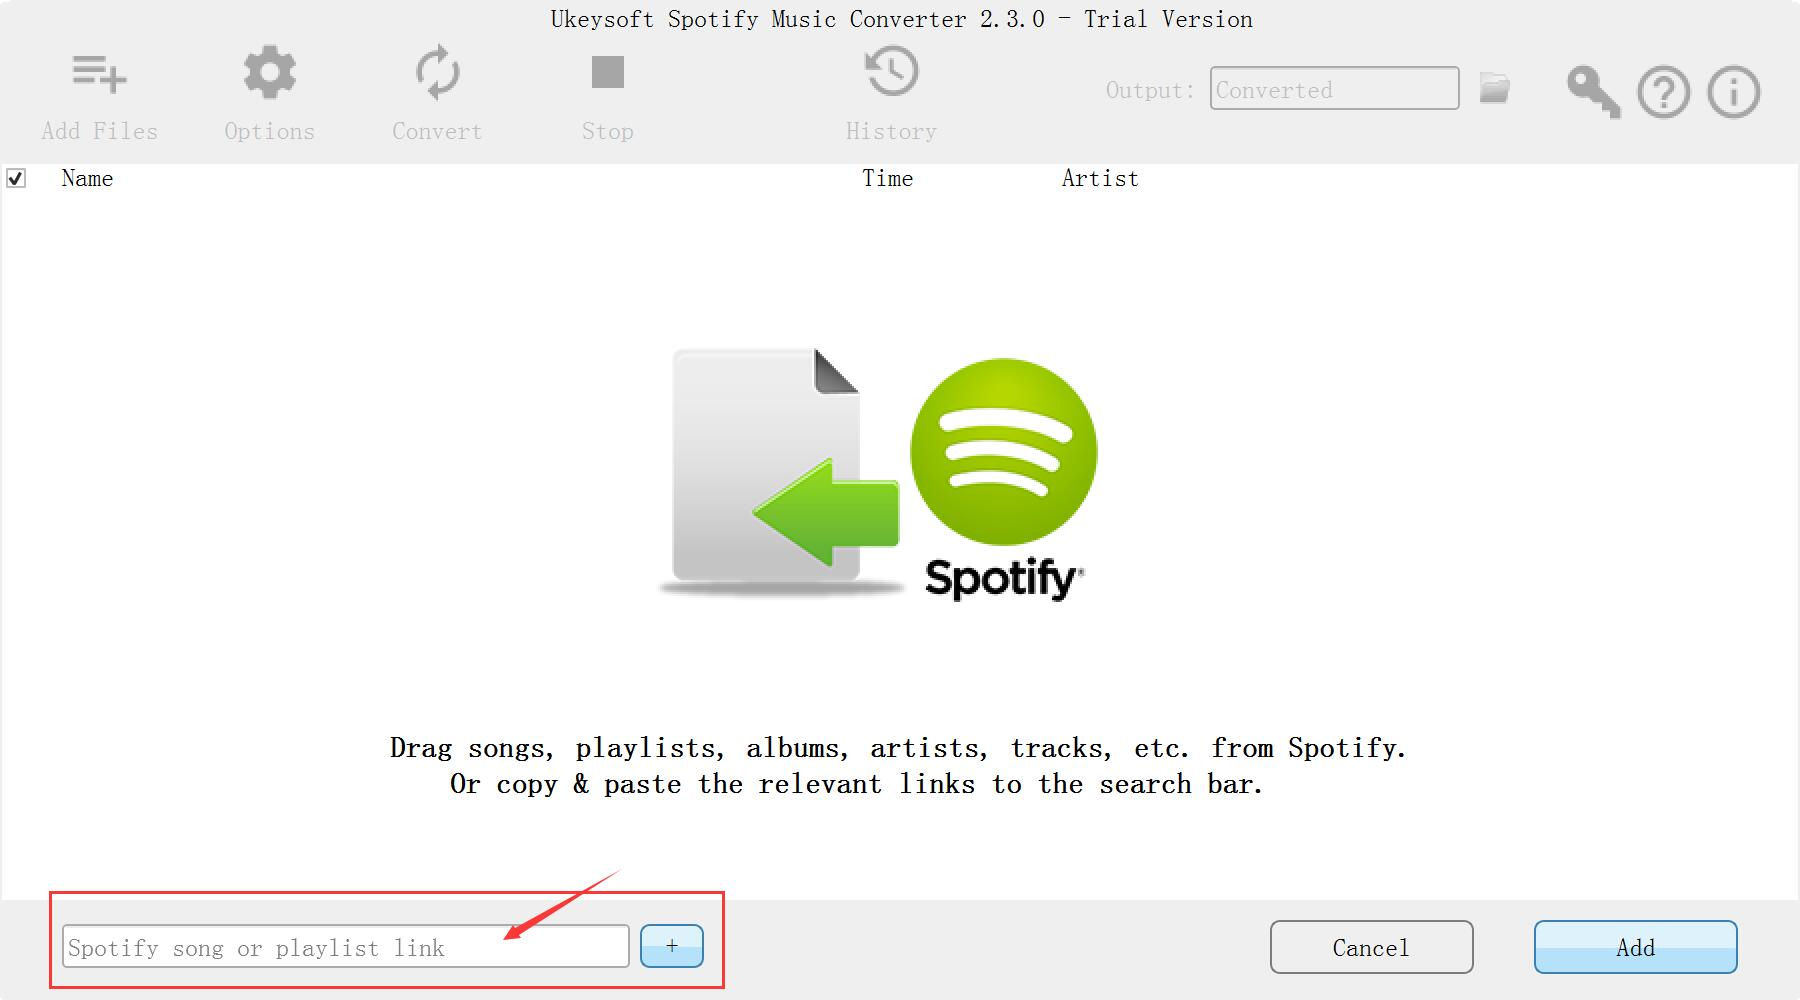
Step 2. Add Spotify Songs/Albums/Playlists for Conversion
From the interface of program, find the songs, albums or playlists on Spotify and drag them to the interface of program. If you are using the web player, copy & paste the link of the song, album or playlist. And then click “Add”.

add Spotify Music

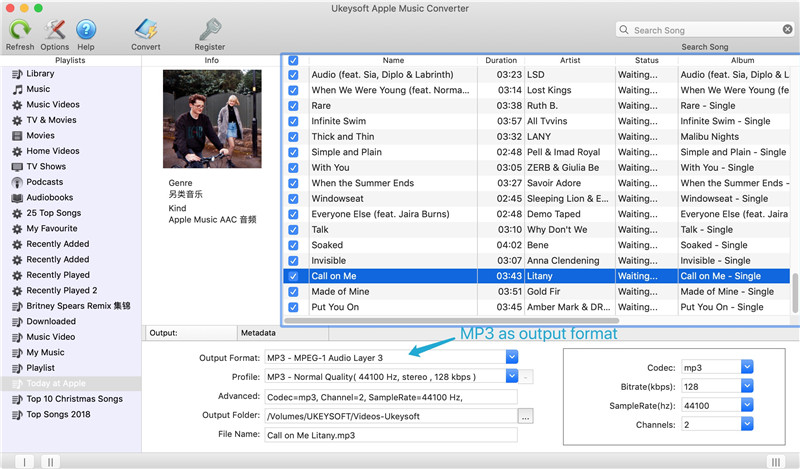
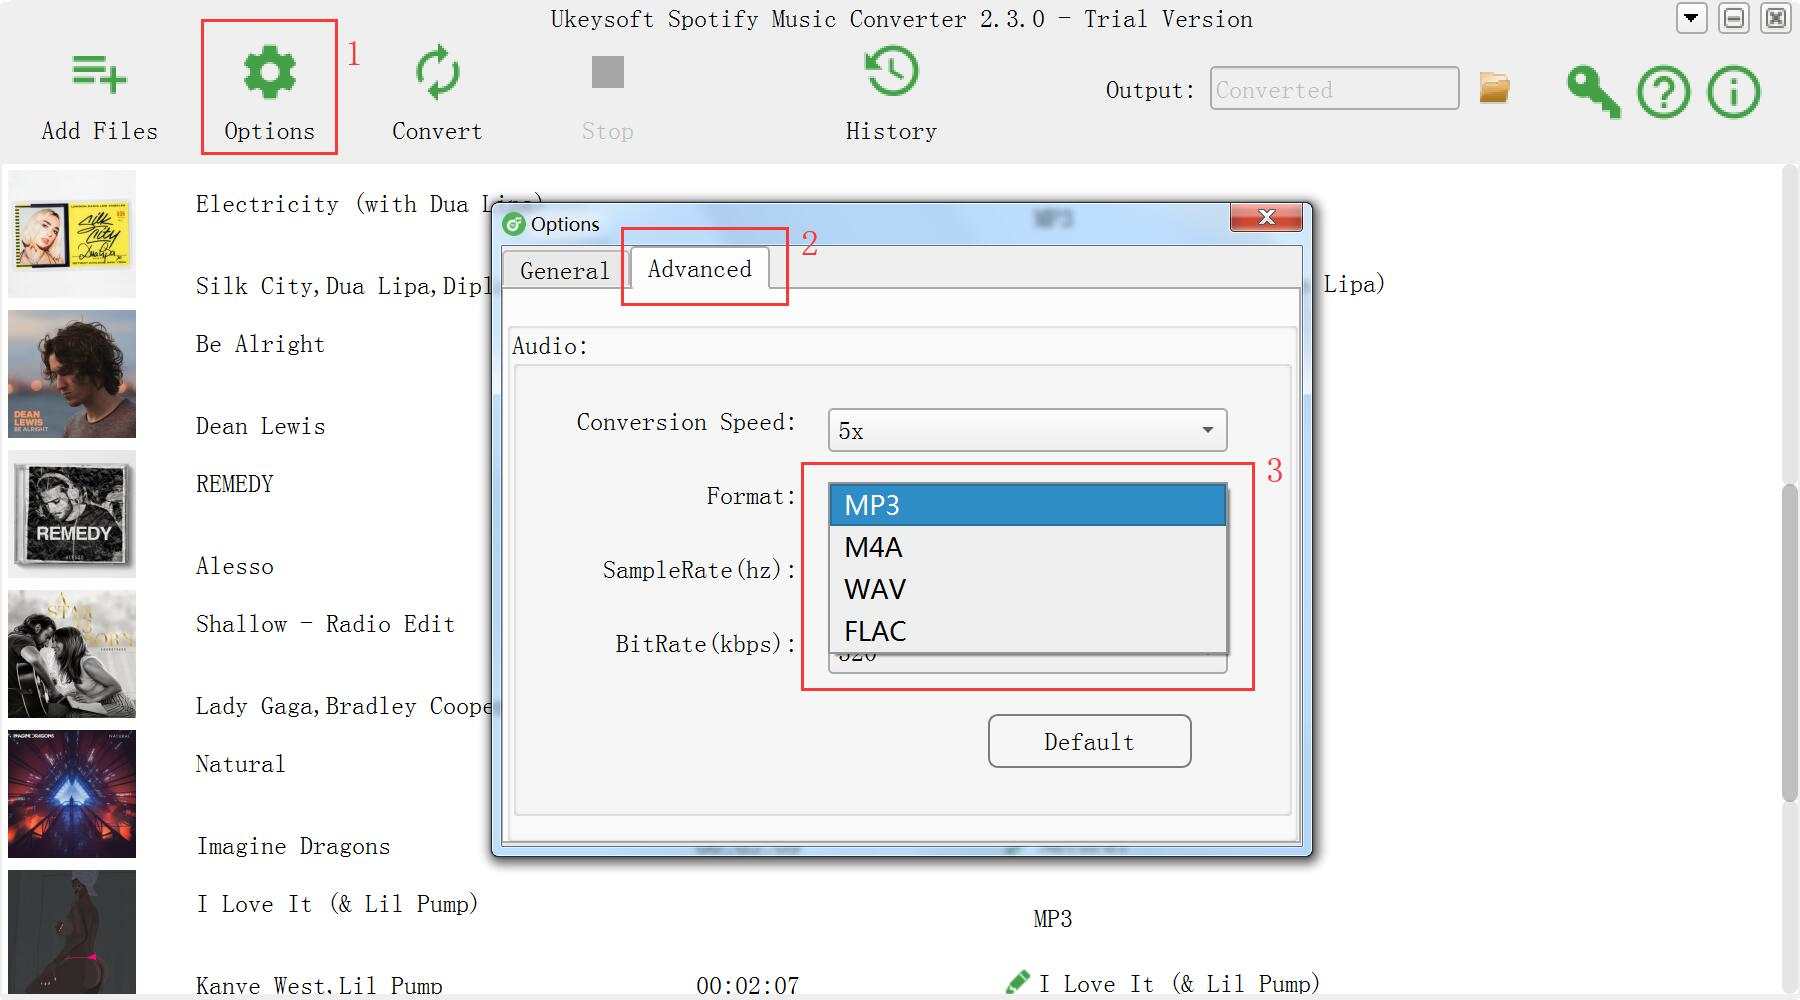
Step 3. Choose Output Format for Converted Music
The default output format is MP3. Spotify Music Converter supports to MP3, M4A, WAV, FLAC format. Click “Option” button to change output format or output folder if you need. You can also change bitrate, samplerate according to your needs. Spotify Music Converter will keep the Artwork, Title, Artist and Album of each song to the output DRM-free songs.

choose format

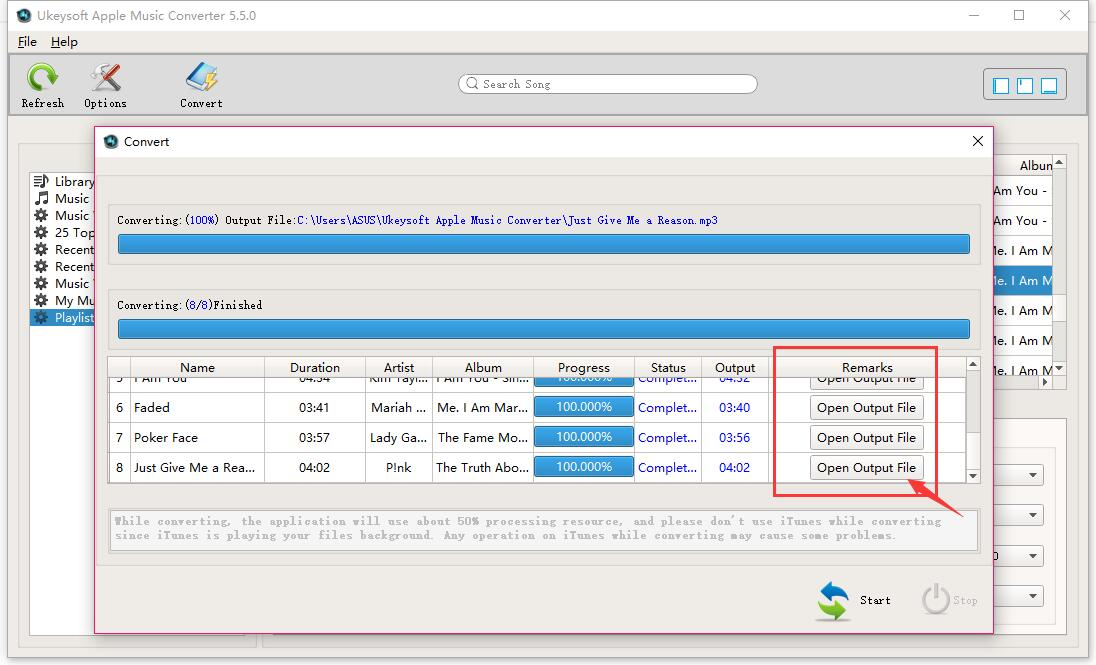
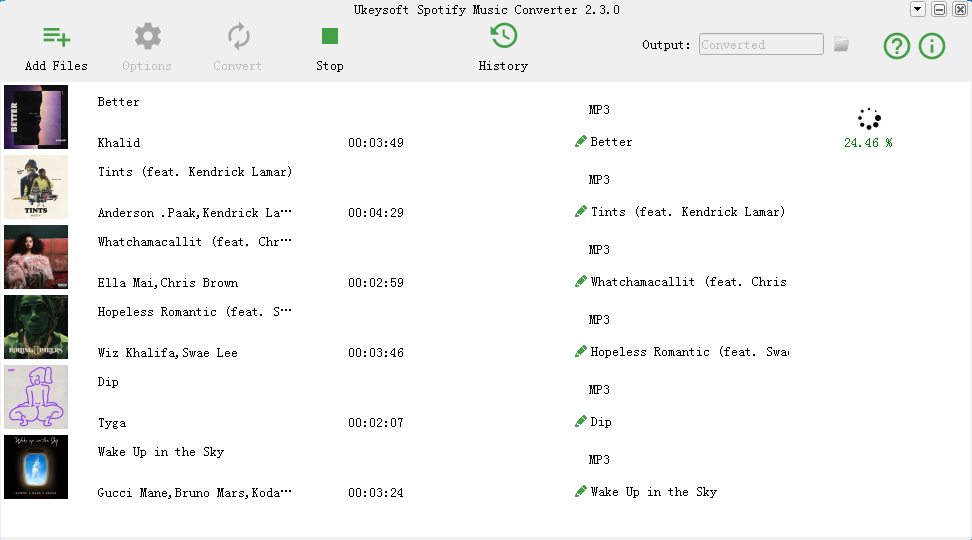
Step 4. Start to Remove DRM from Spotify Music
Click “Convert” button to start removing DRM from Spotify Music and convert to the format you choose.

remove DRM from Spotify Music

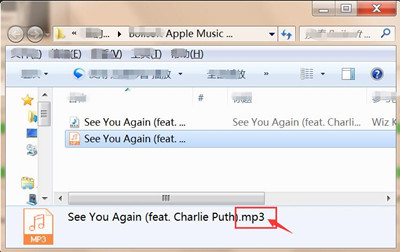
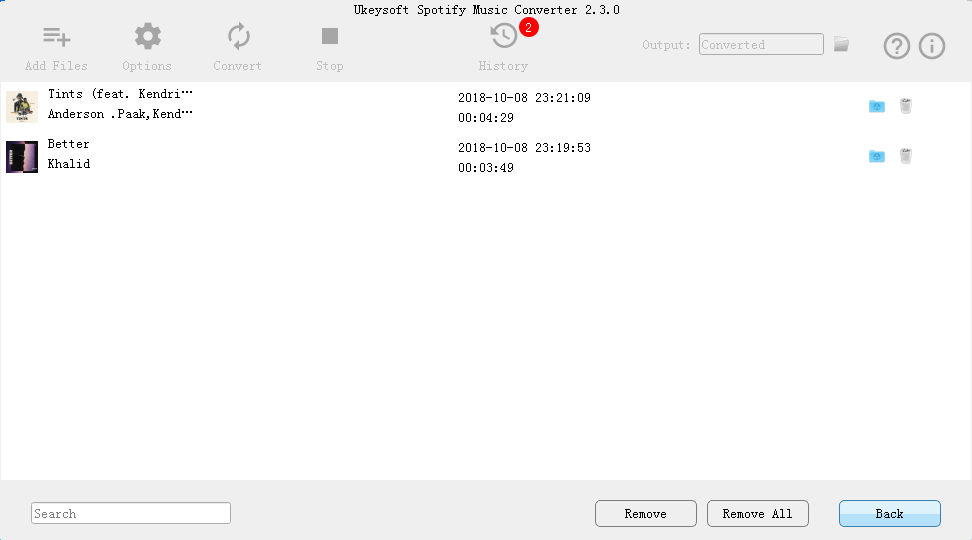
When the conversion is finished, you are allowed to quickly locate the DRM-free Spotify songs by clicking below folder icon. You can then transferring and offline playing it on any compatible device as the local MP3 music files.

view MP3 music

d_win d_mac

Related Guides:

How to Listen to Spotify Music without Subscription

How to Convert Spotify Music to MP3

How to Get Spotify Music at 320kbps High Quality

How to Listen to Spotify Music for Offline Playing

How to Listen to Spotify Music on MP3 Player

How to Record Apple Music M4P Streams as MP3

Remove DRM from Spotify Music

How to Fix iPhone to Normal after iOS 13/12 Update

My iPhone 7 is suddenly stuck in the Recovery Mode after I updated iOS 13 on it. What worse is that I have backup all the iPhone data frequently. Is it possible to return iPhone system to normal with a simple solution? How?

iPhone/iPad/iPod has been a miniature computer for us in daily life, with which we can enjoy our favorite videos and games, read latest news, navigate to the restaurant you have never been, etc,. Though iOS system is the best operating system, sometimes iPhone/iPad/iPod may come across some unexpected trouble. These issues can happen after updating to a new iOS version(for example iOS 13); iOS jailbreak, or the operating system performs sluggish or unresponsive with a unknown curse.

Let’s assume one day when you find it is in an abnormal operating mode to stop you using as usual like: stuck in the Recovery Mode, stuck at white screen, stuck in Apple logo, stuck at black screen of death, stuck in the DFU Mode, apps crashing; how to deal with restoring iOS system to normal? If your iOS devices (iPhone/iPad/iPod touch) is running into the abnormal situation, repairing operating system is recommended as final solution. When you need a helpful solution to fix iOS system to normal, U.Fone iOS Toolkit – iOS System Recovery is the professional one you need.

Fix iOS System to Normal after iOS 13 Update

U.Fone iOS ToolkitiOS System Recovery makes it more efficient to solve all kinds of stuck and booting issues and get your iOS devices to normal mode without data loss. With the help of this program, you could easily fix iOS system to normal after iOS 12.4/13 update, such as, stuck in the Recovery Mode, stuck at black screen, stuck at white screen, stuck in the DFU Mode, and more. All iOS models are compatible with this program, including iPhone XS, iPhone XR, iPhone X, iPhone 8(Plus), iPhone 7(Plus), iPhone 6S/6, iPhone 5S/5, iPad and iPod.

d_win d_mac
d_win d_mac

How to Fix iOS System to Normal after iOS 13 Update

Step 1.Run iOS System Recovery on the Computer
Download and run iOS System Recovery on the computer. After that, connect your iOS 12 iPhone to the computer with its USB cable.

Step 2.Choose Repair Mode of iOS System Recovery
Click the “iOS System Recovery” option under the “More tools” mode in the program main page. And then you can see some notes displayed in the window. If you have no problem with all the notes here, click “Start” button.

iOS System Recovery home page

click start to begin

Notes:Please pay attention that after fixing the issue-restoring iPhone system to normal, your iPhone will be updated to the latest version. And if it is a jailbroken iPhone,it will be updated to a none jail-broken phone.

Step 3.Download Official Firmware for iPhone
In this step,the official firmware download link for your iPhone will be provided. iOS System Recovery will detect your iPhone soon, offering the latest iOS version for you to download. You should download the firmware by clicking “Repair” button.

select your iPhone model

download the firmware for iPhone

Step 4.Restore iPhone System to Normal
When the firmware downloading is end, iOS System Recovery will continue to restore your iPhone system to normal mode in a few minutes, please wait for your iPhone to restart.

restore iPhone system to normal

Done. Now your device has been return to the normal state, you can use it as usual without any iOS system issue.

d_win d_mac
d_win d_mac

Related Articles:

How to Get iPhone Out of Recovery Mode

How to Backup and Restore Data from iPhone before iOS 12 Update

Recover Lost Data from iPhone/iPad after iOS 12 Update

How to Restore Photos from iPhone after iOS 12 Update

Best iPhone Manager: How to Transfer & Manage Files for iPhone

Fix iPhone to Normal

Recover Deleted WeChat History from iPhone after iOS 12 Update

Some important WeChat conversation were lost suddenly after performing iOS 12 update on my iPhone 7. I heard that there are some tools are available for us to recover all iOS data. Which one is the best? Any recommendations?

As one of the most powerful and most functional messaging applications, WeChat is one of the popular chat app among users. Losing WeChat is a trouble thing. If you have made backup using iTunes, iCloud or for Windows/Mac before, you could restore WeChat history from iTunes backup, iCloud backup or backup made by computer. But sometimes, you will lost some important WeChat messages that were not included in a backup and can’t be recovered by yourself, for example iOS 12 update. How to deal with recovering WeChat data without backup? In this article, we are going to show you how to recover deleted WeChat messages from iPhone after iOS 12 update even without backup.

Restore Deleted WeChat Data from iPhone after iOS 12 Update

iOS Data Recovery gives you the chance to restore deleted WeChat data from iPhone after iOS 12 update, including WeChat messages, photos, videos, audio messages, expression patterns and attachments. Besides to WeChat data, iOS Data Recovery allows to recover more than 19 kinds of iOS data, like contacts, messages, photos, videos, call logs, apps data, etc,. It provides you with three recovery modes: directly recover from iOS device, recover from iTunes backup, recover from iCloud backup. Supports to restore iOS data under any data loss circumstances. Compatible with all iOS models and iOS system.

d_win d_mac

Recover Deleted WeChat Data from iPhone after iOS 12 Update

Step 1.Run Program and Select Recovery Mode
Please Download and launch iOS Data Recovery on the computer. Next click on “Recover from iOS Device” recovery mode then begin the process by tapping “Start“. Connect your iPhone to the computer. iOS Data Recovery will detect your iPhone soon.

iOS Data Recovery home page

Step 2.Select WeChat File to Scan by Program
You should select the file type to scan by program. For WeChat history recovery, just click “WeChat“, then click “Next“.

select WeChat file to recover

Then the program begins scanning your device automatically.

scan iPhone and search deleted data

Step 3.Preview and Recover Deleted WeChat History from iPhone
Once the scan is completes, results will be shown in an interface, preview and select the specific data that you wish to recover from the WeChat history. Select what you need and hit “Recover” to save it on the computer.

recover WeChat from iPhone

d_win d_mac

Related Articles:

How to Recover Deleted App Files from iPhone after iOS 12 Update

How to Backup and Restore Data from iPhone before iOS 12 Update

Recover Lost Data from iPhone/iPad after iOS 12 Update

How to Restore Photos from iPhone after iOS 12 Update

Best iPhone Manager: How to Transfer & Manage Files for iPhone

Recover WeChat Data after iOS 12 Update

iOS Data Recovery

Recover Your iPhone iPad Lost Data
Now, Even without Backups

Compatible with iOS 11 & iPhone X/8 (Plus)

Recover Lost Data Now

How to Recover Deleted App Data from iPhone after iOS 12 Update

Summary: If you are one who lost apps data from iPhone/iPad/iPod after iOS 12 update, you can take this way for reference to restore deleted App data which in the follow section we will mention.

Some WhatsApp chat history and WeChat chat conversion were disappeared after I updated my iPhone to iOS 12. Did these files really gone forever? Any suggestions to get it backup? I haven’t backup, I am serious to restore these apps data. Please help.

Accidental deletion can be the most common cause will lead to app data loss on your device, the second one is iOS update. Losing app data is really a frustrating experience for anyone, especially losing it due to iOS 12 update without previous backup. We will find a lot of iOS data recovery tools on the Internet, all of them are used for recovering the common types of data, like contacts, photos, messages, etc,. But there is seldom solution to rescue app data on iOS device. If you need to recover app data from your iPhone/iPad/iPod after iOS 12 update, here is your solution. iOS Data Recovery makes it easy to see all of your available options and recover specific data from backups via iTunes, iCloud and the device itself even without backup.

Undelete App Data from iPhone after iOS 12 Update

iOS Data Recovery is your perfect choice, to recover deleted app data from iPhone after iOS 12 update, insist of WhatsApp, WeChat, Kik, Viber, Skype, Line and more app. It is an excellent program designed for restoring more than 19 kinds of deleted data from iPhone/iPad/iPod, including apps data, contacts, messages, photos, videos, call logs, etc,. It enables you to recover iOS data under any data loss causes, for instances, iOS update, iOS jailbreak, restore to factory reset, virus attack and more. Allows to preview data before selectively recovery, compatible with all iOS models and all iOS system.

d_win d_mac

How to Restore App Data from iPhone iOS 12 Update

Step 1.Run Program and Select Recovery Mode
First of all, please install and run iOS Data Recovery program on the computer, connect your iPhone to the computer with its USB cable.

After connecting, the program will display detailed information of your iPhone in the interface of program. Select “Recover from iOS Device” recovery mode and then click “Start” button.

iOS Data Recovery home page

Step 2.Select the File to Recover
Now you should click the file name to scan by program, for app files recovery, just click “App Photo” & “App Video” and then click “Next” button. (Or you could select “WhatsApp“. “WeChat“, “Viber“, “Kik“, “Skype“, “Line“.)

select app files to recover

Now the program will begin to scan all the data from iPhone. It will take a few minutes to finish the files scanning.

scan iPhone for deleted data

Step 3.Preview and Recover Deleted App Data from iPhone
When the scanning is end, it will list all files found from your iPhone. Preview the recoverable data under “App Photo” & “App Video” category, pick on the data you want, recover it and save it on the computer by clicking “Recover” button.

recover deleted app data from iPhone after iOS 12 update

d_win d_mac

Related Articles:

How to Recover Deleted App Files from iPhone

How to Backup and Restore Data from iPhone before iOS 12 Update

Recover Lost Data from iPhone/iPad after iOS 12 Update

How to Restore Photos from iPhone after iOS 12 Update

Best iPhone Manager: How to Transfer & Manage Files for iPhone

Recover iPhone App Data after iOS 12 Update

iOS Data Recovery

Recover Your iPhone iPad Lost Data
Now, Even without Backups

Compatible with iOS 11 & iPhone X/8 (Plus)

Recover Lost Data Now

How to Backup iPhone/iPad/iPod Data before iOS 12 Update

Finally, iOS 12 is released in WWDC. iOS 12 cements Apple as a leader in augmented reality (AR) with the arrival of groundbreaking multiplayer capabilities it calls shared experiences in ARKit 2. User interface and core app updates give us grouped notifications and also group FaceTime. And, of course, Siri will be smarter in 2018, as it is every year, this time thanks to Siri Shortcuts.

As usual, however, there were still a bunch of new features for updating. iOS 12 bring things like your standard performance improvements, new Animoji features, Memoji — since everyone has always wanted to turn themselves into an Animoji — group FaceTime, camera effects, ways to limit your screen time and many more features that Apple crammed into its two hour-long keynote presentation.

If you own an iPhone/iPad/iPod, after the WWDC you realized how convenience the new OS can help your daily life. Certainly, you can’t wait to update to the latest version of OS and enjoy all the new features. But you still have to be careful before doing so. Keeping iOS data is the most important thing when you decide to update iOS system on iOS device. Since there is always a risk of data loss when upgrading iOS system. Since we save all our previous contacts, photos, videos, documents and important data on our device, update to iOS 12 would possibly cause data loss and we can hardly get them all back. In this tutorial, we will show you the best solution to safely backup iOS data before iOS 12 update.

Safely Backup iOS Device before iOS 12 Update

iOS Data Exporter is the best software can help. It could be used to backup & restore more than 20 types of iOS data, including contacts, SMS, photos, video, note, calendar, reminder, apps data(WeChat, Skype, Viber, Kik, Line, Skype) and more. With using this reliable software, you could safely backup iPhone/iPad/iPod before iOS 12 update. It offer three modes for you: back up & export from device, extract data from backup, restore backup to device. It provides three backup modes with you, insist of export data from iPhone directly, export data from iTunes backups, and download data from iCloud backups; making a full backup or backing up portion data selectively. Supports all iOS devices, such as, iPhone X, iPhone 6S/6, iPhone 5S/5, iPad and iPod.

d_win d_mac

How to Backup iPhone Data Safely before iOS 12 Update

Step 1. Run Program and Select the File to Backup
To begin with, download iOS Data Exporter and run it on the computer. From the “Export from iOS Device” tab, click “Start” to proceed.

export iphone data option

Select the file types you need to backup and click on “Next“. The iOS Data Exporter will prompt you to connect your iPhone to the computer.

select file to scan

Step 2. Scan iPhone Data Completely
Once your device is connected, click “Scan” button and then the program will scan your device.

scan iPhone data

Note: The scan will last for a while and the time depends on the storage of your device.

Step 3. Preview and Backup Data from iPhone
Once the scan is completed, the data available will be displayed on the interface of program. You can check the specific files by clicking different tabs. After selecting the wanted files, just click on the “Export” button at the bottom right corner to backup the selected data on your computer.

preview and backup iPhone data

A popup window will ask you to select where you want to store the selected data on your computer.

select position to save iPhone data

d_win d_mac

Related Articles:

How to Backup and Restore Data from iPhone X/8/7/6S/6

Recover Lost Data from iPhone/iPad after iOS 12 Update

How to Restore Photos from iPhone after iOS 12 Update

Best iPhone Manager: How to Transfer & Manage Files for iPhone

How to Play Apple Music offline on iPhone/iPod/iPad

Backup iPhone Data before iOS 12 Update

How to Stream Apple Music to Google Pixel 2/2XL

Hi. I got a new Google Pixel 2 phone as my birthday gift. How to stream Apple Music I subscribed in Apple Music app to the new phone? I want to enjoy the music on the new Android even though without running Apple Music app. How to make it true?

As we know, we can’t play Apple Music on Android device directly since Apple Music is DRM-protected. We can’t enjoy Apple Music on non – iOS device. Recently, Apple Music released a app called Apple Music for Android, for Android users to play Apple Music more easier. However, Apple Music for Android is not a perfect app for music users on Android device. Because you need to log in Apple ID in this app on Android, what’s more, you can’t upload songs for your Android device. What worse, this app will run stuck on Android device sometimes.

On the other hand, some people may be want to try to play Apple Music on Android device via airplay. Airplay leads a newly trends of wireless streaming audio, video and photos together with related metadata between devices. Users who use iOS devices such as iPhone, iPad are relying on Airplay due to the convenience of transmitting music and other media files. However, the functions of Airplay do not work when transfer content from Apple devices to Android device.

Songs you purchased from Apple Music app or iTunes Store are the M4P format which is not available to play on all devices. But MP3 songs are compatible with all audio devices. If you are a people who want to stream Apple Music to Android device without Apple Music for Android app or Airplay, you need to make the preparation of dealing with protected Apple Music which encrypted DRM technology. To make this true, you need a smart Apple Music conversion tool.

Remove DRM from Apple Music for Playing on Google Pixel 2/2XL

Apple Music Converter is the DRM removal tool we are looking for. It enables you to remove DRM from Apple Music legally. With this Apple Music Converter, you could convert Apple Music to DRM-free music files without quality loss, including MP3/AC3/AIFF/FLAC/M4A or more. The conversion is up to 16x speed. Moreover, Apple Music Converter allows to convert iTunes music and audiobooks to MP3/M4A. All in all, you can offline playing back the converted Apple Music on Google Pixel 2/2XL or other audio players(iOS device, Android device, PSP/PS4, Xbox, TV, etc,), burn it to CDs, save it to SD card, set it as phone ringtone.

d_win d_mac

How to Stream Apple Music to Google Pixel 2/2XL

Step 1. Run Apple Music Converter on the Computer
To get started, download and install Apple Music Converter on your Windows or Mac computer.In the meantime,the iTunes library will be opened automatically. It will load all your Apple Music playlists and iTunes playlists.

Apple Music home page

Step 2. Add Apple Music for Conversion
Click the playlist in the left column, then you can add Apple songs, albums or playlists to the program that you want to convert. The program supports batch conversion so you can choose a few playlists, or select a few songs.

Add Apple Music

Note: If you can’t find the music you want to convert, you can search it in the search box. And please make sure that you have downloaded and saved the Apple Music tracks you want on computer.

Step 3. Select MP3 as Output Format
Then choosing MP3 as output format for Google Pixel phone since most of Android phone compatible with MP3 format. In this part, you can see the Apple Music Converter supports 8 output formats: MP3, M4A, AC3, AIFF, AU, FLAC, M4R and MKA. Just choose MP3 as output format.

select mp3 output format

In addition, you can also specify the location for saving output MP3 files, as well as select audio quality from low, normal, high or set bitrate, sample rate according to your needs.

Step 4. Start Apple Music Conversion
Simply click the “Convert” button and the Apple Music to MP3 conversion starts, the program will immediately pop up the conversion window.

convert Apple Music to MP3

When the conversion is finish, you can click the “Explore output File” button to get the converted DRM free Apple Music in MP3 format on the computer.

explore Apple Music in MP3 format

d_win d_mac

Step 5. Transfer Music to Google Pixel 2/2 XL
In the last step, you should sync the converted music files from the computer to Google Pixel 2/2 XL via Android Transfer tool.

transfer Apple Music to Google Pixel

Tips: Android Transfer is a practical tool to transfer & manage files for Android device on the computer safely and efficiently. Supported files including music, videos, photos, playlist, contacts, SMS, apps and more.

Free Download Android Transfer:
d_win d_mac

Done. Now you could freely play the converted Apple Music on your Google Pixel 2/2 XL without limits. Have fun.

More Guides for Google Pixel Users:

How to Import Music to Google Pixel 2/2XL

Transfer Music from iTunes to Google Pixel 2/2XL

How to Transfer Music and Videos to Google Pixel Phone

Music Transfer from Samsung Android to Google Pixel/Pixel 2

How to Transfer Samsung Data to Google Pixel/Pixel 2

How to Recover Deleted Data from Google Pixel/Pixel 2

How to Backup and Restore Google Pixel/Pixel 2

Stream Apple Music to Google Pixel 2

Transfer Music from iTunes to Google Pixel 2/2XL

I used iPhone device for 3 years, iPhone 5S, iPhone 6S and iPhone 7. I decide to switch to a new Google Pixel 2 phone in these days. However I am trying to figure out how to transfer the songs and playlist from iTunes library to the new model without complicated steps. Anyone could help?

Like most people, you may be curious about Android world and be anxious to get out of Apple’s constraint, you may be disgusted with iTunes’s overbearing attitude – you can’t manger your iPhone, iPad or iPod without iTunes. As we know that Apple iOS is a closed operating system that it doesn’t accept the external data from Android or other resources. If you’ve been a long time user of an iPhone device, you may get a huge collection of music in your iTunes. How to deal with the music when you switch a new Android device like Google Pixel 2/2 XL, Samsung Galaxy S9, Nokia 10, Xiaomi Mi 8, or other new Android models?

Because iTunes redefines and file locations and file format in the iTunes software, so that makes it difficult to get your music from iTunes to an Android device. It seem impossible to transfer music from iTunes to Android device directly. Music play an important in all of our life. You may being trouble in transferring media files between iTunes and Android device when you get a new Android for example Google Pixel 2/2 XL. Luckily, in this article we will give you the best way to move iTunes music to Google Pixel 2/2 XL or other Android models with a reliable Android toolkit – Android Transfer. It is described as a bridge between Android and iTunes.

Import Music from iTunes to Google Pixel 2/2 XL

Google Pixel ManagerAndroid Transfer is a well-known software that lets you manage iOS and Android devices safely. It can backup Google Pixel data to computer, delete files and also export the files on Google Pixel with ease. This Google Pixel Manager supports data types like music, playlist, videos, photos, contacts, SMS among others. With the help of this smart program, you can easily transfer music from iTunes to Google Pixel 2/2 XL. What’s more, this all-in-one program features with one-click-root, app manager, phone to phone transfer, Gif maker and others. Fully compatible with 3000+ Android devices (Android 2.2 – Android 8.0) from Google Pixel, Samsung, LG, HTC, Huawei, Motorola, Sony, Lenovo, OPPO, ZTE, etc,.

d_win d_mac

Part 1: How to Transfer iTunes Music to Google Pixel 2/2 XL

Launch Google Pixel Manager – Android Transfer and connect your Google Pixel 2/2 XL phone to the computer. Your device will be detected and displayed in the primary window very soon.

Step 1. Select Transfer Mode
Simply click “Transfer iTunes Media to Device” on the main interface. Or find the “Transfer iTunes to Device” option under “Toolbox” > “Transfer Tools” section.

Android Transfer home page

Step 2.Transfer iTunes Music to Google Pixel 2/2 XL
All the iTunes files will be scanned and will be shown under different categories like “Music“, “Movies”  and others. By default, all the file types will be selected but to transfer only the music files, you can uncheck the others. Click “Transfer” to start transferring.

transfer iTunes music to pixel 2

transfer iTunes music to pixel 2

d_win d_mac

Part 2: Convert Apple Music to MP3 and Transfer to Google Pixel 2/2 XL

If you want to sync Apple Music as local MP3 files and play it on Google Pixel 2/2 XL without limits, here we recommend this Apple Music Converter for you. It is a famous Apple Music conversion tool for removing DRM protection from Apple Music, convert Apple Music to DRM-free(like MP3, AAC, WAV, or FLAC) files for offline playing without subscription. After the conversion, you could play back the converted music files on any devices freely.

Free Download Apple Music Converter:

d_win d_mac

Step 1. Run Program and Load iTunes Playlist
Step 2. Select Apple Music to Convert
Step 3. Convert Music to MP3 Files

convert Apple Music to MP3 for Google Pixel

Step 4. Transfer Converted Music to Google Pixel 2/2 XL
Note: You could sync the converted music from computer to Google Pixel 2/2 XL via Google Pixel Manager – Android Transfer, it is easy, efficient and safe.

sync music from pc to pixel 2

Free Download Google Pixel Manager – Android Transfer:

d_win d_mac

More Guides for Google Pixel Users:

How to Import Music to Google Pixel 2/2XL

How to Transfer Music and Videos to Google Pixel Phone

Music Transfer from Samsung Android to Google Pixel/Pixel 2

How to Transfer Photos to Google Pixel Phone

How to Transfer Samsung Data to Google Pixel/Pixel 2

How to Recover Deleted Data from Google Pixel/Pixel 2

How to Backup and Restore Google Pixel/Pixel 2

Transfer iTunes Music to Google Pixel 2/2XL

How to Import Music to Google Pixel 3A/3/2/1(XL)

[Summary]: Here are some a tutorial for helping you transfer music to Google Pixel 2/2 XL efficiently. This tutorial also guiding you to know more in details about importing videos, photos and other files to Google Pixel 3/3 XL, Pixel 2/2 XL, Pixel/XL and Pixel 3A/3A XL.

Have you heard of Google Pixel and Google Pixel 2? These are the latest phones in the market manufactured by Google. The Pixel 2 and Pixel 2XL are Google’s second attempt at creating an Android version of the iPhone 8 and a proper competitor to the Samsung Galaxy S9. Instead of focusing solely on top-end specs and including every feature imaginable, it aims to aims to offer users the cleanest Android experience possible. For the most part this means you’re getting the best of Google in a phone.

Most of us save our data on the computer for backup. If you get a new Google 2/2 XL phone you may want to copy the data from the computer to the new device, especially to songs and playlist. To keep favorite music saving on the new phone for entertainment is a necessary thing to do when you switch to a new phone. How to sync music to Google Pixel 2/2XL with a simple solution? Here we will provide the best way with you, to import music and other files to Google Pixel 2/2XL without hassle.

Add Music from Computer to Google Pixel 2/2 XL

iOS & Android Manager and Android Toolkit Android Transfer is the best phone management tool that help to manage, transfer, backup files for Android device, including music, photos, videos, contacts, SMS, playlist and more. With the help of this program, it will be a simple job to import music from computer to Google Pixel 3A/3/2/1(XL). The four click shortcuts include “Rebuild iTunes Library”, “Transfer iTunes Media to Device”, “Backup Photos to PC” and “Phone to Phone Transfer” respectively. You are able to transfer files between Android device and computer, transfer files between Android device and iTunes, transfer files between Android device and iOS/Android device. It works well for most Android devices, such as, Google Pixel, Samsung, HTC, Lenovo, LG, ZTE, Motorola, Sony, OPPO, OnePlus, etc,.

d_win d_mac
d_win d_mac

1 Click to Import Music from Computer to Google Pixel 2/2 XL

Step 1. Run Program and Connect Device
Run Android Toolkit – Android Transfer on the computer first. Connect Google Pixel 2/2 XL that you want to transfer music from the PC using a USB cable.

android transfer home page

Step 2. Import Music to Google Pixel 2/2 XL
On the program home screen, click “Music” on the top left the side of the interface to enter the music window by default. Then click the “Add” button and select “Add Files” or “Add folder” to select the file or the folder that you wish to transfer.

sync music from pc to pixel 2

A new window will pop-out. Choose music file or the music folder that you want. Then click “Open” to transfer the music from your PC to your Google Pixel 2/2 XL. After a while, you can check the transferred songs on your phone to make sure that your desired music collection is moved.

d_win d_mac
d_win d_mac

More Guides for Google Pixel Users:

Music Transfer from Samsung Android to Google Pixel/Pixel 2

How to Transfer Music and Videos to Google Pixel Phone

How to Transfer Photos to Google Pixel Phone

How to Transfer Samsung Data to Google Pixel/Pixel 2

How to Recover Deleted Data from Google Pixel/Pixel 2

How to Backup and Restore Google Pixel/Pixel 2

Transfer Music to Google Pixel 2/2 XL

How to Recover Files from Broken Screen Samsung Galaxy Note 4

[Summary]: When the phone screen is broken, how to get photos, contacts, messages and more off the broken phone? This guide will show you all the possible way to recover data from Samsung Galaxy Note 4 phone with broken screen, as well as other Samsung models.

Many of us have been through situations like cracked screen, water-damaged, black screen when we use Android smartphones. A smartphone is just a fragile little device, no matter how the manufacturer brags about its ability of explosion-proof function. Sometimes accidents happen, breaking the phone screen. When one of these situations happens, the worst thing is not the phone is broken, but we are unable to access the precious data, such as photos, contacts, messages and more that have been stored in the phone memory.

Types of Phone Screen Damaged
There are two ways in which your mobile phone get broken screen can suffer: software damage and hardware damage. Software damage can occur after you get broken on your phone screen, it may be make the phone OS has been corrupted. Hardware damage can occur commonly when your phone is dropped, smashed, watered, thrown or stomped. It can bring a wealth of problems from cracked screens and rough scratches to broken home buttons (they are the worst!).

Extract Files from Broken Screen Samsung Galaxy Note 4

Android ToolKitBroken Android Data Extraction helps you recover data from Samsung Galaxy Note 4 with broken screen, getting your previous files like contacts, pictures, videos, messages, call logs, WhatsApp messages, documents, etc,. Besides to broken screen, other broken cases are also supported to be restored, like black screen, water damaged, stuck in Download Mode, etc,. What’s more, Android ToolKit enables to recover deleted data from Android device, backup & restore Android data. It works well for almost all Samsung models, for instance, Galaxy Note 4/5, Galaxy S4/S5/S6/S7/S8.

d_win d_mac

Recover Data from Samsung Galaxy Note 4 with Broken Screen

Firstly, please run Android ToolKit – Broken Android Data Extraction on the computer, click “Broken Android Data Extraction” option,then click “Start“.

broken Android data extraction home page

Step 2.Select File to Scan
Select the file name which contain the data you wish to recover. If you want to recover all files at once, please click “Select All” option. The program will begin to scan data on your Samsung phone with broken screen.

select file to scan

Step 3.Select Broken Case for Samsung
In this step, the program will guide you to another screen, you will see the following screen. Here are several fault types of phone choices. Please choose the one which match your phone. Then click “Next“. Here “Stuck in the Startup screen”, “Black screen” and more are available for selecting.

choose Samsung broken type

Step 4.Select the Samsung Model
In the new page, select the device name and model of your Samsung phone. For Samsung Galaxy Note 4, you should select”Galaxy Note 4″. Click “Confirm”.

select phone model

Step 5.Enter Samsung into the Download Mode
Now you should follow the simple guide to enter your device into the Download Mode. Power off the phone > press and hold three buttons: “Volume Down”, “Home” and “Power” > press the “Volume Up” button to enter the “Download mode”.

enter Samsung into the download mode

Step 6.Download Recovery Package for Samsung
The program will begin to download the recovery package for Samsung phone. Then it will scan data from your phone.

scanning data from Samsung

Note:Please don’t interrupt the connection with your device and the computer, don’t use your device until the scanning process is end.

Step 7.Preview and Recover Data from Samsung
When the scanning is finish, you are allowed to preview all recoverable data from Samsung, including gallery, contacts, messages, and more. Select the data under the file name to save them on the computer by clicking “Recover“.

recover data from Galaxy Note 4

d_win d_mac

More Guides for Samsung Galaxy Note 4 Users:

How to Recover Lost Data from Broken Samsung Galaxy

Recover Pictures from Broken Samsung Galaxy Note 5/4/3/2

How to Recover Photo Data from Broken Samsung Galaxy Note 4

How to Perform Broken Android Data Recovery, Backup and Restore

How to Manage Samsung Galaxy Note on PC/Mac

Recover Data from Broken Note 4


Android Data Recovery

Recover Your Lost Data from Android
Now, Even Device Broken

Compatible with Android 8.0 Oreo/7.0, etc.

Recover Lost Data Now

How to Recover Photos Data from Broken Samsung Galaxy Note 4

I cracked my Galaxy Note 4 screen carelessly. What worse I can’t turn it on as usual. I decide to buy a new Android phone, and want to know if I can access and recover contacts, messages and photos from this broken device?

Nobody wants to be a disaster when his phone get broken and it can’t be operate anymore. Accident always happen without your permission. Maybe you fell off your phone from your hand or getting out of car you dropped it on the floor and the screen get broken. Accidental drops are the most common case of the broken smartphones, while being damaged in water is the second most common situation. I do believe that no matter how careful you are, accident happens without giving you a single notice. Keeping phone data avoid losing it is important once your phone get broken, and Broken Android Data Extraction provides an excellent way to recover your broken Samsung data.

Recover Data from Broken Samsung Galaxy Note 4

Android ToolKitBroken Android Data Extraction is designed to recover data from broken Android device under any broken situation, insist of broken screen, black screen, water damaged, stuck in Download Mode, etc,. It can help to recover data from broken Samsung Galaxy Note 4 for any types of data, including photos, videos, contacts, text messages, call logs, documents, WhatsApp messages and more. More importantly, Android ToolKit features with Android data recovery, Android data backup & restore. Almost all Samsung models and Android models are compatible with this program, such as, Samsung Galaxy Note 4/5, Galaxy S3/S4/S5/S6, and so on.

d_win d_mac

How to Recover Data from Broken Samsung Galaxy Note 4

Step 1.Run Broken Android Data Extraction Program
To begin with, please run Android ToolKit – Broken Android Data Extraction on the computer, click “Broken Android Phone Data Extraction” option,then click “Start“.

broken Android data recovery mode

Step 2.Select File to Scan
Click the file name which contain the data you want to recover. If you want to scan all files at once, please click “Select All” item. The program will begin to scan data on your broken Samsung phone.

select file to scan

Step 3.Select Broken Situation for Samsung
The program will guide you to another screen, you will see the following screen. There are several fault types of phone choices. Please choose the one which match your phone. Then click “Next“.

choose Samsung broken type

Step 4.Select the Samsung Android Model
On the new window, choose the device name and model of your Samsung phone. For Samsung Galaxy Note 4, you should select”Galaxy Note 4″. Click “Confirm” to continue.

select phone model

Step 5.Enter Samsung into the Download Mode
Now you should follow the simple guide to enter your device into the Download Mode. Power off the phone > press and hold three buttons: “Volume Down”,  “Home” and “Power” > press the “Volume Up” button to enter the “Download mode”.

enter Samsung into the download mode

Step 6.Download Recovery Package for Samsung
The program will begin to download the recovery package for fixing your Samsung system to normal state. Then it will scan data from your phone.

download recovery package

Note:Please keep connection with your device and the computer, don’t use your device until the scanning process is end.

Step 7.Preview and Recover Data from Samsung
Once the scanning is end, you are allowed to preview all recoverable data from Samsung, such as, gallery, contacts, messages, and more. Select the data under the file name to save them on the computer by clicking “Recover“.

recover data from Galaxy Note 4

d_win d_mac

More Guides for Samsung Galaxy Note 4 Users:

How to Recover Lost Data from Broken Samsung Galaxy

Recover Pictures from Broken Samsung Galaxy Note 5/4/3/2

How to Recover Deleted Photo Files from Samsung Galaxy

How to Perform Broken Android Data Recovery, Backup and Restore

How to Manage Samsung Galaxy Note on PC/Mac

Recover Data from Broken Galaxy Note 4

Android Data Recovery

Recover Your Lost Data from Android
Now, Even Device Broken

Compatible with Android 8.0 Oreo/7.0, etc.

Recover Lost Data Now