All posts by DHZ

How to Transfer Android Contacts to Samsung Galaxy S9

I need to sync the phone numbers to the new Galaxy S9 phone. Is it possible to transfer all the contacts between the two devices with only one click?

Ready or not, Samsung Galaxy S9 is coming. There were murmurs that Samsung would switch things up this year and reveal the Galaxy S9 at CES in January. The report claims Samsung is expected to unveil two versions of the Galaxy S9 – a regular S9 and larger S9 Plus, which sounds about right considering the company did the same for the last two years running with the S7 and S8. The phones will reportedly come with “upgraded camera systems” and could launch as early as March.

One of the biggest hassles that you may face is how to sync contacts from old Android to new Samsung phone when switching from an old device to the new one. Earlier, people used to manually add each contact one-by-one between two devices. This entire process always take people a lot of time.In addition, the contacts were added incorrectly. Is it there other way to overcome this limitation and transfer all contacts from Android to the new Samsung within minutes?

Transfer Contacts from Android to Samsung Galaxy S9

Phone Transfer makes data transfer become easier. Phone Transfer enable to transfer files between two devices among Android system, iOS system, and Symbian system. With this Phone Transfer, you can easily transfer contacts from Android to Samsung Galaxy S9 with only one click. The transferable types of data including contacts, text messages, photos, video, music, call logs, calendar, apps. Phone Transfer allow to back up or restore data for mobile device on the computer, it also allow to fully erase old data before selling the device. Phone Transfer work well for almost all Android models, such as, Samsung Galaxy S9/S8/S7/S6, Note 8/5/4/3.

d_win d_mac

How to Import Contacts from Android to Samsung Galaxy S9

Step 1. Install the Program and Connect Both Android Phones to Computer
First of all, download and install the Phone Transfer on your PC (Windows or Mac), then launch it to get the primary windows. Here. you should select “Phone to Phone Transfer” option and Next. Connect both of two phones to the computer via USB cable.

phone transfer home page

Note: Phone Transfer provide four features to you, including phone to phone transfer, data restore, data backup and erase old phone.

Step 2. Detect Your Phone and Select the Files to Transfer
When the program detects your phones successfully, it will display details and images of the two phones, you can select the data types to transfer. You will notice that two phones will be displayed as “Source” and “Destination”, you can simple click the “Flip” to change the places of your two devices.

select file to transfer

Step 3. Transfer Contacts from Android to Samsung Galaxy S9
The program will deeply analyze the content that stored on your source phone, these data will be listed in the middle of the program with numbers, including contacts, messages, photos and more. The final step is just mark the “Contacts” file and click the “Start Transfer” button to get content moved to your Samsung phone, after transferred, the data will be showed on the Samsung phone, you can check freely.

transfer android contacts to galaxy s9

d_win d_mac

Related Articles:

How to Transfer Data from Android to Samsung Galaxy S9

How to Transfer Data from iPhone to Samsung Galaxy S9

How to Recover Deleted Data from Samsung Galaxy S9

How to Recover Deleted Photos from Samsung Galaxy S9

How to Recover Data from Broken Samsung Phone

How to Manage Samsung Galaxy on PC/Mac

How to Stream Apple Music on Samsung Galaxy S9

How to Root Samsung Galaxy S9 with One Click

I am wondering is there a way to root my new Samsung Galaxy S9 phone with only one click? I want to get more control on the new device. Thank you very much.

Samsung Galaxy S9 offers one of the best Android phones on the market in 2017.This smart phone is made of attractive features, and gain a lot of Samsung fans to get it a try. For these features and many others that have not been mentioned, the Samsung Galaxy S9 are considered one of the best android phones in 2017. Most of people will consider to root Samsung phone by himself. After rooting the device, you will gain more full control over the device.For instance, you will be able to manage files and contents in your phone memory.Besides, you will be able to install important apps on the phone, and you can also uninstall the apps to free some space or whenever you do not need them.

Root Samsung Galaxy S9 with One Click

To root Samsung Galaxy S9 with one click, Android Manager is the best option. It is an all-in-one data manager tool for Android device, enable to transfer & manage files for Android, including music, videos, photos, contacts, SMS, apps. This super program also allow to root Android on the computer safely. With using it, you can root Samsung Galaxy S9 on the computer without data loss. What’s more, Android Manager help to transfer files between Android and computer, transfer files between Android and iTunes, transfer files between Android and mobile device. All models of Android devices are compatible with Android Manager, like Samsung Galaxy S9/S8/S7, HTC, Lenovo, LG, Motorola, Huawei, Google Pixel, etc,.

d_win d_mac

One Click to Root Samsung Galaxy S9 without Data Loss

Step 1.Run Program and Connect Samsung Device
Launch, run Android Manager and then connect the Samsung Galaxy S9 phone to the computer with a USB cable.The program will detect your phone if it is connected successfully and display it on the primary window.

android manager home page

Step 2.Select Rooting Mode
Click the “Toolbox” tab in the top menu on the primary window of the program.Three main sections will be displayed under the “Toolbox” option.Go to the “Other Tools” section and from the two subsections that will be shown,choose “One-click Root” to gain full control of your Samsung.

one click root samsung

Step 3.One Click to Root Samsung without Data Loss
A prompt message will be displayed saying that after rooting you will gain full access to your phone system and that rooting may affect your device warranty.Just click “Root” from that warning box to continue rooting your Samsung phone.

root samsung safely

Please don’t interrupt the connection of your device and the computer until the root is completed.The phone may restart during the root process,but you should not operate it.It will prompt you once the root process is completed.

d_win d_mac

Related Articles:

How to Recover Deleted Data from Samsung Galaxy S9

How to Recover Deleted Photos from Samsung Galaxy S9

How to Transfer iTunes Music to Samsung Galaxy S9

How to Transfer iTunes Videos to Samsung Galaxy S9

How to Transfer iPhone Data to Samsung Galaxy S9

How to Manage Samsung Galaxy S9/S8/S7/S6 on PC/Mac

How to Stream Apple Music on Samsung Galaxy S9

How to Recover Deleted Data from Samsung Galaxy S7/S7 Edge

[Summary]: Samsung Galaxy S7 is one of the popular model of Samsung Galaxy series. It’s not just a new phone. It brings a new way of thinking about what a phone can do. The Galaxy S7/S7 Edge, rethink what a phone can do. This article will show you how to recover deleted data from Samsung Galaxy S7/S7 Edge after losing data accidentally.

Lost Data on Samsung Galaxy S7/S7 Edge

There are many causes will lead to lost data on Samsung Galaxy S7/S7 Edge, like deleted accidentally, virus attack, Android system restore, Android system update, Android system root, etc,.However, most people think that data files once deleted from Android device, it can be restored. Needless to say, this is a highly misinterpreted concept. Since the deleted it actually not be removed from device permanently, it remains in the internal memory for a while and become invisible. In this page, we will introduce you how to recover deleted data from Samsung Galaxy S7 or Samsung Galaxy S7 Edge with an easy and efficient Samsung data recovery solution. Hope it is helpful.

Part 1: How to Perform Samsung S7/Samsung S7 Edge Data Recovery

Honestly, various data recovery programs are available.
Here, we recommend you the best one – Android Data Recovery software. The tool is capable of recovering deleted data from Samsung Galaxy S7/S7 Edge, including photos, messages, contacts, videos, audio and documents, etc,. Android Data Recovery allow to restore deleted data on Android from all data loss situations. Being powerful, safe and easy-to-use, it is your ideal tool to recover deleted files from your Samsung Galaxy S7(Edge). Android Data Recovery work well on most models of Android devices, such as Samsung (Galaxy S9/S8/S7/S6/S5), HTC, Lenovo, LG, Motorola, Huawei, Google Pixel, and so on.

d_win d_mac

Step 1.Run Program and Connect Samsung Galaxy S7/S7 Edge to the Computer
To begin with, run the Android Data Recovery program on the computer, click”Android Data Recovery” option in the home page of program.Then please connect your Samsung Galaxy S7 phone to the computer via an USB cable.

android data recovery home page

Step 2.Allow Program Connect Samsung to the Computer
Please click “OK” on the phone and go on, allow the program detect your device on the computer.

allow to connect samsung

Step 3.Select the Files to Recover from Samsung
After allowing program detect your device on computer, you’ll see this window,different types of files can be chose to be scan by program.Select the deleted files contain the data you want from Samsung that to be scanned and then click “Next” to go on.

select file to recover from samsung

Tips: You can click “Select all” to have all your Samsung data scanned.

Step 4.Allow Scanning and Analyzing Data on Samsung
You’ll get a window as follow on your device after your device is detected by the program.Tap “Allow” on your device to enable the program to scan your device for deleted data.

allow scanning samsung

Note:Please make sure that your phone battery is more than 20% charged and keep the connection between your phone and the computer.

Step 5.Scan Samsung for Deleted Data
Now the program will begin to scan data on your phone with only some minutes.

scan samsung for deleted data

Step 6.Recover Deleted Data from Samsung Galaxy S7/S7 Edge
Once the scan is complete, you are allowed to preview all data found on your phone, including contacts, SMS, gallery and more. Preview then retrieving the data you want to restore by clicking “Recover” button to save them on the computer.

recover deleted data from samsung galaxy s7

d_win d_mac

Part 2: How to Recover Data from Broken Galaxy S7/S7 Edge

When your Samsung device is broken, like the screen is locked, the screen is broken, device with black screen, or other cases, you may need to recover data from the broken Samsung Galaxy without accessing the phone.

This method that is mentioned will allow you to unlock your Samsung Galaxy S7/S7 Edge remotely with a Samsung tool named as “Find my Mobile“. The only condition is that you must have logged in to your Samsung account in the phone which is broken. Or you made a Samsung account when you first time used your Samsung or for games center you made Samsung account. If you ever made Samsung account and you used it on your Samsung, you can recover data from broken Galaxy S7/S7 Edge via “Find my Mobile” service. Note, this service is not present in the old Samsung phones.

Note: To make use of this service you must have Remote controls enabled on your phone.

Firstly, you should sign in on “Find my mobile” service using your Samsung account username/email and password.

find my samsung galaxy s7 phone

Once you have logged in to find my mobile service, you will see number of great services you can make use of remotely. It also includes “Unlock Screen Remotely or Remotely Unlock my Phone”. Click on it and your phone will get unlocked.

Now, connect your phone to the computer and use an USB cable to copy the data from broken Galaxy S7/S7 Edge to your computer.

That’s it. Is is a simple solution to extract data on broken device with ease? Hope it will do a great help for you.

Related Articles

How to Recover Deleted/Lost Data from Samsung Galaxy S7

How to Recover Deleted Data from Samsung Galaxy S7 on Mac

How to Recover Deleted Photos from Samsung Galaxy S7

How to Recover Lost Data from Broken Samsung Galaxy S7

How to Recover Data from Broken Samsung Galaxy S7

How to Manage Samsung Galaxy on PC/Mac

How to Stream Apple Music on Samsung Galaxy

How to Bypass iPhone XS/XR/X/8/7 Lock Screen

My iPhone scree is locked without password. Last night I had a row with my wife, then she reset the password on my phone.This morning I entered the wrong password with five times, and the device was locked with 15 minutes. How to bypass the iPhone locked screen without password?

For mobile data security, most of people users set password to lock screen to protect personal data. We need to enter the password to remove locked screen and then accessing the phone. Sometimes we may set the password as complicated as we could, that’s really safe, however sometimes we may be forget the password or someone reset the password on it, no matter what situations we will encounter, we may need to bypass the iPhone locked screen. So how to remove iPhone locked screen without password? Here is the best solution we provide to you for reference. The helpful iPhone locked screen removal tool called iPhone Locked Screen Removal. Let’s see how powerful is it.

Remove iPhone Lock Screen without Password

iPhone Lock Screen Removal is a powerful locked screen removal tool indeed. iPhone Lock Screen Removal enable to bypass lock screen on iPhone X/8/7 without password. You can one click to unlock screen from iPhone and iPad without any tech knowledge required, everybody can handle it, even without losing any data on device. With this tool, you can remove iPhone lock screen without restoring it to factory reset or entering Recovery Mode. Besides, it compatible with all iOS devices, including iPhone XS, iPhone XR, iPhone X, iPhone 8(Plus), iPhone 7(Plus) and iPad Pro, iPad Air, etc,.

d_win d_mac
d_win d_mac

Part 1: How to Bypass iPhone X/8/7 Lock Screen without Data Loss

Step 1. Run Tool and Connect iPhone X/8/7
Launch iPhone Lock Screen Removal on your computer and select “Unlock” among all the tools.

ios toolkit home page

Connect your iPhone to the computer using a USB cable. Then click “Start” on the program.

connect locked iphone to pc

Step 2. Boot iPhone in DFU mode
To bypass iPhone lock screen, you should boot it in DFU mode.

Follow the instruction on iPhone Lock Screen Removal to boot device into DFU mode.

-Power off your iPhone.
-Press and hold the Volume Down button and the Power button together for 10 seconds.
-Release the Power button and keep holding the Volume Down button until the device is in DFU mode.

enter locked iphone into the dfu mode

Step 3. Confirm iPhone Information
After the device is in DFU mode, iPhone Lock Screen Removal will display the device information, such as phone generation, iOS version, etc,. If the information is not correct, you can select the correct information from the dropdown lists. Then click “Download” to download the firmware for your device.

select the information of locked iphone

Step 4. Bypass iPhone Lock Screen without Data Loss
After the firmware is downloaded successfully, click “Unlock Now” to start unlock your iPhone without data loss.

confirm to unlock iphone

Your iPhone will be unlocked successfully in just a few seconds. Done.

unlock iphone without data loss

d_win d_mac
d_win d_mac

Part 2: How to Extract Data from iPhone X/8/7 with Lock Screen

If you need to extract or recover data from iPhone X/8/7 with lock screen, you can use iPhone Data Recovery. This program empower to restore data from iPhone X/8/7 with lock screen. The recoverable types of data including contacts, messages, photos, notes, call history, etc,. With this program, you can access and preview, then retrieving data from locked iPhone with three ways: directly recover from device, recover from iTunes backup, recover from iCloud backup. To sum up, iPhone Data Recovery is an all-in-one data recovery program, help to recover deleted data from iPhone under any data loss circumstances. Compatible with all iPhone models, such as iPhone X, iPhone 8(Plus), iPhone 7(Plus).

d_win d_mac

Step 1. Run Program and Connect your iPhone to PC or Mac
After running the iPhone Data Recovery program on the computer,  connect your iPhone to the computer via USB cable, and click “Recover from iOS Device” then “Start“.

connect iphone to the computer

Step 2.Scan your all Data from your Locked iPhone
Select the files you need to extract/restore from locked iPhone.Then iPhone Data Recovery will begin to scan your iPhone automatically.

scan data on locked iphone

Step 3. Restore Data from Locked iPhone X/8/7
After the scan, all your data will be listed by program, before restoring the data, you’d better preview one by one, and then selecting the data to be recover, and finally click “Recover” button to save the selected data on the computer.

Note: The data found in each category was made up by two parts, one is the missing data deleted accidentally; another part is those data still on your iPhone.

extract data on locked iphone

You can click the button “Only display the deleted items” to make them apart.

d_win d_mac

Related Articles:

How to Extract and Backup Data from Locked/Disabled iPhone

How to Recover Photos from Locked/Disabled iPhone

Forget iPhone Locked Screen Password and How to Remove it

Unlock iPhone Passcode when Forgot iPhone Screen Lock Passcode

Bypass iPhone Lock Screen Password and Fingerprint

How to Unlock iPhone with Unresponsive Screen

iPhone Manager – How to Transfer and Manager Files on iPhone X/8/7

How to Root Samsung Galaxy Note 8 Safely

I need help. I got a new Galaxy Note 8 from my dearest, I just want to root my new device by myself. Any helpful suggestions? I want a reliable and safe solution. Thanks advanced.

Rooting Android can make you get more on authority on your device. If you’ve researched anything about Android on the internet, you’ve probably seen and read about “rooting” one. There was a time when many of the Android phones available didn’t live up to their potential, and root was the answer. However, horrible software was the norm, applications that you would never use ran amok and wasted data and battery life, and the experience was bad all around. So how to root Samsung device on the computer safely become a hot topic among Android users. This tutorial is aims to teach you root Samsung Galaxy Note 8 with a helpful solution.

Root Samsung Galaxy Note 8 with One Click

Android RootAndroid Tool Kit is one of the most well-known Samsung root software. Known for its most simple and easy user interface, it is used by plenty of users all around the world. It offer a reliable and safe way for you, to root Samsung Galaxy Note 8 on the computer without losing data. You can use this smart program to root any Android device with only one click. Not only Samsung Galaxy Note 8,but also most of Android devices are compatible to Android Root tool,including Samsung Galaxy Note 8/5/4/3, Huawei P10/P9, HTC, Motorola, Google Pixel, Lenovo, LG, Sony, ZTE, etc,.

d_win d_mac

How to Root Samsung Galaxy Note 8 without Data Loss

To begin with,please download and run Android Root on your computer then click on “More Tools” in the home page of program.Select “Root” option on it.

android root home page

Step 1.Connect Samsung Galaxy Note 8 to the computer
Connect Samsung phone to the computer with an USB cable.You should enabled the USB Debugging mode on your Samsung.Then Android Root will automatically connect your device.

connect samsung to pc

Once your Samsung is connected,Android Root will offer a proper solution to root your phone.Click on “Start” to continue.

detect samsung with android root

Note:
1.Please keep connection of the device and computer until the whole process is end.
2.The phone will restart sometimes when detecting.
3.It may cost you some time to detect your device.Please be patient.

Step 2.Safely Root Samsung Galaxy Note 8 without Data Loss
It will cost you some minutes for the program to detect your Samsung phone.Then it will be ready for you to root your device.Just click on “Root Now” to safely root your Samsung phone on the computer.

ready root samsung

Note:The phone will pop up a message to prompt whether you would like to root the phone during the rooting process.Tap on “Confirm” to continue the rooting process.You phone will be complete the rooting within minutes.

samsung galaxy note 8 rooted

d_win d_mac

More Samsung Galaxy Note 8 Tutorials You can check:

How to Recover Deleted Data from Samsung Galaxy Note 8

How to Recover Deleted Photos from Samsung Galaxy Note 8

How to Transfer Data from iPhone to Samsung Galaxy Note 8

How to Switch Everything from Samsung to Galaxy Note 8

How to Transfer Music to Samsung Galaxy Note 8

How to Transfer Videos to Samsung Galaxy Note 8

How to Manage Samsung Galaxy S6/S5/S4/S3/Note 8 on the Computer

How to Fix Photos Disappeared on Samsung Galaxy S7/S8

Gallery is the most important file for most people, losing photos on device is always painful. Samsung Galaxy series phones are the most popular phones among Android that comes with the well camera quliaty to capture memory. However, the photos may be disappeared for different situations in daily life.Here we may a list of photos disappeared on Samsung Galaxy S7/S8.

One: Reset your phone due to certain updates or issues and then the photos were disappeared.If you like to store photos in your phone internal storage, then the photos will be deleted.

Two: SD cards gets corrupted due to virus or malware that restrict the access to your SD card. You may be also run the risk of photos disappeared during the virus removal process.

Three: Accidental deletion of photos. You may have accidentally deleted photos just want to release some space on your phone, and somebody else using you phone may have deleted the photos. There are various reasons related to the manual deletion.

Others: More situations like Android system room may be also cause to photos disappeared on Samsung device.

In this article we will discover a renowned tool by which you can get over this trouble situation and recover almost all of your disappeared on Samsung Galaxy S7/S8.

Recover Photos after disappeared on Samsung Galaxy S7/S8

The great Android Data Recovery can be a helpful tool to recover disappeared photos on Samsung Galaxy S7/S8 with simple steps. It is a developed professional program for Android, allowing you to recover deleted photos and videos, audios, text messages, contacts, call log, WhatsApp messages, apps, etc,. Android Data Recovery support to restore deleted Android data under any data loss cases, such as, accidental deletion, restore to factory reset, Android system update, Android system room, various attack, and more. Most of Samsung models are compatible with Android Data Recovery, like Samsung Galaxy S8/S7/S6/S5, Note 8/5/4/3.

d_win d_mac

How to Fix Photos Lost on Samsung Galaxy S7/S8

Step 1.Run Program and Connect Samsung Galaxy S7/S8 to the Computer
After you installing and running the Android Data Recovery program on the computer, click”Android Data Recovery” mode in the home page of program.Then please connect your Samsung Galaxy phone to the computer via an USB cable.

android data recovery home page

Step 2.Allow Program Connect Samsung to the Computer
Please click “OK” on the phone and go on, allow the program detect your device on the computer.

allow to connect samsung

Step 3.Select  the Photos File to Recover from Samsung
After allowing program detect your device on computer, you’ll see this window,different types of files can be chose to be scan by program.Select the deleted file which contain the data you need to restore from Samsung, to be scanned and then click “Next” to go on. For photos recovery, just simple click “Gallery“.

select photos file to recover from samsung

Note: You can click “Select all” to have all your Samsung data scanned.

Step 4.Allow Scanning and Analyzing Data on Samsung
You’ll get a window as follow on your device after your device is detected by the program.Tap “Allow” on your device to enable the program to scan your device for deleted data.

allow scanning samsung

Tips:Please make sure that your phone battery is more than 20% charged and keep the connection between your phone and the computer.

Step 5.Analyze Data on Samsung
Now the program will begin to scan data on your phone with  only some minutes.

scan samsung for disappeared photos

Step 6.Recover Disappeared Photos from Samsung Galaxy S7/S8
When the scan is finish, you could preview all data found on your phone, including gallery, contacts, SMS, and more. Preview then retrieving the data you want to restore under “Gallery” file, then clicking “Recover” button to save the selected photos on the computer.

recover disappeared data from samsung galaxy

d_win d_mac

Related Articles:

How to Recover Deleted Files from Samsung Galaxy

How to Recover Deleted Photos from Samsung Galaxy S6/S7/S8

How to Recover Deleted Photos from Samsung Galaxy on Mac

How to Manage Samsung Galaxy S9/S8/S7/S6 on PC/Mac

How to Stream Apple Music on Samsung Galaxy S9/S8/S7/S6

How to Stream Apple Music on Samsung Galaxy S9

I like the Apple stream music service very much since I purchased the favorite tracks and I like to play the Apple music on my iPhone while traveling. Lately I get another new Samsung Galaxy S9,I want to keep play Apple Music on Samsung Galaxy S9/S9+ after canceling subscription. Is it possible to play Apple music on the new S9 phone without Apple Music for Android App?

People also read:

* Transfer iTunes Music to Samsung Galaxy S9/S9+

* Recover lost or deleted data from Samsung Galaxy S9

Apple Music is Apple’s music-streaming service which was announced on June 8, 2015, and launched on June 30, in over 100 countries worldwide. By the end of December 2016, Apple Music has more than 20 million paying subscribers. Now in 2017, there is no doubt that the apple music user group will grow larger and larger.

Stream Apple Music on Samsung Galaxy S9

Thanks to the audio condition, that most of smartphone allows to play music on device for entertainment. However, since M4P Apple music files are DRM protected, that’s why you can’t get Apple music work on any non-iOS devices, like Android.Though we can’t play Apple music on other non-iOS device in normal, there is a way for you to stream the local DRM-free Apple music files on Android. I’ll show you an easy way to stream Apple music on Samsung Galaxy S9.

Remove DRM Protected and Convert Apple Music

Let’s start with a helpful Apple Music DRM RemovalApple Music Converter. This wonderful software help to remove DRM protected from Apple music and convert the M4P music to normal MP3 or AAC/M4A formats with 16X conversion speed and lossless quality. After the conversion, you can play the converted Apple music on Samsung Galaxy S9 for free without limitation, as well as other compatible audio devices, including Samsung(Galaxy S9/S8/S7/S6, Note 8/5/4/3), iPod nano/shuffle/classic, chromecast, PSP, MP3 player and more Android devices.

d_win d_mac

How to Play Apple Music on Samsung Galaxy S9

Step 1. Launch Apple Music DRM Removal – Apple Music Converter
After installation, launch and run the Apple Music DRM Removal – Apple Music Converter on the computer. iTunes will be launched automatically as well. Then you will find all your iTunes Library and playlists will be displayed on the main interface of the software.

run Apple Music Converter

Tips: There is no need to download the tracks, playlists or albums if your internet connection is fast enough. As long as they are added to your iTunes library, this software will automatically load and show them on the interface of software.

Step 2. Select the Tracks/Playlist and Choose MP3 as Output Format
Click the playlist in the left column, then you can add iTunes’s songs, albums or playlists to the program that to convert. The program supports batch conversion so you can choose a few playlists, or select a few songs.

Add Apple Music to convert

Check the “Output Format“. You can choose output format like AAC, MP3, AIFF as the output format. Here we choose MP3 which is perfectly supported by Samsung device. Customize other settings according to your need.

select mp3 format to Convert

Step 3. Remove DRM & Convert Apple Music for Samsung
Click the magical “Start Convert” button to start the conversion. When the conversion finished, you got DRM-free normal MP3 audio files with the its original quality.

convert Apple Music to MP3

Click “Explore output File” button to browse the converted Apple music files.

explore Apple Music in MP3 format

d_win d_mac

Step 4. Transfer Apple Music to Samsung Galaxy S9 for Playback
In the last step, move the converted MP3 Apple music files to Samsung Galaxy S9 via Android Data Manager, for playing for free without limitation.

transfer Apple Music to Samsung Galaxy S9

Free Download Android Data Manager:

d_win d_mac

Related Articles:

How to Recover Deleted Data from Samsung Galaxy S9

How to Recover Deleted Photos from Samsung Galaxy S9

How to Transfer iTunes Music to Samsung Galaxy S9

How to Transfer iTunes Videos to Samsung Galaxy S9

How to Transfer iPhone Data to Samsung Galaxy S9

How to Manage Samsung Galaxy S9/S8/S7/S6 on PC/Mac

How to Stream Apple Music on Samsung Galaxy

How to Convert iTunes Music to MP3

How to Retrieve Deleted Call History from Samsung Galaxy S9/S9+

[Summary]:You may have lost or deleted call logs by accident on Samsung galaxy phone.Follow the simple steps to recover call history from Galaxy S9/S9+ or SIM card.

How to recover deleted call history from Galaxy S9? I need to get back the lost call logs on my new Samsung device. Could anyone give me some ways available to accomplish this recovery? Many thanks.

I cleared my call logs containing received call numbers and missed the important call numbers on my Samsung Galaxy S9 plus. How can I get the deleted phone numbers back?

People Also Read:

* How to Retrieve Deleted Contacts from Samsung Phones

* How to Recover Lost Photos on Galaxy S7/S8/S9

It must be an trouble thing that if you lost some important call record on smartphone, especially when you forgot to add the calls to the contacts list. If you are one of them who accidentally lost call history on Samsung device, you might quite concern about this issue “How to recover deleted call history on Samsung phone with a perfect solution?” Before performing the recovery, you should read the cautions first, read this tips to pay attention on how to avoid the Android data being impossible to recover.

Ensure the Probability of Samsung Data Recovery

1. Disable your Samsung phone’s Wi-Fi connection
When your Android device’s Wi-Fi is on, the system may download the new Android version, or the Apps on your Android device will upgrade automatically. In fact, all of these operations may cause Android call logs to be overwritten.

2. Stop writing any data to your Samsung Galaxy phone
After Android call logs were deleted, you should stop using your Samsung phone as soon as possible because any new data may overwrite the old data which will cause the deleted the call logs unrecoverable.

3.Don’t add/transfer/import files to your phone
Don’t take any new photo or add new files to your phone,make sure that you didn’t do any update, otherwise, the new data will overwrite the previous data.

Here in this post, we will show you how to retrieve deleted call logs on Samsung Galaxy S9 with a smart software. If you are using other brands of Android devices or other models of Samsung, the operations are the same.

Recover Deleted Call History from Samsung Galaxy S9

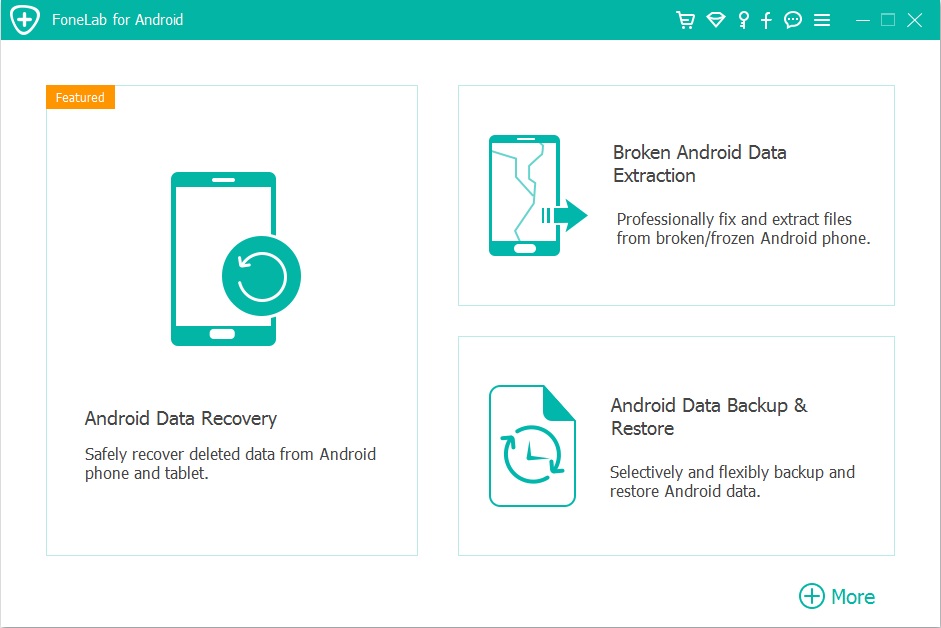
Android Data Recovery gives you an easy and safe solution to restore deleted call history from Samsung Galaxy S9 and S9+. Besides call history, Android Data Recovery allow supports to retrieve verity of files, such as contacts, text messages, photos, videos, WhatsApp messages, and others. Android Data Recovery works on most of Android devices, including not only Samsung, but also HTC, Google, LG, Sony, Moto, OnePlus, Huawei, Google Pixel, ZTE, Xiaomi, OnePlus.

It works well on any data losing cases, for example, deleted by mistake, Android system update, Android system room, forgotten password, factory reset, etc,. Most of Samsung models are compatible with Android Data Recovery, for instances, Samsung Galaxy S9/S8/S7/S6/S5, Note 8/5/4/3.

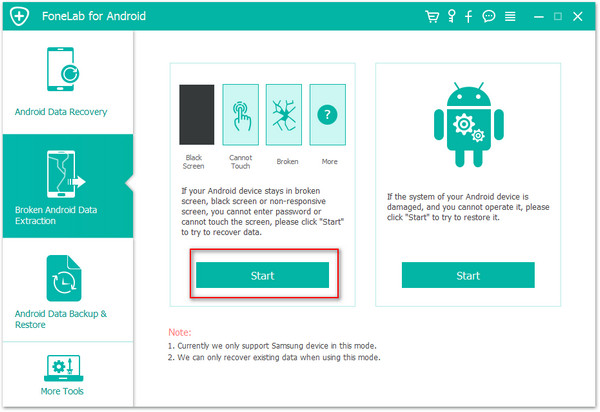
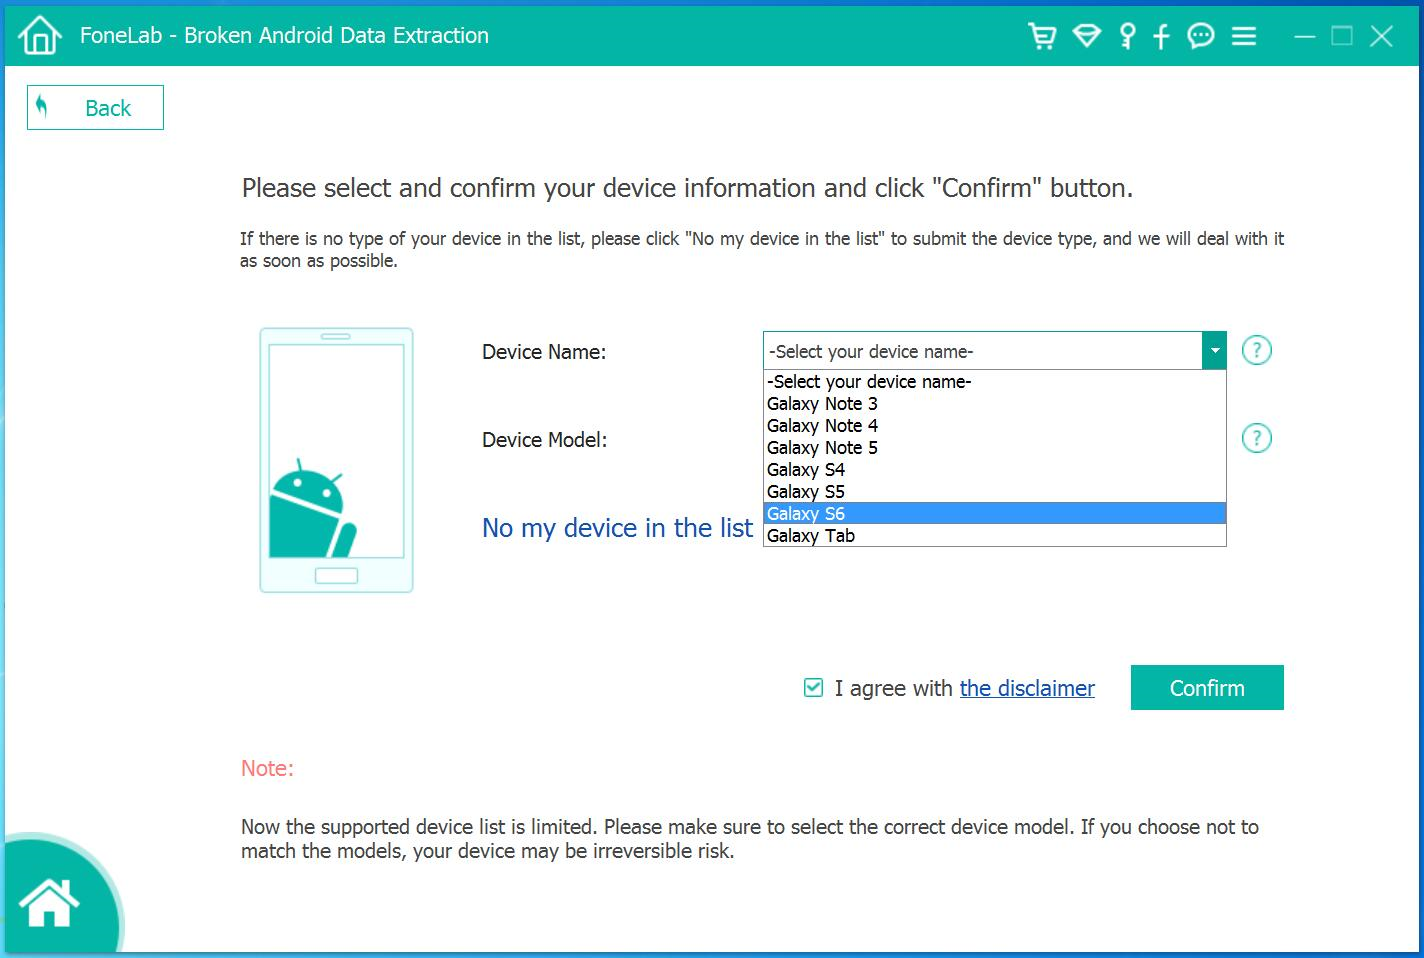
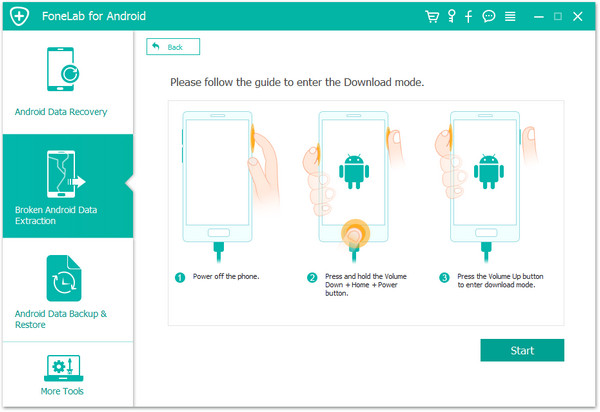
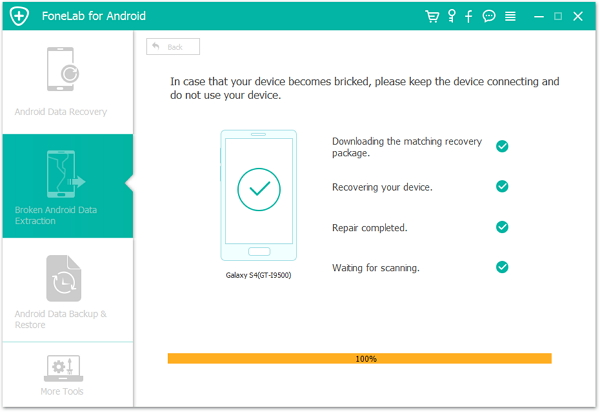
In additional, the “Broken Android Data Extraction” function also can helps users to recover files from broken Samsung Galaxy phone and fix Samsung phone system problem like black-screen, frozen, crashed, startup-screen, Samsung logo-screen, virus-attack, screen-locked, fix the broken phone back to normal.

d_win d_mac

Part 1. Simple Steps to Recover Deleted Call Logs in Samsung S9/S9+

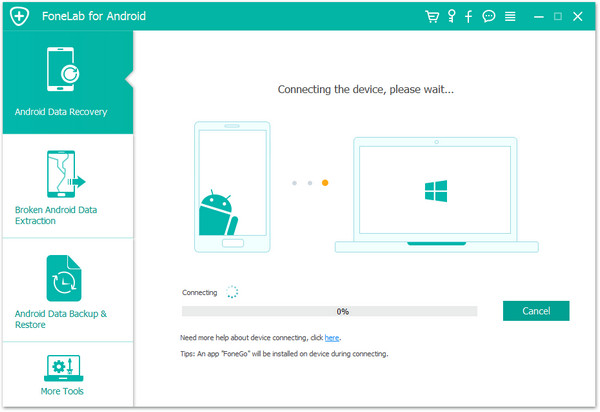
Step 1.Run Android Data Recovery and Connect Samsung to the Computer
Download and install Android Data Recovery on your computer. Run it and choose “Android Data Recovery” mode.

run Samsung galaxy S9 data recovery

Then connect your Samsung Galaxy S9 phone to the computer via an USB cable.

connect samsung s9 to the computer

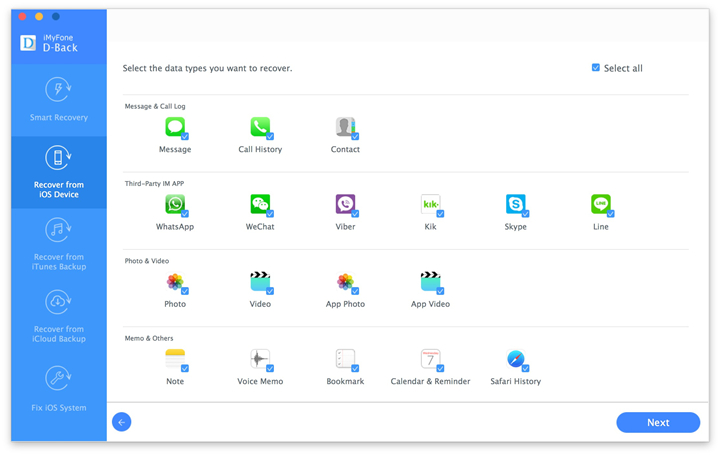
Step 2.Select Call History Files to Scan
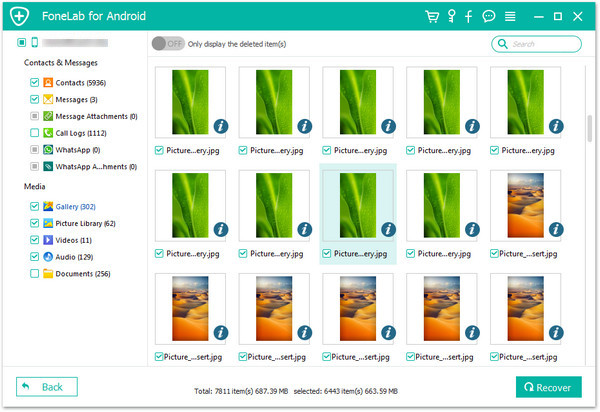
Choose the file type you need to recover from Samsung.For call history recovery,just click “Call Logs”.Then click on “Next”.

select call logs to scan

Step 3.Scan the Data on Samsung
Click “Allow” on your device to allow the program to scan your phone. And then you will see the following window.

allow scan the samsung galaxy s9

Then the program will begin to analyze data on your device,it will take you a few minutes.

scan samsung for deleted call logs

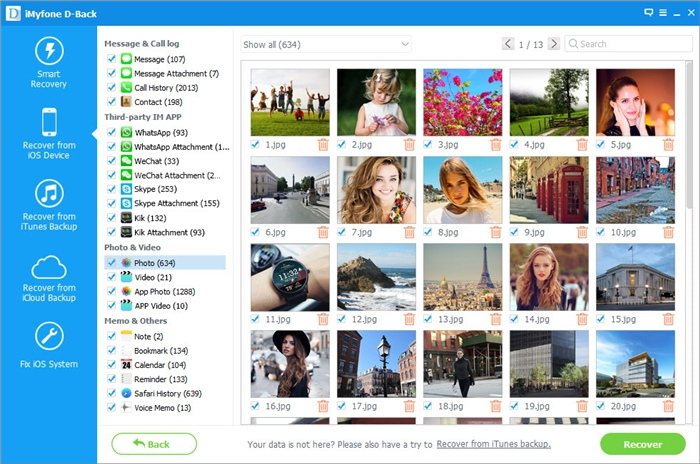
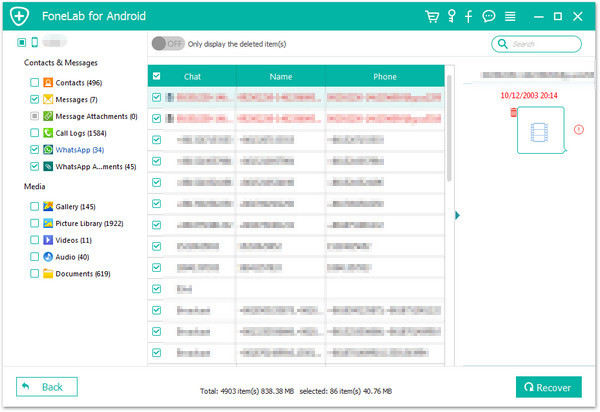
Step 4.Preview and Recover Deleted Call History form Galaxy S9
In the last step,you could preview and click “Recover” to save the selected call logs under “Call Logs” file on the computer.

recover call logs from samsung galaxy s9

d_win d_mac

Part 2. How to Protect Your Samsung Data from Permanent Loss

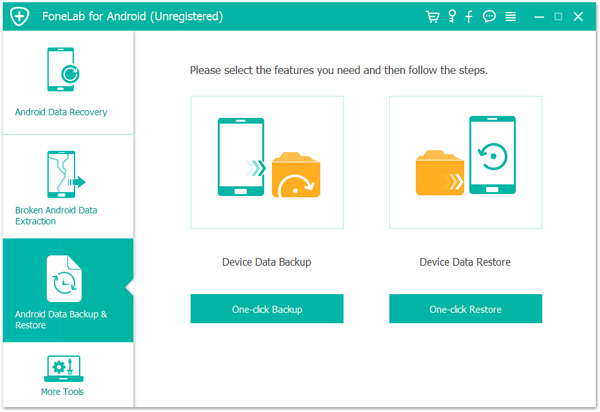
Have you ever experienced some disastrous data loss accidents on Samsung before? What did you do to retrieve deleted call logs from Samsung? As for me, I prefer to backup Android phone data regularly. Sometimes, I export and save my Samsung files on the computer with this Android ToolKitAndroid Data Backup & Restore. It is such a useful data manager tool for Android device, including including contacts, messages, call Logs, photos, videos, audio, documents and so on. Except backing up Android data on computer safely, it allow to recover deleted data on Android, recover data from broken Android under any broken cases.

You may want to know:

How to Backup and Restore Data from Samsung Galaxy S9

d_win d_mac

android backup restore interface

Part 3: Tips to Manage Call Logs on Samsung Galaxy S9/S9+

Delete Call History on Samsung Galaxy S9/S9+

If you want to delete one or all recent calls on your Samsung S9,just follow the simple steps to delete them.

Step 1.From a Home screen, tap Phone apps phone icon (lower-left).

Note:If not available, swipe up or down from the center of the display then tap Phoneapps phone icon (lower-left).

Step 2.From the RECENTS tab (upper-left), view the call history.
Note To delete recent calls:

1)Tap the Menu icon Menu icon (upper-right).
2)Tap Delete.
3)Select the call logs you want to delete.
Note:To mark all items for deletion, tap All (upper-left).

Note:This is the easiest way to delete recent call logs,but some data recovery software can easily scan and recover the deleted call logs from Android device as above.If you want to delete call history, contacts, text messages and other personal data on your phone,you can use a professional Android data eraser tool.
Here is the guide teach you how to permanently delete call history on Android phone

4)Tap DELETE (upper-right) to delete the selected call logs you want to remove on your Samsung Galaxy S9.

Block Incoming Calls:

Open “Phone”apps phone icon
Tap “Menu” Menu iconand go to “Settings” apps settings icon
Access “Block numbers” and follow one of the steps below:
To block a new phone number: enter it and make sure the match criteria is set to “default”
To block a phone number or contact from the phonebook or call log: go to “Contacts” or “Recents” and select the phone number/contact you want to block
To block unknown callers: enable “block unknown callers

Unblock Calls:

Launch “Phone”apps phone icon
Tap “Menu” Menu icon> “Settings”apps settings icon
Tap “Block numbers”
Tap the “-“ symbol associated with the phone number/contact you want to unblock

Enable Call Forwarding:

Launch “Phone”apps phone icon
Tap “Menu” Menu icon> “Settings”apps settings icon
Tap “more settings” > “Call forwarding
Select “Always forward
Enter the phone number you want to use for call forwarding
Tap “Turn on

Enable Conditional Call Forwarding:

Launch “Phone”apps phone icon
Tap “Menu” and access “Settings”apps settings icon > “More settings”
Go to “Call forwarding”
Select to “Forward when unanswered”, “Forward when unreachable” or “Forward when busy”
Enter the phone number you want to use for call forwarding. Alternatively you can select a contact from the phonebook
Tap “Turn On

Disable Call Forwarding:

Open “Phone”apps phone icon
Tap “Menu”Menu icon
Access “Settings”apps settings icon > “More settings”
Tap “Call forwarding”
Select the forwarding option you want to disable if needed
Tap “Turn Off” to confirm

Related Articles

How to Recover Deleted Data from Samsung Galaxy S9

How to Recover Deleted Photos from Samsung Galaxy S9

How to Transfer iTunes Music to Samsung Galaxy S9

How to Transfer iTunes Videos to Samsung Galaxy S9

How to Transfer iPhone Data to Samsung Galaxy S9

How to Manage Samsung Galaxy S9/S8/S7/S6 on PC/Mac

How to Stream Apple Music on Samsung Galaxy S9/S8/S7/S6

Retrieve Deleted Call Log on Samsung S9/S9+

How to Restore Samsung Data if Cannot Enter Samsung System

I lend my Samsung phone to litter brother for one day, however, when he gave back the phone to me, I found that the phone was broken that can’t enter the system on it. I am not sure what’s wrong with it. I decided to send the broken device to the repair shop. How to restore data from Samsung without entering the system before sending it to the repair shop? I need your help in hurry. Any suggestions are welcomed. Thanks.

We may encounter different situations that we break our mobile phone. There are many causes can lead to break phone that can’t enter the system on it as normal. When this unfortunate incident happen, the most important we supposed to do is extract the files from the broken device. If you also have trouble in entering system on Samsung phone and are looking for a solution to recover data from the locked device, here are the tips. After reading this post, you will get an efficient solution to solve the issue, to get back data from Samsung when you can’t enter Samsung system in normal.

Recover Data from Samsung without Entering Samsung System

Thanks to Broken Android Data ExtractionAndroid Data Recovery, you can easily restore Samsung data if can’t enter Samsung system normally. It’s a super helper to get back your personal data on Android device even the broken one, no matter any broken cases, for example, device can’t enter system on it, device stuck in Download Mode, broken screen device, device with black screen, etc,. The recoverable types of data including contacts, text messages, gallery, videos, audio, WhatsApp messages, call history, and more. Almost all Samsung models are compatible with Broken Android Data Extraction, such as, Samsung Galaxy S9/S8/S7, Note 5/4/3.

d_win d_mac

How to Recover Samsung Files without Entering System

Step 1.Run Program and Connect Samsung Device
Firstly, run Broken Android Data Extraction on the computer, connect the abnormal Samsung phone to computer with USB cable,and click “Start” button on right of interface under “Broken Android Data Extraction” mode of program .

connect samsung to pc

Step 2.Select the Files that Contain the Data to Recover
Select the files you need to recover from Samsung which can’t the system on it.Including all file of recovery option from Samsung(Gallery,Contacts,Call History,Messaging,etc, are available). Then click “Next“.

select files to recover

Step 3.Select the Broken Case of Samsung
Select the broken situation that match your device.

choose broken fault type of samsung

Step 4.Select the Model of Samsung
Select the proper version of the Android as well as the exact Samsung model you are using.

choose samsung model

Step 5.Get Samsung into the Download Mode
Follow this steps to get Samsung into the Download Mode
-Hold the Power key to power off the Phone
-You next have to press the volume down key,the Power key as well as the Home key at the same time
-Next up leave all the keys and press the volume up key to enter the download mode of the phone

get samsung into the download mode

Step 6.Analyze Data of Samsung Phone
Once entering Download mode on Samsung, the program will start downloading “recovery package” for repairing abnormal system of Samsung with a few minutes.

analyze data of samsung

Step 7.Preview and Recover Data from Samsung
When the downloading finish,the selected data from Samsung will be list. You can preview all selected data before recovery,including the detailed photos,contacts, messages and more types of files. At last just simply click “Recover” after selecting data and save the recovered data on the computer.

recover data from samsung

d_win d_mac

Related Articles:

How to Recover Photos from Broken Samsung Phone

How to Recover Samsung Photos if Cannot Enter Samsung System

How to Recover Data from Samsung When Touch Screen Cannot be Used

How to Recover Data from Samsung with Broken Screen

How to Manage Samsung Galaxy on PC/Mac

How to Stream Apple Music on Samsung Galaxy S9/S8/S7/S6

How to Transfer iTunes Videos to Samsung Galaxy S9

Summary:Need to get a way to sync iTunes videos to Samsung Galaxy S9? Just have a glance on this tutorial. This tutorial will help you understand how to transfer videos to Samsung Galaxy S9 from iTunes/computer with the help of an amazing software – Android Data Manager. You can use this software to manage variety of files on most of Android devices such as, videos, music, photos, contacts, SMS, apps.

The Samsung Galaxy S8 and S8 Plus are among the best smartphones you can get. They offer gorgeous bezel-less designs, sexy curved displays, and top-of-the-line specs. But they do have their faults .These include the weirdly positioned fingerprint scanner, the lack of dual-cameras, an easily-fooled facial recognition system, and more. Fixes for all of these, and new features, could be part of the Galaxy S9 and S9 Plus. According to Business Korea, Samsung will stick with the same 2D facial recognition software found on the Galaxy S8. The company has decided to ignore 3D technology due to “technological limitations” and concerns over user security.

Sync iTunes Videos to Samsung Galaxy S9

According to users who need to sync iTunes videos to Samsung Galaxy S9, Android Data Manager is a practical software to help transfer and manage files on Android. With this smart software, you can not only transfer videos between computer and Samsung Galaxy S9, but also transfer iTunes videos to Samsung Galaxy S9. Other files including music, photos, contacts, SMS, apps are supported. This program is quite user-friendly. With only a few click, you can preview all files of your Samsung phone on computer. Android Data Manager work well on most brands of Android, like Samsung Galaxy S9/S8/S7, Note 5/4/3; HTC, Lenovo, LG, Motorola, Huawei.

d_win d_mac

Part 1: How to Transfer iTunes Videos to Samsung Galaxy S9

Launch Android Data Manager and connect your Samsung Galaxy S9 phone to the computer.Your Android phone will be detected and displayed in the primary window of program.

Step 1.Select the Transfer Mode
Simply click “Transfer iTunes Media to Device” on the main interface of program.Or find the “Transfer iTunes to Device” option under Toolbox > Transfer Tools section.

android data manager home page

Step 2.Transfer iTunes Videos to Samsung Phone
All the iTunes files will be scanned and will be shown under different categories like Music, Movies, and others. By default, all the file types will be selected but to transfer only the videos file, you can uncheck the others. Check “Movies” options and start to transfer iTunes videos to Samsung Galaxy S9 phone by clicking “Transfer”.

transfer iTunes videos to Samsung Galaxy S9

d_win d_mac

Part 2: How to Sync Videos from Computer to Samsung Galaxy S9

Firstly run Android Data Manager on the computer, then connect your Samsung Galaxy S9 device to the computer. Your Android device will be detected and displayed in the primary window.

android data manager home page

Step 1. Select Videos to Transfer
Select Videos tab. Once your media loads, click Add > Add File or Add Folder.

import videos from pc to galaxy S9

Step 2. Transfer Videos from Computer to Samsung Phone
This brings up your file browser window, from which you can select videos to import from your computer. All videos imported can be watched with the built-in player.

(You can simply Drag and Drop videos from computer to Samsung.)

Done.

d_win d_mac

Related Articles:

How to Recover Deleted Data from Samsung Galaxy S9

How to Recover Deleted Photos from Samsung Galaxy S9

How to Transfer iTunes Music to Samsung Galaxy S9

How to Transfer iPhone Data to Samsung Galaxy S9

How to Manage Samsung Galaxy S9/S8/S7/S6 on PC/Mac

How to Stream Apple Music on Samsung Galaxy S9/S8/S7/S6