All posts by DHZ

How to Recover Deleted Photos on Android Phone

Summary
Deleted photos on your Android phone? The tutorial will teach how to recover lost or deleted photos, videos from Android phone and tablet with Android Photo Recovery. You can also learn how to recover photos, videos from Android SD card with Photo Recovery.

Many people would like to take a lot of photos and videos in their daily life and store them on the mobile phone. Have you ever accidentally deleted your pictures, videos and other media files from Android phone or formatted the SD card? Don’t panic! Android Photo Recovery can help you recover deleted photos from Android phone directly, and the Photo Recovery enable you recover deleted, lost or formatted photos from SD card. Let’s learn the below two simple and secure Android photo recovery solution, let’s get start.

Part 1: How to Recover Deleted Photos from Android Phone

To get the best chance of a successful photo recovery you just need to choose the right tool for the job.Android Data Recovery tool absolutely help to restore deleted photos from Android completely.Besides photos,Android Data Recovery enable to restore several of files on Android,contacts,videos,audio,call logs, messages,WhatsApp messages & attachments,documents are included.Almost all Android device are applicable for Android Data Recovery,such as Samsung, Huawei, OnePlus, HTC, Google Pixel, Google Nexus, LG, Sony, Lenovo, Motorola, etc.

More Features of Android Photo Recovery

  • Directly recover lost or deleted photos, videos, audio files from Android phone or SD cards inside your Android device.
  • Recover deleted contacts, messages, messages Attachments, call history, whatsApp, documents from Android internal memory.
  • Restore Android lost data due to accidentally deleting, factory resetting, system crash, forgotten password, flashing ROM, rooting, ect.
  • Preview and selectively recover photos before recovery.
  • Recover photos from dead/broken Samsung phone internal storage.
  • Fix Samsung Galaxy phone with black screen of dead.
  • Read and recover Android lost data with 100% safety.

d_win d_mac
d_win d_mac

Steps of how to recover photos or videos from Android

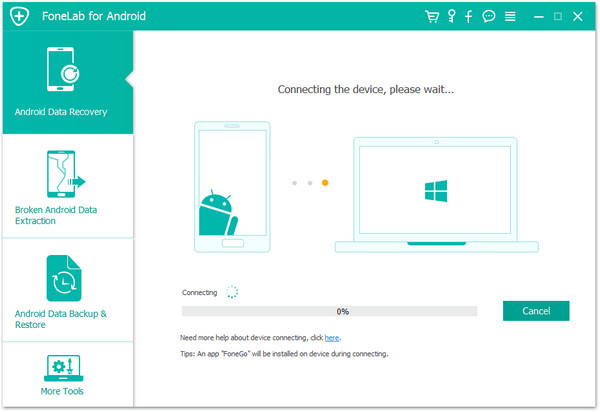
Step 1.Run Android Data Recovery and Connect Android
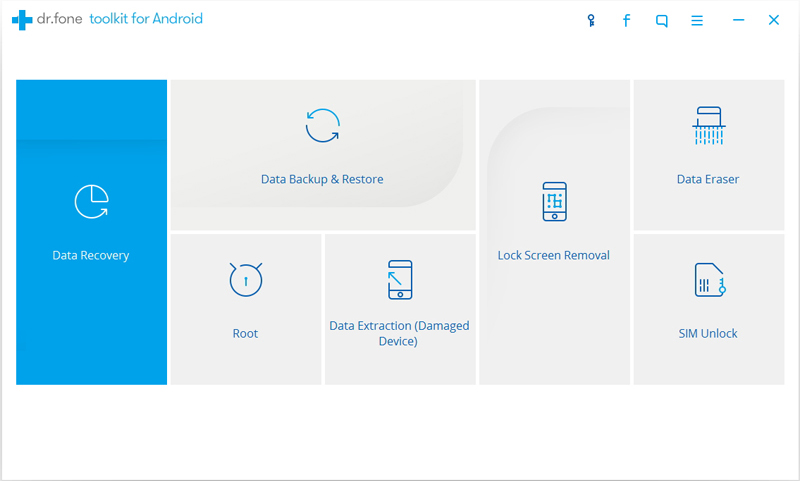
Run this Android Data Recovery software on your computer, then click “Android Data Recovery”.

connect android with computer

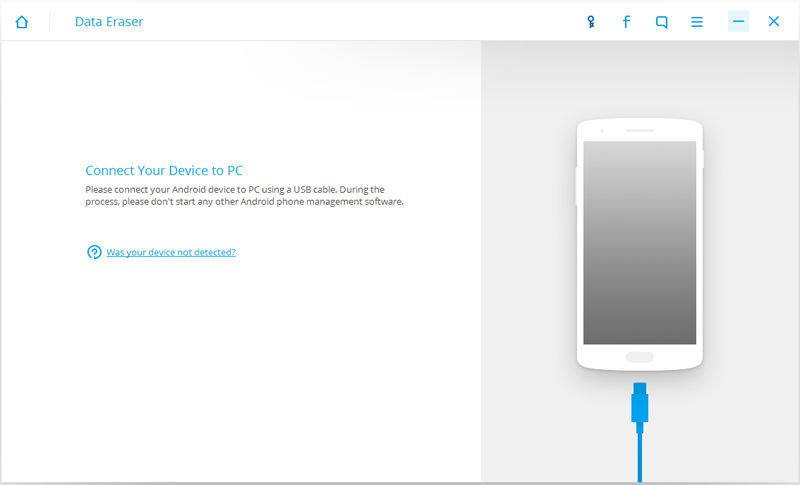
Connect your Android device to the computer. It is important that you ensure your phone’s battery is at least 20% for you to be able to do this easily.

connect android with computer

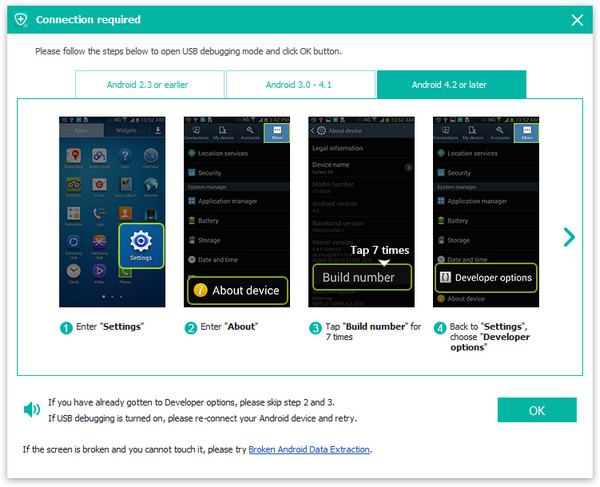
If you didn’t enable the USB debugging on your device before, you will see the window below. Then turn to your device and enable it. If you’ve already enabled it before, skip this step.

enable usb debugging on android

Step 2.Select Data Type to Scan
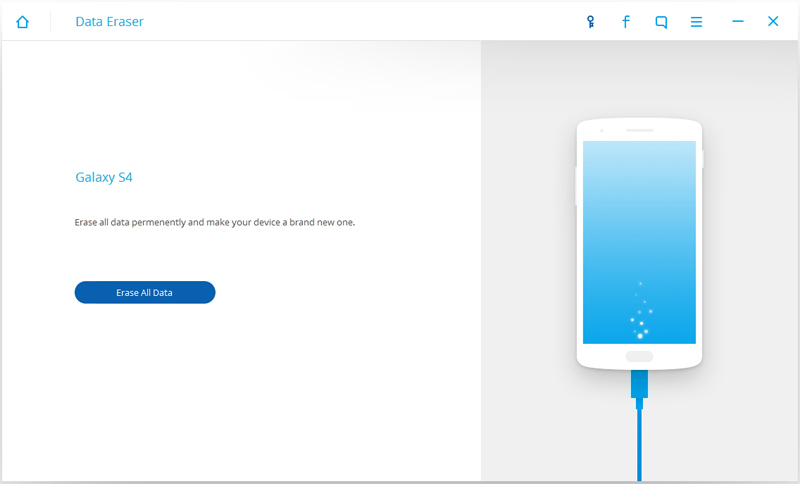
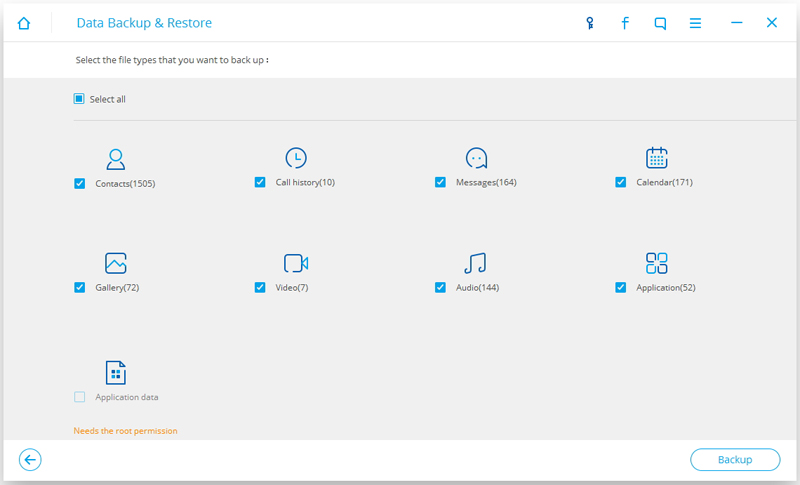
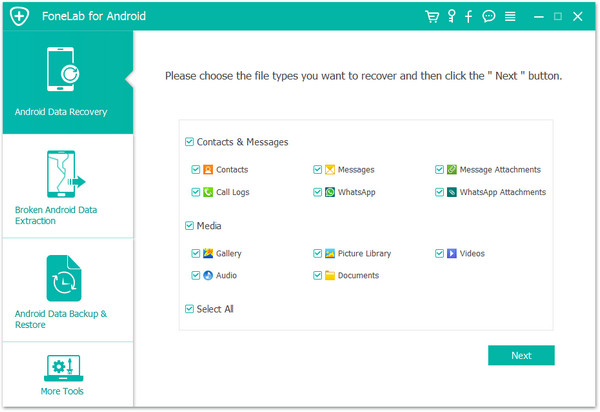
Once your device is connected successfully, you can see the window of this Android Data Recovery software below.Check “Gallery” and then click “Next” to continue. If you also want to check other kinds of file, you can check them at the same time.

select data to scan on android

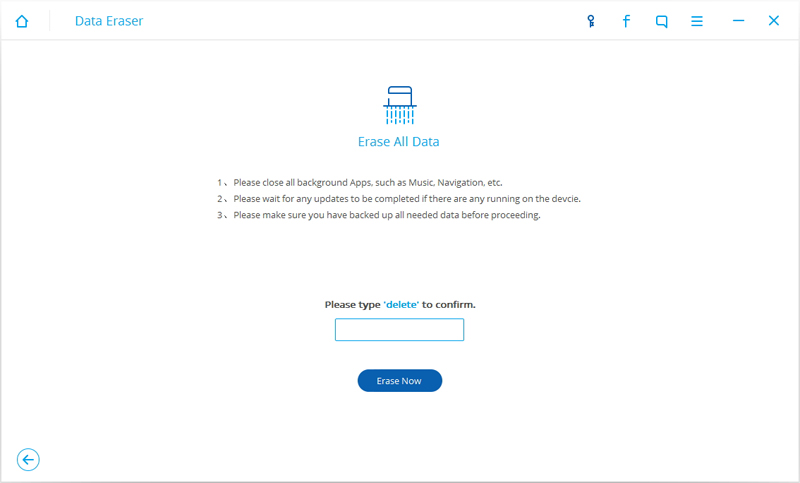
Then you can see that there are two modes of scan for your choice.The Standard Mode is recommended as your first try.It works for most of situations. When it doesn’t, you can switch to the advanced one as a second try later. Next, click “Start” to continue.

select scan mode

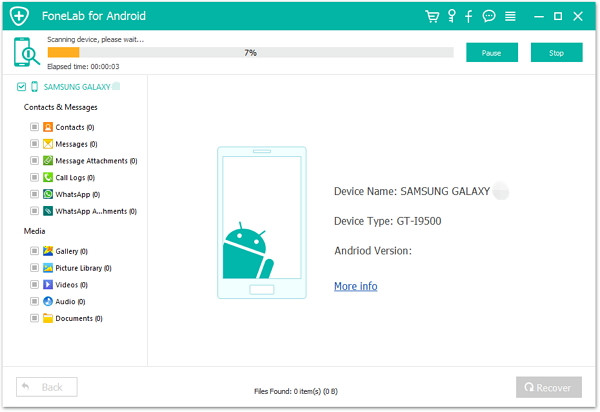
The process of scan will take you some time.Just wait and keep patient.

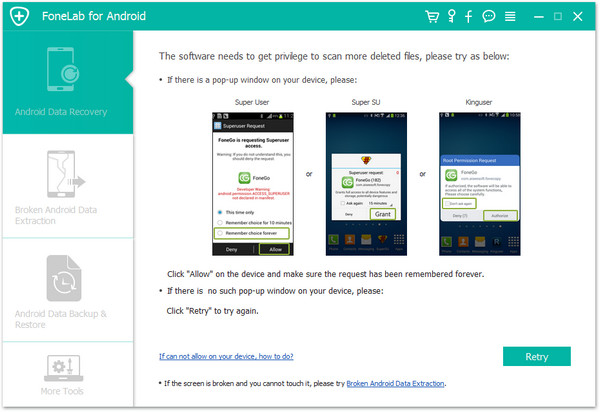
You may receive a Superuser authorization prompt while you attempt to restore deleted files on your device. Click “Allow” to confirm it.

allow the super user request

Now the program will analyze the situations of data on your Android device.

analyze data on android

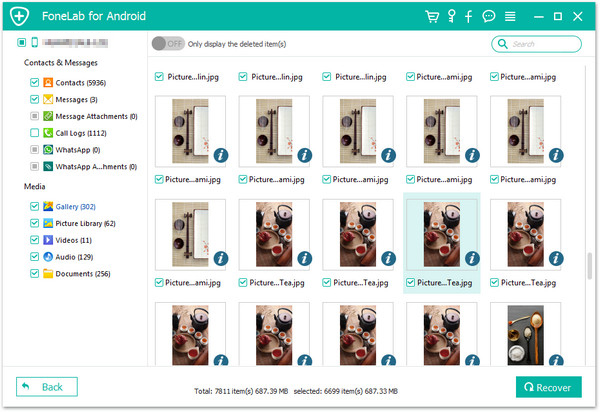
Step 3.Preview and Restore Photos from Android
When the scan stops, you are allow to preview all found data in the scan result one by one. To recover photos from Android, choose “Gallery” and you can preview them. Check the item that you want and click “Recover” to save it.

restore deleted photos from android

d_win d_mac
d_win d_mac

Part 2: Restore Deleted Photos on Android Phone via Google Account

It’s a workable idea trying to get Android photos back from your Gmail account. Please follow the onscreen instructions to recover deleted photos from Android.

Note that photos will be removed from Google cloud after 60 days.

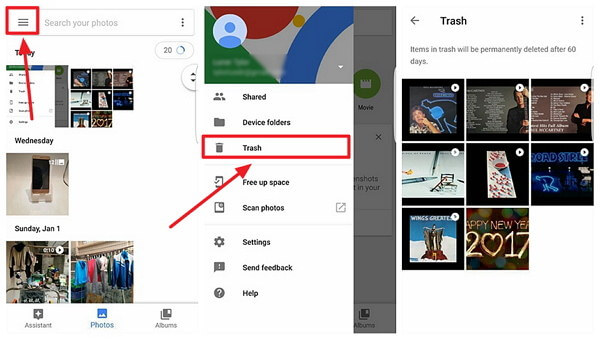
Step 1. Run “Google Photos”/”Photos” app on your Android.

Step 2. Tap on the “≡” icon at the left top of the interface.

Step 3. Select “Trash” option in the panel.

Step 4. Preview your deleted images.

Step 5. Select desired ones to “Restore” on Android.

restore photo google account

Part 3: Retrieve Deleted Pictures from Android SD Card

Have you ever accidentally formatted your memory card with important images in it? Or perhaps your hard drive crashed, you had no backups and you already deleted images from your memory cards? Here I will show you how you can recover and retrieve lost images from Android memory cards and will give you some information on what can be recovered and under what circumstances.

The SD card got formatted, physical damage or corrupt, got virus or trojan attacks, or the device system crashed. All these data loss scenarios cause your data and files lost, you can get a powerful data recovery software to help you retrieve deleted or lost photo files from Android SD card. The most reliable data recovery program for Android SD card recovery, we recommend U.Fone Data Recovery software.It helps you easily and efficiently recover deleted or lost photos, videos and other files from your Android memory card.

Best tool for Android SD card recovery

Recover deleted files from phone memory card effectively, safely and completely.
Recover data files due to accidental deletion, formatted, virus attacked and devices crashed.
Support data recovery from recycle bin, hard drive, memory card, flash drive, digital camera and camcorders.
Support Android phone like Samsung Galaxy Fold/S10+/S10/S9/S8/S7/S6/S5/Note 9/Note 5, HTC, LG, Huawei, etc.
Supported OS: Windows 10/8/7/XP/Vista; Mac OS 10.14, macOS 10.13, Mac OS 10.12, OS X 10.11, etc.

d_win d_mac
d_win d_mac

Helpful tips to avoid losing data on Android SD card

*Before formatting or deleting, please make sure that the correct format or delete operation is selected
*Do not install the Android SD card on an unsupported device
*Avoid using the same Android SD memory card on multiple devices

Restore Photos on Android Memory Card in 4 Steps

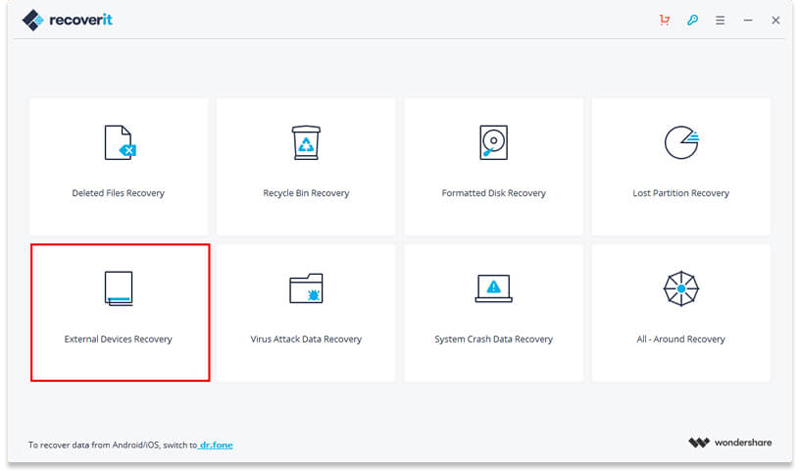
Step 1. Select a Data Recovery Mode

Launch U.Fone Data Recovery on your computer, to perform phone memory card data recovery, you need select “External Devices Recovery” to get started.

Select Samsung SD Card Data Recovery Mode

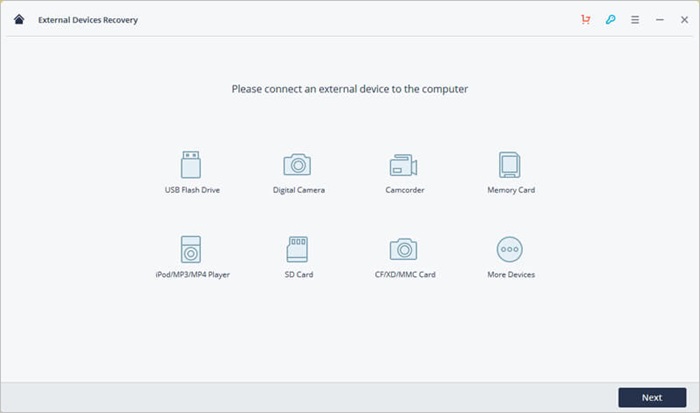
Step 2. Select Your SD Card

Make sure the your Micro SD card has detected by the computer. Select it and click “Start” button to process.

Connect Samsung SD Card

Step 3. Scanning the Phone Memory Card

After connecting, the tool will start a quick scan to search your data files on your Android SD card.

Scan SD Card

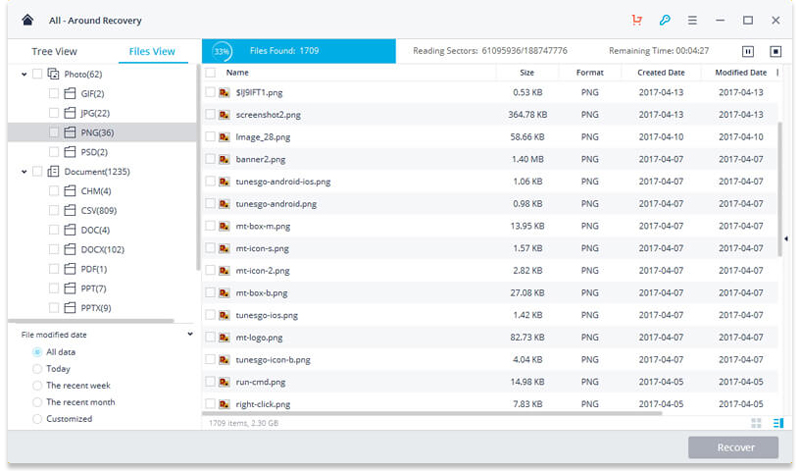
If you cannot find your data, you can go to scan again with “All-around Recovery” mode. It will search more files from memory card and take more time.

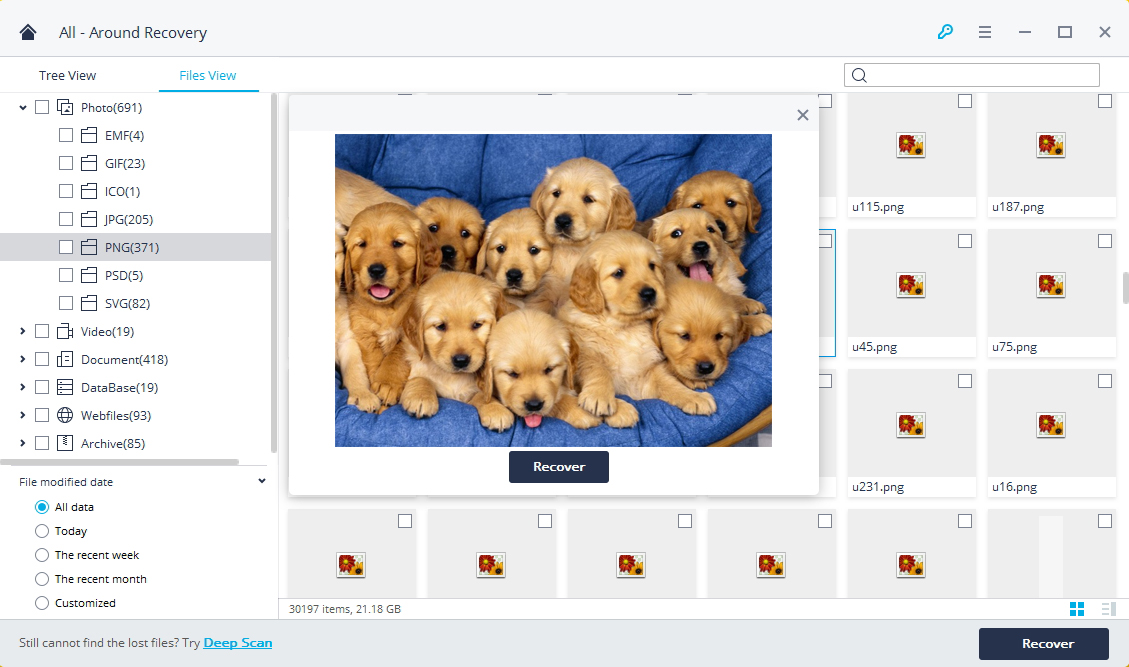
Step 4. Preview and Recover Deleted Photos from Android SD Card

Once done, you can check all recovered files from the phone memory card, such as gallery. Now, preview some recovered photos and select your data to click on “Recover” to get them back.

Scan SD Card

d_win d_mac
d_win d_mac

Android Photo Recovery

How to Restore Deleted Data from Google Nexus 6/6P

“My little sister just deleted my messages and photos by pressing the “delete” button when she played my phone.I was so angry.Now I am eager to get back my deleted data from device.Any suggestions?Please let me know ASAP.My phone is Google Nexus 6.”-Sandy

Install-Google-Nexus-6

Google has started releasing the Android 7.1 Nougat operating system to its devices – Nexus 6/6P, Nexus 5X, and Pixel C.As good as the Nexus 6 may have been, it’s large size was considered a turn off by many, but this year Google looks to rectify this by giving consumers more options. When Google took the wraps off of their latest and greatest at an event earlier today, there wasn’t just one,but two new Nexus smartphones for consumers to choose between. While there is a great, affordable option available for those that would prefer the pure Android experience on a smaller display in the Nexus 5X, the successor to the Nexus 6 is the Huawei-manufactured Nexus 6P.

Restore Deleted Data from Google Nexus 6/6P

Restore deleted data on Google Nexus 6/6P with Android Data Recovery is a reliable and efficient data recovery solution:it is able to recover a variety of file types (e.g. contacts,photos, videos, call logs, messages,documents etc,.) from Google Nexus phone;and it is compatible with more than 6,000 Android devices,for example Google Pixel,Samsung,HTC,Motorola,Lenovo,LG,Sony.Theoretically,Android Data Recovery is your perfect choice to restore files from Android phone after losing data under any circumstances,including deleted mistake,Android system update,device factory resetting,Android system rooting and so on.

d_win d_mac

How to Restore Deleted Data on Google Nexus 6/6P

Step 1.Launch Android Data Recovery and Connect your device
Once you have finished installing the data recovery software on your computer, launch Android Data Recovery and connect your Nexus 6/6P to your computer using an USB cable—if you have not enabled the USB debugging on your device previous, now you need to enable it when you see the pop-up message (you can skip this step if you have already done so).

connect nexus 6 with computer

enable usb debugging on nexus 6

Step 2.Choose the File Type to Scan
The program should be able to detect your Nexus 6/6P soon. Then you can select the file types that you want to restore. You are allow to choose between Contacts, Messaging, Call History, WhatsApp Messages & Attachments, Gallery, Audio, Videos and Documents. Click “Next” to start the Nexus 6/6P data recovery process. Remember, the more file types you look for, the longer it will take.

select data to scan on nexus 6

Step 3.Start Scanning Device for Deleted Data
Carefully read the description of the software’s “Standard Mode” and “Advanced Mode”—choose the one most suitable for your need. If you do not have many files to recover and that you do not require a “deep” search, choose the first option since it is faster. You can always try the second option if the first is not working to your device.
Click “Start”—this will initiate the analyzing and scanning process on your Nexus phone.

select scan mode

Do take note that you may receive a Superuser authorization prompt while you attempt to retrieve deleted files on your device. Click “Allow” to confirm it.

allow the super user request

Step 4.Preview and Recover Deleted Data on Nexus Device
You will be able to preview recoverable data once the scan is complete—you will be able to check if the file is what you wanted. To select, tick on the check box next to it. Once you have made all of your selection, click “Recover” to save them on your computer.

restore deleted data from nexus 6

d_win d_mac

Related Article:

How to Recover Lost Data from Nexus 6 after Android 7.0 Update

How to Recover Data from Android Phone

How to Recover Lost Data from Android SD Card

How to Recover Data from Broken Android Phone

How to Recover Deleted Photos from Samsung Galaxy on Mac

Summary:Lost photos from Samsung Galaxy due to deleted mistake or other reasons?Read this tutorial and follow the guide with step by step to retrieve your deleted photos form Samsung on Mac.

restore deleted photos from Samsung_副本

Samsung Galaxy is the most series phone among Samsung,which gain the excellent evaluation from most Samsung users.Are you one of legions of Samsung fans? Why the Samsung device is so hot? One of the reasons may be that Samsung has one of the high quality cameras, which help to produce pretty photos.But What if you carelessly deleted or formatted the precious photos you take on your Samsung Galaxy?Or you had already experienced such a disaster and looking for solution?Please take it easy.Check these following passages, which is going to offer you the best way to restore your deleted photos on Samsung even though without backup.

Part 1:Samsung Photos Recovery Tool-Restore Deleted Photos from Samsung Galaxy on Mac

Samsung Photos RecoverySamsung Data Recovery is my recommendation and it would be your best choice. This wonderful program enables you to restore deleted photos from Samsung Galaxy on Mac.Samsung Photos Recovery is design for recovering deleted data from Samsung,besides photos recovery,you are able to restore deleted text messages, contacts, videos, audio,WhatsApp messages&attachments,call logs and more from Samsung with this useful Samsung Data Recovery.Various of Samsung phones are supported,such as Samsung Galaxy S5/S4/S3,Samsung Galaxy Note 5/Note 4/Note 3,Samsung Galaxy A9/A8/A7/A5/A3,Samsung Galaxy J7/J5/J3,Samsung Galaxy Core Prime,Samsung Galaxy Grand Prime,Samsung Galaxy Ace Style,etc,.

d_win d_mac

Part 2:How to Restore Deleted Photos from Samsung Galaxy on Mac

Note:Please stop use the Samsung device once your Samsung photos get lost.Otherwise, your phone will be overwritten and the data loss will become irreversible.

Step 1.Connect Samsung Galaxy to MacBook and Enable USB Debugging on it
After downloading and installing the program, launch it and connect your Samsung device to the MacBook.

connect Samsung with mac

Once your Samsung device is detected by the program, you will be asked to enable the USB debugging of your device. There are different steps listed, just choose the suitable one according to your phone Android OS.

enable usb debugging on samsung

Note: Please make sure that the battery is more than 20% to ensure a complete scan. If you’ve enabled the USB debugging before, you can just skip this step.

Step 2.Scan your the Data from Samsung on Mac
In this step, you will be shown a window with multiple data type listed.Such as “Contacts”, “Messages”,”Gallery”,”Videos”, “Audios”, “WhatsApp Messaging & attachments”, “Call history”, “Documents”, and more.

select data to scan on mac

Click the data types you want to restore and click “Next” to move on.You can just click “Gallery” if you just need to get photos back from Samsung.

Choose the scan mode, standard one or the advanced one.Here we suggest you select “Standard Mode” first,if it is not work well then select the other one.

select scan mode

Then a super user request should be allowed. Just follow the below interface:

allow the super user request

Note: If the superuser request doesn’t pop-up, please tap “Retry”.

Now the program will analyze the situations of data on your Samsung device.

analyze data on samsung

Step 3. Preview and Restore Deleted Photos from Samsung Galaxy on Mac
Before long all the data including the deleted and existing ones will be scanned out and listed in categories. Choose the data type you want, take photos for example, not only the photos amount, but also the name,job title and detail data will be shown in the interface.You are allow to preview it and click for recovery.just click “Recover” in the lower right corner of the interface,the selected photos will be restored to your MacBook.

restore deleted photo from samsung galaxy on mac

d_win d_mac
Related Article:

How to Recover Deleted Photos from Samsung Galaxy

How to Recover Deleted Photos from Samsung Galaxy S7/S7 Edge

How to Recover Deleted Photos from Samsung Galaxy S6/S6 Edge

How to Recover Lost Photos and Videos from Samsung

How to Recover Deleted Data from Samsung on Mac

How to Recover Deleted Text Messages from Samsung on Mac

How to Recover Deleted Contacts from Samsung on Mac

How to Transfer Media Files from Samsung to iPhone 7

“Hi.My Pinky.I bought the new iPhone 7 for a week.I try to sync the songs and videos on my computer then transferred to the new device.However,I got message prompted me that the files are not applicable for iPhone 7.Any fast ways to fix it?”-Pinky

Further Reading:

How to Convert Apple Music Files to DRM-free MP3

Transfer Music and Playlists from iTunes to Samsung Galaxy S8

iPhone 7 just announced for 2 months,which with the high quality play function.iPhone can be used as an external hard drive to play media files on it instead of the media players.Whether you try to sync music,videos or photos to iPhone from another mobile device,please make sure the file formats are supported by iPhone first.Otherwise, you have to convert them to iPhone with the suitable format before.If you’re not sure about if the media files with right format or not, or want an easy way to transfer media files to iPhone more convenient,you can follow the method below.

I suggest you try iOS Manager,which is a superior media files transfer tool to transfer & manage media files for iPhone 7/6S/6/5S/5,iPad and iPod.With iOS Manager,you are allow to freely transfer videos/music/photos between Android device and iPhone/iPad/iPod with the compatible format,it help to convert and transfer the media files with right format for iPhone.Moreover,iOS Manager support to transfer media files between computer and iPhone,transfer media files between iTunes and iPhone as well.

d_win d_mac

How to Sync Media Files from Samsung to iPhone 7

Step 1. Launch iOS Manager and connect your devices with the computer.
Launch iOS Manager and connect more than one iPhone/iPad/iPod/Android device with the computer, here we name the connected devices: A, B, C.

ios manager main page

Step 2. Select the source device from which you want to transfer contents
Select the source device A, and click Phone to Phone Transfer option on the main interface. Then a new window will pop up.

Step 3. Select the target device to which you want to transfer contents
From the pop-up window, select the target device B or C from the drop-down list and click Next.

select target device

Step 4. Transfer media files from one device to another
By default, all the content on your source device A that can be transferred are checked, namely Music and Videos, Playlists, Photos, Contacts( Note: Contacts are not supported by Mac version). You can uncheck the contents which you don’t want to transfer. Then, click Transfer. In the whole transfer process, DO NOT disconnect either of the devices. When the transfer completes, click OK.

select media file to transfer

1 click phone to phone transfer

Note: Only for Windows version, you’re enabled to tick the option: “Delete contents on target device then transfer” before clicking Transfer button, then the selected contents on the target device will be deleted before the transfer.

confirm to delete data on target device

d_win d_mac
Related Article:

How to Transfer Music from iPhone to iPhone 7

How to Transfer Videos to iPhone 7

How to Transfer Music to iPhone 7

How to Transfer Photos to iPhone 7

How to Sync Videos from Computer to iPhone 7

How to Transfer Music from Computer to iPhone 7

How to Transfer Music from iPhone to iPhone 7

“I got a new iPhone 7 lately,I just plan to sell my old iPhone 6 which used for 2 years,however,I need to transfer the favorite songs to my new device.I know that it should sync songs to computer,then export the songs to iPhone 7.But have any other more simple way to perform the music transfer?” -Tony

Just get a new iPhone 7 and want to transfer music from the old iPhone to the new one?iTunes gives a solution for transferring files from between current iPhone and another iOS device with synchronization,but you’ll need hours for the tedious and boring backup/restore time,and the songs will cover your previous data on device.Another solution is to copy songs to computer then transfer it from computer to new device,which is pretty complicated.

How to Simply Transfer Music between iPhone

Owning to the convenience of directness and immediacy by using the iOS Manager, now you can instantly transfer music between iPhone and iPhone 7.iOS Manager is an useful media files transfer tool to transfer & manage music/videos/photos on iOS devices,help to transfer media files between computer and iOS device,transfer media files between iTunes and iOS device,transfer media files between iOS device and Android device.All models of iOS device are applicable for iOS Manager,including iPhone 7,iPhone 6S/6,iPhone SE,iPhone 5S/5C/5,iPad and iPod.For a simpler solution, you can follow below step-by-step guide on how to copy music from old iPhone to new iPhone 7 directly.

d_win d_mac

How to Directly Transfer Songs from iPhone to iPhone 7

Method 1: Transfer All The Music and Playlists

Step 1. Launch iOS Manager and connect your devices with the computer.
Launch iOS Manager and connect more than one iPhone/iPad/iPod/Android device with the computer, here we name the connected devices: A, B, C.

select devices to transfer

Step 2. Select the source device from which you want to transfer contents
Select the source device A, and click Phone to Phone Transfer option on the main interface. Then a new window will pop up.

Step 3. Select the target device to which you want to transfer contents
From the pop-up window, select the target device B or C from the drop-down list and click Next.

select target device

Step 4. Transfer contents from one device to another
By default, all the content on your source device A that can be transferred are checked, namely Music and Videos, Playlists, Photos, Contacts( Note: Contacts are not supported by Mac version). You can uncheck the contents which you don’t want to transfer. Then, click Transfer. In the whole transfer process, DO NOT disconnect either of the devices. When the transfer completes, click OK.

select music file to transfer

1 click phone to phone transfer

Note: Only for Windows version, you’re enabled to tick the option: “Delete contents on target device then transfer” before clicking Transfer button, then the selected contents on the target device will be deleted before the transfer.

confirm to delete data on target device

Method 2: Transfer Music Selectively

Step 1. Launch iOS Manager and connect your iPhone 7 with the computer.
Launch iOS Manager and connect more than one iPhone/iPad/iPod/Android device with your computer, here we name the devices: A, B, C.
connect iphone 7-devices

Step 2. Select and transfer music between devices.
Select the device A from which you want to transfer music, and click Music icon at the top of the main interface, check the songs which you want to transfer from A to B or C, then click Export > Export to B or Export to C. As for the following screenshot, the music on the iPhone can be transferred to the Samsung phone or the iPhone 7.

select device to export

Note: Here you can right-click on the selected music and then select Export > Export to B or Export to C as well.

export music to devices

d_win d_mac

Related Article:

How to Transfer Music to iPhone 7

How to Transfer Music from Computer to iPhone 7

How to Transfer Videos to iPhone 7

How to Transfer Photos to iPhone 7

How to Transfer Videos to iPod

“I just buy a new iPod Touch and now I wanna transfer the Bigbang concert videos from my Samsung phone to iPod,but I have no idea to do it easily and simply.Someone provide a good suggestion for me?Thanks a lot.”-Henry

Instead of watching videos on a smartphone was in old days,lately more and more movies fans like to watch videos on iPod for its convenience and delightful.Four years after Apple launched the iPod, several iterations had perfected what the device could do. It was able to play music, photos and videos in the palm of your hand anytime.If you want to watch the videos whenever you want, you will need to download and save videos on your device.However,we found that there are several questions that people ask in the Apple forum,for example how to transfer videos from Samsung phone to iPod,how to export to videos from Mac to iPod,etc,.For solving this kinds of videos transfer problems,we sum up these solutions for reference.

How to Export Videos to iPod

iOS Manager is a media transfer program which enables you to transfer videos between mobile devices and iPod with an easy way in just few clicks only without losing existing videos on your iPod.iOS Manager enables also allows to transfer videos between computer and iPod,transfer videos between iTunes and iPod.Furthermore,this program empowers you to transfer music, videos, movies and any type of media files on iPod and if files are not in the supported format of iPod then iOS Manager will convert them automatically before transferring to iPod.Supported iPod list:iPod 4/3/2/1,iPod touch,iPod nano,iPod shuffle,etc,.

d_win d_mac

Part 1:How to Export Videos from Computer to iPod

Step 1. Launch iOS Manager and connect iPod with the Computer

iOS manager main page

Method 1: Transfer Videos Using Buttons

Step 2. Find video type on iPod
Click Videos icon at the top of the main interface. Select a specific option Movies/Music Videos/Home Videos/TV Shows/iTunes U/Podcasts to transfer( “Movies” is the default option).

select videos to transfer

Step 3. Select and Add Videos from PC/Mac to iPod
Later, click Add and then select Add File or Add Folder.
Note: If you need to select a few videos,then click Add File, and then hold down Shift or Ctrl key to choose multiple videos; if you want to transfer all the videos in one folder, then click Add Folder.

select Add File or Add Folder

From the pop-up window, browse and choose the target video(s) from your computer. And click Open. Then, the selected videos will be exported to the iPod.

open the video older

Method 2: Transfer Videos by Drag and Drop

Step 2. Find videos on your PC/Mac
Find and open the video folder on your PC or Mac which includes the videos that you wish to transfer to your iPod.

Find videos on computer

Step 3. Export the Videos to iPod by Drag and Drop
Click Videos icon on the main interface of iOS Manager,it will go to the Movies window by default, Music Videos, TV Shows, iTunes U and Podcasts are available here too. Drag and drop the selected videos from your computer to the Movies window of iOS Manager.

Export videos to iod by Drag and Drop

d_win d_mac

Part 2:How to Transfer Videos from iTunes to iPod

iOS Manager provides two solutions to transfer videos from iTunes to iPod, include Movies, Music Videos, TV Shows, iTunes U and Podcasts.

Method 1: With 1-Click File Transfer

Step 1. Launch iOS Manager and connect your iPod with the computer.Then click Transfer iTunes Media to Device icon on the main interface.

ios manager main page

Step 2. iOS Manager will detect all the media files in iTunes and show them by list on the pop-up window. By default, the entire library has been checked. But you can uncheck some items that you won’t transfer to your iPod.

select-transfer-videos-to-ipod

Step 3. Transfer media contents to iPod
Click Transfer to start transferring selected files to your iPod and then click OK to complete the process.

Note: iOS Manager enables to automatically detect the duplicates and only transfer the exclusive contents from iTunes to iPod.

click-transfer-button

transfer-music-to-ipod

Method 2: With Toolbox

Step 1. Launch iOS Manager and connect your iPod with the computer. Then go to Toolbox > Transfer iTunes Media to Device on the Toolbox interface.

tool box main page

Step 2. iOS Manager will detect all the media files in iTunes and show them by list on the pop-up window. By default, the entire library has been checked. But you can uncheck some items that you won’t transfer to your iPod.

select-video-file-transfer

Step 3. Transfer media files to your iPod
Click Transfer to start transferring selected files to your iPod and then click OK to complete the process.

Note: iOS Manager enables to automatically detect the duplicates and only transfer the exclusive files from iTunes to iPod.

click transfer to begin

transfer itunes videos to ipod

d_win d_mac

Part 3:How to Transfer Videos between iOS/Android Device and iPod

Method 1: Transfer All The Music and Playlists

Step 1. Launch iOS Manager and connect your devices with the computer.
Launch iOS Manager and connect more than one iPhone/iPad/iPod/Android device with the computer, here we name the connected devices: A, B, C.

transfer videos from iPod to devices

Step 2. Select the source device from which you want to transfer contents
Select the source device A, and click Phone to Phone Transfer option on the main interface. Then a new window will pop up.

select devices to transfer

Step 3. Select the target device to which you want to transfer contents
From the pop-up window, select the target device B or C from the drop-down list and click Next.

select device to transfer

Step 4. Transfer Videos from one device to another
By default, all the content on your source device A that can be transferred are checked, namely Music and Videos, Playlists, Photos, Contacts( Note: Contacts are not supported by Mac version). You can uncheck the contents which you don’t want to transfer. Then, click Transfer. In the whole transfer process, DO NOT disconnect either of the devices. When the transfer completes, click OK.

select media file to transfer

1-click-phone-to-phone-transfer

Note: Only for Windows version, you’re enabled to tick the option: “Delete contents on target device then transfer” before clicking Transfer button, then the selected contents on the target device will be deleted before the transfer.

confirm to delete data on target device

Method 2: Transfer Videos Selectively

Step 1. Launch iOS Manager and connect your devices with the computer.

Launch iOS Manager and connect more than one iPhone/iPad/iPod/Android device with your computer, here we name the devices: A, B, C.

transfer videos from iPod to devices

Step 2. Select and transfer videos between devices.

Select the device A from which you want to transfer videos, and click Videos icon at the top of the main interface, you will enter the Movies window by default. Please note that Movies, Music Videos, Home Videos, TV Shows, iTunes U and Podcasts are available here too. Then, check the videos which you want to transfer from A to B or C, then click Export > Export to B or Export to C. As for the following screenshot, the videos in Movies on the iPod can be transferred to the Samsung Phone or the iPad.

select device to export

Note: Here you can right-click on the selected videos and then select Export > Export to B or Export to C as well.

export-ipod-movies-to-devices

d_win d_mac

Related Article:

How to Transfer Photos from Computer to iPod

How to Transfer Music from iTunes Library to iPod

How to Sync Videos from Computer to iPhone 7

How to Transfer Videos to iPhone 7

How to Delete SMS on Samsung without Restoring

Sometimes you may need to manage your SMS on device,class or delete the large amounts of SMS,or just to remove SMS to free more space for files.When it’s necessary to remove spam messages that you will no longer use,it’s important to erase them permanently from your device.

Your text messages will not disappear forever when you simply press “Delete”.When you add a sufficient amount of new data to fill up the space, the memory in which your old data are stored will be reoccupied,but the erased data can be restored by data recovery tool.Considering the circumstances,you need an available way to wipe data permanently for device and make sure it won’t being able to be read by others.

How to Remove SMS on Samsung Permanently

Android Data Eraser is such an efficacious data eraser tool for Android device,it can be used to remove SMS from Samsung without restoring.Besides SMS,contacts,photos,videos,notes,call logs,apps,documents are allowed to erase on Samsung completely.Supported Samsung models list:Samsung Galaxy S7/S6/S5/S4,Note 7/5/4,A9/A8/A7,etc,.This program can be applied to almost all Android devices, including Samsung, HTC, Huawei, Sony, Motorola,LG, ZTE, and more.

The Features of Android Data Eraser:
-Simple, click-through process.
-Wipe your Android completely and permanently.
-Erase photos, contacts, messages, call logs and all private data.
-Supports all Android devices available in the market.

d_win d_mac

How to Wipe SMS on Samsung Permanently

Launch Android Data Eraser on your Computer. Select Android Data Erase from More Tools tab.

android-data-eraser--more-tools

Connect your Samsung phone to the computer using an USB cable. Please make sure you have enabled USB Debugging mode on the phone. Then Android Data Eraser will detect and connect your Samsung phone automatically.

android-data-erase-connect-phone

When the phone is connected successfully, click on Erase All Data.

android-data-erase-phone-connected

Then type delete in the window to confirm the operation. Click on Erase Now to continue.

android-data-erase-confirm-erase

Normally it will take a few minutes to completely erase all the data on your phone. The time it takes mainly depends on the capacity of data on the phone. Please keep connecting the phone and not to run any other phone management software on the computer.

android-data-erase-erasing-samsung-sms

Once all data have been completely erased,Android Data Eraser will ask you to tap on Factory Data Reset or Erase All Data on the phone. It will help you completely wipe all the settings on the phone.

android-data-erase-factory-reset-samsung

Only a few minutes,the data on your Samsung phone has been completely removed and it’s like a brand new one.

android-data-erase-complete

d_win d_mac

Related Article:

How to Permanently Erase Samsung Data before Selling

How to Erase Text Messages on Android

How to Erase Android Data before Selling

How to Get More Internal Storage from Android

How to Backup and Restore Files on Samsung

How to Erase Android Data before Selling

Planning to sell your old Android device? You’ll want to make sure you have a copy of all of your personal data and that you’re not leaving any of your personal data behind for the new owner. Here are steps for Android owners who wanna erase Android data permanently before selling can be found here.

wipe android data

What You Should Do before Erasing
Back up the useful data and settings to your Google account.Save backups of your data such as contacts, calendars, G-mail data, documents on your Google account. Ensure all of your data has been backed up recently by heading over to Settings > Accounts (tap Google) > Select Google account > check everything you want to sync.

Note:You can also back up your Wi-Fi passwords and other device settings. You can find this option under Settings > Backup & reset > and check Back up my data.

Or you can backup Android Data with Android Backup & Restore Tool,which is a reliable data backup program for Android.With Android Backup & Restore Tool,you are allow to backup Android data on computer selectively.

Extra tips:How to Backup Android on Computer Safely

select data restore to android from backup files

How to Securely Wipe Android Data without Restoring

Once you have completed the backup,now you should delete all data on your Android device safely.Privacy invasion is a big deal and it’s never been easier than it is today.When it comes to most people,they may just to perform the factory reset on device to clean all data and settings.Actually,this simple action can’t erase data for your device permanently.It means that someone still have chance to steal your personal data from the empty device by some professional data recovery after performing factory reset on device.

To erase data on Android without restoring,you should try Android Data Eraser.This perfect data eraser absolutely erase everything permanently on Android before selling,protect your privacy with simple, click-through process.Erase photos, contacts, messages, call logs,apps and all private data with only one click.Android Data Eraser has an incredibly simple explained step-by-step instructions,which really can help to smoothly finish your Android cleaning trip.Supports all Android devices available in the market,including Google,Samsung,Motorola,Lenovo,HTC,ZTE,Huawei,LG,Sony,etc,.

d_win d_mac
d_win d_mac

How to Permanently Delete Data on Android before Selling

Launch Android Data Eraser on your Computer. Select Android Data Erase from More Tools tab.

android-data-eraser--more-tools

Connect your Android phone to the computer using an USB cable. Please make sure you have enabled USB Debugging mode on the phone. Then Android Data Eraser will detect and connect your Android phone automatically.

android-data-erase-connect-phone

When the phone is connected successfully, click on Erase All Data.

android-data-erase-phone-connected

Then type delete in the window to confirm the operation. Click on Erase Now to continue.

android-data-erase-confirm-erase

Usually it will take a few minutes to completely erase all the data on your phone. The time it takes mainly depends on the capacity of data on the phone. Please keep connecting the phone and not to run any other phone management software on the computer.

android-data-erase-erasing-data

After all data have been completely erased,Android Data Eraser will ask you to tap on Factory Data Reset or Erase All Data on the phone. It will help you completely wipe all the settings on the phone.

android-data-erase-factory-reset

Now your Android phone has been completely wiped and it’s like a brand new one.

android-data-erase-complete

d_win d_mac
d_win d_mac

Related Article:

How to Erase Text Messages on Android Phone

How to Delete Photos from Android without Restoring

How to Completely Remove Contacts from Android SIM Card

How to Permanently Erase Samsung Data before Selling

How to Get More Internal Storage from Android

How to Transfer Photos to Google Pixel Phone

Lots of people would like to use their Android phone to take photos, which is more convenient than carrying another camera anywhere.Lately Google Company announced the new Pixel phone.There are a part of Pixel phone users ask how to transfer photos between Pixel and computer.However, have you ever encountered any difficulties like them?Now, this article help to solve your problem.

Do you take a lot of photos with your Pixel phone?When you try to transfer photos to Google Pixel phone,it’s not as smoothly as you think.It’s like locking your keys in the car-you can see them, but you can’t touch them.The following passages offers a few tips help to fix problems when transfer photos to Google Pixel phone.

With Android Manager program, you can transfer photos between Google Pixel and computer easily.Not only copy photos from computer to Google Pixel,this program also enables you to sync Google Pixel phone to computer conveniently.What’s more,Android Manager program empowers to transfer photos between iOS/Android device and Google Pixel,delete photos on Google Pixel.Almost all Android devices are compatible with Android Manager program,such as Google Nexus,Samsung,HTC,Motorola,Lenovo,ZTE,Huawei,etc,.Additionally,Android Manager program help to transfer & manage photos and videos for Android devices.

d_win d_mac

Part 1:How to Export Photos from Computer to Google Pixel

Launch Android Manager and connect your Google Pixel to PC.Your Android device will be detected and displayed in the primary window.

android manager main page

Step 1.Click Photos tab.All the albums will be displayed on the left.Select one to import photos from PC to selected Pixel photo album.

Step 2.Click Add > Add File or Add Folder.

add-photos-from-pc-to-pixel

If you only want to select some photos,then click Add File.You can create new albums and add photos in it. Simply right-click the photos category on the left panel, then click New Album.

If you want to transfer all the photos in one folder,then click Add Folder.

Step 3.Select photos or photo folders and add to your Google Pixel.Hold down Shift or Ctrl key to choose multiple photos.

d_win d_mac

Part 2:How to Sync Photos from Google Pixel to Computer

Step 1.In the photo management window,choose your desired photos and click Export > Export to PC.

transfer-photos-from-pixel-to-pc

Step 2.It brings up your file browser window. Select a save path to store the photos from your Google Pixel to computer.
You can transfer the whole photo album from Google Pixel to PC.

transfer-photo-from-pixel-to-pc

You can also backup all Pixel photos to PC in one click.

android manager main page

d_win d_mac

Part 3:How to Transfer Photos between iOS/Android Device and Google Pixel

Step 1.Launch Android Manager and connect both devices to PC.

connect-multiple-devices

Step 2.Select the source device from which you want to transfer photos and albums.

Step 3.Click Photos tab.Choose your wanted photos and click Export.Select another device from the list.For example,you can transfer photos from Pixel to iPhone by selecting Export > Export to Device > iPhone directly.

transfer-photos-from-pixel-to-iphone

You can also transfer the whole photo album from Google Pixel to other devices in one click.

transfer-pixel-photo-album-to-iphone

d_win d_mac

Related Article:

How to Transfer Music and Videos to Google Pixel

How to Transfer Music between iTunes Library and Google Pixel

How to Transfer Music from Computer to Google Pixel

How to Transfer WhatsApp Messages from iPhone to Google Pixel

How to Transfer Videos to iPhone 7

“Last morning, I downloaded some videos on my Mac.Then I try to transferred the media files from computer to my iPhone 7 but it was failed.If given any help, I will be appreciated a lot.Thanks advance.”Alen

Apple’s iPhone 7 is announced in September 2016,I guess you must be interested in this newest iPhone.Have you prepared well for the powerful iPhone 7 for iPhone upgrade? To enjoy videos on your device more convenient,sometimes you may need to sync the movies to your iPhone 7.However,the traditional ways are not work well everytime.That’s why it’s better to use a different video transfer tool to finish the sync process.It’s a guide on how to transfer videos from computer/iTunes/mobile device to iPhone 7.

How to Export Videos to iPhone 7

You should try iOS Manager. It allows you to transfer videos to iPhone 7 with fast transferring speed without erasing previous data on device.iOS Manager enables to transfer videos between computer and iPhone 7,transfer videos between iTunes Library and iPhone 7,transfer videos between iOS/Android device and iPhone 7.Not only iPhone 7,but also other iOS devices are supported,including iPhone 6S/6/SE/5S/5C/5,iPad and iPod.

Key features of iOS Manager:
•Transfer video, music, photo, media files,apps between Apple devices and PC/Mac without iTunes.
•Transfer data between iOS devices directly.
•Transfer movies, music (purchased/downloaded), photos, playlists, TV shows, music videos, podcasts, iTunes U and audio books between apple devices and iTunes.
•Automatically convert iOS-unsupported video/music formats to compatible ones.
•Create GIF from images or videos.
•Fix & optimize songs’ incomplete ID3 information, album cover to iPhone directly.
•Intelligently export exclusive files to iTunes and automatically filter the duplicate files.
•Perfectly rebuild iTunes library.
•Convert live photos to GIF.

d_win d_mac

Part 1:How to Transfer Videos from Computer to iPhone 7

Step 1. Launch iOS Manager and connect iPhone 7 with the Computer

iOS manager main page

Method 1: Transfer Videos Using Buttons

Step 2. Find video type on iPhone 7
Click Videos icon at the top of the main interface. Select a specific option Movies/Music Videos/Home Videos/TV Shows/iTunes U/Podcasts to transfer( “Movies” is the default option).

select videos to transfer

Step 3. Select and Add Videos from PC/Mac to iPhone 7
Later, click Add and then select Add File or Add Folder.
Note: If you need to select a few videos,then click Add File, and then hold down Shift or Ctrl key to choose multiple videos; if you want to transfer all the videos in one folder, then click Add Folder.

select Add File or Add Folder

From the pop-up window, browse and choose the target video(s) from your computer. And click Open. Then, the selected videos will be imported to the iPhone 7.

open the video older

Method 2: Transfer Videos by Drag and Drop

Step 2. Find videos on your PC/Mac
Find and open the video folder on your PC or Mac which includes the videos that you wish to transfer to your iPhone 7.

Find videos on computer

Step 3. Export the Videos to iPhone 7 by Drag and Drop
Click Videos icon on the main interface of iOS Transfer,it will go to the Movies window by default, Music Videos, TV Shows, iTunes U and Podcasts are available here too. Drag and drop the selected videos from your computer to the Movies window of iOS Manager.

Export videos to iPhone 7 by Drag and Drop

d_win d_mac

Part 2:How to Transfer Videos from iTunes to iPhone 7

iOS Manager provides two solutions to transfer videos from iTunes to iPhone 7, include Movies, Music Videos, TV Shows, iTunes U and Podcasts.

Method 1: With 1-Click File Transfer

Step 1. Launch iOS Manager and connect your iPhone 7 with the computer.Then click Transfer iTunes Media to Device icon on the main interface.

ios manager main page
Step 2. iOS Manager will detect all the media files in iTunes and show them by list on the pop-up window. By default, the entire library has been checked. But you can uncheck some items that you won’t transfer to your iPhone.

select transfer videos to iphone 7

Step 3. Transfer media contents to iPhone 7
Click Transfer to start transferring selected files to your iPhone and then click OK to complete the process.
Note: iOS Manager enables to automatically detect the duplicates and only transfer the exclusive contents from iTunes to iPhone 7.

click transfer button

transfer music to iphone 7

Method 2: With Toolbox

Step 1. Launch iOS Manager and connect your iPhone 7 with the computer. Then go to Toolbox > Transfer iTunes Media to Device on the Toolbox interface.

tool box main page

Step 2. iOS Manager will detect all the media files in iTunes and show them by list on the pop-up window. By default, the entire library has been checked. But you can uncheck some items that you won’t transfer to your iPhone.

select video file transfer

Step 3. Transfer media files to your iPhone 7
Click Transfer to start transferring selected files to your iPhone 7 and then click OK to complete the process.
Note: iOS Manager enables to automatically detect the duplicates and only transfer the exclusive files from iTunes to iPhone 7.

click transfer to begin

transfer itunes videos to iphone 7 complete

d_win d_mac

Part 3:How to Transfer Videos between iOS/Android Device and iPhone 7

Method 1: Transfer All The Music and Playlists

Step 1. Launch iOS Manager and connect your devices with the computer.
Launch iOS Manager and connect more than one iPhone/iPad/iPod/Android device with the computer, here we name the connected devices: A, B, C.

transfer videos from iPhone 7 to devices

Step 2. Select the source device from which you want to transfer contents
Select the source device A, and click Phone to Phone Transfer option on the main interface. Then a new window will pop up.

select devices to transfer

Step 3. Select the target device to which you want to transfer contents
From the pop-up window, select the target device B or C from the drop-down list and click Next.

select device to transfer

Step 4. Transfer Videos from one device to another
By default, all the content on your source device A that can be transferred are checked, namely Music and Videos, Playlists, Photos, Contacts( Note: Contacts are not supported by Mac version). You can uncheck the contents which you don’t want to transfer. Then, click Transfer. In the whole transfer process, DO NOT disconnect either of the devices. When the transfer completes, click OK.

select media file to transfer

1 click phone to phone transfer
Note: Only for Windows version, you’re enabled to tick the option: “Delete contents on target device then transfer” before clicking Transfer button, then the selected contents on the target device will be deleted firstly before the transfer.

confirm to delete data on target device

Method 2: Transfer Videos Selectively

Step 1. Launch iOS Manager and connect your devices with the computer.

Launch iOS Manager and connect more than one iPhone/iPad/iPod/Android device with your computer, here we name the devices: A, B, C.

transfer videos from iPhone 7 to devices

Step 2. Select and transfer videos between devices.

Select the device A from which you want to transfer videos, and click Videos icon at the top of the main interface, you will enter the Movies window by default. Please note that Movies, Music Videos, Home Videos, TV Shows, iTunes U and Podcasts are available here too. Then, check the videos which you want to transfer from A to B or C, then click Export > Export to B or Export to C. As for the following screenshot, the videos in Movies on the iPhone can be transferred to the Samsung Phone or the iPad.
select device to export

Note: Here you can right-click on the selected videos and then select Export > Export to B or Export to C as well.

export iphone movies to devices

d_win d_mac

A Professional iPhone Video Transfer Tool

If you need a professional iPhone video transfer tool, you should pay attention to this Mobile Sync. It is a famous tool designed for transfer & manage data for iOS device. With using this program, you could easily transfer videos to iPhone 7. It supports to transfer files between iOS device and computer, transfer files between iOS devices. The types of transferable files including videos, music, photos, contacts, SMS and more.All in all, it is the best iTunes alternative, a good iOS files transfer & manage tool for iPhone/iPad/iPod.

mobile sync home page

Related Article:

How to Transfer Videos from Computer to iPhone 7

How to Transfer Photos to iPhone 7

How to Transfer Music to iPhone 7

How to Transfer Music from Computer to iPhone 7

Transfer Videos to iPhone 7