All posts by DHZ

How to Convert Apple Music and Spotify Music to MP3

Summary
This article is written for Apple Music users and Spotify users, who want to save their favorite songs. TunesBank’s Apple Music Converter and Spotify Music Converter is the best choice to help music lover to keep Apple Music/Spotify music forever. Read this review article and learn how to convert Apple Music to MP3 and how to convert Spotify songs to MP3, so that you can enjoy Apple Music and Spotify music on any devices/players.

Apple Music and Spotify is the most popular streaming music platform, you may often listen music via several Music apps/services like Apple Music, Spotify, Google Music, Amazon Music, YouTube Music, etc. You can find many Music apps which are offering streaming music with subscription plans. Now, streaming music has changed the way we listen to music, Spotify is the word’s first streaming music platform, and the Apple Music has large users, since many people use Apple devices, both Apple Music and Spotify allow you download the songs/playlist/albums so that you can play them offline, but one of the major disadvantage of this downloaded music is that you can’t play on other devices, such as iPod nano, iPod classic, iPod shuffle,Sony Walkman and Zune, mobile phone including Nokia, BlackBerry, Windows Phone, Android phone, and game console including PSP, PS3, PS4, and Xbox One.

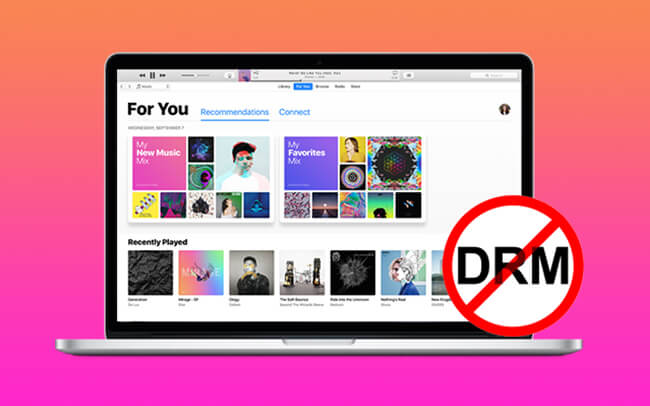
Since songs downloaded from Spotify, Apple Music or iTunes come with a DRM protection, if you want to play Apple Music and Spotify music freely, you need to bypass the DRM protection and convert Apple Music and Spotify Music to MP3 format. In this situation TunesBank Spotify Music Converter and TunesBank Apple Music Converter comes to help. This is why I wrote this review article about TunesBank Music Converer today, this two streaming music converer software can convert Apple Music to MP3, and convert Spotify music to MP3, so that you can transfer, copy, share, burn or play streaming music freely.

apple music converter

In our review of TunesBank Music Converter, we will tell you how you can convert the Apple Music and Spotify music to any other DRM-free audio format, so that you can enjoy them on any devices.

TunesBank inc. committed to developed streaming music converter and recording tool, which offer the best solutions to satisfy users’ needs on listening to Apple Music and Spotify music freely. With this desktop program, all Apple Music and Spotify users can download and convert Apple Music tracks, Spotify music without DRM restriction, subscriber are able to play songs, playlists, albums and podcasts anywhere and anytime.

In the following review contents, I’m going to introduce the TunesBank Music Converter and give a thorough review of why it is the best one in the market.

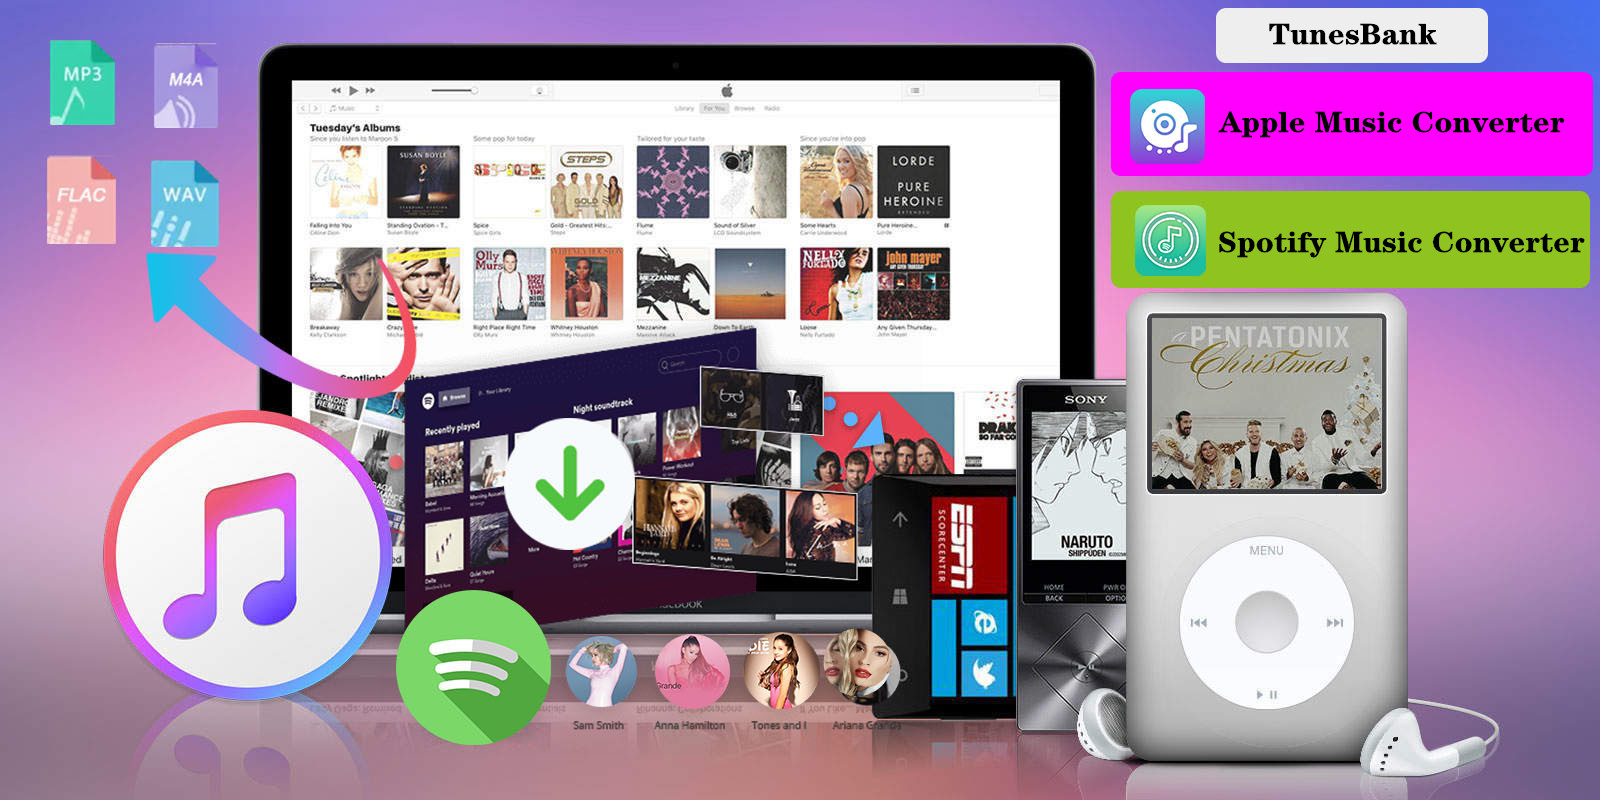
TunesBank Apple Music Converter: The Best Apple Music to MP3 Converter

TunesBank Apple Music Converter is a professional Apple Music DRM removal tool that allows Apple Music users to remove DRM from Apple Music files and convert songs, playlists and albums to DRM-free audio format, like MP3, M4A, AAC, FLAC, AC3, AU and AIFF. Also, it also is a DRM audio converter to convert iTunes M4P songs, iTunes audioboks and Audible AA/AAX audiobooks to MP3, M4A, FLAC and WAV with lossless quality. With the help of TunesBank Apple Music Converter, you can convert Apple music into MP3, M4A, FLAC and many more formats. Moreover, users can convert Apple Music to plain MP3/M4A with all ID3 tags and metadata kept. Its core features can be listed below.

TunesBank Apple Music Converter Features:

This Apple Music Converter comes with many features. Let’s check out the top features:

Remove DRM from Apple Music

Apple Music tracks are encrypted with DRM (Digital Rights management) that limits users to play Apple Music on some devices like MP3 player, iPod Nano, and PS4. That means you can’t transfer your favorite music to your non-Apple devices. Also after cancle your Apple Music subscription, all the tracks becomes unplayable.

Remove DRM from Apple Music

This is where TunesBank Apple Music Converter comes to the rescue. It allows you to remove DRM from Apple Music and convert them to DRM-free audio files. It is professional and you can easily to completed Apple Music DRM removal process with a single click.

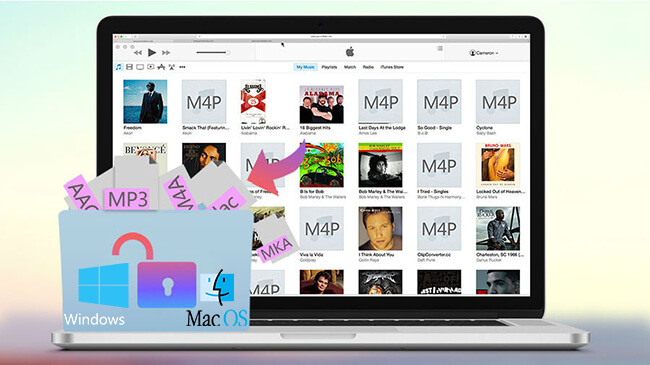
Converting Apple Music to Various Audio Files

Since all Apple Music tracks is Apple Music AAC audio files, which comes with DRM protecion, With the Apple Music file conversion, you can play the Apple Music songs on cross platform devices like Android, Windows etc.

Convert Apple Music to MP3, M4A, FLAC, WAV

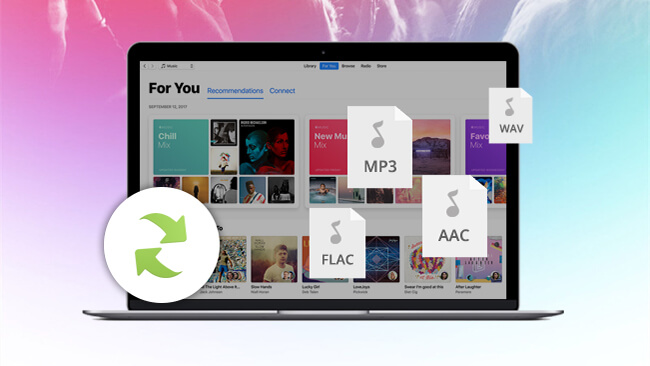
Another useful feature of TunesBank Apple Music Converter is that it allows you to convert Apple music into various audio format like MP3, M4A, FLAC, AC3, AU, AIFF, etc. After converting Apple Music into any plain audio format you want, you can share, copy or play music with no DRM restriction.

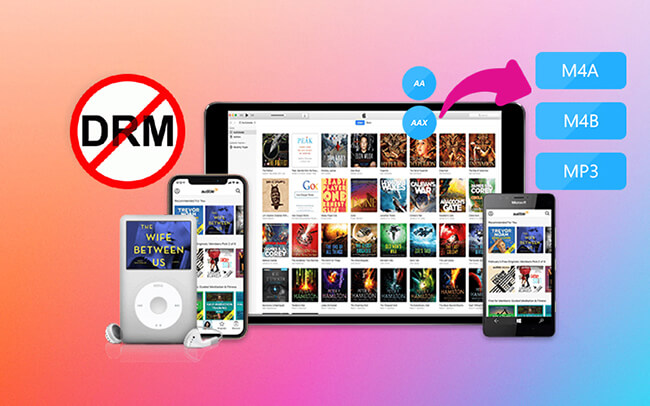
Audible audioBook Converter and iTunes audiobook Converter

TunesBank Apple Music Converter not only can convert Apple Music songs and iTunes M4P songs, it can convert all that the iTunes can playing, incluidng Audible AA/AAX audiobook, iTunes M4P songs and iTunes M4B audiobooks. What’s more, it also enables to remove DRM from any purchased iTunes songs or Audible audiobook, helping your enjoy music and audibooks on any devices.

Convert Audible audiobook to mp3

Allows Add More Songs into “Converting” List

This is the most key features of TunesBank Apple Music Converter, which is stand out from other similar converter, most brands of Apple Music Converer like UkeySoft Apple Music Converter not allows add more songs into the “Converting” list during conversion process, but the TunesBank converter allows user add more songs into the “Converting” list, even the converting process is going, just go back to “Library” and select the songs you want to convert.

tunesbank apple music converter feature

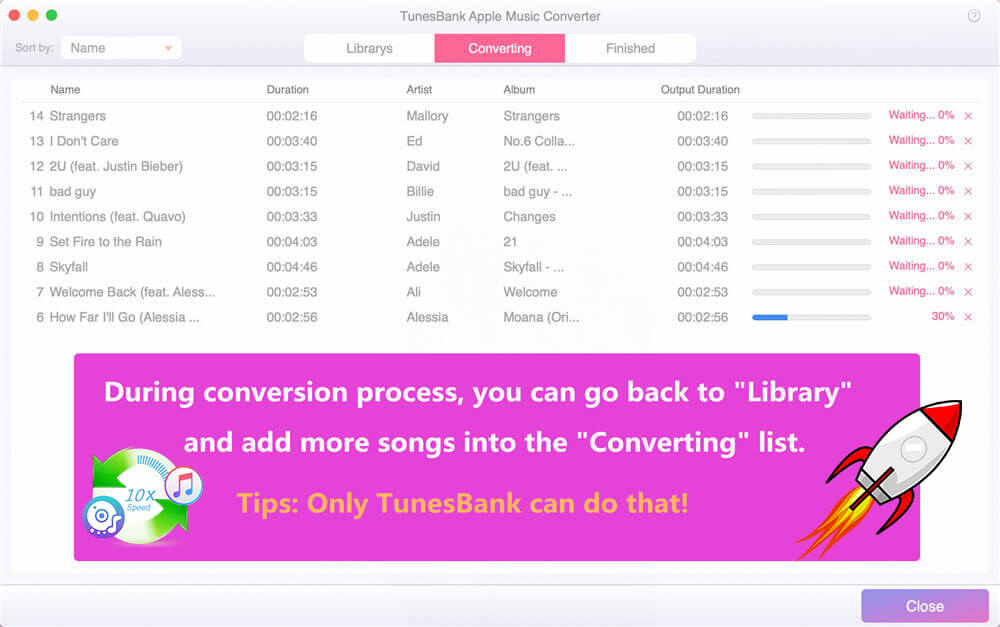
Tips: We have compared different brands of Apple Music Converters. Currently, only TunesBank can do this.

Support Batch Conversion and 5X – 10X Conversion Speed

To save your time to convert songs and playlist, this program allows you to convert songs in batch. You can add as many songs as you like at a time and just click “Convert” button, then all songs you added will be converted immediately.

For Windows: Up to 10X conversion speed on Windows 10/8.1/8/7 (Compared with other brands, the most stable conversion speed on Windows)
For Mac: Up to 5X faster conversion speed on Mac OS X 10.14 or Higher (Compared with other brands, the fastest conversion speed on Mac )

convert apple music with 10X speed

Compatible with MacOS 11 Big Sur and Windows 10

Even if the previous iTunes application has been removed and replaced with the new Apple Music app on MacOS 10.15 Catalina and above(including MacOS 11 Big Sur). TunesBank Apple Music Converter is fully compatible with the latest MacOS 11 Big Sur, you can use this software to convert Apple Music on MacOS 11 Big Sur, just add Apple Music tracks to the Music library, TunesBank Apple Music Converter for Mac will launch Apple Music app automatically and load all your media together with playlists, then select the tracks you want to convert. Of course, the Windows version of this app also compatible with Windows 10/8.1/8/7 (32 bit or 64 bit).

apple music converter for mac and windows

For those who want to convert Apple Music to MP3 for playing on any MP3 player, here’s how you can use TunesBank Apple Music Converter to convert Apple Music songs to MP3 files.

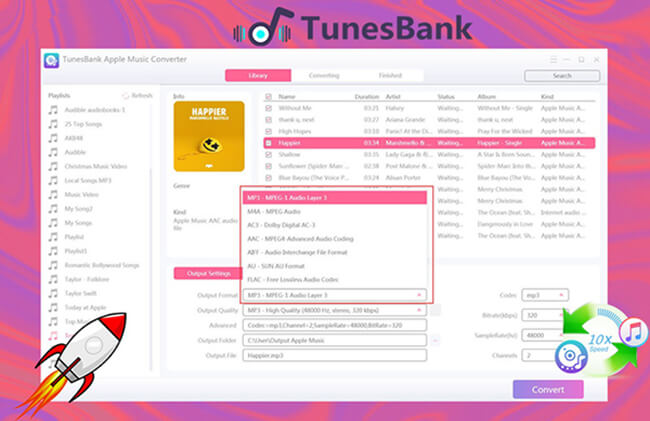
How to Convert Apple Music to MP3?

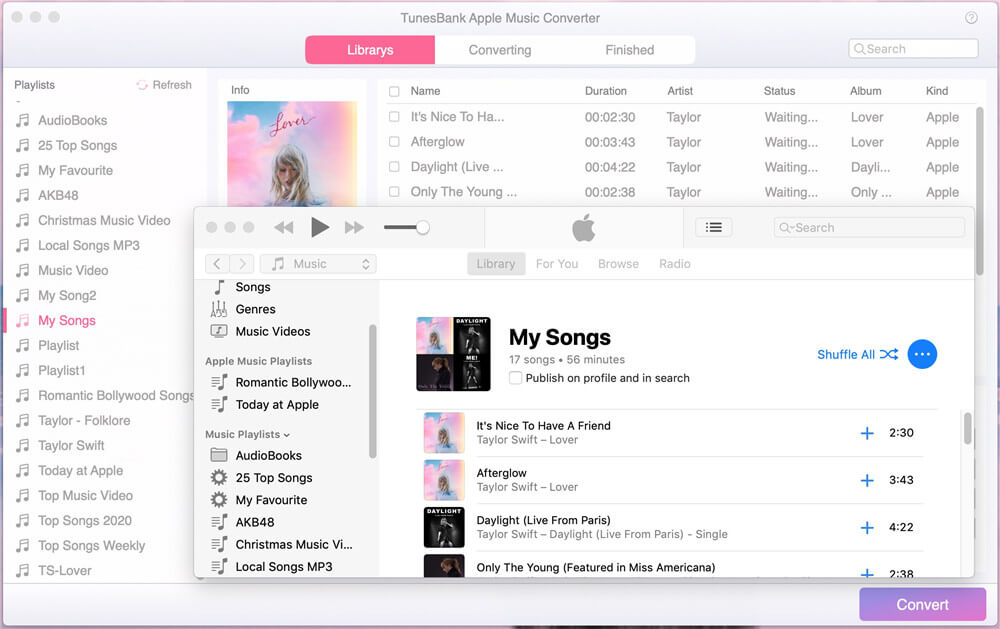
Step 1. Download, install, and launch TunesBank Apple Music Converter on PC or Mac.

d_win d_mac
d_win d_mac

After launcing the Apple Music Converter, the iTunes or Apple Music app will be launch immediately, all media files will be synced into the software automatically.

launch apple music converter

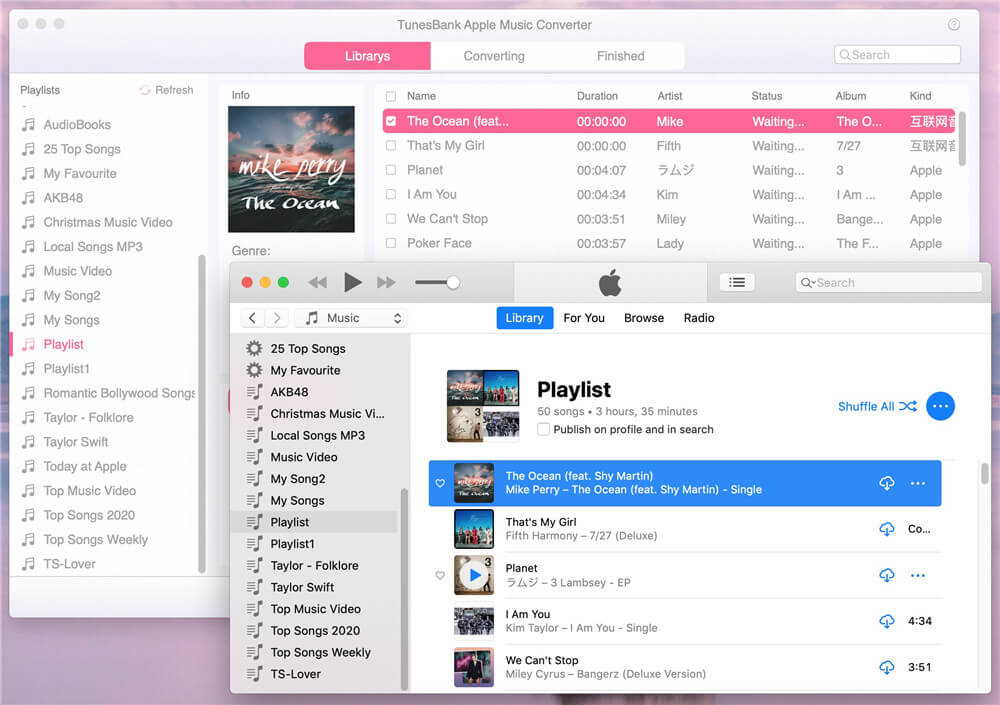
Step 2. Select the Apple Music songs you want to convert, just click the checkbox next to the sone name, you also can select the whole playlist.

select apple music

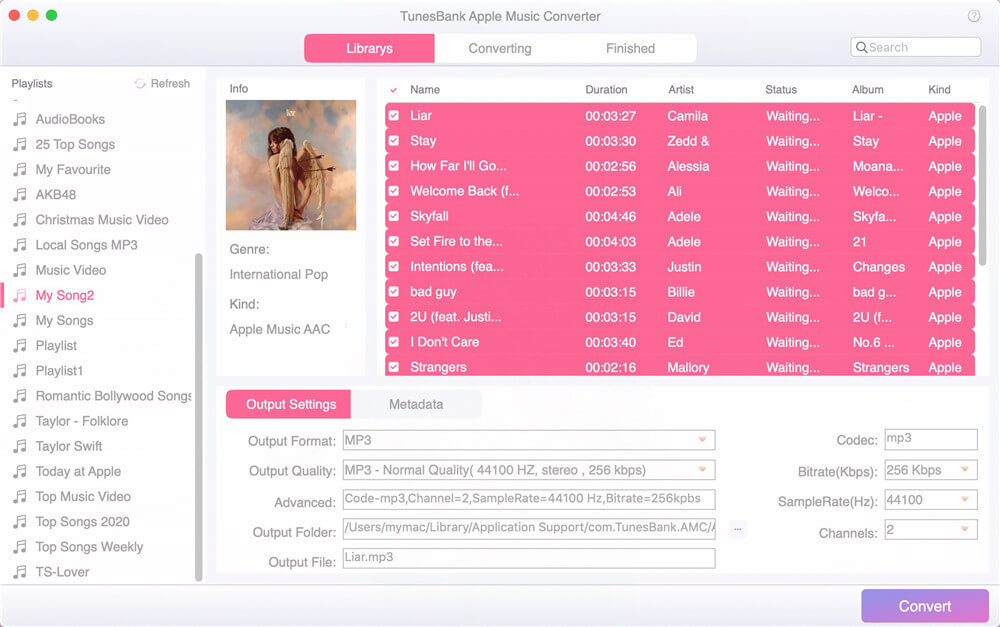
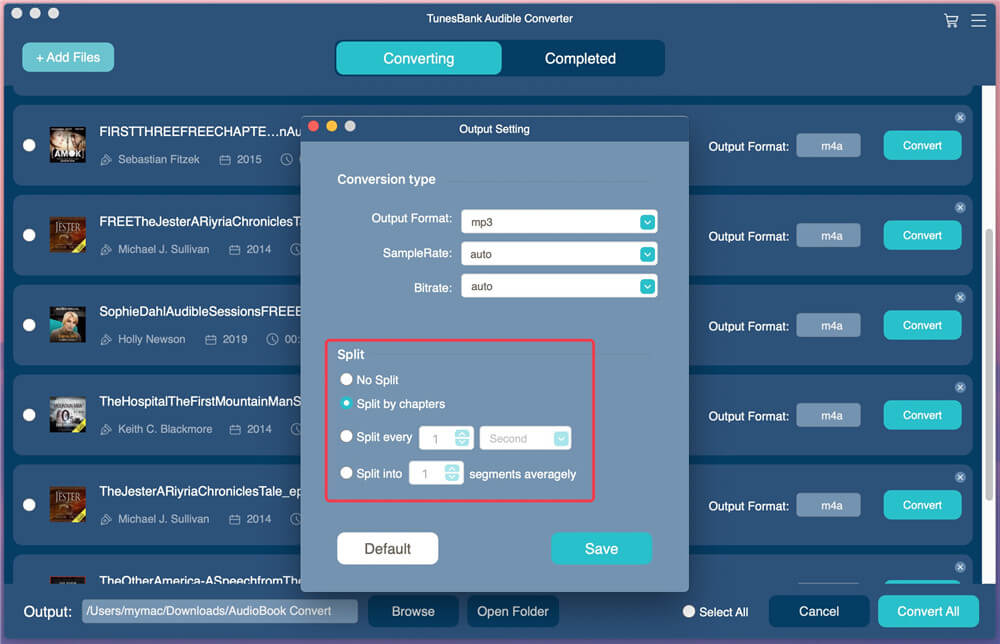
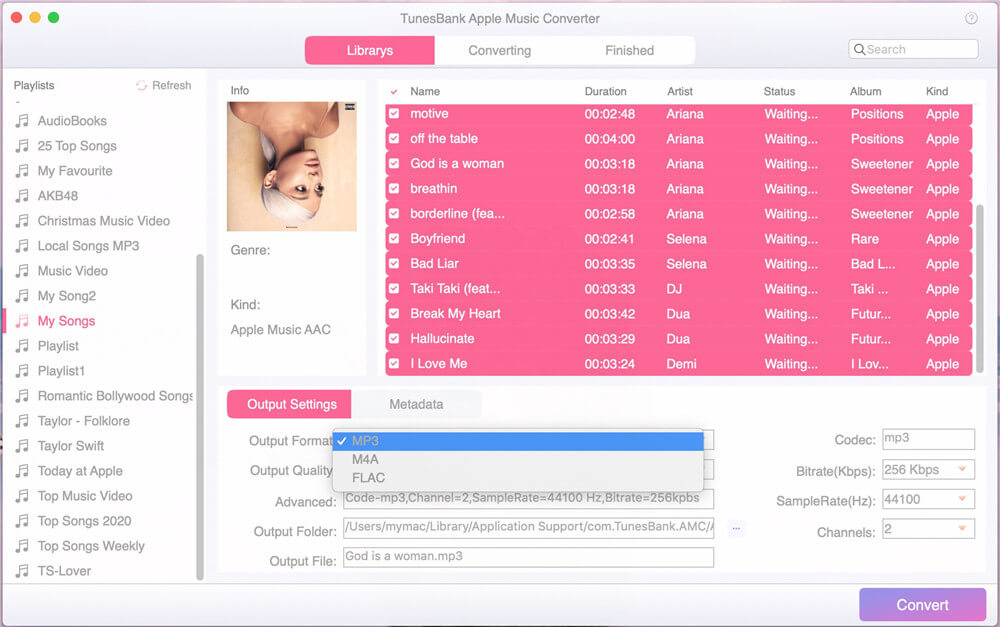
Step 3. Go to Output Settings > Output format and choose MP3 as the audio format, you also can select M4A, AAC , AC3, FLAC or WAV as output format.

output format

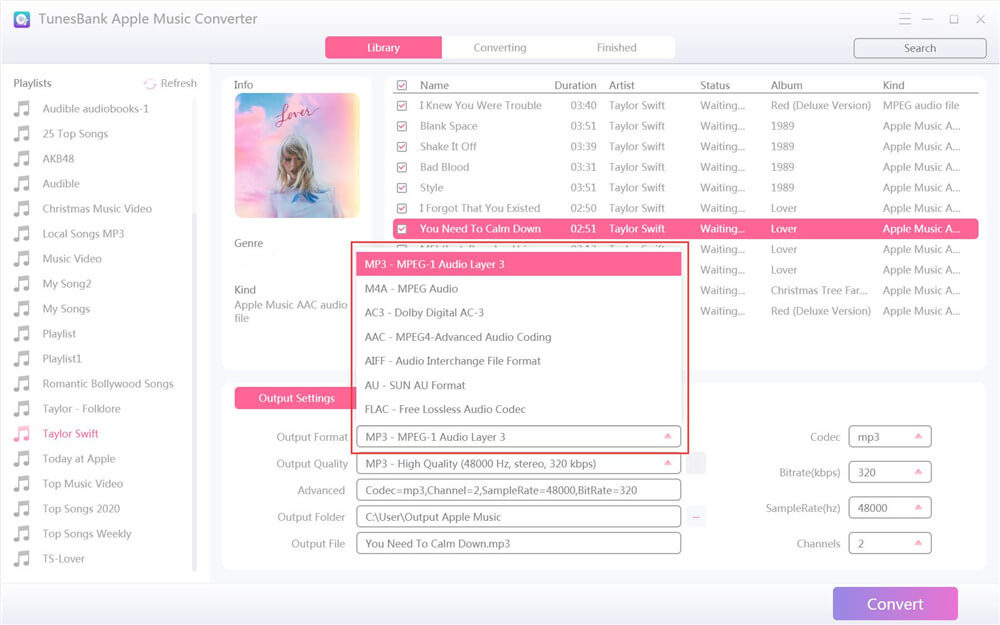
Step 4. Click the “Convert” button to start converting selected Apple Music songs to MP3 format.

convert apple music to mp3

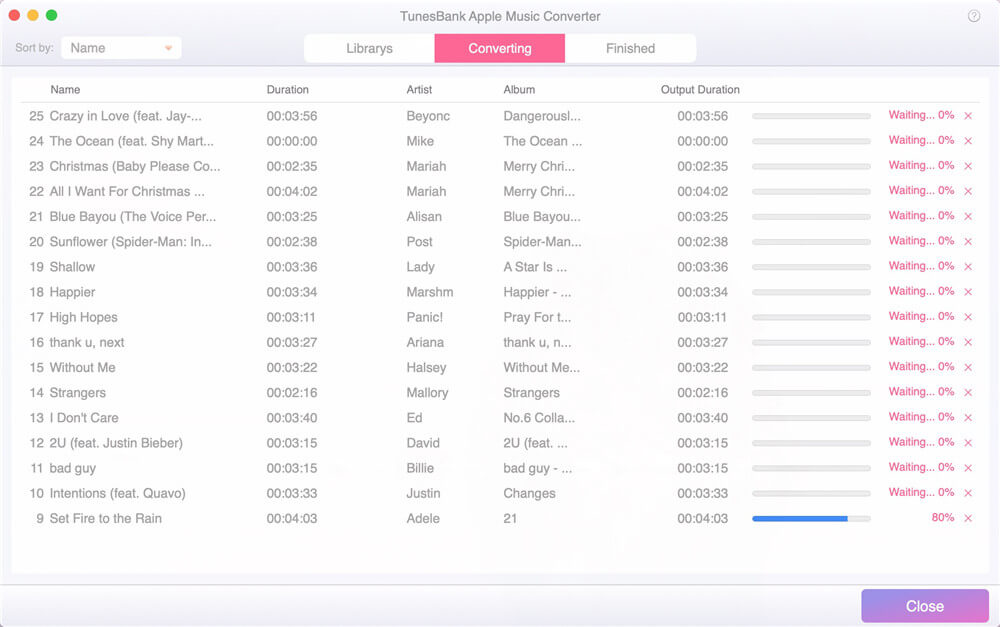
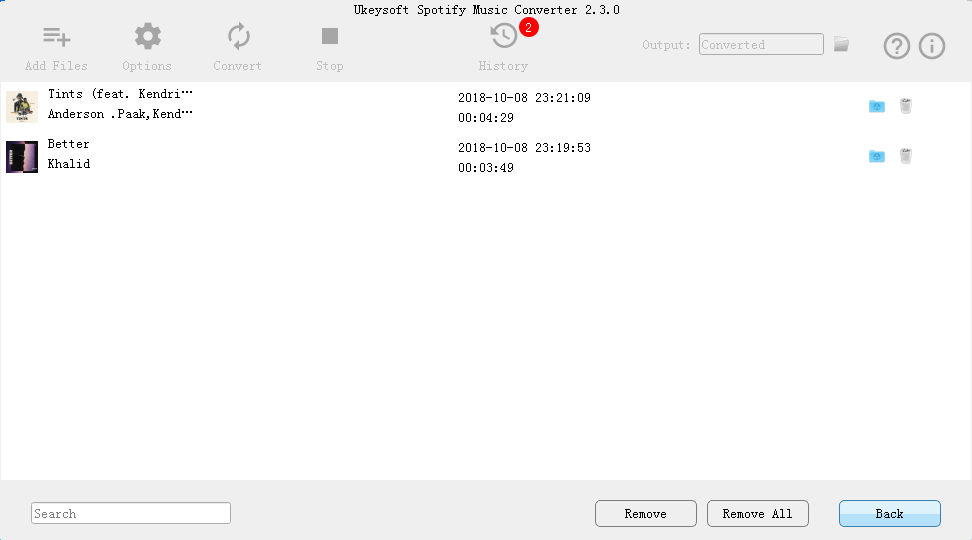
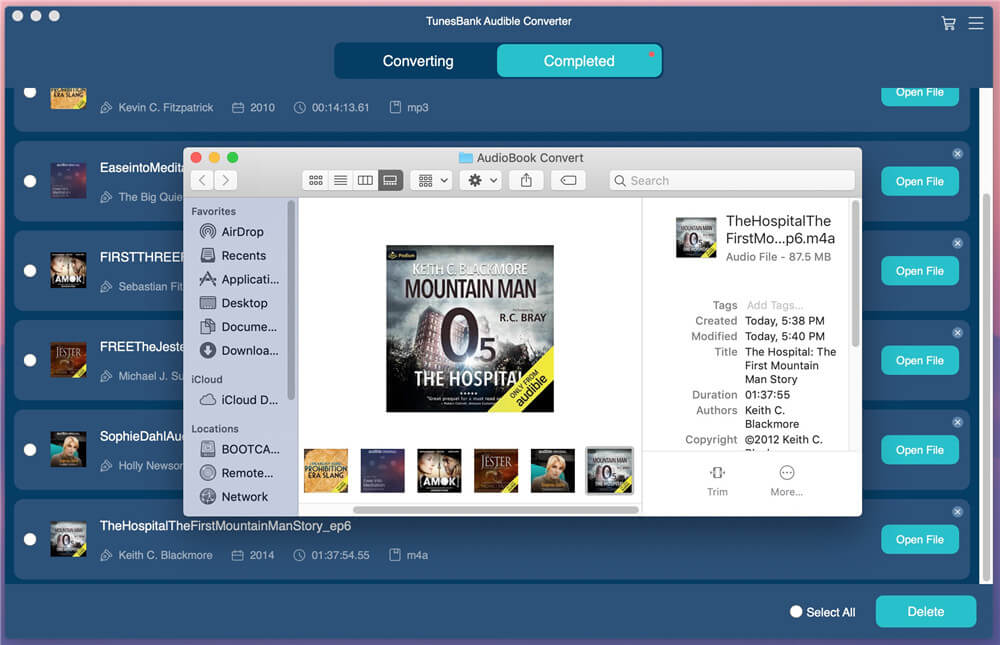
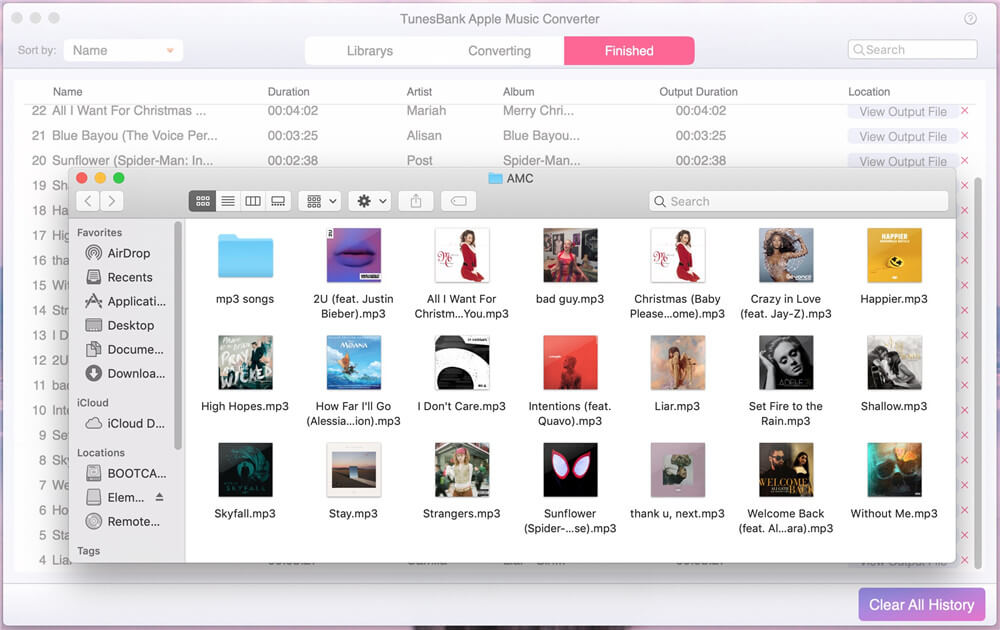
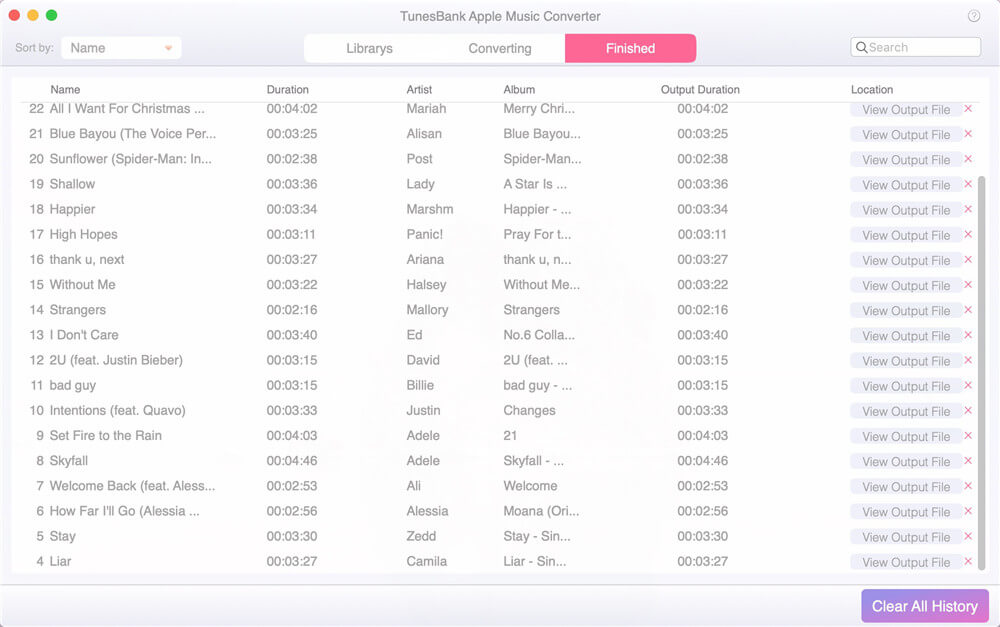
When conversion completes, click “History” menu and click “Open Output File” to open the destination folder, you will get the MP3 files. Now, you can play those unprotected Apple Music songs anywhere anytime without restriction.

apple music mp3 files

The above tutorial is provided to Apple Music users to convert Apple Music tracks easily. For Spotify users, both Spotify premium users and free users can download songs, playlists, albums and podcasts to MP3 for offline listening anywhere anytime. Please keep reading the following review of TunesBank Spotify Music Converter, we will tell you how you can download and convert Spotify music to MP3 and other DRM-free audio format.

TunesBank Spotify Music Converter: The Best Spotify to MP3 Converter & Downloader

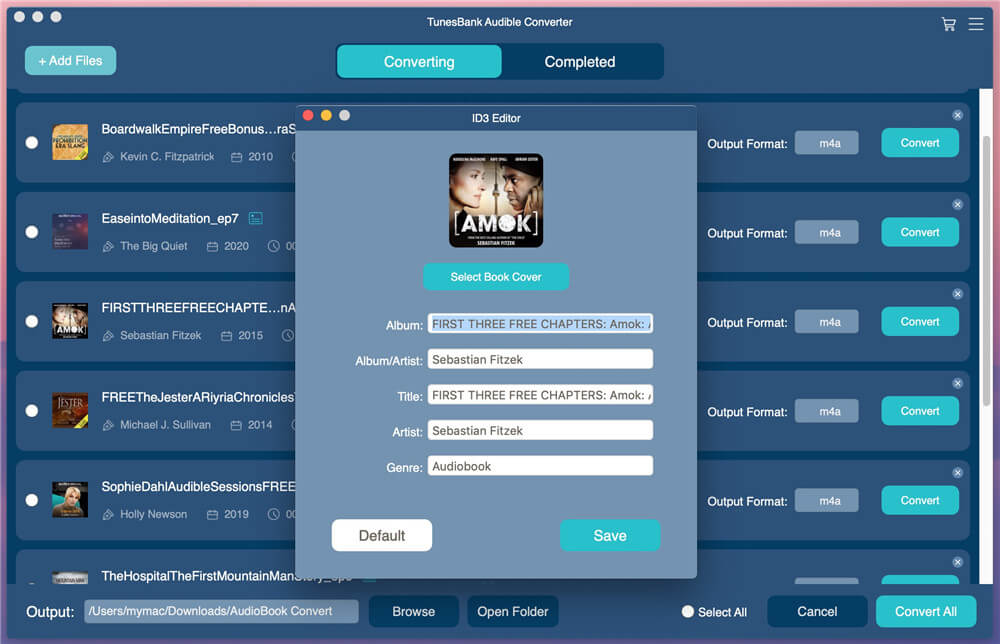
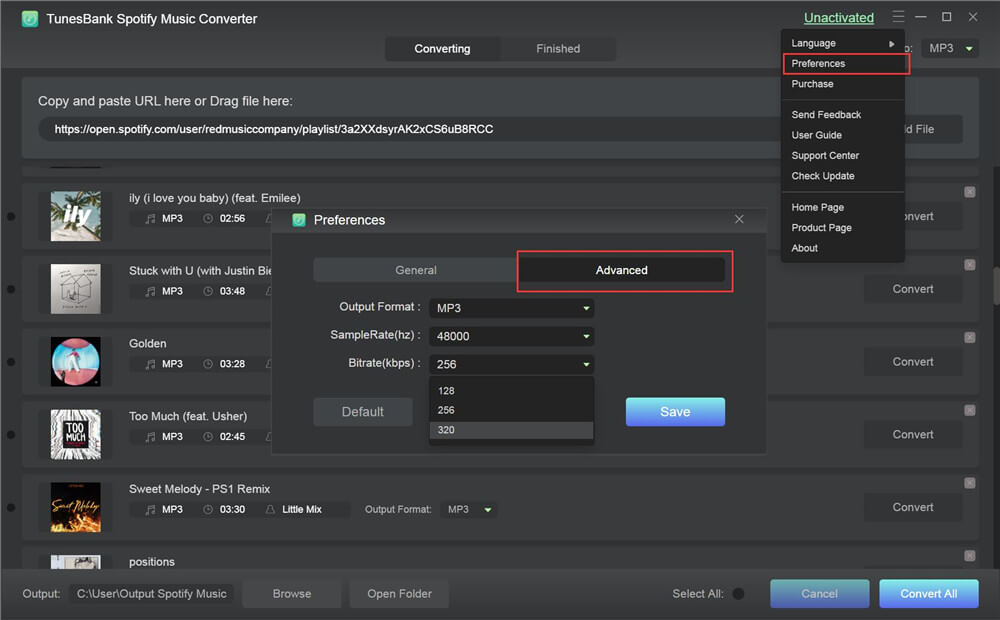
TunesBank Spotify Music Converter is a professional Spotify music downloader allows all Spotify users to download songs, playlists, albums and podcasts to Windows users and Mac. Moreover, users can convert Spotify music to plain MP3, M4A, FLAC and WAV with lossless quality. In additional, all ID3 tags and metadata kept after conversion, users can view all ID3 tags and metadata on media player while playing, which other audio recorder cannot do that!

spotify music converter

With TunesBank Spotify Music Converter, either free or premium subscribers can download and convert Spotify songs, albums, podcast or playlists to MP3/M4A, helping users play Spotify music on any players and devices. Let’s teach you how to download Spotify music to MP3 with Free account.

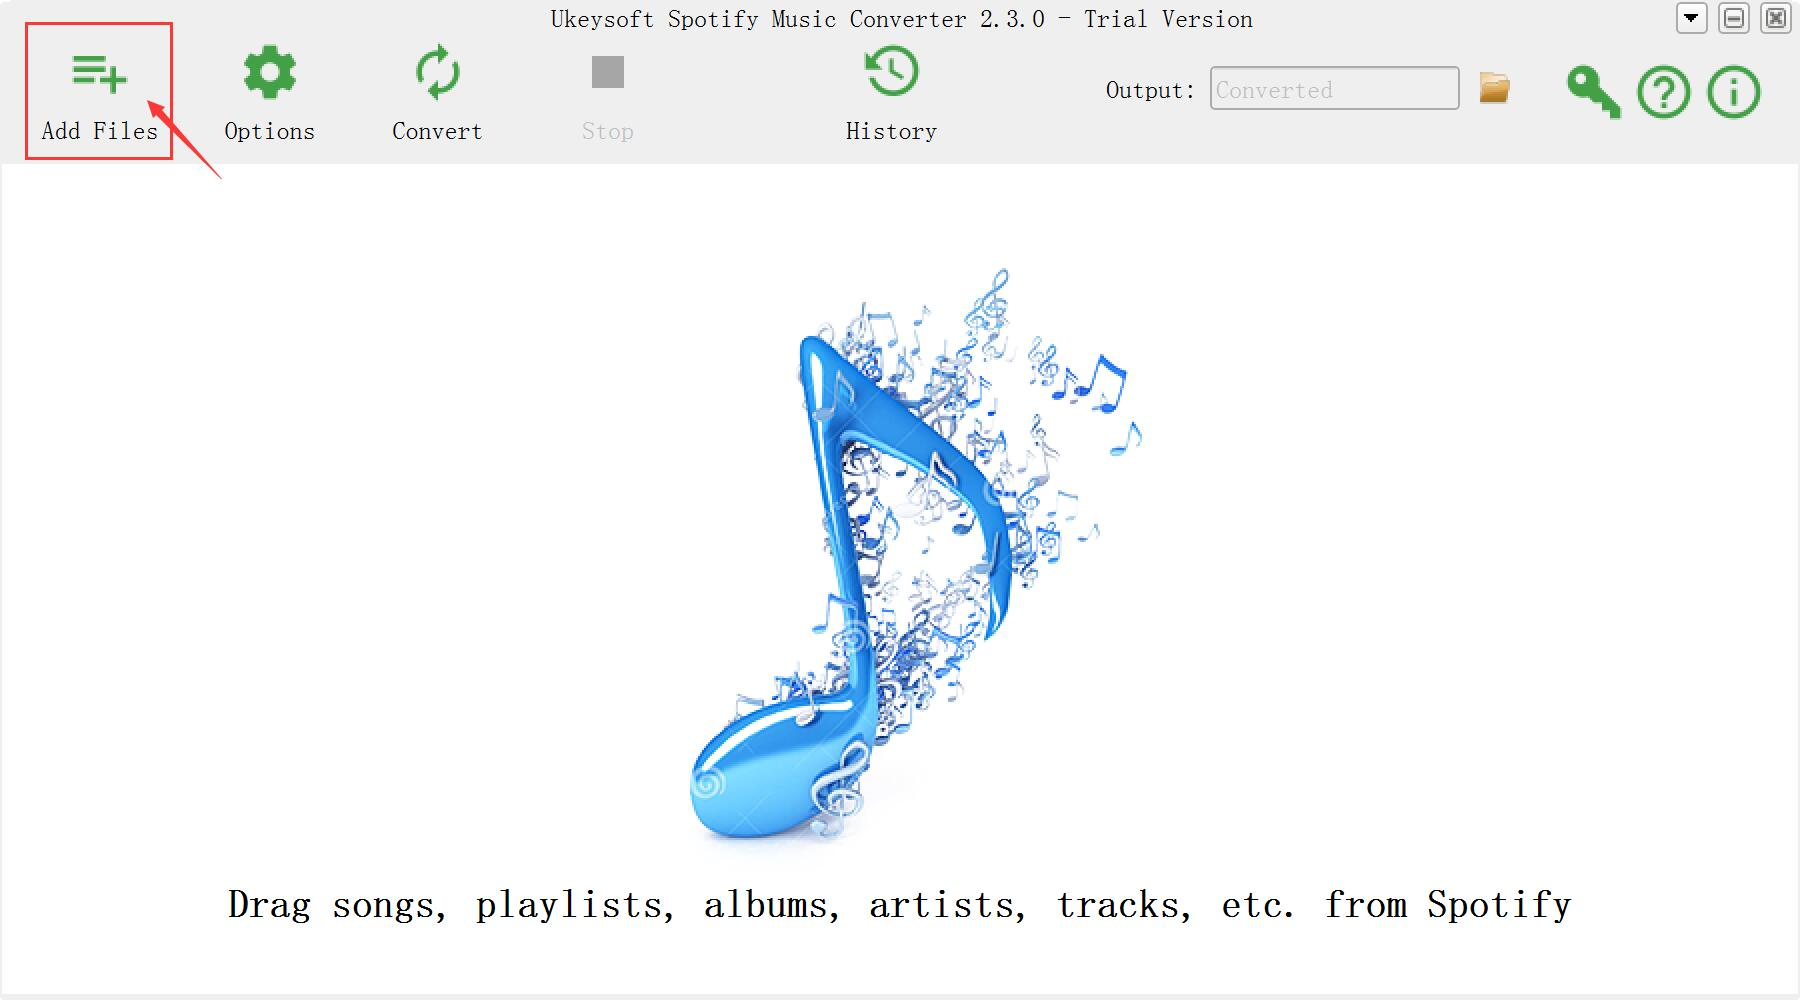
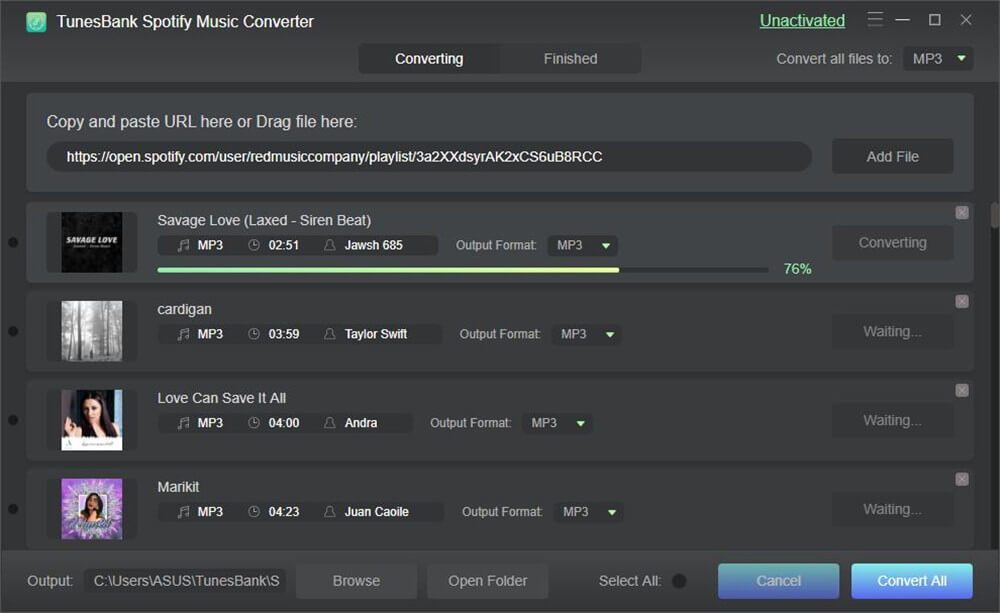
How to Convert Spotify Music to MP3?

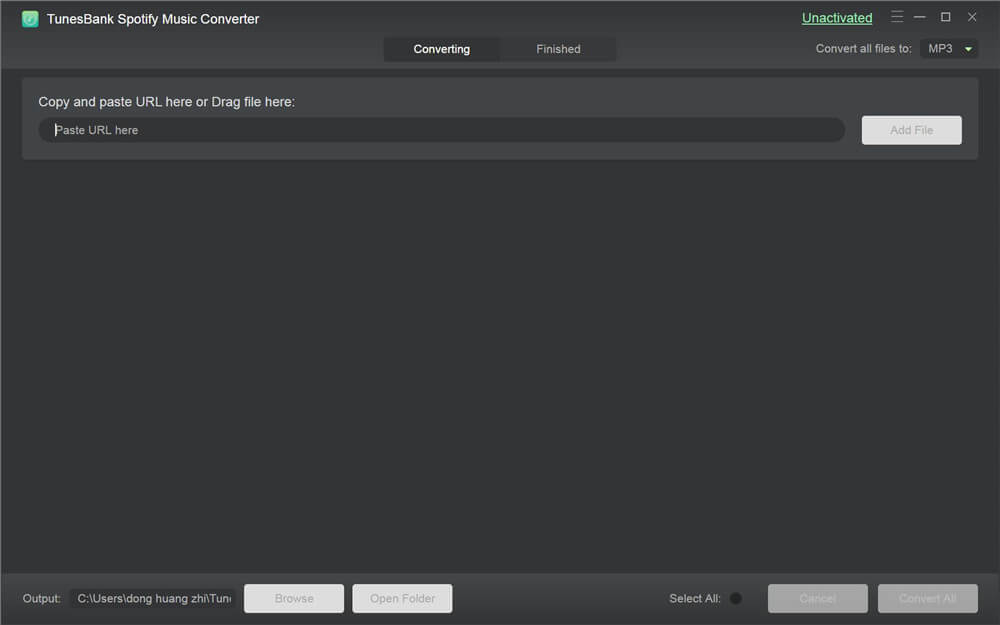
Step 1. Download and Install TunesBank Spotify Music Converter.

d_win d_mac
d_win d_mac

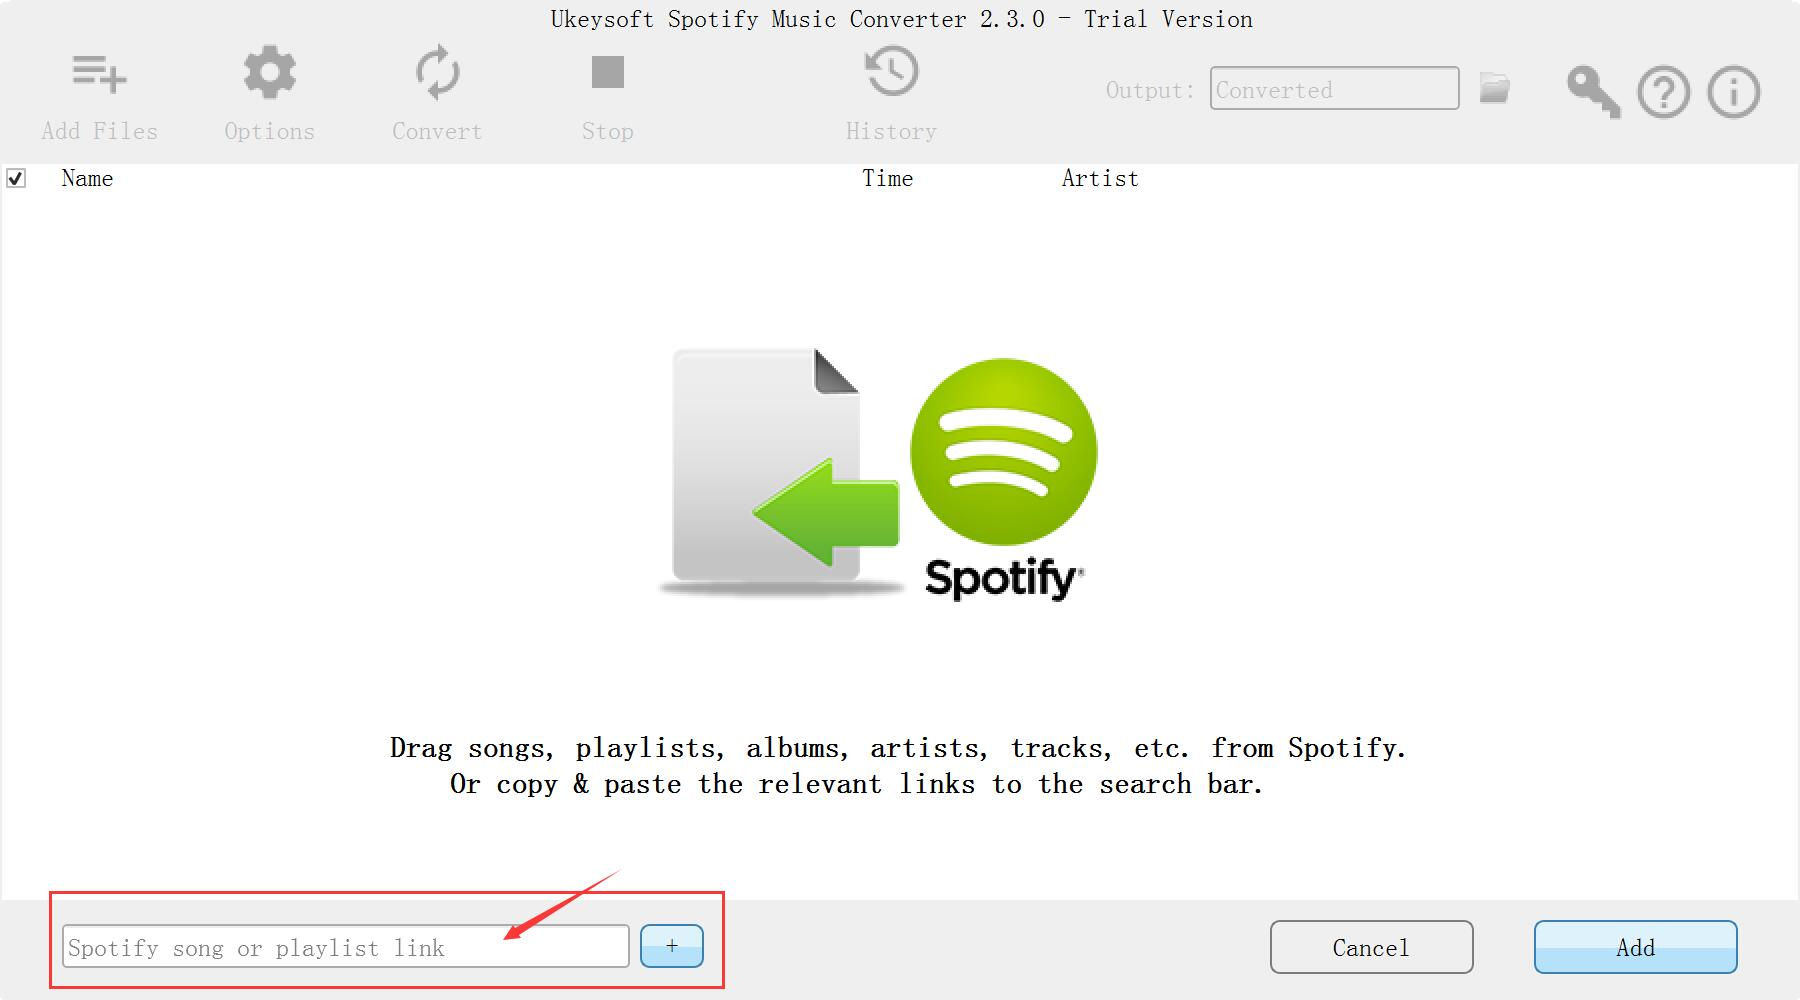
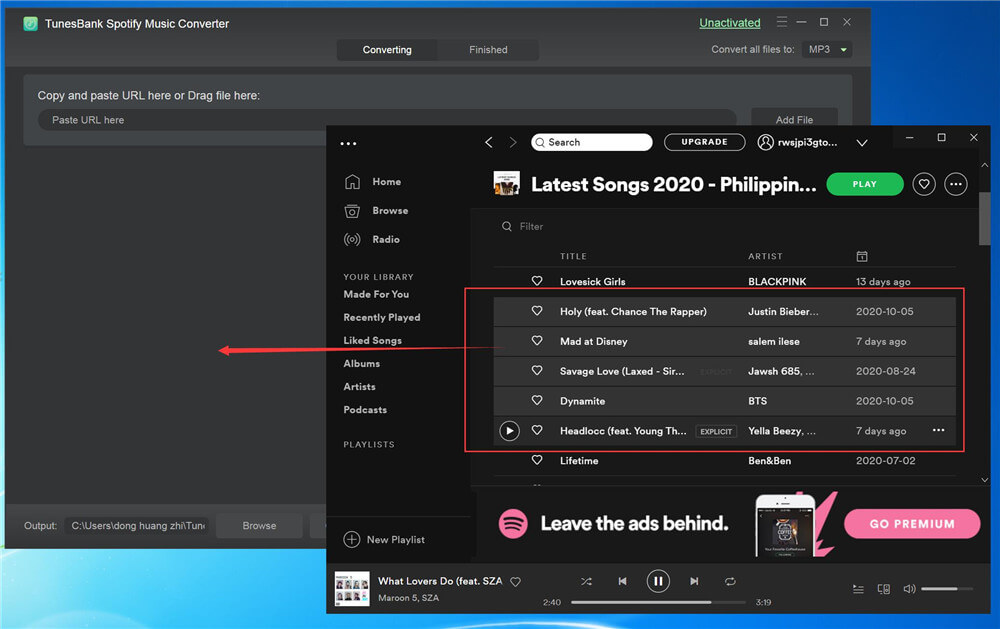
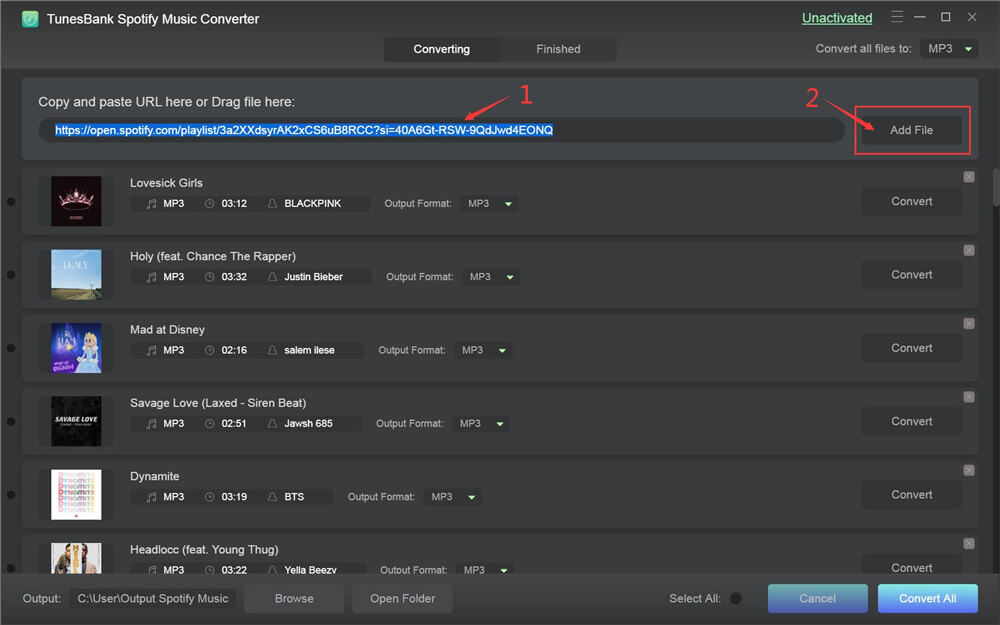
After launching the converter, the Spotify app will launch automatically, then just dragging and dropping the songs/tracks/playlists from Spotify to the converter.

launch spotify music converter

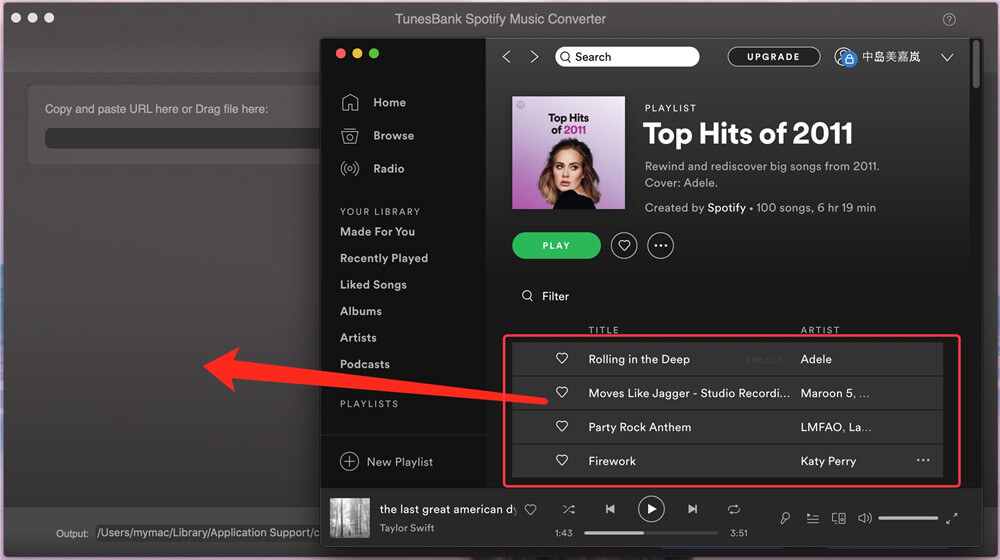
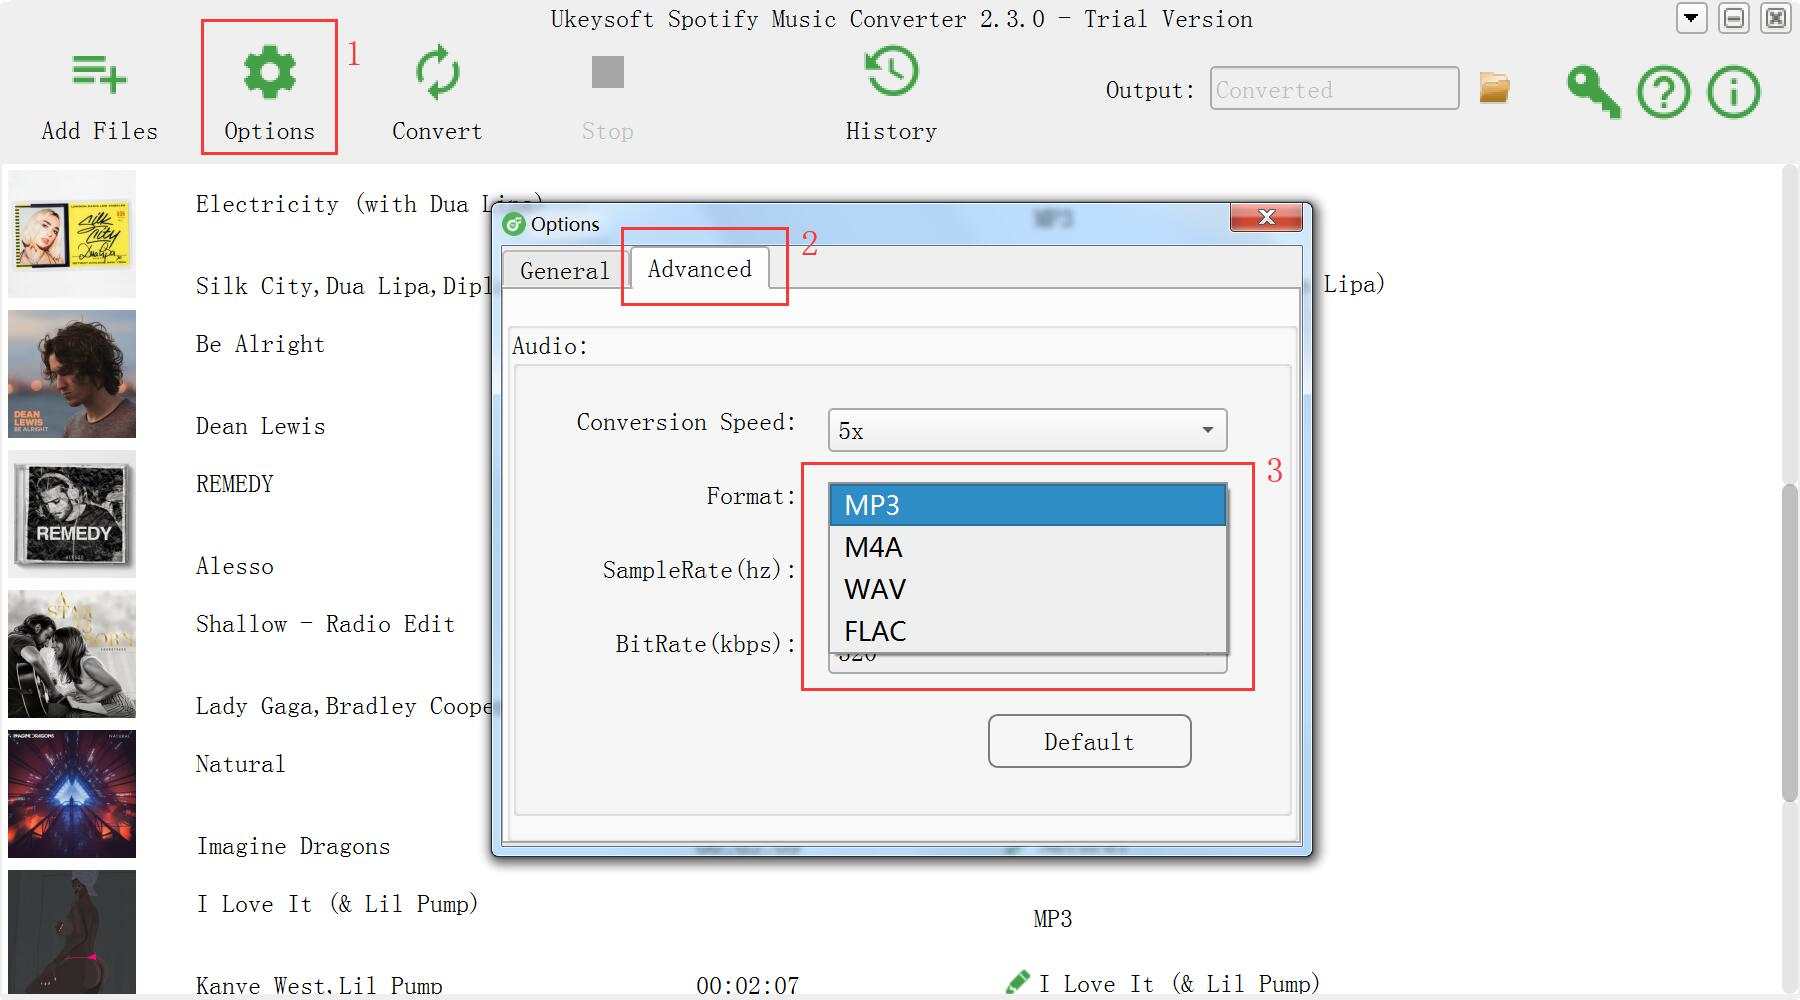
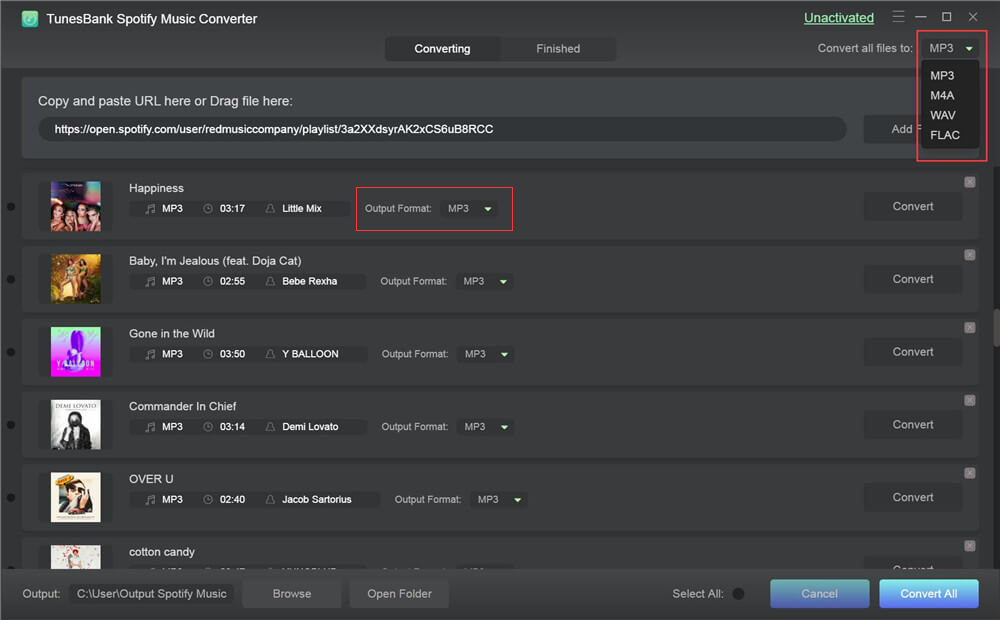
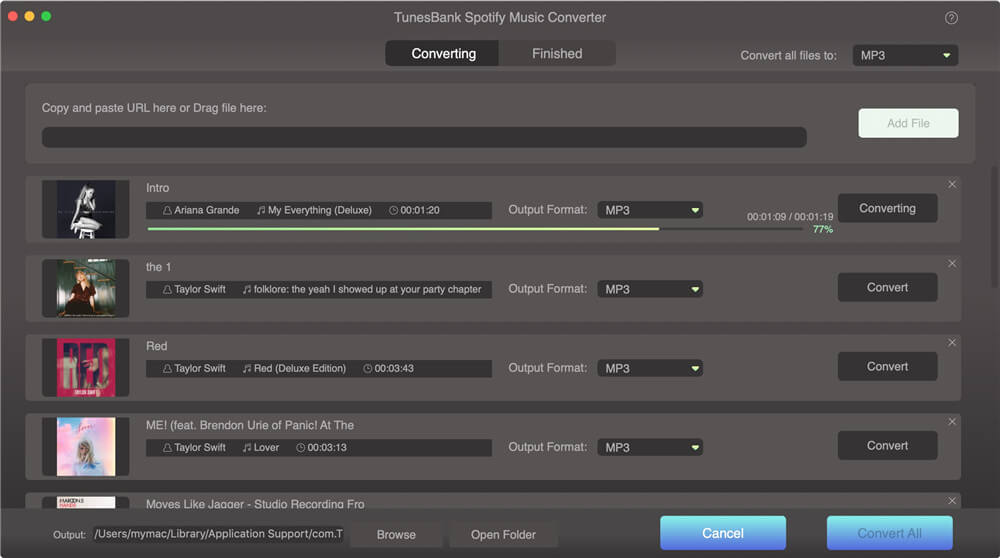
Step 2. After adding Spotify files to the converter, you can choose the output formats from the drop-down lists.
For Windows users, you can select MP3, M4A, FLAC or WAV as output format.

add Spotify files

For Mac users, you can convert Spotify music to MP3, M4A or FLAC.

spotify music converter for mac

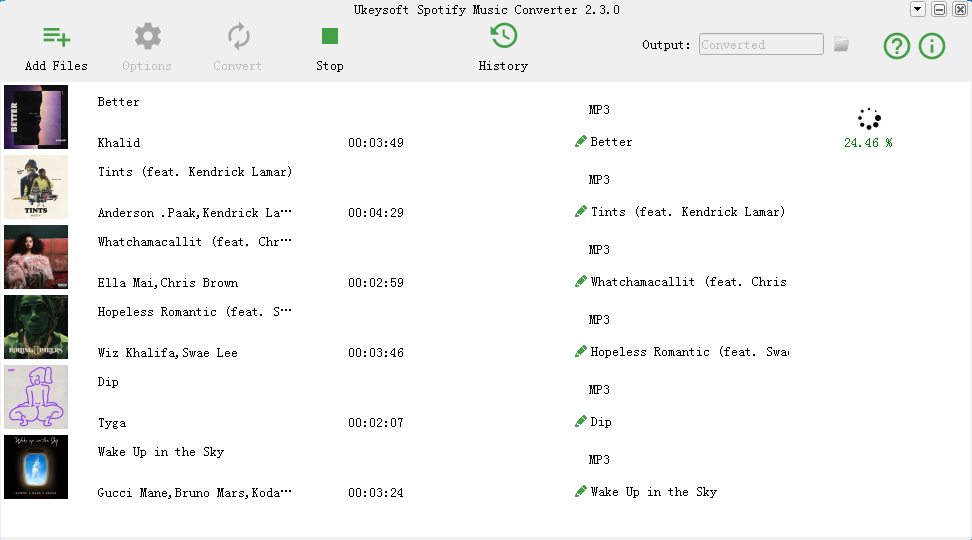
Step 3. Just clicking the “Convert All” start converting Spotify music to MP3.

convert spotify music to mp3

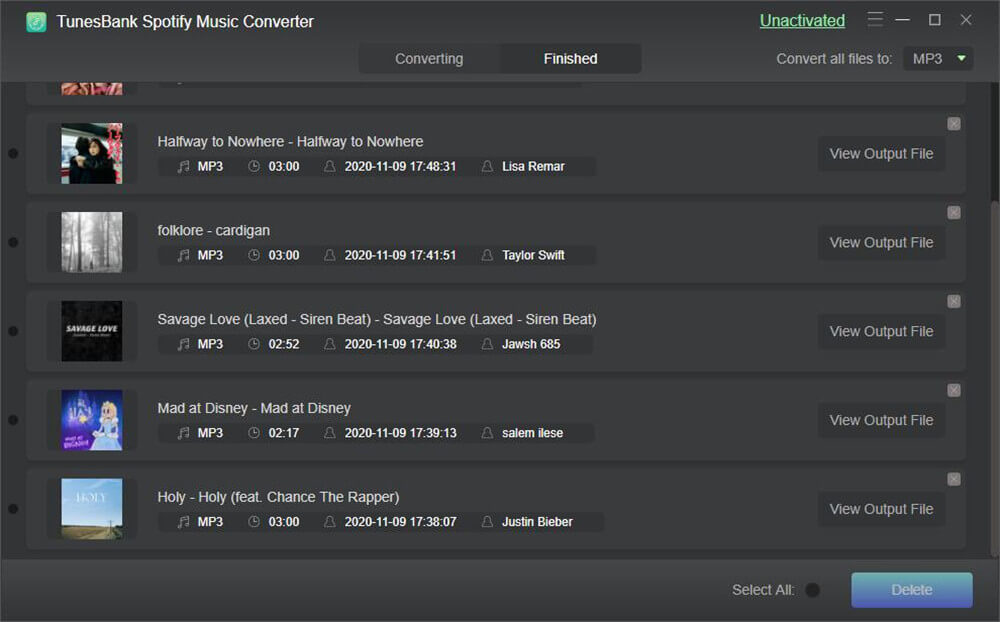
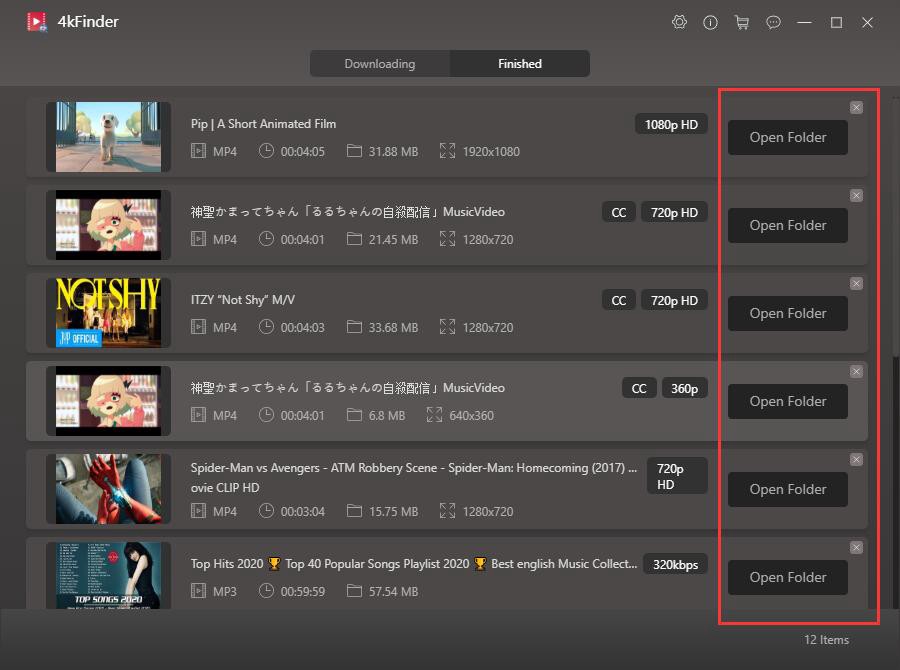
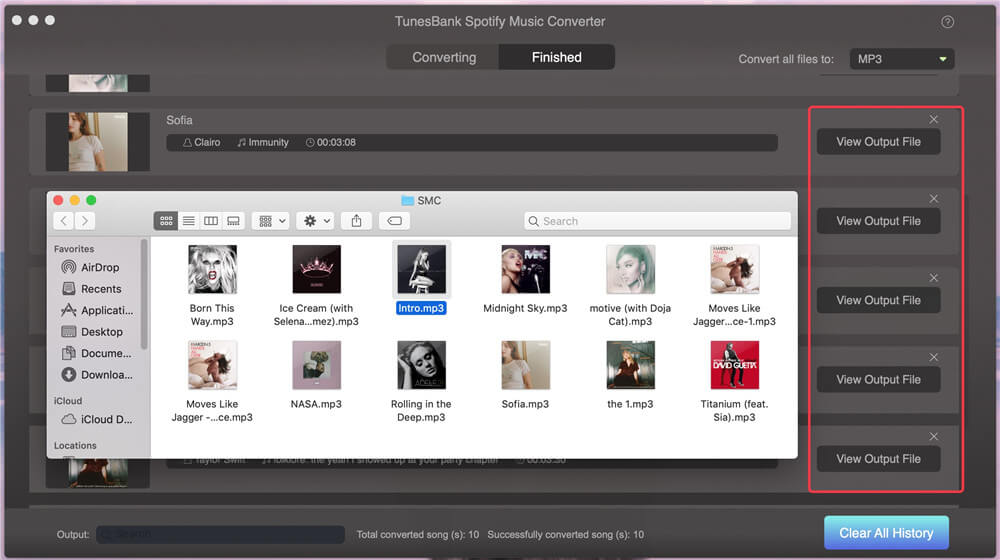
When the whole conversion has done, hit “Finished” and then you can see all the converted history. After that, please click “View Output File” to open the output folder, you will get the MP3 fiels. Now, you can enjoy Spotify Music on any devices freely.

get spotify mp3 music

Conclusion

Unlike other streaming audio recorder, TunesBank Music Converter will keep all ID3 tags and metadata info after conversion, the information of Apple Music/Spotify track like artist, title, album, album artwork and genre will be preserved. Moreover, users can batch as many as songs as they like in one click. With a slick interface and outstanding performance, this tool gets your listening experience back on track with multiple available choices to stream Apple Music and Spotify Music.

Как преобразовать музыку Spotify в MP3

Как слушать Spotify Music как местные музыкальные файлы MP3? Я хочу владеть этими песнями Spotify Music полностью без рекламы, даже без подписки. Можно ли сделать это правдой?

Spotify Music – одна из самых популярных потоковых музыкальных композиций во всем мире с более чем 140 миллионами пользователей, 30+ миллионами музыкальных треков. Это позволяет вам просматривать или искать любые типы музыки по исполнителю, альбому, жанру, списку воспроизведения. Spotify предоставляет вам два типа прослушивания музыки Spotify, включая Premium и Free. Spotify Free доступен всем, у кого нет подписки, но поддерживается рекламой. Недостатком бесплатной службы Spotify Music является меньшее количество функций и ограничений на музыку, которую вы можете воспроизводить, например, она не может сохранять и воспроизводить списки воспроизведения для автономного прослушивания для бесплатной подписки Spotify Music.

Даже если план Spotify Music Premium поддерживает загрузку песен Spotify, все еще существуют некоторые ограничения и требования, вызванные защитой DRM при автономном воспроизведении Spotify Music.

1. Вы можете загружать офлайн-песни только на разные устройства 3;
2. Вы можете загрузить только ограниченное количество песен на устройство;
3. Вы должны выходить в интернет с приложением Spotify Music, по крайней мере, один раз каждые дни 30, чтобы держать устройства в автономном режиме.

Поэтому, если вы хотите полностью сохранить песни Spotify Music, воспроизводить Spotify Music без ограничений, даже без подписки, вам следует конвертировать Spotify Music в MP3.

Конвертируйте Spotify Music в MP3 через Spotify Music

Если вы являетесь пользователем Spotify и хотите загружать и сохранять музыку Spotify в виде файлов MP3, здесь мы хотели бы порекомендовать самое быстрое решение. Пробуя это мощное Музыкальный конвертер UkeySoft Spotify, который является отличным загрузчиком Spotify Music и быстрый конвертер поможет вам легально скачать и конвертировать Spotify Music в MP3 полностью удалив DRM из него, вы сможете бесплатно воспроизводить Spotify Music без ограничений. Выходные файлы будут сохранены с исходным качеством. Для бесплатных пользователей Spotify эта программа также может удалить рекламу Spotify после конверсии. Кроме того, вы можете слушать преобразованную музыку для автономного воспроизведения, записывать ее на компакт-диски или воспроизводить на любых мобильных устройствах без приложения Spotify Music.

d_win d_mac

Как преобразовать музыку Spotify в MP3

Шаг 1. Запустить программу на компьютере
Прежде всего, запустите Spotify Music Converter на компьютере.

спойтер конвертер домашняя страница

Шаг 2. Добавить Spotify Songs или плейлисты
После запуска Spotify Music Converter на вашем компьютере Spotify откроется с ним автоматически. Нажмите «Добавить файлы”В верхнем левом интерфейсе, чтобы открыть окно добавления звука. Затем перейдите в главное меню Spotify, чтобы найти музыку или список воспроизведения, которые вы хотите преобразовать, напрямую перетащите песни или список воспроизведения, которые вы хотите преобразовать, в окно добавления музыки, чтобы завершить импорт.

добавить музыку

Шаг 3. Установка выходного предпочтения
Нажмите кнопку “Опции», Чтобы установить выходной формат, качество вывода, скорость преобразования и путь вывода. Вы можете конвертировать Spotify Music в MP3 / M4A / WAV / FLAC с высоким качеством (доступно 320 кбит / с).

выбрать формат

Шаг 4. Начать преобразование песен Spotify в MP3
После вышеуказанной настройки нажмите «Конвертировать», Чтобы начать преобразование музыки Spotify в MP3. После преобразования вы можете нажать кнопку «папку.», Чтобы найти преобразованную музыку в формате MP3.

конвертировать Spotify музыку в MP3

просмотреть музыку mp3

d_win d_mac

Руководства по теме:

Как слушать музыку Spotify без подписки

Как синхронизировать музыку Spotify на iPod Touch / Nano / Shuffle

Как полностью удалить DRM из Apple Music

Как записать потоки Apple Music M4P в формате MP3

Как играть в Apple Music без подписки

Как восстановить удаленные или утерянные данные с iPhone / iPad / iPod

TunesBank Audible Converter Review: Remove DRM from Audible Books Easily

Summary
This article will review the best Audible DRM Removal – TunesBank Audible Converter. TunesBank Audible Converter is dedicated to removing DRM from Audible Audiobooks and convert AA/AAX to DRM-free MP3, M4A, FLAC, WAV format with lossless quality!

Do you like audiobooks? Amazon Audible is home to millions of audiobooks, exclusive Originals, free podcasts, best sellers, classics, radio shows, and more. It allows users to purchase, stream or download audiobooks from Audible.com or Audible app. However, the downloaded Audible Audiobooks are DRM protected and you can only access them on audible-approved devices with Audible app or iTunes. To break these barriers, you need to use a powerful Audible DRM Removal tool to remove DRM from Audible Books.

We have compared different brands of Audible Converter and audiobooks converter, TunesBank Audible Converter stands out among all the Audible DRM Removal tools. Here we will review TunesBank Audible Converter, with its feature, highlights, user guide, user interface, compatibility, price, etc.

TunesBank Audible Converter Review

Frankly speaking, TunesBank Audible Converter is a one-stop Audible DRM Cracker and Audible AA/AAX Converter. It is specially designed to remove DRM from Audible AA and AAX Audiobooks while converting DRM-ed Audible books to DRM-free MP3, M4A, FLAC and WAV format with original quality, ID3 tags and chapter info kept to free your collection. In this way, users can freely control, share and listen to Audible Audiobooks on any device offline.

Features

A Lossless Audible DRM Removal – By adopting a top-leading DRM decrypting technology, it has ability to losslessly remove DRM from Audible Audiobooks without dropping any audio quality.

No iTunes or Audible Authentication are Required – Unlike TunesBank Apple Music Converter, TunesBank Audible Converter works straightforwardly without launching any other extra apps, such as iTunes, and you don’t need to authorize Audible account.

Convert Audible Books to Popular Formats – Besides removing Audible DRM, it can also convert Audible AA or AAX audiobooks to MP3, M4A, FLAC, and WAV audio formats compatible with any device, tablet and player, like MP3 player, iPods, iRiver, Kindle, Sony Walkman, iPhone, Android, etc.

Preserve & Customize Audio Quality – This Audible DRM Cracker not only retains 100% of the original quality of audiobooks, but also allows you to change certain audio parameters as needed. For example, you can change the bit rate, sample rate to get high-quality audio from Audible books!

Keep All ID3 Tags and Chapters Info – Thanks to the build-in ID3 tag editor, it can help you to keep audiobook chapter information and ID3 tags. In addition, you can edit the ID3 tags according to your preference, including cover, artist, album, title, etc.

Splits Audible Books to Small Parts – Most audio books are relatively long, some even last for more than 8 hours, which takes up a lot of device memory. Don’t worry, TunesBank supports you to split the long-hour audiobook into multiple parts by time or chapters.

Up to 100X Faster Speed and Batch Conversion – TunesBank Audible Converter runs at 100X faster speed when removing Audible DRM. Batch conversion is supported in consideration of people’s busy life.

Highlights

Unlike other Audible Audiobook Converter, TunesBank Audible Converter can not only losslessly remove DRM from Audible Audiobooks, but also allows users to set different output formats for each audiobook before processing the conversion. This means you can set MP3 format for one book, and set M4A, FLAC or WAV format for other audiobooks at once. Also, you can set the same output format for all audiobooks!

tunesbank audible converter supports format

User Interface

Like other DRM removal software developed by TunesBank Inc, TunesBank Audible Converter also has a simple and clean interface without any ads. There are no extra buttons or text, just a few neat icons, making the commands simple and easy to understand. With its user-friendly interface, everyone can control it easily.

tunesbank audible converter interface

How to Remove DRM from Audible Books with TunesBank?

Step 1. Download & Install TunesBank Audible Converter
Click the below button to download and install TunesBank Audible Converter on your Mac or Windows PC.

d_win d_mac
d_win d_mac

Step 2. Add Audible AA/AAX Files to TunesBank
Fire up the TunesBank program after installation. Then drag and drop the audiobooks to TunesBank’s window. Or click the icon of the screen to manually add the Audible AA or AAX files. Batch conversion lets you add multiple audiobooks once.

drag and drop aa aax files

Step 3. Customize Output Settings
The imported Audible audiobooks will be listed on the screen. You can select different format for each book next to the “Output Format”. Or choose the “Output Settings” from the menu bar, and then set the Output Format, Sample Rate (up to 48,000Hz), Bitrate (up to 320kbps). Beside, you can split the audiobook under the “Split” section.

split audiobooks

You can edit the ID3 tags by clicking the “Edit” icon next to each book.

edit audiobook id3 tag

Step 4. Start Remove DRM from Audible Books
Hit on “Convert All” button to bypass Audible DRM restriction and convert Audible books from AA or AAX AA format to non-DRM MP3, M4A, FLAC or WAV format you selected.

remove drm from audible aa/aax books

Step 5. Get DRM-free Audible Books
Go to the “Completed” section, click the “Open File” to open the non-DRM-protected Audible books.

get drm-free audible books

Compatibility & Price

TunesBank Audible Converter is a desktop software, compatible with Windows 10/8.1/8/7 (64-bit), Mac OS X 10.12 or later, including the macOS Big Sur 11.5. It supports multi languages, including English, Japanese, French, German, and Traditional Chinese.

TunesBank Audible Converter is a paid software, but it also offers Free Trial Version for new users. The trial version allows users to fully convert 2 audiobooks in 15 days.

Personal License costs $34.95 for 1 PC/Mac

Family License costs $69.95 for 5 PC/Mac

Both the license version enjoy lifetime update and technical support.

Conclusion
TunesBank Audible Converter is the best Audible DRM Removal you can’t miss. It is capable of removing DRM protection from Audible AA and AAX audiobooks and convert them to lossless M4A, MP3, FLAC, WAV supported by any device. TunesBank Audible Converter is very worth buying, what are you waiting for?

d_win d_mac
d_win d_mac

TunesBank Spotify Music Converter Review: Best Spotify to MP3 Converter

Summary
This is a review of the features, highlights and tutorials of TunesBank Spotify Music Converter, designed to help you download Spotify music and playlists to MP3 format and make them playable on any device without the Spotify program and Internet connection.

Spotify Music is the king of streaming music, with 345 million monthly active users. Spotify allows its Premium subscribers to download their favorite songs for offline listening. However, these downloaded songs are all added with DRM protection, which restricts users from being able to transfer Spotify songs to MP3 player, USB drive, SD card, or burn Spotify music to a CDs, etc.

In order to break this limitation, the best way is to download Spotify music to MP3 format. Therefore, you can save Spotify tracks forever and enjoy them on any device anytime, anywhere. When it comes to downloading Spotify songs to MP3, TunesBank Spotify Music Converter is the best choice. Let’s review its features, highlights and tutorial.

Why Choose TunesBank Spotify Music Converter?

TunesBank Spotify Music Converter is a powerful Spotify music downloader and converter for both Spotify Free users and Premium users which can download music from Spotify without Premium account and save them in MP3, M4A, WAV or FLAC popular formats. It is such a smart tool that gives you more freedom to control the playback of Spotify music. With its help, you can easily play Spotify music on any devices like MP3 players, game consoles, smart speakers, wearables, car players and more even without an internet connection or Wi-Fi.

What Can You Get from TunesBank Spotify Music Converter?

#1. Download Spotify Music for Free
Spotify only allows Premium subscribers to download songs and playlists from Spotify and listen to them in offline mode, but the subscription fee for Spotify Premium is $9.99 per month, which is not a small amount. Worsely, The downloaded Spotify songs can only be playabled on Spotify app during the subscription. Luckily, TunesBank Spotify Music Converter will break thess restrictions. TunesBank gives users ability to download songs, albums and playlist from Spotify to computer in MP3 format without Premium account. So that you can transfer the downloaded songs from computer to any device for offline enjoying.

#2. Popular Output Formats
As we all know, all Spotify tracks are in OGG format with DRM protection and can only be played in the Spotify program. Don’t worry, TunesBank Spotify Music Converter gives you a hand.This great tool supports serval output formats supported by most music devices and players. With it, you can easily download Spotify music and playlist to MP3, M4A, FLAC or WAV format and make it playable on any device, such as MP3 player, iPod Shuffle, iPod Nano, iPod Classic, iPod Touch, Sony Walkman, SanDisk, iPhone,PS4, PS5, PSP, Zune, Xbox, etc.

#3. Lossless Output Quality
Some Spotify music recorders or converters on the market claim to be able to save 100% of the original quality, but after use, many of the output sound quality is not good. When I started using TunesBank Spotify Music Converter for Mac, the first thing that caught my attention was its lossless sound quality. During the test, I found that it allows users to customize the output quality, up to 320kbps bit rate and 48000Hz Sample Rate can make your music always maintain the original quality.

#4. Keep & Edit ID3 Tags
After downloading Spotify music to MP3, it will keep all the ID3 tags and metadata of the Spotify songs, including title, artist, album, artwork, genre, track number, etc. Amazingly, it allows you to rename and organize the output songs for your preference. For those Spotify songs whose tags are not updated in time, you can rename the converted Spotify songs or add missing tags to them.

#5. 5X Faster Download Speed
Everyone wants to download Spotify playlist to MP3 as soon as possible, especially for users who have collected hundreds or even thousands of Spotify songs in the playlist. For me, another highlight of TunesBank Spotify Music Converter is that it enables you to perform tasks 16 times faster, which lets you quickly obtain Spotify songs in MP3 format. In addition, it also supports batch download and conversion of Spotify songs, saving your time.

Tutorial: How to Download Spotify Playlist to MP3 with TunesBank?

Step 1. Launch TunesBank Spotify Music Converter
Download TunesBank Spotify Music Converter from TunesBank’s official website, or click the download link below.

d_win d_mac
d_win d_mac

Launch the program after installation completed. Meanwhile, Spotify program will run with it.

launch tunesbank spotify converter win

Step 2. Add Spotify Songs/Playlist to TunesBank
Next, you need to import Spotify songs to Tunesbank. You can directly drag and drop the songs/album/playlist from Spotify to TunesBank.

drag and drop spotify playlist

Or copy the URL of Spotify song/album/playlist and paste it in the search bar, then click the “Add File” to get the source.

copy and paste spotify links

Step 3. Select MP3 as Output Format
Now, you need to select MP3 format for all imported Spotify songs. You to do this in the “Convert all files to:” option, or pick the target for each songs in the “Output Format”. Currently, only the Windows PC version supports the WAV output format.

select mp3 format for spotify songs

Step 4. Change the Output Preferences
Go to the menu bar, choose “Preference” option, then it will pop up a small window. Here you can change the output settings for your preference, such as Channels, Bitrate(up to 320kbps), or Sample Rate(48000Hz), etc.

set spotify music output bitrate

Step 5. Start Downloading Spotify Playlist to MP3
Now, just click the “Convert All” button at the bottom right corner of the screen to start downloading Spotify songs to MP3, and then wait for the process to complete.

download spotify music to mp3

Once done, you can go to “Finished” section to view the well downloaded Spotify music files. Click “View Output File” to locate the Spotify MP3 songs.

view downloaded spotify songs

Final Words

For those who are looking for a way to download Spotify music and playlist to MP3 losslessly, TunesBank Spotify Music Converter is the best choice. By using this great tool, you can not only save Spotify songs on your Mac or PC forever, but also enjoy Spotify music on any device without Spotify program and internet connection.

d_win d_mac
d_win d_mac

TunesBank Apple Music Converter Review: Get Apple Music Free Forever

Summary
TunesBank has launched a brand new Apple Music Converter designed to convert Apple Music songs to MP3 and other formats at an amazing speed. With it, you can keep Apple Music for free forever without subscription.

Apple Music brings your music together. With a subscription account, you can access more than 70 million songs, a series of playlists, and radio and music recommendations. Is it possible to get Apple Music free after trial? Under the DRM layer, most users find to transfer Apple Music to any other devices for offline playback, such as iPod nano, iPod shuffle, Apple Watch, Kindle Fire, MP3 players, Xbox, Zune, PS4/PS3/PSP and even Sony Walkman, Android phone, etc. To make matters worse, even if they have downloaded Apple Music songs to the device, once users stop paying for the service, they will immediately lose all access to these downloaded songs. In other words, no one can keep Apple Music tracks forever unless DRM is removed from Apple Music.

TunesBank announced that the Apple Music Converter for Windows and Mac operating systems is now officially online. TunesBank Apple Music Converter can unlock Apple’s FairPlay DRM protection and convert Apple Music to DRM-free MP3, AC3, M4A, AIFF, FLAC, etc., with 100% lossless quality and the original ID3 tags kept. Compared with the general Apple Music Converter, TunesBank is faster, the software can be downloaded and convert music with 10X faster conversion speed for Windows PC and 5X faster for Mac computers. With batch conversion feature, you can download Apple Music tracks individually or whole playlists in batches. After getting DRM-free Apple Music MP3 files, you can keep Apple Music playable forever even if the subscription has been canceled.

d_win d_mac
d_win d_mac

Main Features of TunesBank Apple Music Converter:

  • Unlock DRM from Apple Music.
  • Convert M4P songs to DRM-free MP3, M4A, FLAC, WAV and other formats.
  • Convert Apple Music songs on Windows at up to 10X faster speed and 5X faster on Mac.
  • Play Apple Music songs on MP3 players, iPod nano/shuffle, Xbox, Zune, Apple Watch, Kindle Fire, etc.
  • Transfer Apple Music to USB drive, burn Apple Music to CD easily.
  • Get Apple Music free forever after canceling subscription.
  • 100% lossless quality and support batch conversion.
  • Preserve original ID3 tags in the output MP3 or M4A files.
  • Upload Apple Music to iTunes, Google Drive, One Drive, etc.

How to Get Apple Music For Free Forever with TunesBank Apple Music Converter

Step 1. Download TunesBank Apple Music Converter
First, click the link to download the Apple Music Converter from TunesBank’s official website and install it on your Windows or Mac computer.

Download TunesBank Apple Music Converter for Mac

Download TunesBank Apple Music Converter for Windows

After installation, launch the TunesBank program, and iTunes will be opened automatically.

apple-music-added

Tip: You will get a 30-day free trial which only allows you to convert the first 3 minutes of each song. You are able to download unlimited Apple music files after purchasing the software.

Step 2. Add Songs to TunesBank
Start TunesBank and you will see a simple interface. As shown in the screenshot, all Apple Music tracks, playlists and albums in the iTunes library will be automatically synchronized to the TunesBank converter.

To add songs to TunesBank, select “Playlist” or “Music” from the left panel, and then check the box next to the song. You can convert multiple Apple music songs and playlists at the same time thanks to the batch conversion feature.

select-apple-music

Step 3. Choose Output Format
TunesBank supports converting Apple Music to MP3, FLAC, AAC, WAV and other formats. Among them, MP3 is the most widely used audio format. What’s more, all ID3 tags and metadata will be kept intact in the output file.

select-output-format-mp3

Step 4. Convert Apple Music to MP3 to Keep Forever
Click the “Convert” button in the lower right corner, TunesBank starts converting and recording Apple Music to DRM-free MP3, M4A, FLAC and other formats.

converting-apple-music-mp3

After successfully converting the songs, you can click the “View Output File” button to access the converted songs.

get-apple-music-mp3

Now that you have downloaded Apple Music songs to your computer, it’s time to get Apple Music free even after the 90-day free trial or subscription expires with the help of TunesBank Apple Music Converter.

d_win d_mac
d_win d_mac

How to download videos from YouTube, Facebook, and more

[Summary]: Do you want to download video for offline watching on computer or playback on mobile devices like iPhone, iPad, Android and MP4 player? Check out these free way to download video from Web sites like YouTube Facebook, and Vimeo.

Sometimes, you may want to download video to keep it forever or offline playback, YouTube is the largest, most popular video hosting platform and the 2nd largest search engine, and Facebook is the most popular social media platform today. YouTube, Instagram and WeChat follow, with more than a billion users. Tumblr and TikTok come next, with over half a billion users. We can find and watch videos on YouTube, Vimeo, Facebook, Twitter and more video platforms or social platforms.

video downloader

Whether you consume most of your videos on YouTube or another service like Vimeo, downloading a favorite video for offline viewing or personal use has probably crossed your mind.

Before download videos from the video hosting platforms or social media platform, note that policies for the many video Web sites vary, so review those policies and move forward at your own risk. Distributing copyrighted material without authorization is illegal in the United States and many other countries. CBS Interactive does not encourage or condone the illegal duplication or distribution of copyrighted content. Before copying or distributing any content online, make sure you have the legal right to do so.

Today, we recommend you the best video download tool, it let you download video from just about any video-sharing site, you can download video and audios from 1000+ hot sites, including YouTube, Facebook, Vimeo, Instagram, Vevo, Dailymotion, Vine, Tumblr, Veoh, Twitter, Facebook, Instagram, Bilibili, TED, CNN, etc.

4kFinder Video Downloader can download videos from YouTube and 10,000 other sites, it can save videos, playlists, channels in HD- MP4, MP3 and M4A.This is likely the fastest way to download any video from the Web: YouTube, Facebook, DailyMotion, Megavideo, Tumblr, Vimeo and more, you can enjoy the offline video without restriction.

d_win d_mac
d_win d_mac

Download Videos from 1000+ Sites

Download online videos easily from YouTube, Facebook, Vimeo and adult sites. The list is consistently updated! Get clips, videos, films, TV shows, series, movies, how-to’s, gameplays, cartoons, reviews, etc. from the Internet. 4kFinder Video Downloader supports 4K & HD quality video clips.
Support 1000+ Popular Sites: YouTube, Facebook, Dailymotion, Instagram, SoundCloud, Dailymotion, Vimeo, Twitter, Vevo, Tumblr, LiveLeak, Twitch, Niconico, TED Talks, CNN, Naver, V LIVE, NASA, ESPN and more.

Download Videos from any sites

Download 4K & 8K Videos

Download YouTube files in original quality, without re-encoding.
Select quality from the list provided by the program:
4K, 1440p, 1080p, 720p, 480p, 360p, 240p, 180p.

Download 8k and 4k Videos

Save Videos and Music to Computer

Download YouTube content for free to watch offline: videos, playlists, channels, charts, embedded visuals. Download heavy 4K, Full HD, HD files fast & easily. YouTube Video Downloader will show you a file size before saving it. Save up to 500 YouTube clips all at once! To find and download online music, try the Free YouTube to MP3 Converter.

convert YouTube to MP3

Download Full Playlists from YouTube

You can download any playlists, channels, favorites from YouTube freely,batch download feature allows you download up to 100 files at once.

Download Playlists from YouTube

How to Download Online Videos with 4kFinder?

Step 1. Copy the URL of the video you want to download, head to 4kFinder, and paste it in the bar in main interface. Then click “Analyze” to the right of that bar.

Copy video link from YouTube

Step 2. It will load for a few seconds and pop up a new windows, you’ll have the option to download the video in MP4(video), or MP3(audio), if you want to download video and audio at the same time, select MP4 and MP3 option.

output format

Step 3. Click “Download” button start to save video/audio on computer.

Download videos

Step 4. You can find the downloaded video under “Finished“, and open the videos to watch.

get video files

About Video Download software for Desktop

As a third and final option, you may download a program for your Mac or Windows computer dedicated to downloading Web video. For Mac, check out 4kFinder for Mac. Windows users can try 4kFinder for Windows. Both programs have gotten solid reviews and work as advertised, it provides you the quick and easy way to save videos for offline playing! The video quality can achieve 8K and the audio quality can achieve 256kbps. The 4kFinder offers trial version, everyone can free download videos and audios in 15 days.

d_win d_mac
d_win d_mac

Related Articles

How to Transfer Videos to iPhone and iPad

How to Transfer Videos/Music/Photos to iPhone

How to Transfer Video Files Between Android and Computer

Transfer Music, Video, Photos to Samsung Galaxy

UkeySoft FoneFix Review Pros, Cons, Features & Alternatives

Summary
This review introduces features, pros and cons of UkeySoft FoneFix iOS system recovery software, and its alternatives, helping you fix various iOS/iPadOS/tvOS system issues and get your iDevice back to normal.

What is UkeySoft FoneFix?

If you are an Apple user, when you use iOS devices such as iPad and iPhone, you may encounter many challenges, such as the iPhone stuck verifying update while upgrading iOS system, iPhone stuck in recovery mode or DFU mode, iPhone keeps restarting, iPad bricked, white Apple logo, disabled screen, blue screen, white screen, etc. UkeySoft FoneFix gives a hand to fix various iOS issues and get your iDevice back to normal. It comes with three modes: Standard Mode, Advanced Mode and Enter/Exit Recovery Mode.

Ukeysoft Fonefix

Standard Mode helps to solve the common iOS/iPadOS/tvOS issues mentioned above without any data loss, as as well as frozen iPhone, iPhone won’t turn on, etc. If this mode does not work, the Advanced Mode will come in handy. Advanced Mode can easily restore your iPhone or iPad to factory settings without iTunes or password, but it will erase all data and files on the iPhone. In addition, it enables you to enter and exit recovery mode by one click. Next we will present a tutorial on these modes of operation in the text.

Is UkeySoft FoneFix Safe?

UkeySoft Inc. is a software development company, and its products enjoy a good reputation on major websites. Its developers promise that the software is 100% safe and reliable. After testing, it was found that FoneFix has no malware, adware or viruses. According to the survey, its users are satisfied with the security of this program. Therefore, no need to worry about data leakage on iPhone or iPad when using this software to fix iOS system issues. In the Standard Mode, your iPhone data will not be deleted, but Advanced Mode may do that.

Main Features of UkeySoft FoneFix:

  • Easy to use, all-in-one tool, no technique required.
  • Fix various common and serious iOS problems.
  • Get your iOS/iPadOS/tvOS back to normal with 2 modes.
  • Repair iOS problems without data loss in a few clicks.
  • Enter or exit recovery mode on iDevice by one click.
  • Downgrade your iOS to the previous without jailbreak.
  • Get your iDevice out of recovery mode, Apple logo, black screen, etc.
  • Runs smoothly on both Windows and Mac system.
  • Compatible with all iOS devices and versions including iOS 14 and iPhone 12.

Is UkeySoft FoneFix Free?

No, this is a paid software, but the price is very reasonable. Its free version allows you to use for basic work, such as downloading the firmware package. Better yet, you can quickly enter and exit the recovery mode by one-click, this function is free! However, if you want to use the Standard Mode and Advanced Mode to restore you device to normal, you need to purchase its full version. Personal license for one PC/Mac is $49.95, and Family License for up to 5 PC/Mac is $79.95. After purchasing, you will get its lifetime free upgrade and support.

How Can UkeySoft FoneFix Help You?

After knowing something information about UkeySoft FoneFix iOS System Recovery, you may want to know how it can help you fix iOS system issues to normal. For example, get iPhone out of DFU Mode, fix iPhone stuck in Recovery Mode, fix iPhone stuck on verifying update, etc. You can use 3 modes to fix iPhone stuck on tecovery mode/Apple logo/boot loop, etc.

1. Standard Mode

As mentioned above, the standard mode solves most of the issues on iOS devices. Let us use it to fix iPhone stuck in DFU mode, Apple logo, etc. step by step.

Step 1. Download and install the software on the computer desktop, then launch it. Connect your iPhone or iPad or iPod touch to the computer via Apple USB cable. And then select “Standard Mode” option.

select standard mode

Step 2. Follow the instructions on the screen to put your iPhone into recovery mode and click the “Next” button.

enter recovery mode

Step 3. Next, the program will automatically detect your device, click “Download” to download the firmware package for your device.

download firmware package

Step 4. After that, click “Start” to repair your iPhone to normal and wait for the process to complete.

fix ios system to normal

2. Advanced Mode

When the Standard Mode cannot fix your iPhone problem, the Advanced Mode will come in handy. The process is the same as the above Standard Mode, but in step 1 above, please select “Advanced Mode”. Using Advanced Mode to repair the device may cause data loss, so it is best to back up your data before using this mode.

select advanced mode

3.Enter or Exit Recovery Mode

When the home button or other buttons of your device are broken, UkeySoft FoneFix’s one-click enter or exit recovery mode function allows you to quickly enter or exit the recovery mode on iPhone/iPad/iPod touch/Apple TV! It is worth mentioning that you can use this feature for free!

How to Enter Recovery Mode:

Step 1. Install and launch UkeySoft FoneFix on your computer. Select Enter/Exit Recovery Mode on the home screen of UkeySoft.

select enter or exit recovery mode

Step 2. Connect your iPhone or iPad to computer, click Enter Recovery Mode option. After a few minutes, when you see iTunes logo on the screen of your device, it means your device enter Recovery Mode successfully.

enter recovery mode

How to Exit Recovery Mode:

Step 1. Launch UkeySoft FoneFix and select Enter/Exit Recovery Mode on the Home page.

select enter or exit recovery mode

Step 2. Connect your iPhone to the computer via USB cable, and click the Exit Recovery Mode button. After the process is complete, your device will restart and return to its normal state.

exit recovery mode

Where to Download UkeySoft FoneFix?

You can go to the official page of UkeySoft FoneFix and download the app. You are free to try its free version to know if it meets your requirements before purchasing it.

Pros:

  • User-friendly interface, easy to use, reliable.
  • Fix various iOS system issues without data loss.
  • Enter and exit recovery mode totally free.
  • Restore iOS / iPadOS / tvOS to normal at home.
  • Advanced Mode can unlock disabled iPhone without passcode/iTunes.
  • Support the latest iOS 14 and iPhone 12.
  • Works perfectly on Windows and Mac and all iOS device.

Cons:

  • Not free, features are limited in free trial version.
  • The Advanced Mode will erase all iOS data.
  • It takes some time to load the firmware.

Why We Recommend UkeySoft FoneFix iOS System Recovery?

When reading this article, you might think that I am just writing about the advantages and attractive aspects of this software. Furthermore, you will undoubtedly find that there are many iOS system rrecovery tools on the market. Actually, the UkeySoft FoneFix evaluation is conducted after extensive testing of all the most basic functions and operating specifications. We hope UkeySoft FoneFix can help you easily solve all kinds of iOS errors and meet your needs. The following are the factors we tested FoneFix:

1. Compatibility
An excellent iOS system recovery tool should have wide compatibility. UkeySoft FoneFix is ideal for compatibility with all iOS/iPadOS/tvOS devices and all iOS versions. It is fully compatible with Windows and MacOS systems, including Windows XP, 7, 8, 8.1, 10 and macOS 10.15 / 10.14/ 10.13 / 10.12 / 10.11/ 10.10 and older.

2.Easy to use
An excellent application also includes user-friendliness. Simple steps, no technical requirements, any user can use, these are the characteristics of popular iOS system recovery tools. In order to simplify the work for customers, UkeySoft FoneFix has designed a simple user interface so that users can successfully handle the tool.

3. Cost
Everyone wants a free and safe iOS system recovery tool, but in fact all tools are paid. Many free tools will insert advertisements and even carry viruses. Although it costs $49.95 to enjoy all the features of FoneFix, in my opinion, this tool can bring you a great functions. In addition, the price of the dr.fone repair tool listed below is $69.95. In contrast, UkeySoft FoneFix is more worth trying!

4. Support
This UkeySoft FoneFix review will be incomplete if I do not speak on the support before you purchase it. With the paid version(Personal License/ Family License), you can enjoy lifetime free upgrade and support.

Alternatives to UkeySoft FoneFix

Everyone has different requirements for iOS system recovery tools. If you think UkeySoft FoneFix is not your ideal tool, you can try to learn about its alternatives. The following article will list some different iOS system recovery software designed to help you repair Apple devices and get your device back to normal.

1. U.Fone iOS System Recovery

You can also rely on U.Fone iOS System Recovery software to repair your iPhone/iPad/iPod touch/Apple TV system error. It is known for its simple operation, high efficiency and complete compatibility. With using it, you can fix all kinds of iOS abnormal issues, like iPhone stuck in the Recovery Mode, iPhone stuck at black screen; bring your iPhone back to normal state with only 10 minutes. In addition, U.Fone iOS System Recovery has been designed so it won’t affect any of the existing data on your device.

d_win d_mac
d_win d_mac

restore iPhone system to normal

Pros:

  • Repair your iOS system issues at home
  • Fix iPhone/iPad frozen in recovery mode, white Apple logo, black screen, looping on start, etc.
  • 100% workable, no data loss.
  • Support the latest iOS 14 version and iOS device.

Cons:

  • Not free.
  • Cannot enter or exit recovery mode with one click.
  • Takes up a relatively large space.

2. Dr.Fone – System Repair

Dr.Fone – System Repair is also a professional iOS repair tool, which claims to be able to repair most iOS device to a normal state and save your data safely. It is suitable for all models of iPhone, iPad and iPod touch, and is widely compatible with various iOS versions. If your iPhone fails to respond, displays a white Apple logo, restarts endlessly, etc., you can use Dr. fone to fix your device system issues.

d_win d_mac

ios-system-recovery-01

Pros:

  • Rescue the iOS system in various situations.
  • Protect your data safe during the repair process.
  • Available on all iPhone / iPad / iPod touch.

Cons:

  • Expensive, $59.95 for one year, Lifetime License is $69.95, Business License is $399.00.
  • Cannot enter or exit recovery mode for free.
  • The Advanced Mode will erase all iOS data.

3. Tenorshare ReiBoot

Tenorshare ReiBoot is a well-designed iOS repair tool that helps you repair various iOS system problems with no data loss. Like UkeySoft FoneFix, it can also repair frozen screens, white/black screens, Apple logos, iPhone in recovery mode, etc. Similarly, Tenorshare ReiBoot also comes with one-click enter/exit recovery mode. In addition, it can also let you factory reset your iPhone/iPad/iPod touch without iTunes.

Pros:

  • Free enter/exit recovery mode in one click.
  • Keep your data while rescuing iOS system.
  • Compatible with all iOS device and iOS version.

Cons:

  • Not free, $39.95 for one year, while Lifetime License is $49.95.
  • The Advanced Mode will erase all data on the iOS device.
  • Not very stable, the program may sometimes crash.

Conclusion
I hope this UkeySoft FoneFix review can help you solve various iOS system issues. Everyone has different problems with iOS, and their selection criteria for system recovery tools depends on their price, functions, advantages or disadvantages, etc. In my opinion, UkeySoft FoneFix is worth a try, it lets you get rid of various iOS/iPadOS/tvOS system issues, such as iPhone stuck on verifying update problem, DFU mode, recovery mode, Apple logo, blue screen, frozen iPhone, headphone mode, Apple TV Issues, etc. If you follow the guide carefully, you can easily get your iPhone back to normal! It’s 100% safe!

Top 5 iPhone and iPad Lock Screen Removal Review

Summary
If you need to remove passcode from locked/disabled iPhone and iPad, the article reviews best 5 iPhone lock screen removal tool for Windows & Mac to unlock iPhone/ iPad without passcode.

There are many reasons why you might need to remove the passcode from your iPhone. Maybe you forgot the passcode after not using your old device for a long time, or you bought a second-hand iPhone that’s locked. Sometimes the screen is broken and you can’t enter the passcode, or the device is stuck in recovery mode, DFU mode, or shows the message “iPhone is disabled, connect to iTunes.” No matter the situation, an iPhone unlocker tool can help you unlock your iPhone or iPad. In this article, we’ll introduce top 5 iPhone lock screen removal tools, along with their pros and cons, to help you find the best option for your needs.

best iphone unlocker

CONTENTS

Top 1. FoneLab iOS Unlocker [Best]

FoneLab iOS Unlocker is a great option if you’re looking for a free tool to unlock your iPhone. Whether you’ve forgotten your passcode or your device is locked, FoneLab can help. It supports removing different types of iPhone passcodes, including 4-digit codes, 6-digit codes, Face ID, and Touch ID. No matter which method your iPhone uses, you can regain access in just a few minutes and it offers a high success rate up to 99%.

But that’s not all. FoneLab iOS Unlocker can also remove the Apple ID and iCloud account linked to your device even if you don’t know the password. This is especially useful if you bought a second-hand iPhone or can’t remember your login details. Once the lock is removed, you’ll be able to fully use your iPhone again. Just sign in with a new Apple ID, download apps, and enjoy all features without restrictions.

Main Features of FoneLab iOS Unlocker

  • Unlock your iPhone or iPad even if you don’t remember the passcode
  • Bypass locked screens, including Touch ID and Face ID on iPad
  • Remove Apple ID without needing the password
  • Disable Screen Time or Restrictions passcodes
  • Get rid of MDM (Mobile Device Management) profiles from your iPhone or iPad
  • Recover access to iTunes backups by removing forgotten passwords
  • Works with all iPhone, iPad, and iPod touch models

Guide: How to Remove Screen Passcode with FoneLab

Step 1. Download and Install FoneLab iOS Unlocker
Start by downloading and installing FoneLab iOS Unlocker on your computer. Just click the Download button below to get started.

d_win d_mac
d_win d_mac

Step 2. Select “Wipe Passcode” Mode
Connect your iPhone or iPad to the computer, then choose the Wipe Passcode option from the main screen.

select wipe passcode mode

Step 3. Confirm Your Device Info
Check and confirm your device details, then click Start to begin downloading the necessary firmware.

confirm your device

Step 4. Remove the Screen Passcode
Once the firmware is ready, click Unlock to start removing the passcode. To confirm, enter 0000 when prompted.

start to remove passcode

Pros:

  • Easily remove the passcode from iPhone, iPad, or iPod touch
  • Supports all types of locks: 4-digit, 6-digit, Touch ID, and Face ID
  • Unlock a locked or disabled iPhone without using iTunes
  • Works even if your iPhone has a broken or black screen
  • Remove Apple ID from any activated iOS device without losing data
  • Safe, clean, and beginner-friendly tool
  • Compatible with Windows (XP, 7, Vista, 8, 10, 11) and macOS (10.13 and above)
  • Fully supports all iPhone, iPad, and iPod touch models

Cons:

  • Some features require upgrading to the paid version.

Top 2. iMyFone LockWiper

iMyFone LockWiper is another excellent iPhone unlocking tool, available for both Windows and Mac. It can unlock screen passcodes on iPhones and iPads, and also remove Apple ID without needing the password. In addition, it helps recover the Screen Time passcode, making it easy to bypass any restrictions. You can download the software for free on your Windows or Mac computer and use it to unlock your device with ease.

iMyFone iPhone unlocker

Pros:

  • Unlock iPhone or iPad even if it’s locked, disabled, or has a broken screen
  • Bypass Screen Time or Restrictions passcodes without losing data
  • Remove Apple ID without needing the password
  • Regain access to your device if you’ve forgotten the passcode

Cons:

  • Not a free tool
  • Erases all data when removing the screen passcode
  • Downloading the firmware package may take a while
  • Can’t remove Apple ID if you can’t access the device’s settings

Top 3. Dr.Fone – Unlock (iOS)

Dr.Fone – Unlock (iOS) is part of the Dr.Fone toolkit and offers powerful unlocking features for both iOS and Android devices. It can remove screen passcodes from iPhones and iPads, as well as unlock Android devices from brands like Samsung, LG, Huawei, Xiaomi, Lenovo, Motorola, and OnePlus. If you’ve forgotten your iPhone or iPad passcode, this tool helps you unlock it quickly. It can also remove Apple ID and iCloud activation lock without causing data loss.

However, keep in mind that the software package is quite large, so downloading and installing it may take some time. That’s because Dr.Fone is an all-in-one mobile solution offering data recovery, phone transfers, backups, system repair, data erasure, and more. It supports almost all iOS and Android devices.

Dr.Fone iPhone unlocker

Pros:

  • Helps unlock your iPhone if you’ve forgotten the screen passcode
  • Removes various types of locks like pattern, PIN, password, and fingerprint
  • Quickly restores access to disabled or locked iOS devices
  • Supports all models of iPhone, iPad, and iPod touch
  • Fully compatible with iOS 13 and earlier versions
  • Can unlock some Samsung and LG phones without losing data
  • Cons:

    • The software is large and takes up a lot of storage space
    • Runs slower compared to other similar tools
    • Relatively expensive compared to other options

    Top 4. Tenorshare 4uKey

    Tenorshare 4uKey is a straightforward iPhone unlock tool designed with two main features: removing the lock screen passcode and unlocking Apple ID. It supports all types of passcodes, including 4-digit, 6-digit, custom numeric codes, alphanumeric codes, as well as Touch ID and Face ID.

    You can download 4uKey on a Windows PC and use it to unlock your iPhone. However, please note that this process will erase all data from your device.

    Tenorshare iPhone unlocker

    Pros:

    • Remove passcodes from disabled iPhones and iPads
    • Delete Apple ID from activated iOS devices
    • Unlock iPhone or iPad without using iTunes or iCloud
    • Fully compatible with the latest iOS and iPadOS 13.5

    Cons:

    • No free version available
    • Only supports Windows systems
    • Firmware package download may be restricted in some regions
    • Erases all data after removing the Apple ID

    Top 5. iSunshare iPhone Passcode Genius

    iSunshare iPhone Passcode Genius is an iPhone unlocking tool with an interface similar to iMyFone LockWiper. While the name might be a bit hard to remember, it can be helpful if you’ve forgotten your screen passcode or if Face ID/Touch ID is not working.

    The software offers three main features: removing the lock screen passcode, removing Apple ID, and bypassing the Screen Time passcode. In testing, the unlocking process was a bit slow, and it’s important to note that it doesn’t support iOS 11.4 or later if Find My iPhone is enabled.

    iSunshare iPhone unlocker

    Pros:

    • Includes three core features in one tool
    • Can remove screen passcodes and restriction codes from iPhone
    • Allows Apple ID removal if Find My iPhone is turned off
    • Bypasses Screen Time passcode without data loss
    • Runs smoothly during use

    Cons:

    • Not available for free
    • Only compatible with Windows
    • Some steps can be a bit complicated to follow
      FoneLab iOS Unlocker iMyFone LockWiper Dr.Fone – Unlock (iOS) Tenorshare 4uKey iSunshare iPhone Passcode Genius
    Security Utmost level Standard Standard Standard Medium
    Ease of Use 3 steps 3 steps 4 steps 4 steps 5 steps
    Recommendation ***** *** *** ** ***
    Technical Support Yes Yes Yes Yes Yes

    FAQs About Unlock iPhone Software

    Q1. Is It Possible to Unlock An iPhone Passcode?
    Yes, it is. If you enter the wrong passcode too many times, your iPhone will show a message like “iPhone disabled, connect to iTunes.” In such cases, you can use professional iPhone unlock tools to regain access. In this article, we’ve listed 5 top iPhone unlocking tools, including FoneLab iOS Unlocker, iMyFone LockWiper, Dr.Fone – Unlock (iOS), Tenorshare 4uKey, and iSunshare iPhone Passcode Genius. These tools are known for their high success rates in unlocking iPhones.

    Q2. Is It Legal to Unlock An iPhone on Your Own?
    Yes, unlocking your iPhone by yourself is legal, as long as the device is fully paid off and you own it outright.

    Conclusion

    That wraps up our review of the top 5 iPhone unlock tools. As mentioned, each software has its own strengths and limitations. Overall, FoneLab iOS Unlocker stands out as the most recommended option thanks to its user-friendly design, strong performance, and ability to bypass different types of iPhone locks safely. If you ever find yourself locked out of your iPhone, this tool is definitely worth trying.

How to Remove Apple ID from iPhone/iPad

Summary
Forgot Apple ID password and want to remove Apple ID from iPhone/iPad without password? Get the powerful Apple ID Removal tools here and learn how to bapass Apple ID on iPhone/iPad without password.

I forgot Apple ID password, so I cannot quit up and use another Apple ID, how to remove the Apple ID from iPhone, then I able to login with another Apple ID to use Apple’s service.

I bought a second-hand iPhone 13 from Amazon but there is an existing Apple ID used on it. How to remove the Apple ID from iPhone 13 without the password? Please help!

If you want to sell your old iPhone, you must to erase all data, settings and Apple ID, this not only prevents your important data leakage, but also let the buyer login with their Apple ID or create a new Apple ID conveniently.However, if things didn’t turn out to be that way and you have an iPhone with someone else’s Apple ID on it, you will wonder how to remove Apple ID from iPhone without password.

Also read: Permanently erase data from iPhone before selling

Remove Apple ID in Various Situations

  • Forgot your Apple ID password;
  • Bought a second-hand iPhone online which someone else’s Apple ID on it;
  • Bought a second-hand iPhone, but iCloud activation lock iPhone;
  • Remove Apple ID and data permanently before selling your iPhone;
  • Change to a different Apple ID or create a new one;
  • Avoiding previous owner track your second-hand iPhone via previous Apple ID.

So if you forgot Apple ID or iCloud gets iPhone locked somehow,you cannot full use of every single feature on your iPhone. Then, how do you erase Apple ID without password? Here is a guide about how to remove Apple ID without password from your iPhone 16/15/14/13/12/11/Xs/Xs Max/XR/X/SE/8/7/6S, etc. You need to remove Apple ID without password with a third-party Apple ID unlocker tool.

Solution 1. Remove Apple ID from iPhone/iPad via iOS Unlocker

iOS Unlocker is a robust software solution designed to help iOS users remove Apple ID on iPhone/iPad, unlock screen passcode, and remove MDM and iTunes Backup Password. Whether you’re locked out due to a forgotten password, second-hand purchase, or iCloud activation, this powerful iOS unlocker offers a seamless experience to regain control of your device.

d_win d_mac
d_win d_mac

Unlike traditional methods that require entering the correct Apple ID and password, this iOS Unlocker uses advanced bypassing technology to remove Apple ID from iPhone without needing credentials, even if you forgot Apple ID or password.

Main Features of iOS Unlocker:

  • Bypass Apple ID & iCloud activation lock on iPhone/iPad.
  • Remove MDM locks from iPhones and iPads.
  • Unlock Screen Passcode on all iPhone models (iPhone 5 to iPhone 16).
  • Unlock disable/locked iPhone without Jailbreak.
  • Compatible with the latest iOS 26/18 & iPadOS 18.

Simple Steps to Remove Apple ID from iPhone

Note: To remove Apple ID using the software, make sure “Find My iPhone” was disabled on your device. Before using the software, remember to backup data of your device in iTunes or iCloud.

Step 1. Download and Install iOS Unlocker
First, download and install the Apple ID Removal tool – iOS Unlocker on your Windows or macOS. And follow the prompts to complete installation.

d_win d_mac
d_win d_mac

Step 2. Choose Remove Apple ID Mode
Launch the iOS Unlocker. From the main interface, select “Remove Apple ID” mode.

iOS Unlocker interface

Step 3. Connect Your iPhone
Use a lightning cable to connect your iPhone to your computer. The iOS Unlocker will automatically detect your device.

Step 4. Start Apple ID Removal Process
Click “Trust” and enter your screen passcode. Hit on “Start” button to continue.

start to remove Apple ID

Then follow the steps to remove Apple ID from your iPhone.

Situation 1. If Find My iPhone is Disabled
If Find My iPhone is already disabled on your device, removing the Apple ID is straightforward. Just wait for a few minutes. Once completed, your device will be free from the linked Apple ID.

Tips: No password is required in this situation.

Situation 2. If Find My iPhone is Enabled
If Find My iPhone is enabled, additional steps are required to successfully remove the Apple ID.

2.1 Reset All Settings
On your iPhone or iPad, go to “Settings” > “General” > “Transfer or Reset iPhone“. Tap “Reset” > “Reset All Settings“. Enter your device passcode when prompted.

reset all settings on iphone

Tips: This step will not erase your data but will reset settings like Wi-Fi passwords and wallpapers.

2.2 Enable Two-Factor Authentication (for iOS 11.4 and above)
If your device is running iOS 11.4 or later, make sure Two-Factor Authentication is enabled before continuing:

Open “Settings” and tap your name at the top (Apple ID). Navigate to “Password & Security“. Ensure that Two-Factor Authentication is turned on.

If it’s off, toggle it on and follow the setup instructions.

check two factor authentication

Afterwards, it may prompt you to enter a confirmation code (e.g., type 0000) to proceed.

Tips: This verification step is essential to proceed with Apple ID removal on newer iOS versions.

2.3 Confirm Device Information and Download Firmware
The iOS Unlocker software will automatically detect your device model. Carefully review and confirm the detected information (including Device Category, Device Type, and Device Model). If everything is correct, click “Start” button to get the appropriate firmware package.

confirm device information

The iOS Unlocker tool will begin downloading the firmware package that matches your iPhone or iPad model.

download firmware package

2.4 Start Apple ID Removal
Wait until the process completes. The Apple ID and iCloud account will be removed from your iPhone/iPad. Your device will restart, and you’ll be able to set it up with a new Apple ID!

remove Apple ID successfully

Solution 2. Remove Apple ID from iPhone/iPad via UkeySoft Unlocker

If you looking for a easy & safe method to remove Apple Music, you can use a professional iOS unlock tool to remove Apple ID from iPhone without password. Below we recommend you a useful Apple ID removal tool and teach you how to deleted Apple ID from iPhone without password.

UkeySoft Unlocker is a professional iPhone locked screen removal tool and Apple ID removal tool, it can help you remove Apple ID without password on iPhone 6, 6S, 7, 7S, 8, 8 Plus, 9, X, XR, Xs, Xs Max, iPhone 11, iPhone 11 Pro, iPhone 12, iPhone 13, iPhone 14, iPhone 15/15 Plus, iPhone 16/16 Pro/16 Pro Max, etc. Another attractive feature is that it is also capable of removing iPhone screen passcode when your iPhone is disabled of locked screen. In addition, UkeySoft Unlocker also assists you to bypass iCloud activation lock on iPhone/iPad with simple clicks.

UkeySoft iPhone Unlocker can help you:

  • Remove Apple ID from iPhone without password in 1 minutes.
  • Unlock iPhone/iPad lock screen in different situations.
  • Compatible with all iOS devices and all types of lock screen.
  • Unlock iPhone passcode at home, no need any technical skill.
  • Unlock iPhone with broken screen or back screen.
  • Remove icloud activation lock without password.

d_win d_mac
d_win d_mac

Note: This software only supports to remove Apple ID from an activated iPhone/iPad/iPod. In addition, your device must have been set up already and you can access your device settings.

1. If Find My [device] is off, all devices are supported to unlock Apple ID.

2. If Find My [device] is enabled, devices running from iOS 10.2 to 11.4 are supported to unlock without data loss.

3. If Find My [device] is enabled, devices running on iOS 12 and later versions are not supported.

Guide: Remove Apple ID without Password on iPhone

Go through the following guide to see how to remove Apple ID from iPhone without password under the help of UkeySoft Unlocker.

Step 1. Download, Install and Launch UkeySoft Unlocker
Download and install UkeySoft Unlocker on your computer. Launch it and choose “Unlock Apple ID” from the primary interface.

apple id unlocker

Step 2. Connect your iPhone to the computer
To delete Apple ID without a password, you need to connect your iPhone device to the computer.

Connect iPhone to PC

Step 3. Enter screen password and trust this computer
Turn to your iPhone and you will see a pop up dialog asking you whether to trust this computer. Just choose “Trust” so that the software can continue to analyze your iPhone device.

allow iphone connect with pc

Step 4. Start to Remove Apple ID from iPhone
After the operations above, your iPhone will be connected to the program successfully. Now, you will be popped up with a warning window, reminding you that only one device is connected to your computer, click “Next” button to go on.

remove Apple ID

Confirm your device information and click “Start” button start to removing Apple ID and Apple ID password.

start remove Apple ID

start remove Apple ID

Step 5. Apple ID be Removed Successfully
When the Apple ID removing process is completed, your iPhone device will restart automatically. Then, unlock your iPhone and open “Setting”, you can check whether the Apple ID on your iPhone has been removed successfully. If it fails, you can try again.

Apple ID removed

Therefore, we kindly suggest you to backup your iPhone data before going to further step.

Final Words

After reading the above content, you will know how to remove Apple ID account from iPhone/iPad without password. It’s easy to use, you can unlock Apple ID at home and no need to ask professional help, you can easily delete Apple ID account from iPhone without password. Of course, if you forget screen passcode on iPhone, you can also use thess iPhone unlock tools to bypass Apple ID and unlock iPhone without password, anyone can use it!

That’s all, I think this iPhone unlocking software is worth to try, please click the below download button to free download the trial version and start to unlock Apple ID without password.

d_win d_mac
d_win d_mac

Remove Apple ID from iPhone

How to Remove the Passcode on iPhone with UkeySoft Unlocker

Summary
How to remove the Passcode on any iPhone? This article recommend you the best iPhone passcode removal tool, helping you remove the passcode on iPhone X or later, iPhone SE (2nd generation), iPhone 7, iPhone 7 Plus, iPhone 8, and iPhone 8 Plus.

Forgot iPhone passcode, how to remove the passcode on iPhone 7?

My iPhone X screen is broken and I can’t enter the passcode, how to remove passcode on iPhone with broken screen?

iPhone is disabled, connect to iTunes, how to unlock a disabled iPhone without entering passcode?

iphone is disabled

If you forgot the passcode on your iPhone, or your iPhone is disabled, you will get a messages that your “iPhone is disabled, try again in 1 minute”, if you type the wrong passcode again, a message says that your “iPhone is disabled, try again in 5 minute”. Do you really forgot the lock screen passcode on iPhone? Don’t worry, you can bypass iPhone/iPad screen lock without passcode, what you need is a professional iPhone locked screen removal tool.

iPhone Passcode Removal Tool

Forgot your iPhone passcode? Bought a second-hand iPhone but it’s screen locked with passcode? Got a second-hand iPhone which it’s iCloud locked? iPhone is disabled/ locked? iPhone screen is broken and can’t enter the passcode? Don’t worry, UkeySoft iPhone Unlocking software can help you unlock iPhone screen passcode and unlock Apple ID easily.

UkeySoft Unlocker is one of the most useful and reliable iPhone unlocker tool, it can help you remove passcode on iPhone 11, iPhone 11 Pro(Max), iPhone XS, iPhone XR, iPhone X, iPhone SE, iPhone 8/8 Plus, iPhone 7, iPhone 7 Plus and older. If you forgot the passcode on your iPhone or iPad, the iPhone unlocker tool will help you remove passcode from your iPhone/iPad in 5 minutes.

More Things UkeySoft Unlocker can Does:

  • Unlock iPhone/iPad screen lock without passcode;
  • Remove 4-digit/6-digit passcode, Touch ID & Face ID;
  • Remove Apple ID on iPhone/iPad/iPod without password;
  • Remove Apple ID to remove iCloud activation lock without password;
  • Remove iCloud Activation lock on iPhone/iPad/iPod to access your locked iPhone;
  • Support Any Scenario: second-Hand, forget activation lock, broken screen;
  • Compatible with all iOS versions and iPhone 11 Pro

d_win d_mac
d_win d_mac

Tips: Honestly there is no solution to unlock iPhone/iPad lock screen without data loss for the moment in the market.

Guide: How to Remove the Passcode on an Disabled iPhone

Step 1. Launch UkeySoft iPhone Unlocker on Computer
Click the above download button to download the trial version of UkeySoft Unlocker, then install and launch it, you will get below main interface, please click “Unlock Screen Passcode”.

unlock iPhone

Step 2. Connect iPhone to Computer
Connect your iPhone device to the computer using a lightening cable.

Unlock Screen Passcode

Step 3. Put iPhone/iPad in Recovery or DFU mode
Since your iPhone is locked and the computer cannot detect it, you need to boot it in Recovery or DFU mode by following the on-screen instructions. If you don’t know how to get iPhone into recovery mode, go to learn how to put iPhone into recovery mode.

put iPhone into recovery mode

Step 4. Confirm iOS device information and download Firmware Package
After the device is in recovery mode, the iPhone unlocker software will display the device information, such as Device Model and Firmware Version. If the information is correct, click the “Download” button to download the matching firmware of your iPhone device.

confirm iphone information

The software start downloading the matching firmware for your iPhone device.

download firmware package for iPhone

Step 5. Start to Remove iPhone Screen Lock Passcode
After the firmware is downloaded completed, click “Start” button go to new step, the software will pop up a new windows to prompt you that “All data on your iPhone will be erased after removing the passcode”. If you are sure to delete all files and settings, just click “Unlock Now” to start remove passcode on your iPhone.

Remove iPhone Screen Passcode if forgotten passcode

Just in a few minutes, your iPhone screen lock passcode will be removed successfully. Please note this unlocking process will also erase the data and settings on your iPhone.

remove passcode on iPhone

remove passcode on iphone completed

After removing iPhone passcode successfully, the iPhone will restart and you will see Hello startup screen. Please set up your iPhone to access it without passcode.

d_win d_mac
d_win d_mac