All posts by DHZ

How to Recover Deleted Files from Huawei Mate 20(Pro)

[Summary]: Lost contacts, text messages, pictures, music, videos or call logs from Huawei Mate 20/Huawei Mate 20 Pro by accident? Check this page and find the best Huawei Mate 20 data recovery solution.

“My son was playing games on my new Huawei Mate 20 Pro phone, but he erased my contact in business accidentally.I try my best and search everywhere in my phone but empty and nothing inside. Can you help me to recover deleted contacts from Huawei Mate 20 Pro?” – Asked by Jack

“I am used to cleaning my Huawei Mate 20 with Android Data Eraser software to ensure that my phone has enough phone memory space to use. But sadly, I accidentally deleted the call history I forgot to save. Now I urgently need to recover deleted call logs without backup. What can I do?” Asked from Duncan.

When you encounter Huawei Mate 20 (Pro) data / files loss, you will not be a lonely one. Generally, data loss occurs on Android phones including Huawei phones when encountering the following conditions, such as error deletion, accidental formatting, water damaged, malware attacked, factory reset, phone stolen or broken. Regardless of which of these reasons, we need to know the fact that phone data loss is not a horrible thing and they are recoverable, as long as you use the trusted Android data recovery software.

As a professional Huawei data recovery software, U.Fone Android Data Recovery is a complete tool to restore all erased data from Huawei Mate 20 / Mate 20 Pro phones. Recoverable data types are varied, respectively, photos, pictures, videos, contacts, text messages, audio, WhatsApp messages, etc. This software is good at recovering data lost due to accidental deletion, rooting, upgrade, system crash, forgotten password, SD card problem, etc. With its powerful compatibility, it is suitable for almost all Android smartphones, including the latest Huawei Mate 20, Huawei Mate 20 Pro, Samsung Galaxy S9/Note 9 and so on. More importantly, the operation of the software is simple, you only need a few simple steps to complete the data recovery process. Therefore, the software is very practical and trustworthy. First of all, free download the U.Fone Android Data Recovery software on your computer and follow the step guide to retrieve deleted files on Huawei Mate 20 phone.

d_win d_mac

How to Recover Wiped Out Data from Huawei Mate 20

Step 1. Launch U.Fone Android Data Recovery

Launch U.Fone Android Data Recovery on your Windows PC or Mac after downloading and installing. You will gain into program interface shown as 3 function modules: “Android Data Recovery”, “Broken Android Data Recovery” and “Android Data Backup & Restore”. In order you to restore deleted flies from Huawei Mate 20(Pro), click the “Android Data Recovery” and go on.

Choose Android data recovery mode

Step 2. Connect Huawei Mate20(Pro) to PC

Connect your Huawei Mate20(Pro) to PC with USB cable. Wait the moment, then the program will detect your Huawei Mate20(Pro) phone automatically.

connect LG phone to PC

Step 3. Enable USB Debugging to Access Data

You should open the USB debug for detecting your device successfully. Here you are three options to enable USB Debugging on your Android device. Select an option which is compatible your phone status.

1) For Android 2.3 or earlier: Enter “Settings” < Click “Applications” < Click “Development” < Check “USB debugging”
2) For Android 3.0 to 4.1: Enter “Settings” < Click “Developer options” < Check “USB debugging”
3) For Android 4.2 or newer: Enter “Settings” < Click “About Phone” < Tap “Build number” for several times until getting a note “You are under developer mode” < Back to “Settings” < Click “Developer options” < Check “USB debugging”

enable USB debugging on Android

Step 4. Select Deleted Flies Types You Need

If you want saving time during recovery process , you can choose the data types which only you need.  Or you can select all types to scan and recover. And click “Next” to begin scanning your deleted files.

select LG phone's data to recover

Step 5. Scan and Analyze Phone Data

There might be a Superuser authorization appearing on your Huawei Mate 20 during the scan. If you get it, click “Allow” to continue. If not, just skip this step.

allow scan LG Android phone

The tool will now scan your Huawei phone to recover lost/deleted data. This process may take few minutes of time. Just wait for scanning process to get complete.

scan data from android

Step 6. Preview and Recover Deleted Flies from Huawei Mate20(Pro)

After a moment, the result of lost/deleted flies will display in the list on the left. Additionally, all the flies shown as the window allow you preview before recovery, such as contacts, photos, videos, text messages, call logs, etc. Confirm the data you want to restore from Huawei Mate 20(Pro) and click “Recover” button to save them on your computer.

recover lost data from Android

d_win d_mac

Related Articles

How to Retrieve Deleted/Lost Data on Huawei Mobile Phone

How to Recover Deleted/Lost Data from Huawei P20

How to Transfer WhatsApp from iPhone to Huawei Mate 20

How to Restore Deleted Data from Huawei Mate RS

How to Restore Deleted Call Logs from Huawei Mate 9/10

Ways to Restore Deleted Photos/Gallery from Huawei P20

Huawei Mate 20(Pro) Recovery

Transfer Contacts, SMS, Music from Old Huawei to Huawei Mate 20(Pro)

[Summary]: Are you looking a method to transfer significant data from old Huawei to new Mate 20(Pro)?This article will teach you how to move contacts, SMS, music data from old Huawei to Huawei Mate 20 without loss.

“I have beed a loyal fan of Huawei phone product for years, the Huawei Company was released the newest model Huawei Mate 20/Mate 20 Pro.The amazing configuration of these phone attracted me. I plan to replace my old Huawei mobile phone with a new Huawei Mate 20 Pro. However, if I complete the switch, how can I easily sync contacts, SMS, music and other data from old Huawei phone to Huawei Mate 20 Pro?”

As we all know, Huawei Mate 20 and Mate 20 Pro are equipped with outstanding features like Nice looking phones,Triple camera, Kirin 980 and Dual NPU, Speedy face unlock and in-display fingerprint sensor, Fast and reverse charging, etc. These features can appeal to many customers around the world, no matter which Huawei Mate model choose as a replacement. However, you should consider how to sync the data from the old Huawei mobile phone to the new Huawei Mate 20 mobile phone.

For example, you will not want to re-type contacts into the new Huawei Mate 20(Pro) by viewing the contacts in the old Huawei phone. Or other way, your music collection isn’t worth to pay again which pay for download from internet. Here we’ll introduce a quick method to move major data from old Huawei to Huawei Mate 20/Mate 20 Pro, including contacts, SMS, calendar, photos, videos, call logs, music, apps, etc.

Your Huawei Phone Transfer Toolkit – Phone Switch

Regarded as a professional Android data transfer tool, Phone Switch is fully capable of transferring data from HUAWEI to HUAWEI Mate 20 without any trouble.It allows move data between devices with different operating systems, i.e iOS to Android. Various data types for transfer such as contacts, text messages, photos, videos, music and many other file types. The easy transfer process takes only 3 steps. If you want to copy backup of iPhone iTunes/iCould to Huawei Mate 20(Pro), Similarly, this Phone Switch Toolkit can help you. Now free download the trial version on your computer first then follow the steps guide to sync old Huawei data to Huawei Mate 20(Pro).

d_win d_mac

How to Copy Data from Huawei to Huawei Mate 20(Pro)

Step 1. Install Phone Switch Software

You should download, install and run Phone Switch software on your computer. At this point, you can see that the program has 8 functions, select and click “Switch” module, then go on next.

iPhone to huawei mate 20 transfer

Step 2. Connect Both old Huawei and Huawei Mate 20 Phones

Now, you need to connect your old Huawei phone and Huawei Mate 20(Pro) to your computer, so you need to prepare two USB lines. Next, your old Huawei phone should be shown on the left, Huawei Mate 20(Pro) should be displayed on the right. You can click on “Flip” to adjust the position.

connect huawei phones to pc

Step 3. Transfer Contacts, SMS, Music from Huawei to Mate 20

This section, if you want sync Contacts, SMS, Music or other files like text messages, photos, videos, call logs, documents, and more, you should select data types on the middle of the window. And then click “Start Transfer”, the program starts syncing data from old Huawei to Huawei Mate 20 quickly and safely that without no losing. A few minutes later, you can preview your Contact, SMS ,Music on your new Huawei Mate 20(Pro) mobile phone.

huawei to huawei mate 20 transfer

d_win d_mac

Related Articles

Transfer Data from Android to Huawei Mate 20(Pro/X/RS)

Transfer Data from iPhone to Huawei Mate 20/Mate 20 Pro/X

How to Transfer Data from Samsung to Huawei P20/Mate 20(Pro)

Transfer Contacts & SMS from Samsung to Huawei Mate 20(Pro)

How to Transfer Photos, Videos, Music from iPhone to Huawei Mate 20

Transfer Data from Huawei to Mate 20

How to Transfer Contacts & SMS from Samsung to Huawei Mate 20(Pro)

[Summary]: Follow the tutorial below and you can find out the solution to transfer contacts and text messages from Samsung Galaxy S4/S5/S6/S7/S8/Note to the latest HUawei Mate 20 or Mate 20 Pro without any effort.

If you are using a Samsung smartphone, such as Galaxy S9, S8, S7, S6, S5, Note 9, Note 8, Note 5, Note 4, but you plan to switch to the best  Android phone as an alternative. So what is one of the best Android phones in 2018?

Huawei released the Huawei Mate 20 RS Porsche design, Huawei Mate 20 X, Huawei Mate 20 and Huawei Mate 20 Pro on October 16, 2018. Huawei Mate 20 is equipped with a 6.53-inch LCD and Mate 20 Pro is equipped with 6.39-inch OLED. Both of them come with a Kirin 980 processor and a large battery for long-term usage, supporting for screen fingerprinting and 3D structured glossy recognition. For these excellent parameters, would you like to choose Huawei Mate 20/Mate 20 Pro to replace your old Samsung phone? Obviously, many Samsung Galaxy users have made this choice. Contacts and text messages are one of the most important data on your mobile phone, you may not want to abandon these precious data. But how do you transfer Samsung contacts and text messages to Huawei Mate 20 / Mate 20 Pro when you get this new phone?

To sync all data from the old Samsung to Huawei Mate 20/Mate 20 Pro, what you need is just the Phone Switch which can sync your Samsung files to Huawei Android phone, such as Contacts, SMS, Music, Photos, Videos, Call logs, Calendars, Apps and App data and so on.  Transferring contacts and SMS from Samsung to Huawei Mate 20 is only a three-step process. Besides, this Phone Switch software can also be used to copy data from iOS/Android to Android/iOS, iOS to iOS, Android to Android.

Key features:

Data transfer between Android and Android, iPhone and Android, iTunes backup/iCloud backup to Android or iPhone.
Compatible with Android 2.1 to 9.0 (or higher), iOS 5 to 12 (or higher).
Support all data such as contacts, text messages, call logs, calendars, photos, music, videos, etc.
100% complete transfer, no loss or damage.
Absolutely secure transmission, no virus or privacy leaks.

d_win d_mac

Guide: Transfer Data From Samsung to Huawei Mate 20 with Three Steps

Step 1.Run Phone Switch on PC

Install Phone Switch and launch it on computer.You will see different modules on the maintenance, choose “Switch” modules to get start.

iPhone to huawei mate 20 transfer

Step 2.Connect Samsung and Huawei Mate 20 on PC

Next, connect your Samsung phone and Huawei Mate 20 devices with 2 USB cables. They will be detected right now by the software. If you want to sync Samsung files to Huawei mobile phone, please make sure your old Samsung device is detected as Source phone displayed on the left side while your new Huawei phone is shown as Destination phone on the right side. You can use the “Flip” button to exchange their position.

connect samsung and huawei mate 20 to pc

Tips: If you want to empty your destination phone, you can select “clear data before copy” option.

Step 3.Transfer Contacts, SMS from Samsung to Huawei Mate 20/Mate 20 Pro

In this section, you will see contacts, text messages, photos, videos, music, call logs, documents, and more displayed in the middle of the window. Choose the Contacts, SMS file types or other you need to transfer, and you would need to click “Start Transfer” button. In order to transfer successfully, please don’t disconnect both the Samsung and Huawei devices.Just wait for a moment to complete the transmission and verify the data later.

samsung to huawei mate 20 transfer

d_win d_mac

Read More

Transfer Data from Android to Huawei Mate 20(Pro/X/RS)

Transfer Data from iPhone to Huawei Mate 20/Mate 20 Pro/X

How to Transfer WhatsApp from iPhone to Huawei Mate 20

Transfer Contacts & SMS from Samsung to Galaxy Note 9

How to Move Text Messages from Samsung to Huawei Mate 10(Pro)

Copy Samsung Contacts & SMS to Mate 20

How to Fix “iOS 12 Recently Deleted Photos” Problem

[Summary]: Did your iPhone photos missing on “Recently Deleted” folder after iOS 12 update? This article will show you how to fix iOS 12 recently deleted photos not showing issues and how to get your disappeared photos back on iPhone after iOS 12 update.

CONTENTS

I just noticed that my photo album for Recently Deleted is missing after the iOS 12 upgrade. Any ideas? I have an iPhone 8.

After update my iPhone X to iOS 12.1.1, I found all of my photo albums disappeared, is it the iOS 12 upgrading process erase my photos? I haven’t backup my iPhone to iTunes before install iOS 12.1.1, is it possible to recover deleted photos from iOS 12 device?

Lost iPhone/iPad photos after iOS 12.1.1/12 update? All of your photos disappeared on “Recently Deleted Album” folder after iOS 12 update? Don’t worry, this page will teach you how to fix “ios 12 recently deleted photos missing” problem, you can also learn how to fix photos not showing up on iPhone after the iOS 12 update.

Way 1: Check “Recently Deleted Album” in iOS 12

Apple introduced the “Recently Deleted Album” in iOS 9/iOS 10/iOS 11/iOS 12 for users move the recently deleted photos, videos to this Recent Deleted Folder, users can keeps those deleted photos & videos of last 30 days. Normally if you have deleted the photos on iPhone by careless, you can easily to restore them in this “Recently Deleted Album”. If you lost photos after update to iOS 12, you better check your recent deleted folder and if you found all your photos there, just restore it in “Recently Deleted Album”.

Simple Steps to recover photos disappeared in “Recently Deleted Album” after iOS 12 update:

Step 1. First unlock you Phone and launch the Photos app from the Home screen.

Step 2.Tap on Albums and scroll down till you find the “Recently Deleted Album”.

Step 3. If your find the photos you want, just tap “Select” to select the photos and then tap on “Recover” option. You will find your missing photos in the Album.

recover recently deleted photos on iOS 12

Way 2: Enable iCloud Photos Settings

Enabling Apple’s iCloud Photo Library can help us to privately store photos and video online, we can syncs all the photos to iCloud across all the device log-in with same iCloud account. Apple’s iCloud Photo Library service lets you do all that while keeping your storage space free to take even more beautiful 4K video and HDR photographs. But if there is problem during iCloud syncing then you might think all the photos got missing only after the iOS 12 update. Let’s teach you how to recover lost photos from iCloud backups after iOS 12 update:

1. Open settings of your iPhone >> iCloud >> Photos >> Confirm that iCloud Photos Library is turned on.

2. You can even turn it off and after few second again turn it on to ensure that it is working fine.

Enable iCloud Photos Settings

You can even log out and again log in to iCloud account to make sure that there is not any problem with iCloud account and syncing.

1. Just go to settings of your iPhone >> tap on iTunes & App Store.

2. Tap on Apple ID >> Tap on Sign Out.

Enable iCloud Photos Settings

3.Now again sign in to iCloud account entering your Apple ID and Password.

Way 3: Force Restart iOS 12 Devices to Fix “iOS 12 Update Deleted Photos” Issues

If photos missing after iOS 12 update then try force restart your iPhone, because restarting the Phone can fix many issue of your phone. Let’s teach you how to force restart iPhone 8/X/XS Max/XR, iPhone 7/7 Plus, iPhone 6S/6/6 Plus and older models.

For iPhone 8/X/XS Max/XR:

1. Press Volume up and down button along with Power button for few seconds until you don’t see Apple logo.
2. You iPhone will now reboot and see if this fixes you issue or not.

For iPhone 7/7 Plus:

1.Press and hold sleep/wake and volume down button for at least 10 seconds until you see Apple logo.

For iPhone 6S/6 and older models:

1.Press and hold sleep/wake or power button and home button of your iPhone for at least 10 seconds until you see the Apple logo.

force restart iphone ios 12

Way 4: Recover Erased and Deleted Photos Not Only from “Recently Deleted” Folder

If you can’t find the missing photos in “Recently Deleted” Folder, you can use a third-party professional iPhone Photo Recovery to directly recover erased/deleted photos from iPhone after iOS 12 upgrading.

The way that the deleted photos is completely gone is when the space it resided is overwritten by the newly generated files, like any task of downloading media files and install software. So we still have chance to recover deleted and lost photos from iPhone built-in storage memory, what you need is a professional iPhone Data Recovery software. In additional, before recovering deleted files back, please don’t add any files to the phone, otherwise, the deleted data maybe overwritten and you can not get them back forever.

Fix Photos Disappeared from iPhone after iOS 12 Update

U.Fone iPhone Photo Recovery is designed to recover deleted photos, videos and more from iPhone with iOS 12, iOS 11, iOS 10 and older OS version. The iPhone data recovery provides you three ways to recover lost photos from iPhone after iOS 12/12.1 update: directly scan and recover lost/disappeared photos from iPhone, restore iPhone lost photos from iTunes backup and retrieve iPhone missing pictures from iCloud backup. What’s more, the iPhone data recovery supports recover more than 20 files types like WhatsApp, SMS, contacts, photos, videos etc. before they’re been overwritten.

Key Features of U.Fone iPhone Data Recovery:

For free trial version:
– You can recover missing photos without backup.
– You can recover deleted photos selectively or fully.
– You can view the all backed photos in iTunes/iCloud backup before recovering.
For full version:
– You can recover deleted and lost photos without restoring.
– You can recover missing pictures without affecting current data on device.
– Recover up to 18+ types of data including contacts, messages, videos, voice memos, notes, WhatsApp messages and many more.
– Works well with iPhone 8 and iPhone X/XS/XS Max/XR and iOS versions including iOS 12.1/12/11.4/11.3.

d_win d_mac

Recover Lost Photos from iPhone iPad After iOS 12 Update [without Backup]

Tested phone: iPhone X

Operating System: iOS 12

Step 1. Download and Launch iPhone Data Recovery
Click the above download button to download U.Fone iPhone Data Recovery for Windows or Mac, then install and launch it on your PC or Mac computer. Click “iPhone Data Recovery” function.

launch u.fone iPhone data recovery

Step 2. Connect iPhone X to computer
If you want to directly scan and recover lost photos from iPhone without backups, please choose “Recover from iOS Device” mode on the left side of the interface, and then use a USB cable to connect your iPhone to the computer.

connect iPhone X to computer

Step 3. Select Photos to Scan
In this step, you see the program support recover iPhone photos, videos, contacts, text messages and more, if you want to save time to get back your missing pictures, please just select “Camera Roll” category (or “Photo Library”, “Photo Stream”, “App Photos” category) under “Media” section from the left pane, and then go to next step.

select photos to recover

Step 4. Scan Lost Data from iPhone
At this stage, click the Start Scan button at the lower place to begin a deep scan of your iPhone. Just wait while the software scans your iPhone’s memory for stuff and you can track the progress of the scan in the window.

scan iPhone lost photos

Step 5. Preview and Recover Lost Photos from iPhone X(iOS 12)
When the scan completes, the program brings up an intuitive overview of all types of files. And multiple categories listed on the left side guide you to locate the exact files quickly.
Then, please click the “Photos” item to view the scanned pictures, just select one or more photos you need, and press the “Recover” button at the lower right corner, the program will help you recover your iPhone lost photos and save them onto the computer.

Retrieving Deleted iPhone Photos without Backup

Finally, hit the “Recover” button in the pop-up window to initiate the iPhone photos recovering process. This may take some time depending on how many pictures you’ve selected and the power of your computer.

Retrieving Deleted iPhone Photos without Backup

Once finished, open the destination folder on your computer and check up the retrieved pictures.

d_win d_mac

If you want to put the recovered photos from PC to your iPhone, please use this MobileSync tool, which allows you transfer contacts, photos, videos and music from PC to iPhone/iPad/iPod devices easily.

Above is the complete tutorial to fix “iOS 12 recently deleted photos” issues and recover disappeared photos from iPhone after iOS 12 upgrading. If you think this tutorial is helpful, please share this page to your Facebook or Google+ for those people who need help.


iOS Data Recovery

Recover Your iPhone iPad Lost Data
Now, Even without Backups

Compatible with iOS 12 & iPhone XS(Max)

Recover Lost Data Now

Recover Lost Photos iOS 12 Update

How to Transfer Photos, Videos, Music from iPhone to Huawei Mate 20(Pro/X)

[Summary]: Are you looking for ways to transfer precious pictures, videos, music from old iPhone to new Huawei Mate 20 (Pro/X)? This article will focus on exactly how to fast copy data between two phones especially cross-platform.

“I have successfully switched from iPhone 6 to the new flagship phone Huawei Mate 20 Pro because I am attracted by its powerful features. Now I have a tough question. How do I copy photos, videos, music media files from my old iPhone 6 to Huawei Mate 20 Pro? Is there a quick way, even if it is cross-platform?”

Today’s smartphones have been endowed with powerful camera and easy internet connectivity, many guys prefer to capture memorable life moments for real-time social sharing via smartphone. Or they want to listen to lossless audio files on their phones. The new flagship mobile phone Huawei Mate 20 series, Huawei Mate 20 (Pro/X/RS), is undoubtedly your best choice. The Mate 20 Pro has a huge 40-megapixel wide-angle camera, alongside an 8MP telephoto lens and a 20MP ultra wide-angle lens. Meanwhile, the standard Mate 20 drops those specs to a 12MP wide-angle main camera, along with an 8MP telephoto lens and 16MP ultra wide-angle lens.

No matter what mobile phone you update from old device, our photos and videos, even music, contain some of our most precious memories, so it’s imperative that we keep them safe. So how to transfer photos, videos, music data from iPhone 5S/6(Plus)/6S(Plus)/7(Plus)/8(Plus)/X to Huawei Mate 20/Mate 20 Pro/Mate 20 X?

Phone Switch – Perfectly Transfer Data between Phones

Phone Switch, an easy-to-use iOS to Android data transfer tool is all you need to transfer photos, videos, songs from iPhone to Huawei Mate 20(Pro/X). In addition, it allows you to transfer other type of files such as contacts, SMS, calendars, call logs from efficiently and quickly. The entire transfer process takes only 3 steps, so anyone can do it well. If needed, you can also transfer iPhone iTunes backup/iCloud backup to Huawei smart phone by using this Phone Switch software. The program works perfectly with a variety of mobile devices including Vivo, Samsung(Galaxy S/Note/A series), iPhone, HUAWEI, ZTE, OPPO, LG, SONY, Lenovo, Xiaomi, HTC, Motorola and so on. Now free download the trial version on your computer first then follow the steps guide to sync iPhone data to Huawei Mate 20/Mate 20 Pro/Mate 20X.

d_win d_mac

Easy Steps to Copy Photos,Videos,Music from iPhone to Mate 20

Step 1. Run Phone Switch Software

Install and run to Phone Switch program on your Mac or Windows PC. You will see a full functional picture of this Phone Switch progam. Navigate to “Switch” option to get started.

iPhone to huawei mate 20 transfer

Step 2. Connect iPhone and Huawei Mate 20 to PC

Next, you need to connect both an old iPhone and new Huawei Mate 20(Pro/X) to the same computer. Then both two phones will be automatically detected after seconds. To sync iPhone files to Huawei mobile phone, please make sure your old iPhone should appears on the left side shown as Source phone while your new Huawei smart phone is the Destination phone showed on the right side.

select iphone data to transfer

Well, you’re allowed to easily tap the “Flip” to switch place when you want to transfer files from Huawei to iPhone.

Note: If you want to empty your destination phone, you can select “clear data before copy” option.

Step 3. Copy Photos, Videos, Music from iPhone to Huawei Mate 20

As you can see, all transferable data is displayed in the middle of the window, such as contacts, text messages, photos, videos, music, call logs, documents, and more. Select the files you want to copy, then click on “Start Transfer” to begins copying data from iPhone to Huawei Mate 20. You can monitor the progress on the small window via the progress bar. After that, click on OK to end the process.

sync iphone data to huawei mate 20

d_win d_mac

Read More

Transfer Data from iPhone to Huawei Mate 20/Mate 20 Pro/X

How to Import iPhone Photos to Huawei P20

How to Transfer WhatsApp from iPhone to Huawei Mate 20

How to Transfer iPhone Contacts/Pics/SMS to Huawei Phone

Ways to Transfer Data from Android to Huawei Mate 20(Pro/X)

Transfer iPhone Media Files to Huawei Mate 20

How to Recover Deleted Contacts from iPhone and Android Phones

Summary
Lost or deleted contacts on your iPhone or Android phone? This article tells you two simple way for you to recover deleted contacts from Android phone and iPhone. You can free download the iPhone data recovery and Android data recovery and follow the tutorial to retrieve your lost contacts.

How to recover deleted contacts on Android phone?
How do I recover deleted contacts? I deleted contacts from my Samsung phone by mistake, they are very important! Is there any way to restore deleted contacts on Galaxy S8 without backup? Your help will be appreciated. Thanks!

How to recover deleted contacts on iPhone?
I did a factory reset on my iPhone 7 after accidentally pressed the factory reset option. I am really so frustrated right now because all the contacts information is gone. I assumed I have backup to iTunes before, but I can find any backed up data on iTunes library, and I don’t know how t restore contacts from iTunes to iPhone. So I want to recover contacts from iPhone after factory reset from the backup file easily. Is there any way to recover iPhone lost contacts? I have those important contacts since the first day I got the phone.

How to Recover Deleted Contacts from Mobile Phone?

There’s a good chance that the accidentally deleted contacts, SMS, photos, videos can be recovered on Android phone and iPhone, especially if it hasn’t been too long since it’s been deleted. The way that the deleted data is completely gone is when the space it resided is overwritten by the newly generated files, like any task of downloading media files and install software. So we still have chance to recover deleted data from iOS/Android devices.

Contents

Best Solution: Contacts Recovery for iPhone, Android

Note: Please stop to use your phone and try to scan and retrieve lost data from your phone by using a professional Android data recovery or iPhone data recovery. You may know that the general Windows/Mac data recovery software does not support restoring data in the phone’s built-in memory, you must to use a reliable contacts recovery.

Please don’t save the recovered files on your phone until you make sure that you already get back all your lost data. Otherwise, some of your lost data that have not been retrieved maybe overwritten and you can not get them back forever. Below, we’ll teach you how to recover deleted contacts from Android/iOS mobile phone by using Android iPhone Contacts Recovery.

Part 1: How to Recover Deleted Contacts from Android Phones

Android Data Recovery works well to recover deleted or lost contacts from almost all Android phone like Samsung Galaxy, HTC, LG, Sony, Google, HUAWEI, Motorola, ZTE, Xiaomi, Oppo and more Android smartphones, it can also enables you recover deleted photos, videos, messages, contacts, music, WhatsApp messages, document and more files from unlimited Android phones. Let’s shows you how to scan and export lost contacts in CSV, HTML and VCF formats to PC or Mac.

The Features of Android Data Recovery Software

  • Support to retrieve deleted contacts with full information such as contacts name, phone number, email, job title, address, companies and more which you fill on your phone. And saving the deleted contacts as VCF, CSV or HTML to your computer.
  • Preview and selectively recover deleted contacts from Android phone.
  • Recover existing contacts from broken Samsung phone and save them on PC.
  • Retrieve photos, videos, contacts, messages, messages Attachments, call history, audios, WhatsApp, documents due to mistaken deletion, factory reset, system crash, forgotten password, flashing ROM, rooting, ect from andorid phone or SD card.
  • Fix bricked Android to normal such as frozen, crashed, black-screen, virus-attack, screen-locked and get the phone back to normal.
  • Compatible with 6000+ Android phone, such as Samsung, HTC, LG, Huawei, Sony, Windows phone, etc.

d_win d_mac
d_win d_mac

Steps to Recover Deleted Contacts from Samsung Android Phone

Tested phone: Samsung Galaxy S8

Operating System: Android 7.0 “Nougat”

Step 1. Connect your Samsung Galaxy S8 to the computer
Download, install and run Android Data Recovery on your computer, select “Android Data Recovery” and you’ll get the main window below.

Android contacts Recovery

Then connect your Android device to the computer and move to the next step.

Android Data Recovery home page

Step 2. Enter USB Debugging
If you didn’t enable USB debugging on your device, you’ll see the window below. Follow the detailed expression below. There are three different ways to finish this job for different Android system:
Note: If you have already enabled USB debugging on your device before, you can skip this step.
Read More: How to enable USB debugging on Android

1) For Android 2.3 or earlier: Enter “Settings” < Click “Applications” < Click “Development” < Check “USB debugging”
2) For Android 3.0 to 4.1: Enter “Settings” < Click “Developer options” < Check “USB debugging”
3) For Android 4.2 or newer: Enter “Settings” < Click “About Phone” < Tap “Build number” for several times until getting a note “You are under developer mode” < Back to “Settings” < Click “Developer options” < Check “USB debugging”

enable usb debugging

Step 3. Select Contacts to Scan
After the program detected your Android device, you’ll get a window below. Then, please select the file types “Contacts”, then let the program analyze it by clicking “Next” button.
select contacts to scan

select contacts file to recover

Step 4. Allow to Analyze Your Phone
Click Start to analyze your Android. Just wait a sec and a Superuser Request will show up on your phone. Allow it. Sometimes the box may pop up more than once, click “Allow” to permit the Superuser Request. And then, choose “Start” on your computer to begin scanning.

allow analyze the phone

You should be prompted to root the device for a deep analysis of the lost stuff. To do this, press Rooting Tools button and download KingoRoot app on a browser webpage.

Read “How to safely root and unroot an Android Device” for full tutorial.

The program start to scanning your Android phone for all lost data, during the scanning process, please keep connect your phone with the computer until it done.

root Android to scan

Step 6. Recover Deleted Contacts from Android Phone
After the scan, the result will be shown in the interface, you can highlight one of them to see the details of your missing contact or existing one. Then you can stop it and preview all your contacts. Mark the data those “Contacts” that you want to get back and click “Recover” button to save them on your computer.

recover deleted contacts from android phone

Note: Contacts in the scan result are displayed in different colors. Actually,those in orange are the contacts deleted recently, and the black ones are those existing contacts on your Android phone. If you have such a need, you can use the button above (Only display deleted items) to separate them.

Now, download the free trial version of Android Data Recovery below to have a try.

d_win d_mac
d_win d_mac

Part 2: How to Recover Deleted Contacts from iPhone

iPhone Data Recovery is the highest iPhone data recovery rate in the industry, it provides you three recovery modes to recover iPhone lost contacts and deleted phone numbers safely and easily: Recover contacts from iPhone; restore iPhone contacts from iTunes and iCloud backups. What’s more, this iPhone data recovery also supports recover Text Messages, iMessages, Photos, Contacts, WhatsApp, Notes, Call History, WhatsApp chat history, etc. from iPhone 11/11 Pro(Max), iPhone XS/XS Max, iPhone XR, iPhone X, iPhone 8/8 Plus, iPhone 7/7 Plus, iPhone SE, iPhone 6s/6s Plus, iPhone 6/6 Plus, iPhone 5s/5c/5/4S.

The Features of iPhone Data Recovery

  • Recover data directly from the iPhone, iPad and iPod device;
  • Retrieve previous data by extracting it from iTunes or iCloud backup
  • Supported data loss circumstances: accidently deleted files on iPhone; device crashed, smashed or broken; the device is locked by a forgotten password; your device is lost or wiped (eg. freshly upgraded to a new iOS, restored to factory settings, jailbroken or refurbished).
  • Scan and preview the lost contacts in detail before recovery, including address, job title and custom tags, etc., and recover them as a VCF, CSV or HTML file.
  • After getting back the lost data, you can use iOS Transfer Tool to re-sync the restored data to your iOS device for using again.
    For example: Transfer the recovered contacts in VCF format to your iPhone.
    Import the recovered photos and videos back to your iPhone/iPad.

d_win d_mac
d_win d_mac

Steps to Recover Deleted Contacts from iPhone

Tested phone: iPhone X

Operating System: iOS 13

Step 1: Run the iPhone Data Recovery on PC or Mac
Free download the iPhone data recovery tool and install, run it on PC or Mac. Then, click “iPhone Data Recovery” function. If you want to recover lost contacts from iPhone without backup, please choose “Recover from iOS Device” mode to get started.

launch u.fone iPhone data recovery

Then, please connect your iPhone X to computer, when the iPhone X connected with the PC, click Start Scan button.

connect iPhone X to computer

Step 2: Select Contacts and Scan from iPhone X
In this step, please select the “Contacts” item that you want to recover from iPhone X, you can also “Select All” to scan iPhone for all deleted files.

select contacts to recover

Then press “Scan” button to find your iPhone lost data.

scan lost data from iPhone xs

Step 3: Recover Contacts Data from iPhone X
After the scan is finished, all recoverable contacts will be clearly organized as the screenshot below shows. Click the “Contacts” item to view the detail one by one, or only preview the deleted items by choosing “Show only the deleted files”. Select the contacts which you want to recover, and then hit “Recover” at the bottom to save them on computer.

recover contacts from iPhone xs

Tip: You can restore one, multiple, all, or any files by directly can and recover from your iPhone device, including messages, contacts, documents, videos, audio, photos, Safari history & bookmarks, call logs, WhatsApp messages & attachments.

Continue to choose a output directory to save the recovered data files, and finally press the “Recover” button to retrieve deleted files on iPhone XS (Max).

recover contacts from iPhone xs

Well Done! You have successfully recovered contacts from your iPhone, the missing contacts will be save onto the computer, if you want to transfer the recovered contacts from PC to your iPhone, please use this iOS & Android Manager, which allows you import contacts and media files from PC to iOS devices.
Also read: How to Import Contacts to iPhone

d_win d_mac
d_win d_mac

More Contacts Recovery Recommend

Android Toolkit – Contacts Recovery: This is an all-in-one Android toolkit, it not only can help you recover contacts, SMS, photos, videos and more from Android phone, but also can help you backup & restore, switch files, transfer files, erase data on Andorid, as well as unlock Android and root Android.

iOS Toolkit – Contacts Recovery: Also is an all-in-one iPhone toolkit, which supports recover photos, videos, contacts, messages, notes, call logs, and more. As well as transfer, backup, erase data on iOS devices, as well as fix iOS system and remove iPhone/iPad locked screen.

iPhone Contacts Recovery: Provies users four ways to recover iPhone lost or deleted contacts, you can recover contacts from iPhone device/iTunes backup/iCloud backup, or via smart recovery, it also allows users recover lost photos, Text/Whatsapp/Wechat/Kik messages, contacts, notes, videos, call history and more in four recovery modes.

Broken Android Contacts Recovery: If your Samsung phone was damaged with broken screen or black screen, this broken Android data recovery can help you recover contacts from broken Samsung phone with full information such as contacts name, phone number, email, job title, address, companies and more which you fill on your phone. And saving the contacts as VCF, CSV or HTML to your computer for your use. In additional, it aslo supports fix crashed, frozen or locked Samsung Galaxy S/Note smartphone to normal without data loss.

Android iPhone Recovery: Recover Deleted Data from Android and iPhone

[Summary]: Need an Android data recovery and iPhone data recovery to recover deleted or lost data from a mobile phone? This page will teach you how to recover contacts, text message, photos, videos, notes, WhatsApp messages and other files on your iPhone, iPad, iPod Touch or Android phone like Samsung Galaxy, LG, Sony, Google Pixel, Huawei, Motorola, ect.

After upgrade the iOS system, you need recover lost data from your iPhone, iPad and iPod; When you deleted photos on Samsung phone, you may want to recover deleted photos on Samsung Galaxy; After reset Android to factory reset, you need retrieve lost contacts, SMS from your Android phone. Is there a possible way to recover lost data from iOS device and Android device?

When you deleted accidentally files on your Android or iPhone/iPad/iPod, how to recover your data in a simple and secure way? We will recommend you 2 best iPhone data recovery and Android data recovery to retrieve deleted photos, contacts, text messages, videos, WhatsApp chat history and more from your Android/iOS devices.

Part 1: Free iPhone Data Recovery: Recover Photos/Contacts/SMS/Video/Note Free

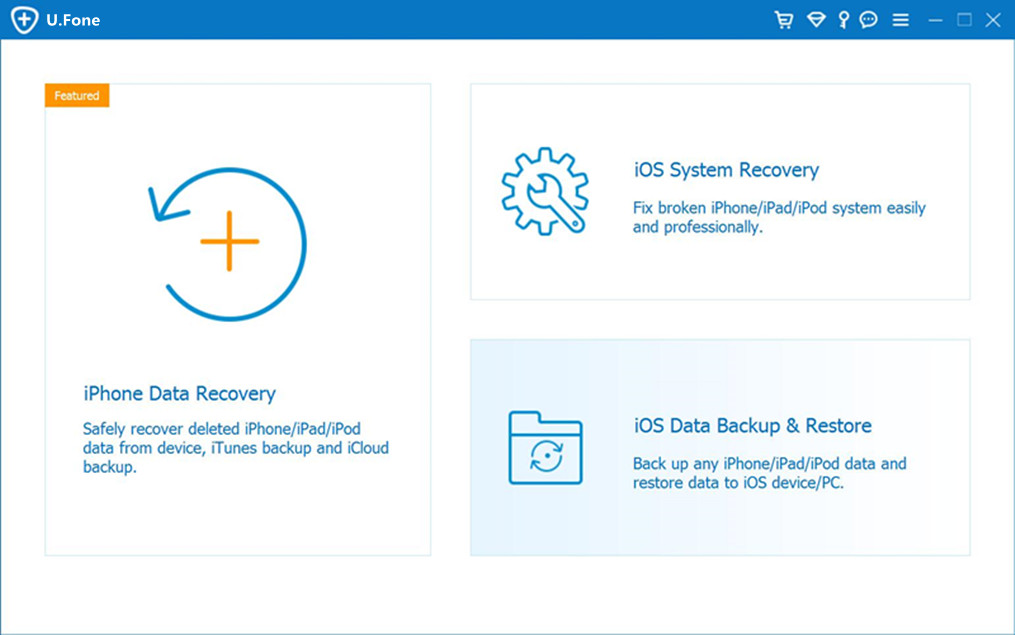
iPhone Data Recovery tool can help you recover iPhone data easily, safely and freely! This program is a professional iOS data recovery software, it not only supports recover media files: photos, videos, App photos, App videos Voice Memos, but also recover text files including SMS, Call History, Calendar, Notes, iBooks reading, Reminders, Safari Bookmarks and App data such as WhatsApp, Viber, Line, Kik, Wechat and more. Now let’s learn more about the iOS Data Recovery software.

1. Support 4 recovery mode to recover file in 25+ format, selectively view and retrieve lost or deleted files from iOS devices, iCloud backup and iTunes backup due to deletion, device crashed, smashed or broken, jailbreak, iOS upgrade or device reset etc. In additional, if you don’t know how lost the data, you can also recover iPhone data via Smart Recovery mode.
2. Restore lost iPhone data from iTunes and iCloud backup, preview the details of backup file and choose the ones you need to get back, avoid the newly created data being overwritten. It’s more advantages than iTunes, you can keep the existing iPhone data, this will be more intuitive and save you a lot of time.
3. Recover photos, messages, contact, notes, call logs, etc. from devices/iTunes backup/iCloud backup, or via smart recovery.
4. Recover third-party app data such as WhatsApp, WeChat, Viber, Kik, Skype etc without backup.
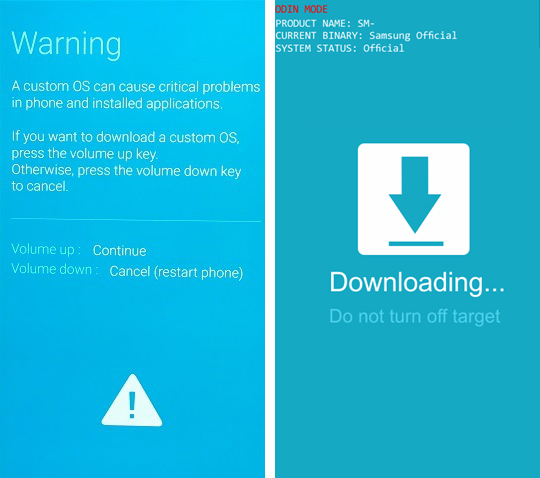
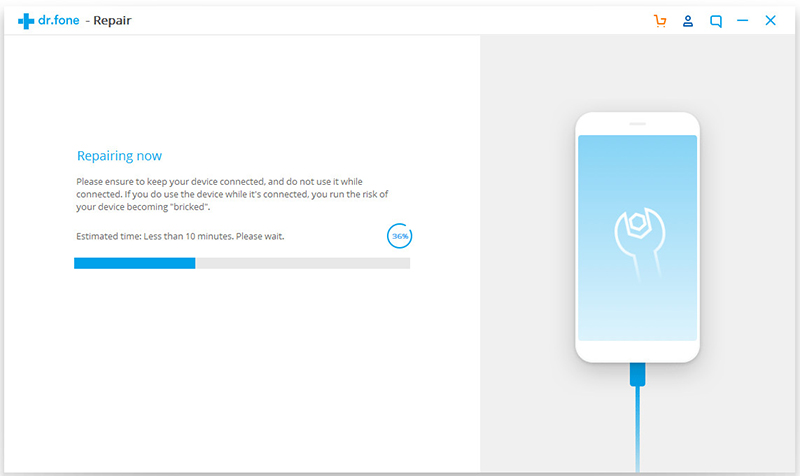
5. Fix ios to normal without lost any data after your iPhone stuck at apple logo, recovery mode, white/black screen, start up exception and other issue.
5. Support all iPhone, iPad, iPod running all iOS versions and all windows and mac computer, the latest version of iOS 12 is included.
6. Support recover lost and deleted data from iPhone XS/XS Max/XR/X and older models.
7. Only read and retrieve the data with 100% safety and quality, no personal info leaking.

Free download and install the iPhone data recovery on your Computer below. This free trial version allows you to extract and preview all the iPhone data.

d_win d_mac

To retrieve lost data from iPhone, iPad and iPod, there are four different modes: “Recover from iOS Devices directly”, “Recover from iTunes Backup Files”, “Recover from iCloud Backup Files” and “Recover iOS Data via Smart Recovery”.

How to Recover Deleted Data from iPhone?

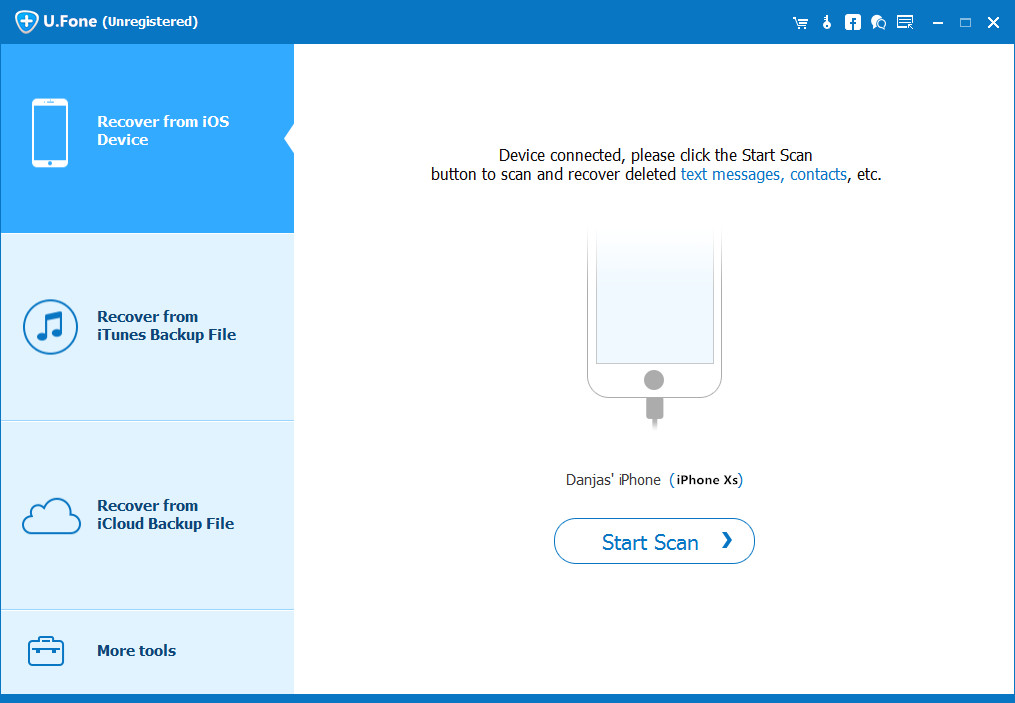
Step 1. Connect Your iPhone to Computer
Once the software is launched, you will find an option called “Recover from iOS Device”. Start with that option and click on the button labeled “Start”.

Recover from iOS Device Tab

You should connect your iPhone to the computer. Once the device is detected by the program, you can press “Next” to move forward.

Step 2. Select the Files You Need to Recover
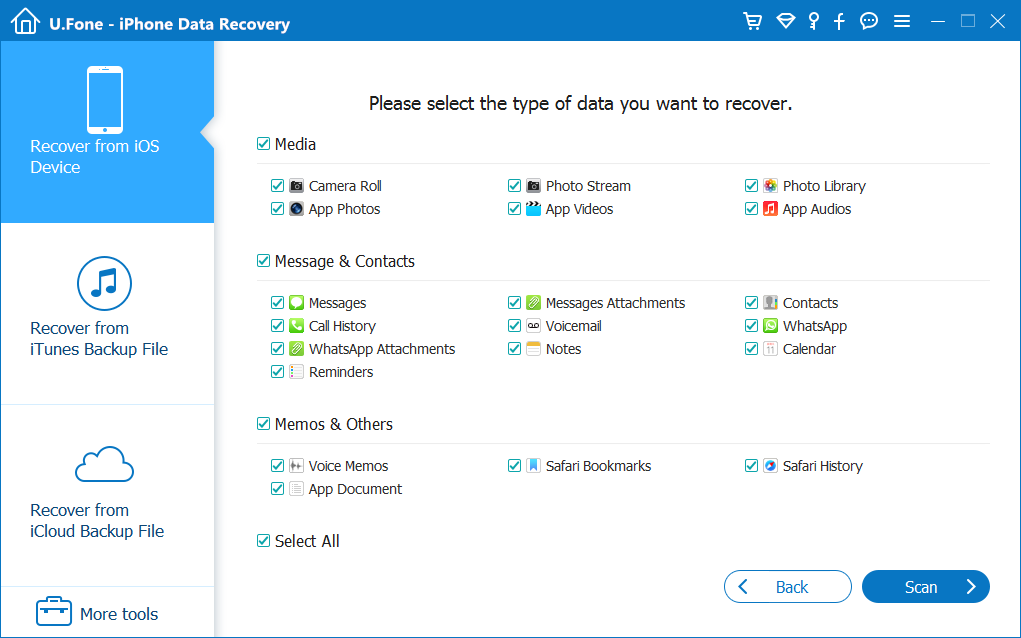
In this step, please select the type of the files you want to recover, such as photos, videos, audios, contacts, text messages, call logs, notes, WhasApp messages, Kiki messages, Line messages, Wechat messages, Viber messages and more. For example, if you want to recover deleted photos from iPhone directly, please click “Photos” and “App Photos” items. Then, you should click on “Scan”. The program will perform a deep scan searching for deleted photos on your iPhone.

select data types

Scan your iPhone for all lost data

scan lost data from iPhone

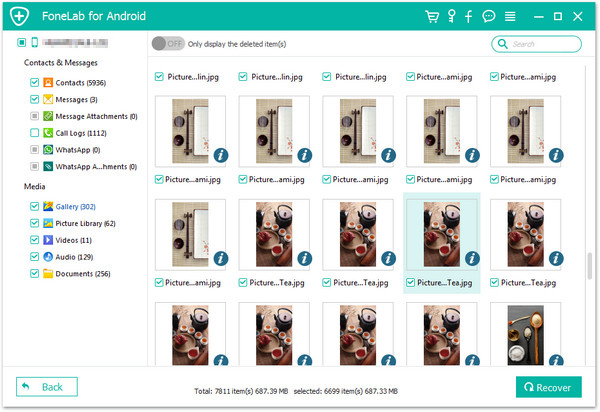
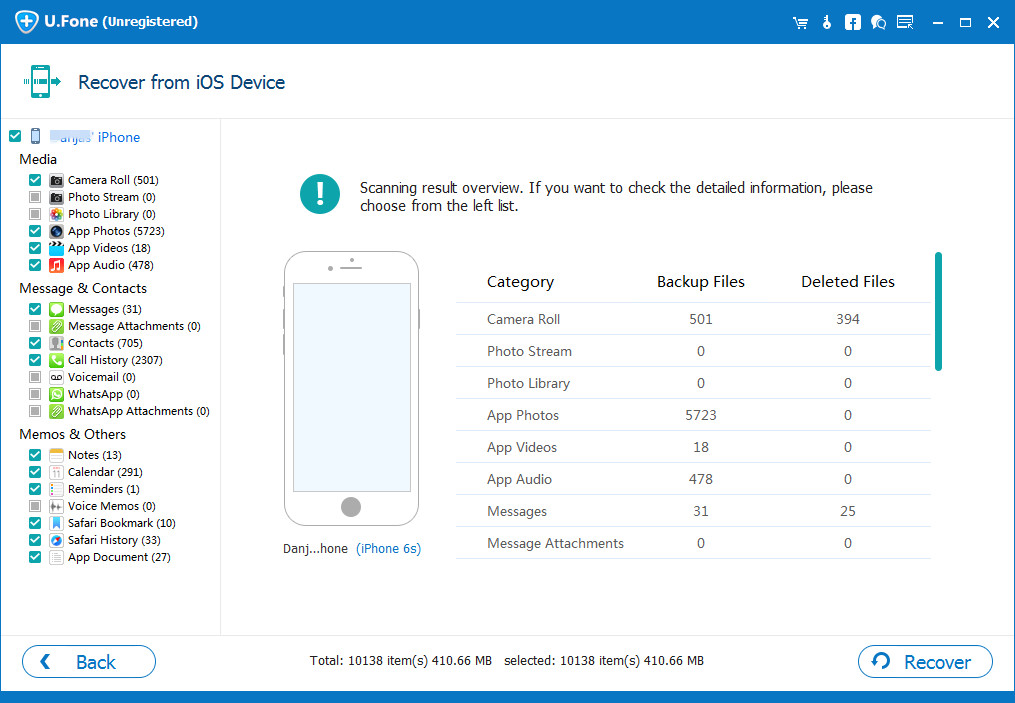
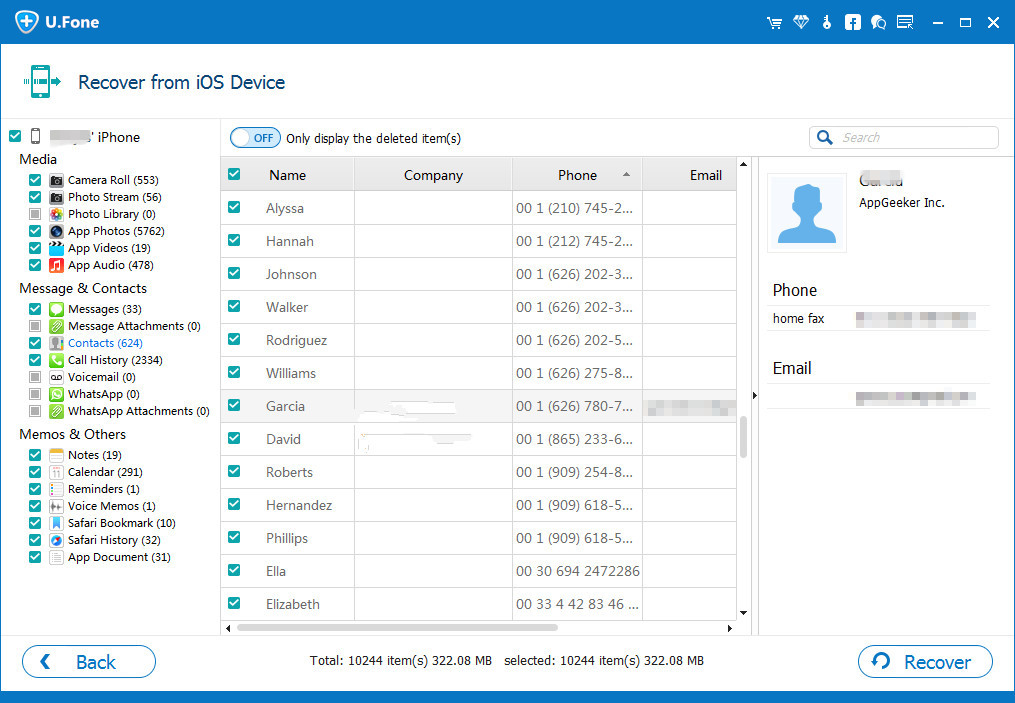
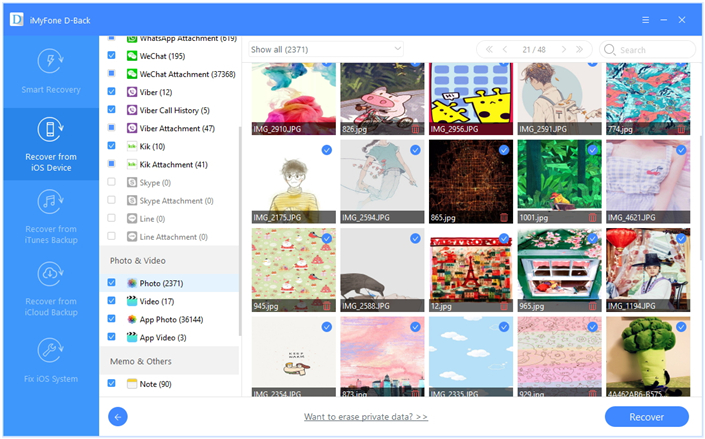
Step 3. Preview the Contents before Recovering
After the scan, all found data are displayed in categories, like contacts, text messages, message attachments, call history, camera roll, photo stream, photo library, calendar, notes, reminders, voice memos and safari bookmark. You can preview full contents of all of them one by one.
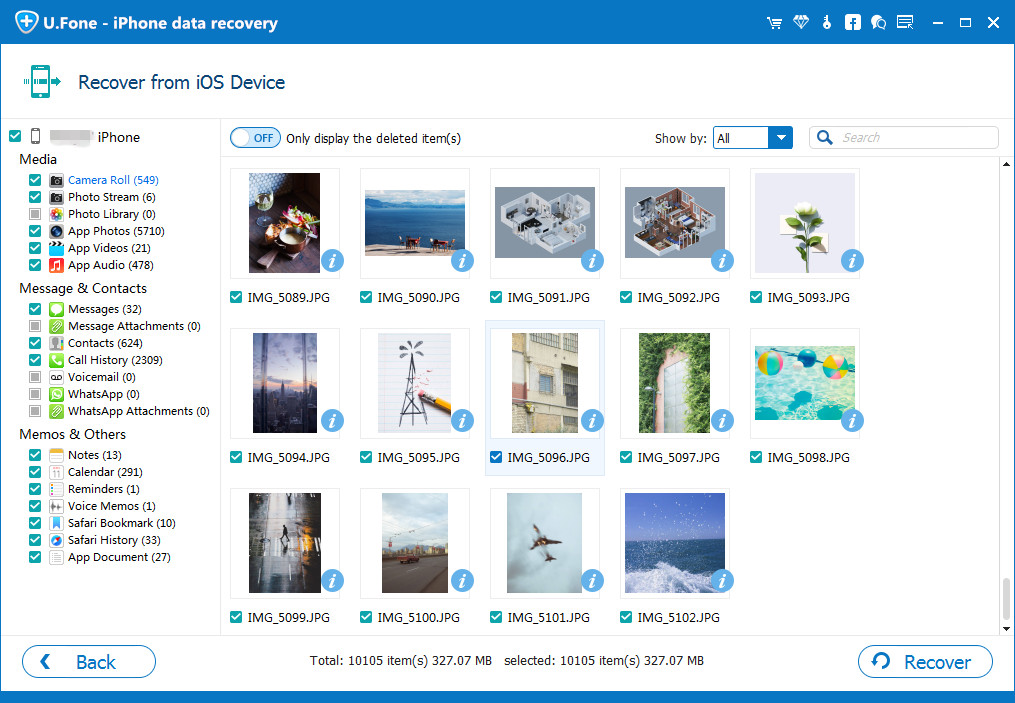
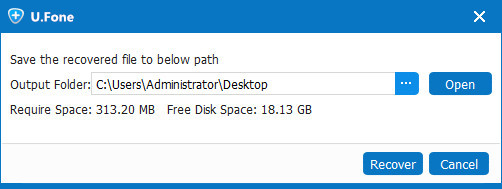
Now, you can select the files you want to recover and hit “Recover” button located towards the bottom of the screen. You need wait for a couple of minutes until the recovery process is done.

recover deleted photo files from iPhone

You can take advantage of the Free Trial for both Windows and Mac version of this iOS Data Recovery and see if you can recover your iOS lost data. It is compatible with iOS 12 now. Give it a try now!

d_win d_mac

Part 2: Free Android Data Recovery: Recover Pictures/Contacts/SMS/Video/WhatApp Free

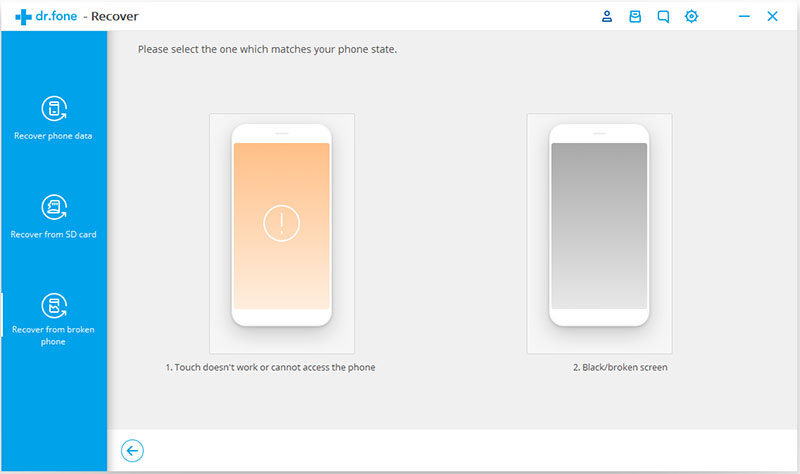
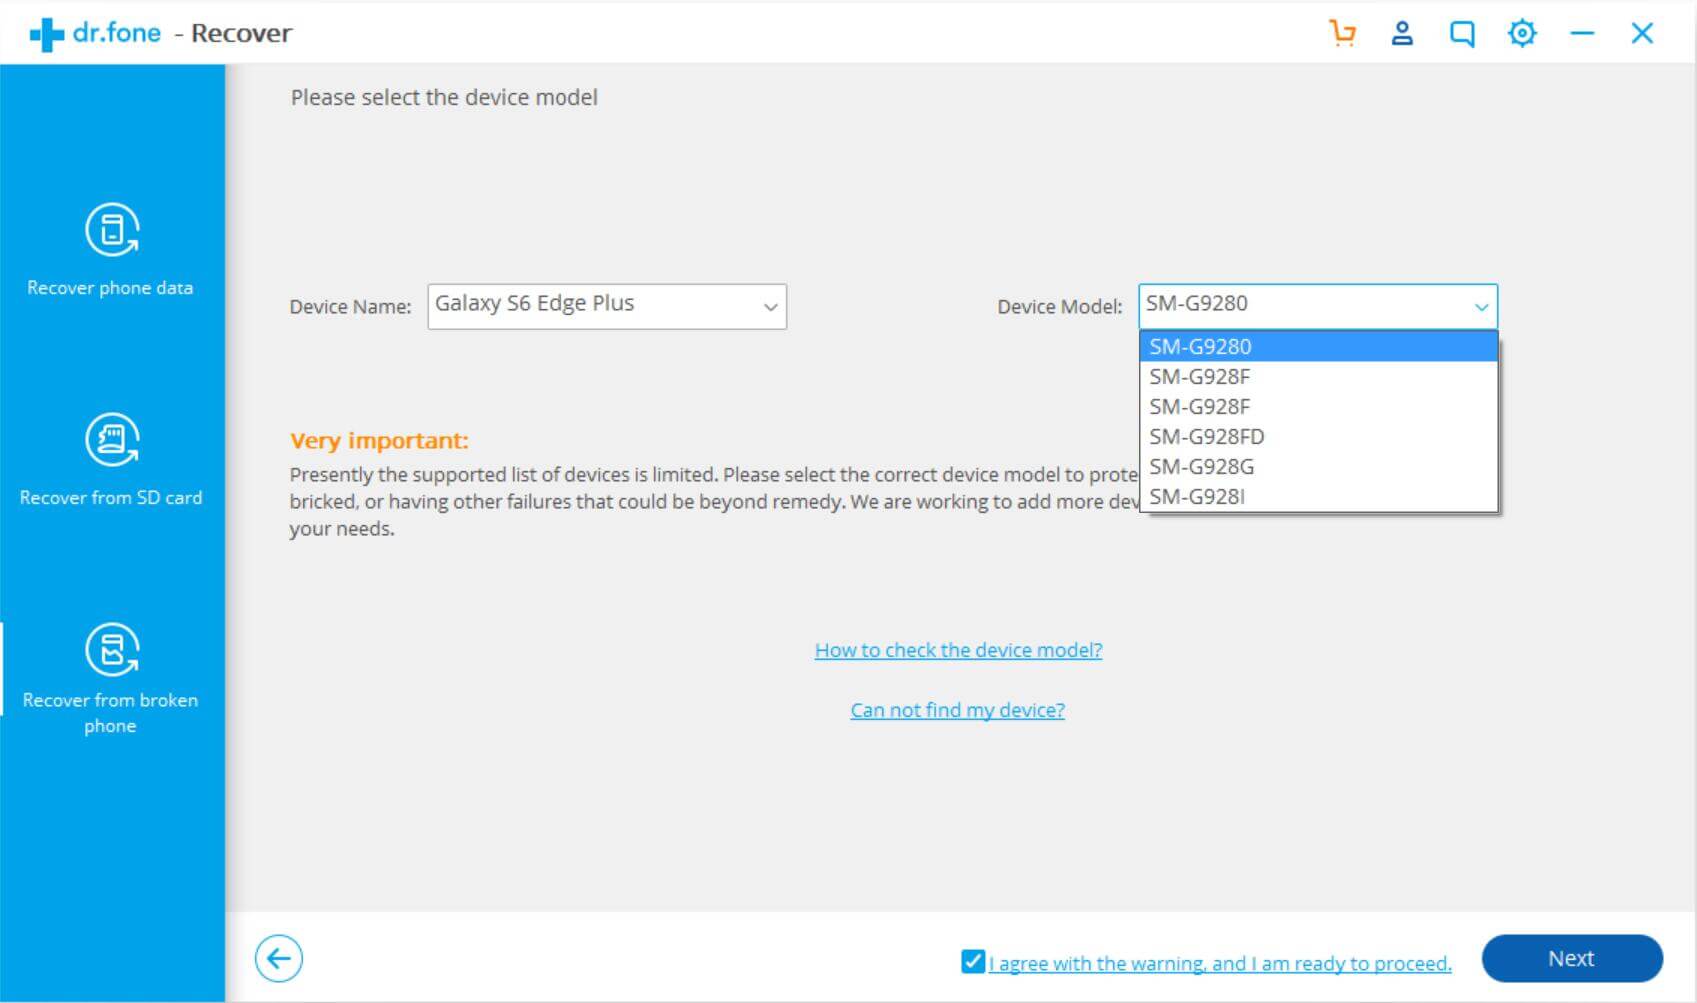
U.Fone Android Data Recovery software is designed to recover all Android lost files, text message, contacts, photos, music, videos, call logs, WhatsApp messages and documents easily. This Android data recovery not only can help you recover deleted and lost data from Android internal memory, but also enables you retrieve files from Android SD card, as well as fixing bricked Android and rescue data from broken Samsung Galaxy S6/S5/S4/Note 5/Note 4/Note 3 with broken screen/black screen. Let’s more information of U.Fone Android Data Recovery software.

1.Recover lost data from your Android phones and tables directly, easily and quickly.
2.Recover data of phones and tablets from Samsung, HTC, LG, Google, Sony, Motorola, ZTE, Huawei, Asus, OnePlus, Sharp, etc.
3.Recover lost or deleted data from Android due to accidental deletion, virus attack, device failure, OS/rooting error, improper handling, system crash, SD Card issue, ect.
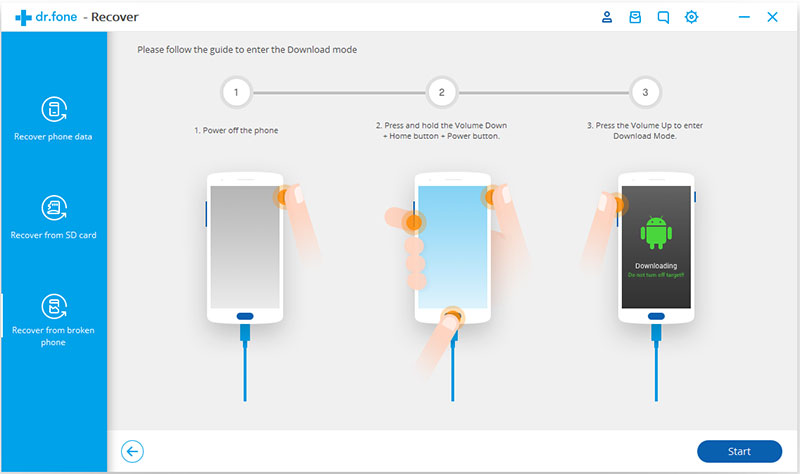
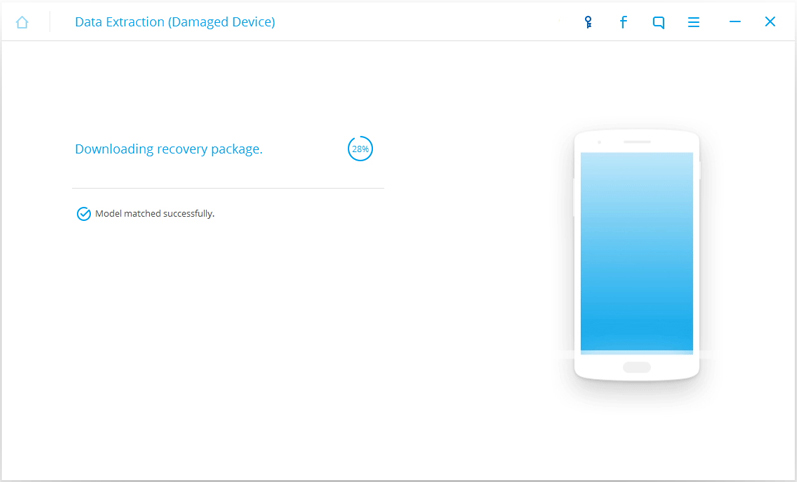
4.Provide the best function to fix Android system problem, you won’t lost any data after your phone stuck at download mode, black screen, start up screen and other issue. When your Android devices encountered some system problems so that you can’t access the system, you still can extract data from dead Android.
5.Extract existing SMS messags, contacts, call history, WhatsApp, photos, etc. from broken Samsung phone and save onto Windows 10/8/8.1/7.
6.Unlock Samsung phone with broken screen and retrieve files from it.
7.Safely and selectively back up your Android data, and restore data from backup files to Android device or computer(Windows/Mac).

d_win d_mac

Note: If you try to recover the lost data from Android device, please stop to use your Android phones or add new data to the device.
Please don’t save the recovered files on your Android device until you make sure that you already get back all your lost data.
Otherwise, some of your lost data that have not been retrieved maybe overwritten and you can not get them back forever.

How to Recover Deleted and Lost Data from Android?

Tested phone: Samsung Galaxy S7

Operating System: Android 6.0.1

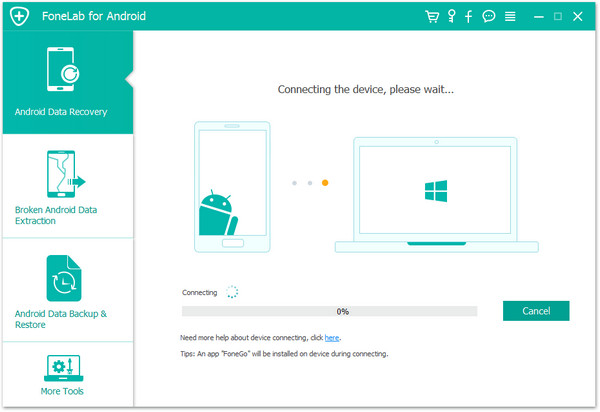
First off all, please run the Android Toolkit on your computer, and then click “Android Data Recovery” function go to retrieve Android lost files.

click Android data recovery

Step 1. Connect Samsung Galaxy S7 to Computer
To begin with, match the Android phone (2.1 – 6.0.1) to a Windows (10/8/7/Vista) computer. Next, go to the Samsung phone and turn on USB debugging. The computer and program will detect the device immediately.

connect Android Samsung phone to PC

Step 2. Enable USB debugging on Samsung Galaxy S7
When the program detects your phone, it requires you to enable USB debugging. There are three options. Please choose the one for your phone’s Android OS.
1) For Android 2.3 or earlier: Enter “Settings” < Click “Applications” < Click”Development” < Check “USB debugging”
2) For Android 3.0 to 4.1: Enter “Settings” < Click “Developer options” < Check “USB debugging”
3) For Android 4.2 or newer: Enter “Settings” < Click “About Phone” < Tap “Build number” for several times until getting a note “You are under developer mode” < Back to “Settings” < Click “Developer options” < Check “USB debugging”

enable USB debugging on Android

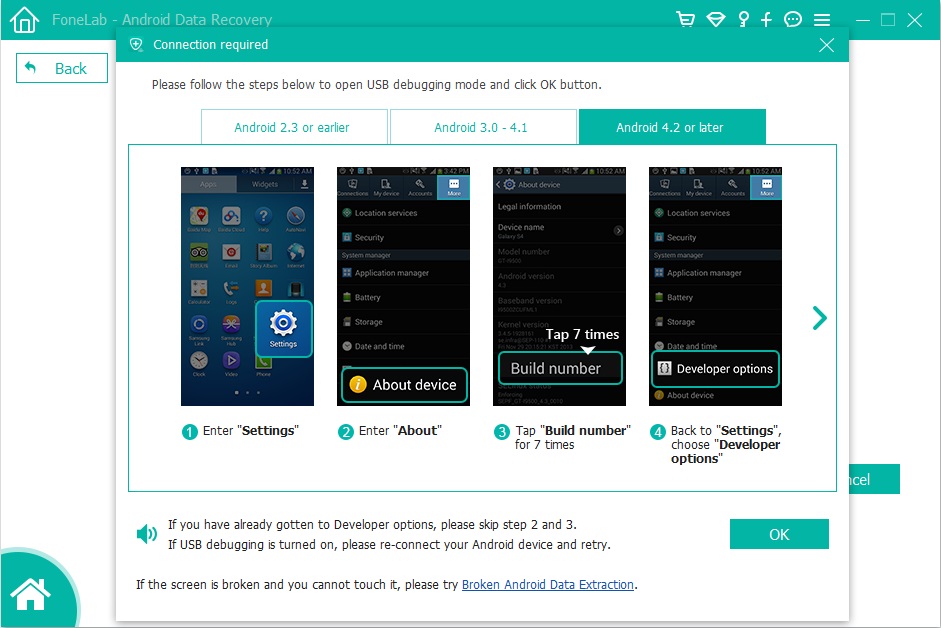
For Android 6.0.1 or above, your phone will appear a message, please just tap on “OK” to allow USB debugging.

allow connect to PC

If you’ve done this before, skip to Step 3.
For more detail guide on how to enable USB debugging mode on Android.

Step 3. Choose File Types to Scan and Retrieve
After connecting your phone with PC succeeds. To retrieve lost data from Android internal memory directly, you should select the types of files to scan. Mark what you want and click the button “Next”.

choose file types to scan and recover

Step 4. Allow the Program to Access the Android Internal Memory
Android device is checking device info, further analyzing device, and getting ready for scanning device.

In this step, you need to tap the note “Allow/Grant/Authorize” on the Android. Then the program will successfully get permission to scan the phone.

allow scan Android phone

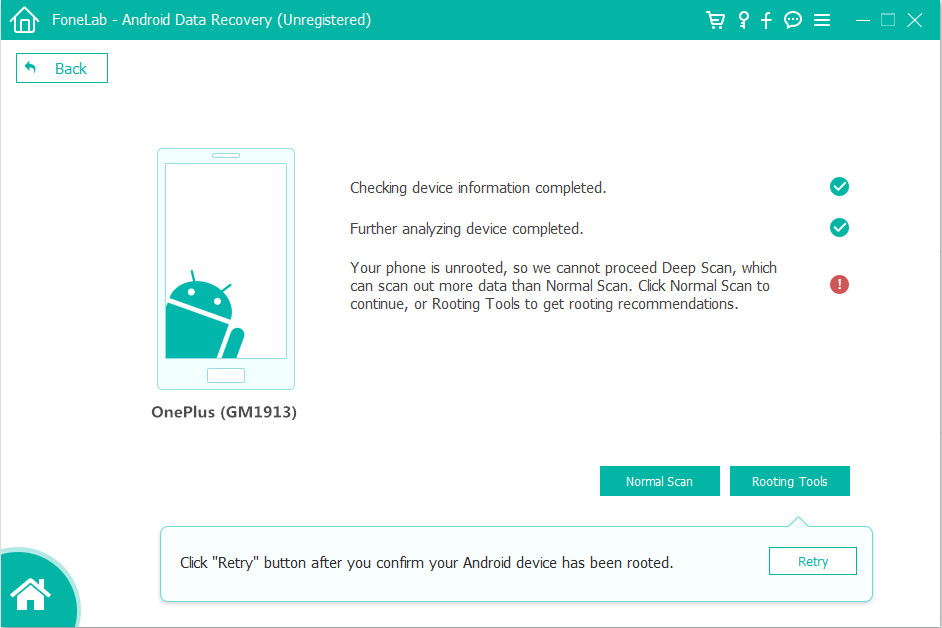
Step 5. Gain Root Permission for a Deep Scan(Option)
The program will check the device information and perform a basic scan of the device. If it can’t find the files you need, it’s suggested that you root the phone to access to the full Android system. (You can unroot the device after the recovery task.)

To do so, click the Advanced Root button at the lower right position. At this point, you will be taken to an external website to download a free Android rooting tool — Android Root or KingoRoot to root the device.

[Also Read: How to Safely Root and Unroot an Android Device with KingoRoot ]

root samsung phone

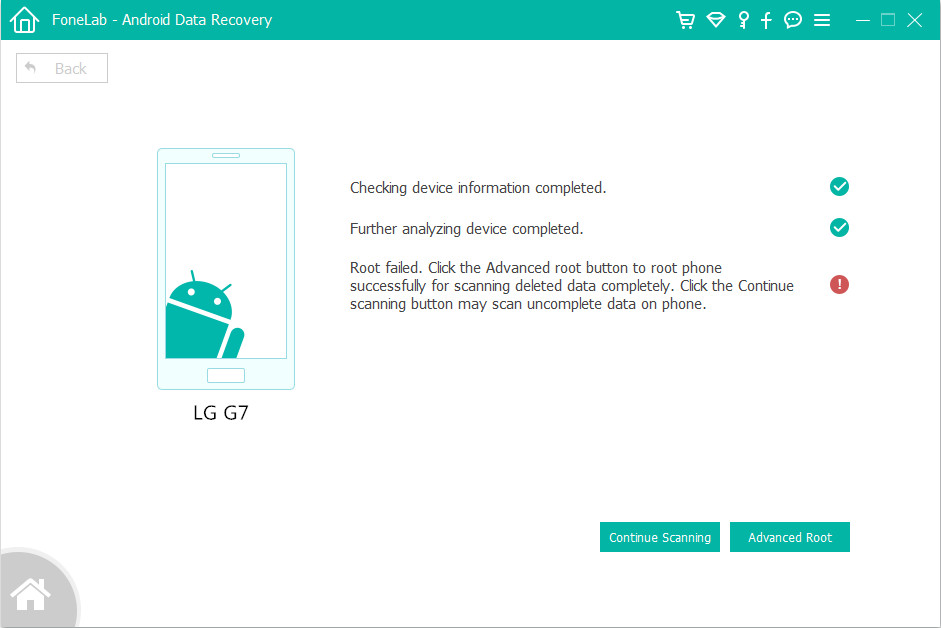
After you’re rooted, this Android Data Recovery software will begin running a deep scan of your Android phone’s memory and SD card to search for the deleted Stuff. Please be patient.

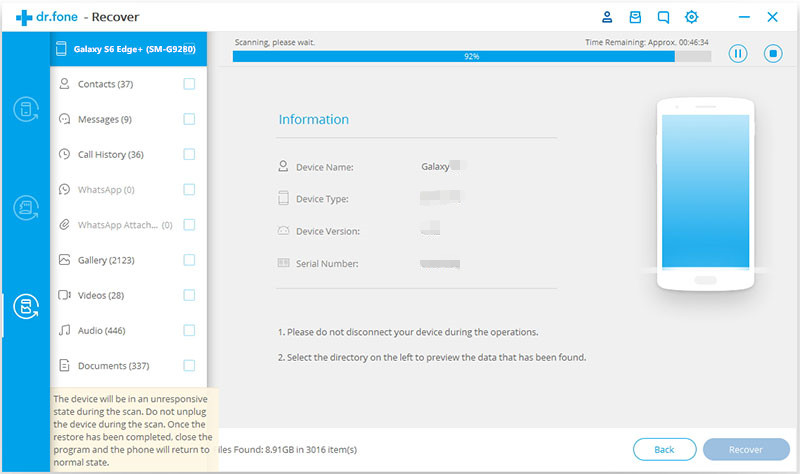
Step 6. Scan Lost Data from Android
When the phone is being scanned, keep it connected, the scanning process will take you a little time, it depend on how many files on your phone.

scan files from android

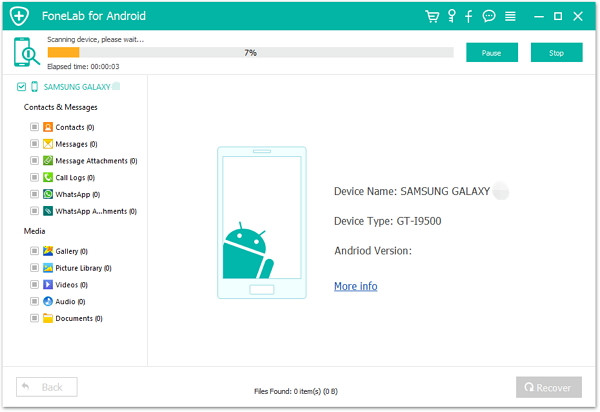
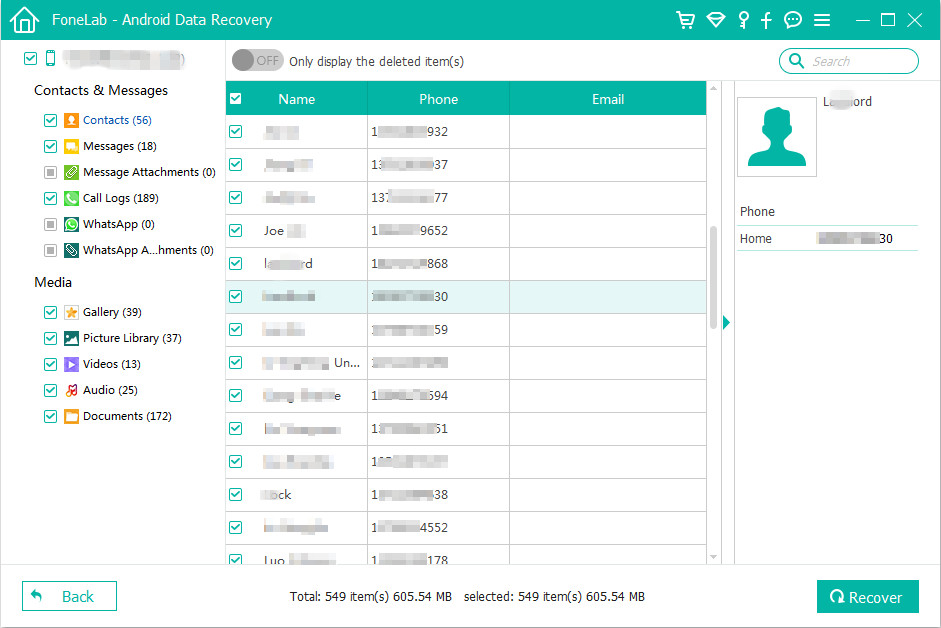
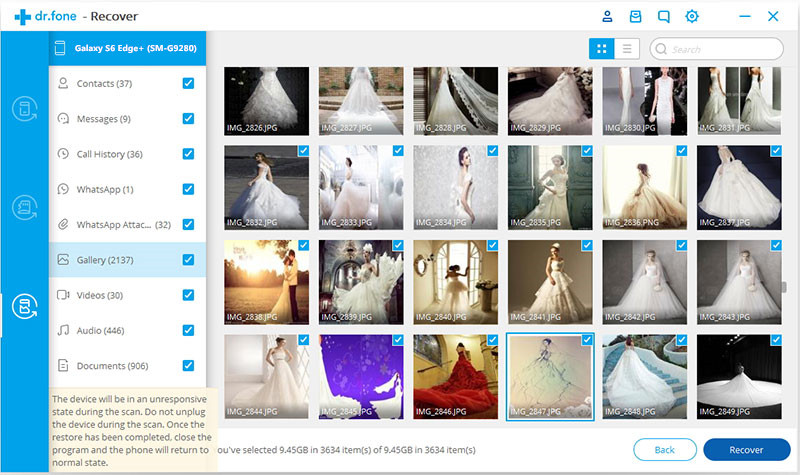
Step 7. Preview and Recover Photos, Contacts, SMS and more from Android
Once scan is completed, you can check file types at the left and preview contents in details, including contacts, text messages, pictures, gallery, videos, WhtsApp chat history and more. Then you are allow to mark which you want to get back and click the button “Recover”. The Android data recovery will help you retrieve all scanned data from internal memory of Android device.

recover photos from Android

Well done, you have restored data from Android phone, the program supports recover deleted and lost files from Samsung Galaxy S/Note/Tab, Google Pixel/Nexus Tablet & Phone, LG phones & tables, HTC One/Desire/EVO/Tablet, Motorola Moto/Droid, Huawei Mate/P/Mi/Note, Xiaomi, ZTE, Oppo, etc.

Free download the Android Data Recovery for Windows and Mac and try to recover your Android data:

d_win d_mac

In additional, the iOS Data Recovery supports retrieve lost and deleted files from almost all iOS devices, including iPhone, iPad and iPod(Touch/Nano/Shuffle/Classic), as wll as restore unreadable iTunes and iCloud backup. So, please choose the appropriate mobile phone data recovery software according to your device and try to recover your data from mobile device.

More Free Android iPhone Recovery on Android-iPhone-Recovery.com

Free iPhone Data Recovery – Restore contacts, messages, notes, WhatsApp messages, safari history, photos and more. from iPhone, iPad, iPod, iTunes and iCloud.

Free iOS System Recovery – Fix iPhone/iPad/iPod from DFU mode, recovery mode, Apple logo, headphone mode, black screen, etc. to normal state without data loss.

Free iOS Toolkit – Data Recovery – Recover photos, videos, contacts, messages, notes, call logs, and more. from iPhone, iTunes and iCloud, it works well with the latest iPhone XS (Max)/XR, iPhone X, iPhone 8 (Plus).

Free Android Tool – Data Recovery – Recover deleted photos, videos, contacts, messages, call logs, and more. from 6000+ Android devices, also supports extract data from broken Samsung phones.

U.Fone Broken Android Data Recovery – Extract Contacts, Messages, Call Logs, WhatsApp, Photos, etc. from broken Samsung phone’s internal storage or memory card, as well as fixing your frozen, crashed, black-screen or screen-locked Android system to normal.

Related Android iPhone Data Recovery Solutions

How to Recover Deleted or Lost Data From iPhone XS/XS Max/XR

How to Recover Lost Photos from iPhone XS/XS Max/XR

How to Recover Deleted Contacts on iPhone XS/XS Max/XR

How to Recover Deleted Photos on Android Phone

How to Recover Lost Data from Broken Samsung Galaxy


iOS Data Recovery

Recover Your iPhone iPad Lost Data
Now, Even without Backups

Compatible with iOS 12 & iPhone XS(Max)

Recover Lost Data Now

Free Android iPhone Data Recovery

Retrieve Data from Samsung Galaxy Note 8.0 with Broken/Black Screen

[Summary]: If your Samsung Galaxy phone was Broken/Black Screen and can’t go into system.Want to recover your Samsung data in a simple way?Follow the article to teach you how to recover your data on Samsung Galaxy Note 8.0.

“I was running at the outside for doing exercise that i was broke my Samsung Galaxy Note 8.0 screen .I was upset, not because I have to buy a new phone as a replacement, but a lot of value data in my phone , such as, images, videos, audio, contacts, etc. Cause it can’t get into system and get these data again from the damaged Note 8.0 phone.I need a method to help me recover them.”

As you see, people usually encounter a lot of accidentally problems when they use mobile phone, for example, black screen, cracked screen, water-damaged, can not access the phone system or the touch screen cannot be used. Because of these accident, it mean your value data is always stored in the phone and can’t be extracted. And if you want preview the data again, you should take some time and money to repair the broken screen. Now I will tell you have an easy solution to retrieve data from Samsung Galaxy Note 8.0 with broken/black screen.Follow guide below, to learn how to extract and recover data from broken/damaged Galaxy Note 8.0?

Data Recovery on Samsung Galaxy Note 8.0 with broken screen

The Android Toolkit – Broken Android Data Recovery helps you in retrieving inaccessible or lost data from Galaxy Note 8.0 with black/broken/crack screen. With it, recovering or extracting data from Samsung Galaxy note becomes a very simple matter. This software can recover or extract photos, videos, audio, music, SMS, Whats App messages, contacts and other data.If your phone is in a black screen, blank screen, no access to the mobile phone system, or lost data due to restoring factory settings, upgrading the system, formatting and other reasons. Then this software is the best way to solve all of your problems well.

With the help of Broken Android Data Recovery, you could:

Recover photos, videos, contacts, messages, messages Attachments, call history, audios, whatsApp, documents from samsung phone or SD card.
Preview and selectively recover deleted data from Samsung phone before recovery.
Extract data from dead/broken samsung phone internal storage, fix samsung phone system problem such as frozen, crashed, black-screen, virus-attack, screen-locked and get it back to normal.
Regain lost data for Samsung phone due to mistaken deletion, factory reset, system crash, forgotten password, flashing ROM, rooting, etc.
Supported damaged/dead Samsung devices: Galaxy S6 Edge(+)/S6/S5/S4/S3, Galaxy Note 5/Note 4/Note 3/Note 2, Galaxy Note 8.0 Tab and other Samsung Galaxy Tab

d_win d_mac

Easy Steps to Restore Data from Broken/Black Screen Galaxy Note 8.0

Step 1. Launch the Program and Connect Black Screen Note 8 to PC

Download and install the Android Data Recovery Software first, then launch program and connect your damaged Samsung Note 8.0 to the computer with USB cable. Enter “Recover” mode to start.

recover data from broken samsung

Next, if you want recover/retrieve/extract data, then click the “Recover Android Data” option.

recover data from samsung galaxy s6 that won't turn on

Step 3. Select Note 8.0 Data Type

You will see more type of data, order you want recover data proper and reduce time losing, you’d better select the data types to extract which you need.

select data to recover from dead galaxy s6

Step 4. Select the Type of Fault in your Phone

In this section, you will be asked to confirm your Galaxy note 8.0 phone failure status. Case 1.The phone cannot enter the system. 2.The phone screen is broken.

choose android phone problem type

Step 5. Choose Correct Info and Enter Download Mode

After confirming which state is your Galaxy Note 8 status, select the correct phone model then hit “Next”.

choose galaxy s6 model

In the next interface, you need to follow the page prompts to enter the download mode of your Samsung Galaxy Note 8.0.

set download mode on broken android phone

Step 6. Download Recovery Package and Scan Your Device

Once the phone successfully enters the download mode, it will automatically download the recovery package to fix your Samsung Galaxy Note 8.0 to normal. (Mode for Galaxy Note 8.0: GT-N5100(GSM), GT-N5110(Wi-Fi), GT-N5120(LTE).)

Download recovery packages for samsung s6

After that, the program starts analyzing and scanning your Samsung phone. The scan progress bar will be displayed in front of you, and you can check the content and progress of the scan at any time.

scan data from dead galaxy s6

Step 7. Recover Lost Files on Broken Galaxy Note 8.0

Wait scanning and analysis, all the losing or deleted data will displayed on the resultant window which you select the data types before. Lastly, you be able to preview these files and more detailed selection of the files you want to recover.If all operating properly, just click the “Recover” button to finish the recovery.

Recover data from broken Galaxy S6 Edge+

d_win d_mac

Read More Tutorial for Galaxy S6

[Fixed]Samsung Galaxy Black Screen – How to Fix and Recover Data

How to Recover Lost Data from Broken Samsung Galaxy Note 4

Recover Data Contacts/Photos/SMS from Broken Galaxy S6/S6 Edge

Extract Data from Galaxy Note 5 with Black Screen

Recover Lost Data from Samsung Galaxy Note 5 after Factory Reset

Data Recovery on Broken Galaxy Note 8.0

Samsung Galaxy S6/S6 Edge+ Won’t Turn On, How to Fix it?

[Summary]: Samsung Galaxy S6 won’t turn on, looking for a way to fix it and recover data from it? This article teach you an effective way to fix Galaxy S6/S6 Edge and Galaxy S6 Edge+ won’t turn on issue.

fix galaxy s6 wont trun on

CONTENTS

In 2015, Samsung released three Android smartphones: Galaxy S6, Galaxy S6 Edge and Galaxy S6 Edge Plus. Now it has been nearly 4 years, the Galaxy S6 was popular all over the world at that time. By 2018, Samsung has released several flagship phones: Galaxy S7, S8, S9 and Galaxy Note 7, Note 8, Note 9, now, many people still use the Samsung Galaxy S6.

Samsung Galaxy S6 uses 5.1-inch screen, 2560×1440 pixels, pixel density up to 573ppi, built-in Exynos 7420 eight-core 64-bit processor, can provide stronger performance and lower power consumption; using the first 500W pixels + after 1600W pixels The dual lens design supports F1.9 large aperture, the sensor is Sony IMX 240, supports OIS optical image stabilization and automatic HDR technology. The Samsung Galaxy S6 edge uses a curved screen. Unlike the GALAXY Note Edge, the Galaxy S6 edge uses a hyperbolic screen. The front looks more beautiful. Under the light, there are two places where the screen transitions. The highlights are bright.

Samsung Galaxy S6 won’t turn on

As we all know that the Samsung Galaxy S6 is equipped with Android OS, but Android phones will become slower and slower for a long time. Recently, many Galaxy S6 users complain saying my Samsung Galaxy S6 won’t turn on.This is a strange error because your Samsung Galaxy S6 won’t turn on and remain stuck at a black screen of death every time you press the power on/off button to switch it on, or the Galaxy S6 stuck at Samsung logo screen, at this time your phone becomes unresponsive and refuses to boot up normally.

Once the Samsung Galaxy S6 won’t turn on, stuck in black screen of death or stuck at restart loop status, when this happens, you can’t accessing the phone, at this time, you must to find a solution to fix the Samsung Galaxy S6 won’t turn issues.

Part 1: How to Recover Data from Galaxy S6 That Won’t Turn On

Android Toolkit and U.Fone Broken Android Data Recovery, both can help you fix your frozen, crashed, black-screen or screen-locked Android system to normal and recover files from broken Samsung Galaxy S6 or memory card. Both two broken Samsung data recovery & fix tool allows you recover photos, videos, contacts, text messages, call logs, WhatsApp messages and more from broken Galaxy S6.

The difference is
U.Fone Broken Android Data Recovery supported broken Galaxy S6 model – SM-G9200, SM-G920F, SM-G920P, SM-G920T, SM-G925F, SM-G925P, SM-G925T, SM-G928P, SM-G928T
Read the guide:
* Recover data from dead Samsung phone
* Fix Samsung phone won’t turn on issue

fix dead samsung galaxy s6

Android Toolkit – Broken Android Data Recovery supported broken Galaxy S6, S6 Edge and Galaxy S6 Edge+, including S6 Edge model: SM-G9250, SM-G925F, SM-G925FD, SM-G925I; S6 Edge+ model: SM-G9280, SM-G928F, SM-G928FD, SM-G928G, SM-G928I and all S6 models.

Let’s teach you how to use Android Toolkit to rescue data when your Samsung Galaxy S6 won’t turn on or stuck on black screen of death.

Steps to Recover Data from Dead (won’t turn on) Galaxy S6 by Android Toolkit

Step 1. Download and Run Android Toolkit on PC
Download, install and run the Android Toolkit for Widows on your PC.

d_win d_mac

Once you launch the software, you will see many tabs before you. If you want to recover lost data from (broken) Samsung phone, please click on “Recover” function.

recover data from broken samsung

Step 2. Connect Dead Samsung Galaxy S6 to PC
Then choose “Recover Android data ” and click “Recover from broken phone”. Connect your Galaxy S6 to the computer using a USB cable.

recover data from samsung galaxy s6 that won't turn on

Step 3. Select File Types to Recover
You will now have before you different file types recognized from S6 which can be extracted and stored on the PC. By default, all content will be checked but you can unmark the ones you do not wish to retrieve. Once you are done selecting the data, hit “Next”.

select data to recover from dead galaxy s6

In this step, choose from the two options before you the true nature of your phone as shown in the screenshot below.

choose android phone problem type

Step 4. Select Phone’s Model Type and Name
The program supported broken/damaged/dead broken Galaxy S6, S6 Edge and Galaxy S6 Edge+, please select your phone’s model type and name as shown in the screenshot below. Give correct details for the software to identify your tab smoothly and hit “Next”.

choose galaxy s6 model

Step 5. Put Your Phone Into Download Mode
In this step, read the instruction the screenshot below carefully to enter into Download Mode, please follow the below steps.

set download mode on broken android phone

1). Press and hold the Volume Down, Home and Power Down button simultaneously and don’t release the button until your device vibrates, then your phone will boot into download mode.
2).Press the Volume Up to confirm recovery mode.

You will see the following screen if your device can display.

pust samsung into download mode

Next, click on “Start” in the toolkit to move on.

Step 6. Recognize your Phone and Download Recovery Package
After get your phone into download mode, the program start to downloading recovery package and get your phone return to normal statue.

Download recovery packages for samsung s6

After downloading recovery packages and fix the dead Galaxy S6 to normal, the program will scan all existing files from the device.

scan data from dead galaxy s6

Step 7. Recover Data from Samsung Galaxy S6 That Stuck in Start Screen
Please wait for the scanning process patiently. Once it is completed, you will be able to get a list of recoverable files including photos, video, contacts, text messages and more. You can preview and select what you want, then click on “Recover” to save them into your computer.

Recover data from broken Galaxy S6 Edge+

Part 2: How To Fix Samsung Galaxy S6/S6 Edge(+) That Won’t Turn On

If the above method didn’t work for you then try the Android Toolkit – “Repair” function, which can help you fix the “Samsung galaxy S6/S5/S4/Note 5/Note 4/Note 3 won’t turn on” problem for sure. This Android Repair tool is the first and ultimate Android system repair software, the one-click repair operation not only can help you fix Galaxy S6 won’t turn on issues, but also enables you fix Android system issues like black screen of death, app keeps crashing, system update download failed, etc. This program is the highest success rate for fixing issues as compared to other Android fix tools available in the market.

d_win d_mac

Note: Before using this Android Toolkit – Repair software to fix Android system to normal, we recommended your should to backup your Samsung data as it may erase existing data from your device.

Steps-by-Step to Fix Samsung S6/S6 Edge(+) Won’t Turn on Issues

Step 1. Download and Launch Android Toolkit Again
Click the above download button to download Android Toolkit for Windows, and then launch it on your computer. If you want to fix Android system issues, please tap on “Repair” function on the software’s main interface.

repair samsung galaxy s6 that won't turn on

Step 2. Connect Your Dead Galaxy S6 to PC
Next, using a USB cable to connecting your Samsung Galaxy S6 mobile phone to the computer, and then select “Android Repair” option.

Android Repair - fix samsung s6 won't turn on

Step 3. Confirm the brand, model and More Information of your Phone
On the next page, specify your device brand, name, model and carrier information, this guide main shows you how to fix a Samsung Galaxy S6 that won’t turn on issues, please select Galaxy S6 and enter “000000” to confirm the details you entered. Then, click on “Next”.

Android Repair - repair samsung s6 won't turn on

Step 4. Downloading Firmware
After entering your phone in download mode, the software will start downloading firmware to the phone automatically.

fix samsung s6 won't turn on

Step 5. Fix Dead Samsung Galaxy S6 to Normal
After downloading firmware complete, the program begin to fix your Samsung Galaxy S6 that won’t turn on problem, please wait for a few minutes until the fix process is not completed. Once it completes, you can to turn on your Samsung Galaxy S6, now your phone return to normal statues.

fix galaxy s6 won't turn on

Above simple steps, you have fix the Samsung Galaxy S6 won’t turn on issues with the help of Android Toolkit – Repair function, this is an All-in-one Android toolkit that not only helps you fix bricked Samsung Galaxy S6/S6 Edge(+) to normal, but also enables you to recover, transfer, backup, erase data on Android devices, as well as remove lock screen and root Android devices.

Free download Android Toolkit for Windows and try to fix, recover data from your dead/broken Samsung Galaxy phone:

d_win d_mac

Read More Tutorial for Galaxy S6

How to Recover Photos from Broken Samsung Galaxy S6/S6 Edge

How to Recover Deleted Photos from Samsung Galaxy S6/S6 Edge(+)

How to Recover Deleted SMS from Samsung Galaxy S6/S6 Edge(+)

How to Recover Deleted and Lost Contacts from Samsung Galaxy S6/S6 Edge(+)

How to Fix a Galaxy S6 Black Screen Issue

Fix a Dead Galaxy S6/S6 Edge

Transfer Data from Samsung to Huawei P20/Mate 20 Free

[Summary]: Looking for a free way to transfer data from Samsung Galaxy S/Note to Huawei P20/Mate 20(Pro)? This guide will teach you how to use free Phone Clone to transfer data including contacts, messaging, call logs, photos, videos and audio from Samsung Galaxy to your new Huawei or Honor smartphone.

CONTECTS

Huawei has just announced its two series of flagship mobile phones– the Huawei P20 series and Mate 20 series, including Huawei P20, P20 Pro, Mate 20, Mate 20 Pro, Mate 20 X and HUAWEI Mate 20 RS Porsche Design, this is the powerful Android smartphone that can be compared with the Samsung Galaxy S9/S9+/S8/S8+ and Galaxy Note 9 so far. Which mobile phone would you choose?

No matter which Android phone you choose, after got an new Android phone to replace the old Android phone, what you need to do is transferring data from Android to Android. When we change Samsung to Huawei, lots of data contacts are not synchronous. At this time , we may think about how to move data from old Samsung Galaxy to Huawei more easily. In order to transferring data from your old Samsung smartphone to your new HUAWEI phone more easier. Today, we will recommend you a free Huawei Phone Clone app and a useful & powerful Android to Android Transfer tool to migrate contacts, videos, photos, text messages, calendar, music, apps, call logs and more from your Samsung Galaxy S4/S5/S6/S7/S8/S9, Galaxy note 3/note 4/note 5/note 7/Note 8, Galaxy A3/A5/A7/A8/A9, Galaxy J1/J2/J3/J5/J7 to Huawei Mate 20(Pro/S/RS) or Huawei P20/P20 Pro.

Solution 1: Free to Transfer Data from Samsung to Huawei P20/Mate 20 by Phone Clone app

Phone Clone app is a free phone data transfer app developed by HUAWEI company, this app is available FREE from Google Play and Apple Store, so no matter you use Android phone or iPhone before, you can also use this free Phone Clone app to transfer contacts, photos, videos from iOS/Android phone to your new Huawei smartphone under that same Wifi connection. Let’s learn how to transfer data from the Samsung Galaxy smartphone to the Huawei Mate 20 as example with the help of free Phone Clone app.

Step 1. Download and Open PhoneClone
First of all, please free download PhoneClone app to your Samsung phone and Huawei phone from Google Play. Then, you need to choose the following settings:
Samsung Galaxy as the old phone
Huawei Mate 20 as the new phone
So, please open the app on your old phone(Samsung Galaxy)

Phone Clone transfer android to huawei mate 20

Step 2. Connect Both Two Phones by Scanning the QR
Using the old Samsung phone to scanning the QR code for connecting two phones via the same Wifi.

Phone Clone transfer android data to huawei mate 20

Step 3. Begin Transfer Data from Samsung to Huawei Mate 20
Finally, please choose which data you want to from old Samsung to new Huawei phone and click “Send”.

Phone Clone move android data to huawei mate 20

Disadvantage: Phone Clone app is free, but this can take 2-3 hours per data size, this method is very slow, it will cost you a lot of time, because this program needs to transfer data via Wifi.

If you are looking for a fast and efficient phone data transfer tool, please keep read the below method.

Solution 2: Easy&Quick Method to Transfer Data from Samsung to Huawei P20/Mate 20 by Phone Transfer

Phone Transfer and Phone Switch both is an profession Android to Android, Android to iOS, iOS to Android and Android to iOS transfer tool, this two mobile phone transfer tool is highly recommended for phone users as it makes it easily to transfer Everything from Samsung Galaxy S9/S8/S7/S6/Edge/S5/S4/Note to Huawei Ascend/Honor/Mate 20/Mate 10/P20/P10/P9/P8/P7 without loss of quality, including contacts, photos, videos, text messages, music, call logs, documents, applications and other files. What’s more, you can also use the Phone Transfer tool to backup and restore your Android data easily, and deleting data from old Android phone before selling. Let’s show you the simple guide about how to transfer data from Samsung to Huawei Mate 20 Pro as example.

Free download Phone Transfer for Windows or Mac:

d_win d_mac

Key Features of Phone Transfer:

– Transfer Data From iPhone, Android, Windows Phone, Symbian etc. to Anywhere without Any Loss. Support 6000+ devices.
– Works perfectly with Apple, Samsung, HTC, LG, Sony, Google, HUAWEI, Motorola, ZTE, Nokia and more smartphones and tablets.
– Transfer contacts, text messages, photos, videos, music, calendar and other file types between devices directly.
– Backup and restore data from iOS/Android devices.
– Restore backup from Blackberry 7/10, iTunes, iCloud, OneDrive, Kies to your phone.
– Fully compatible with major providers like AT&T, Verizon, Sprint and T-Mobile.
– Erase data from iOS or Android device permanently.
– Fully compatible with iOS 12 and Android 9.0.

Step 1. Install and Run Phone Transfer to PC or Mac
Install and launch the Phone Transfer on your Windows or Mac computer, and then select “Phone to Phone Transfer” function.

android to huawei transfer

Step 2. Connect Samsung and Huawei Mate 20 to PC
Now, connect your Samsung phone and your Huawei Mate 20 to the computer. The devices will be automatically detected within a few seconds. If not detected, re-connect the devices and give it a minute to be detected.

transfer samsung data to huawei mate 20

Tips 1: You can click a ‘Flip’ button on the application above to switch the source device and target device. It means that you can make it easy to transfer data from Samsung to Huawei or transfer from Huawei to Samsung. If you want to transfer data from Samsung to Huawei phone, please make sure the Huawei phone in the right side as target device.

Step 3. Transfer Contacts, SMS, Photos, Videos, Music and more from Samsung to Huawei
Then, please select the types of files you would like to transfer from Samsung to Huawei Mate 20(Pro), the program support transfer contacts, text messages, photos, videos, music, call logs, calendar, App, and App data from Samsung to Huawei and other Android phone, just simply click on “Start Transfer” begin to move data from SamSung to Huawei phone.

samsung to huawei transfer

Note: Please do not disconnect any device until the process has been completed.

Tips 2: Before making the transfer you also have the option to delete the data on the destination phone and clear it. Then you can transfer the new data to the phone. If you would like to delete the data on your destination device, simply check the box that says ‘Clear data before copy’ and then proceed with the data transfer.

d_win d_mac