All posts by DHZ

How to Remove DRM from iTunes Audiobooks on Mac

Summary: Have you ever bought audiobooks from iTunes Store but found it is impossible to play them on Android phone or MP3 players? If you get these case, you are likely to be bypassed by Apple’s FairPlay DRM protection. This guide is going to show you how to remove DRM restriction from iTunes audiobooks on Mac.

I wanna remove the DRM-protected from iTunes audiobooks on Mac, how to do this job without any trouble? I want to sync the audiobooks on my Android phone for reading without limits.

As we know, audiobooks is made with DRM technology, audiobooks purchased from iTunes, Audible or other channels are always restricted to play on specific media players only. Audiobooks purchased from iTunes Store are DRM protected M4B/M4P and it can only be played via iTunes on authorized computers and devices. It means that you can’t transfer audiobooks to other MP3 players for syncing. In order to freely enjoy iTunes DRM-ed audiobooks on as many devices as it should be, you should bypass the DRM restriction from audiobooks. To remove these limitations, you need iTunes audio DRM removal software to remove DRM from iTunes audiobooks and output DRM-free MP3, M4A, etc,. Then the audiobooks files that can be played anywhere.

Bypass DRM from iTunes Audiobooks on Mac

You can make use of iTunes Audio DRM Removal for Mac(iTunes Audio Converter), to remove DRM from iTunes audiobooks on Mac. This software allows you to strip DRM off from iTunes and Audible audiobooks at 16X faster speed. At the same time, converting audiobooks from M4B, AA or AAX to DRM-free formats without quality loss, such as MP3, M4A, AAC, and more. After that, the converted audiobooks are playable on iOS device, Android device, MP3 players and other commonly used media players without limits. In addition, this iTunes Audio Converter enable to to convert iTunes music and Apple music to DRM-free files by removing DRM from it completely, then you can enjoy the converted DRM-free audio freely and conveniently.

d_win d_mac

Main Features of iTunes Audio DRM Removal for Mac:
-Remove DRM from iTunes audiobooks at up to 16X recording speeds.
-Convert M4B/AA/AAX audiobooks to MP3, M4A, AAC, WAV, WMA, etc,.
-ID tags and metadata will be saved to output files.
-Batch conversion allows you to convert entire audiobooks collection.

How to Bypass DRM from iTunes Audiobooks on Mac

Step 1. Install iTunes Audio DRM Removal for Mac
Click the button above the get the trial version of the program. Then, install it on your Mac computer. When you run it, all your iTunes files will be shown automatically on the interface, including audiobooks, music, movies, TV shows, etc,.

run iTunes Audio DRM Removal

Step 2. Select Audiobooks You Want to Remove DRM
Click “Audiobooks” on the left column and you will see all your audiobooks on the right side. Then, click the checkbox before the audiobooks you want to remove DRM from.

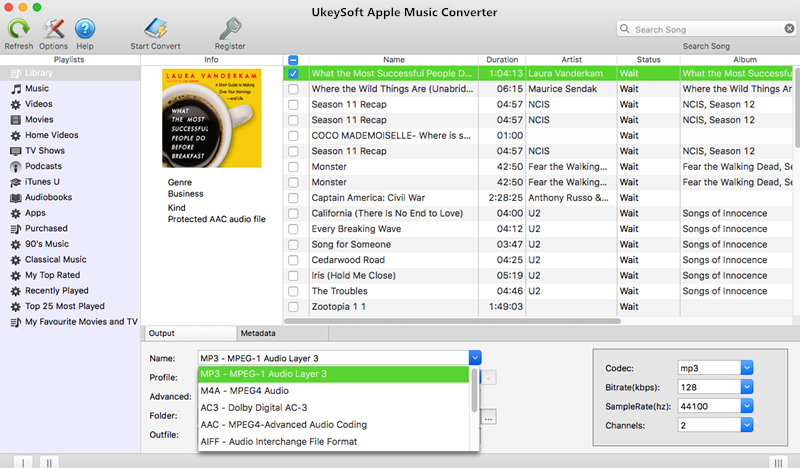
Step 3. Customize Output Settings
In the “Output” section, you can select the output format, customize output file profile, choose an output folder. MP3 and M4A are suggested output format.

adjust output settings

Step 4. Remove DRM from iTunes Audiobooks
Click “Start Convert” to start removing DRM from iTunes audiobooks.

remove DRM from iTunes audiobooks

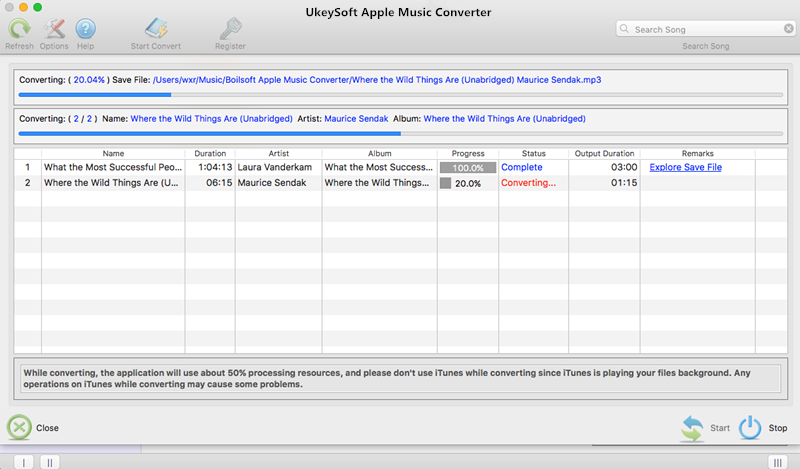
After conversion, you can enjoy iTunes audiobooks on any devices and any audiobooks players without limits.

d_win d_mac

More Audiobooks Conversion Articles:

The Best Way to Remove DRM from iTunes Audiobooks

How to Convert AAX Audiobooks to MP3

How to Convert M4B iTunes Audiobooks to MP3

How to Convert Audiobooks from AAC to MP3

How to Convert iTunes and Amazon Audiobooks to M4A

How to Transfer Audiobooks to iPhone

How to Transfer Audiobooks to Android

Remove DRM from iTunes Audiobooks on Mac

How to Recover Lost Data from Google Pixel 3

[Summary]: Want to recover lost data from Pixel 3/3 XL? Check this article to get the reliable Google Pixel data recovery solution to recover photos, contacts, SMS messages, WhatsApp messages, call logs, documents and more from Pixel 3(XL).

Google may release a family of devices for its third-generation smartphones. Google Pixel 3 is the smartphone pure Android users and camera enthusiasts are looking forward to in 2018 simply because the Pixel 2 and Pixel 2 XL were so good. It may launch in three flavors, with leaks describing the inevitable Google Pixel 3, a screen-refined Google Pixel 3 XL and a cheaper Pixel phone. The three three phones are rumored to launch on October 4, 2018. What we will see in the new Google Pixel models? Smaller bezels, customizable active edge, camera app improvements, a return of the headphone jack, wireless charging, screen improvements, better water resistance and features. Let’s wait for it to be announced later.

Are you a Google Pixel mobile phone user? Do you use your phone to store important data for your personal and business use? If you do, then, perhaps, you have experienced accidentally deleting data from your mobile, something that you find frustrating and difficult to lose. Yes. Many users of mobile phones such as Google Pixel users have enjoyed using their phones and have found it the best storage device for their pictures, text messages, videos, audio files, contact list, WhatsApp messages, and even games. However, data you need for business or for personal communications get lost can be accessible to you anytime and anywhere. Accident always happen without your permits, if you are searching a solvable way to recover lost data from Google Pixel 3 phone, you could take this tutorial for reference.

Recover Lost Data from Google Pixel 3 and Pixel 3 XL

U.Fone Android Data Recovery has the most advanced techniques to restore data on your Android device regardless of any reason of data loss, like accidental deletion, Android OS update, Android root, factory reset restoring, etc,. It comes with advanced feature which allow you to restore lost data from Google Pixel 3/Google Pixel 2/Google Pixel and Google Pixel 3A/3A XL. Restoring photos, videos, contacts, text messages, notes, call logs, WhatsApp messages, document and more types of files with easy steps. Compatible with all Android OS versions and supports all types of devices like Google, LG, Motorola, Lenovo, Samsung, Sony, etc,. More importantly, it allows you preview before recovery and has an easy to use interface. 100% read only program, safe, secure and easy to use.

d_win d_mac
d_win d_mac

Steps To Recover Deleted Data from Google Pixel 3

Step 1.Run Program and Connect Google Pixel Phone
In the first step, please run U.Fone Android Data Recovery on the computer, connect your Google Pixel phone to the computer. It will detect your phone automatically soon. In the home page of program click “Android Data Recovery” option, it will lead you to the next step.

Android ToolKit home page

connect Google Pixel 3 phone

Step 2.Enable USB Debugging on Google Pixel Phone
Now follow the instruction to allow enable the USB debugging mode on your phone. If you have already did it, you will see a pop-up window on the screen, mark “Always” and click “OK“.

allow to detect Google Pixel 3

Step 3.Select Files to Scan
Once finishing enabling USB debugging on the phone, different types of files can be chose to be scan here. If you want to restore all types of data, you can click “Select All” to have all your phone data scanned.

select files to scan

Step 4.Allow to Scan and Analyze Data on Google Pixel Phone
A new screen will appear on your phone to ask you if you allow the program to scan your phone. Tap “Allow” to enable the program to analyze your phone for deleted data.

allow to scan Google Pixel phone

The program will begin to scan the data from Google Pixel phone. The scanning process will take you some time. When the scanning is end, you will see a list of recoverable files, including the gallery, contacts, and other data, you could preview them one by one before recovery.

scan deleted Google Pixel data

Step 5.Recover Lost Data from Google Pixel Phone
In the last step, select the data you want under the files name to restore them to your computer by clicking “Recover“.

recover lost data from Google Pixel 3
d_win d_mac
d_win d_mac

Related Google Pixel Data Recovery Guides:

How to Recover Deleted Data from Google Pixel

How to Recover Deleted Photos on Google Pixel

How to Transfer iPhone Data to Google Pixel

How to Transfer Samsung Data to Google Pixel

How to Transfer Android File to Google Pixel

How to Backup and Restore Google Pixel

How to Manage Google Pixel on Computer

Recover Lost Data from Google Pixel 3

Android Data Recovery

Recover Your Lost Data from Android
Now, Even Device Broken

Compatible with Android 8.0 Oreo/7.0, etc.

Recover Lost Data Now

How to Sync iTunes Audiobooks to Android

I downloaded some audiobooks in iTunes library, is there any way to sync the audiobooks to my Android phone so that I can listen to the audiobooks without limits.

Reading audiobooks is one of the most interesting and exciting experiences. Audiobooks brings great convenience to who can’t read or who enjoy learning something through listening. Audiobooks is a new mode to read for people instead of traditional books. With audiobooks, you don’t need to carry books. Besides, you can listen to audibooks in anywhere at anytime. People may choose different tools to listen to the audiobooks under different situations. For example, you may listen to the audiobooks with your Android phone when you are in the bus or subway.

Audiobooks from iTunes store are in M4P or M4B format that is limited to play on Apple devices. Unfortunately, Android devices are incompatible with M4P and M4B files but unprotected MP3 files. It seems difficult to transfer audiobooks from iTunes to Android device since Apple has a special DRM that makes it impossible to do the transferring manually. So is there any ways to solve this problem? Absolutely. All you need is turning to powerful audiobooks converter app for help. In the follow passages, we are going to share with you this amazing app that enable you to perform the transferring iTunes audiobooks to Android, after converting iTunes audiosbooks to MP3 file by removing DRM restriction.

Remove DRM from Audiobooks for Android

To remove DRM protection from audiobooks and play purchased or authorized audiobooks on Android device, Audiobooks Converter(iTunes Audio Converter) is the must-have app. This program is well known for its up to 16X converting speed and multiple output formats including MP3, M4A, AAC, WAV, WMA, etc, – find the one that suits best. After the conversion, you could sync the converted iTunes audiobooks to Android for playing as the common audio files. What’s more, this program can help to convert iTunes music and Apple music to DRM-free files by removing DRM from it completely, then you can enjoy the DRM-protected audio without limits.

d_win d_mac

How to Sync iTunes Audiobooks to Android

Step 1. Run Software on the Computer
Download and run the Audiobooks Converter on the computer. At the same time, iTunes will run automatically. All your iTunes files will be shown automatically on the interface, including audiobooks, music, movies, TV show, etc,. Click “Audiobooks” option and you will see all your audiobooks downloaded in iTunes will be list.

run iTunes Audio Converter

Step 2. Select Audiobooks for Conversion
Audiobook Converter grabs all audiobooks in your iTunes folder and shows them in the interface, select the audiobooks you want to remove DRM from. In the output settings, you could set the output format, customize output file profile, choose output folder, etc,. For syncing the audiobooks to Android, you could select “MP3” output format.

adjust output settings

Step 3. Convert Audiobooks to MP3 by Removing DRM Restriction
Click “Start Convert ” button to begin the audiobooks conversion. When the process is end, you will get DRM-free MP3 audiobooks.

remove DRM from audiobooks

d_win d_mac

Step 4. Transfer Audiobooks to Android
Finally, you should transfer the converted audiobooks to Android via a USB cable or Android Transfer. When this completes, you can read your favorite audiobooks with Android without limits.

android transfer main page

Free Download Android Transfer:

d_win d_mac

More Audiobooks Conversion Articles:

The Best Way to Remove DRM from iTunes Audiobooks

How to Convert AAX Audiobooks to MP3

How to Convert M4B iTunes Audiobooks to MP3

How to Convert Audiobooks from AAC to MP3

How to Convert iTunes and Amazon Audiobooks to M4A

How to Transfer Audiobooks to iPhone

Download iTunes Audiobooks to Android

How to Recover Deleted Data from Nokia 8 Sirocco

I got new Nokia smartphone, which excited me a lot. However something hapless happened last night. I delete some photos in the gallery on the phone carelessly. That really made me feel depressed. I heard that some professional data recovery software can help to restore the lost data. Is it true? Which one is better? Please send me your idea. Thanks a lot.

Nokia Company released a lot of new smartphone models, the outstanding one is Nokia 8 Sirocco, according to the report it is one of the best Android phones in 2018. The Nokia 8 Sirocco has a beautiful design and incredibly tough build-quality. It is crafted from a single stainless steel block and coated entirely in curved glass. It’s also incredibly slim at 7.5mm. It has a beautiful 1,440 x 2,560p P-OLED display that cascades over the side of the device like a Samsung Galaxy S9. In terms of performance, you’re basically looking at a Snapdragon 835 with 6GB of RAM in the Sirocco. That means that you should see significantly greater performance in gaming and multitasking on the Sirocco.

Accidentally deleted data from your Nokia 8 Sirocco? Mistakenly deleted precious photos and videos? What’s worse, haven’t backup? In daily life, Android users are troubled with data loss on their smartphone for many reasons such as accidental deletion, formatting, virus attacks, phone corruption and other accidents cases that can cause files to be lost. When encountering such a problem, people need to find a reliable Android file recovery solution to rescue their data. Here we want to notice you, stop using phone after the accidental deletion. It’s great. If you insist on using the phone, the deleted files will be overwritten by the new data, which makes recovery more difficult, even impossible. What software can help? U.Fone Android Data Recovery does.

Recover Deleted Data from Nokia 8 Sirocco

To guarantee a successful data recovery, you need this powerful and easy-to-use Android ToolKitU.Fone Android Data Recovery program. Being capable of deep scanning and recover deleted files from Android under any data loss circumstances. The program works extremely well for recover deleted data from Nokia 8 Sirocco. Contacts, text messages, gallery, videos, call logs, WhatsApp messages, documents and more types of Android files are recoverable. More importantly, Android ToolKit is an all-in-one Android data manager tool, help to solve all your Android problems without data loss. Compatible with almost all Android brands, up to 6000 Android models.

d_win d_mac

How to Recover Deleted Data from Nokia 8 Sirocco

Step 1.Run Program and Connect Nokia Phone
To start with, please run Android ToolKit – U.Fone Android Data Recovery on the computer, connect your Nokia phone to the computer. It will detect your phone automatically quickly. Click “Android Data Recovery” option in the home page, it will lead you to the next step.

Android ToolKit home page

connect Nokia phone

Step 2.Enable USB Debugging on Nokia Phone
Follow the instruction to unlock your phone. If you have already allowed the USB debugging mode, you will see a pop-up window on the screen, mark “Always” allow from this computer and click “OK“.

allow to detect Nokia phone

Step 3.Select Files to Recover
Once finishing enabling USB debugging on Nokia phone, different types of files can be chose to be scan here. If you want to restore all types of data, you can click”Select all” to have all your phone data scanned.

select files to scan

Step 4.Allow to Scan and Analyze Data on Nokia
In this step, a new screen will appear on your phone to ask you if you allow the program to scan your phone. Tap “Allow” to enable the program to analyze your phone for deleted data.

allow to scan Nokia phone

Step 5.Scan the Deleted Data of Nokia
The program will begin to scan the data from Nokia phone. The scanning process will take you some time. When the scanning is end, you will see a list of recoverable files, including the gallery, contacts, and other data, you could preview them one by one before recovery.

scan deleted Nokia data

Step 6.Recover Deleted Data from Nokia
Finally, select the data you want under the files name to restore them to your computer by clicking “Recover“.

recover deleted data from Nokia

d_win d_mac

Related Nokia Data Recovery Articles:

How to Recover Deleted Data from Nokia

How to Recover Deleted Photos from Nokia

How to Recover Deleted Contacts from Nokia

How to Transfer iTunes Music to Nokia

How to Transfer iTunes Videos to Nokia

How to Manage Android on Computer

Recover Deleted Data from Nokia 8 Sirocco

Android Data Recovery

Recover Your Lost Data from Android
Now, Even Device Broken

Compatible with Android 8.0 Oreo/7.0, etc.

Recover Lost Data Now

How to Recover Deleted Files from Samsung Galaxy X

Rumor of Samsung Galaxy X
The closest thing we actually got to a foldable phone from Samsung in 2013 was the Samsung Galaxy Round. This was far from the prototypes and concepts we’d seen, but as the world’s first curved screen smartphone it was a big step in the right direction. That was followed up by the Samsung Galaxy Note Edge, which curved in a now more familiar direction, one which Samsung has since fully embraced with the likes of the Samsung Galaxy S7 Edge and other phones with curved edges. We’ve been hearing rumblings for years that an amazing smartphone from Samsung was just around the corner. And now it doesn’t seem like 2018 is going to be the year, the Samsung Galaxy X will likely come out in 2018 and that it will fall under the Note brand.

There are many Samsung smartphone users have the terrible experience of deleting some important files such as text messages, family photos, contacts, or other kinds of files accidentally from their Samsung Galaxy phone. This unexpected disaster always make people frustrated. But now you can stop feeling despressed if you are one of them. We would like to tell you the good news that the deleted files can be recovered from the phones by professional Android data recovery tool. And in this page we will guide you how to recover deleted files from Samsung Galaxy X with step-by-step guide. Read this article and then you will get the perfect solution.

If you accidentally deleted some files of some data you want, then you may want to try any ways to restore it, an efficient Android data recovery tool is the best solution for you to make this true, since we couldn’t do this manually. But why the deleted files can be recovered from Samsung Galaxy phone? Here you should remember that the deleted files can be recovered only before being overwritten by new data. When the deleted data haven’t be overwritten by new data, it still be save in your phone internal memory but it become invisible.

Restore Deleted Files from Samsung Galaxy X

Android ToolKitU.Fone Android Data Recovery is a reliable data recovery tool for Android devices. It supports almost all Android phones and tablets from Samsung, LG, HTC, Motorola, Sony, Google, Huawei, Lenovo, etc,. You can use it to recover deleted files from Samsung Galaxy X whenever you need. Deleted contacts, text messages, photos, videos, WhatsApp messages, documents and all Android files are recoverable. It support to recover deleted Android data under any data loss cases, like accidental deletion, Android system update, Android system rooting, factory reset restoring, and so on. To sum up, Android ToolKit is a famous data manager tool for Android device, features with Android data recovery, Android data backup & restore, broken Android data extraction.

d_win d_mac

How to Recover Deleted Data from Samsung Galaxy X

Step 1.Run Program and Connect Samsung Phone
To begin with, please run Android ToolKit – U.Fone Android Data Recovery on the computer, connect your Samsung phone to the computer. It will detect your phone automatically quickly. Click “Android Data Recovery” option in the home page, it will lead you to the next step.

Android ToolKit home page

connect Samsung phone

Step 2.Enable USB Debugging on Samsung Phone
Unlock your phone, go to Settings > Developer options > Allow USB debugging mode. If you have already allowed the USB debugging mode, you will see a pop-up window on the screen, mark “Always” allow from this computer and click “OK“.

allow to detect Samsung phone

Step 3.Select Files to Restore
Once finishing enabling USB debugging, connect your Samsung phone to the computer via a USB cable, different types of files can be chose to be scan here. If you want to restore all types of Samsung data, you can click”Select all” to have all your phone data scanned.

select files to scan

Step 4.Allow to Scan and Analyze Data on Samsung
A new screen will appear on your phone to ask you if you allow the program to scan your phone. Tap “Allow” to enable the program to analyze your phone for deleted data.

allow to scan Samsung phone

Step 5.Scan Samsung for Deleted Data
The program will begin to scan the data from Samsung phone. The scanning process will take you some time. When the scanning is end, you will see a list of recoverable files, including the gallery, contacts, and other data, preview them one by one before recovery.

scan deleted Samsung data

Step 6.Recover Deleted Data from Samsung Galaxy X
Select the data you want under the files name to restore them to your computer by clicking “Recover“.

recover deleted data from Samsung Galaxy X

d_win d_mac

Related Samsung Data Recovery Articles:

How to Recover Deleted Photo Files from Samsung Galaxy

How to Recover Data from Broken Samsung Galaxy

How to Transfer Data from iPhone to Samsung Galaxy

How to Manage Samsung Galaxy Phone on PC/Mac

How to Play Apple Music on Samsung Galaxy without Limits

Recover Deleted Data from Samsung Galaxy X

Android Data Recovery

Recover Your Lost Data from Android
Now, Even Device Broken

Compatible with Android 8.0 Oreo/7.0, etc.

Recover Lost Data Now

How to Sync iTunes Audiobooks to iPhone

I downloaded some audiobooks in iTunes, I try to transfer the iTunes audiobooks to my iPhone with iTunes, but then the audiobooks haven’t shown on the device. How to sync the iTunes audiobooks to iPhone without iTunes?

In this fast-speed society, it is barely impossible for people to sit down quietly and read a books, especially for the office men. However, in these years there is a new kind of books appear and become popular among young people and the old one, that is audiobooks. Listening to audiobooks can be a good choice, it is convenient for reading in anywhere. For example, reading iTunes audioboks on a quiet corner, walking alone on the street, or taking bus, having a rip in somewhere, even sleeping on deep night.

Actually, there are so many iOS users all around us, so many people would like to listen to audiobooks on iTunes. More people like to listen to iTunes audiobooks via iPhone. What if you have some interesting audiobooks saved in iTunes and want to get them transferred to your iPhone? Since iTunes audiobooks are DRM restriction, it means that you can’t play the incompatible audiobooks on iPhone directly. Here is the problem: How to sync iTunes audiobooks to iPhone for playing. This article will share an easy way with you, to sync iTunes audiobooks to iPhone without iTunes, help you to listen to audiobooks with iPhone successfully. To sync iTunes audiobooks to iPhone without iTunes, you need a special audiobooks DRM removal.

Remove DRM from Audiobooks and Sync to iPhone

Here iTunes Audio Converter(also named iTunes audio DRM removal) will help you to remove the DRM of iTunes audiobooks, convert the DRM-protected M4B, AA, AAX audiobooks to DRM-free MP3, M4A, AAC, WAV, WMA, etc,. Then you can transfer the converted iTunes audiobooks to iPhone. What’s more, you can or playing the converted audiobooks on common MP3 players or other storage devices; transfer it to USB drive; burn it to CD; etc,. Then conversion will be done at 16x fast speed without audio quality loss. Furthermore, this iTunes audio converter tool enable you to convert DRM-protected Apple Music or iTunes Music to DRM-free format, by removing DRM from it completely.

d_win d_mac

Part 1: How to Sync Audiobooks to iPhone with iTunes

Step 1. Download audiobooks to iTunes and then connect your iPhone to the computer via a USB nable.

Step 2. Open the iTunes on the computer and then tap on the “iPhone” icon on the top.

Step 3. In the below menu, choose “Audiobooks” tab and then click on “Sync Audiobooks” option.

Step 4. Select the audiobooks you have downloaded for sync just now.

Step 5. Finally, tap on “Apply” button to start the file transferring process.

sync audiobook from itunes to iphone

Well, it seems only take 5 easy steps, you can easily transfer audiobooks to iPhone with iTunes. But you could meet this or that kind of problems, such as: audiobooks are not shown on iPhone after syncing with iTunes, fail to sync audiobooks to iPhone, or lost all the music and ringtones after syncing. In these case, you need to get some help of iTunes Audio Converter.

Part 2: How to Sync Audiobooks to iPhone without iTunes

This method will help you finish the iTunes audiobooks transfer between iTunes and iPhone without iTunes. After the conversion, you will get DRM-free audiobooks in your device as the common audio files for playing without limits.

Step 1. Run iTunes Audio Converter on the Computer
First of all, run iTunes Audio Converter on the Mac/Windows. At the same time, iTunes will run automatically. All your iTunes files will be shown automatically on the interface, including music, movies, TV show, audiobooks, etc,. Click “Audiobooks” on the left column and you will see it will list all your Audiobooks.

run iTunes Audio Converter

Step 2. Choose Audiobook to Remove DRM from
Choose the audiobooks you want to remove DRM from. Select the output format, customize output file profile, choose output folder. For syncing the audiobooks in iPhone, you could select “MP3” format.

adjust output settings

Step 3. Convert Audiobooks to MP3 by Removing DRM
Click “Start Convert” to begin converting audiobooks to MP3 by removing DRM from it. It will only take you some minutes to finish the conversion. When it is completes, you will get the DRM-free audiobooks.

remove DRM from audiobooks

d_win d_mac

Step 4. Transfer Audiobooks to iPhone
In the last step, you should transfer the converted DRM-free MP3 audiobooks from the computer to iPhone via a USB cable or using iOS ToolKitiOS Transfer.

d_win d_mac

ios transfer main page

Done. Now you have synced all the selected iTunes audiobooks to your iPhone. You could listen to the audiobooks in iPhone without any limits.

Know more about iOS ToolKit – iOS Transfer:
It is an excellent iOS manager tool for transferring & managing files for all iOS devices. The transferable types of files including music, videos, photos, contacts, SMS and playlist, etc,. It support to transfer files between iOS device and the computer, iOS device and iTunes, iOS device and iOS/Android device.

More Audiobooks Conversion Articles:

The Best Way to Remove DRM from iTunes Audiobooks

How to Convert AAX Audiobooks to MP3

How to Convert M4B iTunes Audiobooks to MP3

How to Convert Audiobooks from AAC to MP3

How to Convert iTunes and Amazon Audiobooks to M4A

How to iTunes Audiobooks in USB Drive

Download iTunes Audiobooks to iPhone

How to Recover Deleted Data from OPPO Find X

Summary: With the excellent camera technology, OPPO smartphones are popular with mobile users. But accidents often happen. Many reasons may cause data lost, such as accidental deletion, device broken, restore factory settings, and more. This post is aiming to show you the best solution to recover deleted data from OPPO Find X.

OPPO Find X was launched just a few weeks ago and India is expected to be amongst the first lot of countries to get it. The Find X has a beautiful glass body with a motorized camera module. The front has a 6.4-inch curved Amoled display (without a notch) giving it a screento-body ratio of 93%. Inside is a Qualcomm Snapdragon 845 processor, 8GB RAM, 128/256GB storage and a 3,730mAh battery. The motorized camera module hides a 16MP + 20MP dual rear camera and a 25MP front camera. It also has a 3D face scanning face ID feature (with infrared emitters, similar to the iPhone X) and VOOC fast charge support. Other features include dual SIM slots, USB Type-C port and Android 8.1.

Smartphones play an more and more important role in the daily life. Oppo company have recently launched some hot models like R9s, A39, F1s, R7s and it’s really hitting the Android market with a good impression. July is turning out to be one of the most interesting months for smartphone launches. We’re going to see a lot of new Android smartphones models are going to announce, OPPO Find X is the most interesting ones. But recently, most Oppo users are complaining about malfunctions occurring on their phones. Basically, miscellaneous data such as contacts, messages, recently taken pictures, etc. are missing for different causes. In the follow passages, we will take OPPO Find X as an example, to explain how to recover deleted data from OPPO phone.

Recover Deleted Files from OPPO Find X

U.Fone Android Data Recovery software is here to get you out of trouble. It is current one of the most powerful Android data recovery programs to recover deleted files from Android smartphones and tablets, help to recover deleted data from OPPO Find X. The recoverable types of Android data including contacts, text messages, gallery, videos, WhatsApp messages, call logs, apps data, etc,. It can be used to recover Android data under any data loss circumstances. It works perfectly with Oppo, Samsung, HTC, LG, Sony, Google, Huawei, Motorola, ZTE, and almost all Android mobile models. Additionally, it enable you to view all deleted data in detail before recovery, and it can selective and flexibly backup and restore Android data, extract data from broken Android device.

d_win d_mac

How to Restore Deleted Data from OPPO Find X

Step 1.Run Program and Connect Oppo Phone
To get started with, please run U.Fone Android Data Recovery on the computer, click “Android Data Recovery” function. Connect your Oppo phone to the computer. It will detect your phone automatically soon.

Android ToolKit home page

connect Oppo phone

Step 2.Enable USB Debugging on Oppo Phone
Unlock your phone, go to Settings > Developer options > Allow USB debugging mode.If you have already allowed the USB debugging mode,you will see a pop-up window on the screen,mark “Always” allow from this computer and click “OK“.

allow to detect Oppo phone

Step 3.Select Files to Restore from Oppo
After enabling USB debugging, connect your oppo phone to the computer via USB cable, you’ll see this window, different types of files can be chose to be scan here. If you want to restore all types of Oppo data, you can tick “Select all” to have all your Oppo data scanned.

select files to scan

Step 4.Allow to Scan and Analyze Data on Oppo
You’ll get a window as follow on your device after your device is detected by the program. Tap “Allow” to enable the program to scan your phone for deleted data.

allow to scan Oppo phone

Step 5.Scan Oppo for Deleted Data
Now the program will begin to scan the data from Oppo phone. The scanning process will take you some time. When the scanning is done, you will see a list of deleted files, including the gallery, contacts, and other data, preview them one by one before recovery.

scan deleted Oppo data

Step 6.Recover Deleted Data from Oppo Find X
Mark those data you want under the files name to restore them to your computer by clicking “Recover“.

recover deleted data from Oppo

d_win d_mac

Related Oppo Data Recovery Tips:

How to Recover Deleted Data from Oppo Android Phone

How to Recover Deleted Photos from Oppo Android Phone

How to Recover Deleted Contacts from Oppo Android Phone

How to Root Android on Computer with One Click

How to Manage Android on the Computer

Recover Deleted Data from OPPO Find X

Android Data Recovery

Recover Your Lost Data from Android
Now, Even Device Broken

Compatible with Android 8.0 Oreo/7.0, etc.

Recover Lost Data Now

How to Keep Audiobooks in USB Drive

Summery: A little research determined that this is not an uncommon problem for people who play audiobooks from USB. So how to save audiobooks in USB drive for playing ? What to do? This article will share a perfect way with you, to keep audiobooks in USB drive.

It is the best experience to listen to audiobooks. On the one hand, it replaces the traditional print book in a way to broaden the way of reading. On the other hand, it is different from the musical forms to expand the way of listening on devices. We can image that what is the feeling of listening to literary works, a book of poetry, cross talk and sketch on your spare time, for example when you do housework, when you take a bath, or before your sleep in bed. It’s not a difficult thing to imagine that it is amazing in our life while listening to audiobooks.

Normally people listen to audiobooks on e-reader hardware like tablets or smartphones. Audiobooks will keep the chapter you read last time and play automatically next time when you listen to it on these devices. But people who use devices that aren’t so smart for example, radios or car stereos that take USB drives, or loading MP3 players. It will be jumbled when you play audiobooks in these incompatible devices. The reason has to do with the FAT file system type that thumb drives often use.

Why we can’t Transfer Audiobooks to USB Drive Directly
And different from music streaming service, you own this audiobook purchased and downloaded from iTunes or Audible even if you cancel the subscription. But it doesn’t mean that you can enjoy these audiobooks on any of your devices freely. As all of audiobooks are encrypted by DRM copy protection, in which case you are not allowed to enjoy the audiobooks on many devices as you prefer, including transfer to USB drive. So here comes the question: is it impossible to transfer DRM-ed audiobooks to USB drive for listening? Of course not, what you need is an audiobooks DRM removal.

Audiobooks DRM Removal – Remove DRM from Audiobooks

To save audiobooks to USB drive, the most important thing you need is a powerful audiobooks DRM removal tool. Audiobooks Converter(also called Apple Music Converter) is highly recommended for you, to bypassing DRM protection from audiobooks as well as converting audiobookes to MP3/M4A/FLAC or more DRM-free formats. More importantly, it can keep 100% original quality during converting process while the converting speed is surprisingly faster than any other tools in the market. In addition, it can convert Apple Music and iTunes M4P music files to DRM-free files. After the conversion, you could transfer and keep the converted audiobooks in USB drive for playing without limits; playing the converted audiobooks on common MP3 players or other storage devices; or burn it to CD.

d_win d_mac

Highlights for Audiobooks Converter:
-Remove DRM protection from iTunes & Audible audiobooks;
-Convert iTunes & Audible audiobooks to AAC, MP3, M4A, WAV, WMA, etc,;
-Convert audiobooks at fast speed with lossless quality;
-Convert iTunes music or Apple Music files to MP3, M4A or other DRM-free formats;
-Perfectly support the latest version of iTunes;
-Provide prompt technical support and excellent customer service.

Part 1: How to Convert Audiobooks to MP3

Step 1. Run Audiobooks Converter
Firstly run Audiobooks Converter on the Mac/Windows. After running the software on the computer, iTunes will run automatically at the same time. All your iTunes files will be shown automatically on the interface, including music, movies, TV show, audiobooks, etc,. Click “Audiobooks” on the left column and you will see it will list all your Audiobooks.

add audiobooks to Audiobooks Converter

Step 2. Select Audiobook to Remove DRM from
Select the audiobooks you want to remove DRM from. Select the output format, customize output file profile, choose output folder. For keeping the audiobooks in USB drive, you could select “MP3” format.

adjust output settings

Step 3. Convert Audiobooks to MP3 by Removing DRM
Simply click “Start Convert” to begin converting audiobooks to MP3 by removing DRM from it. It only takes some minutes to finish the conversion. When it is done, you will get the DRM-free audiobooks.

remove DRM from audiobooks

d_win d_mac

Part 2: Transfer the Converted Audiobooks to USB Drive

Step 1. Insert the USB drive into a USB port on your computer.
Step 2. Open the output folder and select the converted audiobooks you want to transfer.
Step 3. Right-click on your selection, select “Send to” and then click your USB drive.
Step 4. Wait for the files to copy.

Finished. Now all the selected audibooks have been save in USB drive.

More Audiobooks Conversion Articles:

The Best Way to Remove DRM from iTunes Audiobooks

How to Convert AAX Audiobooks to MP3

How to Convert M4B iTunes Audiobooks to MP3

How to Convert Audiobooks from AAC to MP3

How to Convert iTunes and Amazon Audiobooks to M4A

How to Keep Apple Music in USB Drive

Copy Audiobooks to USB Drive

How to Burn iTunes Audiobooks to CD

I just purchased and downloaded some audiobooks from iTunes store and I would like to burn it to a CD for playing in my car. But I couldn’t do this due to DRM restriction. How to make this happen without hassle?

Nowadays, more and more people prefer to listen to audiobooks than watching movies in order to relax their eyes. There are two kinds of audiobooks, insist of iTunes audiobooks and Amazon audiobooks. However both of these audiobooks are DRM protected, you are not able to move it to non-Apple devices for enjoying, which restrict you reading audiobooks in anywhere at anytime. It is not possible to burn audiobooks to CD since audiobooks is DRM restriction. That is really inconvenient and frustrating. In this post, we will show you a practical solution to burn iTunes audiobooks to CD simply, so that you can listen to audiobooks via a CD.

Why we Need to Burn iTunes Audiobooks to CD
Normally, people download iTunes audiobooks from iTunes store, iTunes store provides with number of audiobooks with M4B or M4A format. These audiobooks can be downloaded and transferred to iPod, iPhone or iPad for listening to. CD is one of the common media for entertainment in these days. Nowadays CD is gradually being replaced by other popular digital storage such as hard drive, but CD remain one of the most important ways to enjoy music. If you want to listen to the audibooks more freely, you could burn iTunes audiobooks to CD, then you can play the CD in card or any CD player, for offline listening to the converted audiobooks without DRM restriction.

What you Need to Ready to Burn iTunes Audiobooks to CD:
A:A computer: A computer provides you with a disc drive that can burn discs.
B:A blank CD: You can choose a CD-RW or CD+RW disc which can be written to multiple times.
C:Disc-burning software: You can burn a CD of audiobooks via iTunes. If you want a more professional program, you can try Any Video Converter tools, here we suggest you use DVD Creator + Blu-ray Creator, it an excellent DVD maker.

Remove DRM from iTunes Audiobooks for Burning to CD

Here we mainly introduces a useful DRM audiobook converter to you, called Apple Music ConverterAudiobooks Converter, which will help you remove DRM from iTunes audiobooks, convert audiobooks to MP3/M4A/FLAC or more DRM-free formats. After this, you can burn the converted audiobooks to CD, or playing the converted audiobooks on common MP3 players or other storage devices. The conversion will be completed at a fast speed with lossless quality. What’s more, this Apple Music Converter can convert Apple Music to DRM-free files by removing DRM from it.

d_win d_mac

Key Features of Audiobooks Converter:
-Remove the DRM restriction from iTunes & Audible audiobooks;
-Convert multiple DRM-locked audiobooks to to 9 common formats, such us MP3, M4A, AAC, WAV, WMA, etc,;
-Convert audiobooks at 16X speed without audio quality loss;
-Provides customized output settings: the output profile, bitrate, Sample Rate and filename format.

Part 1: How to Remove DRM from iTunes Audiobooks

Step 1. Download and Install Audiobooks Converter
To start with, download and install Apple Music Converter – Audiobooks Converter on the Mac/Windows.

d_win d_mac

After running Audiobooks Converter on the computer, all your iTunes files will be shown automatically on the interface, including music, movies, TV show, audiobooks, etc,. Click “Audiobooks” on the left column and you will see all your Audiobooks on the right side.

add audiobooks to Audiobooks Converter

Step 2. Select Audiobook to Remove DRM from
Click the checkbox before the Audiobook you want to remove DRM from. Before starting conversion, you can select the output format, customize output file profile, choose output folder. For burning the audiobooks to CD, you should select “MP3” format.

adjust output settings

Step 3. Start to Remove DRM from Audiobooks
Click “Start Convert” on the top to start removing DRM from audiobooks. It only takes some minutes to remove DRM from audiobooks. After the Conversion, you will get the DRM-free audiobooks, you can enjoy these converted DRM-free audiobooks anywhere on any devices, or burn it to CD as you like.

remove DRM from audiobooks

d_win d_mac

Part 2: How to Burn DRM-Free Audiobooks to CD

After conversion, the next step is burn the converted iTunes audiobooks to a CD. iTunes is the primary tool recommended to burn your audiobooks to CD. Before burning audiobooks to CD, make sure you have installed the latest iTunes on the computer.

Step 1. Import Converted Audiobooks Files to iTunes
In iTunes, choose File>New>Playlist to create a new playlist and type a name for the playlist, then drag & drop the files into the newly created playlist.

add a playlist

Step 2. Burn iTunes Audiobooks to A CD
Insert a blank CD disc, waiting until the disc is recognized. After that right click the playlist and select “Burn Playlist to Disc“, then adjust the burning setting, and click “Burn” .

burn audiobooks to cd

Done. Now you have burn all the converted audiobooks to CD, have fun.

Tips: Except iTunes audiobooks, you can convert Apple Music files and iTunes M4P music to MP3 or other DRM-free formats with this Apple Music Converter and burn them to a CD. Know more: How to Burn Apple Music to CD

More Audiobooks Conversion Articles:

The Best Way to Remove DRM from iTunes Audiobooks

How to Convert AAX Audiobooks to MP3

How to Convert M4B iTunes Audiobooks to MP3

How to Convert Audiobooks from AAC to MP3

How to Convert iTunes and Amazon Audiobooks to M4A

How to Remove DRM from Apple Music Completely

Burn iTunes Audiobooks to CD

The Best Way to Remove DRM from iTunes Audiobooks

Summary: iTunes is arguably the largest provider of audiobooks in the world. This post is going to introduce the top audiobooks DRM removal software to help you remove DRM from iTunes M4B audiobooks with ease, so that you can enjoy the audiobooks on any devices without restriction.

As we know, iTunes audiobooks is DRM-protected. What is DRM protection? Digital Rights Management, is now a common feature of all audiobooks you downloaded from iTunes and Amazon. With the copyright restriction, you are deeply trapped in a frustrating situation where you can’t control the use of those audiobooks as freely as you expect. Audiobooks purchased on iTunes have a .m4b extension (a variation on MP4) and contain AAC audio covered by Apple’s FairPlay Digital Rights Management to prevent from unauthorized copying and enjoying.

Why need to Remove DRM from iTunes Audiobooks
Since iTunes Audible books are protected by DRM and it can only be played on some devices and players. In order to enjoy the audiobooks on more platforms, it’s necessary to get rid of the DRM and convert the iTunes Audible audiobooks to a more widely used audio format, like MP3, M4A, etc,. You may have been wondering whether there’s a way to remove DRM from iTunes M4B audiobooks so that you can enjoy the audiobooks on any devices without restriction. Fortunately, the answer is yes. Currently there are lost of iTunes audiobook DRM removal tools to help you remove DRM from iTunes M4B audiobooks completely.

Audiobooks Converter – Remove DRM from iTunes Audiobooks

The powerful tool we are talking about here is Apple Music ConverterAudiobooks Converter. Unlike the traditional DRM audiobook converter, it’s adopted with the smart feature to converting the iTunes M4B audiobooks to M4A/MP3/FLAC or more DRM-free formats by removing DRM from iTunes M4B audiobooks. You won’t be asked to authorize the iTunes audiobooks account before conversion. It allows you to choose keeping the its original quality including codec, channel, bit rate, and ID tags, etc. for the converted audiobooks. The converting speed is surprisingly faster than any other tools in the market. Furthermore, this smart converter is also capable of bypassing DRM from iTunes M4P audio and Apple Music M4P songs.

d_win d_mac

How to Remove DRM from iTunes M4B Audiobooks

Step 1.Add iTunes Audiobooks to Audiobooks Converter

add audiobooks to Audiobooks Converter

After launching Audiobooks Converter. iTunes Audiobooks library will be shown in the main interface of software at the same time, it will automatically load all the purchased iTunes M4B audiobooks. You can add the audiobooks by either dragging the files or clicking “Add to Library” under “File” icon in the home page of program. You could convert multiple audiobooks at once.

Step 2. Adjust Output Settings

adjust output settings

Once the iTunes audiobooks are loaded successfully to the conversion window, you can click “Output” under “Options” to choose the output audio formats as you want. Currently it supports various audio formats, such as, M4A, MP3, FLAC and more. Besides, you can freely adjust the parameters, like codec, channel, bit rate, etc. according to your needs.

Step 3. Remove DRM from iTunes Audiobooks

remove DRM from audiobooks

When everything is ready, you can begin to remove DRM from the iTunes audiobooks by clicking “Convert” button at the bottom of the conversion window. Then you will get DRM-free audiobooks, so that you can transfer the audiobooks to more devices for playing without limits.

d_win d_mac

More Audiobooks Conversion Articles:

How to Convert AAX Audiobooks to MP3

How to Convert M4B iTunes Audiobooks to MP3

How to Convert Audiobooks from AAC to MP3

How to Convert iTunes and Amazon Audiobooks to M4A

How to Play Apple Music on MP3 Player

How to Remove DRM from Apple Music Completely

Remove DRM from iTunes M4B Audiobooks