[Summary]Want to listen to Apple Music on your Samsung Galaxy phone without Apple Music app even cancel the subscription service?You can free download Apple Music converter to remove DRM from Apple music and transfer them to Samsung S8/S7/S6/Note 8,etc.for playing offline.
If you have moved from an iPhone or iPad to an Android phone like Samsung Galaxy S9/S8, Note 8/Note 9, or other devices include LG G7, Huawei P11/20, Google Pixel 2, Moto G6, Nokia 8, Xiaomi MIX 2S, vivo APEX and OPPO R11s,etc.Do you want to transfer your favourite music from an iPhone or iPad to an Android phone or tablet, you can use an iPhone to Android Transfer to transfer all data including music, photos, videos, contacts and text messages from iPhone to your Samsung phone.If you have purchased lots of Apple Music songs on iTunes,how you can transfer Apple Music from iTunes to Samsung phone?You might need a professional Apple Music Converter to remove the DRM from Apple Music and convert them to MP3.
With the development of modern technology, the music-capable portable devices like smartphones, laptops, and media players allow people to carry around thousands of songs in just one small device, which make our life more wonderful. There is no doubt that music has become the most important things in our daily life. However, you may encounter a problem that you can not transfer Apple Music or play them on Android devices, include Samsung phone.Because of the M4P format, Apple Music is protected by Apple’s Fairplay DRM. You cannot transfer or use them in an unauthorized device or tablets right now.
Thanks to Apple Music Converter, which can convert Apple Music M4P files to MP3 for Samsung phone or tablet without needing to launch the Apple Music app. You can remove DRM protection from the Apple Music M4P songs and convert them to MP3, M4A, AC3, AAC, FLAC, WAV, etc.In addition, the Apple Music Converter toolkit also allows you to own a collection of old Apple Music M4P songs permanently because of DRM-free MP3.It guarantee converts Apple Music M4P to MP3 at 16X speed with lossless and keep 100% original quality.Now, you can add any track you like to iTunes library and then Apple Music Converter will convert them to DRM-free MP3.After that,you can transfer the converted Apple Music to Samsung phone,as well as offline playback DRM-free MP3 on any media device if you want.
Before heading to the methods of transferring Apple Music to Samsung phone, you need to download the Apple Music Converter on PC first.Here is the trial version of Apple Music Converter (Windows Version/Mac Versions).


Easy Method to Transfer Apple Music to Samsung Phone
Step 1.Download and Launch Apple Music to MP3 Converter
Firstly, you should choose the correct version of Apple Music Converter program. Install both Apple Music (M4P to MP3) Converter for Mac and Apple Music (M4P to MP3) Converter for Windows on your computer,then launch and run it.
Once you have run the Apple Music Converter immediately, the iTunes program will be launched automatically with this program.

Step 2. Mark the Apple Music Tracks that You Want to Convert to MP3
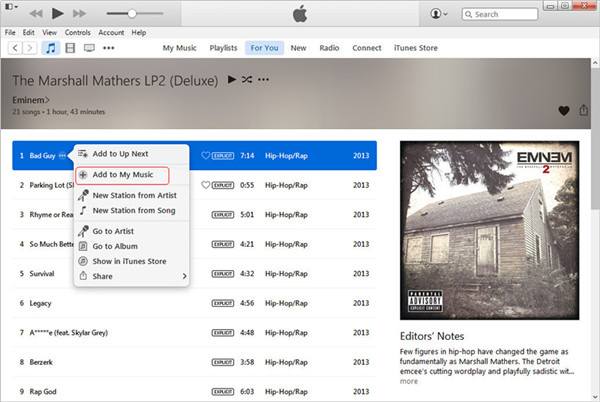
The program will find all loads iTunes files automatically as soon as you launching the program, including music, playlists, Audiobooks, M4P Audio, iTunes movies and TV shows.Please click on “Library” and select the specific Apple Music M4P songs and transfer to DRM-free MP3.

Attention: You can added Apple Music songs/albums to iTunes library by clicking “Music” on the left side, and then sort all songs by Type. Music files items can be selected one by one or you can also tap on the entire album by clicking on the checkbox on the top menu bar.
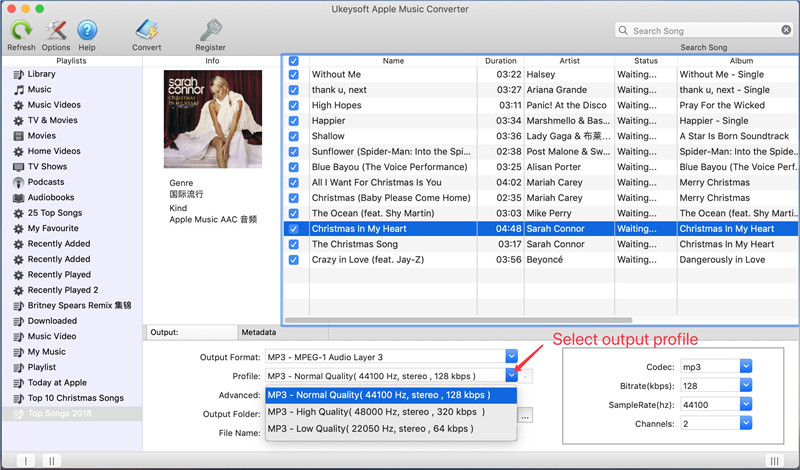
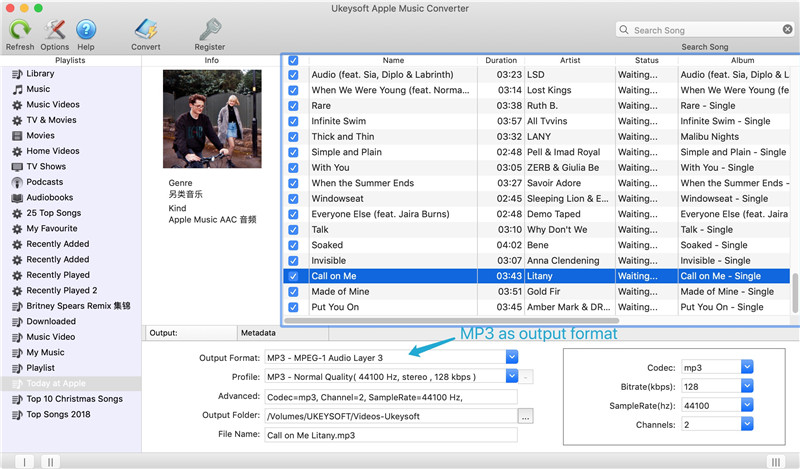
Step 3.Set Output Format – MP3
In this step,you are required to choose the musics output format to convert all Apple music songs to DRM-free MP3 format. Please select .MP3 from the drop-down list under the “Output Format” column.
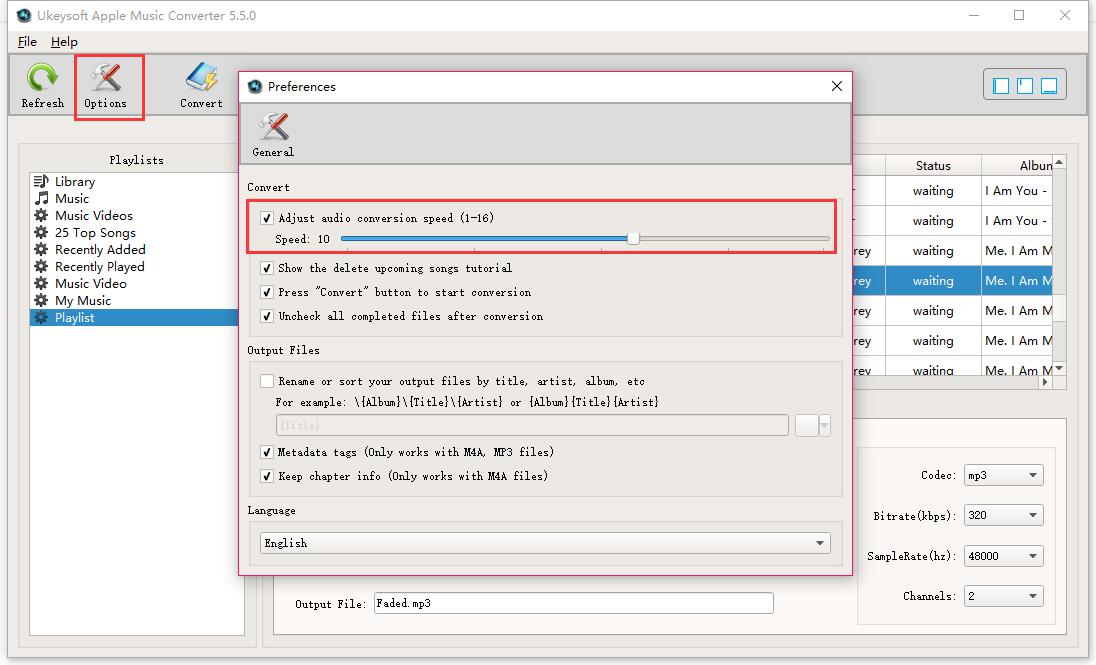
You can also adjust the conversion speed when you need.
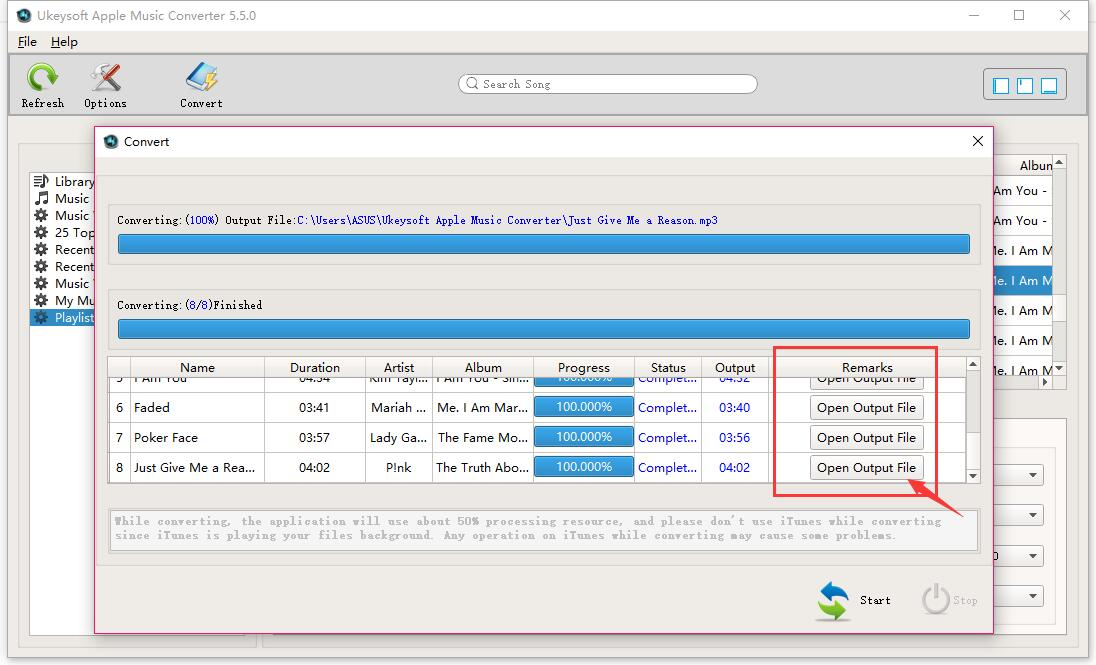
Step 4.Convert Apple Music M4P Songs to DRM-free MP3
Now you can click the“Convert” button to start transferring process and you can remove DRM protection at the same time. Save the converted MP3 Apple songs on the computer.It will take you several time to convert the audio format. After the M4P to MP3 conversion process complete,please click on the “Open Output File” button to find the converted MP3 music files on your computer,then you can enjoy your favorite Apple music in DRM-free MP3 format with more freedom and convenience.
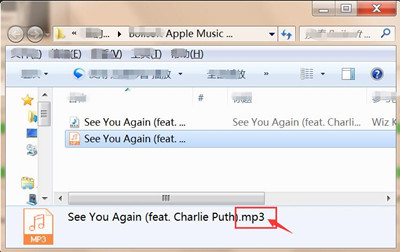
You can view converted .MP3 files on you computer.
Step 5.Transfer the Converted DRM-free Apple Music to Samsung Phone
Now,you have got the converted DRM-free Apple music as free.Then,please connect your Samsung phone with the computer and import them to your Samsung Galaxy by iPhone to Android Transfer or Samsung Kie, Samsung Switch.If you want to listen to Apple Music MP3 songs on MP3 player like iPod, Sony Walkman,just directly import the converted songs to the device for enjoy offline.
Related Articles:
How to Convert the iTunes Music to MP3
How to Stream DRM-free Apple Music to Samsung Galaxy
How to Listen to Apple Music without iTunes
How to Listen to Apple Music Offline