All posts by DHZ

How to Unlock LG Phones If You Forgot Password, PIN, Pattern

I try to access my LG phone but I enter the password on it for several times and failed. The phone is locked now. How to bypass the lock screen on my device when I forgot the password of it?

Our mobile phone contains all the personal contents from work to daily life, including contacts, text messages, photos, videos, call logs, and more privacy data, like E-mail, bank account, etc,. To prevent our data leaking to anyone who haven’t permission of accessing the phone, we set password, PIN, pattern to lock the device. Protecting the smartphone from suspicious and unauthorized access should be top priority on our device.

However, frequently when we forget the password of our device, most of us have no idea to fix this depressed situation. If you are facing the same issue, just take it easy. Actually, it is not so bad in this case as we think. Fortunately, there are some ideal ways to unlock an LG Android device when you have forgotten its password/PIN/pattern lock. In the follow passages, we will teach you how to unlock LG phone by lock screen without password/PIN/pattern in the most efficient ways.

Bypass LG Phone without Password/PIN/Pattern

Among all the unlock tools, Android ToolKitAndroid Unlock is the best one, which enable to help to unlock LG phones when you forgot password, PIN, pattern without data loss. Android Unlock supports to removal lock screen on Android with 4 screen lock types – password, PIN, pattern & fingerprints. More than 1000+ Android phones supported, such as, LG V20, G2/G3/G4/G5; Samsung Galaxy S/Note/Tab series, etc,.

d_win d_mac

How to Unlock LG Phone when Forgot Password, PIN, Pattern

Step 1. Run Android Unlock on Computer
First of all, download,install and run Android Unlock program on your computer. Select “Unlock” under“More Tools”option.

android toolkit home page

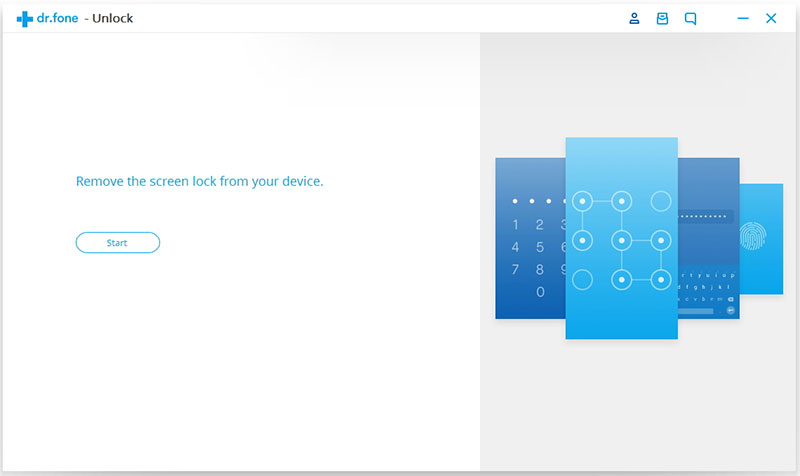
Step 2. Start the Removal Process on LG Phone
Click the “Start” button to start the removal process on your LG phone.

click start to begin process

Step 3. Connect LG Phone to the Computer
Connect your LG phone to the computer using USB cable. Note that the USB debugging mode on your device should be turned on first.

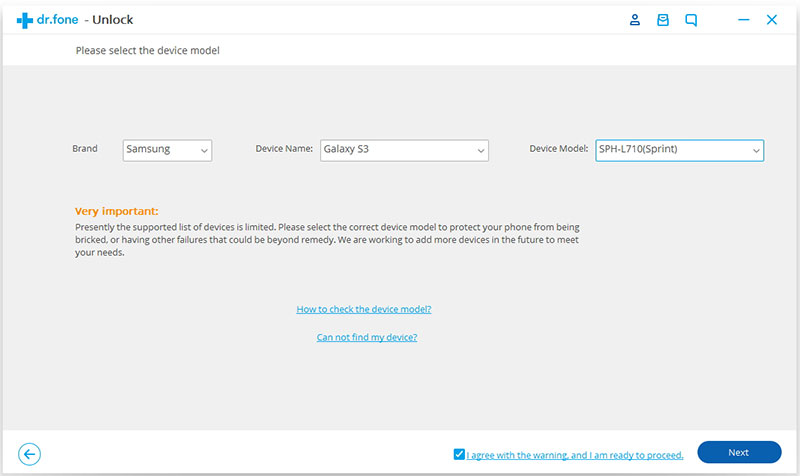
Step 4. Select Phone Info of LG Phone
Select the correct phone model match your LG phone. You can find all the supported device models in the list.

select LG phone model

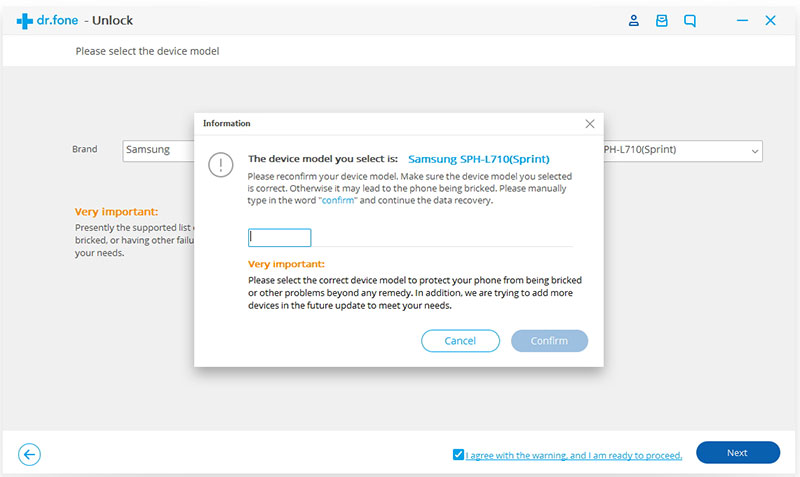
Enter “confirm” to make sure that you have chosen the right model of the device that you need to unlock.

confirm to unlock

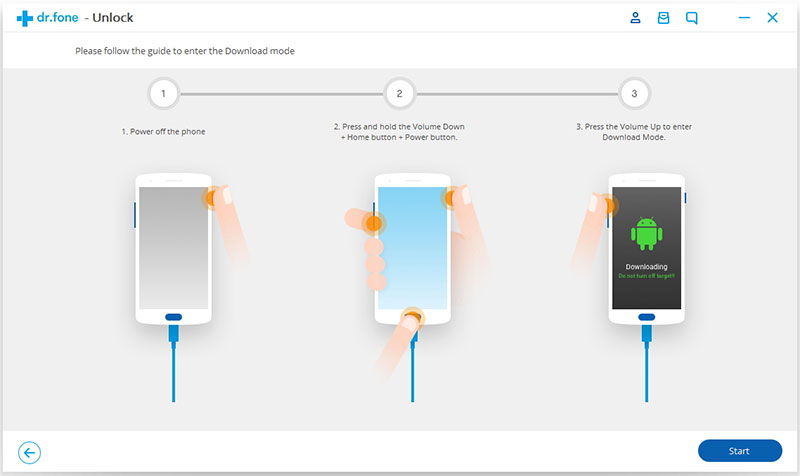
Step 5. Enter LG Phone into the Download Mode
You will be asked to get your device into the download mode by following the instructions of the program.

1. Turn off your LG phone.
2. Press and hold button of Volume “-“, “Home” and “Power” .
3. Press the button of “Volume +” to enter the download mode.

enter LG into download mode

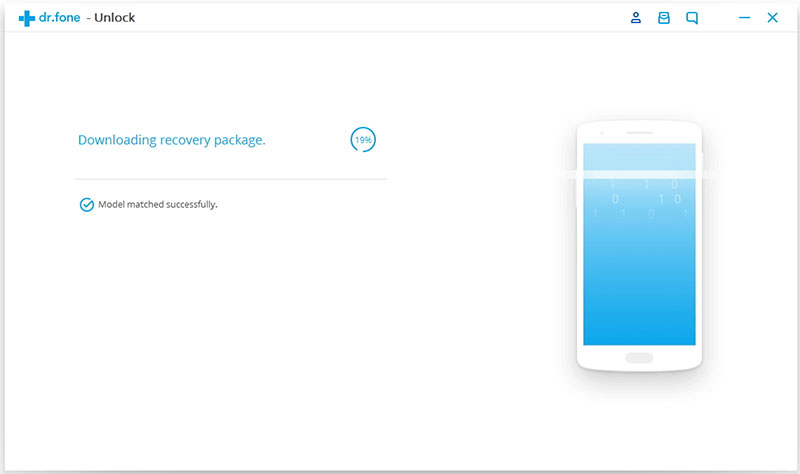
Step 6. Download Recovery Package for LG Phone
Android Unlock will begin to download recovery package for your device and match the phone model after checking the agreements. Then it will begin to restore your device automatically. Please wait until this restoring process is completed.

downloading recovery package for LG phone

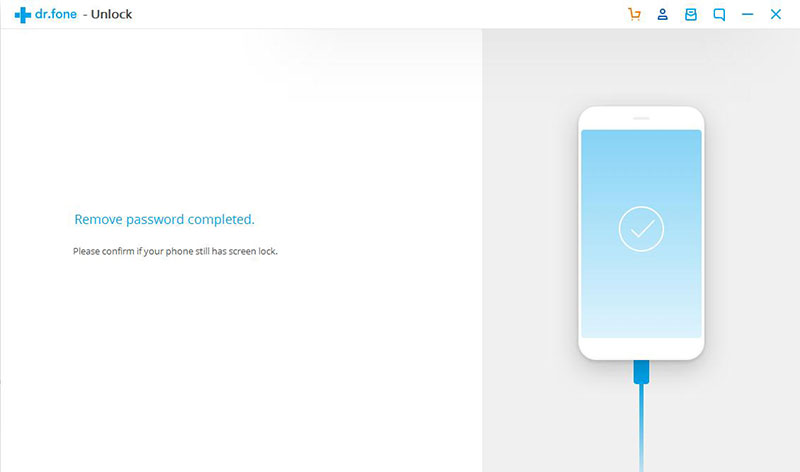
Step 7. Remove Password/PIN/Pattern on LG Phone Completed
Now the program has unlocked your device without Password/PIN/Pattern besides without losing data.

remove lock screen on LG phone

d_win d_mac

More LG Tutorials you can Check

How to Bypass LG Lock Screen When Forgetting Password

How to UnLock your LG Phone Screen Lock

How to Unlock LG G3/G4/G5 with a Broken/Cracked Screen

How to Unlock LG G5/G4/G3 Screen Passcode without Losing Data

How to Manage Android on Computer

Bypass LG Phone Password/PIN/Pattern

Recover WhatsApp on iPhone/iPad after iOS 12 Update

[Summary]WhatsApp is one of the most common apps that experience data loss every time on iPhone/iPad after iOS 12 update. What would you do when you lost your WhatsApp files and get them back on iPhone/iPad after iOS 12 update? The good news is that there are effective ways we provide to recover lost WhatsApp messages from iPhone/iPad after iOS 12 upgrade.

IOS 12 is packed with many great features and changes that iPhone users will surely love, such as update the new interface icon, accomplish a true darkness mode, supports multi-tasking mode of operation function and fix previous mistakes.However, many iOS users were also frustrated that they may lost their WhatsApp messages right after the iOS 12 upgrade.Though you can easily get them back from your backups, but what if you don’t have make the backup and lost WhatsApp after iOS 12 upgrade.How can you retrieve WhatsApp on iPhone/iPad after iOS 12 update?In this article, we will show you the most possible and effective ways to restore your messages with a powerful recover program in a faster time.

The best iOS Data Recovery—-iPhone iPad Data Recovery can perfectly help users restore lost WhatsApp from iPhone after iOS 12 update include SMS/iMessages, pictures, videos, call logs, WhatsApp messages, notes and more contents.Besides lost data after iOS 12 update,the other terrible unexpected situations like factory reset, jailbreak or ROM flashing, Phone crashed, virus attacks can also cause the data deletion.No matter what lead to the data lost, this program can much more quickly and safely to restore your lost data on iPhone/iPad.All deleted contents from iPhone X/8/7/6s/6/5s/5c/5 can be recovered after iOS 12 update.The recovery solution are very simple with three simple steps. Now please follow the steps below to get back your lost WhatsApp chat history,WhatsApp messages,WhatsApp videos safely and selectively.

The trial version of the iPhone iPad Data Recovery program compatible with Windows and Mac version.You can download the program on your computer in 100% Security.

d_win d_mac

How to Recover Lost WhatsApp from iPhone/iPad after iOS 12 Update

Step 1. Connect Your Updated iPhone to the Computer
On the first step,you should download and run the iPhone iPad Data Recovery on your PC or on the Mac, please use the USB cable to connect your iPhone to the computer as soon as the iPhone Data Recovery installed. Next, select “Recover from iOS Device” option in the main interface of the program.

iOS Data Recovery home page

Step 2.Select WhatsApp Files to Scan
All the main file categories found inside the iPhone will be displayed on the left side screen. Now you can select the file types that you want to scan. For WhatsApp recovery, please tick the “WhatsApp” categories on the main screen.The scanning may take a while but you can see its progress on the program screen.

select WhatsApp file to recover

The scanning may take some time depending on a total load of data stored in the iPhone/iPad. Please wait a few minutes for the program analyzing data on your device.

scan iphone and search data

Step 3.Preview and Recover Lost WhatsApp Data
Now you can preview and mark those lost WhatsApp data you want on the interface.Go over your WhatsApp messages and find the lost messages you require.Once found, you can selectively recover them or select them all to restore by clicking “Recover”button to save them to your computer.

recover iPhone WhatsApp data iOS 12 update

d_win d_mac

Related Articles:

How to Recover Lost iPhone Data after iOS 12 Update

How to Recover Lost iPhone Photos after iOS 12 Update

How to Recover Lost iPhone Contacts after iOS 12 Update

How To Backup and Restore Data on iPhone

How to Restore iPhone System to Normal

How to Play Apple Music on iPhone for Free

How to Manage iPhone on Computer

How to Copy Apple Music Songs and iTunes Playlist to USB Stick

As we all know iTunes wont let users drag music to flash drive,if you want to play Apple Music in the car through USB stick,you need to put Apple music on flash drive for car audio,this guide will show you an efficient methods to copy iTunes playlist and Apple Music songs to USB stick, SD card, flash drive or an external hard drive.

save apple music to usb stick

With an Apple Music membership, you get access to a whole world of music – any of the 30 million songs.However,you can only access Apple Music on these devices:

iOS Devices with iOS 8.4 or later
iTunes for Mac or Windows 12.2 or later
Android phones and tablets with Android 4.3 (Jelly Bean) or later

Even though you have downloaded Apple Music songs your iOS device or computer, you can’t copy them to your USB stick, SD card, flash drive or an external hard drive for listening outdoor without Apple Music app,for example: Play Apple Music and iTunes Playlist in a Car without iPhone connecting to car via Bluetooth

Actually,Apple company not allow users share, copy and play Apple Music on non-Apple devices,because Apple Music songs are DRM protected M4P file. If you want to enjoy Apple Music on MP3 players or other a device which is not in above list, you need an Apple Music converter to remove DRM and convert Apple Music M4P songs to MP3 first.

Apple Music Converter also is an iTunes M4P to MP3 Converter, iTunes DRM Removal, Apple Music DRM Unlocker,it allows you to easily not only can help you remove DRM protected from Apple Music songs and iTunes M4P files,but also allows you convert Apple Music M4P songs to MP3 at 16X speed on your Mac or Windows. What’s more, you don’t need to download the Apple Music songs to convert them since Apple Music Converter automatically syncs with iTunes Library and Playlists.After get the Apple Music songs in MP3 format,you can copy the converted Apple Music songs to USB flash drive for playing in the car.Let’s show you the easy guide to remove DRM from Apple Music and copy converted Apple Music songs to USB stick for playing in other media players.

d_win d_mac

Easy Steps to Convert Apple Music Songs to MP3 and Save onto USB Stick

Step 1.Add Apple Music Songs to iTunes Library on your PC/Mac
You can find the entire Apple Music category in iTunes sorted by artists, albums, playlists and songs. What you need to do is to select the songs that you prefer and add them to your iTunes library.

1)In iTunes, find the song, album, or playlist that you want to add in the New or For You tabs, or search within Apple Music.

2)Click the More Options icon to the right of the song or album name.
3)Click Add to My Music.

download-apple-music-songs

After that, check the song under My Music tab and click the cloud icon to download for playing offline.

Step 2.Download and Run Apple Music Converter on PC or Mac
The Apple Music Converter has both windows and Mac version. Download the right version and install it to your Windows PC or Mac.

launch apple music converter

Step 3.Select Apple Music songs you Want
Apple Music Converter loads all your iTunes Apple Music files automatically. Select and add the songs you would like to convert and transfer to USB flash drive to the Apple Music Converter.

select Apple music to convert

Step 4.Choose MP3 as output format, and set profile and folder
Apple Music Converter converts Apple Music M4P to MP3 at 16x playback speed and supports multiple output formats: MP3, M4A, AC3, AAC, AIFF, AU, FLAC, M4R and more.
You can also customize output songs bitrate and sample rate as you like. Metadata information including Title, Artist, Album, Genre and Artwork will be preserved to output MP3/M4A songs. You can also customize them. Click Options button to customize output song name format, which can contain Title, Artist, Album, TrackID and DiskID.

Choose MP3 as output format

Choose MP3 as output format so that you can copy and transfer Apple Music to USB flash drive easily. You can also set the “USB flash drive” as output folder.

Step 5.Start Convert Apple Music to MP3 and Save onto the USB Stick

Click “Start Convert” button to remove DRM from selected Apple Music songs,and convert DRM protected Apple Music files to mp3 with the Apple Music Converter.After that,you will get DRM-free Apple Music songs in MP3 format in the USB Stick.

Apple Music to USB flash drive Conversion

Tips:You can also use this Apple Music Converter to remove DRM from Apple Music and save the converted songs, playlist onto the computer,then move the converted Apple Music songs and playlist to the usb flash drive on a mac or PC.

That’s it. You can find the converted Apple Music songs in the destination folder. These MP3 songs are DRM-free and can be transferred to USB stick, SD card, memory card, MP3 player by plugging the USB device into your computer.Just download this Apple Music Converter and convert/put Apple Music to USB flash drive with ease.

d_win d_mac

Useful Tips: Movies purchased or rented from iTunes Store are also DRM-protected. If you want to remove DRM from your purchased or rented iTunes movies to play them anywhere you want, try this iTunes M4V to MP4 converter.

Related Article

How to Play Apple Music on iPod Nano and iPod Shuffle

How to Set Apple Music Tracks as iPhone Ringtone

How to Play Apple Music on MP3 Player

How to Stream Apple Music on Samsung Galaxy

How to Convert iTunes M4V Videos, Movies to MP4

How to Save Apple Music Songs to SD Card

[Summary]: Do you want to save Apple Music to external SD card for playing Apple Music songs in Car, Android media player, Android phone/tablets or loudspeaker via SD card or USB flash drive? This article teach you a quick and confirmed guide to convert Apple Music to MP3, so that you can transfer Apple Music to SD card or other external hard drive for playing on any devices.

How to save Apple Music to SD card, I looing for a way to download my Apple Music to an SD card, so that I can listen to Apple Music offline on any device that supports SD card. I need some simple suggestions.

I have subscribed Apple Music, I want to play my favorite Apple Music songs in the car without Apple Music app, how to transfer Apple Music to USB flash drive or external SD card? I want to offline play Apple Music in a Car via SD Card.

Apple Music supports SD cards on Android. What about iPhone? I have an iPhone with 16GB memory and wondering whether there is a way to download my Apple Music to an SD card so I can run my apps normally. Is there any method to do that?”

We could see a lot of similar question like these “How to convert Apple Music to MP3 players?”, “How to stream Apple Music to Roku, Chromecast?”, “How to unlock Apple Music for burning to DVD?”. Maybe somebody also wants to know how to save Apple Music to SD card for offline playing. If you’re an iPhone/iPad or iPod user, you’re likely painfully aware that SD cards aren’t compatible with your device and might never will be. You may think you can download the Apple Music tracks on computer instead, then copy Apple Music from your iTunes library to SD card to enjoy the Apple Music tracks on mobile device with SD card for offline playing.

However, DRM-protection stop all the imagine of saving Apple Music on SD card directly. Since all the Apple Music tracks are in DRM-protected M4P format and the tracks are associated with the Apple ID. You can copy Apple Music M4P files to SD card but it won’t be recognized and be playabled on any device. The only way is to bypass the DRM protection and convert Apple Music tracks to MP3 files and saving on SD card. In the following part, we will apply you two practical method to save Apple Music to SD card with a few easy steps.

Part 1. Save Apple Music to SD Card (For Android User Only)

Step 1. Launch Apple Music and tap menu icon in the upper left corner > click on “Settings”.

Step 2. Click “Download Location” option below the “Download on Wi-Fi”, then click “Yes” on the pop-up window to select SD card from the list you want to save.

Step 3. Accept the prompt when asked if you want to move all of your currently downloaded music, along with any future music to your SD card.

android apple music sd card

This improvement made on Apple Music for Android can be considered as a breakthrough. It is possible for Android users to enjoy Apple Music on Android for offline playing and save more space from Android device.

However, save Apple Music songs to SD card from iPhone is not as simple as an Android device. Another better way are recommended for you – using Apple Music Converter.

Part 2. Save Apple Music to SD Card (For All Users)

In this case, you need a professional program to bypass the limitations. UkeySoft Apple Music Converter is a terrific program be recommended for you, to convert DRM-protected Apple Music files, encrypted audiobooks, iTunes playlists to DRM-free files(MP3/M4A or more) with high-quality and full information preserved. With using this program, you can convert Apple Music to common MP3 files, then saving the converted Apple Music to SD card for playing without limits. The process up to 16X speed. By using this professional Apple Music converter, you can take full control over the converted music, such as, freely play back the music on any compatible media player or burn the songs to CDs.

d_win d_mac

Step 1. Run UkeySoft Apple Music Converter on Computer
First of all, download and run UkeySoft Apple Music Converter on the Computer. The program will load all iTunes playlists and songs in the home page of it soon.

run UkeySoft Apple Music Converter

Step 2. Select Apple Music to Convert
In the home page of program, click on “Library” and select the Apple music songs that you want to convert. You are allow to choose a few songs at one time since this program supports batch conversion.

Add Apple Music to convert

Step 3. Choose MP3 as the Output Format
Click “Output Settings” option of the main interface of program. Click “Output Format” and choose the output format for converted music,MP3, M4A, MKA, AIFF, FLAC, etc,.are available. In this case, you should choose “MP3”. (You can specify the location for saving the converted Apple music tracks when you need.)

select Output Format

Step 4. Convert Apple Music to MP3 for Saving to SD Card
In the last step, just one click on “Convert” button to begin the conversion process. Now the program will start to remove DRM protection from Apple Music, convert Apple Music to common MP3 files for saving on computer.

convert Apple music to MP3

The conversion will be done within minutes, you can get DRM-free Apple Music and iTunes music in MP3 format.

get drm-free apple music

Click the output folder you set in previous step, you can find all the converted Apple Music on your computer. Insert SD card to SD card reader and connect it to computer, import the converted Apple Music songs to SD card.

d_win d_mac

Related Articles

How to Convert the iTunes Music to MP3

How to Get DRM-free Versions of Apple Music

How to Listen to Apple Music without iTunes

How to Listen to Apple Music Offline

How to Download Apple Music and Playlist for offline listening

How to Convert iTunes M4V Videos to MP4

Convert Apple Music to MP3

Recover Call Logs on iPhone/iPad after iOS 12 Update

Is it possible to recover my call logs on iPhone? Last week I have update my phone system on iOS 12, when it was almost successful but it crashed at last!Now I lost all precious data on my iPhone and I want to get call logs back as soon as possible.What can I do?

Important Call History in Our Life
In fact, the beginning of this year there are signs that Apple will release the newest iOS system, iOS 12 at WWDC 2018. And now according to a new report shows that Apple will be in the next version of the iOS 12 system, to manage files easier and fix previous mistakes of iOS 11. There is no doubt that the latest iOS 12 update will reveal so many ways to improve user experience and total phone functions, however, there is a problem that needs attention, that is how to recover data from iPhone after iOS 12 update. One of the files most commonly affected by data loss is deleted call history.As we all know, call log including all incoming calls, outgoing calls and missed calls from other people, and our daily life can not live without these important call records.Losing call history from iPhone/iPad has become a very common trouble and it’s a very big disaster after iOS 12 update. But sometimes, when you forget to back up the call history or the recent call was not backed up, then in this case how can you get your call logs back ?

Restore Call logs on iPhone/iPad after iOS 12 Update

Here, we will recommend a powerful data recovery tool to help you recover deleted call logs on iPhone/iPad after iOS 12 update. Choose iPhone iPad Data Recovery (Computer/Mac version) is to choose an easy and safe solution for effectively recovering lost call history after iOS 12 update. It is possible to retrieve all deleted contents include call logs, contacts, text messages, pictures, videos, WhatsApp messages, and more data files from iPhone X/8/7/6s/6/5s/5c/5 after iOS 12 update.This program also can be used to restore iOS data cause you accidentally lost data commonly, such as restore factory settings, accidentally or intentionally deletion, virus infection, phone crash, etc,.

A trial version of the iPhone iPad Data Recovery we recommend can perfectly compatible with Windows and Mac version.

d_win d_mac

Simple Steps to Recover call logs on iPhone/iPad after iOS 12 Update

Step 1.Run the Program and Connect Devices to the Computer
Download and install iPhone iPad Data Recovery on your computer. Run it and then connect your iPhone iPad to the computer via an USB cable.Click” Recover from iOS Device” button.

iOS Data Recovery home page

Step 2.Select Call Logs Files to Scan
Choose the file type you need to recover from iPhone/iPad. For call history recovery,just click “Call History”on the interface and click on “Next”.

select file to recover

Please wait a few minutes for the program analyzing data on your device.

scan iphone and search data

Step 3.Preview and Recover Lost Call Logs
Now you can preview and mark those lost call logs you want on the interface.Then you should click “Recover”button to save them to your computer.

recover iPhone call logs iOS 12 update

d_win d_mac

Related Articles:

How to Recover Lost iPhone Data after iOS 12 Update

How to Recover Lost iPhone Photos after iOS 12 Update

How to Recover Lost iPhone Contacts after iOS 12 Update

How To Backup and Restore Data on iPhone

How to Restore iPhone System to Normal

How to Play Apple Music on iPhone for Free

How to Manage iPhone on Computer

How to Sync Apple Music between Multiple Devices

I subscribed some Apple Music in iTunes Library, how to sync the songs between my iPhone and iPad? I want to listen to the songs on the two devices without logging in the Apple ID. Is it possible?

Apple Music is a new iTunnes-based music streaming service for iPhone, iPad, iPod users. You can listen to purchased Apple Music with subscription. However, there are still some annoying limits, you can’t play Apple Music on multiple devices at once. Apple Music limits play on one device at a time. If you want to listen to 2 or more devices at the same time then you’ll need a Family Membership. Here is the question: How to sync Apple Music between multiple devices? How to enjoy Apple Music on different device without entering Apple ID?

Apple Music adopted the access control technology – DRM (short for Digital Rights Management), to restrict the distribution of copyrighted songs. In this way, Apple Music subscribers are limited to listen to Apple Music. You should get rid of its DRM, then you can easily sync any songs from Apple Music to device. Here we going to apply the most popular Apple Music DRM removal tool – Apple Music Converter to show you how to remove DRM protection from Apple Music step by step.

Apple Music Converter is a efficient Apple Music DRM removal to reomve DRM from Apple Music/iTunes music files, convert Apple Music and audiobooks to DRM-free format(MP3, M4A and more), for playing offline on your iPod, iPhone, Zune, PSP, MP3 player, etc,. iTunes-like interface loads all your Apple Music tracks and playlists automatically without downloading it. Batch conversion allows you to convert as many Apple Music songs as you like. What’s more, the program performs the conversion at 16X faster speed with lossless quality. In this case, you can easily get the DRM-free Apple Music tracks, sync the converted Apple Music to your multiple devices for listening without any limits.

d_win d_mac

Tutorial: How to Convert Apple Music to MP3

Step 1. Download and Run Apple Music Converter
To begin with, download and run the Apple Music Converter on the PC/Mac Computer. You will see the program will load all iTunes playlists in the home page of it.

Step 2. Select Apple Music to Convert
Click on “Library” and select the Apple music songs that you want to convert. You can choose a few songs at one time since this program supports batch conversion.

Add Apple Music to convert

Step 3. Choose the Output Format for Converted Files
Click “Output Settings” option of the main interface of program. Go to “Output Format” and choose the output format for converted music,MP3, M4A, MKA, AIFF, FLAC, etc,.are available. In this case, you should choose “MP3”. (You can specify the location for saving the converted Apple music tracks if you need.)

select Output Format

Step 4. Convert Apple Music to MP3
In the last step, just simply click on “Convert” option to begin the conversion process. Now the program will start to remove DRM restriction from Apple Music, convert Apple Music to common MP3 files for playing on multiple device without limits. The conversion will be done within minutes.

convert Apple music to MP3

Finish. All the selected Apple Music tracks have been converted to MP3 files for freely playing. Thus, you can freely move your Apple Music songs to any devices for listening.

d_win d_mac

Related Articles:

How to Convert the iTunes Music to MP3

How to Get DRM-free Versions of Apple Music

How to Listen to Apple Music without iTunes

How to Listen to Apple Music Offline

How to Stream DRM-free Apple Music to Samsung Galaxy

How to Convert iTunes M4V Videos to MP4

How to Recover SMS from iPhone after iOS 15/14 Update?

Summary
Want to recover lost messages after iOS 15/iOS 14 update? Check out these three simple iPhone SMS recovery programs, you can easily to recover your lost messages from iPhone 13/12/11/SE/SR/XS/XR/X/8/7/7 Plus after iOS 15 upgrading, including text messages, iMessages, WhatsApp messages, and their respective corresponding attachments.

Help! I finally decided to update my iPhone 11 to iOS 15. It was almost successful but it crashed at last! Now I just want to get back my important SMS information.What can I do? Is it possible to recover SMS on iPhone after iOS 15 update? “—Tony

After upgrading iPhone XS to iOS 15 cause losing text messages, is it possible to recover lost Messages after iOS 15 update? How to fix messages missing after iOS 15 update?” — Luska

Nowadays more and more Apple users would like to improve their phone device performance by trying to update the new iOS system – iOS 15. When you can not wait to update your iPhone to the latest iOS 15, have you ever considered your data loss, including the important text messages, WhatsApp messages and more App data. As a longtime iOS phone user,every system update carries the risk of losing data. In order to avoid these problems, you should backup your data in advance. But what if you lost your SMS and forget to make the backup? How to recover lost SMS from iPhone iPhone after iOS 15/iOS 14.8 update? it is undeniable that everyone should install a professional recovery program to restore SMS in one click when needed.

3 Effective Ways to Recover SMS from iPhone after iOS 15 Update

Have you lost SMS after upgrading to the latest iOS 15? If you also have lost some vital files on your iDevice after iOS 15/iOS 14 update, you can find a solution here.In this article, we will provide the best recover measure through which to get your data back if you have lost SMS after upgrade to iOS 12.

The iPhone Data Recovery as a wonderful data recover program can retrieve SMS from iPhone/iPad after iOS 15 update.It can restore all lost data include SMS/iMessages, Contacts, pictures, videos, call logs, whatsApp messages, notes and more contents.No matter what different scenarios you have encountered, the program can recover lost data due to iOS update; water damage; data lost after jailbreak; device locked or forgotten password and other terrible situations. The iPhone iPad Data Recovery can perfectly apply to almost all iOS models, including iPhone 13/12/11/XR/SE/XS/XR/X/8/7/6S/6/5S/5C/5/iPad Pro/iPad mini/iPad Air, and more iDevice. Now let’s try!

Here is the trial version of the iPhone iPad Data Recovery we provided for you to download.You can download the program securely on PC or Mac.

d_win d_mac
d_win d_mac

Method 1: Recover Lost Messages After iOS 15 Update without Backup

Step 1.Connect iPhone to PC
Download iPhone iPad Data Recovery software on your PC or Mac. Then you should connect your iPhone to PC by using the USB cable. As you see, there are some options on the first pop-up window for you, select “Recover from iOS Device”to directly retrieve lost iPhone data without backup.

iPhone Data Recovery home page

Step 2.Scan Data on Your Device
Now you can choose specific data you want like SMS, contacts, call history, WhatsApp data, calendars ,photos, videos, music, apps and more data files to recover. For SMS recovery, you can tick the “Message” button and click “Next” to enter the scan process.

select message file to recover

Now the program will show the scanning interface, this process may take you a few minutes.Please wait patiently until the scan process finished.

scan iphone and search data

Step 3.Recover the Selected SMS from iPhone
Now you can preview the found data by choosing the file type on the left side, all recoverable data will be displayed on the interface . Then you should click “Recover” button to recover SMS on iPhone.

recover iPhone SMS iOS 12 update

d_win d_mac
d_win d_mac

Method 2: Recover Lost Messages After iOS 15 Update from iTunes Backup

To recover deleted iPhone text messages from iTunes backup by restoring the backup can be a little risky because new SMS since last sync will not be stored in iTunes backup. All text messages will be replaced by the text messages in the backup after you click “Restore Backup”. What’s worse, the other apps will also be replaced by the data in your backup.

Steps to recover iPhone SMS with iTunes backup:
-Connect the iPhone to the computer and then launch iTunes.
-Click on the device icon once it shows up in iTunes.
-In the Backups option, click “Restore Backup…” to choose the most relevant backup and then click “Restore”.

recover sms from itunes

Method 3: Recover Lost Messages After iOS 15 Update via iCloud Backup

Step 1. If your device is already set up, you would have to format all data before you can restore your iCloud backup. After resetting your device, follow the setup instructions till you get to the Apps & Data screen, then tap “Restore from iCloud Backup”.

Step 2. You will be asked to login to iCloud using your Apple ID. Choose a backup from the list of previous backups. After you’ve selected the backup, the restore process will begin.

Step 3. You may be asked to login to your Apple ID to restore your iTunes and App Store purchases. You can skip this step to restore your purchases later if you forget the password.

Step 4. Keep the internet connection throughout the restore process, until it completes. It may take some time to complete, depending on the size of your backup file and also the network strength.

restore iphone sms from icloud backup

In concule: If you don’t want to lose all the other data on your device after recovering the lost text messages, you can use the solution A(iPhone iPad Data Recovery solution) to restore SMS from iPhone directly, this way will not wipe the current messages data on your iPhone.

Related Articles:

How to Recover Lost iPhone Data after iOS 12 Update

How to Recover Lost iPhone Photos after iOS 12 Update

How to Recover Lost iPhone Contacts after iOS 12 Update

How to Backup and Restore Data on iPhone

How to Restore iPhone System to Normal

How to Play Apple Music on iPhone X/8/7/6S/6 for Free

How to Manage iPhone on Computer

Recover SMS after iOS 15 Update

iOS Data Recovery

Recover Your iPhone iPad Lost Data
Now, Even without Backups

Compatible with iOS 15 & iPhone 13(Pro)

Recover Lost Data Now

Recover Lost Data from iPhone/iPad after iOS 15/iPadOS 15 Update

Summary
Looking for a way to recover lost data such as photos, videos, contacts and text messages from iPhone, iPad after iOS 15/iPadOS 15 update? This article recommend you the highest iPhone data recovery rate in the industry for you to retrieve lost data from iOS 15 iPhone and iPadOS 15 devices, such as iPhone 13, iPhone 12, iPhone SE/XS/XR/X, iPhone 8/8 Plus and the new iPad Pro.

CONTENTS

In 2021, the WWDC of Apple Developers Conference has released the latest iOS 15 and iPadOS 15, have you update your iPhone to iOS 15 or update your iPad Pro to iPadOS 15/iPadOS 14? The new update may also present a data loss issue. When people are attracted by the amazing new features of the new iOS 15 and can not wait to update the device, some data maybe lost during/after iOS 15 update. Users who did not back up their mobile data regularly may not know how to recover their data. This article is meant to help users recover lost data on iPhone/iPad after iOS 15/iPadOS 15 update, whether have a backup or not.

For the iOS 15 or iPadOS 15 updating, a nother question will be raised by some users – if I update to iOS 15 or iPadOS 15, will I lose data on my iPhone? Actually, many users have encountered the same problem when they previously upgraded to iOS 12 or iOS 13. So what would you do to recover lost data on iPhone after iOS 15 update or iPadOS 15 upgrade? In this article, we will discuss the best useful way through which to recover data back if you lost data after upgrade to iOS 15 or iPados 15 beta.

The iOS Data Recovery – A powerful iPhone Data Recovery and iPad data recovery, which enables you to recover lost data in different scenarios: iOS system update, phone stolen,forget passcode but locked the device, factory reset, unconsciously deletion, iOS system crash and more.You can recover all lost/deleted data on iPhone/iPad after iOS 15/iPadOS 15 update using this program, such as contacts, photos, call logs, text messages, WhatsApp and more data files. All iOS users can handle it and you can selectively recover any files included in the backup, rather than the whole backup.Also, the program support all models of iOS devices including the latest iPhone 13(Pro), iPhone 12, iPhone 11, iPhone XR, iPhone X/8 and the new iPad Pro. It is an ideal solution to recover data from an iPhone in a fast, easy and powerful way.Now you can recover what you want from iPhone and this tutorial will instruct you 3 simple ways to get them back.Here we go!

Before you go ahead and use this step, remember to installed the latest version of program on your Mac or PC. Now we will provide the trial version of the iPhone Data Recovery for you to download.

d_win d_mac
d_win d_mac

Part 1: Recover Lost Data from iPhone/iPad after iOS 15/iPadOS 15 Update

Step 1.Connect iPhone/iPad to PC
Firstly, you should install iPhone Data Recovery software on your PC or Mac. Then you can use the USB cable to connect your iPhone to PC. There are some options on the first pop-up window for you to choose, select “Recover from iOS Device” to directly retrieve lost iPhone data without backup.

iOS 13/12 Data Recovery

Step 2.Select Specific Selected Data
Now you can choose specific data to recover, such as contacts, messages, call history, WhatsApp data, calendars ,photos, videos, and more. Choose the data you need and click “Next” to enter the scan process.

select file to recover

Step 3.Scan Data on Your iPhone
Now the program will show the scanning interface, this process may take you a few minutes.Please wait patiently.

scan iphone and search data

Step 4.Recover the Selected Data from iPhone
All recoverable data will be displayed on the main screen, and now you can preview the found data by choosing the file type on the left side . Then click “Recover” button to save the restored data from iPhone to computer.

recover iPhone data iOS 12 update

Above is the simple method helps you recover lost data from iPhone after iOS 13/iOS 12 update, you can also recover deleted files from iOS 13 devices.

Part 2: Recover Lost Data from iTunes after iOS 15/iPadOS 15 Update

If you use an iPhone XS/XR/X/8/7/6S/6/5S/5/SE, you may do a backup with iTunes. The best way to deal with iOS data loss is to create a backup and restore it when required. iTunes is a viable option in this situation. Learn the steps below to recover lost data after iOS 12 update with iTunes restoring:

Step 1.Install the latest version of iTunes on the computer.
Step 2.Connect iPhone with your computer using a USB cable.
Step 3.Click the device icon and go to Summary pane.
Step 4.Find “Restore Backup” option. Enter your password if you have set up Encrypted iPhone backup feature.

itunes interface

Step 5.Select an up-to-date backup file and click on “Restore” to extract backup file.

restore itunes whole backup

Note that all the content will be replaced by previous iTunes backup file. However, if you want to restore data from iTunes selectively instead of the whole file, besides without overwriting the previous data on your phone, you are suggested using iPhone Data Recovery. It features with iTunes backup recovery mode, help to restore data from iTunes perfectly.

d_win d_mac
d_win d_mac

More iOS Data Recovery Articles:

How to Recover Lost iPhone Photos after iOS 12 Update

How to Recover Lost iPhone Contacts after iOS 12 Update

How to Backup and Restore Data on iPhone Safely

How to Restore iPhone System to Normal

How to Play Apple Music on iPhone X/8/7/6S/6 for Free

How to Manage iPhone on the Computer

Recover Data after iOS 15/iPadOS 15 Update

How to Restore Contacts from iPhone after iOS 12/13 Update

[Summary] If you are annoying about lost contacts from iPhone after iOS 13/12 updatewithout making a backup.This tutorial can show you the easiest and the most efficient way to recover lost contacts from iPhone after iOS 13/12 update.

For many years, Apple’s iOS operating system has long been loved by everyone for its clean, secure, closed-loop ecosystem and its availability and ease of use. Apple has launched the latest iOS version – iOS 13 on Jun 3, 2019. As a major iOS upgrade, iOS 13 will not only fix iOS 12 vulnerabilities, but will also increase several useful features such as a completely new interface icon, darkness mode, a phone that also supports multi-tasking mode of operation, upgrade photos management capabilities; significantly enhance the Siri features and more. Although we do not know more details about iOS 12 before Apple released, it also attracted more people to update the system to enhance the device performance.

However, every nutshell has a concave and convex side.Updating your new iOS system can improve your device’s performance, but at the same time the iOS system update may also bring many new problems to your phone.The most common problem is data loss. Therefore, be aware that it is important to back up your phone data before iOS 12 Update, otherwise you may have a bad situation with contacts loss after updating your system.If you don’t have any backup, or you wouldn’t like to restore an backup to recover your lost contacts after iOS 11 update,what if you are in such a situation and loss your precious contacts, how would you deal with it? Is it possible to retrieve deleted contacts from iPhone after iOS 12/13 update? The answer must be Yes. Fortunately, you are on the right site and now we will recommend a powerful data recovery tool that will do that and more.In this post, we will share the easiest ways helping you restore contacts on iPhone after iOS 12/13 update.

To recover data contacts from iPhone XS/XS Max/X/8/7/6S/SE after iOS 13 upgrading and restore contacts on iOS 12 devices, you need to use a professional iOS 13/12 Data Recovery.

The best iOS 13/12 Data Recovery – iPhone Contacts Recovery can perfectly help users restore lost contacts from iPhone after iOS 12/13 update or other terrible unexpected causes like factory reset, jailbreak or ROM flashing, Phone crashed, virus attacks.Besides contacts, the program supports to recover lost SMS/text messages, pictures, videos, call logs, WhatsApp messages and more contents from iPhone. It can also recover data from iOS 11, iOS 10, iOS 9 devices. With the help of iPhone Data Recovery program, you can directly restore your lost iPhone contacts without backup or with the help of the backup in your iTunes/iCloud. The recovery solution are very simple with three simple steps.

Here is the trial of the iPhone Data Recovery which can perfectly apply to Windows or Mac version.

d_win d_mac
d_win d_mac

Method 1: Restore Contacts from iPhone Directly after iOS 12 Update

Step 1.Download the Program and Connect Your iPhone on PC
Firstly, please download and install iPhone Data Recovery on the computer. Then launch it as soon as possible.Then connect your iPhone to the computer with the USB cable. Next, select “Recover from iOS Device” option on the main interface.

iOS Data Recovery home page

Step 2.Scan Data on Your iPhone
Just select the file types that you want to scan. All data files will be list by the program and for contacts, you should tick the “Contact” options and click on “Next” button.

Attention: By default, all data will be selected at first. You can uncheck the other except for the Contacts.

select contact file to recover

Now the program will show the scanning interface, this process may take you a few minutes.

scan iPhone and search data

Step 3.Recover the Selected Contacts from iPhone
Now all recoverable data will be displayed on the main screen, such as text messages, photos, contacts and so on. You can preview the found data by choosing the file type on the left side . Select the contacts you want to restore and then click “Recover” button.

recover deleted contacts from iOS 12 iPhone

d_win d_mac
d_win d_mac

Method 2: Restore Contacts on iPhone via iCloud (Erase All Data)

Step 1. Erase iPhone data and settings: Before restoring iCloud, you need to erase iPhone. Go to “Settings” < “General” < “Reset” < “Erase All Content and Settings”.

Step 2. Restore iCloud backup to your iPhone: After that you can start to restore iPhone from iCloud backup by going to “Set up your device” < “iCloud Sign In” < “Choose backup”.

icloud backup restore

Apparently, this method is not perfect enough since it require erasing your device before the restore. And it is not flexible, this way can’t restore only contacts.

Conclusion: We conclude two methods to recover deleted contacts on iPhone. We suggest you use the first way to restore your contacts from iPhone after iOS 12 via iOS 13/12 Data Recovery, since it could help to recover iPhone contacts selectively and without overwriting the previous data or even erasing all previous data. This solution can be used to recover lost iPhone data no matter you have a backup or not.

More iPhone Data Recovery Articles:

How to Recover Lost iPhone Photos after iOS 12/13 Update

How To Backup and Restore Data on iPhone

How to Restore iPhone System to Normal

How to Manage iPhone on Computer

How to Play Apple Music on iPhone X/8/7/6S/6 for Free

Recover iPhone Contacts

iOS Data Recovery

Recover Your iPhone iPad Lost Data
Now, Even without Backups

Compatible with iOS 12 & iOS 13

Recover Lost Data Now

2 Ways to Restore iPhone Photos iPhone after iOS 12/iOS 13 Update

[Summary]: Photos disappeared and missing from iPhone after iOS 13/iOS 12.1.4 upgrading? Don’t worry, this article will shows you a free way to recover recently deleted photos on iPhone within 30 Days, we also teach you how to recover deleted and lost photos from iPhone by iPhone photo recovery software.

recover iphone data ios 13 update

CONTENTS

What a pity! I have updated my iPhone 7 to the latest iOS 12 version but I just noticed my memorable photos has vanished. These photos means a lot for me but I did not backup before, how can I recover lost photos from iPhone with iOS 12 update?” — Ben

In order to improve our phone device performance,many people will choose to try the new update system. As we know, iOS system is stable and smooth, which is why many people put it down on the iPhone. According to the latest news, Apple will release a new iOS system at WWDC 2019, iOS 13. As a longtime iOS phone user, we all know that Apple sometimes launches new systems to fix previous mistakes. However, if you do not back up your phone data before upgrading your system, you may experience catastrophic accidents such as losing your precious photos or even other important data files. Although iOS 13 will improve many small details and fixes the deficiencies of iOS 12, it is undeniable that there is a possibility of data loss when you decided to upgrade your iPhone system. How to restore photo from iPhone after iOS 13 update? how to recover lost photos on iPhone after iOS 12 update? This article will give you the best answer to solve your iPhone photo recovery problem.

iOS 12/13 Data Recovery- Recover Lost Photos after iOS 12 or iOS 13 Update

This is a big disaster if all data disappeared from iPhone and you never make a backup on your device.But now you do not need to worry anymore, actually you can get all data back and it is possible to retrieve lost photos from iPhone XS/XR/X/8/7/6s/6/5s/5c/5 after iOS 12 update.

Method 1: Directly Recover Photos from iPhone after iOS 13/12 Update

The iPhone Data Recovery as a professional data recover program can retrieve photos from iPhone after iOS 12 or iOS 13 beta update,as well as iOS 11 or iOS 10 update. The program supports to restore all lost data include photos, videos, contacts, SMS/iMessages, call logs, WhatsApp messages, notes and more contents.No matter what lead to the data lost, iOS jailbreak, factory settings restoring, wrong deletion, broken or formatted storage device or many other unexpected causes. This program can much more quickly and safely to restore your lost data from iPhone directly or with the help of the backup in your iTunes/iCloud.

Firstly, you should download the iPhone Data Recovery on your PC or on the Mac.Here is the trial version of the program.You can download securely in 100% Security.

d_win d_mac
d_win d_mac

Step 1. Connect Your Updated iPhone to the Computer
To begin with,please use the USB cable to connect your iPhone to the computer as soon as the iPhone Data Recovery installed. Next, select “Recover from iOS Device” option in the main interface of the program, then click “Start“.

iOS Data Recovery home page

Step 2. Scan Data on Your iPhone
Now you can select the file types that you want to scan. For Photo recovery, please tick the “Photo” and the “App Photo” categories on the main screen.

select photo file to recover

Tips: You can uncheck the other except for the Photos because by default, all data is selected at the first time. Then click on “Next” button to continue.

Now you will enter the scanning interface, this process may take you a few minutes.Please wait for a moment and ensure the connection always online.

scan iphone and search data

Step 3. Recover the Selected Photos from iPhone
Now as you see, all recoverable data will be displayed in the list, such as photos, text messages, iMessage, contacts or notes, and so on. By clicking the file type in the left side, you can preview the found data. Select the photos you want to restore and then click “Recover” button.

recover iPhone photos iOS 12 update
d_win d_mac
d_win d_mac

Method 2: Manually Recover Deleted Photos on iPhone within 30 Days

For iPhone which run iOS 8 or later, the deleted photos will be still kept on your iPhone for 30 days. However, these photos are not visible when you view photos. To retrieve the photos you deleted recently from backup photos, you need to open the “Photos” app, and tap on Albums to locate the folder of “Recently Deleted”.

recently deleted photo app

Select the photos you want to recover by a tap on them after clicking on “Select” and then click “Recover” on the bottom right corner.

select deleted photos

Note: If you don’t tap on any photos after you click “Select”, all the photos will be selected automatically, and you will see the bottom right corner button is “Recover All”. You can recover all the photos deleted in 30 days on iPhone by clicking on it.

recover recently deleted photos

Related Articles:

How to Recover Lost iPhone Data after iOS 12 Update

How to Backup and Restore Data on iPhone

How to Restore iPhone System to Normal

How to Manage iPhone on Computer

How to Play Apple Music on iPhone X/8/7/6S/6 for Free

Top 5 Best iPhone Data Recovery Software Review

Restore iPhone Photos after iOS 12 Update

iOS Data Recovery

Recover Your iPhone iPad Lost Data
Now, Even without Backups

Compatible with iOS 12 & iPhone XS (Max)

Recover Lost Data Now