[Summary]: Are you looking for a solution to recover deleted data from iPhone X, iPhone XS(Max) or iPhone XR? Here are 6 safe iPhone X/Xs data recovery solutions to help you recover deleted files and lost data from iPhone Xs(Max) and iPhone X/iPhone 8/8 plus easily, hope it will do a great help for you.
“I got a iPhone Xs Max as the gift from my boyfriend, the bad thing happened last night that I deleted some text messages and photos from the phone by accident. Is there any iPhone Xs data recovery software to restore the deleted data on iPhone Xs Max directly without backup? Please give me some available solutions. Thanks.” — Asked by Kitda
“I deleted photos on my iPhone X, any data recovery for iPhone X helps me recover deleted pictures on iPhone X without iTunes backup?” — Asked by Nina Jone
“After upgrading my iPhone X to iOS 12 beta, contacts and text messages disappeared from iPhone X, how can I retrieve lost contacts and messages on iPhone X?” — Asked by Chirson
You may want to know:
* Transfer Data from Android to iPhone XS/XS Max/XR
* Transfer WhatsApp Messages from iPhone 7/6S/6 to iPhone X and iPhone XS/XS Max/XR
Mistakenly deleted photos on iPhone X? Lost data such as contacts, messages, notes after upgrading to iOS 12? iPhone is stolen or broken and looking for a way to restore your previous data from iTunes backups or iCloud backups? When data off your iPhone Xs(Max), iPhone X, iPhone 8 or iPhone 8 Plus missing or deleted, the thing you want to do most is to recover the data from iPhone as soon as possible, or they will be overwritten by new data and become unrecoverable. Then many iPhone users may ask how you can recover deleted photos from iPhone 8/iPhone X/Xs(Max)? Is it possible to restore lost contacts, messages, notes and call logs from iPhone 8/iPhone X/Xs directly? So, just follow the article below to retrieve deleted files from iPhone 8/iPhone X/iPhone Xs(Max)/iPhone XR in a simple and quick process now!
Keep reading this article, we will let you know about iPhone X data recovery with 6 safe solutions.
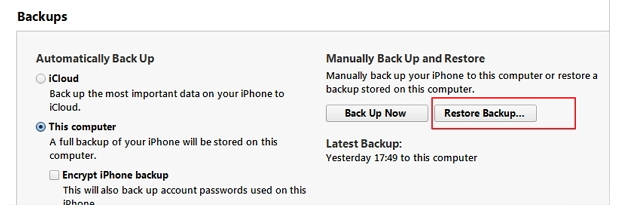
Part 1: Recover Deleted iPhone X Data with Local iTunes/iCloud Backup
If you have already made a backup of your iPhone X data on iCloud or local storage via iTunes, then you can easily restore the deleted data from backup. Let’s see how to restore deleted data on iPhone X with iTunes.
Restore iPhone X from iTunes Backup:
Step 1.Firstly run the lasted version of iTunes on your computer and connect your iPhone X to it.
Step 2.Once it is detected, go to the “Device” icon to select your iPhone X.
Step 3.Now, from the left panel, visit its Summary page.
Step 4.Under the “Backup” section, click on the “Restore Backup” button.
Step 5.It will launch a pop-up window, from where you can choose to restore the backup file.Wait for a while as iTunes will restore your backup on iPhone X.
Restore iPhone X from iCloud Backup:
If you wish to perform iPhone X data recovery via iCloud, then you can follow these steps:
Step 1.Make sure that you are setting up your iPhone X in order to restore its iCloud backup. If that is not the case, then you need to reset your device.
Step 2.To do this, go to its Settings > General > Reset and choose to “Erase All Content and Settings” on your device.
Step 3.Confirm your choice and reset your device. As it would restart, you will get a chance to perform its setup from the scratch.
Step 4.From here, you need to select the option of “Restore from iCloud Backup”.
Step 5.Input your Apple ID and password that is linked to your iCloud account to proceed.
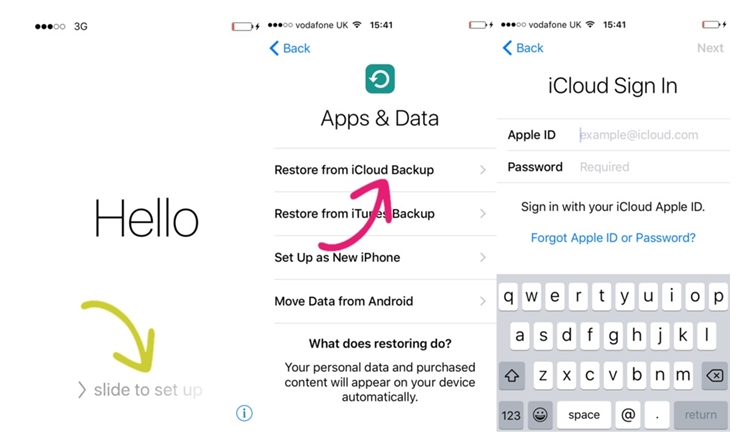
Step 6.Now, you can choose the iCloud backup file and go on.
Step 7.Wait for a while as iPhone will restore the content from the iCloud backup.
To sum up, restore iPhone X data via iTunes or iCloud will wipe the old content on your device and restoring the whole file without selection. If you wish to perform a selective iPhone X data recovery without resetting your device, then read the next part.
Part 2: Recover Deleted Data from iPhone X Directly without Backup
iOS Data Recovery or U.Fone iPhone Data Recovery are both an ideal data recovery program used to recover deleted data from iPhone/iPad/iPod for any data loss cases. Now we show you the main features of iOS Data Recovery. The recoverable kinds of iOS data including contacts, text messages, photos, videos, notes, call logs, calendars, WhatsApp, documents, apps and more. With this powerful data recovery program, you can directly restore deleted data from iPhone X selectively, without covering the previous data. All models of iOS device are compatible with iOS Data Recovery, such as, iPhone X, iPhone 8(Plus), iPhone 7(Plus), iPhone 6S(Plus), iPhone 6(Plus).


More Features of iOS Data Recovery:
-Provide with three ways to recover iPhone data: directly recover data from device; recover data from iTunes backup, recover data from iCloud backup.
-Scan iOS devices to recover photos, videos, contacts, messages, notes, etc,.
-Extract and preview all content in iCloud/iTunes backup files.
-Selectively restore what you want from iCloud/iTunes backup to your device or computer.
-Compatible with latest iPhone models and the latest iOS system.
Step 1.Run Software and Select Recovery Mode
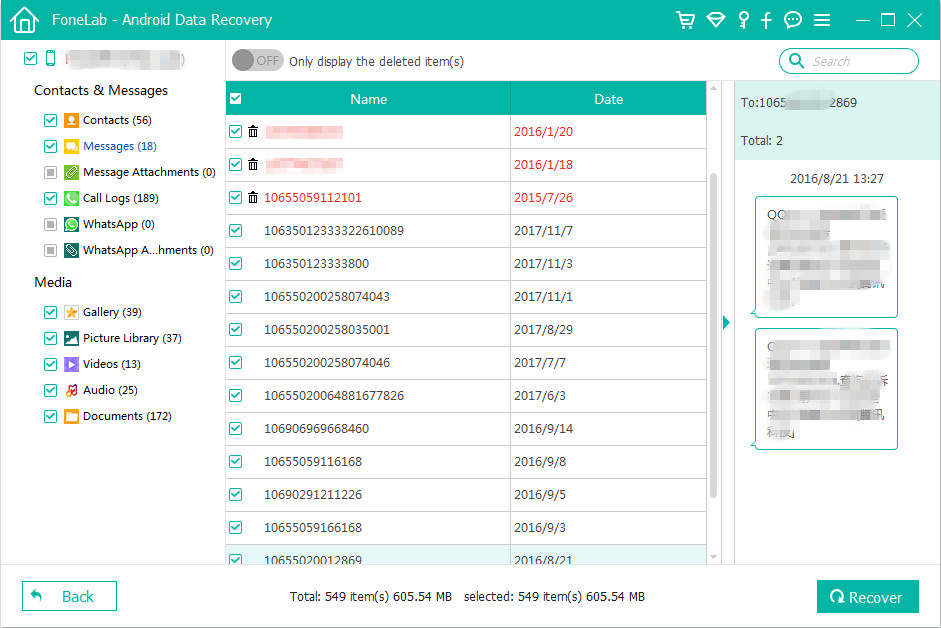
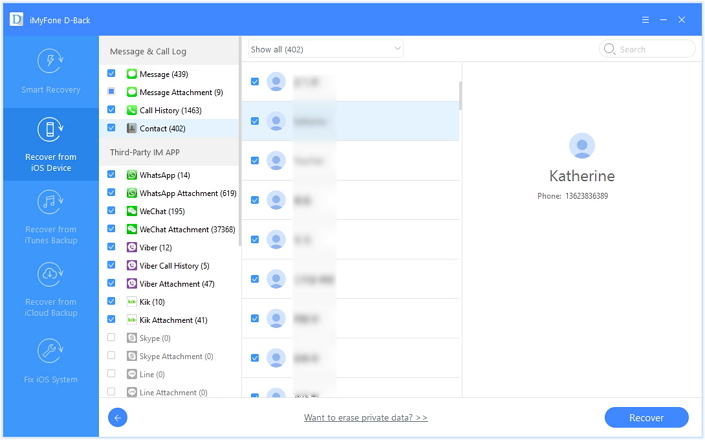
Firstly, please run the iOS Data Recovery on the computer. Connect your iPhone X to the computer. In the main interface of software, select “Recover from iOS Device” mode. Proceed by clicking the “Start” button.

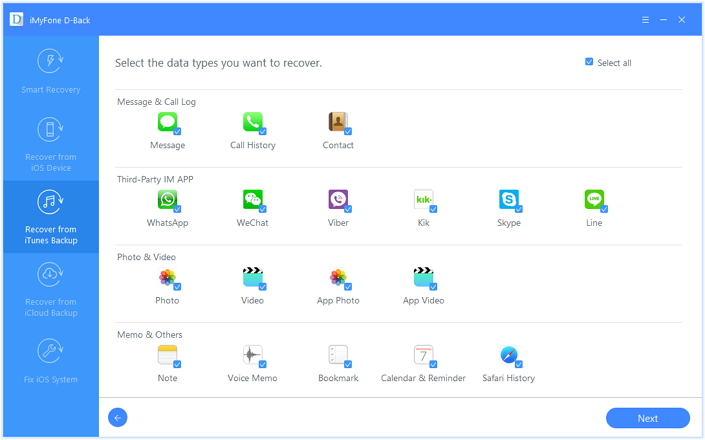
Step 2.Select File to Scan by Software
In the next window, select the files you need to restore from iPhone directly, such as, contacts, messages. Then clicking “Next” button to go on.

Step 3.Scan Deleted Data from iPhone X
Now the software will begin to scan the deleted data from iPhone X.

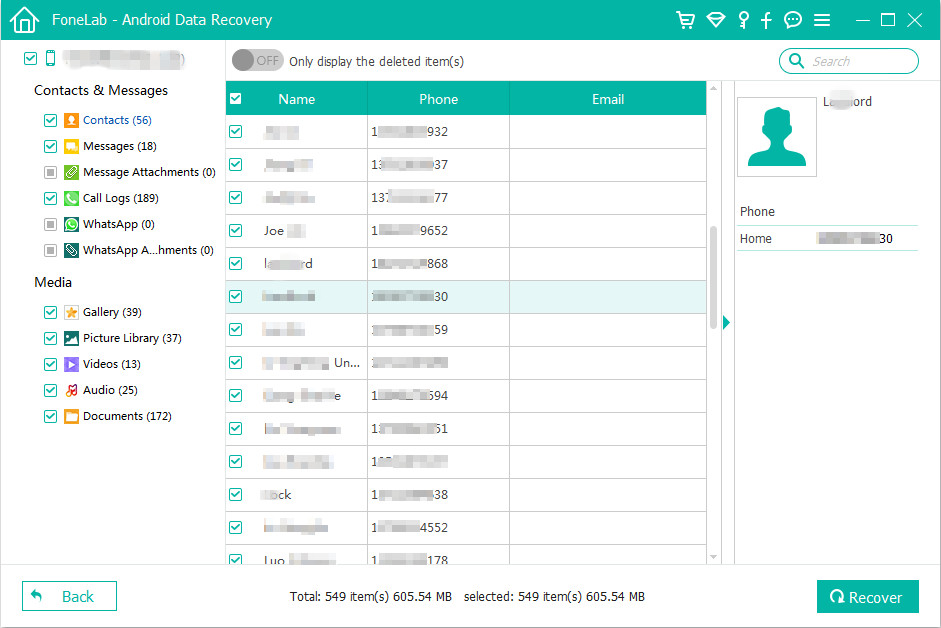
Step 4.Preview and Restore Deleted Data from iPhone
The recoverable files will be shown in the interface of software after the scanning is completed. You can mark the necessary files, or check deleted files by selecting “Show only deleted files” option. Press the “Recover” button to recover selected data from iPhone X.
A dialogue box will appear asking you to select a folder to save the recovered files. Choose the folder and allow the software to complete the recovery process.
Directly Recover Deleted Photos from iPhone X

Directly Recover Deleted Contacts from iPhone X
Directly Recover Deleted Text Messages from iPhone X
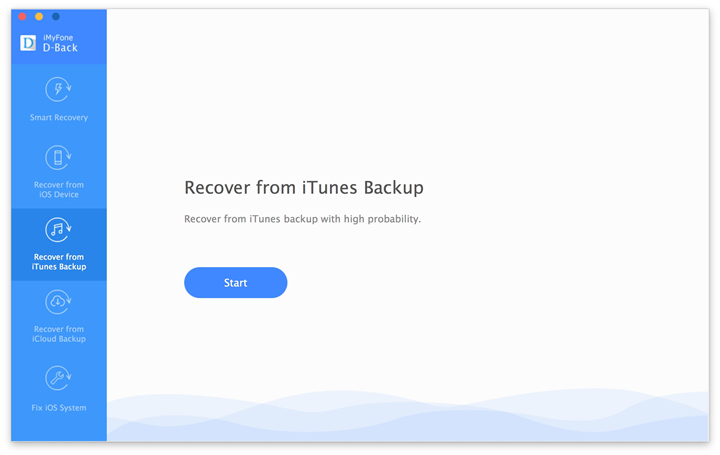
Part 3: Recover Deleted iPhone Data with iTunes Backup via iOS Data Recovery
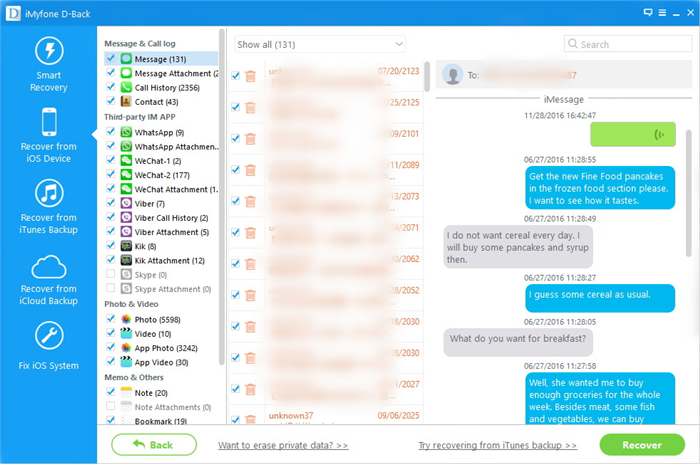
Step 1.Select iTunes Backup File to Scan
When launching the program, you’ll be lead to the “Recover from iOS Device” mode (the default mode). Select “Recover from iTunes Backup” mode to extract previously backed up data from iTunes.
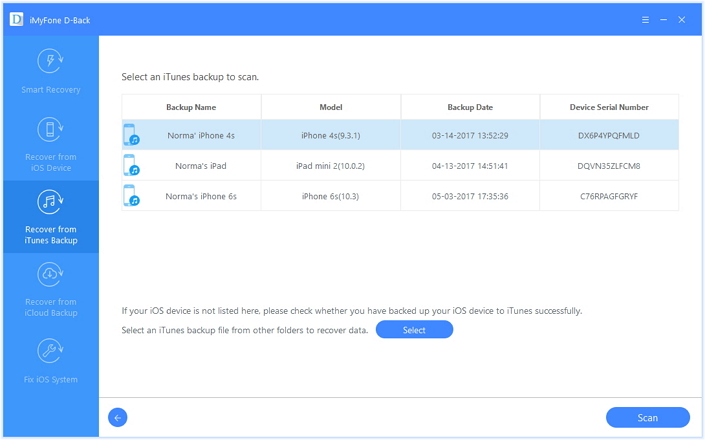
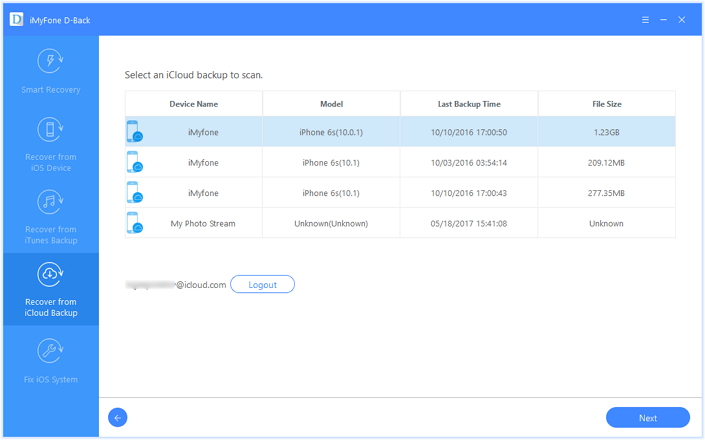
All your iTunes backup data of your iOS devices which has ever synced with iTunes on your computer will be automatically found and listed here. Select the one of yours and click “Start Scan” button to begin iTunes backup extracting.
Step 2.Preview and Restore iPhone Data from iTunes Backup
When the scan finishes, all your files backed up by iTunes can be found and displayed in categories. You can preview them one by one and complete data recovery.

Part 4: Recover Deleted iPhone Data with iCloud Backup via iOS Data Recovery
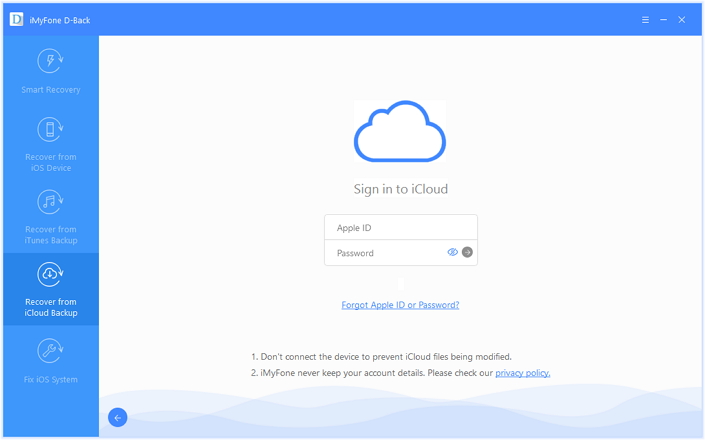
Step 1.Sign in your iCloud Account to Login
Run the iOS Data Recovery Program on computer and choose “Recover from iCloud Backup” mode. Enter your ID and Password to get your backup.
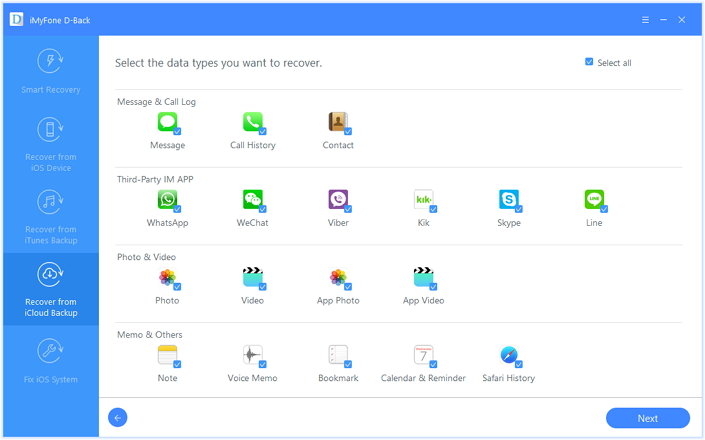
Step 2.Select the Files you Want to Retrieve on iCloud
The program can help you selectively recover the data from iCloud backups,including photos, App photos, videos, notes, contacts, SMS, iMessages and more,please select the file types you need.
Step 3.Download All iCloud Backup Files
Click “Download” button to download all the backup files from iCloud, and move on to the next step.
Step 4.Preview and Get Lost iPhone Data from iCloud Backup
After the download process is completed, the program will scan and analyze the downloaded data,then it will search the results and list to you,to recover previous iPhone backed up data from iCloud,please select the files you need and preview them before recovery,and then click “Recover” button,the program will pop-up to a windows for you choose “Recover to Device” and “Recover to Computer“.

Part 5: Recover Deleted iPhone Data with iTunes Backup via Phone Transfer
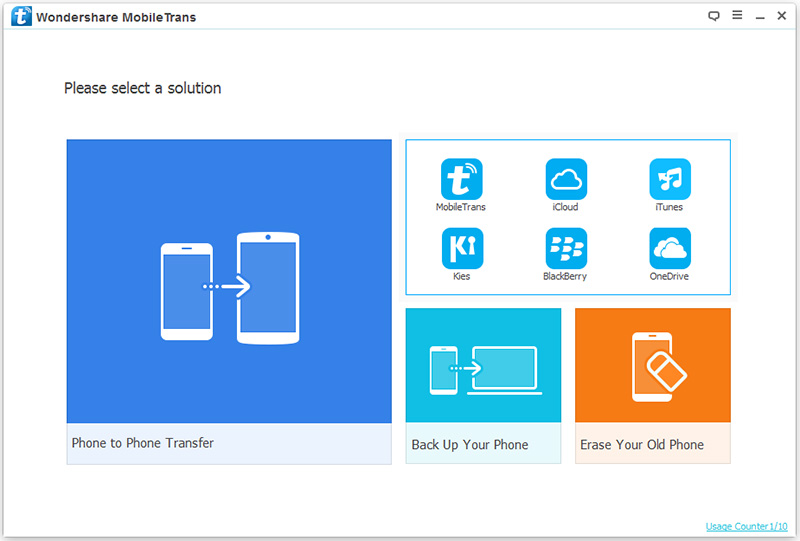
Another easy way to restore deleted data from iPhone X if you synced iPhone with iTunes or iCloud before losing data is using a powerful Phone Transfer tool, which is an all-in-one data transfer and management program. It enable to extract backup iTunes files to iPhone directly, as well as iCloud files. In addition, this program is famous for transferring files between two mobile devices no matter if it run on the same OS system or not.
Free Download Phone Transfer:
Step 1.Run Program and Select Mode
Run program on computer first, then just clicking “iTunes“under”Restore from Backups” option in the primary window of the program.
Step 2. Extract Backup File from iTunes Backup
Select the files you want to transfer from your iTunes backup. Then it will be restored to your computer or iPhone X.

Part 6: Recover Deleted iPhone Data with iCloud Backup via Phone Transfer
Step 1. Run Program and Select Mode
Click on “iCloud” under “Restore from Backups” option in the primary window of the program.
Step 2. Extract Backup File from iCloud Backup
Sign in iCloud account and select the file to extract from iCloud backup.
Step 3. Restore Backed Up File to Computer
Download the iCloud files and save it on the computer or your iPhone X.

Tips: Common Reasons Lead to Data Loss on iPhone X
There are too many causes will lead to data loss on iOS device, here we make a list to show you several of main reasons:
A. Accidentally deleting data on iOS device and can’t get it back when it disappeared.
B. Hardware or System Malfunctions. The hardware or system malfunctions can be shown in many forms, such as, electrical failure, head crash, controller failure, etc,.
C. Software corruption, which is cause by using some diagnostic tools or taking too much memory, etc,.
D. Viruses and malware are a serious problem if you spend a lot of time surfing on the web.
It’s necessary to do a backup job for your iOS device to avoid data losing under unexpected situations. To backup iPhone X to computer, here we suggest you to do an amazing backup tool called iOS ToolKit – iOS Backup & Restore. It is a nice data manage tool will help to backup iPhone data computer safely and completely.
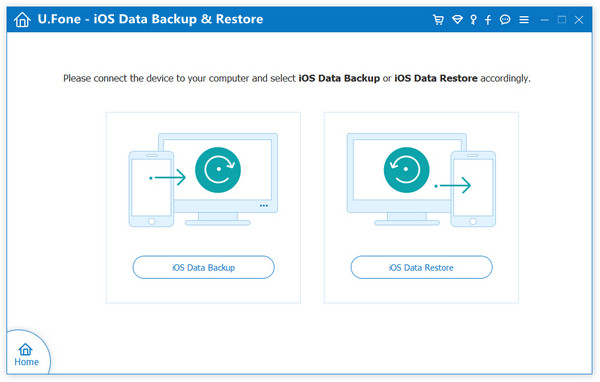
Free Download iOS Toolkit:
More iPhone X Tutorials You could Click:
How to Transfer Android Data Contacts to iPhone X and iPhone XS/Max
How to Import Data to iPhone X from Samsung Android
How to Transfer iPhone Files to iPhone 8/X/XS
How to Backup iPhone X/XS Contacts
How to Backup & Restore iPhone X on the Computer Safely
How to Transfer Videos/Music/Photos to iPhone X/XS
How to Manage Files for iPhone X/XS on the Computer
Recover Data from iPhone X/Xs(Max)

iPhone X/XS Data Recovery
Recover Your iPhone X Lost Data
Now, Even without Backups
Compatible with iOS 12 & iPhone X/XS(Max)
Recover Lost Data Now