All posts by DHZ

How to Import Music/Videos to Huawei Mate 10

I need some help. I got a new Huawei Mate 10 phone. Previously I backup the the favorite music and videos on the computer from my old device. Now I want to know is there an easy way to import the media files from computer to my new Huawei Android in minutes?

The Huawei Mate 9 is a great device that hasn’t quite grabbed as much attention on the market as a lot of its rivals. This year, Huawei plans on changing that with its successor. Once again, the Mate 10 fall into the phablet territory thanks to its large screen and will go head to head with the likes of the Galaxy Note 8, LG V30, and the upcoming Google Pixel 2 XL, among other devices. It’s no doubt that Android fans update to Huawei Mate 10. How to sync files with the new Huawei Mate 10, especially the media files, for example, music and videos. This post will going to share a useful solution with you, which helps to import music and videos to Huawei Mate 10 with easy steps.

Android Manager – Transfer Media Files to Huawei Mate 10

In this case, we suggest you to use this Android Manager. With the help of Android Manager, you can easily transfer music/videos between Huawei Mate 10 and computer. Android Manager is a practical tool help for managing and transferring files of Android on the computer freely, including music, videos, photos, contacts, SMS, apps. What can Android Manager also do for you, transfer files between Android and computer, transfer files between Android and mobile device, transfer files between Android and iTunes. Except for Huawei Mate 10, other models of Android are also compatible with this program, like Samsung, Motorola, Lenovo, HTC, Sony, LG, OnePlus, Huawei, etc,.

d_win d_mac

Kind Tips: If you seek a reliable YouTube to MP3 Converter, 4kFinder YouTube Music Downloader is the tool that allows you to download YouTube videos and music as MP3 or M4A files faster with better quality. Then, you can offline enjoy YouTube music on any MP3 player, iPhones, Android phones.

Part 1: How to Import Music from Computer to Huawei Mate 10

To begin with , run Android Manager on the computer and connect Huawei Mate 10 to the computer. Your device will be detected and displayed in the primary window soon.

android manager main page

Step 1.Select Music File to Transfer
Select “Music” tab.Once your media loads, click Add > Add File or Add Folder.

sync music from pc to huawei mate 10

Step 2.Transfer Music from Computer to Huawei Mate 10
It will bring up your file browser window, from which you can select songs to export from your computer.And you can also create a new playlist by right clicking “Music” to save the imported songs.You are allow to simply Drag and Drop music files from computer to your Huawei phone.

d_win d_mac

Part 2: How to Import Videos from Computer to Huawei Mate 10

Launch Android Manager and connect your Huawei Mate 10 to the computer.Your Android phone will be detected and displayed in the primary window of program soon.

android manager mian page

Step 1.Select Videos Tab
Select the “Videos” tab.Once your media loads,click Add > Add File or Add Folder.

add videos from pc to huawei mate 10

Step 2.Transfer Videos from Computer to Huawei Mate 10
This brings up your file browser window,from which you can select videos to import from your computer.All videos imported can be watched with the built-in player.You can simply Drag and Drop videos from computer to Huawei phone.

d_win d_mac

Related Article:

How to Backup and Restore Huawei Phone

How to Recover Data from Huawei Phone

How to Transfer Data to Huawei Mate 

How to Transfer iTunes Music to Huawei Mate

How to Transfer Music between Huawei Phones

How to Manage Huawei Mate 9/Mate 10 on Computer


How to Sync and Play Apple Music to iPhone X

[Summary]:Want to play Apple Music on your iPhone X offline?Looking for a way to download Apple Music onto iPhone X after cancel your Apple Music subscription?Just using Apple Music Converter to remove DRM from Apple Music and convert them to MP3 or M4A,then move the converted Apple Music files to your iPhone X for enjoying without limitation.

I got a new iPhone X to replace my old iPhone. How to play the purchased Apple music on my new iPhone X for free and quit the time limitation? Is it possible? Please give me some advice.”

The iPhone X is the first drastic new design we’ve seen on an iPhone since the iPhone 6, a phone released back in 2015. And it comes with new features and flourishes we’ve never seen before from Apple. We have seen them from other smartphone manufacturers, though. It’s a big claim that the X is the future on the smartphone. More and more people like to listen to music via mobile device. After getting a new iPhone X, most of us will consider that how to play the Apple music on it. Apple music collect most of the popular music around the world. How to play the purchased Apple music on iPhone X for free without time limitation? Let’s conclude a wonderful solution, to help you convert and play Apple music on iPhone X for free with only a few clicks.

Convert Apple Music to MP3 and Play on iPhone X for Free

Apple Music Converter could do you a favor, absolutely help you remove DRM protection from Apple music, rip and convert Apple music to MP3 with 16X speed, then you can play the converted Apple music on iPhone X for free without time limitation. When the conversion is complete, you can easily playback the converted Apple music on any computer and audio devices such as iPod, PSP, Zune, MP3 player, mobile phones, etc,. Apple Music Converter works well for most of iOS devices, including iPhone X, iPhone 8, iPhone 7, iPhone 6S/6, iPhone 5S/5, iPad and iPod.

d_win d_mac

Simple video tutorials:

Easy Steps to Stream Apple Music on iPhone X

Step 1. Download and Run Apple Music Converter on the Computer
First of all, please download and run Apple Music Converter on the computer.

apple music converter main page

Note: iTunes will run automatically at the same time when you run Apple Music Converter on the computer.

Step 2. Select Apple Music for Converting
The program will load all the Apple Music songs and playlists you have added to iTunes library in the interface of Apple Music Converter program, including iTunes songs, movies, TV shows, audiobooks, and more. Click the checkbox before the Apple Music songs you need to convert. Tips: You can search the Apple Music songs in the searchnox that you want to convert.

select apple music to convert

Step 3. Setting the Parameter for Converted Apple Music
Click to set the data of the converted Apple music and a window will pop up for prompting to make the settings. You are allowed to set the converting speed (up to 16X) and the Apple music output format, and others.

Setting the Output Profile of Converted Apple Music:

setting output profile of converted music

Setting Conversion Speed of Converted Apple Music:
If you would like to change the conversion speed, then go to Options>>General.One the preferences windows to “Set Custom conversion speed for audio convert (1-16)” to adjust the conversion speed.

setting conversion speed

Step 4. Convert Apple Music to MP3 for iPhone X
Simply click “Start Convert” button to begin to convert the selected Apple music to MP3 files. It will done within minutes.

convert apple music

Now the selected Apple music have been converted to the free MP3 files without DRM protection. You are allowed to play the converted Apple music offline on your iPhone X freely.

You can explore the output files and folders by clicking “Open Output File” button to browse the converted music files on the computer.

browse converted music

Step 5.Play the Converted Apple Music on iPhone X Freely
You have finish converting the protected Apple music from M4P to MP3 for free without limitation,you can play all converted MP3 Apple music on iPhone X for free without iTunes even without time limitation.To import the converted Apple music to iPhone X, you could try this iOS Manager.

Guide: How to Import Music from Computer to iPhone X

import music to iPhone X width=

d_win d_mac

Related Article:

How to Make Apple Music Available Offline on iPhone X

How to Listen to Apple Music Offline

How to Play Apple Music on Chromebook

How to Keep iTunes Music Songs Forever

How to Rip Apple Music For Free

How to Record Apple Music M4P Streams as MP3

Remove DRM and Play Apple Music on iPhone without Limitation

How to Play Apple Music on iPhone 7/6S/6 for Free

How to Play Apple Music on Android

How to Transfer Videos to Google Pixel 2

I bought a new Google Pixel 2 recently,but I have so many data that I don’t know how to put into my new sell phone,especially the videos.I have taken a lot of videos about my son since he was born.It’s so valuable that I want to see it whenever I want by syncing from computer to my new phone, it’s there any reliable methods I can use?THX.

On the one hand, Many of us like to download some MV of our favorite idol or favorite songs,take some videos on a important day as a souvenir.Record something or someone memorable that happens around us. On the other hand,people now prefer to watch videos and movies via mobile devices especially travelling in somewhere without Internet connection.Thanks to smartphone,videos become a important part of our life.However,how to transfer videos to the mobile device so that we can enjoy the films anywhere as we like?How can you make the transfer task more quickly and efficiently?The article below will introduce the solutions about how to transfer videos from computer to Google Pixel 2.

Sync Videos from Computer to Google Pixel 2

Android Manager empowers you to import videos from computer to Google Pixel 2 convert to the the incompatible Android easily. Why should we choose Android Manager?With these software,you can transfer and backup videos, contacts, photos, music, SMS, apps on your iOS & Android devices. With this program, you can share your videos with your friend’s video player, or transfer videos from Android phones and tablets to PC. Importantly,it can fully compatible with iOS 11 and Android 8.0.Also supported Android devices including Google Pixel, Sony, Lenovo, Samsung, Motorola, OnePlus, HTC, Huawei, etc.Now,I know you can’t wait to learn how to use Android Manager.The part below shows you the step-by-step guide.

d_win d_mac

How to Import Videos from Computer to Google Pixel 2

To begin with,please launch Android Manager and connect your Google Pixel 2 to computer. Your Android device will be recognized and displayed in the primary window of program.

android manager mian page

Step 1.Select Videos to Transfer
First of all, select “Videos” tab. Once your media loads, then click Add > Add File or Add Folder.

select videos to transfer

Step 2. Transfer Videos from Computer to Google Pixel 2
This brings up your file browser window, from which you can select videos that you want to import from your computer. All videos you imported before can be watched with the built-in player.

Note: You can also simply drag and drop videos from computer to Google Pixel phone.

d_win d_mac

Related Article:

How to Transfer Music to Google Pixel/Google Pixel 2

How to Transfer Photos to Google Pixel/Google Pixel 2

How to Transfer Samsung Data to Google Pixel/Google Pixel 2

How to Transfer Android Data to Google Pixel/Google Pixel 2

How to Play Apple Music M4P on Android Phone

How to Transfer Videos to Samsung Galaxy Note 8

Is there any solution to transfer videos to Samsung phone with only a few clicks? I got a new Galaxy Note 8 phone as the gift from my husband. Now I need a safe way to import videos from the computer to the new device. How? Please let me know ASAP.

Samsung Galaxy Note 8 is the most hottest models of Samsung series phone. There are so many Samsung fans purchased the new device. When you got a new Galaxy Note 8 phone, you would need to transfer your important data files from your existent phone to the new one, for example,the videos. While moving data from one smartphone to another, we often end up losing the data with some wrong ways. Therefore, all of us should know how to transfer files to Galaxy Note 8 with a safe solution. In this post, we will recommend an useful program helps to import video and other files to Samsung Galaxy Note 8 with a few clicks.

Import Videos to Galaxy Note 8 with Android Manager

In order to import videos to Samsung Galaxy Note 8 with simple steps, you should try this Android Manager. This is a famous data manager for Android devices. The types of files can be transferred and managed by Android Manager including videos, music, photos, contacts, SMS, apps. Android Manager allows to transfer files between Android and computer/iTunes/iOS device/Android device with only a few clicks. Android Manager works well for most of Android devices, such as, Samsung (Note 8/5/4/3), HTC, Lenovo, Motorola, Google Pixel, Huawei , and so on. Let move to the next part to see how the smart program works for Samsung Galaxy Note 8.

d_win d_mac

Part 1: Transfer Videos from Computer to Samsung Galaxy Note 8

Launch Android Manager and connect your Samsung Galaxy Note 8 to the computer.Your Samsung phone will be detected and displayed in the primary window of program soon.

android manager mian page

Step 1.Select Videos Tab
Select the “Videos” tab.Once your media loads,click Add > Add File or Add Folder.

add videos from pc to samsung galaxy note 8

Step 2.Transfer Videos from Computer to Samsung Galaxy Note 8
This brings up your file browser window,from which you can select videos to import from your computer.All videos imported can be watched with the built-in player.You can simply Drag and Drop videos from computer to Samsung phone.

d_win d_mac

Part 2: Transfer Videos from iTunes to Samsung Galaxy Note 8

Launch Android Manager and connect your Samsung Galaxy Note 8 to the computer.Your Samsung phone will be detected and displayed in the primary window of program.

Step 1.Select the Transfer Mode
Simply click “Transfer iTunes Media to Device” on the main interface of program.Or find the “Transfer iTunes to Device” option under Toolbox > Transfer Tools section.

android manager mian page

Step 2.Transfer Videos from iTunes to Samsung Galaxy Note 8
Check options and start to copy videos from iTunes to Samsung.All the iTunes files will be scanned and will be shown under different categories like music, movies, podcasts and others. By default, all the file types will be selected but to transfer only the video files, you can uncheck the others. Click “Transfer” to start transferring.

transfer itunes videos to samsung galaxy note 8

d_win d_mac

More Tutorials You May be Interested In:

How to Manage Samsung Galaxy on the Computer Freely

How to Transfer Data from iPhone to Samsung Galaxy Note 8

How to Transfer Data from Android to Samsung Galaxy Note 8

How to Switch Everything from Samsung to Galaxy Note 8

How to Stream DRM-free Apple Music to Samsung Galaxy

How to Transfer Music to Google Pixel 3a/3/2(XL)

I bought a new Google Pixel 2 phone for a week. I try to import the media files to the new phone with USB as usual. However it didn’t work. I’m not sure what’s wrong with it. Are there other ways to transfer music to my new Pixel phone with its original quality? Thanks advanced.

Nowadays people like to sync music on the Android phones then listening music on device or sharing music with friends. There is a need for you to transfer music from computer to Android phone. If you’ve just bought a shiny new Google Pixel/Pixel 2 phone, you might want to copy your favorite music collection to your new device. How to transfer music from your Mac, Windows PC iTunes or other mobile devices to your new phone, as well as copy other media files such as videos and photos on the new device? Here’s how to transfer music to Google Pixel 2 with easy steps.

Import Music to Google Pixel 2 with Android Manager

Android Manager offers a wonderful solution for you, to import music to Google Pixel 2 with only a few clicks. Let me introduce this powerful Android Manager to you. It’s a data manager for Android phones or tablets, helps to transfer & manage data for Android on the computer conveniently, including music, videos, photos, contacts, SMS, apps. Android Manager give you a great help of transfer files between Android and computer/iOS device/Android device/iTunes. Almost all Android phones are compatible with the Android Manager, such as, Google Pixel/Pixel 2, Samsung Galaxy S7/S6/S5, Huawei Mate 9/10, HTC, Lenovo, Motorola, etc,.

d_win d_mac
d_win d_mac

Part 1: Import Music from Computer to Google Pixel 2

First of all , run Android Manager on the computer and connect your Google Pixel 2 phone to the computer. Your device will be detected and displayed in the primary window soon.

android manager main page

Step 1.Select Music File to Transfer
Select “Music” tab.Once your media loads, click Add > Add File or Add Folder.

sync music from pc to google pixel 2

Step 2.Transfer Music from Computer to Google Pixel
It will bring up your file browser window, from which you can select songs to export from your computer.And you can also create a new playlist by right clicking “Music” to save the imported songs.You are allow to simply Drag and Drop music files from computer to your Google Pixel 2 phone.

d_win d_mac

Part 2: Import Music from iTunes to Google Pixel 2

Step 1. Run Android Manager on Computer and Connect Device
Firstly run Android Manager on your computer and connect your Google Pixel 2 phone to the computer via USB. The phone will be detected and displayed in the primary window soon. On the main window of program, click “Transfer iTunes Media to Device” option.

transfer itunes music to google pixel 2

Step 2. Transfer Music from iTunes to Google Pixel 2
Check options and then start to import the music from the iTunes to the Google phone. All files in the iTunes will be scanned and will be shown under different categories such as movies, music podcasts and others. All files are selected by default, but you can uncheck all of them to make sure that you only transfer the music files. Then click “Transfer” to begin transferring the music from iTunes on computer to your Google phone. Android Manager can detect duplicate content, and it enhances the transfer of exclusive content from iTunes.

select itunes music to import

transfer itunes music to google pixel 2

d_win d_mac
d_win d_mac

Related Article:

How to Transfer Photos to Google Pixel

How to Transfer Music and Videos to Google Pixel

How to Transfer Music from Samsung Android to Google Pixel

How to Transfer Music between iTunes Library and Google Pixel

How to Transfer Music from Computer to Google Pixel

How to Play Apple Music M4P on Android Phone

Add Music to Google Pixel

How to Transfer Music from Computer to iPhone X/iPhone 8

[Summary]: How to put/add music to iPhone 8/8 Plus and iPhone X on computer? This guide will tell you how to transfer music from computer to iPhone 8/8 Plus or iPhone X with/without iTunes,however,you can listen to added music on Apple Music App.

When you have bought a new iPhone X or iPhone 8 (Plus),you may want to enjoy your favorite music with iPhone X or iPhone 8,if you don’t want to purchase songs on Apple Music stored,you can free download music on computer or convert Apple Music M4P to M4A,and then transfer music from PC to iPhone X and iPhone 8 (Plus).

transfer music to iPhone x

More Related Tutorial You May Like:

* How to Make Apple Music Available Offline on iPhone 8/X

* How to Transfer Music from iTunes to iPhone 8/X

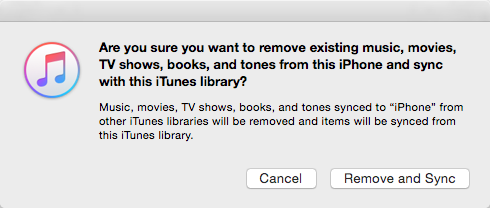
As well all know that the iTunes program is designed to sync music, photos, videos, contacts and SMS between computer and iOS,but it’s very difficult to use and waste time,worse still, every time it syncs, it will erase the previous songs and data on iPhone.Today,we’ll teach you a easy and quickly way to put music from PC to iPhone X or iPhone 8 (Plus) without iTunes.

Let’s learn different ways to transfer music to iPhone X and iPhone 8/8 Plus:

Way 1. How to Transfer Music from Computer to iPhone X and iPhone 8 (Plus) without iTunes

This iPhone X/8 Music TransferiOS & Android Manager, an easy-to-use iOS/Android data transfer and management tool can help you transfer music from computer to iPhone X/8 directly.What’s more,it also allows you transfer music from iTunes to iPhone 8/X; transfer music from old iOS devices to iPhone 8/X; transfer music from Android Samsung to iPhone 8/X.In additional,this iOS & Android Manager enables users transfer and manage music, videos, photos, contacts and text messages on iPhone 8 and iPhone X easily.When you have got a new iPhone 8, iPhone X or iPhone 7,this is a must-have iPhone X/8 manager to manage and transfer iPhone data on PC or Mac.

d_win d_mac

Key Features:

-Transfer Music, Videos, Photos from PC/Mac to iPhone X/8/7S/7/6S/6 (Plus) without iTunes
-Transfer, manage, export/import your music, photos, videos, contacts, SMS, Apps etc.
-Backup your music, photos, videos, contacts, SMS, Apps etc. to computer and restore them easily.
-iPhone X/8 Transfer – Transfer everything from old iOS/Android devices to new iPhone X/8.
-Transfer music, photos, videos, contacts, apps to iPhone X/8/7/6S/6 (Plus) easily.
-Transfer music from iTunes to iPhone X/8 and Android devices,like Samsung Galaxy S8/S7/S6/Note 8, Google Pixel/Pixel 2, HuaWei Mate 11/Mate 10/P10/9, etc.
-Highlighted features such as fix iOS/iPod, rebuild iTunes Library, file explorer, ringtone maker.
-Fully compatible with iOS 7, iOS 8, iOS 9, iOS 10, iOS 11 and iPod.

Easy Steps to Put Music from Computer to iPhone 8 and iPhone X without iTunes

Step 1. Download and Run iPhone X/8 Music Transfer on PC or Mac
Download iPhone X/8 Music Transfer on Mac/PC computer and install it.

d_win d_mac

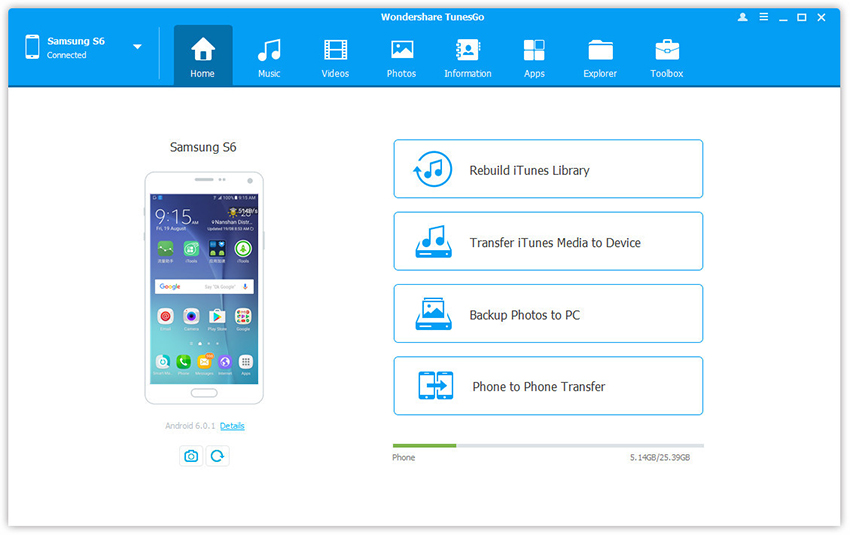
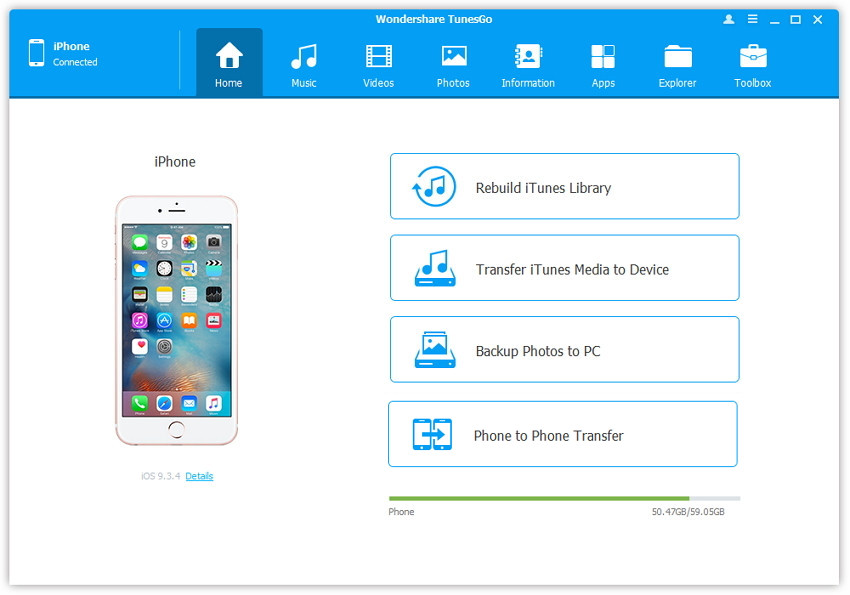
Step 2. Connect iPhone X or iPhone 8 to Computer
Then open it and connect your new iPhone X or iPhone 8/8 Plus to computer via USB cable,when your iPhone is detected by the program,you can see all detailed information of your device.

Run iPhone X/8 Music Transfer

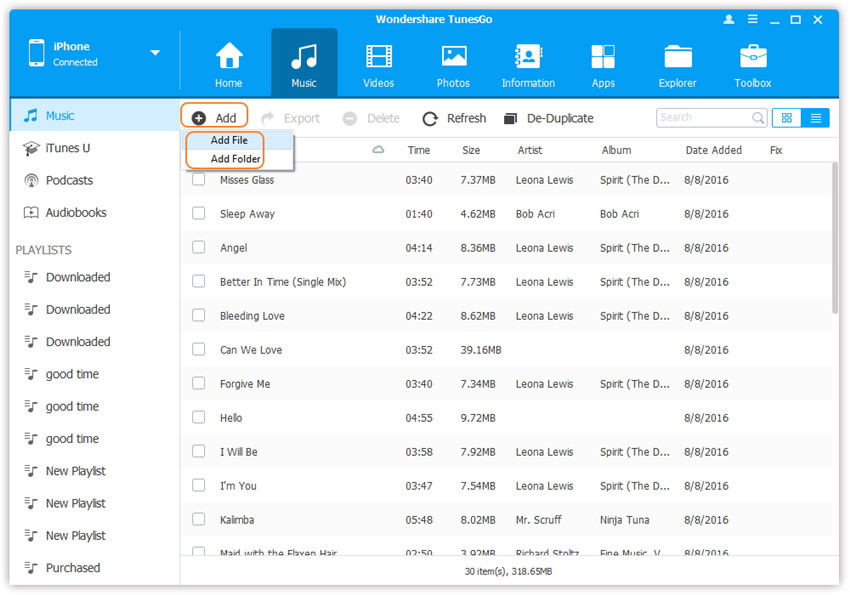
Step 3.Click Music Icon
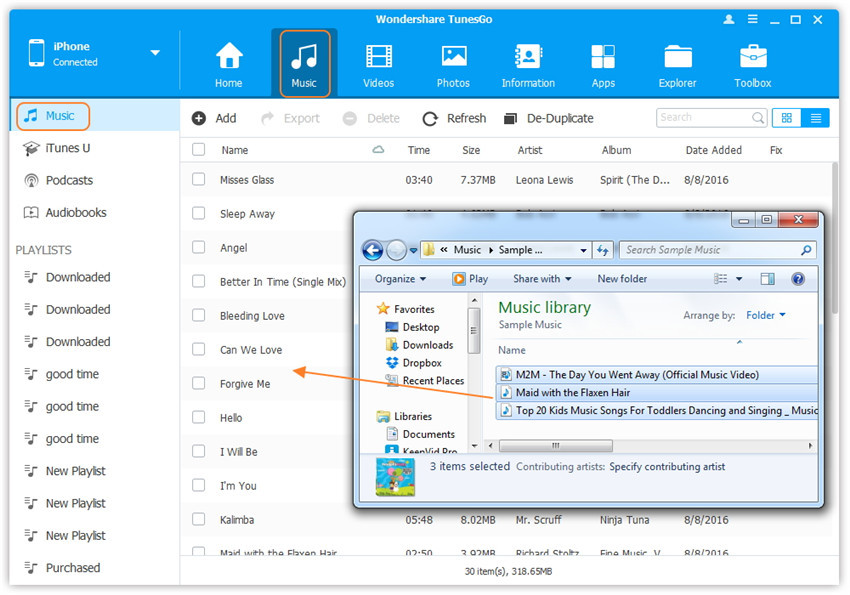
After the iPhone detected successfully,if you just want to add music from computer to your new iPhone X or iPhone 8,please click “Music” icon at the top of the interface,you can see all existing music on your iPhone.

select music transfer to iPhone X/8

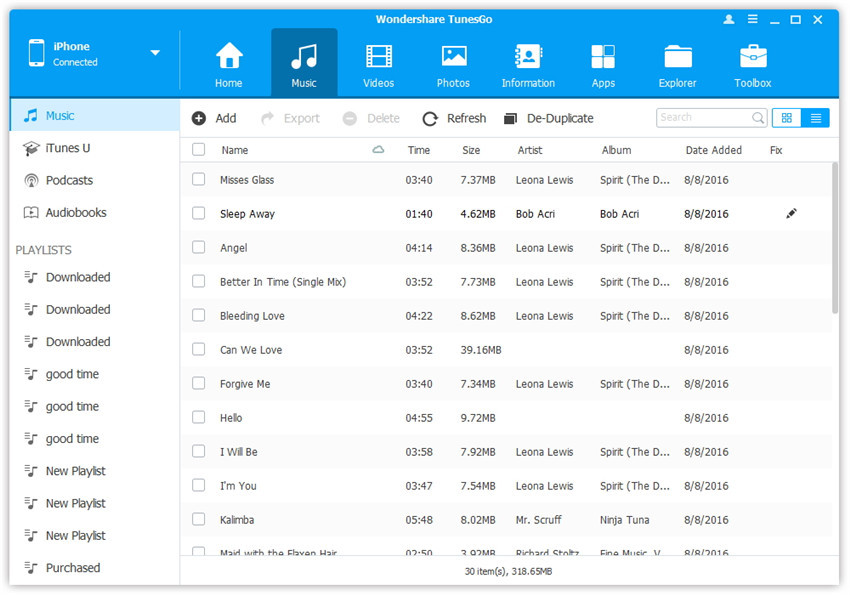
Tips: You can also transfer iTunes U/Podcasts/Ringtone/Audiobooks to your iPhone X and iPhone 8.

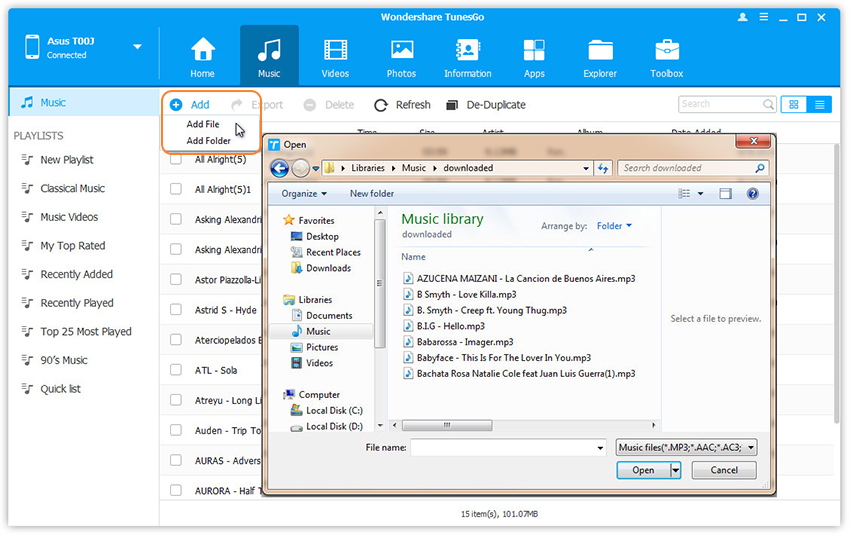
Step 4. Add and Put Music from PC/Mac to iPhone X/8
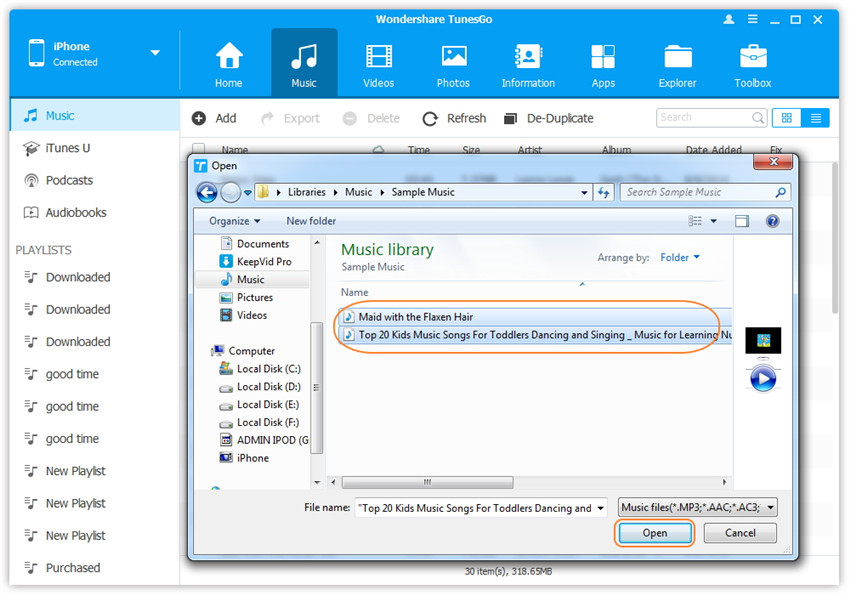
To transfer music from computer to iPhone X or iPhone 8, please click Add >> Add File or Add Folder to import music files from your computer to the program.

Add Folder to add music files to iPhone X/8

After that, click Open to transfer the selected music from computer to iPhone X or iPhone 8/8 Plus.Now,the program will help you import all selected music to your new iPhone,only few minutes,all of you selected music songs be added on your iPhone.

transfer music file from computer to iPhone X/8

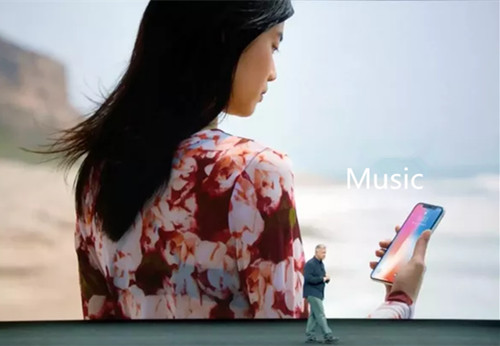
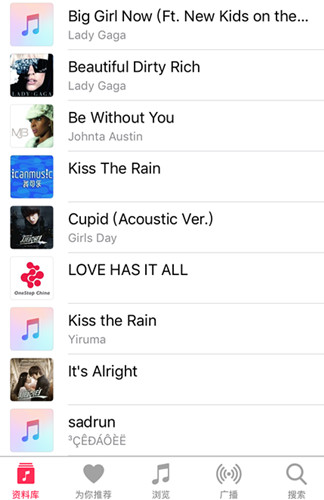
Then open Apple Music app,you can find and listen them with iPhone X/8.

listen to music on Apple Music app with iPhone X/8

Besides transferring music between iPhone and computer, iPhone X/8 Music Transfer & Manager also allows you to transfer music between iPhone and iTunes. Also can help you delete multiple songs from iPhone directly. What’s more,you can also make Ringtone from music and transfer to Ringtone to iPhone X/8 directly.

Free download the iOS Android Manager and try to transfer music from PC/old iPhone iPad/Android to iPhone X and iPhone 8/8 Plus.

d_win d_mac

Way 2. How to Transfer Music from Computer to iPhone X and iPhone 8 (Plus) with iTunes

Above we have teach you how to transfer music to iPhone X/8 without iTunes,in this part,we will teach you how to use iTunes to sync music from computer to iPhone X/8.As well as know that iTunes can help us transfer music to iPhone 8/X, but it will erase the previous songs on your iPhone. If you don’t want to lose anything and prefer an easier way, please go to

to import music to your iPhone 8/X directly without data loss.

transfer music from computer to iphone 8/X with iTunes

Step 1.Run the iTunes on your PC/Mac,and update it to the latest version.
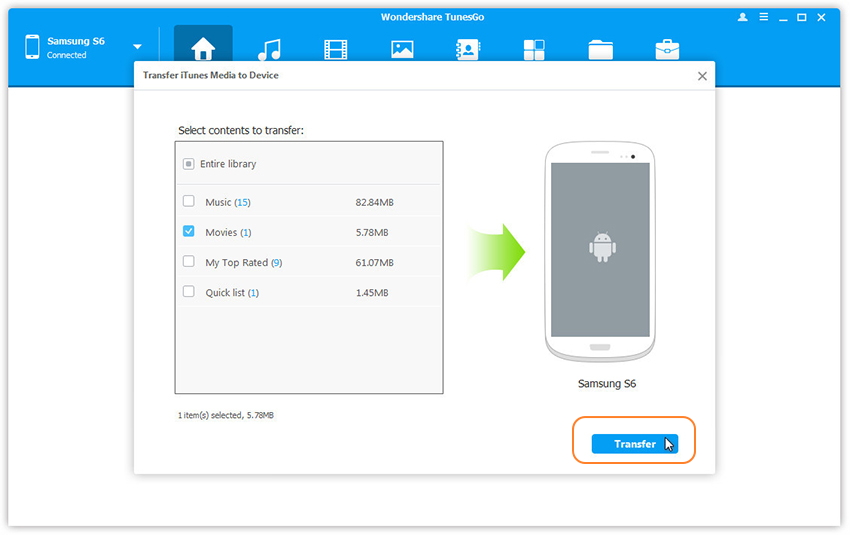
Step 2.Connect your iPhone X or iPhone 8 (Plus) to your computer with its original USB cable.
Step 3.After your device detected by the iTunes program,then click “Music” item under Device >> iPhone option in the left sidebar.
Step 4. Choose the music files you want to add to iPhone X and iPhone 8 (Plus) and drag the music files to the iTunes program in the right sidebar.

iTunes sync music from computer to iphone 8/X

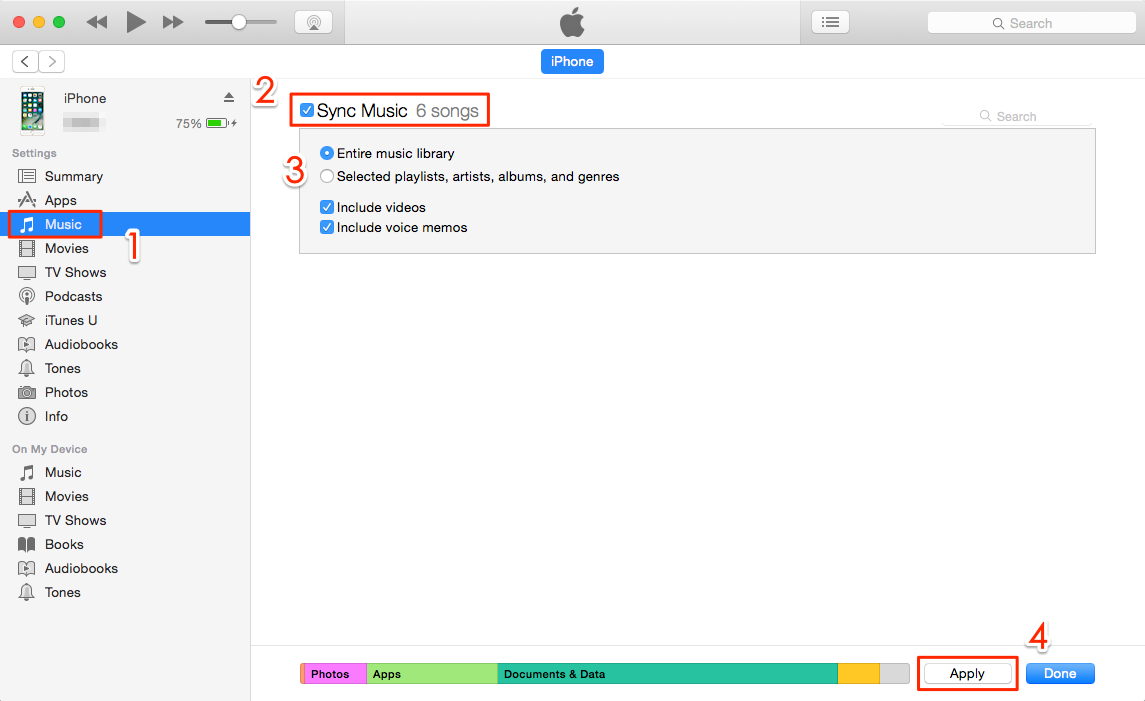
Step 5.Click Apply to start to syncing music from iTunes to iPhone 8/X.After the transferring process done,all music files will added to Apple Music app on iPhone X and iPhone 8 (Plus) and you can enjoy them.

import music from computer to iphone 8 and iPhone X by iTunes

Compared iTunes and iOS & Android Manager

Now,you know how to use iTunes and iOS Android Manager to transfer music from computer to iPhone 8/X,using iTunes to transfer music to iPhone will erase the previous songs on your iPhone and cost you a lot of time.If you use iOS Android Manager to do this job is an easy and quick way,it will not erase any existing data on your new iPhone.Besides music, it also supports transfer photos, videos, ringtones, contacts and more to new iPhone X/8/7/6S/6/SE/5S/5/4S/4.So why not download the iOS & Android Manager and try to import songs to your new iPhone?

d_win d_mac

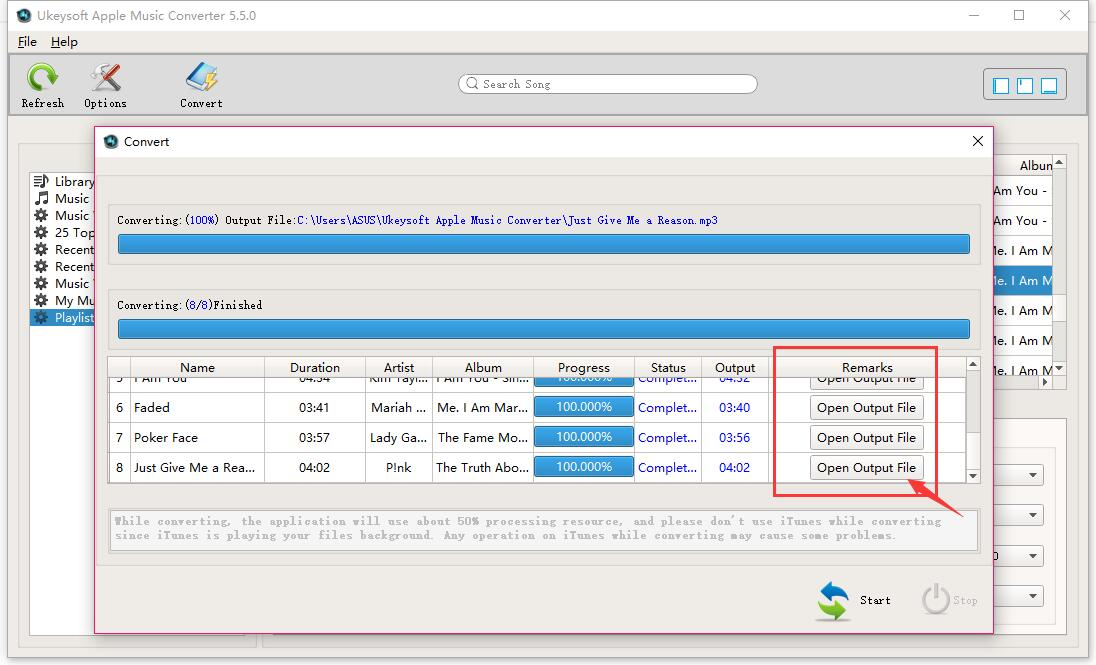
Way 3. How to Play Apple Music on iPhone X and iPhone 8 (Plus) Offline

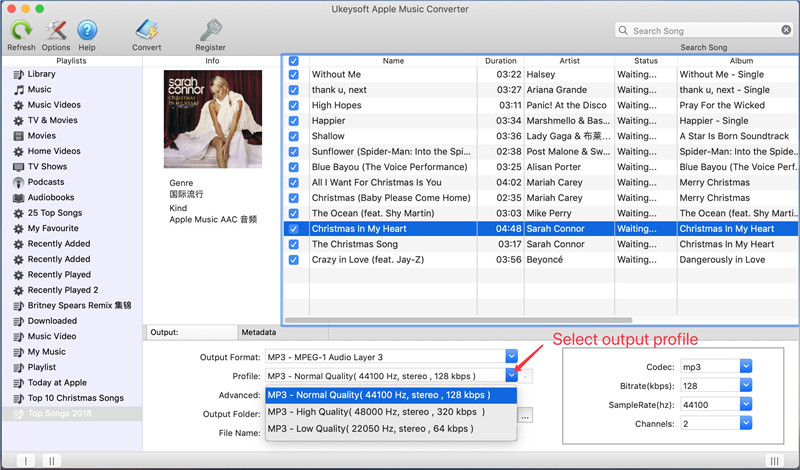
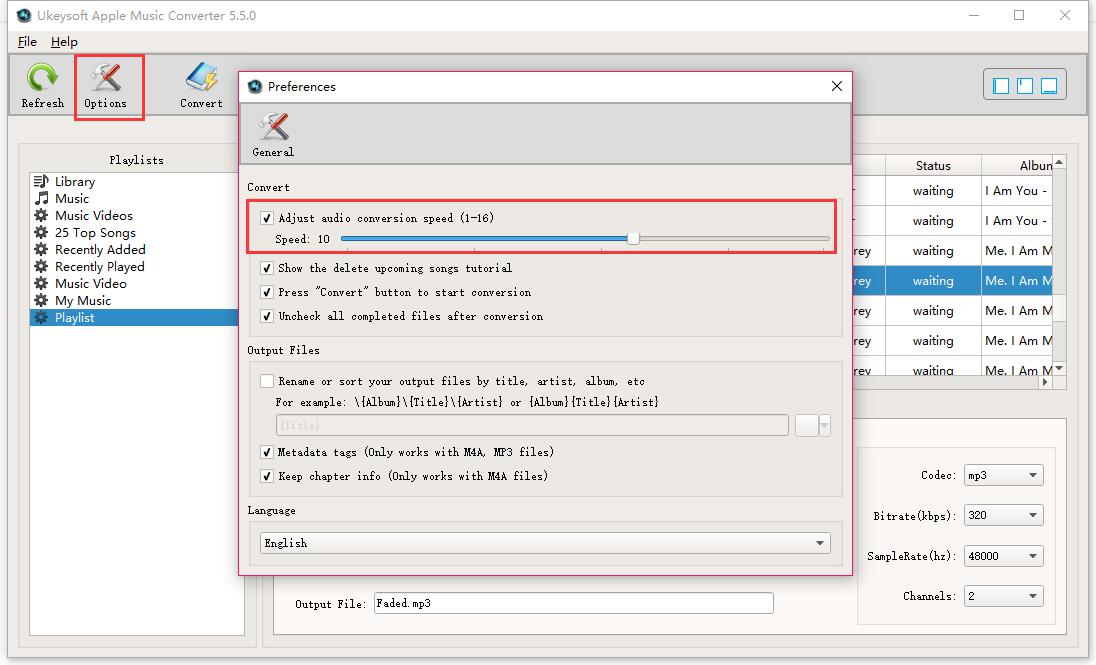
The extra part we will introduce a powerful music converter tool to you, which calls Apple Music Converter. It’s famous for legally remove DRM protection from Apple music, convert Apple music to free MP3 format files, then you can freely play the converted Apple music on iPhone X offline without running Apple music app, even without time limitation. When the conversion is complete, you can playback the converted Apple music on any computer and audio devices such as iPod, PSP, Zune, MP3 player, mobile phones, etc,. Apple Music Converter works well for most of iOS devices, including iPhone X, iPhone 8, iPhone 7, iPhone 6S/6, iPhone 5S/5, iPad and iPod.

d_win d_mac

convert apple music for iPhone x

Detail Guide: How to Convert and Play Apple music on iPhone X

A Smart Music Files Transfer for iPhone

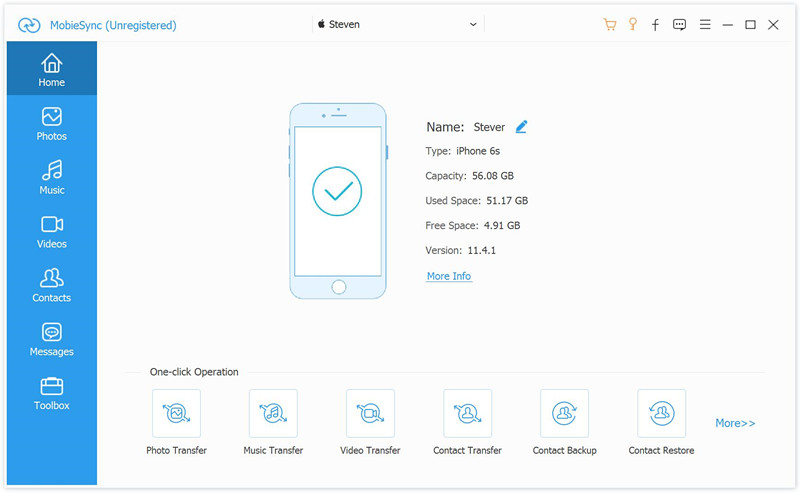
Besides to iOS & Android Manager, there are another smart program here we suggest you try, which is called Mobile Sync, it is capable of transferring music from computer to iPhone X/iPhone 8 with one click. It is the best tool for syncing iOS data between iOS device and computer. In addition to music, it can transfer videos, photos, contacts, text messages and others. Moreover, this program supports to transfer data between two iOS devices directly. Compatibles with all iOS models.

mobile sync home page

Related Articles

How to Transfer Data from iPhone to iPhone X/8– This guide shows a easy way to transfer data including contacts,SMS,photos,videos,calendars,call logs,music,apps and more to new iPhone X and iPhone 8/8 Plus.

How to Sync iTunes Music to Android – Read this guide to see how to transfer iTunes library to your Android phone,like Samsung Galaxy S8/S7/S6/Note 8, Huawe Mate 10/Mate 9/P10, Google Pixel and more.

How to Transfer WhatsApp from iPhone to iPhone X/8 – Want to transfer WhatsApp messages from old iPhone to new iPhone?This tutorial will teach you a easy way to backup, restore WhatsApp data and transfer WhatsApp messages to new iPhone X/8 directly.

How to Transfer Photos from Computer to iPhone 8/X – Read this guide and get 2 ways to add pictures to iPhone X/8 from PC/Mac.

How to Recover Deleted Photos on iPhone 8/X – Accidentally deleted photos on your iPhone?Read this tutorial,you can get 3 ways to recover missing photos from iPhone, iTunes and iCloud backups.

Transfer Music from Computer to iPhone 8

How to Transfer WhatsApp Messages from Old iPhone to iPhone X/Xs(Max)

[Summary]: Have got a new iPhone and want to transfer WhatsApp chat history from old iPhone to new iPhone? This guide teach you two ways to transfer WhatsApp from iPhone to iPhone: Backup WhatsApp data from old iPhone to iCloud and restore to new iPhone from iCloud backups; Directly transfer WhatsApp messages from iPhone 4/4s, iPhone 5/5s, iPhone 6/6s, iPhone SE, iPhone 7/7 Plus to iPhone 8 or iPhone X/Xs(Max)/XR.

People also read:

* Transfer WhatsApp Messages from Android to iPhone

* Transfer Text Messages from old iPhone to new iPhone

I have a question that how to transfer WhatsApp messages from my old iPhone to the new iPhone X with one click? I want to move some WhatsApp conversation with my boyfriend to the new device. The chat history is so meaning to me. Thanks for your suggestion.

WhatsApp is mostly one of the most popular chat apps in the world. It is used by people of all age groups, which lets users communicate with their friends, family, and others in an easy and fast way. However, the dilemma comes with the fear of important WhatsApp data loss while switching to the new phone, for example, the iPhone X, the WhatsApp chat history which may include messages, photos, audio, and attachments. In this post we have specifically attempted to solve the dilemma for those WhatsApp users who need to get solution of how to transfer WhatsApp from old iPhone to new iPhone X and iPhone Xs(Max). If you have bought a new iPhone X device and are wondering how to transfer WhatsApp chat history to the new device in a secure and safe way, this article can help you in getting your answer.

Import WhatsApp Messages from Old iPhone to iPhone X/XS(Max)

To transfer WhatsApp chat history from iPhone to iPhone X/Xs, you can try an well – known professional program calls iOS WhatsApp Transfer tool – iOS Toolkit. This powerful program enables to transfer, backup & restore WhatsApp chat history for iPhone with a simple solution. With the help of WhatsApp Transfer tool, you can easily transfer WhatsApp messages between the old iPhone and the iPhone X. Not only messages, but also the photos, videos and the attachments. All models of iPhone are compatible with iOS WhatsApp Transfer tool, including iPhone Xs Max, iPhone Xs, iPhone XR, iPhone X, iPhone 8, iPhone 7, iPhone 6S/6, iPhone 5S/5C/5.

d_win d_mac

Part 1: Transfer WhatsApp from iPhone 7 to iPhone X/XS(Max) with iCloud Backup

Step 1.Connect your old iPhone to a Wi-Fi network.

Step 2. In iOS 8 or later, tap Settings > iCloud > Backup.

Step 3. Tap iCloud Backup to turn it on.

Step 4. Tap “Back Up Now”. Wait till the backup process is completed. (It may be take you minutes.)

sync whatsapp with icloud

Step 5. Make sure the backup finished by tapping Settings > iCloud > Storage > Manage Storage. The backup you just made should appear with the correct date and backup size.

Step 6. Open your iPhone X and restore the WhatsApp from the iCloud Backup your just have created. After that your messages will be available in WhatsApp installed to the target iPhone.

Part 2: Transfer WhatsApp Messages to iPhone X/XS(Max) with iOS WhatsApp Transfer

Step 1.Run Program and Connect Two iPhone to the Computer
To transfer WhatsApp messages from old iPhone to iPhone X,you should click “Transfer WhatsApp messages” under the “More Tools” mode of iOS WhatsApp Transfer tool.Then connect your two iPhone devices to the computer.Once the program detects them, you will get the window as follows.

iOS WhatsApp Transfer main page

Step 2.Transfer WhatsApp Messages between iPhone
Click “Transfer” to begin the WhatsApp message transfer process from old iPhone to iPhone X.You should click “Yes” to confirm this action if you want to move forward.

click transfer to begin transfer process

transfer whatsapp chat history to iphone x

Then the transfer process starts.

Wait until the WhatsApp messages transfer task is completed.Please keep your devices are connected well during the transfer process.When you see the window below,you can disconnect your devices and view the transferred data on your iPhone X.

transfe whatsapp messages to iphone x completed

d_win d_mac

More WhatsApp Tutorials You May be Interested In:

How to Backup,Restore and Transfer WhatsApp Messages

How to Transfer WhatsApp Messages to iPhone 8/7

How to Transfer WhatsApp Chats History to iPhone 8/7/6S

How to Transfer WhatsApp Messages from iPhone to Samsung Galaxy

How to Transfer Data to a New iPhone X

How to Recover Deleted WhatsApp Messages from iPhone

Transfer iPhone WhatsApp Messages

How to Fix Samsung Stuck at the Startup Screen

My phone stuck at the startup screen and it can’t get into the normal state automatically. How to fix it to the abnormal state? Are there any ways to fix Samsung stuck at the startup screen without losing data?

fix samsung stuck at the startup screen

Samsung is the most popular brands of Android mobile phones, there are quite a large number of Samsung fans around the world. However, even though most of us are highly careful when using our phones, accidents happen without giving us a single notice of caution. For example, some software error occurs on Samsung, Samsung stuck at the startup screen. When your phone get into this troublesome situation, you must feel worry about it. Next comes the fear about the precious data saved on the phone. Fortunately, you can fix Samsung stuck at the startup screen without any loss with a wonderful software calls Broken Android Data Recovery.

Fix Samsung Stuck at the Startup Screen with Broken Android Data Recovery

As its name, Broken Android Data Recovery can exactly download the recovery package for Samsung and fix Samsung stuck at the startup screen without data loss and extract data from the Samsung selectively. What’s more, this program allows to fix most broken kinds of Android phones, like stuck at the startup screen, stuck in the Download Mode, stuck at the black screen, and other bricked issues. Broken Android Data Recovery supports to most of Samsung phones, including Galaxy S6/S5/S4, Note 5/4/3, etc,. Let’s see how the Broken Android Data Recovery help you to get Samsung into the normal state without losing data.

d_win d_mac

Fix Samsung Stuck at the Startup Screen with One Click

Step 1.Connect the Abnormal Samsung to the Computer
Download and Run the Broken Android Data Recovery Tool program on your computer and then connect your abnormal Samsung phone to computer with USB cable, the program now will detect your phone soon. Click on “Broken Android Data Extraction” mode when the following screen appears.Then click “Start” button on the right under the Android logo.

broken android data recovery main page

Step 2.Select the Bricked Type of your Samsung 
Now you should select the bricked situation that match your Samsung device.The program will enter the following interface. Please choose a kind of situation depends on your phone. In this case, you should select “Stuck in the Startup Screen“. Then click “Next“.

select the bricked type

Step 3.Select the Phone Name and Model of your Samsung
You should select the proper Android system as well as the exact model of your Samsung.Then click “Confirm“.

select the model of abnormal samsung

Step 4.Enter Samsung into the Download Mode
In this step the program will ask you to get the abnormal Samsung into the Download Mode manually. Power off your Samsung phone completely. Then press and hold “Volume Down + Home + Power” button on your phone together. After that, your phone will enter to the “Download Mode” successfully.

get samsung into download mode

Step 5.Analyze the Abnormal Samsung and Download Recovery Package for Fixing
Your Samsung will be detected in this step and it is necessary to keep connecting the device with computer so that the program will analyze and display the device model and Android version of your Samsung in the interface of program.

analyze samsung phone

Once the recovery package downloading is finished,the program will begin to fix your Samsung stuck at the startup screen to normal state without data loss. After a little while, your device will restart as usual. Now, you can check your Samsung and make sure whether it can work or not.

Step 6.Recover/Extract Data from Samsung 
Then the program will help you scan and extract/recover files from Samsung phone. Now you can select the data you want and then click “Recover” button to extract/restore the selected data from Samsung to the computer.

recover data from Samsung

d_win d_mac

Related Articles:

How to Fix Frozen Samsung to Normal

How to Fix Samsung Galaxy Stuck in Download Mode

How to Fix Bricked/Disabled/Frozen Samsung to Normal

How to Fi Samsung Galaxy S7 Stuck on Samsung Logo

How to Fix Samsung Phone Frozen on Samsung Screen

How to Fix Bricked, Disabled or Frozen Samsung to Normal

My Samsung phone is bricked, it suddenly get bricked when I was playing the game just now, what’s wrong with it? How to fix the bricked Samsung to normal?

My Samsung phone is frozen it might be due to I installed some harmful third-party apps on it, how to return my phone to the normal state without data loss?

What will Cause Samsung get Bricked/Disabled/Frozen
There are various kinds of reasons will lead to your Samsung phone gets bricked. Here we collect that get bricked on Samsung in the following situations:

1. Flashing Stock/Custom ROM. It could be that you have installed a incompatible ROM on the Samsung phone, the phone powers off in the process or other misoperations that cause Samsung phone restart endlessly, get stuck at startup screen.

2. Rooting your Samsung phone. You fail to root the device properly.

3. Updating Android firmware. The phone will get bricked/disabled/frozen if it is interrupted when updating the Android firmware on it.

4.Installing malicious software on your Samsung phone and then getting virus attacked on it.

Samsung Phone Get Bricked/Disabled/Frozen

For most of Samsung users, they may ever meet the trouble situation that like Samsung get bricked, Samsung is disabled, Samsung is frozen. The worse is that you find that your phone won’t boot as usual. However, not all Samsung users has a clear understanding of what a bricked/disabled/frozen phone really means, and more importantly what to do to fix this abnormal phone. You must be confuse that what’s happen on the phone and be worry about that if the Samsung data will get lost in this abnormal state. This guide is going to give you a full introduction of fix bricked, disabled or frozen Samsung to normal without data loss.

Fix Abnormal Samsung to Normal – Broken Android Data Recovery

Broken Android Data Recovery which could help you fix bricked/disabled/frozen Samsung to normal without data loss. What’s more, this program also supports to fix other abnormal states of Android, including crashed, stuck in the startup screen, stuck in the Download Mode, stuck at black screen, get virus attack, screen-locked and others; and extract data from the device to the computer at the same time. Support almost all Samsung phones like Samsung Galaxy S(S4, S5, S6, Samsung Galaxy Note(Note 3, Note 4, Note 5), Samsung Galaxy Tab(Tab Pro 10.1), etc,.

d_win d_mac

How to Fix Bricked/Disabled/Frozen Samsung to Normal

Step 1.Connect the Bricked/Disabled/Frozen Samsung to the Computer
Download and Run the Broken Android Data Recovery Tool program on your computer and then connect your abnormal Samsung phone to computer with USB cable, the program now will detect your phone soon. Click on “Broken Android Data Extraction” mode when the following screen appears.Then click “Start” button on the right under the Android logo.

broken android data recovery main page

Step 2.Select the Bricked/Disabled/Frozen Type of your Samsung 
Now you should select the bricked/disabled/frozen situation that match your Samsung device.The program will enter the following interface. Please choose a kind of situation depends on your phone. Then click “Next“.

choose the bricked type

Step 3.Select the Phone Name and Model of your Samsung
You should select the proper Android system as well as the exact model of your Samsung.Then click “Confirm“.

select the model of bricked samsung

Step 4.Get Samsung into the Download Mode
In this step the program will ask you to get the abnormal Samsung into the Download Mode manually. Power off your Samsung phone completely. Then press and hold “Volume Down + Home + Power” button on your phone together. After that, your phone will enter “Download Mode” successfully.

get samsung into download mode

Step 5.Analyze the Bricked/Disabled/Frozen Samsung and Download Recovery Package for Fixing
Your Samsung will be detected in this step and it is necessary to keep connecting the device with computer so that the program will analyze and display the device model and Android version on the interface of program.

analyze bricked samsung

Once the recovery package downloading is completed,the program will begin to fix your bricked/disabled/frozen Samsung to normal state without data loss. After a few seconds, your device will restart as usual. Now, you can check your Samsung and make sure whether it can work or not.

Step 6.Recover/Extract Data from Normal Samsung 
Then the program will help you scan and extract/recover files from Samsung phone,click “Recover” button to extract from Samsung and save all the selected data on the computer.

recover data from Samsung

d_win d_mac

More Samsung Tutorials You May be Interested In:

How to Fix Bricked Samsung Phone

How to Fix Samsung Phone Frozen on Samsung Screen

How to Fix Samsung Galaxy Blank Screen of Death

How To Fix Samsung Galaxy Stuck in Download Mode

How to Restore Data from Bricked Samsung

How to Recover Data from Samsung Galaxy

How to Recover Deleted Data from Samsung Galaxy Note 8

In the past two years, Samsung has released several flagship mobile phones, mainly the Galaxy S series and the Galaxy Note series: Galaxy Note 8, Galaxy Note 7, Samsung Galaxy S9/S9+ and Galaxy S8/S8+/S7/S7 Edge,rumors the Samsung company will release Samsung Galaxy X,which is the story of Samsung’s foldable phone so far.As for the Note series, especially the Galaxy Note 8,it is sought after by many business people.However,no matter what series of Samsung phones you use,when you deleted or lost data on Samsung phone,what you need is a profesional Android recovery tool to recover files from your Samsung phone,becuase the Samsung phone running Android OS base on Android 8.0 Oreo/7.0/6.0/5.1/5.0/4.4/4.3/4.2 and previous Android OS.

samsung note 8

We can find lots of similar questions like “Is it possible to recover deleted data from my Samsung Galaxy Note 8?”, “How to recover deleted photos on Galaxy Note 8 directly” on the Internet. As the deleted data still in the phone internal memory until that the deleted data is overwritten by new data. Actually, if you stop using your device immediately avoid covering the existent data on device, the deleted data are possible to be restored with the help of some professional data recovery.

Restore Deleted Data from Samsung Galaxy Note 8

To recover deleted data from Samsung Galaxy Note 8, we recommend this wonderful Android Data Recovery for you. Android Data Recovery is a secure and powerful tool that can be used to restore deleted data from Samsung Note 8, including the deleted photos, videos, contacts, messages, call logs, and more data. All data loss situations are supported by Android Data Recovery, for example, deleted by mistake, Android system update, Android system Room, restore device to factory reset, and others. Android Data Recovery works for all kinds of Samsung device, including Samsung phones and tablets, such as, Samsung Galaxy Note(8/6/5/4), Samsung Galaxy(S9/S8/S7/S6/S5), Samsung Captivate, Samsung Galaxy Ace, Samsung Infuse, Galaxy Nexus, and more.

d_win d_mac

How to Restore Deleted Data from Samsung Galaxy Note 8

Step 1.Run Program and Connect Samsung to the Computer
After you installing and running the Android Data Recovery program on the computer, you will see the main window below,click”Android Data Recovery” mode in the home page of program.Then please connect your Samsung phone to the computer via an USB cable.

connect samsung to the computer

Step 2.Allow Program Connect Samsung on the Computer
Please click “OK” on the phone and go on.

allow to connect samsung

Step 3.Select  the File to Restore from Samsung
After allowing program detect your device on computer, you’ll see this window,different types of files can be chose to be scan by program.Here,you should select deleted files from Samsung that to be scanned and then click “Next” to enter the next step.Note: You can click “Select all” to have all your Samsung data scanned.

select file to recover from samsung

Step 4.Allow Scanning and Analyzing Data on Samsung 
You’ll get a window as follow on your device after your device is detected by the program.Tap “Allow” on your device to enable the program to scan your device for deleted data.

allow scanning samsung

Tips:Please make sure that your phone battery is more than 20% charged and keep the connection between your phone and the computer.

Step 5.Scan Samsung for Deleted Data
Now the program will begin to scan data on your Samsung phone.The scanning process will take you only a little time.

scan samsung for deleted data

Step 6.Recover Deleted Data from Samsung Galaxy Note 8
When the scan is over, you are allow to preview all data found on your Samsung, including messages, contacts,photos and more. Mark those data you want to recover by clicking “Recover” button to save them selectively on your computer.

recover deleted data from Samsung Galaxy Note 8

Tips:You can switch the “only display the deleted item(s)” option on,to view the deleted data only.

d_win d_mac

More Samsung Tutorials You May be Interested In:

How to Recover Deleted Files from Samsung Galaxy

How to Recover Lost Data from Samsung Galaxy

How to Recover Deleted/Lost Data from Samsung Galaxy S7/S6

How to Recover Data from Broken Samsung Galaxy Note 5/4/3/2

How to Manage Samsung Galaxy S6/S5/S4/S3/Note 8 on the Computer

How to Transfer Data from iPhone to Samsung Galaxy Note 8