All posts by DHZ

How to Fix Frozen iPhone after iOS 11 Update

After updating my iPhone to the latest iOS 11 then the device was frozen. Now, I’m not able to work with my iPhone. I have some important files in my phone that are required for the coming meeting. I need help urgently. Thank you so much. ”

The newest iOS 11 system contain so many new functions that may be attractive by iOS users. People are expected about the new features and improvements with the latest iOS 11 system for iOS devices, unfortunately many iOS users have experienced the issue of iPhone freezing during or after the updating process of iOS 11. It’s very disappointing for Apple fans. Luckily, we’ve gathered 3 useful ways to help fixing iOS 11 stuck on installing and running effectively. Let’s focus on the tutorials following and fix your frozen iPhone after iOS 11 update on your own.

Part 1: Fix Frozen iPhone after iOS 11 Update by Force Restart

When iPhone get frozen after iOS 11 update, the first possible way to fix it is reboot your device. To do this, press and hold the “Power” and “Home” buttons simultaneously for at least 10 seconds, when the Apple logo appears on iPhone screen, release both buttons. For iPhone 7 and iPhone 7 Plus users, press and hold the “Sleep” button and “Volume Down” buttons on the device for 10 seconds to restart it.

restart iphone

Part 2: Fix Frozen iPhone after iOS 11 Update by iTunes Restore

Sometimes you can fix a frozen iPhone by getting the device into the Recovery Mode. It’s pretty simple to enter Recovery Mode on the frozen iPhone:

Step 1. Open iTunes and hold the “Home” button as you connect the device to computer.
Step 2. Release “Home” button when there’s a prompt message saying your device is in the Recovery Mode.

fix iphone system with itunes

Part 3: Fix Frozen iPhone after iOS 11 Update by iOS System Recovery

After trying the two methods above, if your iPhone still freezes, then we will suggest you to use iOS System Recovery. This is surely going to do a great help for you. It comes with extremely impressive features and fixes the iPhone frozen issues without any data loss, such as, iPhone frozen in Recovery Mode, iPhone frozen at Apple logo screen, iPhone frozen at black screen of death, etc,. You can use this wonderful program to fix frozen iPhone after iOS 11 update without losing data. The process is easy and simple. All models of iPhone are compatible with the useful program, including iPhone 7, iPhone 6S/6, iPhone 5S/5.

d_win d_mac

Step 1.Run the iOS System Recovery on the Computer
First of all, download and run the software on your computer.

Step 2.Connect iPhone and Select Fixing Mode
Connect your iPhone to the computer after running the software on the computer. Choose “More tools” and “iOS System Recovery” after the software detects the device.

ios system recovery main page

Step 3.Select the iPhone Model and the iOS System of Device
The software will detect the abnormal state of the connected iPhone, like: frozen at Apple logo screen, frozen in the Recovery mode, frozen in the DFU mode, frozen at black screen, etc,. and it will prompt you to click the “Start” button to go on.

connect iPhone

Step 4.Download the Latest iOS Firmware for iPhone
In this step you should confirm the information of your iPhone. Click “Repair” if it is correct, but if not, select the exact information manually before repairing. To fix your frozen iPhone after iOS 11 update, the program will download the latest version of your firmware after detecting the current iOS version of your iPhone.

select iPhone model

download the firmware for iPhone

Step 5.Fixing Frozen iPhone to Normal
Now the software will begin to restore the iOS system of your frozen iPhone to normal.

fix iPhone system to normal

Done. You have restored the iPhone to the normal state without data loss.

d_win d_mac

Related Article:

How to Fix a Frozen iPhone during/after iOS 10 Update

How to Fix an iPhone Frozen on Apple Screen

How to Fix iPhone Stuck in Recovery Mode after iOS 11 Update

How to Fix iPhone Stuck on Apple Logo after iOS 11 Update

How to Fix iPhone Black/White Screen after iOS 11 Update

How to Restore iPhone System to Normal after iOS 11 Update

How to Recover Lost iPhone Data after iOS 11 Update

How to Fix iPhone Red Screen of Death after iOS 11 Update

This morning I updated my iPhone to iOS 11 and it run normally. Now it stuck on the apple logo and after a minute, the screen turns red and goes back to the apple logo. Can anyone help me please? Thanks appreciated.”

Have you ever had the similar experience that an iPhone is suddenly stuck on apple logo and then the screen turns red? The process will continue to happen even though the phone keeps on rebooting itself. Red Screen error is a common issue for iPhone. The red screen of death issue had been occur for most of iPhone users, especially on some Apple forums subject asking for solutions on how to fix this unexpected red screen iPhone error. In this post, I’d like to share some tips and tricks regarding to fix this iPhone red screen of death issue after iOS 11 update.

Part 1: Fix iPhone Red Screen of Death with Rebooting

Some iPhone users report that by doing a simple restart on device, many issues including freezing, crashing, bricking, not responding, etc. can be fixed. To do this, turn off your iPhone by pressing and holding the “Power” button until you see the “Slide to Power off” bar and then swipe it to the right. Wait a minute after the phone is completely turned off and then press and hold the “Power” button until you see the Apple logo appears.

restart iphone

Part 2: Fix iPhone Red Screen of Death with Hard Reset

If a soft restart can’t solve the problem, try the next step to perform a hard reset. To do this, hold down the “Power” and “Home” buttons at the same time for at least 10 second until the Apple logo displays on the screen. Release the buttons and let it reboot.

hard reset on iphone

Part 3:Fix iPhone Red Screen of Death with iOS System Recovery

Use iOS System Recovery to solve the abnormal iOS system issues including red screen of death, white screen of death, frozen iPhone, iPhone stuck in Recovery Mode, iPhone won’t turn on and more bricked iOS system issues. With the help of iOS System Recovery, you can fix iPhone red screen of death in just a few clicks. Most importantly, it won’t lead to loss data on device during/after iOS 11 update. iOS System Recovery works well on all models of iPhone, including iPhone 7, iPhone 6S/6, iPhone 5S/5. Let’s see how the iOS System Recovery works.

d_win d_mac

Step 1.Run the iOS System Recovery on the Computer
To begin with, download and install the software on your computer.

Step 2.Connect iPhone and Select Fixing Mode
Plug your iPhone into the computer after the running software on the computer. Choose “More tools” and “iOS System Recovery” after the software detects the device.

ios system recovery main page

Step 3.Select the iPhone Model and the iOS System of Device
The software will detect the connected iPhone is in abnormal state like: Stuck at Apple logo, Recovery mode, DFU mode, Black screen, etc. and it will prompt you to click the “Start” button to get started.

connect iPhone

Step 4.Download the Latest iOS Firmware for iPhone
You will be asked you to confirm the information of your iPhone. Click “Repair” if it is correct, but if not, select the exact information manually before repairing. To fix your iOS, the program will download the latest version of your firmware after detecting the current iOS version of your iPhone.

select iPhone model

download the firmware for iPhone

Step 5.Fixing iPhone Red Screen of Death to Normal
Now the software will begin to restore the iOS system of your iPhone.

fix iPhone system to normal

Well, it is done. The red screen of death must have been killed by now. It’s very easy to do this all by yourself. What’s more, you will not lose any data after repairing device.

d_win d_mac

Related Articles:

How to Fix iPhone White Screen of Death after iOS 11 Update

How to Fix iPhone Blue Screen of Death after iOS 11 Update

How to Fix Bricked iPhone after iOS 11 Update

How to Fix iPhone Stuck in Apple Logo after iOS 11 Update

How to Fix iPhone Stuck in Recovery Mode after iOS 11 Update

How to Backup and Restore iPhone Data

iPhone Manager – How to Transfer and Manager Files on iPhone 8/7/6S/6/SE

How to Fix iPhone Headphone Mode after iOS 11 Update

Hi. Last week I updated my phone to iOS 11.3. Recently my iPhone get into the headphone mode suddenly, it always prompt me that the phone is in the headphone mode. Is it possible to get it out of the headphone mode?

iphone stuck in headphone mode

Have you ever had your iPhone get stuck in Headphone mode? When your iPhone is stuck in Headphone mode, and you intend to volume up or volume down the ringer, the volume bar shows “Headphones” instead of “Ringer”. What’s more, you can’t hear any sound for calls, music, videos without plugging in earphones. Had your iPhone stuck in headphone mode? The cases are quite common in daily life.This situation always happen on iPhone especially after performing iOS 11 update on iPhone. It can be frustrating, but it’s usually pretty easy to fix. This tutorial mainly shows you how to fix iPhone headphone mode after iOS 11 update with easy steps.

Fix iPhone Headphone Mode after iOS 11 Update

Fixing iPhone headphone mode after iOS 11 update, we suggest you to use iOS System Recovery. It’s a popular data recovery program that help to fix iPhone abnormal system to normal for different situations, like iPhone stuck in headphone mode, iPhone stuck in recovery mode, iPhone stuck at black screen of death, iPhone stuck at Apple logo screen, etc,. You can use it to fix iPhone headphone mode without data loss after iOS 11 update. This wonderful program can solve all iOS bricked issues with only a few clicks. All models of iPhone are compatible with iOS System Recovery, including iPhone X, iPhone 8, iPhone 7, iPhone 6S/6, iPhone 5S/5.

d_win d_mac

How to Fix iPhone Headphone Mode after iOS 11 Update

Step 1.Run the iOS System Recovery on the Computer 
To get started,please download and run iOS System Recovery on the computer,you will get the windows as below.

ios system recovery main page

Step 2.Connect iPhone and Select Fixing Mode
Select the “iOS System Recovery”mode in the primary window under “More tools“.Connect your iPhone to the computer via USB cable. After a few seconds,the iPhone will be detection by program and display it on its screen. Now, click on the button “Start“.

connect iPhone

Step 3. Select the iPhone Model and Latest Version of the iOS System
Now you should select the iPhone model and iOS system version which fit your device.Then click “Repair” to enter the next step.

select iPhone model

Step 4.Download the Latest iOS Firmware for iPhone
iOS System Recovery tool will download the latest iOS firmware for restoring you device,you will see that the program is offering you the latest version of the iOS to download,it will display the progress of the download process as shown in the picture below. Please keep your iPhone and the computer connection.

download the firmware for iPhone

Step 5.Fixing iPhone Headphone Mode to Normal
When the program is finished downloading the latest firmware for your iPhone, it will continue to fix the abnormal iPhone without 10 minutes.

fix iPhone system to normal

Done.Only five steps,your iPhone has been restored to normal state,now you can restart the device.

Free download the iOS System Recovery:

d_win d_mac

Related Articles:

How to Fix iPhone that Won’t Turn on after iOS 11 Update

How to Fix iPhone Blue Screen of Death after iOS 11 Update

How to Fix Bricked iPhone iPad after iOS 11 Update

How to Fix iPhone Stuck in Apple Logo after iOS 11 Update

How to Fix iPhone Stuck in Recovery Mode after iOS 11 Update

How to Backup and Restore iPhone Data

iPhone Manager – How to Transfer and Manager Files on iPhone 8/7/6S/6/SE

How to Unlock a Disabled iPhone with or without iTunes[2019]

[Summary]: Forgot iPhone passcode? iPhone is disabled and won’t connect to iTunes? This article provides four effective solutions to unlock and reset disabled iPhone, using iTunes to restore disabled/locked iPhone will erase data and settings; while using thrid part iPhone unlock tool to fix and unlock a disabled iPhone/iPad will more easily and safely.

This morning my little sister entered the wrong password several times on my iPhone, now my iPhone is disabled. How to fix the disabled iPhone without losing data? I have no a backup of my device.

CONTENTS

Have you ever got the prompted message on your iPhone like “iPhone is disabled”, “try again in 1 minute” or to try again 5, 15, 60 minutes? In the worst case, the message says “iPhone is disabled. Connect to iTunes”, it means that the device is locked and you can’t do anything on it even restart it. It is probably a frustrating thing when you forgetting iPhone password or the touch ID note working that your iPhone is disabled. Actually, quite a lot of Apple users who like to change the password frequently complain that they cannot access their iPhone again or for some reasons they entered the wrong password and it is disabled. This post is going to show you four effective solutions to unlocked a disabled iPhone with easy steps.

Part 1: Unlock a Disabled iPhone with iTunes

If you know the iPhone password and have backed it up recently, you can simply unlock your device with iTunes:
Step 1. Connect the disabled iPhone to the computer with a USB cable and launch iTunes on it.
Step 2. Choose “Sync” in iTunes and enter the proper password when requested to unlock the device.
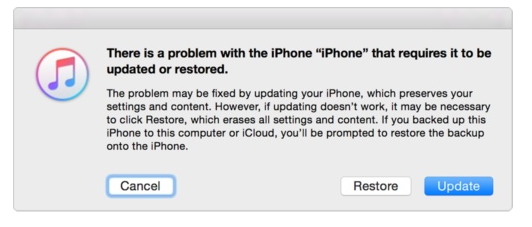
Step 3. Click “Restore” to restore the iPhone from the most recent backup.

reset iphone with itunes

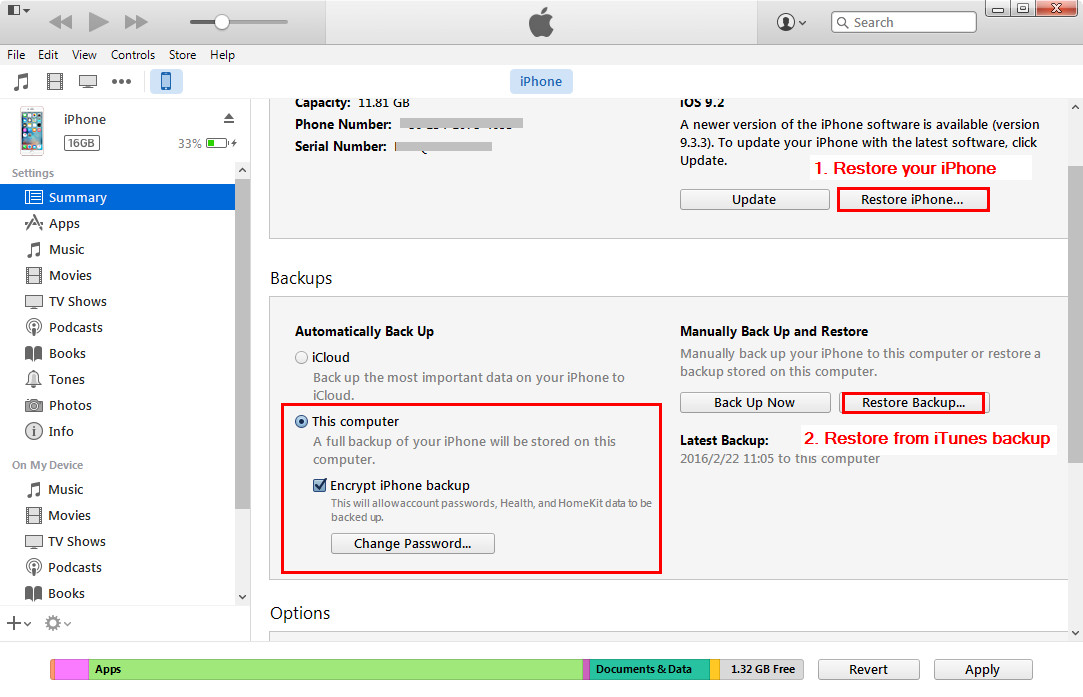
If you don’t know the iPhone password, you have to wipe the iPhone and it will erase all data and settings on it using recovery mode. If you have a backup of iTunes or iCloud, you can restore it after restoring.

Part 2: Unlock a Disabled iPhone via iCloud Find My Phone

Another method to unlock your disabled iPhone is using iCloud Find My iPhone website. If you have registered with your Apple ID and Find My iPhone was enabled in the iCloud menu, you can follow this guide to unlock your disabled/locked iPhone/iPod/iPad.

Step 1. Open icloud.com website and log in with your Apple ID and password on your computer.

Step 2. Click Find My iPhone. Then click All Devices at the top of your browser window.

Step 3. Select your iPhone from all the devices listed. Click Erase iPhone (or any device you are using) to erase your iPhone along with its passcode.

unlock iphone with icloud find my iphone

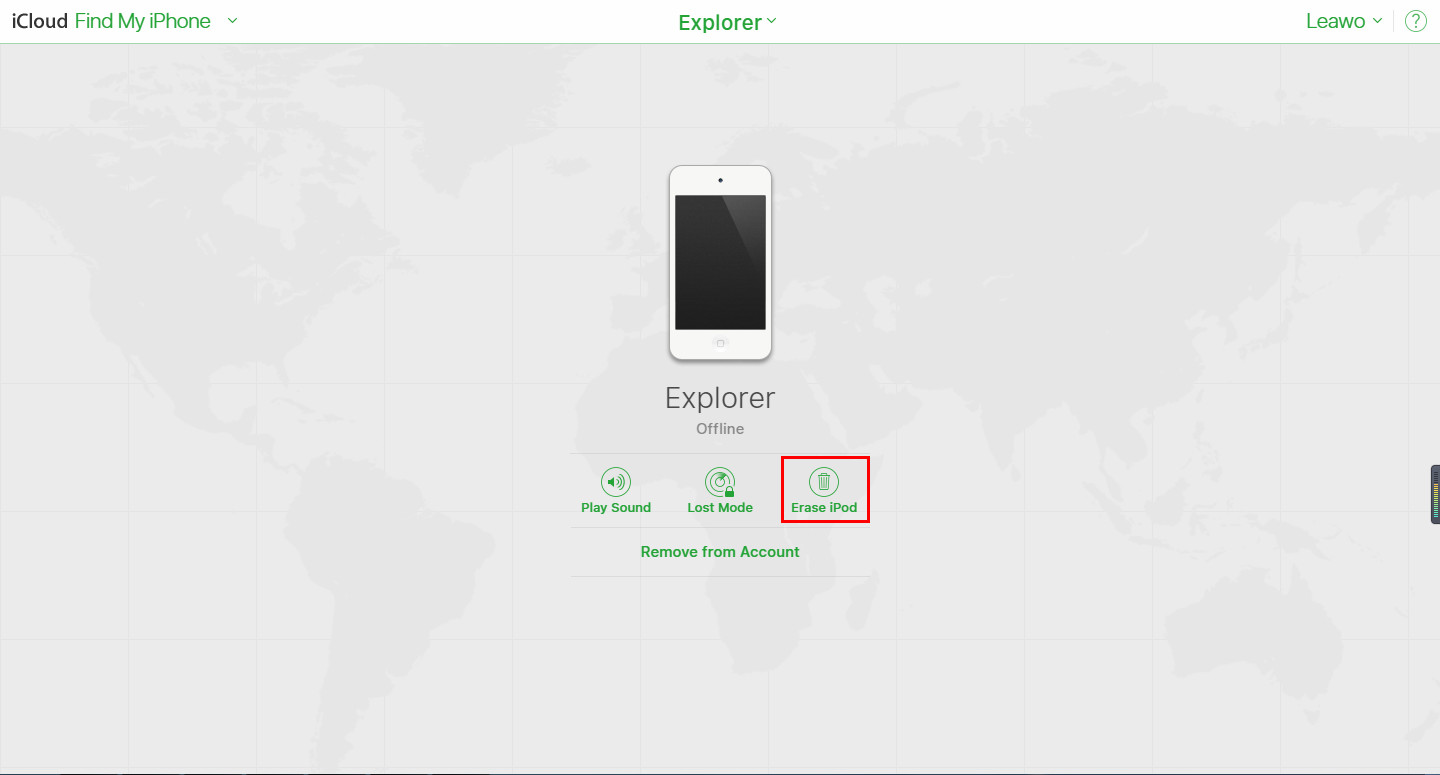
Step 4. Lastly, find recent backup and restore your device. You can use the Setup Assistant on your device to restore the most recent backup of your device.

Note: This method will only work if the iPhone is currently connected to a wireless network, making sure you have registered with your Apple ID and turn on Find My iPhone function in the iCloud menu.Worse, it will erase your iPhone data and settings.

Part 3: Fix and Unlock a Disabled iPhone via iOS System Recovery

The method we talks in the part 1 and part 2is not perfect enough, unlock a disabled iPhone with iTunes will lead to data loss on device.

If you want another safe method to unlock a disabled iPhone with its original data, you can try this iOS System Recovery. It provides you a wonderful way to unlock a disabled iPhone without losing data. This program works well for all iOS system issues, such as, fix a disabled iPhone, fix iPhone stuck in Recovery Mode, repair iPhone stuck at Apple logo screen, fix iPhone stuck at black screen, and fix a bricked iPhone and more. U.Fone iOS System Recovery supported iOS 12, iOS 11 and more.

d_win d_mac
d_win d_mac

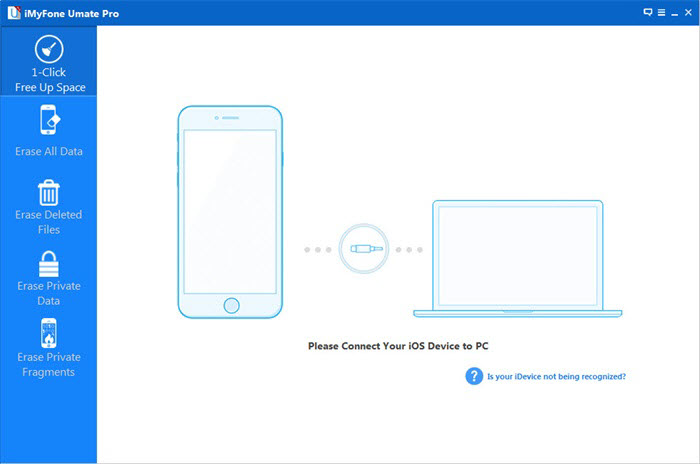
Step 1.Run Program and Connect iPhone
To begin with, run the iOS System Recovery on your computer and connect iPhone to the compute.

ios system recovery main page

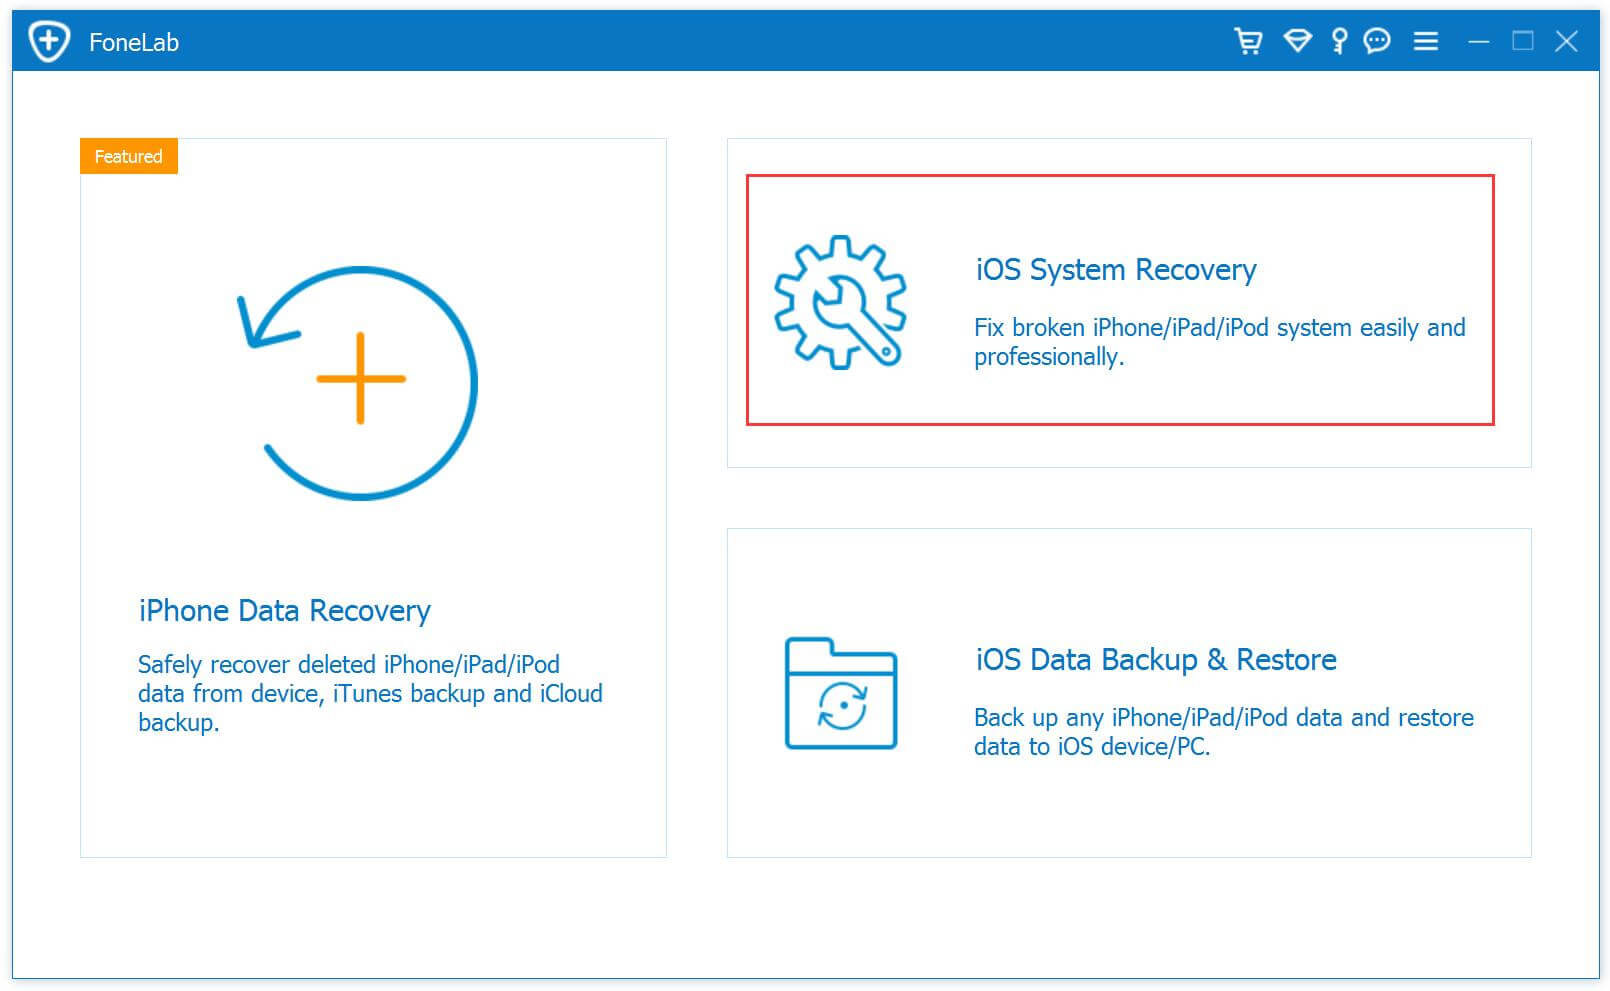
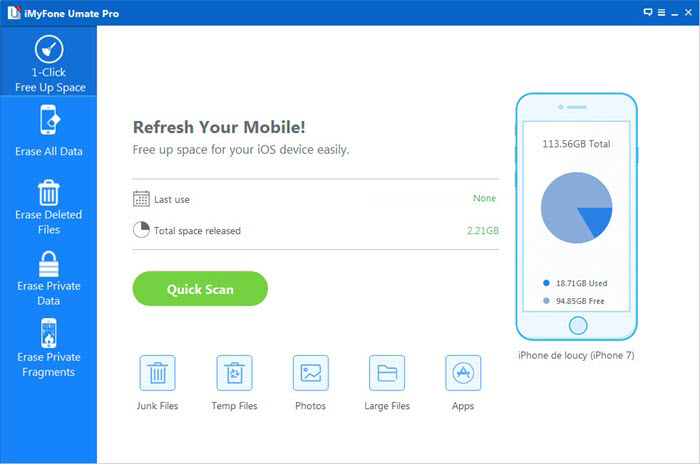
The program will automatically detect your iPhone soon. Click “Fix iOS System” option under “More tools” of program. Click “Start” to proceed.

connect iphone to the program

Step 2. Download Firmware for iPhone
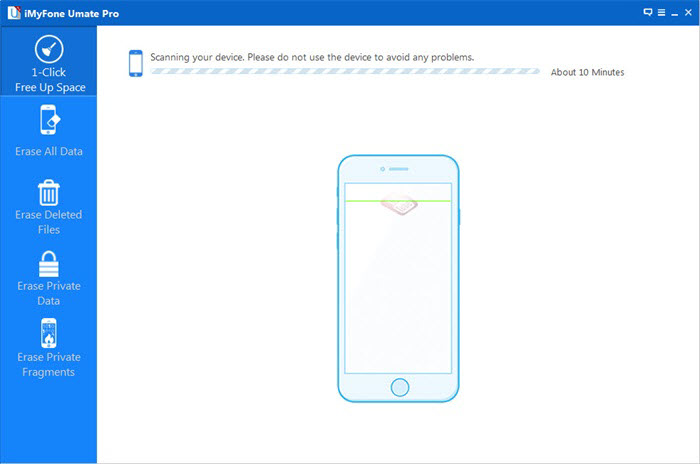
To unlocked a disabled iPhone without data loss, iOS System Recovery will install the latest iOS version on your iPhone. The program identifies your device and provides you the latest and compatible version of iOS required for your phone. Press “Repair” after the firmware is offered.

select iphone model

Now it will download the firmware for fixing your disabled iPhone.

download firmware for iphone

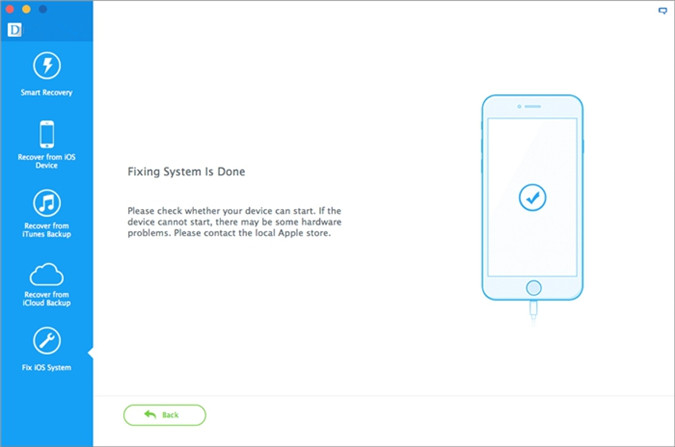
Step 3. Fix Disabled iPhone without Data Loss
After the firmware is downloaded, iOS System Recovery will begin running the repair process to make your iPhone working as usual.

fix disabled iPhone

You iPhone will be booted after repairing to make it functional. Then you can use your iPhone with normal state without any data loss.

d_win d_mac
d_win d_mac

Part 4: Unlock a Disabled iPhone via iOS Unlock

Another way to unlock a disabled iPhone is using an iOS Unlock. This program allow to unlock and access a disabled iPhone with easy steps. You don’t need to worry losing data during the process. What’s more, you can access a disabled iPhone via Locked Screen Removal without restoring to factory or performing Recovery Mode. All of iPhone models are compliacble to the Locked Screen Removal.

d_win d_mac
d_win d_mac

Bypass a Disabled iPhone in Different Situations:

– Remove locked screen from all iPhone and iPad when the Find My iPhone/iPad is disabled.
– Remove iPhone screen locked when fingerprint unlock failed.
– Remove the locked screen of iPhone/iPad and access the persional data on it.
– Backup and recover data from iPhone/iPad with locked/broken/black screen.
– Unlock locked screen iOS 11/iOS 12 devices,it works well with the latest iOS 11 and iPhone X/iPhone 8.

Step 1. Connect your Disabled iPhone to the Computer
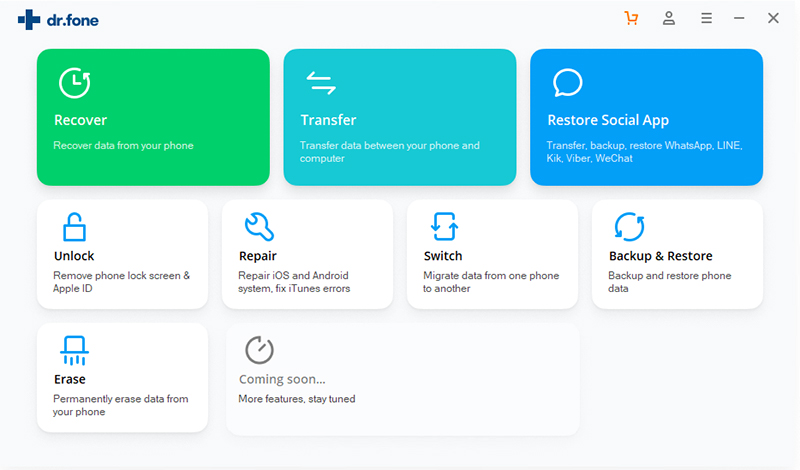
Run program on the computer and click “Unlock” option.

ios locked screen removal

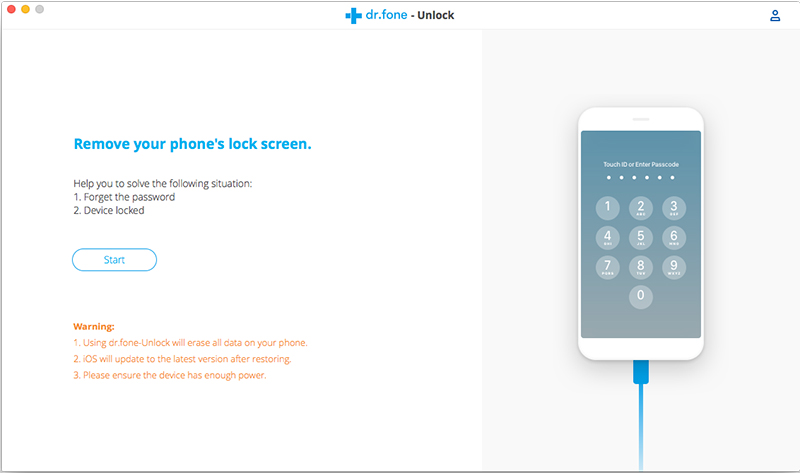
Connect your disabled iPhone to the computer using a USB cable. Then click “Start” to begin the unlock process.

connect disabled iphone to pc

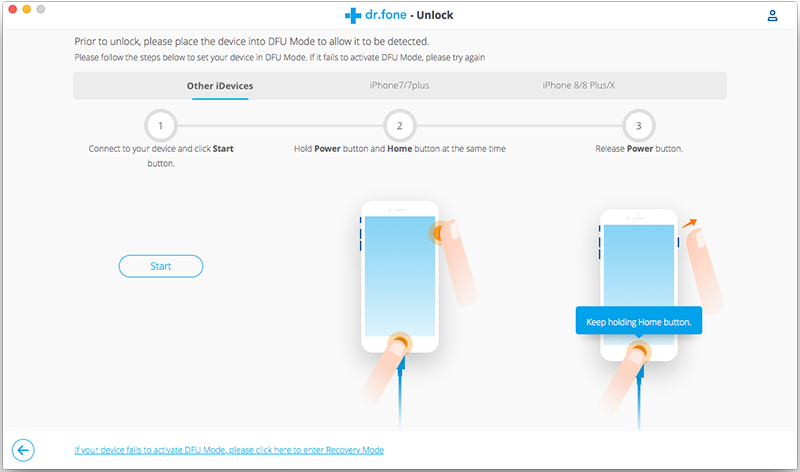
Step 2. Get iPhone into the DFU Mode
Follow the instruction on program to get iPhone into the DFU mode.

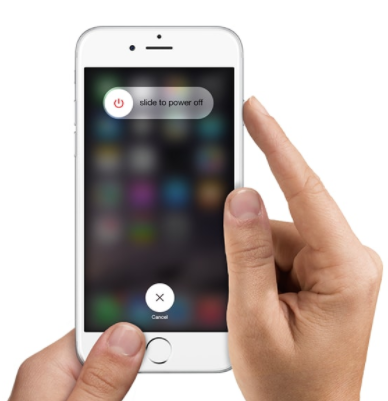
-Power off the iPhone.
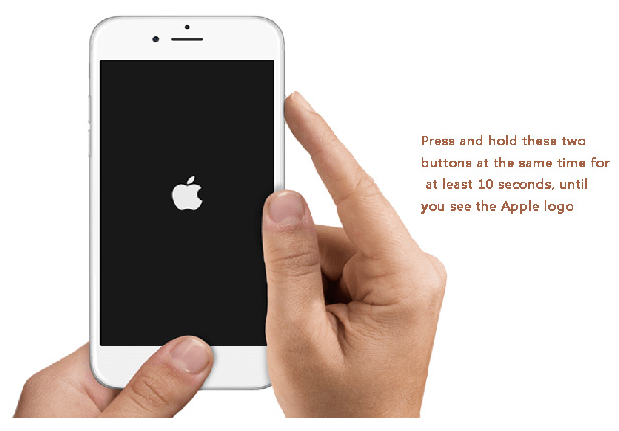
-Press and hold the Volume Down button and the Power button together for 10 seconds.
-Release the Power button and keep holding the Volume Down button until the device is in DFU mode.

enter iphone into the dfu mode

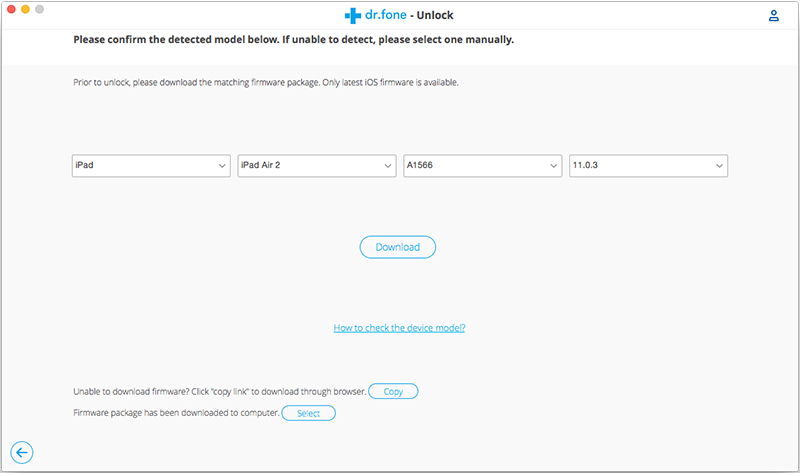
Step 3. Confirm the Information of iPhone
After the device is in the DFU mode, the program will display the information of device, including phone generation, iOS version, etc,. If the information is wrong, you can select the correct information from the dropdown lists. Then click “Download” to download the firmware for your device.

select the information of disabled iphone

Step 4. Access iPhone without Data Loss
When the firmware is downloaded successfully, click “Unlock Now” to start accessing your iPhone without data loss.

confirm to access iphone

access iphone without data loss

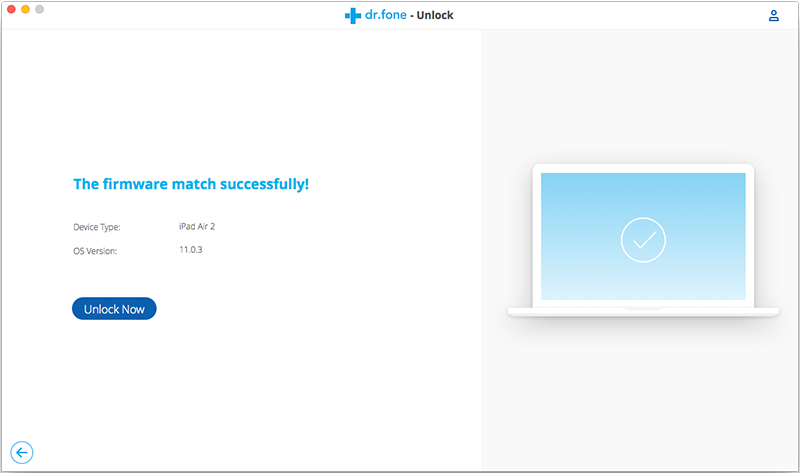
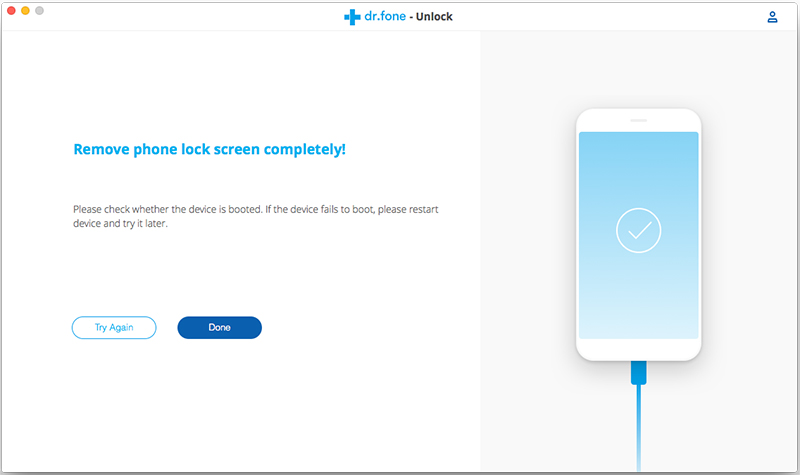
Done. Now you can access your iPhone without data loss freely.

d_win d_mac

Part 5: Unlock Disable iPhone with UkeySoft Unlocker

If your iPhone or iPad is disabled after typing the wrong passcode for too many times, the iPhone screen appear these prompts: “iPhone is disabled, connect to iTunes” or “iPhone is disabled try again in 5 minutes”, it means the iPhone has been disabled/locked or something’s wrong of the system. Although iTunes can reset a disable iPhone, it will erase data and settings, if iTunes asks for a password, iTunes restore method may not apply to you. In addition, if your have enable “Find My iPhone” function, you can unlock disabled iPhone via iCloud’s Find My iPhone, but all the data and settings on your iPhone also will be erased.

This part, we will introduce you more easily and safely method to unlock a disabled iPhone or iPad without iTunes or iCloud.

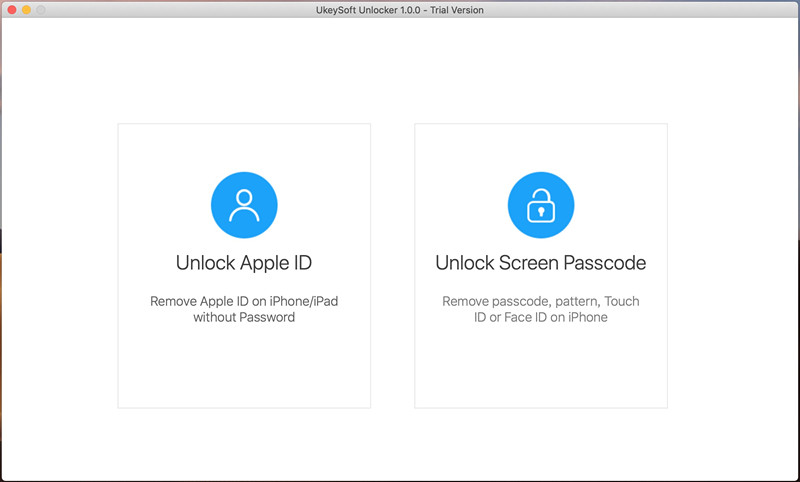
UkeySoft Unlocker is a popular and powerful iPhone Unlock tool, which includes two main features “Unlock Screen Passcode” and “Unlock Apple ID”. If your iPhone is disable/locked or you forgot the passcode of your iPhone, you can easily unlock your iPhone device without hassle in 5 minutes. Except that, UkeySoft Unlocker can also help you unlock Apple ID without password.

Not just to unlock a disabled iPhone and Apple ID, it can also helps you to resolve plenty of other system issues like malware attack, iPhone stuck in recovery mode, black screen of detah, Apple logo screen, blue screen of death, and more.

Key Features:

  • Fix a disabled iPhone/iPad/iPod touch in 5 minutes.
  • Unlock iPhone without passcodes, Face ID or Touch ID.
  • Unlock a broken screen or black screen iPhone.
  • Delete Apple ID/iCloud account from iPhone/iPad.
  • Works for all models of iPhone, iPad and iPod touch.
  • Fully compatible with the latest iOS 13.

Steps to Fix and Unlock Disabled iPhone without iTunes

Step 1. Launch UkeySoft Unlocker on your computer. From the main interface, select the option of “Unlock Screen Passcode” to start the process.

ukeysoft Unlock iPhone Screen Passcode

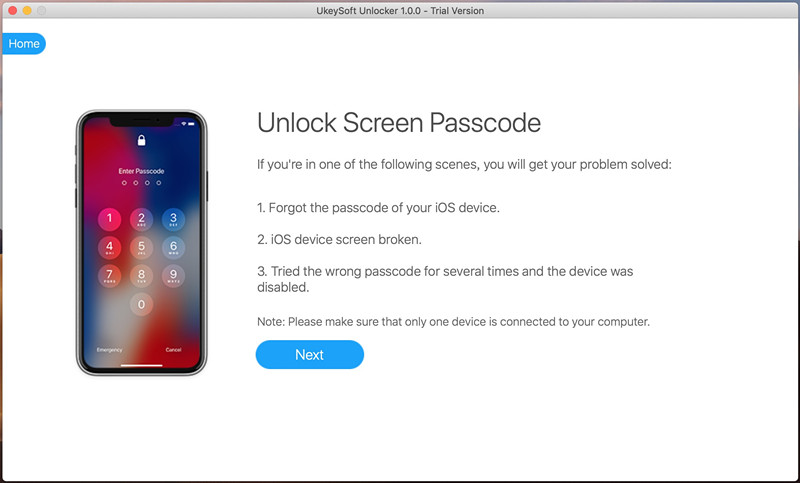
Step 2. Connect your disabled iPhone to computer via a USB/lightning cable, and wait for a while as the application will recognize it automatically. Afterward, click on the “Next” button.

connect iPhone to PC to Unlock iPhone Passcode

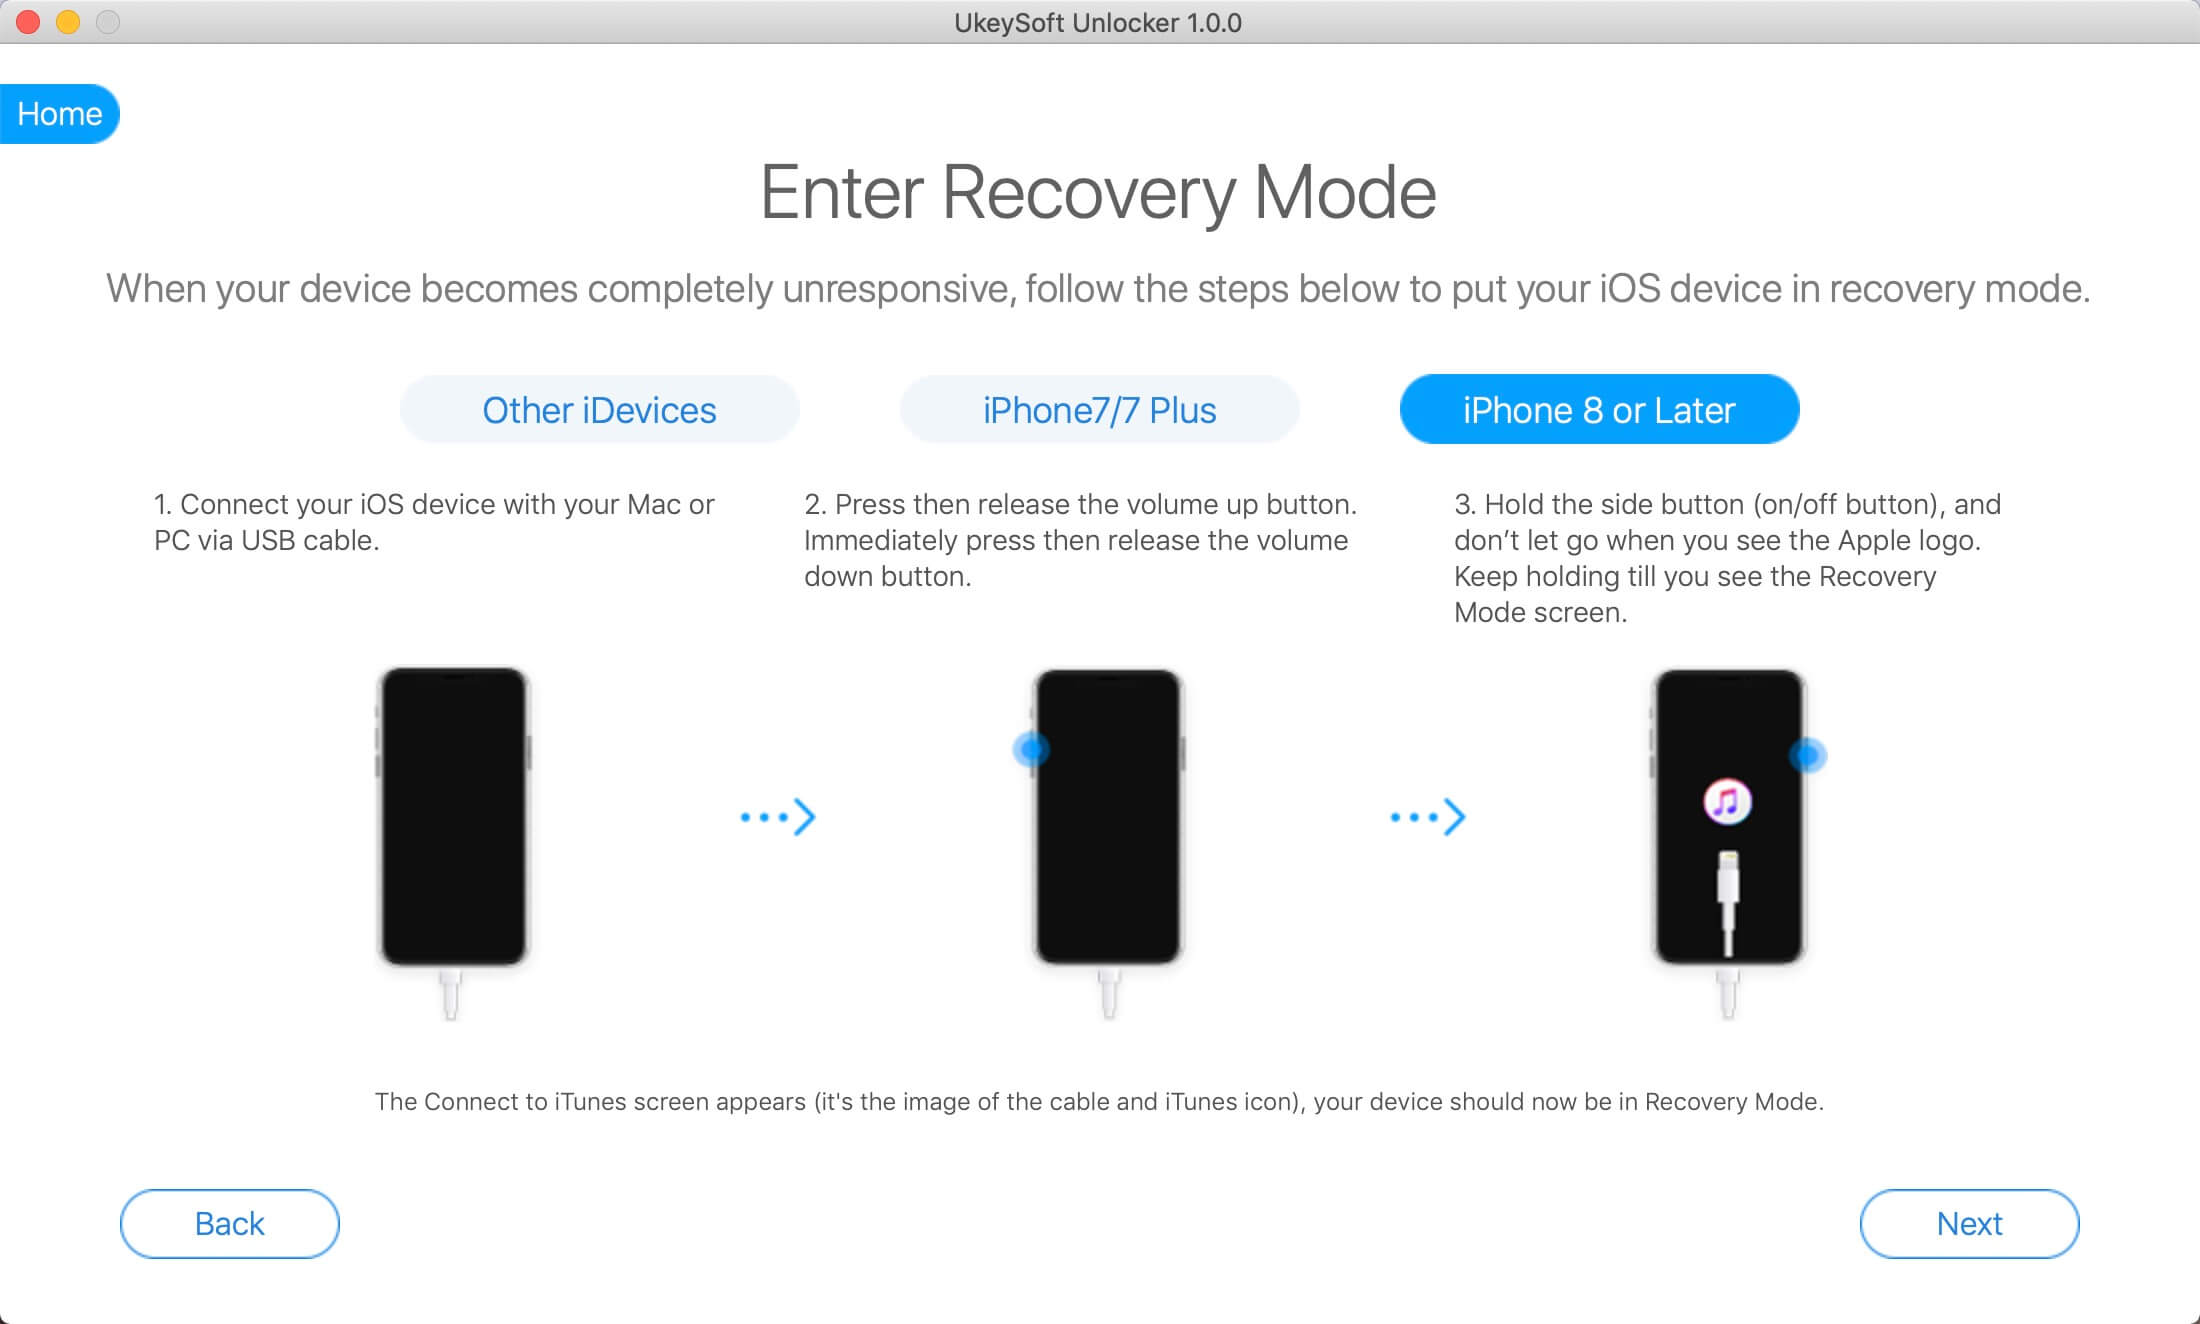
Step 3. Enter Recovery mode or DFU mode on iPhone, please follow the software’s prompts to put the device into recovery mode.

enter recovery mode to Unlock disabled iPhone

Step 4. Provide correct information related to your iPhone’s model, firmware version, and more in the new window. Make sure that you have provided the right information before clicking the “Download” button.

download firmware package to fix disabled iPhone

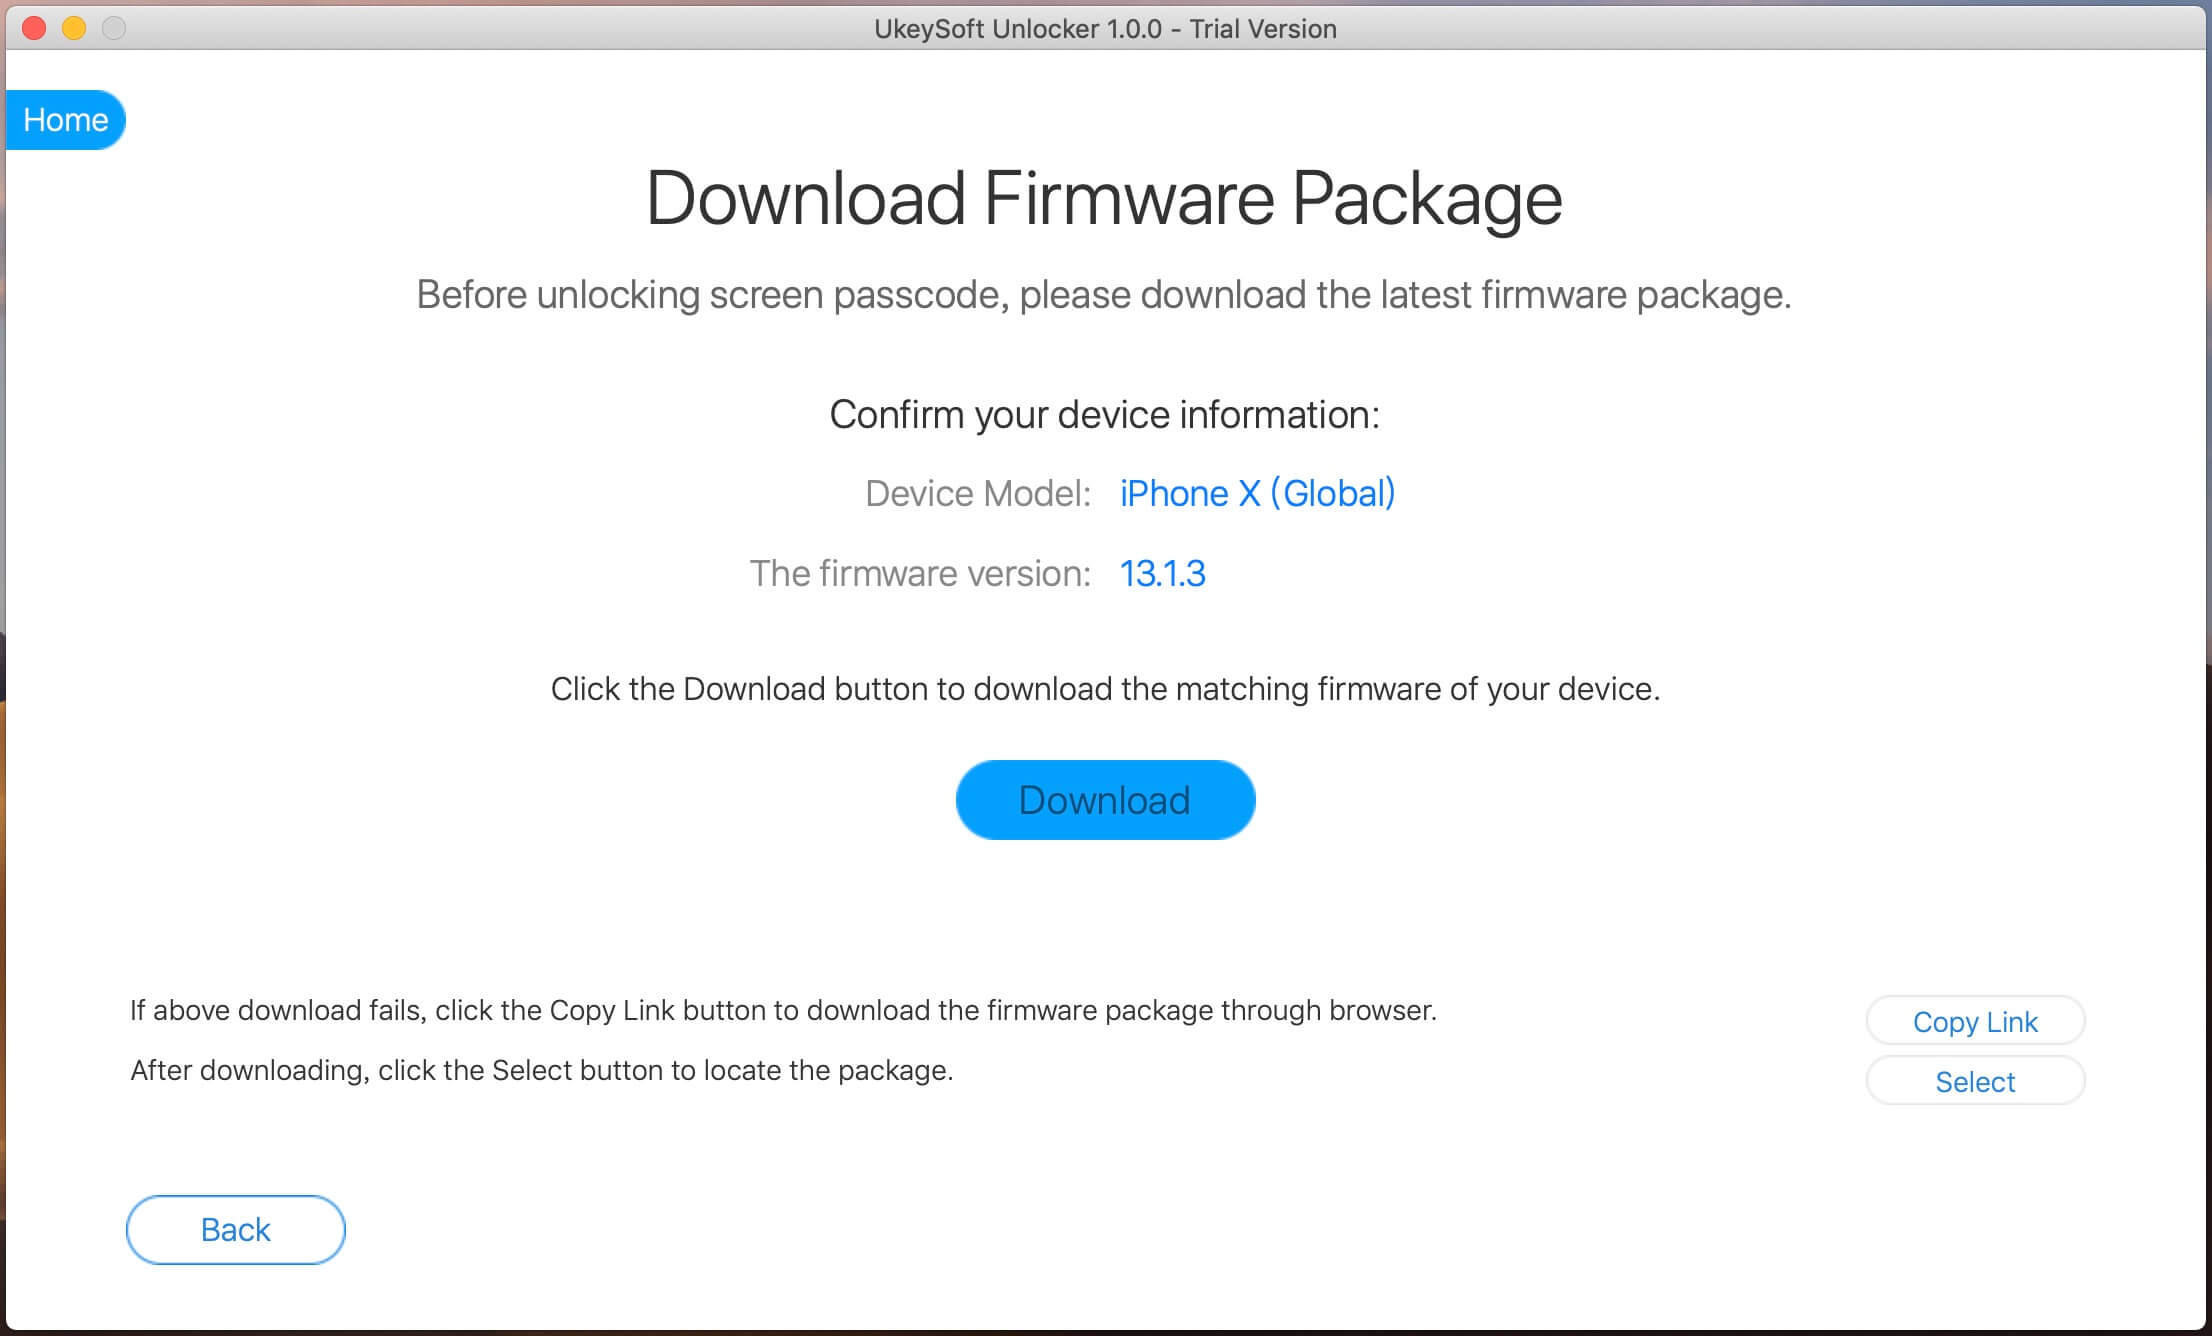
Step 5. UkeySoft Unlocker will automatically download the matched firmware package for your device. It might take a while to complete the download. After downloading completed, click on the “Start” button to go to.

download disable iPhone

Step 6. Start to removing screen passcode, please keep connect your iPhone device with the computer.

unock a disalbe iphone

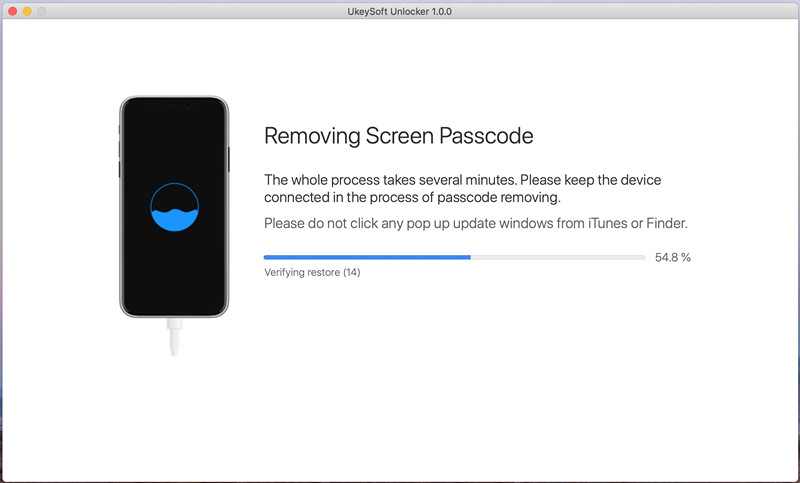
Step 7. Your device will be like brand new and you would be able to unlock disabled/locked iPhone without passcodes, it don’t need iTunes as well during the whole unlocking process.

remove passcode from locked iphone

Related Articles

How to Restore Data on Locked iPhone X/8/7/6S/6/5S

How to Extract Data on Locked iPhone X/8/7/6S/6/5S

How to Fix Bricked iPhone iPad after iOS 11 Update

How to Fix iPhone Stuck in Apple Logo after iOS 11 Update

How to Fix iPhone Stuck in Recovery Mode after iOS 11 Update

How to Backup and Restore iPhone Data

iPhone Manager – How to Transfer and Manager Files on iPhone X/8/7/6S/6/SE

How to Fix iPhone White Screen of Death after iOS 11 Update

After upgrading my iPhone to iOS 11, last night the phone was get white screen of death. I can’t operate it even power it on. Is there any ways to fix iPhone while screen of death after iOS 11 update without data loss? I haven’t backed up me phone recently.

For iPhone users, it happens frequently that they get white screen on their iPhone, the iPhone is just like a brick and you can’t do anything on it. This iPhone White/Black screen of death problem can occur for a number of reasons including hardware issues, damage from falls or updating of the iOS system, for example, upgrading to the latest iOS 11. For most of us, the similar bricked issues of iPhone can be the highly annoying problems. This article shows you 3 solutions on how to overcome this bricked issues after iOS 11 update on iPhone.

Part 1: Fix iPhone White Screen of Death after iOS 11 Update with Hard Reset

To be honest, “turn it off and on again” is often a surprisingly effective solution for most bricked iPhone. iPhone are no exception as a hard reset can be used to recover a frozen device with ease. Here are the steps needed to perform a hard restart in the event that you encounter a white screen of death.

For iPhone 7/7Plus:
Step 1.Press and hold the “Sleep/Wake” and “Home” buttons together until you see the Apple logo appears.
Step 2.Let go of the “Sleep/Wake” and “Home”.
Step 3.Wait your iPhone turns to be normal.

For other iOS devices:
Step 1.Firstly, press and hold down the “Sleep/Wake” and “Home” buttons simultaneously.
Step 2.Continue to hold on to both buttons until the Apple logo appears. This process can take up to 10-20 seconds before completion.
Step 3.Release the buttons, wait for the iPhone to complete its boot up. Then, you are done. Your device has returned to the normal state.

Part 2: Fix iPhone White Screen of Death after iOS 11 Update with iTunes Restore

Step 1.Connect your iPhone with iTunes running on your computer with an USB cable.
Step 2.Click on the tab on the top left of your iTunes screen.
Step 3.Make a backup by clicking on “Backup” and wait for it to compete without disconnecting your device.
Step 4.Once done, click on “Restore”. You can restore from this just completed backup, or select an earlier backup. Wait for the process to complete.

itunes restore

The solutions we mentioned in part 1 and part 2 may be lead to data loss on device. Here we will recommend another perfect method for you to fix iPhone white screen of death without data loss after iOS 11 update. Let’s see the part 3.

Part 3: Fix iPhone White Screen of Death after iOS 11 Update with iOS System Recovery

One of the best tools to fix iPhone white screen of death or any other iOS issue and return it to the normal state is using iOS System Recovery. This program is 100% secure and easy to use. The program has a feature that makes it possible to fix the iOS issues without data loss,like iPhone stuck in Recovery Mode, iPhone stuck at Apple logo screen, iPhone stuck at black screen, iPhone get bricked, etc,. It has been proved to be one of the most efficient tool in the market. All iOS devices are compatible with iOS System Recovery, including iPhone X, iPhone 8, iPhone 7, iPhone 6S/6, iPhone 5S/5, iPad and iPod.

d_win d_mac

Step 1.Run the iOS System Recovery on the Computer 
To begin with,please download and run iOS System Recovery on your computer,you can get the windows as below.

ios system recovery main page

Step 2.Connect iPhone to the Computer and Select Mode
Select the option of “iOS System Recovery” from the primary window under “More tools“.Secondly,use the USB cable to connect your iPhone to the computer. After a few seconds,the iPhone will be detection by program and display it on its screen. Now, click on the button “Start“.

connect iPhone

Step 3. Select your iPhone Model and Latest Version of the iOS System
Now you should select the iPhone model and iOS system version which fit your device.Then click “Repair” to go on.

select iPhone model

Step 4.Download the Latest iOS Firmware for iPhone
In this step,iOS System Recovery tool will download the latest iOS firmware for restoring you device,you will see that the program is offering you the latest version of the iOS to download,it will display the progress of the download process as shown in the picture below. Keep your iPhone and the computer connection.

download the firmware for iPhone

Step 5.Fixing iPhone White Screen of Death to Normal
Once iOS System Recovery software has finished downloading the latest firmware for your iPhone, it will continue to fix the abnormal iPhone without 10 minutes,the iOS fixing and keeping the status displaying as shown below.

fix iPhone system to normal

Only five steps,your iPhone has been restored to normal state,now you can restart the device.

Free download the iOS System Recovery:

d_win d_mac

Related Articles:

How to Fix iPhone Blue Screen of Death after iOS 11 Update

How to Fix Bricked iPhone iPad after iOS 11 Update

How to Fix iPhone Stuck in Apple Logo after iOS 11 Update

How to Fix iPhone Stuck in Recovery Mode after iOS 11 Update

How to Backup and Restore iPhone Data

iPhone Manager – How to Transfer and Manager Files on iPhone 8/7/6S/6/SE

How to Fix iPhone Won’t Turn on after iOS 11 Update

Last night I updated my iPhone to the newest iOS 11 and it run normally. However, this morning when I got up I found that the phone won’t turn on. I don’t know what was happened on it. How to fix my iPhone won’t turn on after iOS 11 update? I need a simple solution without losing data from the device. Thanks for your suggestions.

As an iPhone user who experienced the new iOS system, like iOS 11, you must know that the iOS software update always brings us some unknown iOS issues. Like, iPhone won’t turn on, iPhone won’t connect to Wi-Fi, battery drains much faster, cannot activate iPhone, iPhone get bricked, iPhone get stuck issues, etc,. No surprise, these problems happened again in this iOS update, even the latest iOS 11. To help you solve the iPhone won’t turn on after iOS 11 update perfectly, we collect a wonderful way for recommendation, which will fix the iOS system issues of iPhone after iOS 11 update or other error iOS system issues.

Part 1: Fix iPhone Won’t Turn on after iOS 11 Update with iTunes Restore

To fix iPhone won’t turn on after iOS 11 update with iTunes restore, your device be required to be functional, that is, no hardware issues. It might not boot directly, but it should appear on iTunes for this step to work.

Step 1.Plug your iPhone with iTunes running on your computer with an USB cable.
Step 2.Click on the tab on the top left of your iTunes screen.
Step 3.Make a backup by clicking on “Backup” and wait for it to compete without disconnecting your device.
Step 4.Once done, click on “Restore”. You can restore from this just completed backup, or select an earlier backup. Wait for the process to complete.

itunes restore

Restoring iPhone with iTunes will wipe all the previous data on your device, if you want a better solution to fix your iPhone system without data loss, you should try the method we will mention in the follow part.

Part 2: Fix iPhone Won’t Turn on after iOS 11 Update with iOS System Recovery

Another solution to fix iPhone won’t turn on after iOS 11 update is getting the help of iOS System Recovery, which is an excellent tool help for fixing iPhone system to normal without data loss. With the help of this program, you can restore your iPhone to normal state while fixing all kinds of iOS system issues, such as, iPhone won’t turn on, iPhone stuck in Recovery Mode, iPhone get bricked, iPhone stuck at Apple logo screen, etc,. All models of iOS devices are compatible with iOS System Recovery, including iPhone X, iPhone 8, iPhone 7, iPhone 6S/6, iPhone 5S/5, iPad and iPod.

d_win d_mac

Step 1.Run the iOS System Recovery on PC/Mac
Click the link as given above and download iOS System Recovery on your computer,you can get the windows as below.

ios system recovery main page

Step 2.Connect iPhone to the Computer
Select the option of “iOS System Recovery” from the primary window under “More tools“.Secondly,use the USB cable to connect your iPhone to the computer. After a few seconds,the iPhone will be detection by program and display it on its screen. Now, click on the button “Start“.

connect iPhone

Step 3. Select your iPhone Model and Latest Version of the iOS System
The nest step is so easily for you to handle it . Now you should select the iPhone model and iOS system version which fit your device.Then click “Repair” to go on.

select iPhone model

Step 4.Download the Latest iOS Firmware for iPhone
In this step,iOS System Recovery tool will download the latest iOS firmware for restoring you device,you will see that the program is offering you the latest version of the iOS to download,it will display the progress of the download process as shown in the picture below. Keep your iPhone and the computer connection.

download the firmware for iPhone

Step 5.Begin Fixing iPhone System to Normal
Once iOS System Recovery software has finished downloading the latest firmware for your iPhone, it will continue to fix the abnormal iPhone without 10 minutes,the iOS fixing and keeping the status displaying as shown below.

fix iPhone system to normal

After finishing all the steps,your iPhone has been restored to a normal device,now you can restart the device in normal mode.

Free download the iOS System Recovery:

d_win d_mac

Related Articles:

How to Recover Data from iPhone that Won’t Turn on

How to Fix iPhone Blue Screen of Death after iOS 11 Update

How to Fix Bricked iPhone iPad after iOS 11 Update

How to Fix iPhone Stuck in Apple Logo after iOS 11 Update

How to Fix iPhone Stuck in Recovery Mode after iOS 11 Update

How to Backup and Restore iPhone Data

iPhone Manager – How to Transfer and Manager Files on iPhone 8/7/6S/6/SE

Eight Bright Features Detailed Explanation of HUAWEI Mate 10

It has been less than a month since the release of HUAWEI Mate 10. HUAWEI Kirin 970 officially are released already, and it brought a series of scenes of performance, apparently for the October 16th release of Mate 10 to do a drill.

huwei mate 10

Photo: two strong backlighting, low light camera f/1.6 large aperture to strengthen
HUAWEI Mate 10 will be equipped with 20MP black and white +12MP color third generation Leica double cameras, allegedly aperture will be upgraded to f/1.6, is the first use of this camera aperture of homemade mobile phones. About the Camera, the device is expected to focus on the light and backlighting and capture of three scene performance.

Comparison with the Huawei Mate 10 development machine and iPhone 8 Plus of first snapshot. The Mate 10 camera still looks sharp when the machine is turning, and the iPhone 8 Plus is blurred. HUAWEI said that Kirin 970 in camera response time will be shortened by 30%, and optimize the focus, motion scene detection, exposure strategy.

After that, HUAWEI Mate 10 and iPhone Plus 8 development environment compared to the dark photos. Mate 10 in front of the mobile phone set focuson the portrait picture, Plus and iPhone 8 are concentrated in the frond of the stuff on the picture, two performance of each one has its own merits.

huawei mate 10 vs iphone 8

Super sound quality: supports 32 bit 384K, lossless, more than SONY gold standard
SONY’s Hi-Res standard has been the benchmark in the audio industry, with 24 192KHz certification standards, while Kirin 970 supports 32 bit 384KHz lossless audio playback, much better than SONY gold certification. Hass in the field of mobile phone Hi-Fi although not known, but it is a big selling point. It is worth mentioning that, Kirin 970 selling point also supports Type-C headphone output, that is to say, the next HUAWEI mobile phone is also possible to cut off headphone holes.

Facial recognition: AI recognition of the face, rolling iPhone X?
iPhone X’s Face-ID has brought the facial recognition feature to the full fire, and we know that the work is largely dependent on the A11 bionic chip. And with the same AI point of the HUAWEI Mate 10, will likely support facial recognition, and before HUAWEI had sent a video diss apple face ID suck, but also from the side that this. However, not all Mate 10 supports this functionality and may be monopolized by Mate 10 Pro.

AI function: mobile phones can also identify food calories
Although all kinds of mobile phones lose weight APP many, but most require users to enter their own food name, and search through the network database to get the corresponding calorie value. And HUAWEI Mate 10 with AI chip, you can automatically recognize the food name, weight and calorie value through the camera.

Flagship performance: GPU upgrade is obvious, AI performance is among the best
HUAWEI Mate 10 first Kirin 970 chip, and the latter is also the world’s first ARM Mali-G72 MP12 GPU, in terms of graphics performance is quite interesting. However, HUAWEI this time did not overemphasize the performance of CPU and GPU, but to a group of running points reflects its AI strength.

HUAWEI said Kirin 970 in the same network model, the number of images per minute to identify 2005, iPhone 8, Plus for 889, iPhone 7, Plus for 487, Samsung Galaxy S8 for 95. If their PPT results are not tricky, the performance is impressive.

Call signal: downlink support, LTE, Cat.18, three measures blessing
The 970 kylin power, HUAWEI Mate 10 will become the world’s first downstream support LTE Cat.18 mobile phone network, the peak value of 1.2Gbps, compared with Xiaolong 835 and Exynos 8895 models only support LTE Cat 16, the peak value of 1Gbps. It also supports dual card dual LTE network, to solve the sub card calls, network and call cover problems.

In order to strengthen the call signal, HUAWEI Mate 10 also joined the 4×4, MMIO, 5CC, CA and 256QAM three technologies, you can travel around the world, in every country can achieve the same signal experience.

EMUI 6.0: the improvement of performance, it will not get bricked in 36 months
EMUI 6.0 based on Android 8 depth customization, and its EMUI 5.0 system based on further enhance the system stability and endurance time. EMUI 5.0 is known as “18 months without bricking”, then upgrade to the version of EMUI 6.0, will it achieve to “36 months without bricking”?

Full screen: ultra high screen ratio, the ultimate visual experience
HUAWEI’s first full screen models is head 6, Mate 10 is expected to become the second full screen products. Broke the news, the great God has confirmed that Mate 10 using traditional face screen design, and Mate 10 Pro may abandon hyperbolic screen, switch to full screen.

Which one is most attracted for you of the eight features of Huawei Mate 10?

More Tutorial You May be Interested In

How to Recover Data from Huawei Phone

How to Restore Data from Huawei Mate 9

How to Backup and Restore Huawei Phone

How to Transfer Music from iPhone to Huawei Phone

How to Sync Music from iTunes to Huawei Phone

How to Import Music/Videos from Computer to Huawei Mate 9

How to Fix iPhone Blue Screen of Death after iOS 11 Update

I updated my iPhone 7 to the newest iOS 11. This morning the phone screen turned blue suddenly, then reboot and back to the blue screen again. The phone is stuck like this. What causes blue screen of death on my device? And how to fix the blue screen of death to normal?

Most of Apple users can’t wait to upgrade to the latest iOS 11 and they are having fun with the new features of the new operating system brings. However, there are still some bugs following by the new iOS. Blue screen of death issue is one of the frequently asked questions on forums. The blue screen of death issue may cause of the hardware or the software problems. As iPhone/iPad/iPod users, you must be suffering the same trouble be similar with the blue screen of death issues after iOS 11 update. How we are going to fix this blue screen of death problem after iOS 11 update? Some useful tips are suggested in the following part.

Part 1: Tips of Fix iPhone Blue Screen of Death after iOS 11 Update

A:Fix iPhone Blue Screen by Turning off iCloud Sync
Apps working in sync with iCloud may lead to this iPhone blue screen of death problem. The most common one is iWork. You may turn off the iCloud sync to avoid any iOS system issues.

1.Go to Settings.
2.Select iCloud.
3.Turn off “Numbers, Pages and Keynote” sync.

This may fix your iPhone blue screen of death issue but there no iCloud sync always keeps you at risk. Again, you can only select for this option when the phone starts after a hard reset.

B:Fix iPhone Blue Screen by Restoring iPhone with iTunes
You can fix the iOS system issues of your iPhone like blue screen of death. Then, go on and follow the next few steps:

Step 1. Launch iTunes on your PC and connect your iPhone to it.
Step 2. After iTunes detects your phone, go to the “Summary” section.
Step 3. Click on “Restore iPhone” next.
Step 4. iTunes will ask for confirmation. Click on “Restore” again to initiate the process.

itunes-restore

After this, iTunes will erase your all data from phone including settings, apps and all the files. It will then download the latest version of iOS available. The phone will reboot. So, remember to back up your data before the restore. Or you can try the method in Part 2, it can fix your iPhone of blue screen of death without data loss.

Part 2: Fix iPhone Blue Screen of Death after iOS 11 with iOS System Recovery

iOS System Recovery can help to fix iPhone blue screen of death after iOS 11 without data loss. This program works well on restoring iOS system to normal for iPhone/iPad without losing data through installing the IPSW file on it.It enables you to fix several of iOS system issues, including iOS freeze, iPhone crashed,Recovery Mode stuck,DFU stuck,red iTunes logo stuck, etc,. No need to restore with iTunes, no data loss.iPhone X/8/7/SE/6S/6/5S/5/4S,iPad,iPod are supported. Let’s see how it works for fixing iPhone blue screen of death after iOS 11 update without data loss.

d_win d_mac

Step 1.Launch iOS System Recovery and Select “iOS System Recovery” Selection
• Click on the tab “More Tools” appearing at the bottom of program.Then click on “iOS System Recovery” to start the function.
• Connect iPhone to the computer by USB cable,the program will detect the device soon.
• Click on “Start” button to begin.

ios system recovery main page

fix iPhone system to normal after ios 11 update

Step 2.Download Firmware for iPhone
• To fix iPhone blue screen of death,you should download the firmware for iPhone.
• The program will detect the model of device,asks for confirmation,and suggests the latest version of firmware to download.
• Click “Repair”button.The process completes automatically.

select your iPhone model

download the firmware for iphone

Step 3.Fix iPhone Blue Screen of Death without Data Loss
• Once the firmware is installed,the program will start fixing iOS system for device and return iPhone to normal state in minutes.

fix iphone blue screen of death

restore iphone system to normal completed

Done.Now your iPhone have finished the iOS abnormal system restoring task.You can check if it is back to normal state.

d_win d_mac

Related Articles:

How to Fix iPhone Blue Screen of Death

How to Fix Bricked iPhone iPad after iOS 11 Update

How to Fix iPhone Stuck in Apple Logo after iOS 11 Update

How to Fix iPhone Stuck in Recovery Mode after iOS 11 Update

How to Backup and Restore iPhone Data

iPhone Manager – How to Transfer and Manager Files on iPhone 8/7/6S/6/SE

How to Optimize iPhone for Best Performance after iOS 11 Update

I need some help. My iPhone runs slowly after I updated iOS 11 on it. It always bricked when I was using it. Moreover, it prompted me several times in one day with the message “Please free up space your device for more storage. Anybody get the similar situation like me? Please send me your suggestions for fixing it. Thanks.

iOS 11 is the newest iOS version now are available on iPhone/iPad. Most of us just updated to the new iOS system for the new features. However, a part of Apple fans reflect that the device will get bricked after updating to iOS 11. Some of the iOS 11 apps don’t fare too badly, in absolute terms. But there are some fairly significant regressions, particularly in Mail, Notes, and Maps; and boot time goes way up (though totally rebooting your phone is not something you’re actually going to do all that often). Then some of the iOS 11 users are confusing that if there are good ways to optimize iPhone for best performance after iOS 11 update. Now we tell you that you are in the right place, this tutorial will share a wonderful tool help for free up space on your iPhone after iOS 11 update.

Part 1: Tips to Optimize iPhone for Best Performance after iOS 11 Update

A:No Background App Refresh
In addition to updating when you are otherwise occupied, apps also refresh their content in the background. For example, your Facebook or Twitter feed will update without you manually updating when you open the app. Helpful, to be sure, but it occupies CPU cycles. To turn it off, go to Settings > General > Background App Refresh and tap the toggle switch off. Or, you can take the a la carte approach and leave Background App Refresh enabled at the top and turn it off for individual apps from the list below.

no background app refresh files

B:Dial Back Location Services
Location services chew up battery life more than performance, but if your iOS device is draining its battery at a faster clip with iOS 11, it’s time to cut down on the number of apps using your device’s GPS to request your location. iOS 11 gives you more control over how and when apps access your location. No longer can a developer offer only Always or Never for the tracking options for location services. Now, you’ll be able to choose While Using the App whether the developer likes it or not. Head to Settings > Privacy > Location Services to adjust the settings for all of your apps that use location services.

off location services

C:Restart iOS 11 Device
A simple restart will help remove useless caches and improve processing performance more or less. If normal way won’t work, try force restart by long pressing the Sleep/Wake button and Home button on iPhone 6/6S/6S Plus/5S. Or Volume Down + Home button on iPhone 7/7 Plus.

Part 2: Optimize iPhone for Best Performance after iOS 11 Update via iPhone Data Eraser

Instead of trying each method separately, a better choice provided is using a free iPhone optimizing app calls iPhone Data Eraser. It allows user to thoroughly clean up junk files, large files, apps and other invisible documents and data that may lead to iOS 11 running slow on iPhone/iPad and greatly boost iPhone speed, perfectly optimize iPhone for best performance after iOS 11 update. It’s a famous tool used for one click to free up space on iPhone after iOS 11 update for getting more storage. With using this program, you can securely free up space and speed up your iOS device after updating to iOS 11 or more other situations.

d_win d_mac

Step 1.Run Program on Computer and Connect iPhone 
Run iPhone Data Eraser and connect your iPhone to the computer via an USB cable.

connect iphone

Step 2.Scan iPhone for a Full Space-Saving Analysis
This program integrates more than 25 analyzing technologies,and it support to scan and analyze data of device accurately.Click “Quick Scan” for a full space-saving analysis on how much space can be saved by cleaning up junk files,clearing temporary files,compressing photos,deleting large files and removing apps.

analyze iphone data

Then the program now will begin to scan data from your iPhone.

scanning iphone

Step 3.Free Up Space to Optimize iPhone for Best Performance after iOS 11 Update
When the scanning is end,it will show that the storage of device could be freed up.Now you can click “Clean” button to free up space for iPhone.

free up space iphone

After cleaning,you will see how much space has been released and how much more can be released by the other items as the below interface shows.Choose any part to continue.

free up space iphone completed

Note:

A:Please keep your device connected with your computer and do not use the device until the whole process is end to ensure the program operates properly.

B:There are two releasing modes you can choose to free up space on iPhone.First, all the space-releasing procedures can be done after you click the Quick Scan button, which is a full space-saving analysis. They can be done individually in each tab at the bottom of the interface according to their different functions. That means you can start with junk cleaning, photo compression or managing apps as you prefer.

d_win d_mac

Read more:

How to Free Up Space on iPhone after iOS 11 Update

How to Free Up Space on iPhone X/8/7/6S/6

How to Free Up Space on iPhone/iPad

How to Optimize Slow iPhone For Best Performance

How to Clean iPhone and iPad Junk Files to Free Up Space

How to Fix Bricked iPhone iPad after iOS 11 Update

How to Recover iPhone Data after iOS 11 Update

iPhone Manager – How to Transfer and Manager Files on iPhone X/8/7/6S/6/SE

How to Free Up Space on iPhone after iOS 11 Update

My iPhone always get bricked after I updated to iOS 11. It is such terrible. How to free up space on it with easy solutions?

The launch of iOS 11 has made many Apple fans so excited that many iPhone/iPad users can’t wait to update their devices to iOS 11 for new experience. However, after updating to the latest firmware like iOS 11, in most cases it goes fine but sometimes it might gets bricked. The worse situation is your device may be get the prompt messages like this “Please free up space your device for more storage”. This article will show you some easy ways to fix the problem about how to free up space on device after iOS 11 update with ease.

Part 1:Tips to Free up Space on iPhone after iOS 11 Update

1.Check which apps are using up the most space and decide which ones you can delete.Delete the the useless apps.

check useless apps

2. Download Google Photos to store all your photos in the cloud, then delete them all from your phone.
This is a must for anyone who often runs out of space on their iPhone. Google Photos offers free and unlimited storage of all your photos and videos taken with your iPhone. Once you upload all your photos to Google Photos, you can delete all those that are in the storage of your iPhone by tapping the settings button (three horizontal lines on the top left of the app), then tapping “Free up space”. You can access them from any device where you can log in to your Google account after uploading.

google photos app

3.Make your iPhone delete messages automatically after 30 days.
iPhones are set to keep your messages forever, and they can also take up a lot of space with photos and videos. You can make your iPhone delete messages 30 days after the last message was sent or received automatically by going into Settings > Messages > Keep Messages > set to 30 days.

setting sms app

Part 2:Free up Space on iPhone after iOS 11 Update with iPhone Data Eraser

iPhone Data Eraser is a wonderful tool help to one click to free up space on iPhone after iOS 11 update for getting more storage ,and use for erasing data from device permanently.iPhone Data Eraser allows you to release space on iOS device easily.It provide five powerful functions to you: One Click to Free Up Space,Erase All Data,Erase Deleted Files,Erase Private Data,Erase Private Fragments.With the help of this smart program, you can securely free up space and speed up your iPhone/iPad/iPod Touch for any situations.

d_win d_mac

Step 1.Run Program on Computer
Run iPhone Data Eraser and connect your iPhone via an USB cable.

connect iphone

Step 2.Scan iPhone for a Full Space-Saving Analysis
This program integrates more than 25 analyzing technologies,and it support to scan and analyze data of device accurately.Click “Quick Scan” for a full space-saving analysis on how much space can be saved by cleaning up junk files,clearing temporary files,compressing photos,deleting large files and removing apps.

analyze iphone data

Then the program begin scanning data from your iPhone.

scanning iphone

Step 3.Free Up Space on iPhone after iOS 11 Update
When the scanning is end,it will show that the storage of device could be freed up.Now you can click “Clean” button to release space for iPhone.

free up space iphone

After cleaning,you will see how much space has been released and how much more can be released by the other items as the below interface shows.Choose any part to continue.

free up space iphone completed

Note:

One:Please keep your device connected with your computer and do not use the device until the whole process is end to ensure the program operates properly.

Two:There are two releasing modes you can choose to free up space on iPhone.First, all the space-releasing procedures can be done after you click the Quick Scan button, which is a full space-saving analysis. They can be done individually in each tab at the bottom of the interface according to their different functions. That means you can start with junk cleaning, photo compression or managing apps as you prefer.

d_win d_mac

Read more:

How to Free Up Space on iPhone X/8/7/6S/6

How to Free Up Space on iPhone/iPad/iPod

How to Optimize Slow iPhone For Best Performance

How to Clean iPhone and iPad Junk Files to Free Up Space

How to Fix Bricked iPhone iPad after iOS 11 Update

How to Recover iPhone Data after iOS 11 Update

iPhone Manager – How to Transfer and Manager Files on iPhone X/8/7/6S/6/SE