All posts by DHZ

Restore Lost/Disappeared Contacts on iPhone after iOS 13 Update

[Summary]: If your contacts numbers missing, lost or disappeared after iOS 13/iOS 12.3.1 update on iPhone XS/XR, iPhone X, iPhone 8/7, etc., don’t worry.  This guide will teach you how to recover lost contacts from iPhone after iOS 13 or iOS 12/12.1 update, you can also follow the same steps to recover lost messages, photos, notes, WhatsApp chat history and more after iOS 13/12 upgrading.

Lost contacts on my iPhone X after iOS 13 beta update. How can I restore lost contacts due to iOS 13 beta update error? I have backed up my device to iTunes to iCloud, can I recover lost contacts from iPhone without backup?

After the 2019 WWDC developer conference, iOS 13 has been confirmed to be the next iPhone system right after iOS 12.3.1. And the iOS 13 beta version is already available for iPhone XS, iPhone XR, iPhone X, iPhone SE, iPhone 8/8 Plus, iPhone 7/7 Plus and iPhone 6S/6S Plus, you can install iOS 13 IPSW on your iPhone now, to avoiding data loss, we recommend you should backup iPhone before upgrading to iOS 13. If you lost data contacts after iOS 13 update, this article will teach you how to restore lost contacts after iOS 13 upgrading, you can also recover missing photos, get back losing messages, etc.

If you have backed up your iPhone with iTunes or iCloud before iOS 13 or iOS 12.3.1 update, then you can easily get back lost contacts by restoring from the backup, you need to restore all backe up data including contacts, messages, photos and more. In another world, you can’t just select “Contacts” type to recover it, worse, these two restore methods will erase all existing data and settings on iPhone. So, restoring from iTunes or iCloud backup is not the best choice. If you want to recover lost contacts from iPhone without erasing iPhone data, you need to use a third-party iPhone Contacts Recovery, such as U.Fone iPhone Data Recovery, iOS Data Recovery and iOS Toolkit – Data Recovery.

Let’s shows you three method to recover lost contacts from iPhone after iOS 13 upgrading: restore lost contacts from iTunes backup; restore contacts from iCloud backup; recover deleted/lost contacts from iPhone/iTunes/iCloud backup selectively by U.Fone iPhone Data Recovery.

Method 1. Restore lost Contacts from iTunes backup after iOS 13 update

If you have created data backups in iTunes before upgrading to iOS 13, you can restore lost data contacts from iTunes backup. Let’s see how to get your missing contact numbers back from iTunes backups.
You may want to know: How to Restore Contacts from iTunes Backup without Erasing Data

Step 1. Install the latest version of iTunes application on your PC/Mac and connect your iPhone to your PC.

Step 2. Launch iTunes application and click your iPhone icon, click Summary.

Restore lost contacts from iTunes backup

Step 3. After your iPhone device detected by iTunes application, then select “Restore Backup…” in iTunes.

restore contacts from iTunes after ios 13 update - Step 3

4. Here, you can see the all backed up history with each backed up time, please select the most recent backup of your lost contacts, and then click “Restore” button start to restore lost iPhone data from iTunes backup, including the lost contacts.

recover contacts from iTunes

Please keep your iPhone connected to your computer during the whole restoring process, it will restore iTunes backups to iPhone devices. After this, you can disconnect your iPhone and use your lost contacts on your iPhone again.

Note: Using iTunes to restore backup contents to device will erase all existing data, to recover lost contacts from iPhone, iTunes or iCloud without erasing existing data, the U.Fone iOS Data Recovery solution will be the best choice.

Method 2: Restore Contacts after iOS 13 update from iCloud backup

If you have backed up your iPhone wit iCloud before iOS 13 update, then you can easily restore lost contacts from iCloud backup, but this method will erase all data and settings on iPhone. If there are not other important data on your iPhone, you can choose this method. In additional, if you want to restore only Contacts from iCloud backup without erasing data, you can also use U.Fone iPhone Data Recovery to download and restore lost contacts selectively, as well as restoring deleted and lost data from iPhone without backup.
You may want to know: How to Restore Data Contacts from iCloud Backup without Erasing Data

Let’s learn the detail guide about how to contacts from iCloud backup with erasing existing data.

Step 1. Backup iPhone data before restoring data from iCloud backup.
As we all know that to restore backups from iCloud backup would reset or erase all iPhone data. To avoiding data erased, so here we’d like to suggest you our U.Fone iOS Data Backup tool to backup iPhone data to computer firstly.

Step 2. Turn on your iPhone > Go to Settings > General > Reset > Tap Erase all content and settings option.

restore contacts from icloud after ios 13 update

Step 3. Reach the Apps & Data screen and tap Restore from iCloud Backup > Sign in to iCloud > Choose backup > choose the recent backup of your contacts that you have created, then click “Restore” button start to restore data from iCloud backups.

restore contacts from icloud

Step 4. Restore backup data to iPhone device again.
After your lost contacts be restored back to your iPhone from iCloud backups, if you have backup your iPhone to computer via U.Fone iOS Data Backup & Restore, now you can restore all the backups to iPhone device.

Note: Restoring data contacts from iCloud backup method will erase all iPhone data and settings, if you have backed up your iPhone to iCloud, please follow the method 3, you can easily recover lost contacts from iPhone, iTunes backups and iCloud backups without wiping your iPhone data and setting.

Method 3: Selectively Recover Lost Contacts from iPhone, iTunes and iCloud after iOS 13 Update

U.Fone iPhone Data Recovery, with its highest success rate, has successfully helped millions of iOS users recover lost contacts from iTunes/iCloud backups selectively. Besides recovering contacts from iTunes/iCloud backups, this iOS 13/12 data recovery software can also help to scan and retrieve contacts directly from your iPhone XR/XS/XS Max/X/8/8 Plus/7/7 Plus/SE/6s/6s Plus/6 Plus after iOS 13 upgrading. It supports previewing and selecting the lost contacts before the recovery process. Now, let’s check its detailed steps about how to recover lost contacts from iPhone after iOS 13/12.3 update.

More Features:

  • 1. Recover deleted and lost contacts from iPhone without backup, you can get back contact number, job title, address, companies, email and more which you store on contact app. You can recover and save the lost contacts on computer as VCF, CSV or HTML file.
  • 2. Selectively restore data from iTunes and iCloud backups, you can preview the details of backup file and select which you want to restore, it’s more advantages than iTunes. Unlike iTunes, it won’t erase the existing data on iPhone.
  • 3. Support recover all kinds of data from all iOS devices (the latest version of 13 is included), including photos, videos, contacts, text messages, iMessages, mms, notes, call history, safari bookmark, voicemail, voice memos, as well as third-party social app data like WhatsApp, WebChat, Viber, Kik, line, Skype etc.
  • 4. Backup and restore iPhone data selectively, or one click to backup your all iPhone data to computer.
  • 5. Fix iPhone to normal after your phone stuck at apple logo/ recovery mode, white/black screen, DFU mode and other iOS system issue. For example, repair iPhone stuck in recovery mode after failed upgrading to iOS 13/12.

You can download the free trial version below to have a try.

d_win d_mac
d_win d_mac

Steps to Recover Lost Contacts from iPhone after iOS 13 Update

If your iPhone in hand, please follow this simple steps to recover lost contacts from iPhone directly, you can also use this iPhone Data Recovery program to extract data contacts from iTunes or iCloud backup selectively.

Step 1. Run iPhone Data Recovery on PC or Mac
Firstly, please download, install and launch the iOS Toolkit on your computer, then go to “iPhone Data Recovery” section.

Recover Contacts from iPhone without Backup - Step 1

Step 2. Connect iPhone to Computer via USB Cable
Connect your iPhone to the computer via a USB cable > Choose “Recover from iOS Device” mode > Click “Start Scan” to continue.

Recover Contacts from iPhone without Backup - Step 2

Tips: If you wan to restore data from iTunes/iCloud backups, you don’t need to connect your device to the computer, please choose “Recover from iTunes Backup File” or “Recover from iCloud Backup File” to scan your backups.

Step 3. Scan Your iPhone
The program will automatically begin scanning your iPhone for lost contacts after you doing the steps accordingly.

restore contacts from iPhone after ios 13 update

Step 4. Preview and Recover Lost Contacts from iPhone Directly
When the scan is finished, you can preview all found data before recovery. Choose “Contacts” to preview, mark it and click “Recover” to save all the selected contacts on your computer with one click, you can export all contacts as several format like VCF, CSV or HTML for viewing, printing or using, if you want to import the retrieved contacts to iPhone for using, you should save them as VCF format.

recover contacts from iPhone ios 13 update

Step 5. Import the Retrieved Contacts to iPhone(Option)
Well done, you have recover lost contacts from iPhone devices, or restore lost contacts from iTunes/ iCloud backup. Not matter which recovery modes you using, all lost contacts be save onto the computer, you can keep them forever. If you want to transfer those restored contacts back to your iPhone devices, you can use this iPhone Transfer & Manager to import the contacts from computer to iPhone directly, this iPhone transfer also allows you backup all data from iPhone to computer, as well.
Read the guide: How to Import Contacts to iPhone

Now, please download the iOS Data & System Recovery and try to recover lost contacts from iPhone, iTunes and iCloud.

d_win d_mac
d_win d_mac

iPhone Contacts Recovery


iOS Data Recovery

Recover Your iPhone Lost Contacts
Now, Even without Backups

Compatible with iOS 13 & iOS 12.3

Recover Lost Contacts Now

How to Recover Data from iPhone after iOS 15/14/13 Update

Summary
Lost data after upgrading iPhone to iOS 15 or iOS 14? Don’t worry, these 3 iPhone data recovery methods will help you recover lost data after iOS 15/iOS14 update, including contacts, SMS, photos, videos, notes, WhatsApp and more.

Although the beta version of iOS 15 is yet to come, many of iPhone users already upgraded their devices to the iOS 15 beta to enjoy it’s new features: dark mode, performance boost, new editing tools and more in Photos app, new privacy features, new app to find missing devices and track loved ones, revamped reminders app, quick path keyboard, maps app gets more refined data and new features, memoji stickers expansion and more features. After upgrading your iPhone to iOS 15, you can use the new features in iOS 15. But, the latest iOS 15 beta still comes with some unexpected bugs. One big issue is that you may lose some important contacts or other types of data after upgrading to iOS 15.

Recently, lots of iPhone users can’t wait to try out the new iOS 15 beta to enjoy the new features. But while updating to the iOS 13 beta, some people met problems and bugs and then lost important data from their iPhone, such as contacts, messages, photos, notes and more. If your lot data on your iPhone after iOS 13 update also, you can follow the below 3 most effective methods to recover iPhone lost data after iOS 15 upgrading.

Three iOS 15 Data Recovery Solution

Once you lost data on iPhone after iOS 15 update, if you backed up your iPhone data to iTunes or iCloud before upgrading to iOS 15/iOS 14, you can easily restore data from iTunes or iCloud backup, please learn the Method 1 and Method 2. If you never backup devices before upgrading to iOS 15, you can go to method 3 to recover lost data from iPhone after iOS 15 upgrading, you need to use a professional iOS 15 Data Recovery to get back the lost data. Let’s check.

Method 1: Recover iPhone Data from iTunes Backup After iOS 15/14/13 Update

If your have backed up your iPhone device with iTunes before updating to iOS 15, then you can follow the steps below to recover iPhone lost data from iTunes backup. Please follow the detail guide about how to restore lost data after iOS 15 update from iTunes backup.

Step 1. Run iTunes on PC/Mac and connect your iPhone to the computer with USB cable.

Step 2. Click your iPhone icon when it appears in iTunes.

restore data from iTunes after ios 13 update - Step 2

Step 3. Click Summary > Click “Restore Backup”.

restore data from iTunes after ios 13 update - Step 3

Tips: “Find My iPhone” must be turned off before restoring your iPhone, please go to iCloud setting on your iPhone and turn off “Find my iPhone”.

turn off find my iphone

Step 4. The iTunes application will pop up an new windows, please select a backup history that you made before you upgrade your iPhone device to iOS 15. If you forgot when you have backed up your devices, please choose the latest backed up history and click “Restore” button start to restore iTunes data to iPhone.

restore itunes data after ios 13 update

Note: If your have backed up your iPhone to iTunes, you can choose this method to restore from iTunes backups. But this method will erase all the existing data on your iPhone. So, we recommend you should use a third-party iOS 15 Data Recovery software to recover lost data from iPhone device directly, that won’t cause data loss. Such as the third method we mentioned, please keep reading the below methods.

Method 2: Restore iPhone Data from iCloud Backup After iOS 15/14/13 Update

If you backed up your iPhone to iCloud before updating to iOS 15, then you can follow the detail guide to restore your iPhone lost data from iCloud backup.

Note: Before restoring data from iCloud backup, you should know that this method also will erase all contents and settings of your device. If you don’t want to do so, you can recover data from iCloud without resetting by using a third-party iCloud/iPhone data recovery tool.

Step 1. On your iPhone, go to Settings > General > Find and tap Reset > Tap on Erase All Content and Settings > Enter your password. Then your iPhone will be reset to factory settings.

recover icloud data after ios 13 update

Step 2. After restoring your iPhone to factory setting. When you reach on the “Apps & Data” screen, tap “Restore from iCloud Backup”.

restore icloud backup

Step 3. Sign-in to your iCloud account. Tap “Choose backup” and then select the backup history you made before upgrading to iOS 13, finally just tap “Restore” option in iCloud start to restore iCloud data to your iPhone device.

Method 3: Recover Lost Data from iPhone iPad After iOS 15/14/13 Update

Above two methods can help you restore lost data from iTunes or iCloud backup, but restoring data from iCloud or iTunes backup will to erase all existing data of your device. However, what if there’s no backup? Don’t worry, you still have chance to recover lost data after iOS 13/iOS 12 update without any backup, what you need is a professional iOS 15/14/13 Data Recovery software, you can download the best iPhone iPad data recovery tools here.

Since the missing/lost/deleted data is only hidden somewhere in the device and easily to be covered by new data, once you find the data is lost, you must to use a professional iPhone data recovery software to recover lost data from iPhone as soon as possible. In additional, please don’t add new data to the devices, in order to avoiding the deleted data be overwritten, let’s teach you how to recover lost/deleted data from iPhone iPad after iOS 15 update with iOS 15 Data Recovery, even without backup.

U.Fone iPhone Data Recovery is specifically designed to recover lost data from iPhone, iPad and iPod devices that base on iOS 15/iOS 14/iOS 13/iOS 12/iOS 11/iOS 10/iOS 9/iOS 8. It can scan your iOS device’s memory directly and recover up to 18 types of data, including contacts, SMS, photos, videos, notes, call logs and App data (WhatsApp, Messenger, Kik, Line, Viber, WeChat supported), etc.

Now we can view more features of iOS Data Recovery software.

  • Recover lost data from iPhone devices, iCloud backup and iTunes backup due to deletion, device crashed, smashed or broken, jailbreak, iOS upgrade or device reset etc.
  • Extract unreadable iTunes and iCloud backup, preview the details of backup file and choose the ones you need to restore, avoid the newly created data being overwritten.
  • Recover data from third-party app data without backup, such as WhatsApp, WeChat, Viber, Kik, Skype, etc.
  • Fix iOS system to normal without erase any data after your iPhone stuck at apple logo, recovery mode, DFU mode, white/black screen of death and other iOS system issue.
  • Support all iPhone iPad iPod running all iOS versions and all Windows and Mac computer, the latest version of iOS 15.
  • Backup and restore data from your iPhone, iPad and iPod touch.

d_win d_mac
d_win d_mac

How to Recover iPhone Lost Data after iOS 15 Update

Follow the detail guide about how to recover lost data from iPhone 13/12/11/XR/SE/XS/XS Max/XR/X/8/8 Plus/7/7 Plus/SE/6S Plus/6S after upgrading to iOS 13, you can also retrieve deleted and lost data from iOS 12 devices. Let’s learn how to restore iPhone data without backup.

Step 1. Download and Launch U.Fone iOS Toolkit on PC or Mac
Download, install and run U.Fone iOS Toolkit on your Windows or Mac computer, then go to “iPhone Data Recovery” feature.

iOS 15 Data Recovery: Recover Data from iPhone without Backup - Step 1

Step 2. Connect your iPhone to the computer
Then, please connect your iPhone device to the computer via USB cable. To recover deleted data from iPhone device, just select “Recover from iOS Device” mode, the program also supports “Recover from iTunes ” or “Recover from iCloud”.

iOS 15 Data Recovery: Recover from Data iPhone without Backup - Step 2

Step 3. Scan Lost Data from iPhone
After your iPhone device connected and detected by the software, just click “Start Scan” button, then the software begins scanning your device automatically for lost data, and you’ll get the interface as follow.

iOS 15 Data Recovery: Recover from Data iPhone without Backup - Step 3

The iPhone data recovery will scan all media files and text contents from iPhone. During the scanning process, if you find the file you want, you can stop the scan processing by clicking the “Stop” button.

scan data from iPhone

Step 4. Preview and Selectively Recover Data from iPhone
After the scan, all found data are displayed in categories, like call history, camera roll, photo stream, photo library, contacts, text messages, message attachments, calendar, notes, reminders, voice memos and safari bookmark. You can preview those scanned data one-by-one.

iOS 15 Data Recovery: Recover  Data from iPhone without Backup - Step 4

Please select those you data you want to get back and click “Recover” button to save them on your compute with one click.

recover messages from iPhone after ios 13 update

Step 5. Transfer the Recovered Data to iPhone(Option)
The files including SMS, message attachments, contacts, call history, camera roll, photo stream, photo library, notes, calendar, reminders, voice memos and safari bookmark are retrieved to the PC/Mac. If you want to import the recovered data back to iPhone devices, iOS Transfer and Mobile Sync is a great partner to cooperate with U.Fone iPhone Data Recovery, both can help you easily copy files between PC/Mac and iPhone/iPad/iPod Touch easily.
You may want to read: How to Add Files to iPhone

We have teach you how to recover lost data from iPhone after iOS 13 upgrading(without backup), you can also use this U.Fone iPhone data recovery to recover lost data from iTunes backup and restore lost data from iCloud backup without easing all settings and contents.

Now, download this powerful program to recover your iPhone/iPad/iPod data after iOS 13 or iOS 12.3 update.

d_win d_mac
d_win d_mac

The Bottom Line

Above 3 methods can help you restore lost and deleted data from iPhone after iOS 15/iOS14 update, you can also recover deleted files on any iOS 15/iOS 14/iOS 13 devices, no matter you have a backup or not. Besides data loss, iOS upgrades can also cause a number of other problems, such as the iPhone stuck on recovery mode, stuck on Apple logo, iPhone stuck on black screen of death, etc. Fortunately, U.Fone iOS System Recovery also can help you fix ios system to normal without data loss. Let’s take how to fix iPhone stuck in recovery mode after iOS 15 update as an example.

Recover Data after iOS 15 Update

How to Install iOS 13/iOS 12.4 on Your iPhone Safely

[Summary]: Want to upgrade your iPhone/iPad to iOS 13 Beta / iPadOS? This page provides iOS 13 Beta IPSW download links for iPhone and guide you how to install iOS 13 beta on iPhone using iTunes or OTA Updates (Over-the-Air Updates). Here, you also can learn how to downgrade iOS 13 to iOS 12.4 safely.

install ios 13

You may want to know:

* How to Fix iPhone Stuck in Recovery Mode After iOS 13 Update

* How to Recover Deleted Data on iPhone 11/11 Pro/XS/XR/X

CONTENTS

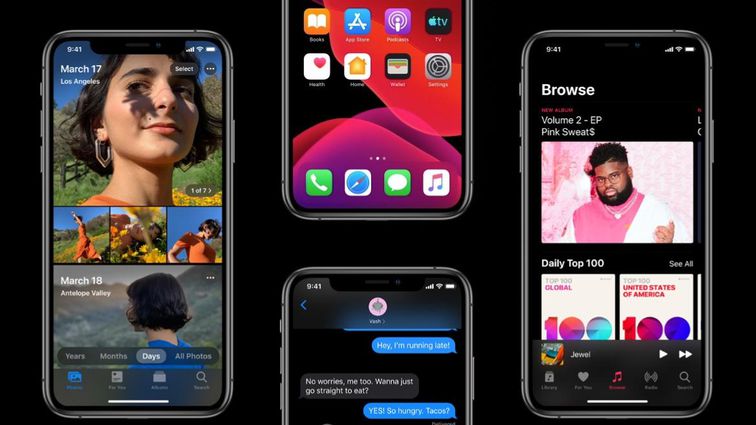
At WWDC 2019, Apple unveiled the new version of iOS 13, the new features of iOS13 are compelling. Apple claims that iOS10 is the biggest change in the history of iOS, and many of the changes are to make iOS closer to user habits. There are main 10 features in iOS 13.

ios 13 dark mode iPhone

1.Overall performance optimization. Face ID face unlocking speed increased by 30% in iOS, software update will be reduced by 60%, and software speed will be increased by 2 times.

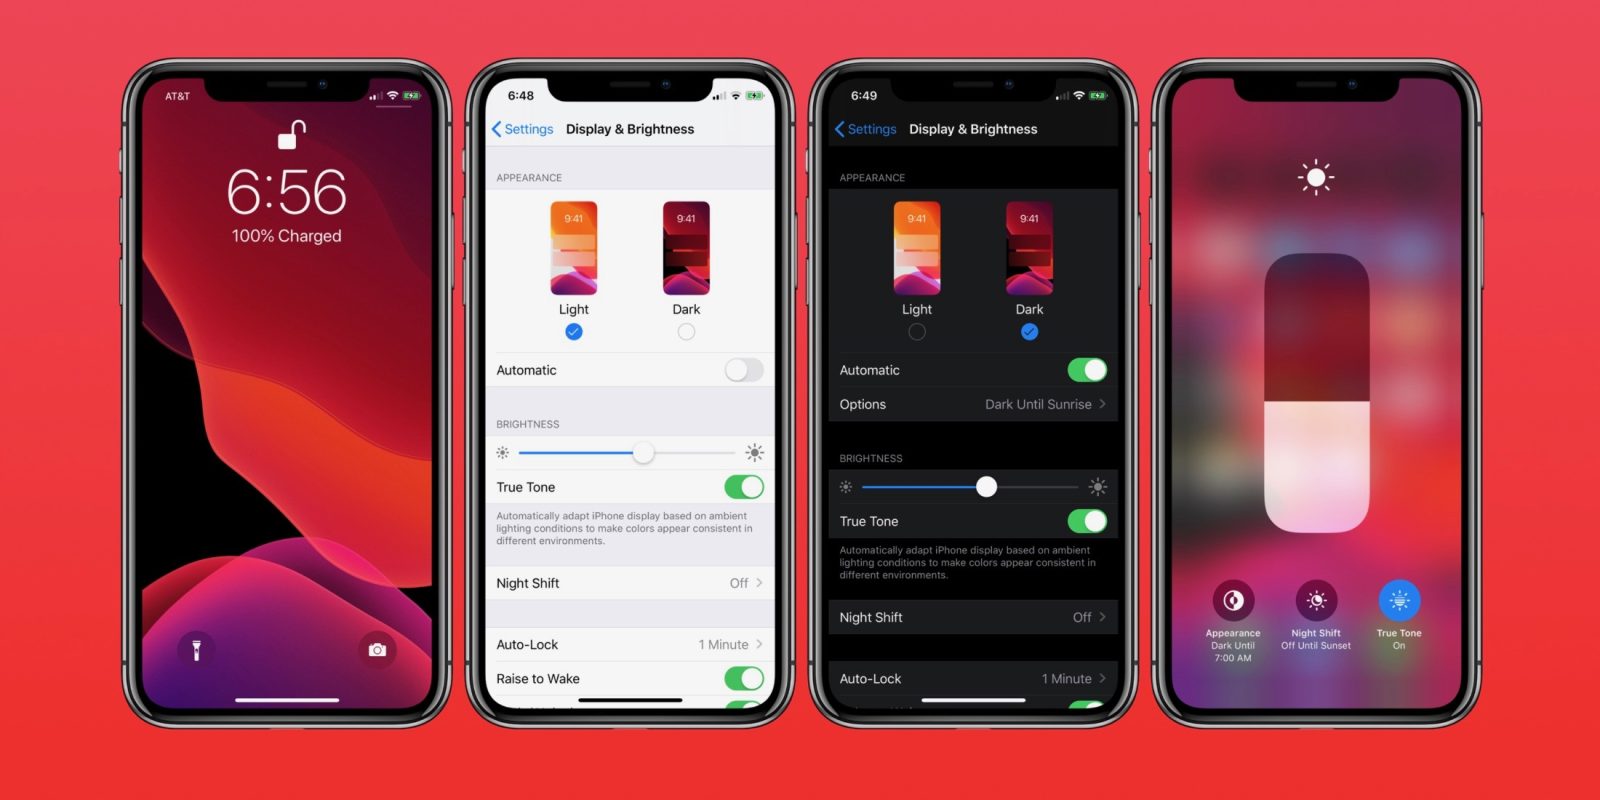
2. Dark Mode in iOS 13. The new black mode is supported in iOS13, and the overall system color matching will match the new black mode. At the same time, music will also support black mode.

2.Rebuild Apple Map. The map features built into iOS 13 are optimized. At the end of 2019, Apple will complete all streets cape maps in the United States. The new map will be modeled in 3D. At the same time, the details of the street scene in the map are preserved.

4. Privacy and Security. There are a lot of privacy details in the new iOS13. Content related to personal privacy is prompted when using the app. Signing in to FaceBook and Google with Face ID will protect a lot of personal privacy. Face ID will continue to support third-party software logins with open APIs.

5. Shooting interesting enhancement. There are more fun features in shooting. The picture supports the timeline function view. The album will automatically recognize the shooting content in the same scene, which is more suitable for the user to view the photo scene.

6. HomeKit will support home monitors. The monitor recorded video will be encrypted and uploaded to iCloud.

7. Memoji will join iOS. Memoji will support Apple devices with A9 processors and above.

8. Apple family audio configuration features increased. AirPods supports Siri to read and voice-convert text responses. Sharing music to other phones is easier. HomePod will support more than 100,000 stations.

9. The new Carplay interface supports more information, while the new Carplay supports Siri.

10.Compared with iOS 12, Siri pronunciation on iOS13 is more like human, and voice interaction is no longer cold.

Apple update to the iOS 13 with performance and security enhancements for your iPhone or iPad, do you want to upgrade your iPhone to iOS 13 beta to feel the latest design? Apple has offers developer beta of iOS 13 for iPhones, iPads, iPod touchs to developers, the iOS 13 public beta version is still a few weeks away, and the iOS 13 developer beta version is available for developers now. If you want to install iOS 13 to your iPhone, you should make sure that your iPhone is compatible with iOS 13.

iOS 13 supports the iPhone models including iPhone XS Max, iPhone XS, iPhone XR, iPhone X, iPhone 8 Plus, iPhone 8, iPhone 7 Plus, iPhone 7, iPhone 6s Plus, iPhone 6s and iPhone SE. So the iPhone 6/6 Plus and other old iPhone models doesn’t compatible with iOS 13.

Here, you can download the match iOS 13 beta IPSW for your iPhone, just click the download links below:

iOS 13 (iPhone 6s): Download iOS 13 Beta iPSW File from Google Drive
iOS 13 (iPhone 6s+): Download iOS 13 Beta iPSW File from Google Drive
iOS 13 (iPhone SE): Download iOS 13 Beta iPSW File from Google Drive
iOS 13 (iPhone 7): Download iOS 13 Beta iPSW File from Google Drive
iOS 13 (iPhone 7+): Download iOS 13 Beta iPSW File from Google Drive
iOS 13 (iPhone 8): Download iOS 13 Beta iPSW File from Google Drive
iOS 13 (iPhone 8 Plus): Download iOS 13 Beta iPSW File from Google Drive
iOS 13 (iPhone X): Download iOS 13 Beta iPSW File from Google Drive
iOS 13 (iPhone XS): Download iOS 13 Beta iPSW File from Google Drive
iOS 13 (iPhone XS Max): Download iOS 13 Beta iPSW File from Google Drive
iOS 13 (iPhone XR): Download iOS 13 Beta iPSW File from Google Drive

Part 1: Back up iPhone Data to Computer before upgrading to iOS 13

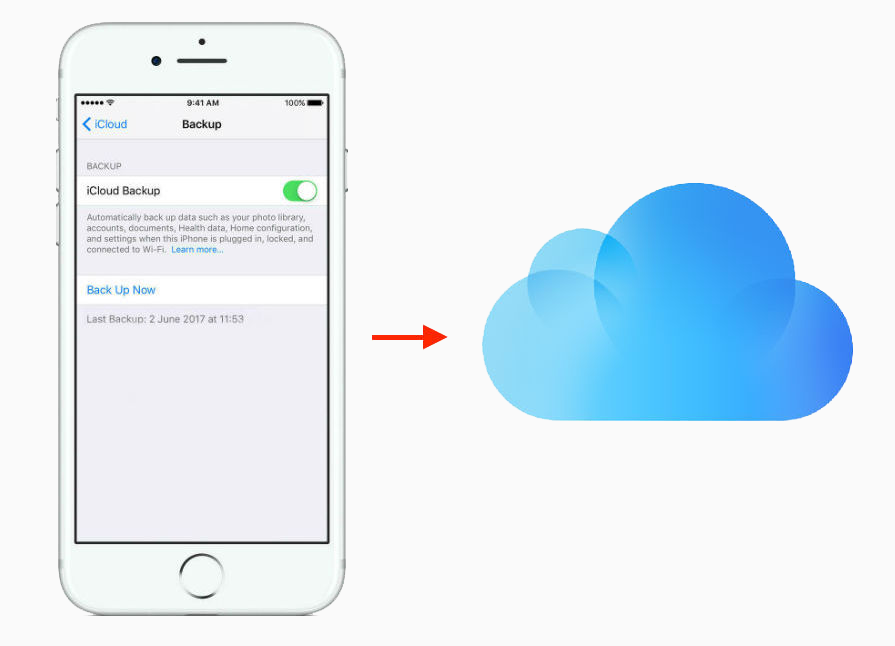
Before installing iOS 13 Beta on iPhone, you should backup data from iPhone to computer firstly, including photos, videos, contacts, messages, notes, call logs, WhatsApp data and other App data. After backup your iPhone data to computer, you should backup each and every single file and setting on your iPhone, iPad or iPod touch via iTunes or iCloud, after full backup your iPhone data, settings and more information to computer, iTunes or iCloud, you no longer worry about data loss, even if the upgrade fails, and will come in handy later whenever you decide to downgrade back to iOS 12, you can easily to restore data back to your iPhone. Please, do not skip this step otherwise you have the potential to lose all your photos, videos, settings and personal files due to an unforeseen event. However, let’s teach you how to backup all data from iPhone to computer via a third-party iOS Data Backup & Restore tool.

1-click backup iPhone/iPad Data without using iCloud and iTunes before iOS 13 Update

You can backup iPhone/iPad/iPod touch via iCloud and iTunes, but iCloud backup requires network, and it’s not convenient to restore the backup to your device which needs you to reset your device. For using iTunes backup, it will take you lots of time during the backup and restore process, and it’s easy to make some unexpected mistakes.
You may want to read: 6 Ways to Backup iPhone/iPad Data before Upgrading to iOS 13

U.Fone iOS Data Backup & Restore is a profession iPhone to computer backup tool, it can help you backup iPhone/iPad/iPod touch to your computer with one click, including Contacts, Messages, Notes, Photos, Calendar, Reminder, Voicemail, WhatsApp & attachments, Voice memos, Safari bookmarks, Safari history, Call history, App photos, App video, App audio, App’s document, and more. After backup your iPhone data to computer via this iOS Data Backup & Restore tool, then you can safely upgrade your iPhone to iOS 13, and then selectively preview and restore any item from the backup to iPhone devices.

More Features:

  • Unlike iTunes and iCloud, it won’t overwrite existing data.
  • Back up and restore iPhone/iPad/iPod data to computer without iTunes.
  • Restore from backup to any iOS device.
  • Restore from backup to Windows or Mac computer.
  • Password protect your backup data on computer.
  • One click or selectively to back up your iPhone/iPad data to computer.
  • Supports all iOS devices (iPhone XS Max, iPhone XS/XS Max/XR/X/8/7/6/5, iPad Pro, iPad mini, iPod touch, etc.)

Download the iOS Toolkit – iOS Data Backup & Restore for Windows and Mac, then backup your iPhone data to computer before upgrading to iOS 13.

d_win d_mac
d_win d_mac

One Click to Backup iPhone Data to Computer before iOS 13 Upgrading

Step 1. Install U.Fone iOS Data Backup & Restore
To backup your iPhone data to computer with 1 click, please download, install and run the iOS Toolkit on your computer immediately.

launch U.Fone iOS Toolkit

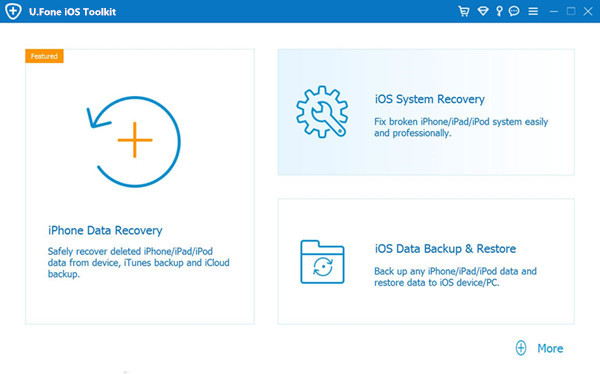
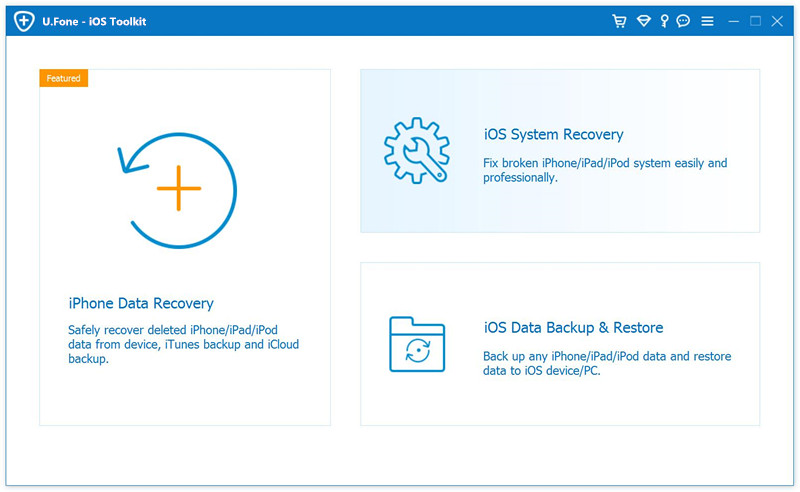
Choose “iOS Data Backup & Restore” feature from the interface. Then locate on iOS Data Backup.

go to ios data backup & restore

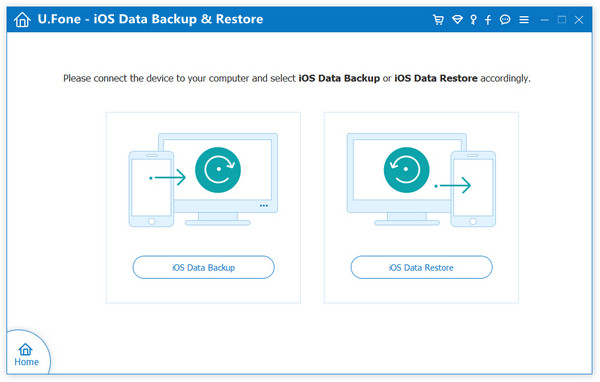
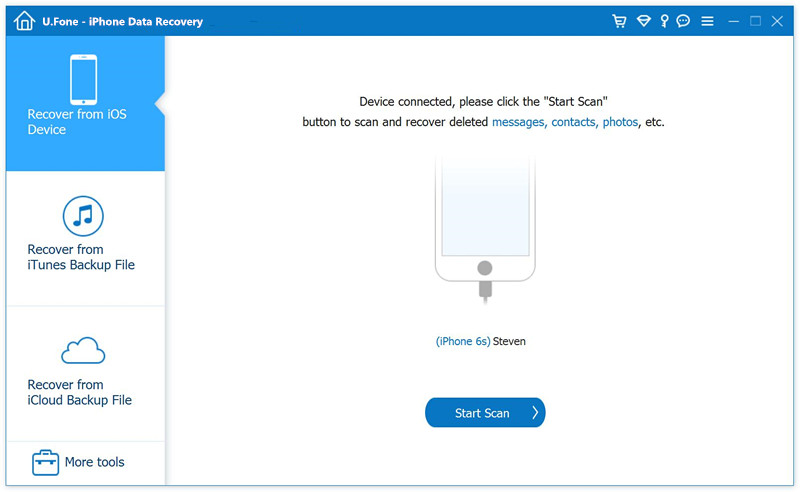
Step 2. Connect iPhone to PC or Mac
According to the next window tips, please connect your iPhone to PC or Mac. There are two backup modes on the screen: Standard backup and Encrypted backup. Tick Standard backup then click Start button to enter the process.

connect iPhone to computer

Note: With Encrypted backup, you will need to enter the password you created when you want to restore the backup.

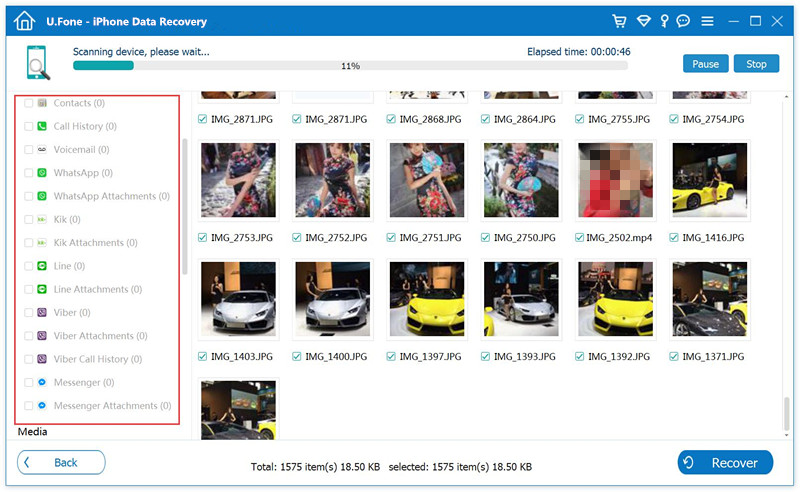
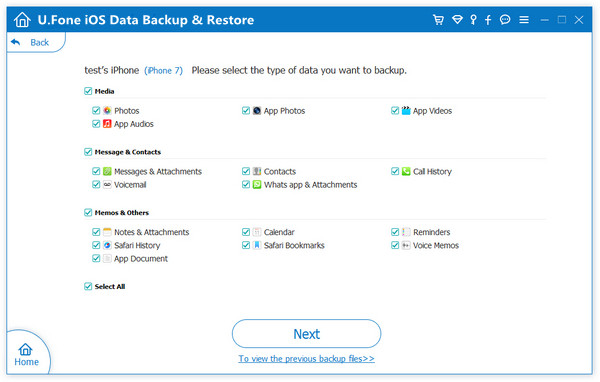
Step 3. Choose Data to Backup
You can see the various data types are supported, you can select the data you want or check all based on your needs. Then click “Next” to start backing up your iPhone data.

select data to backup

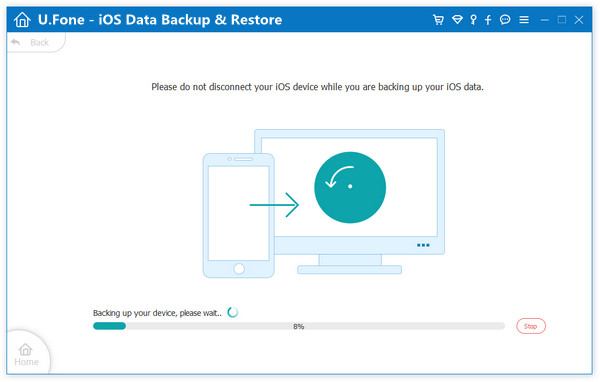
Step 4. Complete iPhone Data Backup
Now the software is backing up your data, please be patient.

backup iPhone data to PC

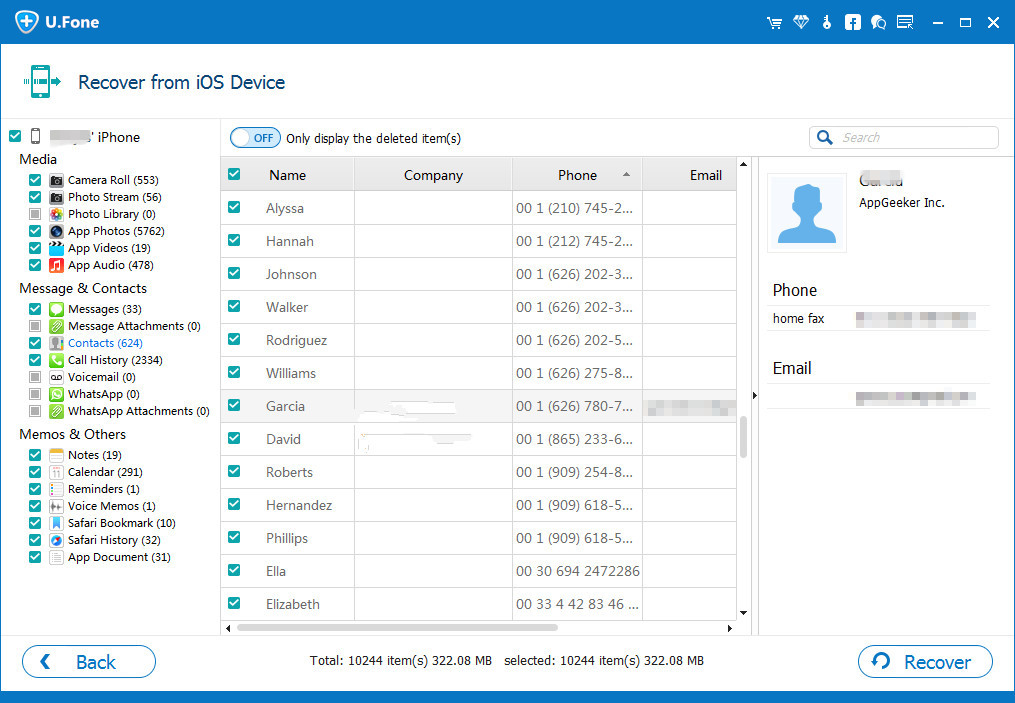
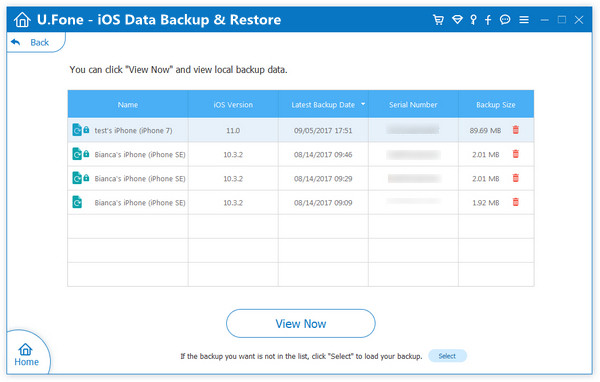
Once the backup is successful, you can easily view the backup specific information, including backup time, backup size, device name and so on.

view backup files

d_win d_mac
d_win d_mac

After you have backed up your iPhone data to computer with this iOS Toolkit – iOS Data Backup & Restore, you can optionally restore data from the backup data to iOS devices after iOS 13 upgrading or downgrading successfully, you can also restore the backups to Windows or Mac PC for your future use.

Part 2: Install iOS 13 Beta Using OTA

Good news: iOS 13 Public Beta 2 Has Be Released as an OTA Update
OTA Updates (Over-the-Air Updates, also know as wireless updates) were introduced with iOS 13. iOS 13 Beta 2 is available for downloading to iPhone devices directly, I believe many of friends can’t wait to experience the latest iOS 13.

The first beta version of iOS 13 has been online for half a month. Since there is no official description file, it can only be upgraded with the help of a computer. Many of the small partners who want to upgrade feel too much trouble and give up. Now, the second beta version of iOS has come out, and this beta version officially provides a description file!

Now, you can upgrade iPhone to iOS 13 without a computer! If your iPhone model compatible with iOS 13, now you can update on your iPhone directly.

Very simple, download the iOS 13 Developer preview beta 2 description file, you can directly to install iOS 13 Beta 2 on iPhone XS / XS Max/XR/X8/8 Plus/7/7 Plus/6s/6s Plus/SE and iPod Touch 7th via OTA updates:

How to Install iOS 13 Beta Using OTA or Over-the-Air Update for Free

Follow the steps below to update your iDevice running on iOS 12 or later to iOS 13 beta using OTA update for free:

Step 1. First of all, you need to launch Safari web browser on your iPhone.
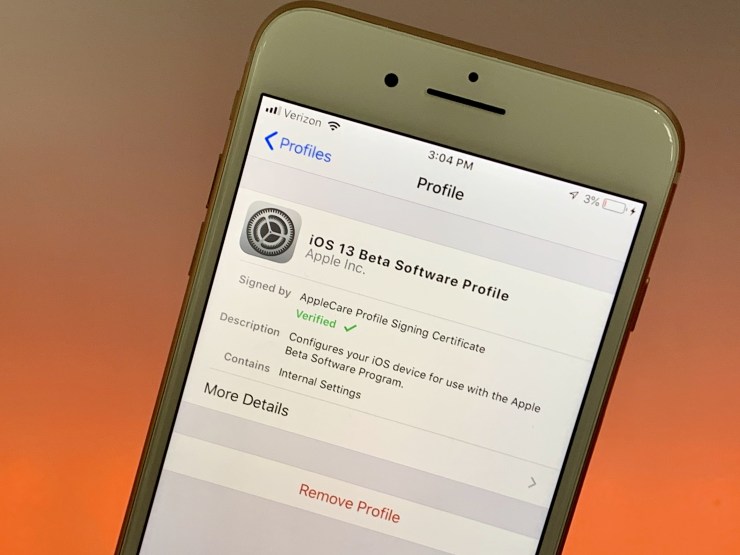
Step 2. Visit page and download the iOS 13 Developer Preview beta 2 description file
iOS 13 Developer Preview beta 2 description file download link:
https://dl.ifanr.cn/ifanr/iOS_iPadOS_13_Beta_Profile.mobileconfig
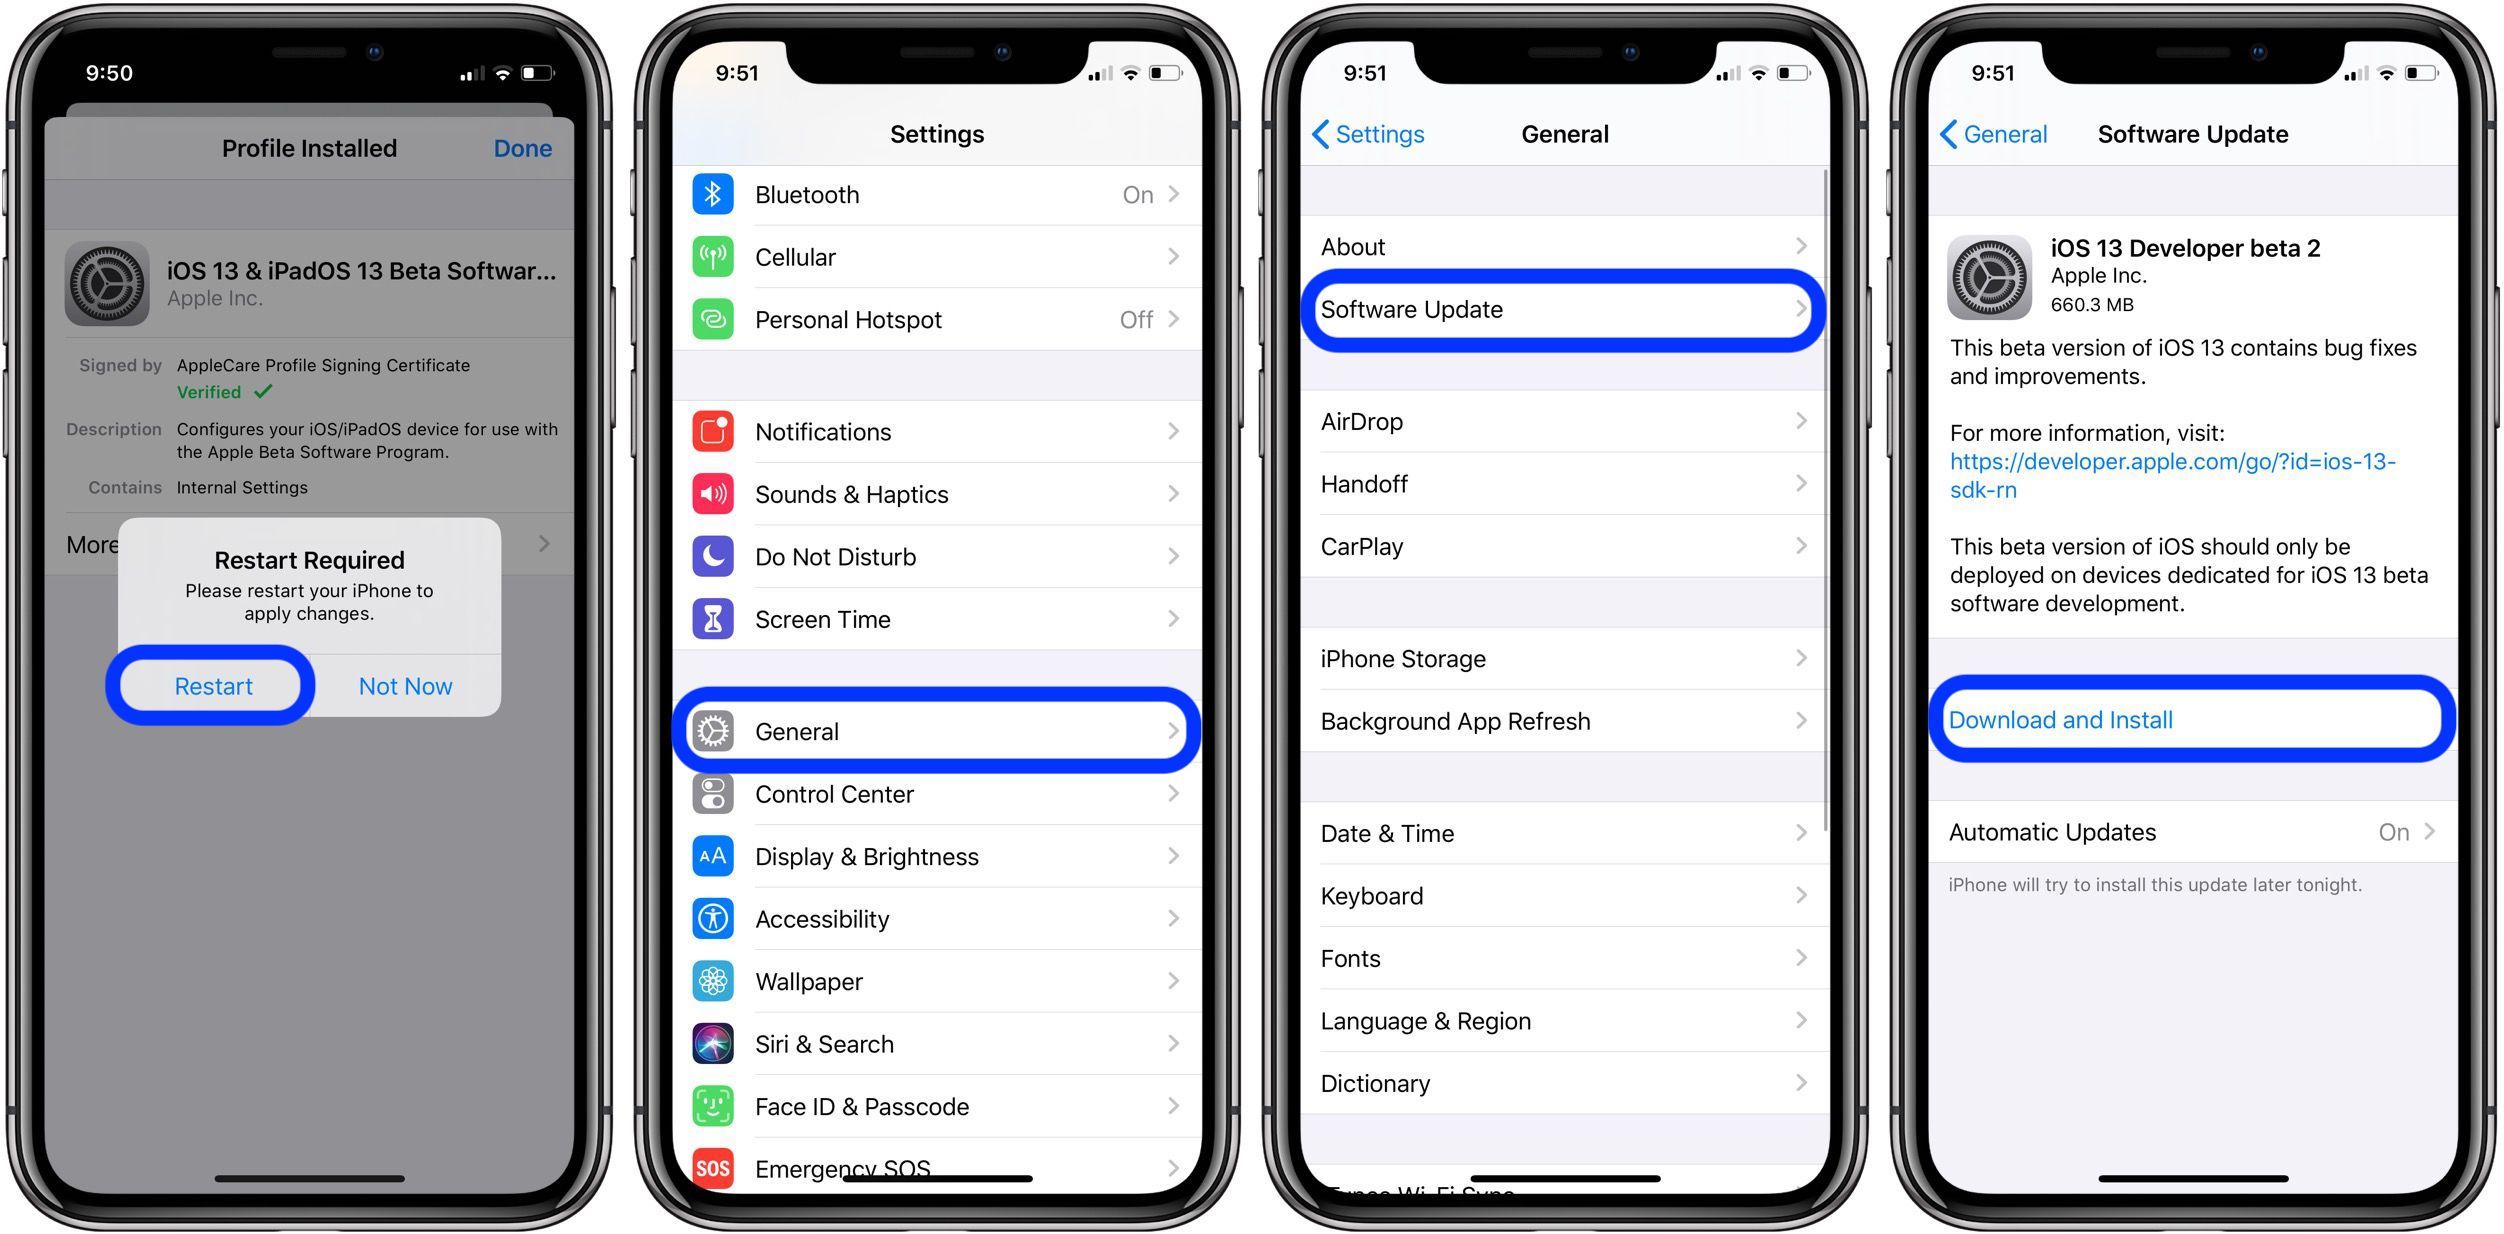
Step 3. Tap “Allow” on your iPhone.
Step 4. Step Your device will need to be restarted after installing the profile.
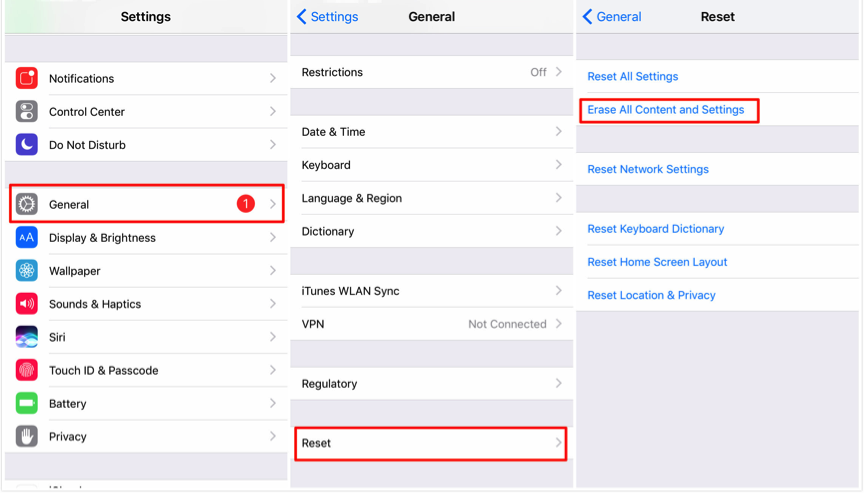
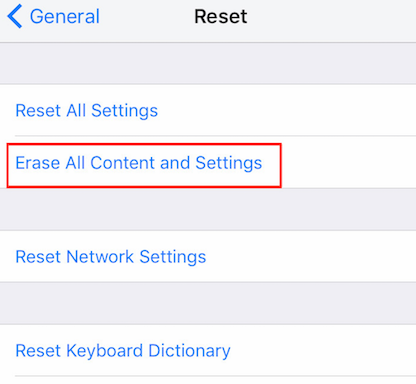
Step 5. Once profile is installed, go to General -> Software Update. There, you will be able to see iOS 13 Beta 1 update as OTA update.
Step 6. Select the “Download & Install” option and wait for it to get completed.

update-ios-13-beta-2-ota

Step 7. Once the downloading is completed, tap on Install now option to start the process.
Your iPhone will restart during the process and it will take sometime before iOS 13 is completely installed on your iDevice.

The key benefit of using OTA or Over-the-Update feature is that you won’t lose any of your existing iOS 12 setting or data and it will remain same on your iPhone device.

Part 3: Install iOS 13 Beta on iPhone with iTunes

After downloading the iOS 13 beta 1 IPSW File and backing up your iPhone data, now follow the simple steps to install iOS 13 on iPhone by iTunes. Once the Apple release the public beta of the iOS 13 such as iOS 13.1 , you can directly download and install iOS 13 on iPhone(via over-the-air (OTA) method). For a jailbroken iPhone, you must to use iTunes to install iOS 13 to iPhone/iPad/iPod Touch on your Mac or Windows PC, otherwise, the device will stuck in recovery mode, white Apple logo screen, black screen of death and other unknown system error.
Also read: how to fix iPhone stuck in recovery mode after iOS upgrading

Let’s shows you the guide to install iOS 13 beta 1 IPSW to iPhone by using iTunes on PC or Mac. For Mac users, your Mac computer must have Xcode 11 beta or macOS 10.15 beta installed. Here, you can directly download Xcode_11_Beta.xip

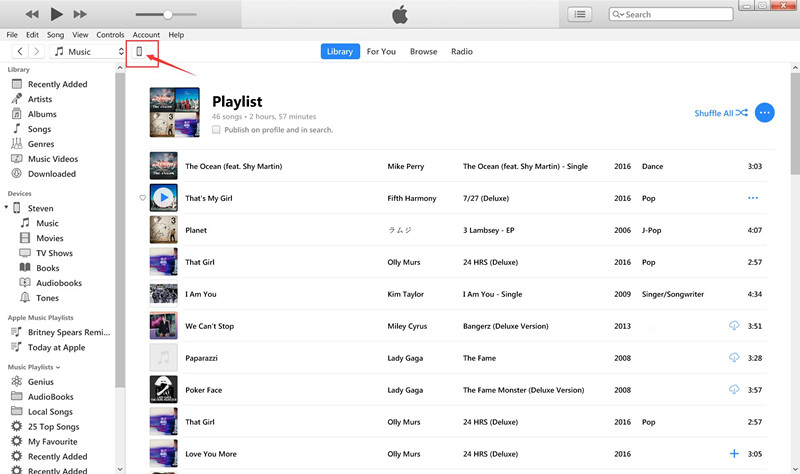
Step 1: Launch iTunes and connect your iPhone to your Mac or PC. If it’s the first time you connect the iPhone with the computer, please enter the passcode and allow connection.

Step 2: After your iPhone devices detected by iTunes, please tap on the iPhone logo on the top-right corner of the sidebar.

update iphone to iOS 13 on itunes

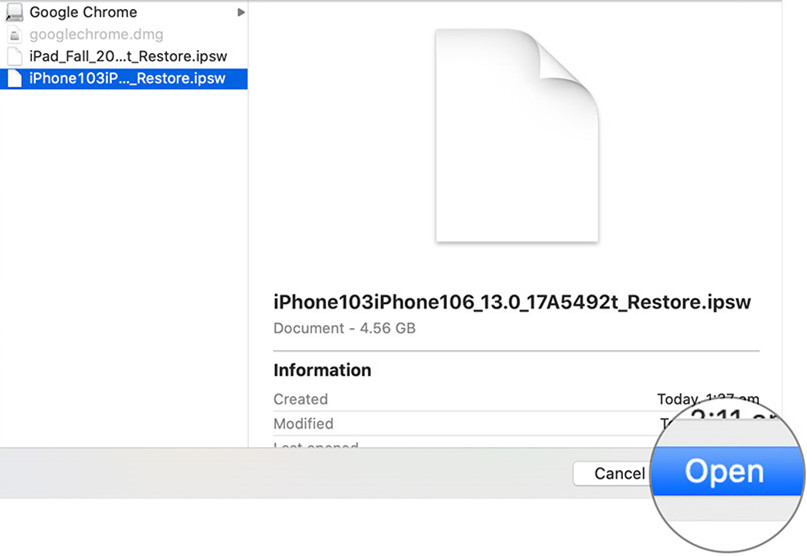
Step 3: From the Summary panel, hold down the SHIFT [ Windows ] or ALT [ Mac ] key and click the “Update” button. In the window that opens, select the iOS 13 beta 1 IPSW file that you have downloaded before.

update iphone to iOS 13 via itunes

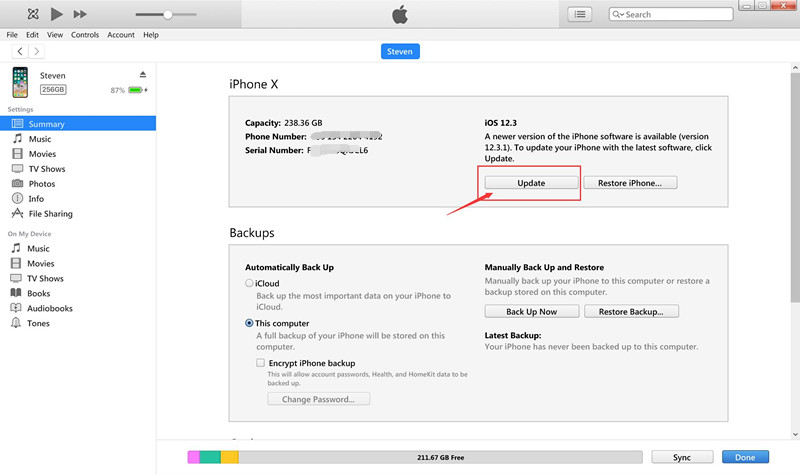
Then, open the downloaded iOS 13 IPSW File and load into the iTunes application.

open ios 13 ipsw file on mac

Step 4: Now, the installation process will now start. Your iPhone will restart during the process. Once done, go through the initial setup process and set up your iPhone again. Make sure your iPhone is connected to the internet for activation purposes.

ios 13 beta on iPhone

After complete installing iPhone to iOS 13, your iPhone device will reboot into the new iOS 13 UI interface.

iphone ios 13

Part 4: Downgrade iOS 13 to iOS 12.3 via iTunes or iOS System Recovery Tool

However, if you think it just doesn’t work out well for your device after upgrading to iOS 13, or there was a bug in the update itself or you have an older device that just made the cutoff to receive the update. Don’t worry, you can downgrade iPhone from iOS 13 to iOS 12.3.1 or an earlier version of iOS, follow the two methods to downgrade iOS 13 to iOS 12 by using iTunes or iOS System Recovery, we recommend you use a third-party tool to safely downgrade your iPhone/iPad/iPod touch to an earlier version of iOS.

What you need to do before downgrading to an earlier version of iOS

1.Download iOS 12 Firmware for iPhone, iPad or iPod Touch on at ipsw.me, this is a site that specializes in hosting these IPSW files. You’ll need to perform this step on a Mac or PC.

2.Put your iPhone in recovery mode
Before downgrading to an earlier version of iOS by using iTunes or iOS System Recovery on PC/Mac, you need to put your iPhone or iPad into Recovery Mode, follow the simple steps to get your devices into recovery mode.

Step 1. Power off your device, then connect the iPhone/iPad to your Mac or PC.

Step 2. Put device into recovery mode
This step depends on what device you’re use.

iPhone 8/X/XS or newer: Press and release the Volume Up button, press and release the Volume Down button, then press and hold the Side button until the connect to iTunes screen appears.
iPhone 7/7 Plus:Press and hold Side and Volume Down buttons until the connect to iTunes screen appears.
iPhone 6s or older, iPad, or iPod Touch: Press and hold Home and Top (or Side) buttons until the connect to iTunes screen appears.
iPad Pro 11-inch or iPad Pro 12.9-inch: Press and release the Volume Up button, press and release the Volume Down button, then press and hold the Top Button until the connect to iTunes screen appears.

Method 1. Downgrade Your iPhone from iOS 13 to iOS 12 via iTunes

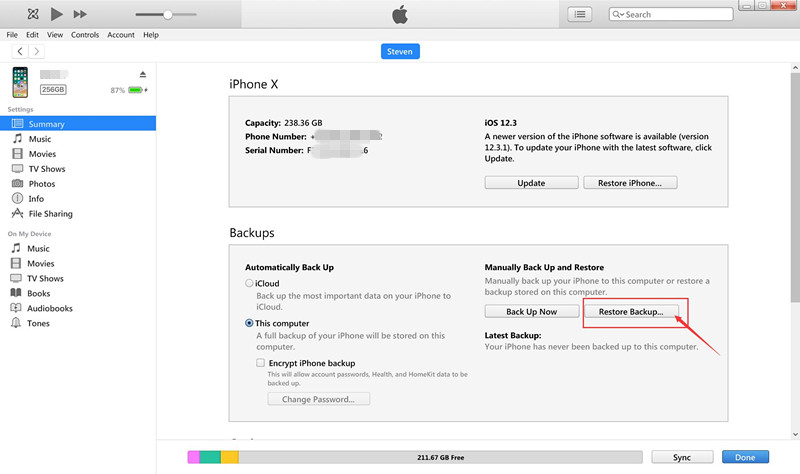
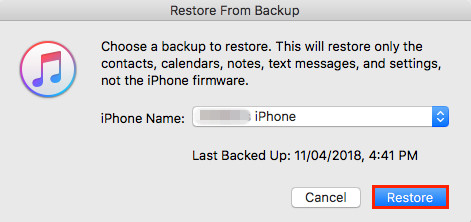
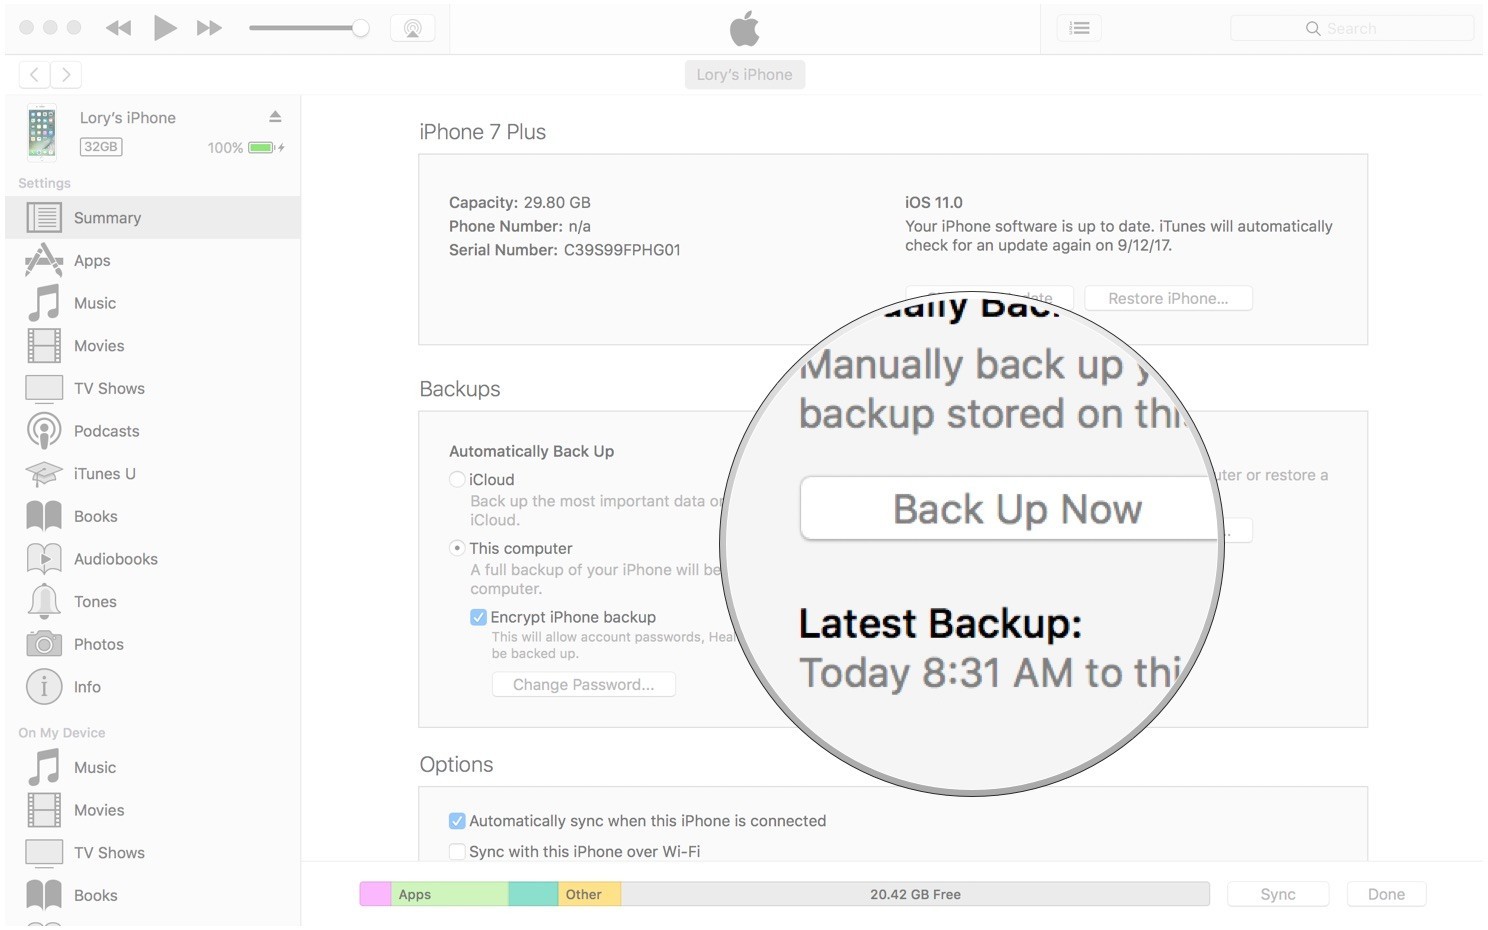
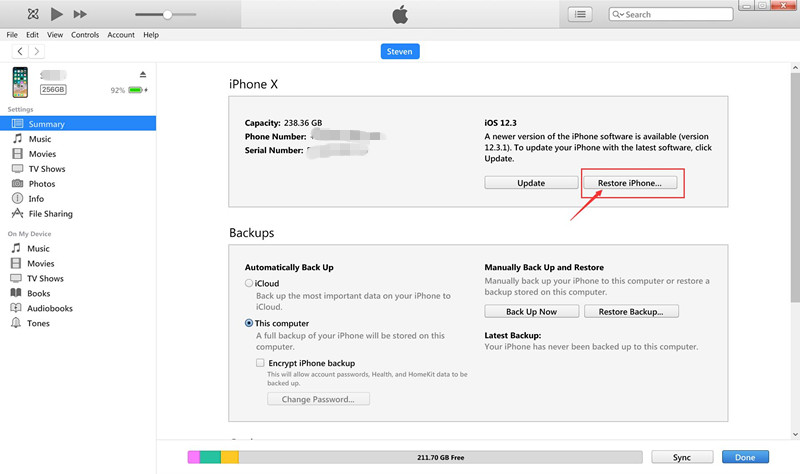
After putting your iPhone into Recovery Mode, iTunes should have opened up automatically on your computer and prompted you; if not, open it yourself and you should be greeted with a Restore prompt.

Below is the screenshot for iTunes for Windows, hold down Shift kep and click “Restore iPhone…” button.

restore iPhone to iOS 12/iOS 11

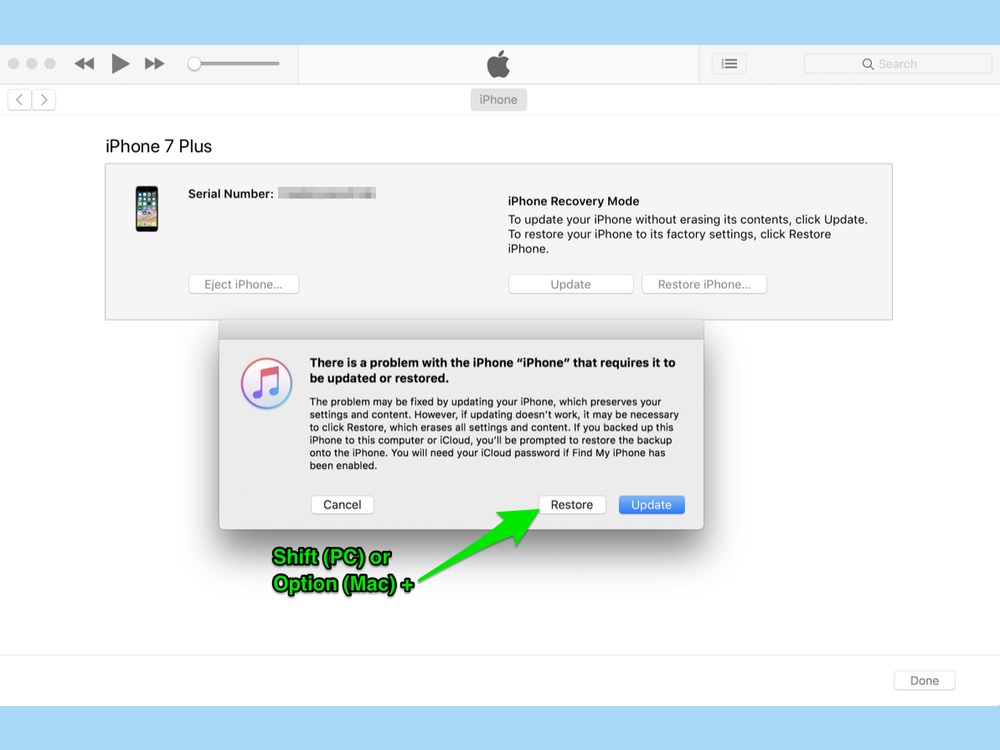
Let’s show you the detail guide on how to downgrade the iPhone from iOS 13 to iOS 12 on Mac computer.

1. Hold down Shift (PC) or Option (Mac) and click the “Restore” button.

downgrade iphone by itunes

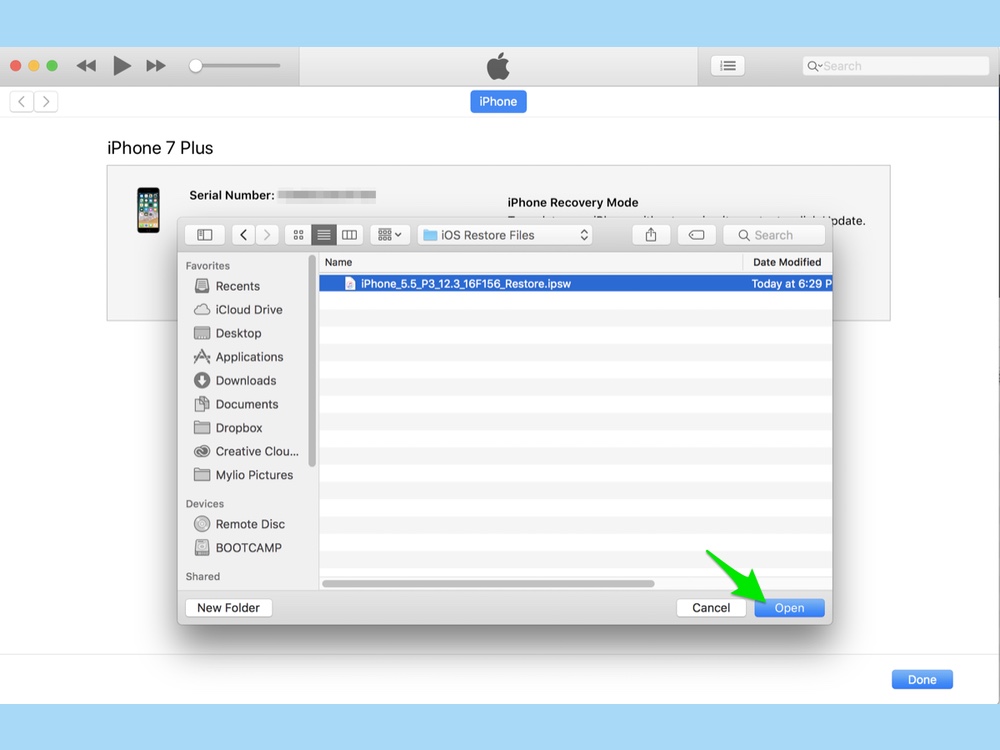
2. Find the IPSW file that you downloaded earlier, select it and click Open.

downgrade iphone by itunes

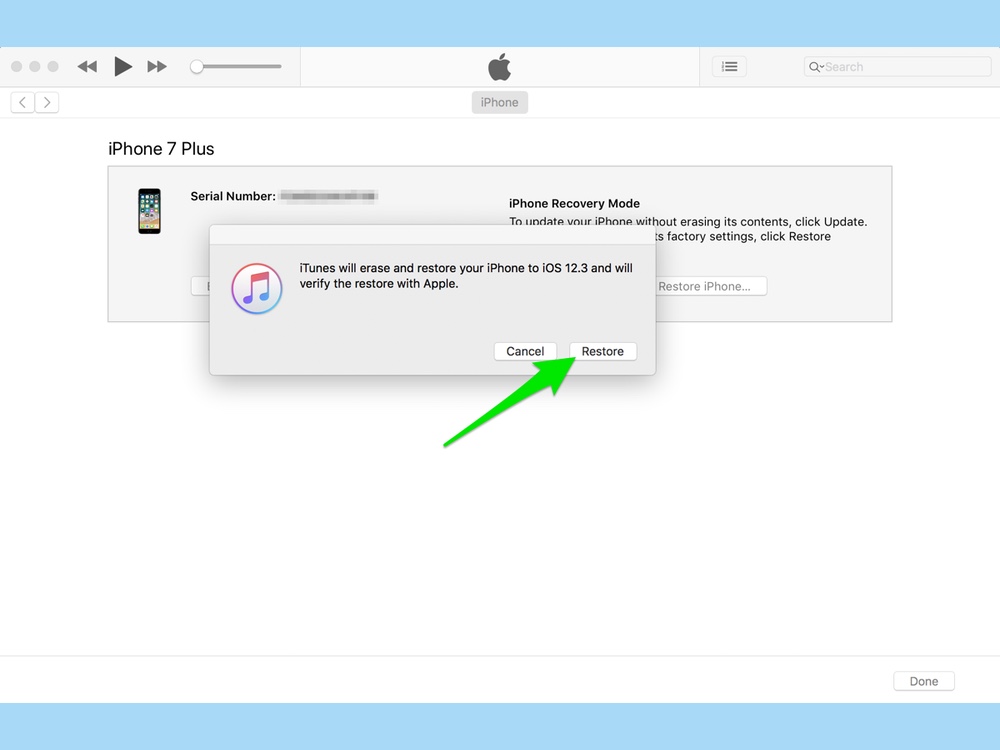
3. Click “Restore” to install and restore your iPhone to iOS 12

downgrade iphone by itunes

Method 2. Upgrade or Downgrade iOS 13 via iOS System Recovery

Above steps, you have downloaded the iOS 12/13 IPSW files on your computer, after get device into recovery mode, you can use this iOS System Recovery to manually install iOS 13 or iOS 12 IPSW file to iPhone safely, it means this software can help you upgrade iPhone/iPad/iPod touch to iOS 13, but also can help you downgrade iOS 13 to iOS 12 or earlier version. Moreover, The iOS System Recovery is an professional iPhone/iPad fix tool, it can help you fix with all kinds of iOS system issues like black screen of death, stuck in recovery mode, white Apple logo, boot loop, etc. So, you can use this iOS System Recovery to fix your iOS system without data loss.

More Features:

  • Easily to download and install iOS firmware on iPhone/iPad/iPod without data loss
  • Fix your iPhone/iPad/iPod to normal status(iOS 13 supported), no data lost at all.
  • Fix a disabled iPhone after unlock failure.
  • Fix iPhone loop restarting status.
  • iPhone cannot turn on normally.
  • Fix iPhone stuck in verifying update.
  • Fix iPhone stuck in Apple logo/recovery mode/black screen/red screen/blue screen issues.
  • Fix a frozen iPhone to normal status.
  • Unlock iPhone when the iPhone touch screen is not working.
  • Upgrade and downgrade your iOS system, no data loss at all.
  • Optimize iOS system performance to speed up your iPhone/iPad/iPod.
  • Provides all IPSW firmware to download, including iOS 13, iOS 12, iOS 11, iOS 10, iOS 9 and previous iOS version.
  • Quickly and easily find the suitable firmware for your iPhone, iPad and iPod(touch).
  • Compatible with Windows and Mac computer.

Download the iOS System Recovery on Windows and Mac.

d_win d_mac
d_win d_mac

Guide: Install iOS 13 on iPhone without Data Loss

Step 1.Run iOS System Recovery and Connect iPhone to Computer
Above step, you have downloaded iOS 12 IPSW file or iOS 13 IPSW file on computer.

connect iPhone to computer

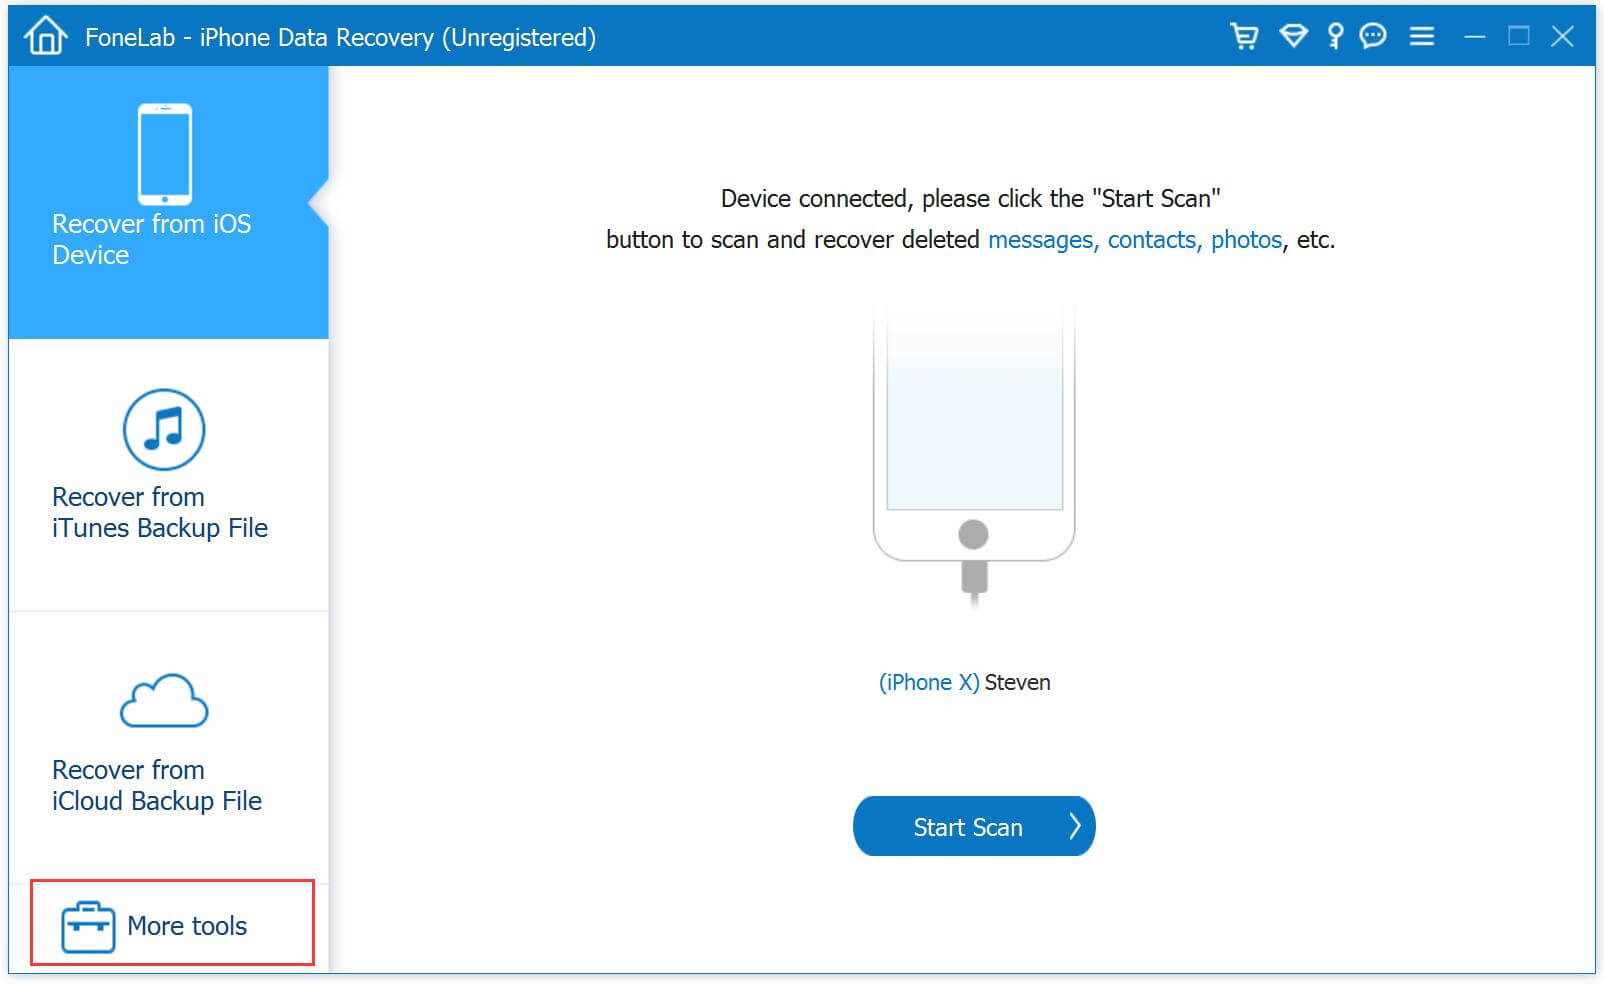
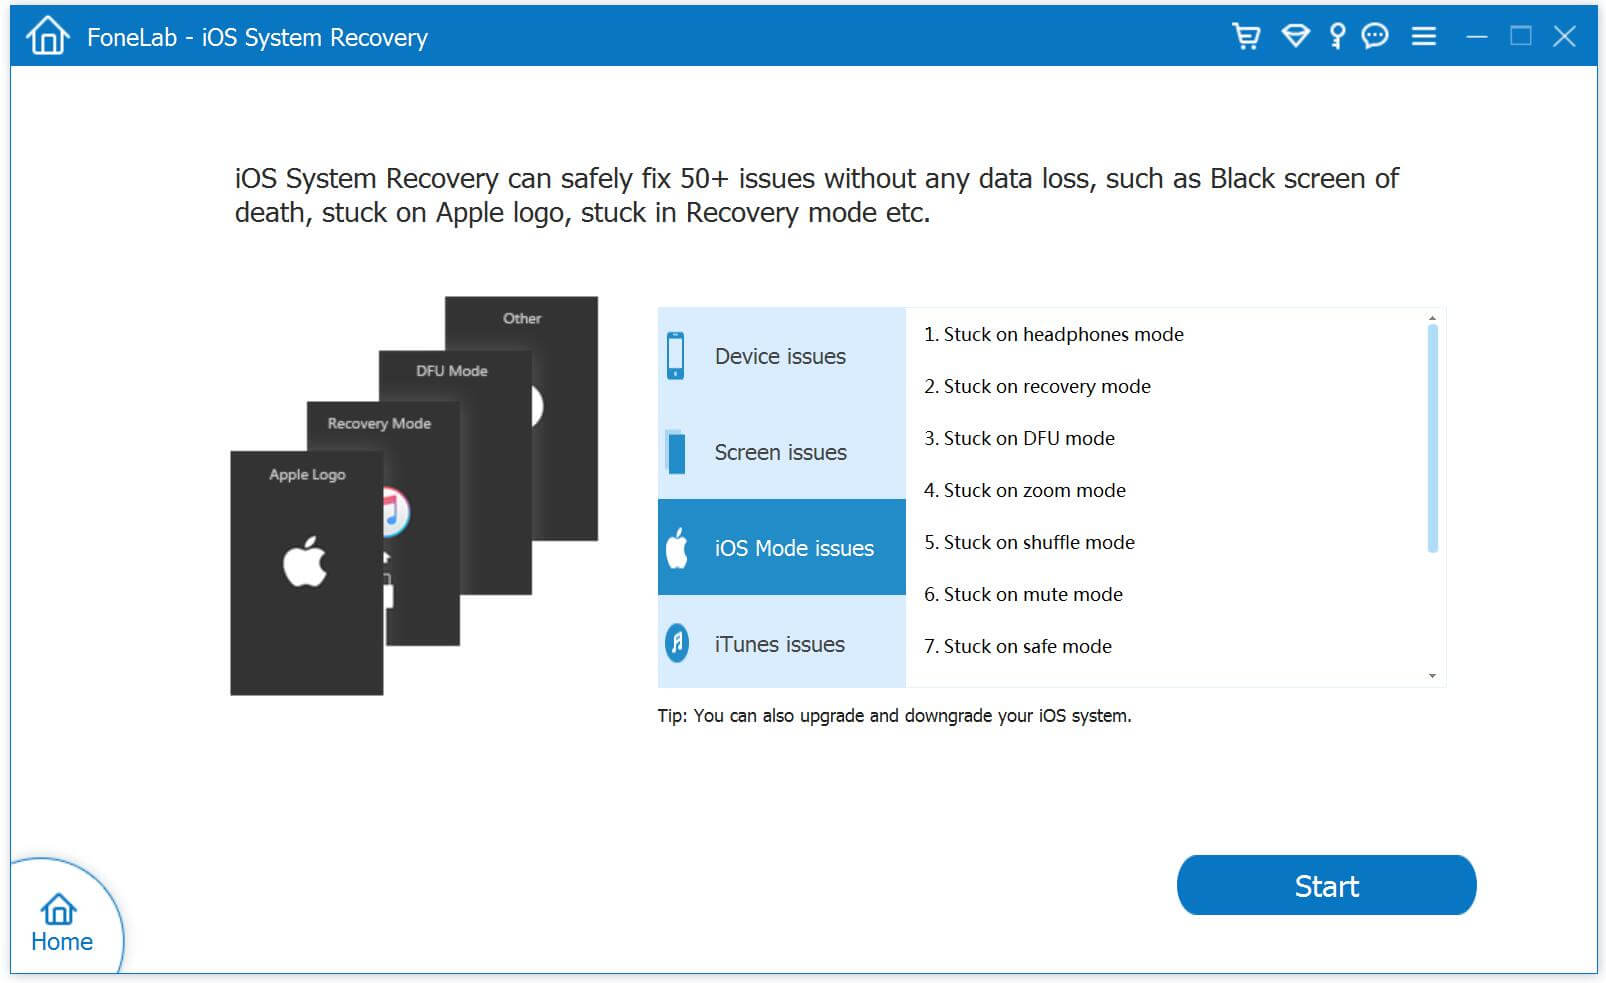
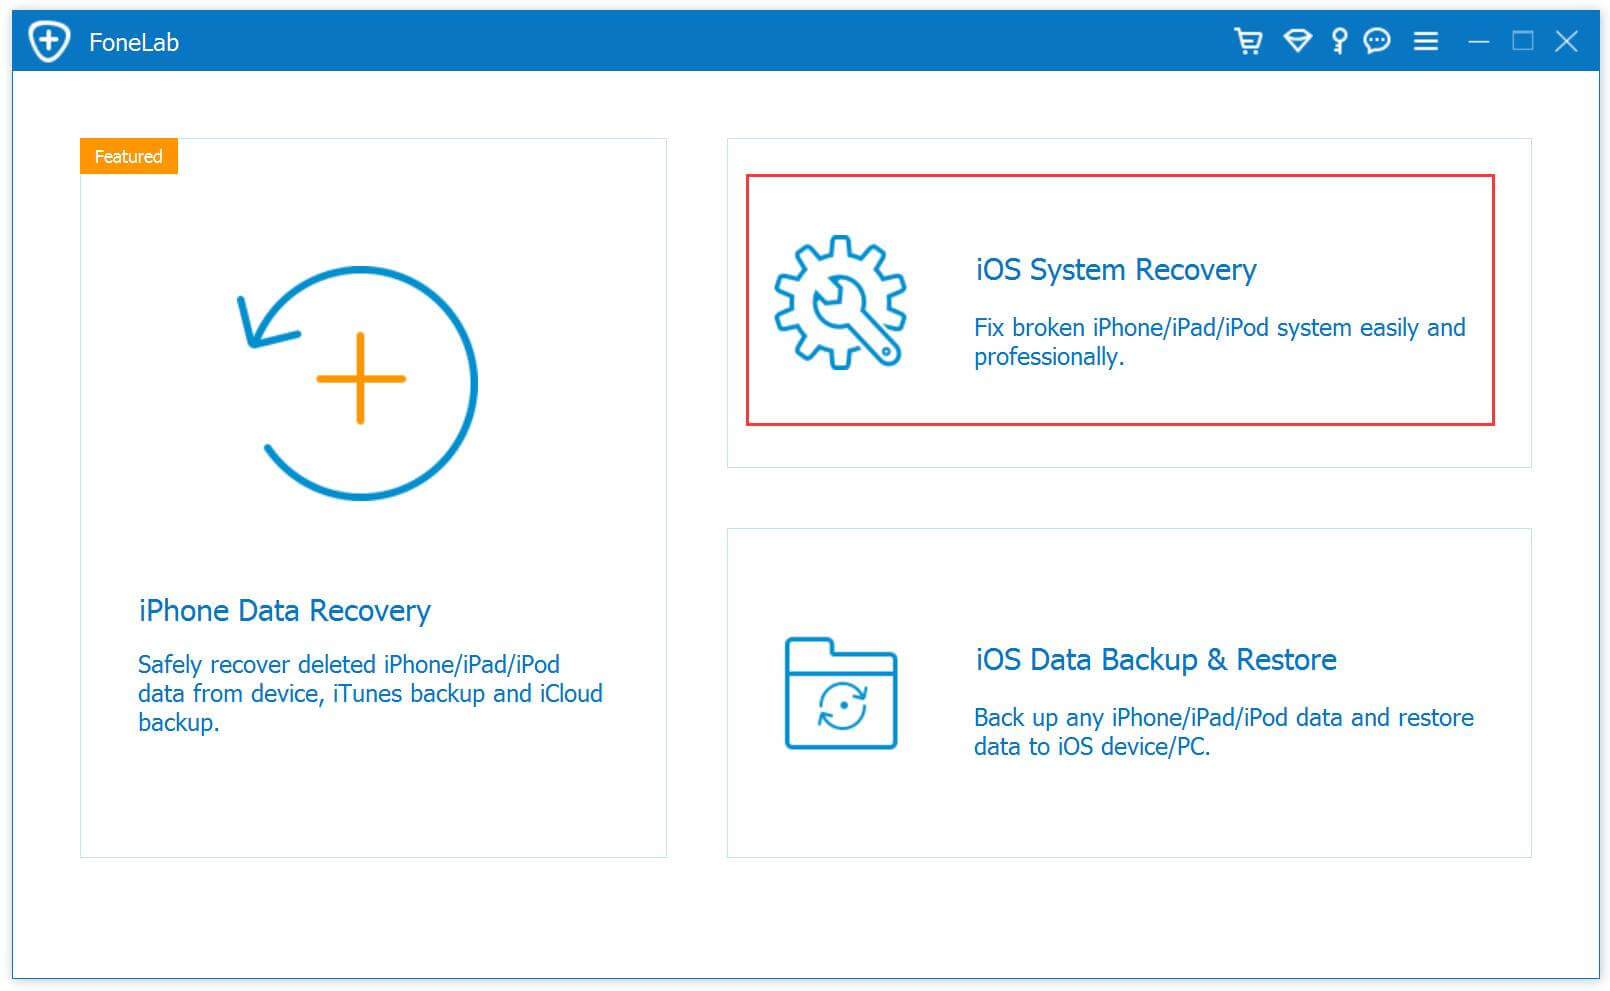
In order to install iOS firmware on iPhone, you need to put your iPhone into recovery mode firstly, then launch the iOS Toolkit and click “iOS System Recovery” function.

iOS System Recovery

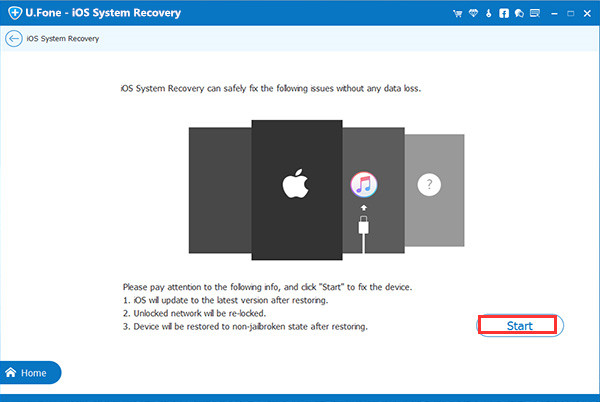
The software will pops up an new window, you can see the software not only can help you fix iPhone stuck on recovery mode, headphones mode, DFU mode, etc. but also enables you upgrade or downgrade iOS system. To go on, hit the “Start” button at the lower right corner to go on.

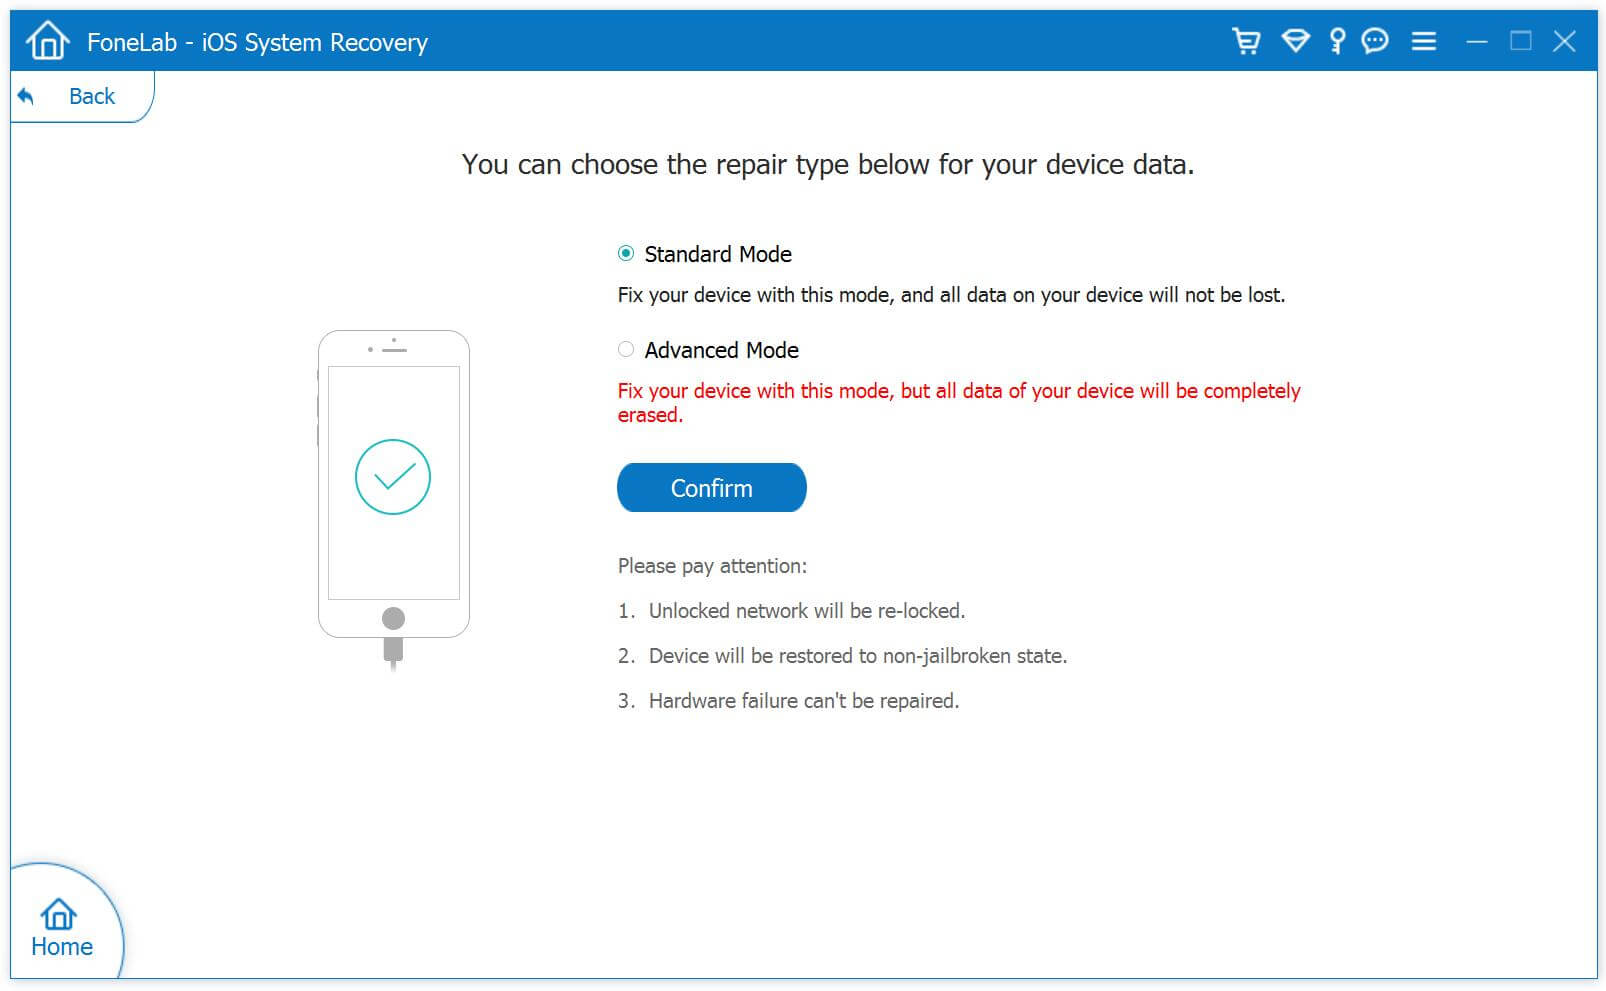
Step 2. Select Standard Mode or Advanced Mode
Please select “Standard Mode” or “Advanced Mode” to install iOS firmware package on your iPhone, I recommend you choose the advanced mode only if the standard mode fails.

install mode

Step 3. Optimize iOS System
The software will detect and analyze your iPhone device and shows all information of the device, if your iPhone is working properly, you will get the screenshot as below:

Optimize iOS

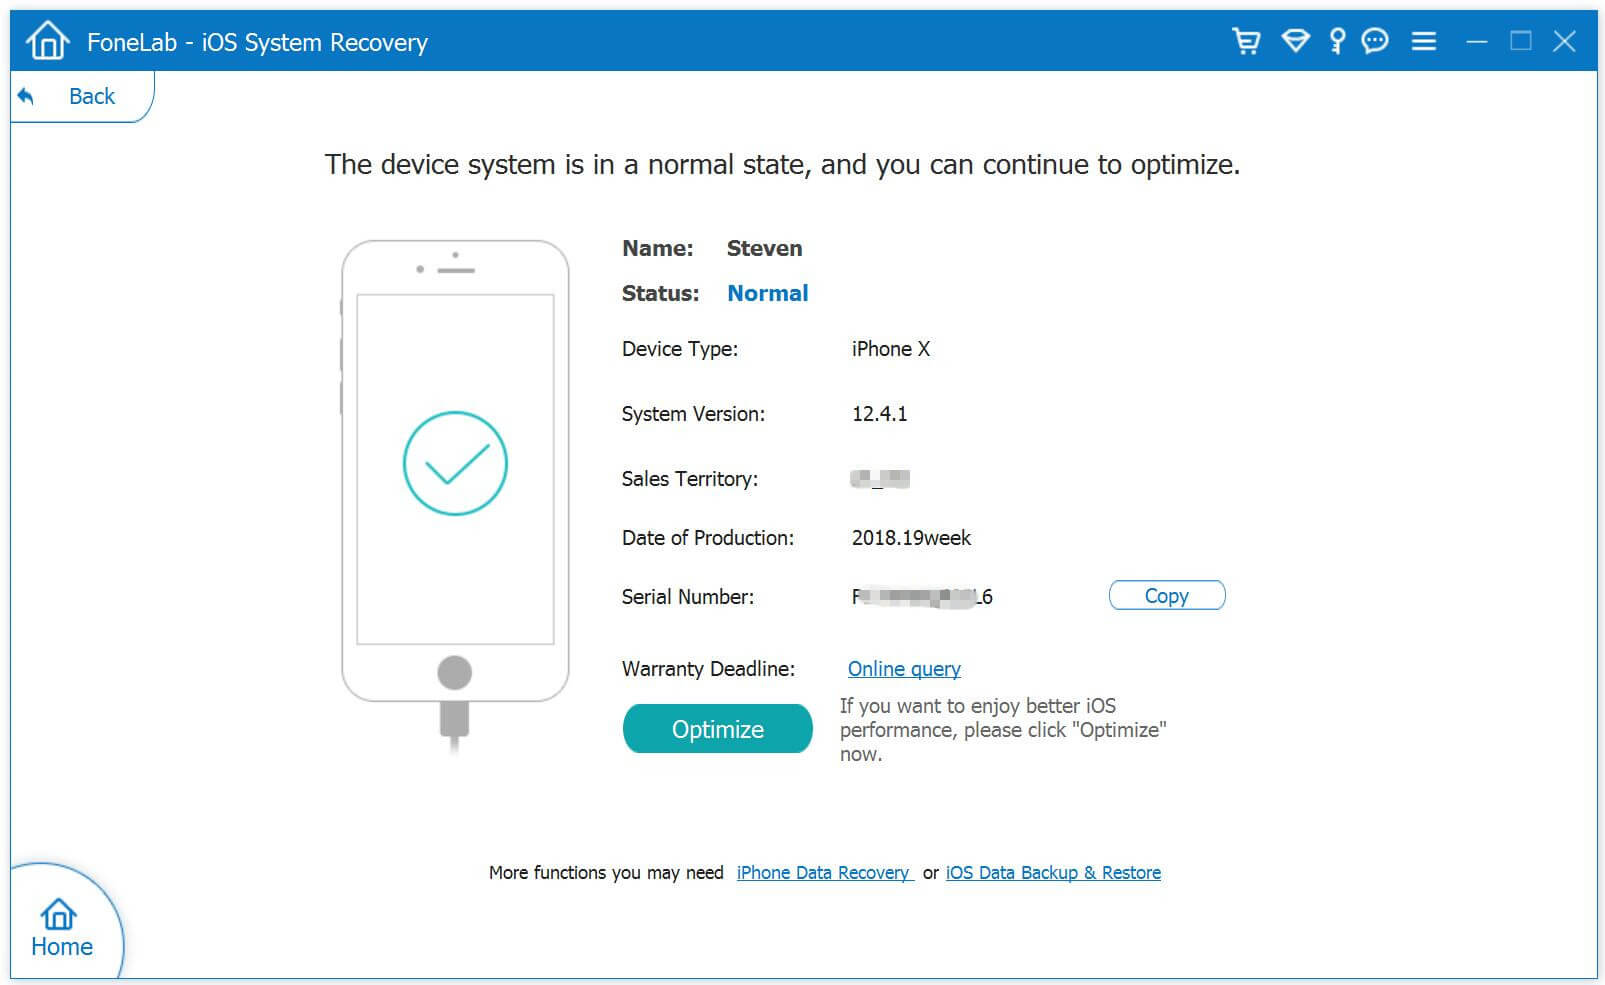
Tips: If you want to enjoy better iOS performance, you can continue to optimize your iPhone, please click “Optimize” button to download iOS 13 fireware and install it on your iPhone without data loss.

Step 4.Select iOS 13 Fireware and Start Downloading
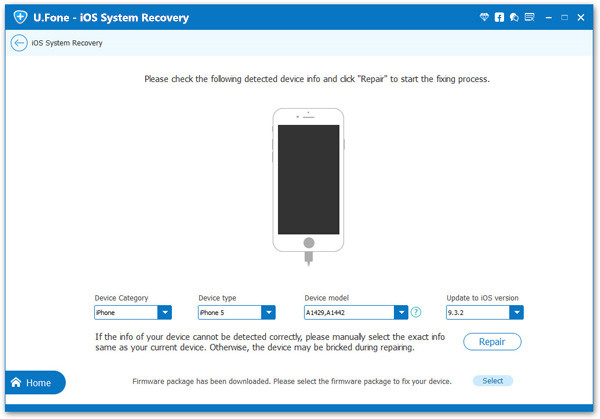
The tool automatically detects the model type of your iDevice and displays available iOS system versions. Select the iOS 13 version and click on “Next” to download iOS 13 fireware .

Select iOS 13 Firmware

Tips: If you have download the IPSW file before, just click “Select” button to choose and load the downloaded iOS 13 IPSW file. So you can also load the iOS 13 IPSW file to the software, it means that you can install iOS 13 to iPhone via this iOS System Recovery tool, in other word, this is another safely method to upgrade iPhone to iOS 13 without iTunes.

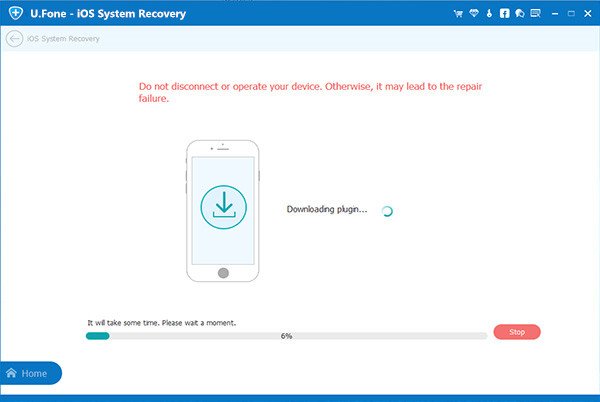
Step 4. Start to Download iOS 13 Firmware(Option)
Above steps, you have downloaded the firmware to the computer, it will skip to the downloading process.
The software helps you download the iOS firmware. Since the firmware we need to download is large, it will take some time to complete the download. Make sure your network is stable during the process, when the software start download iOS 13 firmware package, please do not disconnect or operate your device during the download processing.

Download iOS 13 IPSW files

Tips: If the firmware is not download successfully, you can also click on “Download” to download the firmware using your browser, and click on “Select” button to select the downloaded firmware.

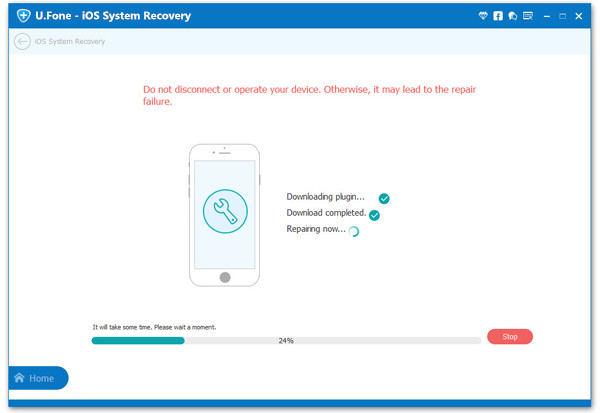
Step 5. Verify and Install iOS 13 on iPhone
In a few minutes, the install process successfully. Just grab your iPhone device and wait for it to start up. You can find your iPhone be restored to iOS 13 or an earlier version of iOS.

upgrade iPhone to iOS 13

Tips: You can also follow the same steps to upgrade iPhone to iOS 13 by using this profession and useful iOS System Recovery tool.

Related Articles

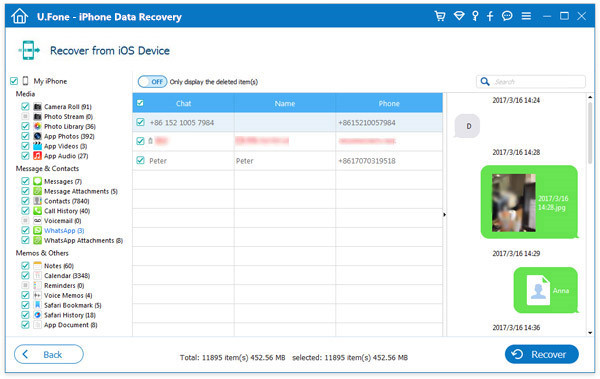
How to Recover Lost iPhone/iPad Data after iOS 13/iOS 12 Update
If you lost data on iPhone/iPad/iPod after upgrading to iOS 13 Beta / iPadOS, learn this tutorial, you can easily recover lost photos, contacts, messages, notes, videos, WhatsApp messages and more App data from iOS devices after iOS 13 update, you can also easily to recover deleted data from iOS 12/iOS 11/iOS 10 devices.

How Fix iPhone iPad Stuck on Apple Logo after iOS 13 Update
Failed to upgrade your iPhone to iOS 13 and stuck on white Apple Logo? Don’t worry, you can follow this guide to fix iPhone stuck in Apple Logo issues, no data loss at all.

How to Fix Apple Music Not Playing after 13 Update
Having a problem with Apple Music after upgrading to iOS 13? If your Apple Music app not working properly after updating to iOS 13/12.3/12.2/12? Follow this guide to fix all Apple Music problems all OS version.

How to Fix iPhone Stuck in Recovery Mode in iOS 13/iOS 12?

[Summary]: Your iPhone stuck in recovery mode and looking for a way to fix iPhone stuck in recovery mode? No matter you use iPhone XS/XR, iPhone 8, iPhone 8 Plus or iPhone X in iOS 12 or the iPhone you recently update to iOS 13 stuck in Recovery Mode, you can follow the easy guide to fix the iPhone Stuck in Recovery Mode after iOS 13 upgrading.

You may want to read:

* Recover lost data from iPhone/iPad after iOS 13/iOS 12 Update

* Transfer data from old iPhone to new iPhone XS/XR/X

iOS 13 will be released on June 3 (Pacific Time) at the WWDC 2019 Global Developer Conference. iOS 13 will only support iPhone 7 and above models, including iPhone XS(Max), iPhone XS, iPhone XR, iPhone X, iPhone 8/8 Plus, iPhone 7 and iPhone 7 Plus, in another word, the older models such as iPhone 6s/6s Plus and iPhone 6/6 Plus will no longer be supported. iOS 13 will appear “dark mode”, similar to the “dark mode” on the current macOS Mojave, this night mode in the iOS 13 system will greatly increase the battery life. It is rumored that the new iOS 13 system will improve the interface of the CarPlay in-vehicle system, and it will also make some updates for the iPad, such as optimizing the device’s file management system and multi-tasking interface, and the new iOS 13 will bring a new system interface.

Here is a case about iOS 13 stuck in recovery mode:

Hey! My iPhone 7 is stuck in recovery mode after iOS 13 update. But, I do not want to restore with iTunes to prevent erase all data. However, I have connected my iPhone to my computer but it is not recognized by iTunes as well. How can I fix iPhone 7 stuck in recovery mode after iOS 13 update? I don’t want to erase all data off my iPhone after restoring the iOS system. Help Me!

I believe that when iOS 13 is released, many Apple users will upgrade their iPhone, iPad to iOS 13 for the first time to experience the newest UI and the latest features. But when if your iPhone stuck in white apple logo, stuck in recovery mode, or stuck in black screen of death after iOS 13 update failure, how you can fix your iOS 12/iOS 13 system without data loss?

This is a common issue that the iPhone stuck in recovery mode after iOS 13/iOS 12 update. That is the reason why I wrote this tutorial to help you fix iPhone stuck in recovery mode/Apple Logo/Boot Loop/Black Screen of death and more OS issues without losing data. But, before teaching you an effective method to fix the iPhone stuck in “recovery mode” while iOS update failed, you need to know why the iPhone stuck into recovery mode during iOS upgrading, so that you can avoid similar accidents when you plan to upgrade the phone OS next time.

Part 1: Reasons cause iPhone into recovery mode during iOS update

Generally, your iPhone/iPad /iPod could suddenly stuck into recovery mode during OS upgrading for the below reason:

1.Not Enough Battery: The battery is not sufficient for the complete installation of the upgrading process. Under normal circumstances, you are be suggested that the remaining power cannot be less than 50%, so you better connect the iPhone to the power supply during the whole upgrading process.

2.Update Jailbroken iPhone: Your jailbroken stuck at “Checking for Updates” status when you using OTA update method. This is because modern jailbreaks have the OTA updates disabled beforehand. Eventually, the jailbreak will get disabled and the jailbreak firmware not allowed to download directly. So, when you try to update on iPhone directly, the iPhone will crash and get stuck in recovery mode status. To update a jailbroken iPhone, you can use iTunes to update the iPhone or you can restore jailbroken iPhone without iTunes, the details are available below.

3.Other Unknown Reasons: A wrong operation or failure during iOS upgrading can cause the iPhone stuck in recovery mode.

Part 2: Force Restart iPhone to Get iPhone Out of Recovery Mode(Data Loss)

If your iPhone is stuck in Recovery Mode during/after iOS 13 or iOS 12 upgrading, you can try to force restart your iPhone to get it out o recovery mode, but this method will cause data loss. If you ignore data loss, please follow the detailed steps below to force restart your iPhone varies according to the iPhone models. You can easily reboot the iPhone when it stuck in recovery mode/white Apple Logo issues.

For iPhone 6 or earlier, hold and press both Sleep/Wake button and Home button until you see the Apple logo. (Sleep/Wake button is also called Side button.)

For iPhone 7/7 Plus, hold and press both Sleep/Wake button and Volume Down button until the Apple logo appears.

For iPhone XS/XR, iPhone X, iPhone 8 and iPhone 8 Plus, please press and release the Volume Up button, quickly press and release the Volume Down button and then press and hold the Sleep/Wake button until you see the Apple logo.

Part 3: Fix iPhone Stuck in Recovery Mode by iOS System Recovery(No Data Loss)

If you don’t want to erase the data after force restarting the device, you can use a professional third-party iOS System Recovery software.

U.Fone iOS System Recovery is designed to fix various iOS problems on your iPhone/iPad/iPod touch and restore your device back to normal status, you can easily fix iPhone stuck in recovery mode, Apple logo, black screen, etc. after iOS 13/iOS 12 update, even no data lost at all. Just connect your iPhone to the computer, the U.Fone iOS System Recovery helps you download a corresponding firmware package and install it on your iPhone quickly, after installing and restoring your iPhone successfully, the iPhone will restart and return to normal status. Moreover, you will find that all previous data is still in the phone. In additional, the “iPhone Data Recovery” feature also can help you recover deleted or lost data from your iPhone after iOS 13/iOS 12 update, including Photo, Contacts, Text Messages, Call Logs, Notes, Videos, Calendar, Media, WhatsApp Messages and more. But in this case, I will show you the detail guide about how to fix iPhone stuck in recovery mode in iOS 13.

Download the iOS System Recovery firstly, it is available on both Windows PC and Mac.

d_win d_mac
d_win d_mac

Step-by-Step to Fix iPhone Stuck in Recovery Mode after iOS 13 Update

Step 1. Download and Install the iOS Toolkit
First, you have to download and install iOS Toolkit, it is available for Windows and Mac as well. To fix ios system to normal, please go to “iOS System Recovery” feature.

U.Fone iOS System Recovery

Step 2. Connect iPhone to Computer
After entering into the “iOS System Recovery” function, you will get an new interface as below, then connect your iPhone to the computer with USB cable. After the program detects your device, you will get a message on the screen that your phone is in recovery mode, please click “Start” to continue.

connect iPhone to computer

Step 3. Select Device Firmware
Follow the instructions to select the firmware that matches your device.

Select Device Firmware

Step 4. Download Device Firmware
In this step, the iOS System Recovery tool will help you download firmware version according to your device mode. When the download finishes, the software will automatically install the newly downloaded firmware to your iPhone.

Download Device Firmware

Step 5. Start to Fix iPhone to Normal Mode
After downloading the plugin package complete, the program will start to fix iOS system to normal and restore iPhone to normal status. A few minutes later, your iPhone will restart and get into normal mode.

Get iPhone out of recovery mode

d_win d_mac
d_win d_mac

Besides fixing iPhone/iPad/iPod stuck in recovery mode after iOS update, this program can also fix iOS issues for many common scenarios, such as black screen, DFU mode, white screen of death, iPhone boot loop issues, frozen issues, iPhone keeps restarting issues and more. After fixing iOS system to normal, it won’t damage your device, and all original data and settings are preserved. In addition, the iOS Toolkit also can help you backup and restore iPhone/iPad/iPod data, and recover deleted or lost data from iOS 13/iOS 12/iOS 11/iOS 10/iOS 9 devices.

Although our software can help you fix iOS system and recover lost data, we strongly recommend that you should back up your phone data regularly, just in case of unexpected damages to the device. If you think this guide is helpful for you, please share this article to Facebook or twitter for your friends.

iOS System Recovery

How to Fix Apple Music Not Playing after iOS 12/13 Update

[Summary]: Having a problem with Apple Music? Is your Apple Music not working properly after updating to iOS 13/12.3/12.2/12? Read this article to learn the most direct and effective way to fix all Apple Music problems on iOS 11/12/13.

“Apple Music won’t play on my iPhone after I updated my iPhone to iOS 12.3. I can’t open it to play any song. How to fix Apple Music not playing properly?”

Some of our iPhone, iPad and Mac users have reported some Apple Music issues after updating iOS to the latest version. Among those Apple Music issues, Apple Music doesn’t work after iOS 12.3 / 12.2 / 12.1 / 12/11 updates, and the latest iOS 13 system is no exception. Actually, there are many possible scenarios where Apple Music is not working properly, including:

Unable to sync.
Unable to login.
unable to download.
The song is skipped randomly.
Can’t play any music.
These songs are gray or skip some songs while playing.
Shuffle does not work properly and you cannot play songs repeatedly.
Apple music cannot be played offline.
“Apple Music” freezes (no response/crash).
Receive “Item not available”, “Unexpected error code 4010” or “This media is not supported” error.
My music can’t load music.
The radio is not working.
Apple Music Library is cleared after iOS 12 update.
Apple Music cannot be used as background music or ringtones.

If Apple Music doesn’t play songs after iOS 11/12/13 update, then the most effective way to fix your iOS system to normal. U.Fone iOS Toolkit – iOS System Recovery is a powerful tool to help you fix iPhone errors without using iTunes or causing any stuck problems or data loss. It’s good at fixing your iOS system issues like app errors, frozen screen, white Apple logo, recovery mode, DFU mode, black/white screen of death, etc. This is its main feature.

Fix iOS devices from recovery mode, DFU mode, headphone mode, Apple logo, etc. to normal state.
Safest way to fix iOS system issues without losing data.
Supports for all iPhones, iPods, iPads & the latest iOS 13.

d_win d_mac
d_win d_mac

Steps to Fix Apple Music Won’t Play on iPhone

Step 1.Install and Launch iOS System Recovery
Download and install the latest version of U.Fone iOS Toolkit – iOS System Recovery, you can launch the program to fix Apple Music not playing on iPhone.
ios system recovery

Step 2.Connect Bricked iPhone to Computer
Select the option of ‘iOS System Recovery’ from the primary window after the software is download completely. Next, Connect your iPhone to your computer with a USB cable. Click “Start”.

connect iphone

Step 3. Select your iPhone Model and Latest Version of the iOS System
You will be asked to confirm the information of your iPhone. Click “Repair” if it is correct, but if not, select the exact information manually before repair.

fix bricked iPhone on iOS 13

Step 4.Download the Latest iOS Firmware for your Bricked iPhone

Now the program will download the required plug-in to fix the issue. Restart the iPhone and check whether the issue has already been fixed.

download the firmware and fix bricked iPhone

d_win d_mac
d_win d_mac

Related Articles:

How Fix iPhone iPad Stuck on Apple Logo on iOS 13

iPhone Stuck on Black Screen after iOS 12 Update, How to Fix

How to Fix iPhone 6s/7/8/X/XS Glitch after iOS 13/12 Update

Top 6 Ways to Backup iPhone/iPad for iOS 13 Update

How to Play Apple/iTunes Music after Canceling Subscription

Fix Apple Music Not Playing on iOS 13/12/11

iPhone Got Bricked after iOS 13 Update? Here’s How to Fix

[Summary]: If you are looking for a way to fix a bricked iPhone after updating to the latest iOS 13, you have come to the right place. You will find the most efficient and easiest way to fix it here.

WWDC 2019 and the grand unveiling of iOS 13 is just over a week away and based on the rumors, it could be one of the biggest iPhone and iPad upgrades ever. Dark Mode, an updated Files, a redesigned volume indicator, iMessage profiles and more are on full display. We all think that iOS 13 is almost perfect, but past experience tells us that it may also have some bugs. Similar to iOS 12 update, severe users have reported about different types of issues with it and one of them was iPhone Getting bricked or freezing. And if your iPhone has got bricked after upgrading to iOS 13 then you might be worried about the date stored on it. Don’t worry, this guide will definitely help you fix iPhone bricked issue after iOS 13 update and there is no data loss here.

Maybe you don’t know what does a bricked iPhone look like. Here are some of the symptoms that your iPhone is bricked:

• iPhone won’t turn on after iOS update
• There is only an Apple logo left on your non-responding screen.
• iPhone gets stuck in boot loop.
• iPhone stuck on the connect to iTunes logo.
• iPhone won’t turn on but it is full charge.
• iPhone bricks microphone.
• iPhone get bricked and get error 53 or iTuens error 53.
• iPhone units with third-party display.
• iPhone screen is black/white/red.
• iPhone is dead and no-responding to your any tap or voice order.
• And more.

What are the factors that cause these symptoms? The reason is various, maybe it’s just an update error; you upgrade your iPhone to an unstable version of iOS; due to heavy application, music, video, photos, etc., there is not enough storage space; firmware corruption or malware attacks; iPhone jailbreak and so on. Whatever the reason, you need to find a way to help you reboot your device. This article is written for you to fix iPhone got bricked after updating to iOS 13/iOS 12.3/iOS 12.2/iOS 12 in the most direct and efficient way.

U.Fone iOS Toolkit – iOS System Recovery may be the best way to deal with any kind of issues or errors occur on iPhone/iPad/iPod Touch. In fact, it is a data recovery tool coming with a feature of “Fix iOS System”. You can use it to recover various types of data or rescue your iPhone from the problems like being stuck in recovery mode, DFU mode, Apple Logo, black screen, white screen and other issues. The software supports all iOS devices and all iOS versions including the latest iOS 13.

d_win d_mac
d_win d_mac

How to Fix Bricked iPhone after iOS 13 Upgrade

Step 1.Run the iOS System & Data Recovery on PC or Mac
Click the link as given above and download iPhone/iPad data recovery on your computer,you can get the windows as below.

ios system recovery

Step 2.Connect Bricked iPhone to Computer
Select the option of ‘iOS System Recovery’ from the primary window after the software is download completely. Secondly,use the USB cable to connect your iPhone to your computer . After a few seconds,the iPhone/iPad will be detection by iPhone/iPad data recovery and display it on its screen. Now, click on the button ‘Start’.

fix bricked iPhone,iPad

Step 3. Select your iPhone Model and Latest Version of the iOS System
You will be asked to confirm the information of your iPhone. Click “Repair” if it is correct, but if not, select the exact information manually before repair.

fix bricked iPhone on iOS 13

Step 4.Download the Latest iOS Firmware for your Bricked iPhone
In this step, the program will download the latest version of your firmware to repair the corrupted system and fix it to normal.

download the firmware and fix bricked iPhone

d_win d_mac
d_win d_mac

Related Articles:

How Fix iPhone iPad Stuck on Apple Logo on iOS 13

iPhone Stuck on Black Screen after iOS 12 Update, How to Fix

How to Fix iPhone 6s/7/8/X/XS Glitch after iOS 13/12 Update

Top 6 Ways to Backup iPhone/iPad for iOS 13 Update

Recover Lost Data from iPhone/iPad after iOS 12/13 Update

Fix iPhone Got Bricked after iOS 13 Update

How Fix iPhone iPad Stuck on Apple Logo on iOS 13

[Summary]: iPhone or iPad stuck on Apple logo after an iOS 13 update? This article will show you the most effective way to fix iPhone stuck on Apple logo screen without losing any data.

Apple’s annual Worldwide Developers Conference (WWDC) kicks off June 3, when we’ll get the first official peek at all the new features coming to iOS 13. These long-awaited features, from the official dark mode, smarter gestures to better third-party support and smarter Siri, iOS 13 is expected to shine in this event. Once iOS 13 is officially launched, many users want to experience its features. However, each upgrade will bring some errors based on past experience, such as apps not working well with iOS 13; hotspot won’t turn off; iPhone/iPad stuck in black or white screen of death; iPhone/iPad stuck in Recovery mode, DFU mode; iPhone looping on start; iPhone error 4013 and so on.

fix iphone stuck on apple logo

Unfortunately, if you encounter one of these errors, how do you fix your iOS device to a normal state? This article is specifically designed to fix iPhone/iPad gets frozen on Apple logo when upgrading to iOS 13.

Reasons for Your iPhone Stuck on White Apple Logo Screen

Maybe you already know that the error was caused by the iOS 13 update. But besides that, there are other factors, they are:

  • iPhone shows an error during a software update.
  • iPhone runs on beta version which is no longer available later on.
  • Your iPhone has been jailbroken.
  • While restoring an iPhone via iTunes or iCloud, it can stuck into Apple logo screen.
  • There is a problem with the hardware of your iPhone.

Best Way to Fix iPhone Stuck on Apple Logo without Data Loss

This iOS System Recovery is your best solution for fixing iPod, iPad and iPhone stuck on Apple logo without any data loss. In addition to the Apple logo screen, it also works effectively to fix iPhone stuck in recovery mode, iPhone freezes problem, iPhone stuck on Black screen, iPhone stuck on White screen, red screen, blue screen etc.

Key Features

  • Fix all iOS problems such as iPhone stuck on Apple logo, recovery mode, DFU mode or headphone mode and so on.
  • Your device will be back to normal with several clicks.
  • Restore an iPhone without iTunes.
  • Full compatible with all iOS devices and iOS versions including iPhone 11/11 Pr (Max) and iOS 13.
  • 放特点

d_win d_mac
d_win d_mac

Fix iPhone Stuck on Apple Logo after iOS 13 Update

Step 1.Run Program and Connect iPhone

To start with, install and run U.Fone iOS Toolkit – iOS System Recovery on the computer. Connect your iPhone which stuck on Apple logo to the computer with a USB cable.

iOS System Recovery home page

Step 2.Select Repair Mode

Select the “iOS System Recovery” option under the “More tools” selection in the home page of program. You will see some notes displayed in the window. If you have no problem with all the notes here, click “Start” button.

select repair mode

Notes:
1.Your iPhone will be updated to the latest version.
2.The Unlocked network will be re-locked.
3.If it is a jailbroken iPhone,it will be updated to a none jail-broken phone.

Step 3. Download Firmware for iPhone

The program will detect your phone model and the iOS version. If it fails to do that, you can manually select them for your device. Then click the “Repair” button.

select your iPhone model

Now the program will begin to download the firmware for restoring iPhone system.

download the firmware for iPhone

Step 4. Fix iPhone Stuck on Apple Logo without Data Loss

The program will start to repair the phone system to normal. Wait for a few minutes. Your iPhone should turn on and get out of Apple logo screen.

fix iPhone stuck on apple logo screen

Done. You can check your device if it return to normal state.

d_win d_mac
d_win d_mac

Related Articles:

How to Fix Bricked iPhone iPad after iOS 11 Update

iPhone Stuck on Black Screen after iOS 12 Update, How to Fix

How to Fix iPhone Stuck in Reboot Loop without Losing Data

Top 6 Ways to Backup iPhone/iPad for iOS 13 Update

Recover Lost Data from iPhone/iPad after iOS 12/13 Update

Fix iPhone Stuck on Apple Logo on iOS 13

6 Ways to Backup iPhone/iPad Data before iOS 15/iOS 14 Update

Summary
Before update to iOS 15/iPadOS 15/iPadOS 14, you must to backup your iPhone/iPad/iPod data to PC or Mac, as you may encounter some unexpected stuck errors. This article will offer top 6 solutions on how to back up data from iPhone/iPad/iPod(touch) to computer before iOS 15/iPadOS 15 upgrade.

iOS 15 and iPadOS 15, Apple’s latest iPhone and iPad mobile operating system is coming soon. As a rule of thumb, every release of iOS (including iOS 15) offers a range of updates and new features on a range of older iPhones and iPads. Normally, you won’t have problems during the iOS 15 software upgrade process. As the saying goes, prevention is better than cure. Before downloading and installing the update, make sure you have backed up your iPhone or iPad, as you may experience some unexpected stuck errors, resulting in data loss. Your iPhone may be stuck on the Apple logo, recovery mode, restart loop and cannot be recovered. Therefore, we strongly recommend you to make a full backup of iPhone/iPad in advance. This article provides top 6 solutions to backup iPhone and iPad data before upgrading to iOS 15 or iPadOS 15, perhaps one of which is what you want.

Part 1: Backup iPhone/iPad with iTunes

When it comes to making backup for iOS device, iTunes is the most common tool. The process is simple:

1. Plug your iPhone or iPad into your Mac or PC.
2. Launch iTunes and choose the iPhone icon in the upper-left corner.
3. Click the Summary tab and scroll down to the Backups section.
4. Click the Back Up Now button and wait for the backup to complete.
5. To verify that the backup worked, open iTunes Preferences and select the Devices tab. If the backup was successful, you’ll see it listed there.

iphone-backup-itunes-mac

Part 2: Backup iPhone/iPad with iCloud

Apple provides 5 GB for free cloud storage for every Apple ID. So, you can leverage these 5 GB to regularly back up your iPhone data. It’s simple to perform this over the Wi-Fi network: Navigate to Settings > Your profile > iCloud > iCloud Backup > Back Up Now.

how-to-backup-restore-iphone-ipa

Part 3: Backup iPhone/iPad via iOS Toolkit – Backup & Restore

iOS Toolkit – Backup & Restore assists you to backup and export iOS device data directly to your computer. Here is a list of features for this iOS Toolkit – Backup & Restore program:

1-click to backup iPhone/iPad data to a computer.
Selectively backs up iPhone data to any Windows or Mac.
Directly backup Social apps on from iPhone/iPad, such as WhatsApp, LINE, Kik, Viber.
Restore data to device from iTunes and iCloud backup.
Export what you want from the backup to your computer.
No data loss on devices during the restore.
Add useful features, such as Recover, Switch, Repair, Erase, Unlock and so on.
Support iPhone XS/XR/8/7/SE/6/6 Plus/6s/6s Plus, etc.
Fully compatible with Windows 10/8/7 or Mac 10.14/10.13/10.12/10.11.

d_win d_mac
d_win d_mac

Step 1. Run iOS Toolkit – iOS Backup & Restore on your computer and you will see its functional section on the window.

Step 2. Choose “Backup & Restore“, connect your iPhone or iPad via USB cable, then click “Backup” button, a list of all supported file types will be displayed.

Step 3. Select data types you like to backup and hit the “Backup” button. Your selected data will be backed up from iPhone to your desktop or laptop instantly.

iTunes music to Android transfer

Part 4: Backup iPhone/iPad by U.Fone iOS Data Recovery

U.Fone iOS Toolkit – iOS Data Backup & Restore is also a one-stop tool for backing up and restoring data on your iPhone and iPad devices. It allows you to back up all your data with one click or select specific data for backup. The following are the specific features of this tool.

Back up any iPhone/iPad data and restore data iOS device easily.
Safely recover deleted files from iPhone and iPad.
Offer 3 recovery modes for iPhone data recovery.
Fix iOS system to normal without any data loss.
Preview data before restoring.
More than 25 data types are supported for backup, like contacts, photos, app data, messages, call history, calendars, voice memos, reminders, etc.
Support IM apps, including WhatsApp, Viber, LINE, Kik, etc.

d_win d_mac
d_win d_mac

Step 1. Open U.Fone iOS Toolkit – iOS Data Backup & Restore and connect your iPhone to PC. Select “iOS Data Backup & Restore” from its home screen.

Step 2. Select the “iOS Data Backup” then tick the boxes beside each file types you want to back up with.

Step 3. U.Fone iOS Toolkit – iOS Data Backup & Restore will start back up your iOS data. When the backup is done, it will display the name and the size of the backup file.

unfone-ios-backup-restore-connect

Part 5: Backup iPhone/iPad by iPhone Data Exporter

iPhone Backup Exporter is a desktop software which helps you to extract data from iTunes and iCloud backup files to computer without any issue.

Main Features:

Flexibly export your data from iPhone/iPad/iPod touch.
Export 18+ types of data, like contacts, messages, photos, music, videos, calendars and more.
Preview data before transfer to get exactly what you need.
Check iTunes backup without restoring it to iOS devices.
Access iCloud data on your own computer at any time.
Extract only the data you need instead of restoring the whole backup.
Compatible with all iOS versions and devices including iOS 13 and
iPhone Xs (Max).

d_win d_mac
d_win d_mac

Step 1. Run iPhone Data Exporter, choose “Export from iOS Device” given at the left panel.

Step 2. Connect iPhone/iPad to PC then select the file types you need to export.

Step 3. Click on “Back Up” and wait for the notification of the completion of process.

export iphone data option

Part 6: Backup iPhone/iPad Using Phone Transfer

Phone Transfer a great handy tool designed to backup your iPhone/iPad with ease. It supports backing up 12 different types of files, including photos, contacts, SMS messages, Notes, Ebooks, call logs, music, videos, etc, and you are allowed to restore the data whenever you want. Let’s see what Phone Transfer can help you with:

One click backup data on your iPhone/iPad/iPod touch, Android phone, or Nokia (Symbian) phone to PC.
Transfer data from iPhone, Android, iOS, iTunes, iCloud to anywhere without any loss.
Easily transfer diverse types of files, including contacts, messages, apps, call logs, photos, videos, etc.
Works perfectly with Apple, Samsung, HTC, LG, Sony, Google, HUAWEI, Motorola, ZTE, and more smartphones and tablets.
Fully compatible with major providers like AT&T, Verizon, Sprint and T-Mobile.
Permanently erase your old Android phone data.

d_win d_mac
d_win d_mac

Step 1. Run Phone Transfer on your Windows PC or Mac.

Step 2. Select “Back Up Your Phone” in the homepage and connect your iPhone/iPad to the computer.

Step 3. All transferable data on your device are displayed. Check those what you wanted, and click on “Start Transfer” to back up them to your computer.

backup mode

Related Articles:

How to Restore iPhone Photos after iOS 12/iOS 13 Update

How to Recover Lost Data on iPhone/iPad after iOS 13/12 Update

Safely Backup iPhone/iPad/iPod Data before iOS 12 Update

Backup & Restore iPhone Data before iOS 11 Update(iOS 10.3)

Install IPSW File on iPhone iPad with/without iTunes

Backup iPhone/iPad Data

How to Fix iPhone Glitch after Update to iOS 13

[Summary]: iPhone met glitch after an iOS 13 update? Here this post will offer top solutions on how to fix iPhone glitch after updating to iOS 12.3/12, even with the latest iOS 13.

We’ll get an official list of iOS 13 features at WWDC 2019. Every iOS update brings new highlights. Similarly, this time Apple did its homework in terms of details. Apple will bring its dark mode to iOS with this latest update. If you want to use your phone at night without blinking, it will come in handy. Also, the new iOS 13 system offers a new slide-based keyboard, the Revamped Health app. Features such as Sleep mode, Home security, iPad multitasking and more have also been optimized in the new iOS 13. If you want to update to iOS 13, please check to see if your device supports the system. The following devices will almost certainly get iOS 13: iPhone XS/XS Max/XR/X/8/8 Plus/7/7 Plus/6s/6s Plus/SE, 12.9-inch iPad Pro (2nd generation), 12.9-inch , iPad Pro (1st generation), 10.5-inch iPad Pro, 9.7-inch iPad Pro, 9.7-inch iPad (2018), iPad Air 4, iPad (2017), iPad mini 5, iPad mini 4.

iPhone Met Glitch after an iOS 13 Update? Like an iOS 12.3/iOS 12.2/iOS 12 update, every update can cause some errors. Some users complained about an iPhone glitch after updating to iOS 13, such as a black screen, a frozen screen, stuck on Apple logo screen or white screen, and so on. There are many reasons for these glitches, but you can easily fix them in many simple ways. Here are some iPhone troubleshooting tips to fix some of the most common iPhone glitches.

Part 1: What You Should Do before Fixing iPhone Glitch

No matter what the circumstances, mobile phone data must be something you don’t want to miss, such as contacts, WhatsApp, news, photos, etc. Therefore, before we show you how to fix iPhone glitch, we strongly recommend that you use iPhone Data Exporter to back up your iPhone. iPhone Data Exporter is designed to transfer data from iPhone, iPad and iPod touch to your computer for extra security. Various data types are supported, namely contacts, messages, photos, music, videos, calendars and more. Plus, iPhone Data Exporter can help you extract and download data from iTunes or iCloud backup without any hassle. If you want to know more, click here.

Here is what iPhone Data Exporter can do for you:

Transfer data from iPhone, iTunes backup, iCloud backup to PC or Mac.
Export iPhone files, like contacts, messages, photos, music, videos, calendars and more.
Import photos, music, videos, ringtones, eBook from PC to iPhone
Restore lost iPhone data due to accidental deletion, broken device, damages, virus infection, jailbreak failure, unsuccessful iOS upgrade, factory reset, frozen device, etc.
You will be able to preview each file before exporting them.

d_win d_mac
d_win d_mac

export iphone data option

Part 2: Fix iPhone Glitch after Update to iOS 13

1. Force Restart Your iPhone

This is the most direct method and a force restart is an activity done at the hardware level and does not affect the software.

iPhone XS Max/XS/XR/X/8 Plus/8:Press and hold the Side and either Volume button until you see the slider appears. Then, drag the slider to turn off your iOS device. Then you can press and hold the Side button again to turn on your iPhone.

iPhone 7/7Plus: Press and hold the Volume button and Side button for about 10 seconds until the Apple logo appears. Then, drag the slider to turn off your iPhone. Then press and hold the Power button to turn on your iPhone.

iPhone 6s/6s Plus: Press the Home and Top/Side buttons, hold them for at least 10 seconds until the Apple logo appears.

2. Fix iOS 13 Glitches by A iOS Repair Tool (No Data Loss)

The focus of the U.Fone iOS Toolkit – iOS System Recovery is entirely on iOS system repair. If you are dealing with any kind of iPhone problem while updating iOS, jailbreaking, it is recommended that you use this iOS System Recovery to get your device back to normal.

Main Features of iOS System Recovery

Easily fix iOS system to normal, such as iPhone stuck in recovery mode, spinning circle, Apple logo, white/black screen of death, frozen screen, iPhone won’t turn on, update failure, forgot lock screen password.
Supports All Models of iPhone, iPad and iPod.
Fix your iOS to normal without any data loss.
Compatible with all iOS versions, the latest iOS 13 supported.

d_win d_mac
d_win d_mac

How to Use iOS System Recovery to Fix iPhone Glitch

Step 1. Install and Run iOS System Recovery
Install and run iOS System Recovery on your computer. Then connect your iOS 13 iPhone to PC with its USB cable.

Step 2.Choose Repair Mode

Select the “iOS System Recovery” option from “More tools“. You will see some notes displayed in the window. If you have no problem with all the notes here, click “Start“.

iOS System Recovery home page

click start to begin

Reminder: Your iPhone will be updated to the latest version after fixing. If it’s a jailbroken iPhone, it will be updated to a non-jailbroken phone.

Step 3.Download the Firmware for Your iPhone

This is automatically done by the program once the model is detected. You can also manually choose the firmware version you like if there is more than one option. Click on “Repair” to download the firmware for your iPhone.

select your iPhone model

After downloading the firmware, the program will start the repair process automatically.

download the firmware for iPhone

Step 4.Fix iPhone Glitch to Normal
After a short while, your iPhone glitches will be removed and your device can work normally again.

restore iPhone system to normal

This all-in-one application can quickly repair various iOS system issues without any data loss, such as iPhone stuck on Apple logo, DFU mode, recovery mode, iPhone i glitch, iPhone screen, keyboard glitch and iPhone FaceTime glitch, etc.

d_win d_mac
d_win d_mac

Related Articles:

How to Restore iPhone Photos after iOS 12/iOS 13 Update

How to Recover Lost Data on iPhone/iPad after iOS 13/12 Update

How to Fix iPhone System to Normal after iOS 12/12.1 Update

How to Fix All iOS Errors on iPhone/iPad without Data Loss

[Fixed]iOS 12/11 Update or Downgrade Stuck in Recovery Mode

Fix iPhone Glitch after iOS 13 Update

How to Transfer Music and Playlist from iTunes to Google Pixel

[Summary]: Want to transfer iTunes library to Google Pixel? Looking for a way to copy iTunes music to Google Pixel Android phone? Read this article and follow the simple steps to transfer songs, Apple Music tracks and playlist from iTunes to Google Pixel 3a/3/2/1(XL).

On the 2019 Google Developer Conference, Google inc has launched two new Android smartphones – Pixel 3a and Pixel 3a XL , both two phones are equipped with Qualcomm Snapdragon 670 processor, built-in 4GB memory, Bluetooth 5.0 support, and 18W fast charge (PD2. 0), the battery is 3000mAh and 3700mAh respectively. The screen sizes of the Pixel 3a and Pixel 3a XL are 5.6-inch and 6.0-inch respectively, all of which are OLED screens, weighing only 147g and 167g, respectively, with a thickness of 8.2mm. On the back of the phone, Pixel 3a and Pixel 3a XL are 12.2 million pixels. Dual-pixel post-camera + capacitive fingerprint recognition, Pixel 3a and Pixel 3a XL run the latest version of Android 9.0 Pie system, Google promises that the two models will be free updated for the new Android system for at least 3 years.

sync itunes music to google pixel

In just a few years, Google has made several upgrades to Pixel phones, Google Pixel modes including Pixel, Pixel XL, Pixel 2, Pixel 2XL, Pixel 3, Pixel 3X and the latest Pixel 3a/3a XL. When if you have purchase an new Android phone to replace your old iPhone, you may want to transfer data from iPhone to Google Pixel, or import music and videos to Google Pixel for enjoying anywhere you like. It’s not difficult to transfer files from old phone/PC/Mac to Android phone, but if you want to sync music from iTunes to Android, including your purchased/downloaded Apple Music songs, how you can transfer music from iTunes to Google Pixel phone?

Today, we will teach you the best method to transfer iTunes music to Google Pixel 3a/3/2/1(XL) or other Android devices by iTunes to Android Transfer tool.

You may want to know how to stream Apple Music to Google Pixel

1 Click iTunes Music to Google Pixel/Android Phone Transfer

To sync music from iTunes library to Google Pixel or other Android devices, you need to use an iTunes to Android Transfer, this iOS & Android Manager and Android Toolkit – Transfer probably is your best choice. You can easily transfer songs, movies, Podcasts, iTunes U and more from iTunes Library to Google Pixel or other Android phones/tablets. In additional, if you want to backup music to iTunes, this program also allows you transfer music and videos from Android to iTunes for backup. Moreover, this Android transfer tool enables you transfer music, videos, photos, contacts from computer to Android if you need that. Let’s see more feature about iOS & Android transfer software.

  • Transfer Music between iTunes and Android devices.
  • Transfer data from Android to PC/Mac, or reversely.
  • Transfer media between iPhone/iPad/iPod and iTunes.
  • Manage your Android phone and iPhone on PC/Mac.
  • Supports the transfer of all data like videos, photos, call logs, contacts, text messages, etc.

d_win d_mac
d_win d_mac

Step-by-Step Guide to Transfer Songs from iTunes to Google Pixel 3/3a(XL)

This guide shows you the detail guide to sync music from iTunes to Google Pixel by Android Toolkit – Transfer, you can also use the iOS & Android Manager to copy songs from iTunes, PC, Mac, Android, iOS to Google Pixel phone, these two software have similar features.

Step 1. Download and Launch Android Toolkit on PC or Mac
Launch Android Toolkit and connect your Android to your Mac or Windows computer, then click “Transfer” section to continue.

iTunes music to Android transfer

Step 2. Click “Transfer iTunes Media to Device”
After entering the data transfer function, then click “Transfer iTunes Media to Device” option, the program will read and load all media files of the iTunes library.

mac android itunes music transfer

Step 3. Connect Google Pixel Phone to Computer
After loading the entire library, then using an Android USB cable to connect your Google Pixel phone to the computer.

sync iTunes music to google pixel

Step 4. Start to Transfer iTunes Music to Google Pixel Phone
You can select the entire library, or select the files which you want to transfer from iTunes to Google Pixel phone. Then hit “Transfer” button to sync songs from iTunes library to your Google Pixel phone.

transfer iTunes music to google pixel

Free download the Android Toolkit and start to sync iTunes music to Android phone.

d_win d_mac
d_win d_mac

Note: This program can’t transfer the Apple Music songs to Android directly, because all Apple Music songs added DRM protection, if you want to transfer Apple Music songs to Android phone for playing offline, you must to remove DRM from Apple Music firstly, then use this Android transfer program to transfer the converted Apple Music songs to your Android phone directly.

Tips to Transfer Apple Music Songs to Google Pixel

Which is the best Apple Music DRM Removal and Apple Music Converter? Here, we recommend the UkeySoft Apple Music Converter, which also is a professional iTunes music converter and DRM audio converter, it can convert Apple Music, iTunes music and audiobooks to MP3/AAC/WMV without DRM protection. After getting the DRM-free Apple Music songs, you can directly import the converted MP3 songs to Android, MP3 player, iPhone/iPad/iPod, Zune, PSP and more.

convert apple music to google pixel

Here, you can learn how to import music from PC/Mac to Google Pixel

Transfer iTunes Music from iTunes to Google Pixel