All posts by DHZ

How to Delete Everything on Android without Factory Reset

Summary: Normally, people will wipe Android manually. But it can remove the Android data permanently. If you want to delete the data and setting on Android completely, you could have a glance in this tutorial, to get the steps on erasing everything from Android without restoring.

With various of new mobile phone models showing up, may be you want to get the newest one for upgrading? And planning to sell your old device? Are you thinking of wipe all the data on your old Android device to protect your privacy? Then you need to completely erase all data and settings from the device without recovery. The first way that people use to delete data on Android may be perform factory reset on Android. However, perform factory reset on Android will not remove all Android data permanently. Let’s see the three section below to know more about wiping data on Android with a reliable solution.

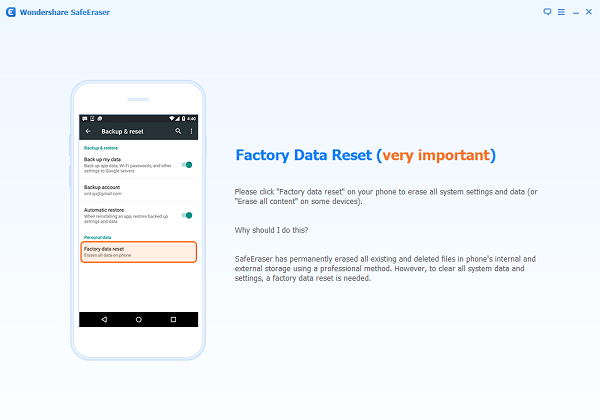
Part 1: Restore Android to Factory Settings to Delete Everything

Step 1. Open Settings on Android.
Step 2. Under “Personal” select “Backup & reset”.
Step 3. Under the section “Personal Data” select “Factory data rest”.
Step 4. Follow the onscreen instructions to complete the reset process.

Part 2: Factory Reset will not Completely Erase All Data on Android

It is good to delete data on Android by restore device to factory reset, but this way will not make sure the Android data is completely removed, the deleted data can be restored by some professional data recovery tools. Here we conclude the reasons of why deleting everything on Android by restoring factory reset will not remove data cleanly.

Reason A: The Deleted Android Data can be Restored
When you delete data on Android, actually the deleted data is stored on the Android internal memory and it just become disappeared. Before the deleted data is overwritten by some new data, the deleted data can be restored while using some professional data recovery.

Reason B: External Memory (SD card) is not Deleted
Another reason why Factory reset is not the right solution is that it does not completely erase the data from the SD card. You need to format SD card separately. Even if you format the Android SD card, the information can still be recovered using the Android recovery tool.

When you are aware that performing factory reset can’t remove everything on Android without recovery, you can move to the next section, we offer the best solution for you, help to delete everything on Android permanently without factory reset.

Part 3: Wipe Everything on Android Permanently

How to Erase Everything on Android Permanently via Android Data Eraser

Android Data Eraser is design for wiping everything on Android permanently, including contacts, text messages, photos, videos, call history, WhatsApp data, documents, etc,. With the help of Android Data Eraser, you can wipe all data and setting on Android without performing factory reset. This program can be applicable to all Android brands, such as, Samsung, HTC, Lenovo, Motorola, LG, Huawei, Google Pixel, ZTE, OnePlus.

Free Download Android Data Eraser:

d_win d_mac

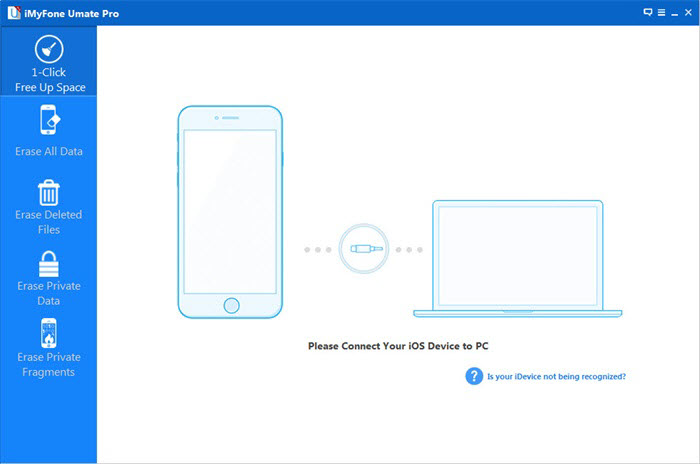
Step 1. Run Program and Connect Android to Computer
Run the Android Data Eraser on the computer, connect your Android device to computer.

android data eraser

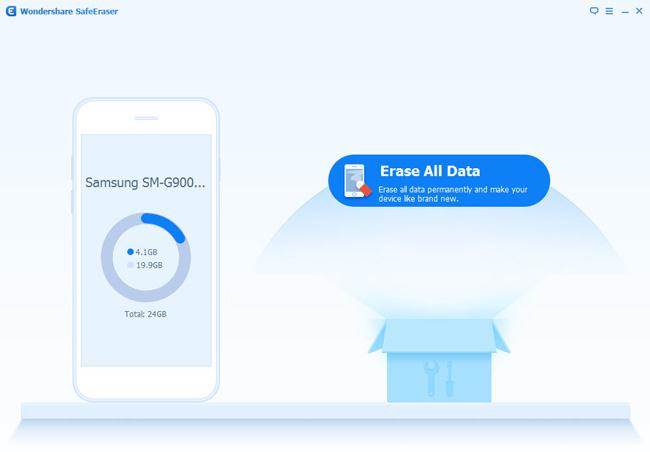
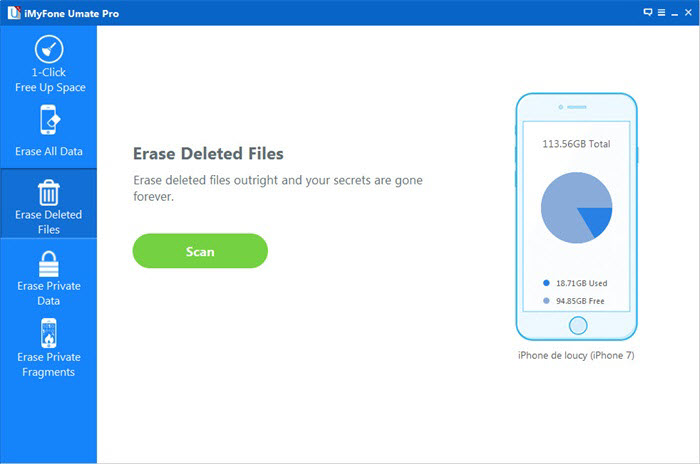
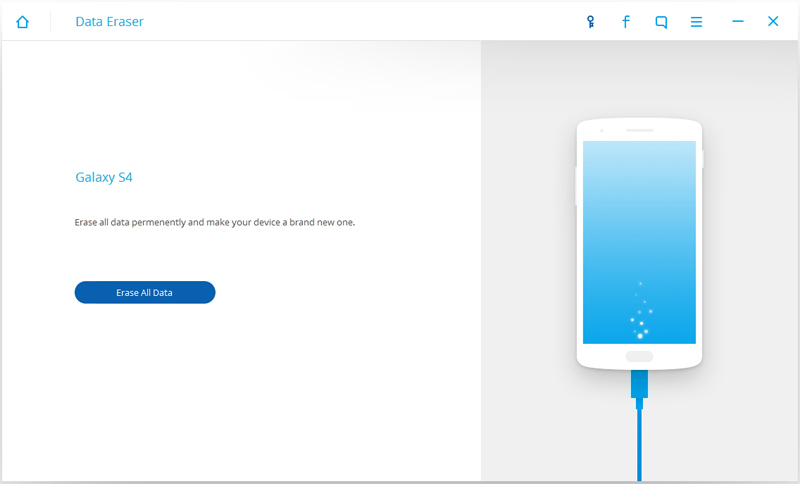
Step 2.Erase Everything on Android without Factory Reset
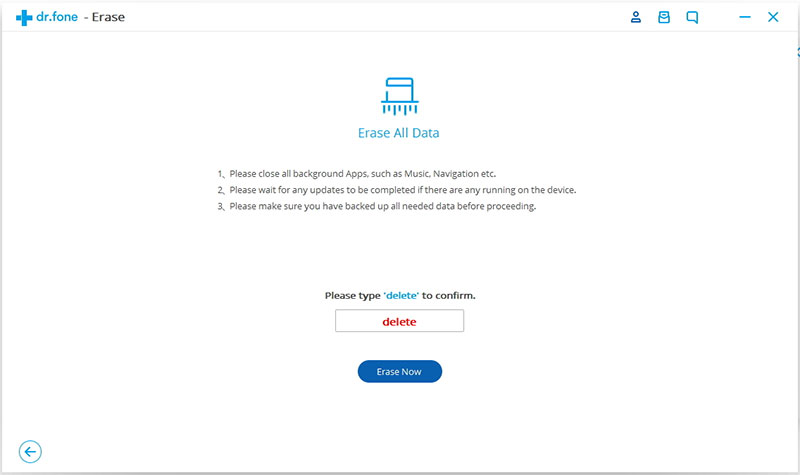
Click the “Erase All Data” button.

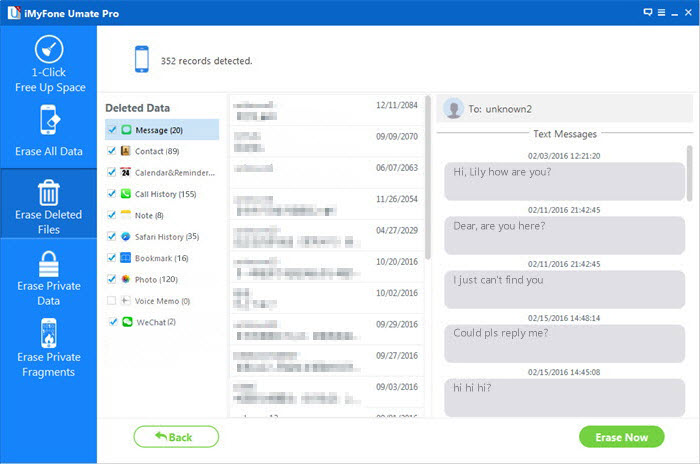
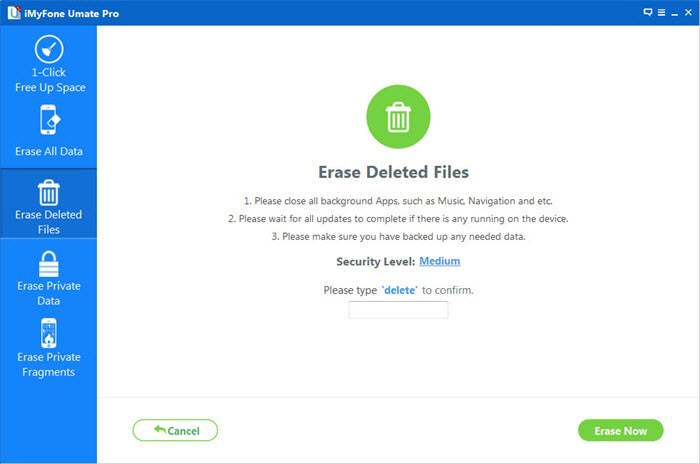
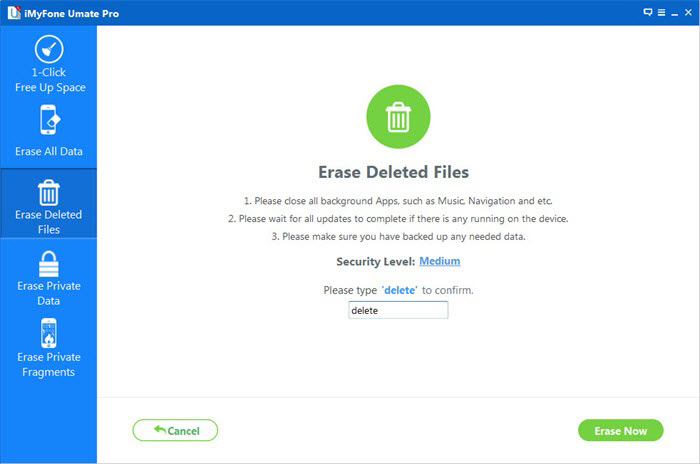
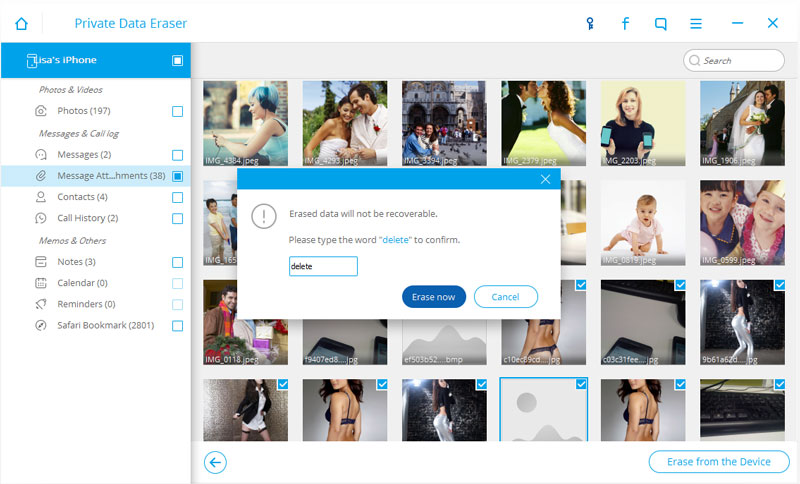
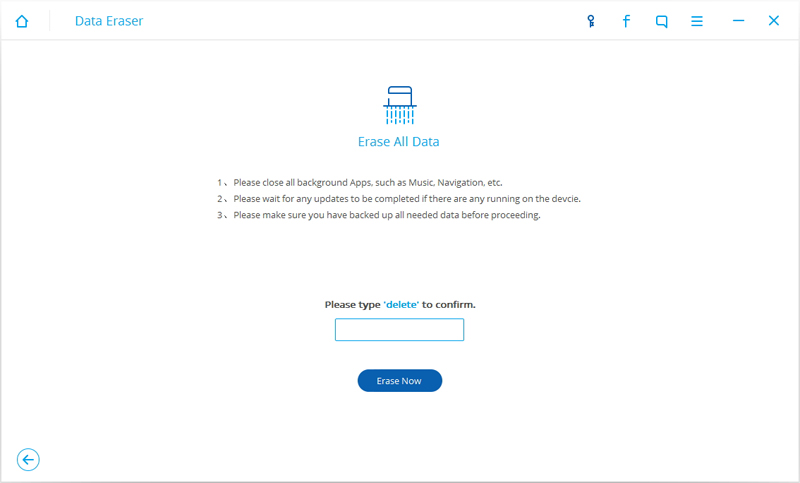
Before you can continue, you need to read the instructions carefully. And then type “delete” into the box to confirm your action to delete the data.

wipe android data

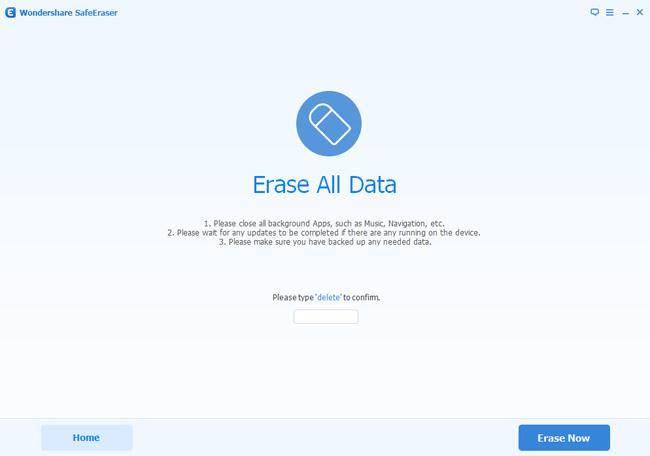
Note: This action will permanently erase all data and the deleted data can not be restored, please make sure you’ve backed up the data you need.

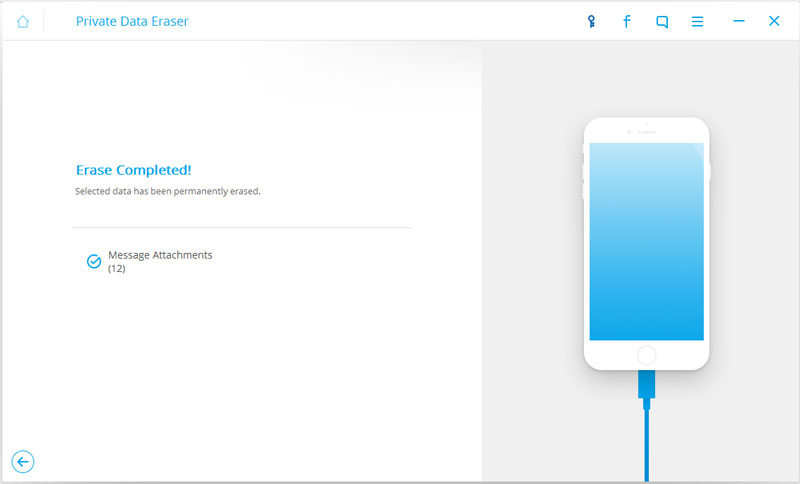
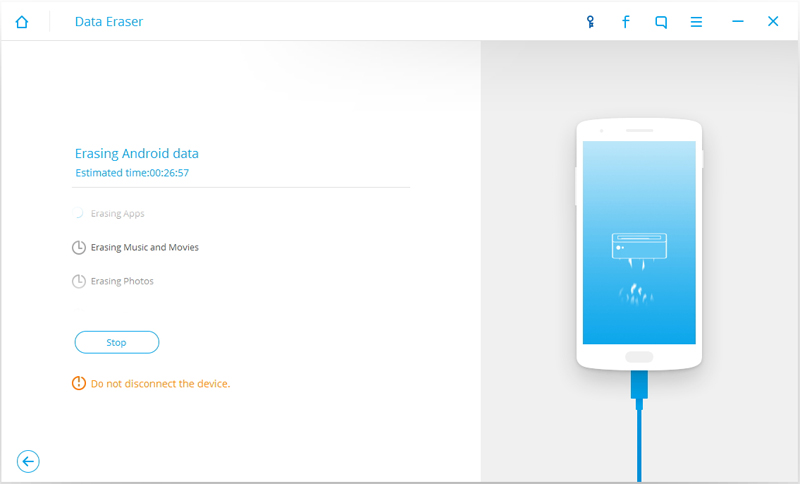
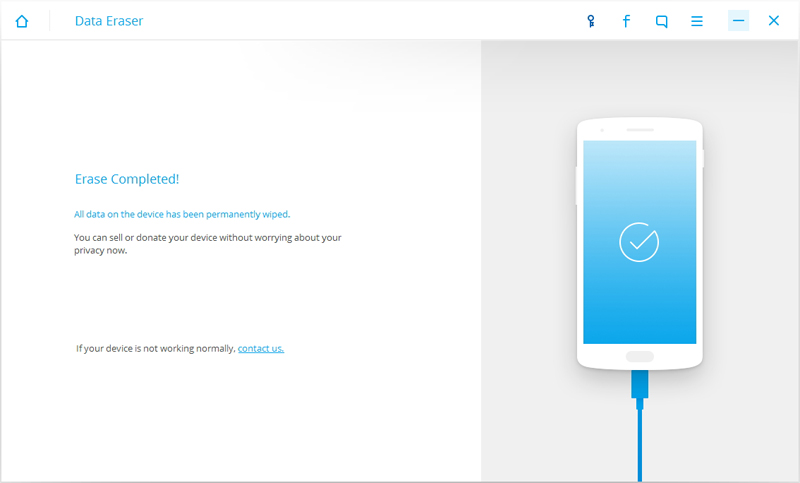
Finally Android Data Eraser will give the report what kind of data was deleted and how much of them.

d_win d_mac

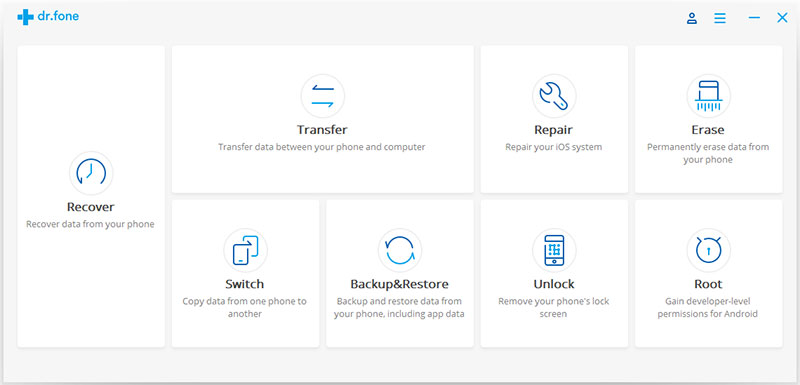
How to Erase Everything on Android Permanently via Android ToolKit
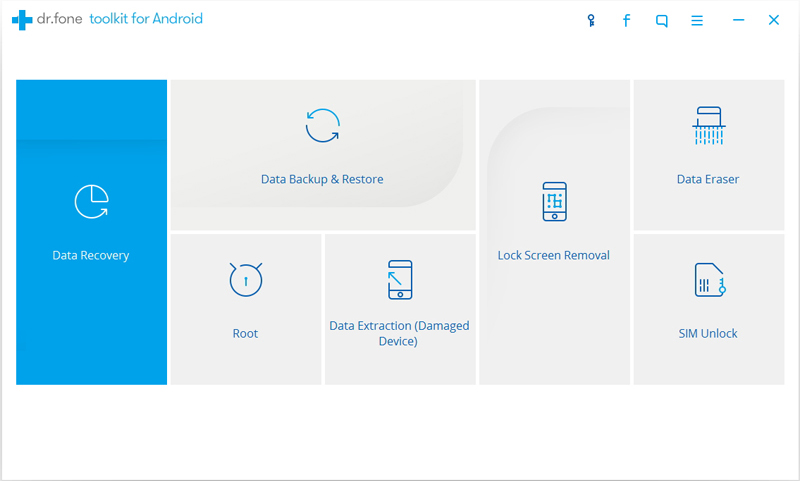
Android ToolKitData Eraser is such an efficient data eraser tool for Android device,it can be used to remove everything from Android without restoring.Including SMS,contacts,photos,videos,notes,call logs,apps,documents, etc,.What’s more, Android ToolKit enable to recover deleted data from Android, backup & restore Android, root Android with one click,extract data from damaged Android. Support to almost all Android devices, including Samsung, HTC, Lenovo, Motorola, LG, Huawei, Google Pixel, ZTE, OnePlus.

Free Download Android ToolKit – Data Eraser:

d_win d_mac

Launch Android ToolKit on your Computer. Select “Data Erase” from More Tools tab.

android toolkit main page

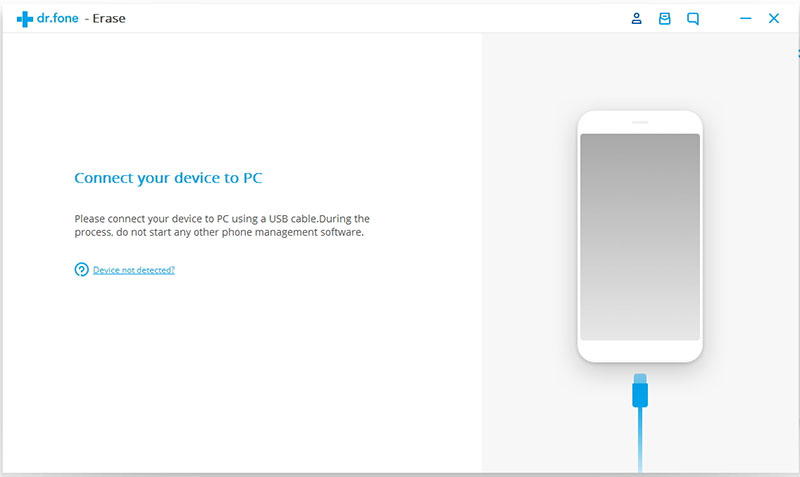
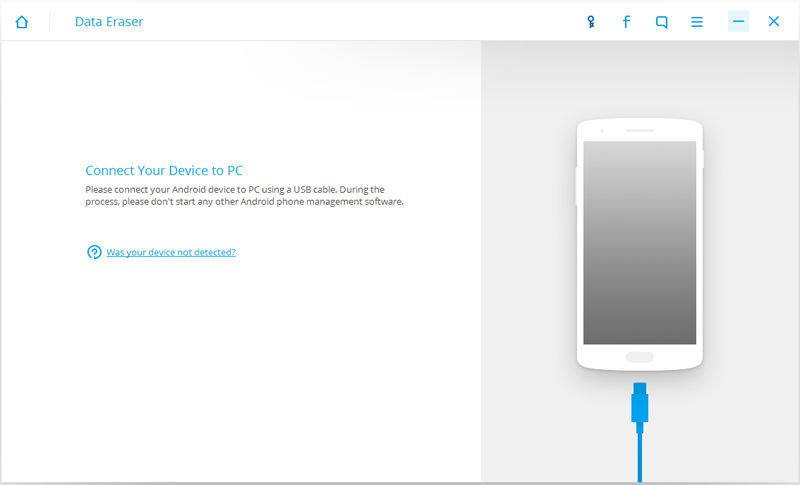
Step 1. Connect Android to Computer
Connect your Android phone to the computer using an USB cable. Please make sure you have enabled USB Debugging mode on the phone. Then Android ToolKit will detect and connect your phone automatically.

connect android to pc

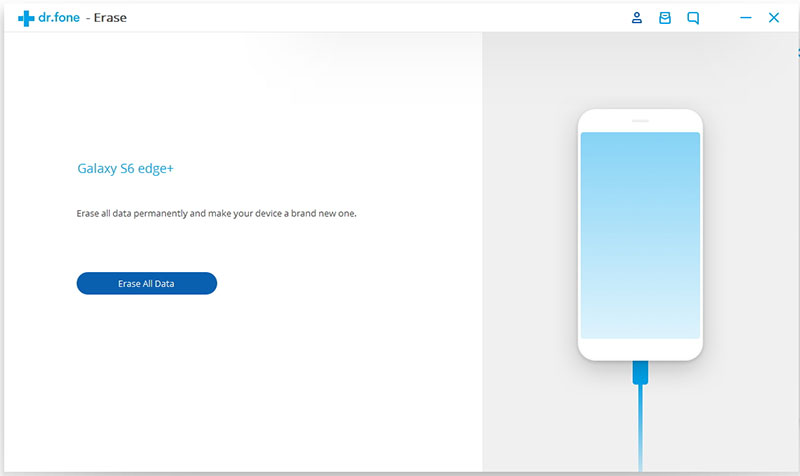
Step 2. Erase Everything on Android
When the phone is connected successfully, click on “Erase All Data“.

confirm to wipe android data

Then type delete in the window to confirm the operation. Click on “Erase Now” to continue.

android data erase confirm erase

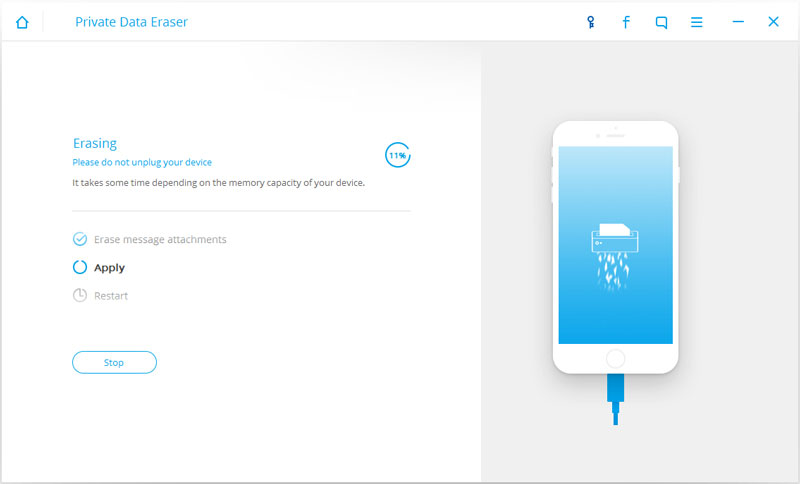
Normally it will take a few minutes to completely erase all the data and settings on your phone. It take the time mainly depends on the capacity of data on the phone. Please keep connecting the phone and not to run any other phone management software on the computer.

erasing android data

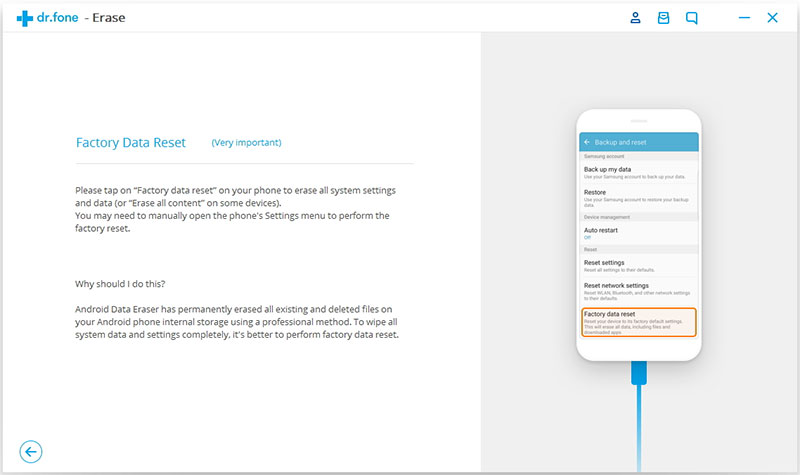
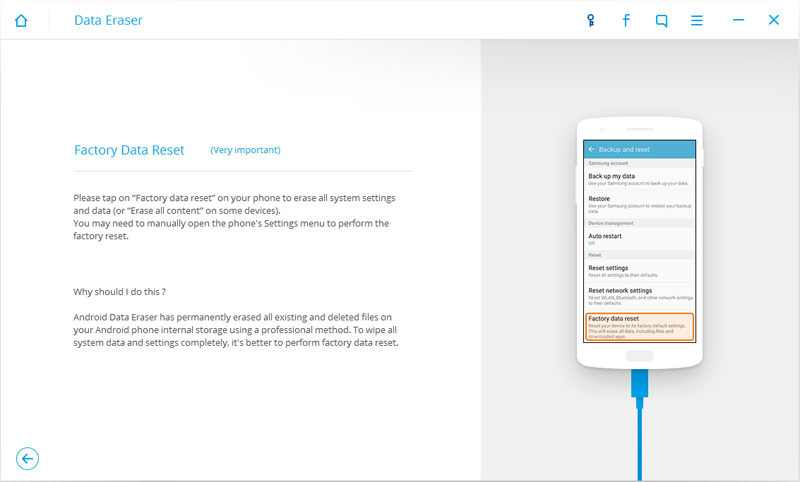
Step 3.Perform Factory Reset on Android
Once all data have been completely erased,Android ToolKit will ask you to tap on “Factory Data Reset” or “Erase All Data” on the phone. It will help you completely wipe all the settings on the phone.

factory reset android

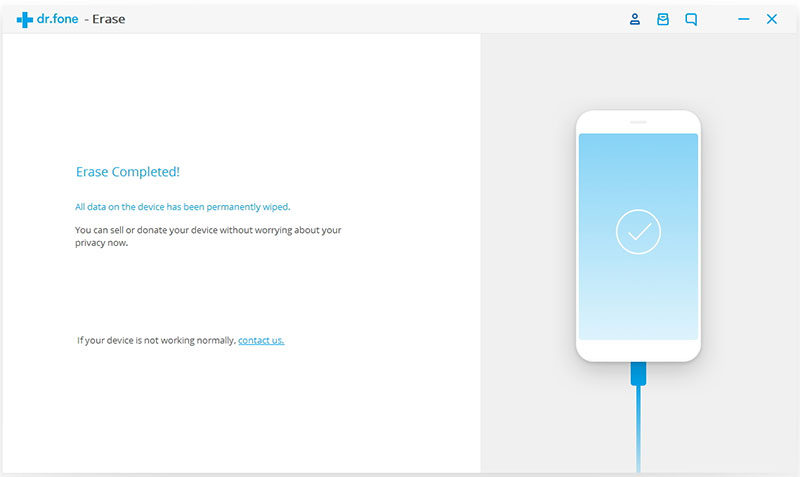
Only a few minutes,the data on your Android has been completely removed and it’s like a brand new one.

android data erase completed

d_win d_mac

More Android Tutorials you may be Interested in:

How to Permanently Erase Android Data

How to Erase Android Data before Selling

How to Permanently Delete Photos from Android Phone

The Best Way to Erase Text Messages on Android Phone

How to Permanently Delete Call History on Android

How to Delete Facebook Messages on Android Permanently

How to Get More Internal Storage from Android Phone

How to Delete Facebook Messages on Android Permanently

Summary: In this tutorial, we will help you remove Facebook history on your Android device completely. We will discuss the tips to erase Facebook messages with two different solutions. One is using the Facebook app, and the other is using Android Data Eraser. Let’s move to the next section.

Facebook Messages has become a vital app for mobile users around the world. You can send and receive messages from your Facebook friends independently of the Facebook app and Facebook website.It a convenient and popular app among those chat apps. Facebook is one of the most useful app for communication, you can update the newest information via using this app, chat with other in anywhere and at anytime. When you use Facebook Messenger on Android, you have the ability to send messages, but sometimes you do want to delete Facebook messages in order to avoid unwanted access from those persons you don’t know. This post aim to guide you delete Facebook Messages on Android without recovery.

Part A: How to Delete Facebook Messages with Facebook App

Step 1. Run the official Facebook app on Android.

Step 2. Tap on “Message Icon”.

Step 3. Now tap on the conversation you want to delete.

Step 4. Tap on “Delete” and confirm the operation.

Note: You can also delete the whole Facebook chat history.

Tips: Simple deletion will not completely wipe Facebook chat history from Android device, it still remain on your Android internal storage. The deleted data will be easily recovered by some prefessional data recovery program. If you want to remove the Facebook messages from Android without restoring, you should try the better solution in the part 2.

Part B: How to Delete Facebook Messages Permanently with Android Data Eraser

It is quite difficult to let the Android data disappear with the manual method. But Android Data Eraser can make it possible and simple. It is a powerful and reliable eraser tool which is designed for Android users.It empower to erase Android data with only one click, including Facebook messages, contacts, photos, videos, call history,etc,.With the help of Android Data Eraser, you can easily remove Facebook messages from Android completely.It supports over 3000s brands of Android tablets and smart phones, such as, Samsung, HTC, Lenovo, HTC, LG, Huawei, Google Pixel, Xiaomi, OnePlus, ZTE.

d_win d_mac

Step 1.Run Program and Connect Android to Computer
After the installation,run the Android Data Eraser first and then connect your Android device to the computer.You should enable the USB debugging on your Android device.When your device is detected, you will see the below interface. Select “Erase All Data” and move on.

android data eraser

Step 2.Confirm to Erase Facebook Data and Other Data without Restoring
Type “delete” in the next interface to allow the program to wipe all data on your Android device.Click on “Erase Now” to confirm the operation.

wipe android data permanently

Now the program will begin to erase all data and settings on your Android permanently.

d_win d_mac

More Android Tutorials you may be Interested in:

How to Permanently Erase Android Data

How to Erase Android Data before Selling

How to Permanently Delete Photos from Android Phone

The Best Way to Erase Text Messages on Android Phone

How to Permanently Delete Call History on Android

How to Get More Internal Storage from Android Phone

How to Delete VoiceMail Messages on iPhone Permanently

I updated to a new iPhone X. How to completely delete the voicemail messages on iPhone before I selling it to the store? I want to get a safe way to make sure all the data will be removed and have no way to restore.

Apple, being one of the largest mobile manufacturer companies in world, offers voice mail for user under their “Phone”tab. User can set this voice mail service with their own passwords. You all must be aware that just like phone memory, you can reach the memory limit of voicemail too. To free up space of the voicemail app, manage the useless messages, or want to wipe the data from device avoid leaking data for anyone, you may need to delete the voicemail messages. Simply delete voicemail messages on iPhone will not remove the data permanently, if you need a reliable solution to wipe the voicemail messages on iPhone permanently, just read the follow passages patiently, we will guide you to remove voicemail messages from iPhone without recovery step by step.

Wipe VoiceMail Messages on iPhone without Recovery

To completely erase voicemail on iPhone without recovery, we prefer you iPhone Data Eraser, which is the most perfect and reliable software for your iPhone to erase data including voicemail, contacts, photos, notes, call history and more. What’s more, It also can clean up your junk files and compress your photos which will increase your storage. It also offer other modes for you to better manage iPhone data freely, such as 1-click free up space, erase all data, erase deleted files. Support iOS devices: iPhone X, iPhone 8, iPhone 7, iPhone 6S/6, iPhone 5S/5C/5, iPad and iPod.

d_win d_mac

How to Delete VoiceMail Messages on iPhone without Restoring

Step 1.Run Program and Connect iPhone 
Run iPhone Data Eraser on the computer, connect your iPhone to the computer via an USB.If this is the first time you are connecting to the computer, you need to Trust the computer first on your iPhone.

connect iphone

Step 2.Select the Erasing Mode
Choose the “Erase Deleted Files” mode,click “Scan” and then iPhone Data Eraser will start to scan the device and list all of the deleted files.This process would take you several minutes.

erase deleted iphone data mode

analyze deleted iphone data

(Note that the erase modes are 1 Click Cleanup, Erase All Data, Erase Deleted Files and Erase Private Data, and all the last 3 modes can delete iPhone voicemail messages.)

Step 3.Preview and Permanently Delete Voicemail from iPhone
When the scanning process is complete, iPhone Data Eraser will list all the deleted files.You can click them one by one to preview and click “Message” file to erase the voicemail message from iPhone.Then click “Erase Now” button to erase the selected data permanently.

preview deleted iphone data

Note: You can select more than one files to erase at one time.Normally iPhone Data Eraser will select all by default.

d_win d_mac

Related Articles:

How to Erase Deleted Data from iPhone without Restoring

How to Delete Photos from iPhone Before Selling

How to Delete Messages on iPhone Before Selling

How to Permanently Delete Contacts from iPhone

How to Delete Massively Videos from iPhone Permanently

How to Permanently Delete Call History on iPhone

How to Permanently Erase Notes on iPhone without Recovery

How to Permanently Erase Notes on iPhone without Recovery

I need to remove the notes from iPhone before selling it to the mobile store. The notes contain something personal information and I want to make sure it will not leak for anyone. How?

Have you been looking for the safe solution on removing notes from iPhone without restoring? Deleting notes on iPhone can be confusing to new users of iPhone users. Even though deleting notes in “Deleted Note” list of note app in iPhone mean not really wipe all data completely, because the deleted notes can be restored by some professional tool. Perhaps, you have tried different methods to delete the notes and you were not sure if it have been removed permanently. If that is the case, would you like to know the best method to finish the easing task? This guide will help you to know how to permanently erase notes from iPhone without restoring.

Delete Notes on iPhone without Recovery

Finally, iPhone Data Eraser is what you are looking for, to help you completely delete notes on iPhone with safe solution under “Erase Private Data” mode. Not only notes, but also other iPhone data are supported to be erased, including message, contacts, call history, bookmark, photo, voice memo, WhatsApp data, etc,. In addition, iPhone Data Eraser offer other three modes for you: 1-click free up space, erase all data, erase deleted files. iPhone Data Eraser work well on all iOS devices, such as, iPhone X, iPhone 8, iPhone 7, iPhone 6S/6.

d_win d_mac

How to Remove Notes from iPhone Permanently

Step 1. Run iPhone Data Eraser and Connect iPhone to Computer
Launch the program on computer and plug iPhone to the computer via USB cable. iPhone Data Eraser will automatically detect the attached device on it was well connected. Make sure iTunes is pre-installed on the computer.

connect iphone

Step 2. Select “Erase Private Data” Mode
As you see, there are 4 data erasing models designed for user. In this case, select “Erase Private Data” mode and click “Start Scan” button, then the program will scan all data that on the device, including notes, messages, caches, photos, etc,. The scanning process will take you some time.

erase private data mode

Step 3. Erasing all notes on iPhone Permanently
Uncheck other options and only leave notes being checked. In default, the program will erase all notes on your iPhone. However, you can choose the notes you want it to be deleted under “Note” file. After selection, then click on “Erase Now” button located at the bottom of the program, then it will start removing the selected notes from your iPhone permanently.

select iphone notes to erase

d_win d_mac

Related Articles:

How to Erase Deleted Data from iPhone without Restoring

How to Delete Photos from iPhone Before Selling

How to Delete Messages on iPhone Before Selling

How to Permanently Delete Contacts from iPhone

How to Delete Massively Videos from iPhone Permanently

How to Permanently Delete Call History on iPhone

How to Erase All Content and Settings on iPhone Permanently

How to Free Up Space on iPhone

How to Delete Massively Videos from iPhone Permanently

I saved a large number of videos on my iPhone 6. How to permanently delete all the videos from device at one time permanently.

Nowadays, people like to take videos via mobile phone to capture precious moments prefer than using the digital camera. Most of mobile phone offer the high quality camera function for users, especially iPhone. However, sometimes remove videos from iPhone is necessary in life. But removing videos on iPhone doesn’t come as easy as counting 1-2-3! In general, people will wipe videos on iPhone by simply click “delete” button and then clean up the “Has been deleted” box on device. Or someone will restore iPhone to factory reset to erase all iPhone data and settings. They must think that it will be all removed under these actions. To be honest, the deleted iPhone videos were not really erased permanently. The follow section we will guide you wipe iPhone videos without restoring with two solutions.

Part 1: How to Delete Massively Videos from iPhone on Computer

iOS Manager is the first choice to delete videos from iPhone permanently in batch with ease, including Movies, Music Videos, Home Videos, TV Shows, iTunes U and Podcasts. It is an amazing program help to transfer & manage files for iPhone on computer, like videos, music, photos, contacts, SMS, apps. With iOS Manager, you can manage videos for iOS device on computer freely, delete/add/export/refresh videos as you like. Furthermore, it can help to transfer videos between iPhone and computer, transfer videos between iPhone and iTunes, transfer videos between iPhone and Android device. iOS Manager work well on all iOS devices, such as, iPhone X, iPhone 8, iPhone 7, iPhone 6S/6.

Free Download iOS Manager:

d_win d_mac

Step 1. Run Program and Connect iPhone
Run iOS Manager on the computer and connect iPhone to the computer.

iOS manager main page

Step 2. Select and Delete Videos from iPhone Permanently
Click “Videos” icon at the top of the main interface, then you will enter the specific option Movies window (“Movies” is the default option). Note: Music Videos/Home Videos/TV Shows/iTunes U/Podcasts is available to select.

Check the videos you want to delete, and click “Delete” button. Later, a confirmation window will pop up, click “Yes” to finish the deletion.

select videos to delete

confirm to delete iphone videos

Note: Here you can right-click on the selected videos and then select “Delete” from the drop down list as well.

delete iphone movies

Part 2: How to Erase Deleted Videos and Photos from iPhone 7/8 Permanently

It can be considered as a straightforward method available for the people to remove videos and photos from iPhone permanently using iPhone Data Eraser. It provide to you five erasing modes: 1-click free up space, erase all data, erase deleted files, erase private data, erase private fragments. Support to delete several of iPhone data, such as, message, call history, photo & videos, note, WhatsApp data, WeChat data and more. All iOS devices are compatible with iPhone Data Eraser, including iPhone X, iPhone 8, iPhone 7, iPhone 6S/6.

Free Download iPhone Data Eraser:

d_win d_mac

Main Features of iPhone Data Eraser:
Export Videos: Transfer videos from iPhone to computer/external hard drive selectively or all at once.
Back up and Delete Videos: Videos will be automatically deleted after backing up.
Permanently Delete Videos: Videos in Photos app will be completely deleted from iPhone without possibility of recovery.

Step 1. Run Program and Connect iPhone to Computer
Run program and connect your iPhone 7/8 to the computer via your USB cable. After that you will be redirected to the main dashboard, where you can see different modes of erasing data.

connect iphone

Step 2. Select the Erasing Mode
Choose “Erase Deleted Files” and click on “Scan” to start the process.

erase private data mode

Step 3. Confirm the Erasing Operation
Type “delete” to confirm your action and click “Erase Now“.

select videos to erase

You are provided with the ability to select the videos that you want to delete. You can also sort the available videos based on their size and delete the videos that take up a lot of space.

d_win d_mac

Related Articles:

How to Erase Deleted Data from iPhone without Restoring

How to Delete Photos from iPhone Before Selling

How to Delete Messages on iPhone Before Selling

How to Permanently Delete Contacts from iPhone

How to Permanently Delete Call History on iPhone

How to Erase All Content and Settings on iPhone Permanently

How to Free Up Space on iPhone

How to Permanently Delete Call History on iPhone

Summary: When you decide to sell your device and upgrade to the new one, or you just need to clean the data on your device, you may need to delete the phone number record on the device to protect the privacy.However, simply delete call history on iPhone or restore device to factory reset can not completely remove all the data. This post is going to share the best solution with you, help to delete call logs from iPhone permanently.

We make calls everyday and it must save a lot of phone call record in the call history, including the import calls, outgoing calls, missed calls. The call history not only show every one you have ever contacted but also let other people the trace of your daily life. The call list contain the most critical information stored on device and if someone access to the call list then they may steal something privacy from the device. In order to avoid leaking the personal information from the device, sometimes we need to remove the call history from iPhone permanently. If you are one of them who want to delete call history on iPhone without restoring, just read the solutions following we are going to mention.

Part 1: Permanently Delete Call History on iPhone via iPhone Data Eraser

iPhone Data Eraser is skillful enough to erase all kinds of data on iPhone, including call history, contacts, text messages, photos, videos, apps data and more. With using this program, you can erase deleted call history on iPhone without restoring, as well as the existent data. After the erasing is complete, it is impossible to restore the deleted iPhone call logs no matter using any tools. iPhone Data Eraser can be used to all models of iOS device, such as, iPhone X, iPhone 8, iPhone 7, iPhone 6S/6, iPad and iPod.

Free Download iPhone Data Eraser:

d_win d_mac

Step 1.Run Program and Connect iPhone 
Run iPhone Data Eraser on the computer, connect your iPhone to the computer via an USB.If this is the first time you are connecting to the computer, you need to Trust the computer first on your iPhone.

connect iphone

Step 2.Select the Erasing Mode
Choose the “Erase Deleted Files” mode,click “Scan” and then iPhone Data Eraser will start to scan the device and list all of the deleted files.This process would take you several minutes.

erase deleted iphone data mode

analyze deleted iphone data

Step 3.Preview Deleted Files from iPhone
After the scanning process is complete, iPhone Data Eraser will list all the deleted files.You can click them one by one to preview and click “Call History” file to erase the whole file from iPhone.Then click “Erase Now” button to erase the selected deleted files.

preview deleted iphone data

Note: Multiple selections are supported,also.Normally iPhone Data Eraser will select all by default.

Step 4.Confirm the Deleting Operation
Next you should type “delete” into the box to confirm.

confirm erase iphone data

Of course if you want to change the security level, you can click the link to change the level. Please read the security level settings carefully.

select delete level

Step 5.Begin to Erase Selected Deleted iPhone Call History Permanently
After you manually type “delete” into the box to confirm your action, click the “Erase Now” button to erase the selected data on your device.

begin erase iphone call logs

d_win d_mac

Part 2: Remove Call History from iPhone Permanently via iOS ToolKit

iOS ToolKit is the second recommendations here we offer to you. iOS ToolKit is privacy protection software for iOS device users, enable to permanently delete recent call history on iPhone. It helps in completely erasing your iOS device to prevent identity theft when selling your device with just one click. It returns your device to a clean slate state like it was when just out of the box. No software will be able to recover the data after using to clean your device.

Free Download iOS ToolKit:

d_win d_mac

More Features of iOS ToolKit:
-Easily Wipe Personal Data from Device
-Simple, efficient process.
-Allow to select which data you want to erase.
-The data is permanently deleted.
-Nobody can ever recover and view your private data.

Step 1. Download Program and Connect
Firstly, download iOS ToolKit on the computer, connect your iPhone to the computer via a USB cable.

Step 2. Select the Erasing Mode
Choose “More Tools” > “iOS Private Data Eraser” in the program.

ios toolkit home page

Step 3. Scan Data on iPhone
Click “Start Scan” to confirm the operation.

connect iphone to the ios toolkit

The program will start scanning your iPhone for all your private data, such as call history, photos, messages, contacts, etc,. Wait for the scan.

scanning iphone

Step 4. Erase All Data from iPhone Permanently
When the scan is complete, you can preview your data one by one and select the items that you want to erase. Click “Erase from the Deice“. You will be prompted to type the word “delete” to permanently delete the selected data from your iPhone. Type “delete” and click the “Erase now” button to permanently erase the call history from iPhone.

confirm to erase iphone

erasing iphone data

After the call history has been deleted, you will get an “Erase Completed” message as seen in the picture below.

iphone call logs erased completed

d_win d_mac

Related Articles:

How to Erase Deleted Data from iPhone without Restoring

How to Delete Photos from iPhone Before Selling

How to Delete Messages on iPhone Before Selling

How to Permanently Delete Contacts from iPhone

How to Erase All Content and Settings on iPhone Permanently

How to Free Up Space on iPhone

How to Watch iTunes Movies on Samsung Galaxy Note 8

[Summary]:Have bought the Samsung Galaxy Note 8 and have no idea of how to play iTunes movies on Galaxy Note 8?Looking for a way to put the iTunes M4V videos on Galaxy Note 8 for playing? This tutorial will guide you the best way to remove DRM from iTunes movies and watching them on Galaxy Note 8/S8/S7 with the most powerful iTunes M4V Converter & DRM removal tool.

watch itunes movie on samsung galaxy note 8

You may like:

* How to Burn Videos/Movies to a DVD

* How to Burn Videos to Blu-ray

How Can I Play iTunes Movies on Samsung Galaxy Note 8?

Any way to play iTunes M4V movies on Android devices?I purchased movies from iTunes store by my iPhone 6S,I have bought an new Samsung Galaxy Note 8 for a while. Now I have a problem that how can I convert iTunes movies from M4V to MP4 and playing on my Galaxy Note 8.Any good ideas helps me

Samsung Galaxy Note 8 is Samsung’s flagship phone released on August 23, 2017, and is the first dual-camera smart phone released by Samsung. Samsung Galaxy Note 8 with 6.3-inch Quad HD + Super AMOLED full-color curved screen, 6GB +64 GB memory combination start. Samsung Galaxy Note 8 measurements for the 162.5 x 74.8 x 8.6 mm, weight 195g, with IP68 waterproof level, while S Pen also supports IP68 waterproof rating; specific data, the S Pen tip is 0.7mm, which has a 5.8 mm width and length of 108mm, pressure-sensitive level reached 4096.

When you have got a new Samsung Galaxy Note 8,it must be a great experience to enjoy iTunes movies and iTunes Music, Apple Music on Samsung Galaxy Note 8. But as we all know, unlike the MP3 audio files,the iTunes music, iTunes movies is M4P and M4V format proteced by DRM encryption, thus they can’t be played on non-Apple devices,so you not allowed play iTunes movies and music on Samsung Galaxy Note/S,unless removing the DRM protection from iTunes media files. However,any way to play iTunes M4V movies on Samsung Galaxy Note 8? Don’t worry,this tutorial will guide you the easiest and fastest way to convert iTunes movies to MP4 and play iTunes movies on Samsung Galaxy Note 8 with iTunes M4V Converter.

iTunes Movies, TV shows – Buy once, Enjoy Life

iTunes M4V Converter(Mac) and iTunes M4V Converter(Windows) both can help you convert M4V videos to popular video formats, including MP4, MOV, AVI and etc, at fast speed with 100% lossless quality. Because the Samsung Galaxy Note 8 supports playing MP4 video format,you can use this iTunes M4V to MP4 Converter to remove the DRM from iTunes movies and convert iTunes movies to MP4 for watching on Samsung Galaxy Note 8,as well as Samsung Galaxy S8/S8 Plus, S7/S7 Edge, S6/S6 Edge and other non-Apple devices.Let’s learn the fast way to remove the DRM protection of Rental & Purchased iTunes videos, get the DRM-Free MP4 and input them to Galaxy Note 8 for watching at any time anywhere.

Buy once,enjoying your rental & purchased iTunes media for free forever!

d_win d_mac

Features of iTunes M4V Converter:

-Remove DRM from iTunes purchased and rented movies, TV shows and music videos
-Convert the DRM M4V videos to DRM-free MP4 format
-Convert iTunes DRM-protected M4V videos to lossless DRM-free MP4
-Convert M4V videos to MP4 for playing on any non-Apple devices
-Enjoy all your iTunes video rentals or purchases on any devices you like, Android smartphone, tablets, TV, MP4 player, car media player, Xbox, PS4, etc.
-Retain all audio track & subtitles including AC3 Dolby 5.1, Closed Captioning, Audio Descriptions
-Remove iTunes video DRM with 30x speed.
-Output 1080P HD with 100% original quality.
-Keep 100% original quality.

Part 1: Guide to Convert iTunes M4V Movies to MP4 for Playing on Galaxy Note 8

Step 1.Download and Run iTunes M4V Converter
Want to play iTunes movies on Samsung Galaxy Note 8?You must to remove DRM from iTunes videos and convert them to DRM-free MP4,you need to download and install iTunes M4V Converter on your Mac or Windows computer.

d_win d_mac

After running it on the computer and you will get following interface,at this time,iTunes will be run automatically.

iTunes M4V to MP4 Converter

Step 2.Add iTunes Movies,TV shows to the Program
In this step,you need to add the iTunes videos to the software,please click “add files” icon and you will see all your iTunes movies and TV shows. Choose the ones you want to remove DRM and convert to MP4 from.

add iTunes movies, TV shows

Step 3.Customize Output Settings – MP4
Then,please select MP4 as output videos format,you can also select other output formats (MOV, AVI, etc).It will be saved to Documents/Boilsoft iTunes DRM Media Converter/Converted by default. You can click the drop-down icon on the top right corner of the interface or click options button to change the path.

select MP4 as output format

Step 4.Start Removing DRM and Converting iTunes Movies to MP4
Finally,just click “Convert button to start removing DRM from selected videos, and soon all added M4V iTunes videos, movies and TV shows be converted and output as DRM-free MP4 videos,only few minutes,all converted iTunes videos saved on your computer as MP4 format.If you want to play converted iTunes movies on Samsung Galaxy Note 8,please learning the below guide to import iTunes videos to Galaxy Note 8 easily.

convert iTunes movies to MP4

If you want to unlock the time limitation of iTunes movies, you can free download the full version of iTunes M4V to MP4 Converter for Mac and Windows and have a try now!

d_win d_mac

Tips: If you want to listen to Apple Music and iTunes Music on your Samsung Galaxy Note 8 and other non-Apple devices,you can using this Apple Music Converter,which can help you remove DRM from MP4 and convert Apple Music/iTunes Music to MP3.

Part 2: Transfer Converted iTunes Movies(MP4) to Samsung Galaxy Note 8

Above guide you have make iTunes videos as DRM-free MP4 files,now you can use this iOS Android Manager to import the converted iTunes movies to Samsung Galaxy Note 8.The Phone Manager & Transfer not only can help you transfer videos, music, photos from computer to Samsung Galaxy Note 8/Note 5/Note 4/S8/S7/S6/S5,etc.But also allows you transfer music from iTunes to Samsung Galaxy and other Android devices easily.In additional,it enables you transfer contacts, messages, photos, videos, music between two devices(iOS & Android).

Free download the iOS Android Manager for Mac and Windows:

d_win d_mac

Phone Media Manager Features:

-Transfer Videos between Android and Computer
-Transfer Videos between Android and iTunes,so you can transfer iTunes videos to Samsung easily.
-Transfer Videos Between iPhone/iPad/iPod/Android
-Delete Videos on Android
-Transfer Music between Android and Computer
-Transfer Music between Android and iTunes
-Transfer Music Between iDevices and Android Devices
-Transfer Photos between Android and Computer
-Transfer Photos Between iPhone/iPad/iPod/Android Devices
-Delete Photos on Android
-Convert Photos on Android to GIF
-Capture Android Screen(Only for Windows Version)
-Backup your music, photos, videos, contacts, SMS, Apps etc. to computer and restore them easily.
-Fully compatible with 3000+ Android devices (Android 2.2 – Android 8.0) from Samsung, Google Pixel, LG, HTC, Huawei, Motorola, Sony etc.

Step 1.Run the Program and Connect Note 8 to Computer
Download and run the iOS Android Manager on your computer and then connect your Galaxy Note 8 to PC. Your Samsung Note 8 device will be recognized and displayed in the primary window.

samsung galaxy note 8 video transfer

Step 2.Select Videos and Transfer to Samsung Note 8 from Computer
To import converted iTunes videos in MP4 format,please click the “Videos” tab and waiting for your media loads into the program, click “Add > Add File or Add Folder” to import your converted iTunes movies, TV shows, MP4 files from your computer to Samsung Galaxy Note 8.

add video to samsung galaxy note 8

Step 3.Play iTunes Movies on Samsung Galaxy Note 8
Only few minutes,all iTunes MP4 videos imported can be watched on your Samsung Galaxy Note 8 with the built-in player.

play itunes movies on samsung galaxy note 8,S8

Free download the iOS Android Manager and try to transfer media files from computer/iTunes/old phone to your Samsung Galaxy Note 8 on Windows/Mac computer:

d_win d_mac

Related Articles:

How to Transfer Any Video to Samsung Galaxy Note 8

How to Play iTunes Movie on Samsung Galaxy S8

How to Sync iTunes Music to Samsung Galaxy Note 8

How to Stream Apple Music on Samsung Galaxy Note 8

How to Listen iTunes Music on Samsung Galaxy Note 8

Watch iTunes Movies on Galaxy Note 8

How to Permanently Delete Call History on Android

I am going to sell my old Android phone which has been used for 3 years,and I am decide to buy a new device to replace. How to erase all the phone number in the call history without restoring? I heard that restore device to factory reset will not wipe the data cleanly. Any other ways available?

Normally, to delete call logs on Android device, just simply select “Delete” option, click on “Delete” button on the top-left corner of the screen. It seems simple. But you may not have thought of the case that simple deletion can’t really delete those Android call logs. Even after restoring device to factory reset, the deleted call logs till can be restored by some professional data recovery tool. In this article, we will show you 2 solutions to permanently delete call history on Android phone with no any chance to restore it no matter use any ways.

Part 1: Permanently Delete Call History on Android with Android Data Eraser

Android Data Eraser is qualified to erase data from Android without restoring, including call history, contacts, messages, photos, videos, documents and more. With the help of Android Data Eraser, you can delete call history on Android permanently. Android Data Eraser works well on most of Android device, such as, Samsung, HTC, Lenovo, LG, Huawei, Google Pixel, ZTE, OnePlus, and so on. Let’s see how the Android Data Eraser work to erase call logs on Android permanently.

Free Download Android Data Eraser:

d_win d_mac

Step 1. Run Program and Connect Android 
First of all, you should run Android Data Eraser on the computer, then connect Android phone to the computer. When your device is detected, you will see the interface below. Select “Erase All Data” and move on.

android data eraser

Step 2. Confirm to Erase Android Data Permanently
You should type “delete” on the next interface to allow the program to erase all data on your Android device.Click on “Erase Now“to confirm the data erasing task.

wipe android data

Step 3. Perform the Factory Reset on Android
Once the process is completed,follow the tips to factory reset your Android device so as to clear all system data and settings completely.

restore factory resetting android

Done. It only takes 3 steps to clean all data on your device.

d_win d_mac

Part 2: Permanently Delete Call History on Android with Android ToolKit

Another tool we suggest you to use called Android ToolKitAndroid Eraser, it is famous for manage Android safely, it provide several functions to you, help to manage your device in a complete solution. One of the functions named “Erase”, it can help to permanently erase call history from Android. The process is safe and quick. Only one click, you can easily erase all data and setting from Android device without restoring. All models of Android are compatible with Android ToolKit, Samsung, HTC, Lenovo, LG, Huawei, Google Pixel, ZTE, OnePlus, etc,. What’s more, this powerful all-in-one program allow to recover deleted data from Android, unlock Android without password, backup & restore Android.

Free Download Android ToolKit:

d_win d_mac

Step 1. Run Program and Connect Android
Launch Android ToolKit – Android Eraser on the computer. Select “Erase” among all the tools.

android toolkit home page

Connect your Android phone to computer using a USB cable. Make sure you have enabled USB debugging on your phone. If the Android OS version is above 4.2.2, there will be a pop-up message on your phone asking you to allow USB debugging. Tap on “OK” to continue.

connect android to the android toolkit

Step 2. Erase Android Permanently
Then the program will automatically recognize and connect your Android device. Click on the “Erase All Data” button to start erasing all your data.

click on the erase all data button

Since all the erased data are not recoverable, make sure you have backed up all needed data before you proceeding. Then key in “delete” in to box to confirm the data erasing operation.

confirm to erase android

Then the program will start erasing all data and settings on your Android phone. The whole process takes you only a few minutes. Please keep connection between the phone and the computer, don’t run any other phone management software on the computer.

erasing android data

Step 3. Perform Factory Reset on Android
After all call history, app data, photos, and all other personal data have been completely erased, Android Toolkit will ask you to tap on “Factory Data Reset” or “Erase All Data” on the phone. This will help you completely wipe all the settings on the phone.

perform factory reset on android

Now your Android phone has been completely wiped and it’s like a brand new one.

android data erased completed

d_win d_mac

More Android Tutorials you can Check:

How to Permanently Erase Android Data

How to Erase Android Data before Selling

How to Permanently Delete Photos from Android Phone

The Best Way to Erase Text Messages on Android Phone

How to Get More Internal Storage from Android Phone

How to Transfer Data from iPod to iPhone

I bought a new iPhone 8 device for upgrading. Now I am asking for help to transfer the songs from my iPod to the new device. How? I want a simple solution. Appreciated.”

Are you ready for switching to the newest iPhone X or iPhone 8 – Apple’s latest flagship smartphone, with upgraded cameras, water resistance and a longer battery life, and more new features? Want to sync the music and more files from iPod to the new device? To have a smooth “Upgrade to new iPhone” journey, please have a check on this How Do I Transfer Files from Old iPod to New iPhone tutorial to have a quick start. This tutorial is aiming to share an excellent solution with you, to sync files from iPod to iPhone with one click.

Transfer Files from iPod to iPhone with One Click

Transferring files from iPod to iPhone is extremely simple if both devices are connected to computer with the Phone Transfer tool. This is the most straightforward method and it works for all iOS device including iPod nano, iPod touch, iPod shuffle, iPod classic; iPhone X, iPhone 8, iPhone 7, iPhone 6S/6, etc,. Phone Transfer is design for transferring files between two mobile device among iOS device, Android device and Symbian device. The transferable type of files such as contacts, text messages, photos, videos, calendar, music, call history, apps. Let’s see how it work in transferring data between iPod and iPhone with three steps.

d_win d_mac

How to Sync Files from iPod to iPhone

Step 1. Run Program and Select the Transfer Mode
To transfer files between iPod and iPhone directly, you should run Phone Transfer on the computer then connecting both of two iOS devices to the computer. Select “Phone to Phone Transfer” mode in the home page of program.

phone transfer home page

Step 2. Select Files to Transfer between Two Devices
Select files to transfer between iPod and iPhone, here contacts, text messages, photos, videos, calendar, music, call history, apps are available. Choose one file or more than one files to transfer.

select files to transfer

Note: The iPod which you need to export data from, should be on the left while another should be on the right. You can click “Flip” to change the position of them if needing.

Step 3. Transfer Files between iPod and iPhone
Simply clicking “Start Transfer” to begin the transfer. Once the transfer is complete, click “OK” to end the process.

transfer data from ipod to iphone

d_win d_mac

Related Articles:

How to Transfer Music from iTunes Library to iPod

How to Manage Files on iOS Dvice

How to Transfer Videos/Music/Photos to iPhone

How to Transfer iPhone Data to iPhone

How to Transfer Data from iPad to iPad

Summary
This article shows you a great solution to transfer your files from iPad to iPad, including music, photos, videos and more. You can follow the steps to have a try!

I used iPad 3 for 3 years, recently I switched to the new iPad Pro. I want to sync all the files from my old iPad to the new one. Is it possible to complete the transfer with one click? I need a simple solution without professional skills. Thanks anyway.

Many iPad users may ask: Can I transfer contacts, photos, videos files between my old iPad and iPad? I would like to say “Yes”. If you have backed up the files with iTunes or iCloud, what you need to do is sync your new iPad with the backup. But if the files which were lost on the iPad, you can’t get anymore or you need to transfer files between two devices without backup? How to transfer the original files on you old device to the new iPad without Syncing the backup? Here is a simple method of transferring files from iPad to iPad.

iPad to iPad Transfer Tool

When you need to transfer data from iPad to iPad, we suggest you use this Phone Transfer. It is a nice program to help you complete the transfer with only one click. Phone Transfer is famous for switching files between two mobile devices based on iOS device, Android device and Symbian device. The transferable files including contacts, text messages, photos, videos, calendar, music, call history, apps. In addition, Phone Transfer provide two extra functions to you, which are backing up data & restoring data for mobile device with one click. Phone Transfer work well on all models of iOS devices, such as, iPad Pro, iPad Air, iPad Pro, iPad Mini, iPad 4/3/2/1, iPhone and iPod.

d_win d_mac
d_win d_mac

How to Transfer Files from iPad to iPad

Step 1. Run Program and Select the Transfer Mode
To transfer files between two iPad directly, you should run Phone Transfer on the computer then connecting both of two iPad to the computer. Select “Phone to Phone Transfer” mode in the home page of program.

phone transfer home page

Step 2. Select Files to Transfer between Two iPad
Now you can select files to transfer between two iPad, here contacts, text messages, photos, videos, calendar, music, call history, apps are available. Choose one file or more than one files to transfer.

select files to transfer

Note: The iPad which you need to export data from, should be on the left while the other one should be on the right. You can click “Flip” to change the position of them if needing.

Step 3. Begin to Transfer Files between Two iPad
The last step is clicking “Start Transfer” to begin the transfer. Once the transfer is finish, click “OK” to end the process. Done.

transfer data from ipad to ipad

d_win d_mac
d_win d_mac

More iPad Useful Guides you can Check:

How to Recover Data from Broken iPad

How to Recover Deleted Videos from iPad

How to Extract iTunes Data Backup for Your iPad

How to Recover Data from iPad after Reset Factory Settings

Install IPSW File on iPad with/without iTunes

How to Recover iPad/iPhone Data after iOS 11 Update