All posts by DHZ

How to Play Apple Music after Canceling Subscription

Since Apple music is launched in 2015, it become one of the best streaming subscription services among different music dervices. Apple Music files are protected with DRM copyright protection, which prevent you from burning the Apple music to a CD or listening on device after canceling the subscription.

You may ever met this situation: Your 3-month free trial duration of Apple music expired and you were not willing to continue your subscription. What really frustrated you was that the songs you purchased and downloaded the free trial were no longer playable. So there are some Apple music fans ask that is it possible to play Apple music after canceling subscription. “How to play Apple music without subscription?”, “How to play Apple music for free?”, “How to play Apple music for offline playing?”. To help you fix this issue, Apple Music Converter come here for you. If you need to play Apple music after canceling subscription, please read the step-by-step guide below patiently.

Convert Apple Music to MP3 for Free Playing

Apple Music Converter is an music converter that can remove the DRM protection from Apple music songs and convert Apple music songs (M4P format) to MP3 or other free-DRM format with its original quality, which is a universally playable audio format. After the conversion, you can play the converted Apple music after canceling subscription. What’s more, you can play back the converted Apple music on any compatible audio players offline without limitation, including iPod, iPhone, Android devices, MP3 player, other smartphone and more devices. The conversion is up to 16x speed.

d_win d_mac

The main features of Apple Music Converter are listed as follow:
-Convert Apple music to free-DRM format;
-Convert Apple music with up to 16x speed;
-Convert Apple music with its original quality;
-Allow to play back the converted Apple music on any compatible audio players without limitation;
-Compatible with many audio players, including iPod, iPhone, Android devices, MP3 player, other smartphone and more devices.

How to Convert Apple Music for Free Playing

Step 1. Download and Run Apple Music Converter on Computer
Firstly, download and run the Apple Music Converter on the Computer.

launch apple music converter

Step 2. Select Apple Music Files to Convert
Once running the program on the computer, it will load the whole iTunes playlists in the main interface of program. Click on “Library” and select the Apple music that you want to convert. You can choose a few songs even the whole music library as this program supports batch conversion.

select Apple music or playlist

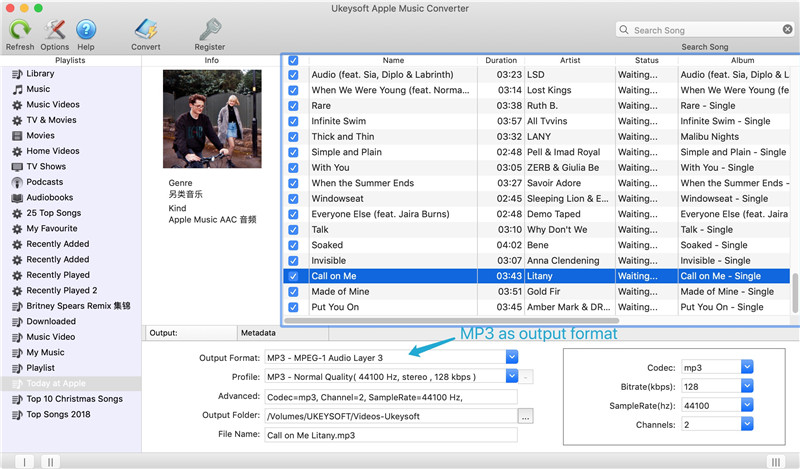
Step 3. Setting MP3 as the Output Format
Go to “Output Settings” then “Output Format” option, choose the output format for converted music files, for example, MP3, M4A, MKA, AIFF, FLAC, etc,. In this case, you should choose “MP3” option. In addition, you can specify the location for saving the converted Apple music tracks.

Select Output Format - MP3

Step 4. Convert Apple Music to MP3 for Free Playing
Click on “Start Convert” button and the program will immediately pop up the conversion window, begin to convert Apple music to MP3 for free playing after canceling the subscription. Wait for minutes until the conversion is end.

convert Apple Music to MP3

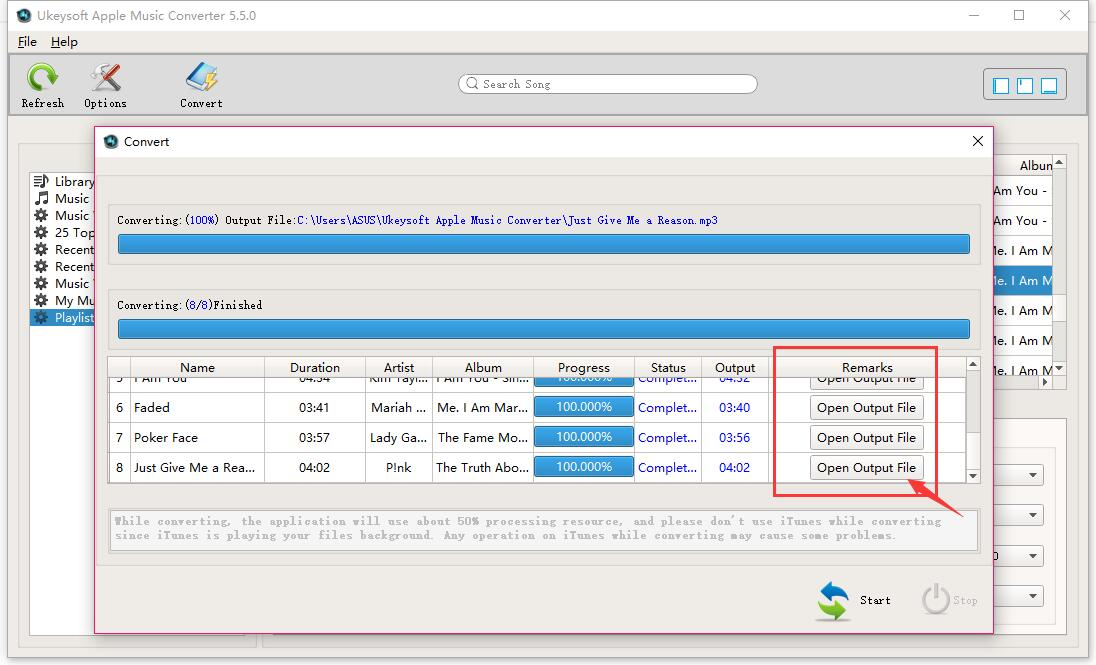
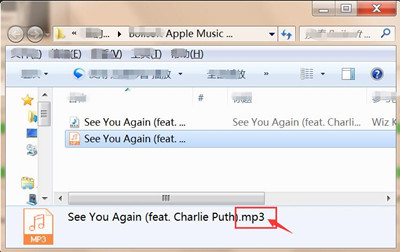
At last, you will have all the output MP3 files saved in the location of computer you specified. Now you can play the converted Apple music for free on any compatible audio device without limitation after canceling the subscription.

Browse the converted Apple music files by clicking “Open Output File”:

find the converted Apple Music in MP3 for listening offline

d_win d_mac

Related Articles:

How to Download Apple Music and Playlist for offline listening

How to Convert DRM-Protected Apple Music to MP3

How to Keep iTunes Music Songs Forever

How to Rip Apple Music For Free

How to Record Apple Music M4P Streams as MP3

How to Convert Protected Apple Music to MP3 for iPhone

How to Convert DRM Protected iTunes M4V Videos to MP4

How to Transfer Contacts from Samsung to Huawei P10

Summary: Have you just bought a new Android phone like Huawei P10 for its improved Android OS system, fashion design and wonderful performance? You must be glad to own such amazing new device that you can enjoy the latest apps, games, and other functions. Before enjoying these features of new phone, you need to switch the files between your old phone and the new device. I guess that you’ve already added transferring contacts on the must-to-do list. If you have trouble in transferring contacts from old Samsung phone to new Huawei phone, please try the method below.

It’s such an excited thing that switching to the new device. However, one of the biggest issues that you are going to face is how to switch files between the old device to the new one, especially contacts. It is quite time consuming or annoying if you prefer doing it manually.Thankfully, it will be save time and be more effective to transfer contacts between two mobile phones when you get the help of Phone Transfer. We have the best option that offer for you to move your contacts from Samsung to Huawei without any trouble. Let’s see the next section that contain the detail steps on how to sync contacts between Samsung and Huawei P10.

Transfer Contacts from Samsung to Huawei P10

Phone Transfer is capable to transfer contacts from Samsung to Huawei P10 with only three steps. Not only contacts, this program enable to transfer several kinds of data between two mobile device no matter it run the same OS system or not. The transferable data including text messages, photos, videos, call history, music, calendar, apps. Phone Transfer works on most of mobile phones base on Android OS system, iOS system and Symbian, for example, Samsung, Huawei P10/P9, Huawei Mate 10/9, HTC, Lenovo, Motorola, LG, HTC, ZTE, Sharp, Sony, Xiaomi, Google, Pixel; iPhone; Nokia; etc,.

d_win d_mac

How to Import Samsung Contacts to Huawei P10

Step 1. Run Program and Connect Devices to PC
To begin with, run Phone Transfer program on PC and connect both of Samsung and Huawei P10 to the PC. Select “Phone to Phone Transfer” mode in the home page of program.

Phone Transfer home page

Step 2. Select Contacts File to Transfer
When the PC detect both of Samsung and Huawei P10, it will be displayed in the interface of Phone Transfer. The Samsung should be on the left as the export device, Huawei P10 should be on the right as the import device. If the devices are not in the wrong position, you could click “Flip” to change it. Now select “Contacts” file for ready to transfer.

select contacts file to transfer

Step 3. Transfer Contacts from Samsung to Huawei P10
In the last step, simply click “Start Transfer” to begin transferring the selected contacts file from Samsung to Huawei P10.

transfer Samsung contacts to Huawei P10

Note: You need to ensure that your phones are connected to the computer until the process is end.

d_win d_mac

Related Articles:

How To Manage Huawei P10/Mate 9 on Computer

How to Transfer Data from iPhone to Huawei P10

How to Transfer Data from Samsung to Huawei P10

How to Transfer Photos from Samsung to Huawei P10

How to Transfer Data from Huawei to Huawei P10

How to Backup and Restore Data on Huawei P10

How to Sync iTunes Music to Samsung Galaxy Note 8/5/4/3

I switched to the new Samsung Galaxy Note 8 phone. How to sync the iTunes music to Samsung phone? Is there any way to transfer and play the iTunes music on my new device without signing in Apple account?

More and more people switch to Android device from iOS device, and most of them have no idea to transfer files between devices since it run different OS system. Although you can use iTunes to sync the music playlists with iOS devices such as iPhone, iPad or iPod with ease, it’s difficult to sync iTunes music with Samsung Galaxy Note phones. Is there any ways to import iTunes music to Samsung Galaxy with easy solution? Deservedly it is. This capable Android Data Manager gives you the ability to sync iTunes music & playlist with Android device, including the latest Samsung Galaxy Note 8/5/4/3.

Sync iTunes Music to Samsung Galaxy Note 8/5/4/3

To satisfy you need, Android Manager is needed. It helps you sync songs from iTunes library to Galaxy Note 8/5/4/3 with simple steps. Android Manager is a powerful data manager program that used for transferring & managing Android files, including music, videos, contacts, SMS, apps. Android Manager enable to transfer music between Android and iTunes, transfer music between Android and computer, transfer music between Android and iOS/Android devices. Furthermore, Android Manager provide you the function that backup or restore files for Android and more. Android Manager work for most of Android models, such as, Samsung Galaxy Note 8/5/4/3, HTC, LG, Lenovo, Motorola, Huawei, Google Pixel, ZTE, OnePlus, Xiaomi, etc,.

d_win d_mac

How to Transfer iTunes Music to Samsung Galaxy Note 8/5/4/3

Step 1.Select the Transfer Selection of Program
Run Android Manager on the computer and connect Samsung Galaxy Note phone to the computer.

Simply click Transfer iTunes Media to Device on the main interface of Android Manager.Or find the Transfer iTunes to Device option under Toolbox > Transfer Tools section.

android manager main page

Step 2.Select Music File to Sync
Check options and start to copy media from iTunes to Samsung Galaxy Note phone.All the iTunes files will be scanned and will be shown under different categories like Music, Movies and others.All the file types will be selected by default but to transfer only the music files,you should uncheck the others.Click Transfer to begin transferring.

select itunes music to transfer

transfer itunes music to samsung galaxy note

Only 2 easy steps all the iTunes music have been transferred to your Samsung device.

d_win d_mac

Related Articles:

How to Transfer iTunes Music to Samsung Galaxy Note 8/5/4/3

How to Play iTunes Music on Samsung Galaxy Note 8/5/4/3 for Free

How to Stream Apple Music on Samsung Galaxy Note 8/5/4/3

How to Convert M4P Apple Music to MP3 for Samsung Galaxy Note

How to Transfer Data from iPhone to Samsung Galaxy Note 8/5/4/3

How to Transfer Android Files to Samsung Galaxy Note 8/5/4/3

How to Manage Samsung Galaxy Note on Computer

How to Sync iTunes Videos to Samsung Galaxy Note 8/5/4/3

Hi. I need to sync the iTunes videos on my Galaxy Note 8 phone after I switching it to the new device. I download some favorite videos in iTunes videos and how to transfer them to Samsung? Any ways available? Thanks a lot.

Most of mobile phones are run on iOS and Android operated systems. More and more people own more than one smartphone, or may some people just switch to the new Android device from iOS device, for example, Samsung Galaxy Note 8. However, when you upgrading to the new device from the old one, it is necessary of transferring data between the two devices, such as, videos, music or other personal data.Since Samsung run Android OS system and it can sign in Apple account to log in iTunes, how to sync iTunes videos to Samsung phone with an easy solution?

Transfer iTunes Videos to Samsung Galaxy Note Phone

In order to transfer iTunes videos to Samsung Note 8/5/4/3, you need Android Manager. Android Manager is an excellent program that help to move different files between multiple platforms. It enable to manage and transfer files between Android and iTunes, transfer files between Android and computer, transfer files between Android and iOS device/Android device.The transferable kinds of files including videos, music, contacts, SMS, apps. The tool recognizes all the smartphones manufactured by companies like Samsung(Galaxy Note 8/5/4/3, S8/S7/S6/S5), Sony, LG, Motorola, Lenovo, Huawei,Google, HTC, ZTE, etc,. It even provides a toolbox that has additional features that will give you complete control over phone management system.

d_win d_mac

More Features of Android Manager:
-Phone to Phone Transfer : Transfer everything between two mobiles.
-Backup music, photos, videos, contacts, SMS, Apps etc. to computer and restore them easily.
-Manage, export/import music, photos, videos, contacts, SMS, Apps etc,.
-Highlighted features such as 1-click root, gif maker, ringtone maker.
-Fully compatible with 3000+ Android devices (Android 2.2 – Android 8.0) from Samsung, Sony, LG, Motorola, Lenovo, Huawei, Google, HTC, ZTE, etc,.

How to Transfer iTunes Videos to Samsung Galaxy Note 8/5/4/3

Launch Android Manager and connect your Samsung Galaxy Note phone to the computer.Your Android phone will be detected and displayed in the primary window of program.

Step 1.Select the Transfer Mode
Simply click “Transfer iTunes Media to Device” on the main interface of program.Or find the “Transfer iTunes to Device” option under Toolbox > Transfer Tools section.

android manager home page

Step 2.Transfer iTunes Videos to Samsung Phone
All the iTunes files will be scanned and will be shown under different categories like Music, Movies, and others. By default, all the file types will be selected but to transfer only the videos file, you can uncheck the others. Check “Movies” options and start to transfer iTunes videos to Samsung Galaxy Note phone by clicking “Transfer”.

transfer iTunes videos to Samsung Galaxy Note phone

d_win d_mac

Related Articles:

How to Transfer iTunes Music to Samsung Galaxy Note

How to Play iTunes Music on Samsung Galaxy Note 8/5/4/3 for Free

How to Stream Apple Music on Samsung Galaxy Note 8/5/4/3

How to Transfer iTunes Playlist to Samsung Galaxy Note 8/5/4/3

How to Convert M4P Apple Music to MP3 for Samsung Galaxy Note

How to Transfer Data from iPhone to Samsung Galaxy Note 8/5/4/3

How to Transfer Android Files to Samsung Galaxy Note 8/5/4/3

How to Manage Samsung Galaxy Note on Computer

How to Recover Deleted Call History from Samsung Galaxy Note 8

“I accidentally deleted some call history containing received call numbers and missed call numbers on my Samsung Galaxy Note 8. How can I get them back?”

“How do I recover the lost call logs in Samsung Galaxy Note 8 without backup?”

Most of mobile phones will record the call numbers in the call history list automatically, like the incoming calls and missed calls. Sometimes you may be delete some call logs for any reasons, for example, to clean the useless data. When you need to restore the deleted call logs from call list you will find it is not as simple as you think. However, call logs are recorded and stored in internal memory before deleting. Even though call history is removed from your phone, actually it still exists in somewhere in the internal storage being invisible and inaccessible instead. If you want to recover the deleted call history from Samsung phone and you can’t get the best way, you are in the right place here.

Restore Deleted Call History from Galaxy Note 8

Android Data Recovery is a powerful data recovery for Android, to recover deleted data on Android without backup even when it was deleted. With the help of Android Data Recovery, you could recover deleted call history from Samsung Galaxy Note 8. The kinds of recoverable data include, of course, call history, contacts, messages, photos, videos and the other files which you will see in the steps. Android Data Recovery allow to get back deleted Android for any data loss situations, such as, deleted accidentally, Android system update, restore device to factory reset, etc,. Compatible with all Samsung models, like Galaxy Note 8/5/4/3, S8/S7/S6/S5.

d_win d_mac

How to Recover Deleted Call Logs from Galaxy Note 8

Step 1.Run Android Data Recovery and Connect Samsung to the Computer
Download and install Android Data Recovery on your computer. Run it and then connect your Samsung phone to the computer via an USB cable.

connect samsung note 8 to the computer

Step 2.Select Call History Files to Scan
Choose the file type you need to recover from Samsung.For call history recovery,just click “Call Logs”.Then click on “Next”.

select call logs file to scan

Step 3.Scan the Data on Samsung
Click “Allow” on your device to allow the program to scan your phone. And then you will see the following window.

allow scan the samsung note 8

Then the program will begin to analyze data on your device,it will take you a few minutes.

scan samsung galaxy notes for deleted call logs

Step 4.Preview and Recover Deleted Call History form Galaxy Note 8
In this step,you are allowed to preview and mark those you want and click “Recover” to save the selected call logs under “Call Logs” file on the computer.

recover call logs from samsung note 8

d_win d_mac

More Samsung Tutorials You May be Interested In:

How to Recover Deleted Data from Samsung Galaxy Note 8

How to Recover Deleted Photos from Samsung Galaxy Note 8

How to Transfer Data from iPhone to Samsung Galaxy Note 8

How to Switch Everything from Samsung to Galaxy Note 8

How to Transfer Music to Samsung Galaxy Note 8

How to Transfer Videos to Samsung Galaxy Note 8

How to Manage Samsung Galaxy S6/S5/S4/S3/Note 8 on the Computer

How to Recover Deleted WhatsApp Messages from Samsung Phone

Summary: We all have encountered the situation where we remove some important WhatsApp messages/chat history from WhatsApp messenger. If your important WhatsApp data have been deleted accidentally but there is no backup for it, you can try this Android Data Recovery for help.

Why people like to use WhatsApp? Why WhatsApp become the most popular chat apps for most of people? WhatsApp is an instant chat apps for contacting people, you can use it to send text, videos, attachments to others immediately. It’s such a convenient and efficient app so people like to communicate with others using it. However, when you accidentally lost WhatsApp messages from WhatsApp app without backup, it may be the troublesome for you, the deleted data may contain something personal information and related to your life. If you are one of them who want to get the helpful way to restore recover deleted WhatsApp messages from Samsung phone, you could see the next section and take a reference, hope it will do a help for you.

Restore Deleted WhatsApp Messages from Samsung

Android Data Recovery is good for you, help to restore deleted WhatsApp messages from Samsung phone without backup, WhatsApp text, photos, videos and attachments are included. The recoverable types of data including WhatsApp messages, contacts, text messages, photos, videos, call history, notes, apps data and more. Android Data Recovery is design to recover deleted data on Android under any data loss circumstances, such as, deleted by mistake, Android system update, Android system room, restore to factory reset, and so on. All models of Samsung are applicable to the Android Data Recovery, for instance, Galaxy S8/S7/S6/S5, Note 8/5/4/3.

d_win d_mac

How to Recover Deleted WhatsApp Messages from Samsung

Step 1.Run Program and Connect Samsung Phone to Computer
First of all, installing and running the Android Data Recovery program on the computer, you will see the main window below. Then please connect your Samsung phone to the computer via an USB.

connect samsung to the computer

Step 2.Allow Program Connect Samsung on Computer
Please click “OK” on the phone to allow program detecting your phone and go to next step.

allow to continue connect Samsung

Step 3.Select “WhatsApp” and “WhatsApp attachments” Files to Recover
Once the program detect your device on computer, you’ll see this window,different types of files can be chose to be scan here.You could tick “Select all” to have all your Samsung data scanned.In this case,you should select “WhatsApp” and “WhatsApp attachments” files that to be scanned and then click “Next” to enter the next step.

select whatsapp files to recover from samsung

Step 4.Allow to Scan and Analyze Data on Samsung
You’ll get a window as follow on your device when your device is detected by the program.Tap “Allow” on your device to enable the program to scan your Samsung for deleted WhatsApp data.

allow scan the samsung

Note:Please make sure that your phone battery is more than 20% charged.

Step 5.Scan Samsung for Deleted WhatsApp Data
The scanning process will take you some time.

scan samsung for deleted whatsapp data

Step 6.Preview and Recover Deleted WhatsApp Data from Samsung
After finishing the scanning process, a list of recoverable files that the lost WhatsApp data have been found from your Samsung will be shown.Mark those you want and click “Recover“ to restore the selected WhatsApp data on the computer.

recover whatsapp from samsung

Tips:You could switch the “only display the deleted item(s)” option on,to check the deleted WhatsApp data only.

d_win d_mac

Related Articles:

How to Backup & Restore WhatsApp Messages on Samsung

How to Recover WhatsApp Data from Broken Samsung Android

How to Transfer WhatsApp Chat History from iPhone to Samsung Galaxy

How to Recover Lost Data from Samsung

How to Recover Deleted or Lost Photos from Samsung

How to Manage Samsung Data on Computer

How to Switch Photos from Android to Google Pixel 2/2 XL

I upgraded my device to the new Google Pixel 2 phone. The photos are still stored on my old Android. Is there any way to switch photos from my old Android device to the new Pixel phone? I want to sync all the photos with one click.

The big brother of Google’s new Pixel 2 family comes with a 6-inch display set and a modern slim bezel design. The P-OLED screen with its resolution of 1,440 x 2,880 pixels translates into a vivid and sharp display with a high pixel density of over 500ppi. Google Pixel 2 is coming under the global spotlight. Most of Android like to take photos and save photos on Android phone. It’s no doubt that we will have a large number of photos need to be sync when we upgrade to a new device. Wondering how to switch photos from Android to Google Pixel 2/2 XL? The two best methods are ready for you.

Part 1: Switch Photos from Android to Google Pixel 2 with Phone Transfer

We highly recommend you to use the powerful phone manager- Phone Transfer to complete all the transferring. Phone Transfer empower to switch photos between Android and Google Pixel 2/2 XL with one click. Not only photos, but also other types of data are allowed to transfer, including contacts, text messages, videos, call logs, music, calendar, apps. Moreover, Phone Transfer support to backup or restore data for mobile device, permanently delete data on mobile device. Phone Transfer is applicable to all mobile devices, such as, Android device(Google Pixel, Samsung, HTC, Lenovo, LG, Huawei, Motorola, OnePlus, ZTE, etc,.), iOS device(iPhone, iPad, iPod), and Symbian device(Nokia).

Free Download Phone Transfer:

d_win d_mac

Step 1.Run Phone Transfer and Connect Android and Google Pixel 2/2 XL
First of all,please download and run the Phone Transfer program on the computer,then click “Phone to Phone Transfer” mode.

To switch photos from Android to Google Pixel 2 phone,you should connect both of two devices to the computer with USB cables.

Phone Transfer home page

Step 2.Select Photos File to Transfer
Once connecting both of two devices to the computer successfully, The Android phone should be on the left side as source device,and the Google phone on the right side as target device.Then choose the the “Photos” item to be transferred.

select photos file to transfer

Note: You can click “Flip” if they are not on the right side. Photos, Videos, Contacts, Text messages, Calendar, Music, Call logs, App and App data are available.

Step 3.Switch Photos from Android to Google Pixel 2
In the last step, click “Start Transfer” to begin transferring all photos stored on Android to new Google phone directly.

transfer Android photos to google pixel 2

Tips:Please keep connecting both of two devices with computer until the transfer is complete.

d_win d_mac

Part 2: Transfer Photos from Android to Google Pixel 2 with Android Manager

Android Manager is tailored for people who want to manage files for Android on the computer. It enable to manage photos, videos, contacts, text messages, and apps between two mobile device. Android Manager help to transfer photos from Android to Google Pixel 2/2 XL easily. With the help of Android Manager, you can transfer files between Android and computer/iTunes/mobile device with only one click also. Most of Android devices are supported by Android Manager, including Google Pixel, Samsung, HTC, Lenovo, LG, Huawei, Motorola, OnePlus, ZTE, etc,.

Free Download Android Manager:

d_win d_mac

Step 1. Launch Android Manager and Connect Devices to the PC
Firstly, please launch Android Manager on the computer and connect both the Android and the Google Pixel 2/2 XL phone to the computer.

Android Manager home page

Step 2. Setting the Android as the Source Device
Select Android phone as the source device from which you want to transfer photos.

Step 3. Select the Transfer Mode
Simply click “Phone to Phone Transfer” on the main interface. Or find the “Phone Transfer” option under Toolbox > Transfer Tools section.

one click phone to phone transfer

Step 4. Setting the Google Pixel 2/2 XL as the Target Device
When your devices are connected and detected by, you’ll get a window as follow. Select Google Pixel 2/2 XL as the target device from the drop-down list and click “Next“.

Step 5. Transfer Photos from Android to Google Pixel 2/2 XL
By default, all data on your source device that can be transferred are ticked, namely contacts, photos, playlist, music and videos. In this case, you should unclick other options except the “Photos“. Then, click “Transfer“. Now the program will begin to switch photos file between Android and Google Pixel 2/2 XL. In the whole transfer process, DO NOT disconnect either device. When the transfer completes, click “OK“.

transfer Android photos to Google Pixel 2

d_win d_mac

Related Google Pixel Tutorials:

How to Transfer Music to Google Pixel/Google Pixel 2

How to Transfer Music from Computer to Google Pixel/Google Pixel 2

How to Transfer Samsung Data to Google Pixel/Google Pixel 2

How to Transfer Samsung Photos to Google Pixel/Google Pixel 2

How to Transfer Android Data to Google Pixel/Google Pixel 2

How to Transfer iPhone Data to Google Pixel/Google Pixel 2

How to Recover Deleted Data from Google Pixel/Google Pixel 2

How to Backup and Restore your Android on Computer

How to Delete Contacts from Android without Restoring

I saved lots of contacts and other personal information off of the Android phone. Now I want to get a perfect way to remove the contacts list from my device at once before I giving up the phone. Any good ideas? Gratefully.

Planning to sell your Android device, or giving it to someone and buy another new device to replace? Before giving it up, you may be annoy with the problem about how to delete contacts on Android without restoring. What can you do to remove the contacts from Android normally? To delete it by simply clicking “Delete” option? Restore your device to factory reset to wipe all data? To be honest, both of the two ways will not erase contacts from Android device permanently. The deleted data still have a chance to be restored by some professional data recovery. This tutorial will guide you how to delete contacts from Android completely.

Part 1: Remove Contacts from Android with Phone Transfer

In this case, we suggest you use Phone Transfer to remove contacts from Android completely, not only contacts, but also other kinds of Android data can be erased, including text messages, photos, videos, music, call history, calendar, apps. Phone Transfer is an all-in-one data manager tool for mobile device, it enable to wipe phone data permanently, transfer data between two devices, backup & restore mobile device. Phone Transfer work well on most of mobile devices, insist of iOS device, Android device and Symbian device.

Free Download Phone Transfer:

d_win d_mac

Step 1. Connect Android Device and Run Software
First of all, connect your Android phone to the computer with a USB cable and launch the installed Phone Transfer software on the computer. Once the connection is successful, the software will automatically detect your device and show it on the program interface. Select “Erase Your Old Phone” option on it.

phone transfer home page

Step 2. Choose Levers of Data Erasing as Needed
The software provides you with three different levers for erasing data: Low – Medium – High. You can directly choose the default second Medium lever, which will leave no recoverable of data erasure and use random data to overwrite all existing and deleted data on your Android device.

confirm to erase android

Step 3. Wipe all Contacts on Android Permanently
Finally, click on the button of “Erase Now” to delete all the contacts from your Android phone at once. The erasing task only costs you a few seconds. After that, you will get a totally new Android device as you wish.

permanently erase all data on android

d_win d_mac

Part 2: Remove Contacts from Android with Android Data Eraser

Another way to remove contacts from Android without restoring is using Android Data Eraser. The erased contacts by this way will never be restored with any recovery program on the market. Android Data Eraser empower to wipe all data and settings from Android permanently, including contacts, messages, photos, videos, call history, WhatsApp history, apps data, etc,. Compatible with all brands of Android devices, such as, Samsung, HTC, OnePlus, LG, Lenovo, Motorola, Huawei, Google Pixel, and more.

Free Download Android Data Eraser:

d_win d_mac

Step 1. Run Program and Connect Android to Computer
Run the Android Data Eraser on the computer, connect your Android device to computer.

android data eraser home page

Step 2.Erase all Data on Android without Restoring
Click the “Erase All Data” button to wipe all the contacts and other data on Android permanently.

Before the erasing, you should read the instructions carefully. And then type “delete” into the box to confirm your action to delete the Android data.

wipe android data

Note: This action will permanently erase all data and the deleted data can not be restored, please make sure you’ve backed up the data you need.

Finally Android Data Eraser will give the report what kind of data was deleted and how much of them.

d_win d_mac

More Android Tutorials you may be Interested in:

How to Completely Remove Contacts from Android SIM Card

How to Permanently Erase Android Data

How to Erase Android Data before Selling

How to Permanently Delete Photos from Android Phone

The Best Way to Erase Text Messages on Android Phone

How to Permanently Delete Call History on Android

How to Delete Everything on Android without Factory Reset

How to Get More Internal Storage from Android Phone

How to Recover Data from Lost/Stolen iPhone

I lost my iPhone this week, my phone was stolen by thief when I was shopping. Is it possible to restore the iPhone data from the iTunes or iCloud backup? Thanks.

You may like:

* How to Back Up and Restore Your iPhone Without iTunes

* Transfer Everything from iPhone to iPhone X

There are different cases of accidents will occur that cause to lost iPhone in daily. For example, your device is stolen or lost by accident carelessly. Losing iPhone will not lead to lose hugely, but is it not the same when you lose the personal data that stored on the lost/stolen device. The contacts, messages, photos and other files saved on our iPhone contain a lot of personal information. No one hope to lost data from the lost/stolen iPhone under any situations. Fortunately, restore data from backup can avoid losing data or leaking information from the lost/stolen iPhone. In the follow section, we will through you the steps on how to restore data from lost/stolen iPhone X/8/7/6S/6 with 2 helpful solutions.

Restore Lost/Stolen iPhone Data from Backup File

iPhone Data Recovery is one of the best data recovery for iPhone, enable to restore data on iPhone with three modes. As long as you have the backup files, it help to restore data from lost/stolen iPhone from iTunes or iCloud backup selectively. In addition, iPhone Data Recovery allow to recover data from iPhone directly without backup. The recoverable kinds of iPhone data including contacts, messages, photos, videos, notes, WhatsApp history, and other apps data. iPhone Data Recovery can be used to recover data on any iOS devices, such as, iPhone X, iPhone 8, iPhone 7, iPhone 6S/6, iPad and iPod.

d_win d_mac

Part 1: Restore Data from Lost/Stolen iPhone with iTunes Backup

Step 1.Run Program and Select iTunes Recovery Mode
After running the iPhone Data Recovery on your Windows computer or Mac,then click “Recover from iTunes Backup” recovery mode option. Then clicking “Next” to go on.

itunes recovery mode

Step 2.Select File Types to Recover
You will find a list of different file types which can be restored. Choose the file types you want to restore, then clicking “Next“.

select file to recover

Step 3.Scan and Download iTunes Backup File
Now, the program will scan and show the available iTunes backup files on your computer. You will find a list of backup files. Then click on the “Scan” button begin scanning and downloading the backup file which contain the data you want to restore.

select itunes backup file to download

Step 4. Preview and Restore iPhone Data in iTunes Backup
After downloading and extract the backed up contents from iTunes,you will see the different files in the backup. The last step,please select the ones you want to get back before recovering,and then save them on your computer by click “Recover” button.

recover iPhone data from iTunes

d_win d_mac

Part 2: Restore Data from Lost/Stolen iPhone with iCloud Backup

Step 1.Run Program and Select iCloud Recovery Mode
After running the iPhone Data Recovery on your Windows computer or Mac,then click “Recover from iCloud Backup” recovery mode option. Then clicking “Next” to go on.

iCloud recovery mode

Step 2.Select Files to Recover from iCloud Backup
To download and extract data from your iCloud backups,please choose the file types which you contain the data you want and click on “Next“.

select file to recover

Step 3.Access your iCloud Account
In this step,please sign in your iCloud account.

login icloud account

Once logged in, you will be in a position to view your backup files. Click on the “Next” option after selecting the backup file contain the data you need to restore.

download icloud file

Step 4.Preview and Recover Data from iCloud Backup
You can choose the data you want,such as, contacts, photos, SMS or other data,then click “Recover” button and save the selected data on computer.

recover iPhone data from icloud

d_win d_mac

Related Articles:

How to Recover Data from Frozen/Bricked iPhone

How to Recover Lost Data on iPhone X/8/7/6S/6

How to Recover Data from Broken iPhone X/8/7/6S/6

How to Recover Data from Water Damaged iPhone

How to Restore iPhone System to Normal

How to Fix Bricked iPhone after iOS 11 Update

How to Manage iPhone X/8/7/6S/6 on Computer

How to Recover Data from Frozen/Bricked iPhone

My iPhone is bricked after I updated it to the new iOS 11 system. Is there any way to restore the data from my frozen iPhone? I need a safe and reliable solution to complete it. Thanks advanced.

iOS 11, the latest iOS system for iOS devices, has been released to the public for several months ago.However, some users faced quite a few problems on the iOS 11 update such as getting freezing or getting bricked. If your iOS device unfortunately get stuck on iOS 11 installation and need to recover data from your frozen device, here we list the best solution for your reference. Moreover, no matter your device get frozen/bricked due to any causes, iOS system update or others, you can use this solution to extra data on the unusual device as well.

List of other cases of frozen/bricked iPhone:
A: iPhone get black screen of death
B: iPhone get white screen of death
C: iPhone stuck at Apple logo screen
D: iPhone stuck in the Recovery Mode
E: iPhone get bricked when you are using the device suddenly
F: More others.

Extract Data on Frozen/Bricked iPhone

To recover data from frozen/bricked iPhone, you can consider using this iPhone Data Recovery. It enable to restore data from iPhone/iPad/iPod due to any data loss circumstances. With the help of iPhone Data Recovery, you can easily recover data on frozen/bricked iPhone for three recovery modes: directly recover from iPhone, recover from iTunes backup, recover from iCloud backup. It support to extract data from any kinds of damaged iPhone, including iPhone get black/white screen of death, iPhone stuck at Apple logo screen, iPhone stuck in the Recovery Mode, and others. Compatible with all models of iPhone, such as, iPhone X, iPhone 8, iPhone 7, iPhone 6S/6, iPhone 5S/5.

d_win d_mac

Part 1: How to Restore Data from Frozen/Bricked iPhone Directly

Step 1.Connect iPhone and Scan it
Firstly, run iPhone Data Recovery on computer.Then connect your frozen/bricked iPhone to computer.When your iPhone is detected,there are three recovery modes for you: “Recover from iOS Device“, “Recover from iTunes Backup” and “Recover from iCloud Backup”.Choose the first one.

iphone data recovery

Select the files that contain the data you need to recover from, then clicking “Next“. The program will scan data from your device.

scan data from iPhone

scan iphone and search data

Note:Not only the existing data,iPhone Data Recovery also can scan out lost data (deleted data) from your iPhone.

Step 2.Preview and Recover Data from Frozen/Bricked iPhone
After scanning your iPhone device is completed,you can preview all data found on it one by one in the scan result.Such as Contacts, Messages, Camera Roll, Photo Stream, Notes, Call History, Calendar, Reminders, Voice Memos and Safari Bookmark.Then choose the items you want to recover,and click on the “Recover” button to save them all on your computer with one click.

directly recover data from frozen iphone

d_win d_mac

Part 2: How to Restore Data on Frozen/Bricked iPhone with iTunes Backup

Step 1.Select Recovery Mode
Run the iPhone Data Recovery on computer and click “Recover from iTunes Backup” on the top of the program’s window.

Step 2.Select and Scan the iTunes Backup File
Choose the one iTunes backup file for your iPhone and click “Start Scan”.

select itunes backup files to download

Step 3. Preview and Restore Data on Frozen/Bricked iPhone from iTunes Backup
The scan only takes you a few seconds. All the contents from the backup file will be displayed in details,including contacts, SMS, photos, notes, videos and more.Select the items and check it before recover them, and click the “Recover” button to extract the selected data on computer depend on your need.

restore iphone data from itunes backup

d_win d_mac

Part 3: How to Fix Frozen/Bricked iPhone System to Normal

iOS System Recovery empower to fix iPhone system to normal, fix frozen/bricked iPhone to normal without data loss. It can fix various iOS system issues without any professional skills, including iPhone get black/white screen of death, iPhone stuck at Apple logo screen, iPhone stuck in the Recovery Mode, and others. Compatible with all models of iPhone, iPad and iPod touch. Fully compatible with the latest iOS 11.

Free Download iOS System Recovery:

d_win d_mac

Step 1.Run the iOS System Recovery on PC or Mac
Click the link as given above and download iOS System Recovery on computer,you can get the windows as below.

ios system recovery home page

Step 2.Connect Frozen/Bricked iPhone to Computer
Select the option of “iOS System Recovery” from the primary window of program under “Mote tools” option. Secondly,use the USB cable to connect your iPhone to the computer . After a few seconds,the iPhone will be detection by program and display it on its screen. Now, click on the button”Start”.

connect iphone

Step 3. Select your iPhone Model and Latest Version of the iOS System
Select the model and iOS system which fit your iPhone, actually the program will detect it and provide to you with the selection. Click the button “Repair” to go to the next screen.

select iphone model and ios system

Step 4.Download the Latest iOS Firmware for Frozen/Bricked iPhone
iOS System Recovery tool will download the latest iOS firmware for fixing you phone,keep your iPhone and computer connection.

download the firmware for bricked iPhone

Step 5.Fixing the Frozen/Bricked iPhone to Normal 
Once iPhone System Recovery tool has finished downloading the latest firmware for your iPhone, it will continue to fix the bricked iPhone without 10 minutes,the iOS fixing and keeping the status displaying as shown below.

fix frozen iphone to normal

After finishing all the steps,your iPhone has been restored to normal and turn to a unbricked device,now you can restart the device as usual.

d_win d_mac

Related Articles:

How to Restore iPhone System to Normal

How to Recover Data from Broken iPhone 8/7/6S/6

How to Recover Data from Water Damaged iPhone

How to Fix Bricked iPhone after iOS 11 Update

How to Fix an iPhone Stuck on Apple Logo