All posts by DHZ

How to Convert Apple Music M4P Songs to M4A

What’s M4P and M4A Format?

What are the Similarities & Differences Between M4P and M4A?

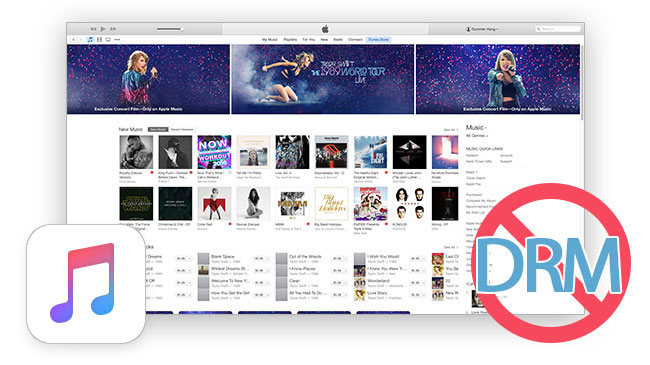
M4P full name is MPEG 4 protected audio file, and M4A is unprotected MPEG 4 audio format, both M4P and M4A are AAC files that iTunes and iOS devices supported.What is the biggest differences between these two audio files? The M4P is protected by DRM encryption while M4A is DRM-free audio file.

Convert M4P Apple Music to M4A

As we all know that Apple Music songs is M4P format,the M4P generally used by Apple iTunes purchased songs with DRM (digital rights management) protected, so once you cancel the Apple Music subscription service,all playlists and music songs you downloaded from Apple Music store not allowed be played.However,any way to play Apple music for free forever? How to listen to the music iPhone/iPod with more freedom? Is it possible to convert Apple Music songs to Android phone or MP3 Players for offline playback without DRM limitation? How to burn purchased Apple music to CDs and playing on car? What you need to do is removing DRM from Apple Music streaming songs and convert them to DRM-free M4A, MP3,etc.

Is there any way to convert DRM-protected Apple Music files to unprotected M4A?

Is there Apple music converter tool helps me make purchased Apple Music songs transform as free local songs? I want to enjoy Apple music on my iPhone 7 plus for free forever even canceling the subscription service.There are about 1000 songs in my iTunes library that are formatted .m4p. I need assistance in converting my M4p songs to M4a. What M4P to M4A Converter tool are available to accomplish this process?

How to Convert Apple Music M4P to DRM-free M4A?

All Apple Music songs are M4P format that protected with DRM encryption, except for the old songs you purchased from the iTunes Store before April 2009.However,now the M4P file can not be played and transferred to any other unauthorized computer, MP3 player, PSP and Android mobile phones/tablets,also the M4P file can not be played on your iPod, iPhone and iPad when the paid Apple music expires,many people finding a way to convert the protected M4P to unprotected M4A or MP3 for playing on any music players.

3 Steps to Convert M4P to M4A with Apple Music Converter

UkeySoft Apple Music Converter is a best M4P converter for you to convert M4P files to M4A, MP3, AC3, AIFF, FLAC, etc. During the conversion,it can remove DRM from iTunes/Apple Music files at super fast speed with zero loss quality.What’s more,the Apple Music Recorder also enables you convert iTunes audiobooks, Audible audiobooks and other iTunes purchased M4P music to DRM-free M4A for playing on iPhone, iPod and iPad freedom and convenience without time limitation.

Both Windows version and Mac version are available to download,you can download this powerful Apple Music Converter (Mac and Windows) to have a try.

d_win d_mac

UkeySoft Apple Music Converter Key Features:

-Remove DRM from iTunes/Apple Music songs.
-Convert Apple Music M4P songs to DRM-free MP3, M4A, etc.
-Convert iTunes music and Audiobooks to MP3, M4A, etc.
-Keep original metadata to MP3, M4A audio files.
-Preserve Audiobook chapter information to M4A output.
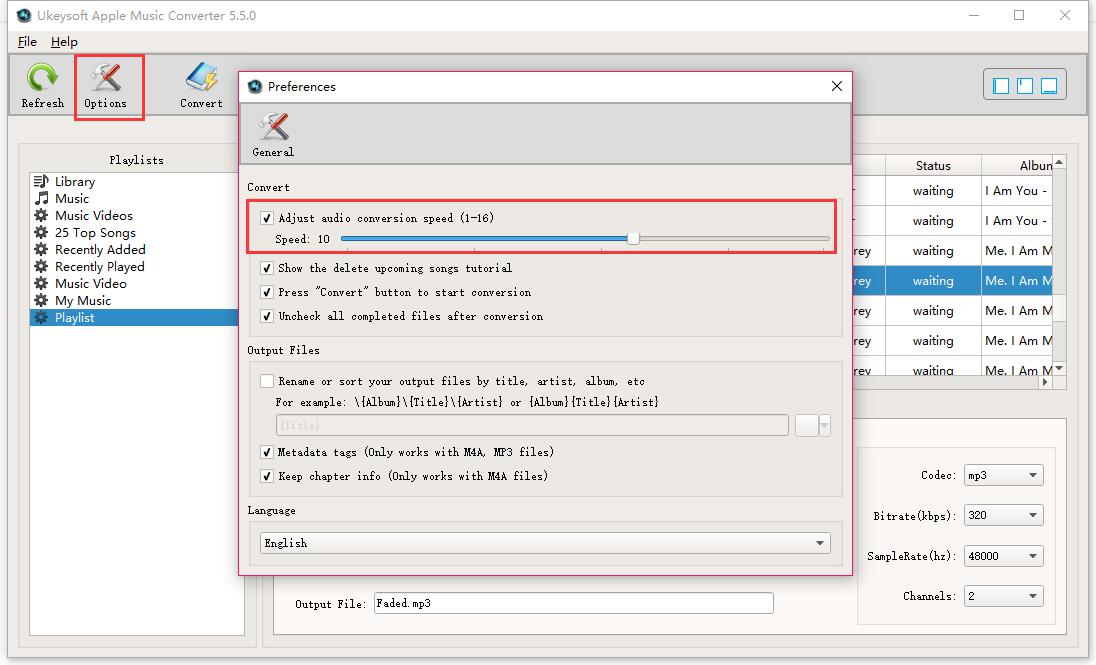
-Convert Apple Music songs at up to 16X speed.
-Batch conversion allows you to convert as many Apple Music songs as you like.

Easy Steps to Convert M4P to to DRM-free AAC (.m4a)

Step 1. Download and Run M4P to M4A Converter
First of all,please download and install the M4P to M4A Converter for Mac or M4P to M4A Converter for Windows program on your PC/Mac.

d_win d_mac

After launching the Apple Music Converter(M4P to M4A Converter) program on your computer,you can see its interface similar as iTunes,and it will loads all your iTunes files automatically,including Apple Music songs, albums and playlists you have added to iTunes library.

Install M4P to M4A Converter

Step 2. Select M4P Files you want to Convert to M4A
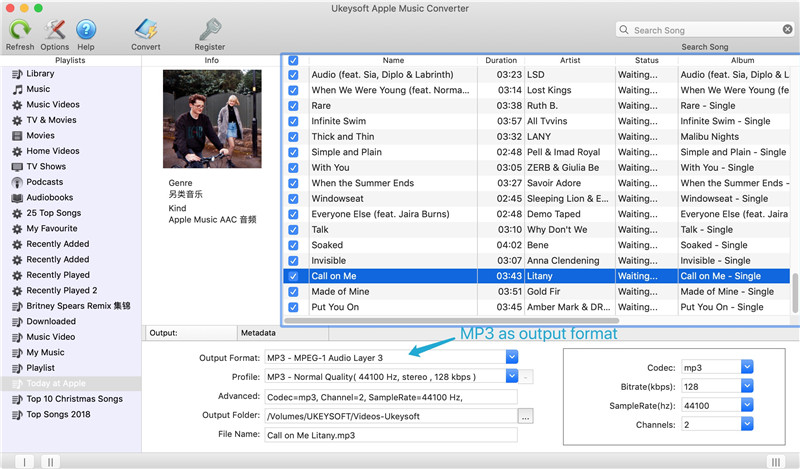
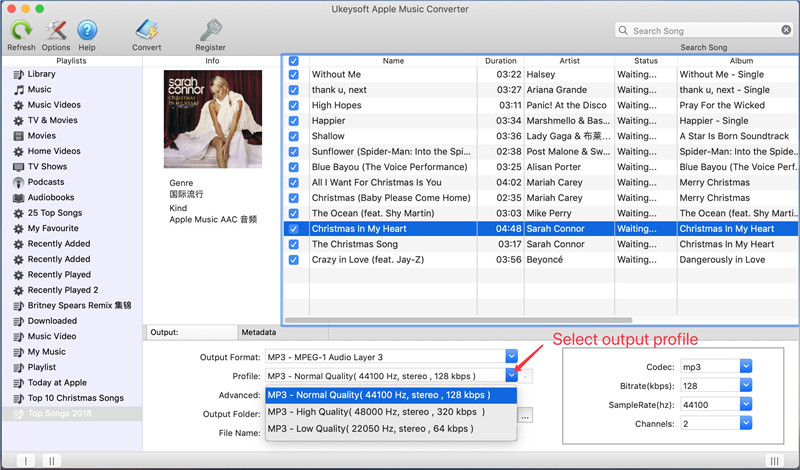
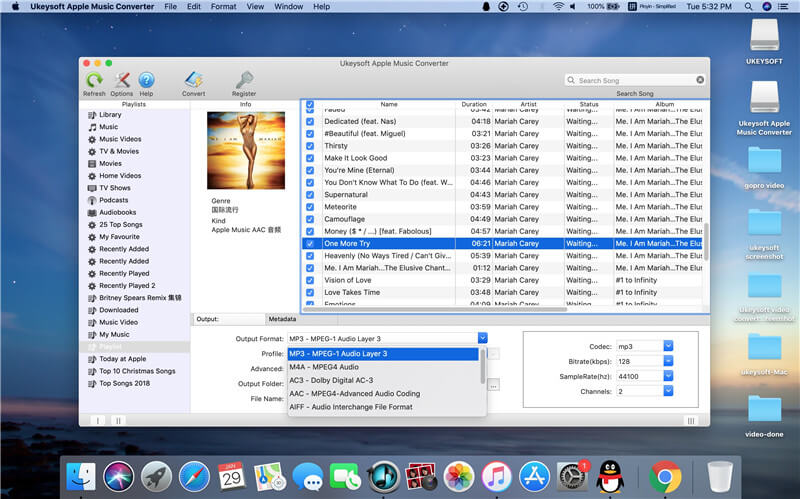
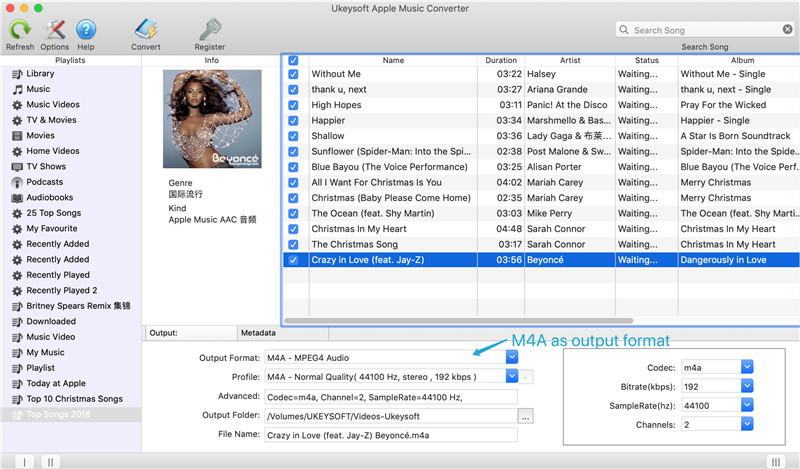
After the program loading the iTunes library,then select the Apple music songs, playlist that you want to convert to M4A – a DRM-free audio format that compatible with all ios devices.Please choose M4A as output format,you can also convert iTunes m4p files to common audio formats: MP3, AC3, AAC, AIFF, AU, FLAC, M4R and MKA.

select Apple music to convert

Choose M4A as Output Format

Select M4A as Output Format

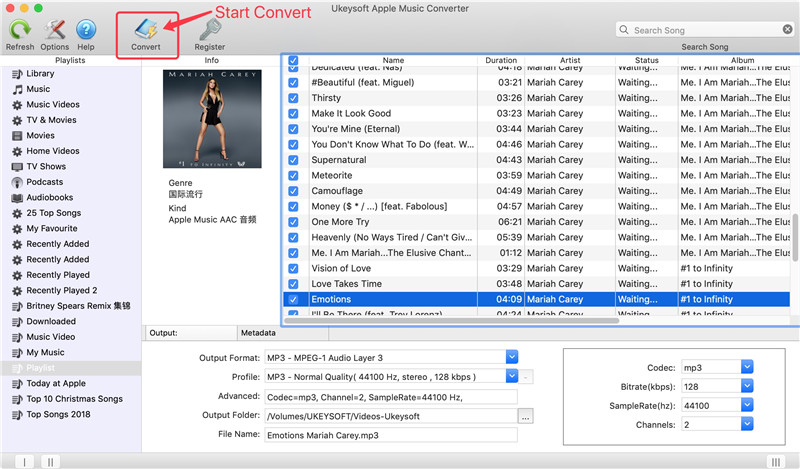
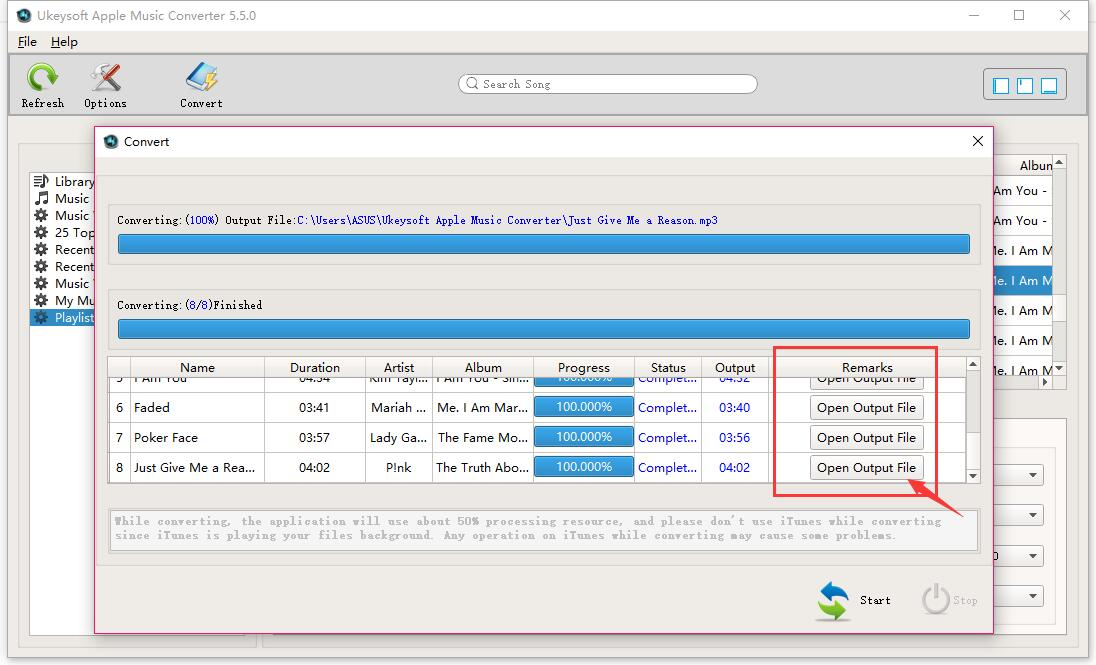
Step 3. Start to Converting Apple Music M4P to M4A
Finally,please click “Convert” button to remove DRM protected and convert M4P files to M4A audio files with the M4P to M4A Mac converter.

convert apple music m4p to m4a

After the iTunes M4P to M4A conversion complete, you will get the M4A files on the computer by clicking on the “Open Output File” button.

get m4a files

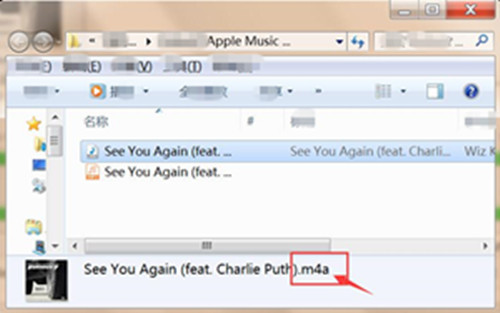
Now you have remove the DRM(Digital Right Management) protection from Apple music and convert the M4P files to DRM-free M4A format,as well as MP3 format for all Android mobile phone and MP3 players.Now,you can transfer these converted DRM free M4A and MP3 files to other computers, Android/iOS smartphones, and tablets for offline playback without DRM limitation.

d_win d_mac

How to

How to Play M4P Apple Music on Android

How to Play M4P Apple Music M4P on iPhone iPod for Free

How to Play Apple Music M4P on MP3 Players

How to Convert Purchased Apple Music to MP3

How to Remove DRM from Apple Music M4P songs

How to Convert iTunes M4P to MP3 on Mac

How to Play Apple Music on MP3 Player

I pay some Apple music from iTunes, however I can’t sync and play the music on my MP3 player. Are there any ways to play the Apple music on it without limitation?”

Are you one of them who meet the same this problem? You payed some Apple music from Apple official website, but when you want to transfer the Apple music to your MP3 player you can’t find a way to do it since the music are in DRM protected M4P format. What is M4P files? M4P – MPEG 4 protected audio, is a protected AAC file extension, generally used by Apple iTunes purchased songs with DRM (digital rights management), while M4A is an audio extension for unprotected AAC file. It means that both M4P and M4A are AAC files, but M4P is DRM protected while M4A is DRM-free. If you want to transfer and play the Apple music file on MP3 player, you should convert the Apple music file from M4P to MP3 format, then you are allowed to enjoy the converted Apple music on MP3 player without paying again and without time limitation. It sounds so good, right? Just see how to convert and play Apple music on MP3 player with Apple Music Converter.

Apple Music Converter can perfectly help you convert DRM-ed Apple Music M4P songs to free AAC or MP3, then you can play Apple Music on MP3 player. With a leading-industry record technology, it can record Apple Music songs in the background at super fast speed with zero loss quality. Apart from recording Apple Music songs, Apple Music Recorder enables to record iTunes audiobooks, Audible audiobooks and other iTunes purchased M4P music.  You just need to add Apple Music songs, albums or playlists to iTunes library or playlists without downloading them, then the program will convert the selected music efficiently so that you can enjoy the converted music on mobile device for free without limitation, like MP3 player, Android phone, iPhone, or more mobile devices.

How to Play Converted Apple Music on MP3 Player

Step 1.Download and Launch Apple Music Converter on Computer
Download the Apple Music Converter on your computer.When you launch the program, iTunes will be launched automatically at the same time.

launch apple music converter

Step 2.Select the Apple Music to Convert to MP3 for MP3 Player
The program will loads all iTunes files automatically,including music, playlists, Audiobooks, M4P Audio, iTunes movies and TV shows.Please click on “Library” and mark the Apple Music tracks that you want to remove DRM and convert to MP3.

select Apple music to convert

Note:You can select several items one by one or select the entire album by clicking on the checkbox on the top menu bar.If you added Apple Music songs/albums to iTunes library, click “Music” on the left side and sort all songs by Type. Check the songs marked with “Apple Music AAC audio file”.

Step 3.Set the Output Format – MP3 for the Converted Music
After selecting the Apple Music songs you want to download/convert,you should select the music output format,in order to converting all Apple music songs to MP3 format. Please select .MP3 from the drop-down list under the “Output Format” column.The program allows you change the output parameters like channels, sample rate, codec, bitrate, etc,.

select mp3 output format

Select MP3 Output Profile :

select mp3 output profile

Adjust Conversion Speed :
If you would like to change the conversion speed, then go to Options>>General.One the preferences windows to “Set Custom conversion speed for audio convert (1-16)” to adjust the conversion speed.

Adjust Conversion Speed

Step 4.Convert M4P Apple Music to DRM-free MP3
In this step you should click “Convert” button to begin converting Apple Music from M4P music to MP3 and save the converted MP3 Apple songs on the computer.It will take you minutes to convert the audio format,once the music conversion process is completed,please click on the “Open Output File” button to find the converted MP3 music files on your computer,then you can enjoy the converted Apple music in DRM-free MP3 format for free.

start convert apple music to mp3

View the converted .MP3 files on the computer:

View MP3 apple music songs

Step 5.Play the Converted MP3 Apple Music on MP3 Player
Now,you have converted the Apple music from M4P to MP3 for free,you can play all converted MP3 Apple music on MP3 player without iTunes after transferring it to your device.

Related Articles:

How to Remove DRM from Apple Music M4P Completely

Unlock iTunes DRM and Play iTunes M4P Songs on Any Devices

Free Download Previous Purchased Music from iTunes to Computer

How to Convert Apple Music M4P to MP3

How to Play Apple Music on iPhone 7/6S/6 for Free

How to Play Apple Music on Android

Play Apple Music on MP3 Player

How to Fix iPhone Stuck during iOS 11 Update

Hm. iOS 11 seems to have bricked my iPhone. How to get my iPhone to normal with a simple way?
Upgrading my iPhone 7 to iOS 11 then it stuck on Apple Logo, no progress bar. Is this normal?

Recently Apple released the beta versions for iOS 11 before it is formally available for iOS users. Not surprisingly, there are so many bugs found in the beta version. One controversially that problem is that iOS 11 update will cause iPhone stuck issues occur. Not all iOS users can successfully download and install iOS 11 on their iOS device. Some users have encountered the stuck issues during upgrading process. The most common issue is iPhone frozen on Apple logo screen, iPhone stuck in Recovery Mode. Just take it easy, here are the best methods you can take to fix iPhone 7/6S/6/SE/5S/5 stuck issues without data loss during iOS 11 update.

Repair iPhone Stuck Issues during Updating to iOS 11

To fix iPhone stuck during iOS 11 update, you could try this iOS System Recovery, this is an ultimate solution, and also the most recommended, if you need a 100% work solution and ensures no data lost. With the iOS System Recovery, you can easily fix iPhone stuck during iOS 11 update without data loss. iOS System Recovery enables to fix different stuck issues during iOS 11 update, including stuck in Recovery Mode, stuck at Apple logo screen, stuck at black screen and more. Supported iOS devices including iPhone 7, iPhone 6S/6, iPhone SE, iPhone 5S/5C/5, iPad Pro, iPad mini, iPod touch 5, iPod Touch 6 and more. iOS System Recovery compatible with the new iOS version including iOS 11, iOS 10, iOS 10.3.3, iOS 10.3, iOS 9.

d_win d_mac

Fix iPhone Stuck during iOS 11 Update without Losing Data

Step 1. Launch Program and Choose “iOS System Recovery” Feature on Program
Launch the iOS System Recovery program and then select “iOS System Recovery” on the left panel of “More tools” then click “Start”. Connect the stuck iPhone to the computer using USB cable.

ios system recovery home page

connect iphone to the program

Step 2. Download Firmware for iPhone
The program then detects your iPhone and displays the latest iOS firmware for your iPhone. Click on the “Repair” button to get the matching firmware, download it for restoring your device.

select iphone model

download firmware for iphone

Step 3. Fix iPhone Stuck during iOS 11 Update
When the firmware is downloaded, iOS System Recovery will start to repair the iOS system of your iPhone. The process of repairing the device will be displayed and it won’t take too much time. After that, you iPhone is completely fixed, and returned to the normal state.

restore iphone to normal ios 11 update

restore iphone system to normal completed

Done.

d_win d_mac

Related Articles:

How to Fix iPhone System to Normal after iOS 11 Update

How to Fix Bricked iPhone after iOS 11 Update

How to Fix iPhone Stuck in Apple Logo after iOS 11 Update

How to Fix iPhone Stuck in Recovery Mode after iOS 11 Update

3 Ways to Recover Lost Photos from iPhone after iOS 11 Update

iPhone Manager – How to Transfer and Manage Files on iPhone 8/7/6S/6/SE

How to Recover Lost Data on Jailbroken iPhone 8/7/6S/6

I performed the iOS 11 jailbreak on my iPhone 7, unfortunately all the data were lost during the process. The worse is that I forgot to backup the data on my device. Now how to restore the lost data from my iPhone directly?

Performing iOS jailbreak on iPhone/iPad/iPod is basically the process of freeing your device (thus the term jailbreak) from the limitations that are imposed by Apple. While the iOS is one of the most stable and secure mobile operating systems around, it can become too restrictive due to Apple’s “closed” mantra. Admittedly, iOS jailbreak is very useful for Apple users, especially for iPhone users. Jailbreaking is beneficial if done in a safe way. However, Jailbreaking can easily mess with the stability of iOS and cause data loss issue to occur. While the problem is usually fixable, most of iOS users are still annoying. In this page we will trough you a practical guide helps to recover lost data on jailbroken iPhone easily even without backup.

Restore Lost Data from iPhone 8/7/6S/6 after iOS Jailbreak

iPhone Data Recovery can rescue your iPhone data with an efficient solution, enables to recover lost data from iPhone 8/7/6S/6 after iOS jailbreak. Not only iOS jailbreak, this program allows o recover lost data on iPhone/iPad/iPod under any data loss causes, such as, iOS update, deleted by mistake, device broken, restore device to factory reset, etc,. The recoverable kinds of data including contacts, text messages, photos, videos, call logs, notes, calendars, Apps &Apps data, and more. In addition, iPhone Data Recovery provides you three recovery modes: directly recover from device, recover from iTunes backup, recover from iCloud backup. All models of iOS devices are supported by program, like iPhone 8(Plus), iPhone 7(Plus), iPhone 6S(Plus)/6(Plus), iPhone 5S/5, iPad and iPod.

d_win d_mac

How to Recover Lost Data on Jailbroken iPhone 8/7/6S/6

First of all,please install and run iPhone Data Recovery on your PC/Mac.

Step 1.Connect iPhone and Select Recovery Mode
Connect your jailbroken iPhone to the computer,select “Recover from iOS Device”mode.Click “Start” to begin the data recovery process.

connect iphone with computer

Step 2.Select Lost File to Scan by Program
To directly recover lost data from iPhone after iOS jailbreak,you should select the type of lost data to be scanned by program.You are allows to select more than one files to be scanned by program,then click “Next”.

select file to recover

Now the program will begin to scan your device automatically for lost data with seconds.

scan iphone for lost data

Step 3.Preview and Directly Recover Lost Data from iPhone after iOS Jailbreak
Once the scanning is finished,you are allowed to preview and directly recover the lost iPhone data.Select the data you want and click “Recover” to save the selected data to the computer.

Recover Lost Contacts from iPhone after iOS Jailbreak:

recover iphone contacts

Recover Lost Photos from iPhone after iOS Jailbreak:

recover lost photo from iphone

Recover Lost Messages from iPhone after iOS Jailbreak:

recover lost sms from iphone

d_win d_mac

Related Article:

How to Recover Lost iPhone Data after iOS 11/10 Jailbreak

How to Recover Lost iPhone Contacts after iOS 11/10 Jailbreak

How to Restore Lost Files on iPhone 8/7/6S/6

How to Recover iPhone Data after iOS 11 Update

How to Backup & Restore iPhone 8/7/6S/6

How to Convert Protected Apple Music to MP3 for iPhone

Is it possible to convert protected Apple music to MP3 and play it on my iPhone for free without limitation? I want to listen the downloaded Apple music on my iPhone whenever and wherever.”

remove drm apple music

Apple Music is a music streaming service by Apple. It allows Apple users select music to stream to their device on demand. The service includes the curated Internet radio station Beats 1 and the blog platform connect for artists to share media with fans. The app provides music recommendations based on user taste and is integrated with Siri voice commands. However, you can’t continue to play the downloaded Apple music after the payment times up because the Apple music is under DRM protection. If you are one of the Apple music fans and who are looking for a no-cost way to convert all of the previously purchased M4P music files from iTunes into MP3 format, just pay attention in the follow passages, we are going to provide you a helpful way to convert protected Apple music to MP3 for iPhone 7/6S/6 with a simple solution.

Remove DRM Protection from Apple Music and Convert to MP3 File

To solve the conversion problem perfectly, the UkeySoft Apple Music Converter is useful, which uses high recording and encoding Apple music files to MP3 or AAC technology to convert the DRM Music files to MP3 formats and remove the Apple Music DRM with up to 20X faster conversion speed and as well as CD output quality, and then you can transfer the converted files to iPhone, USB flash Drive, SD card, Google Drive, Andriod Mobile phones and enjoy these converted files on any audio player devices including Sony PS4, PSP as you like. With using Apple Music Converter, you can easily remove DRM protection from Apple music and convert the music to MP3 file for iPhone XS/X/8/7/6S/6 with only 5 steps. When the conversion is completed, you can enjoy the converted Apple music on any mobile device whenever and wherever.

d_win d_mac

How to Play Converted MP3 Apple Music on iPhone

Step 1.Download and Launch Apple Music Converter on PC
Download the UkeySoft Apple Music Converter on your computer.

After launch the program immediately,iTunes will be launched automatically with this program.

launch apple music converter

Step 2.Select the Protected Apple Music you Want to Convert to MP3
After launching the Apple Music Converter on the computer,the program will find all loads iTunes files automatically,including music, playlists, Audiobooks, M4P Audio, iTunes movies and TV shows.Please click on “Library” and mark the Apple Music tracks that you want to remove DRM and convert to MP3.

select Apple music to convert

Tips:You can select several items one by one or select the entire album by clicking on the checkbox on the top menu bar.If you added Apple Music songs/albums to iTunes library, click “Music” on the left side and sort all songs by Type. Check the songs marked with “Apple Music AAC audio file”.

Step 3.Set the Output Format – MP3
After selecting the Apple Music songs you want to download/convert,you should select the music output format,in order to converting all Apple music songs to MP3 format. Please select .MP3 from the drop-down list under the “Output Format” column.The program allows you change the output parameters like channels, sample rate, codec, bitrate, etc,.

select mp3 output format

Select MP3 Output Profile :

select mp3 output profile

Adjust Conversion Speed :
If you would like to change the conversion speed, then go to Options>>General.One the preferences windows to “Set Custom conversion speed for audio convert (1-16)” to adjust the conversion speed.

Adjust Conversion Speed

Step 4.Convert Protected Apple Music to MP3
After setting MP3 as output format,then click “Convert” button to start converting Apple Music from M4P music to MP3 and save the converted MP3 Apple songs on the computer.It will take you several minutes to convert the audio format,once the M4P to MP3 conversion process complete,please click on the “Open Output File” button to find the converted MP3 music files on your computer,then you can enjoy the converted Apple music in DRM-free MP3 format without limitation whenever and wherever.

convert Apple Music from M4P to MP3

Once the conversion is finished,you are allowed to view converted .MP3 files on the computer:

view mp3 files

Step 5.Transfer the DRM-free Apple Music to iPhone
Now,you have converted the protected Apple music from M4P to MP3 as free,you can play all converted MP3 Apple music on Mac/Windows computer without iTunes. If you want to listen to Apple Music on iPhone,please import them to your device with iOS Manager and enjoy your the converted Apple songs freely as you like.

Guide: How to Import Music from Computer to iPhone 7/6S/6

import converted apple music to iPhone

d_win d_mac

More Tips You May Be Interested In

How to Play Apple Music on iPhone 7/6S/6 for Free

How to Play Apple Music on iPhone/iPod/iPad for Free

How to Play M4P Apple Music on iOS Device

Remove DRM and Play Apple Music on iPhone without Limitation

How to Convert iTunes M4P Music to MP3 for Android

How to Transfer Music from iTunes to iPhone

How to Manage iPhone 7/6S/6 on Computer

Stream Apple Music on iPhone

How to Fix iPhone Stuck during iOS 11 Downgrade

Last day I upgraded my iPhone 7 to iOS 11 and then I want to downgrade it to iOS 10.3.3. Unfortunately it stuck in the Recovery Mode. Any ways to get my phone out of the Recovery Mode? Please help!

iOS 11 is an exciting newest iOS system that Apple announced for iOS devices, which is a wonderful iOS system version you can’t miss. iOS 11 brings a lot of cool new features to the iPhone/iPad/iPod that can also be very useful. However, the problem is that sometimes when upgrading your device to the new iOS 11, you may think that iOS 11 is not perfect enough as you think, then you try to downgrade iOS 11 to iOS 10.3.3. Things may not go smoothly. When your device stuck during iOS 11 downgrade, like stuck in the Recovery Mode, stuck at black screen, stuck at Apple screen logo; how to fix the iOS system to normal on your device? Now, in this post, we are going to show you the top 3 solutions to fix iOS 11 downgrading stuck issues on iPhone 7/6S/6/5S/5 effectively.

Solution A: Force Restart to Fix iOS 11 Downgrade Stuck on iPhone

The first way we shows you to get iPhone out of the stuck issue is to force reset your iPhone. When your iPhone stuck during iOS 11 downgrading due to the software crashes, software bugs or software conflicts, a force restart on iPhone can efficiently reboot your device to normal.

How to Force Restart to Fix iOS 11 Downgrade Stuck on iPhone:
Press and hold the Sleep/wake button and the Home button (Volume Down button on iPhone 7/7 Plus) at the same time. Keep holding the buttons at least 10 seconds and release the buttons when the Apple logo appears.

force restart iphone

Solution B: Get iPhone out of iOS 11 Downgrade Stuck by iTunes Restore

The second way we shows you to get iPhone out of the stuck during iOS 11 downgrade is with the iTunes restore.

How to Fix iPhone Stuck during iOS 11 Downgrade by iTunes Restore:
Step 1. Launch iTunes on your computer. Hold the “Home” button on your stuck iPhone as you connecting the device to iTunes.

Step 2. Release the “Home” button once you see a message in iTunes prompt you “There is a problem with the iPhone “iPhone” that requires it to be updated or restored.”

Step 3. Click “Restore” and wait for iTunes to fix your stuck iPhone to normal.

restore iphone with itunes

Solution C: Fix iOS 11 Downgrade Stuck on iPhone without Data Loss

Please note that the solution A and solution B will lead to data loss on your iPhone while fixing it, here we will provide you an better way to fix iOS 11 downgrade stuck on iPhone without losing data. What you need is the iOS System Recovery, which is a wonderful program helps to fix iPhone stuck during iOS 11 downgrade without data loss. It can be used to fix any stuck issues on iPhone during iOS 11 downgrade, including stuck in the Recovery Mode, stuck at black screen, stuck at Apple screen logo or more. iOS System Recovery compatible with all iOS device, such as iPhone 7, iPhone 6S/6, iPhone SE, iPhone 5S/5C/5, iPad Pro, iPad mini, iPod touch 5, iPod Touch 6 and more. iOS System Recovery compatible with the new iOS version including iOS 11, iOS 10, iOS 10.3.3, iOS 10.3, iOS 9.

d_win d_mac

Step 1. Launch Program and Choose “iOS System Recovery” Feature on Program
Launch the iOS System Recovery program and then select “iOS System Recovery” on the left panel of “More tools” then click “Start”. Connect the stuck iPhone to the computer using USB cable.

ios system recovery home page

connect iphone to the program

Step 2. Download Firmware for iPhone
The program then detects your iPhone and displays the latest iOS firmware for your iPhone. Click on the “Repair” button to get the matching firmware, download it for restoring your device.

select iphone model

download firmware for iphone

Step 3. Fix iPhone Stuck during iOS 11 Downgrade
When the firmware is downloaded, iOS System Recovery will begin to repair your iPhone iOS system. The process of repairing the device will be displayed and it won’t take too much time. After that, you iPhone is completely fixed, and returned to the normal state.

restore iphone to normal ios 11 downgrade

restore iphone system to normal completed

Please check whether your device can start after the fixing process is finished.

d_win d_mac

Related Aritcle:

How to Fix iPhone Stuck in Recovery Mode after iOS 11 Downgrade

How to Restore iPhone System to Normal after iOS 11 Downgrade

How to Fix iOS 11 Downgrading Stuck on Apple Logo Issue

How to Backup iPhone Data before iOS 11 Downgrade

How to Restore/Downgrade iOS 11 to iOS 10

How to Play Apple Music on iPhone/iPad/iPod Offline

[Summary]: Do you want to keep Apple Music forever on iPhone? This article teach you how to remove DRM from Apple Music and transfer them to iPhone for listening offline, so you can keep Apple Music songs playable on iPhone/iPad/iPod after canceling your Apple Music subscription.

How to remove the DRM protection from Apple music and play the converted music on my iPhone 7 for free without time limitation?

remove drm apple music

Apple has released its music streaming service, it has a unique ability to attract first-time subscribers. One of the many staples of Apple Music is that it allows you to manually download your favorite music tracks from Apple official website(iTunes included) and listen to the Apple music even when you’re neither connected to a Wi-Fi nor a cellular network after paying. Apple Music allows paid users to save the music for offline listening and take it on the road. It will be great if you can convert Apple Music to MP3 format file for listening. In this way, you can retain the music you love and even you can play the Apple Music on other mobile devices. To convert Apple music files, Apple Music Converter comes for you.

Remove DRM Protection from Apple Music for free on iPhone

Want to convert the downloaded Apple Music files to other formats for example MP3, for listening it on iPhone or other mobile devices such as iPod, PSP, Zune, Android phone, MP3 player, MP4 player?

What you need is an professional Apple Music Converter, this UkeySoft Apple Music Converter can easily remove DRM protection from Apple music and convert Apple music to MP3 file, after that you can play the converted Apple music on iPhone for free without limitation. Let’s see more features of Apple Music Converter.

More Features of Apple Music Converter:
-Free download and convert previous purchased Apple music from iTunes to the local computer for playing whenever and wherever.
-Convert Apple Music, iTunes M4P songs to DRM-free MP3 and keep Apple Music as long as you like.
Play Apple Music on iPhone/iPod/iPad for free without limitation.
-Convert iTunes M4P songs and Apple Music to most popular Android devices, such as Huawei (P20/P10, Mate 20), Samsung (Galaxy S10/S9/S8/S7/S6/Note 5), LG, Google (Pixel/Pixel 3XL), OnePlus, Sony(Xpearia XZ), HTC, Motorola, Lenovo and more.
-Convert and listen to Apple Music on Any MP3 Player.
-Convert iTunes M4P to MP3 and play M4P music on Windows/Mac computer without iTunes.
-Supports the latest version of iTunes.

How to Play Apple Music on iPhone Offline

Step 1.Download and Launch Apple Music Converter on PC
Click on the “Download” button above to download both Apple Music M4P to MP3 Converter for Mac and Apple Music M4P to MP3 Converter for Windows on your computer,then install it and launch the correct version.

After launch the software immediately,iTunes will be launched automatically with this program.

launch apple music converter

Step 2.Choose Apple Music M4P Songs you Want to Convert to MP3
After launching the Apple Music Converter on the computer,the program will find all loads iTunes files automatically,including music, playlists, Audiobooks, M4P Audio, iTunes movies and TV shows.Please click on “Library” and mark the Apple Music tracks that you want to remove DRM and convert to MP3.

select Apple music to convert

Tips:You can select several items one by one or select the entire album by clicking on the checkbox on the top menu bar.If you added Apple Music songs/albums to iTunes library, click “Music” on the left side and sort all songs by Type. Check the songs marked with “Apple Music AAC audio file”.

Step 3.Set MP3 as the Output Format
After selecting the Apple Music songs you want to download/convert,you should select the music output format,in order to converting all Apple music songs to MP3 format. Please select .MP3 from the drop-down list under the “Output Format” column.Also,the program allows you change the output parameters like channels, sample rate, codec, bitrate, etc,.

select mp3 output format

Select Output Profile – MP3 :

select mp3 output profile

Adjust Conversion Speed :
If you would like to change the conversion speed, then go to Options>>General.One the preferences windows to “Set Custom conversion speed for audio convert (1-16)” to adjust the conversion speed.

Adjust Conversion Speed

Step 4.Remove DRM Apple Music from M4P to DRM-free MP3
After setting MP3 as output format,then click “Convert” button to start converting Apple Music from M4P music to MP3 and save the converted MP3 Apple songs on the computer.It will take you several time to convert the audio format,once the M4P to MP3 conversion process complete,please click on the “Open Output File” button to find the converted MP3 music files on your computer,then you can enjoy your favorite Apple music in DRM-free MP3 format without limitation whenever and wherever.

convert Apple Music from M4P to MP3

Once the conversion is completed,you are allowed to view converted .MP3 files on the computer:

view mp3 files

Step 5.Play Converted Apple Music with MP3 on iPhone Offline
Now,you have converted the protected Apple music from M4P to MP3 as free,you can play all converted MP3 Apple music on Mac/Windows computer without iTunes.If you want to listen to Apple Music on iPhone,please import them to your device with iOS Manager and enjoy your Apple songs with it freely.

Read more: How to Import Music from Computer to iPhone

export converted apple music to iPhone

More Tips You May Be Interested In

How to Play Apple Music on iPhone 7/6S/6 for Free

How to Play Apple Music on iPhone/iPod/iPad for Free

How to Play M4P Apple Music on iOS Device

How to Convert Apple Music M4P to free-DRM MP3

How to Convert iTunes M4P Music to MP3 for Android

How to Transfer Music from iTunes to iPhone

How to Manage iPhone on Computer

How to Recover Data from Note 5 with Broken Screen

[Summary]:Your Samsung Galaxy Note 5 screen was broken/damaged?Here an effective method help you recover data including photos, pictures, contacts, text messages, videos and more from Galaxy Note 5 with cracked screen.

Samsung Galaxy Note 5 Broken Screen Data Recovery

You may want to know:

* How to Transfer Data from Note 4/Note 5 to Galaxy Note 8

* How to Backup and Restore Samsung Galaxy Note 8/Note 5/Note 4

Can I ask how to recover data from mobile device with broken screen? I dropped my Galaxy Note 5 on the bathroom floor when I was bathing, then the screen was crashed. The phone works as usual, I can turn it on and off. But I decide to sell it to the store. How to recover data from Samsung Note 5 with broken screen? The model is Samsung Galaxy Note 5.

Android phones are built with wonderful functionality to attractive people around the world. More and More people use Android as their mobile device. However, it’s a common case that people get broken on the phone by accident in daily life. Thankfully, even if your screen is beyond repair or not, you are possible to extract several of files from your broken Android device, including Android with broken screen, Android with black screen, water-damaged Android, etc,. Today, I’m going to show you how to quickly recover files from Samsung Android with broken Screen.

Retrieve Files from a Broken Screen Samsung Galaxy Note 5

Here a Samsung Galaxy Note 5 Broken Screen Data RecoveryBroken Android Data Recovery– It’s your best choices to recover files from Galaxy Note 5 with broken screen. Except for broken screen, it enables to recover data for any kinds of broken Samsung Android phone, like black screen device, water-damaged device, device stuck in Download Mode, broken device and more. Broken Android Data Recovery allows to preview data before recovery. It works for  almost all Samsung models, such as Samsung Galaxy S4/S5/S6, Samsung Galaxy Note 3/4/5. Let’s see how it works for extracting data including contacts, SMS, photos, videos,WhatsApp messages,etc. from Samsung Galaxy Note 5 with broken screen.

d_win d_mac

How to Extract Files from Broken Screen Samsung Galaxy Note 5

Step 1.Connect Samsung and Run Program
First of all,please connect the your Samsung with broken screen to the computer. Select “Start” under “Broken Android Phone Data Extraction“ in the home page of program.

broken android data recovery

Step 2.Select the Models of Samsung
Make sure that you choose the correct information of your phone including the device name and device model. Then click “Confirm“.

select galaxy note 5 model

Step 3.Setting Samsung into Download Mode
Follow the guide to enter your broken Samsung to the Download mode: Power off the phone > Press the volume down + Home button + Power button > Press the volume up to enter download mode.

get samsung into download mode

After that,your phone will enter “Download Mode” successfully.

Step 4.Download the Recovery Package for Samsung
Now the Broken Android Data Recovery program will download the recovery package for your Samsung Galaxy Note 5.

detect samsung

Step 5.Preview and Recover Files from Broken Screen Galaxy Note 5
Now you should select the files to preview and recover the selected data from Samsung to your computer.

recover files broken screen samsung galaxy note 5

d_win d_mac

Related Article:

How to Recover Data from Broken Samsung Galaxy Note 5

How to Recover Text Messages from Broken Samsung Galaxy Note 5

How to Recover Contacts from Broken Samsung Galaxy Note 5

How to Recover Photos from Broken Samsung Galaxy Note 5

How to Recover WhatsApp Messages from Broken Samsung Galaxy Note 5

How to Recover Data from Samsung with Broken Screen

Transfer WhatsApp Messages from Samsung to Samsung Galaxy S8

Hello. I need some help. I upgraded to the new Samsung Galaxy S8 phone and now I need to sync the WhatsApp messages from the old phone to it. How?

transfer whatsapp messages to samsung galaxy s8

WhatsApp is one of the most popular communication tools around the world. People like to use it for communicating with friends, families, clients, and others. But if you get a new phone and sign in your WhatsApp account on it, the WhatsApp history messages don’t automatically come with you. Have you got a new Samsung phone and you have no idea to sync the WhatsApp conversations between your old phone and the new device? Thankfully we’re here to help. This tutorial explains how to transfer WhatsApp messages and attachments between two Samsung devices.

Method 1: Transfer Samsung WhatsApp Messages to Samsung Galaxy S8 with Google Drive

The newest version of WhatsApp has the feature to copy WhatsApp chat history(text, voice messages, photos and videos) to Google Drive. The Google Drive backup makes it a lot of easier to transfer WhatsApp messages from Samsung to Samsung.Note:You should have a Google account activated on your phone and Google Play service on it.

Step 1.Copy WhatsApp Chat History to Google Drive
On your old Samsung phone, open WhatsApp and go to Menu Button > Settings > Chats and calls > Chat backup. From here, you’ll be able to manually copy your chats to Google drive or set it to mechanically copy as frequently as you prefer.

Step 2.Transfer WhatsApp Backup to New Galaxy S8
Install WhatsApp on your new Galaxy S8 phone, once validating your telephone number, you may be prompted to restore revive chats and media from Google Drive. Once the restoration method is complete, all of your messages will be on your new phone.

transfer whatsapp chats via google drive backup

Method 2: Transfer Samsung WhatsApp Messages to Samsung Galaxy S8 with Phone Transfer

If you think that the method 1 is quite trouble, you can consider to take this solution, transfer WhatsApp messages from Samsung to Samsung Galaxy S8 directly with Phone Transfer. Phone Transfer is a wonderful program helps to transfer files between two mobile devices among Android device, iOS device, Symbian device. The transferable types of files including contacts, text messages, photos, videos, call logs, music, calendars, apps & apps data.

d_win d_mac

More Features of Phone Transfer:
-When transferring contacts, all related information such as job title, company name and email address will all be attached, too.
-Allows to backup data from mobile device to computer; restore backup to mobile device on computer; wipe data from mobile device before selling.
-Phone Transfer is specially developed for all phone users and supports over 2,000 phones, including all models of iPhone, Android and Symbian.
-All transferred files will be of the original quality.

Step 1. Run Program and Connect Device
To begin with, you should run Phone Transfer on the computer, then connect both your old Samsung and the new Galaxy S8 phone to the computer at the same time. Then choose “Phone to Phone Transfer” mode on the home page of program.

phone transfer main page

Step 2. Select File to Transfer
The two phones will be detected by the program once they are connected. Then, you can see the old Samsung and the new Galaxy S8 displayed as the “Source” on the left and as the “Destination” on the right. You can click “Flip” button if you need to switch their positions. Now select “Apps” & “App Data” files to ready for transferring.

select file to transfer

Step 3. Start to Transfer WhatsApp Messages from Samsung to Galaxy S8
When everything is ready, just simply click “Start Transfer” to begin the transfer.

transfer samsung whatsapp messages to galaxy s8

d_win d_mac

Related Article:

Two Ways to Transfer WhatsApp Messages from iPhone to Samsung Galaxy S8

How to Transfer WhatsApp Chat History from iPhone to Samsung Galaxy

How to Backup WhatsApp on Samsung Galaxy S8

How to Recover Deleted WhatsApp Chat History from Samsung Galaxy S8

How to Recover Data from Samsung Galaxy S8

How to Backup & Restore Samsung Galaxy S8

How to Recover WhatsApp Messages from Broken Samsung Galaxy Note 5

My Galaxy Note 5 is broken, unfortunately I forget to backup my phone recently. I need to check the WhatsApp messages from the broken phone that related to my work. Is possible to extract the WhatsApp data directly? Thanks advanced.

recover whatsapp messages from samsung galaxy note 5

Except for contacts,SMS,photos,WhatsApp messages is the important data most of us are not willing to lose it. WhatsApp is the most popular apps that people use to chat with others conveniently. However, I am afraid it is not so easy for you to extract the WhatsApp data since your phone is broken. Does it mean no way to get your WhatsApp conversation off from the broken device? Absolutely not, we are going to recommend a workable way to make it. It’s quite simple to restore WhatsApp messages by using Broken Android Data Recovery.

Extract WhatsApp Messages from Broken Samsung Galaxy Note 5

Broken Android Data Recovery is an amazing program which makes WhatsApp recovery from broken Android device an easy and efficient task. With the help of this software, you can easily recover WhatsApp messages and attachments from broken Samsung Galaxy Note 5. Other data like photos, videos, audio, contacts, call logs, SMS, documents, etc. are recoverable as well. The program supports almost all Samsung models, such as Samsung Galaxy S4/S5/S6, Samsung Galaxy Note 3/4/5. What’s more, you are allowed to preview the found files before recovery. Here is a step-by-step tutorial on how to recover WhatsApp chat messages from broken Samsung Galaxy Note 5.

d_win d_mac

How to Recover WhatsApp Messages from Broken Samsung Galaxy Note 5

Step 1.Run Broken Android Data Recovery Program
Firstly,please run Broken Android Data Recovery on your computer,click “Broken Android Phone Data Extraction” option,then click “Start“.

broken android data recovery home page

Step 2.Select the Samsung Model
On the new window,choose the device name and model of your Samsung phone.Click “Confirm” to continue.

select galaxy note 5 model

Step 3.Enter Samsung into Download Mode
Now you should follow the simple guide to enter your device into the Download Mode.Power off the phone > press and hold three buttons: “Volume Down”, “Home” and “Power” > press the “Volume Up” button to enter the “Download mode”.

enter samsung into download mode

Step 4.Fix Broken Samsung to Normal
The program will begin to download the recovery package for fixing your abnormal Samsung,and return it to the normal state.

fix samsung to normal

Note:Please keep connection with your Samsung and the computer, don’t use your device until the fixing process is end.

fix samsung completed

Now the system issue of your broken Samsung is fixing completed.Now your Samsung has back to the normal state as usual.After that,you could switch to the “Android Data Recovery” mode to scan your phone data including the deleted and existent items for data recovery.

Step 5.Extract WhatsApp Data from Samsung for Recovery
1)Select Data to Scan by Program
When you switch to the “Android Data Recovery” mode.Click the types of file which you want to recover and click “Next” to begin the scanning process.For WhatsApp data recovery,you should click “WhatsApp” and “WhatsApp Attachments”.

select files to scan

Now program will start to scan data stored on your Samsung,including the deleted data and the existent data of WhatsApp.

scanning data on samsung

2)Preview and Extract WhatsApp Messages from Samsung Galaxy Note 5
The scanning process will take you few minutes and you will find the files you choose will be listed here. Click the file type and you are able to preview the detailed information of the file.Select the ones which you want to restore and click “Recover” to extract the WhatsApp data from your Samsung phone to computer.

recover whatsapp broken samsung galaxy note 5

d_win d_mac

Related Article:

How to Recover Data from Broken Samsung Galaxy Note 5

How to Recover Text Messages from Broken Samsung Galaxy Note 5

How to Recover Contacts from Broken Samsung Galaxy Note 5

How to Recover Photos from Broken Samsung Galaxy Note 5

How to Recover WhatsApp Data from Broken Samsung Android

How to Recover Data from Samsung with Broken Screen