All posts by DHZ

How to Backup WhatsApp on Samsung Galaxy S8/S8 Plus

I’m so glad to get a new Galaxy S8 phone, and enjoy the new features on it. But one thing confuse me that how to backup the WhatsApp data on my Samsung device safely?

Many people like to chat via WhatsApp app on mobile device, conveniently and instantly. WhatsApp has announced and gain a large number of users with more than 800 million monthly active users, up from over 700 million in January 2015. Many Android users are more inclined to chat on WhatsApp rather than sending SMS. However, a part of WhatsApp users are not sure how to backup the WhatsApp chat history on Samsung device. The follow passages would guide you to backup WhatsApp messages correctly on Samsung Galaxy S8.

Backup WhatsApp on Samsung Galaxy S8/S8 Plus Safely

Android Backup & Restore – a wonderful data manager for Android, which will guide you to safely backup WhatsApp chat history from Samsung Galaxy S8 to computer, including text,sticker,photo,voice and video messages,  and restore WhatsApp messages for Android from backed up. Android Backup & Restore not only support to backup and restore WhatsApp data, but also other applications data, such as SCR Pro, AASTOCKS. Android Backup & Restore works well for almost all brands of Android, such as, Samsung Galaxy S8/S7/S6/S5/S4, Samsung Galaxy Note 5/Note 4/Note 3, HTC One M9/M8, Google Pixel, Nexus, LG, Lenovo, Motorola, and more.

d_win d_mac

Part 1:How to Backup WhatsApp Messages from Galaxy S8 to Computer

Step 1. RunAndroid Backup & Restore and Connect Galaxy S8 to the Computer
Please run Android Backup & Restore on the computer, connect your Samsung with computer and go on allowing debugging on it. Click “More Tools” in the homepage of program. Then, continue with “Backup” button under “Backup & Restore”, select “WhatsApp” of “Application” and “Application data”.

backup restore select app data

Step 2. Backup WhatsApp History on Galaxy S8
Once clicking the “Backup” button, the program will begin the backup process. After the processing bar shows you the ending of backing up, you can move to view on the backup history and view the app. Although you can’t see the details about the WhatsApp data but you can know the size of it.

backup whatspp data galaxy s8

d_win d_mac

Part 2:How to Restore WhatsApp Messages from Backed up on Computer

Note: Here you are allowed to restore the backed up file to the previous backup Samsung device or another Android as you like.

Step 1. Run Android Backup & Restore and Connect Galaxy S8 to the Computer
Please run Android Backup & Restore on the computer, connect Samsung with the computer and go on allowing debugging on it. Click “More Tools” in the homepage of program. Then, continue with “Restore” button under “Backup & Restore”.

Step 2. Extract Backup File on Computer
Here you will see all backup files of your mobile device previously, choose the one you want to check and click on the “View” button.

view backed up file

Step 3. Restore Backup File on Computer
When the scan stops, you can click “Restore” to restore the backed up file to any Android device. Now you can open WhatsApp on your Android device.

restore backup android

Done.

d_win d_mac

Related Article:

How to Backup & Restore Samsung WhatsApp History on Computer

How to Backup and Restore WhatsApp Messages for Android

How to Backup and Restore Samsung Galaxy S8 with Samsung Kies

How to Backup and Restore Samsung Data

How to Backup & Restore Samsung Galaxy S8

Recover Deleted WhatsApp Chat History from Samsung Galaxy S8

How to Transfer Android SMS to Samsung Galaxy S8

Samsung is set to release a smaller and cheaper version of the Galaxy S8, it has been reported. Its latest flagship smartphones, the S8 and S8+, came out earlier this year and feature 5.8-inch and 6.2-inch screens, respectively. Both handsets rock a “bezel-less” design, with Samsung managing to maximise screen-to-body ratio by squeezing as large a display as possible into an unusually compact body. The S8 is the most attractive smartphone on the market at present, and the S8 Mini is said to look exactly the same, only smaller.

Most of people like to change their phones frequently to try different kinds of hit phones. In addition to iPhone, many Android phones are popular around the world, for example, Samsung Galaxy S8. Switching to new phones is a great thing, but that might bring you troubles when you’re trying to transfer data between the old phone and the new one, including data like text messages, photos, contacts, music, videos, apps, call logs and others. Now you can stop feeling troublesome, we are going to introduce the best ways to you, help to switch files between two mobile phones.

Copy Android SMS to Samsung Galaxy S8

To transfer SMS from Android to Samsung Galaxy S8, Phone Transfer, a third party program for data transferring, can be a good helper. This software can move various types of files between phones based on iOS, Android, Symbian or BlackBerry. The transferable data including SMS, contacts, videos, photos, music, call logs, calendars and apps. Besides, Phone Transfer enables to backup data from mobile device to computer safely, restore backed up data for mobile device on computer completely. Phone Transfer works well for almost all Android brands of mobile devices, like Samsung (Galaxy S8/S7/S6, Note 5/4/3), HTC, Motorola, LG, Sony ,Huawei.

d_win d_mac

How to Switch Android SMS to Samsung Galaxy S8

Step 1. Install and Run Phone Transfer
Connect both your Android phone and Samsung Galaxy S8 to the computer and run the Phone Transfer. You will see the main screen shows connected devices is detected.  Click the “Start” button under “Phone to Phone Transfer” mode.

phone transfer main page

Step 2. Select SMS Transfer from Android to Samsung Galaxy S8
Make sure your target phone is on the right side while the another phone on the left. If not, click “Flip” to exchange their position.

On the middle panel, check data (contacts,text messages,call logs,music,videos,etc) to transfer from Android phone to new Samsung Galaxy S8.  For SMS transfer, you should click “Text messages“.

select files to transfer to s8

Step 3. Transfer SMS from Android to Galaxy S8
Press the blue button “Start Transfer” to begin transferring selected file from Android to Samsung. After a few minutes, all of data will be synced on your Samsung Galaxy S8.

transfer android sms to samsung galaxy s8

d_win d_mac

Related Article:

How to Transfer Android Files to Samsung Galaxy S8

How to Transfer Android Photos to Samsung Galaxy S8

How to Transfer Android Contacts to Samsung Galaxy S8

How to Backup & Restore Samsung Galaxy S8

How to Backup & Restore Samsung Galaxy S8 with Samsung Kies

How to Recover Lost SMS from Samsung Galaxy S8

How to Recover Lost Data from Samsung Galaxy S8

How to Manage Samsung Galaxy S8 on Computer

Videos Transfer from Broken Samsung Phone to S7/S6

My Samsung Note 4 fell and the boot screen does not shine. Then I force it to restart, it stuck in Samsung logo until now. But some important video still stored in the phone,Is there any way to get back the video on broken Galaxy Note 4 and transfer to the new S7? Ask advice!” Asked by Susan.

It must be a terrible thing that you unable to access your contacts, text message, photo, video and other data on your bricked Samsung phone. Once your phone was get brick like stuck in the Samsung logo/download mode, looping restart, what will you do? Even worse, you did not back up your data. How can you do?

There are not many software that can help to recover video from Samsung Galaxy, but don’t worry. Here we recommend you to download Broken Samsung Data Recovery . Broken Samsung Data Recovery is a useful program that can help you repair your broken Samsung phone, such as screen broken, black/blank screen, stuck in Samsung logo/download mode/recovery mode, system crashed, virus attacked, etc. And it’s enough to rescue your lost contacts, SMS, photo, music, video and other documents on broken Samsung phone. With the help of Broken Samung Data Recovery, you could easily extract videos from broken Samsung.

d_win d_mac

Note: The recovery function of Broken Samsung Data Recovery only applies to Samsung(Galaxy S7/S6/S5/S4/S3, Galaxy Note 5/Note 4/Note 3/Note 2, Galaxy Tab). You also can use this program to backup your phone data when it isn’t Samsung, but make sure that phone is normal.

Best Way to Transfer Videos from Broken Samsung Phone to S7/S6

Part One: Recover Videos from Broken Samsung Phone

Step 1. Launch the Program and Connect Broken Samsung Phone
Launch Broken Samsung Data Recovery after downloading and installation. Connect the broken Galaxy Note 4 to computer. Find “Broken Android Phone Data Extraction” and click “Start“.
Tip: If you want to fix the broken phone to normal, just click “Fix device”

broken samsung data recovery main page

Step 2. Select File Types
Next, you can choose the file types you want to recover. Lightly tap on the “Videos” and go on.

select file to restore

Step 3. Select Fault Type and Phone Information
At first you should choose the fault type depends on the broken situation of your Samsung.

choose broken samsung type

Then choose the correct name and model of your Broken Galaxy Note 4.

select broken samsung model

Step 4. Get Galaxy Note 4 into Download Mode
Then the program will ask you enter your Samsung Galaxy Note 4 into Download Mode.
1.Turn off your device;
2.Press and hold Volume down, Power and Home button simultaneously;
3.Press the Volume up button.

enter download mode broken samsung

Step 5. Download Recovery Package and Fix the Galaxy Note 4
Once your Broken Galaxy Note 4 into the “Download Mode“, the program will downloading recovery package and start to fix your Samsung phone to normal without data lost.

download recovery package for broken samsung

After repairing the device,the program will analyze your Note 4 for all exitent and lost files.

Step 6. Preview and Recover Videos on Galaxy Note 4 to Computer
After finishing scanning your Samsung Note 4, you can have preview on your data. Finally, please select the “Videos” and click “Recover” button to get them back on your computer.

restore videos samsung

d_win d_mac

Part Two: Transfer Videos to Galaxy S7/S6

Android Data Transfer is a software to let you transfer data like contacts, SMS, music, photo,video and other document in a simple way. With the help of Android Data Transfer, you could transfer videos from computer to Galaxy S7/S6 easily. This program also have the managed function. It can help you to manage you photo, music, video, contacts, SMS, and application. This software fully compatible with iOS 10.3 and Android 7.0.

d_win d_mac

After the above steps, your video is already inside your computer, and now we are going to the next section to export the videos to Galaxy S7/S6.

Step 1. Connect your Galaxy S7/S6 to Computer
Installing the Android Data Transfer and launch it, connect your Galaxy S7/S6 to computer. You can see the interface.

android data transfer mian page

Step 2. Preview and Export to the Galaxy S7/S6
Choose “Videos”, then you can have a preview on the videos. Select the videos you want and click “Export to device”.

export videos from pc to samsung

d_win d_mac

Related Article:

How to Transfer Contacts from Broken Samsung Phone to Galaxy S7/S6

How to Recover Data from Broken Samsung Phone

How to Recover Data from Broken Samsung Galaxy S6/S7

How to Recover Deleted Data from Samsung Phone

How to Recover Lost Videos from Samsung Galaxy

How to Fix Samsung Galaxy S7/S6/S5 Stuck in Recovery Mode

[Summary]: Your Samsung phone system crash and it stuck on recovery mode? Don’t worry, this article will teach you how to get Android phone out of recovery mode in boot screen by hard reset, soft reset and removing battery, also teach you how to fix Samsung Galaxy phone stuck in recovery mode without data loss.

People also read:

* How to Recover Data from Samsung with Broken Screen?

* How to Unlock Samsung Phone without Passcode?

Help. My Galaxy S5 stuck in Recovery Mode I have no idea to get it out. Are there any ways to fix the abnormal state of Samsung Galaxy S5?

“When I restart my Samsung Galaxy S6, I got a notification saying there was a security breach and that the phone needed to restart in order to undue any changes made. So I pressed the restart button and it started to restart normally until I saw in tiny blue text “RECOVERY BOOTING….”, I didn’t think much of it until nothing started to happen after a minute. I let it go for another 5 minutes and then 15 minutes. I came back and still it was at the same screen. I decided to turn the device off and on to see if that would do anything, nothing happened. I took the battery out and waited a few minutes to put it back in, but the Galaxy S6 still stuck in recovery mode,how can I fix Samsung Galaxy S6 stuck in recovery mode? Thank you!”

Your Samsung device may be stuck in boot screen for many reasons:

– A system update that went wrong;

– Malware downloaded outside of Google Play Store;

– Applications with bugs;

– Software customization such as flashing a new ROM, rooting the device, unlocking the device;

– Malfunctioning memory card.

The above-listed reasons all could make your phone stuck at boot or logo screen. If you want to narrow down the root cause of the booting trouble, you may try these three tricks:

Try to recall if you have recently new applications intalled on your phone;

– Remove memory card and see if the phone can restart normally;

– Recall if you have flashed, rooted or updated the phone lately.

After you have figured out the cause, you can solve the problem more effectively with specific solutions. However, it is okay that you couldn’t find out the causes. Just follow the under-listed solutions one by one to get your Samsung phone out of recovery mode.

Recovery Mode also calls Safe Mode, which is a feature on most Android devices that allows the phone to boot up without any third party apps or programs and on its original default settings. Sometimes Samsung phones get frozen or stuck on the loading screen. It’s really a common of an issue with Samsung phones running on the Android operating system. If your phone won’t turn on all the way like it should, or it boots up to its Samsung logo then freezes, or can’t get out of the stuck state, there is hope.

Fix Samsung Galaxy Phone Stuck in Recovery Mode

Part 1: How to Hard Reset to Get Samsung Galaxy Phone Out of Recovery Mode

Step 1. Turn off your Samsung Galaxy S7 phone if it is on;
Step 2. Press and hold “Volume Up“, “Home” and “Power” buttons simultaneously until your phone turns on; (For some kind of Android phone, “Home” button cannot be pressed, just skip it and press “Volume up” and “Power” only.)
Step 3. Press “Volume Down” to choose the menu, and select “Recovery Mode”.

enter samsung into recovery mode

Tips: Above method for almost all Android uerser, like Samsung Galaxy S9/S8/S7/Note 8, Huawei, LG, Motorola, Google, Sony, HTC,etc. But if you hard reset your phone,it will erase your phone’s data. However,below is the most safely mehtod to fix crashed, frozen or locked Android phone to normal and extract data for backup on Windows computer,not data loss at all.

Part 2: How to Fix Samsung Phone Stuck in Recovery Mode by Broken Android Data Extraction & Fix Tool

Broken Android Data Extraction & Fix Tool is exactly what you are look for. It provides the easiest solution to fix Samsung phone stuck in Recovery Mode. In addition, it also allows to fix and extract data from Android under any stuck cases, like Android stuck in Recovery Mode, Android stuck on start screen, Android stuck at black screen, Android stuck in the Download Mode. The recoverable data including text messages, photos, call history, music, videos, etc. And it supports Samsung Galaxy S6/S6 Edge, Samsung Galaxy S5, Samsung Galaxy S4, Samsung Galaxy Note 5/4/3,etc.

d_win d_mac

Broken Android Data Extraction & Fix Software Supported Devices and File Types

  Supported Devices
Samsung Galaxy S

S4: GT-I9500, GT-I9505, SCH-R970, SCH-R970C, SGH-I337M, SGH-M919, SPH-L720

S5: SM-G900F, SM-G900FQ, SM-G900I, SM-G900K, SM-G900L, SM-G900M, SM-G900P, SM-G900R4, SM-G900R6, SM-G900S, SM-G900T, SM-G900T1, SM-G900W8

S6:SM-G9200, SM-G920F, SM-G920P, SM-G920T, SM-G925F, SM-G925P, SM-G925T, SM-G928P, SM-G928T

Samsung Galaxy Note

Note 3: SM-N900, SM-N9002, SM-N9005, SM-N9006, SM-N9007, SM-N9008 SM-N9008V, SM-N900S

Note 4: SM-N9100, SM-N9106W, SM-N9108V, SM-N9109W, SM-N910C, SM-N910F, SM-N910G, SM-N910H, SM-N910K, SM-N910L, SM-N910P, SM-N910R4, SM-N910S, SM-N910T, SM-N910U, SM-N910V, SM-N910W8

Note 5: SM-N920C, SM-N920G, SM-N920I, SM-N920K, SM-N920L, SM-N920P, SM-N920R4, SM-N920S, SM-N920T, SM-N920W8

Samsung Galaxy Tab Tab Pro 10.1: SM-T525

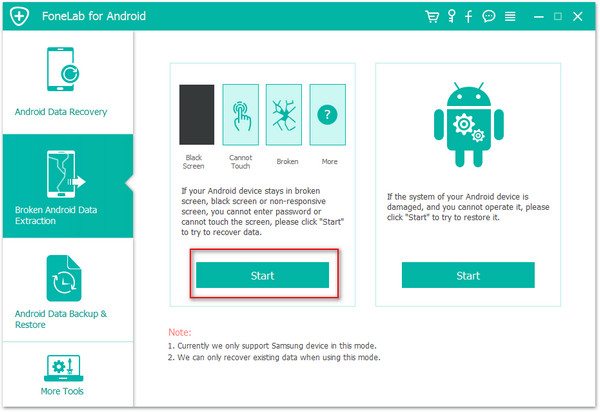
Step 1. Connect Galaxy S7 which Stuck in Recovery Mode to PC
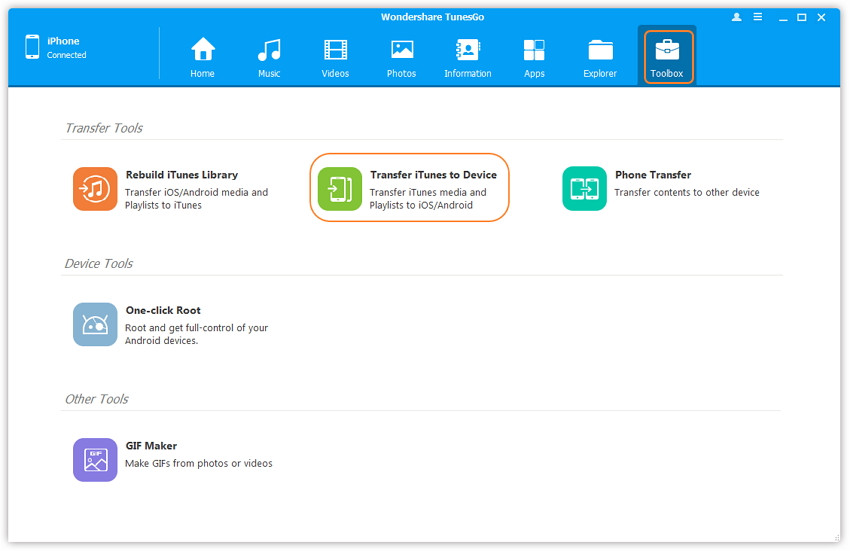
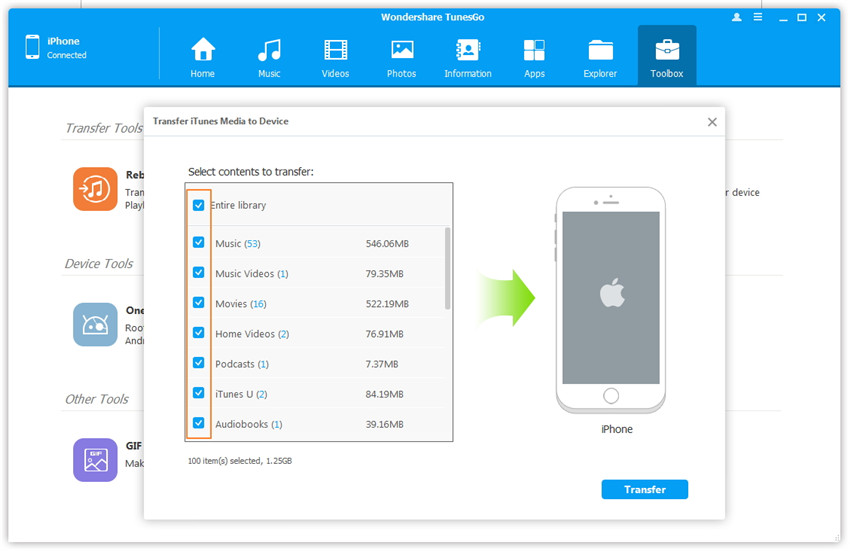
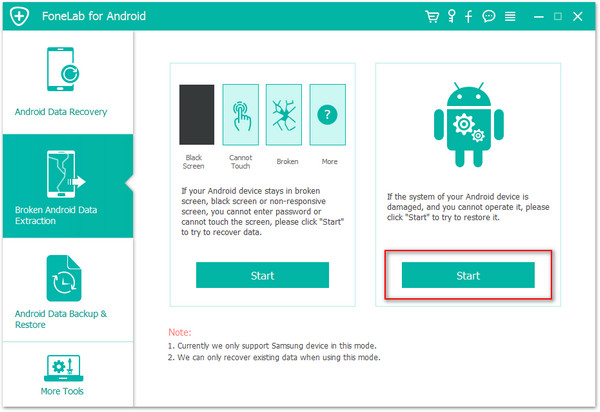
First of all, please connect the your Samsung which stuck in Recovery Mode to the computer. Run the Broken Android Data Recovery program and click” Broken Android Phone Data Extraction” mode, then click “Fix Device“.

broken android data recovery main page

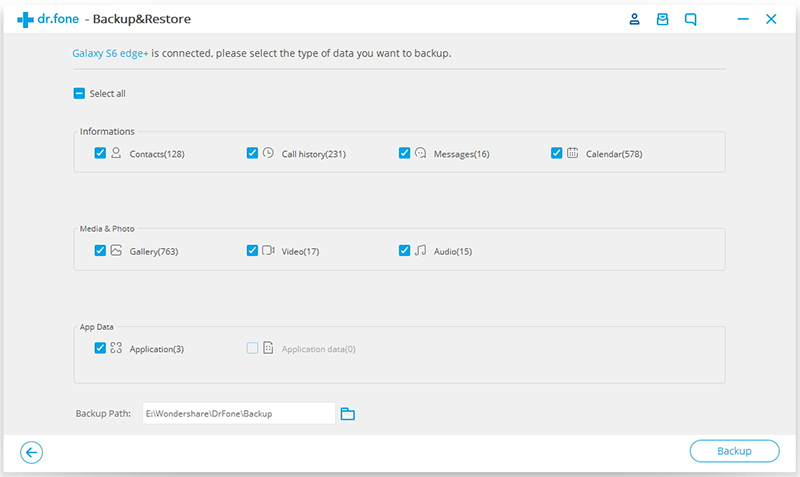
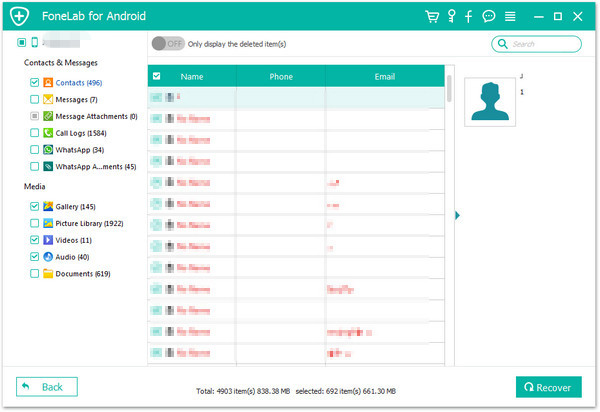
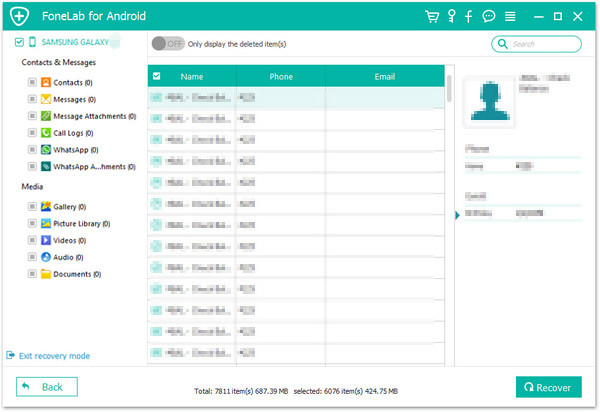
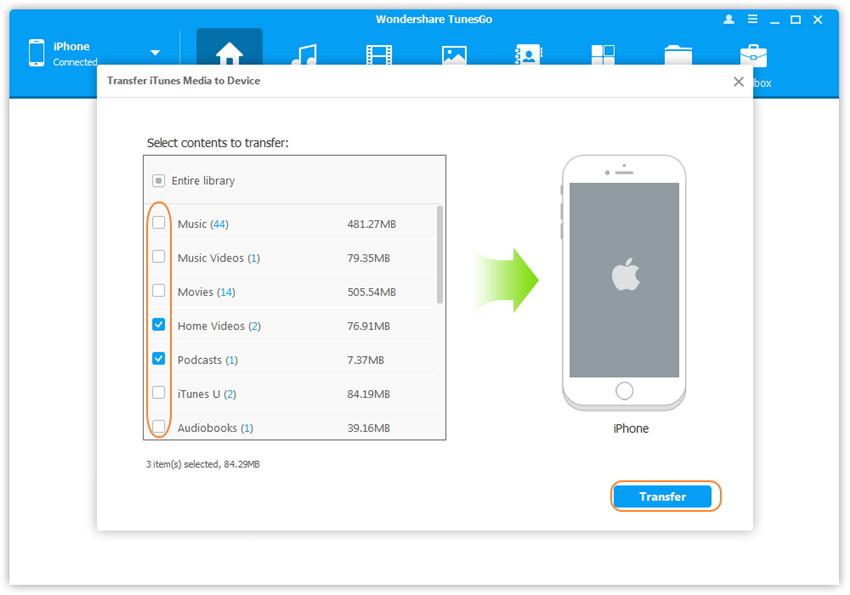
Step 2. Choose the File Types to Restore
Select the items you want to restore. The recovery option however includes contacts, text messages, photos, gallery, music, video and documents among others from Samsung.

select files to restore from samsung

Step 3. Select the Stuck Type of Samsung
You should select the stuck situation that match your device. Here you should select “Others“.

choose stuck type of samsung

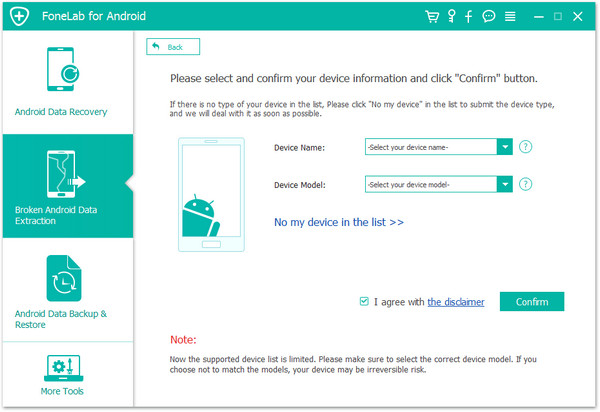
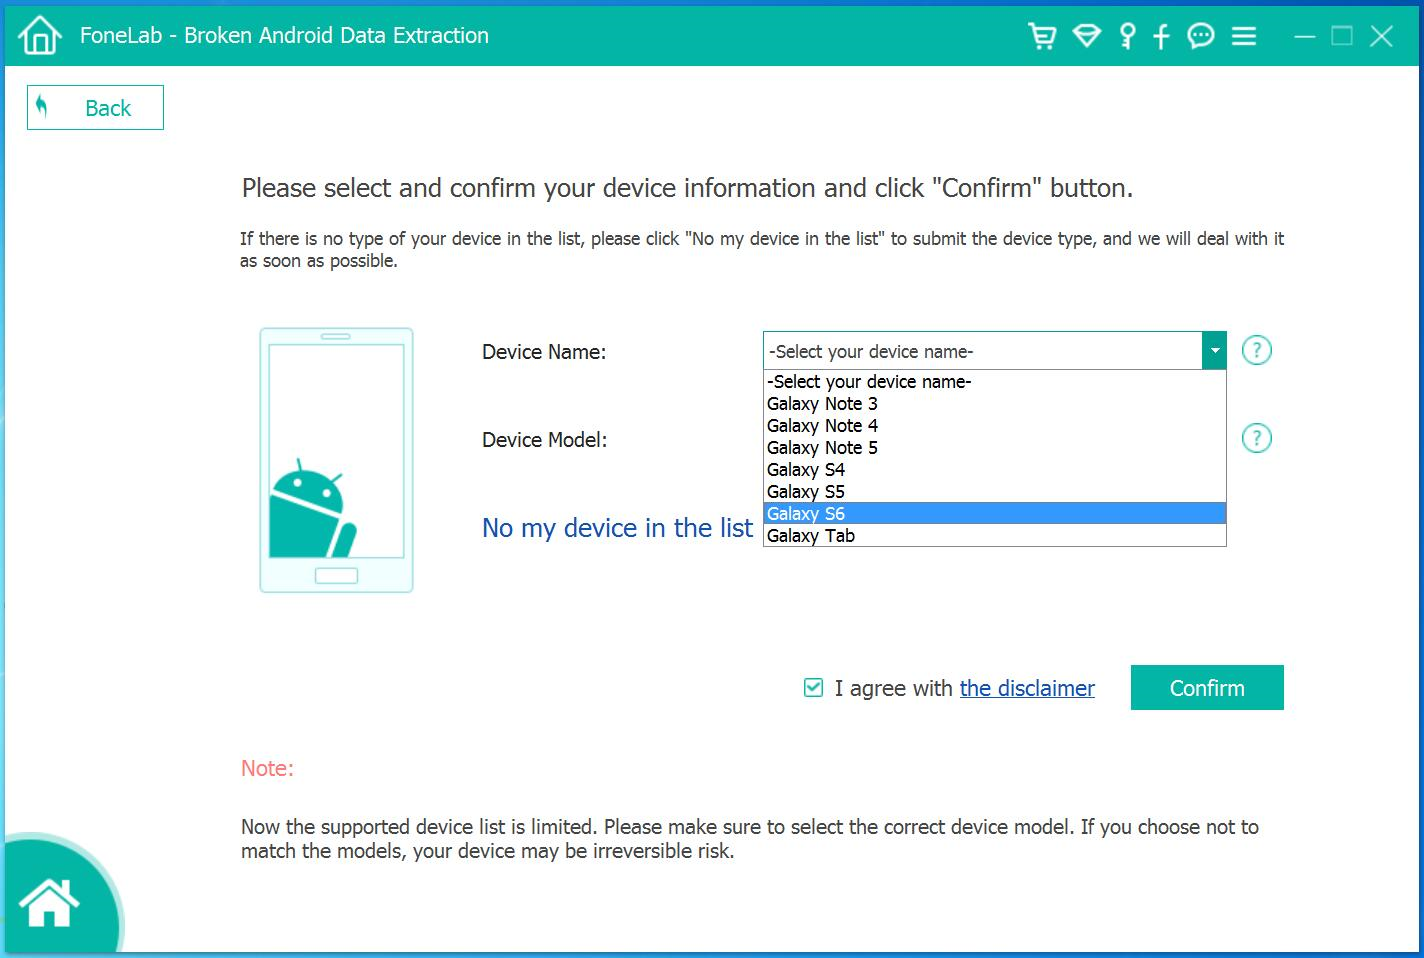
Step 4. Select the Phone Model of your Samsung
The program will enter the interface as the screenshot shows. Please select the phone model that matches your Samsung. Here you should select “Galaxy S7“.

select samsung model

Step 5. Get Samsung into Download Mode
Follow the guide to enter Samsung to the Download mode: Power off the phone > Press the volume down + Home button + Power button > Press the volume up to enter download mode.

get samsung into download mode

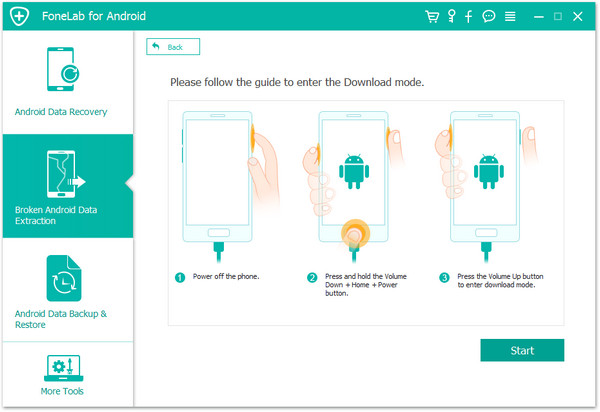
After that, your phone will enter “Download Mode” successfully.

fix samsung stuck in recovery mode

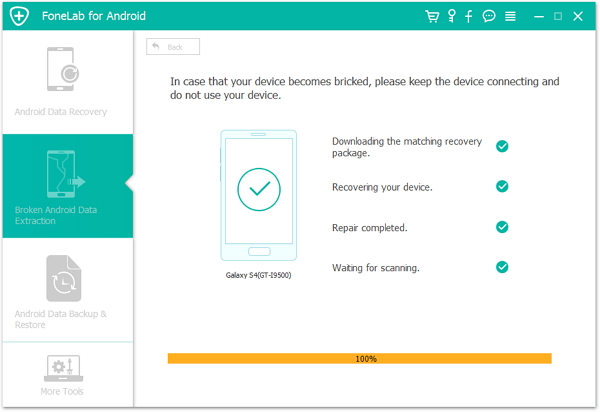
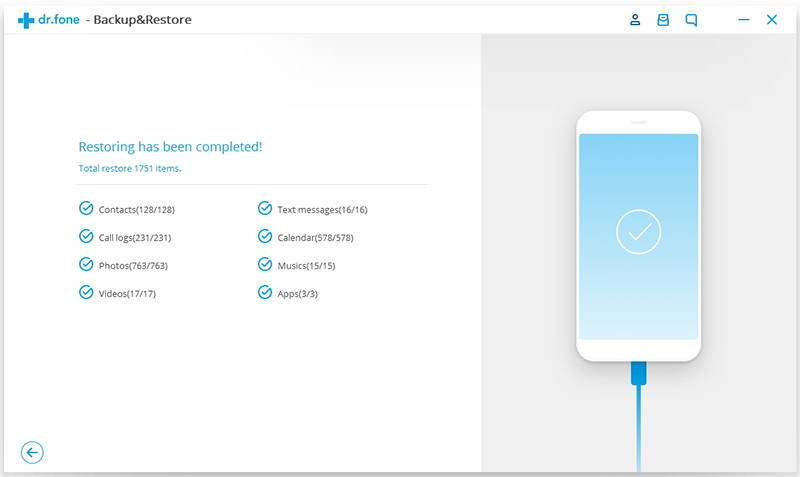
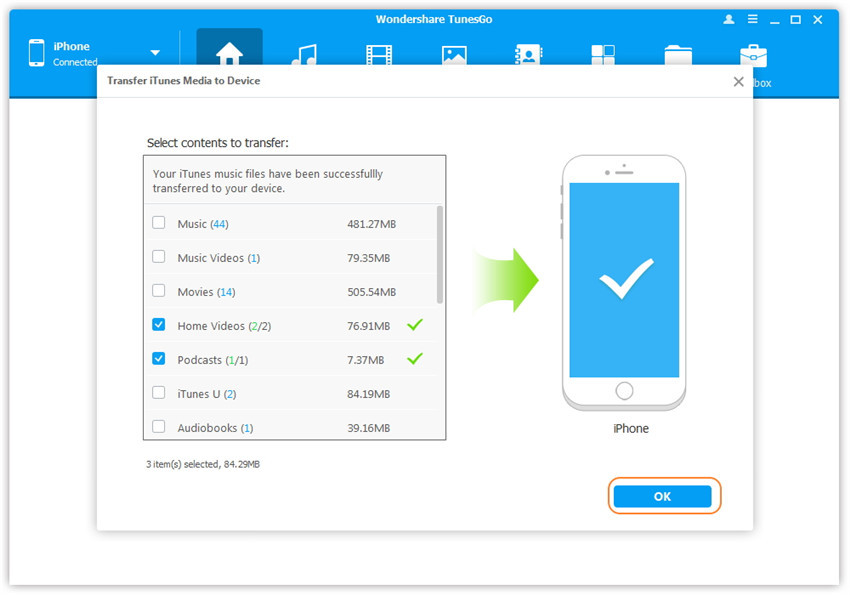
Broken Android Data Recovery program will download the recovery package for restoring your stucked Samsung device, which helps you enable it back to the normal state. Seconds later, the phone will restart as the normal one. Then you should check whether the device works or not.

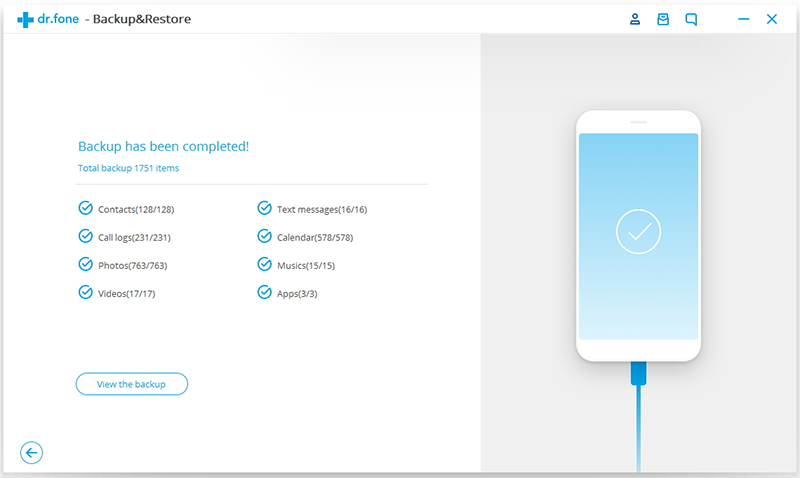
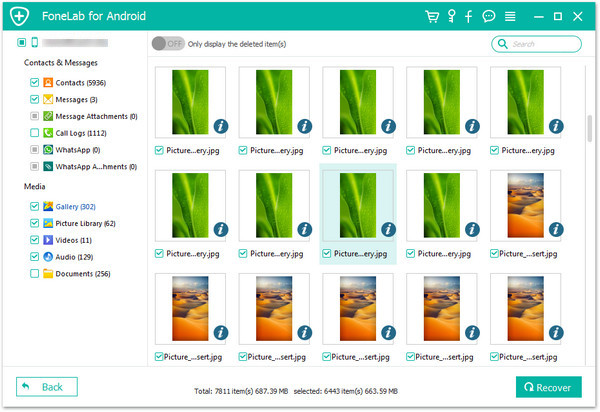
Step 6. Preview and Restore Data from Galaxy S7
Now you should select data to preview and restore the selected data to your computer from Galaxy S7.

recover data from samsung

d_win d_mac

Related Article

How to Fix Samsung Galaxy S7 Stuck on Samsung Logo

How to Fix Bricked Samsung Phone

How To Fix Samsung Stuck in Download Mode

How to Fix Frozen Samsung to Normal

How to Exit Recovery Mode on Android

How to Recover Data from Broken Samsung Galaxy S6/S7

How to Recover Data from Frozen Samsung

Fix Samsung in Recovery Mode

How to Transfer Contacts from Broken Samsung Phone to Galaxy S7/S6

I rooted my Samsung S4 last night, and it stuck in the Samsung logo until now. I forced it to restart, but it doesn’t work. There are many important data in that phone, and now I should use the contacts. I have a new Galaxy S7, is there any ways to help me transfer the contacts from the broken S4 to S7?” said by Amber.

If you are a Android users especially Samsung uses, most of the time you will want to make a change in your phone. You will upgrade or root the phone, without data backup. Unexpected turn of events that no one can think of. Once the phone go wrong such as stuck in Samsung logo/download mode/recovery mode, black or blank screen, system crashed, how to recover data like contacts from a broken Samsung Galaxy?

No matter your Samsung phone is cracked screen, water-damaged, black/blank screen or broken screen, stuck in logo, download mode or recovery mode, the Broken Samsung Data Recovery can help you restore contacts from broken Samsung easily. This software can not only do well in the case mentioned above, but also can fix your Samsung phone to normal when through virus attacked, system crashed, etc. And this useful program can help you recover contacts, photos, videos, SMS, call history, whatsApp message and other important data from a broken Samsung device. Please make attention, this recovery function only support Samsung device(Galaxy S7/S6/S5/S4, Galaxy Note5/Note4/Note3/Note2, Galaxy Tab), if you want to use this program to backup your phone data(not Samsung phone),please make sure that your phone is work well.

d_win d_mac

Two Parts for Transfer Contacts from Broken Samsung Phone to Galaxy S7/S6

Part One: How to Restore Contacts from Broken Samsung to Computer

Step 1.Run Samsung Broken Data Recovery on PC
Launch Broken Samsung Data Recovery after downloading and installation. Connect the broken Samsung phone to PC with USB cable. Find “Broken Android Phone Data Extraction” and click “Start“.

broken samsung data recovery main page

Step 2.Select the File Types you Need to Retrieve from Broken Samsung Phone
In this interface, you should choose the files type you want to restore, select “Contact”, then, click the “Next” button.

scan data broken samsung

Step 3.Choose a Phone Fault Type
Now, you need to select a phone fault type. Please select “Stuck in the start up screen” option at the left side. If it is in other situation, that choose other items.

choose broken samsung type

And then you need to select your device name and model information.

select broken samsung model

Step 4.Enter Broken Samsung Phone into Download Mode
After choosing the phone name and model, you will be asked to get your broken Samsung phone into the Download Mode. Just follow the three steps, and click “Start”.
1.Power off your device
2.Press the volume down, Home and Power button at the same at the same time
3.Press the volume up button to enter “Download Mode”

enter download mode broken samsung

Step 5. Fix the Broken Samsung Phone to Normal
After entering into download mode, the program will download recovery package to your broken Samsung Galaxy phone. Then it will start to fix.

download recovery package for broken samsung

Step 6.Recover Contacts from Broken Samsung Phone to Computer
After repairing the phone, upcoming screen shows all files recoverable from the broken phone. Preview them and mark “Contacts”. Finally, click “Recover” to save all of them on your computer.

restore contacts broken samsung

d_win d_mac

Part Two: How to Transfer Contacts from Computer to Galaxy S7/S6

When you finish the steps above, you have restored the photos to computer from the broken Samsung phone. Then download the Android Data Transfer. It’s a powerful data manage tool for transferring & managing data for Android device on computer safely. With the help of Android Data Transfer, you could easily transfer contacts from computer to Galaxy S6/S7 with only two steps.

d_win d_mac

Step 1. Connect your Galaxy S7/S6 to Computer
After installing the program, connect your Galaxy S7/S6 to computer. You can see the interface  and select “Information”.

android data transfer mian page

Step 2. Preview and Export to the Galaxy S7/S6
Choose “Contact”, then you can preview on the details. Select the contacts items you want and click “Export to device”.

transfer contacts to samsung

d_win d_mac

Related Article:

How to Recover Contacts from Broken Android

How to Recover Data from Broken Samsung Phone

How to Recover Contacts from Broken Samsung Phone

How to Recover Data from Broken Samsung Galaxy S6/S7

How to Recover Deleted Data from Samsung Phone

How to Recover Lost Contacts from Samsung Galaxy S6/S7

How to Transfer Photos from Computer to iPhone 8/iPhone X

I try to transfer the photos from computer to my iPhone 8 in normal way but it failed. I am not sure what’s wrong with it. Can anyone give me some advice?

I have got a new iPhone X,now I want to import pictures from computer to iPhone X,any third-part tool helps me add photos to my new iPhone X without iTunes?

There are actually a couple of effective ways that you can use to upload your photos to iPhone 8. One important thing to remember is that, unfortunately you can’t just plug your iPhone in and start copying photos to computer. This ‘limitation’ often takes new iPhone users by surprise as they expect the iPhone works like a USB drive. Recently we got a lot of report that iPhone 8 users can’t be able to let the computer access the device and can’t do anything on it to make the computer detect it. This post is aim to fix the similar issues, help to transfer photos to iPhone 8 normally.

Import Photos to iPhone 8 and iPhone X Smoothly

iOS Manager can fix your problem, it is useful for transferring & managing data for iOS devices efficiently. With the help of iOS Manager, you are allowed to transfer photos to iPhone 8/X without hassle. iOS Manager enables to transfer photos between computer and iPhone, transfer photos between iOS/Android device and iPhone. What’s more, this program supports to transfer & manage videos and music for iOS device. Not only iPhone 8, all the functions of iOS Manager is applicable to all models of iOS devices, such as iPhone 7, iPhone 6S/6/5S/5, iPad & iPod.

d_win d_mac

Part 1: Transfer Photos to iPhone 8/X with iOS Manager

Step 1. Run iOS Manager and Connect iPhone 8
Launch iOS Manager and connect your iPhone 8 to the computer.

ios manager main page

Method 1:Transfer Photos by Tapping Buttons

Step 2. Add Photos from Computer to iPhone 8
Click “Photos” icon at the top of the main interface, then select the specific option “Photo Library“. Please note that “Camera Roll”, “Photo Stream” and “Photo Shared” are not available to add photos.

transfer photos from photo library

Later, click “Add” and then select “Add File” or “Add Folder” to add photos from your computer. If you only want to select some photos, then click “Add File“, and then hold down “Shift” or “Ctrl” key to choose multiple photos; if you want to transfer all the photos in one folder, then click “Add Folder“. After that, click “Open” to import the selected photos. Here we only add photos to iPhone 8 by clicking “Add File” for example.

add file to transfer

select photos to transfer to iphone 8

d_win d_mac

Method 2:Transfer Photos by Drag and Drop

Step 2. Find Photos on Computer
Find and open the photo folder on your computer which includes the photos that you wish to transfer to iPhone 8.

open the photo folder on pc

Step 3. Export the Photos to iPhone 8 by Drag and Drop
Click “Photos” icon on the main interface of iOS Manager, then go to the “Photo Library” window. Drag and drop the selected photos from your computer to the “Photo Library” window of iOS Manager.

drap and drop the selected photos

Note: With the two methods above, you can also select to add photos to one of the photo albums under “Photo Library”.

selected photos from photo albums

d_win d_mac

Part 2: Transfer Photos to iPhone 8/X with E-mail

Another available way of transferring photos to iPhone 8 from Mac/PC is by emailing the photo to myself as an attachment. This method is in my opinion the simplest and probably the quickest way of doing it.The only thing to consider is that it only works well if you want to just send a small number of photos. This is due to a limitation that email providers (e.g. Gmail, Hotmail, Yahoo) have imposed on the size of an attachment that can sent in one email.

transfer photos to iphone via email

Related Article:

How to Transfer iTunes Videos to iPhone 8

How to Transfer iTunes Music to iPhone 8

Best iPhone 8 Manager: How to Transfer Files to iPhone 8

How to Recover Deleted Data from iPhone 8

How to Backup & Restore iPhone 8

How to Sync iTunes Videos to iPhone 8/iPhone X

I have a question. How to only sync the videos from iTunes to iPhone 8 directly? The iTunes sync itself just offer a solution to sync all data at one time. Any good points?

We know almost everything about Apple substantially redesigned iPhone 8: the massive, elongated display, wireless charging, vertically aligned dual camera and price increase. If you have got a new iPhone 8, and wanna sync favorite videos from iTunes with the previous iPhone after you set up your new device. iTunes automatically backup will sync all data with your new device instead of selecting. So how to copy the videos from iTunes to your new iPhone only?

Sync iTunes Media Files with iPhone 8/iPhone X

You should try this iOS Manager, which is an excellent data manage tool for transferring & managing data for iOS device on computer safely, including videos, photos, music, contacts, SMS, apps. With the help of iOS Manager, you could sync iTunes videos to iPhone 8/iPhone X with one click. What can this program do for you? To transfer files between iOS device and computer, transfer files between iOS device and iTunes, transfer files among iOS & Android device. iOS Manager works well for all iOS devices, such as, iPhone X, iPhone 8, iPhone 7, iPhone 6S/6, iPhone 5S/5, iPad and iPod.

d_win d_mac

Part 1: How to Transfer Videos from iTunes to iPhone 8/iPhone X

iOS Manager offers two solutions to transfer videos from iTunes to iPhone 8/iPhone X,  Movies, Music Videos, TV Shows, iTunes U and Podcasts are supported.

Method 1: Transfer Videos from iTunes to iPhone 8/iPhone X With 1-Click File Transfer

Step 1. Run iOS Manager and Connect iPhone 8/iPhone X  
Run iOS Manager and connect your iPhone 8/iPhone X  to the computer. Then click “Transfer iTunes Media to Device” mode on the main interface.

ios manager main page

Step 2. Select Files to Transfer
iOS Manager will detect all the media files in iTunes and show them by list on the pop-up window. By default, the entire library has been checked. But you could uncheck the items that you don’t want to transfer to your iPhone.

select transfer videos to iphone 8

Step 3. Transfer Media Files to iPhone 8/iPhone X
Click Transfer to start transferring selected files to your iPhone and then click “OK” to complete the process.

Note: iOS Manager enables to automatically detect the duplicates and only transfer the exclusive contents from iTunes to iPhone 8/iPhone X.

click transfer button

transfer music to iphone 8

Method 2: Transfer Videos from iTunes to iPhone 8/iPhone X With Toolbox

Step 1. Run iOS Manager and Connect iPhone 8/iPhone X
Launch iOS Manager and connect your iPhone 8/iPhone X to the computer. Then go to Toolbox > Transfer iTunes Media to Device on the Toolbox interface.

tool box main page

Step 2. Select Files to Transfer
iOS Manager will detect all the media files in iTunes and show them by list on the pop-up window. By default, the entire library has been checked. But you can uncheck the items that you won’t transfer to your iPhone.

select video file transfer

Step 3. Transfer Media Files to your iPhone 8/iPhone X
Click “Transfer” to start transferring selected files to your iPhone 8/iPhone X and then click “OK” to complete the process.

Note: iOS Manager enables to automatically detect the duplicates and only transfer the exclusive files from iTunes to iPhone 8/iPhone X.

click transfer to begin

transfer itunes videos to iphone 8 complete

d_win d_mac

Part 2: How to Transfer Videos from Computer to iPhone 8/iPhone X

Step 1. Run iOS Manager and Connect iPhone 8/iPhone X
Launch iOS Manager and connect iPhone 8/iPhone X to the computer.

ios manager main page

iOS Manager offers two solutions to transfer videos from computer to iPhone 8/iPhone X,  Movies, Music Videos, TV Shows, iTunes U and Podcasts are supported.

Method 1: Transfer Videos from Computer to iPhone 8/iPhone X Using Buttons

Step 2. Find Video Type on iPhone 8/iPhone X
Click “Videos” icon at the top of the main interface. Select a specific option Movies/Music Videos/Home Videos/TV Shows/iTunes U/Podcasts to transfer( “Movies” is the default option).

select videos to transfer

Step 3. Select and Add Videos from PC/Mac to iPhone 8/iPhone X
Click “Add” and then select “Add File” or “Add Folder“.

Note: If you need to select a few videos, then click “Add File“, and then hold down Shift or Ctrl key to choose multiple videos; if you want to transfer all the videos in one folder, then click “Add Folder”.

select add file or add folder

From the pop-up window, browse and choose the target video(s) from your computer. And click “Open”. Then, the selected videos will be imported to the iPhone 8/iPhone X.

open the video older

Method 2: Transfer Videos from Computer to iPhone 8/iPhone X by Drag and Drop

Step 2. Find Videos on your PC/Mac
Find and open the video folder on your PC or Mac which includes the videos that you wish to transfer to your iPhone 8/iPhone X.

find videos on computer

Step 3. Export the Videos to iPhone 8/iPhone X by Drag and Drop
Click “Videos” icon on the main interface of iOS Manager, it will go to the Movies window by default, Music Videos, TV Shows, iTunes U and Podcasts are available here too. Drag and drop the selected videos from your computer to the Movies window of iOS Manager.

export videos to iphone 8 by drag and drop

d_win d_mac

Related Article:

How to Transfer iTunes Music to iPhone 8/iPhone X

Best iPhone 8 Manager: How to Transfer Files to iPhone 8/iPhone X

How to Recover Deleted Data from iPhone 8

How to Backup & Restore iPhone 8

How to Manage iPhone 7 on Computer

How to Transfer Videos to iPhone 7

How to Backup Samsung Galaxy S6 to Galaxy S8 with Samsung kies

Hello. I just got a new Samsung Galaxy S8 phone and going to sell my old Galaxy S6 device. How to backup the data from my old Galaxy S6 to the new Galaxy S8 with Samsung Kies?

Nowadays, people change their mobile phone frequently and they are in great need of transferring phone data between two phones. Having a new Samsung Galaxy S8 mobile phone and need to backup the files from your old phone to the new Samsung? For most of the Samsung users, they will use the Samsung Kies to backup data from old phone to the new Samsung device directly. Samsung Kies enables to backup Samsung Galaxy S6 to Samsung Galaxy S8 cmpletely, including contacts, text messages, calendar, call logs, playlists info, apps, photos, music and videos.

Part 1: Backup Galaxy S6 to Galaxy S8 with Samsung Kies

Step 1. Connect Samsung Galaxy S6 to PC and Select “Backup & Restore”
Connect your Samsung Galaxy S6 phone on computer with an USB cable. Once successfully connected, choose “Backup & Restore” mode and click “Data backup” option. Samsung Kies will divides data on two categories: Personal information (contacts, memo, planner, call log and message) and Content (video, music and photo).

backup mode kides

Step 2. Begin to Backup Samsung Galaxy S6
Choose files and content you need to backup, (here I suggest you to click all the data). Then click the “Backup” button at the top-right corner and the backup process will begin automatically.

backup samsung kids

Just a few minutes gone, press the “Complete” button to end the process. You can directly check the media backup files on your computer, like music, videos and photos. But for call log and messages backup, you need to install some specific software to read them.

Step 3. Choose Backup Files
Connect your Samsung Galaxy S8 phone on computer with an USB cable. Once successfully connected, choose “Backup & Restore” mode and click “Restore data” option. The software will automatically load the files your backed up from the Samsung Galaxy S6 before. (That’s why we always reminder users not to modify the route of backup files. )You can restore all the data or select separate categories of files.

restore mode samsung kids

Step 4. Restore Backed Up Data to Samsung Galaxy S8
After clicking the content you need to regain, tap the “Restore” button to start restoring. When the process completed, you can check the data on your Samsung Galaxy S8 phone.

restore data samsung kids

Here we will introduce another tool to you which helps to backup & restore Samsung data on computer safely called Android Manager. Please continue to read.

Part 2: Backup Galaxy S6 to Galaxy S8 with Android Manager

Android Manager is a wonderful data manage tool for transferring & managing data for Android devices, including music,videos,photos,contacts,SMS,apps. Android Manager allows to transfer data between Samsung Android and computer, transfer data between Samsung Android and iTunes, transfer data among Android and iOS device.

d_win d_mac

android manager mian page

Related Article:

How to Backup & Restore Samsung Galaxy S8 with Samsung Kies

How to Safely Backup Samsung Galaxy S6

How to Manage Samsung Galaxy S8 on Computer

How to Manage Samsung Galaxy S6/S5/S4/S3/Note on PC/Mac

How to Recover Data from Samsung Galaxy S8

How to Backup & Restore Samsung Galaxy S8

How to Transfer Samsung Data to Samsung Galaxy S8

How to Backup & Restore Samsung Galaxy S8 with Samsung Kies

News about Samsung Galaxy S8:
June 29th marks the 10th anniversary of the iPhone, the handset that changed everything in the mobile business. So what better day for Samsung to announce a new phone? Before you get too excited about it, you should know it’s just a new version of the Galaxy S8. We already knew that a pink Galaxy S8 was in the works, and we heard rumors that said only certain markets would get them at first. In June 29th, Samsung confirmed everything. That’s right, it appears that only the bigger Galaxy S8 is going to get this particular color option. Starting June 30th, the Rose Pink Galaxy S8+ will be available in select markets including South Korea and Taiwan.

When you get a new Samsung Galaxy S8, you will be glad to enjoy the new device in hand. However, you should realize that its important to do a reliable backup for your new Samsung device. You know, accident always happen when you are not ready. We may lose personal data from mobile device for different cases, like deleted carelessly, device system update, device system error, device factory reset restore. How to backup & restore Samsung Galaxy S8 safely with Samsung Kies on computer? Here I will offer the entire effective solution for reference.

Part 1: Backup & Restore Samsung Galaxy S8 Safely with Samsung Kies

Samsung Kies is a pretty good tool for backup & restore data for Samsung on computer safely, to backup and restore contacts, text messages, calendar, call logs, playlists info, apps, photos, music and videos from Samsung device with a short time and simple steps.

How to Backup Samsung Galaxy S8 with Samsung Kies

Step 1. Connect Samsung Galaxy S8 to the Computer and Select “Backup & Restore” Option
First of all, please connect your Samsung phone to the computer via a USB cable. Once successfully connected, choose “Backup & Restore” mode and click “Data backup” option. Samsung Kies will divides data on two categories: Personal information (contacts, memo, planner, call log and message) and Content (video, music and photo).

backup mode samsung kides

Step 2. Backup Samsung Galaxy S8 Data
Now you should choose files and content you are desire to backup. Then click the “Backup” button at the top-right corner and the backup process will start automatically.

backup galaxy s8 samsung kids

When it is done, press the “Complete” button to end the process. You could directly check the media backup files on your computer, like music, videos and photos. But for call log and messages backup, you need to install some specific software to read them.

How to Restore Samsung Galaxy S8 with Samsung Kies

Step 1. Connect Samsung Galaxy S8 to the Computer and Select “Backup & Restore” Option
First of all, please connect your Samsung phone to the computer via a USB cable. Once successfully connected, choose “Backup & Restore” mode and click “Restore data” option. The software will automatically load the files your backed up from the device previously. (That’s why we always reminder users not to modify the route of backup files. )You can restore all the data or select separate categories of files.

restore mode samsung kids

Step 2. Restore Backup to Samsung Galaxy S8
After clicking the content you need to regain, tap the “Restore” button to start restoring. When the process completed, you can check the data on your Samsung phone.

restore samsugn s8 samsung kids

Part 2: Backup & Restore Samsung Galaxy S8 Safely with Android Manager

Another way are recommended for you is backup & restore Samsung Galaxy S8 without Samsung Kies. Android Manager is a product which used to manage data for Samsung Android device. With this program, you are allows to transfer and manage data for Samsung Galaxy S8 on computer freely, including music, videos, photos, contacts, SMS,apps. To sum up, Android Manager helps to transfer data between Samsung Galaxy and computer, backup and restore Samsung Galaxy S8 without Samsung Kies on computer completely. Additionally, Android Manager enables to transfer data between Samsung and iTunes, transfer data among Android device and iOS device. Android Manager works well for almost all models of Samsung phones, including Galaxy S8(Plus)/S7(Edge)/S6(Edge)/S5/S4, Note 5/Note 4/Note 3, A9/A7/A5, and so on.

d_win d_mac

android manager

Tutorial: How to Manage Samsung Galaxy via Android Manager

Related Article:

Backup and Restore Galaxy S7/S6/S5 Data with Samsung Kies

How to Backup & Restore Samsung Galaxy S8

How to Recover Lost Photos from Samsung Galaxy S8

How to Recover Data from Samsung Galaxy S8

How to Transfer iPhone Files to Samsung Galaxy S8

How to Transfer Android Files to Samsung Galaxy S8