“My boyfriend bought a new Galaxy S7 phone last week, he set the lock screen pattern on the device. Recently I saw him was talking with someone all the times, I want to know who is it he talked with. How to bypass the patter on Galaxy S7 lock screen without losing data?”
Most mobile devices are equipped with password lock screen function, including the pattern, password, pin. The safety measures you take in the Samsung Galaxy S7 is want to protect personal data on device and avoid leaking to anyone. Since you don’t want your kid or anyone else to access your phone and also you want to keep your privacy merely to yourself, therefore setting and entering the password each time when accessing the device. However, how to remove the lock screen password on Samsung device without data loss? It’s a hot topic that we are going to discuss.
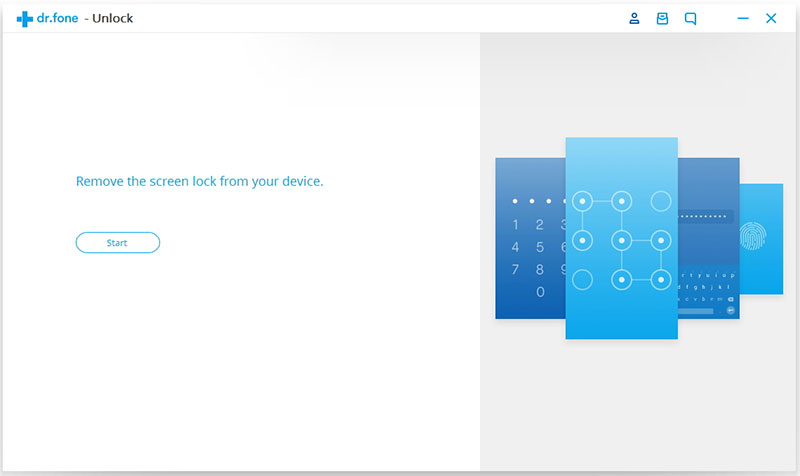
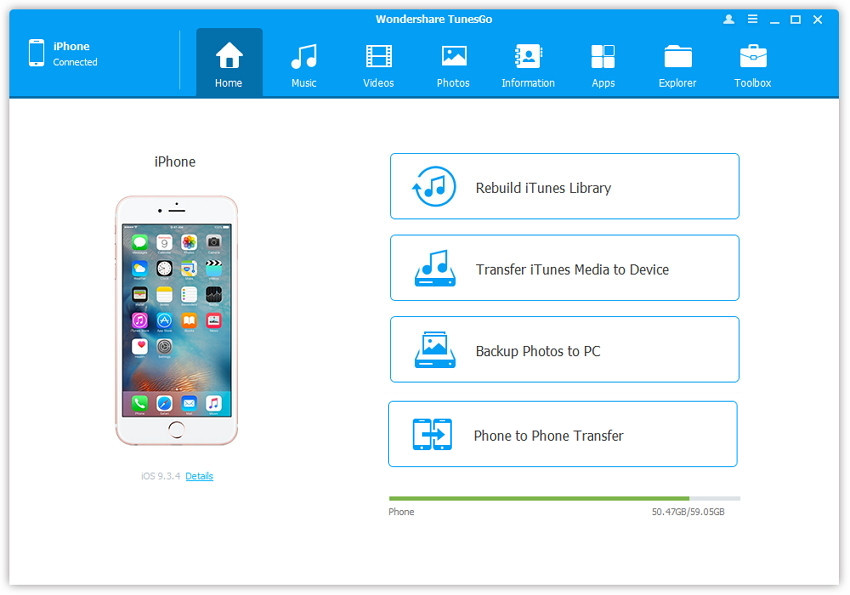
Bypass Lock Screen on Samsung Galaxy S7/S7 Edge without Data Loss
Android Lock Screen Removal is a famous tool for removing password on Android lock screen without data loss. With the help of this program, you could bypass pattern/password on Samsung Galaxy S7 lock screen without losing data. Android Lock Screen Removal supports to remove 4 lock screen types on Android – pattern, PIN, password & fingerprints. Simple and easy to use. Android Lock Screen Removal works for Samsung Galaxy S/Note/Tab series, including Samsung Galaxy S7, Samsung Galaxy S6.
Bypass Pattern/Password on Samsung Galaxy S7 Lock Screen
Step 1. Run Program and Select “Android Lock Screen Removal” Feature
First of all, run Android Lock Screen Removal tool and click “More Tools”. Then select “Lock Screen Removal” option.
This Android Lock Screen Removal tool allows you to remove the password of PIN, patterns, password and fingerprint from Samsung Galaxy S7. Connect your Samsung device and click “Start” to begin the process.
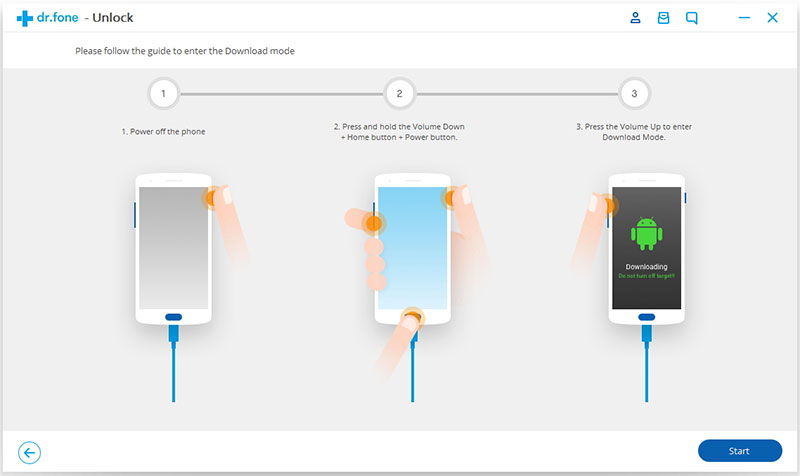
Step 2.Enter Locked Samsung into the Download Mode
Follow the instructions on the program to get your Samsung phone into Download Mode.
1)Power off the phone.
2)Press and hold volume down + home button + power button at the same time.
3)Press the volume up to enter download mode.
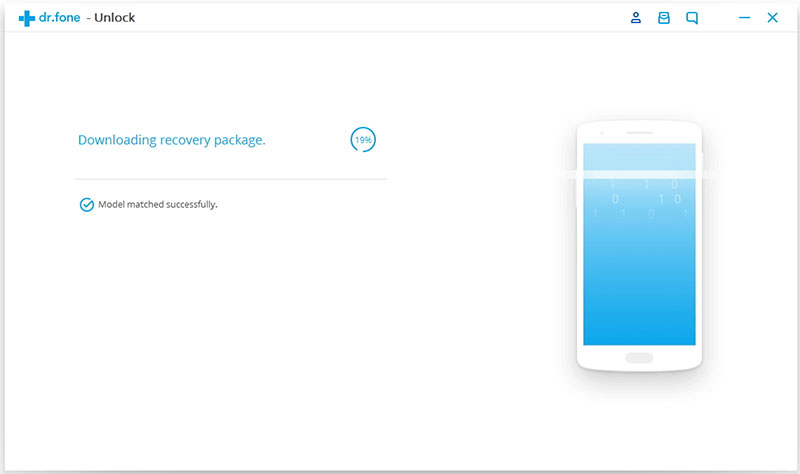
Step 3.Download Recovery Package for Samsung
When you get your Samsung into the download mode, it will begin to download recovery package for your device. Just wait seconds until it’s complete.
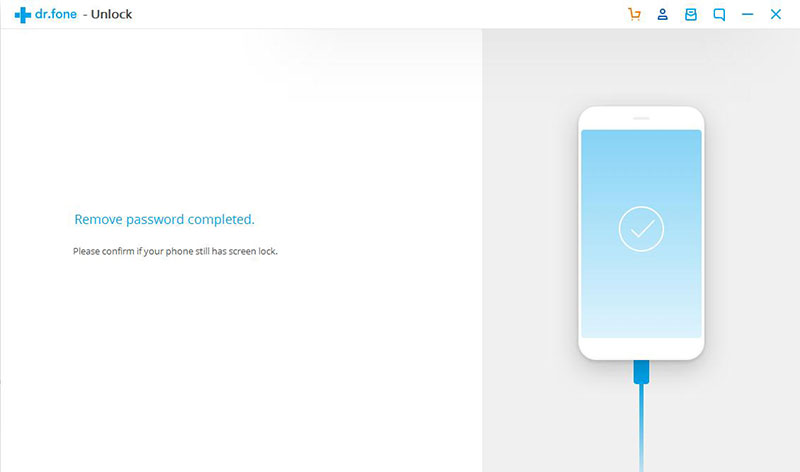
Step 4. Bypass Pattern/Password on Galaxy S7 Lock Screen
When the recovery package downloading is complete, the Android Lock Screen Removal will begin to remove Samsung lock screen without losing data. Once the whole progress is finish, the lock screen on your phone will be successfully removed and you can use your Samsung phone as usual freely.
Supersized smartphones is clearly the trend of 2017: massive new displays crammed inside phones with super skinny bezels. And the iPhone 8 looks set to make the biggest leap of them all. A dramatic shift from the 4.7-inch iPhone 7 to a 5.8-inch on iPhone 8. This 1.1-inch increase is larger even than Samsung’s jump from 2016’s Galaxy S7 and Galaxy S7 Edge to the new ‘Infinity Displays’ on the Galaxy S8 and Galaxy S8 Plus.
When you get a new iPhone 8 and you should do something then enjoy using the new device. Backup iPhone data , keep a copy of your information in case your device is ever replaced, lost, or damaged. Backup iPhone data with iTunes may be overwrite your old data saved on iTunes. So how to backup iPhone without iTunes? This post will show you the best ways to backup and restore iPhone 8 on computer without iTunes, and selectively.
Backup & Restore iPhone 8 Safely on Computer
iOS Backup & Restore can do you a favor, help to backup and restore data for iPhone 8 safely without iTunes. The supported data including contacts, SMS/iMessages, photos, videos, notes, call logs, Apps data and other personal documents. iOS Backup & Restore enables to backup iPhone data to computer, restore backup from computer to iPhone as well. iOS Backup & Restore offers full support for iPhone 7/6S/6/SE/5C/5C/5/4S/4, iPad Pro, iPad Air, iPad mini, iPod Touch and other iOS devices.
How to Backup and Restore iPhone 8 on Computer
Step 1. Run the Program on Computer and Connect iPhone 8 to Computer
After runing iOS Backup & Restore on the computer, click on “More Tools”option in main page of this program, select “iOS Data Backup & Export”option from the tool list. Then connect your iPhone 8 to the computer using USB cable. By default, the program will automatically detect your iPhone soon.
Note:If you have used iOS Backup & Restore to backup your device privously, you can click on “To view the previous backup file” to view the previous backup files list.
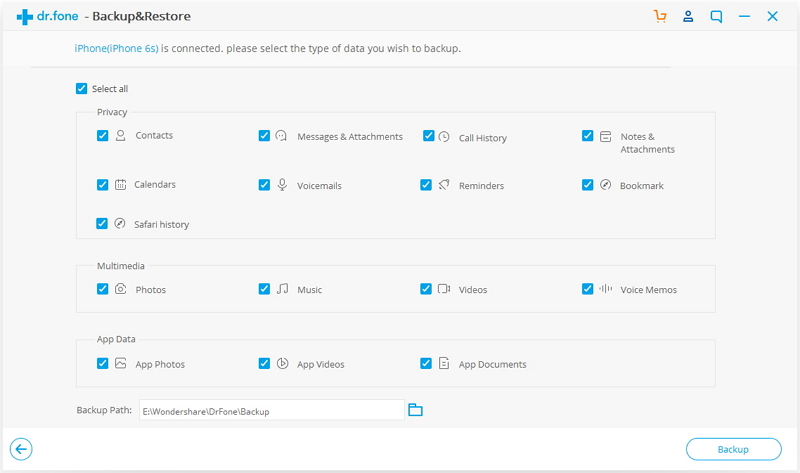
Step 2.Select File Types to Backup from iPhone 8
When your iPhone is connected successfully, iOS Backup & Restore will detect the file types on your device automatically. Then iOS Backup & Restore will display all the supported data, like Photos & Videos, Messages & Call Logs, Contacts, Memos and other data. You can select the file types to backup. One or more are allows. Then click on “Backup”button.
It only will take a few minutes on the whole backup process, depending on the data storage on your iPhone 8.
Step 3. Restore Backup Files for iPhone 8
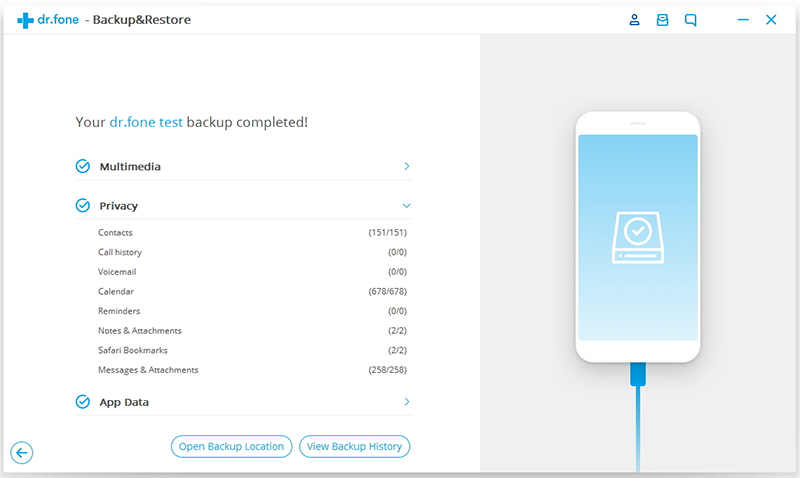
After you select the files to backup by checking the box, please click “Export to PC “button to export the files to computer. When you click “Export to PC”, you will have two options: Only Export this file type and Export all the selected file types. Then you can choose the backup file save path on the popup window to successfully export your iPhone data.
Done. You have backed up your iPhone 8 data to the computer.
Backup & Restore iPhone Tool – Mobile Sync
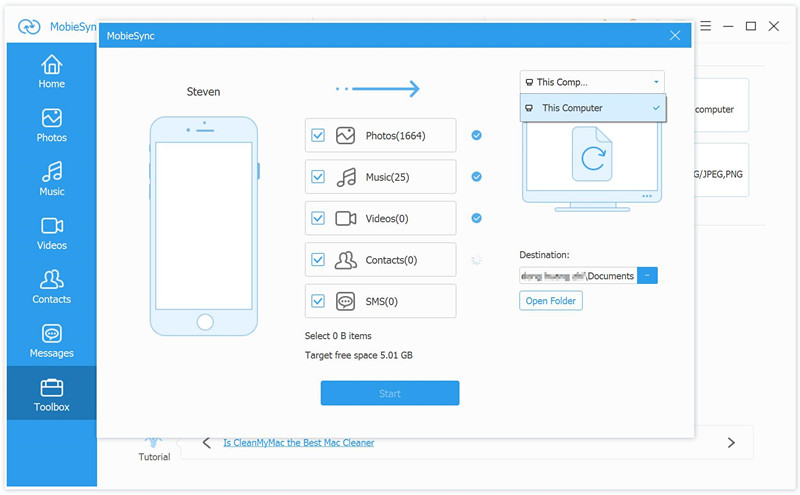
Mobile Sync is a professional iOS data transfer software, it is designed for syncing data between iPhone/iPad/iPod and Computer. With the help of this program, you can backup & restore iPhone 8 on the computer safely. The iOS data sync job can be done with easy steps: Launch Mobile Sync and then connect your iOS device to it with USB cable; select specific iOS files on the preview window; start the transferring. Only three simple steps, you can finish the iOS data sync job. Mobile Sync is an all-in-one iOS data manage tool for sync iOS files between iPhone/iPad/iPod and computer: transfer data between iOS devices; extract features with ringtone maker and HEIC converter. It is recommended that you download the free trial version to sync iOS files with ease.
“Hi. Can I ask how to transfer iTunes music to iPhone X without iTunes? I run iTunes on the computer but it didn’t work. Can anyone offer me some good solutions?”
“I have got a new iPhone XS Max, there are lots of Apple Music songs on my iTunes library, but I don’t know how to sync music from iTunes library to iPhone XS Max? Becuase the Apple Music tracks is M4P format, any want to convert M4P to MP3 or M4A and transfer to my new iPhone?”
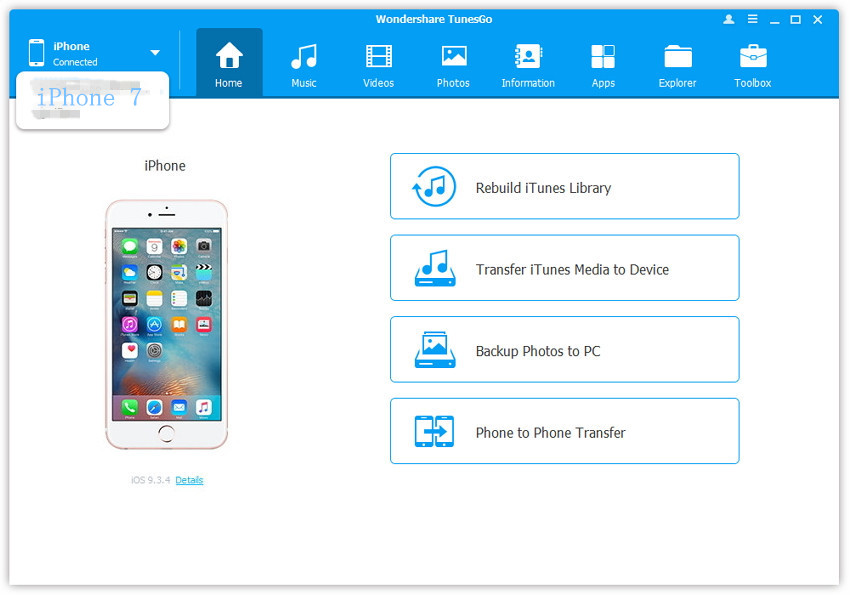
Sync iTunes Music to iPhone 8 and iPhone X
iPhone Data Manager is famous for transferring and managing data for iPhone on computer, including music, videos, photos, apps and more. You could use this smart iOS Manager to transfer music from iTunes to iPhone 8 and iPhone X/iPhone XS(Max)/XR freely. It’s the ideal iOS data manager to backup media files from iPhone to PC/iTunes, transfer media files from PC/iTunes to iPhone. Moreover, this program allow to transfer files between iOS device and Android device directly. iOS Manager works well for most of iOS device, such as, iPhone 7, iPhone 6S(Plus), iPhone 6(Plus), iPhone 5S/5, iPad, iPod.
Part 1: How to Transfer Music from iTunes to iPhone XS(Max)/XR/X/8
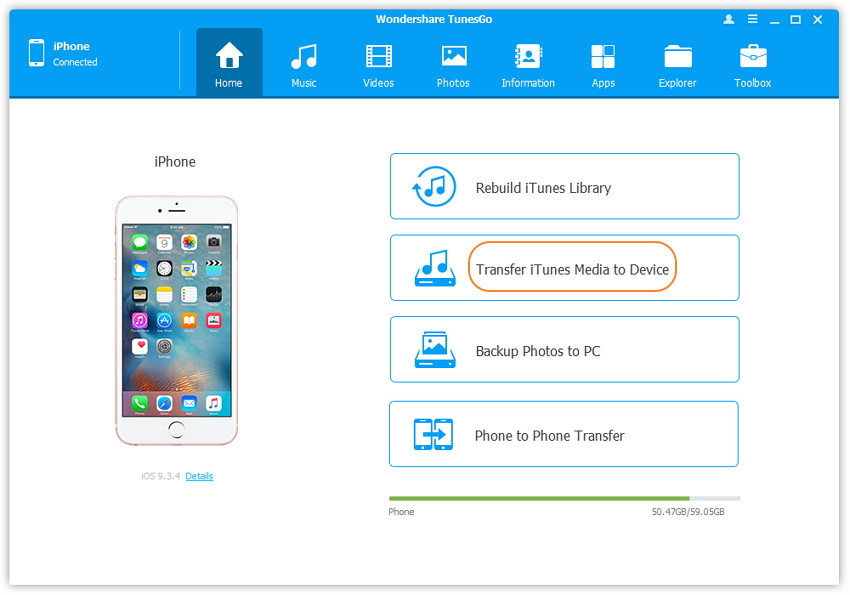
Step 1. Run Program and Connect iPhone to the Computer
Run iOS Manager and connect your iPhone 8 to the computer. Then click “Transfer iTunes Media to Device” option on the main interface of program.
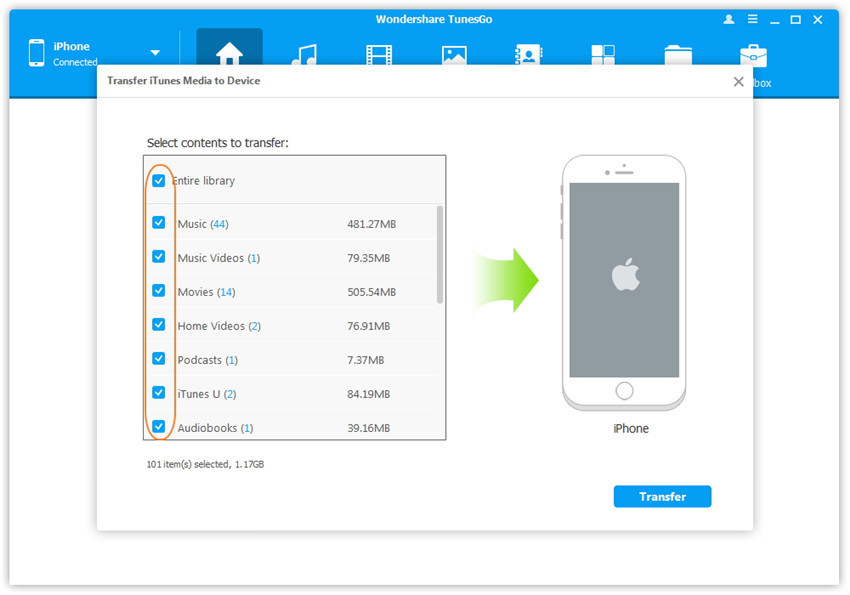
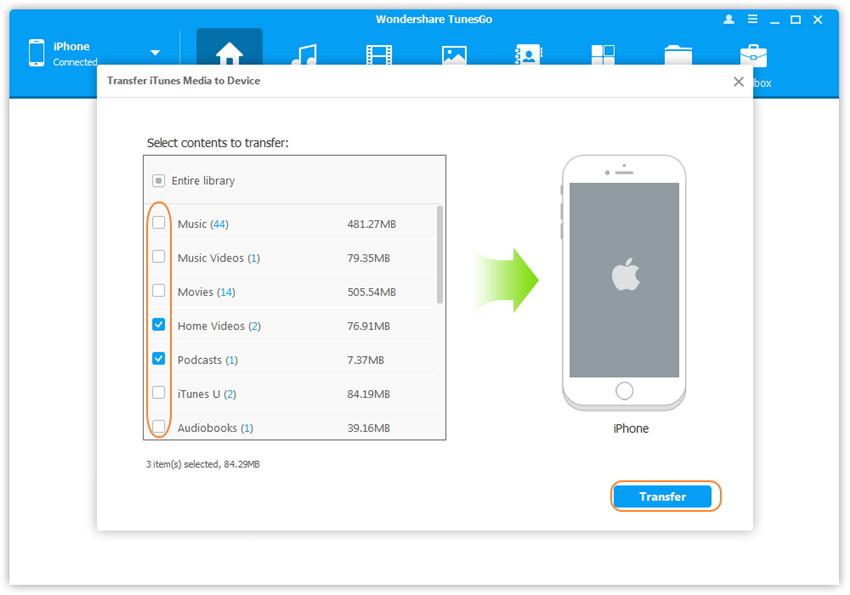
Step 2. Select the Music Item to Transfer
iOS Manager will detect all the media files in iTunes and show them by list on the pop-up window. By default, the entire library has been checked. But you can uncheck some items that you won’t transfer to your iPhone.
Step 3.Transfer Music from iTunes to iPhone 8
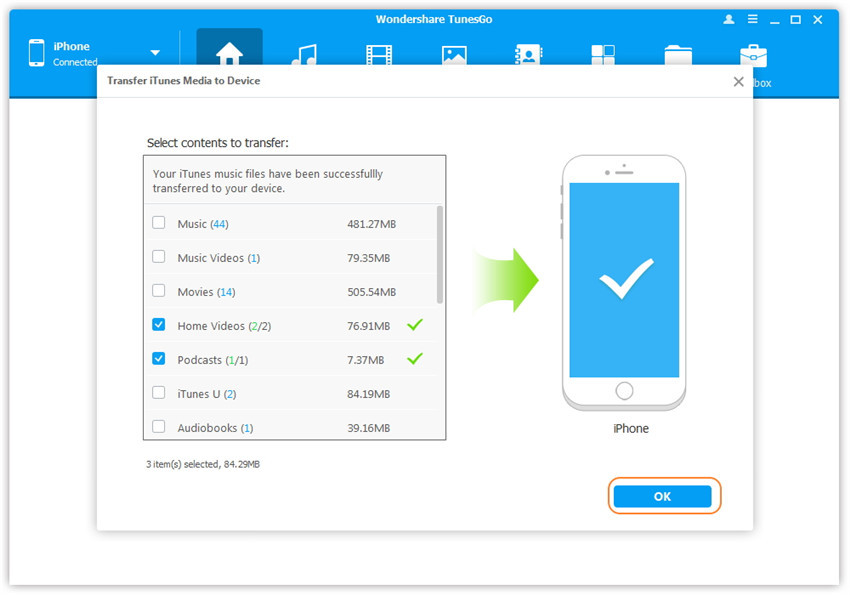
Click “Transfer” to begin transferring selected files to your iPhone 8 and then click “OK” to complete the process.
Note:You should not to worry about duplicate files as iOS Manager enables to automatically detect the duplicates and only transfer the exclusive contents from iTunes to iPhone.
Done. Now your iTunes music files have been transferred to your iPhone 8 completed.
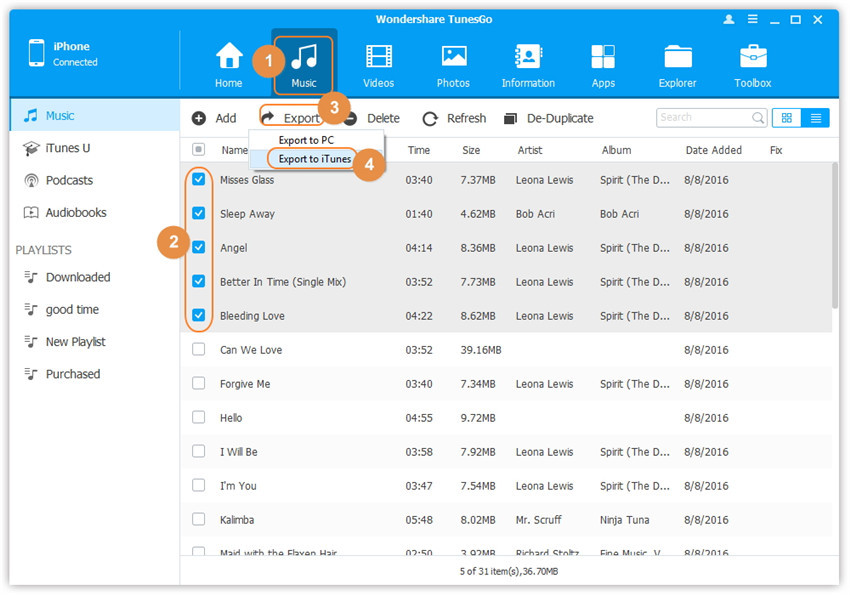
Part 2: How to Export Music from iPhone XS(Max)/XR/X/8 to iTunes
Step 1. Run Program and Connect iPhone 8 to the Computer
Run iOS Manager and connect your iPhone 8 to the computer.
Step 2. Export Music from iPhone 8 to iTunes
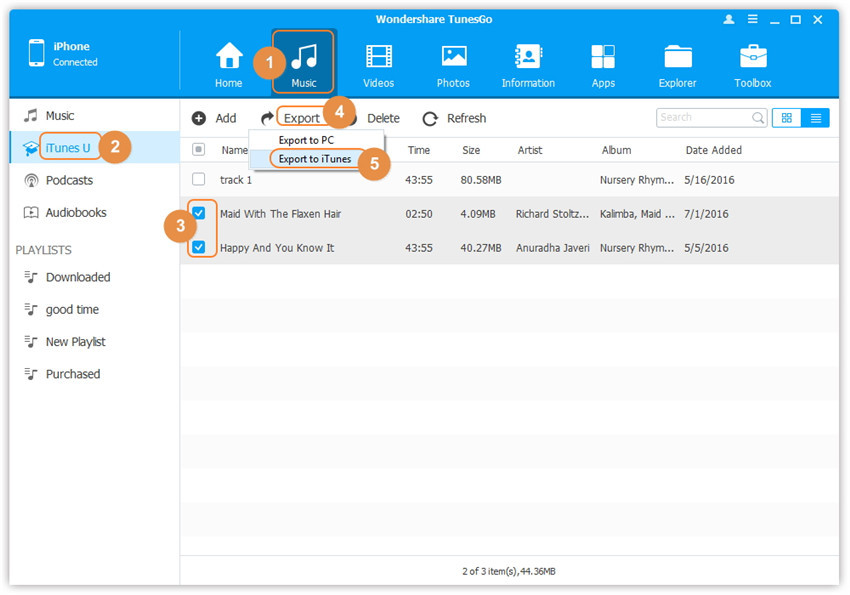
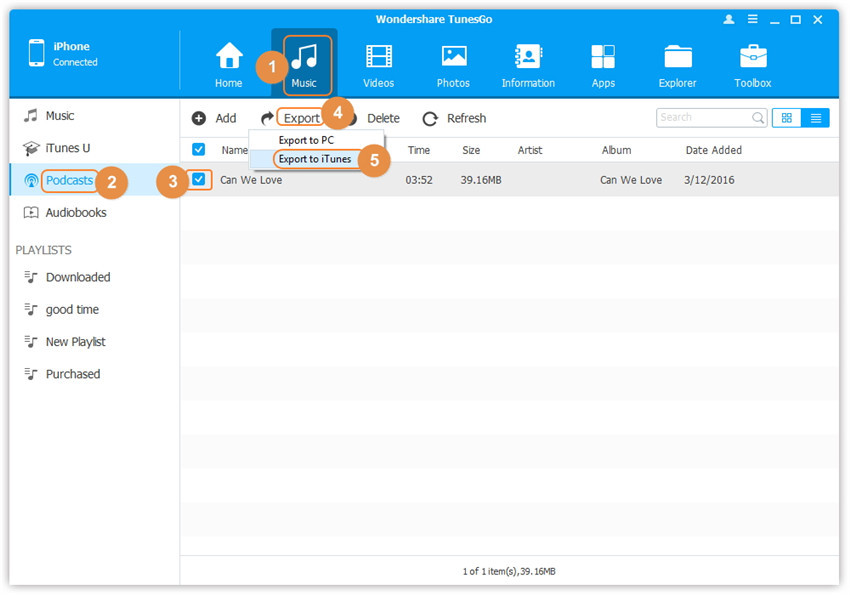
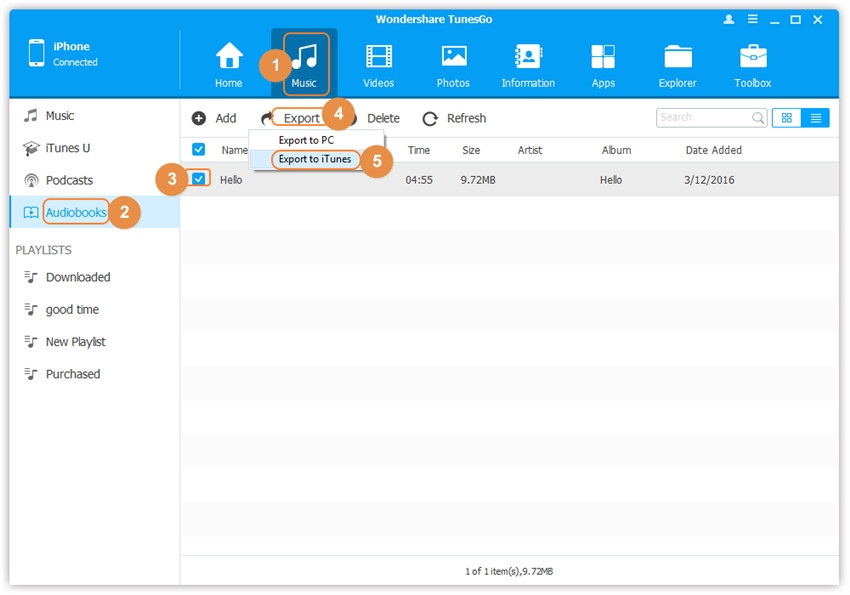
Click “Music” icon at the top of the program interface, then select the specific option “Music” (Music is the default option). Please note that iTunes U/Audiobooks/Podcasts is available to select here too. Then check the files you want to transfer to iTunes, and click “Export > Export to iTunes” .
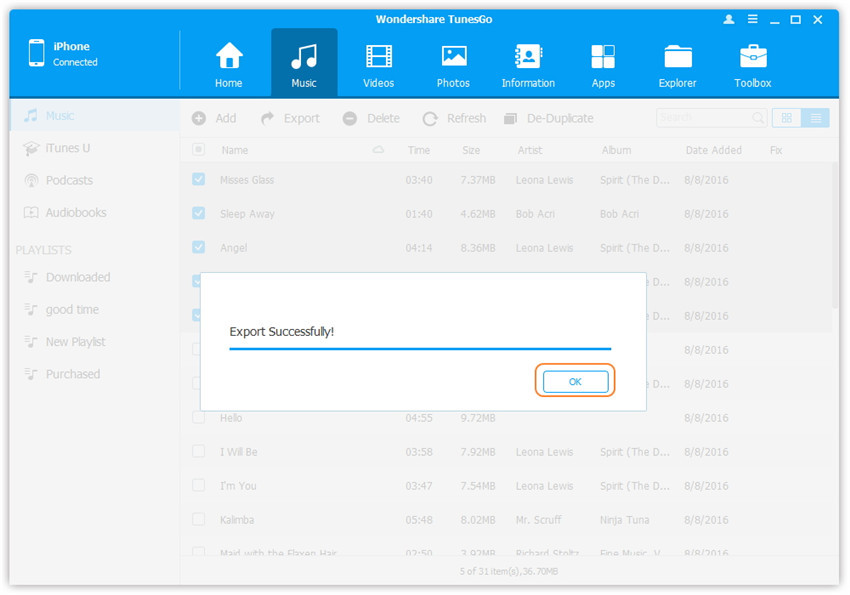
Export files successfully, click “OK” to end the export process.
Part 3: Convert and Play Apple Music on iPhone XS(Max)/XR/X/8 with Apple Music Converter
Except with the help of iOS Manager, you can try this Apple Music Converter,Apple Music Converter can help to easily remove Apple Music DRM and output DRM-free MP3, M4A, etc. for playing on any computer and audio devices such as iPhone, iPod, Android device, PSP, Zune, MP3 player, mobile phones, etc,. What’s more, this Apple Music converter supports to convert iTunes M4P songs, Audiobooks and Audible Audiobooks to DRM free formats. With using this smart program, you could remove the DRM for iTunes music,convert iTunes M4P music to MP3 and play it on iPhone 8 without limitation.
The Key Features of Apple Music Converter:
-Unlock DRM from Apple Music songs.
-Convert iTunes Music to DRM-free MP3, M4A, etc.
-Convert Apple Music and iTunes Audiobooks to MP3, M4A, etc.
-Keep original metadata to MP3, M4A audio files.
-Preserve Audiobook chapter information to M4A output.
-Batch conversion allows you to convert as many Apple Music songs as you like.
-Save all Apple Music on the local computer for free forever, and listen to your favorite music on any of devices and even burn them to CDs.
Step 1. Install and Run Apple Music Converter on the Computer
First of all, Install and run Apple Music Converter program on the computer.
Step 2. Select Apple Music to Convert
Select the Apple music you wanna convert, music, playlists, Audiobooks, M4P Audio, iTunes movies and TV shows are available. Then click “Download“.
Step 3. Choose MP3 – Output Format for Converted Music
Select MP3 as the format for the converted music.
Step 4. Convert Apple Music to MP3 for iPhone 8
Click “Start Convert” to start the music conversion on the computer.
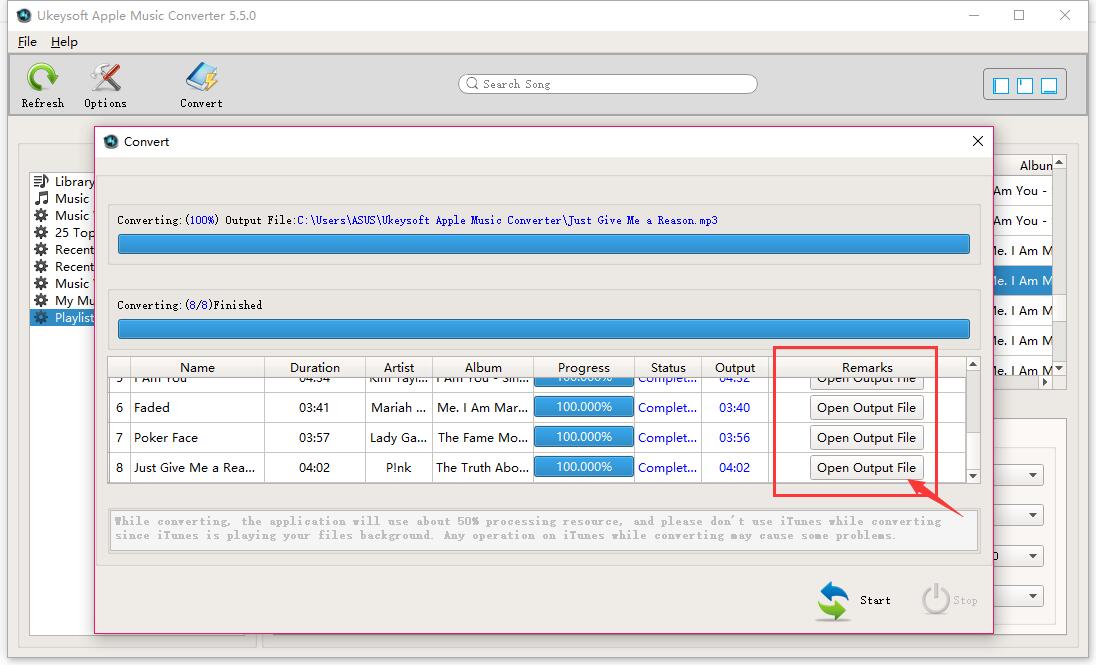
Step 5. View the Converted Apple Music on Computer
When the conversion is completed, you could click the “Open Output File” button to view the converted music file on the computer.
Step 6. Transfer Converted Apple Music to iPhone 8 via iOS Manager
In the last step you should transfer the converted music to your iPhone 8 via iOS Manager.
“I need help. Anyone can give me some good advises? The contacts and photos on my Samsung Galaxy phone was disappeared after I updated Android 8.0 on my device. How to recover the deleted data from Android after Android system update?”
When a new version of Android OS is available, most of Android users would want to make an update especially when the new version boasts of outstanding features and increased performance, right? In general, updating Android system over the air will not erase data on device. However, the failed Android system update may be wipe data on it. If users haven’t backed up important files in advance, they have to suffer from data loss.
Restore Deleted Android Data after Android 8.0 Update
Android Data Recovery is an ideal data recovery for Android to restore deleted data after Android 8.0 update. With using this powerful program, you can easily restore various of Android data directly, including contacts, messages, photos, videos, call logs, WhatsApp data, documents, and more. Android Data Recovery supports to restore deleted Android data under any data loss cases, for instances, Android system update, Android system rooting, deleted accidentally, restore to factory reset, and so forth. Android Data Recovery works perfectly in most of popular Android brands, such as Samsung, HTC, Motorola, LG, Sony, Huawei, Google Nexus, OnePlus, ASUS, and so on.
How to Retrieve Deleted Data after Android 8.0 Update
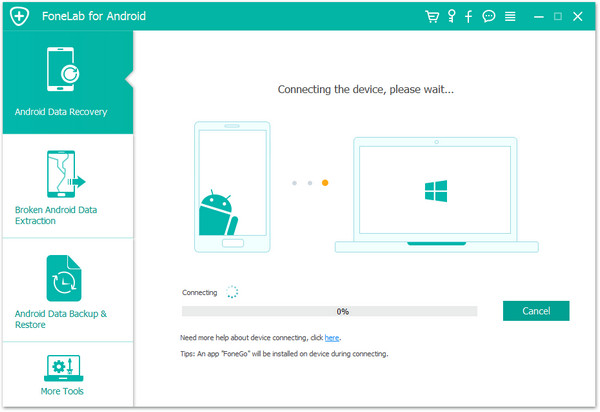
Step 1.Connect Android to the Computer
First of all, please install Android Data Recovery on your computer, run it and connect your Android to the computer. It will take a few seconds to detect your device automatically by program.
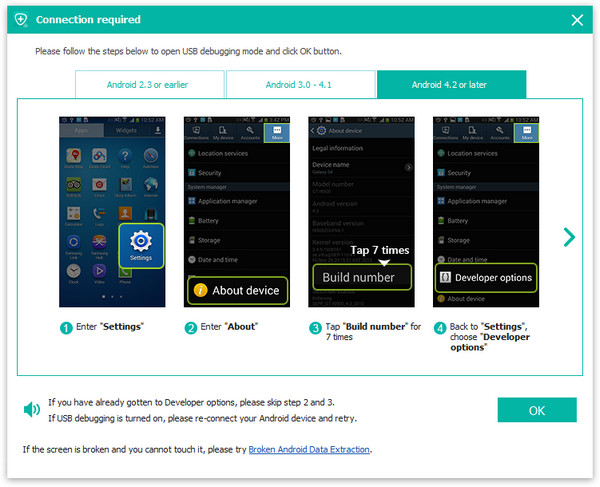
Step 2.Enable USB Debugging on Anroid Unlock your phone, go to Settings > Developer options > Allow USB debugging mode. If you have already allowed the USB debugging mode, you will see a pop-up window on the screen, mark Always allow from this computer and click OK.
Step 3.Select the Type of Data to Restore from Android
After enabling USB debugging, connect your phone to the computer via USB cable, you’ll see this window, different types of files can be chose to be scan here, such as, contacts, messages, gallery. If you want to restore almost all types of Android data, you can tick “Select all” to have all your Android data scanned. Then click “Next“.
Step 4.Allow to Scan and Analyze Data on Android
You’ll get a window as follow on your device after your device is detected by the program. Tap “Allow” to enable the program to scan your phone for deleted data.
Note:Please make sure that your phone battery is more than 20% charged.
Step 5.Scan Android for Deleted Data
The scanning process will take some time due to your request. When everything is done, you will see a list of deleted files, including your messages, gallery, contacts, and other data, appear on the program screen as below, you are allowed to preview them one by one before recovery.
Step 6.Preview and Recover Deleted Data after Android 8.0 Update
Once finishing the scanning process, a list of recoverable files that the deleted data have been found from your Android will be shown. There will be a preview window of files where you can preview(contacts, SMS and gallery, etc,.)from Android. Mark the data you want and click “Recover“ to restore them to your computer.
“I wanna perform iOS 11 downgrade on my iPhone 7, but I heard that downgrade iOS system may lead to data loss. It is true? How can I backup iPhone data before the downgrade?”
Especially for iOS users, both you and I, who are hoping to get a taste of what’s the newest iOS system of Apple each year. And for this year, it gets pretty special with the new iOS 11. So if you’re thinking of making the update to iOS 11, then just hold on for a few minutes because the iOS 11 is not as great as you think and instead it is packed with bugs and errors. Some iOS users compained that iOS 11 is not so good and prefer to use the old iOS 10 so they performed the iOS downgrade job on device. However, before you beginning the downgrade task you’d better to backup your iOS device, to protect your personal data, avoid losing data during or after iOS 11 downgrade. Here we will show you how to backup iPhone data before iOS 11 downgrade on computer safely with two solutions.
Part 1: Backup iPhone Data before iOS 11 Downgrade with iOS Backup & Restore
iOS ToolKit – iOS Backup & Restore is capable of backup iPhone data on computer before iOS 11 downgrade completely, as well as restoring data from backup to iPhone directly. This outstanding data backup & restore program is useful for backup and restore various files on iOS devices, like contacts, messages, photos, videos, notes, call logs and other personal documents. It offers full support for iPhone 7, iPhone 6 and 6S, 6 Plus and 6S Plus, iPhone SE, iPhone 5S/5C/5/4S/4 and iPad, iPod. It works with all iOS versions, including iOS 11 and lower.
Step 1.Run the iOS Backup & Restore Program and Connect iPhone to the Computer
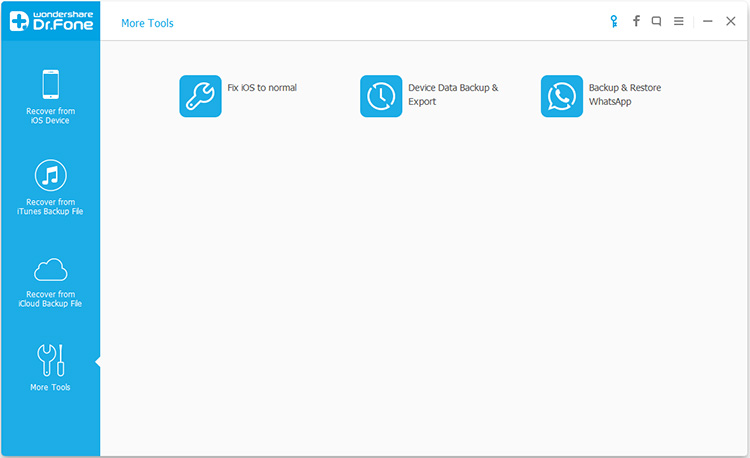
After runing iOS Backup & Restore on computer, click on “More Tools”from the left column, select “Device Data Backup & Export”option from the tool list. Then use the USB cable to connect your iPhone to computer. By default, iOS Backup & Restore will automatically detect your iPhone soon.
Tip:If you have used iOS Backup & Restore to backup your device previously, you can click on “To view the previous backup file” to view the previous backup files list.
Step 2.Select File Types to Backup from iPhone
When your iPhone is connected successfully, iOS Backup & Restore will detect the file types on your device automatically and you can select what file types to backup. Then click on “Backup”.
The whole backup process will take a few minutes, depending on the data storage on your device. Then iOS Backup & Restore will display all the supported data, like Photos & Videos, Messages & Call Logs, Contacts, Memos and other data.
Part 2: Backup iPhone Data before iOS 11 Downgrade with iOS Manager
Another backup tool here are recommended for you is iOS Manager, which is a terrific program use to manage & transfer data for iOS device, photos, music, videos, apps and more are included. iOS Manager allows to backup data from iPhone to computer before iOS 11 downgrade. What’s more, this program enables to transfer iTunes media to iOS device with one click, transfer files between iOS device, transfer files between iOS device and Android device. Almost all iOS devices are compatible with iOS Manager, insist of iPhone 7, iPhone 6 and 6S, 6 Plus and 6S Plus, iPhone SE, iPhone 5S/5C/5/4S/4 and iPad, iPod. It works with all iOS versions, including iOS 11 and lower.
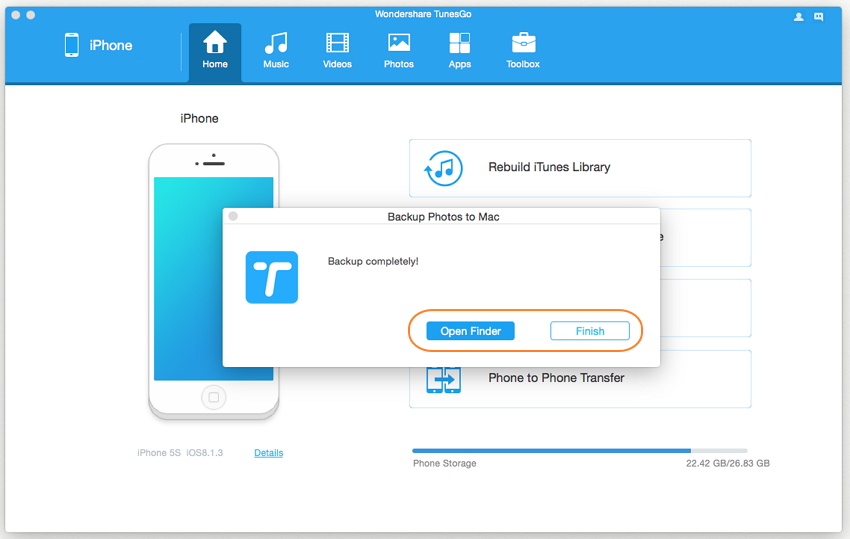
Here we will take the photos for example to expain how to backup iPhone data on computer via iOS Manager:
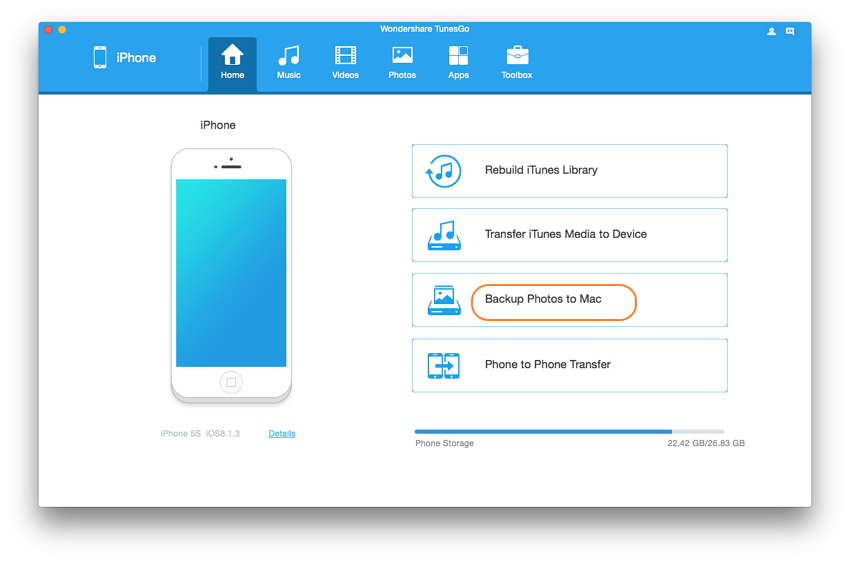
Step 1. Run iOS Manager and Connect iPhone to the Computer
Step 2. Backup iPhone Photos to the Computer
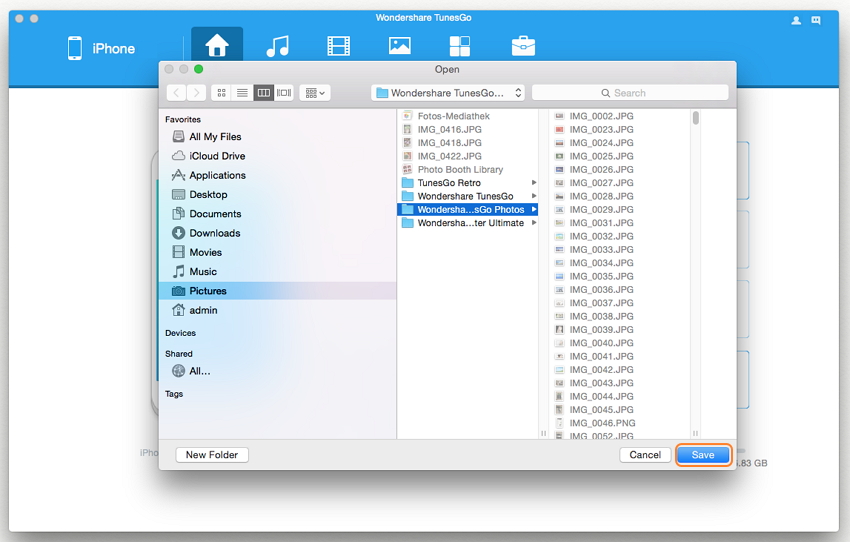
Click Backup Photos to Mac on the main interface. From the pop-up window, browse and select the destination folder for photos, click Save to start the backup.
Step 3. Export Photos to Mac
Click Open Folder to see the exported photos on the selected path of your computer, or click Finish to close the dialog.
“My iPhone X was run into the abnormal status after downgrading iOS 13 to iOS 12.4. I am not sure what’s wrong with it. I just want to restore it to normal as usual, any available solutions for suggestions?”
Many iOS uses are currently enjoying iOS 11 with device, and I suspect that not less than a few of iOS users are not enjoying it as well. It may be time for some of you currently on iOS 13 to start thinking about downgrading. When it comes to downgrading from iOS 13 to iOS 12, most of people will perform the job using iTunes, however, some of them asked for help that their iPhone stuck in the abnormal status when/after iOS 13 downgrade, the cases for examples, iPhone stuck in Recovery Mode, iPhone stuck at black screen of death, iPhone stuck at the frozen screen. No matter which stuck issues you get, here is the best ways to fix iPhone system to normal after iOS 13 downgrade.
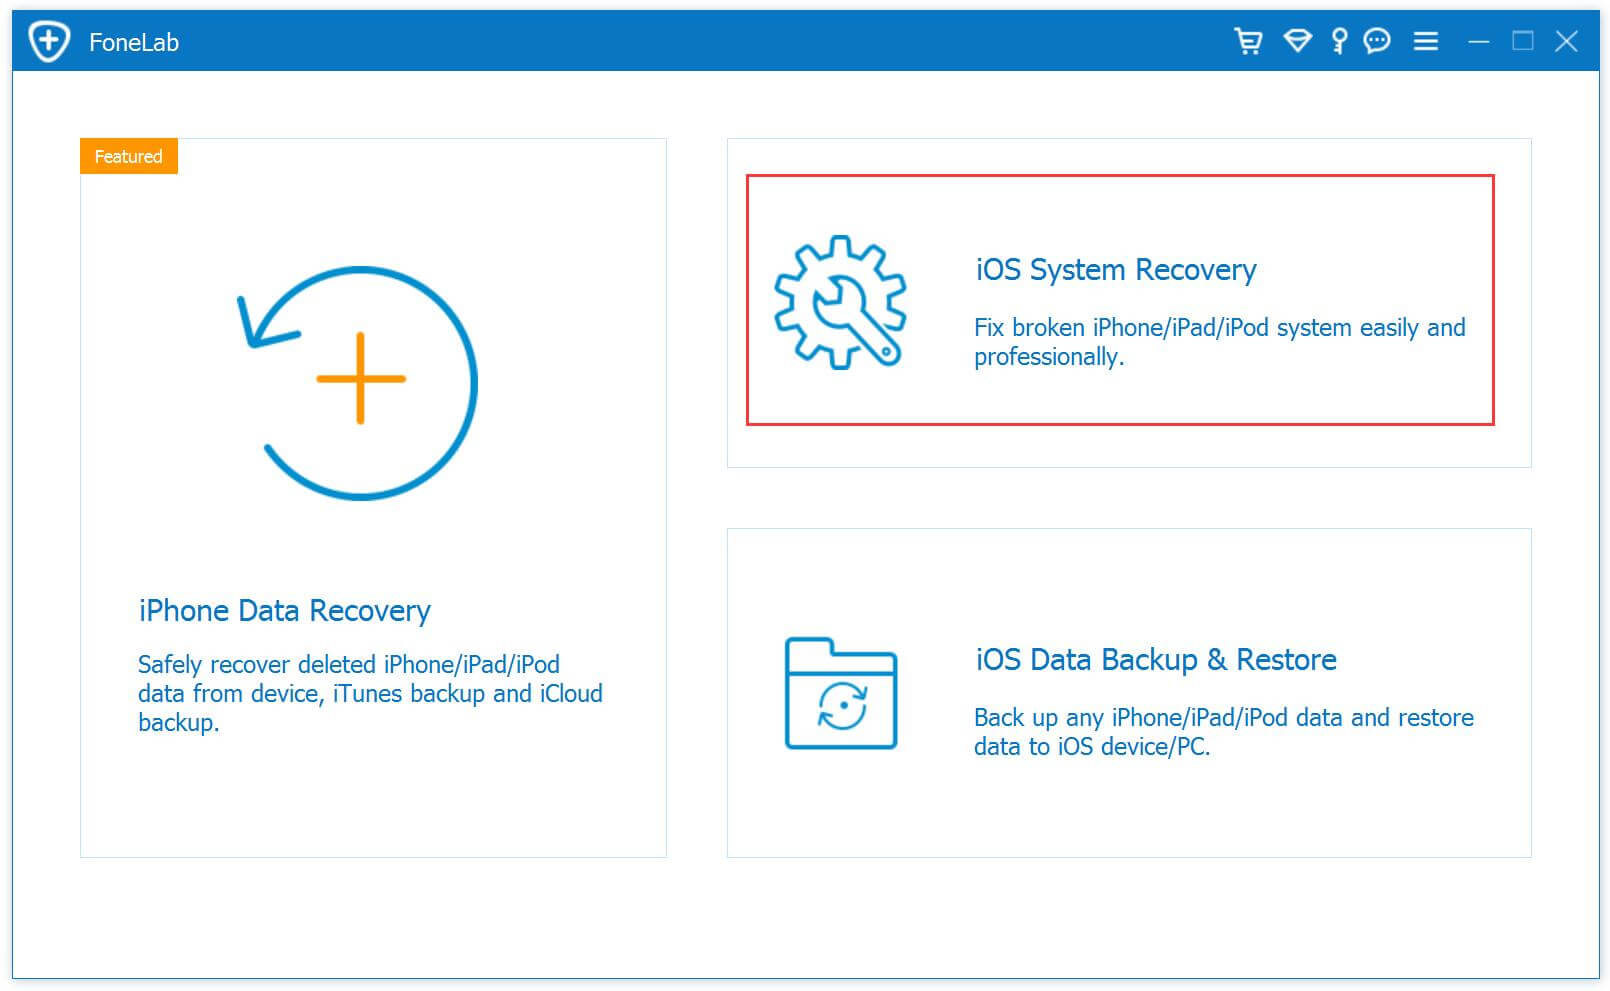
Fix iPhone System to Normal after iOS 13 Downgrade
While resolving the iOS 13 downgrade bricks phone issues via iTunes, you might be losing your precious data. If you don’t wanna lose any data from device and fix this issue perfectly, then consider using iOS System Recovery. It is a wonderful solution to fix various kinds of iOS system issues (like reboot looping, blank screen of death, stuck on Apple logo, and so on). With the help of iOS System Recovery, you are able to restore iPhone system to normal after iOS 11 downgrade. iOS System Recovery compatible with all iOS devices, such as iPhone XS, iPhone XS Max, iPhone XR, iPhone X, iPhone 8, iPhone 7, iPhone 6S/6, iPhone 5S/5, iPad, and iPod Touch.
Fix iPhone to Normal after iOS 13 Downgrade
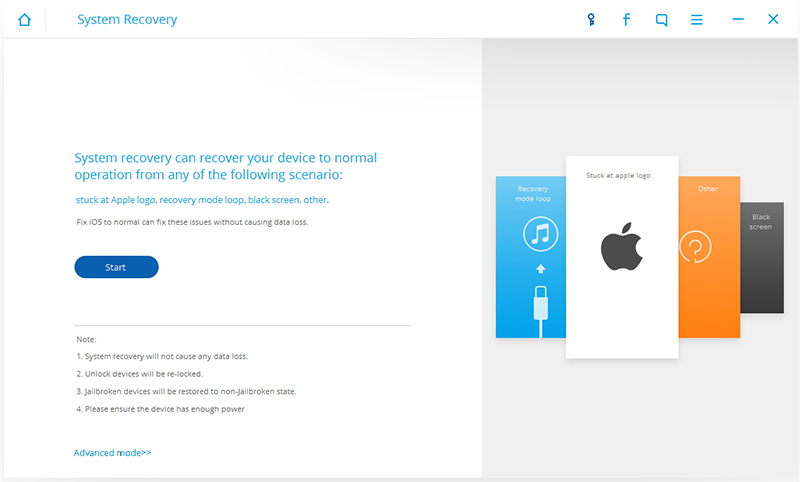
Step 1. Run iOS System Recovery on the Computer
Firstly, please run iOS System Recovery on your computer. Click on the features of “System Recovery” on the home page screen of program.
Step 2. Connect iPhone to the Computer
Connect your iPhone to the computer and the program will detect it automatically. Click on the “Start” button to initiate the recovery process.
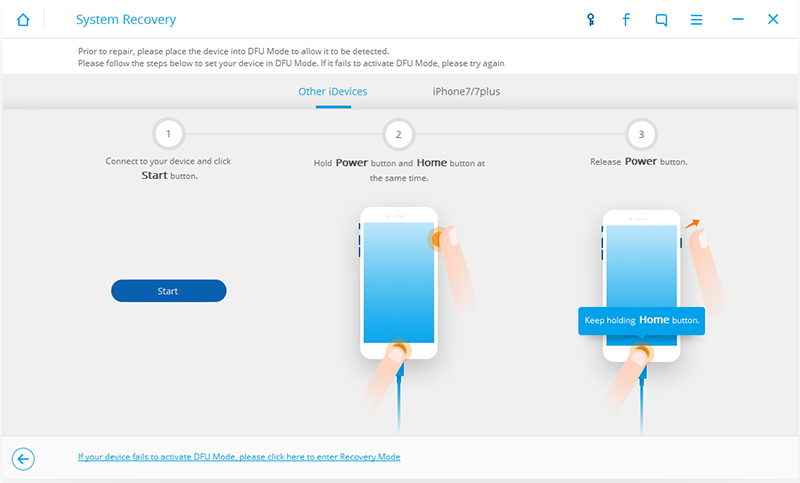
Step 3. Get iPhone into DFU Mode
You would be asked to put your device into the DFU mode (Device Firmware Update). It can be done by pressing the Power and Home button at the same time for at least ten seconds. Afterward, let go of the Power button while still holding the Home button. This will put your device into the DFU mode.
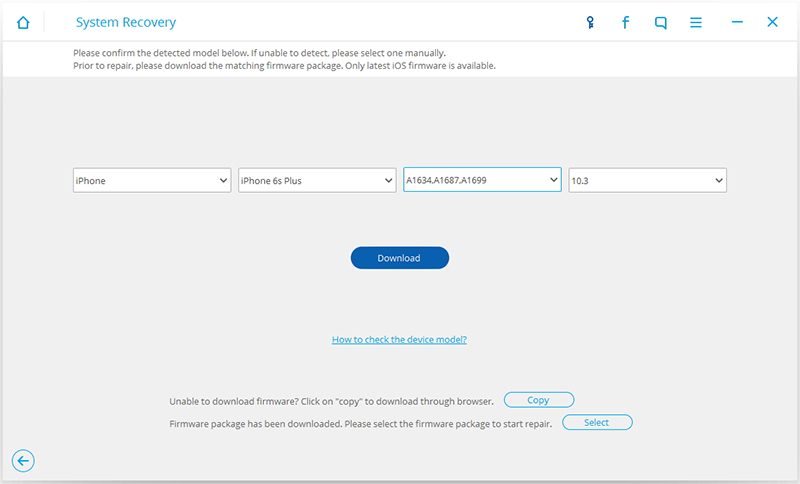
Step 4. Download Firmware for Restoring iPhone
On the next screen, the program will provide the correct information that match of your device, include its device number, model, iOS version, and more. Once you are done, click on the “Download” button to go on.
This will initiate the downloading operation. Make sure you have a stable internet connection to fast-forward this process.
Step 5. Begin Restoring iPhone System to Normal
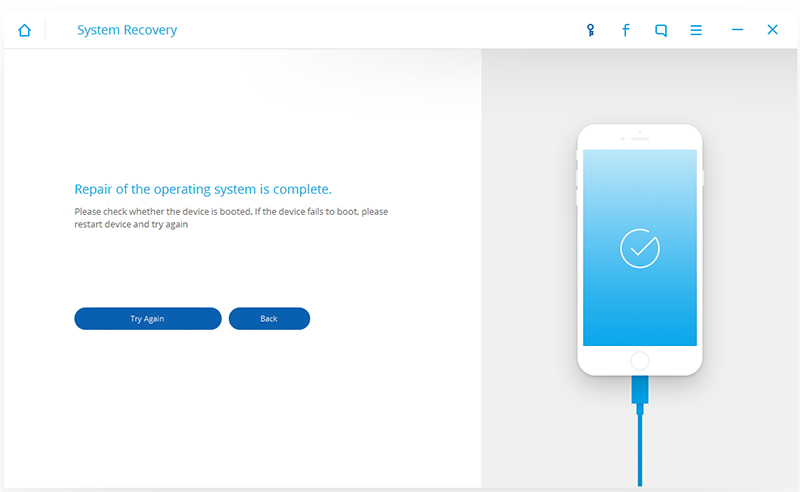
Once the downloading of the related firmware would be completed, the program will start to fix your iPhone automatically. Note: Make sure that your phone is not disconnected during the process.
Done, your phone would be restarted the ideal way (in the normal mode). If your iPhone are fixing failed with the result, then you can do the process again by clicking on the “Try Again” button.
[Summary]: When update iPhone to iOS 12 or downgrade from iOS 12 to iOS 11.4/11.3/11.2, the bricked iPhone may stuck in recovery mode/Apple logo/blue screen, etc. Don’t worry, learn this guide you will know how to fix iPhone X/8/7/7 Plus/6s/6 Plus/5s stuck on recovery mode after iOS 11/iOS 12 update/downgrade.
“I want some help. My iPhone X stuck in the Recovery Mode after performing iOS 12 beta downgrade on it, now I can’t do any operation on it even power it on. Any simple ways to get it out of the recovery mode without data loss? Thanks a lot.”
Install iOS 12 Beta on iPhone but feel it unsatisfied? Downgrade iOS 12 to iOS 11.4 on iPhone but failed? iPhone stuck in Recovery Mode after iOS 12 upgrade and can’t fix it? If you may meet with various issues when iOS 12/11 update or downgrade, you can take a glance at this tutorial, it provides you a perfect solution to fix your device which stuck in Recovery Mode after iOS system update or downgrade. Note: If the iOS downgrade goes wrong then it might brick your device. Therefore, it is always recommended to backup your data before performing the iOS system operation.
Part 1: Fix iPhone Stuck in Recovery Mode with Force Restart
The first solution to fix iPhone stuck in Recovery Mode after iOS 11 downgrade is force restart your device. A force restart can break the current power cycle and reboot your device to normal.
How to fix iPhone stuck in Recovery Mode after iOS 11 downgrade with force restart:
Press and hold the Sleep/wake button and the Home button (Volume Down button on iPhone 7/7 Plus) at the same time. Keep holding the buttons at least 10 seconds and release the buttons when the Apple logo appears.
Part 2: Restore iPhone to Normal State with iTunes
The second way to restore iPhone system to normal after iOS 11 downgrade is using iTunes.
Step 1. Firstly, launch iTunes on your computer and make sure it is updated.
Step 2. Now, put your phone into Recovery Mode. If you are using an iPhone 6 or the older generation device, then press the Home button on your device. Now, connect your device to a USB cable and keep holding the Home button. Let go of it as you would get an iTunes symbol on your device’s screen.
Step 3. You can also put an iPhone 7 into Recovery Mode using the same way as well. Though instead of the Home button, you need to press the Volume Down button for a while and connect it to your system. It will display the symbol of iTunes after turning on the Recovery Mode.
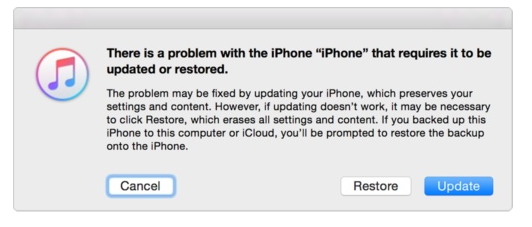
Step 4. The problem would be recognized by iTunes and it will display the following pop-up message. To fix your phone, click on the “Restore” button and wait for a while as iTunes would restore your device. Done.
Note: Get iPhone out of Recovery mode via force reset and iTunes restoring may be lead to data loss from device, your iPhone data will be gone and your device will be restore to the factory restore resetting status. Instead of restoring iPhone with wiping data, here is two other better solutions are strongly recommended for you, to fix iPhone stuck in Recovery Mode using iOS Tookit- iOS System Recovery and U.Fone iOS System Recovery without losing any data on iPhone.
Part 3: Fix iPhone Stuck in Recovery Mode with U.Fone – iOS System Recovery
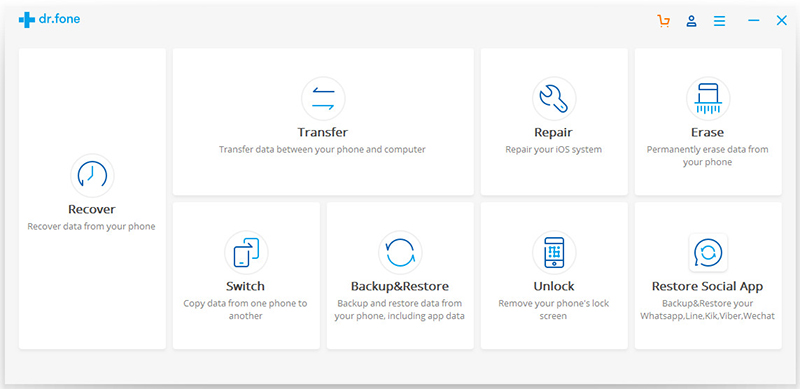
The fourth way to fix iPhone stuck in Recovery Mode after iOS 11/12 upgrade or downgrade is using U.Fone iOS System Recovery. It’s also an excellent program to fix iPhone stuck issues without data loss, such as, iPhone stuck in Recovery Mode, iPhone stuck at Apple logo screen, iPhone stuck at black screen of death, etc,. All iPhone are applicable to the program, including iPhone Xs(Max)/XR, iPhone X, iPhone 8/8 Plus, Phone 7/7 Plus, iPhone 6s/6(Plus), iPhone 5s/5, iPad and iPod.
More Recovery Features of U.Fone for iOS
– Recover Lost or Deleted Data on iPhone, iPad, iPod touch, Easy!
– Recover from devices/iTunes backup/iCloud backup, or via smart recovery.
– Recover WhatsApp, photos, text messages, contacts, notes, etc.
– Fix your iOS system to normal from various iOS issues without data loss
– Supports all iOS versions and devices including iOS 12 beta/11. 4 and iPhone XS/XS Max.
– Supports recover deleted and lost data from iPhone XS(Max).
Step 1.Run the iOS System Recovery on the Computer
Firstly,please download and run iOS System Recovery on the computer,you will get the windows as below.
Step 2.Connect iPhone and Select Fixing Mode
Select the “iOS System Recovery”mode in the primary window under “More tools“.Connect your iPhone to the computer via USB cable. After a few seconds,the iPhone will be detection by program and display it on its screen. Now, click on the button “Start“.
Step 3. Select the iPhone Model and Latest Version of the iOS System
Now you should select the iPhone model and iOS system version which fit your device.Then click “Repair” to enter the next step.
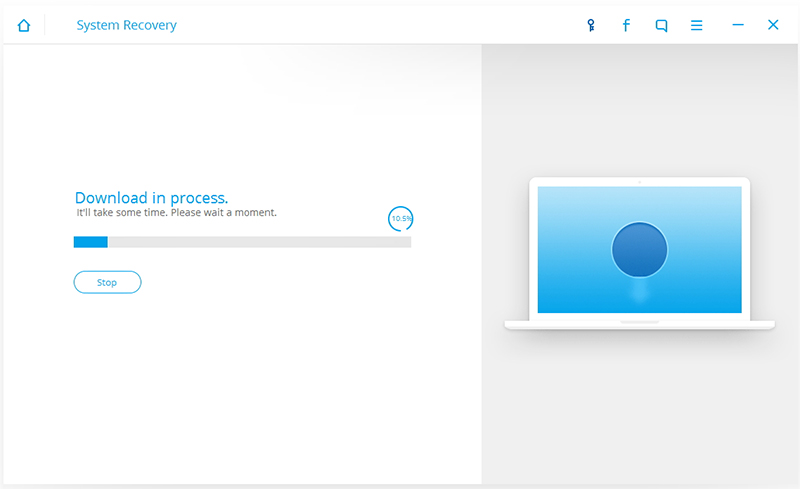
Step 4.Download the Latest iOS Firmware for iPhone
iOS System Recovery tool will download the latest iOS firmware for restoring you device,you will see that the program is offering you the latest version of the iOS to download,it will display the progress of the download process as shown in the picture below. Please keep your iPhone and the computer connection.
Step 5.Fixing iPhone Stuck in Recovery Mode to Normal
When the program is finished downloading the latest firmware for your iPhone, it will continue to fix the abnormal iPhone without 10 minutes.
Done.Now you can restart the device normally.
Free download the U.Fone- iOS System Recovery:
Part 4: Fix iPhone Stuck in Recovery Mode with iOS Tookit – Repair
iOS Tookit – Repair is an ideal tool which used for fix iPhone stuck in Recovery Mode after iOS 11 or iOS 12 downgrade without data loss. Besides, this famous program supports to fix any iPhone stuck issues like iPhone stuck at black screen of death, iPhone stuck on Apple logo, frozen iPhone, etc,. It is a highly advanced and extremely secure way to fix your iOS device, help to restore your device to normal status efficiently. All iOS device are compatible with iOS System Recovery, including iPhone X, iPhone 8/8 Plus, iPhone 7 Plus, iPhone 7, iPhone 6s/6, iPhone 5s/5, iPad and iPod.
Step 1. Run iOS System Recovery
Install iOS System Recovery on your Mac or Windows computer. From the home page screen, click on the option of “Repair”.
Step 2. Connect iPhone to the Computer
Connect your iOS device and let the program detect it automatically. Click on the “Start” button to initiate the recovery process.
Step 3. Get iPhone into DFU Mode
You would be asked to put your device into the DFU mode (Device Firmware Update). It can be done by pressing the Power and Home button at the same time for at least ten seconds. Afterward, let go of the Power button while still holding the Home button. This will put your device into the DFU mode.
Step 4. Download Firmware for Repairing iPhone
On the next screen, the program will provide the correct information of your device. This would include its device number, model, iOS version, and more. You would be required to downgrade from iOS 11 to iOS 10 to fix this issue. Once you are done, click on the “Download” button to continue.
This will initiate the downloading operation. Make sure you have a stable internet connection to fast-forward this process.
Step 5. Start Restoring iPhone System to Normal
Once the downloading of the related firmware would be completed, the program will start to fix your iOS device automatically. Wait for a while and make sure that your phone is not disconnected during the process.
In the end, your phone would be restarted the ideal way (in the normal mode). If your iPhone are fixing failed with the result, then you can repeat the process by clicking on the “Try Again” button.
“Hi. My WhatsApp history on iPhone 7 just gone after iOS 11 downgrade, the worse is that I forgot to backup. Is it possible to restore the lost WhatsApp chat data from my device directly?”
As iOS 11 is released now and many iOS users try to install it on iOS device. However, things will not be better in the true operation. A part of them think about that iOS 11 system is not as perfect as iOS 10 after updating it on device. Can no longer bear with the annoying bugs of the newest iOS version? Stop worrying about it. You can easily downgrade iOS 11 to iOS 10 on your iPhone and iPad now. Unfortunately, iOS 11 downgrade may lead to lose data on iOS device during or after the process. This article is talking about how to recover WhatsApp history or other types of iOS data after iOS 11 downgrade easily.
Restore iPhone WhatsApp History after iOS 11 Downgrade
A wonderful iPhone data recovery called iOS Data Recovery is helpful for you, it can be used to restore WhatsApp chat history on iPhone after iOS 11 downgrade to iOS 10. Not only WhatsApp data, but also other kinds of data can be restored by program, including contacts, messages, photos, videos, notes, call logs, calendars, and more. iOS Data Recovery is your best choice to restore lost data on iOS device for any data loss situations, such as, iOS downgrade/update, iOS jailbreak, deleted carelessly, factory restore resetting, etc,. Most of iOS devices are supported, like iPhone 7, iPhone 6s/6, iPhone 5s/5, iPad and iPod.
Part 1: Directly Restore WhatsApp History from iPhone after iOS 11 Downgrade
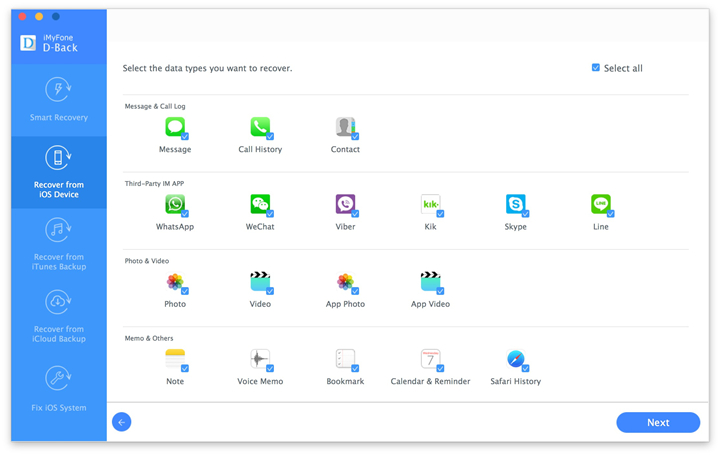
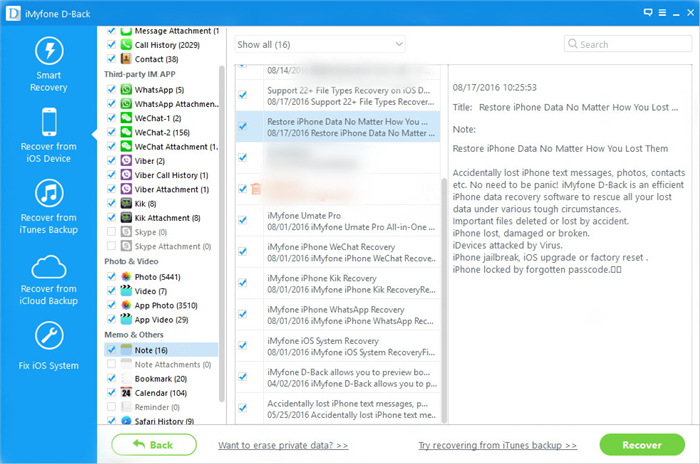
Step 1. Connect iPhone 8 to the iOS Data Recovery First of all, download and install the iOS Data Recovery to your computer. Connect iPhone to the computer then start the process and select “Recover from iOS Device“. And then, the program will detect your iPhone soon.
Step 2. Select WhatsApp File to Scan From “Recover from iOS Device”, choose “WhatsApp” and click “Next” button to enter the scan process.
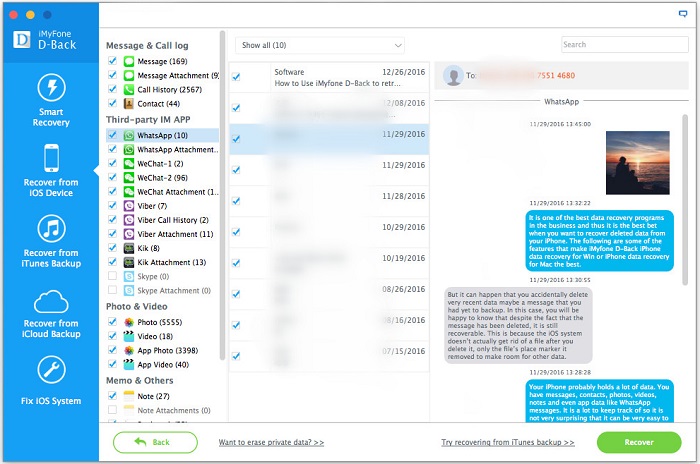
Then, the iOS Data Recovery will begin scanning your iPhone for lost WhatsApp chat history.
Step 3. Recover WhatsApp History from iPhone After the scanning, you can find the recoverable files in the scanning result. Click “Recover” and the tool will prompt you to choose one folder as the recovery path to store your recovered WhatsApp data. And then, you can view your recovered WhatsApp chat data on your PC/Mac.
Part 2: Restore iPhone WhatsApp History with iTunes Backup after iOS 11 Downgrade
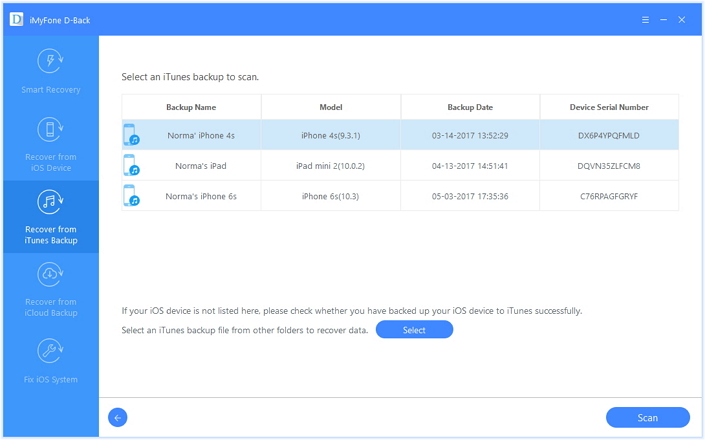
Step 1. Select Recover from iTunes Backup Mode Run program and Select “Recover Data from iTunes Backup” then select the backup file to scan by clicking the “Scan” button.
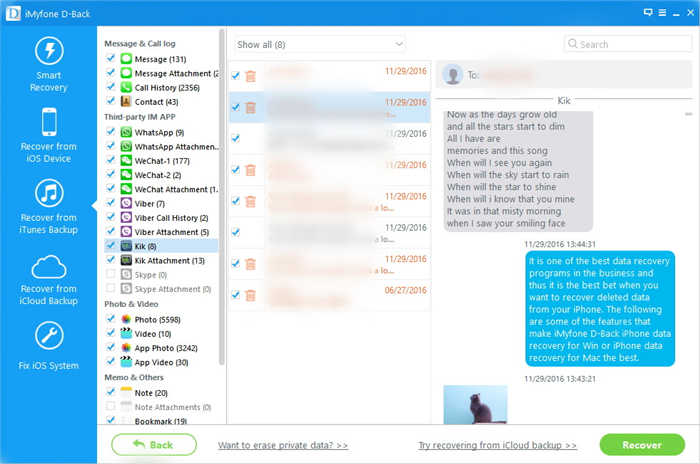
Step 2. Preview and Recover Lost WhatsApp Data from iTunes Backup It will take quite a time for iOS Data Recovery to scan and analyze the data from your iTunes backup file, please wait patiently. After the scanning process completes, you can selectively mark and recover those deleted WhatsApp chat history you want by pressing the “Recover” button.
Summary: iOS 11 is the new-released iOS system for Apple devices, but it is still not perfect enough, a part of iOS users finally performing the iOS downgrade on device. This tutorial is going to show you how to restore lost call history and more kinds of iPhone data after iOS 11 downgrade on device.
iOS 11 was announced at WWDC 2017, iOS 11 is Apple’s latest major update for iPhone, iPad and iPod touch devices, bringing in a number of new features to one of the world’s most popular mobile platform. You can now download iOS 11 beta and install on iPhone 7/6S/6/SE/5S, iPad mini 2 and iPod touch and more iOS devices. Due to the instability of iOS 11, people likely to downgrade iOS 11 to iOS 10. However, data loss appeared after the iOS downgrading. Take it easy, if you get the similar situations like them, you can take this tutorial for reference and try to restore lost data on iPhone by yourself with easy steps.
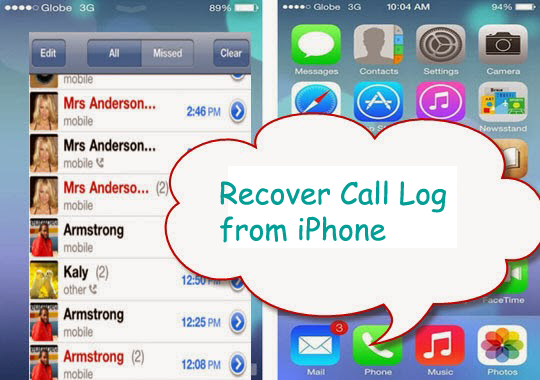
Restore Lost Call Logs on iPhone after iOS 11 Downgrade
iOS Data Recovery is a perfect program help to restore lost call logs on iPhone after downgrading iOS 11 to iOS 10. Not only call logs, but also other types of iOS data can be restored by iOS Data Recovery, like contacts, photos, messaging, notes, calendars, apps data, etc,. iOS Data Recovery provides you three recovery modes: directly recover from device, recover from iTunes backup, recover from iCloud backup. In addition, this powerful program supports to recover lost data on iOS device under any data loss circumstances, such as, iOS downgrade, iOS update, iOS jailbreak, deleted accidentally, restore to factory reset, damaged device, and so on.
Part 1: Directly Restore Lost Call Logs from iPhone after iOS 11 Downgrade
Step 1. Run Program on the Computer
To begin with, please install and run iOS Data Recovery on the computer. Select the “Recover from iOS Device” recovery mode then click “Start” to start the recovery process.
Step 2.Select Call History File to Scan by Program
You should select the “Call History” to be scanned by program, then connect iPhone to the computer(You are allow to select more than one files to be scanned by program). Then click “next”.
Now the program will begin scanning your device automatically for lost data after clicking “Scan”.
Step 3.Preview and Directly Recover Lost Call Logs from iPhone
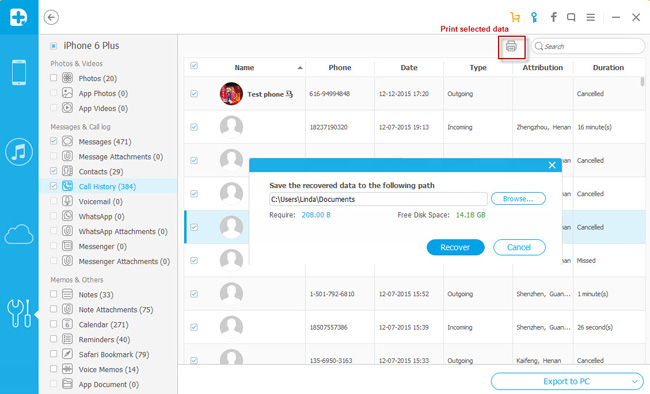
Once the scanning is completed, you are allow to preview and directly recover the lost call logs from iPhone. Select the data you want and click “Recover” to save the selected data on the computer.
Part 2: Restore Lost iPhone Call Logs after iOS 11 Downgrade via iTunes Backup
Step 1. Select the iTunes Backup File and Scan
If you have done iTunes backup before, you will see the backup files listed once you launch iOS Data Recovery and then click the second mode”Recover from iTunes Backup”. Connect iPhone to the computer. Choose the backup file you want and click “Scan”.
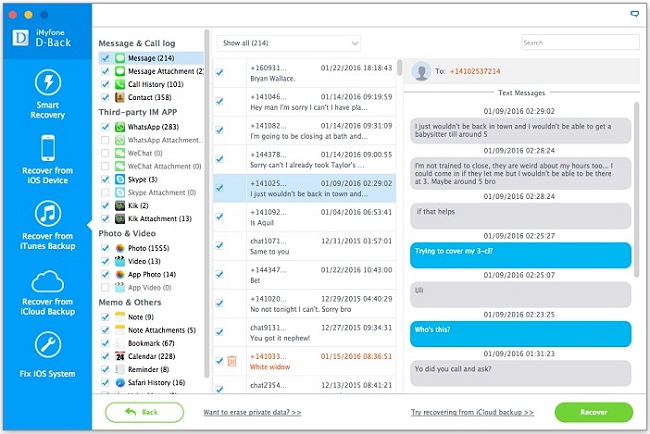
Step 2.Preview and Restore Lost iPhone Call Logs from iTunes Backup
It will be taken to scan your iTunes backup files. And you are allowed to preview all the content in backup file. Choose the files you want and click “Recover” to motivate the recovery. Then save the selected data to the computer.
“Some important work notes were gone after I downgraded iOS 11 to iOS 10 on my iPhone 7, are there any ways to restore the lost notes from my iOS 10 device?”
iOS 11 Downgrade to iOS 10 Lead to Data Loss
iOS 11 has finally been announced and the first beta is in the hands of developers. However, like any other new iOS system version released in the early time, there are bound to be numerous issues. For instance, it’s not fit for being use as a daily driver. Apps and games haven’t been updated to take advantage of the new APIs Apple has introduced. Don’t even get some people started on the crashes and battery life issues. So there are a lot of iOS users prefer to downgrade iOS 11 to iOS 10 on device. The most common error cases is that data loss after downgrading to iOS 10 from iOS 11 on device.
Part 1: Backup iPhone before Downgrading iOS 11 to iOS 10
In order to protect your privacy on iPhone and avoid losing data after performing the iOS system downgrade, you should be better to do a safe backup job on your device. Here we are strongly recommend an amazing data manage tool for you to have a try. iOS Data Manager is a professional software for managing your iPhone data on Windows PC or Mac computer. With the help of iOS Data Manager, you are allowed to backup iPhone data to computer safely before iOS 11 downgrade, including music, videos, photos, contacts, SMS, apps. You can use this program to transfer files between iPhone and computer freely. What’s more, iOS Data Manager supports to transfer data between iTunes and iPhone, transfer data between mobile device and iPhone.
Part 2: Directly Restore Lost Notes from iPhone after Downgrading iOS 11
iOS Data Recovery is your ideal helpful tool for restoring lost notes from iPhone after downgrading iOS 11 to iOS 10. Besides, this program enables to recover various of lost data on iPhone/iPad due to any data loss cases, including contacts, SMS, photos, videos, call logs, calendars, and more. Except for iOS downgrade and update, iOS Data Recovery capable to retrieve data lost due to deleted accidentally, iOS jailbreak, restore to factory reset, device broken/lost, etc,. Supported devices: iPhone 7, iPhone 6S/6, iPhone 5S/5C/5, iPad and iPod.
Step 1. Run Program and Connect iPhone to the Computer
After running the iOS Data Recovery on your computer, then connecting your iPhone to the computer via USB cable, select “Recover from iOS Device“. Click “Start” to begin the data recovery process.
Step 2. Select Note File to Scan
If you just want to restore the lost notes from your iPhone after iOS 11 downgrade, please select the file type “Note” under “Memo & others” and click “Next” to go on.
Step 3. Access iPhone and Scan the Lost Notes
Click “Scan” to begin scanning data on your device. Now the program will scan you iPhone for all lost notes.
Step 4. Preview and Recover Lost Notes from iPhone
When scanning is end, enable the button “Only show the deleted”, just click “Note” item to preview and select the data you want to get back and click “Recover” button to restore the selected notes from your iPhone directly. Finally, the notes will be saved on the computer.