All posts by DHZ

How to Recover Deleted Data From iPhone 11/XS/XS Max/XR/X

Summary
Wondering how to recover lost data from iPhone XS? How to retrieve deleted photo files on iPhone 11? Free methods are shared to teach you how to get back lost photos, contacts, text messages, video, music, call history, WhatsApp chat, voicemails, notes and App data from iPhone XS/XR and iPhone 11(Pro).

How to recover permanently deleted photos from iPhone Xs?
I have bought an new iPhone Xs, last week I travelled in Turkey Greme & Fethiye and shoot lots of great photos by the new iPhone Xs, when I filter some dissatisfied photos and delete them, I mistake deleted an important photo that I took with my girl friend when riding a hot air balloon. Worse, I permanently deleted those photo from iPhone Xs (which means it also disappeared from Recently Deleted), can I recover permanently deleted photos from my iPhone Xs? Thanks for the help of AndroidiPhoneRecovery studio! I will share some photos taken when I was traveling in Turkey.

But we can’t avoid some accident, for example: accidental deletion, iOS system upgrade failure, iOS system jailbreak, device lost/stolen, forgot password, water damaged, factory reset, device stuck, device get broken, virus attack, etc. However, how to recover the delete data from iPhone XS Max/XS/XR/X/8/7/6S/6/5S/5/4S?

From the article, you can learn three easy way to recover lost/delete/disappeared data from iPhone in iOS 13/12/11 with the help of a professional iPhone data recovery software.

Part 1: Recover Deleted Photos from Recently Deleted Album on iPhone XS/XR/XS Max

Because the latest iPhone XS, iPhone XR and XS Max runs on latest iOS 12 version, Apple company adds a new “Recently Deleted album” in Photos app, so we can keep the recently photos, pictures, images, videos, and App photos & videos from “Recently Deleted Folder” for 30 days. If you have deleted those shoot photos and videos on iPhone XS, In fact, those files have not been completely deleted, those photos just be moved from “Camera Roll” to “Recently Deleted album” in Photos app, so you can go to check and recover recently deleted photos.

recover deleted photos from Recently Deleted Album on iphone xs

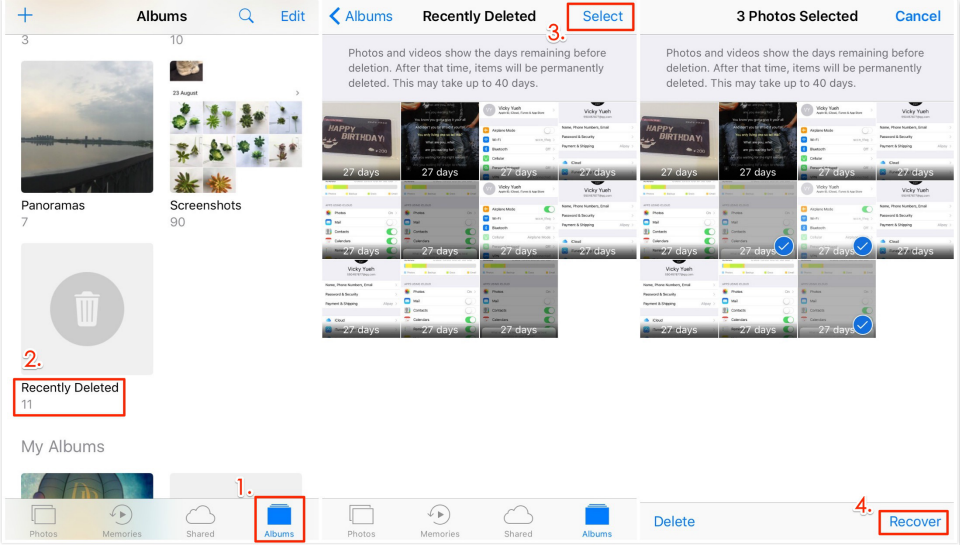
Note: If the photos were deleted from 30 days ago, please learn the (Part 2) free iPhone data recovery method, we’ll teach you how to recover permanently deleted photos from iPhone XS/XR/XS Max, as well as other contents, like videos, contacts, text messages, notes, WhatsApp messages and other App data.

Part 2: Recover Deleted Data on iPhone XS/XR/XS Max with iPhone Data Recovery

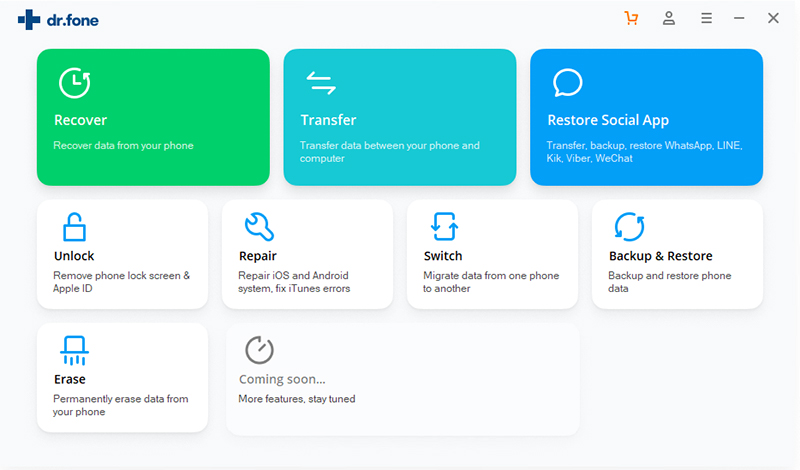
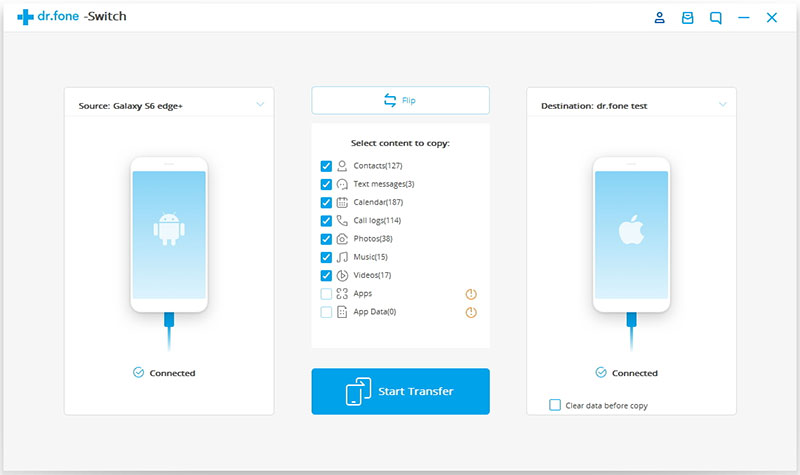
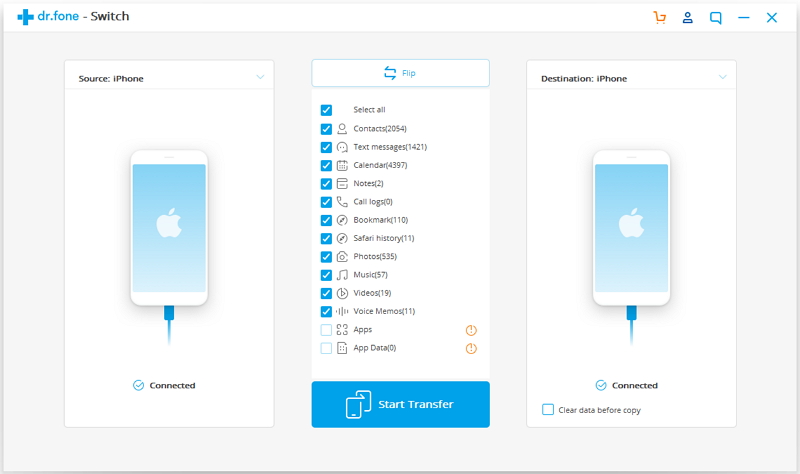
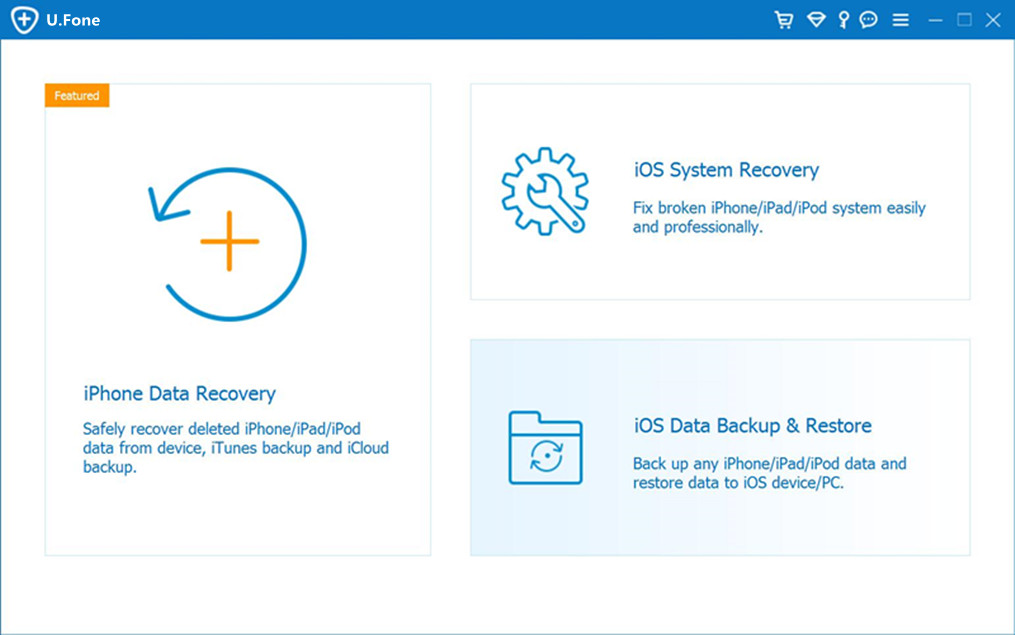
U.Fone iOS Toolkit – iOS Data Recovery help you recover disappeared or lost/ deleted data on iPhone XS/Max/XR and other iOS 12 devices. The files that can be recovered by this iPhone Xs Max data recovery, iPhone Xs data recovery software, include contacts, text messages, photos, videos, call history, calendar, notes, bookmarks, etc. Next, learn more about his iPhone Xs/Xs Max data recovery software, and we’ll tell you how to recover lost data from iPhone Xs Max/iPhone XR without backups.

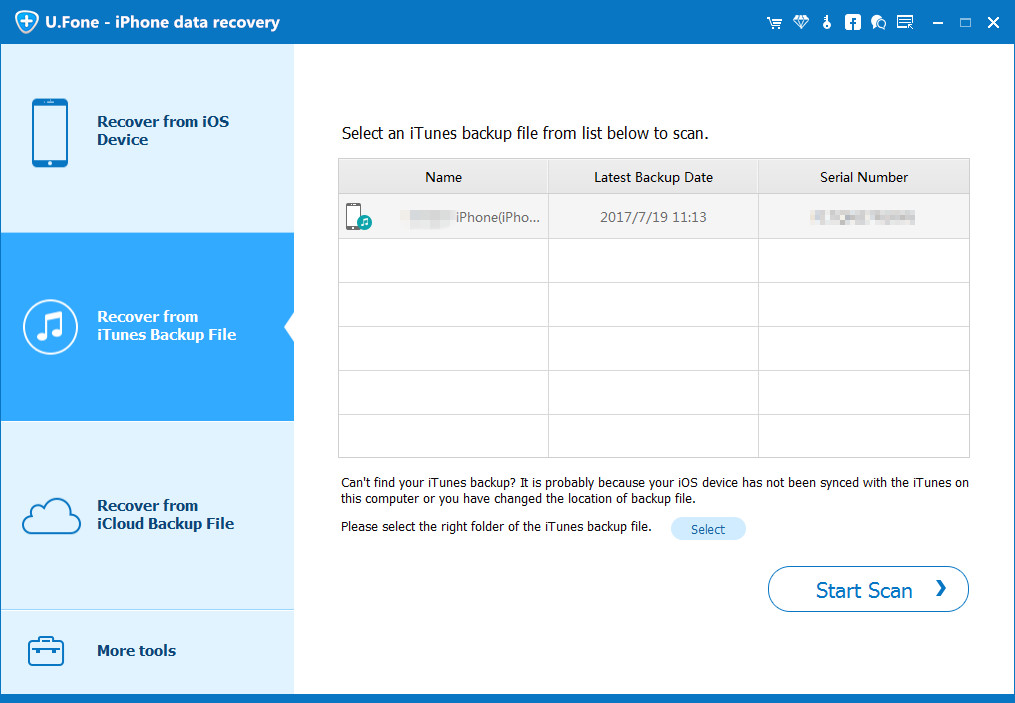
The most convenient way to recover the lost/delete/disappeared data on iPhone XS/Xs Max/XR is use a professional iPhone data recovery software – U.Fone iOS Data Recovery, which can help you directly scan iPhone, iPad or iPod to get those lost files or delete data back. After download the software, you can easily recover from iPhone Xs/Xs Max/XR directly & Recover from iTunes or iCloud backup record. That is to say, you can choose to scan your iPhone Xs/Xs Max or iPhone XR to recover lost data from your devices directly, and even allows you recover data from lost or stolen iPhone as long as you have ever synced your iPhone Xs Max or iPhone XR with the iTunes or iCloud before.

Free download the iPhone Xs data recovery and follow the simple steps to recover the lost/delete data or file from iPhone Xs now!

d_win d_mac

Tips: U.Fone iOS Data Recovery not only supports the latest iPhone Xs Max, iPhone Xs and iPhone XR, but also the previous iPhone X, 8, 8 Plus, 7, 6, 5 are also supported, no matter it base on iOS 9, iOS 10, iOS 11 or iOS 12.

How to Recover Deleted or Lost Data from iPhone XS?

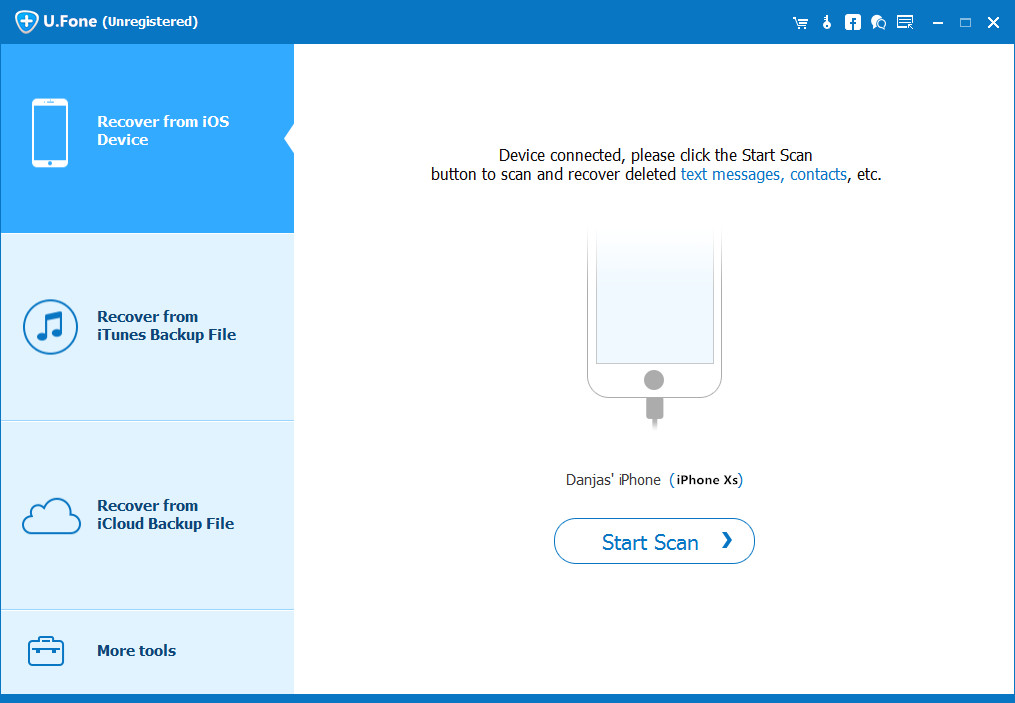
Step 1: Run the software and connect iPhone XS to PC/Mac
After install the powerful software – U.Fone iOS Toolkit, launching it and click “iPhone Data Recovery” function. From the windows, if you want to directly scan your iPhone Xs device to recover the deleted data, you should click the mode “Recover from iOS device” to start.

launch u.fone iPhone data recovery

Then using USB cable to connect with your computer, selecting the data/file you need to recover.

connect iPhone XS to computer

Step 2. Scan the Lost Data from iPhone XS
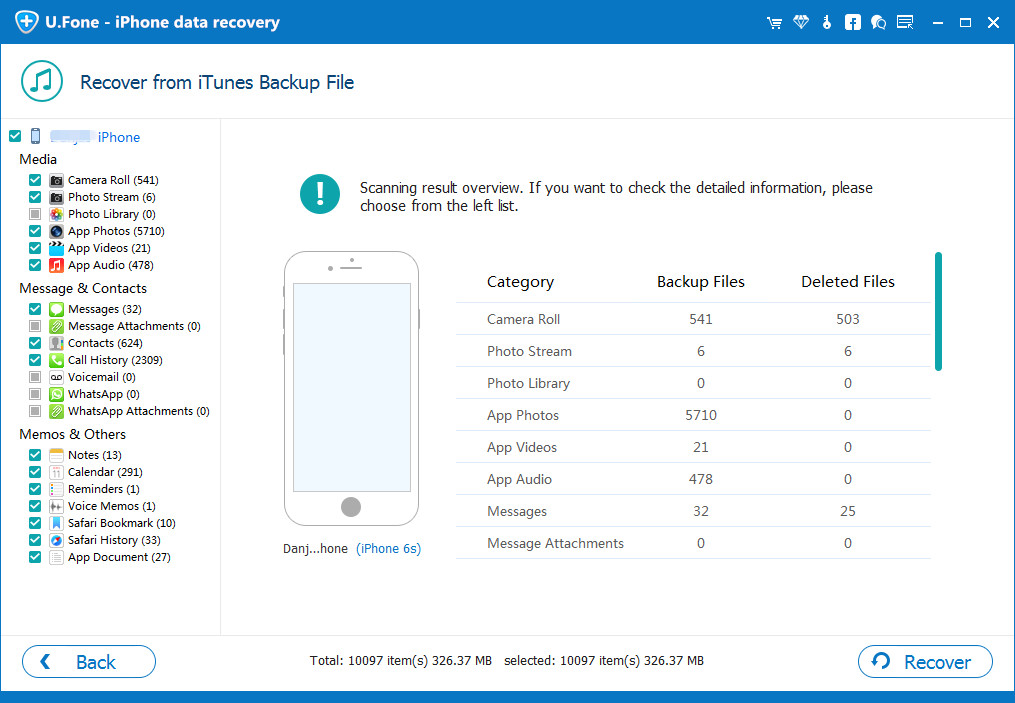
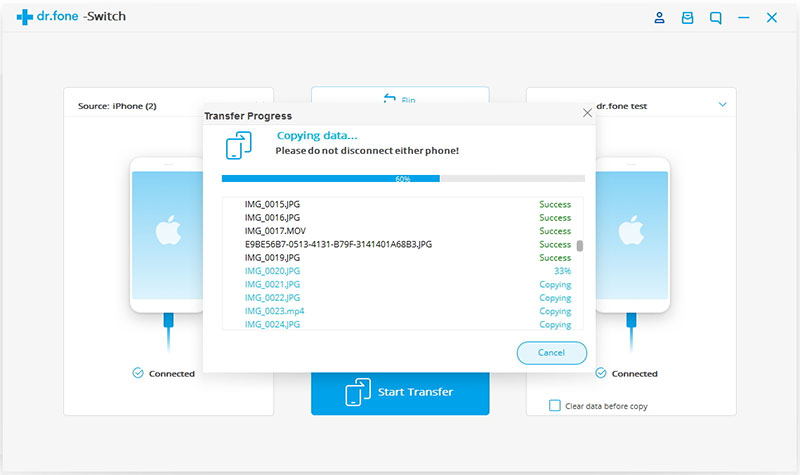
The iOS Data Recovery software can detect your iPhone XS after connect each other, then select the button “Star scan” to scan all the data from your device. It will take you few minutes depend on the capacity of your iPhone.

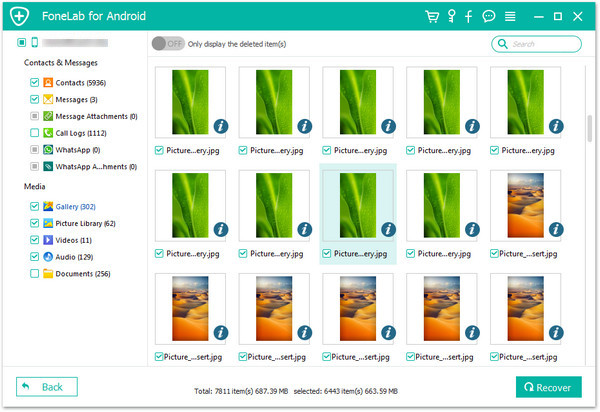
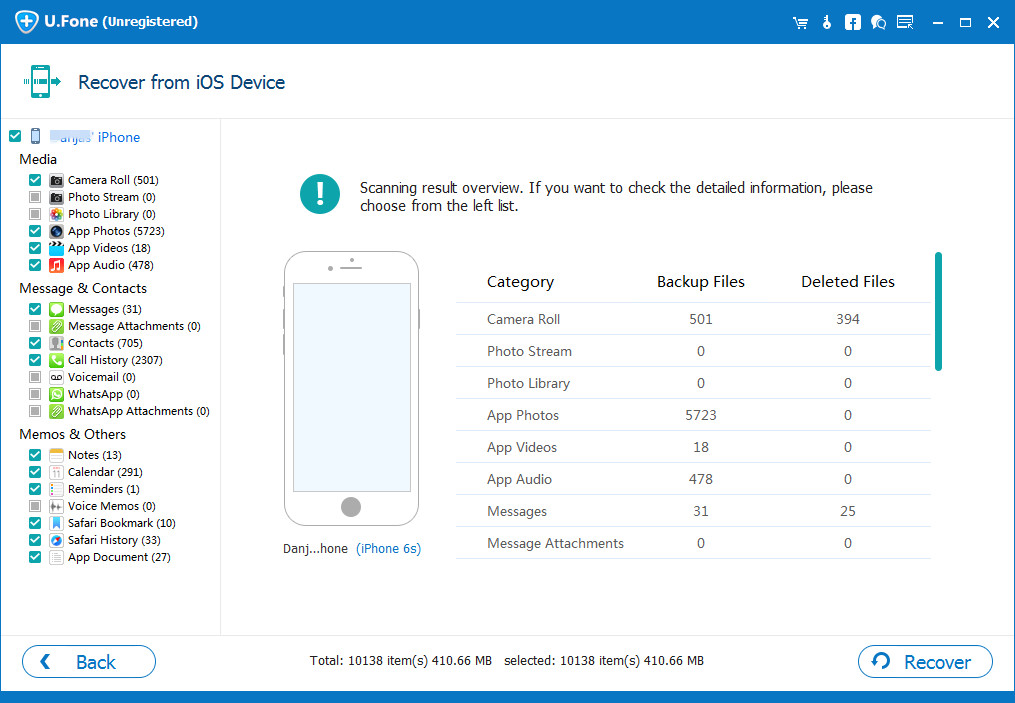
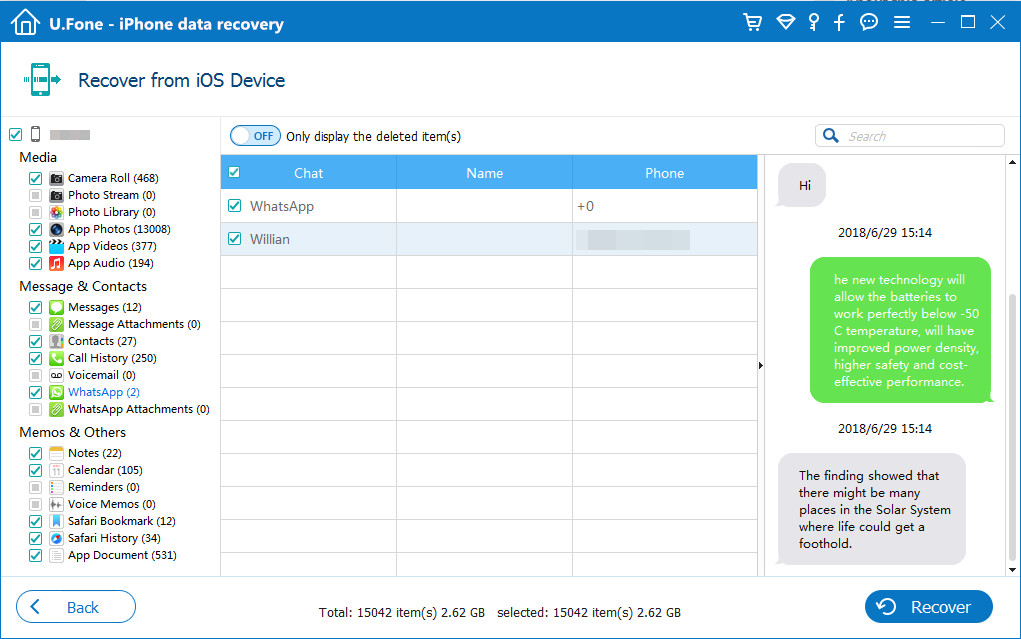
Finally the software will list all the data or file types: Camera roll, Photo Library, Contacts, Text messages, Notes and more.

scan lost data from iPhone xs

Step 3. Preview and selectively recover Files from iPhone XS
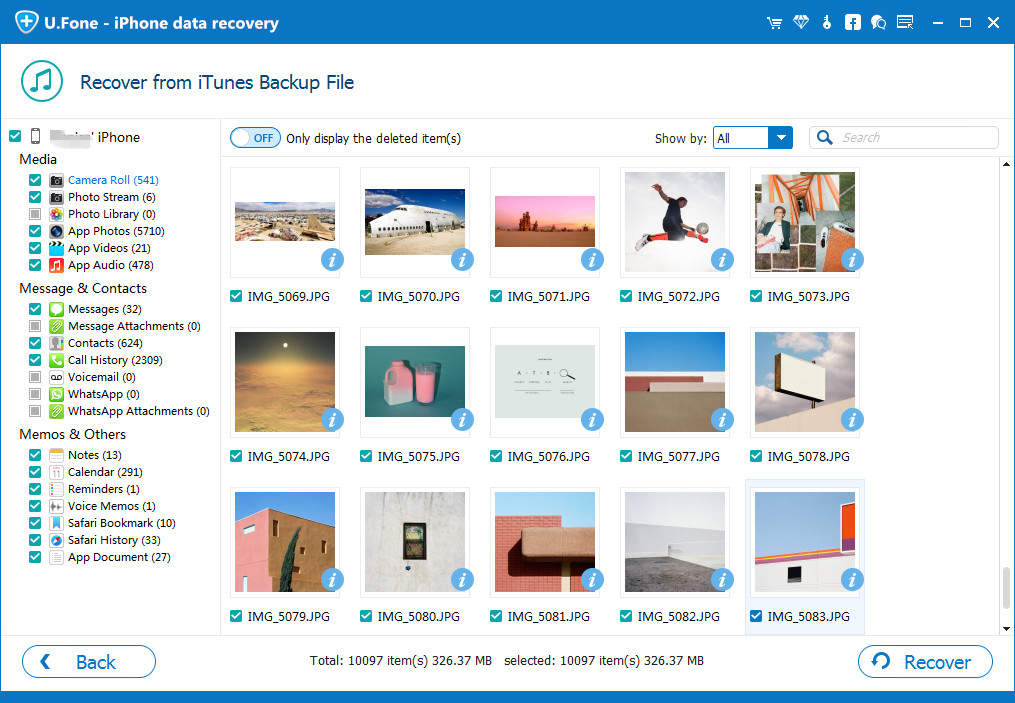
Now, from the left side of the window, all the data has been listed, you can find each kind of the file. All found contents are displayed in categories, like contacts, text messages, message attachments, WhatsApp messages, Wechat messages, Kik messages, Line data, App photos & videos, call history, camera roll, photo stream, photo library, calendar, notes, reminders, voice memos and safari bookmark. You can preview them one by one before recovering.

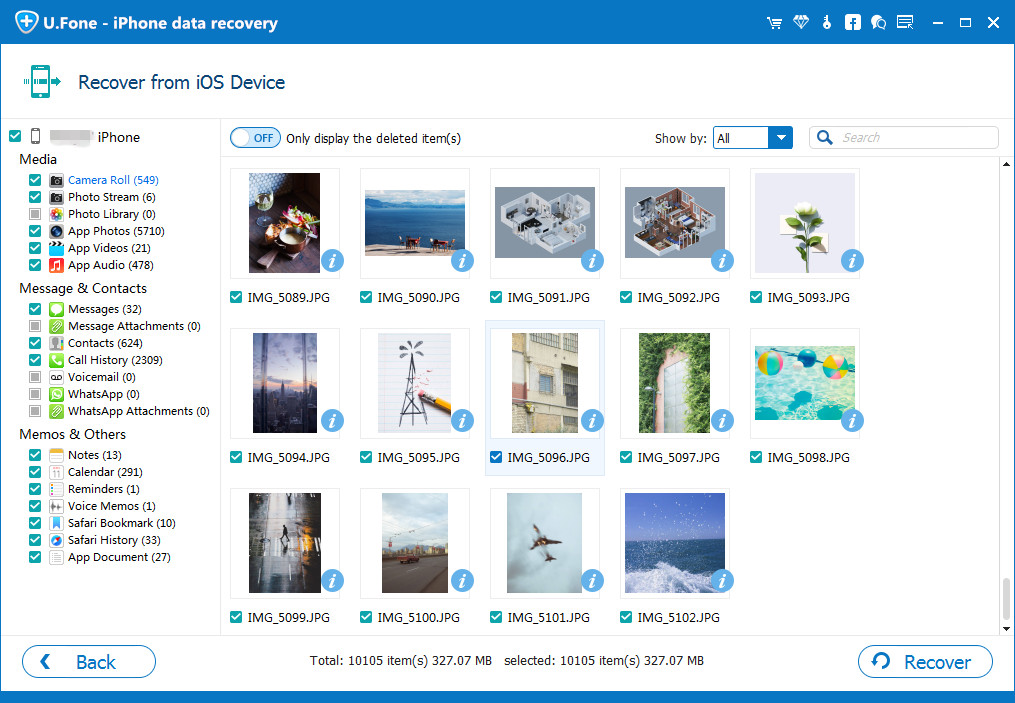
Recover lost or deleted Photos from iPhone XS

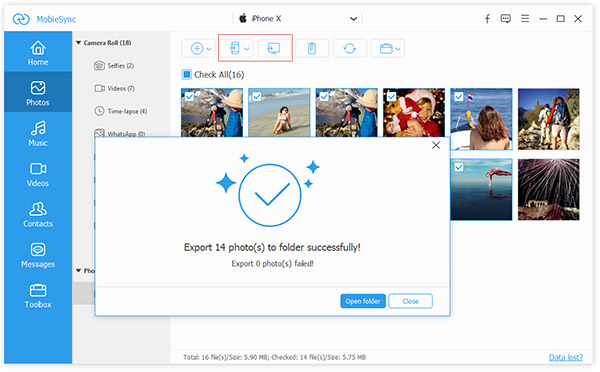
For example, if you need to recover the deleted photos from iPhone XS ,you can click the option- “Camera Roll” (or “Photo Library“, “Photo Stream” option), both the existing and the lost photos are list on the right side,you can read one by one. Select one or more pictures you want to get back, just click “Recover” button to save the deleted photos on your computer as backup.

Recover deleted Photos from iPhone XS

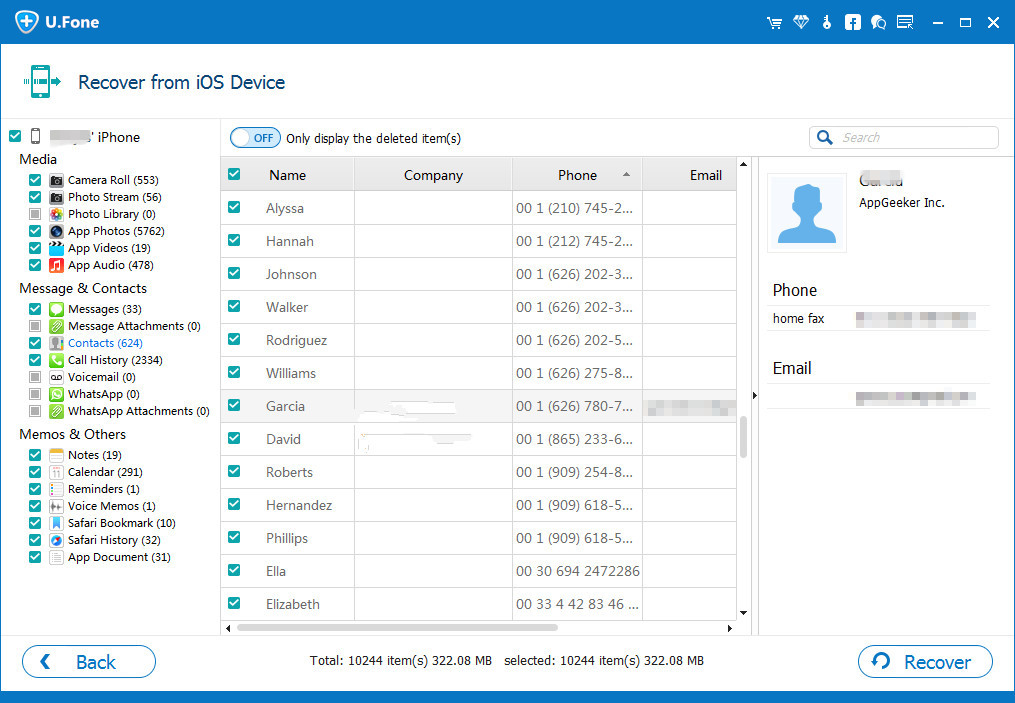
Recover lost Contacts from iPhone XS

When the scan finishes, if you want to recover lost contacts from your iPhone XS, please click “Contacts” to preview the lost contact data before recovery, you can find every missing contacts with full information like phone number, name, email, address, company, job title, website, etc. Just mark the contact you want to get back and click “Recover” button to save all the lost contacts onto your computer, those missing contacts will be retrieved and save onto PC/Mac as VCF, CSV or HTML for your use.

recover contacts from iPhone xs - u.fone

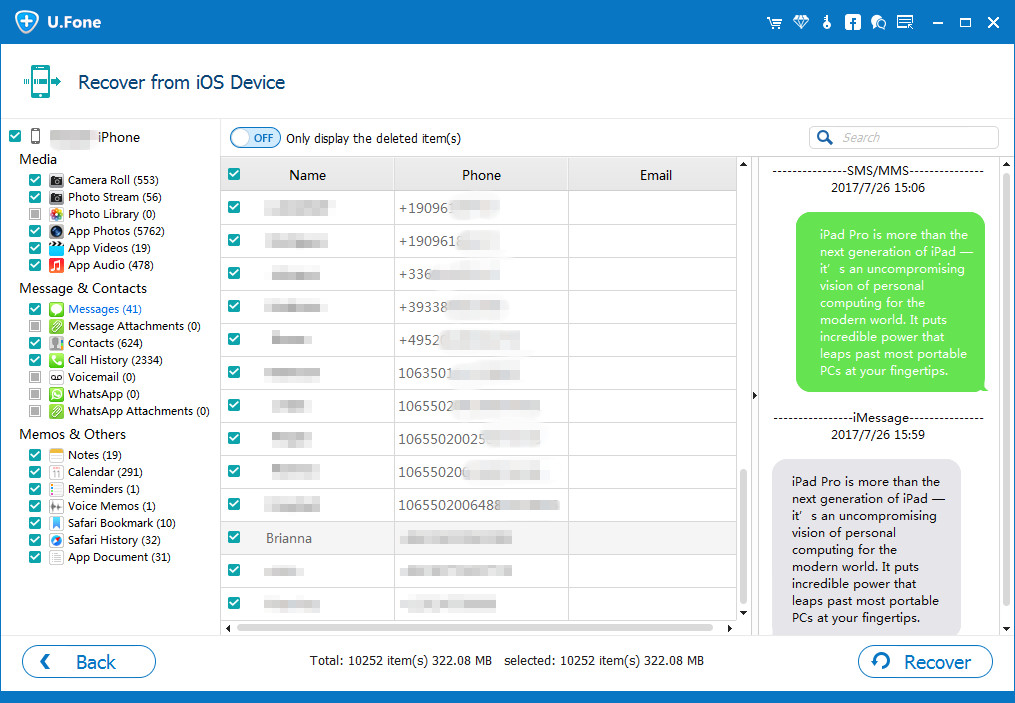
Recover deleted Text Messages and WhatsApp Messages from iPhone XS

U.Fone iPhone data recovery not only can help you recover deleted/lost text messages, message attachments from iPhone, but also allows you recover WhatsApp messages & attachments. After scan the device complete, all found messages contents will be listed in clear, organized categories. Click “Messages” and “WhatsApp messages”to preview the detailed content step by step. Finally, click “Recover” button to save them as CSV, HTML files and attached images.

recover SMS from iPhone xs - u.fone

Recover lost or deleted WhatsApp Messages from iPhone XS

recover WhatsApp messages from iPhone xs - u.fone

Please choose the type of file you want to recover on iPhone XS, only few minutes, the program helps you get back the lost data directly.

Step 4. Confirm the recovery operation again
Then in the dialog window that presents, select a destination on your computer to save the lost data to.

start to recover iPhone xs lost data

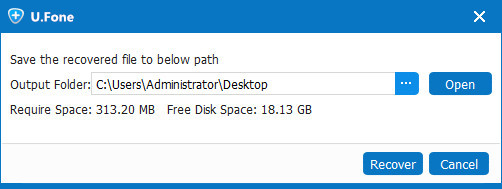
After you select the lost data you need to recover, then click the “Recover” button again, and the deleted/lost iPhone XS data (photos, video, music, messages, contacts, call history, WhatsApp chat, voicemails, notes, ect) are recovered and save to your PC/Mac safely .

d_win d_mac

By this method, you have recovered all the lost/deleted data or file faultlessly. Above guide shows you how to recover lost data from iPhone XS directly through “Recover from iOS Device” mode, if you have sync your iPhone with iTunes and iCloud before, you can also try “Recover from iTunes Backup” and “Recover from iCloud Backup”, both two recovery modes can help you recover data from broken, lost or stolen iPhone, if your iPhone is not in hand.

Other iPhone XS Data Recovery Software Recommend

1# iPhone XS Data Recovery

This iPhone XS Data Recovery helps you recover lost photos, videos, Text messags, App data (Whatsapp/Wechat/Kik) messages, contacts, notes, videos, call history and more from iPhone Xs, iPhone Xs Max, iPhone XR, iPhone X and other old version of iPhone base on iOS 12 or 11. 4, it provides users four methods to recover from iPhone/iTunes backup/iCloud backup, or via smart recovery.
User guide of this iPhone Data Recovery: Recover Deleted Data from iPhone X/Xs (Max)/XR

best iPhone xs data recovery

2# iPhone XS Toolkit

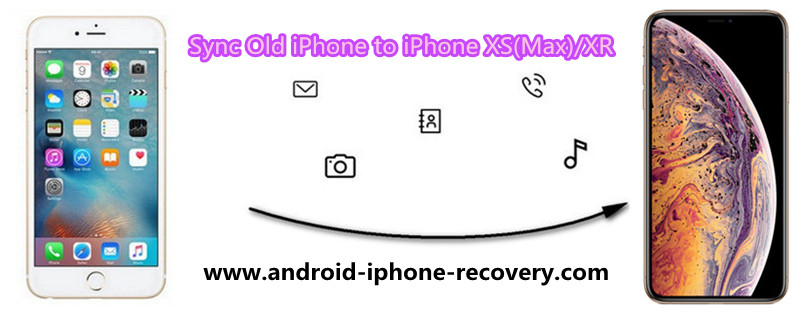
This iOS Toolkit (iOS 12/11 Data Recovery) not only allows to recover deleted data from iPhone XS/XS Max/XR, iTunes and iCloud, but also provides a complete solutions to transfer data from old iPhone or Android to iPhone XS(Max)/XR, this all-in-one iOS toolkit also has other useful additional functions: backup, erase data on iOS devices, as well as fix iOS system and unlock iPhone/iPad.
User guide of this iOS Toolkit: Recover Deleted Photos from iPhone without Backup

best iPhone xs data recovery

Related: Top 5 Best iPhone XS/X/8/7/6S/6 Data Recovery Software Review

Related Articles

Two Ways to Restore Lost Photos from iPhone XS/Max/XR

Transfer Data from Android Samsung to iPhone X/Xs (Max)/XR

Recover Deleted Text Messages on iPhone XS/X/8(Plus)

How to Recover Deleted/Lost Contacts from iPhone X/XS/XS Max

4 Ways to Recover WhatsApp from iPhone X/iPhone 8(Plus)

Transfer WhatsApp Messages from iPhone to iPhone X/Xs(Max)

iPhone Data Recovery

iOS Data Recovery

Recover Your iPhone iPad Lost Data
Now, Even without Backups

Compatible with iOS 13 & iPhone 11

Recover Lost Data Now

How to Import Music to iPhone without iTunes on Mac

Summary
Do you want to import music from Mac to iPhone without using iTunes? This article recommend you an Mac to iPhone Transfer, helping you transfer music to iPhone without iTunes in an effective way. Download a free version and have a try!

I have got an new iPhone 11 Pro, as a music lover, I want to transfer music from MacBook Pro to iPhone 11 Pro, how to import music to iPhone without iTunes on Mac?

Looking for an iTunes alternative to transfer music from Mac to iPhone easily, speedily and without quality loss? iPhone to Mac Transfer can help you directly import music to iPhone 11, iPhone XS, iPhone XR, iPhone X, iPhone 8/8 Plus, iPhone 7/7 Plus, iPhone SE/6S/6/5S/5C/5/4S,iPad 4/3/2, the new iPad Pro, iPad Air, iPad Mini, iPod touch, etc,.

transfer music to iphone xs

When you have upgraded from old iPhone 5/5s/6/6s/7/8 to iPhone 11, iPhone XS or iPhone XR, you may want to enjoy music with the new iPhone, music can bring us endless happiness. Sometimes, you might have downloaded a lot of songs from websites and saved in your computer, or a large music collection on your old iPhone/Android phone, if you want to add music to iPhone or sync music from old phone to new iPhone, we have prepared an easy-to-used iPhone music transfer tool for you to transfer music (including Apple Music, Spotify) from computer or other devices even from iTunes Library to to new iPhone. Keep reading to get what you want!

Part 1: Why Import Music to iPhone without using iTunes?

  • To transfer music from computer to iPhone via iTunes, you have to put your songs to your iTunes library, then sync your the added songs from iTunes library to iPhone.
  • iTunes only supports one-way synchronization to iPhone, which means that the existing songs on your iPhone 11/X/XS/XR shall be erased and replaced with this iTunes library. To avoid those existing songs on your iPhone erased, we recommend you use third-party iPhone Transfer tool to sync music from PC or Mac to iPhone 11/X/XS/XR/X/8/7/6S/6/5S/5,etc. without iTunes. Please keep reading the Part 2 guide.
    3.It’s very very slow to sync songs by iTunes, because it requires automatic backup of the data, it will take you a lot of time.
  • If you want to free download streaming music to iPhone XS, iTunes does not support convert Apple Music to DRM-free MP3 and M4A that iPhone 11/Xs/Xs Max, XR/X/8/X/7/6 supported audio format, what you need is an Apple Music Converter to remove DRM from Apple Music and transfer to iPhone for listening offline.
  • If you’re a Spotify Free or Premium user, iTunes does not support download music from Spotify, what you need is a Spotify Music Converter to download Spotify songs as MP3 format on computer, and then using a iPhone music transfer tool to transfer the DRM-free Spotify music to iPhone Xs for listening offline without premium.

Part 2: Import Music from Mac to iPhone with iPhone to Mac Transfer

If you looking for the best iTunes alternative to add music to iPhone/iPad/iPod, you can use a third-party iPhone to Mac Transfer. The iOS Toolkit – iOS Transfer and MobileSync is an ideal choice for you, both can help you transfer music, videos, photos, etc. from PC/Mac to iPhone quickly.

Worldwide, both two userful Mac to iPhone Transfer tool is designed for transferring any kind of data from Mac to iPhone.

Using iOS Toolkit- iOS Transfer or MobileSync is far better than iTunes library as your data will never be lost while transferring music from computer to iPhone XS (Max). Both two iPhone transfer tools not only helps you transfer songs from computer to iPhone directly, but also enables users transfer music between iPhone/iPad/iPod and Android; sync music between iPhone and iTunes easily. Audio format such as MP3, AAC, WAV, AIFF, M4A are also supported format for the Mac to iPhone transfer. Let’s step-by-step guide on how to using iOS Toolkit- iOS Transfer to transfer music from PC to iPhone XS (Max) without iTunes.

Download trial version of iOS Toolkit- iOS Transfer for Windows or Mac at first.

d_win d_mac
d_win d_mac

Guide: How to Import Music to iPhone on Mac?

Step 1. Download and Run iOS Toolkit- iOS Transfer on PC or Mac
First of all, please free download the iOS Toolkit on your PC/Mac computer. Then, launch the software. After that, choose the “Transfer” module from the software main window.

iPhone to Mac transfer

Step 2. Connect iPhone XS (Max) to Computer
Now, connect your iPhone XS (Max) to your computer using a digital cable. If you are connecting your iPhone XS (Max) to a computer for the first time, then the popup windows will appear on your iPhone XS (Max) for “Trust this computer. So, tap on “Trust”.

connect iPhone to Mac

Step 3. Tap “Music” Tab
If you want to transfer music from computer to your iPhone XS (Max), please tap “Music” tab, at this time, the program will loads all exiting songs of your iPhone and display for you. Here, you can manage your songs.

select music to transfer to iPhone

Step 4. Add Music from Computer to the Program
Now, click on the “Add” icon to add music/music folder to the software’s interface.

add music to iPhone

Step 5.Start to Transfer Music from PC to iPhone XS(Max)
The browser window will appear. Select the desired music files from your computer and finally, tap on “Ok” begin  transferring the selected songs from computer to iPhone XS (Max).

import music from Mac to iPhone

Within a few minutes, your music be imported to your iPhone XS (Max) from the computer. Now, please open the “Music app” on your iPhone XS (Max), you can enjoy those imported songs with your new iPhone XS (Max).

transfer music to iPhone

Tips: After converting Apple Music to MP3, or convert Spotify Music to MP3, you can using this iPhone Transfer tool to transfer the MP3 songs to your iPhone for offline listening, this is the best way to keep Apple Music songs playable on iPhone after canceling subscription.

d_win d_mac
d_win d_mac

Import Music to iPhone

iPhone Photo Recovery: Restore Lost Photos from iPhone XS/XR/X

[Summary]: When you delete or lost the photos on your phone,here are two ways teach you restore delete or lost photos like photos from iPhone iPhone XS/XR/X/8/7, as well as videos,contacts, WhatsApp messages, call logs and text messages, etc.

iphone xs photo recovery

You may want to know:

* iOS 12 Data Recovery: Recover Lost Data from iPhone after iOS 12 Update

* Transfer Data from iPhone/Samsung/Nokia/BlackBerry to New iPhone X/Xs (Max)

How to restore lost photos on my iPhone XS Max?
My little son played my new iPhone XS Max last day,but he deleted all of my precious photos,I’m so sad,does anyone know how to restore lost photos on iPhone XS Max? Please help me.” – Asked by Tommy.

The Apple inc has announced the newest phone-iPhone XS/Mas/XR. Maybe some friends has the situation that they deleted or lost the important photos on their iPhone XS/Max/XR. Maybe you have no idea to restore the lost data. Don’t worry! This article will introduce you two ways to recover lost photos from iPhone XS, iPhone Xs Max and iPhone XR. In additional,it can also recover contacts, messages, notes, videos, WhatsApp messags, call logs,ect. From iPhone in iOS 11/12. Let’s go!

CONTENT

Note: If you have backup the lost data,just follow Method 2, if not please follow Method 1.

When you accidentally deleted or lost important files on iPhone and didn’t create a backup for lost data, don’t worry. Professional iPhone data recovery software – U.Fone iPhone Data Recovery will help you effectively find and restore lost photos on your iPhone by simple clicks.

U.Fone iOS Toolkit – iPhone Data Recovery not only can help you restore deleted or lost important photos on iPhone XS, but also enables you retrieve iPhone Xs lost contacts, text messages, videos, audio, notes, calendar, WhatsApp messages, and more. No matter you didn’t create a backup for the lost/delete data, the program allows you recover stolen/lost/broken/damaged iPhone’s data from iTunes or iCloud backups. Just for several simple steps to recover iPhone Xs lost photos with two different methods.

You should download the U.Fone iPhone Data Recovery software, and the last steps will be so easy.

d_win d_mac

Method 1. Recover Deleted or Lost Photos from iPhone XS/Max/XR.(without Backups)

Step 1.Launching the Software and choose the Recovery Mode
Firstly, Launching the iOS Data Recovery on the computer. Connect your iPhone XS to the computer. In the middle of the software windows.

launch u.fone iPhone photo recovery

Click the mode “Recover from iOS Device” . Then click “Start” to begin.

connect iPhone XS max to computer

Step 2.Scan to find to photos
After that, select the data you need to restore from iPhone XS directly, if you want to recover iPhone lost photos, please click “Photos” item and click “Next”star to scan.

scan lost photos from iphone xs

Step 3.Preview and Restore Deleted Photos from iPhone XS
The recoverable files will be shown in the interface of software after the scanning is completed. You can mark the necessary files, or check deleted files by selecting “Show only deleted files” option. Press the “Recover” button to recover selected data from iPhone XS.
A dialogue box will appear asking you to select a folder to save the recovered files. Choose the folder and allow the software to complete the recovery process.

recover lost photos on iPhone Xs max

Method 2: Recover Lost or Deleted Photos on iPhone XS/Max/XR.(with iCloud or iTunes Backups)

Step 1. Run the U.Fone iOS Toolkit and Select the Mode
First,Connect your iPhone XS to your PC/MAC.The second,download the program on your computer and run it. Then click the recovery mode – “Recover from iTunes Backup File” recovery mode.

iTunes data recovery - ufone

Note: Please don’t connect and sync your device with iTunes after you lost data on the device, to prevent lost data from being overwritten.

Step 2. Scan Data from iTunes Backup File
Once you enter the iTunes recovery mode, then you need is to choose the right device backup file and click “Start Scan”.

san iTunes lost data

Step 3. Preview and Extract iPhone Photos from iTunes Backup File
Let the program find all lost files or data including the deleted/lost photos.All of them can be previewed and displaly by the program. After preview, check the lost photos which you want,and click “Recover” to save them to your computer.

recover pictures from iTunes - ufone

d_win d_mac

Related Articles

Three Ways to Recover Deleted or Lost Data from iPhone iPad iPod

Recover Lost Data from iPhone after Factory Reset

Restore iPhone WhatsApp Messages/Videos/Photos after iOS 11/12 Update

How to Recover Lost or Deleted Video from iPhone Xs/X/iPhone 8(Plus)

How to Recover Deleted Photos Videos from iPhone XS(Max)/XR

[Summary]:Did you accidentally deleted important photos or videos from your iPhone X, iPhone XS or iPhone Xs Max etc. by mistake? Don’t worry! This tutorial article will guide you to recover those permanently deleted or lost photos from iPhone Xs, iPhone Xs Max and iPhone X etc. with or without iTunes backups with the help of the best iPhone data recovery software – U.Fone for iOS.

You may want to know:

* How to Transfer Data from Old iPhone to iPhone Xs/Xs Max

* How to Move Android Data to iPhone Xs/Xs Max

How can I recover deleted photos on iPhone Xs?
I’m so trouble that I have deleted all the graduation photos by a mistake.Last week is my university graduation ceremony,there are so much precious photos in my iPhone XS,but all of the photos have been deleted by my mistake.I have no backup all the photos before,who can help me get back all the precious Memories?” – Asked by Kelly.

How to recover deleted videos and pictures on iPhone XS
I have deleted a few important photos, videos in Camera Roll on my iPhone XS Max, I have no backup my iPhone XS to iCloud or iTunes or anywhere else. I want to know how can I recover deleted photos and videos on iPhone XS Max to get back my precious memories?” – Asked by Jone

How to recover lost pictures and videos after iOS 13 upgrading
After upgrading my iPhone XS to iOS 13, I found all photos and videos are disappear on Camera Roll folder, the iOS 13 deleted photos and videos, is there any way to recover lost video and photos from iPhone XS after iOS 13 update?” – Asked by Silina

Maybe some friends have the same situation that deleted the photos by accidently from iPhone  XS/Max. If you haven’t backup the iPhone photos to your computer, is there any methods to recover the lost photos? Relax! This article will guide you to recover the deleted or lost photos, videos from iPhone XS/Max/XR/X.

Maybe most iOS fans use the newest iPhone X, iPhone Xs, iPhone Xs Max and iPhone XR. But is can’t avoid some problem, you may delete/lost the photos by accident, is it possible to retrieve deleted photos from iPhone XS/Max/XR, iPhone X/8 Plus/8/7 Plus/7/6s Plus/6s, iPad and iPod.etc. Devices? Here I share the useful ways.

Two ways to Recover Deleted/Lost Photos from iPhone XS/Max by U.Fone iPhone Data Recovery

When you directly deleted/lost the photos and videos from your iPhone XS/Max without backups.
Don’t worry! U.Fone iPhone Data Recovery can help you. This program is a professional data recovery for iOS users,it can help you recover deleted or lost data from iPhone/iPad/iPod under any data loss cases, such as, accidental deletion, iOS system upgrade failure, iOS system jailbreak, device lost/stolen, forgot password, water damaged, factory reset, device stuck, device get broken, virus attack, etc.

d_win d_mac
d_win d_mac

Here are twos methods help you to recover photos from your devices. No matter your lost photos with or without backup,the solutions will recover the lost/deleted data perfectly.

Note: If you haven’t backup your photos on iPhoneX/XS, just follow part 1 to go on.
If you have backup the delete/lost photos, just follow the part 2 .

Part 1: Directly Recover Deleted photos from iPhone XS/Max(without Backups)

Step 1. Launch the Program on your PC or Mac
After download and install the U.Fone iOS Toolkit, launching it. We provides Windows version and Mac version, after running the program on the computer, then clicking the button “iPhone Data Recovery” on the main interface.

launch u.fone iPhone data recovery

Step 2. Choose the Recovery Mode
There are 3 Modes for you to choose, if you hadn’t backed up your phone with iTunes or iCloud, you should choose the first recovery mode -“Recover from iOS Device”. Then connect your iPhone XS or iPhone Max to computer via USB cable.

connect iPhone XS to computer

Tips: This recovery mode helps you directly scan your iPhone for lost data, including photos, videos, contacts, text messages and more.

Step 3. Start to Scan and Display the Data
In the middle of the window,you can click “Start Scan” to  scan and analyze all the data from your iPhone XS/Max.Including all the lost photos.How amazing!

scan deleted photos from iphone xs

Tips:After a few minute,all the data will be listed in groups. If you just want to get back the lost photos, click the button“Only display the deleted item(s)”.

Step 4.Preview and Recover Deleted Photos from iPhone XS/Xs Max
After preview and select the  photos which you need,then click “Recover“ to start save the deleted/lost to your computer.

iphone-photo-recovery-ufone

Part 2: Recover iPhone XS/Max Photos from iTunes Backups Selectively

If you need a simpler way than signing in iTunes or iCloud account and load the photos one by one back to your iPhone XS/Max, you can directly try to recover iTunes or iCloud backups of lost photos by using U.Fone  iOS data recovery software with tips below:

Step 1. Run the U.Fone iOS Toolkit and Select the Mode
First download the program on your computer and run it, then click the second recovery mode “Recover from iTunes Backup File”, so you don’t need to connect your iPhone with the computer, the iPhone data recovery software can help you scan your iTunes library and extract data from backups, if your iPhone is lost, broken, damaged or stolen, you can follow this method to restore lost data from iTunes, but making sure you have make your iPhone backup with iTunes before.

recover iTunes data - ufone

Note: Please don’t connect and sync your device with iTunes after you lost data on the device, to prevent lost data from being overwritten.

Step 2. Scan Data from iTunes Backup File
Once you enter the iTunes recovery mode, then you need is to choose the right device backup file and click“Start Scan”.

itune scan results - ufone

Step 3. Preview and Extract iPhone Xs Photos from iTunes Backup File
Let the program find all lost files or data including the deleted/lost photos.All of them can be previewed and displaly by the program. After preview, check the lost photos which you want,and click “Recover” to save them to your computer.

recover photos from iTunes - ufone

Again, hit the Recover button and the program will start retrieving your selected pictures form iTunes backup.

d_win d_mac
d_win d_mac

Related Articles

How to Manage iPhone X/Xs (Max) Files on Computer

How to Recover Deleted Text Messages on iPhone Xs/X/8(Plus)

How to Recover Deleted/Lost Contacts from iPhone X and the New iPhone X/Xs (Max)

How to Recover Deleted WhatsApp from iPhone Xs/X/iPhone 8(Plus)

iPhone Photo Video Recovery


iOS Data Recovery

Recover Your iPhone iPad Lost Data
Now, Even without Backups

Compatible with iOS 12 & iOS 13

Recover Lost Data Now

How to Recover Lost Photos from iPhone XS/XS Max/XR?

Summery】From the article you can get the way to recover permanently deleted, erased, wiped photos and data from iPhone XS/XS Max/XR. Just for several steps by a magical software – U.Fone iPhone Data Recovery, which is the best iPhone photo recovery software for iOS users to recover iPhone Xs lost data, including photos, contacts, messages, notes, videos, WhatsApp messags, call logs,ect.

iphone xs photo recovery

People aslo read:

* Switch from Samsung to iPhone XS (Max)

* Transfer Data from Old iPhone to iPhone XS (Max)/XR

Can I recover lost photos from iPhone XS/XS Max/XR?

I have bought an new iPhone XS Max, many photos are stored on my phone, some photos are the same, so I deleted some duplicate photos on iPhone Xs Max, when choose to delete some less important photos, I made a terrible mistake! I carelessly deleted all the items instead of the chosen ones, note that it’s permanently deleted from the photo album…I want to know how to recover permanently deleted photos from iPhone Xs Max? I am willing to pay for professional iPhone data recovery software, thanks to give me some solutions.

Maybe most iPhone fans use the newest iPhone – iPhone XS/XS Max/XR. But we can’t avoid some problem, for example photos missing, lost or deleted by accident. How to get back the lost photos from iPhone XS/XS Max/XR? Here I share the useful ways.

U.Fone iPhone Data Recovery – A powerful iPhone Xs photo recovery software, which can help you recover delete/lost photos from iPhone XS/XS Max/XR and other iOS 11/12 devices. It can not only help you recover your own accidentally deleted data including contacts, text messages, notes, videos, call history, WhatsApp messages etc, but also can recover data lost due to crashes, system crashes, viruses, forget passwords, stolen and other reasons for lost data. In additional, the program provides you three ways to recover lost data: directly scan devices and recover data without backup; restore iPhone lost data from iTunes backup and retrieve data from iCloud backups. What’s more, U.Fone iPhone data recovery is suitable for almost all Apple devices: iPhone X/8 Plus/8/7 Plus/7/6s Plus/6s, iPad and iPod.

d_win d_mac

How to Recover Deleted Photos on iPhone XS/XS Max/XR?

There is no doubt that backup your important data by iCloud or PC/MAC using iTunes are worry-free and risk-free methods, but some accidents are unpredictable. When you lost the photos without backup, you can use this U.Fone iPhone Data Recovery to recover any data on iPhone XS/XS Max/XR. Let’s go!

Step 1.Run iPhone Xs Data Recovery Program and Select Mode
Launching the U.Fone iOS Toolkit .From the windows,you can see the three recovery options: “iPhone Data Recovery“, “iOS System Recovery” and “iOS Date Backup and Restore“. To recover lost or deleted photos from iPhone Xs directly, please choose the button “iPhone Data Recovery”.

launch u.fone iPhone data recovery

Step 2. Choose the Recovery Mode
If you hadn’t backed up your photos to iTunes or iCloud, you should choose the mode “Recover from iOS Device”, then using a USB cable connect your iPhone XS/XS Max or iPhone XR to computer.

connect iPhone XS to computer

Step 3. Scan and Analyze all the lost photos from iPhone XS(Max)
Then click the button “Start Scan”, the software will scan all the data from your iPhone XS/XS Max/XR.

scan deleted photos from iphone xs

After a few minute,all the photos will be in front of you,including the lost photos and the existent one.If you just want to get back the lost one, please click “Only display the deleted item(s)”.

Step 4.Preview and Recover Selected Photos from iPhone Xs
At the end, you can click the button“Recover” to recover the selected photos from your iPhone Xs. After a few minute, all the lost photos which you have selected will be saved to your computer.

iphone-photo-recovery-ufone

Then go ahead and hit the “Recover” button again and wait for the deleted iPhone Xs photos are recovered and save onto your computer.

path - u.fone iPhone xs data recovery

d_win d_mac

More Solutions to Recover Photo from Android & PC/Mac

Above is the easy guide teach you how to recover deleted photos from iPhone Xs/Xs Max/XR and other Apple devices, if you deleted photos on Android phone like Samsung Galaxy, HTC, Sony, HUAWEI, Motorola, Google Pixel, ect. Or lost photo files on computer, we think that it’s also necessary to provide readers with more photo recovery solutions. Please keep reading the below guide and download a suitable photo recovery software.

1. U.Fone Android Data Recovery – (PC & Mac version)

Root your Android device first and follow the article guide to recover deleted photos from Android phone/tablet directly.

2. iPad Photo Recovery – (PC & Mac version)

Both Windows and Mac version allows you directly scan your iPad and recover deleted photos from iPad Pro, iPad Air, iPad mini, etc.

3. Broken Samsung Photo Recovery – Windows version

A useful broken/damaged Samsung data recovery for users to recover photos from broken Samsung phone, as well as extracting contacts and messages from broken Galaxy S6/S5/S4/Note 5/Note 4/Note 3, it also helps users fix bricked Android to normal without data loss.

4. Photo Recovery – Windows version

Photos lost/deleted from your computer hard drive, USB flash drive or memory card can be retrieved by this powerful Windows data recovery software with ease.

5. Photo Recovery for Mac – Mac OS X version

Not only helps you recover deleted photos, videos and other files from Mac hard drive, but also allows you retrieve pictures and other deleted files from Memory card, USB stick or SD card on your Mac.

Related Articles

Manager and Transfer Files to iPhone X/Xs (Max)

Transfer Data Contacts SMS from Old iPhone to iPhone XS/XS Max/XR

Transfer Data from Any Old Phone to New iPhone X/Xs (Max) Quickly

Transfer WhatsApp Messages from Old iPhone to iPhone X/Xs(Max)

How to Transfer iTunes Music to iPhone 11/XS/XR/X

[Summary]: Do you want to transfer all of your iTunes music tracks including Apple Music tracks to your new iPhone 11/X/XS (Max)/XR? This guide shows how to sync songs from iTunes to iPhone without iTunes. You can also use this iTunes alternatives to import music, videos, photos from computer to iPhone 11/XS/XR/X without wiping data.

CONTECT

When your have got an new iPhone XS, iPhone XS Max or iPhone XR, you may want to sync files from computer to iPhone, you might first think of iTunes, but using iTunes to sync files to device, it will taking lots of your time, worse, this through this method to sync iTunes to iPhone iPad with erasing data on device. If you are looking for a way to transfer music from iTunes to your iPhone XS, iPhone XS Max, iPhone XR, iPhone 8, iPhone 8 Plus or iPhone X without erasing data, read this guide and you will quickly learn how to sync music, playlist and videos from iTunes to iPhone X/XS (Max)/XR, and vice versa; how to put music from computer to iPhone without iTunes. Read on to see more details.

Fast and Reliable iTunes Music to iPhone Transfer

The fast way to transfer music and playlist from iTunes to your new iPhone XS (Max) or iPhone XR, the iOS Transfer – iOS Toolkit not only helps you sync iTunes to iPhone iPad without erasing eata, and vice versa; but also allows you transfer music from old iPhone/iPod/iPad to iPhone XS/XS Max/XR, import music and videos from PC or Mac to iPhone, keep reading on this guide to learn more.

This iOS Transfer is the best iTunes alternative, which not only support sync music, videos and playlist from iTunes to iPhone X/XS (Max)/XR, but also enables you transfer music from (Windows or Mac) computer to iPhone X/XS (Max)/XR without iTunes to avoid syncing data, you can also use this all-in-one iOS Transfer tool to transfer music, videos, photos, contacts, text messages between two iOS devices, when you get a new iPhone X or iPhone XS (Max)/XR, you can just launch the iTunes app and have it syncing data from iPhone to iPhone X/XS(Max) with ease. Besides, this iOS Toolkit – iOS Transfer can also help you manage your iPhone/iPad data with its files management features. Music, ringtones, photos, movies, TV shows, contacts, messages and more can all be managed on your PC or Mac. Follow the steps below to learn how to transfer music from iTunes or computer to iPhone 11 and iPhone X/XS (Max)/XR without iTunes.

d_win d_mac
d_win d_mac

Tips: MobileSync also can help you transfer media files between iOS devices; add music, photos, videos from computer to iPhone X/Xs/Xs Max/XR…..

Part 1: How to Transfer Music from iTunes to iPhone X/XS (Max)/XR without Erasing Data

Step 1. Run iOS Toolkit – Transfer and Connect iPhone Xs to PC/Mac
First of all, please download the iOS Toolkit on your computer, we provides Windows version and Mac version for users to transfer or manage iPhone files on computer. After launching the program on computer, then click “Transfer” function to enter the selected function interface.

u.fone ios toolkit - transfer

Step 2. Click “Transfer iTunes Media to Device”
Once your iPhone Xsis connected, click “Transfer iTunes Media to Device” on the primary window.

Transfer iTunes Media to iPhone Xs

Step 3. Scan All Contents from iTunes
Then click “Start” button to scan the media files in your iTunes library, including music, video, Podcast, audiobooks, playlists, artworks, etc. When the scan is complete, it will display all media file types, you can see how may songs in the iTunes library.

scan iPhone music

Step 4. Transfer Music from iTunes Library to iPhone Xs
Please select the “Music” file type you would like to transfer to iPhone Xs from iTunes library, and click “Transfer” button to start syncing all songs from iTunes to iPhone Xs easily.

sync iTunes music to iPhone Xs

Within a few minutes, the media files on iTunes library will be transferred to iPhone X successfully.

Tips: The entire process will not erase the existing data in your iPhone, and you will save a lot of time, this is something that iTunes can’t do! So iOS Toolkit – iOS Transfer is the best iTunes alternatives.

Download the iOS Toolkit – iOS Transfer and try to manage and transfer music from iTunes, PC/Mac, old Android/iOS to your new iPhone XS/ XS Max and iPhone XR.

Part 2: How to Transfer Music from Computer to iPhone XS without iTunes

Have download lots of downloaded songs on computer, if you want to transfer your songs without having to erase any data on your iPhone XS. Let’s show you how to put music from PC/Mac to your new iPhone X with the help of this iTunes alternatives.

Step 1. Download and Run the iOS Toolkit on PC or Mac
Download and launch iOS Toolkit on computer and click “Transfer” function.

d_win d_mac
d_win d_mac

Then connect your iPhone Xs to PC, your iPhone device will be recognized and displayed in the primary window. No matter you transfer photos, video or music, the steps are similar.

transfer music to iPhone Xs

Step 2.Click “Music” Tab
Once your iPhone Xs device is connected, go to “Music” tab at the top of the program, the program will analyze your iPhone and display all exiting songs.

add music to iPhone Xs

Step 3. Put Music File/Folder from Computer to iPhone Xs
Then click on the “Add” Music icon on the top to add musics to the interface, the program will help you transfer music files from computer to iPhone Xs device. You can select to add one music file to iPhone Xs by this iPhone manger tool, or add all music files in a folder, and then import the music folder to the device.

transfer music to iPhone Xs

Select the music file(s) and tap on “OK”. All selected music files will be added to your iOS device in a few minutes.

add music to iPhone Xs Max

In additional, you can also go to “Video” and “Photo” tab to video/photos from computer to iPhone Xs directly.

Transfer Music, Photos, Videos from iPhone XS to Computer

If you want to backup all media files from iPhone to computer, please select the music files you would like to backup to computer, and click the “Export” icon. It not only supports to transfer music files from iPhone to computer local storage, backup also enables user transfer music, videos, photos, iTunes U/Podcasts/Ringtone/Audiobooks to iTunes library.

import music from computer to iPhone Xs

After select the contents you want to backup to computer local or iTunes library, then click “OK” to start the backup process. The all selected music files will be transferred to your PC/iTunes quickly.

export music from iphone to computer

Other than music, you can also add ringtones to iPhone Xs or make ringtones for your new iPhone Xs/ Xs Max or iPhone XR.

Now, please free download the iOS Toolkit – Transfer and try to sync music, photos, videos to your new iPhone to enjoy it’s latest features.

d_win d_mac
d_win d_mac

Related Articles:

How to Transfer Media Files between iPhone/iPad/iPod and Computer

How to Transfer Data from Android to iPhone X/Xs (Max)

How to Transfer Data from iPhone to Transfer Data to iPhone XS/XS Max/XR

iPhone Manager: Best iTunes Alternatives to Manage your iPhone XS/X Files on Computer

iTunes to iPhone XS Transfer

How to Transfer Data from Android to iPhone XS/XS Max/XR

[Summary]: Don’t know how to transfer data including contacts, sms, photos, videos, WhpatsApp and other apps data from Android to iPhone XS, iPhone XS Max and iPhone XR. Keep reading please, this article will teach you how to move Android to iOS.

Today Apple released the latest three iPhones – iPhone XS, iPhone XS Max and iPhone XR. The 6.1-inch iPhone XR finally debuted, and it is the rumored cheap version of the iPhone X. The iPhone XR formup uses a bangs full screen. Due to cost control, the 6.1-inch screen material is changed from OLED to LCD. The iPhone XR is equipped with 6.1. The inch screen (1792 × 828 pixels, 326ppi), but the size is smaller than the 5.5-inch iPhone 8 Plus, which is the advantage of the full screen, so the control will be better. The iPhone XR actually supports the 120Hz refresh rate screen (the touch will be smoother), which is exactly the same as the new iPhone of the OLED screen. This confirms that it also uses the A12 processor, but cancels the 3D Touch.

transfer data to iPhone XS/XS Max/XR

iPhone Xs, available in 64GB, 256GB and 512GB versions, starts at $999;
iPhone Xs Max, also available in 64GB, 256GB and 512GB versions, starts at $1,099;
The iPhone Xr is available in 64GB, 128GB and 256GB capacities and starts at $749.

Have got an iPhone XS, iPhone XS Max or iPhone XR and wondering how to transfer data from Android to iPhone X/Xs (Plus)? Especially, it’s contacts, text messages and App data transferring. Now keep reading this guide and you’re going to know how to switch from Android to iPhone XS(Max) or iPhone XR with two easy methods.

Phone Switch – Android to iOS Transfer

Want to transfer Everything from Android to your new iPhone XS(Max)/iPhone XR? This article is going to show you an easy-to-used phone transfer tool to migrate all contents from Android to iPhone XS(Max)/iPhone XR. Please free download the phone switch and keep reading how to transfer contacts from Android to iPhone for example.

d_win d_mac

Apple will release the latest mobile phones (iPhone XS, iPhone XS Max and iPhone XR) to compete with Android phones, like Samsung Galaxy S9/S8/Note 9, HUAWEI Mate 10 Pro/P20 Pro, Google Pixel 2XL, HTC U12, LG G6/V30, Sony Xperia XZ3/Xperia XZ2 Premium, Motorola Moto Z3/Pe5 Plus/P30 and other super Android smartphones.

If you switch from an Android user to an new iPhone XS/XS Max/XR users, you may want to know how to transfer data from Android to iOS. Indeed, it’s very complicated to transfer data among different OS, if you want to transfer data like contacts, photos, messages, etc. From Android to iPhone, you need to use a third-party Android to iOS Transfer tool, like Move to iOS and Phone Switch, both two Android to iPhone transfer tool makes it more easy to transfer Everything from Android to iPhone XS/XS Max/XR. Let’s show you two easy guide to move your data from Android to iPhone XS(Max), iPhone XR or iPad with Move to iOS and Phone Switch.

Method 1: Transfer Data from Android to iPhone XS(Max) with Move to iOS app

Move to iOS app is an data transfer tool for iOS users to transfer files from Android to iPhone/iPad/iPod, which is developed by Apple company. However, it only supports to transfer a few types of content, including Contacts, Message history, Camera photos, Mail accounts, Web bookmarks, calendars and free apps. Move to iOS App took your old Android and new Apple device together over a direct Wi-Fi connection and transfers over all your data. It only takes a few minutes to switch all your important data from an Android phone to an iPhone or iPad. Here’s what you need to know.

Step 1. Download and Run Move to iOS app on your Android Phone
First of all, please download Move to iOS app on your Android phone from the Google Play store, then install and open the App, you can see all content listing for Moving to iOS.

move to ios

Tips: The app is supported on all phones and tablets running Android 4.0 and later.

Step 2. Tap “Apps & Data”>>”Move Data from Android” option on iPhone
On your iPhone Xs screen, please tap “Apps & Data” and tap “Move Data from Android” option.

move from android

Step 3. Agree to Move Android to iOS
Tap Continue on both devices and tap Agree go to setting, because it hooks your old Android and new iPhone together over a direct Wi-Fi connection and transfers over all your data, so you must to connect both phones with the same Wi-Fi.

move to iPhone X and iPhone XS

Step 4. Enter Digit Code on Android Phone
In this step, please turn to you your Android phone and enter the 12-digit code displayed on the iPhone Xs. After entering the code, the Android phone will connect with your iPhone over a peer-to-peer Wi-Fi connection and determine what data will be transferred.

move android to iPhone xs

Step 5. Move Data from Android to iPhone(Google Account info Included)
After connecting your Android with your iPhone over a peer-to-peer Wi-Fi connection and determine, now select the contents (text messages, contacts, and the photos and videos in your camera roll) your want to move to iPhone from Android phone. In this step, it will ask whether you want to transfer your Google Account info (Chrome bookmarks) to your new iPhone, if you need, please log in your Google account on iPhone. Please waiting until it done, your Android data will be moved to the new iPhone and place the appropriate content into the correct apps.

move-to-ios-iphone-05

Note: Move to iOS app doesn’t support transfer your apps (as they’re not compatible), music, or any of your passwords from Android to iPhone. Additionally, you can only transfer data from an Android phone or tablet to an iPhone or iPad running iOS 9 or higher. If you’re on the newest iPhone 8 or 8 Plus, iPhone XR or iPhone XS(Max), it can help you move some contents from Android to iPhone. But, if you want to transfer WhatsApp messages or other important data from Android to iPhone, you should use a third-party Android to iPhone transfer program. Below, we will recommend you an one-click Android to iPhone Switch tool, it can help users directly transfer all data between Android and iPhone, iPhone to iPhone and Android to Android.

Method 2: Transfer Data from Android to iPhone XS(Max) with Android to iPhone Switch

Phone Switch and Phone Transfer, both can help you switch from Android to new iPhone X/Xs and other iOS 12/11 devices directly, you can use this two phone to phone transfer to transfer Contacts, Messages, Calendar, Photos, Music, Video, Call log and Apps from Android to iPhone, iPhone to Android, iOS to iOS and Android to Android as well. Phone Switch supports transfer everything from HTC, Samsung, Nokia, Motorola, Sony, Huawei and more to iPhone Xs/X/XR/8/7S/7/6S/6 (Plus)/5s/5c/5/4S/4/3GS. Both two programs compatible with the latest iOS 12/11 and Android 8.0, it works perfectly for more than 6000 devices.

d_win d_mac

How to Transfer Contacts from Android to iPhone X/XS?

Step 1. Run the Program and Connect Android and iPhone XS
Download and run the Phone Toolkit – Switch, and you will see the window as follows. In the main window, choose the “Switch” mode, then connect your Android phone and your iPhone XS with the computer via USB cables respectively. Make sure that both devices can be successfully detected by your computer.

Android to iPhone XS transfer

Step 2. Choose File Types to Switch
After both two devices detected by the program, you can use the “Flip” button to switch the places of your phones and make sure that the Android pone on the left side as source device, the iPhone XS on the right side as target device. Then select “Contacts” you want to transfer to the new iPhone XS.

sync data from android iphone XS

Step 3. Transfer Contacts Data from Android to iPhone XS
Finally, just click “Start Transfer” button start moving contacts from Android to iPhone XS, please don’t disconnect either device. Then all the data including Text Messages, Call Logs, Calendar, Photos, Video and Music will be transferred from Android to iPhone XS/X, as well as iPhone 8/7/6S/6 (Plus).

switch android to iPhone XS

Tips: The Phone Toolkit – Switch function are available to almost any latest Android phones running Android Lollipop and Marshmallow and iPhone running in iOS 11 and iOS 12, including iPhone 8/7S/7/6S/6 (Plus). If you have a new iPhone XR, iPhone XS(Max) or iPhone X, feel free to use the ways to transfer data from Samsung phone to iPhone X/XS/Plus.

d_win d_mac

Related Article

How to Transfer Videos/Music/Photos to iPhone XS/XS Max/XR

How to Import Videos to iPhone 8/X/XS(Max)/XR without iTunes

How to Transfer Samsung Data to iPhone 8/X/XS(Mac)/XR

How to Backup Contacts on iPhone 8/X/XS/XS Mac and iPhone XR

How to Backup & Restore iPhone X/XS(Max) on Computer Safely

How to Backup & Restore iPhone 8/8 Plus

Move Android to iPhone XS(Max)/XR

How to Transfer Data to iPhone XS/XS Max/iPhone XR from Old iPhone

[Summary]: Want to transfer data like contacts, text messages, photos, music, videos, notes and more from your previous iPhone 6S/7/8, iPhone X or earlier to your newly bought iPhone XS(Max)/iPhone XR? Here are 2 details teach you how to migrate Everything to new iPhone XS(Max) and iPhone XR from an old iPhone via Phone Switch and MobileSync.

sync old iphone to iphone Xs, iPhone Xs Max, iPhone XR

CONTENTS

Last year, Apple released the iPhone 8, iPhone 8 Plus and iPhone X, and the OS can be upgraded to the latest iOS 12 Beta. Now, the Apple company has released three oversized iPhones on September 12th in the United States, which is arguably Apple’s release of three different-size smartphones on the same day. According to reports, the three iPhones are 5.8-inch iPhone XS, 6.5-inch iPhone Xs Max, and iPhone XR announced with a notched 6.1-inch LCD display and Face ID. Apple is calling the 6.1-inch screen a “Liquid Retina” display, which offers a 1792 x 828 resolution at 326 PPI, featuring Apple’s True Tone technology. While the iPhone XR may look like a larger iPhone XS, there are a few compromises — the frame is aluminum, not stainless steel. There’s IP67 water and dust protection, instead of the improved IP68 rating on the iPhone XS, and the iPhone XR’s screen is LCD, not OLED.

transfer iPhone data to iPhone XS/XS Max

Don’t Miss: Backup Old iPhone and Restore to New iPhone X/XS/XS Max/XR

Don’t Miss: Add Videos/Music/Photos from PC or Mac to iPhone X/Xs(Max)

No matter you use iPhone or Android phone before, when you have got an new iPhone XS/XS (Max) or iPhone XR, you may want to move everything to the new devices after upgrading to new iPhone. Follow the guide to transfer data, including contacts, SMS, notes, books, Safari bookmarks, photo library, movies, home videos, TV shows, music videos, music, ringtones, audiobooks, playlists and voice memos, from your old iPhone to your new iPhone X/Xs/iPhone XR and iPhone Xs Max.

Get the new iPhone X/Xs (Max) or iPhone XR? Now follow this two methods to know how to make a move data from old iPhone to new iPhone without loss data.

Method 1: Transfer Data from Old iPhone to iPhone XS/ XS Max/XR via Phone Transfer

Phone Transfer and Phone Switch, both is professional iOS to iOS transfer and Android to iOS transfer, which not only helps you directly to transfer data from iPhone X/8/7/6S/6/SE/5s/5 to iPhone XS/ XS Max, iPhone XR, but also allows you transfer Everything to iPhone/iPad/iPod from Android phone, like Samsung, HUAWEI, ZTE, LG, OPPO, vivo, SONY, Google, HTC, OnePlus, Xiaomi, Nokia, Windows phone and any other popular Android smartphone. With the help of this iPhone to iPhone transfer function, you can easily move data, including contacts, videos, SMS, call history, calendar, photos, notes and more from previous iPhone to iPhone XR, iPhone XS and iPhone XS (Max). In addition, if you want to sell the old phone, you can use the “Backup Your Phone” and “Restore from Backups” function to backup and restore your iPhone data, then erase your old iPhone’s data permanently & complete by “Erase your Old Phone” function. Let’s learn how to transfer contacts, SMS photos, music and more from old iPhone to new iPhone selectively.

d_win d_mac
d_win d_mac

Transfer Everything from iPhone 7 (Plus) to iPhone Xs(Max) in 1 Click

Step 1. Download and Run Phone Toolkit – Switch
First of all, please free download the Phone Toolkit on your Mac or Windows computer.
On the main interface, please click the “Switch” option.

Transfer data to new iPhone X/XS

Step 2. Connect your iPhone 7 and iPhone Xs(Max) to Computer
Then, connect your both iPhones to computer via USB cable! Only few seconds the devices will be automatically detected by the Phone Toolkit. If you are connecting an iPhone for the first time, then you need to trust the computer. The application will provide a quick snapshot of both the devices.

Step 3.Select Data Types you Want to Switch
Make sure that your old iPhone (iPhone 7) is listed as the source device and the new iPhone (iPhone Xs) is the destination device. You can click on the “Flip” button to interchange their positions. Then select the contents you want to move, such as photos, videos, contacts, messages, music, call logs, notes, bookmarks, and so much more.

select iPhone files to transfer

Tips: If you want to transfer WhatsApp chat history from old iPhone to iPhone Xs(Plus/Max), please back to the home interface of the program, then click “Backup & Restore” function, this feature not only helps you backup and restore WhatsApp and other data, but also helps you transfer WhatsApp messages from old iPhone to new iPhone.
Read the guide about: Transfer WhatsApp messages from iPhone to iPhone X/XS
How to transfer WhatsApp messages from Android to iPhone XS/XS Max/XR

Step 4.Begin Transfer Data/Files from iPhone 7 to iPhone Xs(Max)
Above steps, you have selected the data you want to transfer to your new iPhone Xs from your old iPhone 7 and click on the “Start Transfer” button begin sync data old iPhone to new iPhone Xs.

connect both iphones to transfer data

The application will automatically copy your data from your old to your new iPhone. Wait until the process is completed successfully and don’t disconnect your phones until then.

Above is the simple guide to sync Everything from old iPhone to new iPhone Xs(Plus/Max), below we’ll shows you you how to use a more powerful iPhone Transfer & Manager tool to transfer data from iOS to iPhone Xs/X/8/7/6s/6(Plus) and transfer files from PC to iPhone.

Method 2: Two Ways to Transfer Files from Old iPhone to iPhone XS/ XS Max/XR via MobileSync

MobileSync is the professional iOS files transfer and manager software, which not only can help you transfer files like photos, videos, songs, contacts, etc. between iPhone, iPad and iPod, but also allows you manager and import files from computer to iPhone Xs/XR/X/8(Plus). If you want to transfer contacts between iPhone and PC, just click “Contacts Backup/Restore”. In additional, you can use this iPhone file transfer tool to make ringtone for your iPhone, and convert HEIC to JPG for backup iOS 12/11 device’s pictures. Let’s teach you how to transfer files between old iPhone and iPhone Xs via MobileSync for Windows.

d_win d_mac

Simple Steps to Transfer Data from iPhone to iPhone Xs(Max)

Way 1: Export to iPhone Xs(Max)

Step 1. Run MobileSync on PC or Mac and Connect Both iPhones
First of all, please download and launch MobileSync on your Windows/Mac computer and connect your old iPhone device and iPhone Xs to computer with theirs USB cables.

iPhone XS File Transfer

Tips: On the software’s main interface, you can see there are some useful features: Phone Transfer, Music Transfer, Video Transfer, Contact Transfer, Contact Backup, Contact Restore, Ringtone Maker, HEIC Converter and more.

Step 2. Select old iPhone Device as Source Device
When you enter the main interface, you can see iPhone data are listed in catogories on the left side. Please make sure your old iPhone as source device and click on the data type on the left to check detailed information.

Check iPhone Files

Step 3. Export Data from Old iPhone to iPhone Xs
Now, you can preview and select the contents of old iPhone,for example, if you want to transfer contacts to iPhone Xs, please click “Contacts” item on the left and select one or more to transfer. Finally, just click “Export to Device” button to start transferring data from old iPhone to new one.

transfer iPhone files to iPhone X/XS/XS Plus

Tips: If you want to backup data from iPhone to PC, please click “Export to PC” button to make your old iPhone’s data backup, after making the old device backup, you can also restore the backups to new iPhone Xs easily.

Way 2: Device to Device

Step 1. Launch MobileSync and Connect your two iPhone Devices to PC
Click the Free Trail button to download and launch MobileSync on PC, then connect your old iPhone and new iPhone to PC with USB cables.

Connect iPhone to PC

Step 2. Click “Device to Device”
Click Toolbox on the left control and choose “Device to Device” or “Transfer Data to Folder” on the right.

once-click Device to Device

Step 3. One-Click to Migrate Data from iPhone to iPhone XS
After the program analyze the old iPhone, it will list all the transferable file types to you, just select those what you want to transferred, click “Start Transfer” button to transfer all data from old iPhone to iPhone XS(Plus/Max) in just one click.

iphone to iphone X transfer

More iPhone Files Transfer Function of MobileSync

– Transfer data between iOS devices
Transfer files including media files and text contents between iPhone, iPad and iPod devices.

– Transfer iPhone/iPad/iPod files to computer
Back up everything from iPhone/iPad/iPod to your computer without iTunes.

– Import Files from computer to iOS device
Directly add all kinds of media or other files from computer to your iPhone, do what iTunes can’t.

– Convert HEIC to JPEG/PNG for Backup
Convert HEIC to JPEG/PNG and transfer to computer for backup.

Download MobieSync for free and try to transfer data from iPhone to another.

d_win d_mac

Related Article

How to Transfer Data to New iPhone X/Xs/Xs Max/XR

Move to iOS: Transfer Data from Android to iPhone X/Xs(Max)

Transfer Data between iPhone and iPhone 8/iPhone X and iPhone XS

Recover Deleted and Lost Data from iPhone X/Xs (Plus)

How to Transfer Data from Samsung to iPhone 8/iPhone X/XS

How to Backup & Restore iPhone 8/X/XS

Transfer Data from iPhone to iPhone XS/XR

How to Download and Convert Apple Music Playlist as M4A

[Summary]: If you want to download Apple Music songs, playlist to DRM-free M4A, please grab Apple Music Converter, which can losslessly convert Apple Music songs to M4A with ID tags retained.

“I know the songs in Apple Music app that are formatted as . m4p, but is it possible to download Apple Music playlist as M4A format?”

All your downloaded Apple Music songs, playlist are DRM protected AAC audio files in M4P format, and the M4A is an unprotected AAC audio format that you can use widely without any restrictions. If you want to remove the DRM from Apple Music into DRM-free M4A, for playback on more smart devices like Samsung Galaxy S/Note/Tab, HTC, LG, Sony, Moto, Google Pixel, music players, or gaming consoles, Apple Music Converter is your perfect partner.

1 Click to Convert Apple Music to M4A Easily

To download and convert Apple Music songs to M4A files, what you need is an Apple Music to M4A Converter, this UkeySoft Apple Music Converter can bypasses these annoying limitations by removing DRM protection from Apple Music songs legally, it can also convert Apple Music to M4A and various unprotected audio formats, such as MP3, M4R, AC3, AU, AAC, FLAC, AIFF, or MKA. And it supports 1X to 16X faster conversion speed and keeps original metadata to MP3, M4A audio files. As a result, you are able to download Apple Music playlists, songs as M4A. Take a full look what this powerful Apple Music Converter can do for you.

Convert Apple Music to M4A, MP3, M4R, WAV, FLAC without quality loss.
Convert iTunes music and Audiobooks to MP3, M4A, etc.
All ID3 tags and metadata kept after conversion.
Perform 16X faster conversion speed.
Rename and sort output M4A songs by ID tags and characters.
Perfectly run on latest Windows 10, macOS High Sierra and iTunes version.

d_win d_mac

Easy Guide to Download Apple Music Playlist as M4A

Step 1. Launch Apple Music Converter

Firstly, download and install the Apple Music Converter on your computer. Then launch it and iTunes will be opened along with the program, purchased M4P tracks and Apple Music M4P tracks will be listed as playlists in left panel.

launch Apple Music Converter

Step 2. Select Apple Music Playlist

Since this Apple Music Converter supports batch conversion perfectly, you can select as many tracks as you want or select entire playlist by ticking the first checkbox in the label bar.

select Apple music playlist to convert

Step 3. Choose M4A as output format

In the output format list, you can see MP3, M4A, WAV, FLAC, AC3 and some other audio formats. Here choose “M4A – MPEG4 Audio” as we need to convert Apple Music to M4A. Also, you can click Options to adjust conversion speed if necessary.

Select M4A as Output Format

Step 4. Convert Apple Music Playlist to M4A

Now you can simply click “Convert” button to convert your Apple Music to DRM-free M4A format quickly.

convert apple music m4p to m4a

When the conversion is done, you can simply click “Open Output File” to get output M4A songs. And you can copy output M4A to iPhone, Android phones, PSP, PS3, Sony Walkman or other MP3 players for playback.

get m4a files

Besides, after converting Apple Music to M4A, you can also set M4A as your ringtone on iPhone or Android mobile phones.

d_win d_mac

Related Tutorials:

How to Play M4P Apple Music on Android

How to Play M4P Apple Music M4P on iPhone iPod for Free

How to Play Apple Music M4P on MP3 Players

How to Convert Purchased Apple Music to MP3

How to Convert Spotify Music to M4A

How to Convert iTunes M4P to MP3 on Mac

Download Apple Music Playlist as M4A

Recover Data When You Cannot Enter Password on Samsung Galaxy

Last night I accidentally break the screen of my Samsung Galaxy phone after dropped it on the floor. Now I want to extract some meaning photos from the broken phone before sending it to the repair store, this photos is important to me. However, I can’t enter password to unlock the phone since the broken touch screen is unresponsive. Are there any ways to recover data when I am locked out of the phone?

For most people, they set a lock screen password to protect their phone data from leaking for others. When your phone get a broken screen or it get damaged for other causes, you must be depressed. What’s worse, the data stored on the phone and you have no way to extract it from the broken device, since the screen is broken. Have you ever encountered with this situation? Your phone accidentally dropped on the floor and the screen is unresponsive and you can’t enter the lock screen password on it. How to recover data from the phone which you can’t enter password on it? Here is the best solution for you to solve the question.

Broken Samsung Galaxy Extraction – Recover Data from Broken Samsung

If your Samsung Galaxy screen is totally not working and you haven’t backed it up on your Google account, there is a perfect way to help you rescue the data. With Broken Android Data Extraction, you can access the locked Samsung Galaxy without a password and recover data when you can’t enter password on Samsung Galaxy. It allows you to extract contacts, messages, call logs, photos, videos, WhatsApp messages, documents, and more types of files from broken Android device. In general, it is a superior data recovery tool for recovering data from Android device for any broken cases, such as, broken screen, stuck at black screen, stuck in the Download Mode, stuck in the restart loop and others. This program compatibles with almost all Samsung models and Android models, insist of Galaxy S4/S5/S6, Note 3/4/5.

d_win d_mac

How to Recover Data from Samsung without Entering Password

Step 1. Connect Samsung Phone to the Computer
In the home page of program, click “Broken Android Data Extraction” among three options, then connect the Samsung Galaxy phone with locked screen to the computer with a USB cable, and click the “Start” button.

broken Android data extraction home page

connect broken screen Samsung to PC

Step 2. Select the Files to Scan
The program will begin to scan data from your phone, click the files contain the data you want. Click the files name then click “Next“. If you want to recover all files at once, please click “Select All” item.

select files to scan

Step 3. Select Broken Situation for your Samsung
In this step the program will guide you to another screen, you will see several fault types of phone choices. Please choose the one which match your phone. In this case, you should click “Others“.

choose Samsung broken type

Step 4. Select Samsung Phone Model
Select the brand and model of your phone according to the option. (You could click the “No my device in the list” option if you can’t find your phone model.)

select device model

Step 5. Enter Samsung into the Download Mode
Follow the instruction to enter your phone into the Download Mode.

enter broken screen Samsung into the download mode

Note:Please keep the connection between the phone and the computer during this process.

Step 6. Analyze Data of Samsung Phone
After entered the phone into the Download Mode, the program will start downloading the recovery package for analyzing your phone data, which will cost you some minutes.

analyze data from Samsung

Once the downloading is completes, all recoverable files including the selected items stored on the device will be scanned out.

Step 7. Preview and Recover Data from Samsung Phone
Lastly, it will list all deleted/lost or existing data from Samsung in the scan out list, including gallery, videos, contacts, messages, and more. Select and preview the data you want under items, recover the selected data and save them on the computer by clicking “Recover” button.

recover data from Samsung

d_win d_mac

Related Articles:

How to Recover Photos from Broken Samsung Galaxy Phone

How to Recover Data from Water Damaged Samsung Phone

How to Recover Photos from Broken Samsung Phone

How to Recover Lost Data from Broken Samsung Phone

How to Backup & Restore Samsung Galaxy

How to Manage Samsung Galaxy on the Computer

How to Stream Apple Music to Samsung Galaxy

Recover Samsung Data with Locked Screen

Android Data Recovery

Recover Your Lost Data from Android
Now, Even Device Broken

Compatible with Android 8.0 Oreo/7.0, etc.

Recover Lost Data Now