All posts by DHZ

How Can we Play Apple Music Songs on Xbox One

Apple Music app is not available on Xbox One, how can we play Apple Music songs on Xbox One without limits? Can you give me some advice? I need a simple solution. Thanks a lot.

Add background music has been one of the most-requested for Xbox fan features. In July, 2016, background music came to Xbox One finally. With supported music apps, you are now able to play music in the background of Xbox One. No matter listen to music while you are playing games or browse the internet, background music can provide the soundtrack to your Xbox experience. What suffer from most of Xbox One user? Actually, Xbox One is not in the list of supported services of Apple Music, since Apple Music is DRM-protected, it means that you can’t play Apple Music on any non-Apple device. Here brings a new question – that’s how to stream Apple Music on Xbox One.

Why Can’t We Directly Stream Apple Music to Xbox One
A.Apple Music songs are encrypted with DRM protection. That’s to say, you can’t stream Apple Music songs to Xbox One for listening like streaming common MP3 songs.
B. There is no official Apple Music app or iTunes for Xbox One.

If you are one of them who want to enjoy Apple Music on Xbox One, the only way is to remove DRM from Apple Music, convert Apple Music to Xbox One supported format. Before we started, you should know what the format supported by Xbox One. Supported Formats of Xbox One: 3GP audio, AAC, ADTS, MP3, WAV, WMA, WMA Lossless, WMA Pro, WMA Voice.

Remove DRM Protection from Apple Music for Xbox One

Once we know the supported audio format supported of Xbox one, we should get a music converter tool called Apple Music Converter that is capable of removing DRM protection from Apple Music for Xbox One, converting Apple Music to Xbox One with compatible formats, such as MP3.It allows you to strip DRM from Apple Music, M4P songs and iTunes/Audible Audiobook, convert them to common audio format with up to 16x speed. The converted music will be output with its original quality. What’s more, when the conversion is finished, you could transfer the converted music files for offline playing on any compatible devices, like Android device, iOS device, computer, PSP, MP3 player and Xbox One.

d_win d_mac

How to Stream Apple Music to Xbox One

Step 1. Launch Apple Music Converter
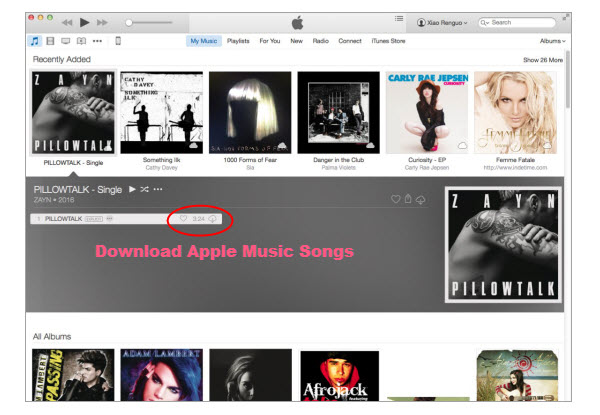
Launch Apple Music Converter and iTunes will be automatically opened to load all your media file. Then you can choose a relevant playlist and select the Apple Music tracks that you want to sync to Xbox One.

select music to convert

Step 2. Choose MP3 as the Output Format
Open the “Playlist” and then choose the Apple Music you want to play on Xbox One.Then select “MP3” as the output format of the converted music files. Here you can also setting other parameter of the converted music files, like the conversion speed and conversion quality.

setting the parameter

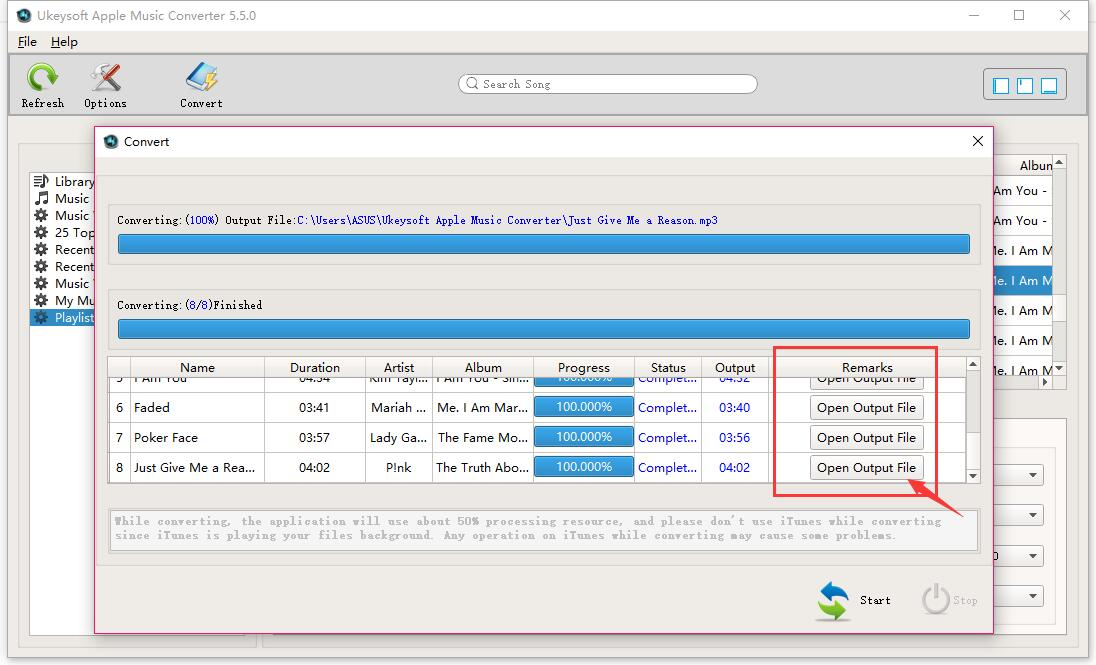
Step 3. Convert Apple Music to MP3
Ready? Simply click “Convert” to start conversion and then wait for the conversion finished. When the conversion is finished, you can click “Explore Output File” to find the converted Apple Music in MP3 format under destination folder.

remove DRM from Apple music

d_win d_mac

Step 4. Stream Apple Music to Xbox One via a USB Cable

1. Install the Xbox Media Player App from the Xbox Sore.

2. Connect the USB drive with your computer and copy converted Apple Music onto it.

3. Then eject it from your computer and connect it to one of the USB ports on your Xbox One.

4. Open the Media Player app and you’ll see your connected drive as an option. Select the drive and you can browse all the media files on it and play them, control the playback with your Xbox controller.

Done. Now you can freely enjoy Apple Music as the background music on Xbox One while you are playing games or browse the internet using it. Sounds so great?

More Apple Music Guides

How to Stream DRM-free Apple Music to Samsung Galaxy

How to Play Apple Music on iPod Nano and iPod Shuffle

How to Set Apple Music Tracks as iPhone Ringtone

How to Play Apple Music on MP3 Player

How to Copy Apple Music Songs and iTunes Playlist to USB Stick

How to Convert iTunes M4V Videos/Movies to MP4

How to Burn Videos to Blu-ray Disc/ISO File/Folder

I have a question and need a help. How to burn the movies to Blu-ray disc that I downloaded on the Internet, to play back on the Blu-ray player? I want to enjoy the movies in the media room of my house. Thanks so much.

What is Blu-ray Disc
Blu-ray Disc (also known as BD or Blu-ray) is an optical disc storage medium designed to supersede the standard DVD format. Its main uses are for storing high-definition video, PlayStation 3 video games, and other data, with up to 25 GB per single layered, and 50 GB per dual layered disc. The name Blu-ray Disc derives from the blue-violet laser used to read the disc. While a standard DVD uses a 650 nanometer red laser, Blu-ray uses a shorter wavelength, a 405 nm blue-violet laser, and allows for almost ten times more data storage than a DVD.

Solution to Record Videos to Blu-ray Disc/ISO File/Folder

As there are so many popular video sharing website you can watch the videos, perhaps millions of people like to upload, share videos, and of course registered users are also be allowed to download their favorite videos. Is it possible to convert the videos for offline playing on Blu-ray disc? Absolutely YES. Maybe you have downloaded several HD videos from iTunes/Amazon or Youtube. Let’s assume you’ve got some fantastic videos. Now you want to record these videos to Blu-ray disc so that you can play it on the compatible device, like PS3 or Blu-ray disc, but have no ideas?

DVD Creator + Blu-ray Creator can solve your problem. It is a smart program designed for burning local videos to Blu-ray disc/ISO file/folder or DVD disc/ISO file/folder with fast speed. Easily to burn videos to various DVD types, like DVD-R, DVD+R, DVD-RW, DVD+RW, DVD+R DL, DVD-R DL, DVD-5, DVD-9, etc,. and play them on any DVD player. The conversion will be end with high quality of the videos. More importantly, it enables to download online videos, add audio/subtitle before burning, edit videos before burning. Preview your DVD and BD project before burning with a built-in player to ensure all goes as you want, burn DVD with simple interface and clear note.

d_win d_mac

How to Convert Videos to Blu-ray Disc/ISO File/Folder

Firstly download and launch DVD Creator + Blu-ray Creator on your computer.

interface of program

Step 1. Inset a Black Blu-ray Disc
Connect the Blu-ray drive to your computer. Insert a blank Blu-ray disc to the computer.

Step 2. Add Videos File
Click “Add Files” to load the video in the interface of the program.

Step 3. Setting Video Track or Subtitle
Check the video file and click “Audio Track” or “Subtitle“. Choose your preferred audio track and subtitle of video. Or you can directly choose in the main interface of program.

setting the data of converted videos

Tips: You can click the left or right arrow to choose your favorite menu subject.

Step 4. Burn Video to Blu-ray Disc
Lastly, simply click the “Create” button to start burning the selected video to Blu-ray disc.

burning video to blu-ray disc

Note: The HD video file is large, and the Blu-ray creating process may take longer time than the DVD creating. Please wait patiently until the conversion is end. Once it finished, you can the converted videos on your Blu-ray player freely.

d_win d_mac

More Guides you may be Interested in:

How to Burn Videos/Movies to DVD Disc/Folder/ISO

How to Convert DVD Movies on Samsung Galaxy

How to Rip and Convert DVD Movies for iPhone/iPad

How to Transfer Videos between Samsung and iPhone

How to Convert YouTube FLV Video to Samsung Galaxy

2 Ways to Burn Apple Music to CD

How to Burn Videos/Movies to DVD Disc/Folder/ISO

I downloaded my favorite Taylor Swift Music track videos from Youtube, how to enjoy these videos on my big screen HD TV? Is there anyway to burn it to DVD disc for playing back? I heard that there are some DVD converter tool are popular in the market. Any suggestions? Thanks advanced.

Most of people like to watch videos or movies on the Internet. We can switch to any videos at anytime on line. Streaming may be the most common way to watch videos/movies, but it may be more convenient to have a physical copy of your home videos or movies for a play back for offline. In fact, it is pretty good to burn a playable DVD of your own videos if you want to make a backup copy of your videos or movies collection. Burning to a DVD will give you the freedom to enjoy the videos on a large screen TV, or watch them without having to rely on an Internet connection. Here is the best way we provides to you, for helping burning videos/movies to disc/folder/ISO.

Record Videos/Movies to DVD with High Quality

Using this easy to use DVD Creator + Blu-ray Creator, you can burn local videos, downloaded online videos/movies from YouTube, Vimeo, etc. to DVDs and Blu-ray discs/ISO/folder. With the help of DVD Creator + Blu-ray Creator, you can easily burn videos/movies to DVD disc/folder/ISO with high quality, for offline playing back the videos freely. In addition, it allows to download online videos, add audio/subtitle before burning, edit videos before burning. This video burning tool empowers the fast speed to burn your video to DVDs and Blu-ray discs/folder/ISO with any formats. You can easily preview all the changes you’ve made in real time for adjustments. Let’s see how to do the job with the smart DVD Creator + Blu-ray Creator.

d_win d_mac

Kind Tips: As for the online video downloader, 4kFinder Video Downloader is a time-saving and reliable solution. Copy and paste the video URL to download the video from YouTube or other popular online streaming sites (Facebook, Instagram, Twitter, Bilibili, NicoNico, BBC, Vimeo, VLive, Tumblr) to MP4 at 360p, 720p, 1080p, 1080p HD , 4K, 8K quality.

How to Burn Any Videos Files to DVD Disc/Folder/ISO

Step 1. Run Program and Add Videos
Firstly, run DVD Creator + Blu-ray Creator on the computer. Click “Add Media File(s)” and load your videos to the program. (You can load more than one file to the program.) If you want to create video files in a folder to the disc, click the down arrow and choose “Add Folder“, then the whole folder will be loaded right now.

dvd converter home page

add media files

Insert a blank DVD disc to the DVD drive of the computer.

inset DVD disc

Choose “Disc Type” in the bottom-left corner to make sure what type of DVD or Blu-ray disc you want to burn videos into.

Step 2. Adjust the Parameter of the Burning Videos
Click the “edit” button in the main interface to edit videos. Here the visual effect, add watermark and other adjustments are available, to edit the video file before burning it to DVD.

editing video

Tips:Click the left or right arrow to choose a DVD menu for editing the DVD menu in detail. Or if you don’t need a menu, just check “No Menu“.

Step 3. Burn Videos to DVD with High Quality
At last, simply click the “Burn” button to begin burning selected videos to DVD with high quality.

click burn to begin the conversion

Once the burning process is completed, you can playback the burned DVD on any DVD player freely.

d_win d_mac

More Guides you may be Interested in:

How to Burn Videos to Blu-ray Disc/ISO File/Folder

How to Convert DVD Movies on Samsung Galaxy

How to Rip and Convert DVD Movies for iPhone/iPad

How to Transfer Videos between Samsung and iPhone

How to Convert YouTube FLV Video to Samsung Galaxy

2 Ways to Burn Apple Music to CD

How to Remove DRM Protection from Apple Music Streams

Are there any ways to remove the DRM from Apple Music streams that I downloaded with the ‘Make Available Offline’ option? I just want to be able to download the songs from Apple Music and keep using the songs even after I unsubscribing Apple Music streaming service. I have tried different Apple Music DRM removal tools that claim they can do this job. But none of them have worked successfully. Any good ideas for recommendation? Thanks so much.

When you subscribe Apple Music streaming service, you must know that about the restrictions of Apple Music, you can only access to the streaming music from devices registered with your Apple Music account. However, the tracks would become unplayable after you canceling the subscription, and the most annoying limit – you are not allowed to transfer the downloaded songs from Apple Music to SD card or other music players for offline playing. So what if you want to copy the Apple Music songs to play on the mobile device, for example, USB flash drive? This article will guide you to easily unlock DRM from Apple Music streams, then you can play the DRM-free Apple Music on any compatible music player.

Unlock DRM from Apple Music Streams

To unlock DRM from Apple Music streams, you’ll need the help of a professional DRM removal software – UkeySoft Apple Music Converter, to bypass the DRM protection from Apple Music. Here are some features of the Apple Music Converter. It’s specially developed to strip DRM restriction from Apple Music streams while converting the locked songs from M4P to MP3, M4A, and other format. It’s able to keep the original CD quality of the Apple Music songs as well as the ID tags, such as artist, cover, year, etc,. The conversion is up to 16x speed. With the help of this smart Apple Music DRM remover, you can easily copy and transfer the converted Apple Music songs to any media device for offline playing, or burn the music copies to CD disk.

d_win d_mac

How to Remove DRM Protection from Apple Music

Step 1. Add Apple Music to Apple Music Converter
Launch the Apple Music Converter. A pop-up window will show you all of the songs you’ve downloaded in your iTunes library.(If need to download the Apple Music first). Add Apple Music to the program. Choose the songs you like for converting.

1)In iTunes, find the song, album, or playlist that you want to add in the New or For You tabs, or search within Apple Music.
2)Click the More Options icon to the right of the song or album name.
3)Click Add to My Music.

download apple music songs

select music to convert

Step 2. Choose Output Format and Confirm Output Path
There will be a pop-up window to allow you to choose output format (MP3/AAC/FLAC/WAV, etc,.), output quality, conversion speed(up to 16x) and output path. Setting the parameter as you like.

setting the parameter

Step 3. Start Unlock DRM from Apple Music Stream
Click button “Convert” to begin unlock DRM from Apple Music, convert to common audio music files and then you will see the progress bar of the conversion. When they are all done, you could check the converted music songs saved on the selected folder. Here you can find all the converted DRM-free songs that have been converted successfully.

remove DRM from Apple

d_win d_mac

Related Article

How to Remove DRM from Apple Music on Mac

How to Play Apple Music on iPod Nano and iPod Shuffle

How to Set Apple Music Tracks as iPhone Ringtone

How to Play Apple Music on MP3 Player

How to Copy Apple Music Songs and iTunes Playlist to USB Stick

How to Convert iTunes M4V Videos/Movies to MP4

Recover Deleted Data from Samsung Galaxy S8 after Android 8.0 Update

Summary: In my earlier post I have discussed about Recovering Data after Android 7.0 Update and Android Data Recovery. In this page I am going to provide the best solution to you guys, about how to restore deleted data from Samsung Galaxy S8 after Android 8.0 Oreo updated.

Something about Android 8.0
Android 8.0 Oreo is still making its way across the rather fragmented Android ecosystem. Android 8.1 Oreo is also rolling out to a small number of devices. We’ll keep you up to date on which smartphones and tablets are getting Android Oreo and when.The latest devices to receive it are the Huawei P9 and P9 Plus, the ZenFone 4 and the LG V30, and 8.1 Oreo has arrived on both the Essential Phone and OnePlus 5T. However, There are some rumor saying that Samsung Galaxy series phone may be get the version of Android 8.0 for updating ,for example, Samsung Galaxy S8.

What’s New of Android 8.0
Each new Android version introduces several innovations, some of which are far from obvious. In this article we show you some tricks and tips for those who own a smartphone already updated to Android 8.0 or 8.1 Oreo. There are some new features of Android 8.0, like Delay notifications, Disable Notification Dots, Permanent notifications of app behavior and more.

Lost Data from Samsung after Android 8.0 Update
Android 8.0 Oreo is the latest Android system, it has brought lots of improvements over the past versions such as Marshmallow and Lollipop, along with few nice usability changes. Since, the Android users who are facing data loss after Android 8.0, it is obvious that they are looking for a reliable solution for recovering data from device after Android 8.0 update. Now please assume that you use Galaxy S8 phone and you can’t wait to update your phone to newest Android 8.0 system, however, your data loss after the unstable Android system update. You must wish to restore the deleted data from the new Android system as soon as possible. Here is the suggestion for you.

You may Want to Know more Tips about Samsung Galaxy S8:
How to Backup Samsung Galaxy S8 before Android System Update
How to Recover Deleted Data from Samsung Galaxy S8

Restore Deleted Data from Samsung Galaxy S8 after Android 8.0 Update

For Android users, Android ToolKitAndroid Data Recovery with a user-friendly interface is a famous data recovery tool in recovering the existent and deleted data from smartphones running Android OS between 2.1 and 8.0. With the help of this program, you can restore deleted data from Samsung Galaxy S8 after Android 8.0 update. Contacts, gallery, videos, audio, messages, call logs, documents, WhatsApp data and more are available. Android Data Recovery features allows to restore deleted Android data for any data loss causes, such as, Android system update, deleted carelessly, factory reset restoring, etc,. It is an all-in-one Android ToolKit, provides you different functions to manage your Android, including Data Recovery, Broken Android Data Extraction, Android Data Backup & Restore. Almost all Android models are compatible with Android ToolKit – Android Data Recovery, for instance, Samsung Galaxy (S8/S7/S6, Note 8/5/4), HTC, Huawei, LG, Lenovo, Motorola, Xiaomi, OnePlus, ZTE, OPPO and so on.

d_win d_mac

Restore Galaxy S8 Deleted Data after Android 8.0 Update

Step 1. Run the Program and Connect Samsung Phone
First of all, please download and run the Android ToolKit – Android Data Recovery on PC/Mac computer. Here are three functions displayed on the program and then select “Android Data Recovery” option to proceed.

Android ToolKit home page

Connect Samsung Galaxy S8 to the computer with a USB cable. Make sure USB debugging is enabled on your phone.

connect Samsung Galaxy S8

After that,please allow the program detect your Samsung to the computer, you will get the pop up message on your phone, Follow the tutorial to enable it.

allow to detect Galaxy S8

Step 2. Select File Contain your Wanted Data to Scan
In this step the program will list all recoverable data from your device.You can select the specific files contain the data you want and scan them by clicking the “Next” button to go on.

select files to scan

Then you’ll get a window as follow on your device after your Samsung phone is detected by the program. Now click “allow” on device to allow the program scanning and analyzing the deleted data from Samsung Galaxy S8.

allow scan Samsung phone

Please wait patiently. The scanning process will take you a few minutes.

scan Samsung for deleted data

Step 3. Preview and Recover Samsung Galaxy S8 Data
Lastly, you are allow to preview all recoverable data on the list after the scanning process is end. Choose the data you want to recover and then save them on the computer by clicking “Recover” button.

recover deleted data from Galaxy s8

d_win d_mac

More Tips about Galaxy S8 you may be Interested in:

How to Recover Lost Photos from Samsung Galaxy S8

How to Transfer Samsung Data to Samsung Galaxy S8

How to Transfer iPhone Data to Samsung Galaxy S8

How to Enjoy Apple Music on Samsung Galaxy S8

How to Manage Samsung Galaxy S8 on Computer

Recover Deleted Data from Samsung Galaxy Note 8 after Android 8.0 Update

Summary: This page tells you how to recover data from Galaxy Note 8 after Android 8.0 update. Try this guide to recover contacts, videos, photos, messages, documents, etc lost after Android 8.0 update with a fast and efficient Android data recovery.

News about Android 8.0 Oreo
Android 8.0 is Google’s latest Android operating system. With the Android P developer preview already having been released, it is surprising that there are quite a few devices out there that have yet to be updated to Android 8.0 Oreo. In fact the Samsung Galaxy Note 8 is not one of them. According to the report, Samsung Galaxy Note 8 will be upgraded to Android 8.0 in March 30th.

note 8 Android 8.0 oreo

Data Loss after Android 8.0 Update & How to Fix

Though Android 8.0 system hasn’t been released right now, it is a hot topic that people discuss when will it announce. It is no doubt great news for those who are long-anticipated about the new system, except unexpected data loss problems during or after the new Android system update. Let assume you have installed and updated the Android 8.0 on your Galaxy Note 8 phone and being glad. However when you are using the latest and the most powerful system of Android, you may be encounter some annoying problems. The biggest problem should be: upgrading the system and leading to the missing data.

You may like:
How to Backup Galaxy Note 8 before Android System Update
How to Recover Deleted Data from Samsung Galaxy Note 8

When it comes to restore deleted data from Galaxy Note 8 after Android 8.0 update, Android ToolKitAndroid Data Recovery is a great solution to make it true with highly comment by so many Android users. It can help you restore contacts, messages, WhatsApp data, photos, video, audio, call logs, documents and other types of data. What’s more, this program enables to recover deleted data after losing data under any data loss cases, for example, Android system update, Android system Root, factory reset restoring, deleted carelessly, even extracting data from broken/damage Android device. It supports hundreds of Android mobile models: Samsung(Note 8/5/4/3, S8/S7/S6), Huawei, LG, SONY, Google Pixel, One Plus, ZTE, OPPO, Lenovo, HTC and so on.

d_win d_mac

Restore Deleted Data from Galaxy Note 8 after Android 8.0 Update

Step 1. Run the Program and Connect Samsung Phone
To begin with, please download and run the Android ToolKit – Android Data Recovery on your computer. You will see different functions displayed on the program and then select “Android Data Recovery” option to continue.

Android ToolKit home page

Now connect your Samsung Galaxy Note 8 to the computer using a USB cable. Make sure USB debugging is enabled on your phone.

connect Samsung Galaxy Note 8

After that, you should allow the program detect your Samsung to the computer, you will get the pop up message on your phone, Follow the prompts to enable it.

allow to detect Galaxy Note 8

Step 2. Select File to Scan

In this step the program will list all recoverable data from your device.You can select the specific files you want and scan them by clicking the “Next” button to go on.

select files to scan

Then you’ll get a window as follow on your device after your Samsung phone is detected by the program. Now you must click “allow” for the program scanning and analyzing the deleted data from Samsung Galaxy Note 8.

allow scan Samsung phone

The scanning process will cost you a few minutes. Please wait patiently.

scan Samsung for deleted data

Step 3. Preview and Restore Deleted Data from Samsung Phone
In the last step, you could preview all recoverable data on the list after the scanning process is end. Choose the data you want to restore and then save them on the computer by clicking “Recover” button.

recover deleted data from Galaxy Note 8

d_win d_mac

More Guides about Galaxy Note 8 you could Check:

How to Recover Deleted Photos from Samsung Galaxy Note 8

How to Transfer Data from iPhone to Samsung Galaxy Note 8

How to Transfer Data from Samsung to Samsung Galaxy Note 8

How to Stream Apple Music on Samsung Galaxy Note 8

How to Manage Samsung Galaxy Note 8 on Computer

First look at Apple’s 6.5-inch ‘iPhone X Plus’ screen – Three new iPhone specifications leaked

Apple’s 6.5-inch ‘iPhone X Plus’ screen

Since Apple introduced the iPhone X in November last year, there have been reports that Apple is developing at least three new models of different sizes, including two giant versions based on the current flagship model. In addition to the new form factors and features, Apple is likely to make improvements in terms of color, screen resolution, and battery life. Although there are several months before we see the finished product, this does not hamper the news from time to time. There are some rumors about the leak.

You may like:

How to Transfer Everything from old iPhone to iPhone X/iPhone 8

How to Transfer Data from Android Samsung to iPhone

iPhone X File Transfer – Transfer Files between iPhone and Computer

Apple’s 6.5-inch ‘iPhone X Plus’ screen

Release date. Apple has not officially announced the exact date of the next mobile phone release, but the time for this annual ceremony has now become a reliable tradition. After launching several iPhones in June, Apple has turned to launch new products in September 2012. In addition to disabling the iPhone SE, it has been insisting on this, and it should be like this in 2018. There will be nothing. change.

Apple’s 6.5-inch ‘iPhone X Plus’ screen

New machine name. According to Apple’s traditional naming, the next phone should be the “S” series. However, due to the advent of the iPhone X, it is possible to have names like the iPhone XS and the XS Plus, but such naming would appear confusing and cause unnecessary misunderstandings, so most people prefer the next iPhone’s flagship. The machine is iPhone 11.

Apple’s 6.5-inch ‘iPhone X Plus’ screen

New machine size. Bloomfield’s Mark Gurman reported that the company has developed two new ultra-large iPhones: a 6.5-inch OLED model and a 6.1-inch LCD version. Because of its reduced orders for OLED components, Apple may abandon the 5.8-inch size of the current iPhone X, and Apple analyst Guo Mingji speculates that Apple will launch three models of new products in 2018.

Apple’s 6.5-inch ‘iPhone X Plus’ screen

New machine price. Apple will release more affordable products. The news seems to everyone know, but they may not know that in order to produce a more affordable 6.1-inch model than the current product, Apple may omit some expensive components, including OLED display, 3D Touch And the second rear camera. Kuo predicts that a 6.1-inch LCD monitor may cost between $649 and $749, which is the same price as the current iPhone 8.

Apple’s 6.5-inch ‘iPhone X Plus’ screen

Face ID. Apple’s face recognition is really better than other people’s mobile phones. It has been proved by iPhone X on this point. According to Kuo, facial recognition technology will be fully deployed in the iPhone lineup in 2018, which means that Apple will launch three new devices that will be equipped with facial recognition systems, and that the updated iPad is also likely to support facials. Identification.

Apple’s 6.5-inch ‘iPhone X Plus’ screen

Unlock your virtual fingerprint. Although Face ID has greatly eased the need for fingerprint unlocking, rumors with Touch ID embedded in the display still exist, and now this technology has been implemented – it is called Clear ID and it will be used on Vivo X20 Plus on. Although Apple’s Face ID is very good, it is not perfect, so whether it will be equipped with Clear ID on the new machine is still unknown.

Apple iPhone X Plus 6.5-inch Screen

iOS 12. The next version of Apple’s mobile operating system, may be called iOS 12, which may pay more attention to the quality of its operation rather than new features. According to Mark Gurman, the company has already commissioned the system to better adapt to the new features of the upcoming new machine, and iOS 12 may be released in June this year.

More iPhone Solutions

3 Methods to Restore Deleted Data from iPhone X

How to Recover Deleted Photos from iPhone X

How to Recover Deleted Photos from iPhone after iOS 11 Update

Recover Deleted or Lost Data from iOS 11 Devices

How to Fix iPhone Won’t Turn Off

Summary: Your iPhone will not turn off and you’re looking for help. It’s a problem that can be easy or difficult to fix, depending on the cause. In this article, I’ll help you determine the reason why your iPhone won’t turn off and show you how to fix your iPhone when it isn’t turning off.

My iPhone got something wrong, it won’t turn off as usual, I am not sure what cause this problem, so how to fix iPhone to normal without data loss? I haven’t backed up my phone lately.

In these days, we have received feedback from iPhone users who complain that their iPhone frozen won’t turn off. This can be caused due to different reasons. Though, there are solutions to fix it. If your iPhone won’t turn off, may be your the battery of your phone is going to run out or that even your iPhone is broken. An iPhone that’s stuck on is a rare situation, but if it’s happening to you, you need to understand what’s going on so you can know how to fix it.

Restore iPhone Won’t Turn Off

Most of cases that lead to iPhone won’t turn off may be the problems like iOS jailbreak, iOS update, virus attack or more. In this way, you are recommended to try iOS System Recovery program, which designed to solve various types of iOS system issues easily and efficiently. It’s a powerful system repair tool help to fix iPhone won’t turn off issue, as well as other system issues, like iPhone stuck in Recovery Mode, iPhone stuck at black screen, iPhone stuck in Apple logo, iPhone can’t connect to iTunes, etc,. Only a few steps, you can make your device return to normal state without data loss. All iOS models are compatible to iOS System Recovery, such as, iPhone X, iPhone 8, iPhone 6S/6, iPhone SE, iPhone 5S/5C/5; iPad Air, iPad Mini, iPad Pro.

d_win d_mac

How to Fix iPhone Won’t Turn Off Issue

Step 1.Run the Program and Connect iPhone to PC
To begin with, run the iOS System Recovery on your computer, then connect your iPhone to the computer with a USB cable.

ios system recovery home page

After connected it, the program will detect your device automatically. Then you will see several options on the interface of program, click on the “Fix iOS System” option under “More tools” function. Then press “Start” button to begin the repair process.

click start to begin

Step 2.Download Firmware for Repairing iPhone
In this step,the program will offer the latest and the match iOS version of your iPhone for you. Then you should click on “Repair” option to go on.

select iphone model

To fix iPhone won’t turn off error, you should install the firmware for restoring iPhone system.It will cost you some time, please wait patiently and do not disconnect or operate your device during the firmware downloading process.

download firmware for iphone

Step 3.Fix iPhone Won’t Tun Off Issue
In the last step, the iOS System Recovery will begin to restore iPhone system to normal automatically.

fix iPhone won't turn off issue

When it is done, you can use your iPhone as usual without any data loss.

d_win d_mac

Related Articles:

How to Fix iPhone Stuck in Reboot Loop

How to Fix a Frozen iPhone to Normal

How to Get iPhone Out of Recovery Mode

How to Fix iPhone Stuck on Apple Logo

How to Fix iTunes Cannot Connect to iPhone Error

How to Fix iPhone Keeps Restarting Issue

How to Restore iPhone System to Normal

How to Fix iPhone Keeps Restarting Issue

Summary: If your iPhone keeps restarting randomly, here is the best way we provides to you, help to fix the iPhone X/8/7/6S/6 keeps restarting issue.

As we know, iOS system is the modern system, iPhone carry with a well-performing system, goes smoothly and hardly breaks down in daily life. However, it still can be a problem when the iPhone get restarting randomly loop. Before you start using tips below to fix your keep-restarting iPhone, let’s understand why does your iPhone keep restarting first. This is a common circumstance that happen that iPhone screen displays the Apple logo.

Here are some causes that might be a reason lead to iPhone keep restarting.
A. iOS Updated Failed
It is one of the most common issues for the iPhone restarting error. While updating your device to a new version of iOS, if the process gets something wrong, then it might result in a few issues. An unstable updated of iOS can result in this issue.

B. Virus Attack
This usually happens with jailbroken devices. If you have performed iOS jailbreak on your iPhone, then you can install apps from other sources as well. Though, this comes with a few disadvantages as well, especially making your device vulnerable to security threats. If your device get virus attack, then it can result in iPhone keeps restarting error.

C. Hardware Issue
When a malfunctioning hardware get something wrong also causes this issue. For instance, there could be a problem with your device’s Power key that might cause the iPhone restarting error.

Solve iPhone Keeps Restarting Issue

There are some professional tools can fix iOS issue of “keeps restarting”. For example, iOS System Recovery provides you with “iOS System Recovery” feature to fix different kinds of iOS system issues on iPhone/iPad. It can do a great help for you to restore iPhone system to normal without data loss, to fix iPhone keeps restarting problem, other iOS system issues also can be fix, such as, iPhone stuck in Apple logo, iPhone stuck in Recovery Mode, iPhone stuck at black screen, iPhone stuck at frozen screen, etc,. It works for all models of iPhone/iPad, supports iPhone X/8(Plus)/iPhone 7(Plus)/iPhone 6S(Plus)/iPhone 6(Plus), iPhone SE and the latest iOS 11 fully.

d_win d_mac

How to Fix iPhone Keeps Restarting Issue

Step 1.Run the Program and Connect iPhone to PC
First of all, run the iOS System Recovery on your computer, then connect your iPhone to the computer with a USB cable.

ios system recovery home page

The program will detect your device automatically. Then you will see different options on the interface, click on the “Fix iOS System”under “More tools” function. Then press “Start”button to continue.

click start to begin

Step 2.Download Firmware for Restoring iPhone
In this step,the program will provide the latest and the match iOS version of your iPhone to you. Then you should click on “Repair” option to go on.

select iphone model

To fix iPhone restarting error,you should install the firmware for restoring iPhone system.It will take some time, and you should wait patiently and do not disconnect or operate your device during the downloading process.

download firmware for iphone

Step 3.Fix iPhone Restarting Issue
In the last step, the iOS System Recovery will begin running the iOS system repairing process automatically.

fix iPhone restarting issue

Once it is done, you can use your iPhone without any data loss.

d_win d_mac

Related Articles:

How to Fix iPhone Stuck in Reboot Loop

How to Fix a Frozen iPhone to Normal

How to Get iPhone Out of Recovery Mode

How to Fix iPhone Stuck on Apple Logo

How to Fix iTunes Cannot Connect to iPhone Error

How to Restore iPhone System to Normal

How to Retrieve Text Messages from Broken Samsung Galaxy Phone

[Summary]Text messages as an important data in our life and no phone users can leave without SMS.If your Android phone broken and cause your text messages lost,this article will provide the best way to help you recover text messages from broken Samsung Galaxy phone.

Nowadays, message is still the most popular mobile service because we can use it to communicate with our friends and family more flexible and more fun. However, if our Samsung mobile phone is broken due to some unexpected reasons, our text messages may lost or deleted permanently.In general,there are several situations that may result in phone broken and losing our text messages, for example: water damaged, stuck in black screen, get frozen suddenly while using, virus attack.Actually, many people have encounter these problem like:

Last week, my Samsung Galaxy S6 smart phone fell into the swimming pool and all data saved on my phone has lost.My text messages stored on my phone is especially important that I need to recover. I wonder is it possible to recover SMS from my water damaged Samsung?”—David

My Samsung Galaxy Note 8 stuck in black-screen after reboot it,I have tried a lot of ways to fix it and get my SMS back but failed.How can I recover lost messages from black-screen Galaxy Note 8?”—Bill

What should we do when we face with these terrible situation?When our phone frozen, crashed, broken-screen, virus-attack, screen-locked or black-screen,can you recover text messages from the broken Samsung phone directly?The answer is absolutely “Yes” when you’re reading this page.Now we will recommend a powerful and professional program to help you recover SMS from broken Android phone.

The Android ToolkitBroken Android Data Extraction as a reliable recover program with many advanced features can help you recover all data and fix the phone system to normal issues.With the Broken Android Data Extraction, to retrieve text messages from broken Samsung Galaxy phone is just a piece of cake.No matter what broken circumstances your phone have met, including water damaged, broken screen, black screen, frozen screen, stuck in Samsung logo, stuck in the Download Mode, etc, the program can help you get your data include SMS back easily.In addition,besides text messages,you can recover all types of data files,such as contacts, video, audio, documents, gallery, call logs, WhatsApp data and more from broken Android device efficiently.It is perfectly applicable with Samsung phones like Samsung Galaxy Note 3,Note 4,Note 5, Samsung Galaxy S4/S5/S6, Samsung Galaxy Tablet, etc,.

Free download the trial version of the Android Toolkit – Broken Android Data Extraction on your computer.

d_win d_mac

How to Recover Text Messages from Broken Samsung Galaxy

Step 1.Download the Android Toolkit and Connect Galaxy Phone to PC
At first,please install and run Android ToolKit – Broken Android Data Extraction on the computer. Then you should connect your broken Samsung Galaxy phone to computer via USB cable.Among those options displayed on the program,please choose the “Broken Android Data Extraction” section to move on. Then click “Start” to go on.

Android ToolKit home page

select broken Android extraction mode

Step 2.Select SMS File to Scan
Then you can see many kinds of files types displayed on the main screen.For example,you can choose Contacts, Call History, Gallery, Messaging, etc, to scan.You can also scan all data from broken Samsung by clicking the“Select all”option. Now for SMS recovery, you can select “Messages”&”Message Attachments” categories to scan.

select files to scan

Step 3.Select Repair Mode to Recover
All phone problem can be fixed with the Android Toolkit program.Now you can select the correponding button to fix the broken phone.As the picture shows below, you can repair your broken Samsung Galaxy phone which stuck in the startup screen, stuck in the download mode, stuck in the FoneGo interface, black screen or other circumstance.

select repair mode

Step 4. Select Samsung Device Model
Now you should select the name and model of your phone from the list. Then click “Confirm” as soon as you have confirm your device.

select Samsung model

Step 5. Enter Samsung into the Download Mode
Next, please follow the guide below to enter the Download mode:
A.Power off the phone
B.Press and hold the Volume Down+Home+Power button
C.Press the Volume Up button to enter download mode.
After then, you can click “Start” to go on.

get samsung into download mode

Step 6. Start to Download the Matching Recovery Package
Now the program will download the matching recovery package automatically.The recovery package can repair your broken Samsung system safely and efficiently. You could access and recover your Samsung data after it finished.

fix samsung system to normal

Step 7.Preview and Recover SMS from Samsung
Now as you see, all data file will be displayed in the resultant window after analysis and scanning completed. You can select the text messages to recover from Samsung Galaxy phone and then click on “Recover” button.

recover sms from broken samsung galaxy

d_win d_mac

Related Articles:

How to Recover Data from Broken Samsung Galaxy

How to Recover Data from Samsung with Broken Screen

How to Recover Data from Black Screen Samsung Galaxy

How to Recover Photos from Broken Samsung Galaxy

Recover Data Contacts from Broken Samsung Galaxy