Category Archives: Fix iOS

How to Fix iPhone Error 14 on iTunes

[Summary]If you are still feel frustrated about the error 14 issues on iTunes and don’t know what to do with this situation,here is the best solution to help you fix iPhone error 14 on iTunes in this tutorial.

Believe it or not, many iPhone owner may mad at their iOS devices,because sometimes iPhone may pop up an error messages like “The iPhone/iPad could not be restored. An unknown error occurred (14)”when they are trying to update or restore their iOS devices via iTunes.This error issue often appear because of many different reasons.Maybe is because of the USB issues,or sometimes because of the firmware upgrade or even specific to iTunes version.In the other hand, sometimes you may also receive a prompted error messages if you did some wrong operations during iOS 11/10/9 update or jailbreak.Ordinary,when you have got an error occur messages, you can not freely update and restore your iOS devices,and what’s worst, your phone may stuck in recovery mode, white Apple logo, black screen, restarting multiple times automatically, etc.What can you do when you meet these problem?How can you get rid of iPhone error 14 on iTunes in a safe and quick way?

The iOS System Recovery is your best choice to fix iPhone error 14 on iTunes, besides error 14, it can deal with other iPhone error and iTunes errors, such as iTunes error 4013, error 3194, iTunes error 27,iTunes error 9 and more.If you are an Apple‘s fanatical fan who have own many iDevices, the iOS System Recovery is most suitable for you.Because this program support all models of iPhone,iPad and iPod touch. It is fully compatible with the latest iOS 11 as well.Moreover,you can use this powerful program to fix various iOS system issues when your phone stuck in recovery mode like stuck in Apple logo or black screen.If you’re having trouble figuring out the iTunes error 14 issues, move on and read this the steps below carefully for an easy measure to fix iPhone error 14 on iTunes without data lost.

Here is the trial of the iOS System Recovery program which provide Windows version and Mac version for you to download.

d_win d_mac

Best Way to Get Rid of iPhone Error 14 on iTunes

Step 1.Download the Program and Link Your Device to PC
Firstly,please choose a suitable version of the iOS System Recovery to download.Then you can run the program and connect your iDevices with the USB cable at the same time.

ios system recovery main page

Once the connection completed successfully,your device will be detected by the program automatically.Then you are required to find a button named “Fix iOS System” under “More tools” option and click it.For the nest step,you should tap on “Start” option to move on.

connect iphone to the program

Step 2.Download the Firmware for iPhone
To get rid of error 14,in this step, the iOS System Recovery program will install the latest iOS version on your iPhone.Then the program will identify your device type, model and more information and display them as the picture below.What you need to do is press “Repair” to continue.

select iphone model

Attention:Please wait patiently and do not disconnect or operate your device during the downloading process.

download firmware for iphone

Step 3.Restore iPhone System to Normal
Now the program will start running the repair process as soon as the firmware is downloaded.

fix iPhone error 14 itunes issue

After that, you can see some words like “Fixing System is Done” on the interface which means that your iPhone error 14 on iTunes has been removed without any data lost.Now you can use your iPhone as usual.

d_win d_mac

Related Articles:

How to Restore iPhone System to Normal

How to Fix iPhone Stuck in Reboot Loop

How to Enter & Exit iPhone Recovery Mode

How to Fix iPhone Blue Screen of Death

How to Fix iTunes Cannot Connect to iPhone Error

How to Fix iPhone Error 3194 on iTunes

How to Get Rid of iTunes Error 9006

How to Fix iPhone Error 3194 on iTunes

[Summary]The iTunes error 3194 always appears when you try to update, restore or sync your iPhone, iPad and iPod Touch with iTunes.This post will provide a useful way to help you fix iPhone error 3194 on iTunes.

When you are trying to upgrade or downgrade an iOS System,if you have some wrong operations like using an unsigned or expired firmware during some restores via iTunes,the process will fail with Error 3194. Actually, this kind of error will always happened because the software we download must be digitally signed by Apple to update the version and firmware of our device, and once Apple has stopped signing the version before the available version, these error tips like “The iPhone could not be restored. An unknown error occurred (3194).” will appear.

For most cases,if iTunes cannot connecting or communicate with Apple’s firmware signature verification server, it maybe the main reason that causes 3194 error. In this situation, you can fix iPhone/iTunes error 3194 by you can fix it by temporarily blocking Apple’s firmware signing services of checking host files.However,you may find it doesn’t work though you try to update and restore iPhone again. Because of the unknown error occurred still on your phone and you can not fix error problem with the above method, please continue to read and get rid of iPhone error 3194 on iTunes with iOS System Recovery.

The iOS System Recovery can help you fix iPhone error 3194 on iTunes in an easy and efficient way to update or restore iPhone. When iTunes is unable to communicate with the server refresh and restore, it can work perfectly with different stuck issues like stuck white Apple logo, black/white screen, looping on start, etc,. In addition, all models of iOS devices include iPhone X, iPhone 8, iPhone 7, iPhone 6S/6,iPhone 5S/5C/5, iPad Pro, iPad Mini, iPad 4/3/2 are supported.And it only fix your iOS to normal without any data lost and so that you do not have to worry about the security of your data.

A pretty popular tool that allows users to update or restore iOS without any error occurred (3194) problem.First of all, please download and install iOS System Recovery(Windows version/Mac version) program on your computer.

d_win d_mac

3 Simple Steps to Fix iPhone Error 3194 on iTunes

Step 1.Run Program and Connect iPhone
First step,please download the iOS System Recovery on your computer and run it.Then you should connect iPhone to the compute by using the USB cable.

ios system recovery main page

As long as the program detect your devices successfully,please pay attention to the following info.Click on the “Fix iOS System” option under “More tools” of the program.After that please press “Start” button to move on.

click start to begin restore process

Step 2.Initiate the Firmware Download
Now the iOS System Recovery program will download the latest iOS version on your iPhone.Then you can see your device type, model and more information displayed on the interface.What you need to do is press “Repair” to continue.

select iphone model

Please wait patiently until the downloading of firmware finished.

download firmware for iphone

Step 3.Fix iPhone System to Normal
When the downloaded is finished, the program will run the repair process and start to fix iTunes error 3194 without any data loss with the iOS System Recovery.

fix itunes 3194 issue

The above steps we provide for you can help you get rid of more iOS system issues, such as iTunes error 4013, error 14, iTunes error 27,iTunes error 9 and more.Now you can fix these stuck problems and have your iPhone working normally again with the iOS System Recovery.If it work and you like it, please share it with your friend and family!

d_win d_mac

Related Articles:

How to Fix iPhone Stuck in Reboot Loop

How to Enter & Exit iPhone Recovery Mode

How to Restore iPhone System to Normal

How to Fix iPhone Blue Screen of Death

How to Fix iTunes Cannot Connect to iPhone Error

How to Get Rid of iTunes Error 9006

How to Get Rid of iTunes Error 9006

There is something wrong with my iPhone.The Error 9006 appears while I’m restoring my iPhone in iTunes. I tried to run my software firewalls and anti-virus apps to fix the problem, but it didn’t work. How can I fix iTunes error 9006 effectively ?”—-Amy

Many people may have encounter a prompted message that states something, like “There was a problem downloading software for the iPhone. An unknown error occurred (9006).”.When it shows up on your device, it always means your iPhone may get into the stuck loop because of the iTunes Error 9006. Usually, iTunes error 9006 would appear when iTunes is not able to communicate with the update servers and cause a failed download or interrupting a download. It‘s a common circumstance that iPhone get the errors with red iTunes logo when you try to update your iOS system, restore you phone factory setting, download some new apps or doing some wrong operations during jailbreak.Maybe your phone would suddenly stuck on connect to iTunes screen with unknown reasons sometimes and you can not find the exactly reasons.Fortunately, no matter what causes the iTunes Error 9006 trouble,in this post we will share the best ways with you to help you fix these stuck problems.

Part 1. How to Fix iTunes Error 9006 via iTunesFix Tool

You can fix iTunes 9006 error with the help of iTunesFix tool, which is a famous iTunes repair tool for fixing iTunes 100+ unknown errors and issues without data loss, like iTunes can’t update/restore issue, iTunes can’t install/update issue, iTunes can’t connect issue. It offer for you with the effective method to return iTunes to normal. It can also manage iTunes Library on computer safely, clear iTunes to free up and boost your computer with an efficient solution.

d_win d_mac

Step 1. Run Program on Computer
To get started, run iTunesFix program on computer, it will auto-detect your iTunes.

Step 2. Select the Fixing Mode
If there is no issue of iTunes and its components, you will be in the home interface of program. Choose one of the repair modes. Here “Repair iTunes Connect Issues”, “Fix iTunes Install/Update Issues”, “Repair Backup/Restore Errors”, “Fix Other iTunes Problems”; “Quick Clean”, “Deep Clean”, “Full Uninstall” are available.

itunesfix home page

To fix iTunes Error 2/13/56/1002/3194/4037 and other unknown errors, choose “Fix Other iTunes Problems”.

fix other itunes problems

Step 3. Fix iTunes Error and Return it to Normal
In the last step, click “Repair” to begin the repair job. Please keep the internet stable until the repairing process is completes.

repairing itunes

When the repair job is finish, click “Open iTunes” to launch your iTunes and try it again.

d_win d_mac

Part 2. How to Get Rid of iTunes Error 9006 via iOS System Recovery

The iOS System Recovery can be your best choice to fix all iOS system issues, includes get rid of iTunes error 9006 or the stuck loop.As a functional software,the iOS System Recovery can perfectly restore iPhone to normal for any stuck issues, such as stuck on the black/white screen, stuck in Recovery Mode, stuck in Apple logo, etc,.If you encounter the error problem when updating the latest iOS system software,restoring factory settings ,failing to iOS jailbreak or other unknown reasons, the iOS System Recovery can help you restore iOS system to normal.It can support many iOS devices include iPhone 8,iPhone 7, iPhone 6S/6,iPhone 5S/5C/5, iPad Pro, iPad Mini, iPad 4/3/2.

Securely download the iOS System Recovery (PC / Mac version).

d_win d_mac

Easy Steps to Get Rid of iTunes Error 9006

Step 1.Download the Program and Connect iPhone
Firstly, you should choose the right version of the iOS System Recovery and download the program on your computer, then connect iPhone to the compute with a USB cable.Then you can see some sections on the interface.Please click on the “More tools” on the left side and tap the “iOS System Recovery” button.

ios system recovery main page

Then the program will detect your iPhone automatically. Click “Fix iOS System” option to move on.Then you should click on“Start”button on the next interface to go on.

connect iphone to the program

Step 2.Start the Firmware Download
In this step, the iOS System Recovery program will install the latest iOS version on your iPhone.At the same time, the program will detect your device type, model and more information.What you need to do is press “Repair” to continue.

select iphone model

It will take some time to download plugin and you should wait patiently.

download firmware for iphone

Step 3.Restore iPhone System to Normal
Now the iOS System Recovery will start running the repair process as long as the firmware is downloaded. This step can make your iPhone working again.

fix itunes 9006 issue

Now your iPhone can be booted after repairing and restart as usual without any data loss.

d_win d_mac

Related Articles:

How to Fix iPhone Stuck in Reboot Loop

How to Enter & Exit iPhone Recovery Mode

How to Restore iPhone System to Normal

How to Fix iPhone Blue Screen of Death

How to Fix iTunes Cannot Connect to iPhone Error

How to Fix iTunes Cannot Connect to iPhone Error

Question: When I use iTunes on the computer and I try to sync my iPhone with iTunes, I got an error message prompted me “iTunes could not connect to this iPhone, the value is missing.”. The computer is normal as well as my phone. What’s wrong with iTunes? Why I can’t can’t the phone to iTunes successfully? How to fix this issue?

In fact, there are many different curses will lead to iTunes not connect to iPhone, the software error or hardware error. Have you ever met the same problem that iTunes cannot connect to iPhone like the users described above? When iTunes doesn’t recognize your iOS devices, you may be prompted with an iTunes error. This article aims to teach you the best way to fix iTunes cannot connect to iPhone error or other unknown error issues. If you try to connect iTunes to iPhone but failed, just read the follow passages to get the practical methods to fix this issue without data loss.

Part 1: Tips to Fix iTunes Cannot Connect to iPhone Error

A.Update iTunes to the Latest Version
Step 1. Launch iTunes and once it’s loaded, click on the “Help” tab.
Step 2. From this drop-down menu, click on “Check for Updates”.
Step 3. After a few seconds, iTunes will download and install the latest version if an update is required.

update itunes

B.Update iOS to the Latest Version
Step 1. Unlock your iPhone and open up the “Settings” application.
Step 2. Scroll down and tap on “General” followed by “Software Update”.
Step 3. You’ll see the option to “Download and Install”, click it to begin the iOS update.

update ios

However, the two methods are not always work for fixing iTunes cannot connect iPhone issue, here is another better way to fix it perfectly.

Part 2: Fix iTunes Can’t Connect to iPhone Error via iTunesFix Tool

If you want to fix iTunes can’t connect iPhone error, try this iTunes Fix tool and it won’t disappoint you. It can deal with all iTunes errors and return iTunes to normal without data loss. Fixing iTunes couldn’t connect to iPhone issue, fix won’t install/update issue, fix iTunes won’t back up/restore issue, etc,. Fix iTunes was not installed correctly, installer has insufficient privileges, etc,. In addition, this program allows to clean iTunes files or completely uninstall iTunes from computer.

Free Download iTunes Fix Tool:

d_win d_mac

Step 1. Run Program on Computer
Firstly, run iTunesFix on computer, it will auto-detect your iTunes. If there is no issue of iTunes and its components, you will be in the home interface of program.

itunesfix home page

Step 2.Select Repair Mode
Here you can choose the “Repair iTunes Connect Issues” mode.

repair itunes connect issues

Step 3. Start to Repair iTunes to Normal
After that, click “Repair” and it will fix the iTunes connect issue.

begin fix itunes connect issues

If you still can’t fix the problem, just try other mode like “Fix iTunes Install/Update Issues“, “Repair Backup/Restore Errors“. There is always a solution to your problem.

d_win d_mac

Part 3:Fix iTunes Can’t Connect to iPhone Error via iOS System Recovery

If you intend to fix iTunes cannot connect to iPhone error, you are recommended to try iOS System Recovery program, which allows you to solve iOS system issues effectively by downloading firmware for restoring iPhone. It the best solution to fix iPhone system to normal without data loss, like iPhone stuck in Recovery Mode, iPhone stuck at Apple logo screen, iPhone stuck at black/white screen, etc,. Compatible with all iOS device models, including iPhone X, iPhone 8, iPhone 7, iPhone 6S/6,iPhone 5S/5C/5, iPad Pro, iPad Mini, iPad 4/3/2.

d_win d_mac

Step 1.Run Program and Connect iPhone
Run the iOS System Recovery on your computer and connect iPhone to the computer.

ios system recovery main page

The program will automatically identify your iPhone. Click “iOS System Recovery” under “More tools” option of program. After that you need to click “Start” to proceed.

connect iphone to the program

Step 2.Initiate Downloading of Firmware
To fix your iTunes cannot connect to iPhone, iOS System Recovery will install the latest iOS version for your iPhone. The program identifies your device and provides you the latest and compatible version of iOS required for your phone. Press “Repair” after the firmware is offered.

select iphone model

Now the program will begin to download the firmware for restoring iPhone.

download firmware for iphone

Step 3.Restore iPhone System to Normal
When the firmware is downloaded, iOS System Recovery will start running the firmware to restore your iPhone system to normal without data loss.

fix iphone can't connect to itunes

You iPhone will be booted after repairing to make it functional. Now you can connect iTunes to iPhone successfully.

d_win d_mac

Related Articles:

How to Repair iTunes Unknown Errors

How to Enter & Exit iPhone Recovery Mode

How to Restore iPhone System to Normal

How to Fix iPhone Blue Screen of Death

Fix iPhone Stuck on Connect to iTunes Screen after iOS 11 Update

How to Bypass iPhone XS/XR/X/8/7 Lock Screen

My iPhone scree is locked without password. Last night I had a row with my wife, then she reset the password on my phone.This morning I entered the wrong password with five times, and the device was locked with 15 minutes. How to bypass the iPhone locked screen without password?

For mobile data security, most of people users set password to lock screen to protect personal data. We need to enter the password to remove locked screen and then accessing the phone. Sometimes we may set the password as complicated as we could, that’s really safe, however sometimes we may be forget the password or someone reset the password on it, no matter what situations we will encounter, we may need to bypass the iPhone locked screen. So how to remove iPhone locked screen without password? Here is the best solution we provide to you for reference. The helpful iPhone locked screen removal tool called iPhone Locked Screen Removal. Let’s see how powerful is it.

Remove iPhone Lock Screen without Password

iPhone Lock Screen Removal is a powerful locked screen removal tool indeed. iPhone Lock Screen Removal enable to bypass lock screen on iPhone X/8/7 without password. You can one click to unlock screen from iPhone and iPad without any tech knowledge required, everybody can handle it, even without losing any data on device. With this tool, you can remove iPhone lock screen without restoring it to factory reset or entering Recovery Mode. Besides, it compatible with all iOS devices, including iPhone XS, iPhone XR, iPhone X, iPhone 8(Plus), iPhone 7(Plus) and iPad Pro, iPad Air, etc,.

d_win d_mac
d_win d_mac

Part 1: How to Bypass iPhone X/8/7 Lock Screen without Data Loss

Step 1. Run Tool and Connect iPhone X/8/7
Launch iPhone Lock Screen Removal on your computer and select “Unlock” among all the tools.

ios toolkit home page

Connect your iPhone to the computer using a USB cable. Then click “Start” on the program.

connect locked iphone to pc

Step 2. Boot iPhone in DFU mode
To bypass iPhone lock screen, you should boot it in DFU mode.

Follow the instruction on iPhone Lock Screen Removal to boot device into DFU mode.

-Power off your iPhone.
-Press and hold the Volume Down button and the Power button together for 10 seconds.
-Release the Power button and keep holding the Volume Down button until the device is in DFU mode.

enter locked iphone into the dfu mode

Step 3. Confirm iPhone Information
After the device is in DFU mode, iPhone Lock Screen Removal will display the device information, such as phone generation, iOS version, etc,. If the information is not correct, you can select the correct information from the dropdown lists. Then click “Download” to download the firmware for your device.

select the information of locked iphone

Step 4. Bypass iPhone Lock Screen without Data Loss
After the firmware is downloaded successfully, click “Unlock Now” to start unlock your iPhone without data loss.

confirm to unlock iphone

Your iPhone will be unlocked successfully in just a few seconds. Done.

unlock iphone without data loss

d_win d_mac
d_win d_mac

Part 2: How to Extract Data from iPhone X/8/7 with Lock Screen

If you need to extract or recover data from iPhone X/8/7 with lock screen, you can use iPhone Data Recovery. This program empower to restore data from iPhone X/8/7 with lock screen. The recoverable types of data including contacts, messages, photos, notes, call history, etc,. With this program, you can access and preview, then retrieving data from locked iPhone with three ways: directly recover from device, recover from iTunes backup, recover from iCloud backup. To sum up, iPhone Data Recovery is an all-in-one data recovery program, help to recover deleted data from iPhone under any data loss circumstances. Compatible with all iPhone models, such as iPhone X, iPhone 8(Plus), iPhone 7(Plus).

d_win d_mac

Step 1. Run Program and Connect your iPhone to PC or Mac
After running the iPhone Data Recovery program on the computer,  connect your iPhone to the computer via USB cable, and click “Recover from iOS Device” then “Start“.

connect iphone to the computer

Step 2.Scan your all Data from your Locked iPhone
Select the files you need to extract/restore from locked iPhone.Then iPhone Data Recovery will begin to scan your iPhone automatically.

scan data on locked iphone

Step 3. Restore Data from Locked iPhone X/8/7
After the scan, all your data will be listed by program, before restoring the data, you’d better preview one by one, and then selecting the data to be recover, and finally click “Recover” button to save the selected data on the computer.

Note: The data found in each category was made up by two parts, one is the missing data deleted accidentally; another part is those data still on your iPhone.

extract data on locked iphone

You can click the button “Only display the deleted items” to make them apart.

d_win d_mac

Related Articles:

How to Extract and Backup Data from Locked/Disabled iPhone

How to Recover Photos from Locked/Disabled iPhone

Forget iPhone Locked Screen Password and How to Remove it

Unlock iPhone Passcode when Forgot iPhone Screen Lock Passcode

Bypass iPhone Lock Screen Password and Fingerprint

How to Unlock iPhone with Unresponsive Screen

iPhone Manager – How to Transfer and Manager Files on iPhone X/8/7

How to Remove Forgotten Passcode from iPhone/iPad

Summary
Forgot iPhone passcode? iPhone is disalbed? Here this post will introduce some powerful iOS Unlockers and share four effective solutions to help you remove forgotten passcode from iPhone 16/15/14/13/12/11/X/XR/SE/8 and iPads without data loss.

I forgot iPhone passcode. I have try try to enter passcode many times, now my iPhone is locked out. How to remove the iPhone locked screen passcode? Please help me.

Forgot my iPhone 16 passcode, is it possible to remove forgotten iPhone password without iTunes?

I have got a second-hand iPhone 15 Pro, but I don’t know it’s password, how to remove passcode on iPhone 15 Pro? Thanks to help.

Are you aware that many iPhone users like you, forgot iPhone passcode? Don’t worry, here 4 ways to remove forgotten passcode from iPhone.

Remove iPhone Passcode

See Also:

* Recover Lost Data from iPhone after Factory Reset

* How to Back Up and Restore Your iPhone Data

  • When you forgotten the passcode of iPhone, you need to access your iPhone urgently.
  • Searching for ways to regain your passcode when your spouse or friend have changed your iPhone passcode.
  • Found a missing iPhone, and you want to know the rightful owner in order to return it to him or her.
  • Trying to access your device in order to wipe it clean before giving it out.
  • Needing to remove the passcode of your dearest/family/friends and access the device to check something.

When you need to remove passcode from iPhone with locked screen, most of people may try to restore device to factory reset with iTunes. It sounds work and can fix your problem. However, restore device to factory reset will wipe all data and setting on your device after bypassing the passcode on it. Actually, it is not the only way to unlock iPhone locked screen with iTunes. Another solution to unlock iPhone passcode is using a thrid-party iPhone Passcode Removal tool. In this comprehensive guide, we’ll walk you through how to wipe passcode from iPhone using some of the best professional unlocking tools on the market: iOS Toolkit, UkeySoft iOS Unlocker, and iOS Unlocker.

Part 4: Remove Passcode from iPhone via iOS Unlocker

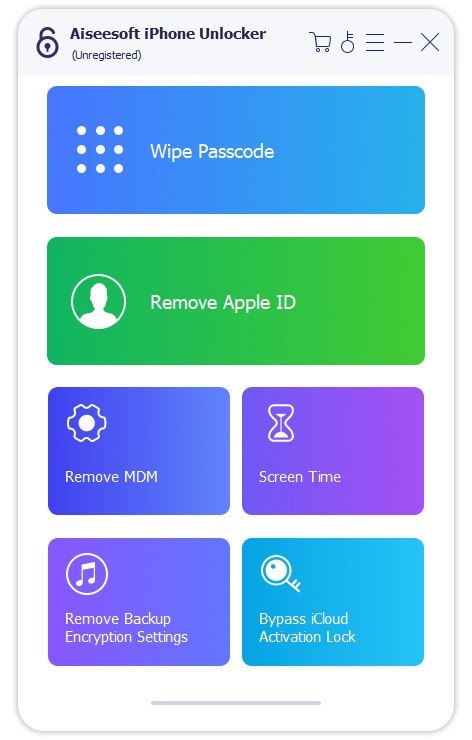
With its clean interface and high success rate, iOS Unlocker stands out as one of the best choices to remove iPhone screen passcode without hassle. It is an easy-to-use yet powerful iOS unlocker, designed to help iPhone, iPad, and iPod Touch users handle various iOS screen lock issues. Whether is 4-digit, 6-digit, Face ID, Touch ID or even a complex alphanumeric passphrase, it empowers you to wipe/erase/remove passcode from iPhone in a few clicks. What’s more, this tool is capable of removing Screen Time, Apple ID, MDM, as well as iTunes Backup Password.

d_win d_mac
d_win d_mac

Key Features of iOS Unlocker:

  • User-Friendly Interface: Remove forgotten iPhone screen passcode without iTunes/iCloud.
  • Unlock iPhone Screen Passcode: Supports all screen lock types: 4-digit/6-digit codes, Face ID, Touch ID.
  • Bypass Disabled iPhone: Works even if your iPhone is disabled or locked after too many incorrect attempts.
  • Erase Apple ID Without Password: Easily remove Apple ID if you forget the credentials.
  • Screen Time Passcode Removal: Remove Screen Time restrictions without data loss.
  • MDM Removal Tool: Remove MDM from iPhone/iPad without password in few clicks.
  • Wide Compatibility: Supports iOS 7 to the latest iOS 18, including iPhone 16/15/14/13/SE/11/X/8 and iPads.

Note: If your can turn off Find My iPhone/iPad feature, any iOS device can be unlocked, even if you forgot the screen passcode.

How to Remove iPhone Passcode with iOS Unlocker

Here are the step-by-step instructions to erase iPhone screen passcode.

Step 1. Download and Install the iOS Unlocker
Click the Download above, to get the downloaded for your Windows or Mac.

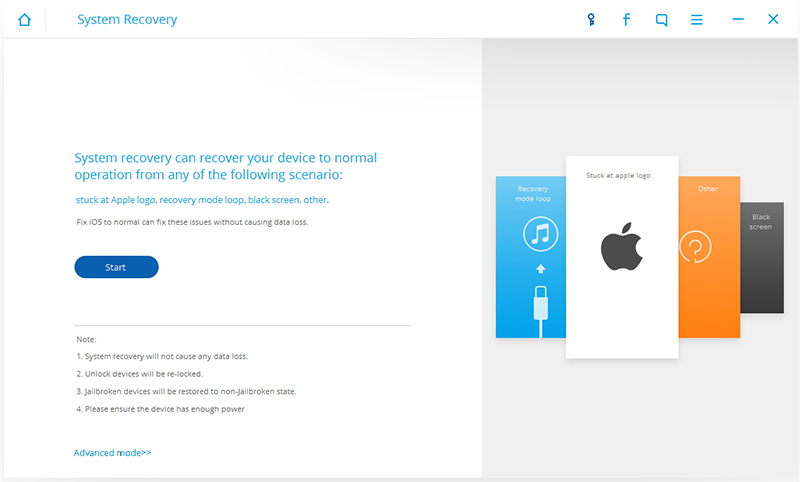
Step 2. Select Wipe Passcode Mode
Fire up AiseeSoft iOS Unlocker, choose the “Wipe Passcode” feature on the main interface.

launch iOS Unlocker

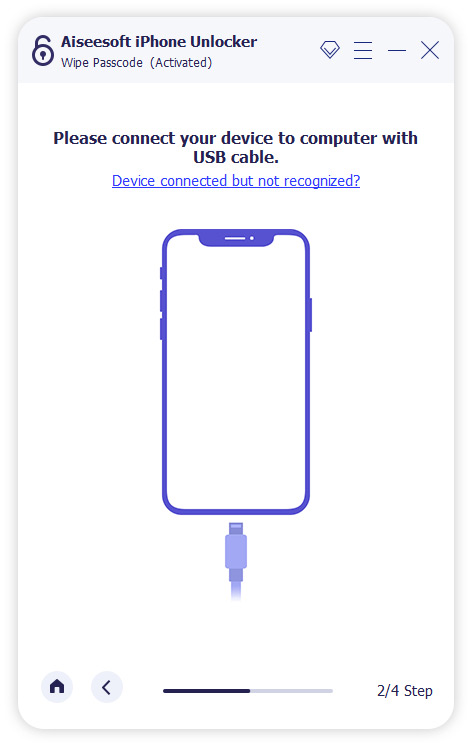
Step 3. Connect Your iPhone
Read the instructions and use a USB cable to connect your iPhone to the computer.

connect iPhone to computer

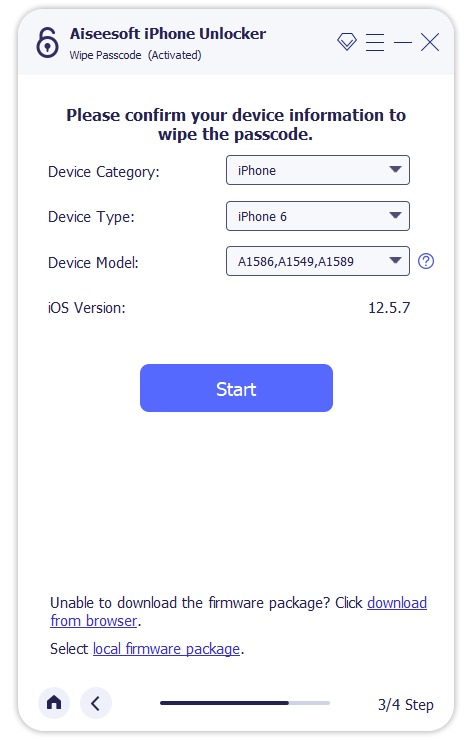
Step 4. Confirm iPhone Information
Then, click “Start” button, and enter the 0000 code on the blank box to confirm iPhone information.

confirm iPhone information

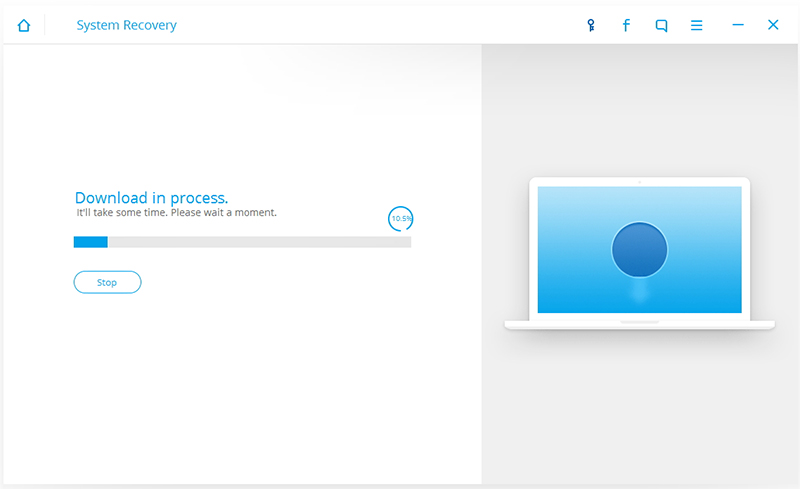
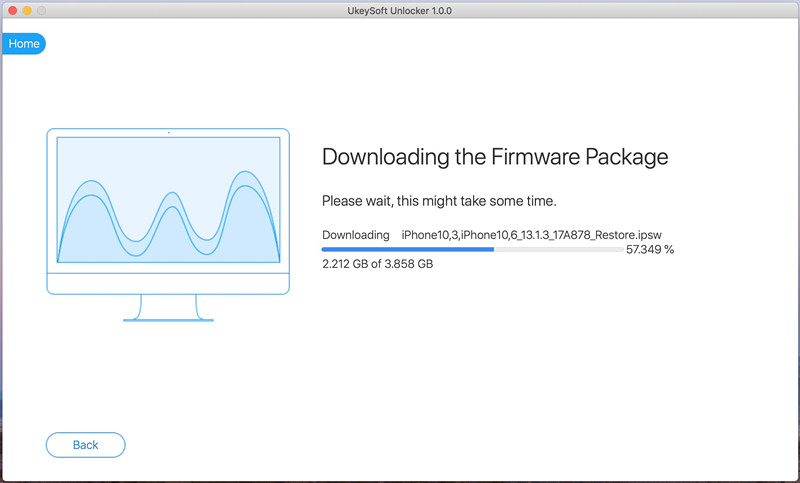
Step 5. Start Downloading Firmware Package
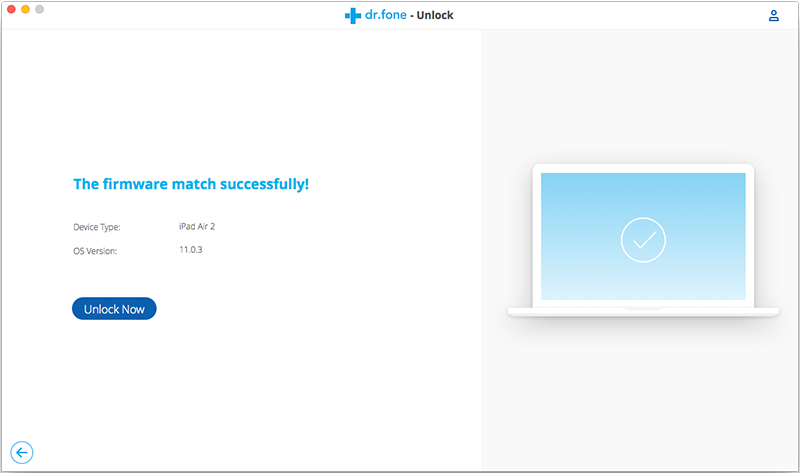
Please confirm your iPhone information and start downloading firmware package for the device. During downloading process, it will take some time, please wait patiently.

Downloading Firmware Package for iPhone

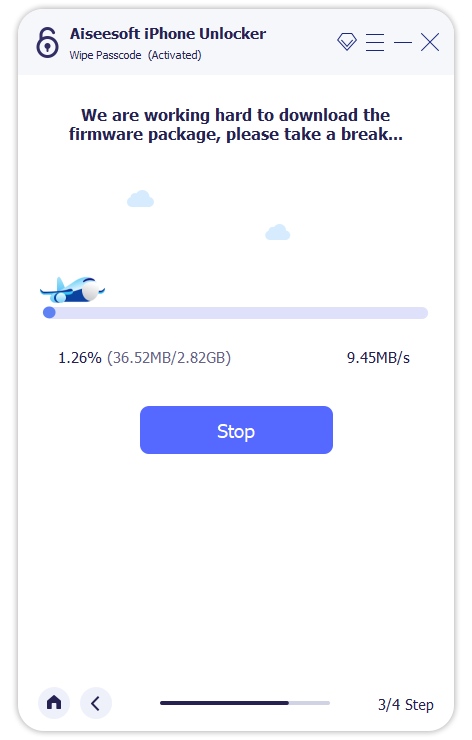
Downloading iOS firmware package completed, then clicking “Next” button.

Downloading Firmware completed

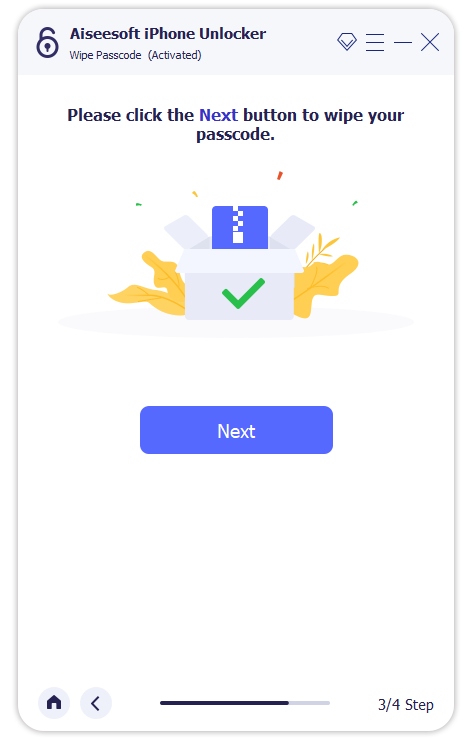
Step 6. Confirm to Unlock your iPhone
After downloading the firmware package completed, the software will pop-up a tips windows for you to confirm the action. If you really to unlock your iPhone, please enter “0000” to confirm, and click the “Unlock” button to continue.

Downloading Firmware Package for iPhone

Note:

1. All of your iPhone data will be erased after unlocking iPhone successfuly.

2. Your iPhone will be updated to the latest iOS version.

3. Make sure that “Find My iPhone/iPad” has been disabled on your device before.

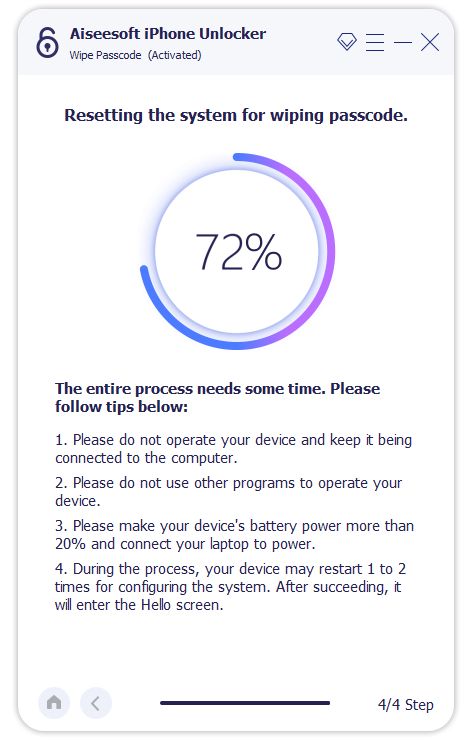
Step 7. Start to Unlock your iPhone
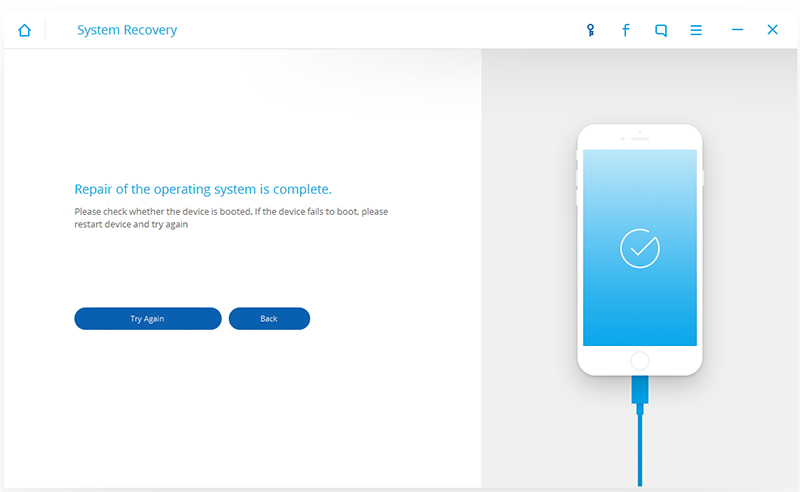
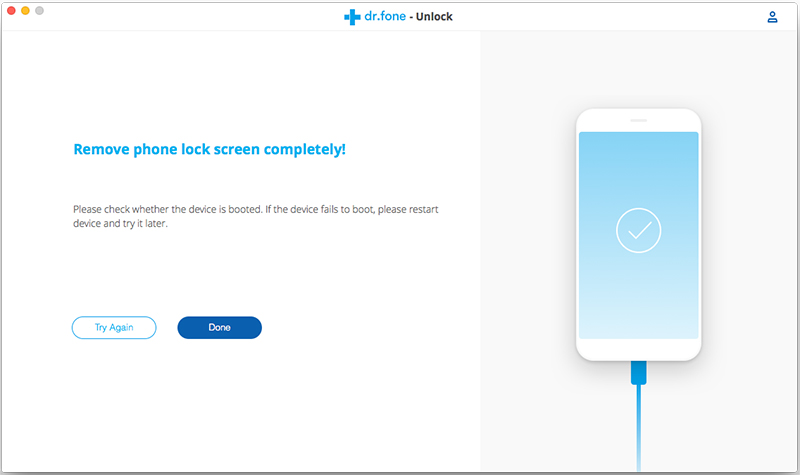
Finally, click “Unlock” button, the software start to remove forgotten passcode from iPhone. Wait for the process to complete.

unlock iPhone without passcode

Step 8. Unlock iPhone Successfully
After unlocking the iPhone device successfuly, the iPhone will automatically restart, all data and settings has been removed from the device.

Step 9. Reset a New Passcode to Access Your iPhone
Please follow instruction to set up your iPhone right now. Now, you can regain full access to your iPhone again, your device as an new one.

set up iPhone

Download the iOS Unlocker and try to unlock your iPhone now!

d_win d_mac
d_win d_mac

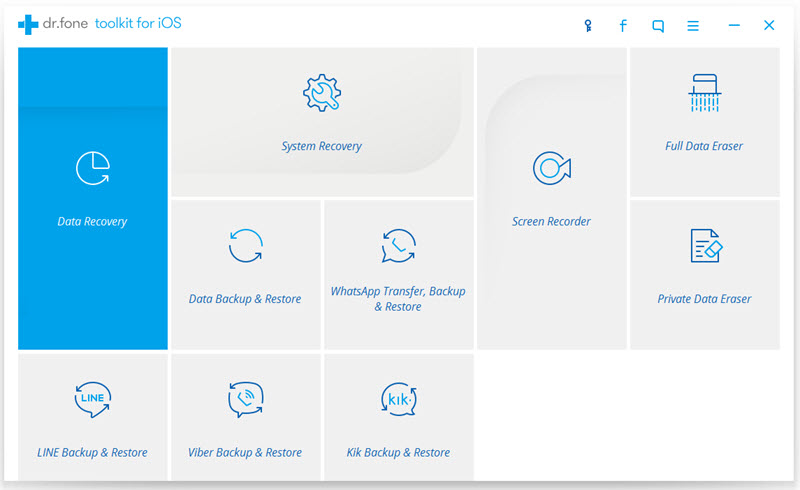
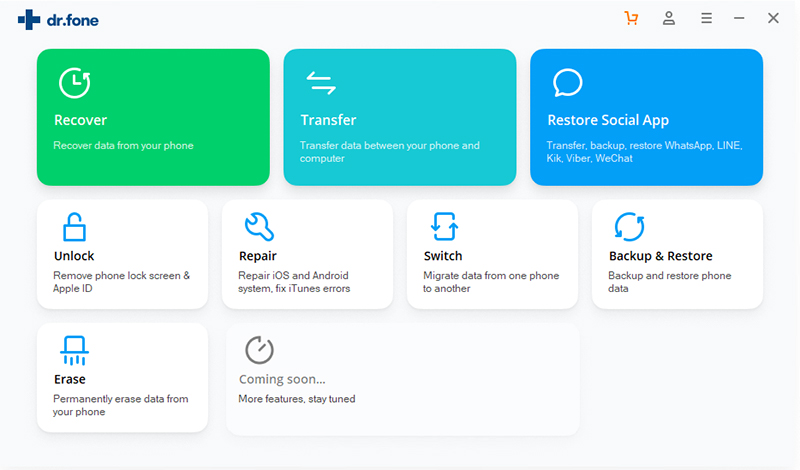
Method 2: Remove Forgotten Passcode from iPhone with iOS Toolkit – iOS Unlocker

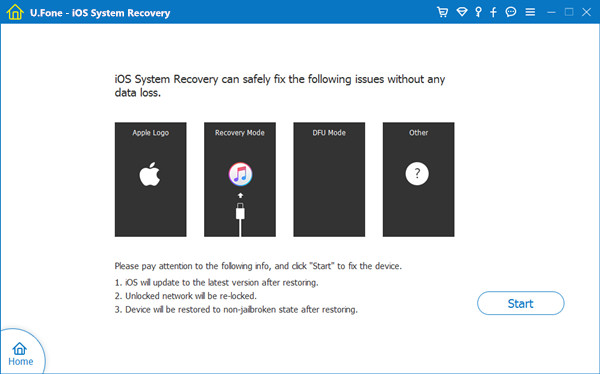
iOS Toolkit – iOS Unlocker is one of the functions of iOS Toolkit, it can helps you bypass iPhone locked screen without data loss. It is possible to remove the iPhone locked screen without passcode. This iOS Toolkit – Locked Screen Removal enables you to easily remove lock screens, when you forget the passcode on your device or you just don’t know the passcode on a second-hand iPhone or iPad. You can use this program to get rid of the unknown passcode in 5 minutes. Before doing it, you need to know this: the Find My iPhone/iPad should be disabled. Then you can successfully unlock your device without restoring it to factory reset. Compatible with the latest iPhone X, iPhone 8 (Plus) and iOS 18.

d_win d_mac
d_win d_mac

How to Remove Forgotten Passcode from iPhone

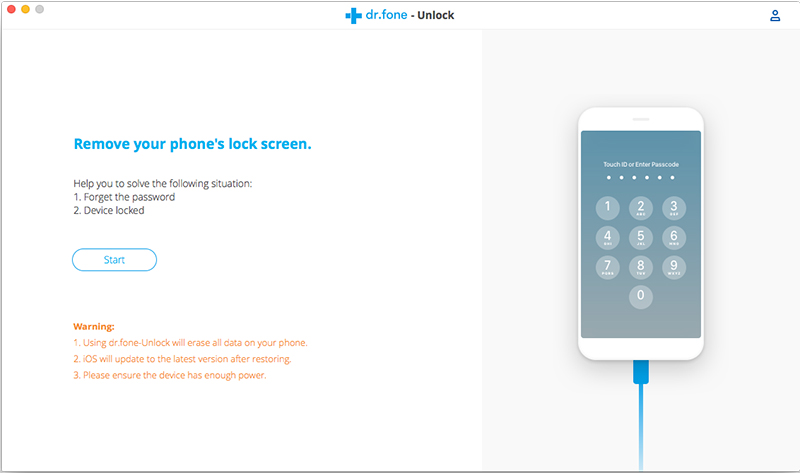
Step 1. Connect your Locked iPhone to the Computer
Launch and run iOS Toolkit – Locked Screen Removal on the computer and select “Unlock” among all the tools.

ios locked screen removal

Connect your locked iPhone to the computer using a USB cable. Then click “Start” on the program.

connect locked iphone to pc

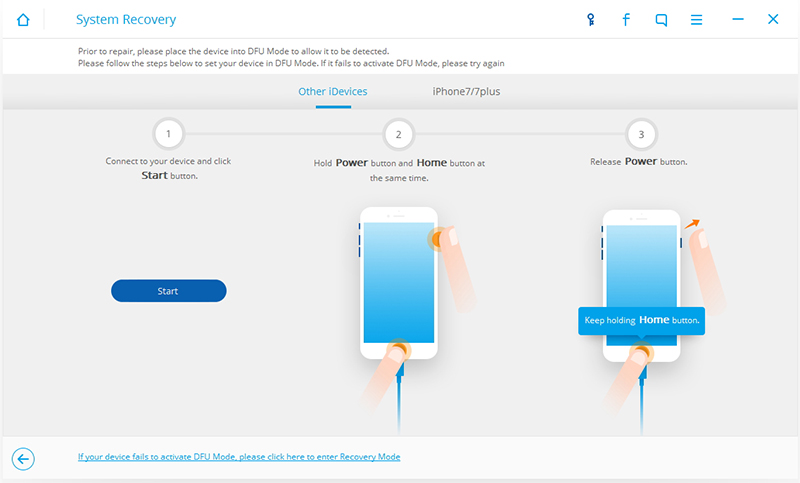
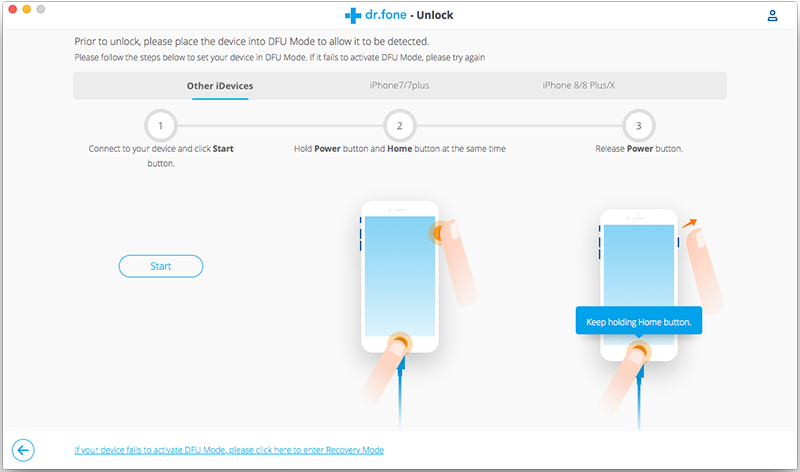
Step 2. Boot iPhone in DFU Mode
Follow the instruction on program to boot iPhone into DFU mode.

-Power off the locked iPhone.
-Press and hold the Volume Down button and the Power button together for 10 seconds.
-Release the Power button and keep holding the Volume Down button until the device is in DFU mode.

enter locked iphone into the dfu mode

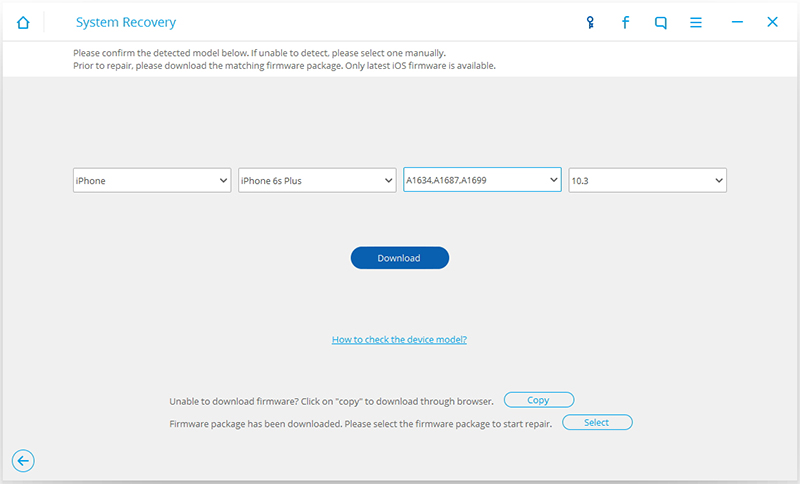
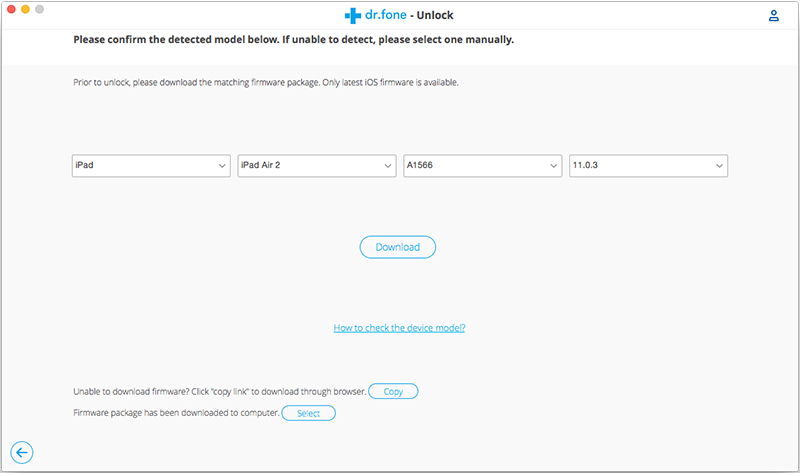
Step 3. Confirm the Information of iPhone
After the device is in DFU mode, the program will display the information of device, such as phone generation, iOS version, etc,. If the information is not correct, you can select the correct information from the dropdown lists. Then click “Download” to download the firmware for your device.

select the information of locked iphone

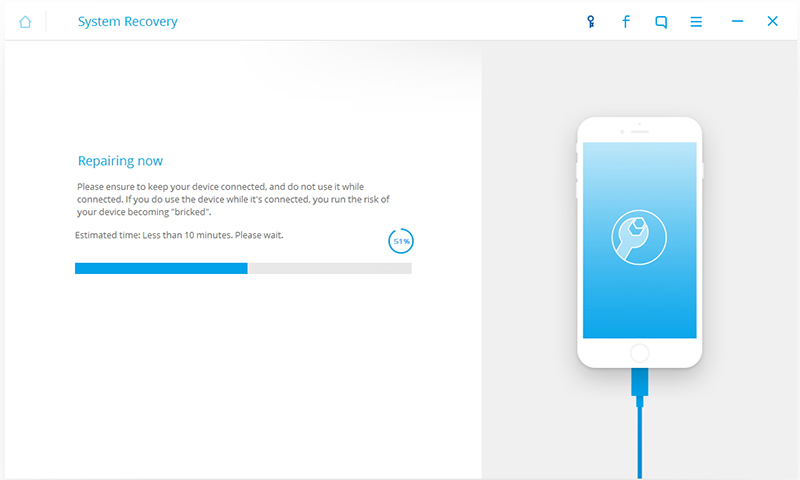
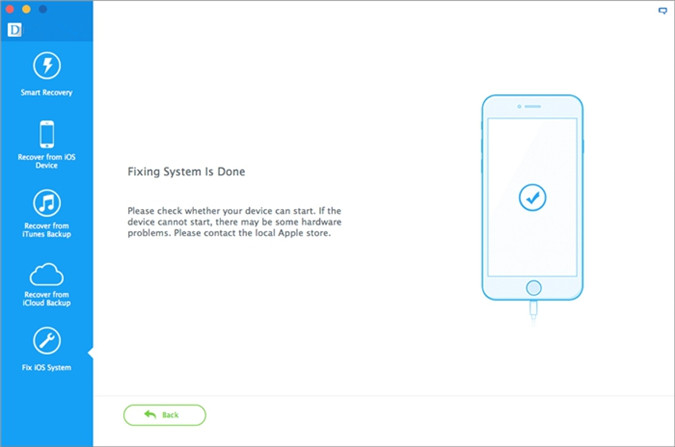
Step 4. Unlock iPhone Locked Screen without Data Loss
When the firmware is downloaded successfully, click “Unlock Now” to start unlock your iPhone without passcode.

confirm to unlock iphone

Your iPhone will be unlocked successfully in just a few seconds.

unlock iphone without data loss

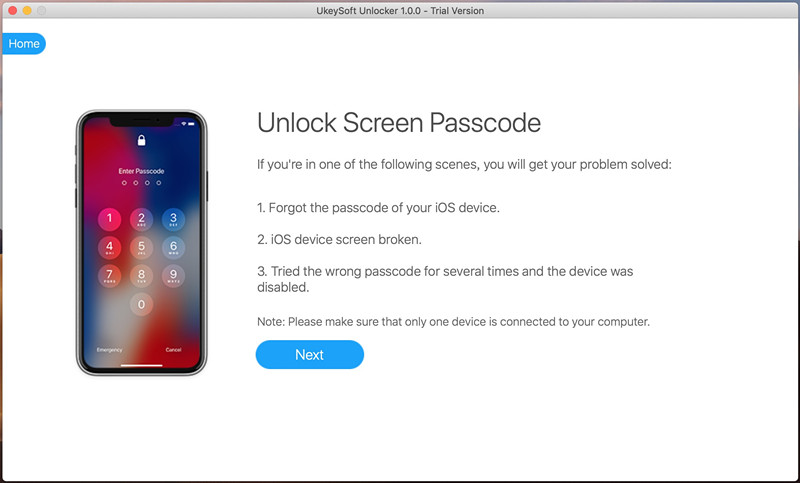
Method 3: Remove Forgotten Passcode from iPhone with UkeySoft Unlocker

Forgot your Apple ID password? Forgot your iPhone screen passcode? How to unlock your Apple ID without password? We will introduce a more powerful iPhone unlock tool and Apple ID unlock tool in this part.

UkeySoft Unlocker not only can help you unlock iPhone if you forgot the passcode or don’t know the second-hand phone’s passcode, but also can help you remove Apple ID from all activated iPhone or iPad. Using the professional iPhone unlock tool, you don’t need learn special tech knowledge then you can unlock your iPhone/iPad.

Key Features:

  • Unlock Apple ID on iPhone/iPad without Password
  • Remove iPhone/iPad Screen Passwords without iTunes
  • Unlock a Disabled iPhone/iPad without iTunes or iCloud
  • Remove 4-digit/6-digit passcode, Touch ID & Face ID from iPhone/iPad
  • Fully Compatible with the latest iOS 26/18 and iPhone 16

How to Unlock iPhone with Passcode

Step 1. Launch iPhone Unlock tool on computer, and select “Unlock Screen Passcode”, then connect your iPhone to the computer via USB cable.

remove iphone passcode

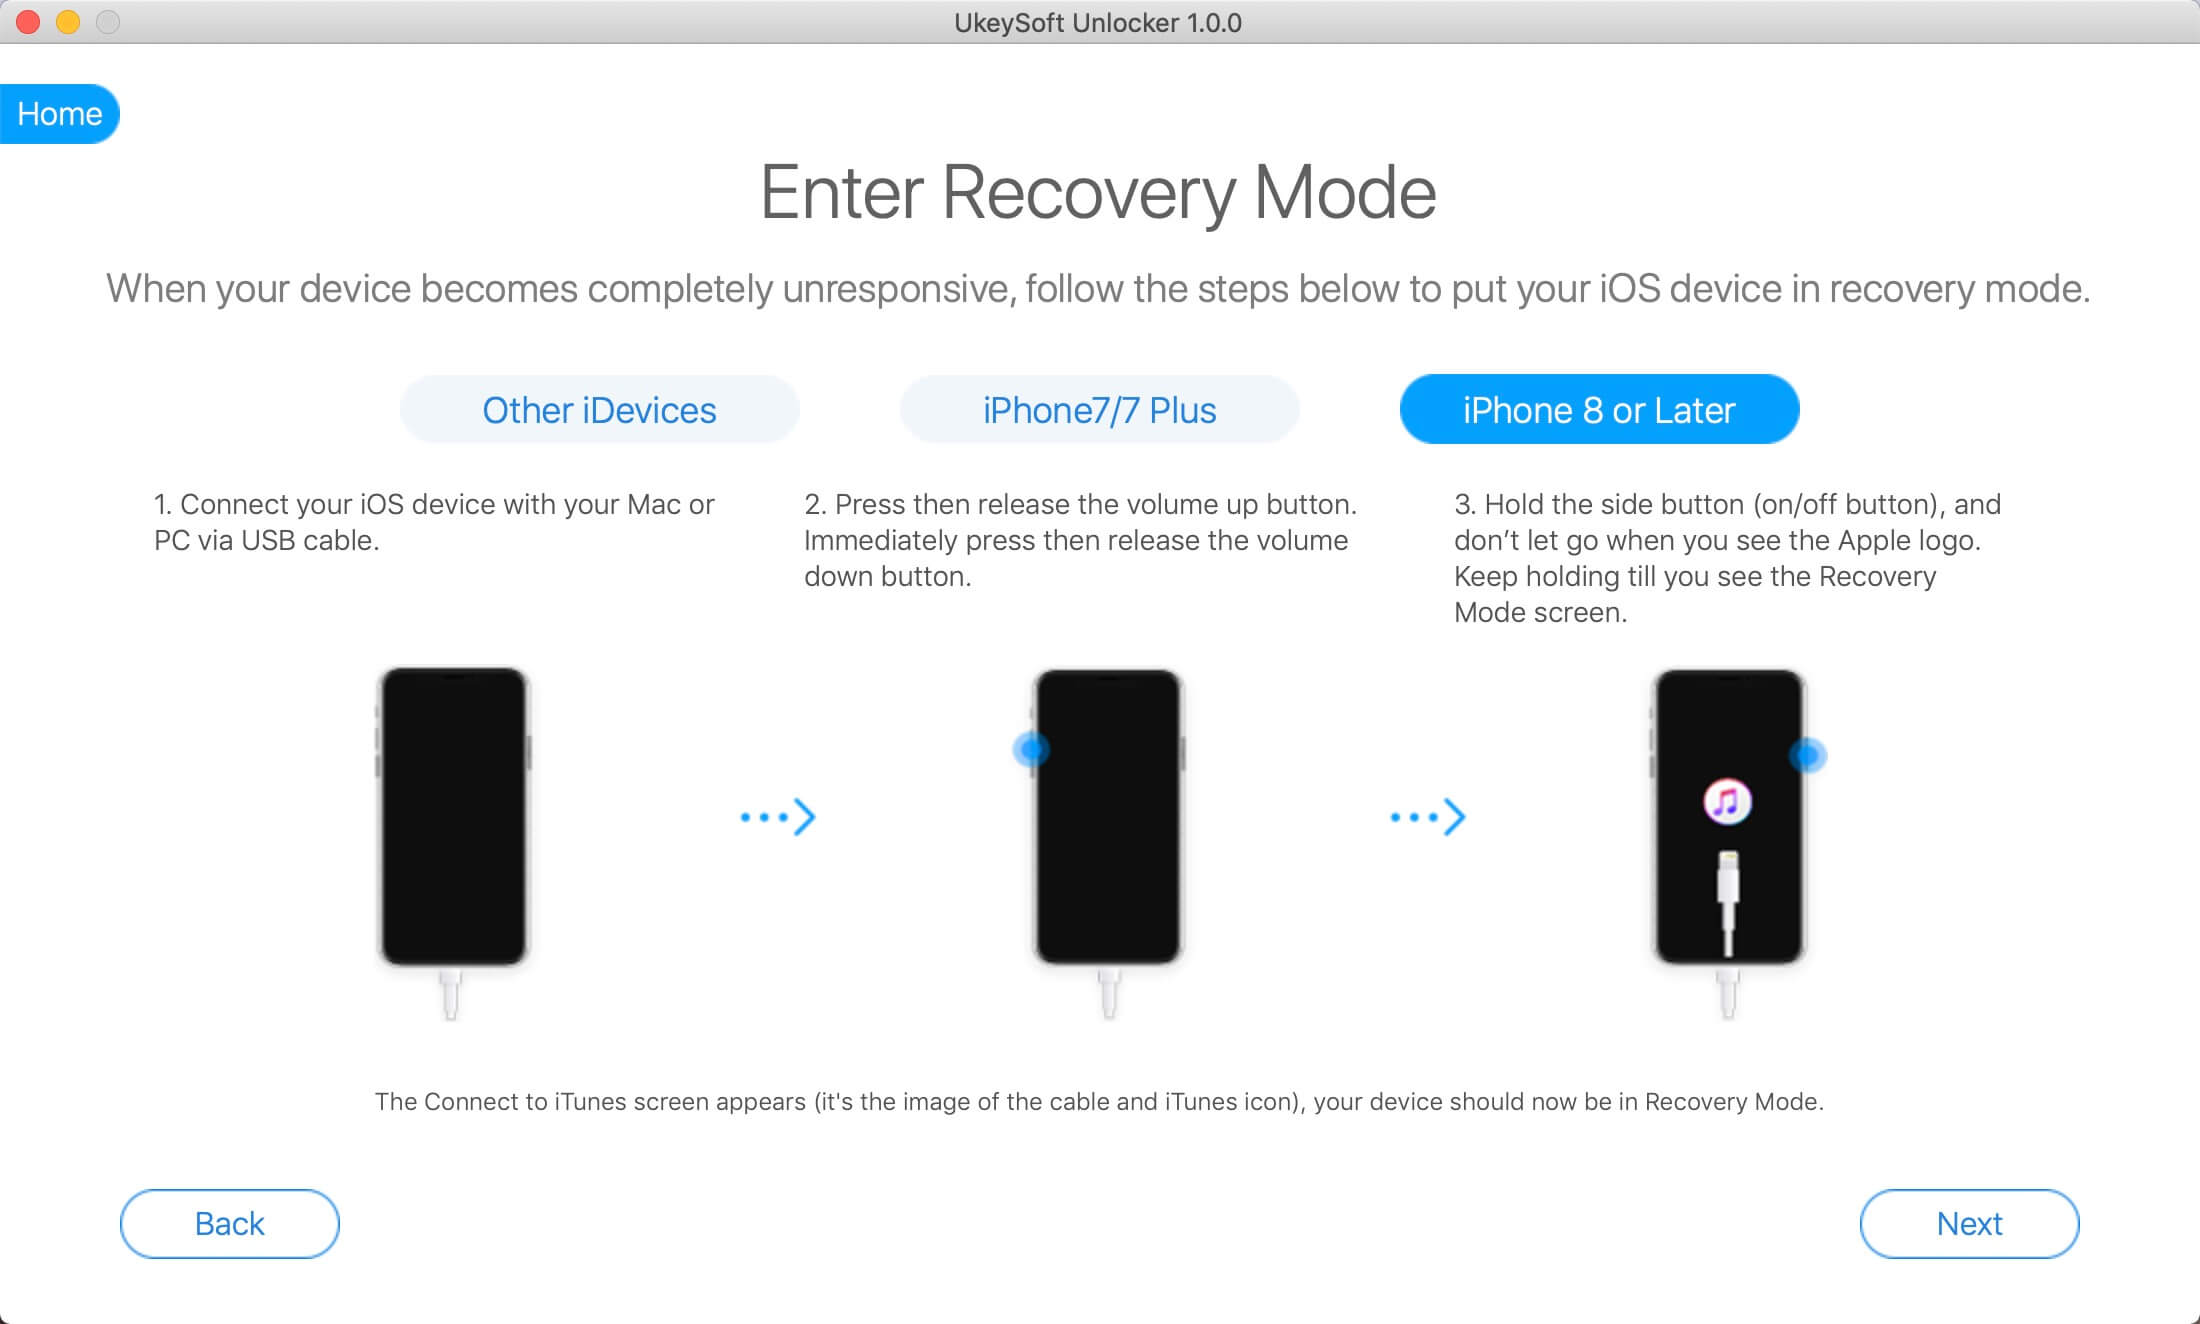
Step 2. Put iPhone into recovery mode or DFU mode.

recover mode

Step 3. Download firmware packge for iPhone and re-install it to the device.

download IPSW files

Step 4. Start remove iPhone screen passcode, then your iPhone will restart with “Hello” tips screen.

unlock iPhone without password

Learn the detailed user guide: How to Remove Password and Apple ID on iPhone

Tips: If you forgot your Apple ID password? Or iCloud locked problem, UkeySoft Unlocker also can help you to bypass iCloud activation on iPhone.
Also read: How to bypass iCloud Activation on iPhone

Method 4: Remove iPhone Passcode with Restoring Factory Reset

If you backed up your iPhone to the computer, you can use this method to unlock iPhone locked screen with restoring it to factory reset by iTunes.

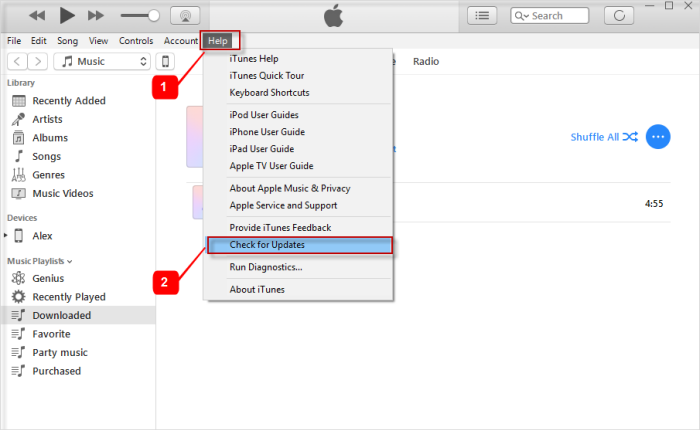
Step 1. Connect the locked iPhone to the computer.
Step 2. Choose the iPhone in the iTunes siderbar and click the tab of “Summary”.
Step 3. Click the “Check for Update”, then click “Restore” button.

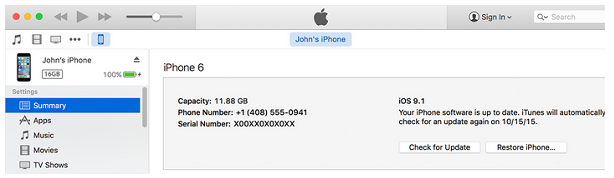
Only three steps, you have finished iPhone to factory reset by iTunes. Note: This way will erase all data and settings on your device, if you don’t want to clean your device you could try the solution following.

The Bottom Line

If you forgot iPhone screen passcode or your iPhone is disabled, don’t worry. With tools like AiseeSoft iOS Unlocker, Dr.Fone iOS Toolkit, and UkeySoft iOS Unlocker, you can quickly remove passcode from iPhone, wipe passcode from iPhone, or erase iPhone screen passcode in just a few clicks. Each tool provides a user-friendly interface, supports the latest iOS versions and iPhone models, and ensures a high success rate. Whether your iPhone is disabled, broken, or second-hand, these solutions make it easy to remove iPhone screen passcode and regain access to your device. Download these powerful tools and have a try!

Remove iPhone Passcode

How to Fix iPhone to Normal after iOS 13/12 Downgrade

My iPhone X was run into the abnormal status after downgrading iOS 13 to iOS 12.4. I am not sure what’s wrong with it. I just want to restore it to normal as usual, any available solutions for suggestions?

Many iOS uses are currently enjoying iOS 11 with device, and I suspect that not less than a few of iOS users are not enjoying it as well. It may be time for some of you currently on iOS 13 to start thinking about downgrading. When it comes to downgrading from iOS 13 to iOS 12, most of people will perform the job using iTunes, however, some of them asked for help that their iPhone stuck in the abnormal status when/after iOS 13 downgrade, the cases for examples, iPhone stuck in Recovery Mode, iPhone stuck at black screen of death, iPhone stuck at the frozen screen. No matter which stuck issues you get, here is the best ways to fix iPhone system to normal after iOS 13 downgrade.

Fix iPhone System to Normal after iOS 13 Downgrade

While resolving the iOS 13 downgrade bricks phone issues via iTunes, you might be losing your precious data. If you don’t wanna lose any data from device and fix this issue perfectly, then consider using iOS System Recovery. It is a wonderful solution to fix various kinds of iOS system issues (like reboot looping, blank screen of death, stuck on Apple logo, and so on). With the help of iOS System Recovery, you are able to restore iPhone system to normal after iOS 11 downgrade. iOS System Recovery compatible with all iOS devices, such as iPhone XS, iPhone XS Max, iPhone XR, iPhone X, iPhone 8, iPhone 7, iPhone 6S/6, iPhone 5S/5, iPad, and iPod Touch.

d_win d_mac
d_win d_mac

Fix iPhone to Normal after iOS 13 Downgrade

Step 1. Run iOS System Recovery on the Computer
Firstly, please run iOS System Recovery on your computer. Click on the features of “System Recovery” on the home page screen of program.

Step 2. Connect iPhone to the Computer
Connect your iPhone to the computer and the program will detect it automatically. Click on the “Start” button to initiate the recovery process.

connect iphone to the computer

Step 3. Get iPhone into DFU Mode
You would be asked to put your device into the DFU mode (Device Firmware Update). It can be done by pressing the Power and Home button at the same time for at least ten seconds. Afterward, let go of the Power button while still holding the Home button. This will put your device into the DFU mode.

enter iphone into dfu mode

Step 4. Download Firmware for Restoring iPhone
On the next screen, the program will provide the correct information that match of your device, include its device number, model, iOS version, and more. Once you are done, click on the “Download” button to go on.

select iphone device model

This will initiate the downloading operation. Make sure you have a stable internet connection to fast-forward this process.

download firmware package for iphone

Step 5. Begin Restoring iPhone System to Normal
Once the downloading of the related firmware would be completed, the program will start to fix your iPhone automatically. Note: Make sure that your phone is not disconnected during the process.

restore iphone to normal without data loss

Done, your phone would be restarted the ideal way (in the normal mode). If your iPhone are fixing failed with the result, then you can do the process again by clicking on the “Try Again” button.

d_win d_mac
d_win d_mac

Related Articles:

How to Fix iPhone Stuck in Recovery Mode after iOS 11 Downgrade

How to Fix iOS 11 Downgrading Stuck on Apple Logo Issue

How to Downgrade from iOS 11 to iOS 10 without Data Loss

How to Restore Lost  iPhone Files after iOS 11 Downgrade

Two Ways to Backup and Restore Data from iPhone

How to Fix iPhone System to Normal after iOS 11 Update

How to Fix iPhone System to Normal after iOS 13 Update

My iPhone was stuck in recovery mode after iOS 13 update, now the screen is black. How to fix iPhone system to normal after iOS 13 upgrading failed?

Fix iPhone to Normal in iOS 13

The best options to restore iPhone system to normal after iOS 13 update is using iOS 13 System Recovery. The iOS System Recovery can perfectly fix your iPhone system to normal without data loss. Fix various iOS system issues, such as, stuck in Recovery Mode, stuck on white Apple logo, stuck at black screen, looping on start, etc,. Fully compatible with all models of iPhone, iPad and iPod touch.

d_win d_mac
d_win d_mac

Fix iPhone Stuck in Apple Logo after iOS 13 Update

Step 1.Run Program on Computer and Connect iPhone to the Computer
Download iOS System Recovery and install it on your computer.Connect your iPhone to the computer via USB.Select “Fix iOS System” of the home page.

ios system recovery main page

Click the “Start” button to begin the fixing process.

connect iphone to the program

Step 2.Download Firmware for iPhone
A new window will pop up.Select your device model and download a matched iOS firmware to download for it.

select iphone model

Now the program will start to download the firmware for your iPhone.

download firmware for iphone

Step 3.Restore iPhone System to Nomral after iOS 11 Update
Once the download is complete,iOS System Recovery will continue to restore the iOS system of your iPhone.

fix iphone system to normal ios 11 update

Done,your iPhone will restart.Now your device have returned to the normal state,you can use it freely as usual.

d_win d_mac
d_win d_mac

Related Article

How to Fix iPhone Stuck in Recovery Mode after iOS 11 Update

How to Fix iPhone Stuck on Apple Logo after iOS 11 Update

Fix iPhone Stuck on Connect to iTunes Screen after iOS 11 Update

How to Fix iPhone Black/White Screen after iOS 11 Update

How to Restore iPhone System to Normal

How to Recover Lost iPhone Data after iOS 11 Update

Fix iPhone in iOS 13

How to Fix iPhone Blue Screen of Death

“My iPhone 6S screen is blue.I tried restarting and updating it but it didn’t work.No sudden rebooting has occurred.How to fix this issue?”-Alison

“Hey!My iPhone occurred the blue screen of death when I was using a game app,all of a sudden,the screen started flickering,lines appeared on screen and then got a blue screen of death.What’s up?How to return my iPhone to normal?Help!”-Ben Jonson

Sometimes you may be frustrating that your iPhone get into the blue screen of death suddenly.Although not known by its official name,the blue screen problem has become a common occurrence to many iPhone users.As the name suggests,the blue screen of death problem causes the phone to behave as though it were dead or dying.We actually don’t know the real causes of leading iPhone to blue screen of death,just can guess the issues are caused by the hardware or software errors.If you are affected by this problem,then you will be glad to know that you can fix the problem easily on your own.

Fix iPhone Blue Screen of Death without Data Loss

iOS System Recovery is strongly recommended for fixing iPhone blue screen of death without data loss.This wonderful system recovery is designed for fixing iPhone system abnormal issues,return it to normal with easy steps,for instances,iPhone stuck in Recovery Mode,iPhone stuck at Apple logo screen,iPhone stuck at “Connect to iTunes” screen,iPhone stuck at black/white screen,etc,.All iOS devices are compatible with iOS System Recovery,including iPhone 7,iPhone 6S/6,iPhone 5S/5,iPad Air,iPad Pro,iPad Mini,and so on.

d_win d_mac

How to Fix iPhone Blue Screen of Death without Losing Data

Step 1.Select the Functioning of iOS System Recovery
Click on the last tap on iOS System RecoveryTool of the main window “fix iOS system to normal” .Then make your iPhone which get the blue screen of death to computer with an USB cable.Just click”Start”when program detect your iPhone,it will enter the next step.

ios system recovery main page

select ios system recovery feature

Step 2.Select and Download the Firmware for iPhone
To fix iPhone to normal,you should download a firmware for it.iOS System Tool will detect your iPhone and provides the latest iOS version for you to download.You just need to tap “download” and then wait a moment.The program will automatically accomplish it quickly.

select the firmware to download for iphone

download the firmware for iphone

Step 3.Fix iPhone Blue Screen of Death
When the download process is end,the program will continue to fix your iPhone to normal.

fix iphone blue screen of death issue

Just few minutes later,it will prompt you that your device is already return to normal state.The whole procedure of fixing operating system of iPhone only takes you within 10 minutes with simple steps.

fix iphone blue screen of death issue completed

d_win d_mac

Related Article:

How to Fix iPhone Stuck in Reboot Loop

How to Fix a Frozen iPhone during/after iOS 10 Update

How to Restore iPhone System to Normal

How to Fix iPhone Stuck on Apple Logo

How to Get iPhone Out of Recovery Mode