Category Archives: Fix iOS

Fix iPhone X/8/7/6S/6/SE/5S/5C/5 Stuck in Reboot Loop

“Hi,I need help.My iPhone 6S got into the reboot loop after iOS 11.3 update.I don’t know what actually happen.Now I am eager to get it out of the loop state.How?”-Nelson

iPhone Stuck in Reboot Loop Issue:
According to the Apple store report,iPhone users have complained of a similar problems like iPhone get into the reboot loop.The device boot up initially for no reason and show the Apple logo then go back to a blank screen.This process is repeated indefinitely.It’s really annoying.iPhone reboot loop is a common problem among iPhone users has faced this at least one time.I have the best solution which I going to show you step by step in the following passages.

iphone-stuck-in-reboot-loop

The Common Cause of iPhone Stuck in Reboot Loop
A.iOS Jailbreak
iOS jailbreak on iPhone may cause serious problems of software errors.If it not done perfectly,your iPhone can break down and may not be able to perform even the simplest of tasks.

B.iOS Update
iOS update on iPhone may cause iPhone can’t get out of the reboot loop as well.Your iPhone may get stuck in the process of the iOS update, and cause the anomalies.

C.Malfunctioning Battery Issue
Sometimes when your device has run out of charge,it will lead to the battery connector malfunctions problems happen.It is quite often that iPhone stuck in reboot loop during such cases that your iPhone battery is out of order.

Get iPhone Out of Reboot Loop without Losing Data

iOS System Recovery is powerful to fix iOS system stuck issues effectively,help to fix iPhone stuck in reboot loop without data loss,return it to normal state efficiently.iOS System Recovery works well for restoring iOS system to normal state,for instances,stuck in Recovery Mode,stuck at Apple logo screen,stuck on “connect to iTunes” logo screen,stuck at black/white screen,etc,.

d_win d_mac

More Features of iOS System Recovery You Would Like:
-Fix iOS system to normal under any circumstances,for example,stuck in Recovery Mode.
-Fix iOS system to normal state without data loss.
-Recover deleted data on iOS devices under any circumstances,for instance,deleted carelessly,iOS update/jailbreak,restore device to factory resetting.
-Supports to recover 22+ different types of files on all iOS devices,such as contacts,messaging,photos,videos,audios,notes,call logs,apps & apps data,documents,and so on.
-Three data recovery modes:recover data directly from device or extract data from iTunes/iCloud backup selectively.
-Applicable with all iOS devices,like iPhone X, iPhone 8/8 plus, iPhone 7,iPhone 6S/6,iPhone 5S/5,iPad Air,iPad Pro,iPad Mini,and so forth.
-Works well withe the latest iOS 11.3.

How to Get iPhone Out of Reboot Loop without Data Loss

Step 1.Launch iOS System Recovery and Select “iOS System Recovery” Selection
• Click on the tab “More Tools” appearing at the bottom of program.Then click on “iOS System Recovery” to start the function.
• Connect iPhone to the computer by USB cable,the program will detect the device soon.
• Click on “Start” button to begin.

ios system recovery main page

fix iPhone system to normal after ios 10 update

Step 2.Download Firmware for iPhone
• To fix iPhone stuck in reboot loop,you should download the firmware for iPhone.
• The program will detect the model of device,asks for confirmation,and suggests the latest version of firmware to download.
• Click “Download”button.The process completes automatically.

select your iPhone model

download the firmware for iphone

Step 3.Get iPhone Out of Reboot Loop without Data Loss
• Once the firmware is installed,the program will start fixing iOS system for device and return iPhone to normal state in minutes.

fix iphone stuck in reboot loop

restore iphone system to normal

Done.Now your iPhone have finished the iOS abnormal system restoring task.You can check if it is back to normal state.

d_win d_mac

Related Article:

How to Restore iPhone System to Normal after iOS 10 Update

How to Fix a Frozen iPhone during/after iOS 10 Update

How to Restore iPhone System to Normal

How to Recover Deleted Data from iPhone 7/6S/6/SE

How to Recover Data when iPhone Stuck at Black Screen of Death

[Summary]:Your iPhone stuck in black screen of death after update/downgrade or jailbreaking? This guide will teach you how to fix a black screen iPhone and recover all the lost data including text messages, contacts, photos, call history, notes, etc. from the device after fix ios system to normal.

“This morning I try to upgrade iOS 11.3 on my iPhone 6S.However,the unfortunate thing happened,my device was turn into black screen of death.I don’t know why.I tried rebooting a few times and had the same issue.Any useful ways to get my iPhone out of the black screen and return it to normal?In addition,I am desire to restore my personal data from it.It’s so important for me.Thanks advance.”-Jerry

You may want to know:

* How to Fix iPhone black screen of death issues

* How to Recover Deleted or Lost Data from iPhone

iphone stuck at black screen

iPhone black screen is also known as iPhone black screen of death.iPhone black screen appears when there is physical damage or software damage on device,or it may appear after iOS jailbreak/update.Compare with fixing iPhone system to normal state,iPhone users are more eager to recover data when iPhone get black screen of death,especially contacts,messaging,photos.In the coming part of passages,we are going to discuss the best solution to recover data when iPhone stuck at black screen of death and other similar cases.

Recover Files when iPhone Stuck at Black Screen of Death

iOS System&Data Recovery fit your needs to solve iOS system stuck issues and return iPhone to normal state,help to repair iPhone stuck at black screen of death and restore data effectively.

d_win d_mac

More Features of iOS System & Data Recovery:

-Fix with various iOS system issues like recovery mode,white Apple logo, black screen, looping on start,won’t slide to unlock,etc,.
-Fix iOS to normal without any data loss.
-Recover lost data on iPhone with three recovery modes:Directly recover from iOS device,recover from iTunes backup files,recover from iCloud backup files.
-Recover various of data on iOS device,like contacts,messaging,photos,videos,call logs,notes,documents and so on.
-Fully compatible with iOS 11.3, Windows 10 or Mac 10.11 and iOS 10 system or lower.
-Work for all models of iPhone, iPad and iPod touch,such as iPhone X, iPhone 8, iPhone 7(Plus),iPhone 6S(Plus),iPhone 6(Plus),iPhone 5S/5C/5,iPad Air,iPad Pro,iPad 4/3/2,etc,.

scan data on iphone

Steps to Fix iPhone Black Screen and Recover Data

Step 1.Run Program and Select iOS System Recovery Option
Launch iOS System & Data Recovery and click on the “iOS System Recovery” tab from “More Tools” on the program interface. Connect your iPhone to the computer via USB cable. The program would detect your iPhone soon. Click “Start” to initiate the process.

ios system recovery main page

fix iphone stuck at black screen

Step 2.Download the Selected Firmware for iPhone
You will need to download the right firmware for your iPhone to fix the device.iOS System & Data Recovery should be able to detect the model of your iPhone, suggest which iOS version that is best for your iPhone for you to download.

Click on “Download” and wait until the program finishes downloading and installing it on your iPhone.

download the firmware for iPhone

Step 3.Fix your iPhone Stuck at Black Screen of Death
Once download is completed, the program will continue to repair your iPhone, return it to the normal state. It will take you a few minutes.

fix iphone stuck at black screen

Step 4.Switch Data Recovery Mode

Your iPhone have get out of the stuck of black screen.Now you should recover lost data from device with the help of iOS System& Data Recovery.Please switch to iOS Data Recovery mode.Choose “Recover from iOS Device” mode in the main page of program.

fix iphone stuck at black screen

Step 5.Select Files Types for Scanning
Select the files types for scanning on iPhone.The data you can select including contacts,messaging,photos,videos,call logs,notes,documents and so on.

If you want to select the lost data to scan by program,you could click the items of ”Deleted Data from the Device”,if you want to select all data to scan you should click “Select All”.Then click “Start Scan”.Then the program will start to scan data for iPhone.

Step 6.Preview and Recover Lost Data from iPhone
You will see a list of recoverable files after the program has finished scanning process.There are several filter options to help you find data that you want.Once you have identified the data that you want to restore,check on the boxes next to the files name.After selecting all that you need, click the “Recover” button. To recover the selected data directly to your iPhone,click on “Restore to device” or if you’d like to recover the selected data to your computer, just click on “Export to PC”.

recover data from iPhone with black screen

d_win d_mac

Video Guide: How to use iOS System Recovery to Fix a black screen iPhone

Related Article

How to Recover Data when iPhone Stuck on Apple Logo

How to Recover Data from iPhone in Recovery Mode

How to Fix a Jailbroken iPhone Stuck on Black Screen

How to Restore iPhone System to Normal

Install IPSW File on iPhone iPad with/without iTunes

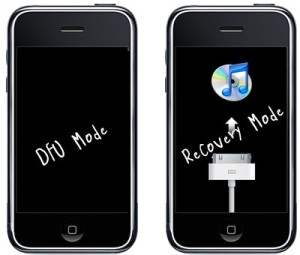
There are many situations that we will make in daily,and need to install IPSW file on our iPhone/iPad,for example update iPhone from iOS 12 to iOS 13; download and install iOS 13 on iPhone, install iOS 12 on iPhone/iPad; downgrade iOS 13 to iOS 12 on iPhone and iPad; fix the software update failed error; get iPhone out of recovery mode/DFU mode; fix iPhone/iPad stuck in black screen of death; fix iPhone stuck at Apple logo; repair an iPhone stuck at looping on start; fix device abnormal system issue; failed restore device to factory reset, as well as fix iPhone stuck on recovery mode after iOS 13 update. You would be required to downgrade from iOS 13 to iOS 12, in order to fix/restore iPhone back to factory setting status. Whatever the case, we’ll walk you through the entire process to fix bricked iPhone/iPad and gets it back to normal status by re-installing IPSW files(firmware package) on iPhone/iPad with/without iTunes.But before we get into those,be sure to backup your device, in case something goes wrong during the procedure.We highly recommend that you don’t move forward until or unless you’ve made a proper backup of your device.
You may want to know:How to Backup iPhone to Computer

* 2 Ways to Downgrade your iPhone with Losing Data

* How to Recover Deleted Data on iPhone

* How to Restore iPhone Data from iTunes Backup

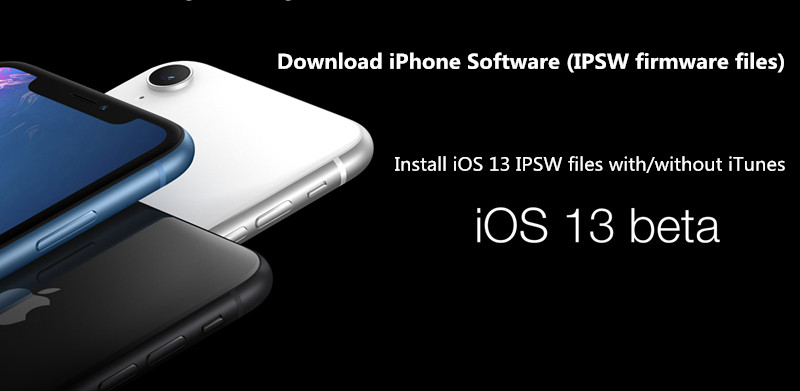
Download & install iOS IPSW File Manually for iPhone, iPad

There are a few routes you can take when it comes to installation of iOS.The manually one is to download & install iOS IPSW file on iPhone/iPad with iTunes,it’s easy to complete the restoring task via iTunes on device.However,it gain the big chance to lost data from device after using IPSW file to restore the jailbroken iPhone/iPad with iTunes.Below we have shown method on how to download & install iOS iPSW file manually for iPhone /iPad with iTunes.

Note:Backup iPhone before installing IPSW file on iPhone with iTunes

Part 1:Install IPSW File on iPhone iPad With iTunes (Lead to Data Loss)

Step 1.Download the iOS IPSW file[ links below ] that relates to your specific iOS device.
Step 2.Run iTunes.
Step 3.Connect your device to the computer.
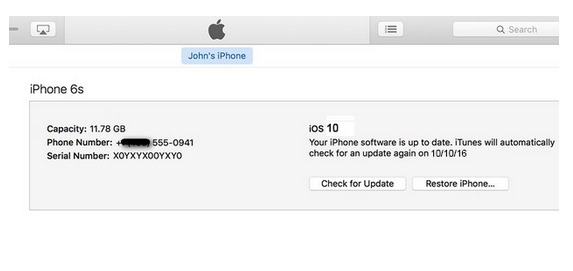
Step 4.Open Device Summary for the iOS device you are updating.
Step 5.Hold down the SHIFT [ Windows ] or ALT [ Mac ] key and click Restore in iTunes simultaneously iTunes restore.

itunes restore

Step 6.Locate the iOS IPSW file you downloaded and select it.

select ipsw file

Step 7.Follow the on onscreen instructions and iTunes will begin the update process.
Step 8.When the update has finished, your iOS device will reboot into the iOS you select.

Please download the .IPSW files:

iOS firmware file for iPhone
iOS firmware file for iPad
iOS firmware file for iPod touch

Part 2:Install IPSW File on iPhone iPad Without iTunes (No Data Loss)

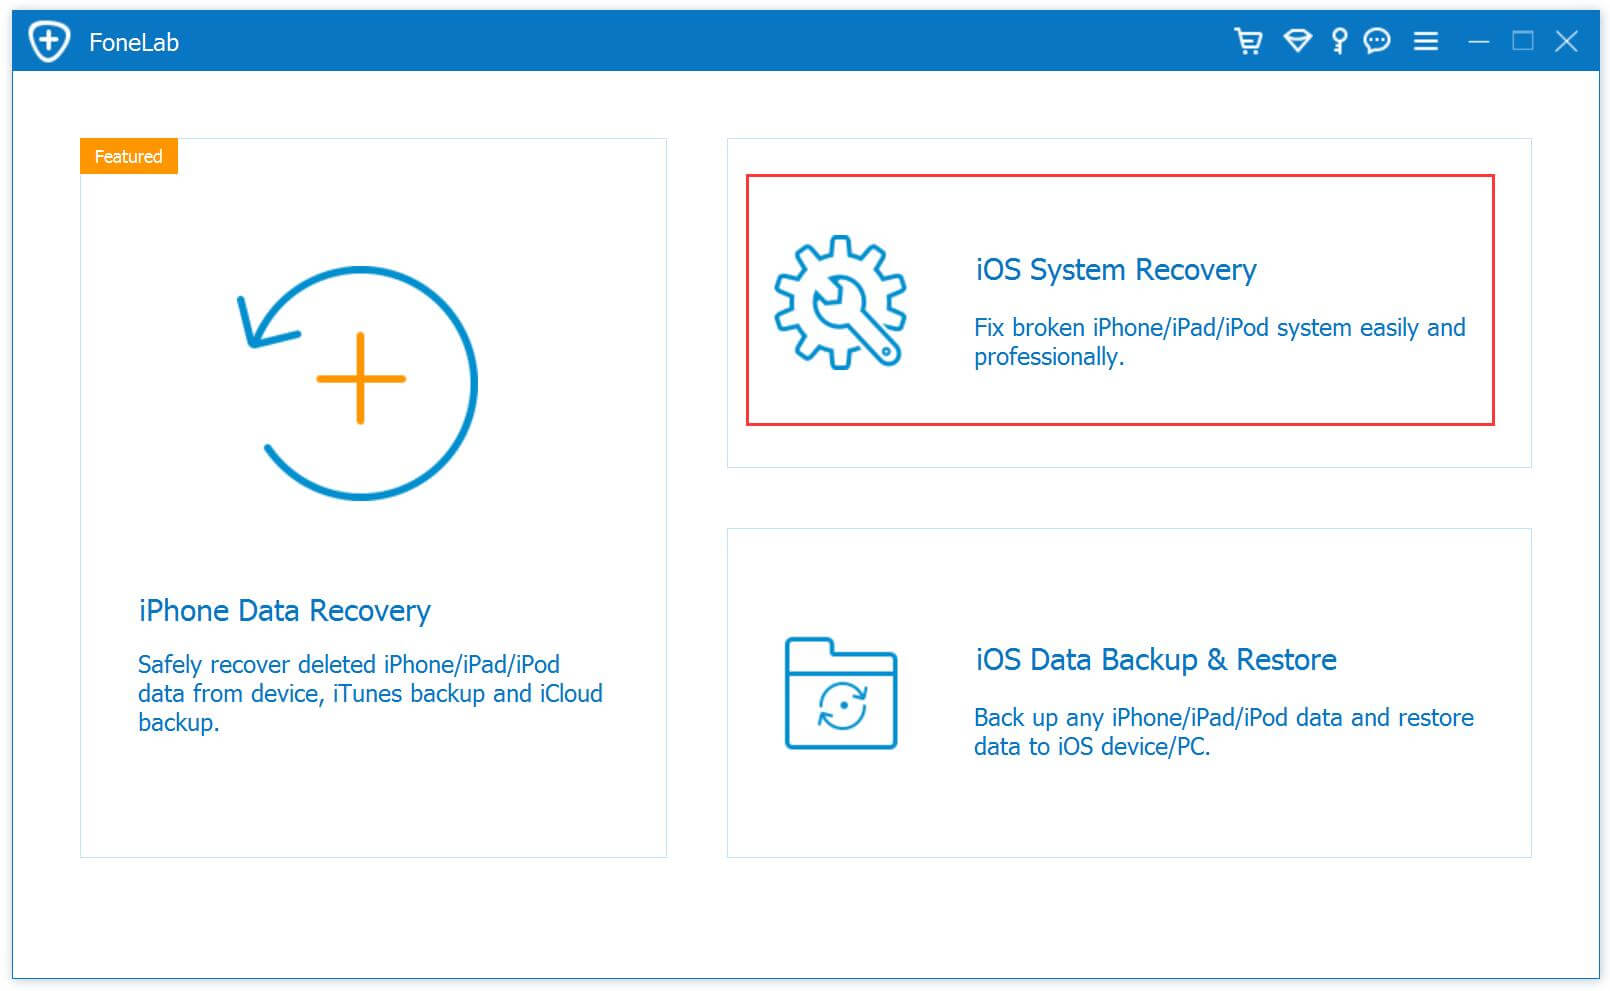
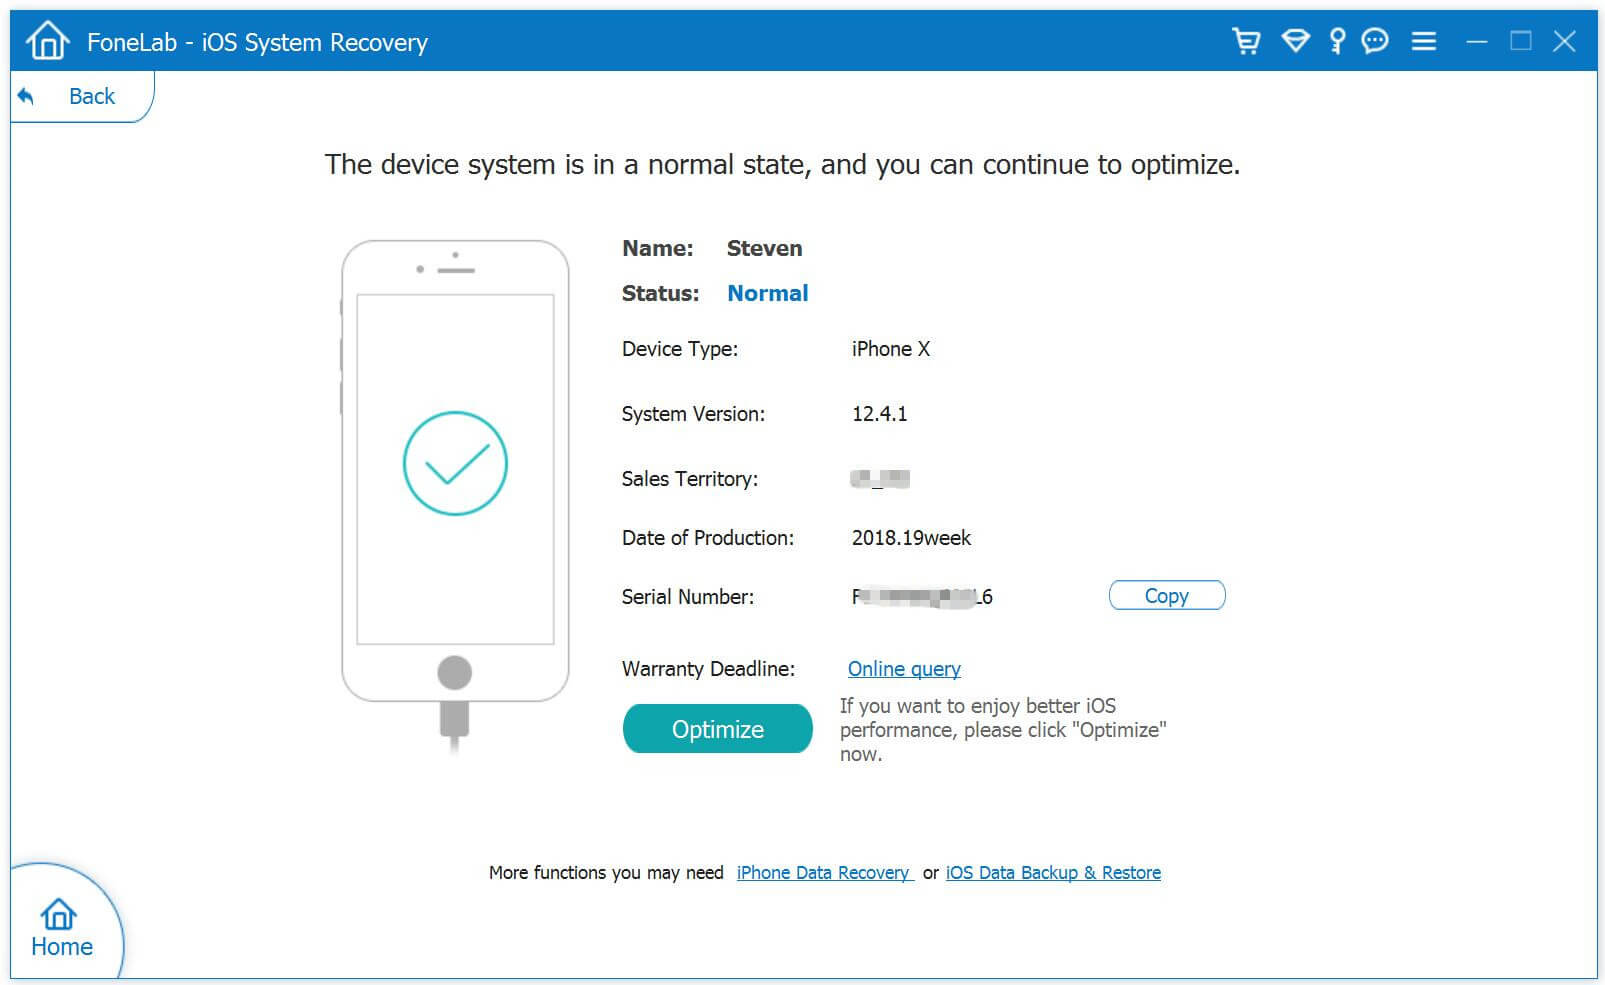
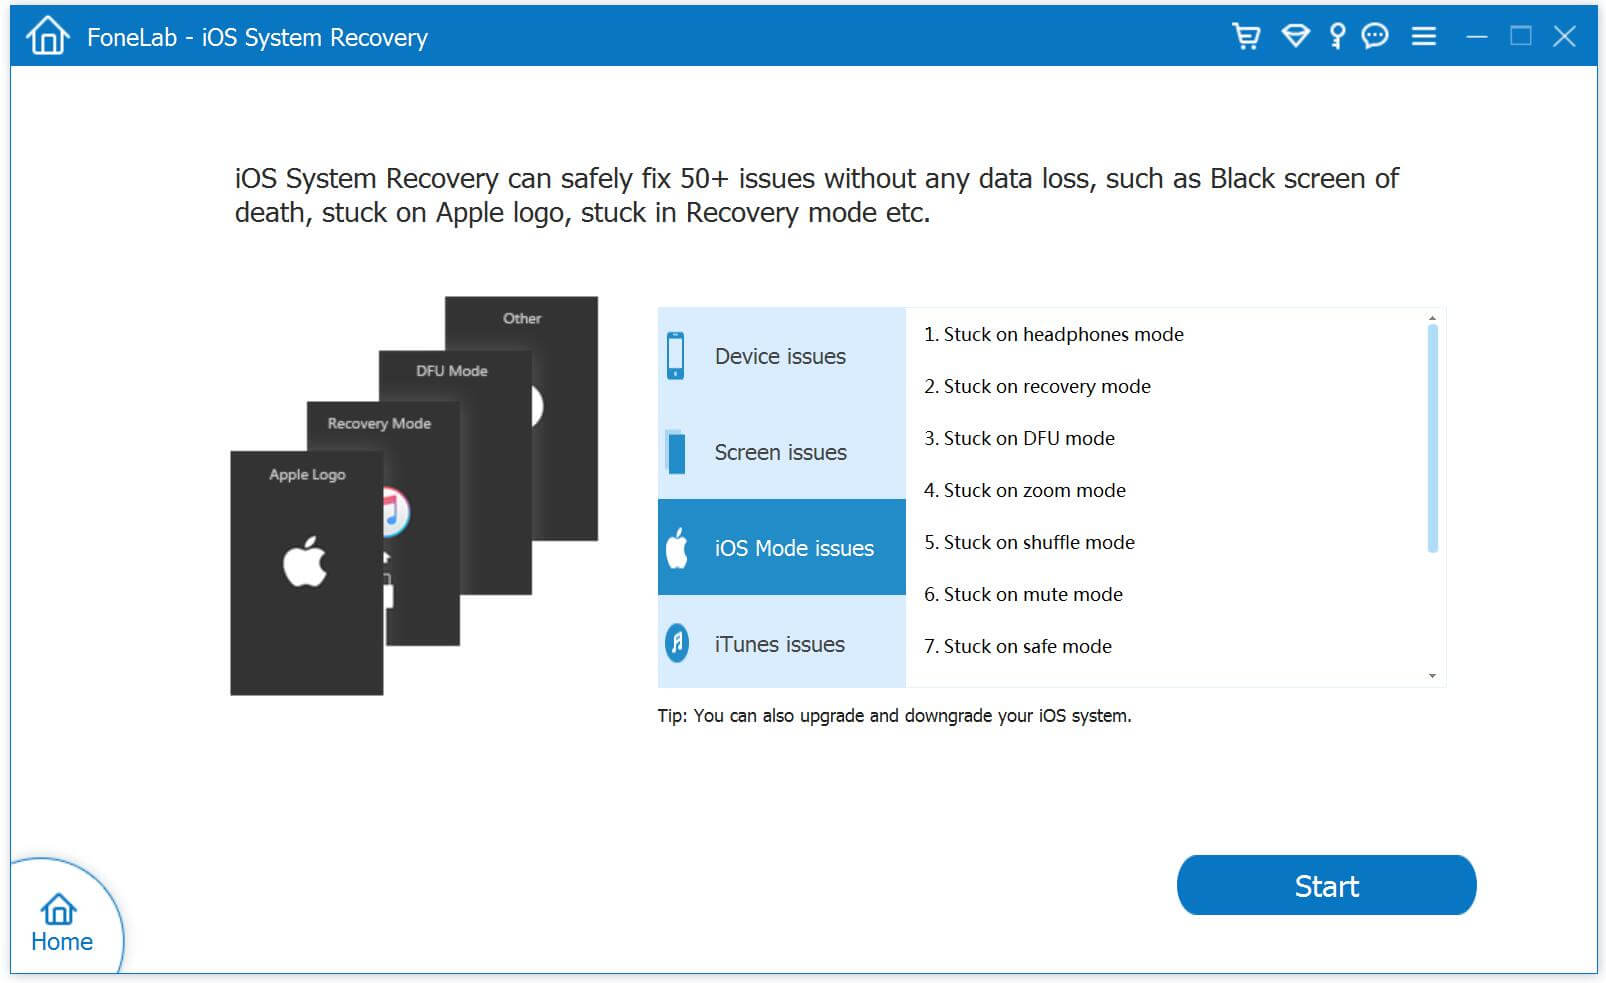
Another better way to use IPSW file to restore iPhone/iPad without iTunes is install IPSW file on device via IPSW Files Installation Tools or IPSW Restore Tool – iOS System Recovery.No matter the jailbroken or non-jailbroken iDevice,it will not lead to data loss in the whole restoring process.IPSW Files Installation Tools-iOS System Recovery perfectly help to install IPSW file on iPhone/iPad without iTunes,so you can use this auxiliary tools to update or downgrade your iOS devices without data loss, including the latest iOS 12 and iOS 12.1. What’s more,this program allow to restore deleted data from iPhone/iPad completely after losing data under any circumstances.Additionally,it also designed for restore iOS system to normal state on iPhone/iPad.

Features of iOS System Recovery:

* Provides the latest iOS 11 firmware package .IPSW files downloading and install on iPhone/iPad without data loss;
* Install IPSW file on iPhone/iPad without data loss;
* Fix/Repair iPhone iPad device stuck in Recovery Mode;
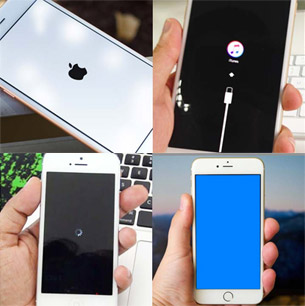
* Get iPhone iPad out of Apple Logo screen/ iTunes screen/ loading screen/ white screen;
* Fix iPhone iPad can’t enter the system;
* Without any data loss during the repairing process.
* Provides three recovery mode for lost contacts, iMessages/SMS/MMS, photos, videos, call logs, notes, etc, on iPhone iPad device: Directly recover data on iPhone iPad device; Restore data from iTunes backup; Retrieve data from iCloud backup.
* Supported iPhone, iPad devices: iPhone 11/iPhone 11 Pro(Max), iPhone XS/XS Max/X/8/7/6S/6S Plus/6/6 Plus/5S/5C/5/4S, iPad Air 2/3, iPad Pro 3, iPad Mini, iPod Touch 4/5, etc.

d_win d_mac

The following part we will take an example on how to install iOS 10.3.3 IPSW file on iPhone with IPSW Files Installation Tools-iOS System Recovery.

Easy Steps to Download and Install iOS 9/iOS 10 IPSW File on iPhone without Data Loss

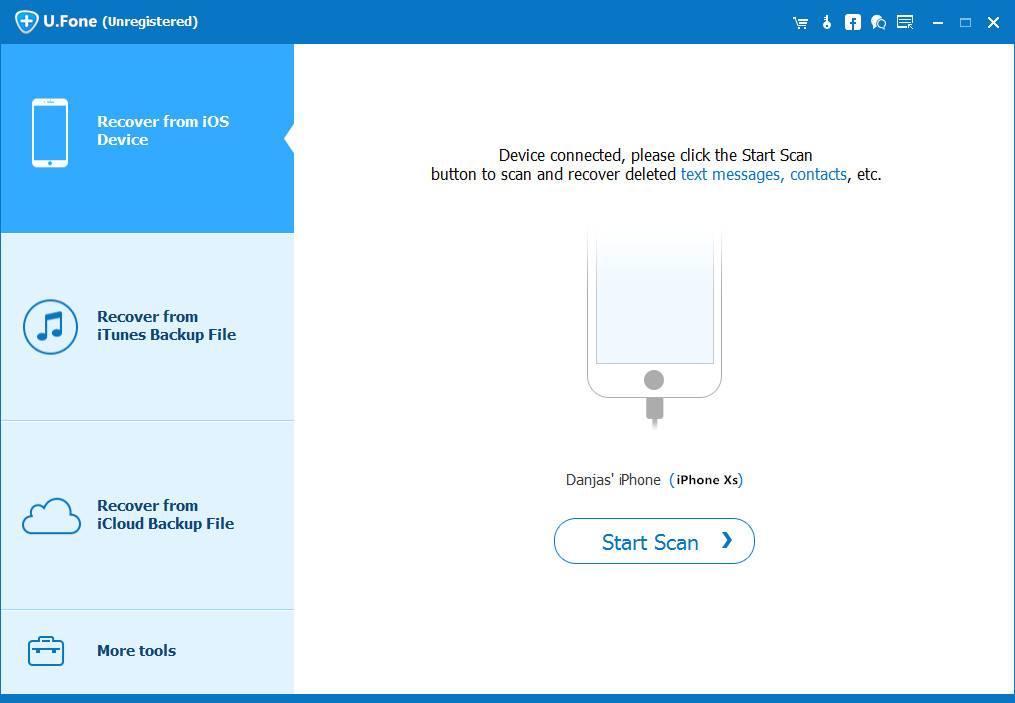
Step 1.Run the IPSW Files Installation Tools and Connect iPhone to Computer

restore iPhone from ios 10 system to ios 9

Step 2.Select iOS 12/11/10/9 Firmware Files and Download to iPhone

download iOS 11 Firmware to iPhone

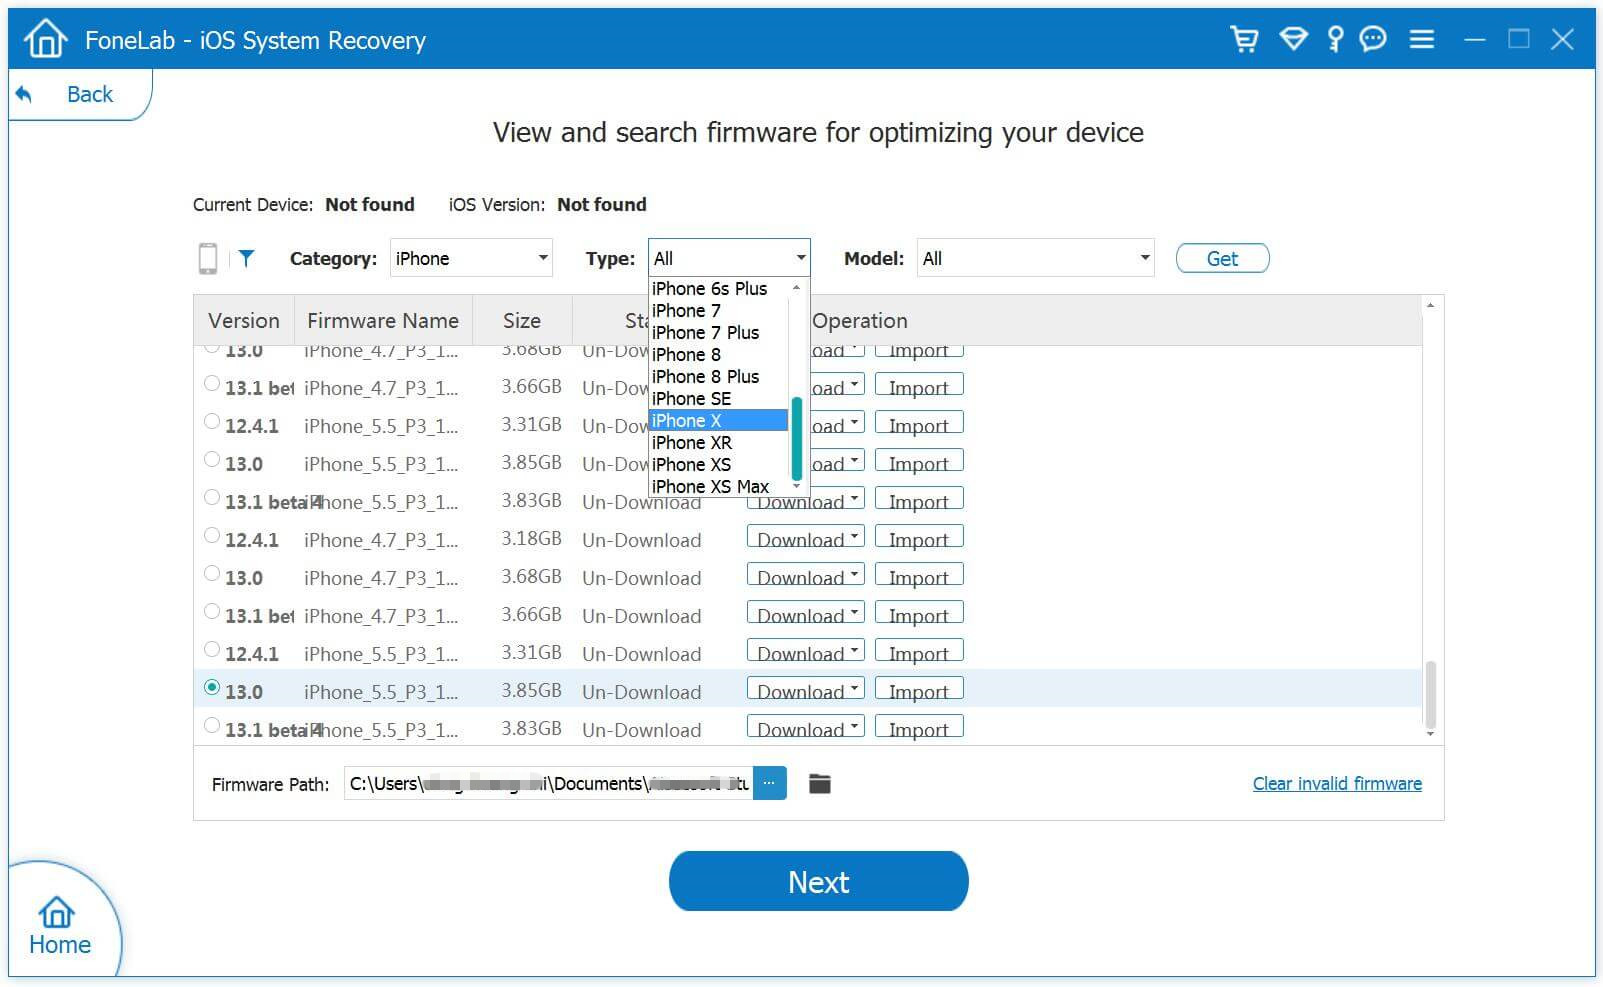
Tips:The program provides iOS 10.3.3 and the newest iOS 11 official version firmware package for download.

1)If you want to install iOS 10 on your iPhone directly,please click the “Download” button to download the iOS 10.3.3 firmware files for your iPhone.

2)If you want to install iOS 10/iOS 9 or other older IPSW file on iPhone,please select and install the .IPSW files on your iPhone via IPSW Files Installation Tools(no data loss),then save it on your computer.

Please download the .IPSW files in below download page:

iOS firmware file for iPhone
iOS firmware file for iPad
iOS firmware file for iPod touch

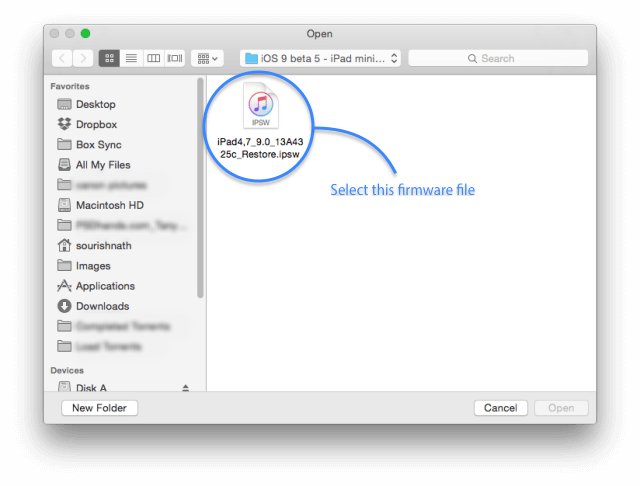
Step 3.Locate the Downloaded iOS 9/iOS 10 or iOS 11 .IPSW File from PC to Program
To install the iOS 9 or iOS 10 .IPSW File on your iPhone,please click the “Select” button the import the files to the IPSW Files Installation Tools and going on.

select and import ipsw file

Tips:If you want to install iOS 10.3.3 on your iPhone, iPad or iPod touch,please select,download and install it on your iOS devices directly,during the installing process,it won’t cause data loss.

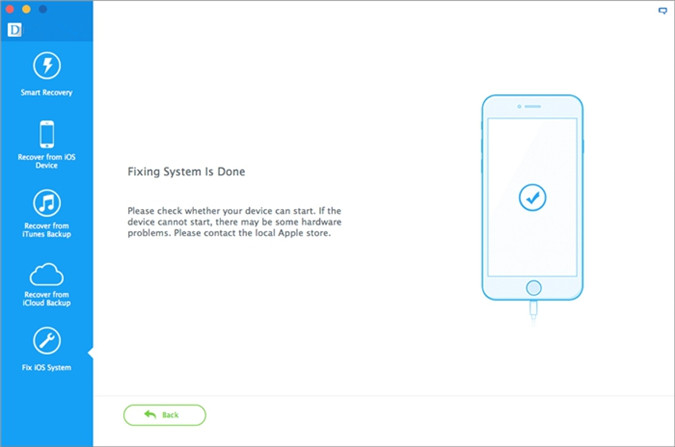
Step 4.Install the iOS 11/10/9 IPSW File on iPhone without Data Loss

Install IPSW File on iPhone

Note:Once finish this restoring job, your iPhone/iPad/iPod Touch will be updated to the iOS version which you select. If your iOS device is a jailbroken one, then it will be updated to non-jailbroken.If you have unlocked your iOS device before, then it will be re-locked again.

Free download the IPSW Files Installation Tools and have a try!

d_win d_mac

Part 3: Install iOS Firmware Package to Unlock iPhone by using UkeySoft Unlocker

Some professional iPhone unlocking tools like UkeySoft Unlocker unlock iPhone by installing IPSW (iOS Firmware Package), so you can downgrade/update your iPhone through downloading and installing firmware package by using UkeySoft Unlocker, which is a good choice to install IPSW files on your iPhone, iPad and iPod touch at ease.

UkeySoft Unlocker is designed to unlock iPhone/iPad/iPod lock screens in different situations: locked, disabled, broken screen, black screen, unresponsive screen, Apple logo screen, recovery mode, DFU mode, etc. If your iPhone is disable, or you forget your iPhone screen passcode. Don’t worry, UkeySoft Unlocker can help you fix and unlock your disable/locked iPhone at ease.

How does UkeySoft work? Actually, UkeySoft Unlocker can help you download the matching firmware of your iPhone, iPad or iPod touch device, then re-install the downloaded firmware package to the device, your iPhone will unlock and restore to normal status after installing iOS firmware package completed.

More Features:

  • Remove screen passcode from iPhone and iPad.
  • Unlock your disabled iPhone at home, no tech knowledge required.
  • Remove iPhone passcode from locked, disabled, broken screen.
  • Unlock Apple ID without password.
  • Bypass iCloud activation lock in iOS 13, 12, 11 or Earlier.
  • Compatible with all iOS devices and the latest iOS 13.
  • Offers iOS 13, iOS 12, iOS 11 firmware package to download.
  • Directly reinstall firmware package, restore and unlock iPhone.

Guide: Re-install Firmware Package to Unlock a Disabled iPhone

Step 1: Download and Launch the Software
The first thing you should do is download and launch UkeySoft Unlocker on your computer.

Launch UkeySoft Unlocker

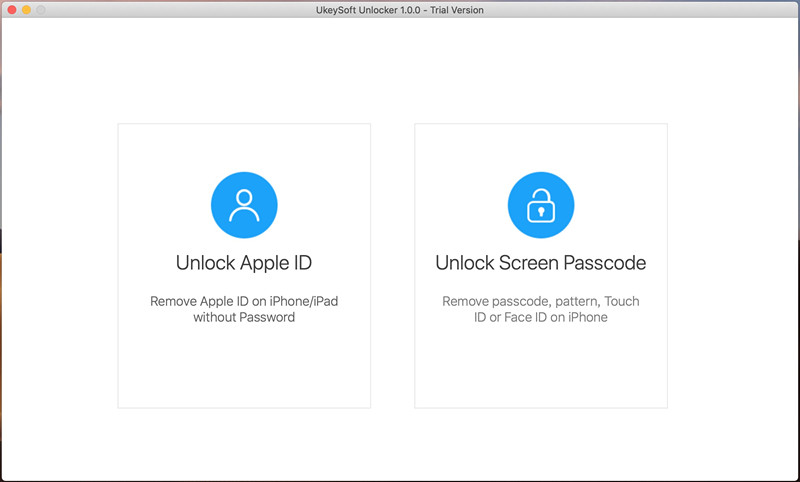
Step 2: Connect iPhone to Computer
Click “Unlock Screen Passcode” function, then connect your iPhone to your computer.

Connect iPhone to Computer

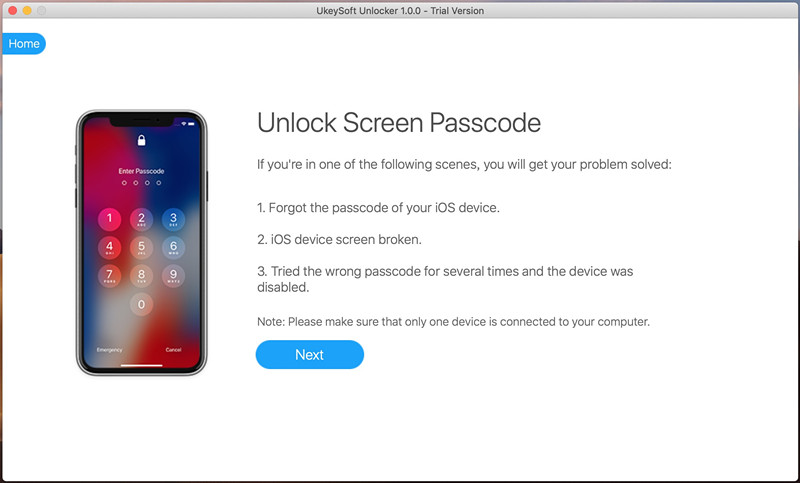
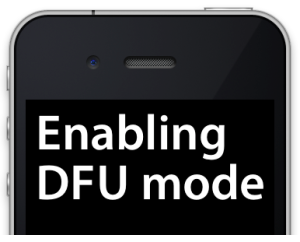
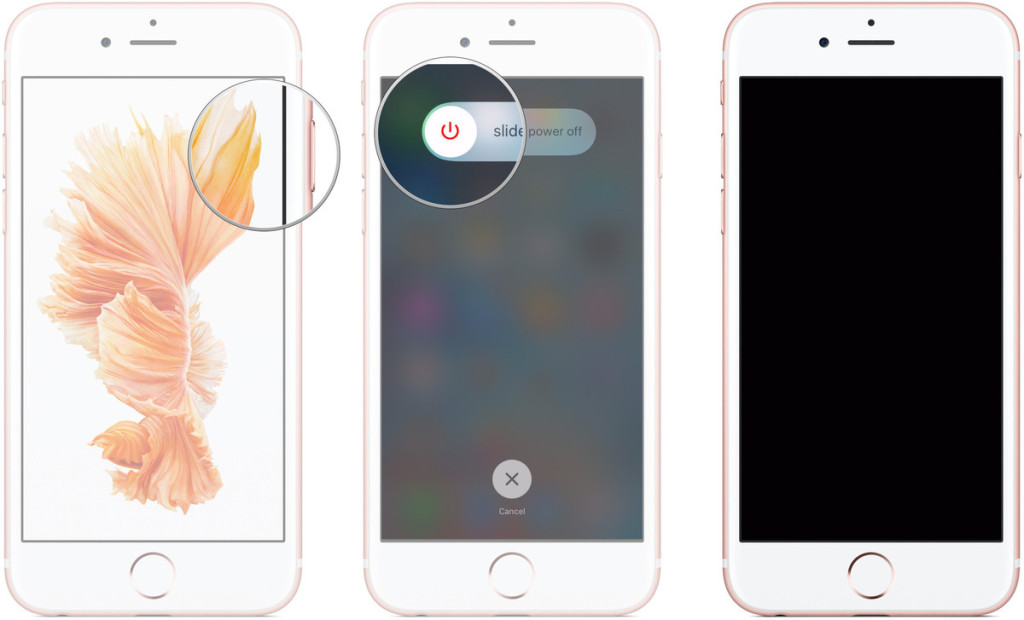
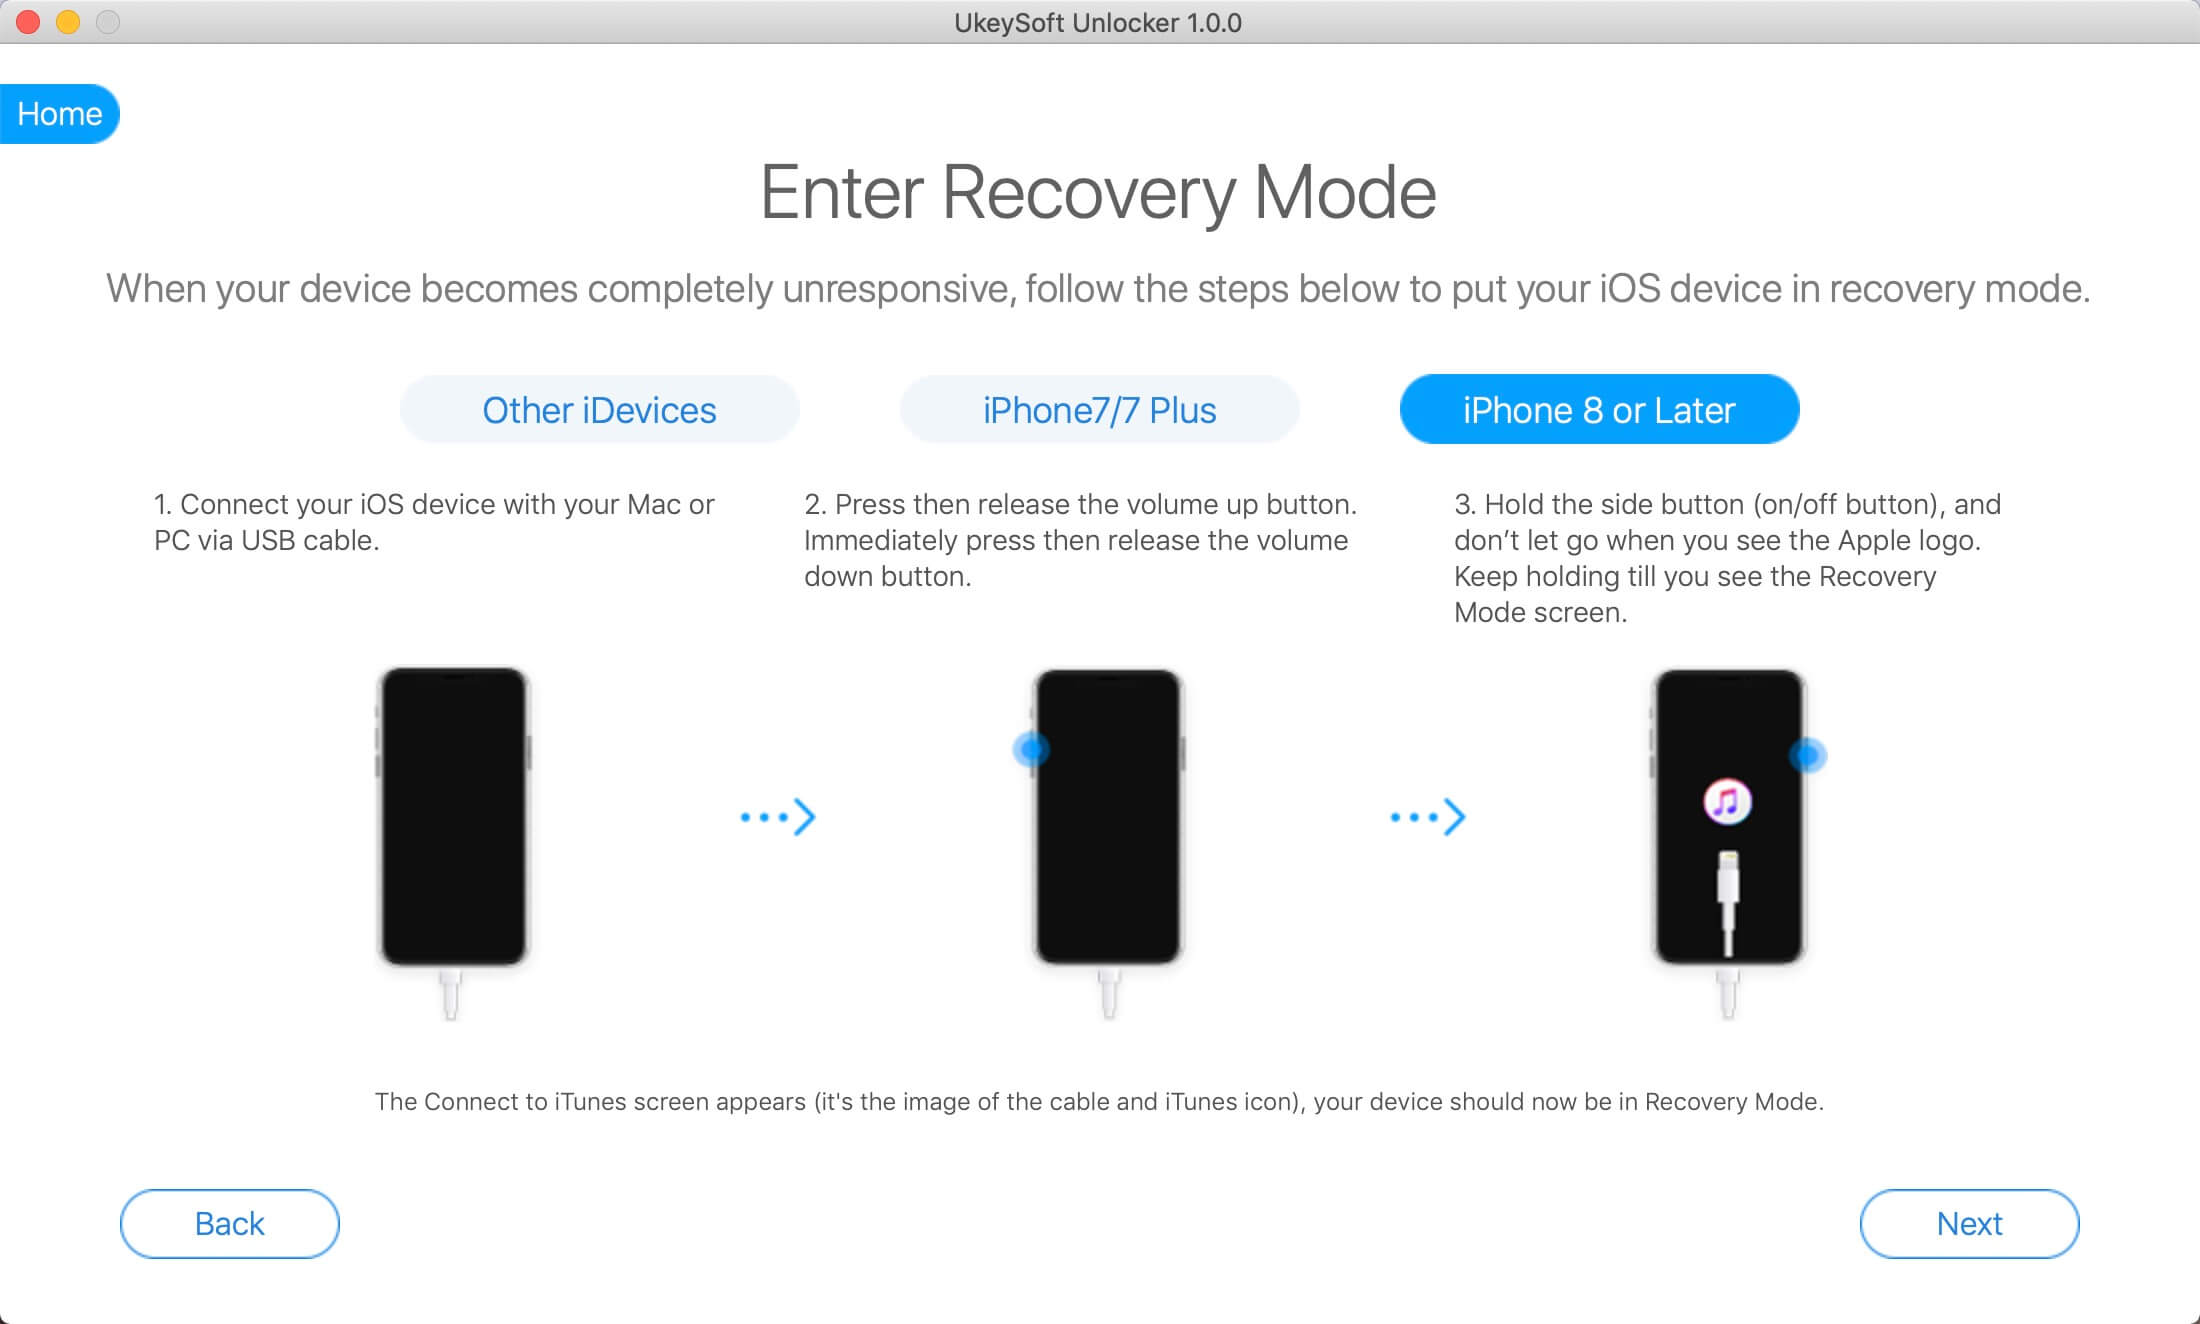
Step 3: Enter Recovery Mode on iPhone
Switch off your phone. After your iPhone is switched off, press and hold the volume down button along with Power button for nearly 10 seconds. After the 10 seconds, you need to release the power button and keep holding the volume down button.
Also read: how to put other iPhone into recovery mode

Enter Recovery Mode on iPhone

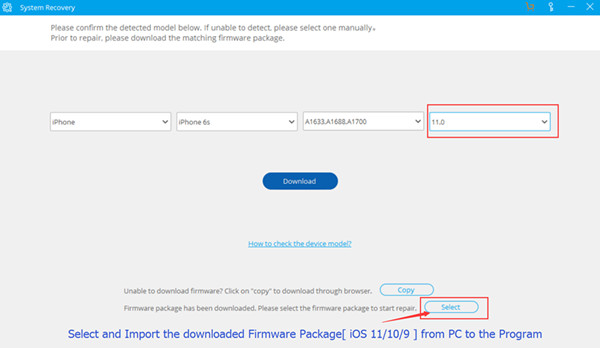
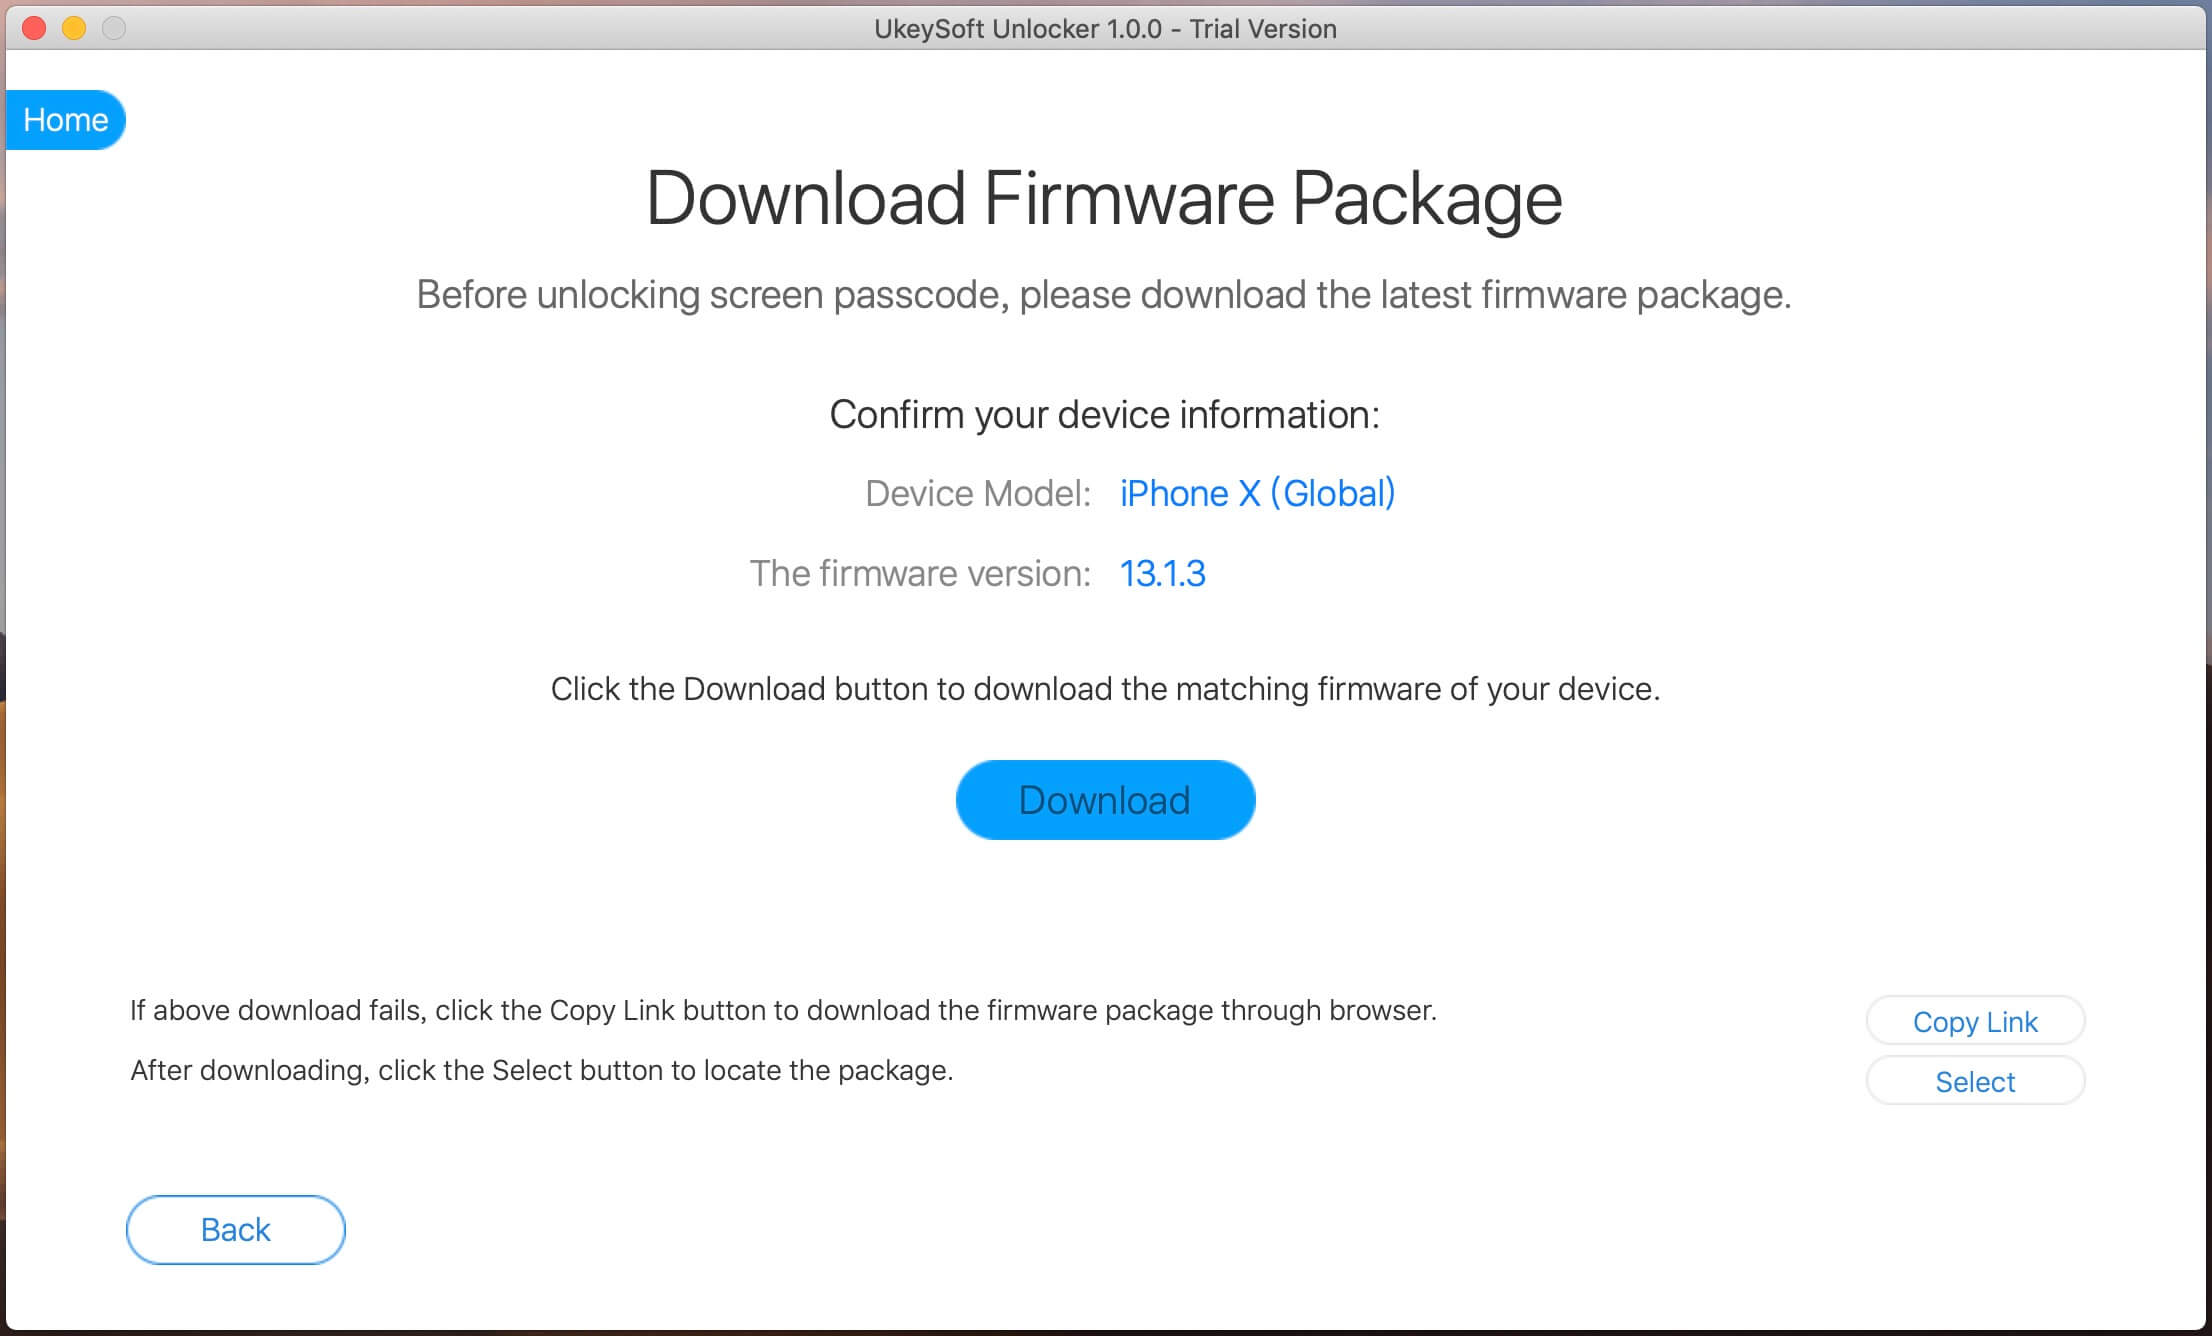
Step 4: Download Firmware Package
The software will show the information for your iPhone. If all the details are correct, click on the “Download” button to download the firmware.

detect iPhone version and download ipsw file

Start downloading firmware package for the iPhone.

download ipsw file for iPhone

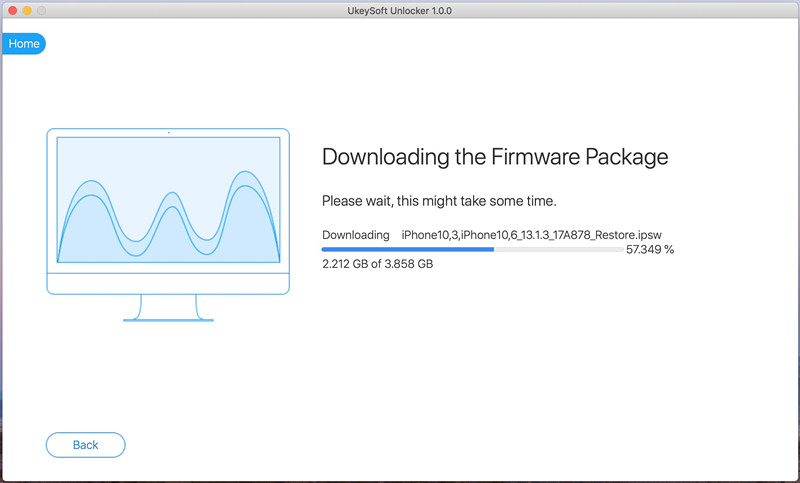
Step 5: Firmware Package Downloaded Completed
Firmware package download complete! Everything goes well, just click “Start” button to go on.

download ipsw file

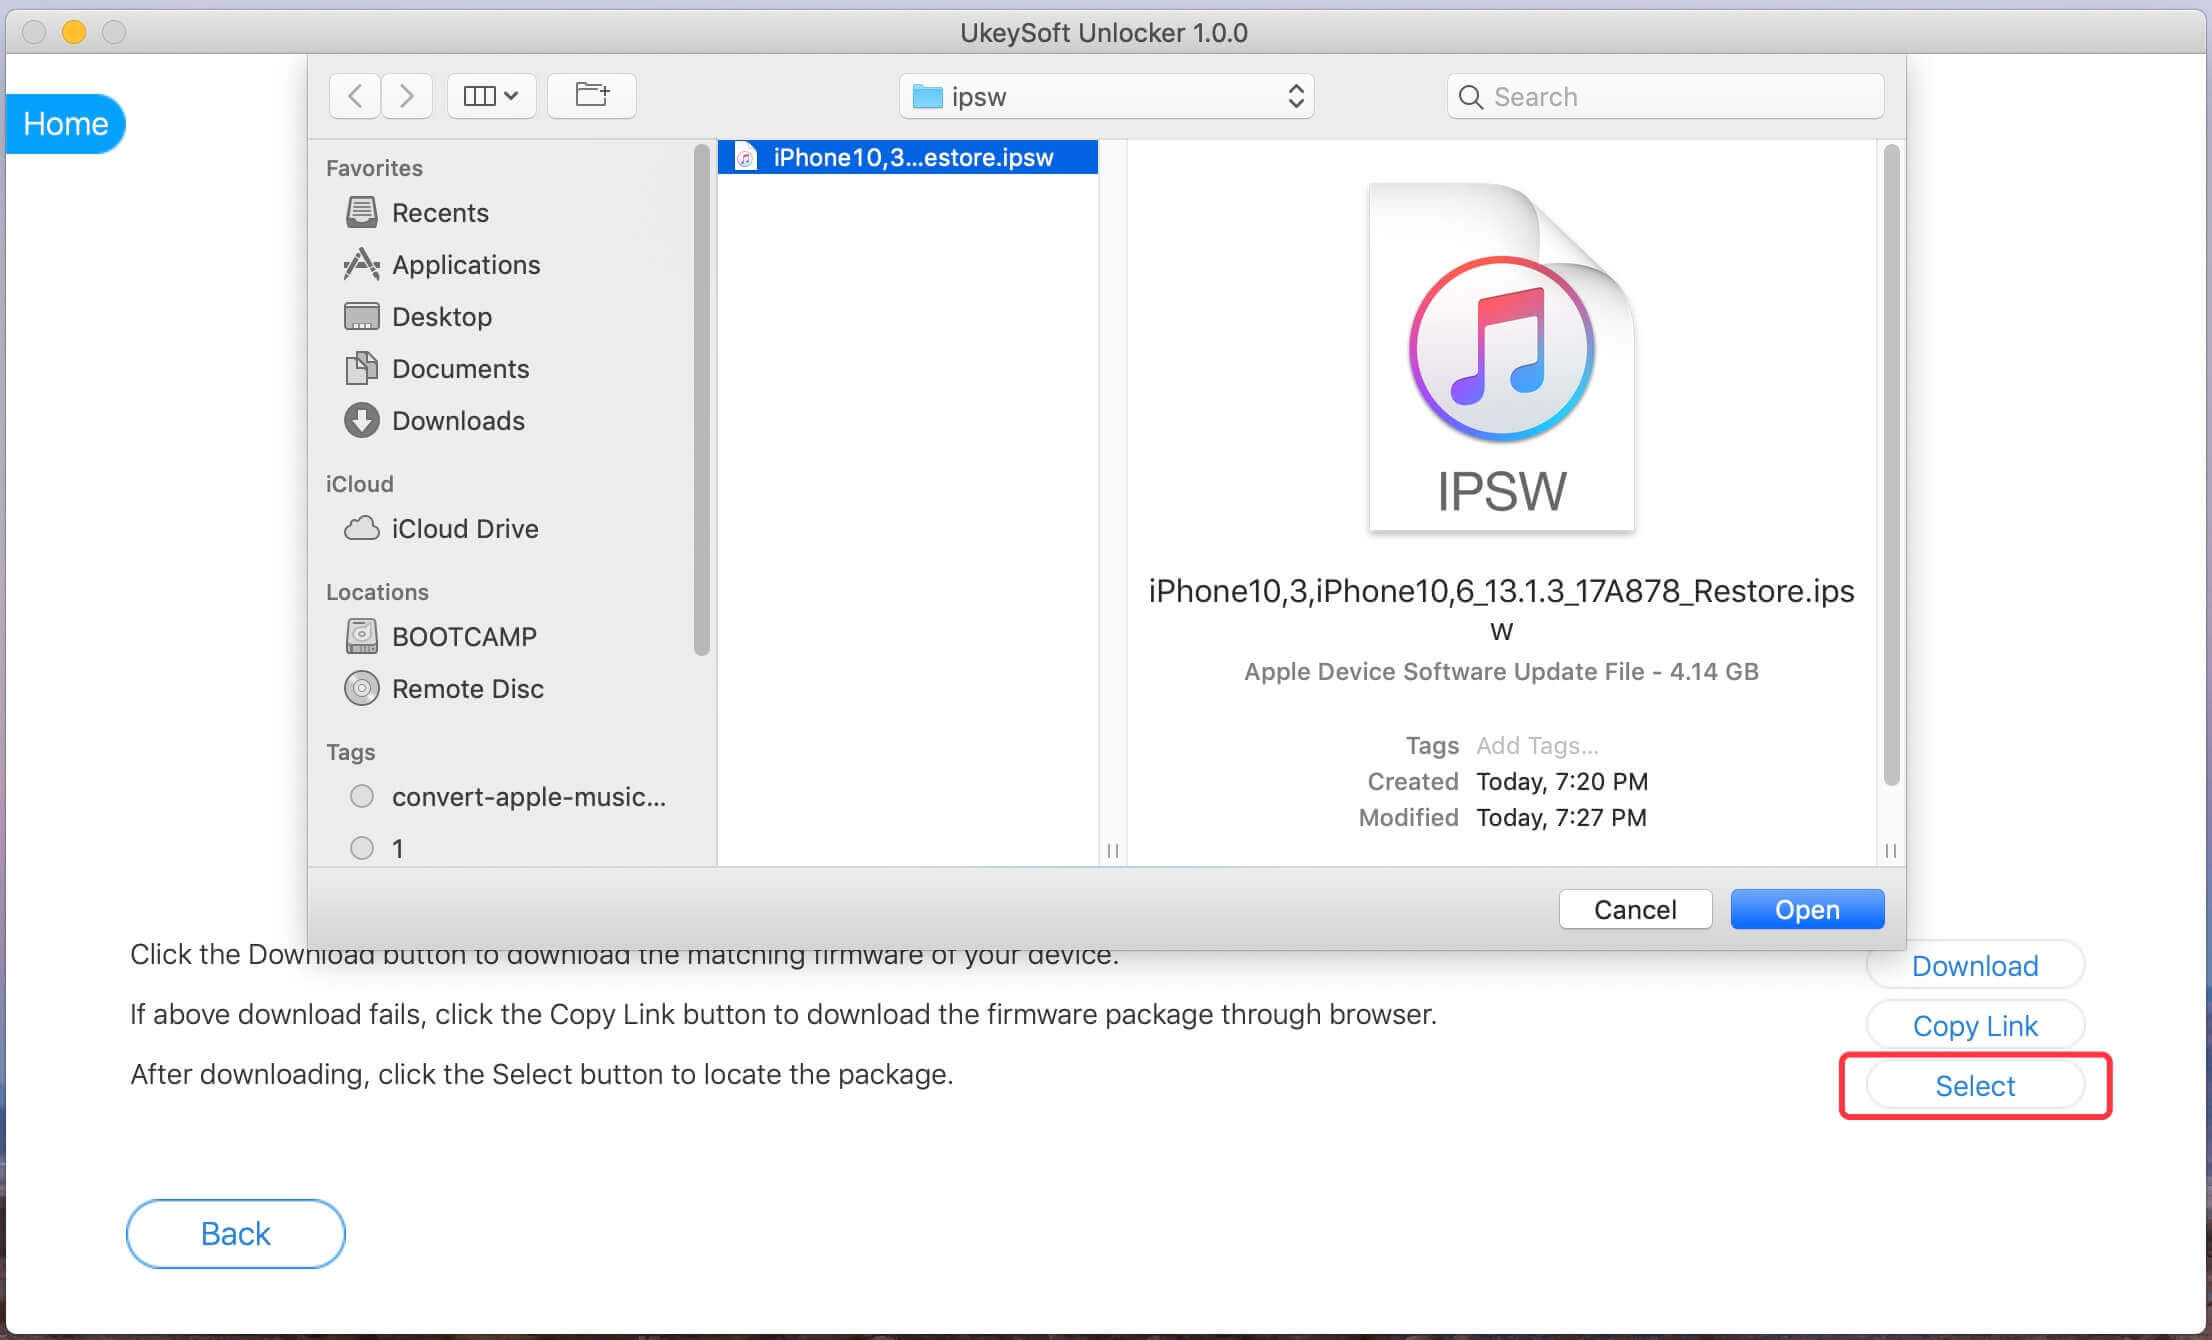
Tips: Or, you can click the “Copy Link” button and paste it into the browser to download the firmware package via the browser. After downloading complete, then click “Select” button to view and import the downloaded iOS Firmware package.

import ipsw file

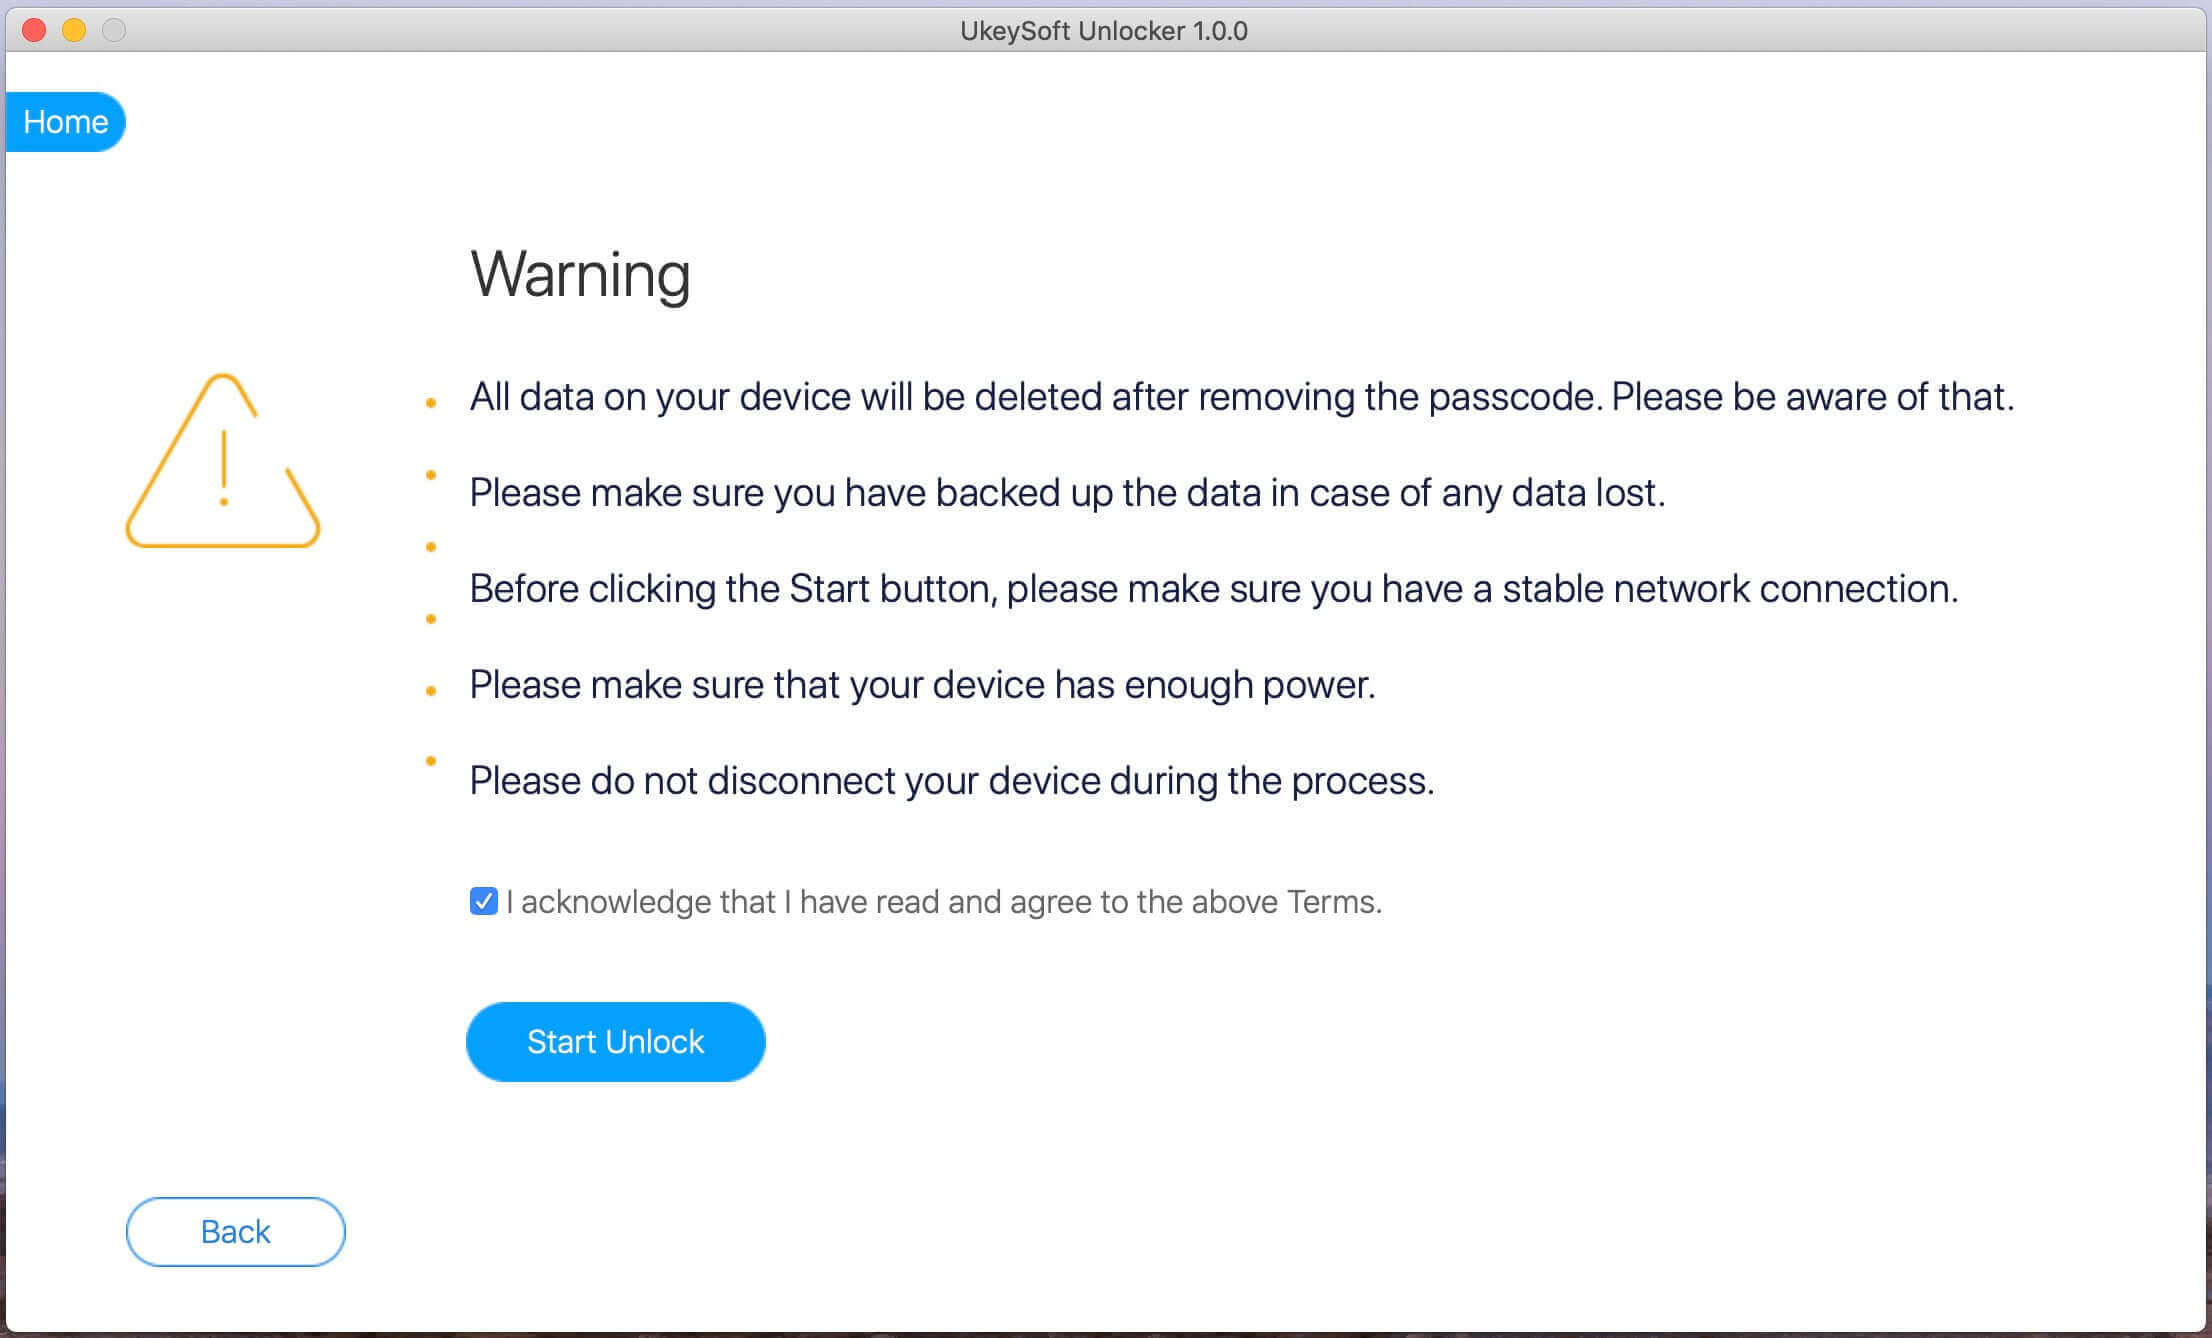
Step 6: Start Install Firmware Package to iPhone
When it finish verifying, click the “Start Unlock” button to begin installing the download IPSW firmware package to your iPhone.

Install Firmware Package to iPhone

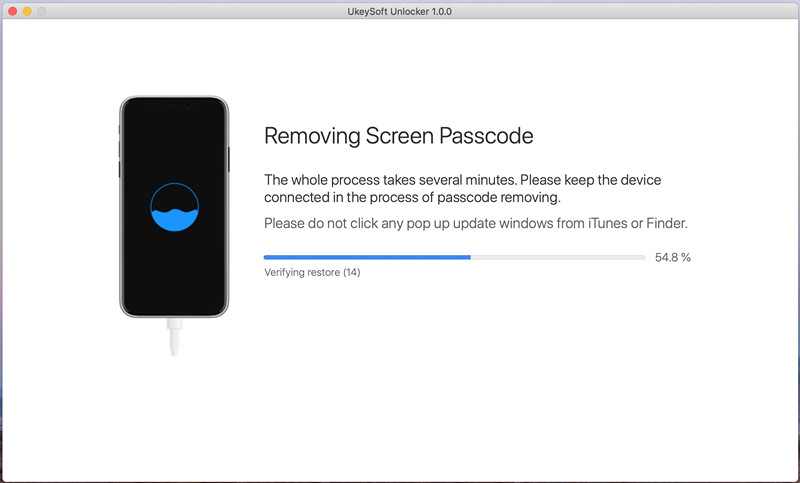
Step 7: Removing Screen Passcode
The software will install the IPSW files to the iPhone and unlock your iPhone.

Removing Screen Passcode

Step 8: iPhone Restarts automatically
When you see below window, the passcode has been erased from your device successfully. The device is unlocked. It will take a few minutes to restart your device. After your iPhone restart, please go ahead to set your iPhone and access it.

unlock iPhone and restart

Also read: How to Reset Locked iPhone without Passcode

Related Article:

How to Upgrade iOS 9 to iOS 10 Beta on iPhone and iPad

How to Download & Install iOS 10 Beta 7 On iPhone

How to Downgrade iPhone from iOS 10 to iOS 9 without Data Loss

How to Recover iPhone Data after Downgrading iOS 10 Beta to iOS 9

How to Recover Lost Data from iPhone after iOS 10 Update

How to Recover Deleted Data from iPhone 7/SE/6S/6

How to Restore iPhone System to Normal after iOS 10 Update

IPSW Files Direct Download Links for iPhone[2019 Updated]

iOS 12.3.1 official version and iOS 13 beta is released, there are a large of iOS users can’t wait to update their device to the new version of iOS system. However, it’s said that,a coin has two sides, there is another part of iOS users consider that iOS 13 is not as useful as they think. So it’s no strange to downgrade iOS 13 to the previous iOS system on device. The following passages is contain several link that allow you to download iOS 13 IPSW files and iOS 13, iOS 11, iOS 10, iOS 9 and iOS 8 firmware file for iPhone, you could select the one match your device and have a try to download.

install ios 13 ipsw file

* How to Download & Install iOS 13 on Your iPhone

* Download and Install iOS 12 on iPhone without Data Loss

* How to Downgrade Your iPhone without Losing Data

* Install IPSW File on iPhone iPad with/without iTunes

Part 1: Download iOS 13 Beta Firmware File for iPhone

iOS 13 is available for iPhone XS Max, iPhone XS, iPhone XR, iPhone X, iPhone 8 Plus, iPhone 8, iPhone 7 Plus, iPhone 7, iPhone 6s Plus, iPhone 6s and iPhone SE. But the iPhone 6/6 Plus and older version doesn’t compatible with iOS 13.

Here, you can download the match iOS 13 beta IPSW for your iPhone, just click the download links below:

iOS 13 (iPhone 6s): Download iOS 13 Beta iPSW File from Google Drive
iOS 13 (iPhone 6s+): Download iOS 13 Beta iPSW File from Google Drive
iOS 13 (iPhone SE): Download iOS 13 Beta iPSW File from Google Drive
iOS 13 (iPhone 7): Download iOS 13 Beta iPSW File from Google Drive
iOS 13 (iPhone 7+): Download iOS 13 Beta iPSW File from Google Drive
iOS 13 (iPhone 8): Download iOS 13 Beta iPSW File from Google Drive
iOS 13 (iPhone 8 Plus): Download iOS 13 Beta iPSW File from Google Drive
iOS 13 (iPhone X): Download iOS 13 Beta iPSW File from Google Drive
iOS 13 (iPhone XS): Download iOS 13 Beta iPSW File from Google Drive
iOS 13 (iPhone XS Max): Download iOS 13 Beta iPSW File from Google Drive
iOS 13 (iPhone XR): Download iOS 13 Beta iPSW File from Google Drive

Part 3:Download iOS 11 Firmware File for iPhone

iOS 11.4 IPSW Downloads for iPhone
iOS 11.4 IPSW Direct Download Links for iPhone X

iOS 11.4 IPSW Direct Download Links for iPhone 8

iOS 11.4 IPSW Direct Download Links for iPhone 8 Plus

iOS 11.4 IPSW Direct Download Links for iPhone 7

iOS 11.4 IPSW Direct Download Links for iPhone 7 Plus

iOS 11.4 IPSW Direct Download Links for iPhone 6s

iOS 11.4 IPSW Direct Download Links for iPhone 6s Plus

iOS 11.4 IPSW Direct Download Links for iPhone 6

iOS 11.4 IPSW Direct Download Links for iPhone 6 Plus

iOS 11.4 IPSW Direct Download Links for iPhone SE

iOS 11.4 IPSW Direct Download Links for iPhone 5s

iOS 11.3 IPSW Downloads for iPhone
iOS 11.3 IPSW Direct Download Links for iPhone X

iOS 11.3 IPSW Direct Download Links for iPhone 8

iOS 11.3 IPSW Direct Download Links for iPhone 8 Plus

iOS 11.3 IPSW Direct Download Links for iPhone 7

iOS 11.3 IPSW Direct Download Links for iPhone 7 Plus

iOS 11.3 IPSW Direct Download Links for iPhone 6s

iOS 11.3 IPSW Direct Download Links for iPhone 6s Plus

iOS 11.3 IPSW Direct Download Links for iPhone 6

iOS 11.3 IPSW Direct Download Links for iPhone 6 Plus

iOS 11.3 IPSW Direct Download Links for iPhone SE

iOS 11.3 IPSW Direct Download Links for iPhone 5s

iOS 11.2 IPSW Downloads for iPhone
iOS 11.2 IPSW Direct Download Links for iPhone X

iOS 11.2 IPSW Direct Download Links for iPhone 8

iOS 11.2 IPSW Direct Download Links for iPhone 8 Plus

iOS 11.2 IPSW Direct Download Links for iPhone 7

iOS 11.2 IPSW Direct Download Links for iPhone 7 Plus

iOS 11.2 IPSW Direct Download Links for iPhone 6s

iOS 11.2 IPSW Direct Download Links for iPhone 6s Plus

iOS 11.2 IPSW Direct Download Links for iPhone 6

iOS 11.2 IPSW Direct Download Links for iPhone 6 Plus

iOS 11.2 IPSW Direct Download Links for iPhone SE

iOS 11.2 IPSW Direct Download Links for iPhone 5s

iOS 11.1 IPSW Downloads for iPhone
iOS 11.1 IPSW Direct Download Links for iPhone X
iOS 11.1 IPSW Direct Download Links for iPhone 8

iOS 11.1 IPSW Direct Download Links for iPhone 8 Plus

iOS 11.1 IPSW Direct Download Links for iPhone 7

iOS 11.1 IPSW Direct Download Links for iPhone 7 Plus

iOS 11.1 IPSW Direct Download Links for iPhone 6s

iOS 11.1 IPSW Direct Download Links for iPhone 6s Plus

iOS 11.1 IPSW Direct Download Links for iPhone 6

iOS 11.1 IPSW Direct Download Links for iPhone 6 Plus

iOS 11.1 IPSW Direct Download Links for iPhone SE

iOS 11.1 IPSW Direct Download Links for iPhone 5s

iOS 11.0 IPSW Downloads for iPhone
iOS 11 (iPhone 5s GSM): iPhone_4.0_64bit_11.0_15A372_Restore.ipsw
iOS 11 (iPhone 5s GSM+CDMA): iPhone_4.0_64bit_11.0_15A372_Restore.ipsw
iOS 11 (iPhone 6 Plus): iPhone_5.5_11.0_15A372_Restore.ipsw
iOS 11 (iPhone 6): iPhone_4.7_11.0_15A372_Restore.ipsw
iOS 11 (iPhone 6s): iPhone_4.7_11.0_15A372_Restore.ipsw
iOS 11 (iPhone 6s+): iPhone_5.5_11.0_15A372_Restore.ipsw
iOS 11 (iPhone SE): iPhone_4.0_64bit_11.0_15A372_Restore.ipsw
iOS 11 (iPhone 7 GSM+CDMA): iPhone_7_11.0_15A372_Restore.ipsw
iOS 11 (iPhone 7+ GSM+CDMA): iPhone_7Plus_11.0_15A372_Restore.ipsw
iOS 11 (iPhone 7 GSM): iPhone_7_11.0_15A372_Restore.ipsw
iOS 11 (iPhone 7+ GSM): iPhone_7Plus_11.0_15A372_Restore.ipsw
iOS 11: iPhone10,4_11.0_15A372_Restore.ipsw
iOS 11: iPhone10,5_11.0_15A372_Restore.ipsw
iOS 11: iPhone10,4_11.0_15A372_Restore.ipsw
iOS 11: iPhone10,5_11.0_15A372_Restore.ipsw

Part 4:Download iOS 10 Firmware File for iPhone

iOS 10.1 (iPhone 5 GSM): iPhone_4.0_32bit_10.1_14B72_Restore.ipsw
iOS 10.1 (iPhone 5 GSM+CDMA): iPhone_4.0_32bit_10.1_14B72_Restore.ipsw
iOS 10.1 (iPhone 5s GSM): iPhone_4.0_64bit_10.1_14B72_Restore.ipsw
iOS 10.1 (iPhone 5s GSM+CDMA): iPhone_4.0_64bit_10.1_14B72_Restore.ipsw
iOS 10.1 (iPhone 5c GSM): iPhone_4.0_32bit_10.1_14B72_Restore.ipsw
iOS 10.1 (iPhone 5c GSM+CDMA): iPhone_4.0_32bit_10.1_14B72_Restore.ipsw
iOS 10.1 (iPhone 6 Plus): iPhone_5.5_10.1_14B72_Restore.ipsw
iOS 10.1 (iPhone 6): iPhone_4.7_10.1_14B72_Restore.ipsw
iOS 10.1 (iPhone 6s): iPhone_4.7_10.1_14B72_Restore.ipsw
iOS 10.1 (iPhone 6s Plus): iPhone_5.5_10.1_14B72_Restore.ipsw
iOS 10.1 (iPhone SE): iPhoneSE_10.1_14B72_Restore.ipsw
iOS 10.1 (iPhone 7): iPhone_7_10.1_14B72c_Restore.ipsw
iOS 10.1 (iPhone 7 Plus): iPhone_7Plus_10.1_14B72c_Restore.ipsw

iOS 10.0.1 (iPhone 5 GSM): iPhone_4.0_32bit_10.0.1_14A403_Restore.ipsw
iOS 10.0.1 (iPhone 5 GSM+CDMA): iPhone_4.0_32bit_10.0.1_14A403_Restore.ipsw
iOS 10.0.1 (iPhone 5s GSM): iPhone_4.0_64bit_10.0.1_14A403_Restore.ipsw
iOS 10.0.1 (iPhone 5s GSM+CDMA):iPhone_4.0_64bit_10.0.1_14A403_Restore.ipsw
iOS 10.0.1 (iPhone 5c GSM): iPhone_4.0_32bit_10.0.1_14A403_Restore.ipsw
iOS 10.0.1 (iPhone 5c GSM+CDMA):iPhone_4.0_32bit_10.0.1_14A403_Restore.ipsw
iOS 10.0.1 (iPhone 6 Plus): iPhone_5.5_10.0.1_14A403_Restore.ipsw
iOS 10.0.1 (iPhone 6): iPhone_4.7_10.0.1_14A403_Restore.ipsw
iOS 10.0.1 (iPhone 6s): iPhone_4.7_10.0.1_14A403_Restore.ipsw
iOS 10.0.1 (iPhone 6s+): iPhone_5.5_10.0.1_14A403_Restore.ipsw
iOS 10.0.1 (iPhone SE): iPhoneSE_10.0.1_14A403_Restore.ipsw
iOS 10.0.1 (iPhone 7): iPhone9,1_10.0.1_14A403_Restore.ipsw
iOS 10.0.1 (iPhone 7 Plus): iPhone9,2_10.0.1_14A403_Restore.ipsw
iOS 10.0.2 (iPhone 5 GSM): iPhone_4.0_32bit_10.0.2_14A456_Restore.ipsw
iOS 10.0.2 (iPhone 5 GSM+CDMA): iPhone_4.0_32bit_10.0.2_14A456_Restore.ipsw
iOS 10.0.2 (iPhone 5s GSM): iPhone_4.0_64bit_10.0.2_14A456_Restore.ipsw
iOS 10.0.2 (iPhone 5s GSM+CDMA):iPhone_4.0_64bit_10.0.2_14A456_Restore.ipsw
iOS 10.0.2 (iPhone 5c GSM): iPhone_4.0_32bit_10.0.2_14A456_Restore.ipsw
iOS 10.0.2 (iPhone 5c GSM+CDMA):iPhone_4.0_32bit_10.0.2_14A456_Restore.ipsw
iOS 10.0.2 (iPhone 6 Plus): iPhone_5.5_10.0.2_14A456_Restore.ipsw
iOS 10.0.2 (iPhone 6): iPhone_4.7_10.0.2_14A456_Restore.ipsw
iOS 10.0.2 (iPhone 6s): iPhone_4.7_10.0.2_14A456_Restore.ipsw
iOS 10.0.2 (iPhone 6s Plus): iPhone_5.5_10.0.2_14A456_Restore.ipsw
iOS 10.0.2 (iPhone SE): iPhoneSE_10.0.2_14A456_Restore.ipsw
iOS 10.0.2 (iPhone 7): iPhone9,3_10.0.2_14A456_Restore.ipsw
iOS 10.0.2 (iPhone 7+): iPhone9,4_10.0.2_14A456_Restore.ipsw
iOS 10.0.3 (iPhone 7): iPhone9,1_10.0.3_14A551_Restore.ipsw
iOS 10.0.3 (iPhone 7 Plus): iPhone9,2_10.0.3_14A551_Restore.ipsw

iOS 10.1 (iPhone 5 GSM): iPhone_4.0_32bit_10.1_14B72_Restore.ipsw
iOS 10.1 (iPhone 5 GSM+CDMA): iPhone_4.0_32bit_10.1_14B72_Restore.ipsw
iOS 10.1 (iPhone 5s GSM): iPhone_4.0_64bit_10.1_14B72_Restore.ipsw
iOS 10.1 (iPhone 5s GSM+CDMA): iPhone_4.0_64bit_10.1_14B72_Restore.ipsw
iOS 10.1 (iPhone 5c GSM): iPhone_4.0_32bit_10.1_14B72_Restore.ipsw
iOS 10.1 (iPhone 5c GSM+CDMA): iPhone_4.0_32bit_10.1_14B72_Restore.ipsw
iOS 10.1 (iPhone 6 Plus): iPhone_5.5_10.1_14B72_Restore.ipsw
iOS 10.1 (iPhone 6): iPhone_4.7_10.1_14B72_Restore.ipsw
iOS 10.1 (iPhone 6s): iPhone_4.7_10.1_14B72_Restore.ipsw
iOS 10.1 (iPhone 6s Plus): iPhone_5.5_10.1_14B72_Restore.ipsw
iOS 10.1 (iPhone SE): iPhoneSE_10.1_14B72_Restore.ipsw
iOS 10.1 (iPhone 7): iPhone_7_10.1_14B72c_Restore.ipsw
iOS 10.1 (iPhone 7 Plus): iPhone_7Plus_10.1_14B72c_Restore.ipsw
iOS 10.1.1 (iPhone 5 GSM): iPhone_4.0_32bit_10.1.1_14B150_Restore.ipsw
iOS 10.1.1 (iPhone 5 GSM+CDMA):iPhone_4.0_32bit_10.1.1_14B150_Restore.ipsw
iOS 10.1.1 (iPhone 5s GSM): iPhone_4.0_64bit_10.1.1_14B150_Restore.ipsw
iOS 10.1.1 (iPhone 5s GSM+CDMA):iPhone_4.0_64bit_10.1.1_14B150_Restore.ipsw
iOS 10.1.1 (iPhone 5c GSM): iPhone_4.0_32bit_10.1.1_14B150_Restore.ipsw
iOS 10.1.1 (iPhone 5c GSM+CDMA):iPhone_4.0_32bit_10.1.1_14B150_Restore.ipsw
iOS 10.1.1 (iPhone 6 Plus): iPhone_5.5_10.1.1_14B150_Restore.ipsw
iOS 10.1.1 (iPhone 6): iPhone_4.7_10.1.1_14B150_Restore.ipsw
iOS 10.1.1 (iPhone 6s): iPhone_4.7_10.1.1_14B150_Restore.ipsw
iOS 10.1.1 (iPhone 6s Plus): iPhone_5.5_10.1.1_14B150_Restore.ipsw
iOS 10.1.1 (iPhone SE): iPhoneSE_10.1.1_14B150_Restore.ipsw
iOS 10.1.1 (iPhone 7): iPhone_7_10.1.1_14B150_Restore.ipsw
iOS 10.1.1 (iPhone 7 Plus): iPhone_7Plus_10.1.1_14B150_Restore.ipsw

iOS 10.2 (iPhone 5 GSM): iPhone_4.0_32bit_10.2_14C92_Restore.ipsw
iOS 10.2 (iPhone 5 GSM+CDMA): iPhone_4.0_32bit_10.2_14C92_Restore.ipsw
iOS 10.2 (iPhone 5s GSM): iPhone_4.0_64bit_10.2_14C92_Restore.ipsw
iOS 10.2 (iPhone 5s GSM+CDMA): iPhone_4.0_64bit_10.2_14C92_Restore.ipsw
iOS 10.2 (iPhone 5c GSM): iPhone_4.0_32bit_10.2_14C92_Restore.ipsw
iOS 10.2 (iPhone 5c GSM+CDMA): iPhone_4.0_32bit_10.2_14C92_Restore.ipsw
iOS 10.2 (iPhone 6 Plus): iPhone_5.5_10.2_14C92_Restore.ipsw
iOS 10.2 (iPhone 6): iPhone_4.7_10.2_14C92_Restore.ipsw
iOS 10.2 (iPhone 6s): iPhone_4.7_10.2_14C92_Restore.ipsw
iOS 10.2 (iPhone 6s Plus): iPhone_5.5_10.2_14C92_Restore.ipsw
iOS 10.2 (iPhone SE): iPhoneSE_10.2_14C92_Restore.ipsw
iOS 10.2 (iPhone 7): iPhone_7_10.2_14C92_Restore.ipsw
iOS 10.2 (iPhone 7 Plus): iPhone_7Plus_10.2_14C92_Restore.ipsw
iOS 10.2.1 (iPhone 5 GSM): iPhone_4.0_32bit_10.2.1_14D27_Restore.ipsw
iOS 10.2.1 (iPhone 5 GSM+CDMA): iPhone_4.0_32bit_10.2.1_14D27_Restore.ipsw
iOS 10.2.1 (iPhone 5s GSM): iPhone_4.0_64bit_10.2.1_14D27_Restore.ipsw
iOS 10.2.1 (iPhone 5s GSM+CDMA):iPhone_4.0_64bit_10.2.1_14D27_Restore.ipsw
iOS 10.2.1 (iPhone 5c GSM): iPhone_4.0_32bit_10.2.1_14D27_Restore.ipsw
iOS 10.2.1 (iPhone 5c GSM+CDMA):iPhone_4.0_32bit_10.2.1_14D27_Restore.ipsw
iOS 10.2.1 (iPhone 6 Pls): iPhone_5.5_10.2.1_14D27_Restore.ipsw
iOS 10.2.1 (iPhone 6): iPhone_4.7_10.2.1_14D27_Restore.ipsw
iOS 10.2.1 (iPhone 6s): iPhone_4.7_10.2.1_14D27_Restore.ipsw
iOS 10.2.1 (iPhone 6s Plus): iPhone_5.5_10.2.1_14D27_Restore.ipsw
iOS iOS 10.2.1 (iPhone SE): iPhoneSE_10.2.1_14D27_Restore.ipsw
iOS 10.2.1 (iPhone 7): iPhone_7_10.2.1_14D27_Restore.ipsw
iOS 10.2.1 (7+): iPhone_7Plus_10.2.1_14D27_Restore.ipsw

iOS 10.3 (iPhone 5 GSM): iPhone_4.0_32bit_10.3_14E277_Restore.ipsw
iOS 10.3 (iPhone 5 GSM+CDMA): iPhone_4.0_32bit_10.3_14E277_Restore.ipsw
iOS 10.3 (iPhone 5s GSM): iPhone_4.0_64bit_10.3_14E277_Restore.ipsw
iOS 10.3 (iPhone 5s GSM+CDMA): iPhone_4.0_64bit_10.3_14E277_Restore.ipsw
iOS 10.3 (iPhone 5c GSM): iPhone_4.0_32bit_10.3_14E277_Restore.ipsw
iOS 10.3 (iPhone 5c GSM+CDMA): iPhone_4.0_32bit_10.3_14E277_Restore.ipsw
iOS 10.3 (iPhone 6 Plus): iPhone_5.5_10.3_14E277_Restore.ipsw
iOS 10.3 (iPhone 6): iPhone_4.7_10.3_14E277_Restore.ipsw
iOS 10.3 (iPhone 6s): iPhone_4.7_10.3_14E277_Restore.ipsw
iOS 10.3 (iPhone 6s Plus): iPhone_5.5_10.3_14E277_Restore.ipsw
iOS 10.3 (iPhone SE): iPhone_4.0_64bit_10.3_14E277_Restore.ipsw
iOS 10.3 (iPhone 7): iPhone_7_10.3_14E277_Restore.ipsw
iOS 10.3 (iPhone 7 Plus): iPhone_7Plus_10.3_14E277_Restore.ipsw
iOS 10.3.1 (iPhone 5 GSM): iPhone_4.0_32bit_10.3.1_14E304_Restore.ipsw
iOS 10.3.1 (iPhone 5 GSM+CDMA):iPhone_4.0_32bit_10.3.1_14E304_Restore.ipsw
iOS 10.3.1 (iPhone 5s GSM): iPhone_4.0_64bit_10.3.1_14E304_Restore.ipsw
iOS 10.3.1 (iPhone 5s GSM+CDMA):iPhone_4.0_64bit_10.3.1_14E304_Restore.ipsw
iOS 10.3.1 (iPhone 5c GSM): iPhone_4.0_32bit_10.3.1_14E304_Restore.ipsw
iOS 10.3.1 (iPhone 5c GSM+CDMA):iPhone_4.0_32bit_10.3.1_14E304_Restore.ipsw
iOS 10.3.1 (iPhone 6 Plus): iPhone_5.5_10.3.1_14E304_Restore.ipsw
iOS 10.3.1 (iPhone 6): iPhone_4.7_10.3.1_14E304_Restore.ipsw
iOS 10.3.1 (iPhone 6s): iPhone_4.7_10.3.1_14E304_Restore.ipsw
iOS 10.3.1 (iPhone 6s Plus): iPhone_5.5_10.3.1_14E304_Restore.ipsw
iOS 10.3.1 (iPhone SE): iPhone_4.0_64bit_10.3.1_14E304_Restore.ipsw
iOS 10.3.1 (iPhone 7): iPhone_7_10.3.1_14E304_Restore.ipsw
iOS 10.3.1 (iPhone 7 Plus): iPhone_7Plus_10.3.1_14E304_Restore.ipsw
iOS 10.3.2 (iPhone 5 GSM): iPhone_4.0_32bit_10.3.2_14F89_Restore.ipsw
iOS 10.3.2 (iPhone 5 GSM+CDMA): iPhone_4.0_32bit_10.3.2_14F89_Restore.ipsw
iOS 10.3.2 (iPhone 5s GSM): iPhone_4.0_64bit_10.3.2_14F89_Restore.ipsw
iOS 10.3.2 (iPhone 5s GSM+CDMA): iPhone_4.0_64bit_10.3.2_14F89_Restore.ipsw
iOS 10.3.2 (iPhone 5c GSM): iPhone_4.0_32bit_10.3.2_14F89_Restore.ipsw
iOS 10.3.2 (iPhone 5c GSM+CDMA): iPhone_4.0_32bit_10.3.2_14F89_Restore.ipsw
iOS 10.3.2 (iPhone 6+): iPhone_5.5_10.3.2_14F89_Restore.ipsw
iOS 10.3.2 (iPhone 6): iPhone_4.7_10.3.2_14F89_Restore.ipsw
iOS 10.3.2 (iPhone 6s): iPhone_4.7_10.3.2_14F89_Restore.ipsw
iOS 10.3.2 (iPhone 6s Plus): iPhone_5.5_10.3.2_14F89_Restore.ipsw
iOS 10.3.2 (iPhone SE): iPhone_4.0_64bit_10.3.2_14F89_Restore.ipsw
iOS 10.3.2 (iPhone 7): iPhone_7_10.3.2_14F89_Restore.ipsw
iOS 10.3.2 (iPhone 7 Plus): iPhone_7Plus_10.3.2_14F89_Restore.ipsw
iOS 10.3.3 (iPhone 5 GSM): iPhone_4.0_32bit_10.3.3_14G60_Restore.ipsw
iOS 10.3.3 (iPhone 5 GSM+CDMA): iPhone_4.0_32bit_10.3.3_14G60_Restore.ipsw
iOS 10.3.3 (iPhone 5s GSM): iPhone_4.0_64bit_10.3.3_14G60_Restore.ipsw
iOS 10.3.3 (iPhone 5s GSM+CDMA):iPhone_4.0_64bit_10.3.3_14G60_Restore.ipsw
iOS 10.3.3 (iPhone 5c GSM): iPhone_4.0_32bit_10.3.3_14G60_Restore.ipsw
iOS 10.3.3 (iPhone 5c GSM+CDMA):iPhone_4.0_32bit_10.3.3_14G60_Restore.ipsw
iOS 10.3.3 (iPhone 6+): iPhone_5.5_10.3.3_14G60_Restore.ipsw
iOS 10.3.3 (iPhone 6): iPhone_4.7_10.3.3_14G60_Restore.ipsw
iOS 10.3.3 (iPhone 6s): iPhone_4.7_10.3.3_14G60_Restore.ipsw
iOS 10.3.3 (iPhone 6s Plus): iPhone_5.5_10.3.3_14G60_Restore.ipsw
iOS 10.3.3 (iPhone SE): iPhone_4.0_64bit_10.3.3_14G60_Restore.ipsw
iOS 10.3.3 (iPhone 7 GSM+CDMA): iPhone_7_10.3.3_14G60_Restore.ipsw
iOS 10.3.3 (iPhone 7+ GSM+CDMA): iPhone_7Plus_10.3.3_14G60_Restore.ipsw

Part 5:Download iOS 9 Firmware File for iPhone

iOS 9.0 (iPhone 4S): iPhone4,1_9.0_13A344_Restore.ipsw
iOS 9.0 (iPhone 5 GSM): iPhone5,1_9.0_13A344_Restore.ipsw
iOS 9.0 (iPhone 5 GSM+CDMA): iPhone5,2_9.0_13A344_Restore.ipsw
iOS 9.0 (iPhone 5c GSM): iPhone5,3_9.0_13A344_Restore.ipsw
iOS 9.0 (iPhone 5c GSM+CDMA): iPhone5,4_9.0_13A344_Restore.ipsw
iOS 9.0 (iPhone 5s GSM): iPhone6,1_9.0_13A344_Restore.ipsw
iOS 9.0 (iPhone 5s GSM+CDMA): iPhone6,2_9.0_13A344_Restore.ipsw
iOS 9.0 (iPhone 6 Plus): iPhone7,1_9.0_13A344_Restore.ipsw
iOS 9.0 (iPhone 6): iPhone7,2_9.0_13A344_Restore.ipsw
iOS 9.0 (iPhone 6s): iPhone8,1_9.0_13A342_Restore.ipsw
iOS 9.0 (iPhone 6s Plus): iPhone8,2_9.0_13A343_Restore.ipsw
iOS 9.0.1 (iPhone 4S): iPhone4,1_9.0.1_13A404_Restore.ipsw
iOS 9.0.1 (iPhone 5 GSM): iPhone5,1_9.0.1_13A404_Restore.ipsw
iOS 9.0.1 (iPhone 5 GSM+CDMA): iPhone5,2_9.0.1_13A404_Restore.ipsw
iOS 9.0.1 (iPhone 5c GSM): iPhone5,3_9.0.1_13A404_Restore.ipsw
iOS 9.0.1 (iPhone 5c GSM+CDMA): iPhone5,4_9.0.1_13A404_Restore.ipsw
iOS 9.0.1 (iPhone 5s GSM): iPhone6,1_9.0.1_13A404_Restore.ipsw
iOS 9.0.1 (iPhone 5s GSM+CDMA): iPhone6,2_9.0.1_13A404_Restore.ipsw
iOS 9.0.1 (iPhone 6+): iPhone7,1_9.0.1_13A404_Restore.ipsw
iOS 9.0.1 (iPhone 6): iPhone7,2_9.0.1_13A404_Restore.ipsw
iOS 9.0.1 (iPhone 6s): iPhone8,1_9.0_13A342_Restore.ipsw
iOS 9.0.1 (iPhone 6s Plus): iPhone8,2_9.0.1_13A405_Restore.ipsw
iOS 9.0.2 (iPhone 4S): iPhone4,1_9.0.2_13A452_Restore.ipsw
iOS 9.0.2 (iPhone 5 GSM): iPhone5,1_9.0.2_13A452_Restore.ipsw
iOS 9.0.2 (iPhone 5 GSM+CDMA): iPhone5,2_9.0.2_13A452_Restore.ipsw
iOS 9.0.2 (5s GSM): iPhone6,1_9.0.2_13A452_Restore.ipsw
iOS 9.0.2 (iPhone 5s GSM+CDMA): iPhone6,2_9.0.2_13A452_Restore.ipsw
iOS 9.0.2 (5c GSM): iPhone5,3_9.0.2_13A452_Restore.ipsw
iOS 9.0.2 (iPhone 5c GSM+CDMA): iPhone5,4_9.0.2_13A452_Restore.ipsw
iOS 9.0.2 (iPhone 6 Plus): iPhone7,1_9.0.2_13A452_Restore.ipsw
iOS 9.0.2 (iPhone 6): iPhone7,2_9.0.2_13A452_Restore.ipsw
iOS 9.0.2 (iPhone 6s): iPhone8,1_9.0.2_13A452_Restore.ipsw
iOS 9.0.2 (iPhone 6s Plus): iPhone8,2_9.0.2_13A452_Restore.ipsw

iOS 9.1.0 (iPhone 4S): iPhone4,1_9.1_13B143_Restore.ipsw
iOS 9.1.0 (iPhone 5 GSM): iPhone5,1_9.1_13B143_Restore.ipsw
iOS 9.1.0 (iPhone 5 GSM+CDMA): iPhone5,2_9.1_13B143_Restore.ipsw
iOS 9.1.0 (iPhone 5s GSM): iPhone6,1_9.1_13B143_Restore.ipsw
iOS 9.1.0 (iPhone 5s GSM+CDMA): iPhone6,2_9.1_13B143_Restore.ipsw
iOS 9.1.0 (iPhone 5c GSM): iPhone5,3_9.1_13B143_Restore.ipsw
iOS 9.1.0 (iPhone 5c GSM+CDMA): iPhone5,4_9.1_13B143_Restore.ipsw
iOS 9.1.0 (iPhone 6 Plus): iPhone7,1_9.1_13B143_Restore.ipsw
iOS 9.1.0 (iPhone 6): iPhone7,2_9.1_13B143_Restore.ipsw
iOS 9.1.0 (iPhone 6s): iPhone8,1_9.1_13B143_Restore.ipsw
iOS 9.1.0 (iPhone 6s Plus): iPhone8,2_9.1_13B143_Restore.ipsw

iOS 9.2 (iPhone 4S): iPhone4,1_9.2_13C75_Restore.ipsw
iOS 9.2 (iPhone 5 GSM): iPhone5,1_9.2_13C75_Restore.ipsw
iOS 9.2 (iPhone 5 GSM+CDMA): iPhone5,2_9.2_13C75_Restore.ipsw
iOS 9.2 (iPhone 5s GSM): iPhone6,1_9.2_13C75_Restore.ipsw
iOS 9.2 (iPhone 5s GSM+CDMA): iPhone6,2_9.2_13C75_Restore.ipsw
iOS 9.2 (iPhone 5c GSM): iPhone5,3_9.2_13C75_Restore.ipsw
iOS 9.2 (iPhone 5c GSM+CDMA): iPhone5,4_9.2_13C75_Restore.ipsw
iOS 9.2 (iPhone 6 Plus): iPhone7,1_9.2_13C75_Restore.ipsw
iOS 9.2 (iPhone 6): iPhone7,2_9.2_13C75_Restore.ipsw
iOS 9.2 (iPhone 6s): iPhone8,1_9.2_13C75_Restore.ipsw
iOS 9.2 (iPhone 6s Plus): iPhone8,2_9.2_13C75_Restore.ipsw
iOS 9.2.1 (iPhone 4S): iPhone4,1_9.2.1_13D15_Restore.ipsw
iOS 9.2.1 (iPhone 5 GSM): iPhone5,1_9.2.1_13D15_Restore.ipsw
iOS 9.2.1 (iPhone 5 GSM+CDMA): iPhone5,2_9.2.1_13D15_Restore.ipsw
iOS 9.2.1 (iPhone 5s GSM): iPhone6,1_9.2.1_13D15_Restore.ipsw
iOS 9.2.1 (iPhone 5s GSM+CDMA): iPhone6,2_9.2.1_13D15_Restore.ipsw
iOS 9.2.1 (iPhone 5c GSM): iPhone5,3_9.2.1_13D15_Restore.ipsw
iOS 9.2.1 (iPhone 5c GSM+CDMA): iPhone5,4_9.2.1_13D15_Restore.ipsw
iOS 9.2.1 Build 13D20 (iPhone 6 Plus): iPhone7,1_9.2.1_13D20_Restore.ipsw
iOS 9.2.1 Build 13D20 (iPhone 6): iPhone7,2_9.2.1_13D20_Restore.ipsw
iOS 9.2.1 Build 13D20 (iPhone 6s): iPhone8,1_9.2.1_13D20_Restore.ipsw
iOS 9.2.1 Build 13D20 (iPhone 6s Plus): iPhone8,2_9.2.1_13D20_Restore.ipsw

iOS 9.3 13E237 (iPhone 4S): iPhone4,1_9.3_13E237_Restore.ipsw
iOS 9.3 13E237 (iPhone 5 GSM): iPhone5,1_9.3_13E237_Restore.ipsw
iOS 9.3 13E237 (iPhone 5 GSM+CDMA): iPhone5,2_9.3_13E237_Restore.ipsw
iOS 9.3 13E237 (iPhone 5s GSM): iPhone6,1_9.3_13E237_Restore.ipsw
iOS 9.3 13E237 (iPhone 5s GSM+CDMA): iPhone6,2_9.3_13E237_Restore.ipsw
iOS 9.3 13E237 (iPhone 5c GSM): iPhone5,3_9.3_13E237_Restore.ipsw
iOS 9.3 13E237 (iPhone 5c GSM+CDMA): iPhone5,4_9.3_13E237_Restore.ipsw
iOS 9.3 13E233 (iPhone 6 Plus): iPhone7,1_9.3_13E233_Restore.ipsw
iOS 9.3 13E233 (iPhone 6): iPhone7,2_9.3_13E233_Restore.ipsw
iOS 9.3 13E234 (iPhone 6s): iPhone8,1_9.3_13E234_Restore.ipsw
iOS 9.3 13E234 (iPhone 6s Plus): iPhone8,2_9.3_13E234_Restore.ipsw
iOS 9.3 13E233 (iPhone SE): iPhone8,4_9.3_13E233_Restore.ipsw
iOS 9.3.1 (iPhone 4S): iPhone4,1_9.3.1_13E238_Restore.ipsw
iOS 9.3.1 (iPhone 5 GSM): iPhone5,1_9.3.1_13E238_Restore.ipsw
iOS 9.3.1 (iPhone 5 GSM+CDMA): iPhone5,2_9.3.1_13E238_Restore.ipsw
iOS 9.3.1 (iPhone 5s GSM): iPhone6,1_9.3.1_13E238_Restore.ipsw
iOS 9.3.1 (iPhone 5s GSM+CDMA): iPhone6,2_9.3.1_13E238_Restore.ipsw
iOS 9.3.1 (iPhone 5c GSM): iPhone5,3_9.3.1_13E238_Restore.ipsw
iOS 9.3.1 (iPhone 5c GSM+CDMA): iPhone5,4_9.3.1_13E238_Restore.ipsw
iOS 9.3.1 (iPhone 6 Plus): iPhone7,1_9.3.1_13E238_Restore.ipsw
iOS 9.3.1 (iPhone 6): iPhone7,2_9.3.1_13E238_Restore.ipsw
iOS 9.3.1 (iPhone 6s): iPhone8,1_9.3.1_13E238_Restore.ipsw
iOS 9.3.1 (iPhone 6s Plus): iPhone8,2_9.3.1_13E238_Restore.ipsw
iOS 9.3.1 (iPhone SE): iPhone8,4_9.3.1_13E238_Restore.ipsw
iOS 9.3.2 (4S): iPhone4,1_9.3.2_13F69_Restore.ipsw
iOS 9.3.2 (iPhone 5 GSM): iPhone5,1_9.3.2_13F69_Restore.ipsw
iOS 9.3.2 (iPhone 5 GSM+CDMA): iPhone5,2_9.3.2_13F69_Restore.ipsw
iOS 9.3.2 (iPhone 5s GSM): iPhone6,1_9.3.2_13F69_Restore.ipsw
iOS 9.3.2 (iPhone 5s GSM+CDMA): iPhone6,2_9.3.2_13F69_Restore.ipsw
iOS 9.3.2 (iPhone 5c GSM): iPhone5,3_9.3.2_13F69_Restore.ipsw
iOS 9.3.2 (iPhone 5c GSM+CDMA): iPhone5,4_9.3.2_13F69_Restore.ipsw
iOS 9.3.2 (iPhone 6 Plus): iPhone7,1_9.3.2_13F69_Restore.ipsw
iOS 9.3.2 (iPhone 6): iPhone7,2_9.3.2_13F69_Restore.ipsw
iOS 9.3.2 (iPhone 6s): iPhone8,1_9.3.2_13F69_Restore.ipsw
iOS 9.3.2 (iPhone 6s+): iPhone8,2_9.3.2_13F69_Restore.ipsw
iOS 9.3.2 (iPhone SE): iPhone8,4_9.3.2_13F69_Restore.ipsw
iOS 9.3.3 (iPhone 4S): iPhone4,1_9.3.3_13G34_Restore.ipsw
iOS 9.3.3 (iPhone 5 GSM): iPhone5,1_9.3.3_13G34_Restore.ipsw
iOS 9.3.3 (iPhone 5 GSM+CDMA): iPhone5,2_9.3.3_13G34_Restore.ipsw
iOS 9.3.3 (iPhone 5s GSM): iPhone6,1_9.3.3_13G34_Restore.ipsw
iOS 9.3.3 (iPhone 5s GSM+CDMA): iPhone6,2_9.3.3_13G34_Restore.ipsw
iOS 9.3.3 (iPhone 5c GSM): iPhone5,3_9.3.3_13G34_Restore.ipsw
iOS 9.3.3 (iPhone 5c GSM+CDMA): iPhone5,4_9.3.3_13G34_Restore.ipsw
iOS 9.3.3 (iPhone 6 Plus): iPhone7,1_9.3.3_13G34_Restore.ipsw
iOS 9.3.3 (iPhone 6): iPhone7,2_9.3.3_13G34_Restore.ipsw
iOS 9.3.3 (iPhone 6s): iPhone8,1_9.3.3_13G34_Restore.ipsw
iOS 9.3.3 (iPhone 6s Plus): iPhone8,2_9.3.3_13G34_Restore.ipsw
iOS 9.3.3 (iPhone SE): iPhone8,4_9.3.3_13G34_Restore.ipsw
iOS 9.3.4 (iPhone 4S): iPhone4,1_9.3.4_13G35_Restore.ipsw
iOS 9.3.4 (iPhone 5 GSM): iPhone5,1_9.3.4_13G35_Restore.ipsw
iOS 9.3.4 (iPhone 5 GSM+CDMA): iPhone5,2_9.3.4_13G35_Restore.ipsw
iOS 9.3.4 (iPhone 5s GSM): iPhone6,1_9.3.4_13G35_Restore.ipsw
iOS 9.3.4 (iPhone 5s GSM+CDMA): iPhone6,2_9.3.4_13G35_Restore.ipsw
iOS 9.3.4 (iPhone 5c GSM): iPhone5,3_9.3.4_13G35_Restore.ipsw
iOS 9.3.4 (iPhone 5c GSM+CDMA): iPhone5,4_9.3.4_13G35_Restore.ipsw
iOS 9.3.4 (iPhone 6 Plus): iPhone7,1_9.3.4_13G35_Restore.ipsw
iOS 9.3.4 (iPhone 6): iPhone7,2_9.3.4_13G35_Restore.ipsw
iOS 9.3.4 (iPhone 6s): iPhone8,1_9.3.4_13G35_Restore.ipsw
iOS 9.3.4 (iPhone 6s Plus): iPhone8,2_9.3.4_13G35_Restore.ipsw
iOS 9.3.4 (iPhone SE): iPhone8,4_9.3.4_13G35_Restore.ipsw
iOS 9.3.5 (iPhone 4S): iPhone4,1_9.3.5_13G36_Restore.ipsw
iOS 9.3.5 (iPhone 5 GSM): iPhone5,1_9.3.5_13G36_Restore.ipsw
iOS 9.3.5 (iPhone 5 GSM+CDMA): iPhone5,2_9.3.5_13G36_Restore.ipsw
iOS 9.3.5 (iPhone 5s GSM): iPhone6,1_9.3.5_13G36_Restore.ipsw
iOS 9.3.5 (iPhone 5s GSM+CDMA): iPhone6,2_9.3.5_13G36_Restore.ipsw
iOS 9.3.5 (iPhone 5c GSM): iPhone5,3_9.3.5_13G36_Restore.ipsw
iOS 9.3.5 (iPhone 5c GSM+CDMA): iPhone5,4_9.3.5_13G36_Restore.ipsw
iOS 9.3.5 (iPhone 6 Plus): iPhone7,1_9.3.5_13G36_Restore.ipsw
iOS 9.3.5 (iPhone 6): iPhone7,2_9.3.5_13G36_Restore.ipsw
iOS 9.3.5 (iPhone 6s): iPhone8,1_9.3.5_13G36_Restore.ipsw
iOS 9.3.5 (iPhone 6s Plus): iPhone8,2_9.3.5_13G36_Restore.ipsw
iOS 9.3.5 (iPhone SE): iPhone8,4_9.3.5_13G36_Restore.ipsw

Part 6:Download iOS 8 Firmware File for iPhone

iOS 8.0 (iPhone 4S): iPhone4,1_8.0_12A365_Restore.ipsw
iOS 8.0 (iPhone 5 GSM): iPhone5,1_8.0_12A365_Restore.ipsw
iOS 8.0 (iPhone 5 GSM+CDMA): iPhone5,2_8.0_12A365_Restore.ipsw
iOS 8.0 (iPhone 5c GSM): iPhone5,3_8.0_12A365_Restore.ipsw
iOS 8.0 (iPhone 5c GSM+CDMA): iPhone5,4_8.0_12A365_Restore.ipsw
iOS 8.0 (iPhone 5s GSM): iPhone6,1_8.0_12A365_Restore.ipsw
iOS 8.0 (iPhone 5s GSM+CDMA): iPhone6,2_8.0_12A365_Restore.ipsw
iOS 8.0 (iPhone 6 Plus): iPhone7,1_8.0_12A366_Restore.ipsw
iOS 8.0 (iPhone 6): iPhone7,2_8.0_12A365_Restore.ipsw
iOS 8.0.1 (iPhone 4S): iPhone4,1_8.0.1_12A402_Restore.ipsw
iOS 8.0.1 (iPhone 5 GSM): iPhone5,1_8.0.1_12A402_Restore.ipsw
iOS 8.0.1 (iPhone 5 GSM+CDMA): iPhone5,2_8.0.1_12A402_Restore.ipsw
iOS 8.0.1 (iPhone 5c GSM): iPhone5,3_8.0.1_12A402_Restore.ipsw
iOS 8.0.1 (iPhone 5c GSM+CDMA): iPhone5,4_8.0.1_12A402_Restore.ipsw
iOS 8.0.1 (iPhone 5s GSM): iPhone6,1_8.0.1_12A402_Restore.ipsw
iOS 8.0.1 (iPhone 5s GSM+CDMA): iPhone6,2_8.0.1_12A402_Restore.ipsw
iOS 8.0.1 (iPhone 6 Plus): iPhone7,1_8.0.1_12A402_Restore.ipsw
iOS 8.0.1 (iPhone 6): iPhone7,2_8.0.1_12A402_Restore.ipsw
iOS 8.0.2 (iPhone 4S): iPhone4,1_8.0.2_12A405_Restore.ipsw
iOS 8.0.2 (iPhone 5 GSM): iPhone5,1_8.0.2_12A405_Restore.ipsw
iOS 8.0.2 (iPhone 5 GSM+CDMA): iPhone5,2_8.0.2_12A405_Restore.ipsw
iOS 8.0.2 (iPhone 5c GSM): iPhone5,3_8.0.2_12A405_Restore.ipsw
iOS 8.0.2 (iPhone 5c GSM+CDMA): iPhone5,4_8.0.2_12A405_Restore.ipsw
iOS 8.0.2 (iPhone 5s GSM): iPhone6,1_8.0.2_12A405_Restore.ipsw
iOS 8.0.2 (iPhone 5s GSM+CDMA): iPhone6,2_8.0.2_12A405_Restore.ipsw
iOS 8.0.2 (iPhone 6 Plus): iPhone7,1_8.0.2_12A405_Restore.ipsw
iOS 8.0.2 (iPhone 6): iPhone7,2_8.0.2_12A405_Restore.ipsw

iOS 8.1 (iPhone 4S): iPhone4,1_8.1_12B411_Restore.ipsw
iOS 8.1 (iPhone 5 GSM): iPhone5,1_8.1_12B411_Restore.ipsw
iOS 8.1 (iPhone 5 GSM+CDMA): iPhone5,2_8.1_12B411_Restore.ipsw
iOS 8.1 (iPhone 5c GSM): iPhone5,3_8.1_12B411_Restore.ipsw
iOS 8.1 (iPhone 5c GSM+CDMA): iPhone5,4_8.1_12B411_Restore.ipsw
iOS 8.1 (iPhone 5s GSM): iPhone6,1_8.1_12B411_Restore.ipsw
iOS 8.1 (iPhone 5s GSM+CDMA): iPhone6,2_8.1_12B411_Restore.ipsw
iOS 8.1 (iPhone 6 Plus): iPhone7,1_8.1_12B411_Restore.ipsw
iOS 8.1 (iPhone 6): iPhone7,2_8.1_12B411_Restore.ipsw
iOS 8.1.1 (iPhone 4S): iPhone4,1_8.1.1_12B435_Restore.ipsw
iOS 8.1.1 (iPhone 5 GSM): iPhone5,1_8.1.1_12B435_Restore.ipsw
iOS 8.1.1 (iPhone 5 GSM+CDMA): iPhone5,2_8.1.1_12B435_Restore.ipsw
iOS 8.1.1 (iPhone 5c GSM): iPhone5,3_8.1.1_12B435_Restore.ipsw
iOS 8.1.1 (iPhone 5c GSM+CDMA): iPhone5,4_8.1.1_12B435_Restore.ipsw
iOS 8.1.1 (iPhone 5s GSM): iPhone6,1_8.1.1_12B435_Restore.ipsw
iOS 8.1.1 (iPhone 5s GSM+CDMA): iPhone6,2_8.1.1_12B435_Restore.ipsw
iOS 8.1.1 (iPhone 6 Plus): iPhone7,1_8.1.1_12B436_Restore.ipsw
iOS 8.1.1 (iPhone 6): iPhone7,2_8.1.1_12B436_Restore.ipsw
iOS 8.1.2 (iPhone 4S): iPhone4,1_8.1.2_12B440_Restore.ipsw
iOS 8.1.2 (iPhone 5 GSM): iPhone5,1_8.1.2_12B440_Restore.ipsw
iOS 8.1.2 (iPhone 5 GSM+CDMA): iPhone5,2_8.1.2_12B440_Restore.ipsw
iOS 8.1.2 (iPhone 5c GSM): iPhone5,3_8.1.2_12B440_Restore.ipsw
iOS 8.1.2 (iPhone 5c GSM+CDMA): iPhone5,4_8.1.2_12B440_Restore.ipsw
iOS 8.1.2 (iPhone 5s GSM): iPhone6,1_8.1.2_12B440_Restore.ipsw
iOS 8.1.2 (iPhone 5s GSM+CDMA): iPhone6,2_8.1.2_12B440_Restore.ipsw
iOS 8.1.2 (iPhone 6 Plus): iPhone7,1_8.1.2_12B440_Restore.ipsw
iOS 8.1.2 (iPhone 6): iPhone7,2_8.1.2_12B440_Restore.ipsw
iOS 8.1.3 (iPhone 4S): iPhone4,1_8.1.3_12B466_Restore.ipsw
iOS 8.1.3 (iPhone 5 GSM): iPhone5,1_8.1.3_12B466_Restore.ipsw
iOS 8.1.3 (iPhone 5 GSM+CDMA): iPhone5,2_8.1.3_12B466_Restore.ipsw
iOS 8.1.3 (iPhone 5c GSM): iPhone5,3_8.1.3_12B466_Restore.ipsw
iOS 8.1.3 (iPhone 5c GSM+CDMA): iPhone5,4_8.1.3_12B466_Restore.ipsw
iOS 8.1.3 (iPhone 5s GSM): iPhone6,1_8.1.3_12B466_Restore.ipsw
iOS 8.1.3 (iPhone 5s GSM+CDMA): iPhone6,2_8.1.3_12B466_Restore.ipsw
iOS 8.1.3 (iPhone 6 Plus): iPhone7,1_8.1.3_12B466_Restore.ipsw
iOS 8.1.3 (iPhone 6): iPhone7,2_8.1.3_12B466_Restore.ipsw

iOS 8.2 (iPhone 4S): iPhone4,1_8.2_12D508_Restore.ipsw
iOS 8.2 (iPhone 5 GSM): iPhone5,1_8.2_12D508_Restore.ipsw
iOS 8.2 (iPhone 5 GSM+CDMA): iPhone5,2_8.2_12D508_Restore.ipsw
iOS 8.2 (iPhone 5c GSM): iPhone5,3_8.2_12D508_Restore.ipsw
iOS 8.2 (iPhone 5c GSM+CDMA): iPhone5,4_8.2_12D508_Restore.ipsw
iOS 8.2 (iPhone 5s GSM): iPhone6,1_8.2_12D508_Restore.ipsw
iOS 8.2 (iPhone 5s GSM+CDMA): iPhone6,2_8.2_12D508_Restore.ipsw
iOS 8.2 (iPhone 6 Plus): iPhone7,1_8.2_12D508_Restore.ipsw
iOS 8.2 (iPhone 6): iPhone7,2_8.2_12D508_Restore.ipsw

iOS 8.3 (iPhone 4S): iPhone4,1_8.3_12F70_Restore.ipsw
iOS 8.3 (iPhone 5 GSM): iPhone5,1_8.3_12F70_Restore.ipsw
iOS 8.3 (iPhone 5 GSM+CDMA): iPhone5,2_8.3_12F70_Restore.ipsw
iOS 8.3 (iPhone 5c GSM): iPhone5,3_8.3_12F70_Restore.ipsw
iOS 8.3 (iPhone 5c GSM+CDMA): iPhone5,4_8.3_12F70_Restore.ipsw
iOS 8.3 (iPhone 5s GSM): iPhone6,1_8.3_12F70_Restore.ipsw
iOS 8.3 (iPhone 5s GSM+CDMA): iPhone6,2_8.3_12F70_Restore.ipsw
iOS 8.3 (iPhone 6 Plus): iPhone7,1_8.3_12F70_Restore.ipsw
iOS 8.3 (iPhone 6): iPhone7,2_8.3_12F70_Restore.ipsw

iOS 8.4 (iPhone 4S): iPhone4,1_8.4_12H143_Restore.ipsw
iOS 8.4 (iPhone 5 GSM): iPhone5,1_8.4_12H143_Restore.ipsw
iOS 8.4 (iPhone 5 GSM+CDMA): iPhone5,2_8.4_12H143_Restore.ipsw
iOS 8.4 (iPhone 5c GSM): iPhone5,3_8.4_12H143_Restore.ipsw
iOS 8.4 (iPhone 5c GSM+CDMA): iPhone5,4_8.4_12H143_Restore.ipsw
iOS 8.4 (iPhone 5s GSM): iPhone6,1_8.4_12H143_Restore.ipsw
iOS 8.4 (iPhone 5s GSM+CDMA): iPhone6,2_8.4_12H143_Restore.ipsw
iOS 8.4 (iPhone 6 Plus): iPhone7,1_8.4_12H143_Restore.ipsw
iOS 8.4 (iPhone 6): iPhone7,2_8.4_12H143_Restore.ipsw
iOS 8.4.1 (iPhone 4S): iPhone4,1_8.4.1_12H321_Restore.ipsw
iOS 8.4.1 (iPhone 5 GSM): iPhone5,1_8.4.1_12H321_Restore.ipsw
iOS 8.4.1 (iPhone 5 GSM+CDMA): iPhone5,2_8.4.1_12H321_Restore.ipsw
iOS 8.4.1 (iPhone 5c GSM): iPhone5,3_8.4.1_12H321_Restore.ipsw
iOS 8.4.1 (iPhone 5c GSM+CDMA): iPhone5,4_8.4.1_12H321_Restore.ipsw
iOS 8.4.1 (iPhone 5s GSM): iPhone6,1_8.4.1_12H321_Restore.ipsw
iOS 8.4.1 (iPhone 5s GSM+CDMA): iPhone6,2_8.4.1_12H321_Restore.ipsw
iOS 8.4.1 (iPhone 6+): iPhone7,1_8.4.1_12H321_Restore.ipsw
iOS 8.4.1 (iPhone 6): iPhone7,2_8.4.1_12H321_Restore.ipsw

Related Article

How to Install IPSW File on iPhone without Data Loss

How to Download iOS Firmware File for iPad

How to Download iOS Firmware File for iPod Touch

How to Fix the Issue of iTunes Can’t Read Data of iPhone

How to Fix iOS 10/11 System Update Failed

How to Fix iPhone Stuck in Recovery Mode

How to Fix iPhone to Normal after iOS 13 Update

Apple Company release iOS 13 system version software update recently.According to widespread complaints across social media,a lot of iPhone and iPad users ran into installation problems.For some, the update process failed with a subsequent error message asking users to plug their iOS device into a computer for a complete restore of the operating system.Some get this circumstance that device prompt “Connect to iTunes” and can’t get out of the Recovery Mode during/after iOS 13 update,etc,.

Restore iPhone Using IPSW File without Data Loss

Since iOS 13 system hasn’t announced for a long time,it’s not as perfect as imagine,it may be still contain bugs that haven’t been fixed.As we all know, when we install iOS 13 on iPhone or iPad manually with IPSW Firmware Files in iTunes,it will cause data loss.Here we write this article to absolutely fix this bricked issues on iOS devices after iOS 10 update without iTunes(no data loss),hope it will give the best solution for you all to solve these abnormal system problems of iOS 10 devices.

How to Fix iPhone to Normal after iOS 13 Update

To be honest,it’s no more better way to fix iPhone system to normal states by using iOS System Recovery.As its name,this program help to achieve the purpose that download and install IPSW firmware files on iPhone,then restore iPhone system to normal after iOS 13 update under any abnormal states,such as iPhone stuck in Recovery Mode,iPhone stuck on Apple logo, iPhone stuck at black/white screen,iPhone get frozen suddenly,etc,.All models of iOS devices are compatible with iOS System Recovery,including iPhone XS, iPhone XS Max, iPhone XR, iPhone X, iPhone 8, iPhone 7,iPhone SE,iPhone 6S(Plus),iPhone 6(Plus),iPhone 5S/5C/5,iPad Air,iPad Mini,iPad Pro,iPod and so on.

d_win d_mac
d_win d_mac

Easy Steps to Fix iOS 13 to Normal without Data Loss

Step 1.Launch iOS System Recovery and Select “iOS System Recovery” Feature
• The menu displays to the left.Click on the tab appearing at the bottom named “More Tools”.Then click on “iOS System Recovery” to start the function.
• Connect the iPhone to the computer by using USB cable,the program will detect the device soon.
• Click on “Start” button to begin.

iPhone system recovery

fix iPhone system to normal after ios 10 update

Step 2.Download Firmware for iPhone
• To restore from an operating system failure,the latest firmware must be downloaded for iPhone.
• The program detect the model of device,asks for confirmation,and suggests the latest version of firmware to download.
• Click “Download”button.The process completes automatically.

select your iPhone model

download the firmware for iPhone

Step 3.Restoring iPhone System to Normal after iOS 10 Update
• Once the firmware is installed,the program begins fixing operating system for device and return iPhone to normal state in minutes.

restore iPhone system to normal after ios 10 update

Extra tips:This iOS System Recovery tool allow to restore deleted data from iPhone after iOS 13/12 update.

d_win d_mac
d_win d_mac

Related Article:

Restore iPhone System to Normal without Firmware Upgrade to iOS 10

How to fix Bug on iPhone/iPad after iOS 10 Upgrade

How to Fix iPhone Stuck on Apple Logo after iOS 10 Update

How to Fix iPhone Freezes During/After iOS 10 Update

2 Ways to Fix iPhone Stuck in Recovery Mode After iOS 10 Update

How to Fix iOS 10 iPhone Running Slow Issue

Fix iPhone Stuck on Apple Logo after iOS 10 Update

”My iPhone 6 stuck on apple logo after iOS 10 update. I tried restoring with iTunes but it just gets stuck.Help please.” Donald Vinson

Summery:iPhone stuck on Apple logo during/after iOS 10 update?This tutorial is showing you some basic tips to perfectly fix this issue and more other iPhone stuck issues.

fix iphone stuck on apple logo

There are lots of iPhone users are annoying about their iPhone stuck on Apple logo after iOS 10 update,most of them search the methods on the Internet then get nothing.If you are looking for best iPhone stuck issues solutions then we have the best collections of it.There are various things we can do before we come to the conclusion that our iPhone has simply died and has to be replaced.The most common situation that the iPhone can’t get rid of the Apple logo screen.The following passages are some of the useful steps that you can take to fix iPhone stuck on Apple Logo issue.

Part 1:Fix iPhone Stuck on Apple Logo by DFU Mode

DFU (Default Firmware Update) is an simple way to get iPhone out of stuck on Apple logo and then work normally as usual.To do this, you have to connect your iPhone to your PC (that have iTunes installed on it). You should press the home button and power button for about 10-15 seconds.After 10-15 seconds you can leave the power button, but you should not leave the home button that you are holding.After few seconds,the iTunes will pop up saying that it has detected an iPhone in DFU mode.This will reset and restore the firmware completely.

enable DFU mode

Note:Setting iPhone enter the DFU mode that there is a high chance of losing all your iPhone files.You can try the recovery software to restore deleted data from iPhone after losing data due to enter DFU mode.

Part 2:Reset iPhone to Factory Settings to Fix iPhone Stuck on Apple Logo

Not only can iTunes sync data between your device and computer, but also allows you to fix iPhone stuck on Apple logo by factory restore mode.However,it may cause data loss also because all the data and settings will be erased from device before system restoring process.

factory reset on iphone

Step 1.Run the latest iTunes and connect your iPhone to computer.

Step 2.A message will pop up and prompt that your iPhone is in recovery mode and needs to be restored.

Step 3.Click your iPhone device icon on iTunes interface and go to Summary tab.

Step 4.Click Restore button to restore your device to its previous settings.

Part 3:Fix iPhone Stuck on Apple Logo by Hard Reset

This is one of the simplest methods that will help you to restore your phone system in most of the cases.But this method didn’t work for most iPhone,and I cannot promise about that though you can give a try.The method is very simple.You just have to take your iPhone in your hand.Hold the home button and the power button for 15-30 seconds.If you are lucky,this is going to work like a charm.If these methods doesn’t your ideal choice,please just follow the most useful solution mentioned below.

hard reset on iPhone

Part 4:Fix iPhone Stuck on Apple Logo by iOS System Recovery

To be honest,the three ways above we are talking about may lead to data loss on your device while/after the iOS system restoring.Take it easy,as its said that the best thing will appear at the last moment.Now we are strongly recommend this helpful impeccable tool for you all- iOS System Recovery.

iOS System Recovery enables to restore iPhone system to normal state under any abnormal circumstances as its name,especially fixing iPhone stuck on Apple Logo after iOS 10 update without data loss.iOS System Recovery perfectly solve all kinds of iPhone system stuck issues,such as iPhone stuck in Recovery Mode,iPhone stuck in DFU Mode,iPhone stuck at “Connect to iTunes” screen,iPhone bricked issues(black/white screen),etc,.Additionally,this famous recovery support to restore deleted data from iPhone after iOS 10 update with three recovery modes,it must do you a favor for your iPhone restoring.Just download and try this program right now.

d_win d_mac

Step One.Download and Install iOS System Recovery on Computer
Download and install iOS System Recovery on your computer and then connect your phone to your computer using USB cable.

iOS System Recovery

Step Two.Select Repair Mode of iOS System Recovery
On the main page,click on “Fix iOS to Normal” and the program will detect your device,once the device has been detected click on “Start”.

fix iphone stuck on apple logo after ios 10 update

Step Three.Download Official Firmware for iPhone
Click on “Download” when the program provide the latest version of firmware for your iPhone in order to fix your device.Wait for the download to complete.

select your iPhone model

download the firmware for iPhone

As soon as the download is complete.The program will begin to restore iPhone normal system.The whole repair process of your device should take no more than 10 minutes.Then you will get a message prompt that your device will now restart normally.Just ensure that your device remains connected to your computer during the entire process.

fix iphone stuck on apple logo after ios 10 update

fix iphone stuck on apple logo after ios 10 update

iOS System Recovery makes the restoring process so easy you could be able to fix your iPhone stuck on Apple logo effectively and enjoy the funny trip on your iOS device.

d_win d_mac

Related Article:

How to Fix iPhone Freezes During/After iOS 10 Update

2 Ways to Fix iPhone Stuck in Recovery Mode After iOS 10 Update

Fix iPhone Stuck on iTunes Logo After iOS 10 Update

How to Fix Bricked iPhone after iOS 10 Update

How to fix Bug on iPhone after iOS 10 Update

How to Fix iOS 10 iPhone Running Slow Issue

How to Fix a Frozen iPhone in iOS 13/12/11

“Apple released the iOS 13, the problems come for most iOS users after iOS 13 update, my iPhone XS was frozen after iOS 13 update, how to fix a frozen iPhone in iOS 13?”

One big benefit for users of Apple iOS compared with Google’s Android is they’re able to update their devices to the latest version of the software each year. But iOS often has bugs when it first hits the market, making it prudent for users to wait a few days before downloading. Before downloading a software update, users should also be sure their iPhone are backed up. If they have to restore the devices, they’ll be able to recover all of their contacts/photos/messages and other items.

Fix a Frozen iPhone in iOS 13

Extra tips:How to Backup iPhone Data before Update

When download a new iOS on your iPhone, you may encounter the bad situations for example iPhone get frozen during/after iOS 13 update.Generally,it takes a long time to return iPhone to normal state.But it may always stuck the bricked for endless hours if you don’t get a correct way to repair it.

How to Fix iPhone Freezes During/After iOS 13 Update

To fix iPhone freezes during/after iOS 13 update and restore iPhone to normal state,you can try iOS System Recovery, which is an useful tool to restore iPhone system to normal when iPhone frozen during/after iOS 13 update,perfectly help to repair iPhone system to normal state and return it to normal in minutes.What’s more,this outstanding program assist you to fix iOS system stuck issues like iPhone stuck in Recovery/DFU Mode, iPhone stuck at “Connect to iTunes” screen, iPhone stuck on black/white screen, iPhone stuck on Apple logo screen, etc,.To be clarified that it can’t cause any data loss while repairing the operating system of iOS device. iOS System Recovery is fully compatible with iOS 13, iOS 12, iOS 11, iOS 10, iOS 9 or lower.

d_win d_mac
d_win d_mac

Part 1:Restore iPhone System to Normal after iOS 10 Update with Home+Power Button

Once your iPhone freezes and stuck during/after update to new iOS 10, the easiest way to repair it is to perform hard reboot.That requires no extra and complicated operation, but uncertain to work. Hold Home and Power buttons simultaneously until the iPhone restarts automatically.Once the iPhone changes from the frozen state to a normal state you are succeeded.If it doesn’t work well, move to next part.

Part 2:Easy Steps to Fix a Frozen iPhone to Normal without Data Loss

Step 1.Download and Install iOS System Recovery
Download and install iOS System Recovery on your computer.After that,connect your iPhone to the computer by using USB cable.

Step 2.Choose Repair Mode of iOS System Recovery
Click the “iOS System Recovery” option under the “More tools” in the program main page.And then you can see some notes displayed in the window.If you have no problem with all the notes here,click “Start”button.

iOS System Recovery

restore iPhone system to normal

Regard: Please pay attention that after fixing the issue-restoring iPhone system to normal,your iPhone will be updated to the latest version.And if it is jailbroken iPhone,it will be updated to none jail-broken phone.

Step 3.Download Official Firmware for iPhone
In this step,the official firmware download link for your iPhone will be provided.iOS System Recovery will detect your iPhone very soon,offering the latest iOS version for you to download.You should download the firmware by clicking “Download”button.If you have downloaded it before,then here you just need to choose “Already downloaded” to browse your computer to locate it.

select your iPhone model

download the firmware and saved on iPhone

Step 4.Fix iPhone to Normal
When the firmware downloading is end,iOS System Recovery will continue to get your iPhone out of abnormal mode in a few minutes,you just need to wait for your iPhone to restart.

restore iPhone system to normal

d_win d_mac
d_win d_mac

Related Article:

How to Fix iOS 10 iPhone Running Slow Issue

How to fix Bug on iPhone after iOS 10 Update

Restore iPhone System to Normal without Firmware Update to iOS 10

2 Ways to Fix iPhone Stuck in Recovery Mode After iOS 10 Update

How to Fix iPhone Stuck on Red iTunes Logo After iOS 10 Update

How to Fix Bricked iPhone after iOS 10/iOS 9 Update

How to Enter & Exit iPhone Recovery Mode

Many iOS users do not know what is the difference of the iPhone recovery mode and DFU mode, here I’m going to introduce the details to you all on the following passages.

Recovery-vs-DFU-Mode

What is Recovery Mode
Recovery mode allows iTunes to restores your iPhone to its original factory settings but with the latest iOS and firmware.When your device is in recovery mode, the iTunes logo and the icon of your USB cable will appear at the same time and iTunes will inform you that an iPhone/iPad/iPod touch in recovery mode has been detected.

What is DFU Mode
DFU mode is short for device Firmware Update mode. It skips the iBoot bootloader for jailbreak fascinates. When your device is in DFU mode, the device screen will be totally black. DFU mode can be used in different situations including upgrading firmware, downgrading firmware, and even rebooting your tethered jailbroken device.

What is the Difference of iPhone Recovery Mode and DFU mode
The biggest difference of iPhone recovery mode and DFU mode is that whether or not to start the iBoot.In iPhone recovery mode,the system uses iBoot to restore and upgrade the firmware,while in the DFU mode,the system will not start iBoot,so you can downgrade the firmware in DFU mode.iBoot is on IOS devices boot loader,when you in recovery mode for system recovery or upgrade,iBoot will lead you to upgrade the firmware version detection to ensure you want to upgrade the firmware version than the current system firmware version(to the new version number higher).If you want to upgrade the firmware version is less than the current installed version of the system,then iBoot will prohibit the recovery of the firmware.

So the degradation of the firmware must be switched to DFU mode. This also means that if you need to restore the current firmware version,only need to enter device to the recovery mode, iTunes will over the next restoration work; if you need the firmware downgrade, you need to enter DFU mode on device.For example, in the absence of access to the DFU mode, you can not downgrade your firmware from 7.04 to 7.02, of course, apple now officially released a new firmware, the firmware will soon be closed to verify. Of course, the firmware is closed to verify what way the firmware is not activated, DFU is not.

What You Should Do before Entering iPhone to Recovery/DFU Mode
Charge your device to 100% and last for a few minutes,which can help to solve the problem of partial power display error.

Part 1:How to Enter iPhone Recovery Mode

When your iOS device fail to reset,stuck during/after upgrading,software error,stuck at white screen,can not open the device, forget the password of device,stuck on the cycle loop issues,etc,. you should enter device to recovery mode.

Step 1.Turn Off your iPhone/iPad/iPod if it isn’t off already.Press and hold down the On/Off button on the right side (iPhone 6 or later) or top (all other iPhone/iPad/iPod) for 3 seconds.

Step 2.Swipe the slide to power off confirmation slider to the right.

how-to-iphone-power-off-screens

Step 3.Press and hold down the Home button on your device.

Step 4.Plug your device into your Mac or Windows PC and make sure iTunes is running.

Step 5.Release the Home button when you see the Connect to iTunes screen.

how-to-iphone-recovery-screens2

At this moment iTunes should display an alert saying it’s detected an iPhone/iPad/iPod in recovery mode,and will allow you to restore your device.

Part 2:How to Exit iPhone Recovery Mode and Restore iPhone to Normal

However,you may encounter the especial circumstance,for example your device stuck in recovery mode and can’t get it out of this mode.Over the years we’ve had a few customers contact us asking how to fix iPhone stuck in recovery mode.As it appears to be a common problem (even among some of us here in the office), we thought we’d share the best solution of how to solve an iPhone stuck in recovery mode issue.

What You Can Do When Your iPhone is Stuck In Recovery Mode
DO NOT do anything if your iPhone goes into Recovery Mode.The official way to exit Recovery Mode is to restore your iPhone with iTunes.However,sometimes you may fail to get iPhone out of recovery mode with iTunes,or you just wanna another better method to fix it.

Note:Trying to fix iPhone stuck in recovery mode in the common way may lead to data loss.Remind you doing this especially after backing up your iPhone regularly because restoring your iPhone will wipe all data and content on device.Tips:How to backup iPhone data to computer.

Here is our strongly recommendation-iOS System Recovery.iOS System Recovery can perfectly solve this program completely,enable to get iPhone out of recovery mode without losing data,get iPhone out of DFU mode without losing data and restore iPhone system to normal status as usual.It gains highly assessment from iOS users widely.While there is guarantee that definitely help to excellently fix iPhone system stuck issues after the restoring process.What’s more,this program provide an available way to recover deleted data from iPhone/iPad/iPod as well.

d_win d_mac

Step 1.Run Program and Connect iPhone to Computer
Run iOS System Recovery on computer and connect your iPhone to the computer with an USB cable.Select the “iOS System Recovery” from “More Tools” on program,and then click “Start” to begin the process.(The restoring errors happen mostly because the operating system on your iPhone performs abnormally.)

get iphone out of recovery mode

get iphone out of recovery mode

Step 2.Download the Firmware for iPhone Restoring
You’ll see that the program detects your iPhone,confirm it and “Download” the firmware for your device.

get iphone out of recovery mode

get iphone out of recovery mode

When it finished,iOS System Recovery will continue to get your iPhone out of Recovery Mode in a few minutes.

get iphone out of recovery mode

get iphone out of recovery mode

d_win d_mac

Read more:

How to Restore iPhone System to Normal

How to Get iPhone Out of Recovery Mode after iOS 10 Upgrade

How to Fix iPhone Stuck in Recovery Mode after Jailbreaking

How to Get iPhone SE/6S/6/5S/5 Out of Recovery Mode

How to Fix iPhone Stuck in DFU Mode

How to Fix “Verifying Update”/”Slide to Upgrade” Error on iPhone

Since iOS 10 is coming on the way,a lot of iOS fans are interested in the newest iOS version and ready to do the iOS upgrade.In a General,there are two practical ways to upgrade device to iOS 10, but either OTA or through iTunes,it is easy to encounter some errors in updating.In fact, Apple website has given solutions to fix some common bugs of iOS 10.Here we are going to talk about the two cases:”Verifying Update” and “Slide to Upgrade” error while installing iOS 10 or the beta version.

Part 1:Tips to Fix “Verifying Update”/”Slide to Upgrade” Error on iPhone

Status One: iDevice Stuck in “Verifying Update” Screen
From iOS users communication,part of users reported the pop-up of “Verifying update” still occurs all the day and nothing changes.Some advise to restore iPhone in order to exit the error screen while it is in vain. Just try these tricks to fix your case to check the results.

Tips 1: Undoubtedly, waiting for several minutes is what should be done firstly. Because here may be network mistake, just be patient to wait for 10-20 minutes.

Tips 2: Stay pressing the power button to get your device locked and it would take more than 5 times. As you see the loading screen, the process of downloading would start right now.

Tips 3: Go to open the newest version of iTunes and use it to get iOS updated on the computer.

Tips 4: Try to hard reboot on iPhone/iPad. At first, just hold the “Home” and “Sleep/Wake” button at the same time. Then, when you see apple logo appear, please release the buttons.

Status Two:iDevice Stuck in “Slide to Upgrade”Screen
Another case about stuck screen also annoys users,”Slide to Upgrade” signal stays on the device interface and it seems to get frozen. At this time, for getting iPhone/iPad back to normal status, we found some steps which work for this situation.

Step 1.Use USB cable to get iDevice and PC connected. Then run iTunes on computer.
Step 2.Pressing “Home” and Power button at the same time for several seconds once the PC cannot detect the mobile device. As iPhone/iPad restart, you can select the device on iTunes.
Step 3.Click “Restore” to restore your iOS device.If you have no any backup before upgrading iOS 10 or public beta version. Please do a backup immediately and choose it to restore.

Note:If you have enabled “Find My iPhone” before,official Apple Support may assist you to fix your need.

Hope the helpful tips above can do a great help for restoring your device to normal.To thankful, these cases will only occur on iPhone6S/iPad mini 4/iPad Air 2 or the former device.Wish you have a good experience with iOS10.

Part 2:Solve iPhone “Verifying Update”/”Slide to Upgrade” Error via iOS System Recovery

iOS System Recovery,a third-party tool which is excellent on restoring iOS system to normal for iPhone(iPad).This program works well for fixing iPhone/iPad stuck on “Verifying Update”/”Slide to Upgrade”screen while installing iOS 10.Additionally,it enables you to fix iOS frozen/crashed status during or after iOS update/jailbreak,fix recovery mode stuck,DFU stuck,red iTunes logo stuck,etc.iPhone SE/6S/6/5S/5/4S,iPad,iPod are supported.One point can’t be ignored is that this wonderful program empower to restore lost data from iPhone/iPad after iOS 10/iOS 9.3.3 upgrade.Use guide on:How to Recover Lost Data on iPhone/iPad after iOS 9/iOS 10 Upgrade.

d_win d_mac

Step 1.Select the Repair iOS System Feature
Click “Fix iOS to normal” from “More Tools” in the homepage of iOS System Recovery.Then connect your iPhone/iPad to computer with its USB cable.When iOS System Recovery detects your device,click “Start” to go on.

iphone-system-fix-tools

fix-verifying-update-error-on-iphone

Step 2.Download and Select Firmware for Device
To fix the abnormal operating system of iPhone/iPad,you need to download the suitable firmware for your device first.iOS System Recovery will recognize your device very soon,offering the latest iOS version for downloading.You should click “Download” and wait a second.The program will finish it automatically.

select iPhone model

download the firmware for iPhone

Step 3.Get iPhone/iPad out of “Verifying Update”/”Slide to Upgrade” Screen
When the download is complete,the program will continuously start repairing your device to restore device system to normal,and get your device to work properly.In a few minutes,it will tell you that your device is restarting to normal mode.The whole process of fixing the operating system of iPhone/iPad only takes you less than 10 minutes.

fix-verifying-update-error-on-iphone

fix-verifying-update-error-on-iphone

d_win d_mac

Related Article:

How to fix Bug on iPhone/iPad after iOS 10 Upgrade

How to Restore iPhone System to Normal without Firmware Upgrade to iOS 10

How to Get iPhone Out of Recovery Mode after iOS 10 Update

How to Fix Bug on iPhone/iPad after iOS 13/12 Upgrade

Don’t celebrate yet:iOS 13 could lead to bugs
Developer previews of iOS 10 are live now and we’re starting to go hands-on with the next big release.The new iOS 10 add new features on Siri and Messages, ability to remove default apps, updates Music,Photos and many more (more iOS 13 advantages over iOS 12).While users are flocking to update to iOS 13 for a new experience,many of them are reporting iOS 13 update problems like an error occurred downloading iOS 13,frozen during update on iPhone/iPad,iOS 3 won’t finish updating. It’s entirely possible that most major developers will have fixed all default app-related problems by the time iOS 13 launches. But as previous iOS launches have shown, not every developer has made their app ready by launch day.Let’s see the bugs may appear with upgrading to iOS 13.

Bug 1:Device stuck on Slide to Upgrade screen
A lot of iPhone users were horrified to find their devices stuck on the Slide to Upgrade screen and totally unresponsive after the update.The screen freezes on Slide to Upgrade and simply won’t respond. Apple acknowledged this bug and posted advice.

Bug 2: Touchscreen unresponsive
Quite a few people have reported that the touchscreen on their iPhone or iPad will freeze occasionally and no longer react to taps or swipes. If you find that your touchscreen becomes unresponsive, it’s usually pretty easy to fix, at least temporarily.

Bug 3:Reporting Error 14 after update to iOS 13
The iOS 13 upgrade problem users have the infamous Error 14, namely a message saying that iPhone iPad could not be restored. An unkown error occurred (14). This is a bug of iOS 13 that no fix is announced currently, but there are some tricks you may try to solve this iOS 13 update problem.

Bug 4. Stuck in recovery mode while updating to iOS 13
The iOS 10 updating seems smooth but the iPhone iPad get stuck in the recovery mode/iTunes log.These iOS 10 update issues can be caused by different reasons like factory resetting, wrong operation to upgrade to iOS 10 from jailbreak or unknown reasons.

How to fix Bug on iPhone/iPad after Upgrading to iOS 13

iOS System Recovery,it’s a perfect iOS system repair tool to fix iOS system to normal on iPhone after upgrading to iOS 13.What’s more, the iOS System Recovery which enable to totally fix operating system for iPhone/iPad/iPod to recover from booting issues like stuck on “Slide to Upgrade” screen,stuck at white/black screen,stuck in recovery/DFU mode,stuck in Apple logo loops,etc.iOS System Recovery helpfully to fix typical problems from iDevice leading to abnormal performance.All models of iOS devices are applicable to this wonderful program,including iPhone XS(Max), iPhone XR, iPhone X, iPhone 8, iPhone 8 Plus, iPhone 7, iPhone 7 Plus, iPhone SE,iPhone 6S(Plus),iPhone 6(Plus),iPhone 5S/5C/5,iPad Air,iPad Mini,iPad Pro,iPod and so on.

d_win d_mac
d_win d_mac

How to Fix Bugs on iPhone and Optimize iOS 13 System

Step 1.Launch iOS System Recovery and select “iOS System Recovery” Feature
• The menu displays to the left.Click on the tab appearing at the bottom named “More Tools”.Then click on “iOS System Recovery” to start the function.
• Connect the iPhone/iPad to the computer by using USB cable.Very soon the program will detect the device.
• Click on “Start” button to begin.

iphone-system-fix-tools

fix iPhone system to normal after ios 10 upgrade

Optimize iOS Performance(Option)
Tips: If you want to enjoy better iOS performance, just click “Optimize” to optimize your iPhone system, you can also use this iOS System Recovery to download firmware for optimizing your iPhone

optimize ios performance

Step 2.Enable Firmware Download
• To recover from an operating system failure,the latest firmware must be downloaded to the iOS device.
• The program detect the model of device,asks for confirmation,and suggests the latest version of firmware to download.
• Click “Download”button.The process completes automatically.

select your iPhone model

download the firmware and saved on iPhone

Step 3. Restore iPhone To Normal
• Once the firmware is installed,the program begins fixing operating system for device and return it to normal in minutes.

fix iPhone system to normal after ios 10 upgrade

Apart from fixing iOS device system to normal by iOS System Recovery,this multiple functions tool allow to recover lost/deleted data from iPhone/iPad/iPod.

d_win d_mac
d_win d_mac

Read More:

How to Restore iPhone System to Normal

How to Get iPhone Out of Recovery Mode after iOS 10 Update

How to Fix iPhone System to Normal After iOS 9 Upgrade Failed