All posts by DHZ

How to Play Apple Music on Chromebook

How to listen to Apple Music on Chromebook

How to play Apple music on chromebook without time limitation? I payed some iTunes music and now the music are times up. Is there any way to play Apple music on Chromebook for free? Thank you so much.

play apple music chromebook Google Chromebook

It’s no doubt that you will get a message prompt that “Your Apple Music membership has expired” in our daily life. All of us know that we can’t play the Apple music when it is times up because the Apple Music songs are encrypted with DRM protection. Apple Music is not available on Chromebook since there is no iTunes for Chromebook. Feeling it is trouble, don’t you? Do you want to continue to play the Apple music on the Chromebook without limitation? To be honest, It is not so easy to transfer Apple Music to Chromebook directly. So there are many users are searching a solution to stream Apple Music on Chromebook. In this page, we’re going to show you a solution about how to convert Apple Music and then play the converted music on chromebook for listening for free.

Convert Apple Music for MP3 Files and Play on Chromebook

Apple Music Converter – your ideal music converter. Which is a useful tool help for converting Apple music for MP3 files and then you can play the converted music on chromebook without time limitation. This Apple Music Converter help you legally remove DRM from Apple Music songs and playlists and convert Apple Music files, audiobooks, or other downloaded music from iTunes or Apple Music to MP3, FLAC, AAC or WAV format at 16X faster speed with keeping the original quality.

Know more about Apple Music Converter:
-Remove DRM from Apple Music songs.
-Convert Apple Music M4P songs to DRM-free MP3, M4A, etc,.
-Convert iTunes songs and Audiobooks to MP3, M4A, etc,.
-Keep original data to the converted MP3, M4A audio files.
-Preserve Audiobook chapter information to M4A output.
-Convert Apple Music songs at up to 16X speed.
-Batch conversion allows you to convert many Apple Music songs at the same time.
-After the conversion, you can play the converted music on any mobile device that compatible with the converted music freely.

d_win d_mac

How to Play Apple Music on Chromebook without Limitation

Step 1.Download and Run Apple Music Converter on the Computer
Download the Apple Music Converter on your computer.When you run the program on the computer, iTunes will be launched automatically at the same time.

launch apple music converter

Step 2.Select the Apple Music to Convert to MP3 for Chromebook
The program will loads all iTunes files automatically,including music, playlists, Audiobooks, M4P Audio, iTunes movies and TV shows.Please click on “Library” and mark the Apple Music tracks that you want to remove DRM and convert to MP3.

select Apple music to convert

Note:You can select several items one by one or select the entire album by clicking on the checkbox on the top menu bar.If you added Apple Music songs/albums to iTunes library, click “Music” on the left side and sort all songs by Type. Check the songs marked with “Apple Music AAC audio file“.

Step 3.Set MP3 as the Output Format for the Converted Music
After selecting the Apple Music songs you want to download/convert,you should select the music output format,in order to converting all Apple music songs to MP3 format. Please select MP3 from the drop-down list under the “Output Format” column.The program allows you change the output parameters like channels, sample rate, codec, bitrate, etc,.

select mp3 output format

Select MP3 Output Profile :

select mp3 output profile

Adjust Conversion Speed :
If you would like to change the conversion speed, then go to Options>>General.One the preferences windows to “Set Custom conversion speed for audio convert (1-16)” to adjust the conversion speed.

Adjust Conversion Speed

Step 4.Convert M4P Apple Music to DRM-free MP3
In this step you should click “Start Convert” button to begin converting Apple Music from M4P music to MP3 and save the converted MP3 Apple songs on the Chromebook.It will take you minutes to convert the audio format,once the music conversion process is completed,please click on the “Open Output File” button to find the converted MP3 music files on your Chromebook,then you can enjoy the converted Apple music in DRM-free MP3 format for free without time limitation.

convert Apple Music from M4P to MP3

View the converted MP3 files on the Chromebook:

view mp3 files

Now you could play the converted Apple music on your Chromebook for free without time limitation.

d_win d_mac

Related Article:

How to Rip Apple Music For Free

How to Play Apple Music on iPod nano and iPod shuffle

How to Play Apple Music on MP3 Player

How to Play M4P Apple Music on iOS Device

How to Play Apple Music on iPhone 7/6S/6 for Free

How to Play Apple Music M4P on Android

How to Recover Call History from iPhone after iOS 11 Update

Summary: It is unlikely that you will lose call logs while updating your iPhone iPad to iOS 11. There are three ways for you to restore iPhone call history: directly scan your phone, extract your iTunes backup, extract your iCloud backup.

Yesterday I performed the iOS 11 update on my iPhone 7, what made me feel regret is that some calls history on my call list are lost after the iOS update. I forgot to save the client phone number in the call list. Is it possible to get back the deleted phone calls from my iOS 11 iPhone?

Apple has released several beta version of iOS 11 since WWDC, and the official version would come later in 2017. iOS 11 contain so many great new features that impressed me, like the customized control center, text with Siri, new WiFi settings, etc,. Maybe you can’t wait to upgrade your iPhone to the iOS 11 beta to experience the new features, but you should be noted that the beta version is the developing version after all, which means that there are bugs issues need to be fixed, it may cause different problems on your device, like lost data on device after iOS 11 update. This tutorial is going to show you how to recover lost call history or other types of iOS data from iPhone after iOS 11 update.

Recover Lost iPhone Call History on iOS 11 iPhone

iOS Data Recovery, a comprehensive data recovery tool designed for iOS devices, provides 3 modes to help you recover lost data on iOS 11 device: Recover from iCloud backup, recover from iTunes backup, recover from iOS device directly without backup. The recoverable types of data including call logs, contacts, photos, videos, text messages, notes, calendars, WhatsApp & attachments, apps and more. With this amazing data recovery tool, you can effortlessly recover lost call logs from iPhone after iOS 11 update. What’s more, iOS Data Recovery supports to restore lost data from iPhone/iPad due to any data loss caurses, including iOS update, iOS jailbreak, deleted accidentally, restore to factory reset, device lost and so on.

d_win d_mac

Step 1. Run Program on the Computer
First of all, please install and run iOS Data Recovery on the computer. Select the “Recover from iOS Device” recovery mode then click “Start” to start the recovery process.

connect iphone with computer

Step 2.Select Call History File to Scan by Program
Select the “Call History” to be scanned by program, then connect iPhone to the computer(You are allowed to select more than one files to be scanned by program). Then click “next”.

select file to recover

Now the program will begin scanning your device automatically for lost data after clicking “Scan”.

scan iphone and search lost iphone call logs

Step 3.Preview and Directly Recover Lost Call Logs from iOS 11 iPhone
Once the scanning is completed, you are allow to preview and directly recover the lost call logs from iPhone after iOS 11 update. Select the data you want and click “Recover” to save the selected data on the computer.

recover lost call log from iphone

d_win d_mac

Part 2: How to Recover Lost iPhone Call History on iOS 11 with iTunes Backup

Step 1. Select the iTunes Backup File and Scan
If you have done iTunes backup before, you will see the backup files listed once you launch iOS Data Recovery and then click the second mode”Recover from iTunes Backup”. Connect iPhone to the computer. Choose the backup file you want and click “Scan”.

select itunes recovery mode

Step 2.Preview and Restore Lost iPhone Call Logs from iTunes Backup
It will be taken to scan your iTunes backup files. And you are allowed to preview all the content in backup file. Choose the files you want and click “Recover” to begin the recovery. Then save the selected data to the computer.

recover iphone call logs from itunes bakcup after iOS update

Part 3: How to Recover Lost iPhone Call History on iOS 11 with iCloud Backup

If you had created an iCloud backup, and this backup contains the records of calls, you can use iCloud account to get them back from iCloud backup.

Step 1. Load the Program and Sigin Your iCloud Account

After running iOS Data Recovery program, switch to “Recover from iCloud Backup” mode. Then you can using Apple ID and password to sigin your iCloud account.

log in icloud account

Step 2. Choose iCloud Backup File to Extract

Next, the program will detect all iCloud backup files in your iCloud account and display a list. You can select the right one that you want to access and click “download” button to extract your iCloud backup files.

select icloud backup file

Step 3. Preview and Recover iPhone Call History

After that, the program will display all contents in scan result, you can preview the call logs and select the calls you want then click the “Recover” button to save them on your computer.

recover call history on iphone after ios 11 update

d_win d_mac

Related Article:

How to Recover Deleted iPhone Data on iOS 11

How to Recover iPhone Data after iOS 11 Update

How to Recover Deleted iPhone Text Messages after iOS 11 Update

How to Recover Deleted iPhone Contacts after iOS 11 Update

How to Recover Deleted iPhone Photos after iOS 11 Update

How to Fix iPhone System to Normal after iOS 11 Update

How to Stream Apple Music on Samsung Galaxy Note 8

[Summary]:No other way to enjoy Apple Music on Samsung Galaxy Note 8, besides installing the sluggish Apple app?This article teach you how to remove DRM from Apple Music and stream Apple Music on Samsung Galaxy Note 8 for playing offline without installing sluggish Apple Music app.
play apple music on samsung galaxy note 8
Apple Music is only supported on these devices:

*iPhone, iPad, and iPod touch with iOS 8.4 or later
*iTunes for Mac or Windows 12.2 or later
*Android phones with Android 4.3 (Jelly Bean) or later

Samsung Galaxy Note 8 is the latest Samsung smart phone in Note series,if you use iPhone before,you may often listen Apple Music songs on iPhone,now you can got a new Samsung Galaxy Note 8,how can you listen to those already purchased Apple Music and playlist on Galaxy Note 8?You can use a third-part iPhone to Android Transfer to transfer contacts, text messages, photos, call logs from iPhone to Galaxy Note 8,however,how to play Apple Music on Samsung Galaxy Note 8?This article will teach you a easy guide to stream Apple Music on Galaxy Note 8 and playing Apple Music on your Samsung phone – playback offline free forever.

You may want to know:

* How to Transfer iTunes Music to Galaxy Note 8/S8

* How to Transfer Contacts from iPhone to Galaxy Note 8

Apple Music is M4P format with DRM protect,once your cancel the subscription service,you can’t play the Apple Music songs,the Samsung Galaxy Note 8 supported MP3 format,so you must to remove DRM from Apple Music and convert to MP3 format for playing Apple Music on Samsung Galaxy Note 8.

Apple Music Converter is designed for Apple Music users to remove the DRM from Apple Music, iTunes Music songs and convert them to DRM-free MP3, FLAC, AAC or WAV format at 10X faster speed with keeping lossless audio quality. In this case, you can easily convert Apple Music M4P to MP3 and sync Apple Music to Samsung Galaxy Note 8, Note 5, Note 4, Galaxy S8/S7/S6,etc. as you want to stream.

Please download Apple Music Converter for Mac or Apple Music Convert for Windows version and follow the detailed tutorial to remove DRM from Apple Music songs and enjoy them on Samsung Galaxy Note 8.

d_win d_mac

Apple Music Converter Key Features:

-Remove DRM protection from iTunes M4P music, Audiobooks, Apple Music;
-Convert iTunes M4P music, Audiobooks, Apple Music files to MP3/AAC/FLAC/WAV;
-Convert Apple Music DRM at 20X faster speed with lossless quality;
-Remove DRM from Apple Music songs and enjoy them on Android phone;
-Preserve original ID tags to output MP3 and M4A audio files;
-Perfectly support macOS Sierra 10.12 and iTunes 12.7

Tutorial about How to Enjoy Apple Music on Samsung Galaxy Note 8

Step 1. Add Apple Music Songs or Playlist to iTunes Library
In order to convert Apple Music songs to MP3 for playing on your Samsung Galaxy Note 8,please add Apple Music song, album or playlist to your iTunes Library. You don’t need to download them.

add Apple Music and playlist to iTunes

Step 2. Download and Run Apple Music Converter for Mac or Windows
Here,we provide the Apple Music Converter both for Mac and Windows version,please download the corresponding version and run it on your computer.

d_win d_mac

You will find it will automatically launch iTunes and load all Apple Music songs, albums and playlists you have added to iTunes library.

download and run apple music converter

Step 3.Select Apple Music M4P Files you Want to Convert to MP3
In this step,please click the music playlist in the left side and select songs that you want to convert.You can search the songs you want in the “search box”.

select Apple Music

Step 4.Select MP3 as Output Format
Then, choose MP3 as output format. Set profile, output path, name format as you like.The program also provides 3 profile settings: High, Normal and Low with different Bitrate, SampleRate and channels. You can also customize the value on the right side as you like.

select mp3 output format

Tips:Apple Music converter also supports convert iTunes M4P files to common audio formats: MP3, M4A, AC3, AIFF, AU, FLAC, M4R and MKA as output format.

Step 5.Convert Apple Music from M4P to MP3
The last step,please click  “Convert” button to start converting selected Apple Music songs to MP3. iTunes will play the songs in the background (muted) during converting, so you’d better not use iTunes before conversion is finished.

Stream Apple Music on Samsung Galaxy Note 8

After conversion, click “Open Output File” to quickly get the DRM-free MP3 output.

view mp3 files

Step 6. Move Converted Apple Music(.mp3) to Samsung Galaxy Note 8
Now you can use this Android Transfer & Manager to transfer converted MP3 to Samsung Galaxy Note 8 for streaming and then play it on the Samsung Galaxy Note 8 music player Apps.
Learn the guide: How to Transfer Music from Computer to Samsung

import apple music to Samsung Galaxy Note 8

Useful Tips: Movies and TV shows purchased from iTunes Store are also DRM-protected. If you want to remove DRM from iTunes movies and TV shows and convert iTunes M4V to MP4, try iTunes M4V Converter for Mac.

Free download the Apple Music Converter for Mac or Windows and try to convert M4P to MP3:

d_win d_mac

What’s More about Apple Music Converter

Apple Music Converter is a useful and powerful iTunes M4P converter and DRM removal for Apple music users to enjoy Apple Music songs on any devices,only 4 steps to to remove DRM protection from the Apple Music M4P songs and convert to MP3, M4A, AAC, etc.

-Remove DRM from Apple Music files to help you listen them on your Android Samsung phone, HTC, Huawei, Motorola, Google Pixel, iPhone X, iPhone 8/8 Plus, iPhone 7/7 Plus, iPhone SE, iPad Pro, iPod, Zune, PSP, MP3 player offline.
-Legally Remove DRM from Apple Music, Audiobooks in M4P format.
-Legally remove DRM from iTunes M4P, M4A, M4B & Audible AA audiobooks and convert the audiobooks to DRM-free MP3, AAC, FLAC or WAV.
-Easily remove DRM protections from iTunes M4P music, purchased Apple music and convert them to the plain formats you like.

Related Articles:

How to Transfer Any Video to Samsung Galaxy Note 8/S8/S7

Transfer Photos and Videos from Samsung to Samsung Galaxy Note 8

3 Ways to Sync iTunes Music to Android Phones

How to Sync Apple Music to iPhone 8/iPhone X

How to Transfer Videos from iTunes to iPhone 8/iPhone X

How to Convert DRM Protected iTunes M4V Videos to MP4

iOS Data Recovery – How to Recover Deleted iPhone Data on iOS 11

I updated my iPhone to iOS 11 last week, however, some personal data were lost for no reason. How to restore the deleted iPhone data on iOS 11?

The first public beta version of iOS 11 for iPhone/iPad was released lately. After iOS 11 released, a lot of Apple fans can’t wait to update the device to the new iOS system. However, the newest iOS version is still not perfect enough, the most worse situation is updating iOS device will lead to data loss on device. There are some of the Apple fans reported that they lost data on iPhone without backup after iOS 11 update. What if you are in such a situation, how would you deal with it? How to restore deleted iPhone data on iOS 11? This tutorial will provide you a perfect solution to solve it.

Restore Deleted iPhone Data on iOS 11

Fortunately, iOS Data Recovery offers a best solutions for you to recover deleted data from iPhone after iOS 11 update with three recovery modes, which are “Recover from iTunes Backup Files”, “Recover from iCloud Backup Files” and “Directly Recover from Device”. iOS Data Recovery enables to restore several types of iOS data, including contacts, photos, videos, text messages, notes, call logs, calendars, WhatsApp & attachments, apps and more. iOS Data Recovery allows to recover iOS data under any data loss circumstances, like iOS update, iOS jailbreak, deleted accidentally, restore to factory reset, device lost and so on. All models of iOS devices are compatible with iOS Data Recovery, including iPhone X, iPhone 8(Plus), iPhone 7(Plus), iPhone 6S(Plus), iPhone 6(Plus), iPhone 5S/5C/5, iPad and iPod.

d_win d_mac

Part 1: How to Restore Deleted iPhone Data on iOS 11 with iTunes Backup

Step 1.Choose the iTunes Backup File and Scan
Run iOS Data Recovery and choose the second mode”Recover from iTunes Backup”.Connect iPhone on iOS 11 to the computer.Choose the backup file you want and click “Scan”.

scan itunes files

Step 2.Preview and Restore Deleted Data from iTunes Backup
A few seconds will be taken to scan your iTunes backup files.And you are allowed to preview all the content from the backup files.Choose the files you want and click “Recover” to complete the recovery.Then save the data to the computer or device.

recover iphone data from itunes file

d_win d_mac

Part 2: How to Restore Deleted Data from iPhone Directly after iOS 11 Update

Step 1.Run iOS Data Recovery and Connect iPhone
Run iOS Data Recovery on your computer and select “Recover from iOS Device” and click “Start“.Then,connect iPhone on iOS 11 to your computer with the USB cable.

connect iphone to computer

Step 2.Scan Deleted Files from iPhone
Select the files contain the data you lost from iPhone on iOS 11, then click “Next“.

scan data on iphone

Note:Make sure the USB cable is well connected until the process is end.

Now the program will scan data on your iPhone.

scan iphone data

Step 3.Preview and Recover Deleted Data from iOS 11 iPhone Directly
Now you could choose the detail data you want to recover after previewing that,mark the data you want and click “Recover” button on the lower right corner in the interface of program to recover the selected data on the computer or your device.

recover deleted data from ios 11 iphone

Note:This mode fits the situation if you didn’t backup your iPhone before losing data.If you have backed up your device,you can choose the first mode for data recovery.

d_win d_mac

Related Article:

How to Recover iPhone Data after iOS 11 Update

How to Recover Deleted iPhone Text Messages after iOS 11 Update

How to Recover Deleted iPhone Contacts after iOS 11 Update

How to Recover Deleted iPhone Photos after iOS 11 Update

How to Fix iPhone System to Normal after iOS 11 Update

How to Switch from Android Samsung to iPhone XS/XS Max/XR

[Summary]: Want to switch from Android Samsung Galaxy phone to iPhone X/Xs (Max)? Here is a complete guide shows you how to transfer data from Android to iPhone X/Xs (Max) via Move to iOS app, Phone Transfer and iPhone & Android Manager tool.

People also read:

* Transfer WhatsApp Messages to iPhone 7/8/X and iPhone Xs(Max)

* Manage and Transfer Files to iPhone X and iPhone Xs(Max)

android iphone data transfer

I need some help. I got some trouble that have no ideas to transfer contacts, text messages and other data from my old Samsung Galaxy S7 to the new iPhone Xs. How to complete the transfer process with a simple solution?” – Asked by Ellie Goulding

Move to iOS app can’t help me move text messages, music and video from Galaxy Note 8 to iPhone Xs Max, is there any third party free Android to iOS transfer tool helps me transfer SMS from Samsung to iPhone Xs and convert Samsung video, music to iPhone Xs compatible format? Thanks!” – Asked by Aimee Allen

The iPhone Xs and iPhone Xs Max can help you take more perfect photos, if you using Android phone, why not upgrade to iPhone Xs? When you have got a new iPhone Xs, however, there is an question coming for you, how to transfer previous photos and videos from Samsung phone the iPhone Xs? For example, If you use Samsung Galaxy S8/S7/S6/Note 8/Note 5 before, how to move contacts, SMS from Samsung Galaxy to iPhone Xs Max? With just a few steps, you can migrate your content automatically and securely from your Android phone with the Move to iOS app, but Move to iOS app can’t support transfer text messages from Android to iPhone. This article will shows you 3 different ways to transfer data including SMS, contacts, photos, music and videos from Samsung and iPhone X/Xs (Max) without hassle.

Part 1: Transfer Data from Samsung to iPhone X/Xs (Max) via Phone Transfer

Phone Transfer is an ideal tool helps for importing data from Samsung to iPhone X/Xs directly, including contacts, text messages, photos, videos, call logs, calendars, music, apps. Phone Transfer is designed for switching files between two mobile devices among Android device, iOS device and Symbian device, like Samsung, HTC, Lenovo, Motorola; iPhone X, iPhone 8; Nokia. In addition, Phone Transfer enables to backup & restore files for mobile device on the computer safely.

d_win d_mac

Step 1.Install and Run Phone Transfer on Computer
Now download Phone Transfer and run it on computer.The screen will automatically appear after the installation.Select the “Phone to Phone Transfer” option in the homepage of program.

samsung to iphone xs data transfer

Step 2.Connect Samsung and iPhone X to the Computer
Connect both the two devices to computer using USB.Once detected,both your Samsung phone and iPhone will be shown in the window. Make sure the iTunes are installed on your computer.

select file transfer from samsung to iphone xs

Note:There is a “Flip” button in the middle of the program,which allows users to switch the destination and source device.

Step 3.Began Analyzing and Transferring Samsung Data to iPhone XS
In this step,the program will automatically analyze and read the data on your Samsung device,display each items with numbers.Then just select the data you need to transfer from the content list,click “Start Transfer” button located at the bottom of the app,you will see a small window pop up and prompt you the work is done after a moment.Just note that the connection can not be interrupt during the transferring.

transfer samsung data to iPhone x

d_win d_mac

Part 2: Import Samsung Data to iPhone X/Xs (Max) via iOS & Android Manager

The second way to transfer Samsung data to iPhone X, you can try this iOS & Android Manager. It is a famous data manage tool for iOS device and Android device. You can use it to transfer & manage files for iOS device and Android device freely, including videos, music, photos, contacts, SMS, apps. This wonderful program allows to transfer files between iTunes/computer/mobile device and iOS/Android device directly. With iOS & Android Manager, you can easily switch data from Samsung Android to iPhone with easy steps.

d_win d_mac
Step 1.Launch iOS & Android Manager and Connect Devices with the Computer
Launch iOS & Android Manager and connect both Samsung Android device and iPhone X to the computer at the same time.

iPhone Xs manager transfer

Step 2.Setting the old iPhone as Source Device
Setting Samsung as the source device,and click “Phone to Phone Transfer” option on the main interface of program. Then a new window will pop up.

Step 3.Setting the iPhone Xs as Target Device
Setting iPhone Xs as the target device to which you want to transfer files.From the pop-up window,select the target device from the drop-down list and click “Next“.

select target device

Step 4.TransferFiles from Samsung Android to iPhone XS
By default,all the content on your source device that can be transferred are checked,namely Music and Videos,Playlists,Photos,Contacts(Note:Contacts are not supported by Mac version).You can uncheck the contents which you don’t want to transfer.Then,click “Transfer“.In the whole transfer process,DO NOT disconnect either of the devices.When the transfer completes,click “OK“.

select file to transfer

1 click phone to phone transfer

Note:Only for Windows version, you’re enabled to tick the option: “Delete contents on target device then transfer” before clicking Transfer button,then the selected contents on the target device will be deleted before the transfer.

confirm to delete data on target device

d_win d_mac

Part 3: Switch Samsung Data to iPhone X/Xs (Max) via Move to iOS App

Here are the steps which will teach you how to move data to a new iPhone X/Xs (Max) from Samsung Galaxy S9/S8/S7/S6/S5/Note 9/Note 8/Note 5 via “Move to the iOS” app. You can migrate your content including Contacts, Mail accounts, Message history, Calendars, photos, videos, Free apps and Web bookmarks from your Android phone to iPhone automatically and securely with the Move to iOS app.

move to ios app

Take the following steps:

Step 1. On your Samsung phone or other Android phones, install and launch “Move to iOS” app. You can get it from Google Play.

launch move to ios

Step 2. While you are setting your new iPhone Xs, look for Applications and Data screen. Then tap on “Move Data from Android”.
Step 3. On the Android device, open “Move to iOS” application and tap “continue”.
Step 4. Read the terms and conditions carefully and then tap “agree”. Tap “Next” in the top right corner of “Find your Code” screen.
Step 5. On your iPhone Xs, tap continues on the screen called Move from Android. Then wait for a ten or six digit code to appear.
Step 6. Enter the code on the Samsung device. Then you will have to wait for the transfer screen to appear.
Step 7. Select the content which you wish to transfer on your Samsung to iPhone Xs and tap “next”. Leave the loading bar to complete on both the devices.

select files move to ios

Step 8. Tap “Done” on your Samsung device after the loading bar is complete.
Once your all the data has been moved to your iPhone X, you’re ready to get going, you can see all Samsung data appear on your iPhone Xs. iOS will set up your default mail account and automatically add any free apps you already own. For paid Android apps, you can purchase them if they’re available on the App Store.

move to ios complete

Tips: We recommend you use a thid-part tool like Android to iPhone Switch or Phone Transfer to move everything from Android to your new iPhone. After the data is transferred, all data remains intact and will not cause data loss. In additional, Phone Transfer also can help you directly transfer data from iPhone, Android, Windows Phone, Symbian etc. to iPhone X/Xs(Max) or iPhone XR without Any Loss, it support 6000+ devices.

More Features of Phone Transfer:

– Transfer contacts, text messages, photos and other file types between devices directly.
– Restore backup from Blackberry 7/10, iTunes, iCloud, OneDrive, Kies to your phone.
– Backup data from old phone to computer.
– Restore data to new phone from backups.
– Permanently erase data from old phone before selling.
– Works perfectly with Apple, Samsung, HTC, LG, Sony, Google, HUAWEI, Motorola, ZTE, and more smartphones and tablets.
– Fully compatible with major providers like AT&T, Verizon, Sprint and T-Mobile.
– Fully compatible with iOS 12/11 and Android 8.0.

Related Article

How to Transfer Data to a iPhone X/Xs (Max)

How to Transfer Videos/Music/Photos to iPhone X/iPhone 8

How to Import Videos to iPhone Xs/iPhone X/iPhone 8 without iTunes

How to Transfer Samsung Data to iPhone 8/iPhone X

How to Backup iPhone X/iPhone 8 Contacts

How to Backup & Restore iPhone X/XS on Computer Safely

How to Backup & Restore iPhone 8

Move Data from Android to iPhone X/Xs(Max)

Transfer Everything from Old Phone to New iPhone X/Xs (Max) Quickly

[Summary]: Look for a way to transfer data to new iPhone X/Xs/Xs Max/XR? Read this guide to learn how to transfer everything from old phone to new iPhone X/Xs (Max) smoothly and quickly, no matter you use an iPhone, Android, Windows Phone, Symbian Nokia or BlackBerry mobile phone before.

Latest News of iPhone Xs

Apple held a press conference at the Steve Jobs Theater in Apple Park, and officially launched the new iPhone Xs series of smartphones: iPhone Xs and iPhone Xs Max. The two models are 5.8 inches and 6.5 inches, equipped with A12 chips, offering a new gold color, and a powerful neural network engine to provide a breakthrough camera, and the dual card dual standby function has finally been realized. The iPhone Xs’ screen is the same as the iPhone X, which is the 5.8-inch Super Retina super retina display with a resolution of 2436×1125 pixels, a total screen pixel of 2.7 million pixels and a pixel density of 458ppi. Apple claims that this is the highest pixel density on iOS devices, and the overall size is the same as the size of the iPhone 8 Plus.

Apple official released the new iPhone Xs, iPhone Xs Max and iPhone XR today. The new iPhone X, iPhone 8 and iPhone 8 Plus were released in September of last year. When you get a new iPhone, how can you transfer music, photos, contacts, and more data from old phone to new iPhone easily? You’ll find how to sync data to iPhone Xs solution you need in this article to upgrade to new iPhone XR and iPhone XS(Max), no matter you use iPhone, Android phone, Nokia, BlackBerry or Windows phone before.

This article is going to show you the reliable solutions to transfer your old data to new iPhone 8/9/X/XR/Xs(Max). I’d like to share five complete guides to switch data to iPhone XR and iPhone Xs (Max) without complicated steps.

CONTENTS

Questions about iPhone Xs Data Transfer

How to transfer data to a new iPhone XS? I have pre-ordered a new iPhone XS on the Apple official website. Now one question confuse me is that how to transfer data from my Samsung Galaxy S7 to the new iPhone Xs directly? Any good recommendations?

Part 1: Transfer Data from Android, iPhone to New iPhone X/Xs (Max)

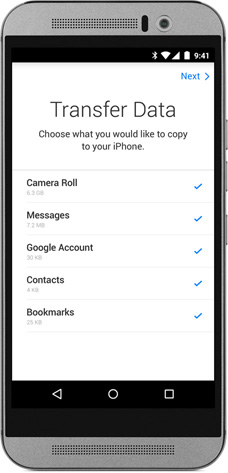
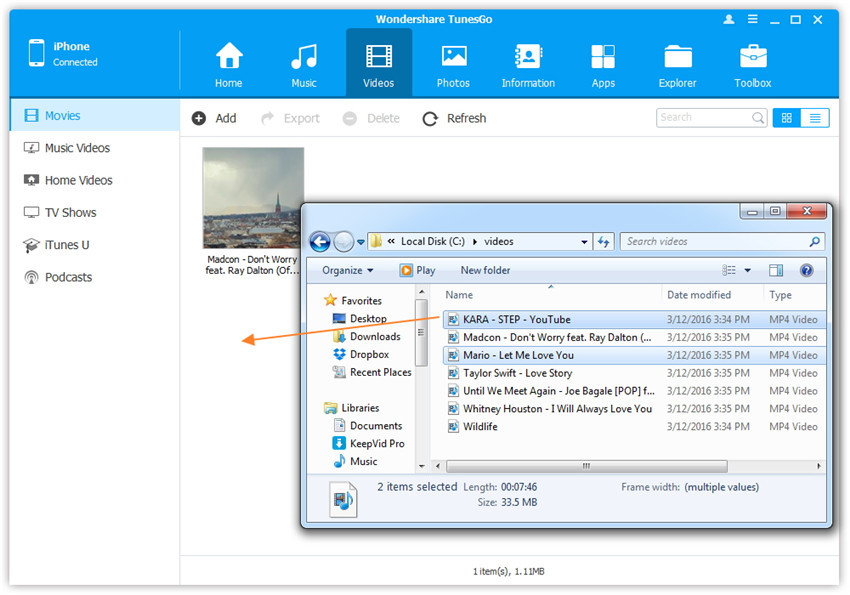
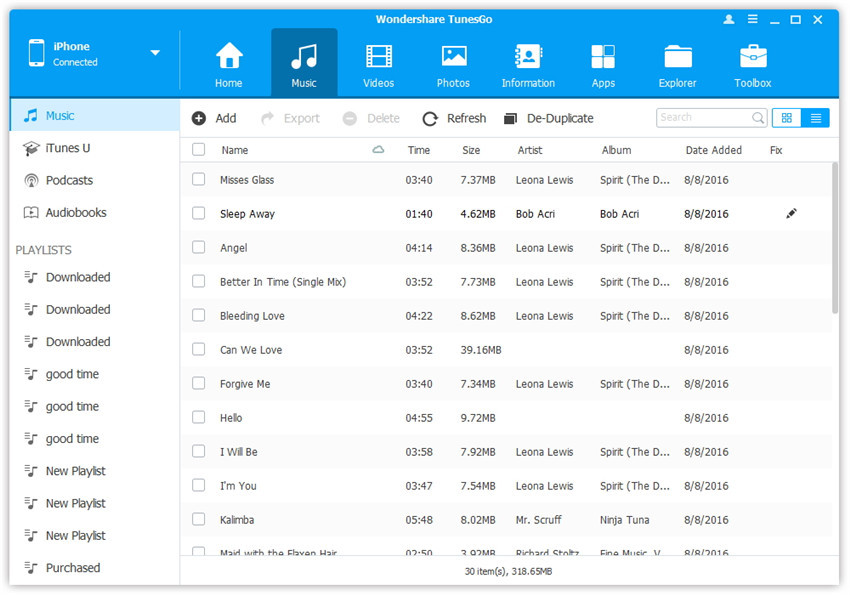
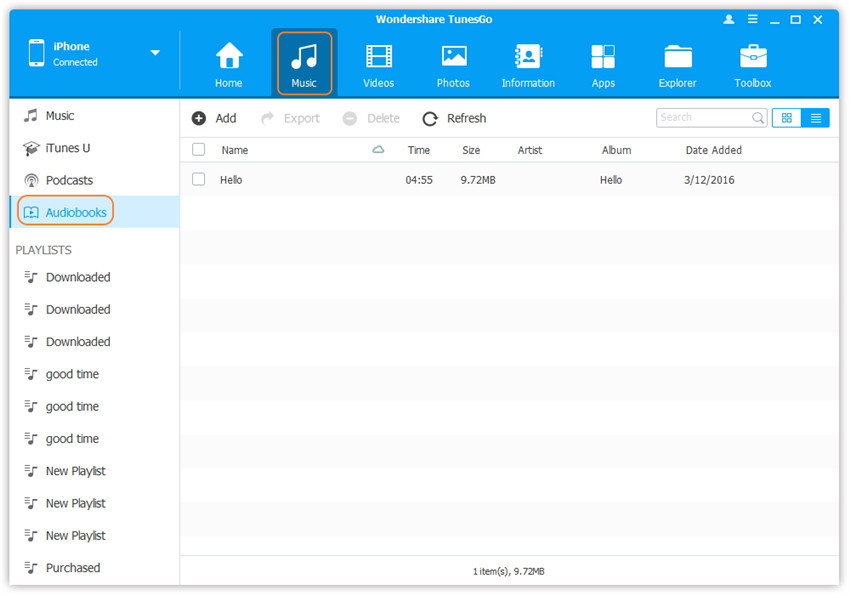
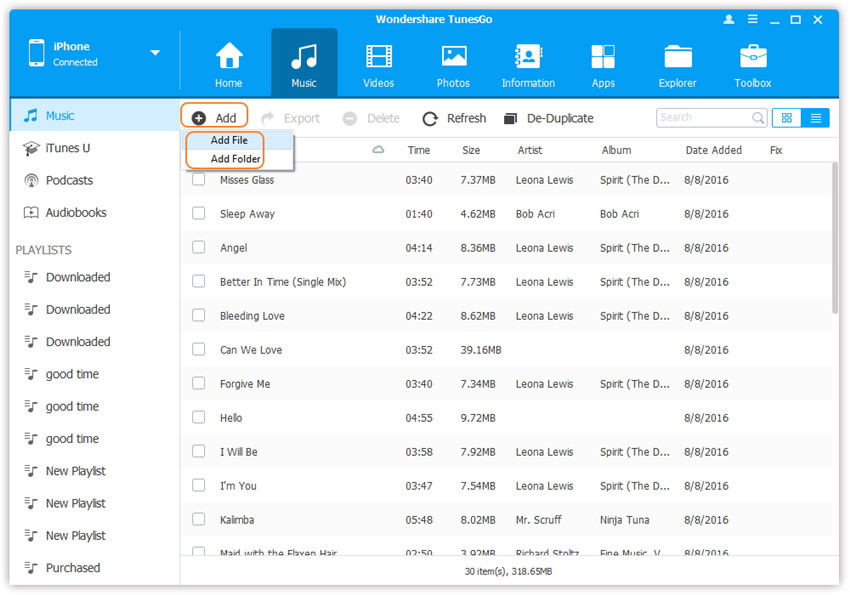
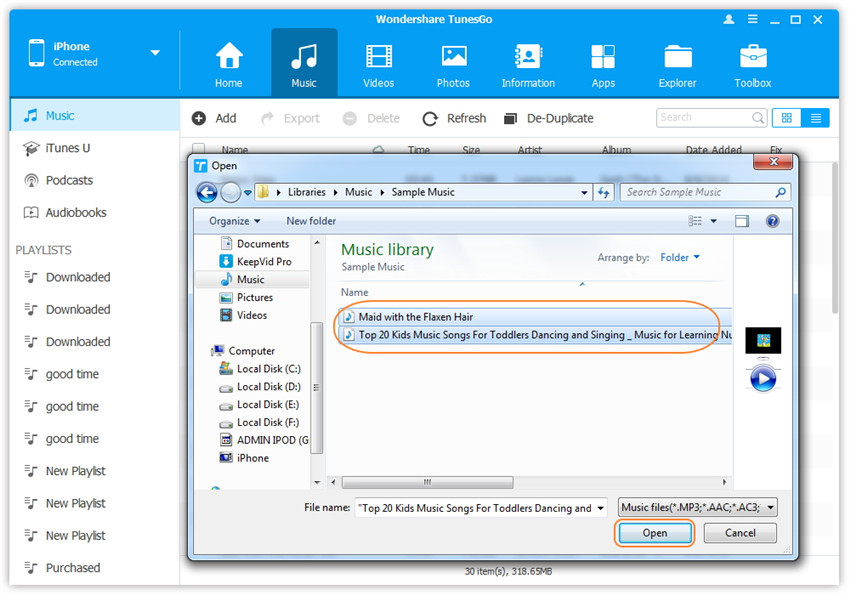
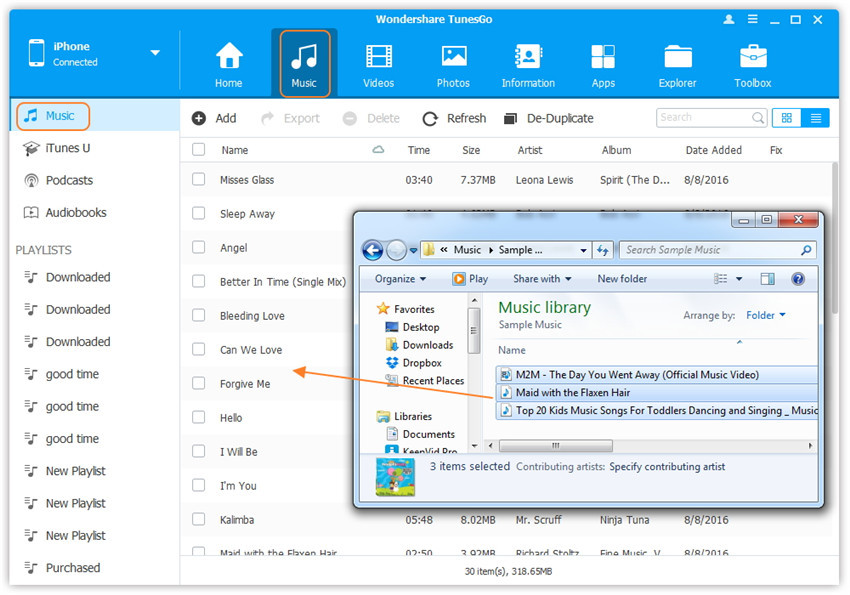
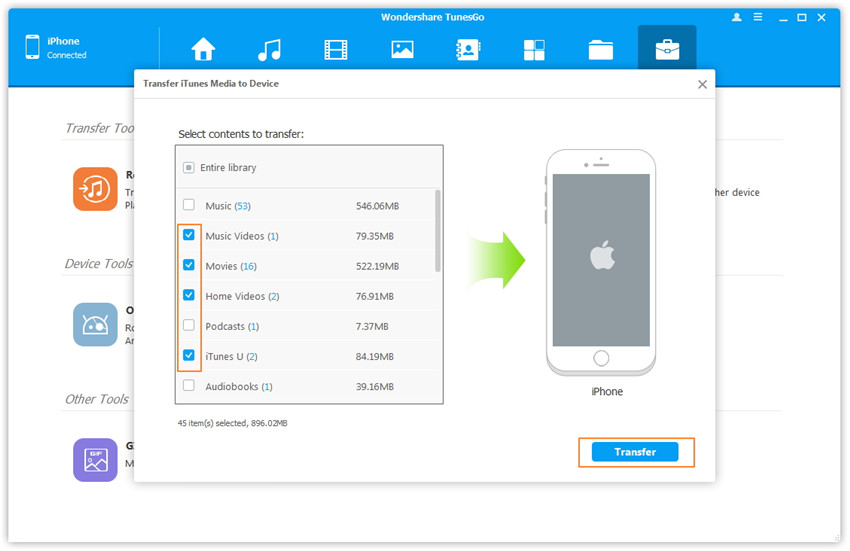
You can use Phone Transfer or Phone Switch without any limitation on the transfer or management feature you can use, on the files types you can transfer or on the number of items you can import. That’s what Phone Transfer really is. With this program, you can transfer files between Android, Symbian Nokia, Windows Phone and the new iPhone XS/XS Max/XR all at once. Or you can selectively transfer one type like transferring photos to new iPhone Xs from the old mobile phone. The transferable types of data including contacts, text messages, photos, videos, music, call logs, calendars, apps.

Free download Phone Toolkit -Switch for Windows or Mac:

d_win d_mac

More Features of Phone Switch:

Phone Transfer: 1-Click Phone Transfer
-Transfer contacts, text messages, photos, videos, music, call logs, notes, bookmarks and other file types between devices directly.
-Transfer data from iPhone, Android, Windows Phone, Symbian Nokia, BlackBerry, etc,. to anywhere without data loss. Support 6000+ devices.
-Restore backup from Blackberry 7/10, iTunes, iCloud, OneDrive, Kies to your phone.
-Fully compatible with iOS 11/12 and Android 8.0.

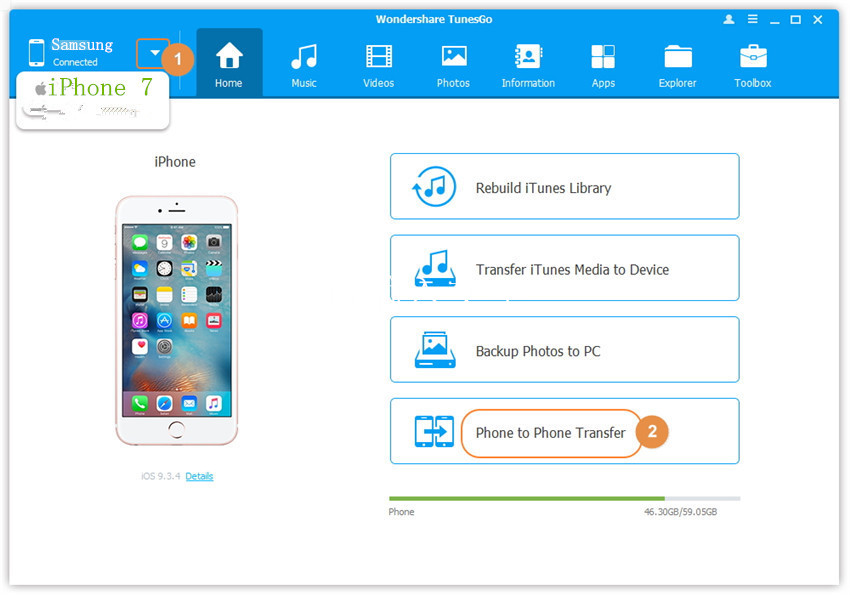
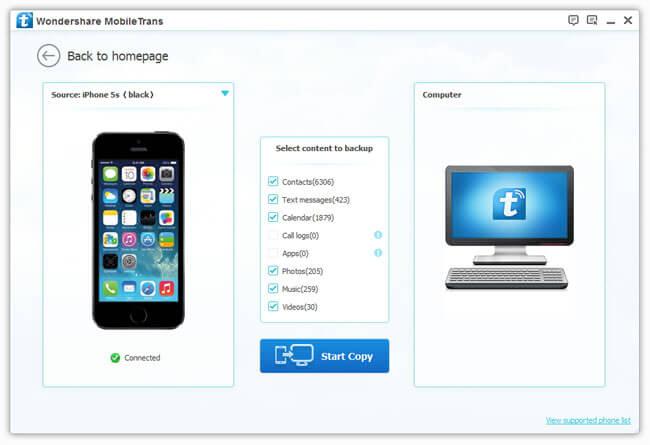
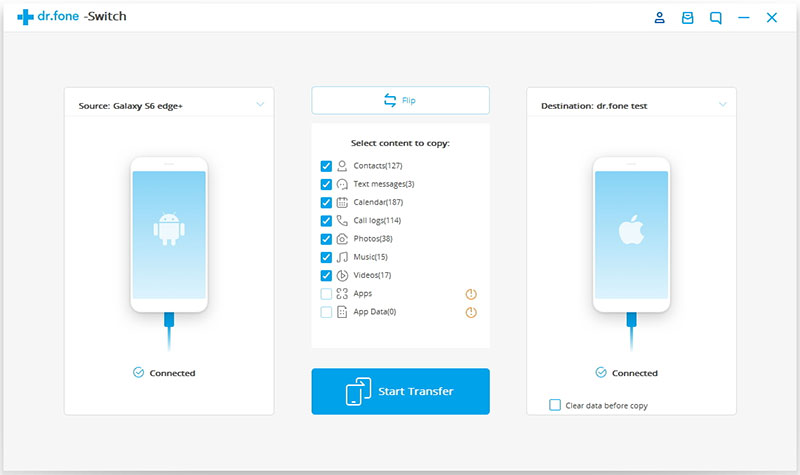
Step 1.Run Program and Connect Devices
– Run Phone Transfer program on your computer.
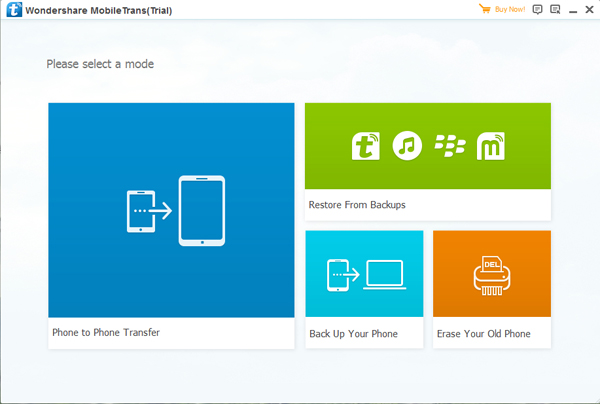
– Choose “Phone to Phone Transfer” mode.
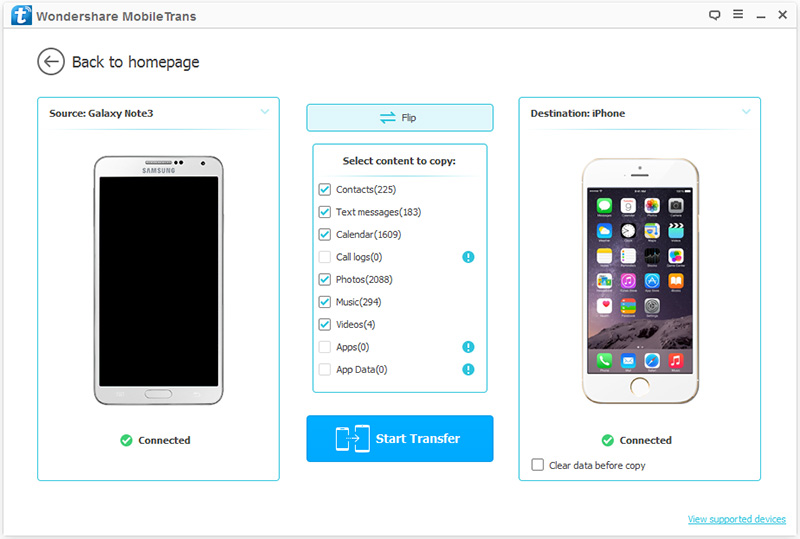
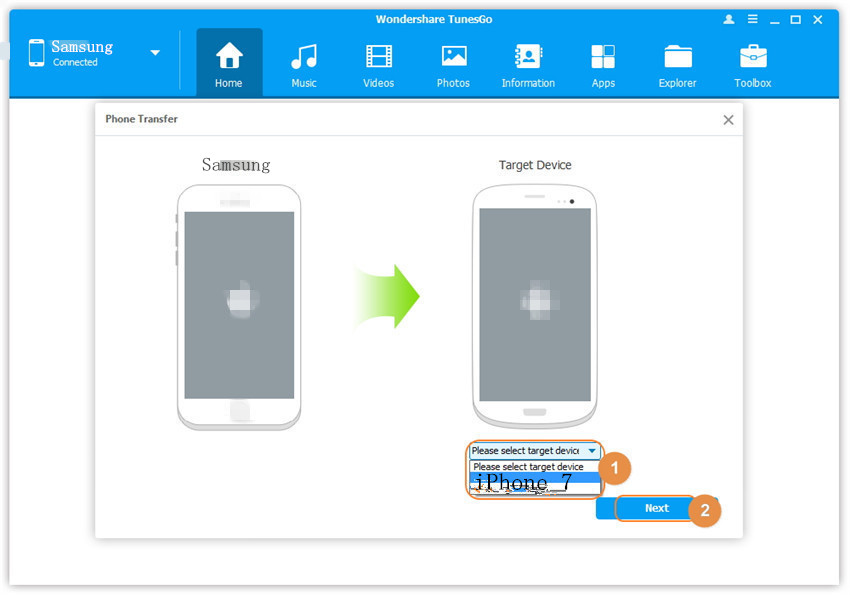
– Connect Symbian Nokia/Windows phone and iPhone X to the computer with the USB cables and wait for detecting.
– Ensure Symbian Nokia/Windows phone and iPhone X is respectively set as Source and Destination.If not, click the “Flip” button and exchange their place.

iPhone X Switch

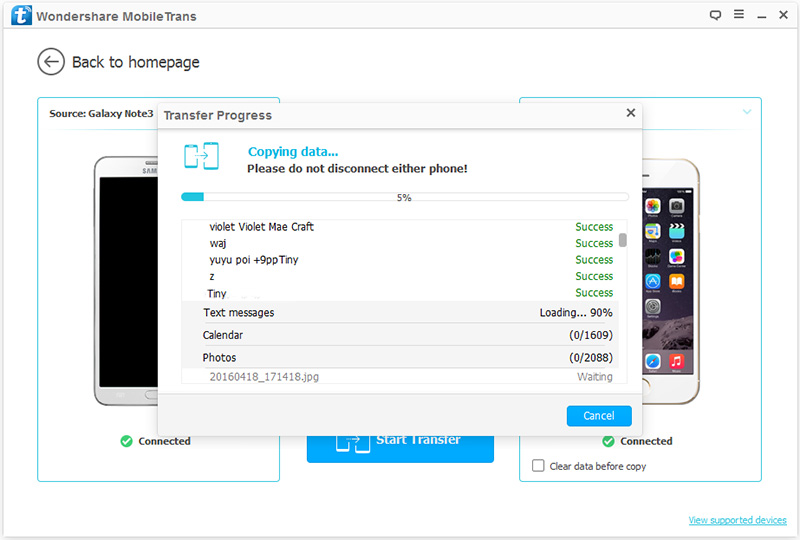
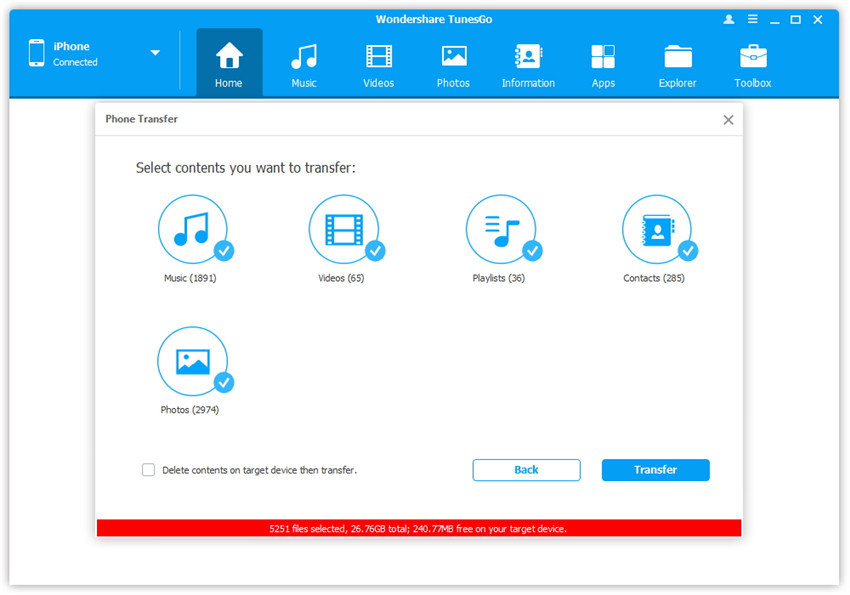
Step 2.Choose File to Transfer
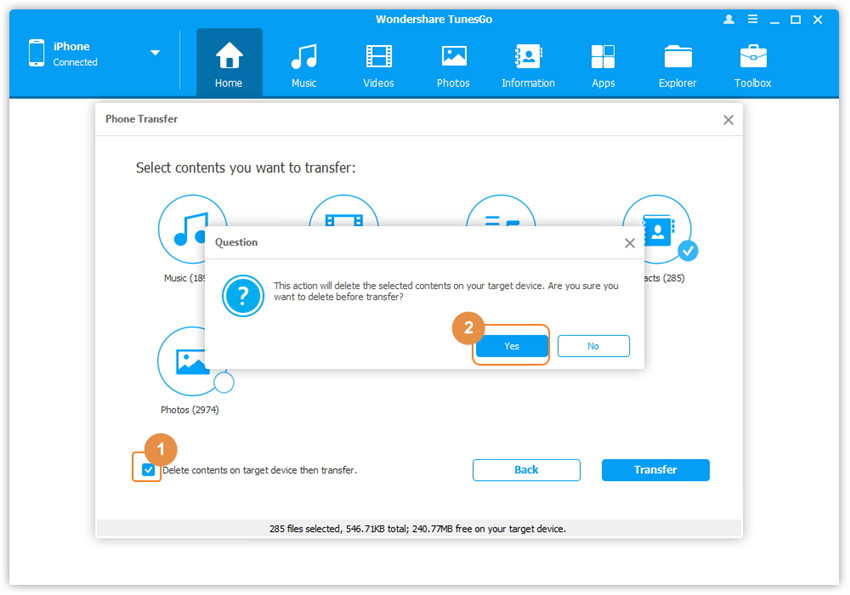
Now you are allowed to select the files to transfer from Symbian Nokia/Windows phone to iPhone X:contacts,text messages,photos,videos,call logs,calendars,music,apps are available;just click it and then tap “Start Transfer“.(You can click more than one file to transfer at the same time.)

phone switch android to iphone X

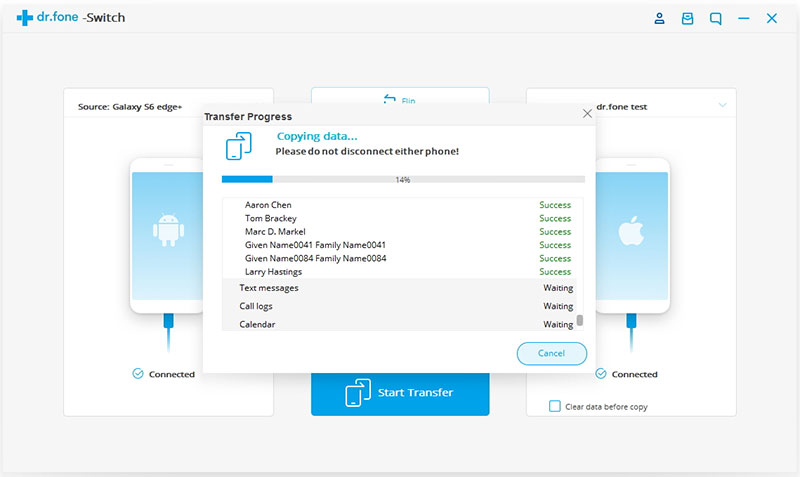
Step 3.Transfer Data from Symbian Nokia/Windows phone to iPhone X
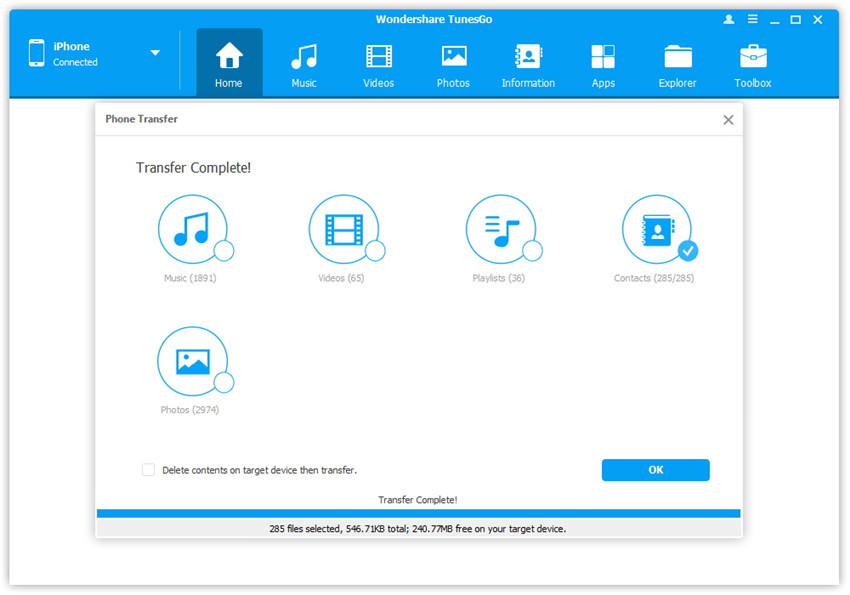
Once you clicking the “Start Transfer” button,the program will begin to the data transfer process automatically.It will finish in minutes,please wait for a moment.

switch android to iPhone X

d_win d_mac

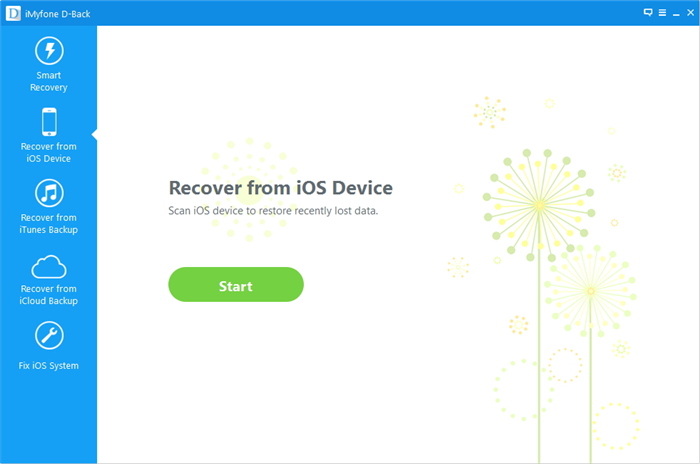
Part 2: How to Restore iTunes Backup to iPhone X/Xs (Max)

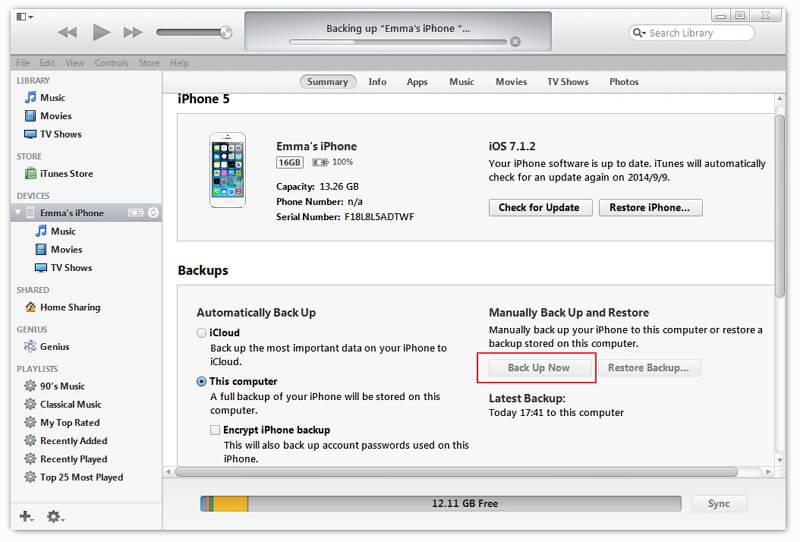
We will back up the data to iTunes regularly, it’s a good habit to have an iTunes backup of your iPhone/iPad/iPod, no matter you would like to restore data to new device or transfer files to a new device. If you use iTunes to restore the backups to device, it will erase your exiting data, but with the help of iOS Data Backup & Restore, which is a part of iOS Toolkit, it will help you selectively restore iTunes backup content to iPhone, iPad and iPod without affecting the existing data on the device.

Step 1. Connect your iPhone/iPad to Computer
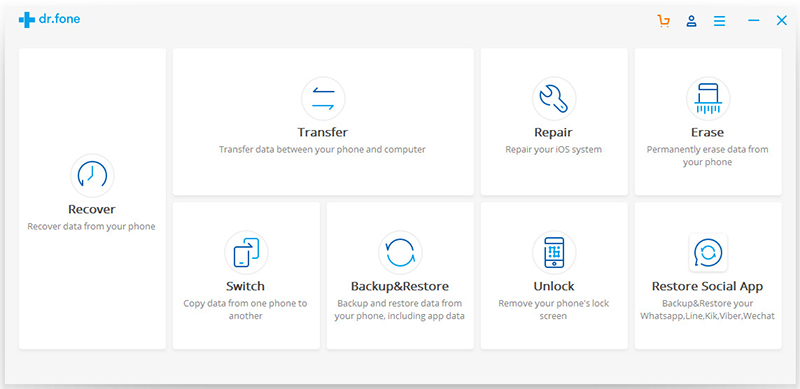
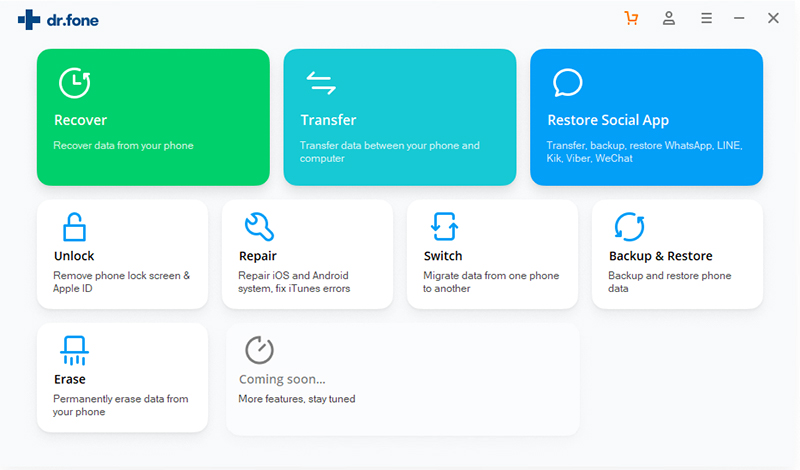
Download and install iOS Toolkit on your computer. Launch the program and select “Backup & Resotre” among all the tools.

restore iTunes to iPhone X

Step 2.Connect iPhone X to Computer
Connect your iPhone/iPad to the computer using a lightening cable. Then click “Restore” on the program, and click “Restore from iTunes Backup” option.

connect iphone to computer

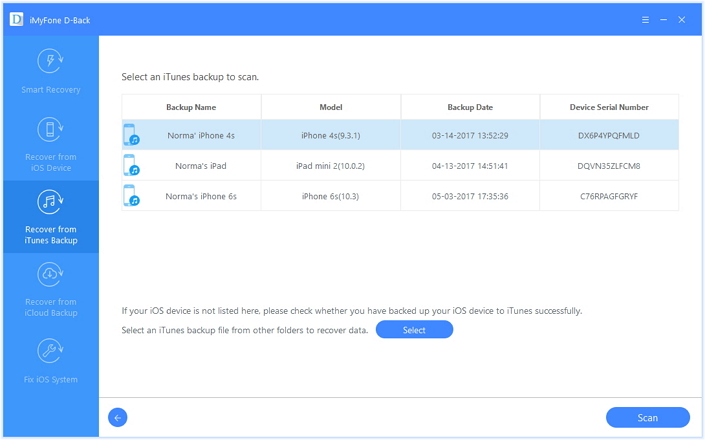
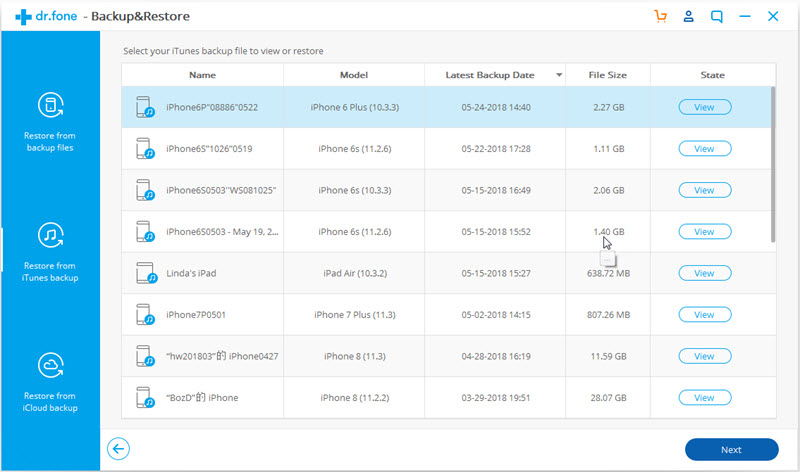
Step 3. Analysis iTunes Backup File
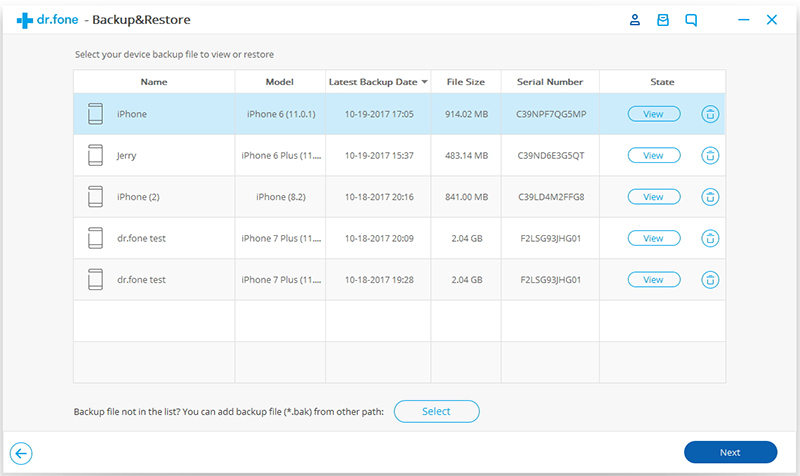
On the left column, select Restore from iTunes Backup. The iOS Toolkit will list all iTunes backup files from the default iTunes backup location. Select the iTunes backup file and click on View or Next button.

restore itunes backup to iphone x

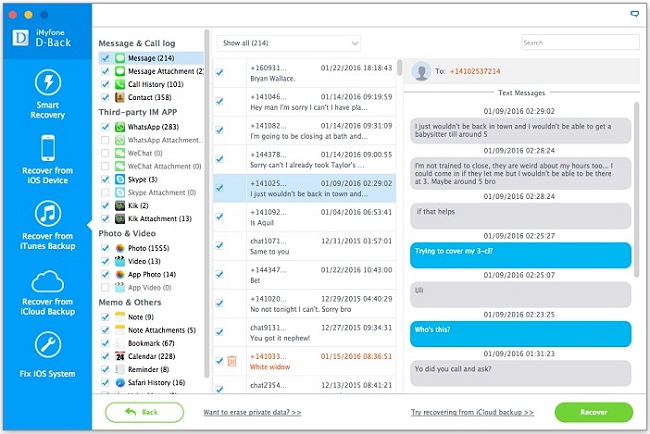
Step 4. Preview and Restore iTunes backup to iPhone X/Xs (Plus)
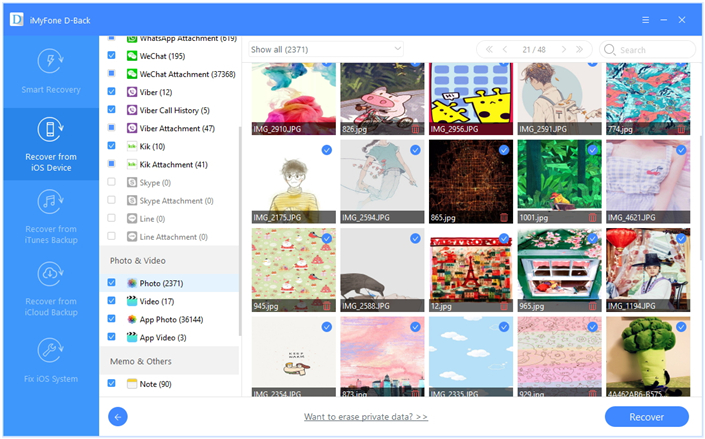
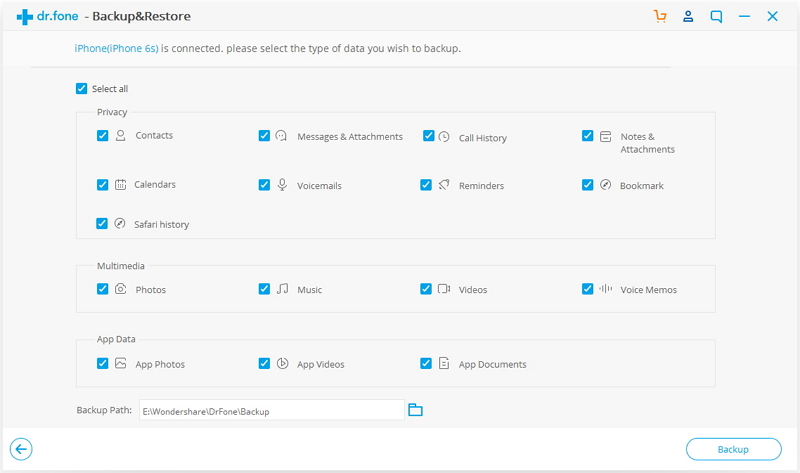
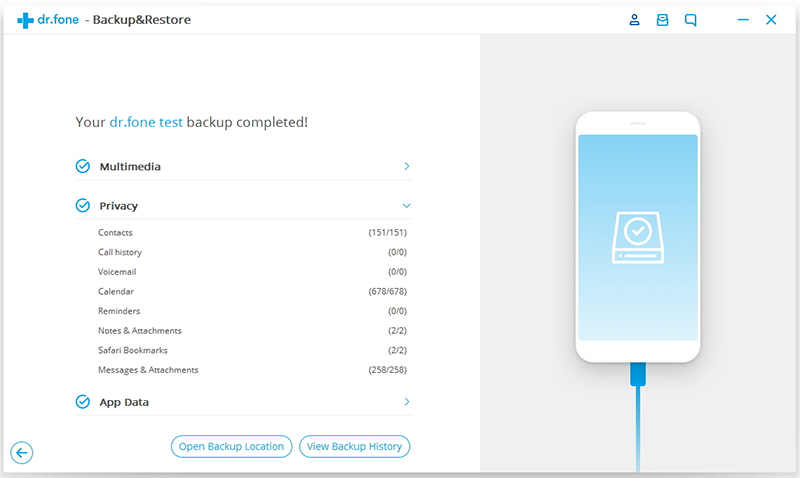
dr.fone will extract all content from iTunes backup file and display them in different data types.

restore itunes backup to iphone x

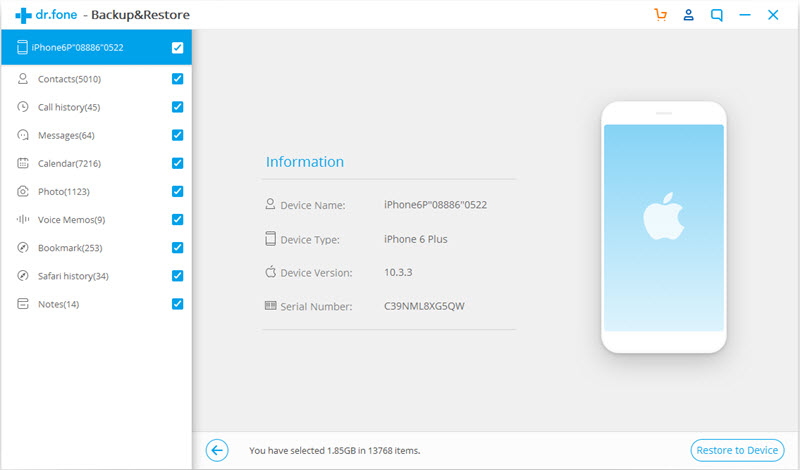
You can then go through all data types and select the ones you need, click on “Restore to Device” to restore the backup file to your iPhone X/Xs (Plus).

restore itunes backup to iphone x

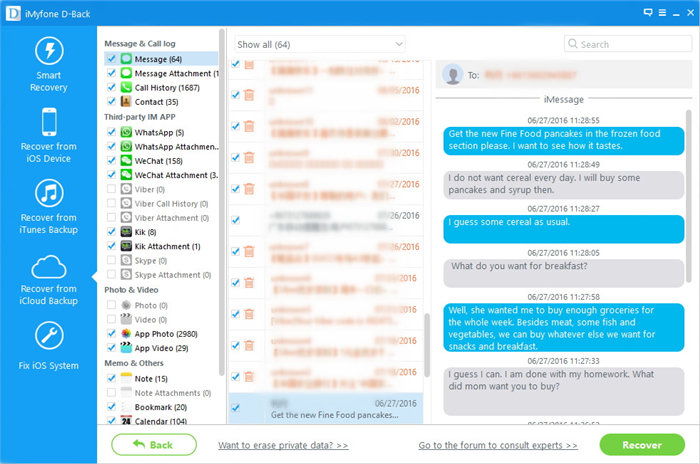
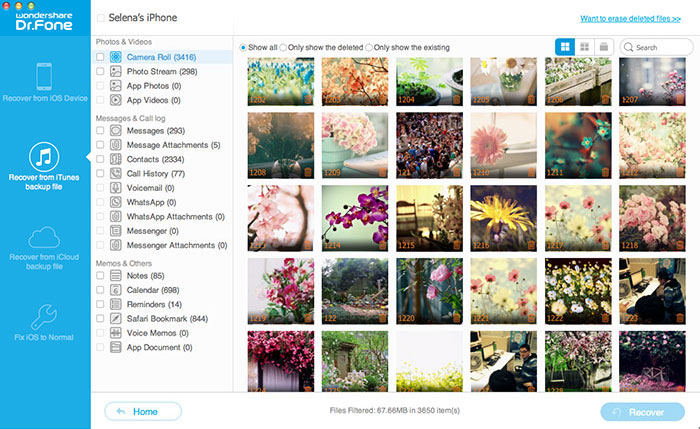
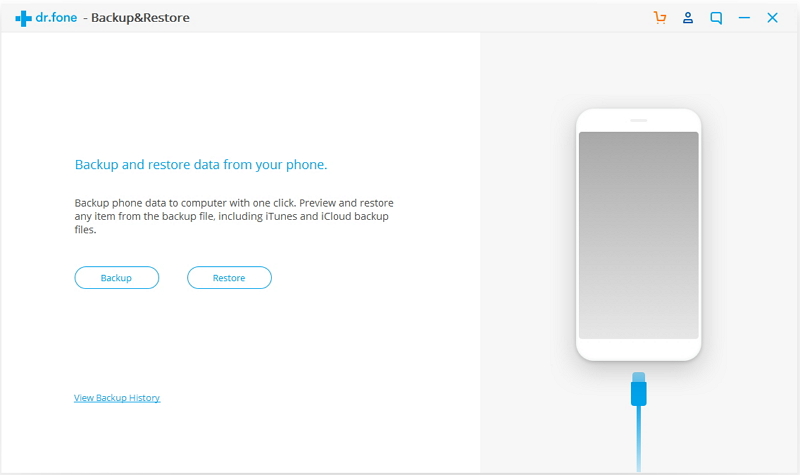
Part 3: How to Restore iCloud to iPhone X/Xs (Plus)

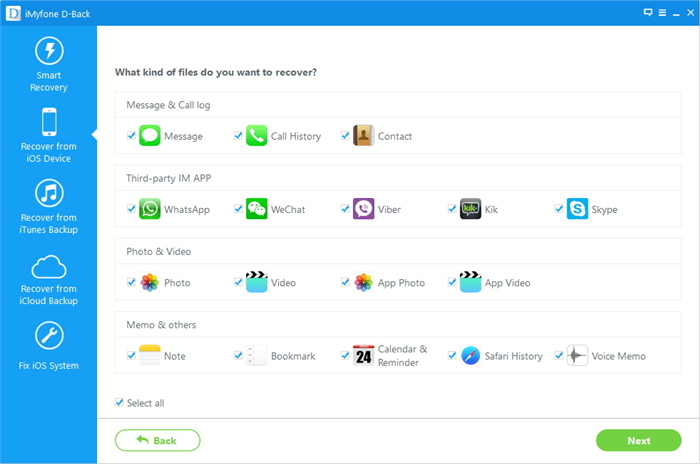
If you have backup data from old iPhone to iCloud before, how you can selectively restore iCloud backups to new iPhone without erase the existing data? We can only restore the whole iCloud backup during the iOS device setup process. If you want to selectively restore any file types from iCloud backup to iPhone X/Xs (Plus) without affecting the existing data, iOS Toolkit – iOS Data Backup & Restore function can help you easily restore iCloud backups to new iPhone X/Xs (Plus).

Step 1. Download and Run iOS Toolkit – Backup & Restore
Download and iOS Toolkit on your computer. Launch the program and select “Backup & Resotre” among all the tools.

launch ios toolkit on your computer

Step 2. Connect your iPhone X to Computer
Connect your iPhone X to the computer using a lightening cable. Then click “Restore” on the program, and click “Restore from iCloud Backup” feature.

connect iPhone X to computer

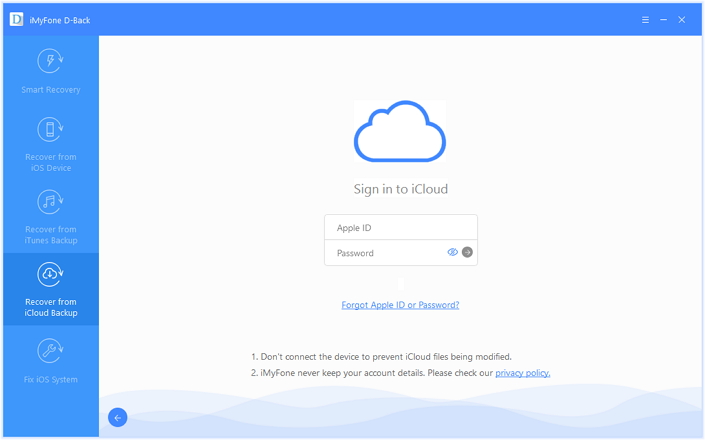
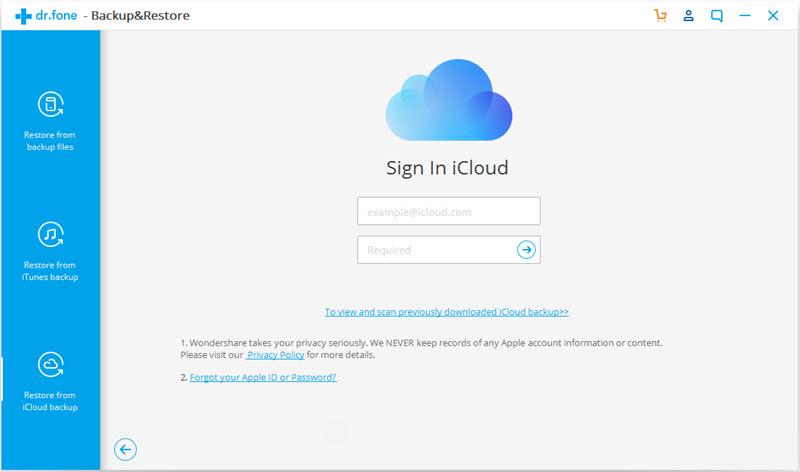
Step 2. Sign in your iCloud credentials
On the left column, select Restore from iCloud Backup. Then sign in your iCloud accont.

sign in icloud account

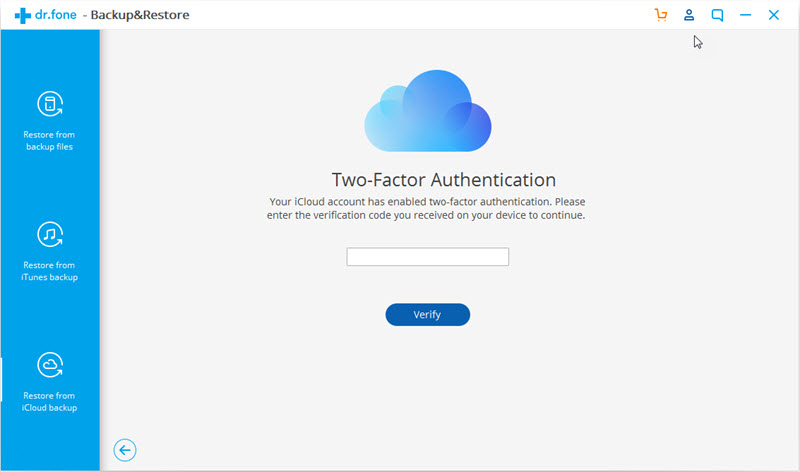
If you have turned on two-factor authentication for your iCloud account, you will receive a verification code. Enter the verification code on dr.fone and click Verify.

enter two factor authentication code

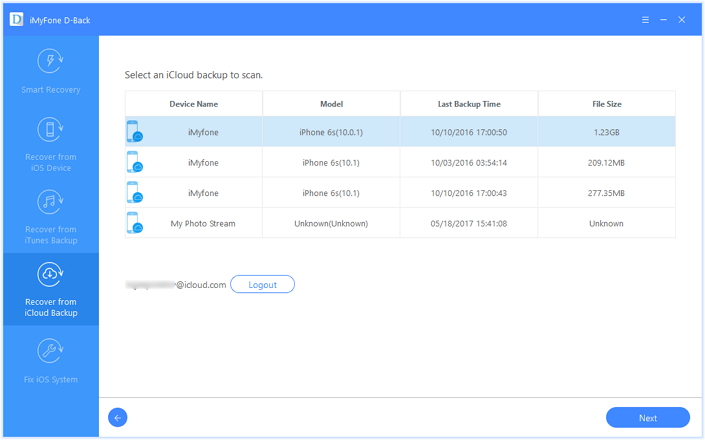
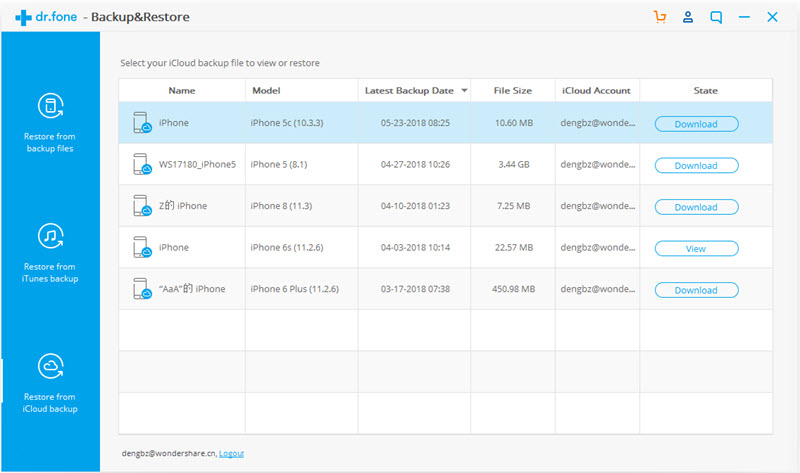
Step 3. Download Backups from iCloud
Once you sign in your iCloud account successfully, dr.fone will display all the backup files on your iCloud account. Click the “Download” button to download the backup file.

download icloud backup file

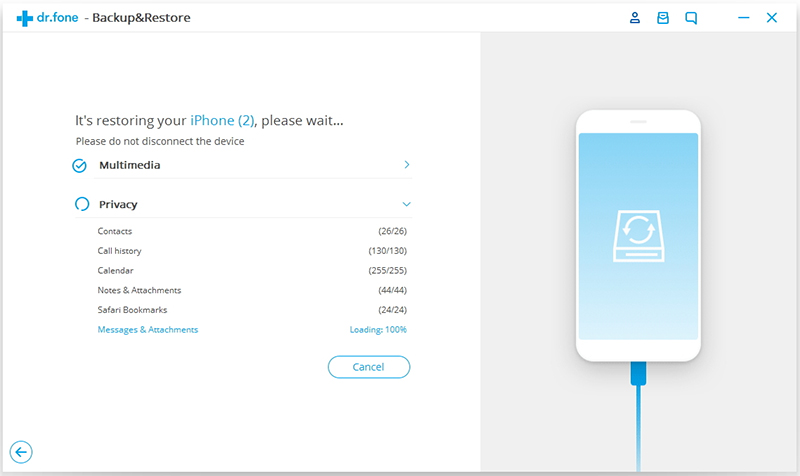
Step 4. Preview and Restore iCloud backup to iPhone X/Xs (Plus)
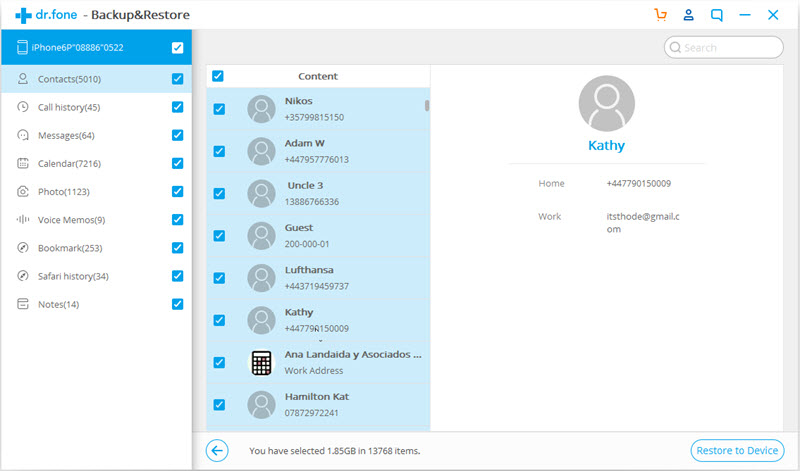
After the backup file is downloaded successfully, the program will display all iCloud backup data in different categories. You can preview each iCloud backup data and select the ones you would like to restore.

restore icloud contacts to iphone x

Then click “Restore to Device” to restore iCloud backup to iPhone X/Xs (Plus) selectively. Currently the ios Toolkit supports to restore Messages, Contacts, Call history, Calendar, Photo, Voice Memos, Notes, Bookmarks, Safari history from iCloud backup to your iPhone X and iPhone Xs (Plus).

restore icloud contacts to iphone XS

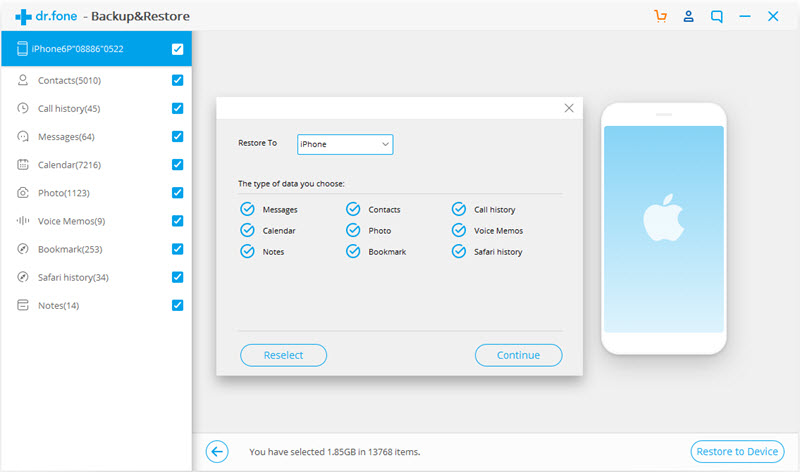
Note:You can use the “Clear data before copy” feature if you need to wipe the previous data on your device.

Download iOS Toolkit – Phone Switch for free and have a try now!

d_win d_mac

Part 4: Restore Backup from Blackberry to iPhone X/Xs (Max) with Phone Transfer

Moreover, Phone Transfer enables to transfer files to any device or backup files to PC/Mac which you can retrieve data from later. You can use it to backup data from mobile device to the computer, restore backup to the mobile device on the computer. Additionally, Phone Transfer empowers to restore backup from Blackberry, iTunes, iCloud, OneDrive, Kies to iPhone X with easy steps.

d_win d_mac

Simple Steps to Restore Blackberry Backups to iPhone X/XS(Max) with Phone Transfer

Step 1. Run Program and Choose “BlackBerry” to Restore the backup
First of all, run Phone Transfer on the computer and connect your iPhone Xs to the computer. Then in the primary window, click “Restore from Backups“, and then select “BlackBerry” from the options displayed.
blackberry restore

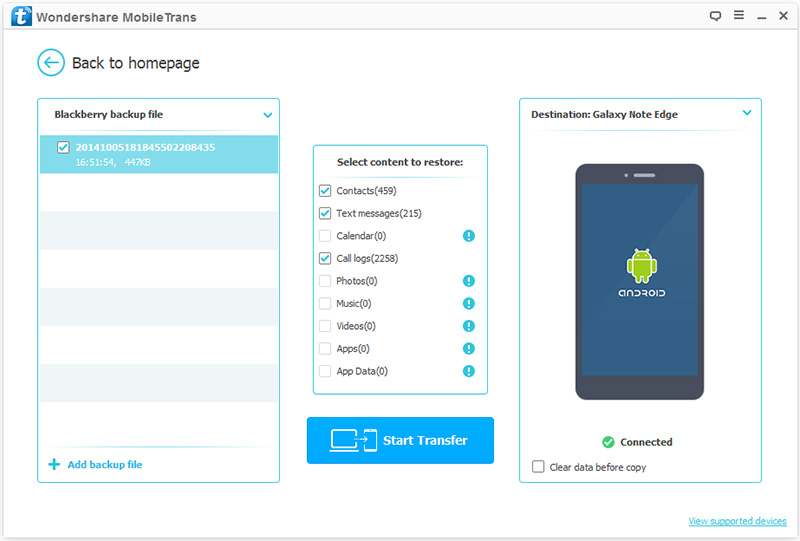
Step 2. Restore BlackBerry Backup to iPhone XS
From the left side, choose your BlackBerry backup file and then select the content to restore. You only need to check the box before the file types. If you want to replace your device’s content, you can do it by checking the “Clear data before copy” box.

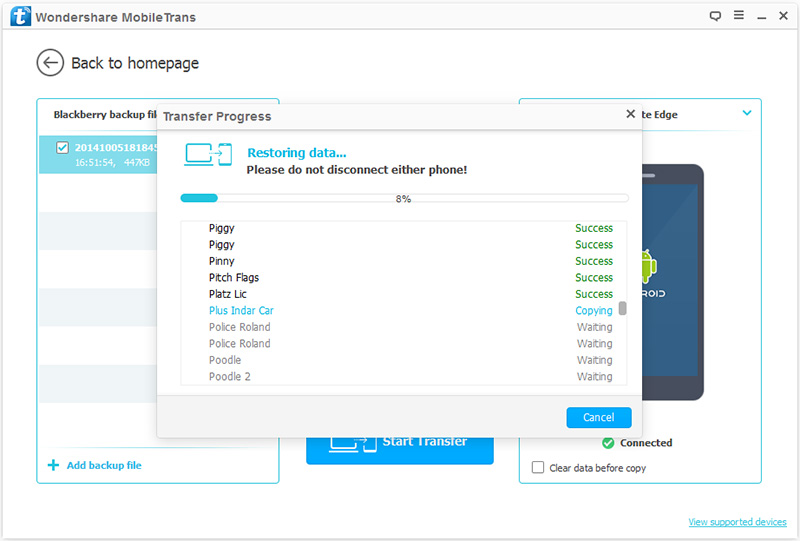
Now, click “Start Transfer” to begin the process after all steps above. Then you only need to keep your device connected through the entire process, and the program will do all for you automatically.

restore blackberry to iphone xs

Part 5: How to Restore Backup from OneDrive, Kies to iPhone X/Xs (Plus)

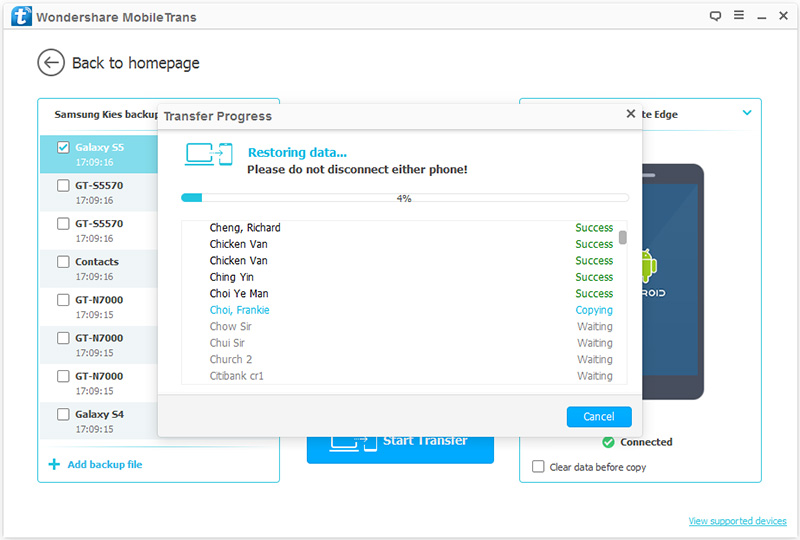
Step 1. Run Program and Choose “Kies” to Restore the Backup
First of all, run Phone Transfer on the computer and connect your iPhone X to the computer.Then in the primary window, lick “Restore From Backups“, and choose “Kies” in the options presented.
restore kies backup

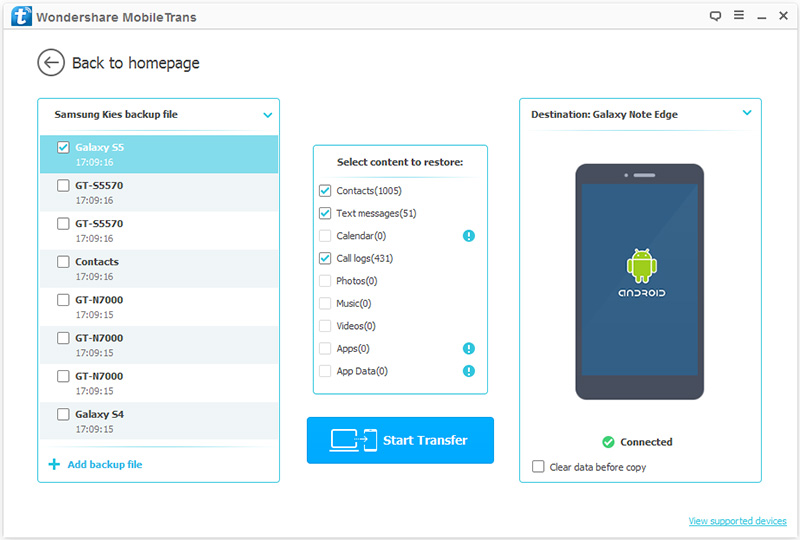
Step 2. Restore Kies Backup to your iPhone XS
Select the file you would like to transfer from the available backup files on the left. In case you don’t see the file you would like to transfer, click on “Add Backup File” for additional options.

Click on “Start Transfer” to begin the process. Keep the phones connected through the process. You can also decide to erase the destination device before copying any files. If you want to do this; simply check the “Clear data before copy” box below the destination phone.

restore kies backup to iphone x

d_win d_mac

Related Article

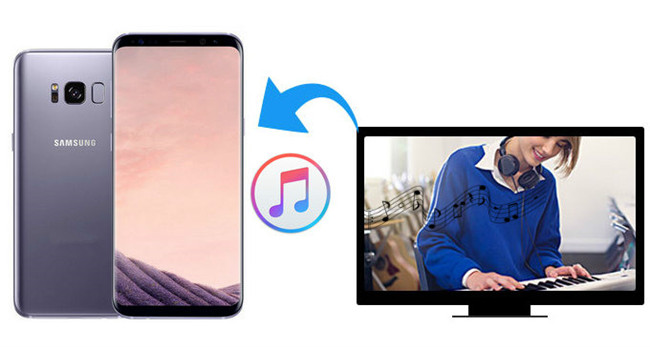
How to Transfer Videos/Music/Photos to iPhone 8 and iPhone X/Xs (Max)

How to Import Videos to iPhone 8/X/Xs (Max) without iTunes

How to Transfer Samsung Data to iPhone 8/X/Xs (Max)

How to Backup iPhone X/iPhone 8 Contacts

How to Backup & Restore iPhone X/Xs (Max) on Computer Safely

How to Backup & Restore iPhone 8/8 Plus

Transfer Data to iPhone X/Xs (Max)

How to Backup Contacts from iPhone to Computer?

I need a tool help for backup the contacts list of my iPhone X. Any good suggestions? I want a simple solution. Please let me know as soon as possible. Thank you so much.

More and more people are beginning to realize the importance of backing up data for mobile device. If you are one of the iPhone users, it is important to regularly backup iPhone data, especially the contacts. There are a lot of people that have missed opportunities of getting back the lost data from device while having a backup. When you lost contacts from iPhone accidentally, there is a high probability that you are able to restore the contacts from backup. Here are 3 methods on how to backup iPhone X/iPhone 8 contacts, you are allowed to pick one for backup your iPhone X/iPhone 8 depend on yourself.

Part 1: How to Backup iPhone X/iPhone 8 Contacts via Phone Transfer

The first way to backup iPhone X/iPhone 8 contacts safely on the compute is with the help of Phone Transfer. Phone Transfer is an efficient tool helps to backup or restore iPhone data on the computer, including contacts, text messages, photos, videos, music, call logs, calendars, apps. You can freely use Phone Transfer to backup iPhone X/iPhone 8 contacts with only two steps. In addition, you can also restore the backup file to iPhone X/iPhone 8 on the computer completely. What’s more, Phone Transfer allows to transfer files between two mobile devices among iOS device, Android device, and Symbian devices. Phone Transfer works for all mobile devices, such as, iPhone X/iPhone 8; Samsung, HTC, LG, Lenovo, Motorola, Huawei, Google; Nokia, etc,.

d_win d_mac

Step 1.Connect iPhone X/iPhone 8 to the Computer
After installation,launch Phone Transfer on the computer.When its primary window shows up,select the “Back Up Your Phone” mode and click it to move on.

backup mode

Connect your iPhone to the computer with an USB cable.When it is detected,it will be shown on the left side of program.

Step 2.Backup Data on iPhone X/iPhone 8
Select “Contacts” file,Then click “Start Copy”. The program will begin to backup content on your iPhone to the computer.

backup iphone to pc

Just two easy steps,you have backed up the contacts for your iPhone X/iPhone 8.

d_win d_mac

Part 2: How to Backup iPhone X/iPhone 8 Contacts via iOS Backup & Restore

The second solution to backup iPhone X/iPhone 8 Contacts on the computer here we recommend for you is using iOS Backup & Restore tool – iOS ToolKit. It can be used for backup & restore iPhone on the computer effectively. There are several of iOS data supported, including contacts, messages, photos, videos, notes, calendars, call logs, apps data and more. This program allows to backup iOS data to the computer safely, restore backup to device on the computer completely.

d_win d_mac
d_win d_mac

See more Features of iOS Backup & Restore:
-One click to backup the whole iOS device to your computer.
-Allow to preview and selectively export contacts from iPhone to your computer.
-No data loss on devices during the restore.
-Supports iPhone X, iPhone 8(Plus), iPhone 7(Plus), iPhone 6S(Plus), iPhone 6(Plus), iPhone 5S/5, that run iOS 11/10/9/8.
-Fully compatible with Windows 10 or Mac 10.11.

Step 1. Run the Program on Computer and Connect iPhone X/iPhone 8 to the Computer

After runing iOS Backup & Restore on the computer, click on “More Tools”option in the home page of this program, select “iOS Data Backup & Export”option from the tool list. Then connect your iPhone to the computer via USB cable. By default, the program will automatically detect your iPhone soon.

ios data backup restore tool

Step 2.Select File Types to Backup from iPhone X/iPhone 8
When your iPhone is connected successfully, iOS Backup & Restore will detect the file types on your device automatically. Then iOS Backup & Restore will display all the supported data, like Photos & Videos, Messages & Call Logs, Contacts, Memos and other data. You should select the “Contacts” file to backup. One or more are allows. Then click on “Backup”button.

backup iphone data to computer

It will only cost you a few minutes for the whole backup process, depending on the data storage on your iPhone.

backup files from iphone x to pc

Step 3. View the Backed Up File
When the backup is completed, you can check all contents of the backup file in categories. You can choose one single file or mulptiple files to print them or export them to your computer.

view the backup file

Finished. You have backed up your iPhone data to the computer.

d_win d_mac
d_win d_mac

Part 3: How to Backup iPhone X/iPhone 8 Contacts via iTunes

Actually, we can backup iPhone with iTunes. But backing up with iTunes is obviously not the best option because the contacts backed up cannot be accessed individually or restored selectively. Moreover, when you restore the backed contacts with iTunes backup, your iPhone data will be covered at the same time. Let’s see how to backup iPhone X/iPhone 8 Contacts with iTunes syncing.

Step 1. Open iTunes and connect your iPhone X/iPhone 8 to computer.
Step 2. Your phone is automatically detected by iTunes.
Step 3. Click on the “Device” tab.
Step 4. Locate “Summary” and click on “Back up now”.
Step 5. Then iTunes will backup all data on your X/iPhone 8.

itunes backup

Part 4: How to Backup iPhone X/iPhone 8 Contacts via Email

Here is a simple guide to backup and export iPhone contacts to your email.

Step 1. Firstly, click on settings, then select “Mail, Contact, Calender” as the picture shown.
Step 2. A new page pops up, select “Add Account” on the new page.
Step 3. From the list of options, click on “Exchange”.
Step 4. Enter the required information with respect to your mail details.
Step 5. In the next page, select “Save and Export”. There you go, you have exported and saved the contacts.

backup iphone contacts to email

Related Articles:

How to Backup & Restore iPhone X on Computer Safely

How to Backup & Restore iPhone 8

How to Backup iPhone/iPad Data

Best iPhone 8 Manager: How to Transfer Files to iPhone 8

How to Recover Deleted Data from iPhone 8

How to Transfer Videos/Music/Photos to iPhone 8/iPhone X

How to Backup & Restore iPhone X on Computer Safely

[Summary]: Looking for a way to make your iPhone X/8 backup before iOS 11.4/12 update? Here a simple guide shows you how to safely backup data from iPhone X/iPhone 8/8 Plus to Windows or Mac computer, then preview and restore any item from the backup to iOS/Android devices easily.

Apple introduced three brand new iPhones lately. Three! They include the iPhone 8 and 8 Plus, which have faster processors and better cameras than last year’s iPhone 7 – and now you can charge them wirelessly. And then there’s the iPhone X, a $1,000 smartphone that Apple is basically trying to market as a gadget from the future that arrived a little early. It’s the first iPhone ever to have an OLED screen, and even better, that stunning display basically runs edge to edge. iPhone X comes with other radical changes like the removal of the home button in favor of a new feature Apple is calling Face ID, which scans your face to unlock your iPhone instead of the traditional Touch ID method still used on the iPhone 8 and 8 Plus.

The new- released series of iPhone is worth to have a try, especially the faceID function of iPhone X is attractive. If you are one of the Apple fans who want to purchase a new iPhone X, iPhone 8, or iPhone 8 Plus, you may face the annoyed problem that how to backup and restore iPhone data on the computer safely, in order to keep your personal data safely, avoid losing data from device one day. You are in the right place, this tutorial is going to show you an available solution to backup & restore iPhone X, iPhone 8, iPhone 8 Plus with a simple solution without iTunes or iCloud.

Backup & Restore iPhone X on Computer Safely

iOS Backup & Restore is a powerful tool designed for backup and restore data for iPhone without iTunes/iCloud. It enables to backup & restore iPhone X on the computer safely. The supported types of data including contacts, SMS/iMessages, photos, videos, notes, call logs, Apps data and other personal documents. iOS empowers to backup iPhone data to the computer, restore backup from computer to iPhone completely. iOS Backup & Restore fully support for iPhone X/8/7/6S/6/SE/5S/5C/5/4S/4, iPad Pro, iPad Air, iPad mini, iPod Touch and other iOS devices.

d_win d_mac

Part 1: How to Safely Backup iPhone X on Computer

Step 1. Run the Program on Computer and Connect iPhone X to the Computer
After runing iOS Backup & Restore on the computer, click on “More Tools”option in main page of this program, select “iOS Data Backup & Export”option from the tool list. Then connect your iPhone X to the computer via USB cable. By default, the program will automatically detect your iPhone soon.

ios data backup restore tool

Note:If you have used iOS Backup & Restore to backup your device privously, you can click on “To view the previous backup file” to view the previous backup files list.

Step 2.Select File Types to Backup from iPhone X
When your iPhone is connected successfully, iOS Backup & Restore will detect the file types on your device automatically. Then iOS Backup & Restore will display all the supported data, like Photos & Videos, Messages & Call Logs, Contacts, Memos and other data. You should select the file types to backup. One or more are allows. Then click on “Backup”button.

backup iphone data to computer

It will only take a few minutes for the whole backup process, depending on the data storage on your iPhone X.

backup files from iphone 8 to pc

Step 3. View the Backed Up File
When the backup is completed, you can check all contents of the backup file in categories. You can choose one single file or mulptiple files to print them or export them to your computer.

view the backup file

Finished. You have backed up your iPhone X data to the computer.

d_win d_mac

Part 2: How to Restore Data to iPhone X from Backup

Step 1. Run Program and Select the Backup File
Lauch iOS Backup & Restore tool on the computer and select “Data Backup & Restore“. If you have used this function to backup your iOS device before, it will offer the option “To view the previous backup file“. Click on this option to view the backup file list.

connect iphone

Then program will display the backup files list. Just select the backup file you need and click on “View” button on the buttom of the program.

select backup file to restore

Step 2. View and Restore the Backup File
After you click on “View“, the program will take a few seconds to analysis the backup file and display all data in catagories from the backup file.

analysis backup file

After you find the files you need, you can just select a few files or select them all to proceed to next step. Currently iOS Backup & Restore supports to restore the Messages, Contacts, and Notes to mobile device. So you can restore these files to your iPhone or export them all to your computer.

If you want to export the selected files to your computer, click on “Export to PC“. Then select the save path to export your files.If you want to restore the files to your iPhone X, select the files and click on “Restore to Device“. Just in a few seconds, you will have these files on your iPhone.

restore backup to iphone x

If you want to backup the selected files from iPhone X to your computer, click on “Export to PC“. Then select the save path to export your files.

backup iPhone X to PC

Download the iOS Toolkit – Data Backup & Restore and try to make your iPhone X backup in few seconds.

d_win d_mac

Related Articles

How to Backup & Restore iPhone 8

Best iPhone 8 Manager: How to Transfer Files to iPhone 8

How to Recover Deleted Data from iPhone 8

How to Transfer Videos/Music/Photos to iPhone 8/iPhone X

How to Transfer iTunes Music to iPhone 8/iPhone X

How to Transfer Android Data to iPhone 8/iPhone X

How to Transfer iPhone Data to iPhone 8/iPhone X

iPhone X Backup & Restore

How to Transfer Videos/Music/Photos to iPhone X/Xs (Max)

[Summary]: If you have just bought a new iPhone X or iPhone Xs(Max), you want to enjoy your digital life with the new iPhone. Because this page will not only show you how to import music, videos and photos from computer to iPhone X/Xs (Plus), but also introduces the easy way to transfer media files from iPhone X/Xs (Max) to computer without using iTunes by it’s trivial steps.

add/put/transfer music video photos to iphone xs/xs max/xr

CONTENTS

People also read:

* How to Play Apple Music Offline on iPhone/iPod/iPad

* How to Remove DRM from iTunes Movies

I am going to pre-order the new iPhone X to replace my old iPhone 6. Now here is the question, how to transfer the media files, like videos, music, photos from Mac to iPhone X without iTunes with? I need an easy-to-used iTunes alternative to transfer files to iPhone” – Cindy

It’s not surprised that Apple fans will purchase the super iPhone for upgrading. How to import media files from computer to the new iPhone 8 or iPhone X/Xs(Max)? In fact, we can use iTunes to sync files to iOS devices, but there are many kinds of data that iTunes could not support, like contacts, text messages and App data. In additional, it is very time consuming to transferring data with iTunes, and the iTunes function is really limited, it will erase all existing data on device. Why not iTunes alternative choice? Let’s shows you how to use a best FREE iPhone data transfer tools to transfer photos, videos, music and other files from computer to iPhone X/Xs (Max).

Import Media Files to iPhone X/Xs(Max)/XR

To import media files to new iPhone X/iPhone 8 easily, you can rely on this powerful iOS Manager. It’s a amazing tool useful for managing data for iPhone/iPad/iPod. With this iOS Manager, you can import videos, music, photos to iPhone without covering the previous data. iOS Manager enables to transfer files between iOS device and computer/iTunes/mobile device, including videos, music, photos, contacts, SMS. Not only iPhone X/Xs(Max) and iPhone 8, it is applicable to all models of iOS devices, such as iPhone 7, iPhone 6S/6/5S/5, iPad & iPod.

d_win d_mac

Part 1: How to Import Videos from Computer to iPhone 8/X/Xs (Max)

Step 1. Run iOS Manager and Connect iPhone X/iPhone 8
Launch iOS Manager and connect iPhone X/iPhone 8 to the computer.

ios manager main page

iOS Manager offers two solutions to transfer videos from computer to iPhone X/iPhone 8,  Movies, Music Videos, TV Shows, iTunes U and Podcasts are supported.

Method 1: Transfer Videos from Computer to iPhone X/iPhone 8 Using Buttons

Step 2. Find Video Type on iPhone X/iPhone 8
Click “Videos” icon at the top of the main interface. Select a specific option Movies/Music Videos/Home Videos/TV Shows/iTunes U/Podcasts to transfer( “Movies” is the default option).

select videos to transfer

Step 3. Select and Add Videos from PC/Mac to iPhone X/iPhone 8
Click “Add” and then select “Add File” or “Add Folder“.

Note: If you need to select a few videos, then click “Add File“, and then hold down Shift or Ctrl key to choose multiple videos; if you want to transfer all the videos in one folder, then click “Add Folder”.

select add file or add folder

From the pop-up window, browse and choose the target video(s) from your computer. And click “Open”. Then, the selected videos will be imported to the iPhone.

Method 2: Transfer Videos from Computer to iPhone XS Max by Drag and Drop

Step 2. Find Videos on your PC/Mac
Find and open the video folder on your PC or Mac which includes the videos that you wish to transfer to your iPhone.

find videos on computer

Step 3. Export the Videos to iPhone XS/iPhone 8 by Drag and Drop
Click “Videos” icon on the main interface of iOS Manager, it will go to the Movies window by default, Music Videos, TV Shows, iTunes U and Podcasts are available here too. Drag and drop the selected videos from your computer to the Movies window of iOS Manager.

import videos to iphone 8 by drag and drop

d_win d_mac

Part 2: How to Import Music from Computer to iPhone 8/X/Xs (Max)

Step 1. Run Program and Connect iPhone
Launch iOS Manager and connect your iPhone X/iPhone 8 with the computer.

iOS manager main page

Method 1.Transfer Music Using Buttons

Step 2. Add Music from Computer to iPhone X/iPhone 8
Click Music icon at the top of the interface, then select the specific option Music (Music is the default option). Please note that iTunes U/Audiobooks/Podcasts is available to select here too.

select music to transfer

select itunes u music

select podcasts music

select audiobooks music

Later, click Add and then select Add File or Add Folder to add music files from your computer. If you only want to select some music files, then click Add File, and then hold down Shift or Ctrl key to choose multiple files; if you want to transfer all the music in one folder, then click Add Folder. After that, click Open to import the selected music. Here we only add music to iPhone X/iPhone 8 by clicking Add File for example, others are with the similar steps.

Add Folder to add music files

export music file from computer

Method 2: Transfer Music by Drag and Drop

Step 2. Find songs on your PC/Mac
Find and open the music folder on your PC or Mac which includes the music files that you wish to transfer to iPhone X/iPhone 8.

open the music folder on computer

Step 3. Export the Songs to iPhone X/iPhone 8 by Drag and Drop
Click Music icon on the main interface of iOS Manager,it will go to the Music window by default. Drag and drop the selected music from your PC or Mac to the Music window of iOS Manager.

Export the songs to iPhone by Drag and Drop

Tips:iOS Manager also supports to add Podcasts, iTunes U, Audiobooks from PC/Mac to iPhone X/iPhone 8 with this method too. The only change while adding these media files is to select one of the options: Podcasts, iTunes U, Audiobooks instead of Music.

d_win d_mac

Part 3: How to Import Photos from Computer to iPhone 8/X/Xs (Max)

Step 1.Run Program and Connect iPhone
Launch iOS Manager and connect your iPhone X/iPhone 8 with the computer.

iOS manager main page

Method 1:Transfer Photos by Tapping Buttons

Step 2.Add Photos from Computer to iPhone X/iPhone 8
Click Photos icon at the top of the main interface, then select the specific option Photo Library. Please note that Camera Roll, Photo Stream and Photo Shared are not available to add photos.

transfer photos from photo library

Later,click Add and then select Add File or Add Folder to add photos from your computer.If you only want to select some photos,then click Add File, and then hold down Shift or Ctrl key to choose multiple photos; if you want to transfer all the photos in one folder, then click Add Folder. After that, click Open to import the selected photos. Here we only add photos to iPhone X/iPhone 8 by clicking Add File for example.

add file to transfer

select photos to transfer to iphone 7

Method 2:Transfer Photos by Drag and Drop

Step 2. Find Photos on your Computer
Find and open the photo folder on your computer which includes the photos that you wish to transfer to iPhone X/iPhone 8.

open the photo folder on pc

Step 3.Export the Photos to iPhone X/iPhone 8 by Drag and Drop
Click Photos icon on the main interface of iOS Manager,then go to the Photo Library window.Drag and drop the selected photos from your computer to the Photo Library window of iOS Manager.

drap and drop the selected photos

Note:With the two methods above, you can also select to add photos to one of the photo albums under Photo Library.

selected photos from photo albums

d_win d_mac

Another Best File Manager for iPhone

The second iOS media file manage here we strongly recommend for you is Mobile Sync. Which is the best tool for sync iOS data between iOS device and computer, it has several features like PC to iOS Transfer, iOS to iOS Transfer, add files to iOS, or vice versa. Mobile Sync is a professional iOS data manage & transfer software, it is designed for syncing data between iPhone/iPad/iPod and computer. With the help of Mobile Sync, you can efficiently transfer videos/music/photos or other files from the computer to iPhone X/iPhone 8. The iOS data sync job can be done with easy steps: Launch Mobile Sync and then connect your iOS device to it with USB cable; select specific iOS files on the preview window; start the transferring. Only three simple steps, you can finish the iOS data sync job.

connecting iphone to computer

Related Articles:

How to Import Videos to iPhone 8/iPhone X without iTunes

How to Sync iTunes Videos to iPhone 8/iPhone X

How to Transfer iTunes Music to iPhone 8/iPhone X

How to Transfer Photos from Computer to iPhone 8/7/6S

How to Backup & Restore iPhone 8 on Computer

Transfer Photo/Video/Music Files to iPhone X

Transfer Videos from PC/Mac to iPhone 8/iPhone X/XS/iPhone 11/12/13 without iTunes

[Summary]: Looking for the way to transfer videos from Windows/Mac to your iPhone 8, iPhone 8 Plus, iPhone X, iPhone XS(Max), iPhone XR or iPhone 11/12/13? Read this article to learn a quickily way to import videos from PC/Mac to your iPhone 8/8 Plus/X/XS(Max)/11/12/13 directly, you can also sync videos from iTunes to iPhone.

I would like to transfer some favorite videos both from my computer and the iTunes to my new iPhone X, but iTunes syncing will cover the previous data on my iPhone. Are there any ways to transfer videos to my iPhone X without iTunes and without losing data on device?

People like to take videos or download videos on iPhone for playing. After the latest iPhone Xs Max and iPhone Xs comes out which has good experience to watch videos with a good video player, more and more people would like to take control of transferring videos to the new iPhone. Like the common case above, probably most of Apple users will face the situation that can’t get a reliable way to put videos to iPhone Xs. In this tutorial, we will mainly focus on the solutions about transferring videos to iPhone 13 Pro/13/12/12 Pro/11 Pro/11/XS Max/XS/XR/X/8/7/6S/6 without iTunes, now you can stop worrying about easing data on iPhone when sync videos with it via iOS Manager.

Import Videos to iPhone 8/iPhone X/iPhone XS/iPhone XR/iPhone 11/iPhone 12/iPhone 13 with iOS Manager

iOS Transfer and Mobile Sync, both is the best choice for you to import videos to iPhone 8/iPhone X/iPhone Xs without losing previous data. With the help of iOS Manager, you could easily transfer videos from computer/iTunes/mobile device to iPhone 8 directly with only a few clicks. iOS Manager is a deep manager for transferring &managing files on iPhone/iPad/iPod. It enables to transfer files between iOS device and computer/iTunes/mobile device, including videos, music, photos, contacts, SMS. Not only iPhone 8 and iPhone X/Xs, all the functions of iOS Manager is applicable to all models of iOS devices, such as iPhone 7, iPhone 6S/6/5S/5, iPad & iPod.

d_win d_mac

Part 1: How to Import Videos from iTunes to iPhone 8/iPhone X/XS

iOS Manager offers two solutions to transfer videos from iTunes to iPhone 8/iPhone X,  Movies, Music Videos, TV Shows, iTunes U and Podcasts are supported.

Method 1: Transfer Videos from iTunes to iPhone 8/iPhone X/XS With 1-Click File Transfer

Step 1. Run iOS Manager and Connect iPhone 8/iPhone X 
Run iOS Manager and connect your iPhone to the computer. Then click “Transfer iTunes Media to Device” mode on the main interface of program.

ios manager main page

Step 2. Select Files to Transfer
iOS Manager will detect all the media files in iTunes and show them by list on the pop-up window. By default, the entire library has been checked. But you could uncheck the items that you don’t want to transfer to your iPhone.

select transfer videos to iphone 8

Step 3. Transfer Media Files to iPhone 8/iPhone X
Click Transfer to start transferring selected files to your iPhone and then click “OK” to complete the process.

Note: iOS Manager enables to automatically detect the duplicates and only transfer the exclusive contents from iTunes to iPhone 8/iPhone X.

click transfer button

transfer videos to iphone 8

Method 2: Transfer Videos from iTunes to iPhone 8/iPhone X/XS With Toolbox

Step 1. Run iOS Manager and Connect iPhone 8/iPhone X
Launch iOS Manager and connect your iPhone 8/iPhone X to the computer. Then go to Toolbox > Transfer iTunes Media to Device on the Toolbox interface of program.

tool box main page

Step 2. Select Files to Transfer
iOS Manager will detect all the media files in iTunes and show them by list on the pop-up window. By default, the entire library has been checked. But you can uncheck the items that you won’t transfer to your iPhone.

select video file transfer

Step 3. Transfer Media Files to your iPhone
Click “Transfer” to start transferring selected files to your iPhone and then click “OK” to complete the process.

Note: iOS Manager enables to automatically detect the duplicates and only transfer the exclusive files from iTunes to iPhone 8/iPhone X.

click transfer to begin

transfer itunes videos to iphone 8 completed

d_win d_mac

Part 2: How to Import Videos from Computer to iPhone 8/iPhone X/XS

Step 1. Run iOS Manager and Connect iPhone 8/iPhone X
Launch iOS Manager and connect iPhone 8/iPhone X to the computer.

ios manager main page

iOS Manager offers two solutions to transfer videos from computer to iPhone 8/iPhone X,  Movies, Music Videos, TV Shows, iTunes U and Podcasts are supported.

Method 1: Transfer Videos from Computer to iPhone 8/iPhone X Using Buttons

Step 2. Find Video Type on iPhone 8/iPhone X
Click “Videos” icon at the top of the main interface. Select a specific option Movies/Music Videos/Home Videos/TV Shows/iTunes U/Podcasts to transfer( “Movies” is the default option).

select videos to transfer

Step 3. Select and Add Videos from PC/Mac to iPhone 8/iPhone X
Click “Add” and then select “Add File” or “Add Folder“.

Note: If you need to select a few videos, then click “Add File“, and then hold down Shift or Ctrl key to choose multiple videos; if you want to transfer all the videos in one folder, then click “Add Folder”.

select add file or add folder

From the pop-up window, browse and choose the target video(s) from your computer. And click “Open”. Then, the selected videos will be imported to the iPhone.

open the video older

Method 2: Transfer Videos from Computer to iPhone 8/iPhone X by Drag and Drop

Step 2. Find Videos on your PC/Mac
Find and open the video folder on your PC or Mac which includes the videos that you wish to transfer to your iPhone.

find videos on computer

Step 3. Export the Videos to iPhone 8/iPhone X by Drag and Drop
Click “Videos” icon on the main interface of iOS Manager, it will go to the Movies window by default, Music Videos, TV Shows, iTunes U and Podcasts are available here too. Drag and drop the selected videos from your computer to the Movies window of iOS Manager.

import videos to iphone 8 by drag and drop

d_win d_mac

Related Article

How to Sync iTunes Videos to iPhone 8/iPhone X

How to Export Videos from Mac to iPhone XS/X/8/7/6S

How to Transfer iTunes Music to iPhone 8/iPhone X

Best iPhone 8 Manager: How to Transfer Files to iPhone 8

How to Recover Deleted Data from iPhone 8

How to Backup & Restore iPhone 8