All posts by DHZ

How to Recover Deleted Data from LG V30

Hi guys, I accidentally deleted some photos and contacts on my LG V30, but I did not make any backup. Now I just want to get them back as soon as possible. Is there any way can help me recover the deleted files on my Android device? Thanks for your response in advance.

It’s a story as old as Android Oreo – the update is announced, it starts rolling out and then someone hits pause. It has happened to several phones now, including LG V30 phone. But it is all okay now, V30 and V30+ phones can once again update to Android v8.0. LG V30 owners sour about the debut of the smarter LG V30S ThinQ don’t have to feel so forgotten anymore, as the AI upgrade that comes built into the V30S ThinQ is starting to reach the V30 as well.

Losing data on mobile phone is one of the common case for most phone users. This does not only happen to one or two Android users, more and more people find it common losing personal files from their Android phones. To those who desperately want their deleted files back, we are happy to let you know: your deleted files are NOT gone forever. If you accidentally lost data from the LG phone no matter due to any causes, congratulations! There’s a good chance you can retrieve them. All you need is a LG phone recovery tool.

Restore Deleted Data from LG V30

A useful recovery program – LG phone recovery, also called U.Fone Android Data Recovery, can help you out of the trouble. Which is specially dedicated to recover deleted several kinds of Android data, including photos, videos, messages, contacts, call history, WhatsApp messages, and more. With the help of this program, you could easily recover deleted data from LG V30 and almost all Android models. Besides, this program enable to backup & restore Android, extract data from broken Android. It allow you to preview data before recovery.

d_win d_mac

How to Recover Deleted Data on LG V30

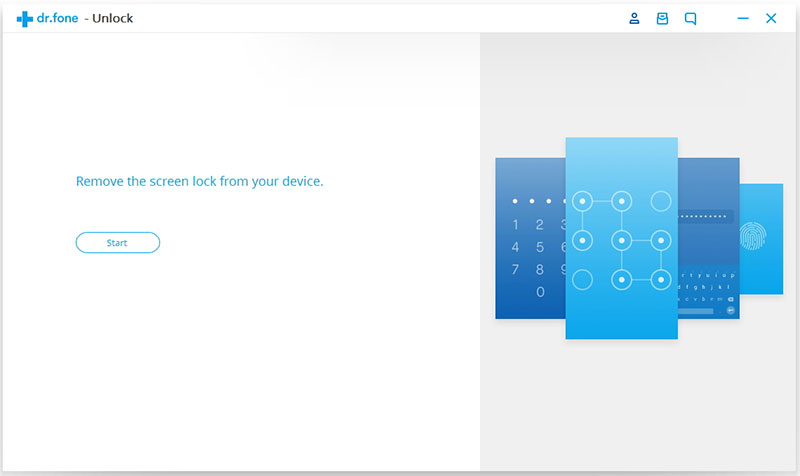
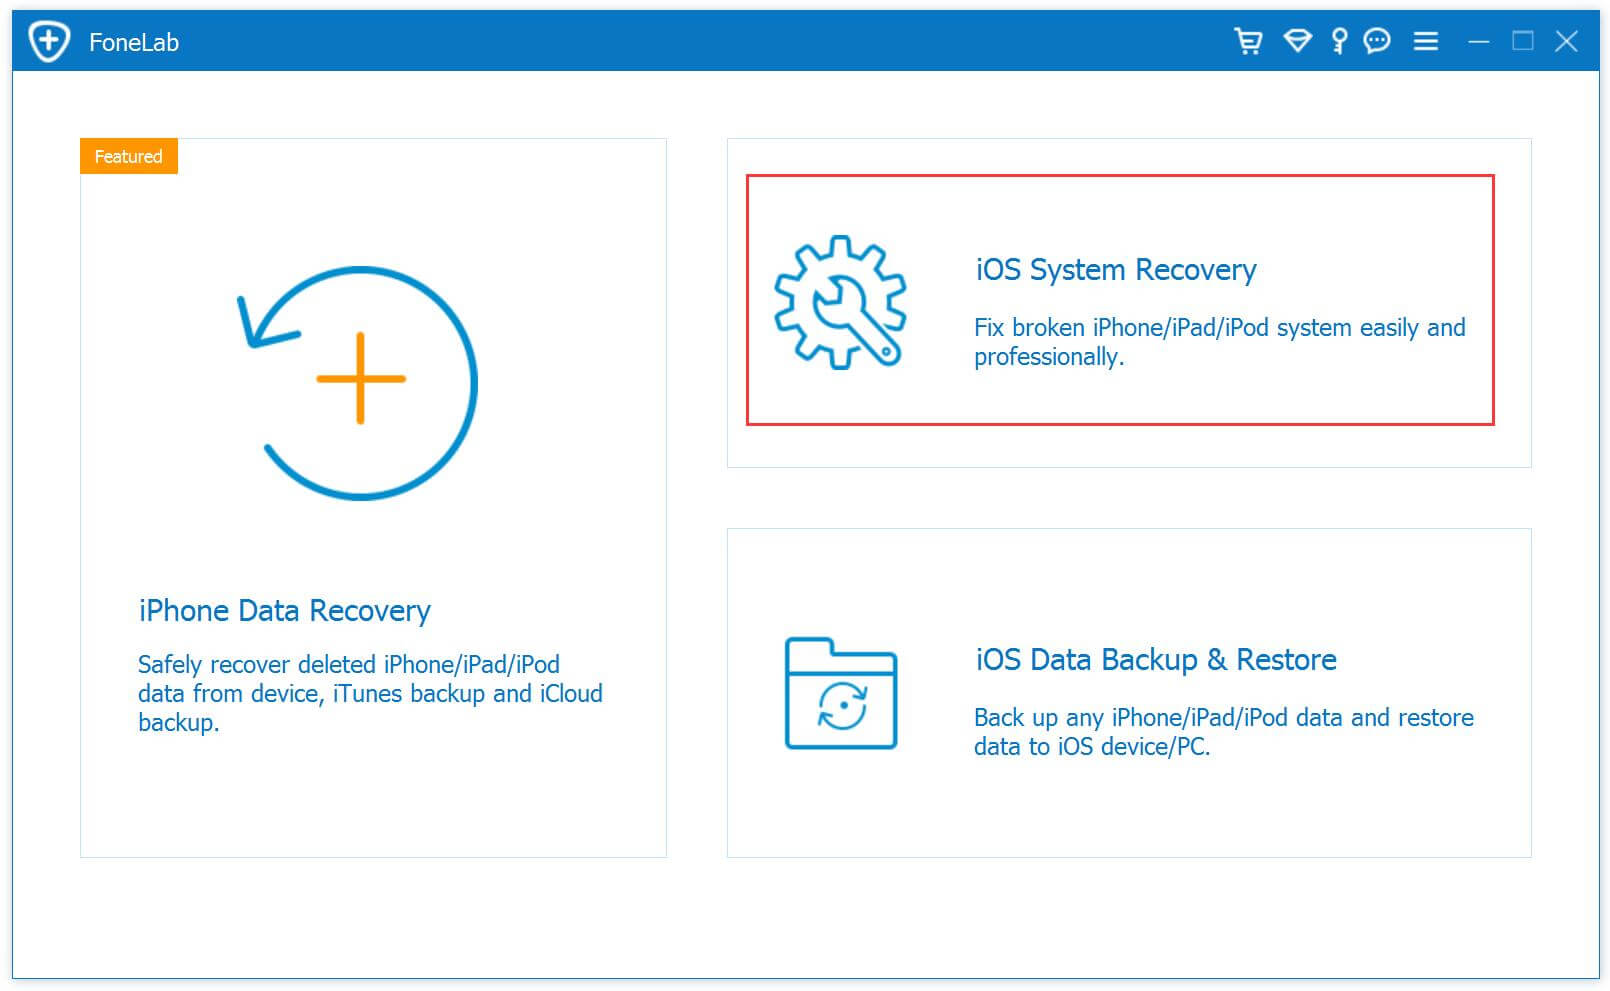
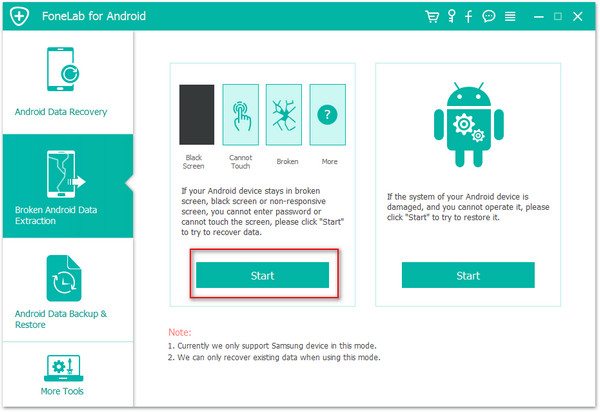
To start with, run U.Fone Android Data Recovery on the computer. There are three modes for selection: Android Data Recovery, Android Data Backup & Restore, Broken Android Data Extraction. Click “Android Data Recovery” in the home page of program.

Android ToolKit home page

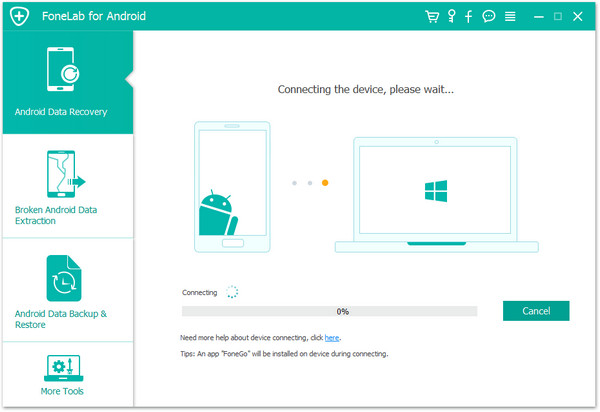
Step 1. Connect LG Phone to Computer
Connect your LG V30 phone to the computer with a USB cable, enable the USB debugging on your phone.

connect LG phone

allow to detect LG

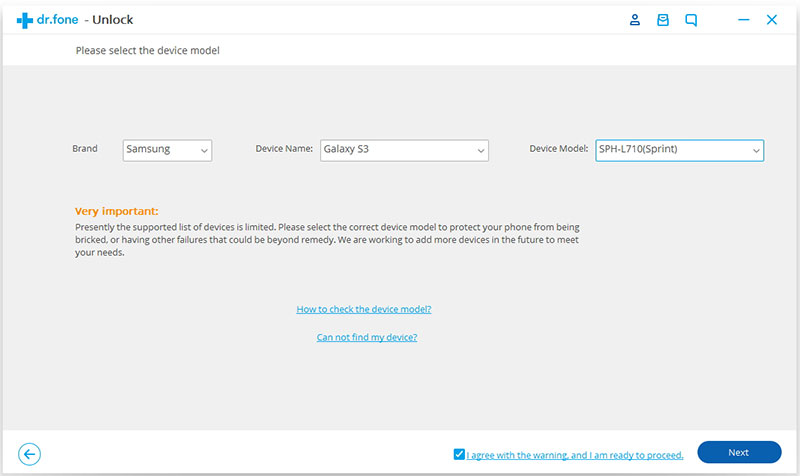
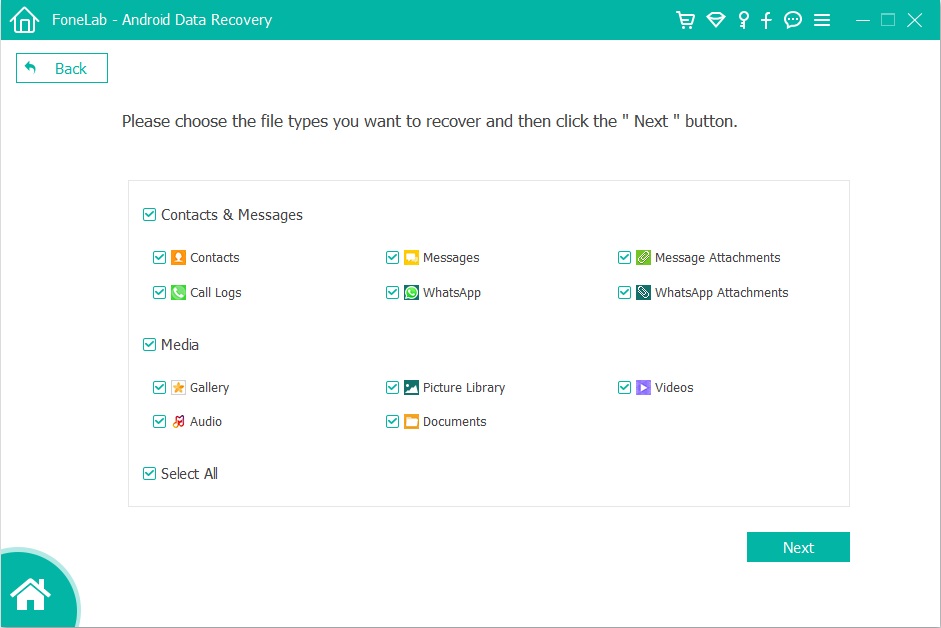
Step 2. Select File to Scan on the Phone
When your phone is connected with the computer, you can see all the data types that can be restored, including gallery, text messages, contacts, etc,. Click the files including the data you need, then click “Next“.

select file to scan

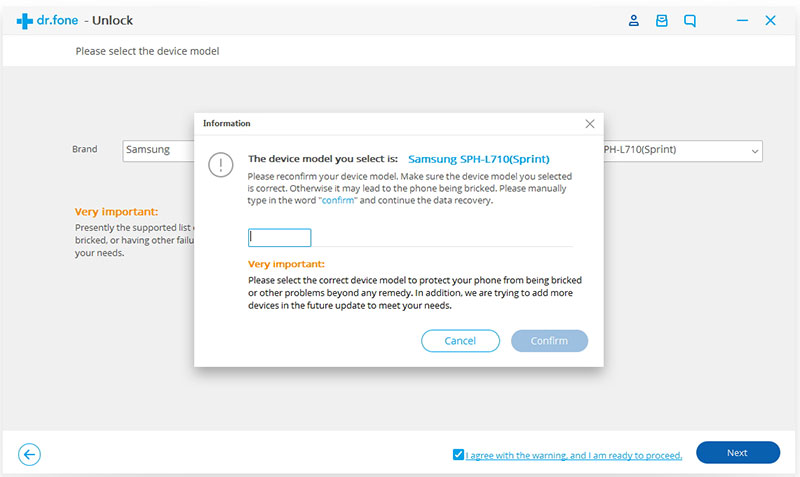
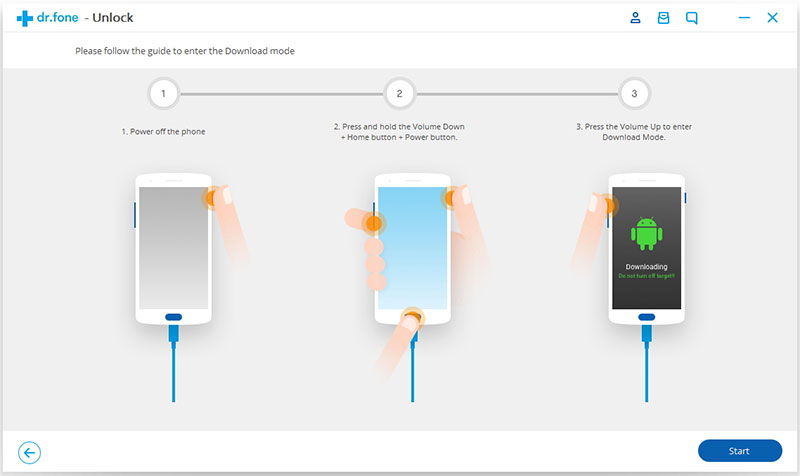
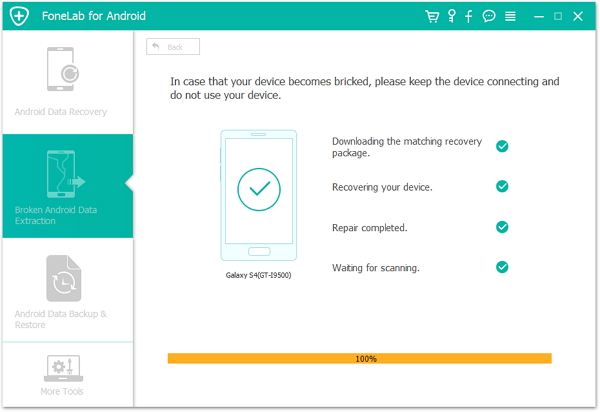
Step 3. Allow Scan the LG V30
When the following window shows up, if you get a superuser authorization appearing on your phone for allow scanning the device, click “Allow” to go on.

allow scan Samsung phone

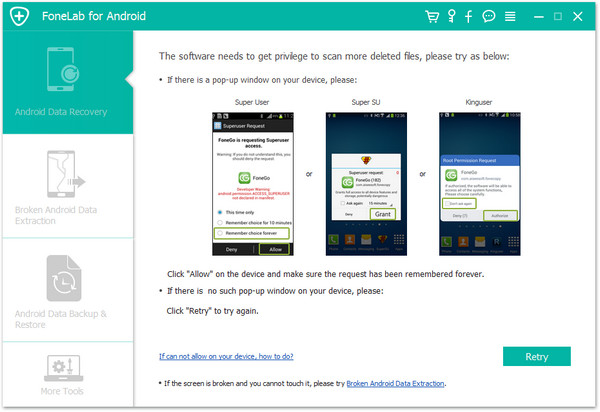
Now the program will scan and find the deleted data from LG phone.

scan LG for deleted data

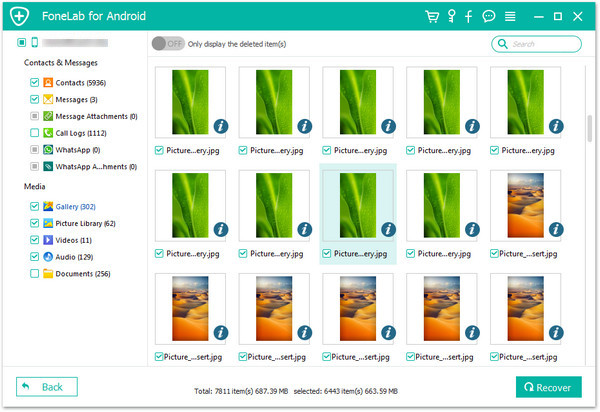
Step 4. Find and Recover Deleted Data from LG
When the scan is finishes, all disappeared data will be find and list, you are allowed to preview the deleted data one by one under the files. In the last step, clicking “Recover” to save all the selected data on the computer.

recover deleted data from LG

d_win d_mac

More LG Related Guides you can Check:

How to Recover Deleted Data from LG Phone

How to Recover Deleted Photos from LG Phone

How to Recover Deleted WhatsApp Messages from LG Phone

How to Recover Data from Water Damaged LG Phone

How to Backup and Restore LG Phone

How to Manage Android Phone on the Computer

Recover Deleted Data from LG V30

Android Data Recovery

Recover Your Lost Data from Android
Now, Even Device Broken

Compatible with Android 8.0 Oreo/7.0, etc.

Recover Lost Data Now

How to Unlock Samsung Galaxy S9 without Password

How to unlock the pattern lock on my Galaxy S9 phone? I have changed my password last night but I forgot it now. Please help.

What a great device! Samsung new released model- Samsung Galaxy S9, it is such an excellent smartphone. Some of its features are introduced for the first time by Samsung, such as adaptive camera lenses, which imitates the human eye. Lately, we have got lots of feedback and queries like who need to perform a pattern unlock on their Galaxy S9 device. It doesn’t matter if you have forgotten the password of your Android phone or would like to access someone’s phone, there are lots of ways to unlock an Android phone without password.

Forgetting password(pattern/PIN code) on Android is on of the most common problem that you can hear from a lot of Android users. Samsung is one of the most popular Android brands which come with a wide variety of functions and features. These functions and features of Samsung device allow users to do almost everything that they actually want. But problems occur when some unexpected conditions happen and lead to unwanted results like forgetting your Samsung phone’s password. In this case, they may be searching for an effective and efficient method to unlock their Samsung phone screen password.

Bypass Password of Samsung Galaxy S9 without Data Loss

If you are looking for a reliable software help to remove lock screen on Android without password, this Android ToolKitAndroid Unlock is what you need. With using this software, you could bypass password of Samsung Galaxy S9 without data loss. What’s more, it could be used to unlock remove 4 types of screen lock, including password, pattern, Pin, fingerprint. It is an all-in-one Android ToolKit that features with Android unlock, Android data recovery, data transfer, data switch, Android backup & restore, data erase, Android root. This smart program work well for most of Android devices, like Samsung Galaxy S9/S8/S7/S6, Note 8/5/4/3, A7/A5 and more.

d_win d_mac

How to Remove Locked Screen on Samsung Galaxy S9

Step 1. Run Software and Connect Samsung Phone
Launch Android ToolKit – Android Unlock on the computer, select “Unlock” among all the tools.

android toolkit home page

Connect your Galaxy S9 phone to the computer using a USB cable. Then click “Start” on the program.

click start to begin process

Step 2. Select Samsung Model
Since the recovery package for different phone models is different, it’s very important to select the correct phone model. You can find all the supported device models in the list.

select Samsung phone model

Begin your start, please enter “Confirm” to make sure that you have chosen the right model of the device that you need to unlock.

confirm to unlock

Step 3. Enter Samsung into the Download Mode
Then follow the instructions on the program to get the phone into the Download Mode.

-Power off the phone.
-Press and hold Volume Down + Home button + Power button at the same time.
-Press the Volume Up to enter Download Mode.

enter Samsung into download mode

Step 4. Download Recovery Package for Samsung
After you get your Samsung phone into the Download Mode, it will begin downloading recovery package for it. Just wait until it’s completed.

downloading recovery package for Samsung phone

Step 5. Remove Samsung Lock Screen without Data Loss
When the recovery package downloading is completed, the software will start to remove the screen lock for the phone. This process won’t hurt any data on your device. Once the whole progress is over, you can access your phone without entering any password and view all your data on the device without limits.

remove lock screen of Samsung phone

d_win d_mac

Related Articles for Galaxy S9 Users:

How to Recover Deleted Data from Samsung Galaxy S9

How to Transfer iTunes Music to Samsung Galaxy S9

How to Transfer iTunes Videos to Samsung Galaxy S9

How to Transfer iPhone Data to Samsung Galaxy S9

How to Stream Apple Music to Samsung Galaxy S9

How to Transfer & Manage Files for Samsung Galaxy S9

Unlock Samsung Galaxy S9 without Data Loss

How to Import Spotify Music to Walkman MP3 Player

Can anyone please help? I am having difficulty finding out how to import Spotify Music to my Sony Walkman for syncing. Not sure how to do this though and have been trying for hours. Please send me your ideas. Thanks anyway.

Spotify is a popular music streaming service providing Digital Rights Management-protected content from record labels including Sony, EMI, Warner Music Group and Universal. When you want to select an online music service nowadays, Spotify is probably the first that come to mind. Being able to create, share playlists and take all of your playlists anywhere, is something that we couldn’t live without.

There have always been many ways to download Spotify Music for listening. People can stream tons of Spotify Music on computers, laptops, mobiles, tablets and so on. However, common MP3 players like Sony Walkman aren’t supported, it needs to be an internet connected device with the ability to run a Spotify application. How to import Spotify Music to Walkman MP3 player for playing without Spotify? Since Spotify Music are DRM-locked, in order to sync Spotify Music to common MP3 player, you should remove DRM from Spotify first.

Remove DRM from Spotify Music for Syncing to Walkman MP3 Player

Here we’ll suggest you try Spotify Music Converter, a professional and unique DRM Audio Converter that enables you easily bypass DRM from Spotify songs/playlist to DRM-free formats, like MP3, M4A, WAV and FLAC. What’s more? This awesome tool can also keep the best output audio quality and retain the ID3 tags & metadata, including title, artwork, artist, album, track number and cover art, etc,. After that, you can sync the music to Walkman MP3 player for playing without Spotify, stream the music to any device for offline playing without limits. Moreover, you can save the music to SD card, save the music to USB drive, set it as phone ringtone.

d_win d_mac

How to Sync Spotify Music to Walkman

Step 1. Import Tracks or Playlist from Spotify to Spotify Music Converter
Launch Spotify Music converter on the computer first. Spotify app will open automatically at the same time. Click “Add files” button to add the Spotify songs you want to remove DRM from. Besides, you can drag songs, playlists, albums, artists, tracks, etc. from Spotify.

Spotify Music Converter home page

add Spotify Music

Step 2. Choose Output Formats
Click the “Options” button on the top-left to choose output format. In convert settings, you can choose output format (MP3, M4A, FLAC or WAV), output quality (High 320kbps, Medium 256kbps, Low 128kbps). In the output settings, you could change the output folder as you prefer.

setting output formats

Note: Here you should choose “MP3” format since MP3 is the most common format for syncing to Walkman.

Step 3. Start to Remove DRM from Spotify Music
When finish setting all the parameter, click “Convert” button to start to remove DRM from selected Spotify Music.

remove DRM from Spotify Music

d_win d_mac

Step 4. Sync Music to Walkman
After conversion, you can connect the Walkman MP3 player to the computer via a USB cable, and then transfer the converted Spotify music to it for streaming.

Related Tutorials:

How to Convert Spotify Music to MP3

How to Remove DRM from Spotify Music Completely

How to Listen to Spotify Music without Subscription

How to Get Spotify Music at 320kbps High Quality

How to Download & Save Spotify Music on Computer

How to Stream Spotify Music for Free without Ads

How to Save Spotify Music to SD Card

Sync Spotify Music to Walkman MP3 Player

How to Listen to Spotify Music on iPhone X without Spotify

Summary: Want to sync Spotify Music to iPhone X for playing it without Spotify? Check this post, we will share an useful way with you, to listen to Spotify Music on iPhone X without limits.

The latest model – iPhone X of Apple looks and works differently than any iPhone before it. Losing the home button, a great blend of handheld comfort and a big, gorgeous OLED screen. There is no doubt that it is an overdue and winning evolution of the iPhone. Spotify updated its iOS app with support for iPhone X. The update removes the letterboxing of Spotify’s interface on the iPhone X’s 5.8-inch OLED display, which should come as welcome news to heavy users of the app, allowing them to see more of track lists and search results on the screen, and more artwork when browsing albums and playlists.

Since Apple has launched iPhone X, many users have changed their old devices to the new model. You may want to sync the Spotify Music after getting the new iPhone X. Premium users should install Spotify app and pay $9.99 every month, then download Spotify songs to iPhone X. However, free uses are not allowed to download Spotify Music. No matter Premium or free uses, they can’t play Spotify Music without Spotify as local files. As we all know, Spotify Music is DRM restriction. You are limited to play Spotify Music on Spotify app. To download Spotify Music and transfer them to iPhone X for offline playing like local files, you should remove the Spotify DRM protection at first.

Remove DRM from Spotify Music for Syncing to iPhone X

Spotify Music Converter is a professional Spotify DRM removal software. It will remove DRM from Spotify Music completely, convert Spotify Music to MP3, M4A, WAV or FLAC with lossless quality. After that, you could sync the converted Spotify Music to iPhone X for playing without Spotify. Besides, you could offline playing back the converted music without Spotify subscription; stream music to any device for listening freely, such as iOS device, Android device, PSP/PS4, Xbox one, TV, MP3 player, web player, etc,; save music to USB drive; copy music to SD card; set music as phone ringtone.

d_win d_mac

How to Play Spotify Music on iPhone X without Spotify

Step 1. Run Spotify Music Converter on the Computer
In the first step, run Spotify Music Converter on the computer. After that, Spotify will open automatically at the same time.

Spotify Music Converter home page

Step 2. Add Spotify Music
Click “Add Files” button to open the add audio window. Then go into Spotify main menu to find music or playlist you want to convert, directly drag the songs or playlist you want to convert to the add music window to finish importing.

add Spotify Music

Step 3. Setting Output Format
Click the setting button to choose output format. In convert settings, you can choose output format (MP3, M4A, WAV or FLAC), output quality (up to 320kbps). In this case, you should select “MP3” since MP3 is the most common format for syncing it to iPhone X.

setting output format

What’s more, you could change the output folder as you prefer in the output settings.

Step 4. Start Removing DRM from Spotify Music
When finish customization, click “Convert” button to start removing DRM from Spotify Music, converting Spotify Music MP3 files. After that, you can get the converted Spotify Music as local files.

convert Spotify Music to MP3

d_win d_mac

Step 5. Transfer Music from the Computer to iPhone X
In the last step, transfer the converted music from the computer to iPhone X via iOS ToolKit iOS Transfer. Now you could offline playing the music on iPhone X without Spotify.

Free Download iOS ToolKit – iOS Transfer:
d_win d_mac

import music to from pc to iPhone x

Related Guides:

How to Convert Spotify Music to MP3

How to Remove DRM from Spotify Music

How to Listen to Spotify Music without Subscription

How to Get Spotify Music at 320kbps High Quality

How to Listen to Spotify Music on MP3 Player

How to Sync Apple Music to iPhone X for Offline Playing

Sync Spotfiy Music to iPhone X

How to Save Spotify Music to SD Card

Are there any recommendations to save my favorite Spotify Music to SD card so that I can enjoy the songs in my car conveniently? I am trouble in downloading the music as local files. How to do this with ease?

Both of Spotify free users and Spotify Premium users are allow to listen to create playlistes in Spotify app. Everyone has their own musical tastes, and you may want to listen to your favorite songs over and over again on Spotify. To do this, all you need is to make a playlist and add your favorite songs. Spotify Premium users is being able to download Spotify playlists and offline playing it. However, nowadays, most people prefer listening to music in smartphones or on car stereo when driving, it is necessary to save Spotify Music to an SD card for playing the music on a storage device.

Why We Can’t Download & Save Spotify Music on SD Card Directly
Because Spotify Music is DRM restriction, it prevent us downloading and playing the songs for offline playing without Spotify. It means that we just able to listening to the Spotify Music on line via Spotify as Spotify free users or offline listening to the Spotify Music via Spotify as Spotify Premium. You can’t save the songs as local files as common MP3 music files. So the DRM-locked must be removed first if Spotify users want to download and save Spotify music to SD card without restriction.

Convert Spotify Music for Saving to SD Card

It is specifically designed for Spotify Music lovers. UkeySoft Spotify Music Converter is the best music converter tool for converting Spotify Music to MP3, M4A, WAV or FLAC with 100% original quality, by removing DRM from Spotify Music with fast speed. No matter you are a Spotify free user or Spotify Premium user, you can download and save the Spotify Music as local files for offline listening, save the music to SD card, stream it to any device(iOS device, Android device, PSP/PS4, Xbox one, TV, MP3 player, web player, etc,.) or set it as phone ringtone.

d_win d_mac

Part 1: How to Download Spotify Music as MP3

Step 1. Run Spotify Music Converter on Computer
To begin with, run Spotify Music Converter on the Mac/Windows computer first. After running Spotify Music Converter on the computer, Spotify will open with it automatically.

Spotify Music Converter home page

Step 2. Add Spotify Music
Click “Add Files” button to open the add audio window. Then go into Spotify main menu to find music or playlist you want to convert, directly drag the songs or playlist you want to convert to the add music window to finish importing.

add Spotify Music

Step 3. Choose Output Formats
Click the setting button to choose output format. In convert settings, you can choose output format (MP3, M4A, WAV or FLAC), output quality (up to 320kbps). In this case, you should select “MP3” since MP3 is the most common format for syncing it to SD card.

setting output format

Besides, you could change the output folder as you prefer in the output settings.

Step 4. Start Downloading Spotify Music
When finish customization, click “Convert” button to start downloading. After downloading, you can get offline Spotify music, and save it to SD card.

convert Spotify Music to MP3

d_win d_mac

Part 2: Transfer Music from the Computer to SD Card

Finally, all of the selected Spotify Music are downloaded to MP3 files without DRM restriction, you can transfer the songs from the computer to a SD card as common music files.

Step 1. Insert the SD card into your computer’s card reader.
Step 2. Open “Computer/My Computer/This PC” on the computer.
Step 3. Double-click on your SD card in the list of drives.
Step 4. Drag and drop Spotify music files to the SD card.
Step 5. Now, you can listen to the converted Spotify Music on any devices(smartphone, car player, etc,.) via SD card.

Tips: If your computer does not has an SD card adapter slot, you should get an external SD card adapter that connects via USB. Or inserting your SD card into your cellular phone’s SD card slot and connect the phone to your computer via a USB cable.

Related Tutorials:

How to Convert Spotify Music to MP3

How to Remove DRM from Spotify Music Completely

How to Listen to Spotify Music without Subscription

How to Get Spotify Music at 320kbps High Quality

How to Download & Save Spotify Music on Computer

How to Stream Spotify Music for Free without Ads

How to Listen to Spotify Music for Offline Playing

Save Spotify Music to SD Card

How to Fix iPhone Stuck on Apple Logo after iOS 12 Update

When I try to power on my iPhone 7 it stuck on Apple logo after iOS 12 update, I am not sure how to fix this phone system to normal. Any good ways to fix this issue without losing my data stored on the phone? I haven’t backed up my phone recently. Thanks anyways.

We have great news coming our way this year from Apple in the form of a brand new iOS at WWDC 2018, the upcoming iOS 12. Yes, it is a much-needed upgrade as iOS 11 has been cursed with various new functions and bugs. The new update for iPhone and iPad does include some significant additions, changes, and improvements including Screen Time, Memoji, Group FaceTime, etc,. However, sometimes it is not easy to download and install iOS 12 Beta on our iOS device. Not everyone can do it successfully and a lot of users have experienced problems after the update. The most common issue being iOS 12 Beta stuck on Apple logo or frozen Apple logo after an update.

fix iphone on apple logo after ios 12 update

Here we collect some tips to fix iPhone system to normal in manual ways:
1.Force restart – The most basic solution is to try to force restart your iPhone. This is a very basic and free option, but it simply will not work in most cases. You can always try this first, but do not be surprised if it does not work.

2.Restore in Recovery Mode – While this method does erase all of the data on your phone, you can use your previous backups to restore everything very easily.

3.Do a full DFU restore – This is the most serious type of iPhone restoration, and so a default firmware update should only be used with caution, and after you have tried all other options.

4.A “no data loss” solution – Please note that all the above tips may lead to data loss during the iOS system repair process. Using iOS System Recovery is the fastest and most efficient way to fix an iPhone that is stuck on the Apple logo after iOS 12 update, and you don’t have to risk losing any data.

Restore iPhone System to Normal after iOS 12 Update

U.Fone iOS ToolkitiOS System Recovery is exactly what you want, using this program can meet your needs perfectly. With iOS System Recovery running on Windows or Mac computer, you can fix iPhone stuck on Apple logo after iOS 12 update without data loss. Besides to stuck on Apple logo, this program enable to restore iPhone system to normal under any abnormal cases, like stuck in the Recovery Mode, stuck on black screen, stuck at connect to iTunes screen, etc,. It works for all models of iPhone, iPad and iPod touch, supports iPhone X, iPhone 8(Plus), iPhone 7(Plus), iPhone 6S(Plus), iPhone SE and compatible with all iOS system including iOS 12 and lower.

d_win d_mac

Get iPhone Out of Apple Logo after iOS 12 Update

Step 1.Run Program and Connect iPhone
To start with, install and run iOS System Recovery on the computer. Connect your iPhone which stuck on Apple logo to the computer with a USB cable.

iOS System Recovery home page

Step 2.Select Repair Mode
Select the “iOS System Recovery” option under the “More tools” selection in the home page of program. You will see some notes displayed in the window. If you have no problem with all the notes here, click “Start” button.

select repair mode

Notes:
A.Your iPhone will be updated to the latest version.
B.The Unlocked network will be re-locked.
C.If it is a jailbroken iPhone,it will be updated to a none jail-broken phone.

Step 3. Download Firmware for iPhone
The program will detect your phone model and the iOS version. If it fails to do that, you can manually select them for your device. Then click the “Repair” button.

select your iPhone model

Now the program will begin to download the firmware for restoring iPhone system.

download the firmware for iPhone

Step 4. Fix iPhone Stuck on Apple Logo
The program will start to repair the phone system to normal. Wait for a few minutes. Your iPhone should turn on and get out of Apple logo screen.

fix iPhone system to normal

Done. You can check your device if it return to normal state.

d_win d_mac

Related Articles:

How to Restore iPhone System to Normal after iOS 12 Update

How to Fix iPhone Stuck in Recovery Mode after iOS 12 Update

How to Fix iPhone Stuck on Black Screen after iOS 12 Update

How to Backup and Restore Data from iPhone before iOS 12 Update

Recover Lost Data from iPhone/iPad after iOS 12 Update

Best iPhone Manager: How to Transfer & Manage Files for iPhone

Fix iPhone Stuck on Apple Logo iOS 12 Update

How to Recover Data from Galaxy Note 5 with Black Screen

Excuse me. Can you tell me how to save my files stored on the Galaxy Note 5 phone with black screen? I can’t operate it since the screen is unresponsive. How to extract contacts, SMS, gallery from the broken device?

One of the most common issues that you may face with your Samsung phone is the blank screen of death. The Samsung Galaxy phone is not immune to this problem. Once it happens, the screen won’t be operated no matter the phone is on or off. Have you recently got your Samsung Galaxy phone with black screen which become unresponsive? You may be wondering that all the data stored on your phone is lost, but the good news is that it is still recoverable. Here we will be discussing the best way that you can try to retrieve your data from your broken screen Samsung phone.

Let’s Check the Common Reasons for Samsung Galaxy Black Screen:
A.Dropping: This is the most common situation that you drop your phone. It will lead to hardware damaged of your phone then the screen got black screen of death.

B.Water Damaged: Entering of water in the phone makes the electrical circuit wet causing problems. Yes, some Samsung Galaxy device come with a water-resistance feature, but don’t mix it up with waterproof feature. The phone is not able to cope with high-pressure water. So make sure, not to place your phone in water deliberately. In case, your phone gets moisture, ensure that it’s off and remove all the parts like battery, SIM card, SD card or cover.

C.Virus Attacked: Please not to connect your Samsung phone with any unknown medium to avoid entry of viruses. Besides, use of antivirus to guard your phone from viruses frequently.

D.Installing Applications from Unknown Sources: Google Play Store is one of the most trusted sources to install applications. So, installation of applications from unknown sources is not recommended as it may cause viruses to enter your device eventually becoming the reason for that black screen issue.

Note: Many people will send the black screen phone to the repair shop for fixing the problem. Perhaps, the problem did occur due to some hardware malfunction instead of software malfunction. But you need to backup all your data earlier than moving to a repair store. Of course, you all want to save your important data forever. Don’t you? Broken Android Data Extraction will definitely help you to recover data from Samsung Galaxy Note 5 with black screen.

Recover Data from Black Screen Galaxy Note 5

U.Fone ToolkitBroken Android Data Extraction & Fix is a powerful data restore software help to recover data from Galaxy Note 5 with black screen. It is designed to fix broken Android system and recover data from Android device under any broken cases, like black screen, unresponsive screen, broken screen, system crash, virus attack, USB debug fail, water-damaged, etc,. More importantly, it will not lead to any data loss during the fixing and recovery process. Contacts, text messages, Gallery, call logs, WhatsApp messages, videos and more types of files are recoverable. Supports to almost all models of Samsung phones, insist of, Galaxy S4/S5/S6/S7/S8/S9, Galaxy Note 4/5/8/9, Samsung Galaxy J2/J3/J5/J7, etc,.

d_win d_mac

How to Extract Data from Black Screen Galaxy Note 5

Step 1.Run Program and Connect Samsung to the Computer
Firstly, run U.Fone Toolkit – Broken Android Data Extraction & Fix on the computer, then connect your Samsung to the the computer with a USB. After that, click “Broken Android Data Extraction” option and click “Start“.

broken Android data extraction home page

Step 2.Choose the File Type to Recover
Next up once it lands to another page, you now need to select the files and the items you actually want to recover. The recovery option however includes contacts, text messages, photos, gallery, music, video and documents among others from broken Samsung phone.

select file to scan

Step 3.Select the Stuck Type of your Samsung
You should select the stuck situation that match your device.

choose Samsung broken type

Here you should select “Black screen” and then click on “Next“.

Step 4.Choose the Phone Name and Model
Select the proper version of the Android as well as the exact model you are using. In this case. you should click “Galaxy Note 5“.

select phone model

Step 5.Get Samsung into the Download Mode
After you connect your Samsung which is stuck at black screen to computer, the program will pop up the window as below. Follow the steps to get your phone into the Download Mode.

enter Samsung into the download mode

1)Hold the power key to Power off the phone.
2)You next have to press the Volume Down, Key, The Power key as well as the Home Key at the same time.
3)Next up leave all the keys and press the Volume Up key to enter the download mode of the phone.

Step 6.Detect Samsung Galaxy and Begin Download Recovery Package
When the phone enters download mode successfully, the program will detect it and display the device model, Android version etc,.

scanning data from Samsung

Step 7.Fix Black Screen Samsung Galaxy to Normal
Now the program will download the recovery package to help you fix the phone automatically and return it to normal state. When the download is completed, your phone will return to normal as usual.

Step 8.Recover Data from Samsung Galaxy Note 5
After installing the recovery package on your broken phone complete, the program will help you scan and recover all files from Samsung phone with black screen, click “Recover” button to extract and save all the selected Samsung data on the computer.

recover data from black screen Galaxy Note 5

d_win d_mac

More Guides for Samsung Galaxy Note 5 Users:

How to Recover Lost Data from Broken Samsung Galaxy

Recover Pictures from Broken Samsung Galaxy Note 5/4/3/2

How to Recover Data from Broken Samsung Galaxy Note 5

How to Perform Broken Android Data Recovery, Backup and Restore

How to Manage Samsung Galaxy Note on PC/Mac

Recover Data from Black Screen Note 5

Android Data Recovery

Recover Your Lost Data from Android
Now, Even Device Broken

Compatible with Android 8.0 Oreo/7.0, etc.

Recover Lost Data Now

How to Make Spotify Music as Android Phone Ringtone

I am a Spotify Premium user and I subscribed a lot of songs from Spotify. I want to set it as my Android ringtone. How to make this with easy steps?

Spotify is one of the most wonderful music streaming service, provides Spotify users with accessing to countless popular songs. It could be a common problem that most Spotify users who want to set the favorite songs from Spotify as phone ringtone but have no ways to do. You may be ever meet this problem after streaming a specifically lovely song. It is quite easy to get Spotify tracks suit your taste and stream them. But you can’t freely download Spotfiy Music and set it as your phone ringtone even you are a Spotify Premium subscriber, since the Spotify Music is DRM protection. To remove DRM from Spotify Music and use it as phone ringtone, you are supposed to find a Spotify Music DRM removal.

Remove DRM from Spotify Music for Setting Android Ringtone

UkeySoft Spotify Music Converter is an excellent music tool designed for Spotify users with which to remove DRM protection from Spotify Music with 100% lossless quality kept. It’s able to help you download and convert any Spotify track, album and playlist to common MP3, M4A, WAV or FLAC with fast speed. No matter you are using the free or Premium account of Spotify Music, this smart tool will let you easily transfer the Spotify songs to Android phone as ringtone. Moreover, After that, you can keep the converted Spotify music as local files for offline listening without Spotify.

d_win d_mac

How to Set Spotify Music as Android Phone Ringtone

Step 1. Run Program on Computer
To start with, run UkeySoft Spotify Music Converter on the Mac/Windows computer.

Spotify Music Converter home page

Step 2. Add Spotify Music to Program
After running Spotify Music Converter on your computer, and Spotify will open with it automatically. Click “Add Files” button on the top-left interface to open the add audio window. Then go into Spotify main menu to find music or playlist you want to convert, directly drag the songs or playlist you want to convert to the add music window to finish importing.

add Spotify Music

Step 3. Setting Output Preference
Click the “Options” button to set output format, output quality, conversion speed and output path. You can convert Spotify Music to MP3/M4A/WAV/FLAC with high quality (320 kbps is available to choose).

setting output format

Step 4. Start Converting Spotify Songs to MP3
After the above setting, click “Convert” button the start converting Spotify Music to MP3. Once the conversion is finish, you can click check the converted MP3 music on the computer.

convert Spotify Music to MP3

d_win d_mac

Step 5. Setting Music as Android Phone Ringtone
In the last step, you can use Android Transfer to transfer the converted music files to Android, set it as your Android phone ringtone without limits.

Or you can set the music as ringtone for Android phone via Android Transfer – Ringtone Maker tool.  Lastly, sync the completed music to the Android.

ringtone maker on Android

Free Download Android Transfer:

d_win d_mac

Related Guides:

How to Convert Spotify Music to MP3

How to Remove DRM from Spotify Music Completely

How to Listen to Spotify Music without Subscription

How to Get Spotify Music at 320kbps High Quality

How to Download & Save Spotify Music on Computer

How to Stream Spotify Music for Free without Ads

How to Set Spotify Music as iPhone Ringtone

Set Spotify Music as Android Phone Ringtone

How to Sync Spotify Music to Samsung Galaxy Note 8

As a Spotify Music fans, after I getting new Galaxy Note 8 phone, I am eager to get the way to sync all Spotify tracks and playlists to the phone. But how to do this without trouble?

The Galaxy Note 8 looks very similar to the Galaxy S8+, but it is the first smartphone Samsung made with a dual camera system on the back. One of the cameras has a wide angle lens and the other has a telephoto lens. And the S Pen that comes with the Galaxy Note 8 has better pressure sensitivity than previous versions. They will be the most popular Android smartphone released these two year, without a doubt. For Spotify Music fans, it is an excellent experience to enjoy Spptify Music on the new Samsung device.

Spotify songs are encrypted with DRM copyright technology. What is DRM-protected of Spotify Music? It prevents Spotify members from streaming music to some wanted devices and players, such as burning playlists from Spotify to CD for playing them in car stereo. Under the DRM protection, you don’t actually take a full control of downloaded tracks. When you canceled the paid subscription, you will loss the rights to download Spotify songs again. What’s more, you can’t play any Spotify Music without Spotify since it is DRM-protected even though you are a Spotify Premium. So how to stream Spotify Music to Samsung Galaxy Note 8 as local files playing?

Convert Spotify Music to MP3 for Sync with Galaxy Note 8

With the purpose of syncing Spotify Music to Samsung Galaxy Note 8 for playing without Spotify, you should remove DRM from Spotify Music completely with fast speed, convert Spotify Music to MP3 for offline playing. What can do this for you is Spotify Music Converter. It is a reliable music converter for Spotify, help to record Spotify Music to DRM-free formats with its original quality, like MP3, M4A, WAV or FLAC. After that, you could save the music as local files for playing, stream the music to any devices after canceling the subscription. In addition, you could one-click to burn it to CD; share it with friends; copy it to USB drive; set it as phone rightone.

d_win d_mac

How to Stream Spotify Music to Samsung Galaxy Note 8

Step 1. Add Music to Program
In the first step, run Spotify Music Converter on the computer, click “Add Files” and then drag and drop any music file or playlist from Spotify to the adding window, or copy & paste the relevant links to the search bar.

Spotify Music Converter home page

add Spotify Music

Step 2. Output Settings
Go to the “setting” menu to open the format setting window, in which you can see a list of supported output formats and you can choose one of them as output format for Samsung, including MP3, M4A, FLAC or WAV. What’s more, you could adjust the output quality up to 320 kbps. (For syncing Samsung phone, “MP3” format since it is a common format compatible with almost all Android models.)

output format settings

Step 3. Convert Spotify Songs to MP3 for Samsung Galaxy Note 8
Once you pressed the “Convert” button of the main interface, Spotify Music Converter will automatically begin to convert Spotify Music to MP3 by removing DRM from Spotify Music. Generally speaking, it can work with a fast speed, the output music will be save without losing is audio quality.

convert Spotify Music to MP3

d_win d_mac

Step 4. Transfer Music to Samsung Galaxy Note 8
Once the conversion is end, you could easily check the MP3 files on the computer. Now, you can transfer the music from the computer to Samsung Galaxy Note 8 via Android Transfer, freely playing the music on Samsung phone without Spotify as local files.

Free Download Android Transfer:

d_win d_mac

transfer music to Samsung Galaxy Note 8

Related Guides:

How to Convert Spotify Music to MP3

How to Remove DRM from Spotify Music

How to Listen to Spotify Music without Subscription

How to Get Spotify Music at 320kbps High Quality

How to Download & Save Spotify Music on Computer

How to Stream Spotify Music for Free without Ads

Stream Spotify Music to Galaxy Note 8

How to Set Spotify Music as iPhone Ringtone

Summary: Looking for a way to set Spotify Music as iPhone ringtone? If you are interested in it, don’t miss the following tutorial. Just check this tutorial and get steps to record Spotify songs to local MP3 files and make it as iPhone ringtone.

As a Spotify Music lovers, I have collected lots of favorite Spotify songs. I wonder to know is there any way to make Spotify Music as my iPhone ringtone? How?

For many people, ringtones are one of the easiest ways of personalizing your iPhone. Have you ever meet this embarrass situation that when you pick up the iPhone to answer the coming call but you find this familiar phone ringtone come from other phone. At this moment, you must want to make a special ringtone for your iPhone, to distinguish your phone and others. On the other hand, you may be need to set your loved music as the phone ringtone to keep the song. Or you want to set up the songs as some callers ringtone.

Spotify Music is DRM-Protected
What’s DRM restriction of Spotify Music? The technology DRM, short for Digital Rights Management, which was intended to protect digital media from piracy. It means that you are not really own the subscribed Spotify Music. You can’t save the the Spotify Music and play it on any device without Spotify, even though your are a Spotify Premium subscriber.

Let’s assume that you are tired of iPhone existent ringtone and want to set your favorite Spotify Music as iPhone ringtone, but it seem to be a trouble job since Spotify Music is DRM-protected, besides, iOS doesn’t offer the function for you, to set a customized song as an iPhone ringtone. However, it doesn’t mean we have no way to make this be possible. What you should do is removing DRM restriction from Spotify Music first, rip Spotify Music to common MP3 files via Spotify Music Converter, then you could set it as your iPhone ringtone without limits with the help of iOS ToolKitiOS Transfer.

Part 1: How to Record Spotify Music to MP3 Files

As the professional Spotify DRM removal software, we can meet Spotify Music Converter, which is not only a DRM remover but also a music converter for Spotify. With innovative DRM decryption technology, it is able to remove DRM from Spotify Music tracks with fast speed, convert Spotify Music to MP3, M4A, WAV or FLAC with its original quality. After that, you can download and save the converted Spotify songs, playlists and albums as local files for offline listening without Spotify, no matter you are using a free or paid Spotify subscription.

d_win d_mac

How to Convert Spotify Music to MP3

Step 1. Add Music from Spotify to Program
First of all, run Spotify Music Converter on the computer, click “Add Files” and then drag and drop any music file or playlist from Spotify to the adding window, or copy & paste the relevant links to the search bar.

Spotify Music Converter home page

add Spotify Music

Step 2. Output Parameters Settings
Clicking “setting” button to change the basic parameters (Including Output format, Output quality and BitRate, etc,.). Here you can choose MP3, M4A, FLAC or WAV as the output format, adjust output quality up to 320 kbps. (For making songs as iPhone ringtone, you should click “MP3” format since it is a common format compatible with almost all phone models.)

output format settings

Step 3. Begin the Conversion
Click “Convert” to start removing DRM from Spotify Music, converting Spotify Music to MP3 files with its original audio quality.

convert Spotify Music to MP3

d_win d_mac

Part 2: How to Set Music as iPhone Ringtone

iOS ToolKitiOS Transfer features a dedicated Ringtone Maker tool that allows its users to create customized ringtone, setting music as the ringtone for iPhone. As its name, is an all-in-one data manager tool for iPhone/iPad/iPod. With the help of iOS Transfer, you can transfer or manage files for iOS device, including music, videos, photos, contacts, SMS, playlists. It could be used to transfer files between iOS device and iTunes, transfer files between iOS device and computer, transfer files between iOS device and Android/iOS device.

Free Download iOS ToolKit – iOS Transfer:

d_win d_mac

ringtone maker on iPhone

Related Guides:

How to Convert Spotify Music to MP3

How to Remove DRM from Spotify Music

How to Listen to Spotify Music without Subscription

How to Get Spotify Music at 320kbps High Quality

How to Listen to Spotify Music on iPhone without Spotify

How to Set Apple Music as iPhone Ringtone

Set Spotify Music as iPhone Ringtone