All posts by DHZ

How to Transfer Android Data to Android Phone

Upgrading to a new Android phone is an excited experience. It brings the joy of using new hardware, getting adjusted to a new user interface, as well as trying other new features on device. However, transferring your data from the old Android to the new one can be quite difficult – especially if this is your first time. If you are one of them who need to switch files between two Android phones and have no idea to do it. Here you are in the right place. In this page, we will show you two ways to complete the transfer, you could choose one depend on your situation, to overcome the obstacle of syncing data between two Android phones.

If you just want to start using your new Android phone, you will realize that all the importance of transferring data between your previous phone and the new one, that’s bothering you most is how can you transfer a large number of data to your new device with a straight way. Actually, you might have already figured out how to solve this problem, you may consider USB transfer, Bluetooth transfer, Dropbox or WIFI transfer. But for the transferring process, what you care about most are easy and efficient.

Part 1: Transfer Android Data to Android Phone with Bluetooth

Step 1. Bluetooth Connection between Two Android Phones
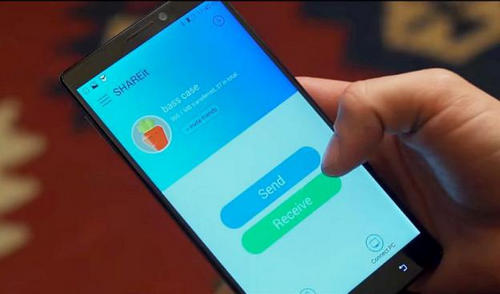
Firstly, you need to turn on Bluetooth on both of the two phones, the target phone should be set in “discoverable mode”, you can see that the target device will allow source phone to detect its presence and attempt to establish a connection.

connection bluetooth

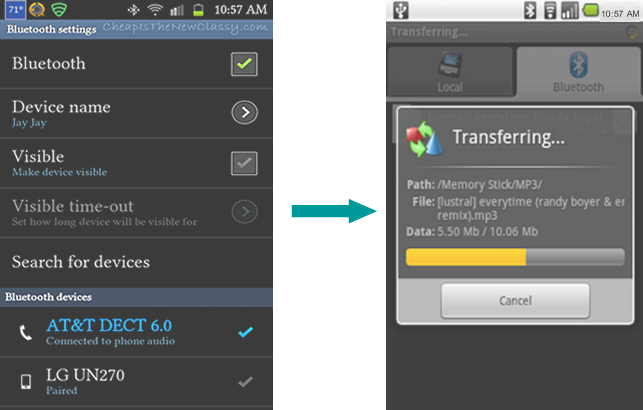
Step 2. Paired and Transfer Data
Both of two Android phones will show a connection confirmation on the home screen, it means that the two phone have been paired and ready to transfer files, including files, songs, ringtongs, images and videos. You can select a file from Android device and select other phone as destination.

Bluetooth can’t transfer some operating system-dependent things like text messages, contacts, call history or apps. What’s more, this way will be time-costing. If you need an efficient solution to transfer data, please follow the next section.

Part 2: Transfer Android Data to Android Phone with Phone Transfer

The best solution to transfer data between Android and Android phone can be asking the help of Phone Transfer. In a matter of fact, compared to Bluetooth, Phone Transfer is highly recommended for phone users as it makes it extremely easy to transfer everything from Android to Android phone without time-costing, including contacts, SMS, photos, videos, music, calendar, call logs, apps. In addition to transfer data between two mobile devices, it allows you to backup and restore phone data without root, and help you completely erase data on your phone. It works well for almost all Android models, including Samsung, HTC, Lenovo, LG, Motorola, Google Pixel, Huawei, HTC, OPPO, Vivo, Xiaomi and more.

d_win d_mac

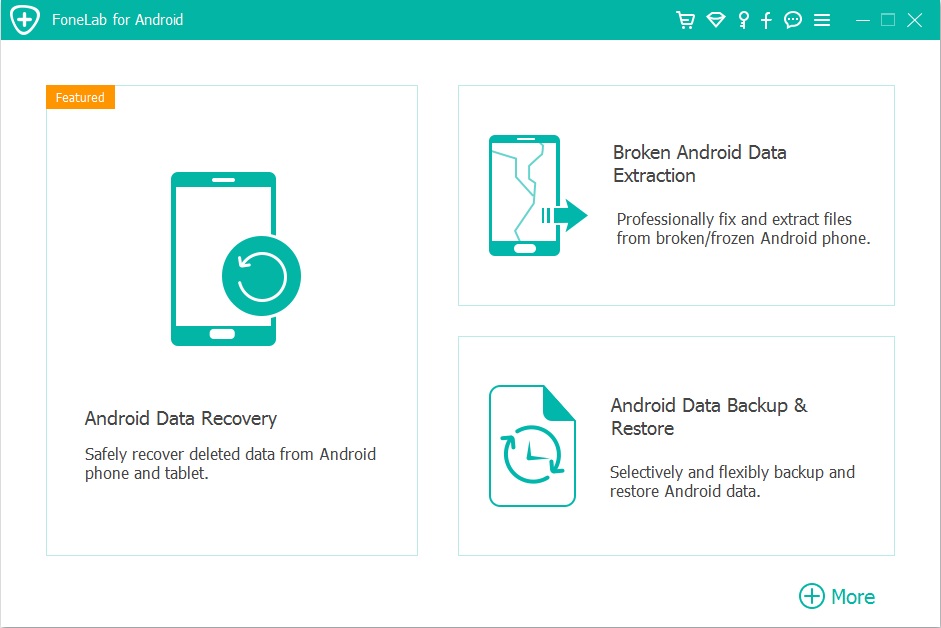
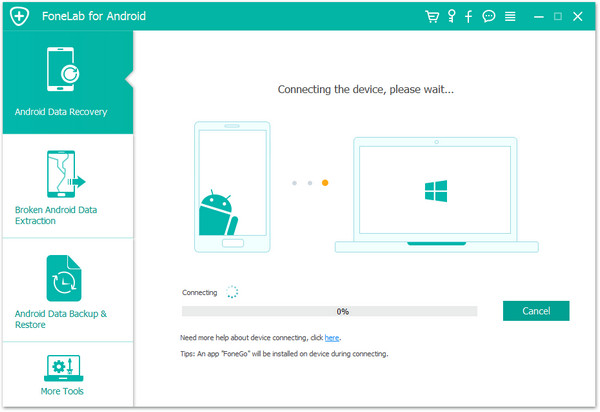
Step 1. Connect Android Phones to the Computer
To begin with, run Phone Transfer on the computer. Select “Phone to Phone Transfer“ mode. Connect both of two Android phones to the computer with its USB cables.

phone transfer home page

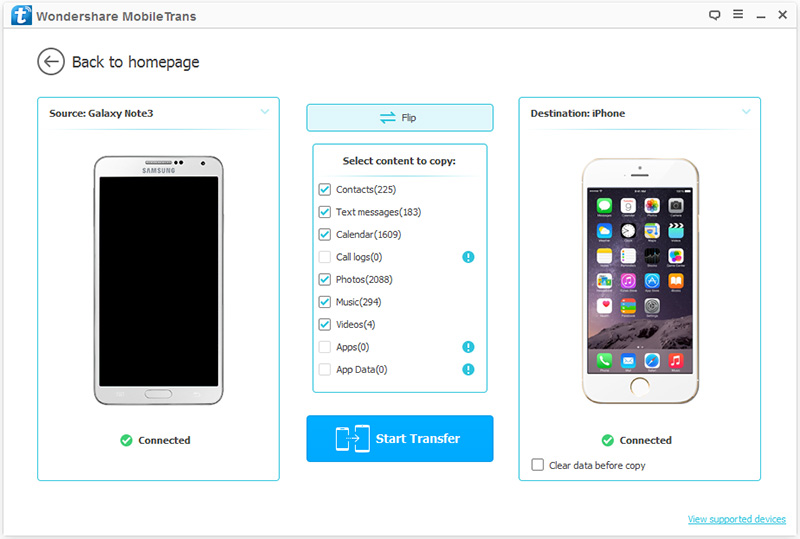
Step 2. Select Files to Transfer
Next, choose files to transfer, here contacts, text messages, photos, videos, call logs, calendar, music, apps are available to select. Then click the button “Start Transfer“.

select file to transfer

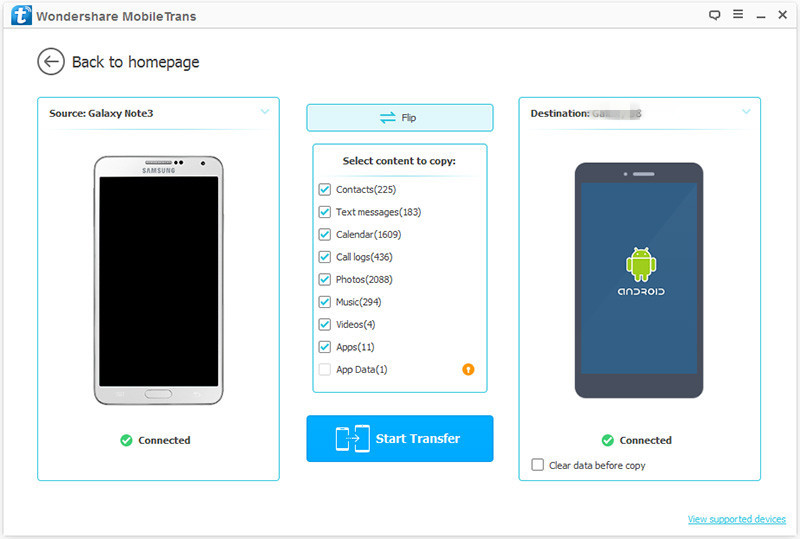
Note: Please make sure that the source phone is your previous Android which on the left and the target phone is another which on the right. If not, click the button “Flip” to change the position of them.

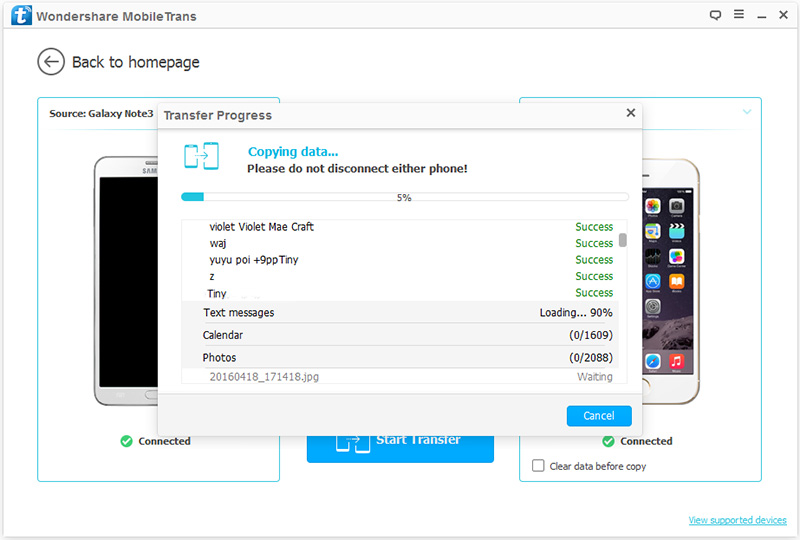
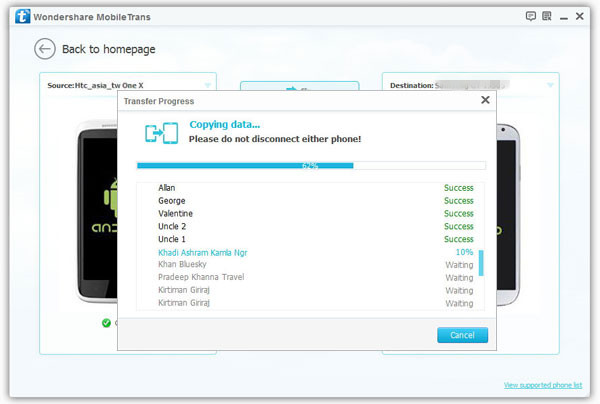
Step 3. Transfer Data from Android to Android
Now the program will start to transfer data between the two phones. When the transfer is done, click the button “OK” to end the job.

transfer Samsung data to Samsung

d_win d_mac

More Android Tips you could Check:

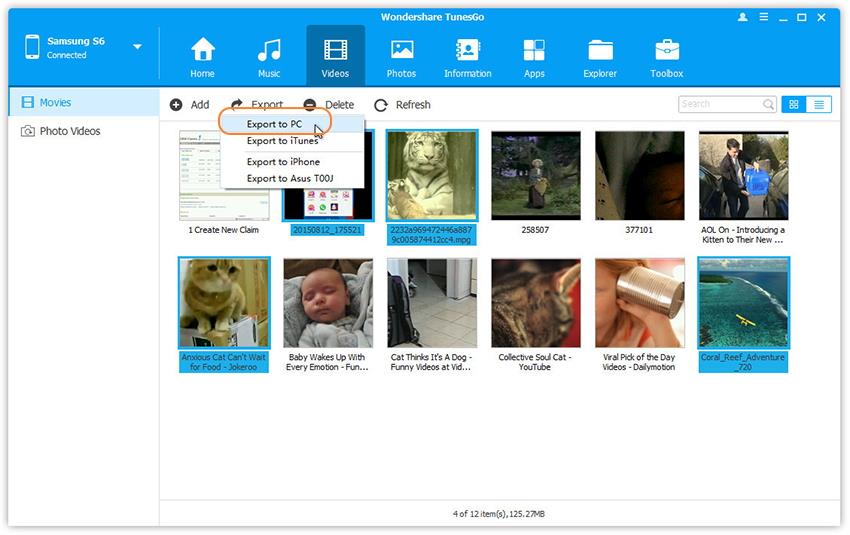
How to Transfer Android Data to Computer

How to Backup and Restore Android

How to Transfer Android Data to Samsung Phone

How to Transfer Android Data to Huawei Phone

How to Recover Lost or Deleted Data from Android

How to Manage Android on Computer

Transfer Android Data to Android

How to Transfer Samsung Data to Samsung Galaxy/Note

Summary: When it be consider to transfer contacts, messages, photos, videos, or other files between two Samsung phones, it could be hundred of method you can search on the Internet. In this guide, we will share the best way with you who need to complete Samsung to Samsung transfer without time-costing.

I switch to a Galaxy S8 phone for upgrading from an old Samsung device. I search a lot on the Internet and can’t fine the best way to transfer my photos, contacts, SMS between the two phones. Which way could be the efficient one? Can anyone tell me?

I have purchased an new Samsung Galaxy Note 10+, how to transfer contacts, SMS and music from old Galaxy S7 to Galaxy Note 10?

Getting a new Samsung Galaxy or Samsung Note phone, especially the latest models, for example Galaxy S8/S9, Note 10/9/8, which is always an exciting experience, but it’s trouble when you can’t figure out how to transfer all your contacts, messages, photos, videos, music, apps, call logs and more files from your old phone to the new one. There are full of thousands of data transfer tools, but we have identified the top on depend on Samsung to Samsung data transfer that can help you move all your files in a more simple and faster way.

Part 1: Transfer Samsung Data to Samsung Galaxy/Note with SHAREit App

SHAREit is a free Android app available on Google play store that can be used to transfer content between your two Android devices by establishing a connection between the two devices. Here are the steps:

Step 1. Launch Google Play Store on both of two phones and install SHAREit apps on both of them.

Step 2. Open the app on both of two phone, from your previous Samsung phone tap on “Send” and from your new Samsung phone, tap on “Receive” and connect both phones using the app.

Step 3. Now, from the old phone, select all the apps, videos, music, pictures and click on “Send”.

Step 4. All the files should be transferred automatically and when it is done, you will be able to see the selected files on new phone.

shareit app

This way could be complete the transfer simply, but it doesn’t support to transfer contacts, messages, documents and other files. Moreover, this Ad supported app may be get some virus attacked on your phones; sending and receiving files using this app can be slow which makes this way is time-costing. Let’s see the better way to import Samsung data to Samsung Galaxy/Note.

Part 2: Transfer Samsung Data to Samsung Galaxy/Note with Phone Transfer

Phone Transfer makes contents transfer pretty easy and efficient. It could be used to transfer data between Samsung and Samsung Galaxy/Note with one click. The transferable types of data including contacts, text messages, photos, videos, call logs, calendar, music, apps. Actually, this program is designed for switch files between two mobile devices based on Android system, iOS system and Symbian system. Additionally, it features with backup & restore data safely, remove data completely. It is compatible with all Samsung models and other mobile devices, such as, Samsung Galaxy S9/S8/S7/S6/S5, Note 9/8/5/4 and the latest Galaxy Note 10/Note 10+/Note 10 5G/Note 10+ 5G.

d_win d_mac

Step 1. Connect Samsung Phones to the Computer
Firstly run Phone Transfer on the computer. Select “Phone to Phone Transfer“ mode. Connect both of two Samsung phone to the computer with USB cables.

phone transfer home page

Step 2. Choose File to Transfer
Please make sure that the source phone is your previous Samsung which on the left and the target phone is your new Samsung which on the right. If not, click the button “Flip” to exchange their places.

select file to transfer

Next, choose files to transfer, contacts, text messages, photos, videos, call logs, calendar, music, apps are available to select. Then click the button “Start Transfer“.

Step 3. Transfer Data from Samsung to Samsung Galaxy/Note
Now the program will begin to transfer data between the two phones. When the transfer is done, click the button “OK” to finish the process.

transfer Samsung data to Samsung

d_win d_mac

Related Articles:

How to Transfer Samsung Data to Huawei Phone

How to Transfer Samsung Data to Android Phone

How to Transfer Samsung Data to iPhone

How to Recover Deleted Data from Samsung Phone

How to Backup and Restore Samsung

Transfer Samsung Data to Samsung Galaxy/Note

Get Back Disappeared Photos/Gallery on Samsung Galaxy S9

Summary: Accidentally lost some important photos from Samsung Galaxy S9/S9+ and in a hurry to get them back? Read and follow this guide to get the best solution to recover disappeared photos from Samsung Galaxy S9/S9+ with just 4 steps.

Samsung’s new models Galaxy S9 and S9+ are definitely iterative updates over last year’s dramatically redesigned Galaxy S8 series, but that’s not a problem. Instead of going back to the drawing board altogether, Samsung focused on fixing a lot of the issues while making drastic improvements to the camera experience and retaining everything that made the last generation so great. It is no doubt that this new model attractive a lot of people to but it and have a try. However, there is something accident will happen out of the expectation. Have you find some photos disappeared on your Samsung Galaxy S9 phone?

Losing your photos become more and more frequently in nowadays. No matter for any situations, photos disappeared on Samsung phone may be a frustrating thing for all users. However, the photos as disappeared just marked as deleted and become invisible. Since the invisible photos can’t be found by personal human factors, thus you need professional tools. In these cases, you need U. Fone Android Data Recovery for help. Let’s show you the main features of this super data recovery tool.

Get Back Disappeared Samsung Galaxy S9 Photos

Generally speaking, U.Fone Android Data Recovery is the ideal choice to get back disappeared photos on Samsung Galaxy S9/S9 +. It offer for you with the reliable way to restore disappeared data on Android for any data loss causes, including accident deletion, Android system updated, factory reset restoring, device damaged, virus attacked, etc,. It support to retrieve several kinds of Android data, including photos, videos, contacts, text messages, call logs, WhatsApp messages, apps and more. It is compatible with all Samsung models and Android models, such as Samsung Galaxy S9/S8/S7/S6/S5, Note 9/8/5/4/3; HTC, LG, Huawei, Google Pixel, Lenovo, Motorola, OPPO, ZTE, Xiaomi, Vivo, etc,.

d_win d_mac

How to Restore Disappeared Photos from Samsung Galaxy S9 Photos

To get started, you should run U.Fone Android Data Recovery on the computer first. There are three modes for selection: Android Data Recovery, Android Data Backup & Restore, Broken Android Data Extraction. Click “Android Data Recovery” in the home page of program.

run U.Fone Android Data Recovery

Step 1. Connect Samsung Phone to Computer
Connect your Samsung Galaxy S9 to computer with a USB cable, enable the USB debugging on your phone.

connect Samsung to the computer

Note: Please make sure that you have enabled USB debugging on your Samsung phone in connection.It is supposed to entitle the PC to transfer, recover, backup data, install apps and read log data without notification.

enable USB debugging on Samsung

Step 2. Select Photo File to Scan on Samsung
When your phone is connection with computer, you can see all the data types that can be restored, including gallery, text messages, contacts, etc,. For photos recovery, click “Gallery” and “Picture Library” files. Then click “Next”.

select gallery file to recover from Galaxy S9

Step 3. Allow Scan the Samsung Galaxy S9
When the following window shows up, there might be a superuser authorization appearing on your Samsung phone for allow scanning the device. If you get it, click “Allow” to go on.

superuser authorization

Step 4. Preview and Recover Disappeared Photos
When the scan is end, all disappeared data will be list, you are allowed to preview the data one by one under “Gallery” and “Picture Library” files. Lastly, clicking “Recover” to save all the selected photos on the computer.

recover disappeared photos on Samsung Galaxy S9

d_win d_mac

Related Articles for Samsung Galaxy S9 Users

How to Recover Deleted Photos from Samsung Galaxy S9/S9+

How to Recover Disappeared Data from Samsung Galaxy S9/S9+

How to Recover Deleted Contacts from Samsung Galaxy S9/S9+

Transfer & Manage Files to Samsung Galaxy S9/S9+

How to Stream Apple Music to Samsung Galaxy S9/S9+

Get Back Disappeared Photos on Samsung Galaxy S9

How to Get Back Disappeared Data on Samsung Galaxy S9

Summary: Contacts/Gallery/Text Messages or other files disappeared on Samsung Galaxy S9/S9 +? In a matter of fact, this disappeared data are not really gone and it just become invincible. Your data can be easily restored when you get a proper way. This post will help. It will provides you with an easy solution to recover disappeared files from Samsung Galaxy S9/S9 +.

Data disappeared on Samsung Galaxy S9 are so previous that we may be feeling depress about it, may be the data is message from your loved ones, the photos taking with you family, the contacts of your business client. All in all, you don’t want to afford to lose the disappeared data on your device. To get back the disappeared data from Samsung Galaxy S9, you just need to find these invincible files. But it is limited. Please stop worrying about that. In the following section, we will show you how to scan the disappeared data and restore it on Samsung Galaxy S9 effortlessly.

Restore Disappeared Data from Samsung Galaxy S9

Comparing with other data recovery tools, a professional U.Fone Android Data Recovery could be the best one. It is just the reliable and safe one, which is recognized as the No.1 Android data recovery software among multiple Android data recovery tools. It stands out with easy steps to get back disappeared data on Samsung Galaxy S9/S9+, including contacts, text messages, gallery, videos, call logs, calendars, documents, WhatsApp messages, etc,. It allow to scan and preview data before recovery. It has successfully helped over a large number of Android users to recover deleted data, and highly recommended by those users for Android data recovery. Besides Samsung Galaxy S9 and other Samsung models(Samsung Galaxy S5/S6/S7/S8, Note 4/5/8/9), it compatible with all Android models and tablets, such as, ZTE, OPPO, Google Pixel, Huawei, LG, Lenovo, Motorola, Xiaomi, etc,.

d_win d_mac

Part 1: Retrieve Disappeared Files on Samsung Galaxy S9/S9+

To begin with, you should run program on the computer and click “Android Data Recovery” in the home page of program. There are three modes for selection: Android Data Recovery, Android Data Backup & Restore, Broken Android Data Extraction.

run U.Fone Android Data Recovery

Step 1. Connect Samsung Phone to Computer
Connect your Samsung Galaxy S9 to computer with a USB cable, enable the USB debugging on your phone.

connect Samsung to the computer

Note: Please make sure that you have enabled USB debugging on your Samsung phone in connection.It is supposed to entitle the PC to transfer, recover, backup data, install apps and read log data without notification.

enable USB debugging on Samsung

Step 2. Select File to Scan on Samsung
When the connection is successful, you can see all the data types that can be restored, including gallery, text messages, contacts, etc,. Then click “Next”.

select files to recover from Galaxy S9

Step 3. Allow Scan the Samsung Galaxy S9
When the following window shows up, there might be a superuser authorization appearing on your Samsung phone for allow scanning the device. If you get it, click “Allow” to go on.

superuser authorization

Step 4. Preview and Recover Disappeared Data
When the scan is finishes, all disappeared data will be list, you can preview the data one by one. Lastly, clicking “Recover” to save all the selected data on the computer.

recover disappeared data on Samsung Galaxy S9

d_win d_mac

Part 2: How to Prevent Data Loss on Samsung Galaxy S9/S9+

I know you must be aware of the importance of making a backup of your device frequently. Once you lose data from it, you could restore data from the previous backed up. To backup Samsung Galaxy S9/S9+ on the computer safely, I strongly recommend for you use this U. Fone Android Data RecoveryAndroid Data Backup & Restore tool. It enable to backup Android on the computer safely, and restore backed up to the previous phone or other Android device completely, including contacts, messages, call logs, gallery, videos, audio, documents.

Choose Backup Content

d_win d_mac

Related Articles for Samsung Galaxy S9 Users

How to Recover Deleted Photos from Samsung Galaxy S9/S9+

How to Recover Deleted and Lost Data from Samsung Galaxy S9/S9+

How to Recover Deleted Contacts from Samsung Galaxy S9/S9+

Transfer & Manage Files to Samsung Galaxy S9/S9+

How to Stream Apple Music to Samsung Galaxy S9/S9+

Get Back Disappeared Data on Samsung Galaxy S9

How to Get Back Disappeared Data on Samsung Galaxy S8/S8 +

I noticed that some of my photos disappeared from my Galaxy S8 phone after I try to perform the Android OS updated on it but failed. Has anyone ever meet the same situation as me? How to get back the disappeared data from my Samsung phone with a simple solution?

Some phone numbers were lost after I root my Samsung phone, I haven’t made a backup of it recently. Is there any way to restore all the deleted contacts directly from my phone? By the way, the phone model is Galaxy S8. Thanks a lot.

When a phone user find that his precious personal data stored on mobile phone has been disappeared from Samsung Galaxy S8, it is a problem that how to get it back as soon as possible. In the past days, people will ask a professional expert for help. However, nowadays we can do this by ourselves. It means that we can restore the disappeared data from our mobile phone on our own. Before beginning the data recovery tutorial, we should know the cause of data get disappeared on Samsung device.

Here we list the main causes of losing data from Samsung Galaxy S8:
A. Human Errors
1) Delete important data by mistake
2) Damage your Samsung phone accidentally

B. Hardware Malfunctions
1) Corrupt SD card
2) Bad sectors
3) Battery replacement

C. Software Failures
1) Software faults happen when upgrading to the latest Android OS version
2) Something goes wrong when you attempt to root your Samsung device
3) ROM flashing
4) Restore your device to factory settings
5) Virus attack

The best way to get back disappeared data on Samsung Galaxy S8 is using U.Fone Android Data Recovery. It is specially designed for recovering deleted data from Android device without backup. The recoverable types of files including contacts, text messages, gallery, videos, call logs, calendars, documents, WhatsApp messages and more. Not only data recovery, it has other functions like Android data backup & restore, recover data from broken Android device. It compatible with all Android models, such as, Samsung Galaxy S5/S6/S7/S8/S9, Note 4/5/8/9; Google Pixel, Huawei, LG, Lenovo, Motorola, ZTE, OPPO, Xiaomi, etc,.

d_win d_mac

How to Restore Disappeared Data from Samsung Galaxy S8

Step 1. Connect Your Samsung Galaxy S8 to PC
To get started, download and run the U.Fone Android Data Recovery on your computer. Next, find and click “Android Data Recovery” from the main interface function.

run U.Fone Android Data Recovery

Connect your Samsung Galaxy S8 to computer and enable the USB debugging on your phone after connect your phone to the computer with a USB cable.

connect Samsung to the computer

Note: Please make sure that you have enabled USB debugging on your Samsung phone in connection.It is supposed to entitle the PC to transfer, recover, backup data, install apps and read log data without notification.

enable USB debugging on Samsung

Step 2. Select Samsung File to Scan
When the connection is successful, you can see all the data types that can be get back, including gallery, text messages, contacts, etc,. Then click “Next”.

select files to recover from Galaxy S8

Step 3. Allow Scan the Samsung Galaxy S8
When the following window shows up,there might be a Superuser authorization appearing on your Samsung phone for allow scanning the device. If you get it, click “Allow” to continue.

superuser authorization

Step 4. Preview and Recover Disappeared Data
When the scan is complete, all disappeared data will be list, you can preview the data one by one. Finally, clicking “Recover” to save all the selected data on the computer.

recover disappeared data on Samsung Galaxy S8

d_win d_mac

Related Articles for Samsung Galaxy S8 users

How to Fix SMS Disappeared on Samsung Galaxy S8

How to Fix Contacts Disappeared on Samsung Galaxy S8

How to Fix Pictures Disappeared on Samsung Galaxy S8

Manage and Transfer Photos/Videos/Music to Samsung Galaxy S8/S8+

How to Transfer Data from Samsung Phone to Samsung Galaxy S8/S8+

How to Transfer Data from iPhone to Samsung Galaxy S8/S8+

Get Back Disappeared Data on Samsung Galaxy S8

How to Fix iPad Won’t Show up in iTunes Issue

My iPad just stuck when I try to connect it to iTunes after I ‘trust’ it on my windows computer. After I upgrading to iOS 11 on my iPad, I can’t get my device to connect to iTunes successfully. The device won’t show up in iTunes. I don’t know what’s problem with it. Any ways to fix this issue and return iTunes to normal?

When you plug an iPad into a computer and run iTunes on it but nothing happens, the device won’t show up in iTunes. What’s it going on? When you connect iPad to iTunes and it display nothing, it means something wrong with your iTunes, may be iPad. When iTunes stuck on computer, there is nothing more frustrating than when iTunes doesn’t your iOS device. Here are some of the most reliable fixes we’ve found, list some tips to figure out iPad won’t show up in iTunes issue.

Tips A: Force Restart iPad
Many iPad users are complaining that it freezes often and something undetected by iTunes. But force restarting your iPad can help you when iTunes does not recognize iPad. It will also make a frozen iPad return to normal again.

Step 1: Press and hold the Power and Home button together for about 10 seconds.
Step 2: Release your hold when Apple logo appears on your iPad screen.

force restart ipad

Tips B: Make Sure Your iTunes is Up to Date
Here are the steps to update your iTunes software:
-For Mac: Launch iTunes and click on the following tabs “iTunes > Check for Updates”. Then install the latest version of iTunes by following the onscreen guide.
-For Windows: Launch iTunes and click on the following tabs “Help > Check for Updates”. Then install the latest version of iTunes by following the onscreen guide.

check itunes for updates

If you’ve done all the tricks above and the iOS device is still not detected, just try the best solution in the follow part we are going to share with you. Another way to fix iPad won’t show up in iTunes is asking the help of iTunes Fix.

Fix iPad Can’t Display in iTunes

iTunes Fix is an all-in-one iTunes repair tool for detecting and fixing all iTunes errors. With the help of iTunes Fix, you could easily fix iPad won’t show up in iTunes issue. It enable to fix iTunes unknown issues without data loss, including iTunes could not connect, iTunes won’t open, iTunes won’t install/update, and other issues. In addition, it allow to clean iTunes data selectively in bulk or all at once, including media, iOS backups, cache, cookies, etc., to quickly release space on computer, completely uninstall iTunes and its related software (and user data if you want).

d_win

How to Fix iTunes Doesn’t Detect iPad Issue

Step 1. Run Program on Computer
Firstly, run iTunes Fix on computer, it will auto-detect your iTunes. If there is no issue of iTunes and its components, you will be in the home interface of program.

iTunes fix home page

Step 2.Select Repair Mode
Select the repair mode depend on your situation. In this case, you should choose the “Repair iTunes Connect Issues” mode. “Fix iTunes Install/Update Issue”, “Repair Backup/Restore Errors” and more are available for you to select.

Step 3. Fix iTunes Can’t Detect iPad Issue 
In the last step, click “Repair” and it will fix iPad won’t show up in iTunes issue.

repair iTunes connect issues

d_win

Related Articles:

How to Repair iTunes Unknown Errors

How to Repair iTunes Connect Issue without Data Loss

How to Fix iTunes Freezes When iPhone is Connected

How to Fix iTunes Crashing Issue

How to Completely Untinstall iTunes from Windows/Mac

Fix iPad Won’t Show up in iTunes Issue

How to Clear iTunes to Free Up Computer

Summary: iTunes Library is a iOS master tool for managing your files especially media files on computer. Besides, it help to sync files with your iOS device safely. However, iTunes may occupy the storage of your computer. Read this post, we will share the best way with you to clear iTunes to free up computer without data loss.

It’s always safely to take backups in iTunes. It makes sure that you don’t end up losing some personal data in case any accidents happen. iTunes makes it simple to backup your data when you connect your iPhone/iPad/iPod to it on the computer, people usually think it’s all fine. And then one day you find that there’s not enough space on your computer or you find that you computer run slowly; then you aware of the importance of removing data from the computer manually to free up some space on it.

Normally, we will clean up space on computer with some software, but it will not ensure you it will not lead to data loss on the compute during the process. Uninstalling iTunes is usually fairly straight forward, and it always make you face a loss of data – may be it offer a chance that you could lose your music. To clear iTunes completely and confirm it will not cause to lose data on the computer, you need iTunes Fix tool. Let’s show you the features of this program.

iTunes Fix Clear iTunes to Free Up Computer

Instead of uninstall iTunes on the computer as mentioned above, you can use some a reliable software that will make it easier and safer to clean iTunes to free up computer without data loss, which is iTunes Fix. It provides with you two modes to clean iTunes without data loss, including Quick Clean and Deep Clean. It enable to scan iTunes and select data to clean, like iTunes media files, iOS backups, software update files and other data. Moreover, iTunes Fix allow to detect and fix all iTunes error without data loss, return iTunes to normal, completely uninstall iTunes.

d_win

How to Clean iTunes on Computer without Data Loss

Step 1. Run Program and Choose the Clean Mode
When you are in the home interface of iTunes Fix, please choose the clean mode.

iTunes fix home page

Choose “Quick Clean” if you just want to clean iTunes media, software updates files, iOS backups, cache, cookies, logs and other junk files.

quickly clean iTunes

Choose “Deep Clean” if you also want to remove iOS backups created by third-party software.

deeply clean iTunes

Step 2. Scan iTunes & Select Data
Click “Scan” and it will start to scan your iTunes. When it’s done, you can preview and select the unwanted files to delete.

Note: All the iTunes data will be checked by default. You can uncheck those files you want to keep.

scan iTunes data

Step 3. Clean Up iTunes
Once you select the files, click “Clean” and it will start to delete the checked files from your iTunes.

removing iTunes files

When it’s done, you will know how much storage space has been saved.

iTunes cleaned finished

d_win

Related Articles:

How to Repair iTunes Unknown Errors

How to Fix iTunes Crashing Issue

How to Fix iTunes Won’t Install/Update Issues

How to Fix “iTunes Could Not Backup/Restore” Issue

How to Fix iTunes Freezes When iPhone is Connected

How to Completely Untinstall iTunes from Windows/Mac

Clear iTunes to Free Up Computer

How to Transfer Samsung Data to iPhone X/8/7/6S/6

Summary: Want to transfer data from previous Samsung phone to iPhone but do not know how? Here in this guide we list two easy ways to help you move data between Samsung and iPhone X/8/7/6S/6 with ease.

Every time when the new phone model release, it always attractive a lot people to buy. Want to switch from Samsung to iPhone and try another OS system? That’s really nice. However, I guess that it may worry you a lot for how to sync data from your previous phone to the new one. It is not a strange thing that you tired of Samsung phone, and you just want to get one new iPhone X/iPhone 8 or other iPhone model to have a try. As a long time Android phone user, you may know how to transfer data between two Android phones, however, this time you may get confused about how to switch from Samsung to iPhone.

The tradition way to transfer data between two phones is complicated and time-costing, you need to sync the data from the previous phone to PC, then sync to your new phone. In a matter of fact, there are some ways available for you to transfer content between a Samsung phone and iPhone with easy steps, the job will be done simply and efficiently. If you are one of them, who want to switch data between Samsung phone and iPhone without hassle, this tutorial is help. We are going to share two solutions for you of Samsung to iPhone transfer process.

Part 1: Sync Samsung Data to iPhone via “Move to iOS” App

This Move to iOS app securely transfers your contacts, message history, camera photos and videos, web bookmarks, mail accounts, calendars, wallpaper, and DRM-free songs and books. And it will help you rebuild your app library, too. Any free apps you used -like Facebook and Twitter – are suggested for download from the App Store. And your paid apps are added to your iTunes Wish List.

move-to-ios

How to move data from Samsung to iPhone with “Move to iOS” app:

Step 1. Look for the Apps & Data screen and select the “Move Data from Android” option.
Step 2. On your Samsung phone, search and install “Move to iOS” in Google Play Store.
Step 3. Tap Continue on both phones, and Agree and then Next on the phone.
Step 4. One the Samsung phone, enter then 12-digit code displayed on the iPhone.
Step 5. After entering the code, it will ask whether you want to transfer your Google Account info, Chrome bookmarks, text messages, contacts, and the photos and videos in your camera roll. Select what you want, and then tap Next.
Step 6. After the loading bar finishes on your iOS device, tap Done on your Samsung phone. Then tap Continue on your iOS device and follow the onscreen steps to finish setting it up.

Note: This apps does not support to transfer call logs and apps between phones. It you want to do this, please try a better way to complete the transfer.

Part 2: Transfer Samsung Data to iPhone via Phone Transfer

Phone Transfer is a computer software which can transfer contents include contacts, messages, photos, videos, call logs, music, apps, and calendar between two mobile device based on Android OS, iOS or Symbian OS. With the help of Phone Transfer, you could easily transfer data from Samsung to iPhone X/8/7/6S/6 with a few clicks. Besides, it can backup phone data and restore in lossless quality, sync contents between PC and mobile device. It works well for almost all Android models and iOS models, including Samsung(Galaxy S4/S5/S6/S7/S8/S9, Note 4/5/8/9), Google Pixel, Huawei, Lenovo, Motorola, LG, HTC, OPPO, ZTE, Xiaomi; iPhone X/8/7/6S/6, iPad, iPod, etc,.

d_win d_mac

Step 1. Install & Launch Phone Transfer tool
Firstly run Phone Transfer tool on computer. Select “Phone to Phone Transfer” mode in the home page of program.

Phone Transfer home page

Step 2. Connect your Devices to PC
The program will show all your files in the window. Please note that Samsung as the source phone is on the left and iPhone as the target phone is on the right. So if you would like to transfer from iPhone to Samsung, just simply click the “Flip” button to change positions of it.

Step 3. Select Content to Transfer
Here several files are available for you to select to transfer. If you do not want to transfer some items, please just uncheck them.

select files to transfer

Step 4. Start Transfer
Hit the “Start Transfer” button. A dialog comes out both showing the files’ names and a progress bar, please do not disconnect neither your iPhone nor Samsung phone while transferring, or the transfer will stop.

transfer data from Samsung to iPhone

d_win d_mac

Related Articles:

How to Import Data to iPhone X from Samsung Android

How to Transfer Data from Broken Samsung to iPhone

How to Transfer Samsung Data to iPhone 8/iPhone X

How to Recover Deleted and Lost Data on iPhone

How to Backup iPhone X/8/7/6S/6 Safely

Transfer Samsung Data to iPhone X/8/7/6S/6

How to Transfer Music/Videos Files between Huawei and Computer

With the rapidly development of mobile technology, more and more new Android models have released in these years. Mobile phone plays an important role in out daily life and became more and more powerful in business. Huawei is one of the biggest mobile phone companies in China, it is a modern Android brand and keep with the current trend. In fact, Huawei has been attracting lots of users in the domestic smart phone market because of its affordable price and excellent user experience.

As we know, the good audio quality of mobile phones are so important to us. There is no doubt that people like to save media files on mobile device, especially music, videos, photos and more. Most of us listen to music or watching/taking videos on mobile phone for entertainment frequently. However, just as nothing is perfect in the world, these precious files can be deleted or erased due to various reasons, and they can easily occupy the storage of mobile device. At this moment, getting a useful tool to backup media files from phone to computer is necessary.

Transfer Media Files between Huawei and Computer

Android & iOS Manager can be the best helper to transfer music, videos between Huawei and computer with one click. Except music and videos, it allow to transfer other files among device, computer and iTunes, including photos, playlist, contacts, SMS. It is an all-in-one data manager tool for managing files for bot of Android device and iOS device. Other functions of Android & iOS Manager insist of Rebuild iTunes Library, Backup Device, Restore Device and GIF Maker. It compatible wit all Android and iOS models, like Huawei Mate RS, Huawei P20/P10/P9, Huawei Mate 10/9, Huawei Honor; ZTE, Samsung, Google Pixel, HTC, OPPO, Lenovo, Xiaomi, Motorola, LG; iPhone, iPad.

d_win d_mac

Part A. How to Backup Music from Huawei to Computer

Step 1. Run Android & iOS Manager on the Computer
After running the program on computer, select “Music” Tab
Once your media loads,choose your wanted songs and click “Export” > “Export to PC“.

select music from huawei to pc

Step 2.Backup Music from Huawei to Computer
This brings up your file browser window,choose a save path to save songs from your Huawei to computer.

You can simply Drag and Drop music files from Huawei phone to computer.You can also transfer the whole music playlist from Huawei to computer in one click.

export huawei music to pc

d_win d_mac

Part B. How to Backup Videos from Huawei to Computer

Step 1. Run Android & iOS Manager on the Computer
After running the program on computer, select “Videos” Tab
Once your media loads, choose your desired videos and click “Export” > “Export to PC“.

transfer videos from huawei to pc

Step 2. Backup Videos from Huawei to Computer
This brings up your file browser window. Select a save path to store the videos from your Huawei to computer.You can simply Drag and Drop videos from Huawei to computer.

d_win d_mac

Related Articles:

How to Transfer Files between Huawei and Computer

How to Transfer Photos between Huawei and Computer

How to Transfer Data from Samsung to Huawei

How to Transfer Data from iPhone to Huawei

How to Recover Deleted Files from Huawei Phone

How to Backup and Restore Huawei Phone

How to Manage Huawei Phone on Computer

Transfer Media between Huawei and Computer

How to Transfer Samsung Data to Android Phone

There are so many hot Samsung models got good comment from users, like Samsung Galaxy S5, Galaxy S6, Galaxy S7. Undoubtedly, Samsung is one of the outstanding Android brands. However, the launch of new Android models creates a new purchasing trend for Samsung. In these years, many advance smart phones have been made by Android manufacturers. Running on Android OS, which is known for highly features, these quality cellphones are very popular on mobile market. So many people will switch to a new mobile device for upgrading for quite a time.

You may ready to switch your old Samsung phone to a new Android models, may be Huawei P, may be LG 6, may be Google Pixel. It’s easy to change a new phone with enough money, but it’s not easy to transfer all your data between the old phone and the new one. It is depressed to lose friends’ contacts, call logs, or favorite songs, videos, meaningful photos saved in old Samsung. The tradition to transfer data between two phones are actually time-costing. Thus here we will share with you an happy experience to transfer data between Samsung and Android phone with one click via a famous tool called Phone Transfer.

Transfer Files between Samsung and Android with One Click

If you are looking for a quick and easy way to transfer files between Samsung and Android, Phone Transfer is your best choice. The main reason why you may want to use Phone Transfer is because the software is designed with data transfer between two mobile device with only click. All of its features are designed to make the process simple and efficient. It enable to transfer files between phones among Android device, iOS device and Symbian device. Allow to transfer several kinds of files including contacts, text messages, photos, videos, calendar, call logs, music and apps. In addition, it features with device backup & restore safely, wipe data from device completely. Work well for almost all Android models insist of, Samsung(Galaxy S9/S8/S7/S6/S5, Note 9/8/5/4), Huawei, Google Pixel, HTC, OPPO, Lenovo, Motorola, ZTE, LG, etc,.

d_win d_mac

How to Transfer Samsung Data to Android Phone

Step 1. Connect Samsung and Android to a Computer
Install and run Phone Transfer on your computer. Then choose the mode “Phone to Phone Transfer“. Connect your Samsung and Android to the computer with USB cables.

phone transfer home page

Step 2. Choose File Types to Transfer
Make sure that the source phone is your Samsung and the destination is your Android. If not, click the button “Flip” to exchange their places. Next, choose file types to transfer, for example, contacts, text messages, photos, videos, etc,. Then click the button “Start Transfer“.

select file to transfer

Step 3. Transfer Data from Samsung to Android
Now the program is start transferring data from Samsung to Android. You can view the progress. Please don’t unplug either phone from the computer under it’s end. When the transmission is done, click the button “OK” to finish the process.

transfer Samsung data to Android

d_win d_mac

Related Articles:

How to Transfer Samsung Data to Huawei Phone

How to Transfer Samsung Data to Samsung Phone

How to Transfer Samsung Data to iPhone

How to Recover Lost or Deleted Data from Android

How to Backup and Restore Android Phone or Tablet

Transfer Samsung Data to Android Phone