All posts by DHZ

How to Import Apple Music to iMovie Projects

[Summary]: The Apple Music songs are protected and unavailable in iMovie. From this post, you can solve this problem easily by converting Apple Music to plain MP3/FLAC/AAC/WAV, and import to iMovie as background music for video editing.

iMovie is a video editing software developed by Apple that bundles all new Mac and iOS devices (iPhone, iPad and iPod). In iMovie, users can edit photos and video clips and add titles, themes, background music and effects, including basic color correction and video enhancement tools and transitions such as fades and slides. Simultaneously, iMovie can take advantage of Apple’s latest features, including support for 3D touch, 1080p HD videos at 60fps, and ultra high-definition 4K footage, etc.

“As an Apple Music subscriber, I can pick and choose full albums or individual songs, and download these streaming music freely. However, it seems that I am not given the ability to import downloaded Apple music songs to iMovie, what should I do?”

Disable to Add Apple Music to iMovie as Background Sound? Why?

Each of Apple Music songs is DRM-locked. Except for listening, DRM protection will prevent user from using Apple Music songs freely, such as setting Apple Music as iPhone ringtone, importing Apple Music to iMovie for video projects, which is why you can’t import Apple Music into your iMovie project. Therefore, to add Apple music songs to iMovie without restrictions, the first thing you need to do is to remove DRM protection for Apple Music.

While Apple Music Converter is such a software that helps users remove DRM protection from any Apple Music song and convert to iMovie supported audio file formats, such as MP3, WAV, M4A, AIFF, AAC with super fast conversion speed and lossless output quality.

Here are some amazing features of Apple Music Converter.

Remove DRM from Apple Music, iTunes M4A, M4B & Audible AA, AAX audiobooks.
Convert Apple Music to plain audio formats like MP3, WAV, M4A, AIFF, AAC.
Keep ID tags and metadata information after conversion.
Keep 100% original audio quality.
Perform up to 16X faster speed & support batch conversion.
Fully compatible with latest Windows OS, Mac and iTunes.

The following will show you the complete steps to remove DRM from M4P music & Apple Music for importing to iMovie project as background music.

d_win d_mac

Part 1: How to Remove DRM from Apple Music

Step 1. Launch Apple Music Converter

Launch Apple Music Converter on your computer and iTunes will be also launched automatically. The entire iTunes library will be listed as playlists in the left panel.

Note: Apple Music Playlists created by Apple will be listed as separate lists in the left bottom.

run Apple Music on PC

Step 2. Select Apple Music Tracks

Next you can select the playlist category at the left pane and select songs you want. You can also use search box to locate songs quickly. Of course this powerful program can also batch convert the entire album.

add music

Step 3. Choose MP3/AAC/FLAC/WAV for iMovie

Apple Music Converter supports many output formats, of which, MP3, WAV, M4A, AIFF, AAC. You can choose one of them as output. Besides, you are allowed to define output path if you don’t want to save the converted songs in the default folder.

output settings

Step 4. Start Conversion

Now, simply click “Convert” button to start converting Apple Music tracks to MP3/AAC/FLAC/WAV. After conversion, you can click “Open output file” to locate converted Apple Music tracks.

dwonload Apple Music without subscription

d_win d_mac

Part 2: Import Converted Apple Music Songs to iMovie

The original Apple Music can’t be imported to iMovie to be a part of the project, however, the converted Apple Music song has no such restriction. You need to import the converted Apple Music (the MP3 audio) to iTunes first, then you can add Apple Music as BGM for iMovie.

Step 1: Launch iMovie on your computer, open the movie item you want edit, and then click “Import” to add the converted Apple Music file to iMovie.

launch-imovie

Step 2: Open the output folder and then choose the Apple Music song from it, and then click “Import Selected”.

Now, you have imported Apple Music songs to iMovie successfully, the next you need to do is edit the movie item and Apple Music as you want.

More Apple Music Conversion Articles:

How to Remove DRM from Apple Music Completely

How to Record Apple Music M4P Streams as MP3

How to Download Apple Music and Playlist for offline listening

How to Download and Listen to Apple Music/iTunes Music Songs offline

How to Play Apple Music after Canceling Subscription

Import Apple Music to iMovie Projects

How to Add Spotify Music to iMovie as BGM

[Summary]: The article provides a step-by-step guide on how to add songs from Spotify to iMovie as a background music for your videos with a powerful Spotify Music Converter.

“As a long-term tenant of Spotify, I have the ability to download my favorite music to a local music library. But this doesn’t seem to work for adding Spotify songs to iMovie. Is there any effective way to make my Spotify music compatible with iMovie perfectly?”

iMovie provides a wonderful platform for video editing where numbers of video clips can be joined together so easily in order to create something very interesting. With Spotify Premium subscription, you can get the offline playback feature and download songs, playlists or albums for offline listening. But I am afraid that it is impossible to directly import Spotify Music songs to iMovie since Spotify songs are in DRM protected Ogg Vorbis format and can only be played with Spotify app. iMovie supported audio File formats like MP3, WAV, M4A, AIFF, AAC, MP4, MOV, MPEG-2, AVCHD, DV, HDV, MPEG-4, H.264, etc, while all editing tools including iMovie don’t support Ogg Vorbis format. Perhaps you are bothering how to add Spotify music to iMovie as background music for your video, what you should do?

spotify-to-imovie

The video files are in different formats, you won’t be able to add Spotify into iMovie as expected. To get out of the trouble, you should try UkeySoft Spotify Music Converter, an easy-to-use Spotify music downloader and converter which can quickly and losslessly download any Spotify song/playlist/album, remove DRM protection and convert Spotify songs to MP3, AAC, WAV that are supported by iMovie. It’s able to keep the original metadata info and ID3 tags as well, such as artwork, artist, album, etc. After converting, you can add Spotify music to video editing tools, like iMovie, WMM, etc. with ease to make the video more attractive.

Now free download the Spotify Music Converter with your Windows/Mac and then follow the steps tutorial to copy Spotify tracks to iMovie easily.

d_win d_mac

Part 1: Convert Spotify Music to iMovie Friendly Format

Step 1. Launch Spotify Music Converter

Simply launch the installed converter software and you will see the intuitive interface of UkeySoft Spotify Music Converter. Spotify will be open automatically.

Spotify Music Converter home page

Step 2. Import Spotify Songs

Browse the Spotify store to find the songs you want to add into iMovie. You can drag and drop the songs you want to convert. Or if you have already got the link of the songs, you can also click “+” button to add through the URL directly.

add Spotify Music

Step 3. Choose Output Format

Click the Options button to select the output format. You can choose output format (MP3, AAC, FLAC or WAV…), output quality (High 320kbps, Medium 256kbps, Low 126kbps). Also, you can change the output channel, sample rate, bit rate and more as you prefer.

choose mp3 format

Step 4. Start Conversion

After setting down, click ‘Convert’ button to start removing DRM from Spotify sons and converting Spotify audio files to MP3 or other iMovie supported formats. After conversion, click on ‘History’ icon to view the DRM-free songs.

convert Spotify Music to mp3

d_win d_mac

Part 1: How to Convert Spotify Music Tracks to MP3 Format

Now you have the Spotify music in iMovie friendly format. Follow the steps below to add the DRM-free Spotify songs to iMovie for your video creation.

add music to iMovie

Primary Condition: You should add the converted Spotify songs to your iTunes library firstly.

Step 1. Launch iMovie with your computer or iDevice to open your project. Make sure you have created a project. If not, you can click “Create New” menu to create a new one.

Step 2. Click “Audio” menu from iMovie > select “iTunes” from the sidebar > Browse to the target converted Spotify downloads that you’d like to add to your project and then adjust it on the timeline.

Related Guides:

How to Listen to Spotify Music without Subscription

How to Convert Spotify Music to MP3

How to Sync Spotify Music to iPod Touch/Nano/Shuffle

How to Stream Spotify Music to Apple TV 4

How to Set Spotify Music as Android Phone Ringtone

Add Spotify Music to iMovie

Recover Deleted Photos from iPhone/Android/PC/Mac

[Summary]: Don’t worry when you accidentally deleted or lost photos, this page recommend you the best photo recovery, iPhone photo recovery and Android photo recovery to recover permanently deleted, erased, wiped photos and data from iPhone, Android Samsung, Windows computer, MacBook, digital camera, memory card, USB flash drive, etc.

From this passage,you may know how to recover deleted/lost photos and any other data from iPhone, Android phone, PC and Mac computer. Use the best iPhone photo recovery, Android photo recovery and photos recovery for Windows & Mac separately, you can easily recover permanently deleted, erased, wiped, formatted photos and data from on your device.

CONTENTS

Can I Recover Permanently Deleted Photos?

Some friends may use their iPhone or Android phone take many precious photos, if the phone may run out of storage space due to the large-size photos and other file, you may delete some less important photos, videos and apps to free up more space, sometimes you may delete some important photos by accident.

Question:

How to Recover Already Deleted Photos from iPhone
I careless deleted some iPhone photos include the need one, worse, I erased all already deleted items in “Recently Deleted album”, I want to know if I still have a chance to recover the already deleted pictures from iPhone XS Max?

How can I Recover Deleted Pictures from Samsung Phone?
All my photos on my Galaxy S7 are lost due to factory reset, how can I recover lost photos from Galaxy S7 after factory reset?  I’ve tried to find a free photo recovery tool to recover lost photos from Samsung Galaxy S7 edge, but failed. Any professional Android photo recovery software helps me retrieve lost and deleted photos on Samsung S7?

How to Recover Deleted Photos on MacBook Pro?
I use MacBook Pro over 3 years, I often back up my phone photos from iPhone to my MacBook Pro. What makes me angry is that my brother accidentally deleted some of my important photos, yesterday. But I have deleted those photos on my iPhone after I have backed up to the computer, I want to know is it possible to recover deleted photos on Mac?

How to Recover Formatted/Lost Photos from USB flash drives?
Help! My USB flash drive is formatted due to an unknown error, and hundreds of important photos, videos and documents stored in the USB flash drive. What’s the possible way to recover formatted photos, videos and other files from USB memory sticks on Windows 10? I’m waiting for your kind suggestions.

Don’t worry! This page introduces another way to recover permanently deleted, erased, wiped photos from iPhone/Android/PC/Mac, please select a valid photo recovery software based on your device.

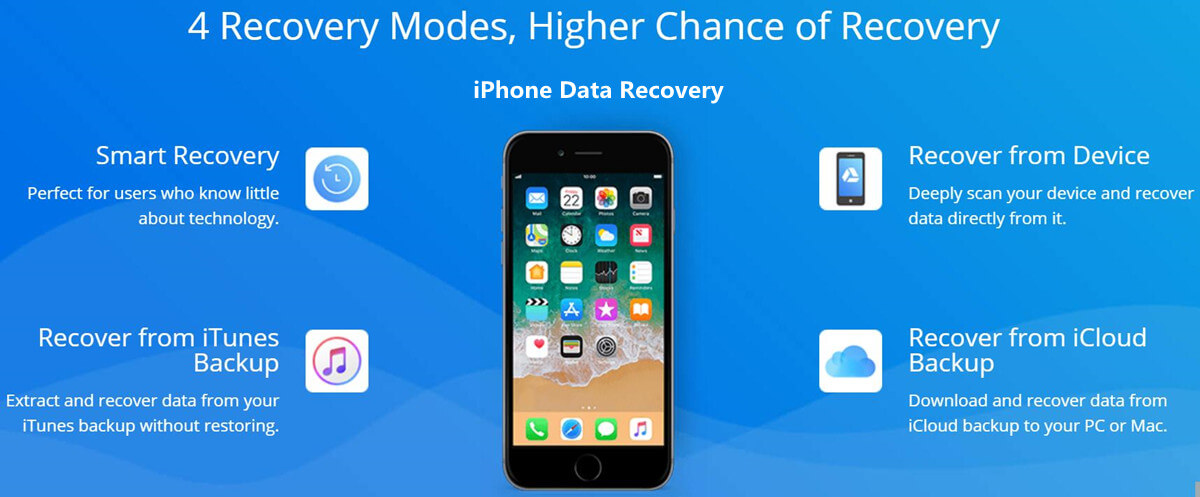
Part 1: Recover Deleted Photos from iPhone/iPad/iPod by iPhone Photo Recovery

iPhone Photo Recovery is a powerful software help you to recover deleted or lost photos from iPhone due to the data loss circumstances, such as, accidental deletion, factory reset, ROM flashing, software update, iOS system update, virus attack, etc. It can also recover message, call history, notes, contacts and other types of files. Most of Apple device are compatible with iPhone data recovery, including iPhone XS Max, iPhone XS, iPhone XR, iPhone X, iPhone 8/8 Plus, iPhone 7/7 Plus, iPhone 6/6S (Plus), iPad, iPod base on iOS 12, iOS 11, iOS 10, ect.

d_win d_mac
d_win d_mac

The Main Features of iPhone Photo Recovery

– Recover more that 19 types of data from iOS device.
– Recover photos from iPhone, iTunes and iCloud.
– Recover deleted photos, contacts, text messages, notes and more from iPhone/iPad/iPod.
– Easily back up and restore data on iPhone/iPad/iPod touch, which iTunes and iCloud cannot do.
– Fix iPhone to normal if your iPhone stuck in Apple logo, recovery mode or black screen of death.

Let’s take the example of using the iPhone Photo Recovery to recover deleted photos from iPhone XS step by steps.

Simple Steps to Recover Deleted Photos from iPhone XS

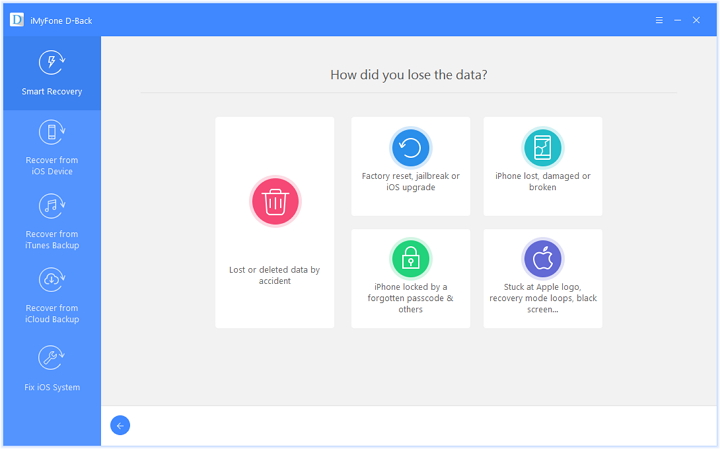
Step 1: Running iPhone data recovery and select the recovery mode
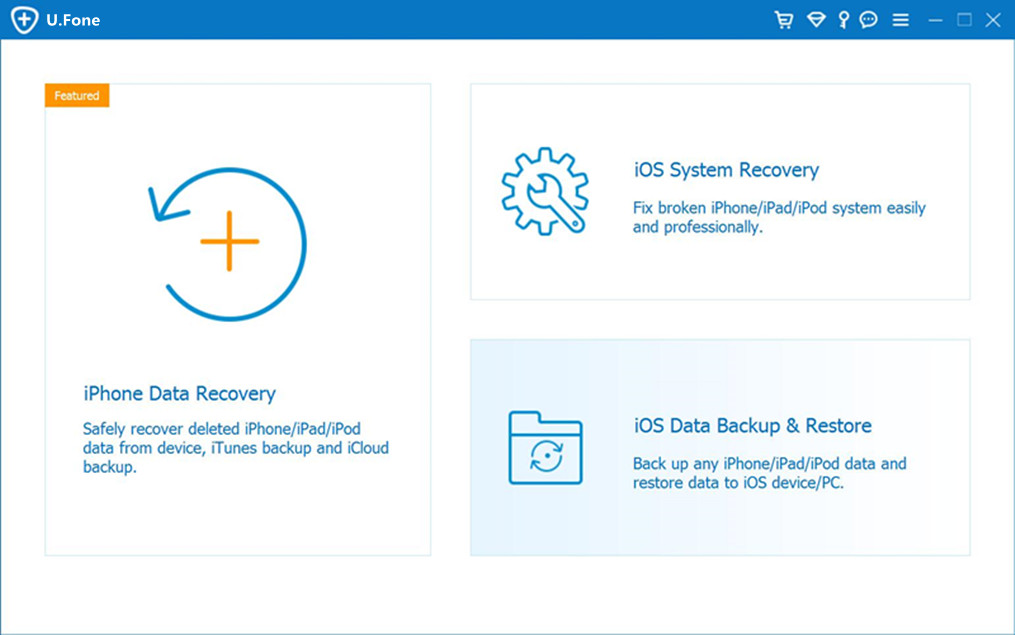
After downloading, installing and launching the iPhone Photo Recovery software on your PC or Mac, then click “iPhone Data Recovery” function.

launch iPhone photo recovery

Step 2. Connect iPhone XS to Computer
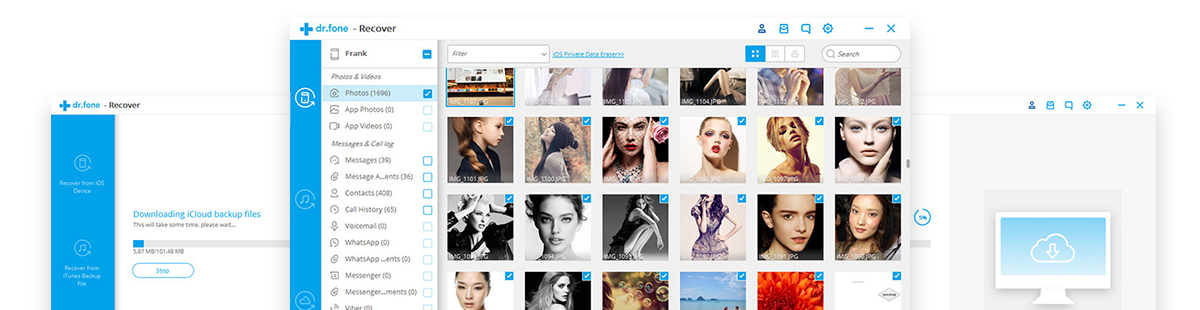
If you haven’t backup the photos from iTunes or iCloud, you should choose the first mode “Recover from iOS Device” to ready directly scan and recover your deleted pictures on iPhone. You need to connect your iPhone XS to computer with USB cable.

connect iPhone XS to computer

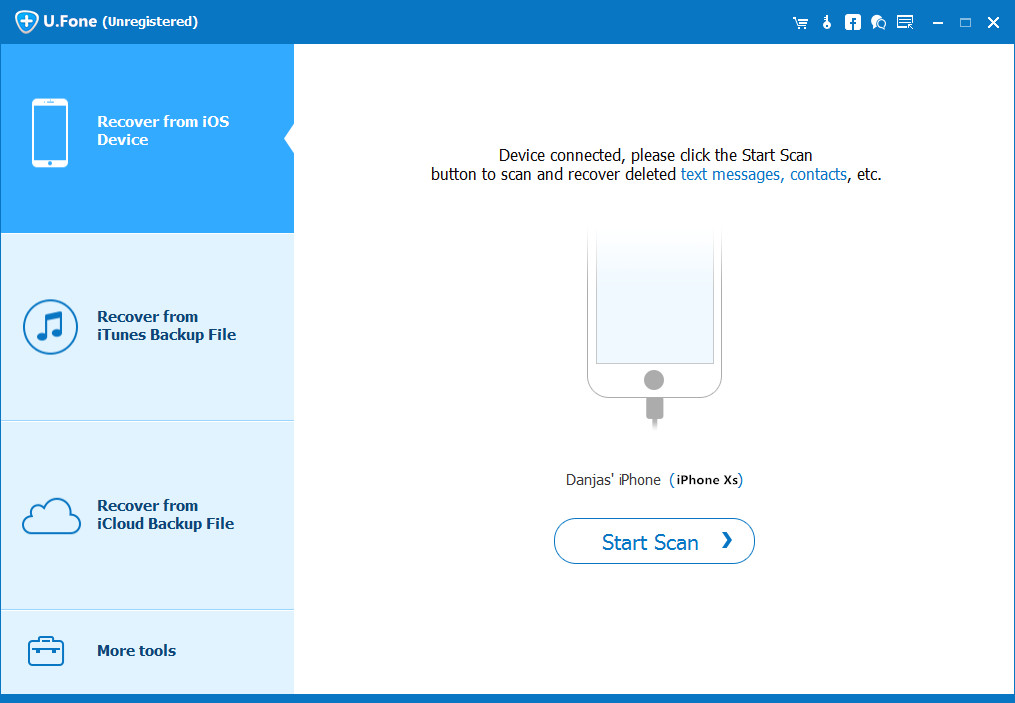
Tips: This recovery mode helps you directly scan your iPhone for lost data, including photos, videos, contacts, text messages, WhatsApp messages and more.

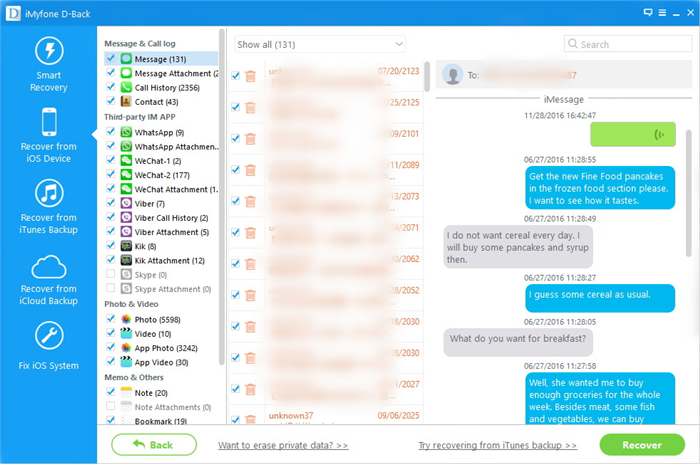
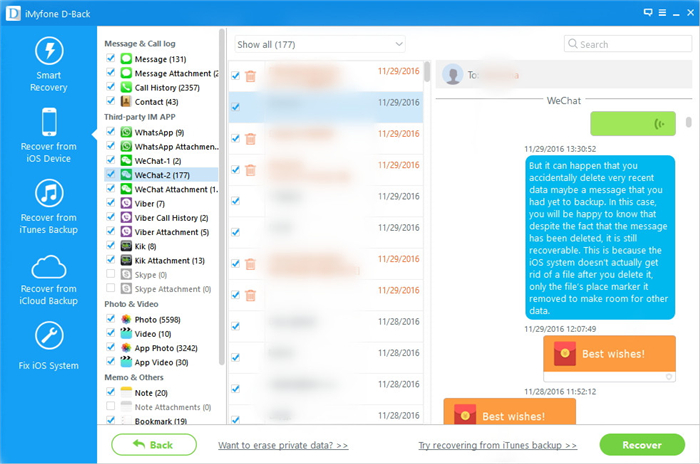
Step 3. Scan the Lost Photos from iPhone XS
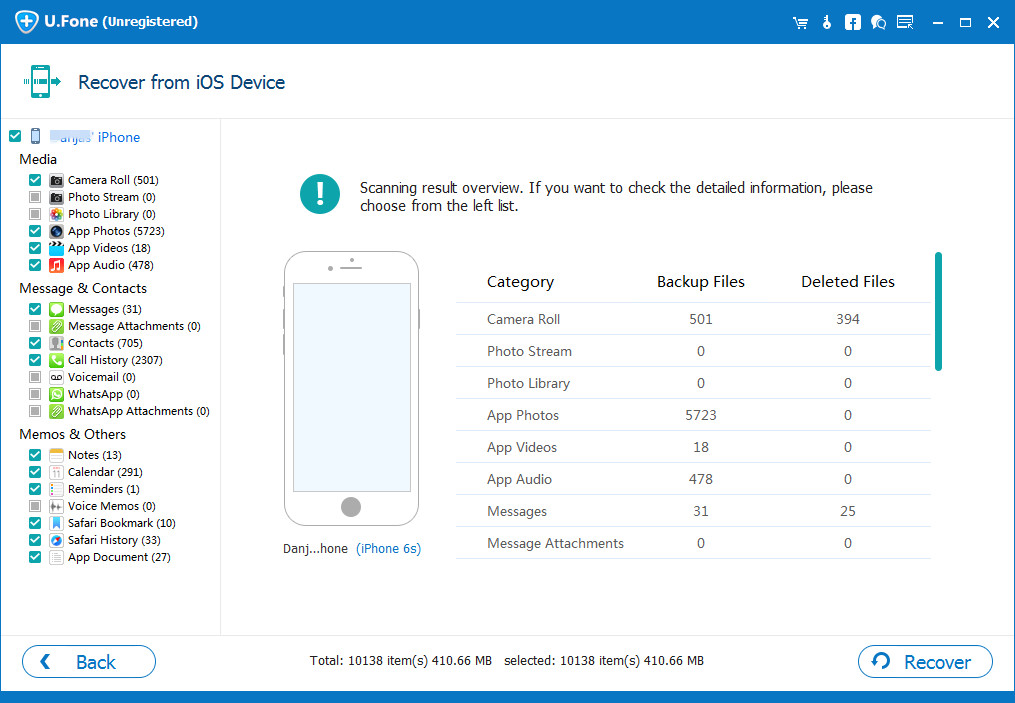
Click the button “Start Scan” to go on.After a few minute,the windows show you the type of data you want to recover. If you only want to recover deleted/lost photos from iPhone, please just select “Camera Roll”, “Photo Stream”, “Photo Library” or “App Photos” items, then click the “Scan” button to go on scanning the device.

scan photos from iphone xs

Don’t use your iPhone while the program is scanning your device.It will take you a few minute to complete.

Step 4. Recover Deleted Photos on iPhone XS Directly
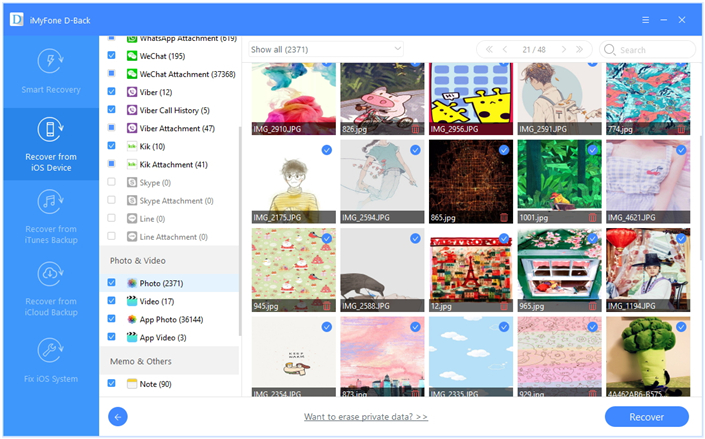
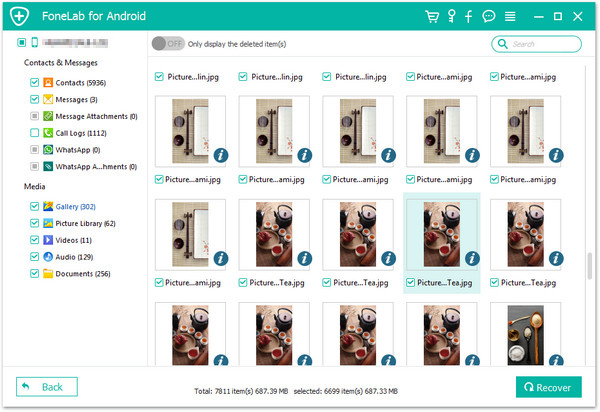
After scan the lost photos from your device, you can choose the photos which you need to recover from the program. At the left portion, you can click on the photos-related category, for example the “Photo Library” option, and then the window only display the deleted item, you can also choose show by all, then select specific photos by checking the box.

recover deleted photos on iPhone XS

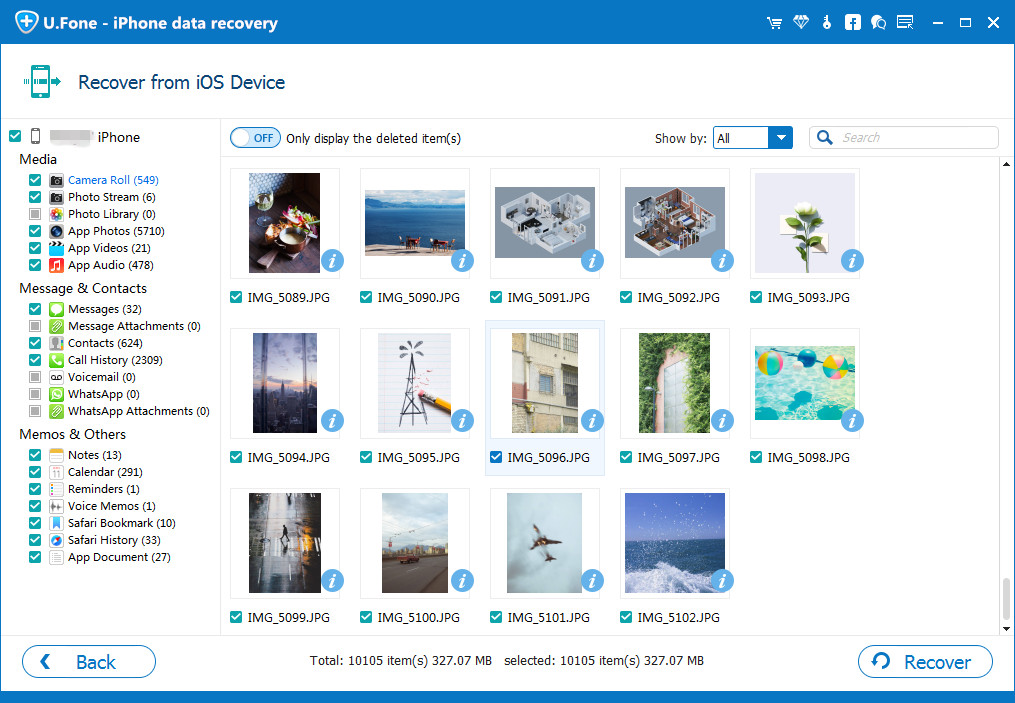
Tips: After a few minute,all the data will be listed in groups. If you just want to get back the lost photos, click the button “Only display the deleted item(s)”.

The last step is click the “Recover” button to retrieve deleted photos from iPhone XS, all the lost photos you need will save onto your computer, you should wait for a few minute.

Now you can find all the lost photo from your computer, if you need to transfer the retrieved photos to your iPhone XS, you can use this iPhone Transfer tool or Mobile Sync, both can help you manage and transfer iPhone files on computer easily

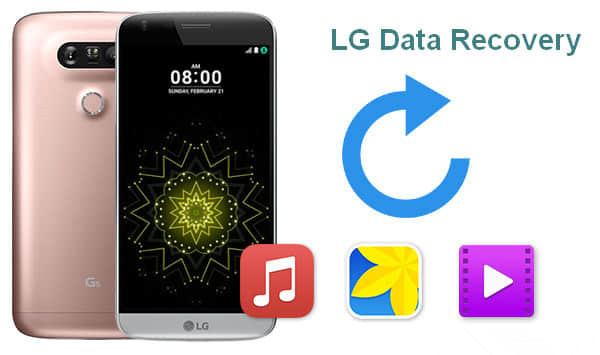
Part 2: Recover Deleted Photos from Android Phone by Android Photo Recovery

Android Photo Recovery is a professional Android data recovery software to recover deleted or lost photos from Android Phone, such as Samsung, HTC, LG, Sony, Google Pixel, HUAWEI, Motorola, ZTE, and more smartphones and tablets. If your precious photos have been deleted. Don’t worry! You can use Android Photo Recovery to get back your lost photo due to any accident, such as mistakenly delete photos or format your android phone without any backup. In addition, the powerful Android data recovery software also supports recover deleted/lost contacts, text messages, call history, videos, WhatsApp messages and more from Android, It works well in most Android phones one the market.

In additional, Broken Android Photo Recovery function is one of the functions of this Android data recovery software, you can use this powerful broken Android data recovery & fix function to fix bricked, crashed, frozen or locked Samsung phone to normal and extract data from the broken Samsung Galaxy phone for backup on Windows computer. Currently, the Broken Android Data Extraction function support Samsung Galaxy S6/S5/S4, Samsung Galaxy Note 5/Note 4/Note 3, etc. If you want to know how to recover text messages, contacts, call history, WhatsApp, photos, etc. from broken phone.
Please go to: How to recover data from broken/dead Samsung phone

d_win d_mac
d_win d_mac
Let’s take the example of recover the delete photos from Samsung Galaxy S7/S8/S9, ect.

Simple Steps to Recover Deleted Photos from Samsung Galaxy S8

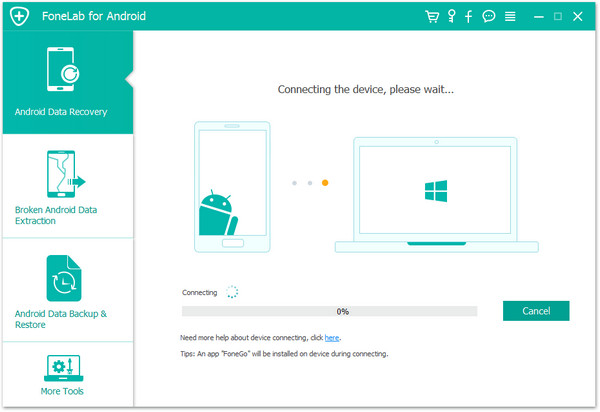
Step 1. Run the Android Photo Recovery software and Connect Samsung to PC/Mac
To recover the deleted photo on Samsung phone, you must download the Android data recovery software, and launch it! Form the window, there are 3 mode for you to choose. If you recover the lost photo on your Samsung Galaxy S8, please select “Android Data Recovery” option. If you want to fix bricked Android and recover deleted data from broken Samsung phone, please choose “Broken Android Data Extraction” instead.

Choose Android data recovery mode

After that, you should use a USB cable to connect your Samsung Galaxy S8 with your computer.

connect Samsung phone to PC

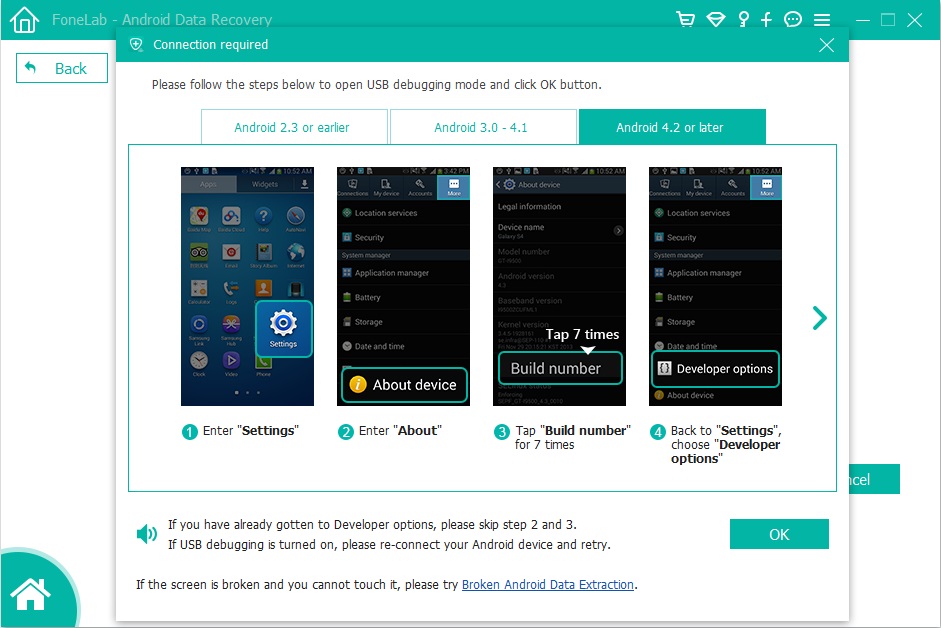
Step 2. Enable USB Debugging on Samsung phone
When you connect the Samsung phone, the program will prompt you to enable USB Debugging mode on your Samsung phone. Please follow the steps to open USB debugging mode:

1) For Android 2.3 or earlier: Enter “Settings” – Click “Applications” – Click “Development” – Check “USB debugging”.
2) For Android 3.0 to 4.1: Enter “Settings” – Click “Developer options” – Check “USB debugging”.
3) For Android 4.2 or newer: Enter “Settings” – Click “About Phone” – Tap “Build number” for several times until getting a note “You are under developer mode” – Back to “Settings” – Click “Developer options” – Check “USB debugging”.

Enable USB Debugging on Android

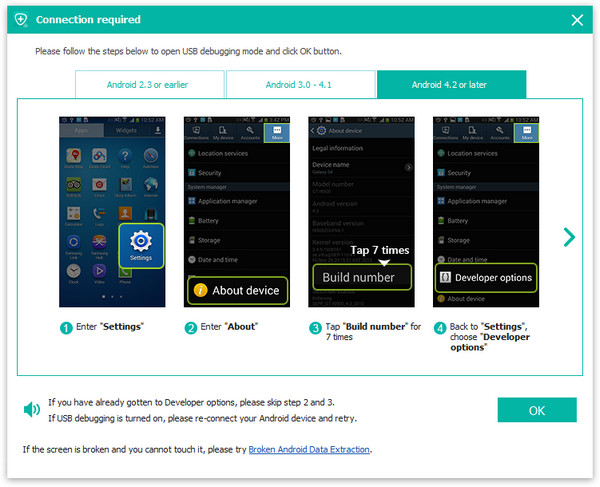
If you’ve done this before, skip to this step.

If fails, please visit article: How to Enable USB Debugging on Android.

Tips: If the screen is broken and you can’t touch it, please try another mode – “Broken Android Data Extraction” from the step 1.

Step 3. Choose the Lost Photo to Scan on the Device
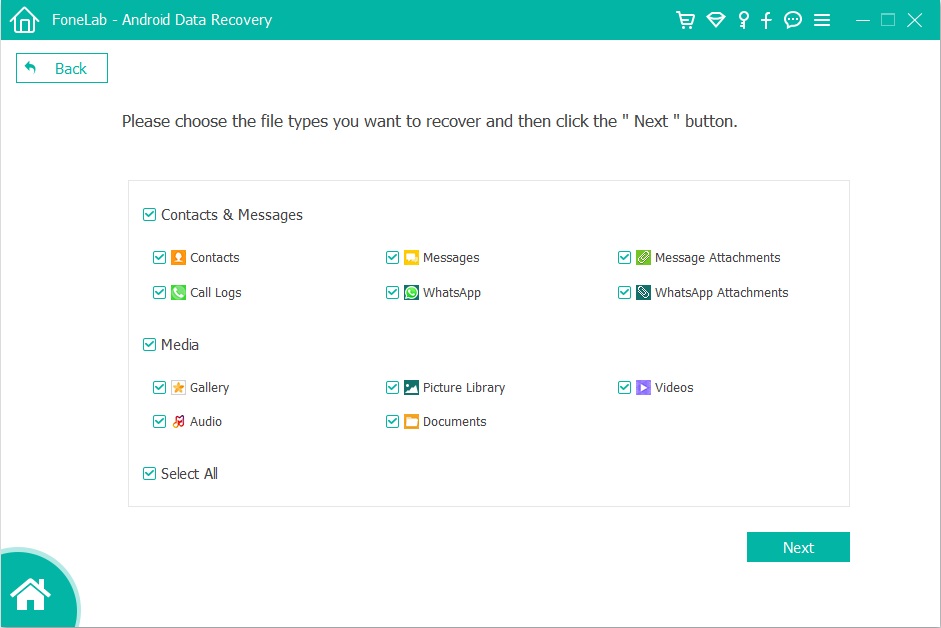
When the USB Debugging mode is finished, you will be ask to choose the file types you want to recover. If you just want to recover deleted photos, please select “Gallery” and “Picture Library” get ready to scan the lost photos.
Then, click the button “Next” to go on.

select photos to scan

Then, please allow the program analyze and scan data on Samsung Android phone, you need to turn back to your phone again to accept and tap on the “Allow” button to let the program scan your phone for lost messages, contacts, photos and video on your LG phone.

allow scan Samsung Android phone

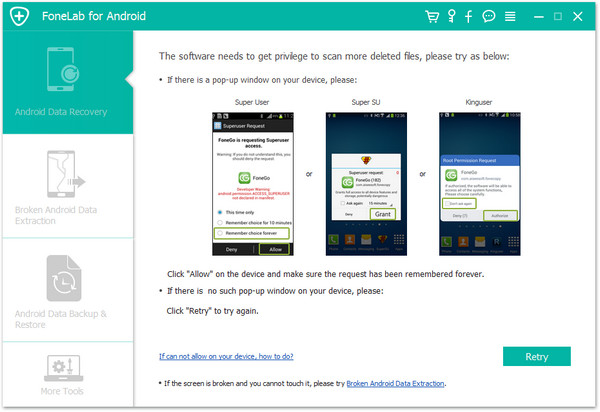
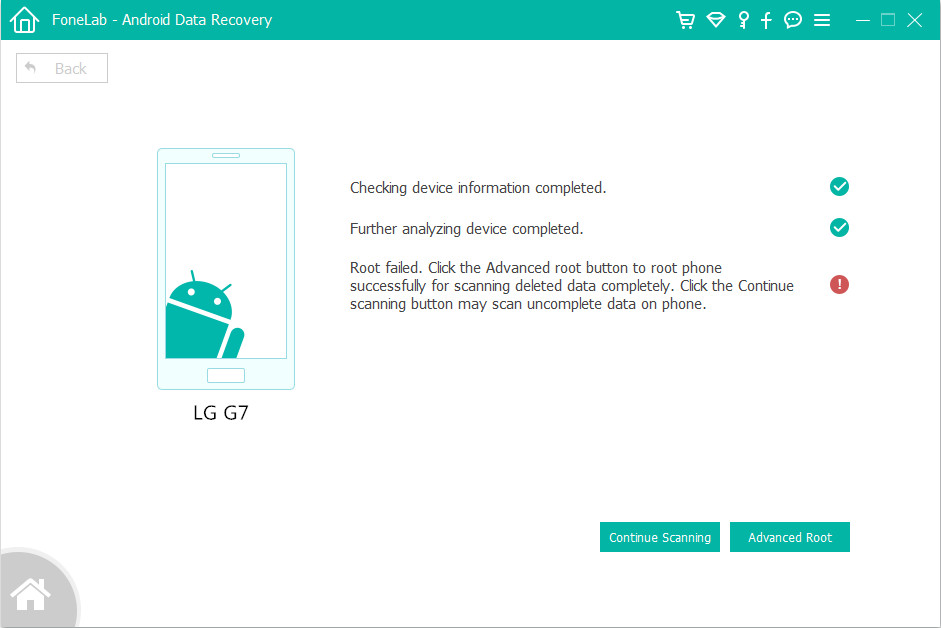
Step 4. Advanced Root for Deep Scan Device
At this step, the program will pop up an new window, if you want to deep scan the device for all lost and deleted files, you need to root your Samsung Android phone at first.

To root your Samsung phone, please hit the “Advanced Root” button and we will send you to an useful Android Root tool – KingoRoot. Then, install the Android Root app on your computer and follow the simple guide to root your phone.
You can also use our Android Toolkit – Root tool to root your Android phone on Windows computer.

root lg phone

Tips: Read the article about How to Root and Unroot an Android Device with KingoRoot.

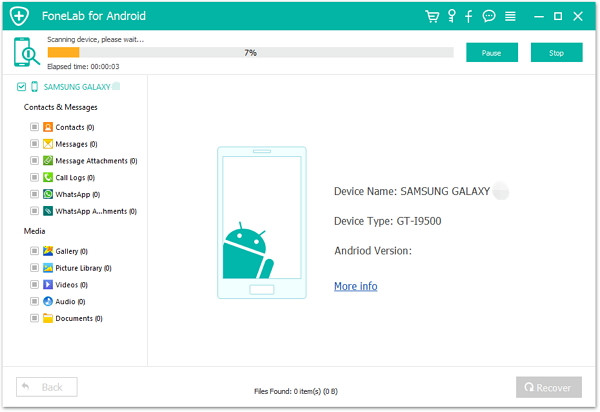
Step 5. Start Analyzing and Scanning Data from your phone
Once rooted, this software will start scanning your phone thoroughly for the lost photo . It will take a few minute, please be patient.

scan data from Samsung

Step 6: Recover Deleted Photos from your Samsung Galaxy Phone
After scanning the lost photos from your phone, an new window will be show as below, it displays a list of results for the selected file type in the window, you can see all deleted/lost and existing pictures be scanned. If you want to recover the deleted photos, please turn on display the deleted item. Now you can select the lost photos from the right hand pane.

recover deleted photos on Samsung S8

After select the lost photo which you need to recover, click the button “Recover” to go on.

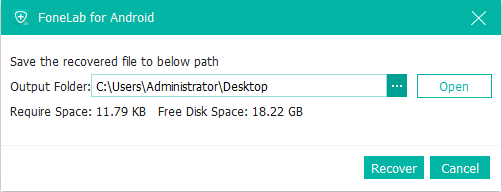
Before the recovery, the program may ask you where the path you want to save the photos on the computer, you should make sure a path where ever you want. Then, click “Recover” button again to start retrieve your deleted photos from you Samsung Galaxy phone.

android data recovery save path

Well done! You have retrieved all deleted or lost photos from Samsung phone, please download the Android Photo Recovery or Android Data Recovery for Mac and try to retrieve photos from Android devices.

d_win d_mac
d_win d_mac

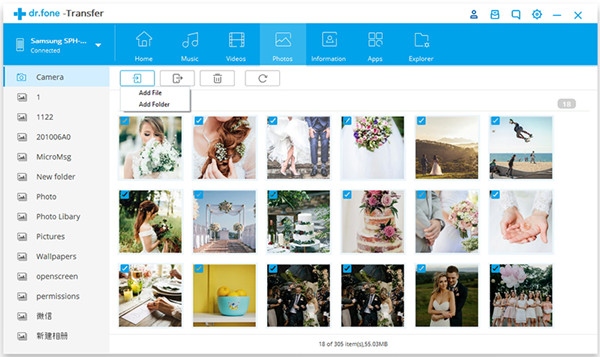
Step 7. Transfer the Retrieve Files Backup to Devices
Just for 6 detail steps! All the deleted photo have been get back from your Samsung Android phone perfectly. Now you can view the lost photos from your computer. If you want to transfer the retrieved files back to your Android phone, you can use this Android Transfer or Android Manager to transfer all retrieved audios, photos, videos, contacts, documents (Word, Excel, PDF, etc) back to your phone for view or using.

Tips: The Android Transfer can’t transfer call logs and text messages from PC to devices, but you can use this Android Transfer & Manager tool to backup everything from Android to computer easily.

Part 3: Recover Deleted Photos on PC or Mac by Photo Recovery

Accidentally deleted photos on computer? Emptied your recycle bin on Windows or Mac computer? Photos lost due to formatted, lost partition, virus attacked and system crashed? Deleted or lost pictures on your memory card, digital camera, SD card, USB flash drive and other external storage device? Don’t worry, those deleted photos don’t have to be gone forever, you still have chance to get them back actually. But the important thing is, please stop using your laptop or digital camera/memory card to add any new data on it, you’d better stop using your devices. Why? Once the deleted files will be overwrite, you can no longer recover those lost data. Please use a professional photos recovery software to recover all lost/deleted photos back as soon as possible.

Photo Recovery (Windows/Mac) is an effective data recovery software, which is designed to recover deleted photos, videos, audios and other documents from SD card, memory card, digital camera, Windows computer hard drive and MacBook effectively, safely and completely. With the help of this powerful data recovery software, you can easily retrieve deleted or lost photos due to accidental deletion, formatted, lost partition, virus attacked and system crashed.

The Photo Recovery for Windows supports Windows 10/8/7/XP/Vista and the Photo Recovery for Mac supports Mac OS 10.13, macOS 10.12, OS X 10.11, 10.10, 10.9, 10.8, 10.7, 10.6. Please free download a suitable version and try to recover your missing, lost, deleted and formatted photo files.

d_win d_mac
d_win d_mac

Simple Steps to Recover Deleted Photos from Laptop

This tutorial will take how to use Windows version to recover deleted photos on Laptop. If you are working with Mac, you can get the Mac version and follow similar steps to retrieve deleted photos on Mac.

Step 1. Run Data Recovery and Click “Deleted Files Recovery” mode
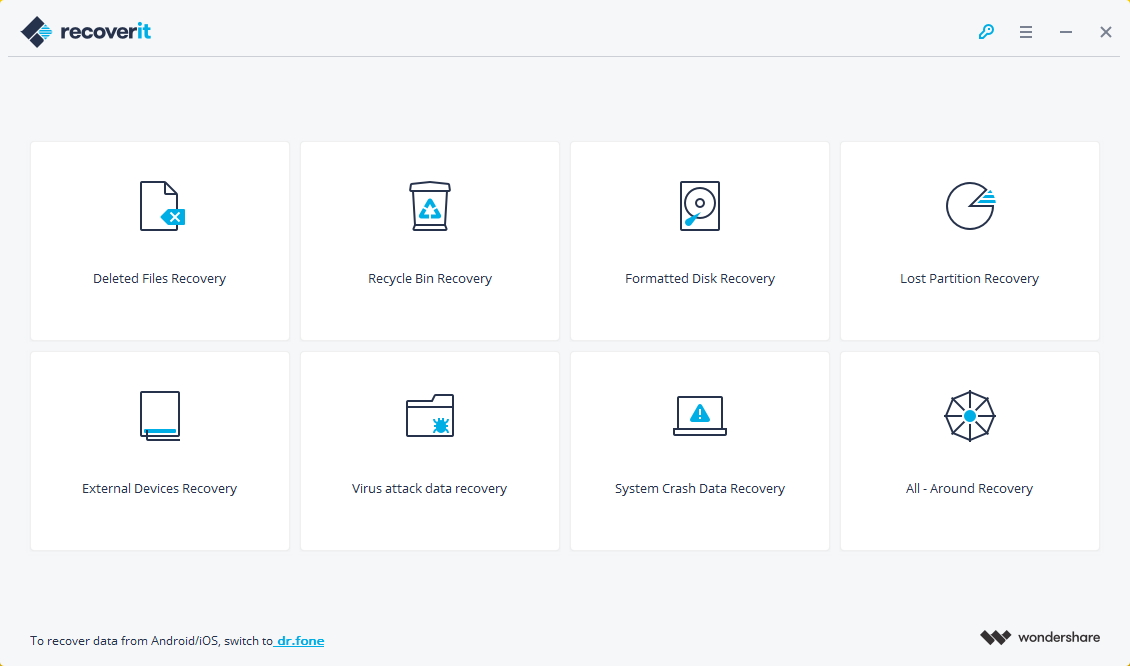
First of all, please free download, install and launch the Data Recovery software on your computer, after launching it, you can see there are 8 recovery modes to recover data back. If you want to recover deleted photos from hard disk drive, please select “Deleted Files Recovery” option, this recovery mode allows you recover deleted or lost photos from laptop.

select deleted files recovery mode

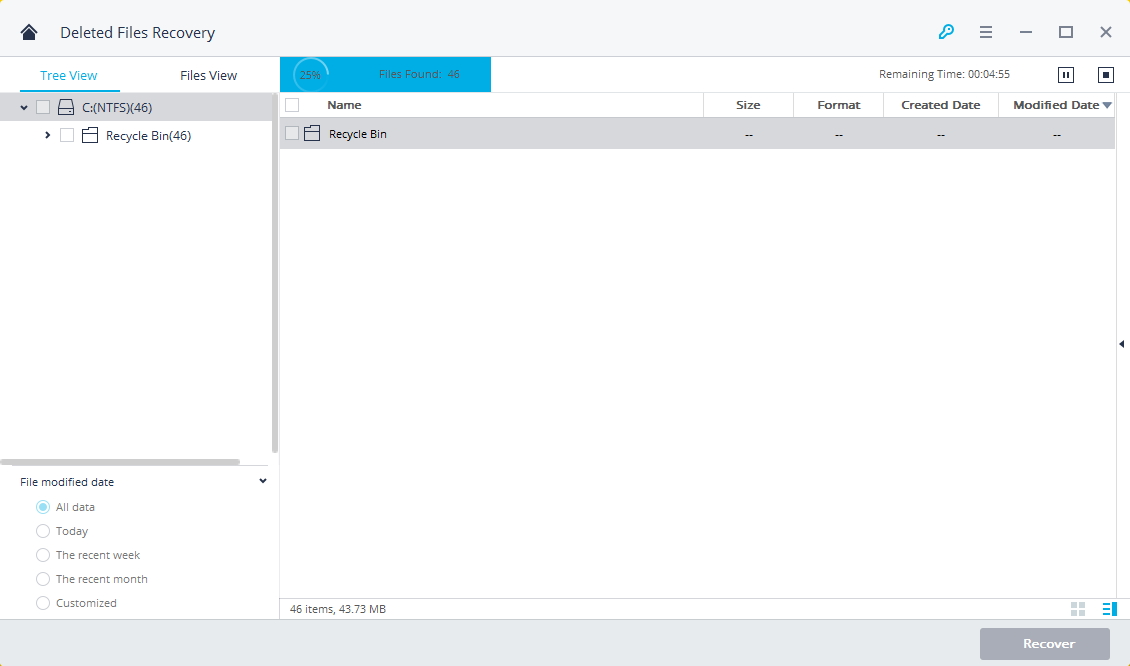
Tips: If you want to recover deleted photos from recycle bin, please select “Recycle Bin Recovery” mode to get started.

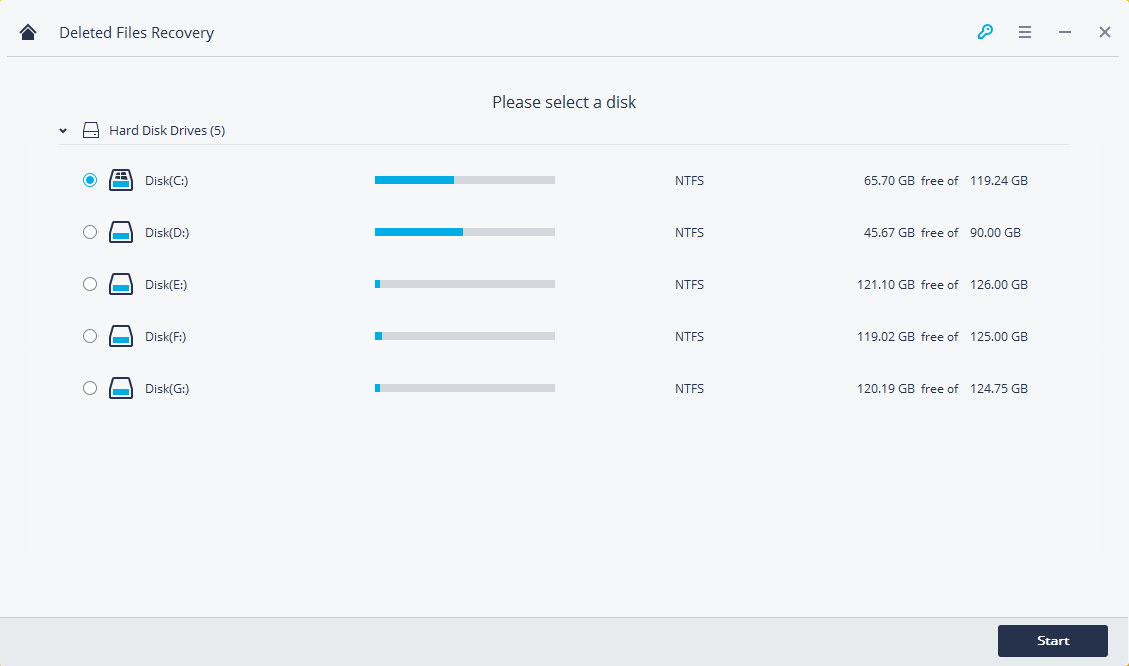
Step 2. Select a Location (Hard Disk Drive)
In this step, please select a location where your deleted/lost/formatted photos stored before. Please select a hard disk drive and click “Start” button to scanning the devices.

select a hard disk drive

Step 3. Begin Scanning Your Deleted Photos
Now, the program start to scanning all recoverable data from your laptop hard disk drive, the first scanning will be completed in 1 min. After scanning process complete, if you find the photos you need, please click them one-by-one to preview. Finally, just click “Recover” button to get them back.

scanning photos from hard disk drive

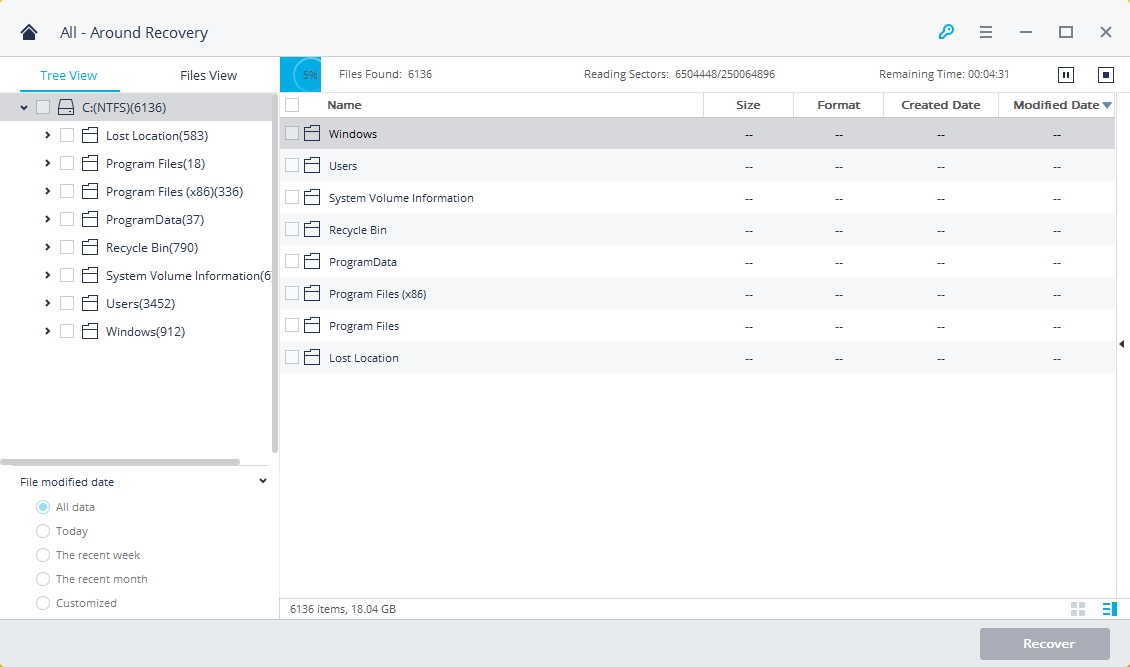
Step 4. Deep Scan Again with “All-around Recovery” Mode
Above is the simple scan mode for you to scan all recoverable data, this scanning mode is fast, save time, but not full scan.

If you cannot find your photos after the first scan, you can go to scan again with “All-around Recovery” mode which will be deeply scan and search more files from laptop hard disk drive. While it will take more time to completely the process of scanning.

all around scan deleted photos

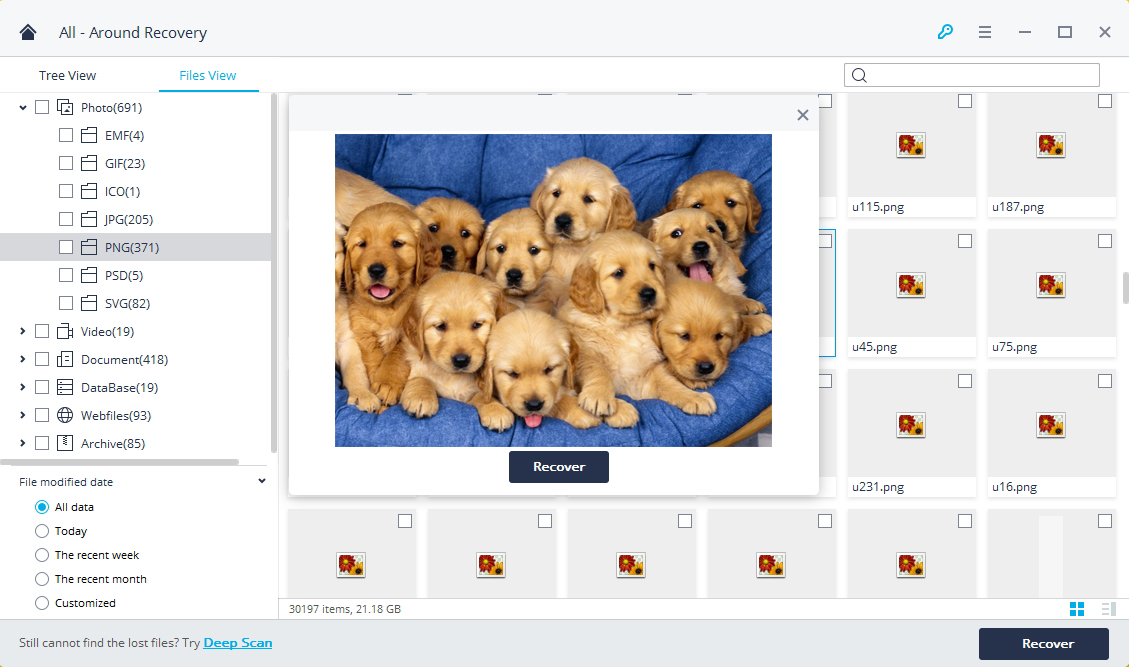
Step 5. Preview and Recover Deleted/Lost Photo Files
After deep scanning the hard disk drive completed, the program will display all recoverable files for you. Please preview your recovered photos and click “Recover” button to save your photos on the other location.

recover deleted photos

Note: Please save your recovered files on the other location or save them on a safe hard disk drive to store. Or it will be caused data loss again.

Above is a simple and effectively method to recover your deleted or lost photos from laptop with Photo Recovery for Windows. If you want to recover deleted photos from Mac, please free download the Mac data recovery software and recover your deleted photos on Macbook.

d_win d_mac
d_win d_mac

More Android iPhone Data Recovery Recommend

1. Android Toolkit – Contains the following features:

Android toolkit - Android data recovery

– Android Data Recovery
Recover deleted files from Android phone directly, as well as get back data from Android SD card and a broken Android phone.

– Android Transfer & Manager
Transfer contacts, SMS, photos, music, video, and more from Android to PC/iTunes, and vice versa.

– iOS & Android Switch
One click to move contacts, SMS, photos, music, video, and other data between any iOS and Android devices, for example Android to iOS, iOS to Andorid, Android to Android, iOS to iOS, ect.

– Android Data Backup & Restore
Back up your Android data safely and selectively, and restore data from backup files to Android device, or restore backup files to PC/Mac computer.

– Android Data Erase
Permanently erase Everything on Android devices in a one-click, totally protect your privacy before selling, donated or discarded your mobile phone.

– Android Unlock
Remove the lock screen (pattern, PIN, password & fingerprints.) from your Samsung phones or LG phones, no data loss at all.

Read the detail guide: Recover Deleted Photo Files from Android by Android Toolkit – Data Recovery

2. iOS Toolkit – Contains the following features:

iOS toolkit - iPhone data recovery

– iOS Data Recovery
Recover deleted photos, contacts, SMS, notes, call logs and apps data like Kik, Viber, WhatsApp from iPhone/iPad/iPod devices, as well as restore lost data from and iTunes/iCloud backup files.

– iOS Data Transfer
Manage your iPhone/iPad/iPod files on computer easily, also supports transfer contacts, SMS, photos, music, video, and more between your iOS devices and PC / iTunes.

– iOS & Android Switch
Copy data including contacts, messages, photos and more between iPhone/iPad/iPod or Android devices.

– iOS Data Backup & Restore
Backup data on your iPhone/iPad/iPod data easily and restore backup files to any device selectively, it also supports backup and restore WhatsApp data and transfer iOS WhatsApp messages to iOS or Android devices.

– iOS Data Eraser
Permanently delete data from your iPhone, iPad or iPod touch devices, in order to keeping your privacy data safely after selling the devices.

– iOS Unlock
Unlock screen passwords from iPhone and iPad, when you forget the password on your device.

– iOS Repair
Fix iPhone/iPad/iPod stuck in recovery mode, white Apple logo, black screen, looping on start, etc. No data loss at all.

– iOS Restore Social App
Backup and restore your App’s chat history and attachment, the app data that can be backed up is: WhatsApp, Wechat, LINE, Kik, Viber. It also suports transfer WhatsApp messages from iOS to iOS/Android.

Read the detail guide: Recover Deleted Photos from iPhone by iOS Toolkit – Data Recovery

3. iPhone Data Recovery – Contains the following features:

iphone data recovery banner

– Recover lost or deleted data from iPhone directly without backups
– Restore lost data from iTunes backup or iCloud backup.
– Recover iPhone data via smart recovery mode.
– Recover App data including WhatsApp, Viber, WeChat, Kik, Line from iPhone and iPad
– Recover deleted and lost photos, text messages, contacts, notes, call history, etc. from iOS devices.
– Fix iOS System: Fix iPhone/iPad/iPod to noral status, if the devices stuck on white screen/black screen/Apple logo/DFU mode, restarting loops, bricked iOS devices, freezing screen, not turning on and more.
– Three fixing mode “Standard More”, “Exit Recovery Mode” and “Advanced Mode”. Fixing various iOS issues and restore device backup to normal without data loss
– Compatible with the latest iOS versions and devices including iOS 12 and iPhone XS(Max)

Read the detail guide: Recover Deleted Photos from iPhone X/XS(Max)/XR by iPhone Data Recovery

How to Stream Spotify Music to Apple TV 4

[Summary]: Spotify haven’t released official Spotify app for tvOS. Spotify Music Converter helps you stream Spotify songs to play on Apple TV without using AirPlay.

“I have been waiting for the Apple TV app store to add the Spotify music app, but it has not been implemented! Is it possible to play Spotify music on Apple TV without AirPlay?”

Why no Spotify for Apple TV?

The new Apple TV 4 is finally arrived, but it lacks a popular app. The new Apple TV 4 has built-in support built into the App Store and Apple Music. We are still waiting for Spotify, the largest streaming music service in the world to release its tvOS app for Apple TV. So far, Spotify users must use AirPlay to play music on Apple TV. To make matters worse, many users complain about unexpected situations with Airplay Spotify, such as unsuccessful download or stuttering audios.

If you want to listen to Spotify on your Apple TV 4, don’t leave, this tutorial will show you a quick and easy way to listen to Spotify Music on Apple TV 4 without using AirPlay.

Tools that Help You Stream Spotify Music to Apple TV

All Spotify music is DRM protected, restricting you from playing Spotify music directly on Appel TV 4. To break this limit, you need to use the Spotify DRM Removal Tool. Most worthy of being introduced is Spotify Music Converter, which can download and convert any Spotify audio track into DRM-free MP3/AAC/WAV/FLAC without losing quality. It works with Spotify free accounts and premium accounts. By using this smart software, you can easily convert all Spotify songs to audio formats supported by Apple TV. Look at the key features of Spotify Music Converter:

Remove DRM from Spotify Music
Convert Spotify Music tracks to MP3/AAC/FALC/WAV
Lossless quality & preserve ID3 tags
5X faster speed & Easy to use

Simply download the program on your computer to get started:

d_win d_mac

Part 1: How to Convert Spotify Music Tracks to MP3 Format

Step 1. Install Spotify Music Converter

After downloading, install and launch Spotify Music Converter with your computer. And Spotify will open with it automatically.

Spotify Music Converter home page

Step 2. Import Spotify Music

Drag&drop tracks, playlists or albums from Spotify app to the interface directly. Or click “Add Files”, copy&paste the link of the song, album or playlist to the bottom area and then click + icon.

add Spotify Music

Step 3. Choose Output Format

To make the songs playable on Apple TV, you are suggested to set the output format as MP3. It also supports converting Spotify Music to M4A, WAV, FLAC.

choose mp3 format

Step 4. Convert Spotify music to MP3

Once done, click “Convert” button to start converting Spotify Music tracks to MP3. After conversion, click the “History” icon to quickly locate the DRM-free Spotify songs, albums or playlists in MP3 format.

convert Spotify Music to mp3

d_win d_mac

Part 2: How to Transfer Converted Spotify Songs to Apple TV 4

Now you get all Spotify Music tracks are in MP3 format on your computer. Next you can find out the way to transfer converted Spotify songs to Apple TV 4.

Step 1. Launch Home Sharing in iTunes

Launch iTunes and then go to File > Home Sharing and select Turn on Home Sharing. Next you need to enter your Apple ID and password to start the program.And then click Turn on Home Sharing.

turn-on-home-sharing-in-itunes

Step 2. Launch Home Sharing on Apple TV 4

Launch Apple TV 4 and then go to Settings > Accounts > Home Sharing and choose Turn on Home Sharing, you need to enter your Apple ID and password too.

home-sharing-on-apple-tv-1

Step 3. Start Playing Spotify Songs with Apple TV 4

After completing the above settings, you can click on “Computers” on your Apple TV 4 and then select a library. You’ll see all media files available. Now you can play Spotify songs on your Apple TV 4 freely.

play-spotify-on-apple-tv

Related Guides:

How to Listen to Spotify Music without Subscription

How to Convert Spotify Music to MP3

How to Sync Spotify Music to iPod Touch/Nano/Shuffle

How to Remove DRM from Apple Music Completely

How to Set Spotify Music as Android Phone Ringtone

Stream Spotify Music to Apple TV 4

How to Stream Spotify Music to Chromecast

[Summary]: Here we’ll guide you to cast Spotify Music to Chromecast so that you can easily play any Spotify Music track on smart speakers or other devices without Spotify premium subscription.

“I am a Spotify premium subscriber. But it appears I can’t cast the songs from Spotify Music to Google Chromecast. Did I miss anything? Can anyone help me to stream Spotify on chromecast Audio?”

spotify-music-on-chromecast

Chromecast has native support for Spotify Music, which means you can stream Spotify songs online from Chromecast. However, it only works if you spend $14.95 per month to subscribe to Spotify Premium membership. Well, for some users, monthly renewals are still stressful. Here, we’ve brought you another great alternative to downloading Spotify songs and casting Spotify music to Chromecast audio without Spotify premium subscriptions. The following is the complete guide – whether you are a premium user or a free user, you can easily stream Spotify music to Chromecast.

Part 1: Stream Spotify Music to Chromecast with Premium Account

Step 1. Insert Chromecast or Chromecast Audio to TV HDMI port or a speaker input port.

Step 2. Start the Spotify app on the same WiFi network as your Chromecast/Chromecast Audio.

Step 3. Select a track that you want to listen to. At the bottom of the screen, tap “Devices Available”.

Step 4. Select your Chromecast or Chromecast Audio from the devices listed. Then you’ll be able to stream Spotify music track to TV or speaker via Chromecast.

spotify-on-chromecast

Part 2: Play Spotify Music on Chromecast without Premium Subscriptions

Free users are not allowed to download Spotify music for offline listening. Since the DRM protection inserted, songs only can be played on Spotify app. In order to play Spotify music on Chromecast without premium subscriptions, the most important thing is to download Spotify music and remove DRM restriction from Spotify songs. If you’re a Spotify free user, or cancel the premium subscription but want to keep the Spotify tracks still playback on Chromecast, then you can try a powerful Spotify downloader and DRM remove tool – Spotify Music Converter.

UkeySoft Spotify Music Converter allows you enjoy Spotify music offline with free or premium account. It is designed to download Spotify songs, albums or playlists and convert to MP3, M4A, WAV or FLAC with 100% audio quality retained. Let’s take a look at its specific features:

Download Spotify songs, albums and playlists for offline listening.
Remove DRM from Spotify songs/albums/playlists.
Convert Spotify music to DRM-free MP3, M4A, WAV or FLAC.
Enjoy Spotify music offline without premium.
Get rid of protected Ogg Vorbis format when using Spotify Premium.
One click to burn Spotify music to CD.
Preserve ID3 tags(artwork, title, album, artist name) and 100% original quality.
5X faster conversion speed.

Free download Spotify Music Converter from here:

d_win d_mac

Step 1. Launch Spotify Music Converter

Please make sure you have installed Spotify app on your computer. Install and launch Spotify Music Converter on your Mac/Windows.

Spotify Music Converter home page

Step 2. Add Spotify Music Songs

You can drag&drop Spotify songs, albums or playlists to software directly. Or click “Add Files”, copy&paste the URL of the Spotify song, album or playlist to the left bottom area and then click “Add”.

add Spotify Music

Tip: By default, all songs in a playlist or album are selected. You are free to uncheck the tracks you don’t want to convert. Then click “Add” to import all selected songs.

Step 3. Choose Output Format

The default output format is MP3. Currently it supports multiple output formats, including MP3, AAC, WAV, FLAC, M4A, and M4B. You can also adjust output audio quality, conversion speed and directory, etc. according to your own requirements.

choose mp3 format

Step 4. Start Converting

Click the “Convert” button to start converting the DRM-ed Spotify music to MP3.

convert Spotify Music to mp3

After recording, click the “History” button to quickly locate the DRM-free Spotify song.

view mp3 spotify music

Step 5. Stream the Converted Spotify Music on Chromecast

To play the converted Spotify music on Chromecast. Start Chrome and connect your computer and Chromecast device to the same wireless network. Use Chrome to go to Google Play Music (play.google.com/music). Click the song and then click Play. At the bottom of the screen next to the playback controls, click the Cast button . Under “Dress to,” select your Chromecast from the device list.

d_win d_mac

Related Guides:

How to Listen to Spotify Music without Subscription

How to Convert Spotify Music to MP3

How to Sync Spotify Music to iPod Touch/Nano/Shuffle

How to Remove DRM from Apple Music Completely

How to Set Spotify Music as Android Phone Ringtone

Stream Spotify Music to Chromecast

How to Recover Photos, Contacts, SMS, Videos from LG Phone

[Summary]: Looking for a powerful LG Data Recovery software to recover lost data (photos, contacts, text messages, videos, audios, notes, call logs, documents, etc.) from LG phone? U.Fone Android data recovery software can help you retrieve lost and deleted files from LG, HTC, Samsung, Sony phones & tablets.

lg data recovery

CONTENTS

LG phone is one of popular Android phone, currently LG V40, LG V35, LG V30/V30+, LG V20, LG G7/G6/G5/G4/G3/G2/G, LG K10 LTE, LG K9, LG K7, LG Q7+, LG Q6 Single and other models of LG phone are available on the market, if you use LG Android phone, you may stored many data such as photos, videos, music, text messages, contacts notes, memos, and WhatsApp messages on LG smartphone, but when you accidentally deleting files on LG phone; carelessly factory reset LG phone cause data loss; failed rooting, formatting SD card, or virus attacks cause lost contacts, messages, photos and other important data on LG Android phone. When you found data lost or deleted on LG phone, you may need to recover your lost data from LG phone at first, what you need is a professional LG Android Data Recovery software.

A Powerful LG Android Data Recovery

U.Fone Android Data Recovery is a powerful LG data recovery for users to recover data includes SMS, contacts, photos, videos, call logs, audio, WhatsApp messages, documents and more from your LG phone, no matter data lost in various data loss situations. It supports recover data from most LG phone, such as LG V40, V30, G6, V20 (AT&T, T-mobile, Sprint, LRA, Unlocked, U.S. Cellular, in Titan, Verizon Wireless), LG G5 (ACG), LG Stylo 2 Plus, LG K7, LG Tribute, LG X power, LG K10, LG Escape, LG Stylo, LG Classic, LG Rebel, LG Treasure, LG X style, LG Premier, LG Stylo, LG K3, LG Tribute, LG K7, LG K8, LG Optimus Zone, LG G4, LG Phoenix, LG Tribute, LG Wine, LG V10, Nexus 5X, LG Spree,and the latest LG phone. What’s more, the Android data recovery are supports recover files from multiple Android smart phones and tablets, including Samsung, Sony, HTC, Motorola, LG, Google Pixel, OnePlus, Oppo, Huawei, ZET, VIVO and more. In addition, you can Let’s teach you how to recover your LG lost contacts, SMS, pictures and videos with ease.

d_win d_mac
d_win d_mac

Recover Lost Contacts, Photos, SMS and Videos from LG Phone

Step 1: Download and Run Android Data Recovery
First of all, please download the Android data recovery on your computer and install it.

d_win d_mac
d_win d_mac

Open it and you will see there are 4 main function: “Android Data Recovery”, “Broken Android Data Recovery” and “Android Data Backup & Restore”. This guide shows you how to recover deleted files from LG phone’s internal storage or memory card, please click “Android Data Recovery” and move on.

Choose Android data recovery mode

Step 2: Connect LG Phone to Computer
Then, connect your LG phone to computer using a USB cable, the program will detect your phone automatically.

connect LG phone to PC

Step 3: Enable USB Debugging to access data
Once detected, the program will present you with simple instructions to turn on USB Debugging Mode on your phone. There are three options. Please choose the one for your LG phone’s Android OS.
1) For Android 2.3 or earlier: Enter “Settings” < Click “Applications” < Click “Development” < Check “USB debugging”
2) For Android 3.0 to 4.1: Enter “Settings” < Click “Developer options” < Check “USB debugging”
3) For Android 4.2 or newer: Enter “Settings” < Click “About Phone” < Tap “Build number” for several times until getting a note “You are under developer mode” < Back to “Settings” < Click “Developer options” < Check “USB debugging”

enable USB debugging on Android

If you’ve done this before, skip to Step 3.
For more detail guide to Enable USB Debugging Mode on Android.

Step 4: Choose File Types Your Need
In this step, please select which types of data you want to recover. In order to saving time during the recovery process, please select only the types you want to recover, so we can speeds up the scan process. You can also “select all” to get back your lost data at once, and then click “Next” button to let the program analyze the file on your device.

select LG phone's data to recover

Tips: Before recovering files from your LG phone, please make sure that your phone battery is more than 20% to enable the follow steps.

Step 5: Allow Analyze and Scan Files on LG Phone
In this step, you need to authorize and allow the software to scan your LG phone, it will prompt you turn back to your phone again to accept and tap on the “Allow” button to let the program scan your phone for lost messages, contacts, photos and video on your LG phone.

allow scan LG Android phone

Step 6: Gain Root Permission for a Deep Scan(Option)
The program will check the device information and perform a basic scan of the device. If it can’t find the files you need, it’s suggested that you root the phone to access to the full Android system. (You can unroot the device after the recovery task.)

To do so, click the Advanced Root button at the lower right position. At this point, you will be taken to an external website to download a free Android rooting tool — Android Root or KingoRoot to root the device.

[Also Read: How to Safely Root and Unroot an Android Device with KingoRoot ]

root lg phone

After you’re rooted, this Android Data Recovery software will begin running a deep scan of your LG phone’s memory and SD card to search for the deleted Stuff. Please be patient.

Step 7: Deep Scan your LG phone Complete
If you have rooted your phone above step 6, then the program will deep scan of your phone’s memory and SD card to search all deleted and exiting files. In this scanning process, please be patient, it depending on how many files and how much file is stored in your phone.

scan data from android

Step 8: Preview and Recover Deleted Data from LG Android Phone
After the scan, a list of recoverable files that have been found from your LG mobile phone will be shown. Moreover, there will be a preview window of files for you to preview the messages, contacts, and photos from Samsung device before recovery. You can choose the data you want and click “Recover” button to save them on your computer.

recover lost data from Android

Tips: You can toggle the button to ON position on the top of the screen to display only the deleted items. It also offers an advanced search option in the upper right corner to help you quickly locate what you want from the results.

Well done! You have restored lost and deleted files from LG phone, and you can find all the recovered files save onto the computer.

Contacts will be saved as VCF, CSV or HTML for your use.
Text Messages will be saved as CSV, HTML and attached images for you reading or printing.
Call Logs will be save as in HTML format and attached images for you browse.
The chat history, attached photos or video/audio on your WhatsApp app will be save on the computer.
Photos, Videos, Audios will be extract and save onto the computer and retain the original format and quality. Supported photos types: JPG, JPEG, TIFF, GIF, PNG, BMP; Video: MOV, M4V, MP4, AVI, 3GP; Audio: AAC, AIFF, M4A, MP3;
Documents including Word, Excel, PPT, PDF, HTML, Zip, RAR on your Android phone or SD card can be retrieved and save in the computer for you use.

Download the Android Data Recovery and try to retrieve lost data from your LG Android phone directly

d_win d_mac
d_win d_mac

Tips 1: Backup and Restore LG Phone

In additional, if you want to backup data from LG phone to computer, you can use this Android Toolkit’s build-in Android Data Backup & Restore function to back up and manage your Android data (SMS, contacts, photos, video and music) on the computer, the program not only helps you recover deleted files from Android, but also allows you back up the existing data on Android to computer without rooting your phone. For those deleted items, you could follow the above guide to back up to a Windows computer or Mac after scanning the deleted data from Android phone.
Further reading: how to backup and restore Android data

Tips 2: Transfer the Retrieved Files to Phone

Above steps, you have restore lost and deleted files from LG phone and save onto the computer, if you want to import the retrieved files back to your LG phone or other Android/iOS phone for using and viewing, you can use this Android Toolkit – Android Transfer to manage and transfer those restored data from computer to your phone.

transfer files to LG phone

Further reading:
How to transfer files from computer to Android
how to transfer data from Android to iPhone
how to transfer data from Android to Android
how to transfer data from Android to computer

More Software for Android LG Mobile Phone Recommend

Android Toolkit – This Android Toolkit provides a complete solution for all LG mobile phone users to solve all phone problems, like LG phone data recovery, transfer data to LG phone, LG data backup restore, Android root, erase data on LG permanently, etc.

Android Unlock – remove PIN, Password, Fingerprint & Pattern of locked screen on LG G2/G3/G4, ect.

Android Transfer – One-stop LG phone’s data management software for users to manage everything on PC or Mac computer.

Phone Transfer – Transfer files including contacts, text messages, photos, videos, music and more between Android LG phone and other mobile phones directly.

LG Data Recovery

How to Convert Spotify Music to AAC Format

[Summary]: If you’d like to convert Spotify music to AAC audio format for playing them on AAC compatible devices offline, Spotify Music Converter should be the best choice for you.

“I have subscribed Spotify premium to listen to streaming music offline. Now I am wondering if I can play my Spotify song in AAC format. Can anyone help me?”

As a successor to the MP3 format, AAC (Advanced Audio Coding) typically achieves better sound quality than MP3 at similar bit rates. AAC, with the file extension M4A, is becoming the most popular audio format. You might wish to convert Spotify music files to AAC format for playback on offline AAC compatible devices. However, like Apple Music, Spotify also adds DRM protection to streaming music, which prevents users from extracting AAC files from Spotify, so subscribers cannot get AAC audio from Spotify for playback. If you need to access Spotify Music after a 30-day free trial, you will need to pay $9.99 per month, which gives you a lot of permissions, such as offline listening, on-demand playback, no ads, and more. So, is there any way to rip AAC from Spotify?

View also: How to Convert Apple Music to MP3

convert-spotify-to-aac

UkeySoft Spotify Music Converter also is a Spotify Music to AAC Converter, which can help you convert Spotify music to AAC or other widely used formats. The Spotify music downloader tool is able to download and convert Spotify tracks, albums, artists and playlists to DRM-free AAC, MP3, WAV, FLAC, etc at up to 5X speed and the original audio quality and ID tags kept. The following is main feature of Spotify Music Converter:

– Remove DRM from Spotify Music.
– Download Spotify playlist freely with free or premium subscription.
– Batch convert Spotify audio files to free AAC/MP3/WAV/FLAC.
– The original audio quality and ID tags kept; 5X faster speed.
– 1-click to download and burn Spotify music to CD or share via Email.
– Customize output audio quality according to your needs.
– Transfer converted music files to MP3 or any AAC compatible devices.

d_win d_mac
d_win d_mac

Detailed Tutorial about How to Convert Spotify Music to AAC Format

Step 1. Launch Spotify Music Converter

Download and install the Spotify to AAC Converter first, then launch it. Please note that Spotify program will be automatically launched.

Spotify Music Converer Interface

Step 2. Add Spotify Songs, Albums or Playlists

You can directly drag songs, albums or playlists from Spotify to the program, or you can right-click on a song, an album or a playlist to copy the URL and paste the link in the search bar at the bottom of the program, then click + or Add button.

Add songs from Spotify to Spotify Music Converter

Step 3. Set “AAC” as Output Format

After adding audio files, set output format as AAC by clicking the Setting button on the top-right. You can also adjust output quality, conversion speed (1-5X) and output directory according to your needs.

Choose AAC Format

Step 4. Remove DRM & Convert Spotify Music to AAC

Once all settings are ready, please click the “Convert” button at the upper bar to launch the converting process. Spotify Music Converter will preserve all ID3 tags like song title, album, artist, artwork, etc.

convert spotify music

Then it supports batch conversion, so you don’t have to worry about the conversion time is too long. After conversion, you can click “History” button and open the output folder to locate the AAC files.

Now you can add the output AAC files to your iTunes library, sync to iPod Nano/Shuffle/Classic or copy to Sony Walkman or other MP3 players.

d_win d_mac
d_win d_mac

Related Guides:

Remove DRM and Convert Spotify Music to M4A

How to Convert Spotify Music to WAV

The Best Way to Remove DRM from Spotify Music

How to Download Spotify Music as MP3

How to Rip/Convert Spotify Music to FLAC

How to Play Spotify Music on MP3 Player

Convert Spotify Music to AAC

Recover Lost Messages on iPhone after iOS 12.1 Update

[Summary]: The article describes the method to recover lost text messages when they turn inaccessible and missing after iOS 12.1 update by using iPhone Data Recovery software.

iPhone Texts Disappeared after iOS 12.1 Update? Most iOS updates also bring with them a slew of newly discovered bugs including iPhone unresponsive, iPhone black screen, and other problems including the unfortunate and potentially devastating iPhone text messages disappeared. If you noticed that some or all messages disappeared from iPhone after an iOS update or other circumstances like accidentally deletion, formatting, factory restore, jailbroke failed, iPhone stuck or broken, but the storage still shows a large usage for Messages, it indicates that missing messages probably are not really gone and still exist on your iPhone. You enable to stop using your iDevice and use a data recovery software to extract lost text messages from iPhone directly or from iTunes/iCloud backup without erasing your original iPhone files.

Here I will recommend you a worthy iPhone data recovery software. Restoring iPhone will delete all existing contents on iPhone. An alternative way is using third-party tools like iPhone Data Recovery. It is specifically designed to help you recover lost data without affecting your device in any way. It means that you can easily restore lost messages on iPhone when backup is available, even no backup is available. iPhone text messages lost due to an iOS 12.1 update can be retrieved within a few clicks.

Key Features:

Recover up to 22 type of data including messages, contacts, photos, videos, notes, WeChat data, WhatsApp chat and more.
3 recovery modes available: directly recover from the device, from an iTunes Backup of an iCloud backup.
Recover easily in just 3 steps: Connect > Scan > Recover.
Perfectly compatible with iPhone XS/XS Max/XR/X/8/7/6S, iPad, iPod touch and the latest iOS12.1/12.

d_win d_mac

How to Undelete Texts on iPhone after iOS 12.1 Update

The “Smart Recovery”function of program provide different features to choose-to get back lost data on device,which will make the data recovery efficiently.You could select this recovery mode when you lost data from device under the unknown circumstances.

smart iphone data recovery

Step 1.Run iPhone Data Recovery on Computer
Launch iPhone Data Recovery in the first step,connect your iPhone to computer and select the recovery mode “Recover from iOS Device“.

connect iphone with computer

Step 2.Scan your iPhone for Lost iMessages, Text Messages
Started to scan your iPhone for lost messages after iOS 12.1 update.To recover SMS on iPhone,you should click”Message“.If you also wanna recover other data simultaneously,you can click more file types to scan,such as “Contacts”,”Call History”.

select file to scan

Click “Next” to search for your lost data,then the program will start to scan your device automatically for lost data.

scan iphone and search lost data

Step 3.Restore Text Messages from iPhone in iOS 12.1 Directly
When the scanning is finished,you can preview all data on your iPhone and then choose the text messages you want,just simply clicking “Recover” button.

recover lost sms directly from iphone

d_win d_mac

Related Articles:

How to Recover Lost iPhone Data after iOS 12 Update

How to Recover Lost iPhone Photos after iOS 12 Update

How to Recover Lost iPhone Contacts after iOS 12 Update

How to Backup and Restore Data on iPhone

How to Restore iPhone System to Normal

How to Play Apple Music on iPhone X/8/7/6S/6 for Free

How to Manage iPhone on Computer

Recover Lost Messages after iOS 12.1 Update

iOS Data Recovery

Recover Your iPhone iPad Lost Data
Now, Even without Backups

Compatible with iOS 11 & iPhone X/8 (Plus)

Recover Lost Data Now

How to Recover Deleted WeChat Messages from iPhone XS/XS Max

[Summary]:This tutorial introduces a powerful tool through which you can recover deleted WeChat message from iPhone XS/XS Max without backup and the latest iOS 12.1 is also supported.

“I usually use WeChat to set messages or photos to my friend and family, but my iPhone XS has no more memory space yesterday, then I cleared all the WeChat chat logs. Suddenly, I discover the most important message has been deleted without backup in WeChat. How to recover deleted WeChat messages from iPhone XS?Who can help me?” Ask by anxious Cherry.

recover deleted wechat messages on iphone

WeChat is popular used nowadays, we use the APP to send messages, share funny photos each other,chat with our workmates or family. However, you still can’t avoid any accident. You may accidentally delete WeChat messages without backup. How to recover delete WeChat message from iPhone XS? From this article, you will learn an useful method to get back the lost data. The first step you need to do is download the magical software—iPhone Data Recovery, which is an iOS data recovery software recover your lost/deleted data from your iOS devices, as well as retrieving deleted Wechat messages on iPhone XS, iPhone XS Max.

The key features of iPhone Data Recovery software
1.Supports the recovery of not only WeChat messages, but also other 20+ types of files, such as photos, videos, contacts, messages, call history, WhatsApp/Viber/Line data.
2.Applies four types of recovery modes to locate your deleted or lost data easily – Smart Recovery, Recover from iOS Device/Recover from iTunes/iCloud Backup.
3.Supports recovering data lost when: your iPhone is lost or damaged, a virus attacked your device, accidentally deletion, iPhone is locked by unknown passcode and more.
4.Compatible with almost all iOS devices and iOS versions including the latest iOS 12.1/12/11.

d_win d_mac

3 Steps to Recover Deleted WeChat Messages from iPhone XS/XS Max

Step 1: Connect the iPhone XS to PC/Mac

After installed the iPhone Data Recovery program, please connect the iPhone XS with your computer. Launch the iPhone Data Recovery software and select the “Recover from iOS Device”(without backup) feature to continue. Then the software will recognize and list your iPhone XS.

select recover from ios device mode

Step 2:Select the Data Type You Want to Recover

There are all the data tyes for you to choose to recover. Select “WeChat” as the type of data to recover, in addition you can also recover more data together, such photo, video, App Photo, message etc. Click on “Scan” .

select photos to recover

And then the program will take some time to scan your iPhone XS, the scanning times depends on how much data on your iPhone.

scan iphone and search lost data

Step 3: Preview and Recover Delete WeChat Messages from iPhone XS

After the scan is completed, you can see all the WeChat messages are resulted, they are all listed on the interface. You can easily preview all the message, both the deleted/lost one and the existing one. Selecting what you need to recover, then hit “Recover”, which is available on the bottom-right corner. In the pop-up that appears, choose a location where you want the recovered WeChat messages to be store. After a few seconds, the recovery process will be done.

recover wechat from iphone

iPhone XS deleted WeChat message recovery software – iPhone Data Recovery can help you easily and quickly get back & recover deleted/lost data from iPhone. It not only can help you get back all deleted WeChat message from iPhone XS, iTunes backup and iCloud backup, but also help you preview and recover from iTunes/iCloud backup directly without restoring.

d_win d_mac

Related Article

Recover Deleted WhatsApp Messages from iPhone XS/XS Max

How to Recover Deleted or Lost Data From iPhone XS/XS Max/XR

[Solved]Recover Deleted Text Messages on iPhone XS/XS Max/XR

Recover Deleted Photos Videos from iPhone XS/Max

Recover SMS from iPhone XS/XS Max/XR with or wirhout Backup

Recover WeChat Messages from iPhone XS

How to Recover Lost Photos on iPhone after iOS 12/iOS 13 Update

[Summary]: Want to recover lost photos on iOS 13/iOS 12 iPhone without backup? In this article, we provide you an effective method to recover deleted/lost pictures from iPhone XS/XR/X/8/7(Plus) after iOS 12.1.4 or iOS 13 update.

ios 13 data recovery to recover iphone photos

Photos Disappeared and Missing from iPhone X afer iOS 12 update
“Help! After I downloaded and installed iOS 12.1.4 on my iPhone X, all my iPhone photos are gone. Why? Is there any way to recover lost photos on iPhone X after updating to iOS 12.14?” – Peya

Lost photos after update iPhone XS to iOS 13 beta
After upgrading my iPhone XS to iOS 13 beata, I found photos disappeared after iOS 13 upgrading, is it possible to retrieve lost photos from iPhone X after iOS 13 update?

A handful of iPhone users have discovered their pictures have gone missing after updating iOS to the latest version – iOS 13. There are many reasons can cause iPhone lost data during the iOS 12.1 upgrade process, such as iOS update error, iPhone storage is not enough, app data is incompatible and more. Therefore, we should back up the iPhone device before updating.

Easily Retrieve Lost Photos from iPhone without Backup

If you this is your first time losing your iPhone data, especially if you don’t save your data somewhere else, you might want to seek methods to retrieve pictures from iPhone without backup.

iPhone Data Recovery software is one of the best iPhone data recovery software for you to restore deleted or lost photos from iPhone with iOS 13/iOS 12 update. Apart from iPhone photo recovery, it allows you to preview and recover deleted calendar events, messages, contacts, call history, Safari bookmarks, notes and reminders on Windows/Mac from iPhone and iPad by scanning your iDevice and listing all the marked and hidden files, no iTunes or iCloud backup copy is required. If you have synced your iPhone with iTunes and iCloud, you can also use iPhone Data Recovery to restore lost photos by extract from iTunes or iCloud backup without erasing the original data. Main features:

– Recover deleted or lost data on iPhone/iPad/iPod in iOS 12/iOS 13 devices, such as iPhone XS/X/XR/8/7 and the latest iPhone XI.
Recover lost photos from iPhone after iOS 13 update.
– Retrieve iPhone lost data in 3 recovery modes:iOS device, iTunes backup, iCloud backup.
– Recover lost data from iOS 12.1/iOS 13 due to iPhone crash, virus infection, jailbreak, etc.
– Recover all types of iOS data including messages, contacts, photos, videos, voice memos, WhatsApp messages, Wechat messages, notes, etc.

d_win d_mac
d_win d_mac

Recover Lost Photos on iPhone after iOS 12/iOS 13 Update

Step 1.Open iPhone Data Recovery Program
Launch the program on your computer after downloading and installing it. Then, connect your iPhone to the computer and you’ll see the pictures below. Select “Recover from iOS Device” recovery mode if you have not an iTunes or iCloud backup.

select recover from ios device mode

All recoverable files are shown on the screen, such as messages, photos, videos, contacts,etc. Select “Photo” you want to recover and click on “Next” button.

select photos to recover

Step 2.Begin Scanning your iPhone
The program will begin to scan your iPhone for all the deleted photos. The scan time depends on the amount of your data.

scan iphone and search lost data

Step 3.Preview and Restore Lost Photos from iPhone without Backup
When the scan completed, you will note that photos are fitly organized on the interface. You can then preview the deleted photos and select the ones that you need. At last, click “Recover” and choose a location for storage on your computer.

recover lost photos after ios 13 update

Besides, iPhone Data Recovery can also recover lost videos, text messages, contacts and more on iPhone, iPad and iPod Touch (iOS 12.1.4/12 and iOS 13 supported) with the similar process.

d_win d_mac
d_win d_mac

Related Article

Methods to Restore iPhone Photos after iOS 12 Update

Recover Deleted iPhone Photos after iOS 11 Jailbreak

[Solved]Photos Missing after Downgrade iOS 11 to iOS 10

How to Restore Lost Photos after Factory Reset iPhone/iPad

Recover Call Logs from iPhone/iPad after iOS 12 Update

Recover iPhone Photos after iOS 12 Update