All posts by DHZ

How to Root Huawei Mate RS on Computer Safely

Summary: Huawei is one of the famous brands out there and because of this, a lot of people don’t even consider them when it comes to buying a new phone. However, considering that they are a fairly new and smaller brand, a lot of people are unaware on how to root Huawei devices. In this article we are going to be focusing in on the root process behind Huawei Mate RS phone and the steps which must be taken to do so.

You might already know the benefits of rooting an Android phone. After rooting, you can easily customize your phone, install Custom ROMs, block ads, uninstall inbuilt apps, and perform a wide range of other tasks. However, if you root your phone without a correct way, you may damage your phone or losing data from the device.

Huawei Mate RS Porsche Design is one of the most successful and superior smartphones produced by Huawei. It is equipped with plenty of high-end specifications and it is almost the most expensive device among Android phones. However, just like other Android smartphone, it comes with a few limitations. For instance, only after the Huawei P10 rooting, you can install a custom ROM or block ads on your device. If you wish to root Huawei Mate RS, then you have come to the right place. In this simple tutorial, we will make you familiar with the best ways to perform Huawei Mate RS root on computer without data loss by yourself.

Root Huawei Mate RS without Data Loss

If you don’t want to lose data from your device while/after rooting, you should try this Android & iOS Manager One-click Root tool. It is capable of rooting Huawei Mate RS safely without data loss on computer. Just one click, you can complete the rooting task easily without any skills. Generally, Android & iOS Manager is an all-in-one data manager tool for Android and iOS devices. It can do a lot for you, such as, transfer files between device and iTunes, transfer files between device and computer, transfer files between two mobile devices. In addition, it features with Rebuild iTunes Library, Backup Device, Restore Device and GIF Maker. Works for all Android and iOS models, like Huawei Mate RS, Huawei P20/P10/P9, Huawei Mate 10/9; Google Pixel, HTC, Samsung, OPPO, Lenovo, Motorola, LG; iPhone, iPad.

d_win d_mac

How to root Huawei Mate RS Porsche Design safely? After rooting your phone, you can improve the performance of other Android models. Now just begin to root your device carefully.

How to Root Huawei Mate RS without Losing Data

Step 1.Run Program and Connect Huawei Mate RS
Firstly, run Android & iOS Manager on computer and then connect the Huawei Mate RS phone to the computer with a USB cable.The program will detect your phone if it is connected successfully and display it on the primary window.

android & iOS manager home page

Step 2.Select Rooting Mode
Click the “Toolbox” tab in the top menu on the primary window of the program.Three main sections will be displayed under the “Toolbox” option, including Transfer Tools,Backup & Restore, and Other Tools. Click the “Other Tools” selection,choose “One-click Root” to gain full control of your Huawei phone.

one click root

Step 3.One Click to Root Huawei without Data Loss
A prompt message will be displayed saying that after rooting you will gain full access to your phone system and that rooting may affect your device warranty.Just click “Root” from that warning box to continue rooting your Huawei phone.

root Huawei Mate RS without data loss

It will prompt you once the root process is end. Please remember to don’t interrupt the connection of your device and the computer until the root is completed. Note: The phone may restart during the root process.

d_win d_mac

Related Guides you can Check:

How to Recover Deleted Data from Huawei Mate RS

How to Transfer Android Data to Huawei Mate RS

How to Transfer iPhone Data to Huawei Mate RS

How to iTunes Music/Videos Media Files to Huawei Mate RS

How to Backup and Restore Huawei RS

How to Manage Huawei Android on Computer

How to Stream Apple Music to Huawei Mate RS

How to Fix iTunes Error 45 When Update/Restore iPhone with iTunes

I put my iPhone into Recovery Mode and attempted to update on the most current iTunes, but I got the error ‘The iPhone could not be updated. An unknown error occurred (45).’ What’s wrong with my phone? How to fix this iTunes issue?

It’s a common case that you get iTunes error 45 when you try to update or restore iPhone using iTunes. A lot of iPhone users faced this issue and reported to Apple official company. Most of people are wondering why they were suffering from this error. Here we list some curses that lead to this iTunes error.

A. The version of iTunes is old, you should update it to the newest version.
B. If you iPhone is firmware damaged, you will get this error when update/restore iPhone.
C. Some apps or programs that may disturb the updating/restoring process by interfacing it.

iTunes Error 45 Fix – Update iTunes
You can try this way to fix iTunes error 45, check and update your iTunes to the newest version. To do this job, you could follow these steps.

update itunes

Step 1: Open iTunes on your computer.

Step 2: Click on Help and then choose Check for Updates.

Step 3: If there is a new version available, a pop up window will appear. Click on Download iTunes.

Step 4: Then, just follow the instruction it shows to update your iTunes to the latest version.

If iTunes error 45 can be fixed after updated iTunes to the newest version. You can try the second way to return iTunes to normal.

Fix iTunes Error 45 via iTunesFix Tool

If you want to fix iTunes Error 45, try iTunesFix tool and it won’t disappoint you. It can deal with all iTunes errors and return iTunes to normal without data loss. Solve iTunes won’t install/update issue, fix iTunes couldn’t connect to iPhone issue, fix iTunes won’t back up/restore issue, etc,. Solve iTunes can’t start because Error 2, Error 13, Error 56, Error 1002, etc,. Fix iTunes was not installed correctly, installer has insufficient privileges, etc,. Clean iTunes files or completely uninstall iTunes.

d_win d_mac

How to Fix iTunes Error 45 to Normal

Step 1. Install and Launch iTunesFix on PC
Firstly, please install and launch iTunesFix on computer.

iTunesFix will automatically detect your iTunes and its related components. If there is no issue, you will be brought to its home interface. If your iTunes or components are lost or corrupted, it will show you the details.

detect itunes

Step 2.Repair iTunes Components Issues
Click on “Repair” and it will repair iTunes components issues.

repair itunes components issues

Step 3.Fix iTunes Error 45
If your iTunes components have no issue. You can choose other modes like “Repair iTunes Connect Issues“, “Fix iTunes Install/Update Issues“, “Repair Backup/Restore Errors” to fix iTunes error 45.

itunesfix home page

d_win d_mac

Related Articles:

How to Fix iTunes Won’t Install/Update Issues

How to Repair iTunes Unknown Errors

How to Fix “iTunes Could Not Backup/Restore” Issue

How to Fix iTunes Cannot Connect to iPhone Error

Fix iTunes Error 2/13/56/1002/3194/4037 and Other Unknown Errors

How to Recover Deleted/Lost Data on iPhone X/8/7/6S/6

How to Use a Stolen iPhone without Getting Caught

Summary
Have found a lost iPhone or bought a stolen iPhone and dont’s know how to use a stolen/found iPhone safely without getting caught?Just unlock passcodes on stolen iPhone;factory reset iPhone to erase all contents and settings; clear everything from the stolen iPhone completely & permanently;and sign out of all account including Apple ID, iTunes Store ID, iCloud ID and Find My iPhone account,etc.

Use A Stolen/Lost/Found iPhone

Man’s nature is good at birth,if you help others, God will also help you.If you found a phone on the road,returning sth. to its origin owner is a virtue.Even with the best of intentions, it can be difficult to know how to proceed when you find a lost or stolen iPhone. Fortunately there are a few things you can do to help return the device to its rightful owner.If the iPhone is locked with passcodes and don’t know how to get in touch with the phone’s owner,you can unlock iPhone passcode,after that you can access the phone and contact with the phone owner’s friends or family.
For Samsung users: How to Unlock Samsung Galaxy without Passcode

If you have picked up an iPhone and want to use it safely without getting caught,the following measures you must do.

Part 1: Unlock a Stolen iPhone Passcode or Apple ID with UkeySoft Unlocker

Found a lost or stolen a iPhone? How do you unlock a stolen iPhone without knowing the passcode? How to unlock Apple ID from second-hand iPhone? If “Find My iPhone” is disabled, you can remove password on stolen/second-hand iPhone easily.

UkeySoft iPhone Unlocker is special designed to unlock iPhone/iPad/iPod touch, it can unlock all kinds of locked screen passcode: 4-digit/6-digit passcode, pattern, Face ID, or Touch ID. When you forget the password on your iPhone/iPad or you just don’t know the password on a stolen iPhone or iPad, this iPhone unlocker helps you remove iPhone lock screen passcode easily, but mare sure “Find My iPhone” function is turned off. In addition, UkeySoft Unlock also allows you remove Apple ID from any iOS devices, even if the “Find My iPhone” function is on, when you got a second-hand iPhone, this program can help you remove Apple ID without password.

Key Features:

  • Unlock a locked, disabled, broken screen iPhone or iPad.
  • Delete screen passcode, pattern, Touch ID, Face ID.
  • Unlock a stolen iPhone if you don’t know the passcode.
  • Unlock Apple ID if you don’t know the password.
  • Bypass iPhone lock screen Restrictions/Screen Time Passcode.
  • Remove iOS 13 iPhone Lock Screen without Passcode.
  • Protect your data and settings after unlocking Apple ID.
  • Bypass iCloud activation lock after removing Apple ID.

d_win d_mac
d_win d_mac

Part 1: How to Unlock a Stolen iPhone Passcode

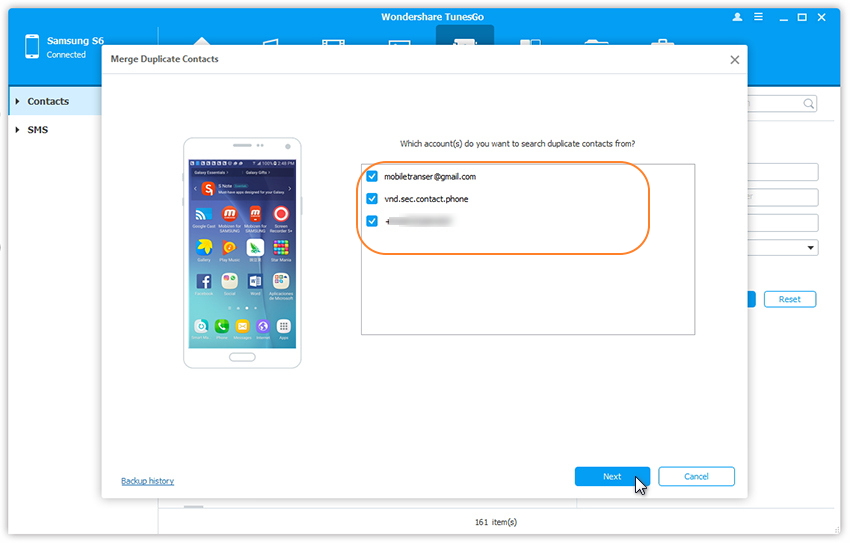
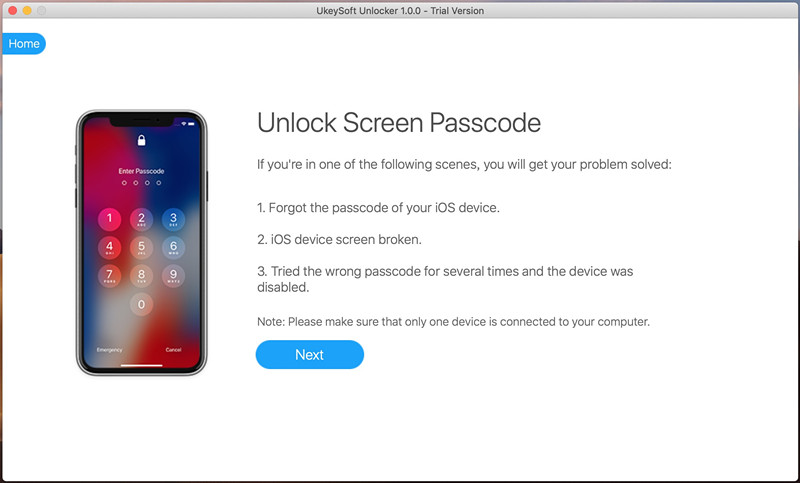
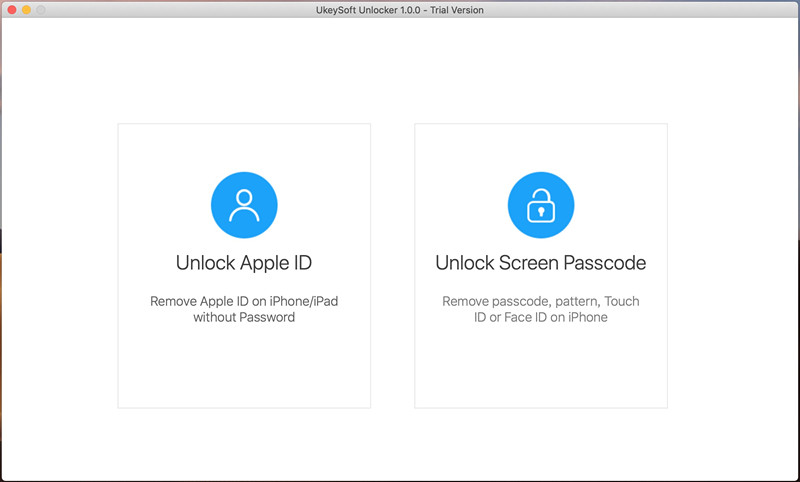
Step 1. Download, install and launch UkeySoft Unlocker. Then, select the “Unlock Screen Passcode” function and click “Start”.

Connect iPhone to Computer

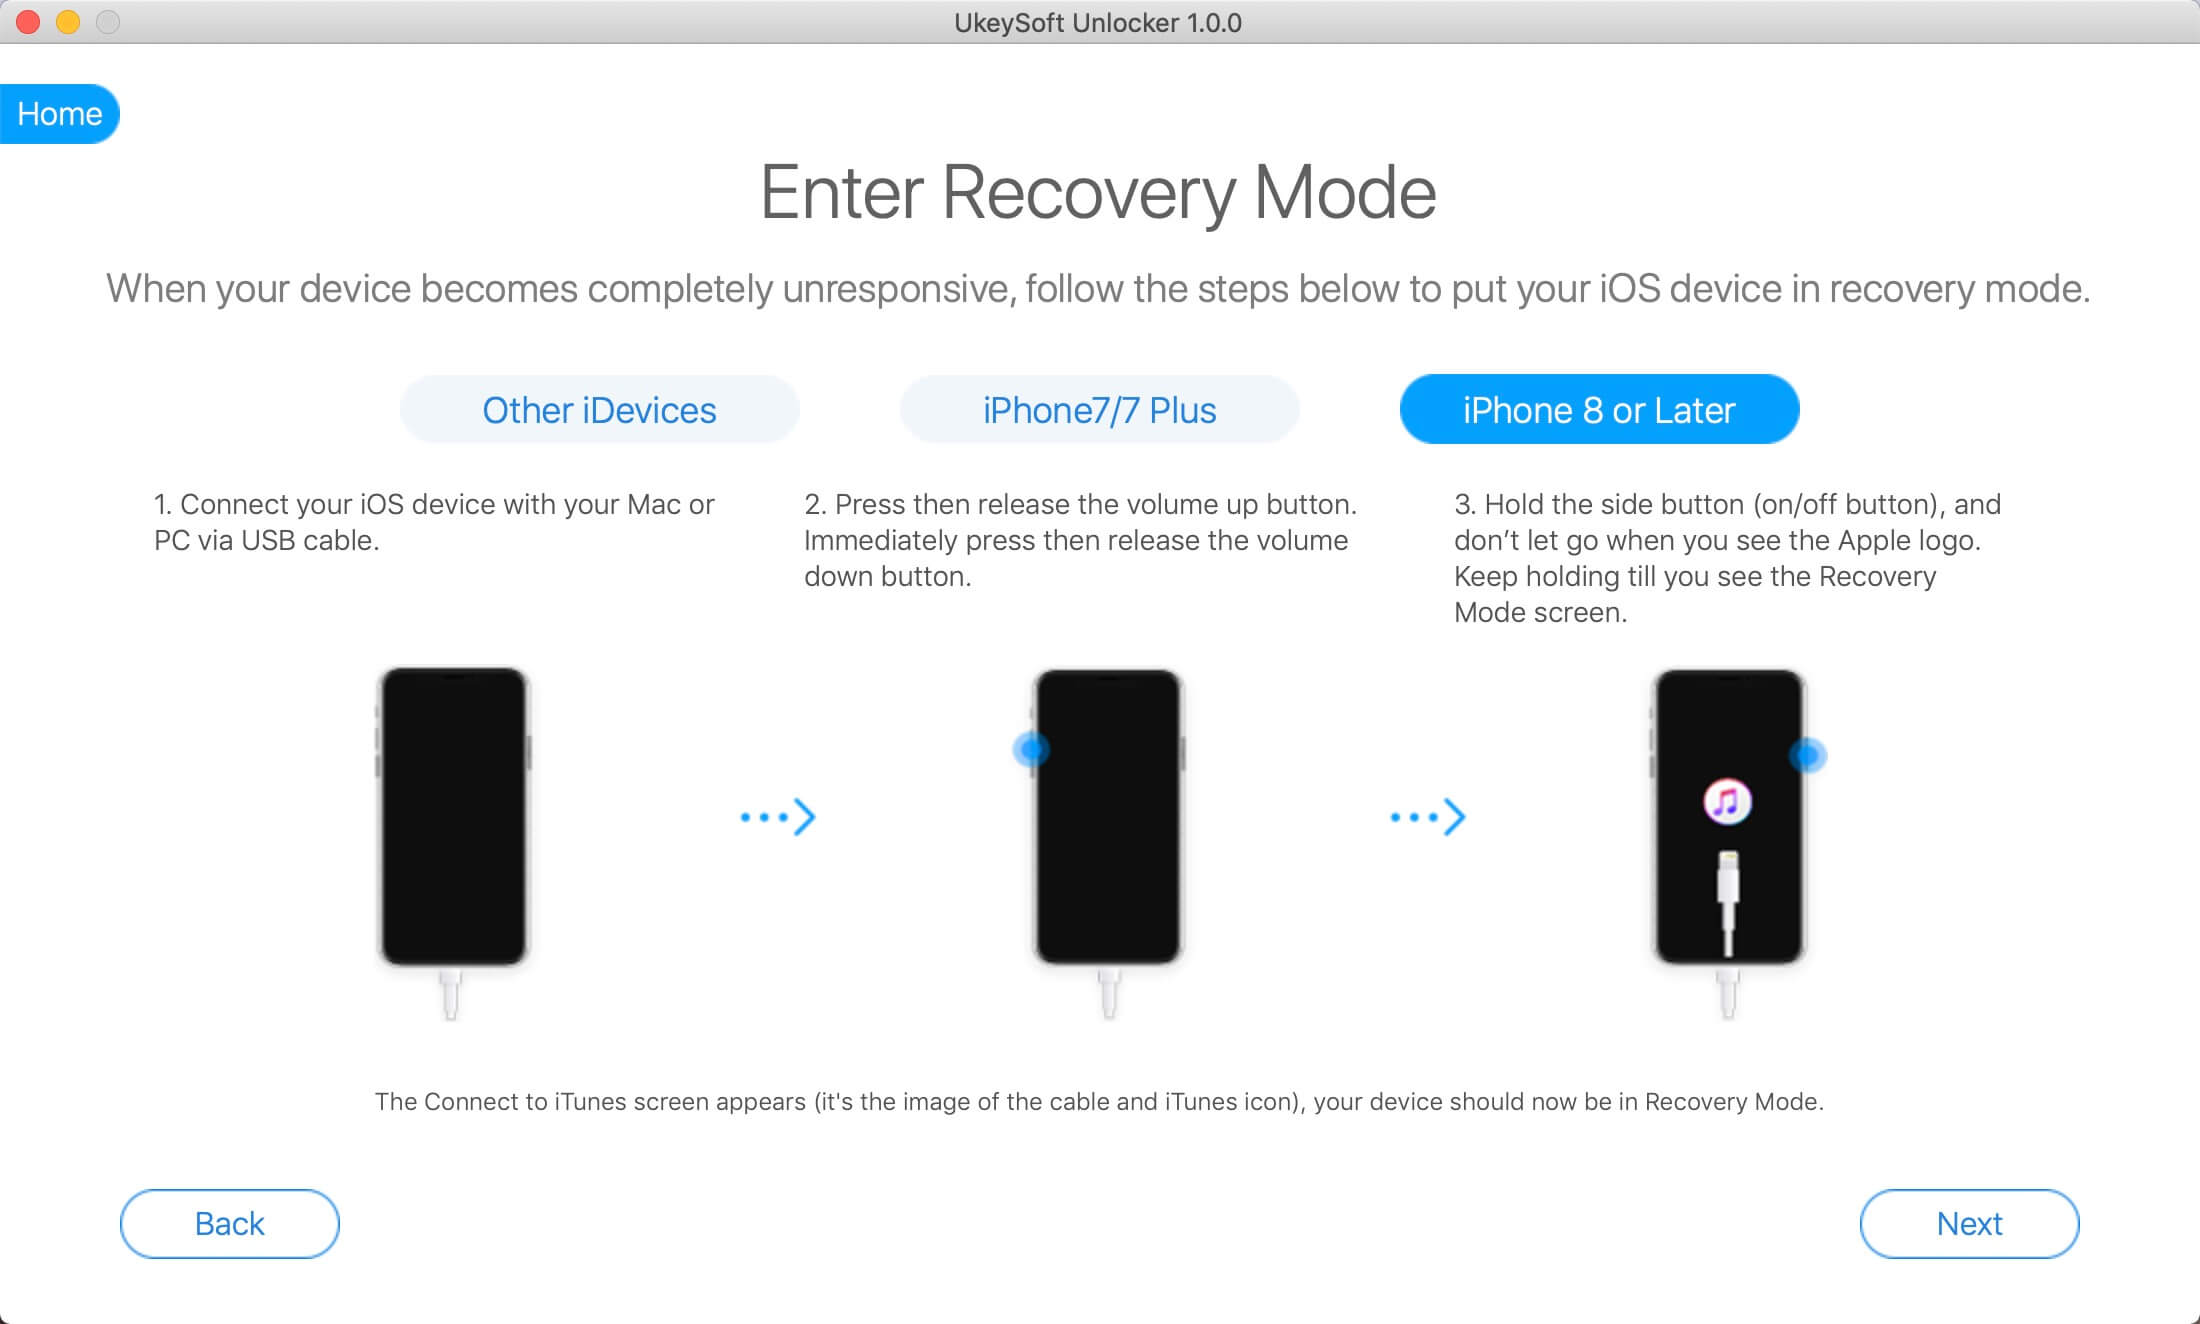
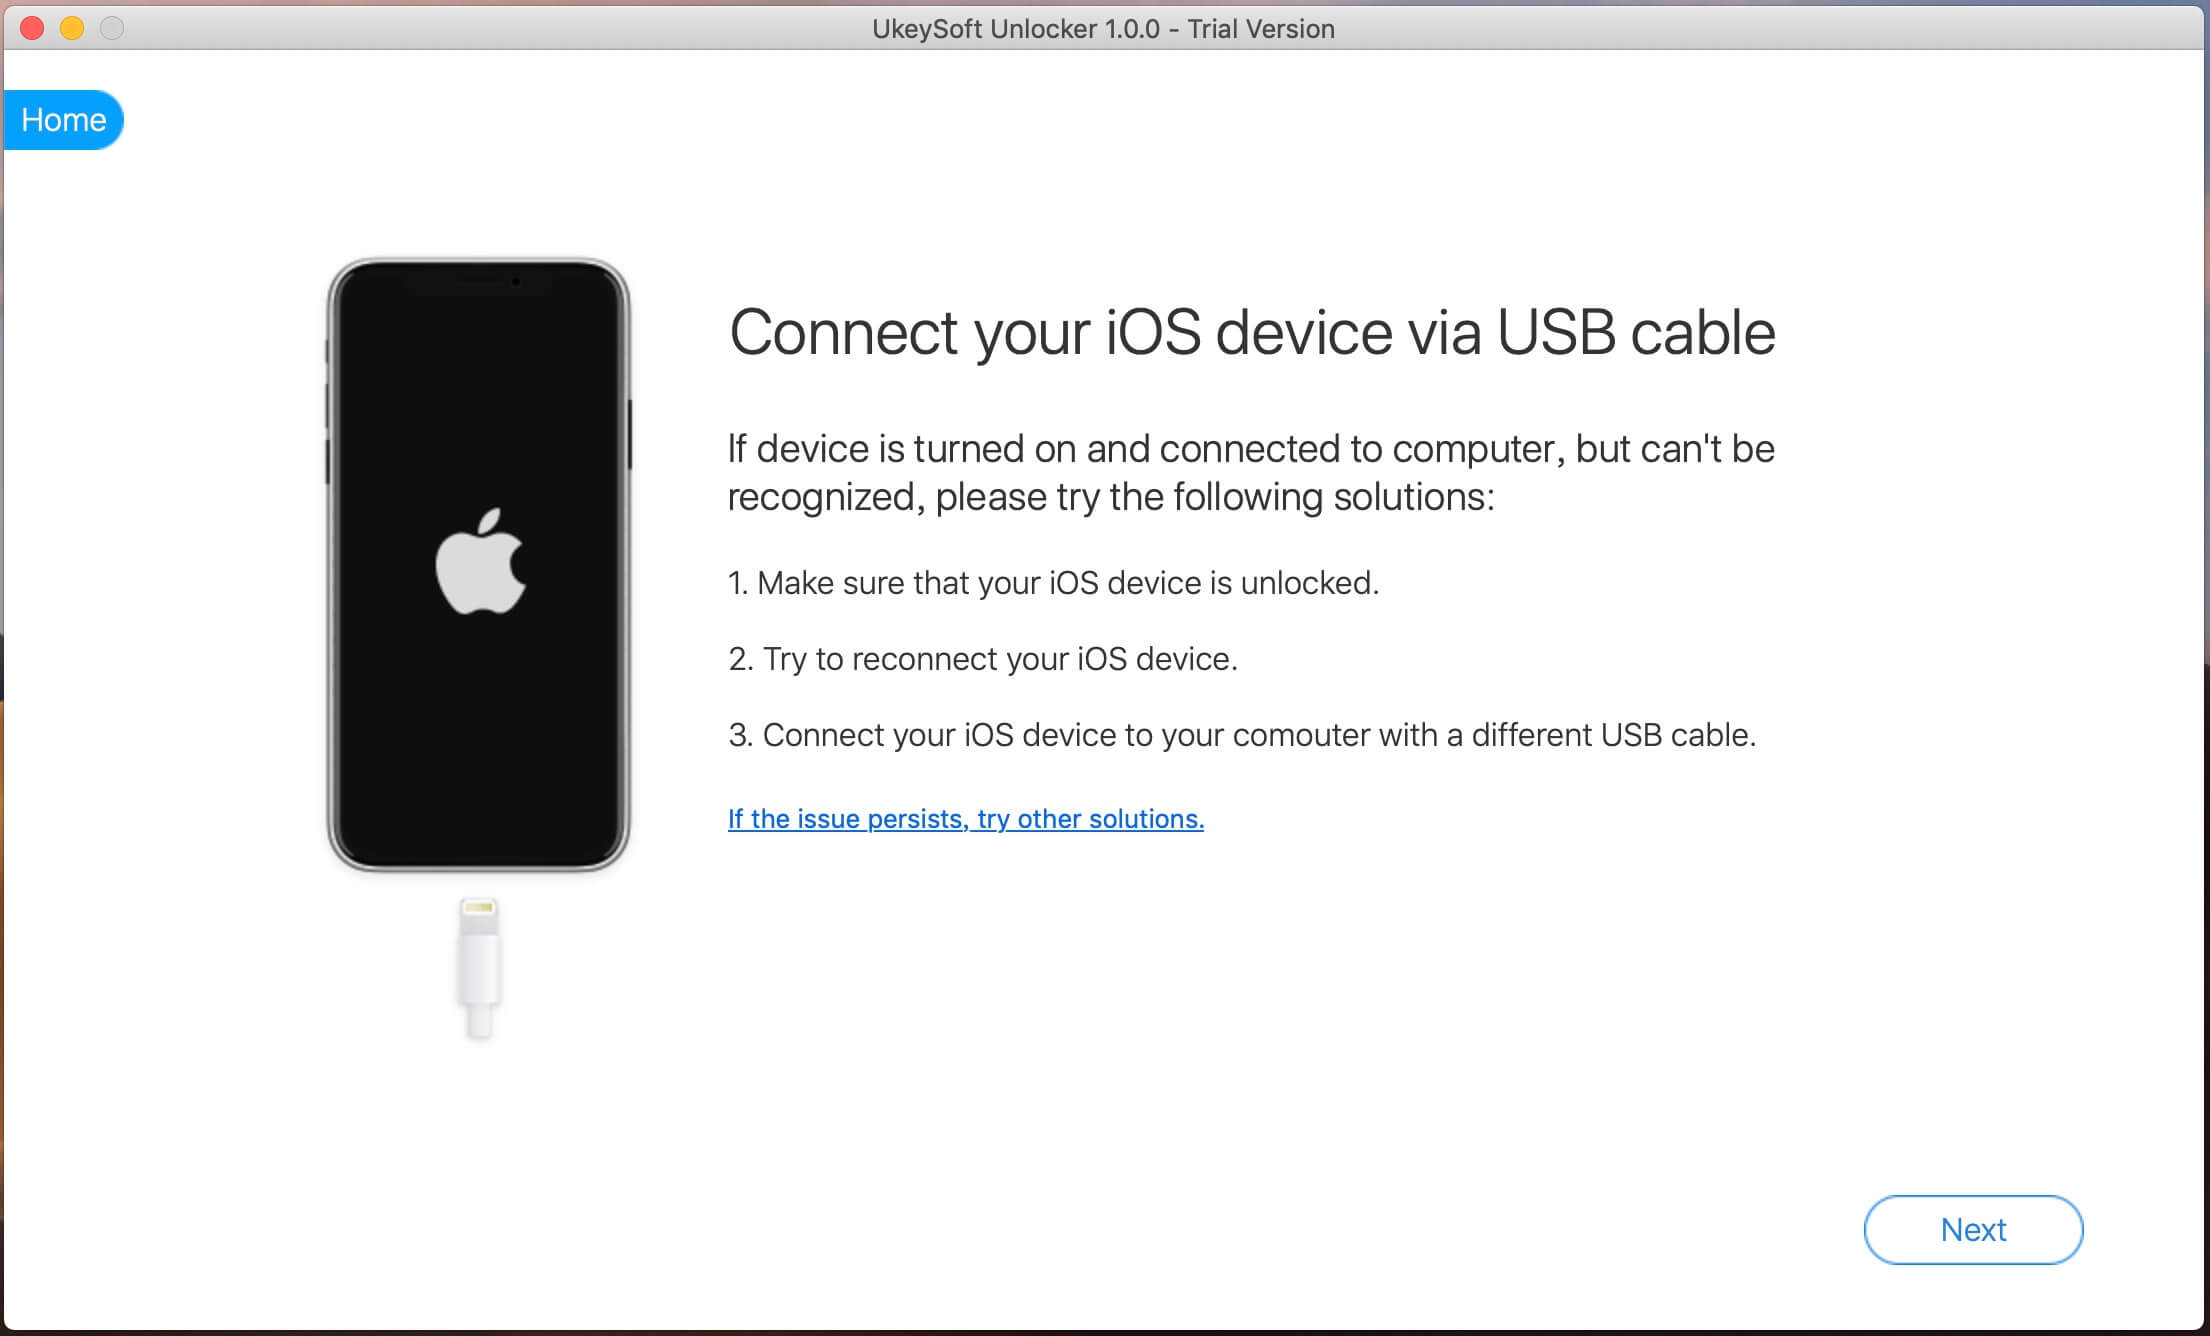
Step 2. Connect the iPhone to your computer via a Apple USB cable and put iPhone into recovery mode.
Also read: How to enter recovery mode on iPhone

Enter Recovery Mode on iPhone

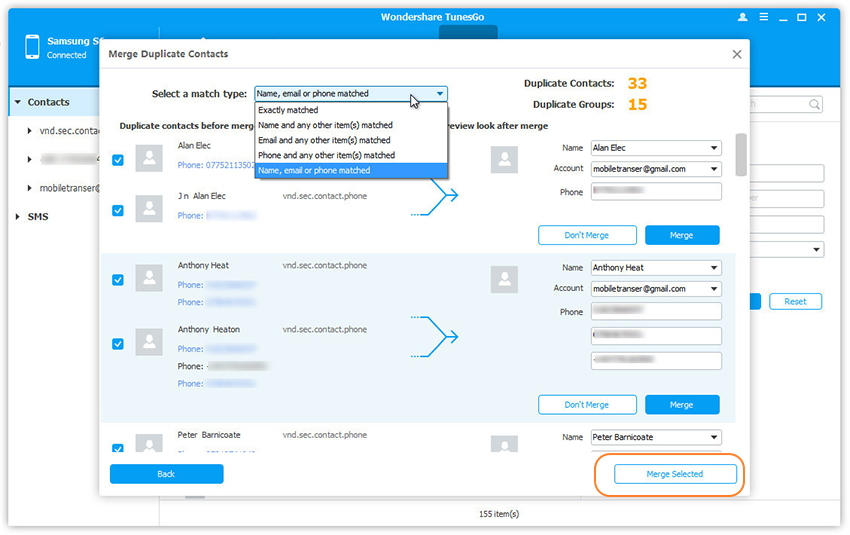
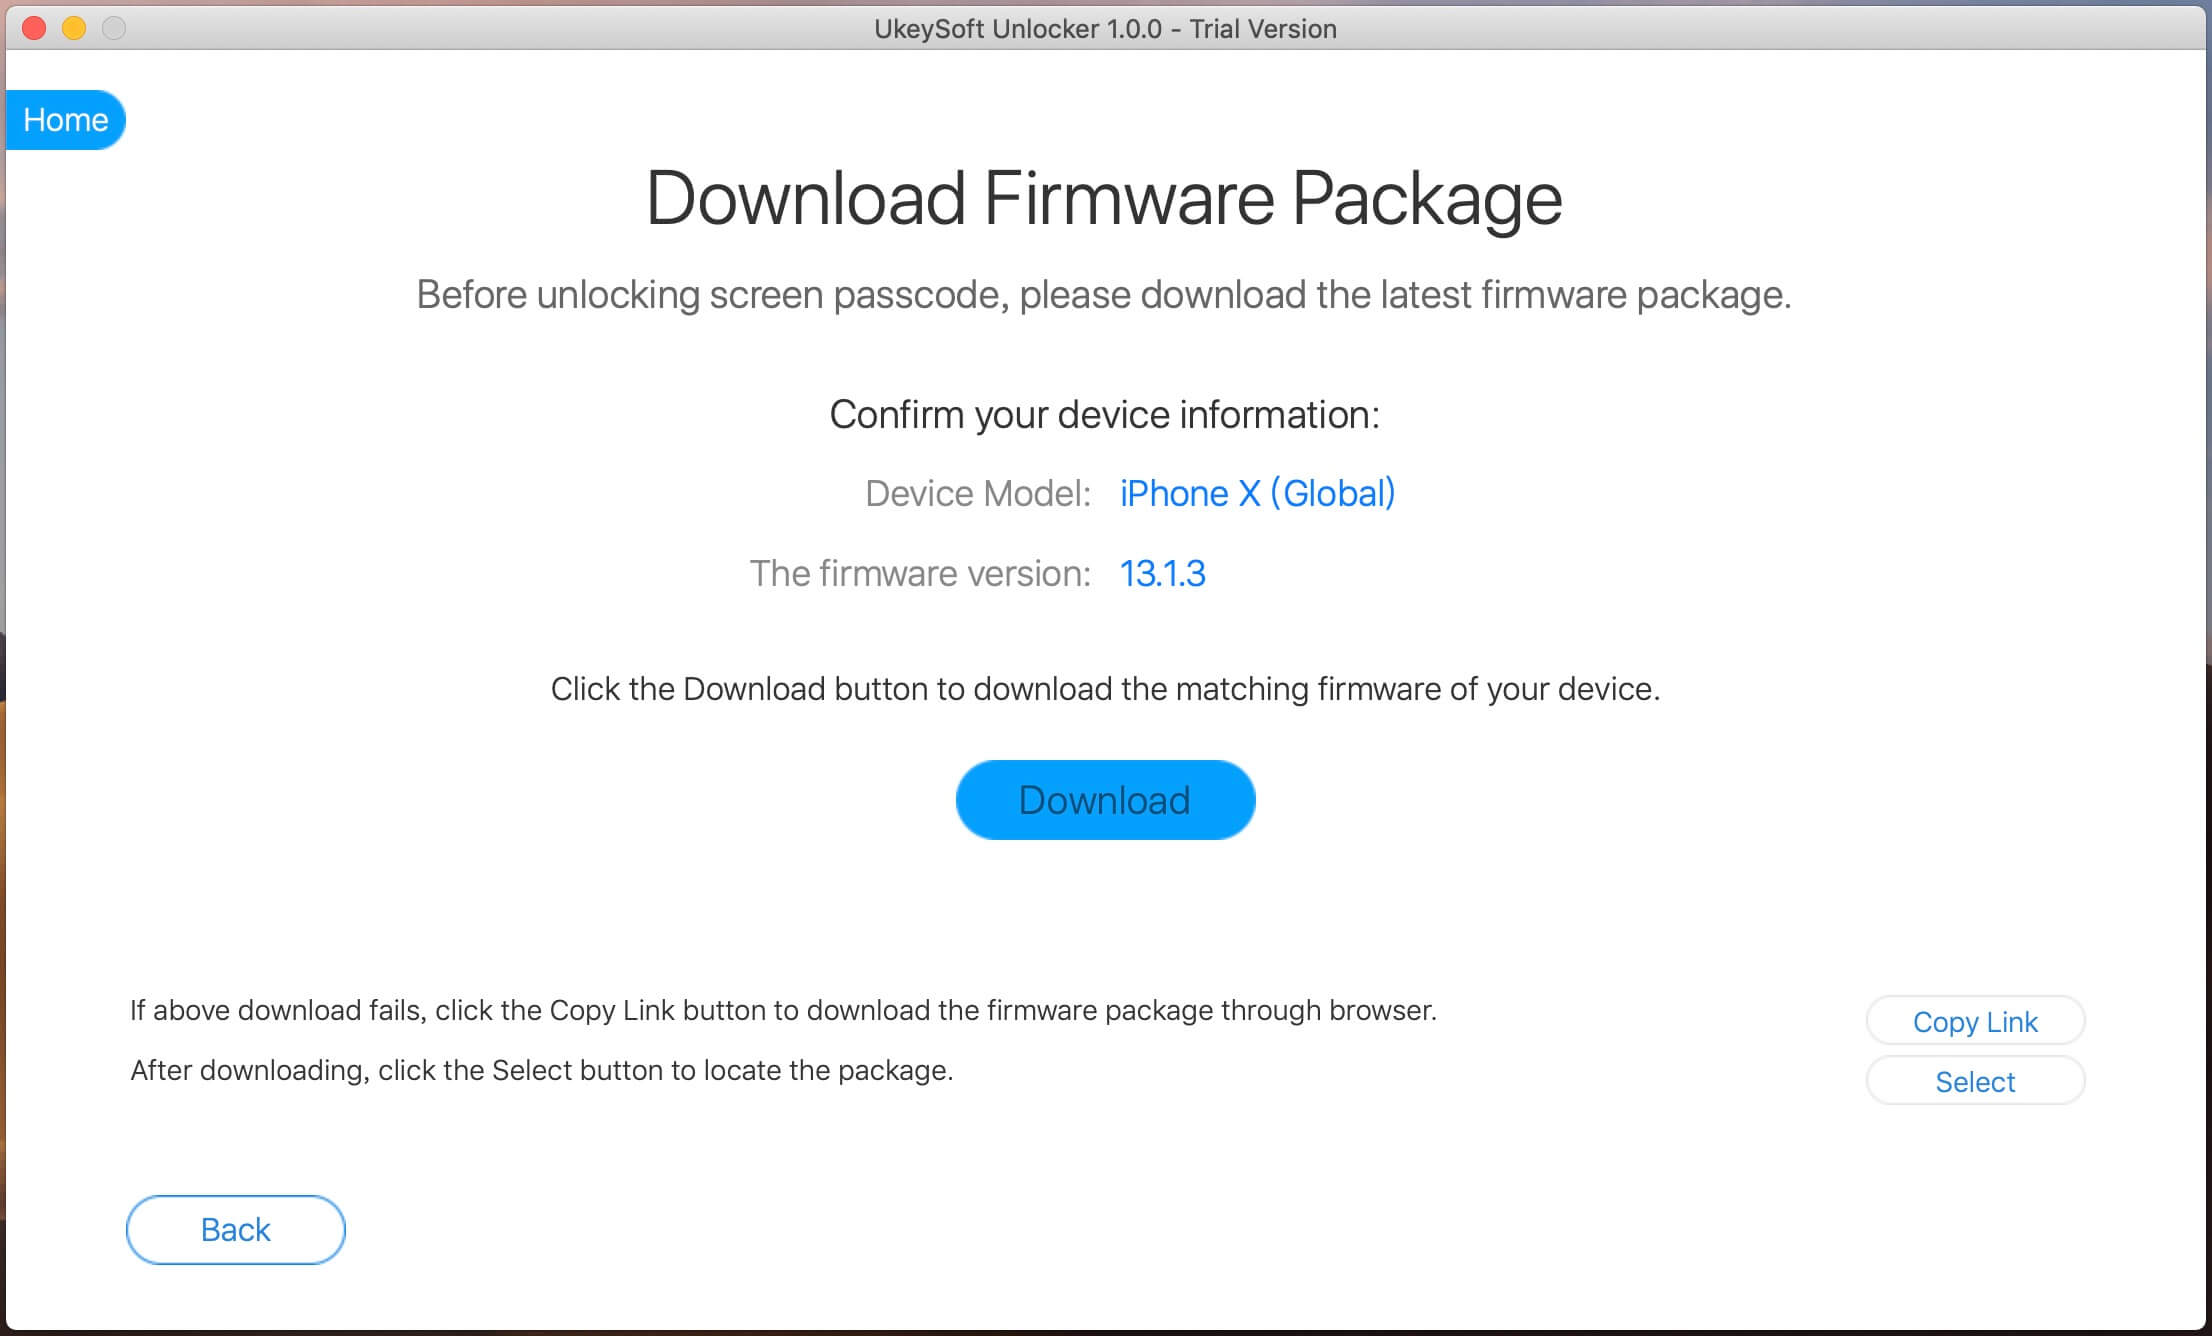
Step 3. The iPhone is recognized and there shows the matching firmware package. Click “Download” start to download the firmware.

detect iPhone information

Step 4. Click “Start” button ready to unlock your iPhone after downloading the firmware package completed.

remove iphone passcode

Step 5. Click “Start Unlock” button start to remove screen passcode, pattern, Touch ID or Face ID.

unlock iphone locked screen

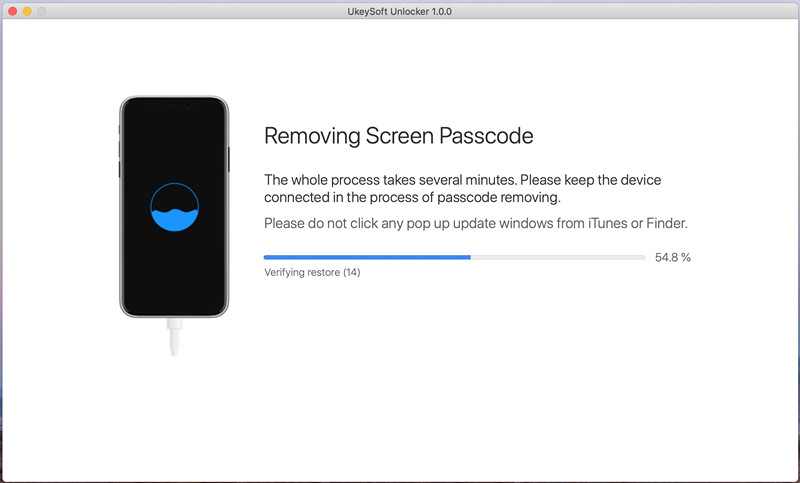
Step 6. When the unlocking process completes, your iPhone will restart, then disconnect your iPhone with computer and setup the device.

unlock stolen iPhone passcode

Part 2: How to Unlock Apple ID from a Stolen iPhone

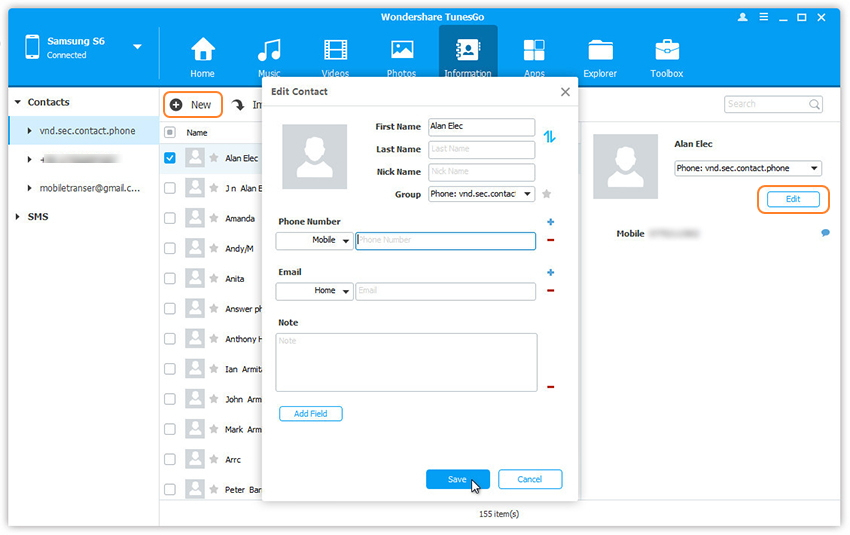
Step 1. Launch UkeySoft Unlock on computer and click “Unlock Apple ID” function.

Launch UkeySoft Unlocker

Step 2. Connect the iPhone to computer via a USB cable, the software will detect it automatically.

connect iPhone to Mac

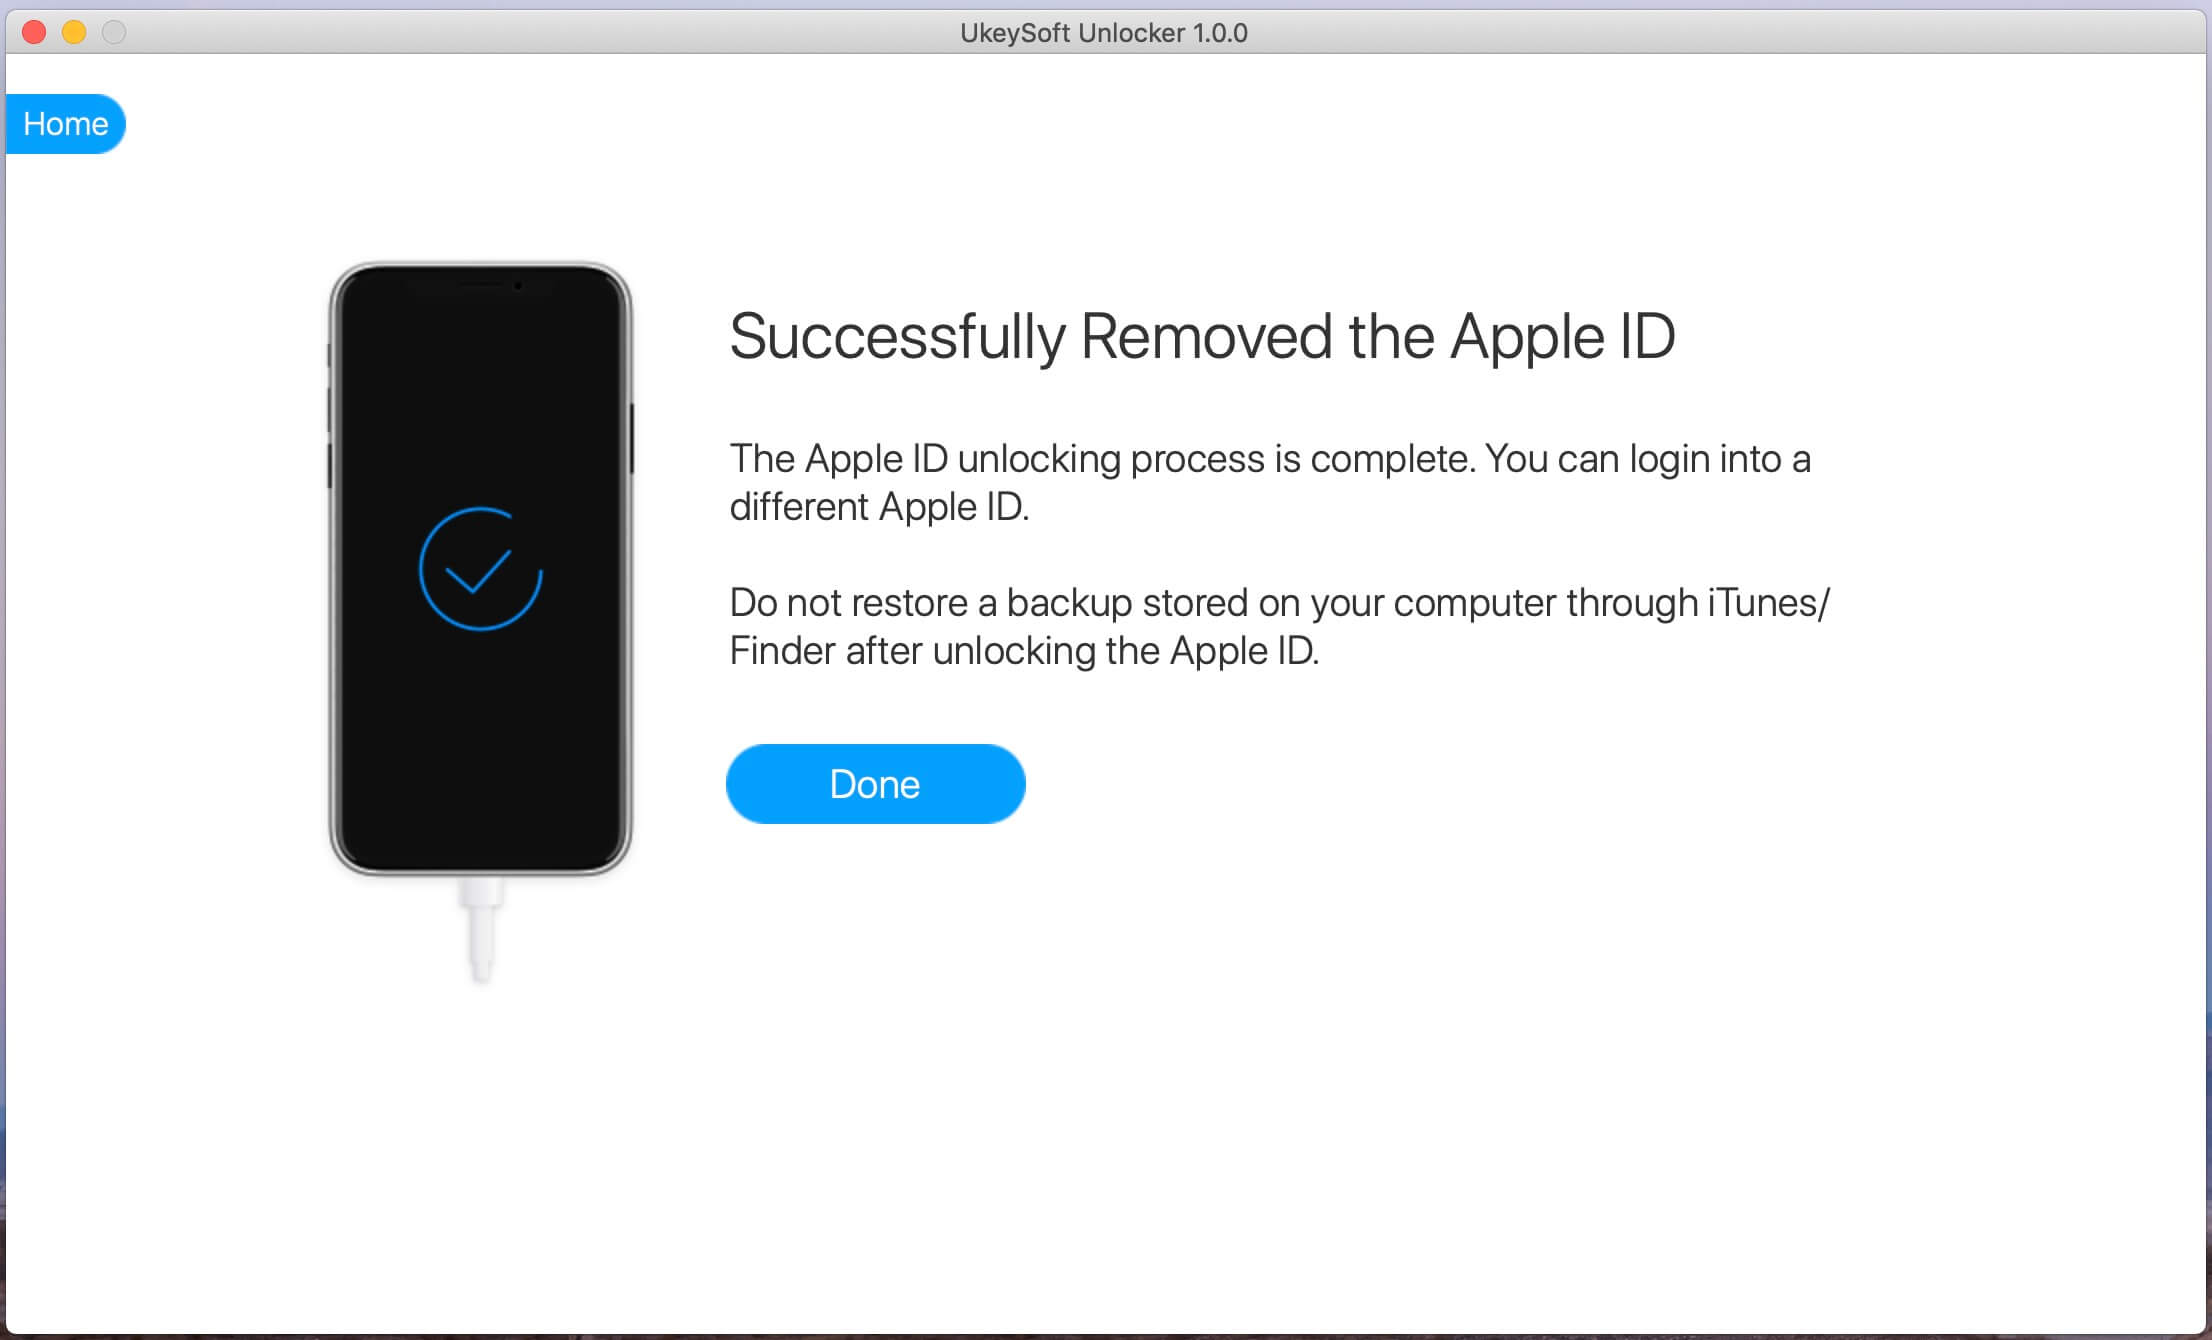
Step 3. Click “Start” button begin to unlock Apple ID

start to unlock Apple ID

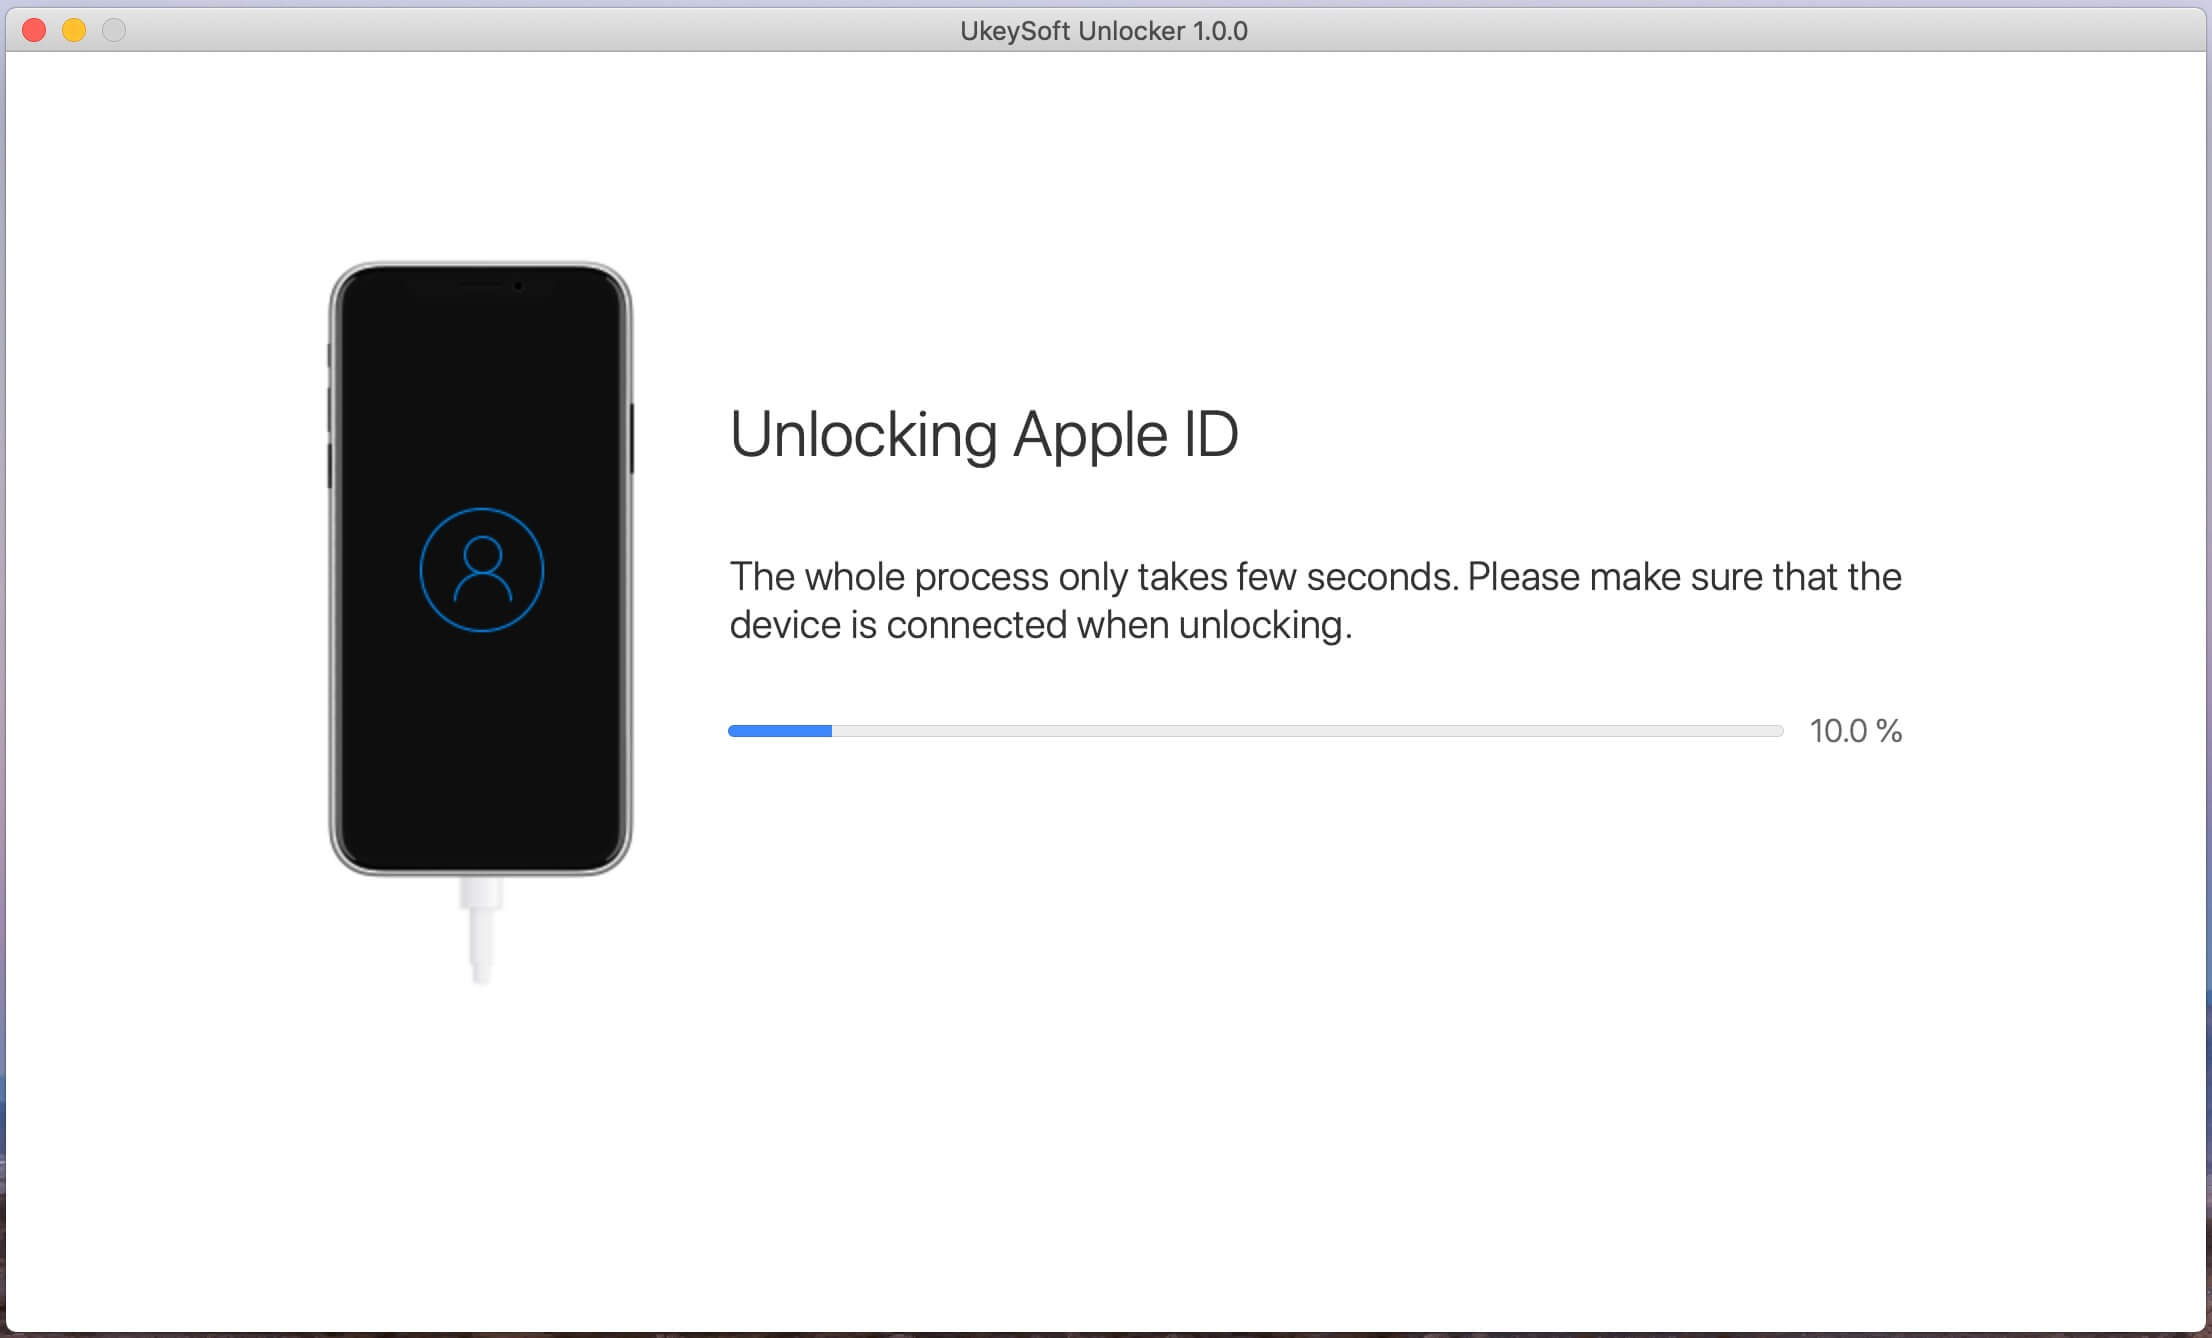
Step 4. Apple ID removed successfully, you can login into a different Apple ID or create a new one.

remove Apple ID

Also read: How to Reset Locked/Disabled iPhone without Password

Part 2: Unlock a Found/Stolen iPhone with iOS Toolkit – Unlock iOS

How thieves unlock passcodes on stolen iPhones 6/6 Plus, iPhone 7/7 Plus, iPhone 8/8 Plus, iPhone X/XS/XR and even the latest iPhone 11 Pro and iPhone 11 Pro Max. Unlock iPhone with iTunes is very fastly, but it will cause data lossing. However, how to byepass iPhone password quickily?

When our iPhone screen is broken, disable or locked, we can’t enter the passcode, even we can’t unlock the iPhone screen with Touch ID or Face ID. At this time, if you have turn on “Find My iPhone”, you can sign in iCloud web to remotely unlock the iPhone screen, but this method will erase all data and settings on your iPhone. Unfortunately, if you have turned off “Find My iPhone”, you can’t unlock it via iCloud. Don’t worry, you can use a third-party iPhone unlocking tool to unlock your iPhone without knowing the passcode, even “Find My iPhone” is disabled. So, if you have got a second-hand iPhone or a stolen iPhone, if “Find My iPhone” is off, you can easily unlock a stolen iPhone without passcode.

Phone Toolkit – Unlock (iOS) and UkeySoft Unlocker, both can help you unlock iPhone/iPad locked screen easily. When you forget the password on your iPhone or you just don’t know the password on a stolen & found iPhone,it can help you unlock screen passwords from iPhone and iPad,or remove passcode from iPhone with broken screen in 5 minutes.Before doing it, you need to know this: the Find My iPhone/iPad should be disabled,then you can successfully unlock your iPhone and iPad.If the stolen iPhone’s “Find My iPhone/iPad” is turning on, I’m unlucky to tell you that this program can not help you, but you can also give it a try if this “Find My iPhone/iPad” function is turning off.

Download the Phone Toolkit – Unlock (iOS) for Windows and Mac computer:

d_win d_mac
d_win d_mac

Tips:Phone Toolkit compatible with the latest iPhone 11 Pro, iPhone XS, iPhone XR and iOS 13.

How to Unlock A Stolen iPhone Without the Passcode

Tips: Disable “Find My iPhone” firstly.

Step 1:Download and Run the Phone Toolkit – Unlock iOS
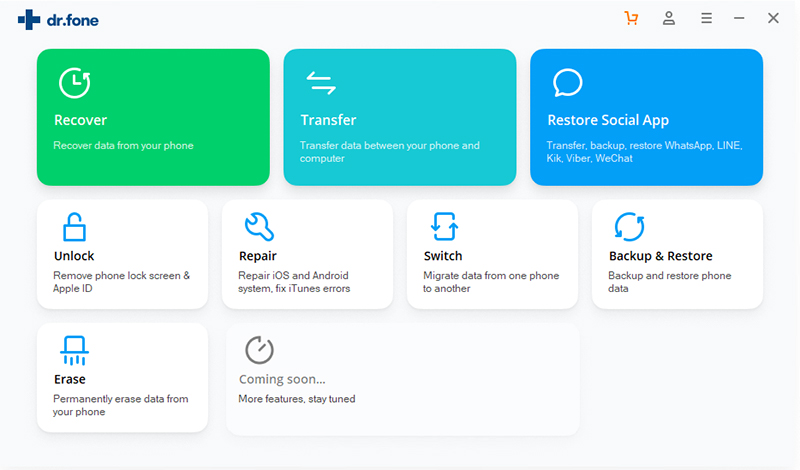
The very first as always is to download the Phone Toolkit on your computer. Then select the option “Unlock”.

unlock iphone without passcode

Step 2: Connect iPhone to the Computer
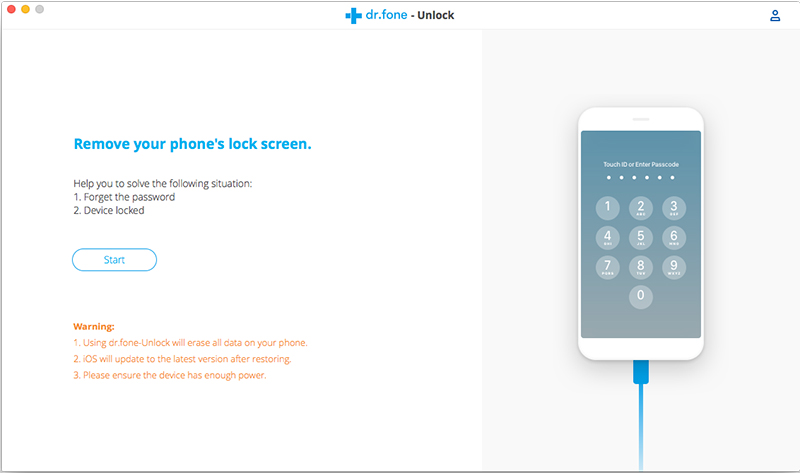
Use the USB cable to connect your iPhone to the computer.Now the iPhone is enabled with dr.fone and you will see the Unlock window displayed. Simply, click Start to begin your work.

unlock a stolen iphone without passcode

Step 3: Enter iPhone in DFU mode
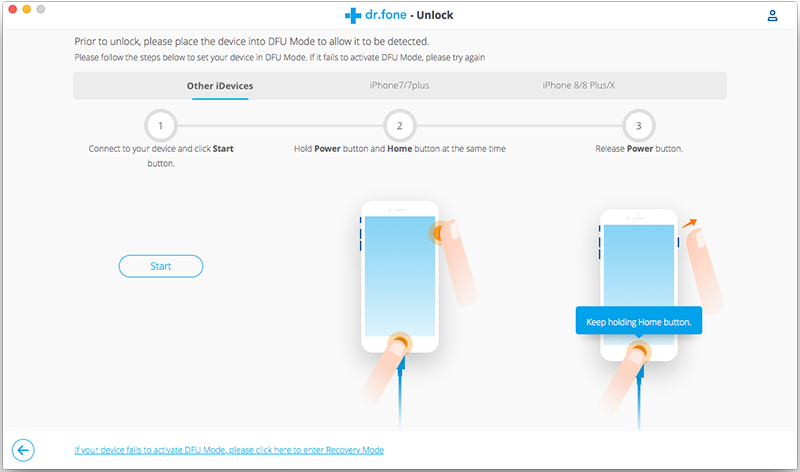
In the new window, you need to follow the instructions to enter the DFU mode.
1)Power off your iPhone.
2)Press and hold the Volume Down button and the Power button together for 10 seconds.
3)Release the Power button and keep holding the Volume Down button until the device is in DFU mode.

DFU mode to unlock iphone without passcode

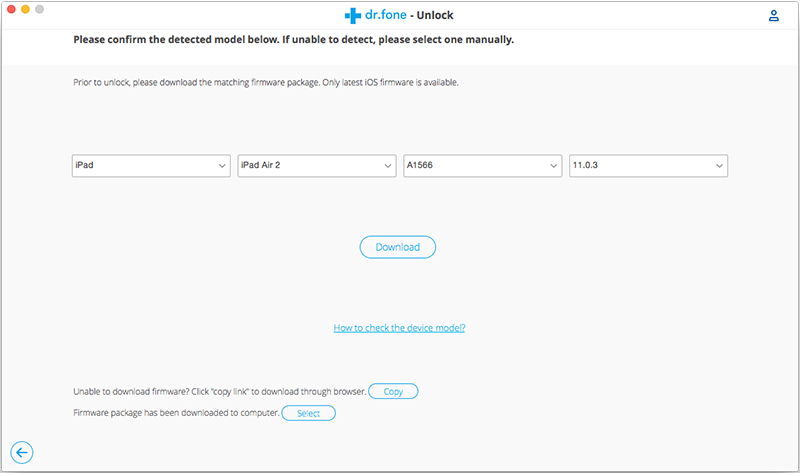
Step 4:Confirm the iPhone Information
In this step to unlock iPhone without passcode, you will see that Phone Toolkit will detect your iPhone information such as the iOS version, device number and generated code etc. Just cross check the information.Then click Download the download the firmware for the stolen iPhone.

check information to unlock iphone without passcode

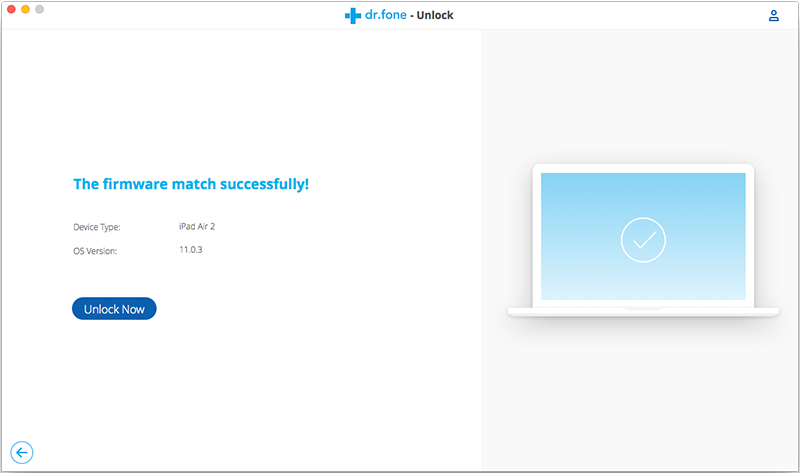
Step 5:Unlock the Stolen iPhone Screen Lock
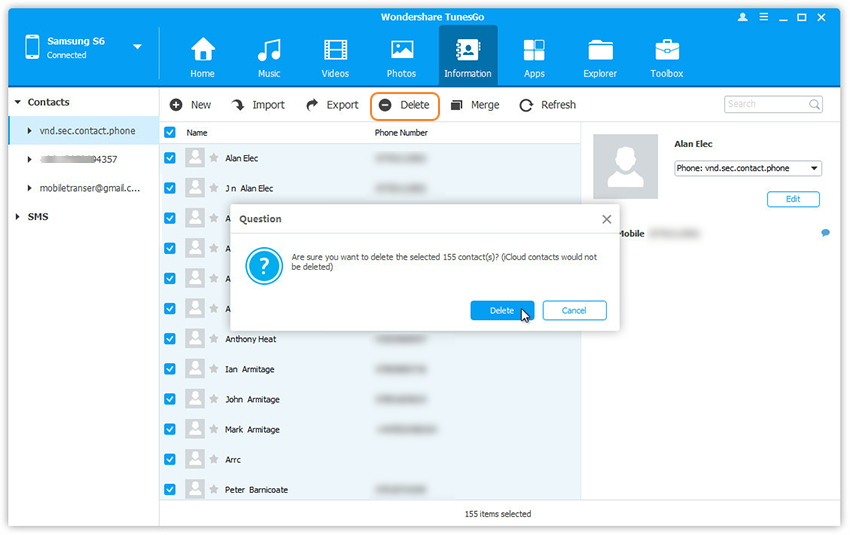
Once the firmware gets downloaded, the iPhone Unlock tool will proceed to erase your passcode. For that, you would have to click the button “Unlock Now” as shown in the image below. Then you need to confirm the erasing operation as this will wipe out your phone data.

confirm and unlock iphone without passcode

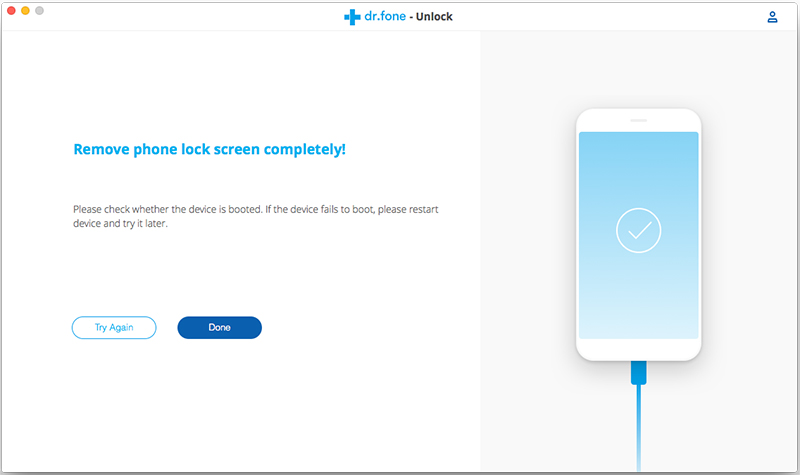
Step 6:Remove the Stolen iPhone Locked Screen and Access it without Passcode
Within a few minutes the lock screen will be removed from the stolen iPhone,after that the device will reboot as a newly bought iPhone without lock screen display.

confirm and unlock iphone without passcode

Download the Phone Toolkit – Unlock (iOS) and have a try now.

d_win d_mac
d_win d_mac

Part 3. Turn Off Find My iPhone/iPad

After got a stolen/found iPhone and the owner have’t disable Find My iPhone remotely,if you have assess the phone system,plase turn off “Find My iPhone/iPad” at firstly.The simplest and fastest way to turn things off is right on the device.

Step 1.Launch Settings from the Home screen.
Step 2.Tap on iCloud.
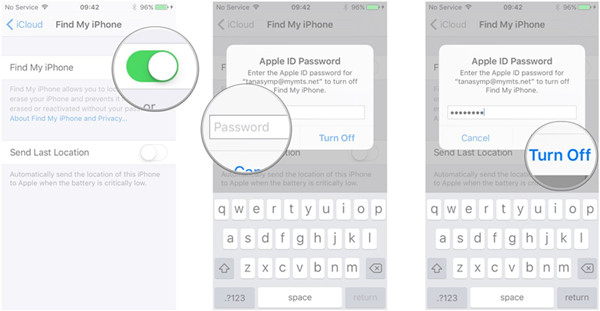
Step 3.Tap Find My iPhone.

find my iphone disable find my iphone

Step 4.Switch Find My iPhone to Off.
Step 5.Enter your Apple ID password to confirm.
Step 6.Tap Turn Off.

disable find my iphone on a stolen iPhone

That’s it. The stolen & found iPhone or iPad can no longer be found via Find My iPhone.

Part 4: Remove a Previous owne’s Apple ID,iTunes Store ID and iCloud ID from a Stolen iPhone Completely

When you have got a used iPhone/iPad, and everything seems fine except that when you attempt to log into iTunes, the previous owner’s Apple ID pops-up and it requests a password.Here is the guide tach you how to get rid of Apple ID,iTunes Store ID and iCloud ID,so that I can use your own Apple ID on a stolen iPhone.

Remove/Delete Apple ID

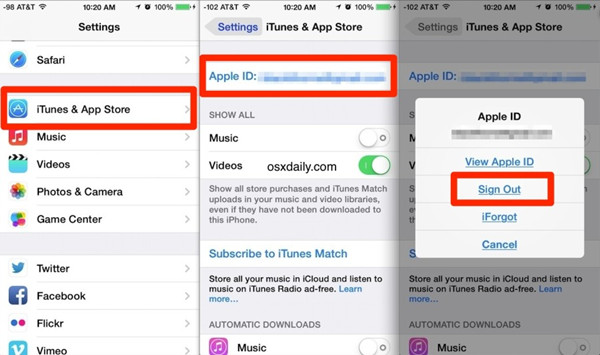
Sign Out Everywhere on Stolen/Found iPhone: Go to Settings → iTunes & App Store and tap on the Apple ID field. Then, tap on Sign Out. Next up, go to Settings → iCloud and repeat the process. This is a usual places where you have sign out and signed in with your Apple ID.

Remove a Previous Apple ID

Part 5: Factory Reset a Stolen/Found iPhone and Erase iPhone

A factory reset can help resolve issues with your iPhone or iPad if it’s crashing or freezing, if you have bought a second-hand iPhone.Luckily it’s very easy to wipe an iPad or iPhone through factory reset.

Factory reset is the easiest way is to remove everything from iPhone. To do this, all you have to do is go to Settings → General → Reset → Erase All Content & Settings. Then, Settings → General → Reset → Reset All Settings.

Factory Reset iPhone erase all content and settings

Note:But factory reset is not completely and permanently wipe an iPad or iPhone,becuase some data recovery in market can recover data from iPhone after factory reset.However,you must to us a professional iOS Data Eraser to completely erase all data on a stolen iPhone without leaving a trace,after that,even the professional data software can’t recover the erased data back.

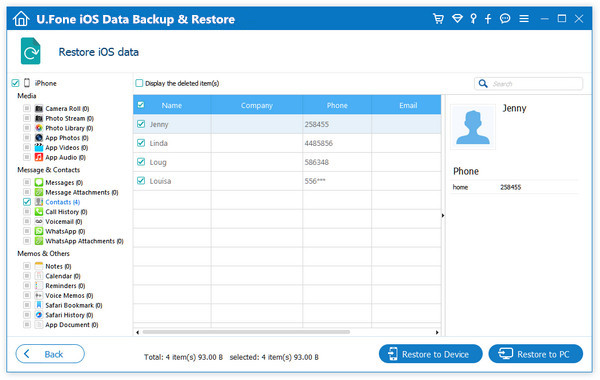
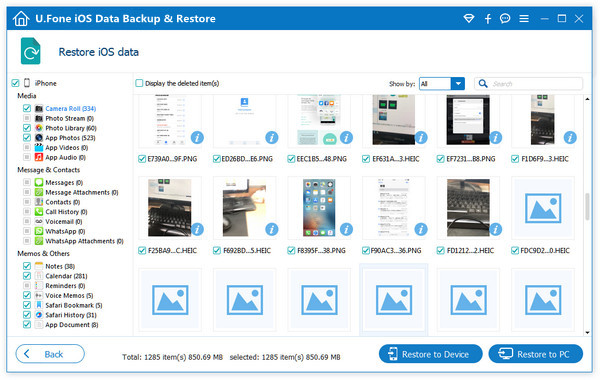
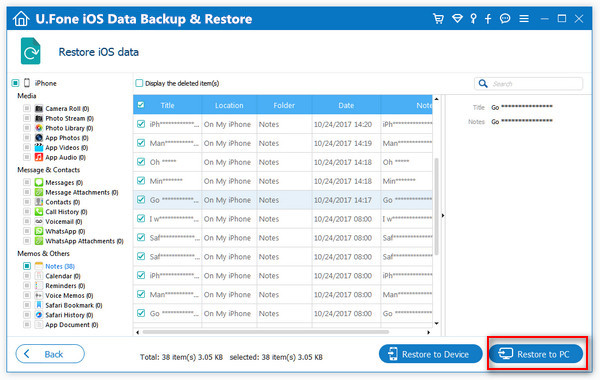
It’s easily be recovered by Most iPhone Data Recovery Softwares.Scanned out all messages, contacts, notes, call logs, phone numbers, name and other data. Just one click, everyone can recover these data and save to computer.

Part 6: Permanently Erase All Data from a Stolen iPhone, 100% Unrecoverable

UkeySoft FoneEraser and this iPhone iPad Data Eraser is a professional iOS Data Eraser and iOS Optmizer,it provides four erasing options to ensure all deleted data were overwritten and erased without the possibility of recovery by any practical data recovery software or hardware methods.You can use this ios data eraser to wipe all text messages, photos, contacts, call history and other persional data from a stolen iPhone without harming the device,after that,the second-hand device as new one.

Download the iPhone iPad Data Eraser for Windows or Mac and start to wiping all data and setting from the device permanently.

d_win d_mac

iPhone iPad Data Eraser Features:

  • Data erased by this iOS Data Eraser is 100% unrecoverable.
  • Completely factory reset iPhone without any trace.
  • Review and selectively erase iPhone data.
  • Data deleted before can be erased as well.
  • 3rd-party apps data can be erased completely.
  • One click free up space, erase deleted files and erase private files which also help users deal with memory and data protection issues.

Step 1. Connect the stolen iPhone to the computer and run the iOS Data Eraser.
Step 2. Go to the erase all data tab.
Step 3. Choose a security level from high, medium and low. The optimum one would be medium.
Step 4. Type “Erase” into the box which appears on the erase all data page. Confirm action by pressing “Erase Now”.
Detail guide: How to permanently erase all data on iPhone

erase data on stolen iPhone

If want to selling your old iPhone/iPad, it’s absolutely vital that you delete all the sensitive data stored on it. If not, an unscrupulous buyer could gain access to your social media profiles, your financial information and even your personal photos and videos, enabling them to browse through your private moments or steal your identity.So,it’s necessary to erase everything from your iPhone before re-selling.
Learn this guide abouth:Permanently erase everything from iPhone before selling.

How to Manage Huawei Phone on Computer

Huawei Technologies Co. Ltd. is a company operating at multi national level, and it is labelled as the biggest Telecommunications Equipment Company in the world at the moment. It’s a Chinese based company. Huawei phones become more and more popular around the word, not only in China. The most used Android mobile phone is Samsung, however, Huawei, is the second. All of the Huawei Phones are based on the popular Android OS. Their devices are based on cutting-edge technologies and Huawei is determined to be the next big thing in the smartphone market.

Huawei phones are based on Android, when you stored a number of personal data on your Huawei phone, manage data is one thing you can’t ignore, including videos, music, photos, contacts, SMS and more. Most of mobile users think that it is necessary to backup and secure the data on their devices so that in case of accidents, Huawei users is no exception. It is possible to recover the data which was stored on their Huawei phones from backed up after losing. This is available with the help of some professional data manager tool.

One-Click Manage Huawei Phone on Computer

Android & iOS Manager Huawei Manager is the tool which totally meets your need. It’s a wonderful manager tool for Android and iOS devices, help to manage Huawei phone on computer safely, backup/restore/transfer files for Huawei phone, including videos, music, playlists, photos, contacts, SMS, apps. It is capable of transferring files between Huawei and iTunes library, transferring files between Huawei and computer, transferring files between Huawei and Android/iOS device. Compatible with all Huawei and Android models, such as, Huawei P20/P10/P9, Mate 10/9, Honor, etc,.

d_win d_mac

More Main Features of Android & iOS Manager:
-Backup music, photos, videos, contacts, SMS, Apps etc. to computer and restore them easily.
-Manage, export/import music, photos, videos, contacts, SMS, Apps etc,.
-Phone to Phone Transfer – Transfer everything between two mobiles.
-Highlighted features such as 1-click root, gif maker, ringtone maker.
-Fully compatible with 3000+ Android devices (Android 2.2 – Android 8.0) from Huawei, Samsung, LG, Lenovo, HTC, Motorola, Sony, OnePlus, OPPO, etc,.

Part 1: How to Manage Videos on Huawei Phone

Launch Huawei Manager and connect your Huawei phone to computer.Your Huawei  phone will be detected and displayed in the primary window.

huawei manage home page

Step 1.Select Music File to Transfer
Select Music tab.Once your media loads, click Add > Add File or Add Folder.

add videos from pc to huawei

Step 2.Sync Songs from Computer to Huawei Phone
This brings up your file browser window,from which you can select videos to import from your computer.All videos imported can be watched with the built-in player.You can simply Drag and Drop videos from computer to Huawei phone.

d_win d_mac

Part 2: How to Manage Music on Huawei Phone

Launch Huawei Manager and connect your Huawei to computer.Your device will be detected and displayed in the primary window.

huawei manage home page

Step 1.Select Music File to Transfer
Select Music tab.Once your media loads, click Add > Add File or Add Folder.

sync music from pc to huawei

Step 2.Sync Songs from Computer to Huawei Phone
This brings up your file browser window, from which you can select songs to export from your computer.And you can also create new playlist by right clicking Music to save the imported songs.You can simply Drag and Drop music files from computer to your Huawei.

d_win d_mac

Part 3: How to Manage Photos on Huawei Phone

Launch Huawei Managr  and connect your Huawei phone to PC.Your device will be detected and displayed in the primary window.

huawei manage home page

Step 1.Select Photos File to Transfer
Click Photos tab.All the albums will be displayed on the left.Select one to import photos from PC to selected Samsung photo album.

Step 2.Sync Photos from Computer to Huawei Phone
Click Add > Add File or Add Folder.

add photos from pc to huawei

If you only want to select some photos,then click Add File.You can create new albums and add photos in it. Simply right-click the photos category on the left panel, then click New Album.

If you want to transfer all the photos in one folder,then click Add Folder.

Select photos or photo folders and add to your Huawei phone.Hold down Shift or Ctrl key to choose multiple photos.

d_win d_mac

Part 4: How to Manage Contacts on Huawei Phone

Huawei Manager makes it extremely easy to add and edit contacts, group contacts, merge duplicate contacts and delete useless contacts in batches.Huawei Manager also allows you to manage contacts on your Phone, SIM card, iCloud, Exchange, Yahoo! and other accounts. In the following part, we would like to show you the detailed tutorial.

Launch Huawei Manager and connect your Huawei to computer.

huawei manage home page

Manage Contact Groups
Step 1. Click Information tab. In the contact management window, select and expand account from which you want to add and edit contacts, including your phone Contacts, SIM Contacts and Google Contacts.

Step 2. Right-click the contact groups on the left panel.
You can select to create New Group, Rename Group, or Delete Group.
select option

Step 3. Right-click on selected contacts, you can add contacts to specified group.

add contacts to groups

Merge Duplicates
Step 1. Click Information tab. In the contact management window, click Merge.
merge option

Step 2. Select account(s) from which you want to search duplicate contacts, including your phone Contacts, SIM Contacts and Google Contacts.

select account to merge duplicate contacts on huawei

Step 3. All duplicate contacts that have the same name, phone number or email will appear for your review.

Step 4. Select a match type to find duplicate contacts.

merge duplicate contacts on huawei

Step 5. Click Merge Selected to merge all the contacts or Merge selected contacts one by one.

How to Add & Edit Contacts
Step 1. Click Information tab. In the contact management window, select account and group from which you want to add and edit contacts, including your Phone Contacts, SIM Contacts and Google Contacts.

Step 2. Click New to open the Add to contact window. As you see, you can edit name, email, phone number, website, address, middle name, etc,. You can also search and Edit selected contacts.

add and edit huawei contacts

Delete Contacts in Batches
Step 1. Click Information tab. In the contact management window, select group from which you want to delete unwanted contacts, including your Phone Contacts, SIM Contacts and Google Contacts.

Step 2. Tick Contacts you want to delete and click Delete.

delete huawei contacts

Step 3. In the pop-up dialog, click Yes.

d_win d_mac

Part 5: How to Manage SMS on Huawei Phone

Huawei Manager works like a desktop SMS assistant, helping to manage all SMS of your Android device on computer. With it, you could save SMS and transfer to computer, send and receive SMS on computer, and mark unread SMS as read.

Launch Huawei Manager and connect your device to computer.

huawei manage home page

Delete Messages in Batches
Step 1. Click Information tab, then select SMS on the left panel. All messages will be shown on the right.
Step 2. Tick Messages you want to delete and click Delete.

delete huawei sms

Step 3. In the pop-up dialog, click Yes.
Note: The program may ask you to set MobileGoConnect as your default messaging application, as shown below. Tap on Yes on your device first, and then confirm it on your computer.

set default sms app

change messaging app

Send Messages via PC
Step 1. Click Information tab, then select SMS on the left panel. All messages will be shown on the right.
Step 2. Search and read selected messages. You can simply type the content and click Send to send messages via Huawei Manager on the computer.
send message on pc

Or you can click New SMS on the right column to create and send a new message to multiple recipients.

create and send new message on pc

d_win d_mac

Related Articles:

How to Recover Deleted Data from Huawei Phone

How to Transfer iPhone Data to Huawei Phone

How to Transfer Android Data to Huawei Phone

How to Backup and Restore Huawei Phone

How to Play Apple Music on Huawei Phone

How to Sync iTunes Videos/Movies to Huawei Phone

How to Backup Old iPhone & Restore to iPhone X

Summary: The new iPhone model always catch people’s attention, especially those who can’t wait to upgrade their device to the latest one. In this post we walk you through the absolutely easy and efficient way to backup everything from that old iPhone and then restoring backed up to the brand-new iPhone X.

I bought a new iPhone X for upgrading, the thing bother me is that I try to sync the data from my old iPhone with iTunes and then restoring it to the new device, the previous data saved in iTunes will be removed. Is there an other way to backup and restore iOS data without overwriting? Any suggestions?

iPhone X now is the most attractive product of iOS device, it comes with many new technologies and features like super Retina display, TrueDepth camera, Face ID (facial recognition), Animoji, wireless charging and more. It is awesome to upgrade to new iPhone X from iPhone 5/5S/6/6S/7. When you get the shiny iPhone X model, you’ll need to move all data from the old iPhone to the new iPhone X. Whether you’re using iOS 11 Automatic Setup feature, iCloud backup, iTunes backup or a USB cable, you should backup the old device first, then restoring backed up to iPhone X. It seems so complicated and time-costing. What’s worse, these backup ways not allow to perform backing up for selecting files, besides, your old data will be overwritten by new data. Here we will show you a better way that is safer and quicker to backup and restore contents for iOS device.

U.Fone iOS ToolKitiOS Data Backup & Restore tool is the ideal tool for backup & restore iOS data safely and efficiently, including photos, messages, contacts, WhatsApp messages, call history, notes, calendar, app data, etc,. With using this tool, you can backup data from old iPhone, restore backed up to iPhone X or other iOS device. It will not overwrite your previous data, allows to select files instead of the whole device, allows to preview before backing up or restoring. More importantly, U.Fone iOS ToolKit provides you a complete solution to manage your device with the features with iOS Data Recovery, fix iOS system under any abnormal situations. It is compatible with iPhone 5/5S/6/SS/7/8/X, iPad Pro/Air and iPod Touch.

d_win d_mac

Part 1: How to Backup iPhone to PC/Mac without iTunes/iCloud

Step 1. Run U.Fone iOS ToolKit – iOS Data Backup & Restore tool
Once the downloading is successful, install and run U.Fone iOS ToolKit – iOS Data Backup & Restore tool on your computer.

ufone toolkit home page

Choose “iOS Data Backup & Restore” feature in the interface of program. Then locate on “iOS Data Backup“.

ios backup restore

Step 2. Connect Old iPhone to Computer
Please connect your old iPhone to PC or Mac. There are two backup modes on the screen: Standard backup and Encrypted backup. Tick “Standard backup” then click “Start” button to enter the process.

connect iphone to computer

Note: With Encrypted backup, you will need to enter the password you created when you want to restore the backup.

Step 3. Choose Data to Backup
You can see the various data types are supported, you can select the data you want or check all depend on your needs. Then click “Next” to start backing up your iPhone data.

select file type

Step 4. Backup iPhone
Now the software is backing up your data, please be patient.

backup iphone data

Once the backup is completed, you can easily view the backup specific information, including backup time, backup size, device name and so on.

view backup files

d_win d_mac

Part 2: How to Restore Backup Data to iPhone X

Once you have a backup with iOS Toolkit, you can optionally restore data from the backup data to iPhone/iPad/iPod or to Windows or Mac PC depend on your need.

Step 1. Run U.Fone iOS ToolKit – iOS Data Backup & Restore tool
Run the U.Fone iOS ToolKit – iOS Data Backup & Restore tool on computer, select “iOS Data Restore” on the screen under “iOS Data Backup & Restore” option.

restore backup

Step 2. Select a Backup
All backups will be displayed on the page. Select a backup you want to restore.

select a backup

Step 3. Select Data to Restore to iPhone X
You are allowed to view the detailed backup data. Choose items that you want to restore, such as contacts, messages, photos, videos and more.

Choose Contacts from Backup

restore backup contacts

Choose Photos from Backup

restore backup photos

After selecting data, choose to tap on “Restore to Device” or “Restore to PC” option. In this case, you should select the previous one.Connect your iPhone X to the computer, it will be detected soon.

restore to device

Click “Restore” and go on.

Step 4. Start Restoring Files from Backup
Then it will begin the restoring job on iPhone X. After the data is completed, click “OK” to complete the process. You could check the restored files on your iPhone X.

d_win d_mac

More iPhone X Tutorials You can Check:

Transfer Photos between iPhone X and Windows 10/8/7 without iTunes

How to Recover Deleted Data from iPhone X

How to Transfer Android Data to iPhone X

How to Transfer iPhone Files to iPhone X

How to Backup & Restore iPhone X on the Computer Safely

How to Transfer Videos/Music/Photos to iPhone X

How to Manage Files for iPhone X on the Computer

How to Backup & Restore Huawei Mate RS

The Porsche Design Huawei Mate RS, is the first smartphone to exclusively rely on Goodix for its in-display fingerprint sensor technology, with Goodix announcing in a press release that its solution is “exclusively featured” in the device. Goodix’s statement adds that its solution is “the only option in the market that supports both flexible & rigid OLED displays, simultaneously maintaining performance and reliability”.

Huawei has released its super model Porsche Design Huawei Mate RS in these days. It is such an amazing mobile phone, features with Goodix function and others. People stored a large number of personal information on mobile device. Meanwhile, they are facing data loss in every moment. There are some common accidents that may cause data loss in Huawei phone: mistakenly delete important data; phone data disappear because of a update error; factory resetting; data loss caused by rooting failure.

Let’s assume that you’ve purchased newest Huawei Mate RS. Have you ever been wondering how to backup Huawei data such as contacts, videos, pictures, music, etc on the computer with a reliable way? To creating a backup is, probably, the one and only way to help you permanently preserve your files as well as your memory. In this article, we will show you the best method to backup and restore Huawei Mate RS data.

Backup & Restore Huawei Mate RS with A Reliable Way

Android toolkitAndroid Backup & Restore can perform a reliable data backup & restore task for you, help to backup & restore Huawei Mate RS on computer with a few clicks, including contacts, messages, gallery, videos, audios, call logs, documents, etc,. It enables to backup data from device to computer safely, restore backed up to device completely. What’s more, Android toolkit is an all-in-one Android data manager tool, features with Android Data Recovery and Broken Android Data Extraction. Works perfectly well for almost all Android models, like Huawei(Mate RS/Mate 10/Mate 9, P20/P10/P9), Samsung Galaxy S/Note series, Google Pixel, Nokia Android, OnePlus, HTC, Sony, ZTE, OPPO, Motorola, LG, Lenovo, and so on.

d_win d_mac

Part A. How to Backup Huawei Mate RS on Computer

Step 1.Run the Program on the Computer
Download Android ToolKit – Android Backup & Restore tool on the computer and run it, then click on “Android Data Backup & Restore” option to go on.

backup restore mode

Step 2.Connect Huawei to Computer
Connect your Huawei Mate RS phone to the computer via a USB cable. If you are prompted to enable the USB debugging mode on the device,you can follow the instruction to try it.

Step 3.Allow the USB debugging on Huawei Phone
In this section you must allow the USB debugging on your phone for the process,then you should tap “OK” when it shows up on the device screen.

allow usb debugging

Step 4.Select Backup Mode
In this step you should select data you would like to either backup or restore when it is successfully connected. To do a selective backup click “Device Data Backup” option to go on.

choose data backup

Step 5.Choose File Types to Backup
Choose the file types to backup,such as Contacts, Messages,Photos,Videos, etc,. and click “Start“.

Choose Backup Files

Step 6.Select the Folder for the Output Files
Select a location to store your backed up data and click “OK” to continue.

Choose Output Location

Step 7.Begin to Backup Huawei Data to Computer
In the last step,just simply click “Start” button to backup the selected data from Huawei to computer.

backup Huawei Mate RS to Computer

d_win d_mac

Part B. Restore Backed up to Huawei or Other Device

This Android Toolkit – Android Backup & Restore allows to restore the backup to your Huawei phone or other devices if needing. The easy steps are almost as same as the backup process except the step 4.Please locate to the step 4 and in this part you are required to click “Device Data Restore” selection.

choose backed up data

d_win d_mac

Related Guides:

How to Recover Deleted Data from Huawei Mate RS

How to Transfer Android Data to Huawei Mate RS

How to Transfer iPhone Data to Huawei Mate RS

How to iTunes Music/Videos Media Files to Huawei Mate RS

How to Manage Huawei Android on Computer

How to Stream Apple Music to Huawei Mate RS

How to Transfer Huawei Data to Huawei Mate RS

The Porsche Design Mate RS simply looks and feels incredible. As with the P20 Pro, the front and back are made of glass, and a metal frame holds the chassis together. The Mate RS features IP67 certification against dust and water. The OLED display itself is already spectacular with its rounded edges and a resolution of 2880 x 1440 pixels at 6.0 inches. But Huawei has also integrated a fingerprint sensor into the display – just as we have already seen from Vivo. In addition, there is even a second sensor on the back of the housing.

Have had your old Huawei device for years, and it’s time for an upgrade? When you switch to a new phone, for example, Huawei Mate RS, you have to give up your old device. If your old phone stored a large of personal data you need, you have to move the data to your new device. In normal, you can transfer data from the old phone to PC via a USB cable, then copy the data from PC to the new phone. But what you need to know is that this way doesn’t transfer text messages, whatapp, contacts, etc,. What you need just a one-click transfer tool named Phone Switch.

Import Huawei Data to Huawei Mate RS

Compared to hundred phone transfer apps, another professional tool is highly recommended – Phone Switch. It is a one-click solution which can help you transfer data from Huawei to Huawei Mate RS, including contacts, text messages, call logs, calendar, photos, videos, music and apps between two devices among Android devices, iOS device and Symbian device, such as, Huawei, Samsung, HTC, LG, Xiaomi, Sony, Motorola, ZTE, Google, etc,. What’s more, Phone Switch features with data backup & restore, remove data from device completely.

d_win d_mac

How to Import Huawei Data to Huawei Mate RS

Step 1. Connect Devices and Run Program
Connect both of two Huawei phones to computer using USB cable, and run Phone Transfer. In the homepage of program, click “Phone to Phone Transfer“.

phone transfer home page

Step 2. Select Files to Transfer
You will see both your two Huawei phone are list as the source device and target device, it also list files available to transfer. Select files to transfer from Huawei to Huawei Mate RS, including contacts, SMS, photos, videos, music,call logs, calendar, apps.

select files to transfer

You can change source and target phone by clicking “Flip“.

Step 3. Start Transfer
Click “Start Transfer” to begin transferring files from Huawei to Huawei Mate RS.

transfer huiwei data to huawei Mate RS

Note: Please do not disconnect two phones and computer while transferring. Click “OK” when the process finishes.

d_win d_mac

Related Guides:

How to Transfer Android Data to Huawei Mate RS

How to Transfer iPhone Data to Huawei Mate RS

How to Recover Deleted Data from Huawei Mate RS

How to iTunes Music/Videos Media Files to Huawei Mate RS

How to Backup and Restore Huawei Phone

How to Manage Huawei Android on Computer

How to Stream Apple Music to Huawei Mate RS

Fix iTunes Error 2/13/56/1002/3194/4037 and Other Unknown Errors

Summary: Some Windows users reports and complaint such issue related to iTunes error when installing/updating/running iTunes. From this topic we figure out the best way to solve iTunes Error 2/13/56/1002/3194/4037 and other unknown errors.

I have tried installing iTunes on my computer many times but I got this messages prompt me ‘Apple Application Support was not found. Apple Application Support is required to run iTunes. Please uninstall iTunes, then install iTunes again. Error 2.’ Any help to overcome this error 2 please?

I download the latest iTunes 12 on my Windows 7 computer, and then I try to install iTunes. But I receive the prompt messages of iTunes error 2. How to fix this problem?

The Causes of iTunes Error 2/13/56/1002/3194/4037
When you got the prompt messages on iTunes like the error 2/13/56/1002/3194/4037, it means that there are something wrong with iTunes. The iTunes error always happened when you want to update/install or running iTunes on a Windows/Mac, and many reasons could lead to errors. The iTunes installation could be failing due to multiple issues:

A. Interrupted download or partial installation of iTunes Library.
B. Virus attacked that corrupt Windows system files or iTunes-related software files.
C. An iTunes-related application corrupts or deletes Windows registry by mistake.
D. Other unknown reasons.

Fix iTunes Error 2/13/56/1002/3194/4037 and Other Unknown Errors

If you want to fix iTunes error 2/13/56/1002/3194/4037 and other unknown errors, you can try this famous iTunesFix. It is specially designed for fix more than 100 kinds of iTunes errors and issues without data loss, for instance, fix iTunes won’t install/update issue, fix iTunes couldn’t connect to iPhone issue, fix iTunes won’t back up/restore issue, etc,. It provides you a safe and effective way to repair iTunes to normal. Except fixing iTunes errors and issues, this tool features with Manage iTunes Library on Computer Safely, Clear iTunes to Free up, Boost your Computer, Uninstall iTunes Completely.

d_win d_mac

Fix iTunes Error 2/13/56/1002/3194/4037 and Other Unknown Errors

Step 1. Run Program on Computer
To get started, run iTunesFix program on computer, it will auto-detect your iTunes.

Step 2. Select the Fixing Mode
If there is no issue of iTunes and its components, you will be in the home interface of program. Choose one of the repair modes. Here “Repair iTunes Connect Issues”, “Fix iTunes Install/Update Issues”, “Repair Backup/Restore Errors”, “Fix Other iTunes Problems”; “Quick Clean”, “Deep Clean”, “Full Uninstall” are available.

itunesfix home page

To fix iTunes Error 2/13/56/1002/3194/4037 and other unknown errors, choose “Fix Other iTunes Problems”.

fix other itunes problems

Step 3. Fix iTunes Error and Return it to Normal
In the last step, click “Repair” to begin the repair job. Please keep the internet stable until the repairing process is completes.

repairing itunes

When the repair job is finish, click “Open iTunes” to launch your iTunes and try it again.

d_win d_mac

Tips to Fix iTunes Error 2/13/56/1002/3194/4037 and Other Unknown Errors

1.Update iTunes Version
For running iTunes correctly, you should make sure you get the latest iTunes version. Run iTunes to click “Help” > “Check for Updates”, and then it will show you if you are running the latest version of iTunes.

2.Reinstall iTunes
When you suffer from the failed installation or repair of iTunes, then you could try to remove the components left from a previous installation and reinstall iTunes.

3.Clean System Junk
Your computer may accumulate junk files over time. If the junk files are not cleaned up from your computer completely or occasionally, your iTunes will respond slowly or provide an error.

4.Restart your Computer
Like iPhone, restarting will be a good idea to deal with some problems. You can restart your computer to have a try to remove the error on iTunes.

5. Contact Apple support
After trying all solutions mentioned above, you could contact Apple support team to help you fix the issue.

Related Articles:

How to Recover Deleted/Lost Data on iPhone X/8/7/6S/6

How to Repair iTunes Unknown Errors

How to Fix “iTunes Could Not Backup/Restore” Issue

How to Fix iTunes Cannot Connect to iPhone Error

How to Fix iTunes Won’t Install/Update Issues

Fix iTunes 9/4005/4013/4014 Error when Restore iPhone

How to Play Apple Music on HomePod

Apple Music is pretty much the whole reason the HomePod exists. If you’re buying Apple’s HomePod, you likely have a vested interest in Apple Music. After all, it’s basically what HomePod was made for, and being able to play all of that goodness right on a compact speaker that fills your room with awesomeness is not a bad primary, baked-in feature to have. However, the question is how to play Apple Music on HomePod?

As we know, we can’t play Apple Music on HomePod directly, since Apple Music is DRM protected, it just allow to play Apple Music online under the subscription. HomePod is a powerful speaker that sounds amazing and adapts to wherever it’s playing. It’s the ultimate music authority, bringing together Apple Music and Siri to learn your taste in music. If you want to play Apple Music on a HomePod, you should convert Apple Music to common MP3 local music files, save it on Mac, or transfer it to an iPhone, then play the music on HomePod after connecting device to it via Wi-Fi or AirPlay. To do this, you should remove DRM protected from Apple Music first.

Remove DRM Protected from Apple Music for Playing on HomePod

Apple Music Converter is specially designed to remove the DRM encryption from Apple Music and convert Apple Music songs to MP3 or other formats(M4A, AC3, AIFF, AU, FLAC, M4R, MKA. ). Then help you play the converted Apple Music songs on HomePod after connecting device to it via Wi-Fi or AirPlay. It can preserve the original quality in output files after conversion. Also, it can offer up to 16x speed for you, the process is efficiently. In addition, you can offline play back the converted local Apple Music files on any compatible media players, for example, iPhone/iPod, Android device, PSP/PS4, MP3 player, Xbox one.

d_win d_mac

How to Play Apple Music on HomePod

Step 1. Import M4P Apple Music Music

apple music converter home page

Before you get started, please make sure you have add the Apple Music on iTunes first. After running Apple Music Converter on the computer, iTunes will run automatically. You can click the “Add Files” button from the bottom left of the software to browse and import the files from iTunes media library.

Step 2. Setting Output Format as MP3

setting MP3 as output format

For converting Apple Music to local files for playing on HonePod, you should select the output format as “MP3“. Besides, you can also setting the conversion speed and other parameter of the converted music files.

Step 3. Start Apple Music Conversion

convert apple music to mp3

When all settings are ready, just simply click the “Start Convert” button to start the Apple Music conversion. All the selected files will be converted to MP3 files after converting.

d_win d_mac

Step 4. Connect Device to HomePod and Play Music
Once the conversion is completes, you can save the output music files on computer, or transfer the files to iPhone, then offline playing the music after connecting computer/iPhone with HomePod via Wi-Fi or AirPlay.

More Apple Music Guides you can Check:

How to Remove DRM Lock from Apple Music Streams

How to Convert Apple Music to MP3 Files

How to Play Apple Music on iPhone for Free

How to Play Apple Music on Android Device without limits

How to Save Apple Music Songs to SD Card

How to Set Apple Music as Ringtone for Any Phones

How to Sync Samsung Data to Huawei Mate RS

You might think that the Huawei P20 Pro is the nicest phone that Huawei announced, but you may change your mind after taking a look at the Porsche Design Huawei Mate RS. With its sleek looks, forward-thinking features, and massive price tag, the Porsche Design Huawei Mate RS is certain to turn a lot of heads. The Mate RS has three cameras, the exact same setup in fact. It has an under-glass fingerprint sensor, the option for 512GB of storage (the first of its kind), and wireless charging – three features that the P20 Pro doesn’t have. In fact, the Mate RS is essentially a P20 Pro, but better.

As the most outstanding flagship phone of Huawei, Huawei Mate RS not only has a very attractive appearance, but also has a very strong performance. That is the one of the main reason that why so many old Samsung users choose the Huawei Mate RS. Many people are troubling with how o sync data to Huawei phone from the previous device. So, are you also one of the people switch to new Huawei from Samsung? If you are, you need a reliable tool to finish the transfer job. To move your phone data from Samsung to Huawei, you just need the Phone Transfer.

With the help of Phone Transfer, you can move files between any of Samsung phone and Huawei Mate RS phone with one click. This phone transfer tool can help you move several kinds of contents such as contacts, photos, text messages, videos, call logs, music, calendar, apps between two mobile device among Android device, iOS device and Symbian device. Moreover this tool empowers to backup device on computer safely, restore data to device from local backed up or cloud backed up. Compatible with almost models, including Huawei(Mate RS, Mate 10/9, P10/P9); Samsung(Galaxy S9/S8/S7/S6, Note 9/8/5), Google Pixel, HTC, Lenovo, Sony, OPPO, OnePlus, ZTE, Xiaomi; and iPhone or Nokia phone.

d_win d_mac

How to Sync Samsung Files to Huawei Mate RS

Step 1. Run Program and Select Transfer Mode
Install and launch the Phone Transfer on your computer. Select “Phone to Phone Transfer” function.

phone transfer home page

Step 2. Connect Samsung and Huawei Device
Now, connect the two devices both of your Samsung phone and your Huawei Mate RS to the computer. The devices will be automatically detected within seconds. If not detected, re-connect the devices and give it a minute to be detected.

select files to transfer

Step 3. Select Files and Start Transfer
As soon as both the devices are detected, the program will list all files that which you can select you would like to transfer from from Samsung to Huawei Mate RS. Once you have made the selection, simply click on “Start Transfer“. Do not disconnect any device until the process has been completed.

import Samsung data to Huawei Mate RS

Tips: You will find a “Flip” button on the program above the checklist of file types. You can use this option to flip the positions of the devices. If you want to change position of the source device (the device from where the content is being transferred) and the destination device (the device to which the content is being transferred). In this case, Samsung should be on the left as the source device, Huawei should be on the right as the destination device.

d_win d_mac

Related Guides:

How to Transfer Android Data to Huawei Mate RS

How to Transfer iPhone Data to Huawei Mate RS

How to Recover Deleted Data from Huawei Mate RS

How to iTunes Music/Videos Media Files to Huawei Mate RS

How to Backup and Restore Huawei Phone

How to Manage Huawei Android on Computer

How to Stream Apple Music to Huawei Mate RS