All posts by DHZ

How to Recover Lost Data from Motorola G5(Plus)

I accidentally deleted some photos from my Moto G5 phone. Is there any solution to restore it as simple as possible? These media were just so important to me. They are very precious for me, please help me, send me your ideas. Sincerely.

Motorola Moto G5 smartphone was launched in February 2017. The phone comes with a 5.00-inch touchscreen display with a resolution of 1080 pixels by 1920 pixels at a PPI of 441 pixels per inch. The Motorola Moto G5 is powered by 1.4GHz octa-core processor and it comes with 3GB of RAM. The phone packs 16GB of internal storage that can be expanded up to 128GB via a microSD card. As far as the cameras are concerned, the Motorola Moto G5 packs a 13-megapixel primary camera on the rear and a 5-megapixel front shooter for selfies.

There are many Motorola smartphone users complain that they have no ideas to recover lost data from the phone. Here are some main causes lead to data loss on Motorola phone: accidental deletion, Android OS update, Android OS Room, Android OS crash, factory reset restoring, etc,. In fact, no matter you use Motorola phone or other Android models, it is great possibility to lost data on Android. How to recover lost data from Motorola G5? Get a Motorola phone data recovery program before you do anything else. Here is the recommended tool help to perform the data recovery.

Get Back Lost Data on Motorola G5(Plus)

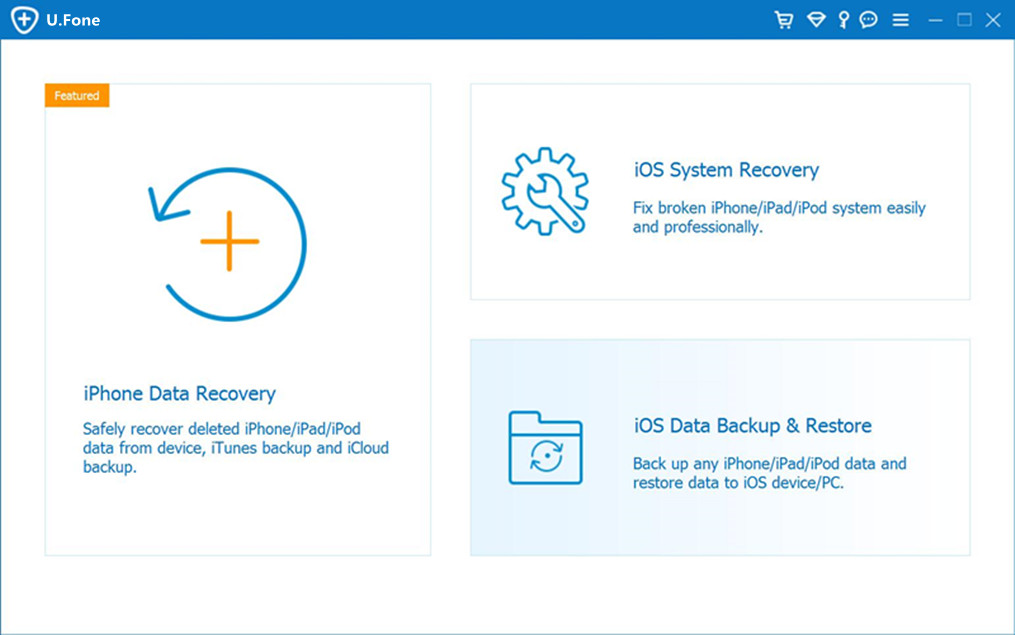
U.Fone Android Data Recovery is a reliable phone data recovery software, it is an outstanding tool will do you a favor to recover lost data from Motorola G5(Plus). The recoverable types of Android data for instance, photos, videos, contacts, SMS, WhatsApp, call logs, apps, etc,. This program empowers to restore lost data after losing it due to any situations, like accidental deletion, Android OS update, Android OS Room, Android OS crash, factory reset restoring, etc,. All in all, it is a powerful all-in-one tool for Android, features with Android data backup & restore, broken Android data extraction. Compatible with all Motorola phones and most of Android models, such as, Z/Z2, G5/G6, E4 and so on.

d_win d_mac

How to Restore Lost Files from Motorola G5(Plus)

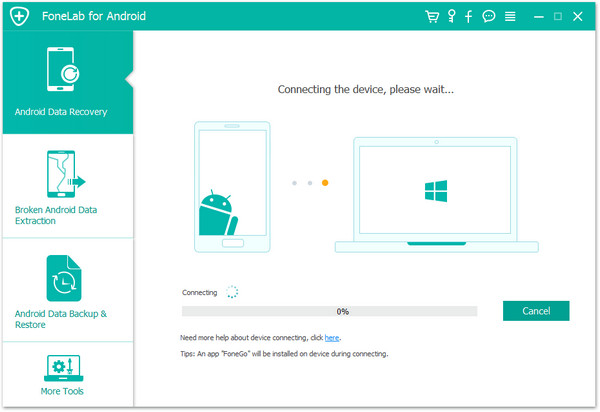
Step 1.Run Program and Connect Motorola to the Computer
To start with, please install U.Fone Android Data Recovery on the computer, run it and connect Motorola phone to the computer. It will take seconds to detect your device automatically by program.

connect Motorola to the computer

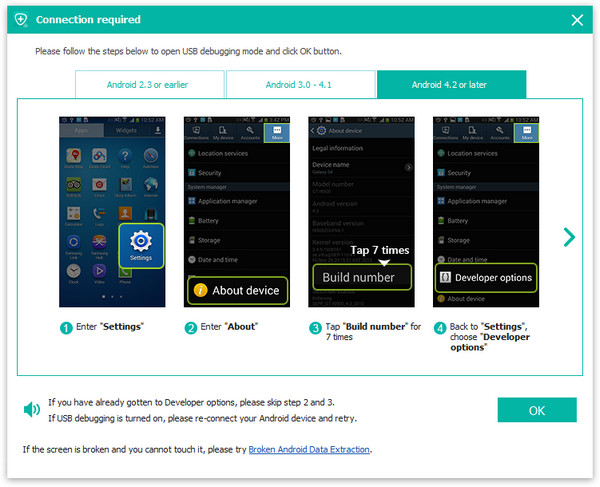
Step 2.Enable USB Debugging on Motorola
Unlock your phone, go to Settings > Developer options > Allow USB debugging mode. If you have already allowed the USB debugging mode, you will see a pop-up window on the screen, mark “Always” from this computer and click “OK“.

usb debugging Motorola phone

Step 3.Select File to Recover from Motorola
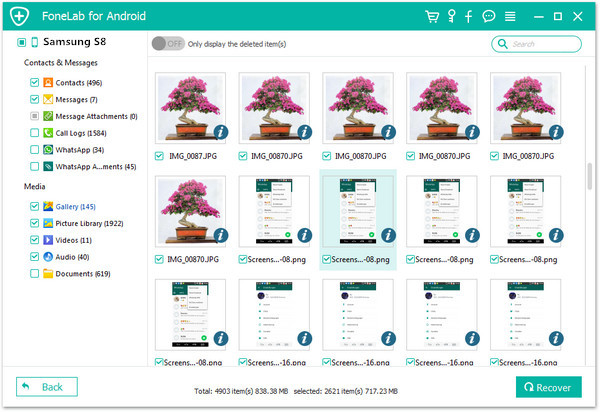
In this step, different types of files can be chose to be scan here, such as, gallery, contacts, messages. Select the desire files contain the data you want to restore and click “Next“.

select file to recover from Motorola

Step 4.Allow to Scan and Analyze Data on Motorola
You’ll get a window as follow on your device after your device is detected by the program. Tap “Allow” to enable the program to scan your phone for deleted data.

allow to scan Motorola

Tips:Please make sure that your phone battery is more than 20% charged.

Step 5.Scan Deleted Data of Motorola
Now the program will begin to scan data from your Motorola phone.

scan Motorola for lost data

Step 6.Preview and Recover Lost Data from Motorola
When the scanning process is end, a list of recoverable files that including the lost data have been found from your phone will be shown. It will be a preview window of files where you can preview(contacts, SMS and gallery,etc,)from device. Mark the data under the files name, restore the selected data on your computer by clicking “Recover“.

recover lost data from Motorola

d_win d_mac

Related Articles:

How to Recover Deleted Photos from Motorola Phone

How to Recover Data from Water Damaged Motorola

How to Backup and Restore Motorola Phone

How to Root Android on Computer with One Click

How to Manage Android on the Computer

Recover Lost Data on Motorola G5(Plus)

Android Data Recovery

Recover Your Lost Data from Android
Now, Even Device Broken

Compatible with Android 8.0 Oreo/7.0, etc.

Recover Lost Data Now

How to Recover Deleted Photos on Xiaomi Mi8

Xiaomi Mi8 Reviewed on: 15 July 2018. Astonishing value, insane performance, awesome photography, a larger than ever 18.7:9 AMOLED display and a cool new 3D Face recognition feature are all reasons why you should rush out and buy the Mi 8. The highly anticipated in-display fingerprint is unique to the Explorer Edition. Amazing phone, highly recommended.

A rapidly growth in varying industries with respect to telecommunication has been birthed, especially the mobile phone companies. Undoubtedly, there are thousands of smart phones currently in the market making every possible to beat competitors. Talking about smart phone, Xiaomi is not left out. Although relatively being a young company, it has made its way among the top smart phone companies in the world. Xiaomi has a reputation for developing devices that are of good value and sound quality on a regular basis. Xiaomi phone become more and more popular around the world.

It is quite excited that you are using this model at its fullest and you must have many personal data stored on your Xiaomi smartphone. But with the recent issues with software updates and virus attacks, people are complaining of experiencing data loss without their knowledge. Moreover, data loss may occur due to factory reset or even you or your deletion carelessly. It doesn’t matter what caused the data loss on Xiaomi phone but if these data and files are important and precious to you like meaningful photos; then it is urgent to restore it whatever using the way. Taking your smartphone to service center is not an option since they don’t help with data recovery at all.

Recover Deleted Photos from Xiaomi Mi8

U.Fone Android Data Recovery is a software designed to restore all of your deleted Android data insist of photos, videos, contacts, SMS, WhatsApp, call logs, apps, etc,. With using this program, you could easily recover deleted photos from Xiaomi Mi8 without hassle. It is a very effective tool which supports all Android phones and tablets. Xiaomi devices like Mi Mix, Mi Note 2, Mi 5s (Plus), Mi Max, Redmi Pro, Redmi 3S, Redmi Note 4X, Redmi Note 3, are all compatible. It is capable of recover Android data lost due to accidental deletion, Android OS update, Android OS room, factory reset restoring, etc,. More importantly, this all-in-one program features with Android data backup & restore, broken Android data extraction.

d_win d_mac

How to Perform Xiaomi Mi8 Gallery Recovery

Step 1.Run U.Fone Android Data Recovery
First of all, please run U.Fone Android Data Recovery on the PC/Mac computer.

Step 2.Connect Xiaomi Phone to the Computer
Connect your Xiaomi phone to the computer with a USB cable. It will take seconds to detect your phone.

connect Xiaomi to the computer

Step 3.Enable USB Debugging on Xiaomi
Allow USB debugging mode on your device. Unlock your phone, go to Settings > Developer options > Allow USB debugging mode. If you have already allowed the USB debugging mode on your phone, you will see a pop-up window on the screen, mark “Always” allow from this computer and click “OK“.

enable USB debugging on Xiaomi

Step 4.Select Files to Recover from Xiaomi
After connecting successfully,all types of files will be displayed in the interface of program. Click the “Gallery” file and then tab “Next“. It will take several minutes to analyze the deleted and existent data from your phone.

select gallery file to recover from Xiaomi

Step 5.Recover Deleted Photos from Xiaomi
After scanning, this program enables you to preview the detailed data of selected files. You are allowed to preview the data in the scan out list. Choose the data you want to recover under “Gallery” file, and then click “Recover” to save the restored data on the computer.

recover deleted photos from Xiaomi

d_win d_mac

Related Articles:

How to Recover Deleted Files from Xiaomi Phone

How to Recover Deleted Files from Xiaomi Mi 8

How to Recover Deleted Contacts on Android Phone

How to Backup and Restore Android Safely

How to Manage Android on the Computer

Restore Deleted Gallery from Xiaomi Mi8

Android Data Recovery

Recover Your Lost Data from Android
Now, Even Device Broken

Compatible with Android 8.0 Oreo/7.0, etc.

Recover Lost Data Now

How to Set Spotify Music as Phone Ringtone

I have love a Spotify Music track very much, is there any way to set it as my phone ringtone? I try to do this but failed. How to fix it with an easy method?

Spotify Music is one of the amazing steaming music for most of music lovers, allows you access to countless popular tracks and songs. It is quite easy to get some tracks suit your taste and stream them. It is generally known that all of Spotify track are copyright-protected, even the paid users can’t stream Spotify Music freely as they want, like play the music on MP3 player or burn it to a CD, they can’t access to offline music once canceled subscription.

It is so cool to set our favorite songs as phone ringtone. And we have many music sources for listening or phone ringtone, but we can’t directly set Spotify Music as phone ringtone as the common music files. In this post we mainly talk about how to create Spotify music as any phone ringtone. It does not matter you have an iPhone or an Android, you can take the designated Spotify Music as phone ringtone for reference.

Why We Can’t Set Spotify Music as Phone Ringtone Directly
Since Spotify Music is DRM-protected, we can’t set the music as phone ringtone like common music files. DRM, abbreviated to Digital Right Management Protection, is a kind of technological protection measure added on digital content, with the aim of restricting the free editing or copying on them. Besides, it is difficult for iPhone users to make a DIY ringtone with the reason that you need to take the complex operation to make the compatible file for your iPhone. And as for Android Users, things seem not so bad that they just need to make Spotify Music to the Android-playable file format.

Remove DRM Restriction from Spotify Music for Setting Phone Ringtone

To make ringtone from Spotify Music, the key is to get a DRM removal tool to remove DRM from Spotify Music and to convert Spotify Music to common music file formats. UkeySoft Spotify Music Converter is an excellent choice since it is professional and easy-to-use. It could be used to remove DRM protection from Spotify songs, at the meantime convert Spotify songs, playlists to MP3, M4A, FLAC or WAV formats. Then you can make the converted songs as phone ringtone without limits or enjoy Spotify Music offline without Ads interruption. Moreover, the output files will be save with its original audio quality at 16X conversion speed.

d_win d_mac

Part 1: How to Remove DRM from Spotify Music

Step 1. Run Spotify Music Converter and Add Spotify Songs
Download and run Spotify Music Converter on the computer and the Spotify app will be opened automatically as well. Click the “Add Files” button, drag any song or playlist you want to make as ringtone from Spotify into the Converter. Or you can copy and paste the track link directly. When finished, click the “Add” icon.

Spotify Music Converter home page

add Spotify Music

Step 2. Setting the Parameter of Output Files
Click the “Options” button on the top-left of the converter and a new interface will pop up. Then click “General” and choose your specified output folder. Go to “Advanced” section, you can select output format (MP3, M4A, WAV, FLAC), and amend the output quality, including sample rate and bitrate. (For setting music as phone ringtone, here we suggest you choose “MP3” as output format.)

change output settings

Step 3. Start Conversion
Once you have finished the output settings adjustment, click on the “Convert” icon and Spotify Music Converter will start converting Spotify tracks that you want to make as the ringtone to MP3 that you have selected, by removing DRM protection from the music with fast speed.

convert Spotify Music to MP3

Done. Now you have got all converted Spotify Music with DRM-free format, just setting it as phone ringtone like the common music file without limits.

d_win d_mac

Part 2: How to Set Music as Phone Ringtone

A.Set Music as iPhone Ringtone

#Set Music as Ringtone for iPhone with iTunes

Step 1. Launch iTunes and then click “Add File to Library” to add the created files to your iTunes.

Step 2. Connect your iPhone to iTunes, you will see the device icon on the top of iTunes.

Step 3. You can open the iPhone from iTunes and then select the tones and click “Sync” to transfer them from computer to the iPhone.

Step 4. Go to “Settings”> “Sounds”/”Sounds & Haptics” > “Ringtone”, you can choose the one you like easily.

sync ringtones to iphone

#Set Music as Ringtone for iPhone with iOS ToolKit – iOS Transfer

iOS ToolKitiOS Transfer is an all-in-one data manager tool for iOS device, help to transfer & manage files for iPhone/iPad/iPod on the computer. What’s more, it is also a phone ringtone maker, it allows users to create customized ringtone, setting music as the new ringtone on iPhone.

ringtone maker on iphone

B.Set Music as Android Ringtone

Step 1. Connect Android phone via a USB cable, you will find the device icon on your computer explorer.

Step 2. Copy & paste the music files from computer to the phone internal storage.

Step 3. Click “Settings” > “Sound and notifications” > “Ringtones”, it will prompt you the option to set a song from your Android phone.

Finished. Now you have learn how to set Spotify Music as phone ringtone easily. Just try to make your customized ringtone as you like.

More Spotify Music Conversion Guides:

How to Make Spotify Music as Android Phone Ringtone

How to Set Spotify Music as iPhone Ringtone

How to Download Spotify Music on the PC without Premium

How to Stream Spotify Music for Free without Ads

How to Remove DRM from Spotify Music Completely

How to Get Spotify Music at 320kbps High Quality

Set Spotify Music as Phone Ringtone

How to Download Spotify Music to MP3 for Offline Playing

Is it possible to download and convert Spotify music to MP3 for offline playing without any limits? I want to own the Spotify Music without ads forever even though after canceling the Premium subscription. How?

Spotify is the biggest music-streaming service in the world right now, with 140 million active users. You don’t need to subscribe to Premium to listen to Spotify streaming music, but only paying subscribers can download songs, albums or playlists for offline listening. Spotify free subscribers can only listen to the songs whenever there is Internet connection. Many Spotify users have the same question that how to download Spotify Music to MP3 for offline playing. They want to download Spotify music for streaming on their storage devices without subscription, or they just want to burn the Spotify music into CDs for better enjoying. However, Spotify adds digital rights management (DRM) to protect that. It means that you can’t download Spotify Music for free users, you can’t listen to Spotify Music without ads after canceling the Premium subscription.

Let’s Check the Requirements of Offline Playing Spotify Music:
Since Spotify Music is DRM restriction, there are many requirements when listen to Spotify music for offline playing:
-Only Spotify Premium subscribers can download Spotify music for offline enjoying, which means you need spend money to subscribe to Spotify Premium service.
-Only Spotify Premium subscribers can save playlists for offline use on up to three devices. If you attempt to use offline mode on more than three devices at the same time, the oldest registered device will not work offline.
-Need to be online with Spotify Music at least once every 30 days to keep your devices on offline mode.

It is possible to Convert Spotify Music to MP3 for Offline Playing?
Some Spotify free users want to download Spotify songs or playlists for offline listening, just list the local files. Some free users want to play Spotify Music without ads. Some users want to play the Spotify Music on all of their devices without being associated with Spotify accounts. Since Spotify Music is DRM-protected, to play Spotify Music without these limitations, you need to find a Spotify Music Converter to help you download and convert Spotify music to MP3 for offline use conveniently.

Download Spotify Music to MP3 for Offline Listening

In this case, you need the help of Spotify Music Converter. It is a superior music converter tool for downloading Spotify Music to MP3 by removing DRM from it with an industry-leading recording technology. The conversion with be done at 16X speed. This program can convert Spotify Music to DRM-free files with 100% lossless quality, including MP3, M4A, WAV and FLAC. After that, you can save Spotify Music as local files, listen to Soptify Music for offline playing, you can play Spotify Music without ads forever even though after canceling the Premium subscription. You can even stream it to any storage devices for enjoying without limits.

d_win d_mac

How to Save Spotify Music to MP3 for Offline Playing

Step 1. Launch Spotify Music Converter
Download and install the compatible version of Spotify Music Converter by clicking on the above button. Then run it on the computer.

Spotify Music Converter home page

Step 2. Add Spotify Music Songs
By hitting on “Add Files“, you’re free to add songs, playlists or albums from Spotify by dragging the songs or paste the link. You can also paste the track links to the program conversion window to add the songs. Then get your music ready for converted.

add Spotify Music

Step 3. Change Output Settings
Go to “Options” > “Advanced“, you are able to select the output format like MP3, M4A, WAV, FLAC. In this case, you should select “MP3“. Besides, sample rate & bitrate can also be specified to improve the output quality. By clicking on “Options” > “General“, you’ll specify the output folder to save the converted songs.

change output settings

Step 4. Begin to Download Spotify Music to MP3
After completing all the settings, press on “Convert” to begin to download the selected Spotify Music to MP3, so that you can play them for offline listening on any device freely as you want.

convert Spotify Music to MP3

d_win d_mac

More Spotify Music Conversion Guides:

Keep Spotify Music be Playable after Canceling Subscription

How to Download Spotify Music Offline for Free

How to Download Spotify Music on the PC without Premium

How to Stream Spotify Music for Free without Ads

How to Remove DRM from Spotify Music Completely

How to Get Spotify Music at 320kbps High Quality

Download Spotify Music to MP3 for Offline Use

Remove Apple Music DRM for Offline Listening on Samsung Galaxy

Summery: If you need to offline listening Apple Music on Samsung Galaxy, you should save Apple Music as local files like the common music files. Here are the easy steps for you to play Apple Music on Samsung Galaxy without Apple Music app by removing DRM from Apple Music completely.

Apple Music is a service that grants its users unlimited access to the entire Apple catalog of music. Its members are privileged to get new songs directly from artists and recommendations from the whole music world. With the first solution, you are required to keep the subscription of Apple Music in order to continuously download the songs for offline listening. Additionally, another limit of that method is you can only listen to the downloaded Apple Music tracks on authorized devices like iPhone, iPad, Android, etc.

In other words, you can’t enjoy those songs on unauthorized devices like iPod, Windows Phone, or other common MP3 players even they are already downloaded. Why? That’s because of FairPlay, a DRM technology used by Apple to protect the copyright of digital contents sold in its online store. In result, the songs in Apple Music can only be streamed to devices authorized with Apple ID. If you have subscribed Apple Music, you may want to listen to the songs and playlists for offline playing. How to listen to Apple music for offline listening on any unauthorized device? For example, Samsung Galaxy. To fix this, you should remove DRM from Apple Music completely.

Remove DRM from Apple Music for Offline Listening on Samsung Galaxy

If you are looking for a way to make Apple Music available offline playing on any device, you are recommended to use Apple Music Converter, a smart and easy-to-use DRM removal tool for Apple Music that can help you legally remove DRM from Apple Music while converting Apple Music to popular formats such as MP3, M4A, AC3, AIFF, AU, FLAC and more with its original quality kept. After this, you can save the music as common music files, you can play Apple Music for offline listening on Samsung Galaxy for streaming. What’s more, you can transfer the converted music to SD card/USB drive; transfer it to any storage device for playing without subscription(Android device, iOS device, PSP, Xbox one, etc,); or even set it as phone ringtone. The conversion will be done at 16X speed.

d_win d_mac

Remove DRM from Apple Music for Offline Playing on Samsung Galaxy

Step 1. Import Apple Music Tracks
After launching Apple Music Converter program, iTunes will be also automatically launched and disappear quickly. It will pop up a window, which will show you all of songs you have downloaded from iTunes. You can choose any song you want to convert, just adding it to the conversion list.

Add Apple Music

Step 2. Choose Output Parameters
Then click the “Options” button on the upper left of program interface, a new window would pop up. Here you can choose MP3, M4A, AC3, AIFF, AU, FLAC and more as output format, set the conversion speed and adjust the output quality up to 320 Kbps. In addition, the output folder is also changeable if required.

select mp3 output format

Step 3. Start Conversion
Once everything is ready, you can click “Convert” button to start converting. When the conversion is finished, you can find the converted DRM-free audio files under target folder.

remove DRM from Apple Music

d_win d_mac

Step 4. Move Apple Music from Computer to Samsung Galaxy
Once got the DRM-free music files, you can easily transfer all the Apple Music to Samsung Galaxy via USB cable or using Android Transfer(An all-in-one Android data manager tool) and offline listening them on your Samsung phone without limits.

transfer Apple Music to Google Pixel

More Tutorials about Samsung Galaxy:

How to Play Apple Music on Samsung Galaxy without Limits

How to Stream Apple Music on Galaxy S9/S8/S7/S6

How to Transfer iTunes Music to Samsung Galaxy

How to Sync iTunes Audiobooks to Android

How to Manage Samsung Galaxy on the Computer

Offline Listening Apple Music on Samsung Galaxy

How to Selectively Restore iPhone Data from iCloud Backup

Summery: Lost iPhone data and searching the ways to restore iCloud backup to iPhone? Check this post and get all the solutions to extract data from iCloud backup. Hope it will do a favor for you guys.

I deleted all my contacts on my iPhone 8 carelessly. Fortunately I had a backup in iCloud. But I was prompt to restore the whole iCloud backup file when I try to directly restore from iCloud. Is there any way to restore content from iCloud without wiping any data on my device?

Your iPhone contains a lot of valuable information that you don’t want to lose. But all the time, data loss can occur in our life. You can lose data on your iPhone through accidental deletion, virus attack, iOS update, iOS jailbreak or any other causes. If any of the unfortunate situation happens, you must need to restore deleted data on iPhone. If you already have an iCloud backup of your device, you should be commended to restore data with the iCloud backup on your device. The importance of backup cannot be overstated especially because of just how easy it is to lose some of the data on your device. This page is going to talk about some solutions to restore iCloud backup to iPhone, you can take the suitable one depend on your situation.

Part A: Restore iCloud Data by Restoring Your iPhone

Here are the steps to retrieve iCloud data by using restore and reset “Erase all content and settings”.

Step 1. Open the “Settings” on your iPhone.
Step 2. Click on “General” and then “Reset” and choose “Erase all Contents and settings”.
Step 3. Flow the instructions on the Set up screen and then choose “Restore from iCloud Backup”.
Step 4. Sign in with your Apple ID and then select the backup file to restore the data.

restore iphone from icloud  backup

Shortcoming: This solution will wipe all previous data on the device, and it can’t selective data to restore from iCloud backup instead of the whole file. If you want to restore iCloud data without losing any original data, please try the second solution.

Part B: Extract Data from iCloud Backup without iCloud

Is there a way to restore iCloud backup without losing previous iPhone data? The answer depends on who you ask. If you ask someone from local Apple store, the answer will be “No”. Selectively restore iCloud backup is out of the question if you use the official restoration process — it is all or nothing. If you ask us, the answer will be “Yes”. U.Fone iOS ToolkitiOS Data Recovery will be super helpful. This program basically take the iCloud backup file and choose the exact content that you want. Waste no more time and get to know of it.

U.Fone iOS ToolkitiOS Data Recovery enables you to preview your iCloud backup files before performing the recovery. You can selectively restore any data from iCloud to computer without iCloud, including contacts, messages, call logs, photos, videos, calendars, notes, WhatsApp, apps, etc,. What’s more, it dose not require “Reset” on your iOS device and would not erase any data on your phone. In addition, it can help to extract data from iTunes backup, recover data from iPhone without backup. Compatible with all iOS devices and all iOS system.

d_win d_mac

Highlights of iOS Data Recovery:
-Recover up to 16+ iOS data from iCloud backup.
-Preview and selectively recover what you want from iPhone, iTunes, or iCloud backup.
Recover iOS data without wiping any original data.
-Safely backup & restore iOS data on the computer.
-Fix any iOS system errors without data loss.

Extract Data from iCloud Backup without Wiping Original Data

U.Fone iOS Toolkit – iOS Data Recovery provides you with three recovery modes,  to manage your iOS data on the computer safely. In the homepage of program, you can see these three options are available: iPhone Data Recovery; iOS System Recovery; iOS Data Backup & Restore.

ios data recovery home page
Step 1. Run Program and Select Recovery Mode
Download and run iOS Data Recovery on the computer. For iOS data recovery, you should select the biggest one “iPhone Data Recovery” in the home page of the program. Then select “Recover from iCloud Backup File” recovery mode.

Step 2. Log into your iCloud Account
Log in your iCloud account by entering the iCloud ID.

log in icloud

Step 3. Download and Extract the iCloud Backup File
Once you’ve logged in, a list of backup files will be under your iCloud account. Select the iCloud backup file that you want to extract from. Then click on the “Download” button to go on.

choose icloud backup

When it’s complete, click the “Scan Downloaded” button to extract data from the selected iCloud backup file.

Step 4. Preview and Recover Data from iCloud Backup File
Once the scan process is finished, you can preview data in the scan out list, and recover any selected data to the computer by clicking “Recover” button.

recover data from icloud

d_win d_mac

Related Articles:

How to Recover Deleted or Lost Data from iPhone/iPad/iPod

How to Recover iPhone Data from iCloud Backup

How to Recover Data/Files/Information from an iCloud Backup

How to Recover iPhone Data from iTunes Backup

How to Restore iPhone Data from iTunes/iCloud Backup

How to Recover Deleted Data from iPhone Directly without Backup

How to Back Up and Restore Your iPhone Safely

How to Extract Data from iCloud Backup

How to Recover iPhone Data from iTunes Backup

Summery: How to freely extract data from iTunes backup after losing iPhone data? Here are some tips on how to recover iPhone data from iTunes backup with iOS Data Recovery, which could restore deleted contacts, SMS, photos, videos, call history, WhatsApp and more iOS data from iTunes backup selectively.

I want to only recover my lost data from my iTunes backup instead of the whole iTunes backup files. Syncing iTunes to do the restore will overwrite all my iOS data. How to recover iPhone data from iTunes backup files selectively without overwriting my previous data?

It is a good habit for everyone to have regular backup for an iPhone, iPad and iPod. Some people like to backup device with iTunes syncing, some of them like to backup device with iCloud syncing, others like to backup via third-party tools. In this case, you can extract the iPhone data from backup after your device is lost/damaged or just losing data under different data loss situations. However, recover iPhone data from iTunes directly will sync all backup files to your device by overwriting the previous data. What’s more, you can’t recover any data from the iTunes backup file selectively instead of the whole file. Which is no convenient enough. In this page, we will show you a complete guide to recover iPhone files from iTunes backup without iTunes.

Part 1: How to Restore iPhone Data with iTunes Backup

Step 1. Launch iTunes and connect your iPhone to the computer.
Step 2. In iTunes, click on your device, which appears in the upper-left corner.
Step 3. Select “Restore Backup…” under Backups section on the right panel.

restore itunes backup

Your iPhone will show “Restore in Progress” on the screen, and iTunes will show a progress bar of the restore process. Be patient to wait for the progress bar to finish, and for the restart to complete before you try to use or disconnect the device. After it finished, all of your lost data would be recovered on your iPhone.

Cons: This solution not support to restore iPhone data of selected data from the iTunes backup file instead of the whole file, and the restored data will overwrite your previous data on iPhone. Besides, iTunes doesn’t support to preview backups before the recovery. To restore iPhone data from iTunes backup perfectly, you should turn to the second solution in the follow section we are going to talk about.

Part 2: Restore iPhone Data from iTunes Backup without iTunes

With a variety of iOS backup data extracting features, many iPhone backup extractor tools allow you to restore your lost information. Indeed, it is not an easy job to find the iTunes backup location for most users because iTunes won’t tell you where the backup will be stored when you create backup manually. So you are not able to extract any iPhone data from iTunes backup on the computer without the help of some professional tools. However, there actually are some kind of iPhone backup viewer or iPhone backup extractor which has a powerful function to preview and extract selective data from iTunes backup. For example, U.Fone iOS ToolkitiOS Data Recovery is one of the iTunes backup extractor you’re looking for.

iOS Data Recovery could be the best iPhone backup extractor if you’re facing a severe iOS data deletion or corruption disaster. It’s fully capable of extracting iPhone data from iTunes backup without iTunes, up to 16+ different types of iOS files. Selectively preview and choose data types you want, and import them directly to iPhone or to the computer. In addition, it is more than one iPhone backup extractor, it can also export iPhone data from iCloud backup and recover deleted data from iPhone directly.

d_win d_mac

U.Fone iOS Toolkit – iOS Data Recovery Main Features:
– Focus on recovering up to more than 16+ different types of iOS files, such as contacts, messages, photos, videos, call history, WhatsApp and apps, etc,.
– Recover your important files with three safe ways: recover from iTunes backup; recover from iCloud backup; recover from iOS device directly.
Preview the files in thumbnail before recovery so that you can selectively extract data.
– Recover iOS data after losing data for any data loss causes.
Recover backup files without overwriting the previous data on device.
-Backup & restore iOS data safely.
-Fix iOS system to normal without data loss.

Restore iPhone Data via iTunes Backup without iTunes

U.Fone iOS Toolkit – iOS Data Recovery offers three recovery modes for you to manage your iOS data on the computer safely. In the homepage of program, you can see these three options are available: iPhone Data Recovery; iOS System Recovery; iOS Data Backup & Restore.

ios data recovery home page
Step 1. Run Program and Select Recovery Mode
Download and run iOS Data Recovery on the computer. For iOS data recovery, you should select the biggest one “iPhone Data Recovery” in the home page of the program. Then select “Recover from iTunes Backup File” recovery mode.

Note: Please don’t connect and sync your device with iTunes after you lost iPhone data, to prevent lost data from being overwritten.

Step 2. Scan Data from iTunes Backup File
Once you enter the iTunes recovery mode,  choose the right device backup file and click “Start Scan“.

scan itunes backup

Step 3. Preview and Extract Data from iTunes Backup File
After scanning, all the content in the iTunes backup has been displayed. All of them can be previewed and checked by program. After the preview, check those you want to extract and click “Recover” to save them on the computer.

restore iPhone data from iTunes backup

d_win d_mac

Related Articles:

How to Recover Deleted or Lost Data from iPhone/iPad/iPod

How to Recover Contacts Only from iTunes Backup File

How to Recover Photos Only from iTunes Backup File

How to Restore iPhone Data from iTunes/iCloud Backup

How to Recover iPhone Data from iCloud Backup

How to Recover Deleted Data from iPhone Directly without Backup

How to Back Up and Restore Your iPhone Safely

Extract iPhone Data from iTunes Backup

How to Fix iPhone White Screen of Death

Summery: If you are one of the them who are complaining about their iPhone get white screen of death, you should take this tutorial for reference. Let’s have a look at the best solution to fix iPhone stuck at white screen of death.

Many Apple users nowadays are complaining about their iPhone abruptly showing nothing but white screen. The white Screen of death is an operating system issue that makes the device stop working, and display a white screen instead. If you are a iPhone user, it is likely that you might have encountered the white screen of death at some moment. Of course, there are some other reasons can lead to a death screen of white on iPhone but not so obvious. For the hardware issue and drop-down to the hard surface issue, you have no choice but bring your iPhone to Apple Store for repair. However, how to deal with the software issue of iPhone get white screen of death? Regarding the issue of abnormal iOS system, you will be covered with solutions to fix iPhone white screen of death in this post.

Part 1: The Cause of iPhone Stuck White Screen of Death

The iPhone Stuck at white screen of death mainly due to 2 reasons: software problem and hardware problem.

A. Software Problem: Most of the time, users encounter the “iPhone white screen of death” issue due to software problems. These problems arise due to many reasons such as iOS system get error while updating the app or the latest version of iOS on your device.
B. Hardware Problem: And if it is not the software problem then definitely it is the hardware problem. A loose connection or a broken component can cause the white screen on your device turning it into a table lamp.

Part 2: Fix iPhone White Screen of Death by Entering DFU Mode

Get iPhone into the DFU Mode can get iPhone out of white screen. Even though the DFU Mode and the Recovery Mode is similar, they are completely different. Here are the steps to enter iPhone into the DFU Mode.

Step 1: Press Home and Power button at the same time for almost 10 seconds. Keep holding both the keys till the screen turns black. Release the Power button and keep holding the Home button for 10 more seconds. This will get your iPhone into the DFU Mode.

get iphone into dfu mode

Step 2: Now, hold Home and Power button together for 5 seconds. Release the Home button and continue to hold the Power button until the Apple logo comes into view removing your iPhone out of the DFU Mode.

get iphone out of dfu mode

Now you could check if your device has return to normal state.

Part 3: Fix iPhone White Screen of Death via iOS System Recovery

However, get iPhone into the DFU Mode or the Recovery Mode may lead to data loss of iPhone. If you want to fix iPhone white screen of death without losing data, you could try the better way – get iPhone out of white screen of death via iOS System Recovery.

iOS System Recovery is designed for fix iOS issues under any abnormal state, help to fix iPhone stuck at white screen of death without data loss. Besides, it supports to fix all iOS system to normal with only some minutes, including iPhone stuck in the Recovery Mode/DFU Mode, iPhone stuck at black screen of death, iPhone stuck at connect to iTunes screen, iPhone stuck in Apple logo, etc,. Only a few steps, you can make your device return to normal state without losing any data. All iOS models are compatible to iOS System Recovery, such as, iPhone X, iPhone 8, iPhone 6S/6, iPhone SE, iPhone 5S/5C/5; iPad Air, iPad Mini, iPad Pro.

d_win d_mac

Step 1.Run the iOS System Recovery on the Computer 
To start with, please download and run iOS System Recovery on the computer, you can get the windows as below.

ios system recovery home page

Step 2.Connect iPhone to the Computer and Select Mode
Select the option of “iOS System Recovery” from the primary window under “More tools“. Secondly, use the USB cable to connect your iPhone to the computer. After a few seconds, the iPhone will be detection by program and display it on its screen. Now, click on the button “Start“.

connect iPhone

Step 3. Select your iPhone Model and Latest Version of the iOS System
Now you should select the iPhone model and iOS system version which fit your device. Then click “Repair” to go on.

select iPhone model

Step 4.Download the Latest iOS Firmware for iPhone
In this step, iOS System Recovery tool will download the latest iOS firmware to restore you device, you will see that the program is offering you the latest version of the iOS to download, it will display the progress of the download process as shown in the picture below. Please keep the connection of your iPhone and the computer during the process.

download the firmware for iPhone

Step 5.Fixing iPhone White Screen of Death to Normal
Once iOS System Recovery software has finished downloading the latest firmware for your iPhone, it will continue to fix the abnormal iPhone within 10 minutes, the iOS fixing and keeping the status displaying as shown below.

fix iPhone white screen of death

Done. Now your device has return to normal state without data loss.

d_win d_mac

Part 4:How to Avoid iPhone Stuck White Screen of Death

Tip 1: Reducing your phone’s exposure to environmental stress is a surefire way of keeping it safe. Damp surroundings and dusty spaces are some physical risks that you should guard against as they can result in the “white screen” problem, among other handphone woes.

Tip 2: Overheating is another common problem will lead to some iOS system error. Be sure to give your phone a break every now and then by shutting it down.

Tip 3: Software issue are another common reason for the “white screen” problem, and they appear more frequently in iPhone running earlier iOS builds (i.e. below iOS 7). Therefore, one effective measure is to simply keep your iOS devices updated with the latest OS.

Related Articles:

How to Restore iPhone System to Normal

How to Fix iPhone Get Frozen/Bricked Screen

How to Fix iPhone Stuck on Apple Logo

How to Get iPhone Out of Recovery Mode without Data Loss

How to Use IPSW File to Restore iPhone without Data Loss

How to Fix iTunes Cannot Connect to iPhone Error

Fix iPhone White Screen of Death

iOS 12 IPSW Download Link for iPhone

[Summary]: This page provides iOS 12.0 beta 4/beta 3/beta 2/beta 1 IPSW direct download links for iPhone users to free download, and teach users how to install iOS 12 IPSW File on iPhone X/8/7/6S/6/se/5s with/without iTunes.

People also read:

* How to Downgrade iOS 12 to iOS 11.4 without Losing Data

* Fix a Locked/Disabled iPhone and Retrieve Data Back

ios 12 ipsw download links and install on iphone

Apple has just released a new beta version of iOS 12 – iOS 12 beta 4, which contains lots of new features and improve system stability. Apple users can download and install it right now by either downloading the IPSW file and installing it with iTunes or updating over the air on your iPhone/iPad/iPod device after installing the OTA profile below.

Before download iOS 12 IPSW and install it on your device, please check if your devices supports iOS 12:

iPhone: iPhone 5s, iPhone 6, iPhone 6 Plus, iPhone 6S, iPhone 6S Plus, iPhone SE, iPhone 7, iPhone 7 Plus, iPhone 8, iPhone 8 Plus, iPhone X

iPad: iPad Air, iPad Mini 2, iPad Mini 3, iPad Mini 4, iPad Air 2, iPad 9.7-inch (2017), iPad Pro 9.7-inch, iPad Pro 12.9-inch (1st generation)
iPad Pro 12.9-inch (2nd generation), iPad Pro 10.5-inch, iPad 9.7-inch (2018)

iPod touch: iPod touch 6

Before upgrading to iOS 12, you must to backup your iPhone to computer attempting to update, in order to avoiding data lossing during installing it with iTunes or updating over the air.
In additional, you can use this iOS System Recovery to install iOS 12 IPSW on iPhone without data lossing.
Here is the guide will teach you how to update iPhone to iOS 12 without data loss

In this page, we provides IPSW direct download links & over the Air Profile. Currently, you can download iOS 12.0 beta 4/beta 3/beta 2/beta 1 for free.

Part 1: Download iOS 12.0 beta 4 Firmware File for iPhone

iOS 12.0 beta 4 IPSW Direct Download Links for iPhone X

iOS 12.0 beta 4 IPSW Direct Download Links for iPhone 8

iOS 12.0 beta 4 IPSW Direct Download Links for iPhone 8 Plus

iOS 12.0 beta 4 IPSW Direct Download Links for iPhone 7

iOS 12.0 beta 4 IPSW Direct Download Links for iPhone 7 Plus

iOS 12.0 beta 4 IPSW Direct Download Links for iPhone 6s

iOS 12.0 beta 4 IPSW Direct Download Links for iPhone 6s Plus

iOS 12.0 beta 4 IPSW Direct Download Links for iPhone 6

iOS 12.0 beta 4 IPSW Direct Download Links for iPhone 6 Plus

iOS 12.0 beta 4 IPSW Direct Download Links for iPhone SE

iOS 12.0 beta 4 IPSW Direct Download Links for iPhone 5s

Part 2: Download iOS 12.0 beta 3 Firmware File for iPhone

iOS 12.0 beta 3 IPSW Direct Download Links for iPhone X

iOS 12.0 beta 3 IPSW Direct Download Links for iPhone 8

iOS 12.0 beta 3 IPSW Direct Download Links for iPhone 8 Plus

iOS 12.0 beta 3 IPSW Direct Download Links for iPhone 7

iOS 12.0 beta 3 IPSW Direct Download Links for iPhone 7 Plus

iOS 12.0 beta 3 IPSW Direct Download Links for iPhone 6s

iOS 12.0 beta 3 IPSW Direct Download Links for iPhone 6s Plus

iOS 12.0 beta 3 IPSW Direct Download Links for iPhone 6
iOS 12.0 beta 3 IPSW Direct Download Links for iPhone 6 Plus

iOS 12.0 beta 3 IPSW Direct Download Links for iPhone SE

iOS 12.0 beta 3 IPSW Direct Download Links for iPhone 5s

Part 3: Download iOS 12.0 beta 2 Firmware File for iPhone

iOS 12.0 beta 2 IPSW Direct Download Links for iPhone X

iOS 12.0 beta 2 IPSW Direct Download Links for iPhone 8
iOS 12.0 beta 2 IPSW Direct Download Links for iPhone 8 Plus

iOS 12.0 beta 2 IPSW Direct Download Links for iPhone 7

iOS 12.0 beta 2 IPSW Direct Download Links for iPhone 7 Plus

iOS 12.0 beta 2 IPSW Direct Download Links for iPhone 6s

iOS 12.0 beta 2 IPSW Direct Download Links for iPhone 6s Plus

iOS 12.0 beta 2 IPSW Direct Download Links for iPhone 6

iOS 12.0 beta 2 IPSW Direct Download Links for iPhone 6 Plus

iOS 12.0 beta 2 IPSW Direct Download Links for iPhone SE

iOS 12.0 beta 2 IPSW Direct Download Links for iPhone 5s

Part 4: Download iOS 12.0 beta 1 Firmware File for iPhone

iOS 12.0 beta 1 IPSW Direct Download Links for iPhone X

iOS 12.0 beta 1 IPSW Direct Download Links for iPhone 8

iOS 12.0 beta 1 IPSW Direct Download Links for iPhone 8 Plus

iOS 12.0 beta 1 IPSW Direct Download Links for iPhone 7

iOS 12.0 beta 1 IPSW Direct Download Links for iPhone 7 Plus

iOS 12.0 beta 1 IPSW Direct Download Links for iPhone 6s

iOS 12.0 beta 1 IPSW Direct Download Links for iPhone 6s Plus

iOS 12.0 beta 1 IPSW Direct Download Links for iPhone 6

iOS 12.0 beta 1 IPSW Direct Download Links for iPhone 6 Plus

iOS 12.0 beta 1 IPSW Direct Download Links for iPhone SE

iOS 12.0 beta 1 IPSW Direct Download Links for iPhone 5s

Two Free Ways to Install iOS 12 on iPhone, iPod touch or iPad without UDID Activation

Way 1: Download the iOS 12 IPSW File and Installing it with iTunes

Step 1. Download the latest iOS 12 beta IPSW from the links above.
Step 2. Plug your device into your computer and open iTunes
Step 3. Backup your data before attempting to update.
Step 4. Select your device from the lefthand menu of iTunes.
Step 5. Hold down Shift (Windows) or Alt/Option (Mac). While doing this, click the ‘Update’ button. You will then be prompted to select the IPSW file you wish to update to. Select the iOS 12 IPSW you downloaded before.
Your device will now begin to update to iOS 12.

Way 2: Download the iOS 12 IPSW File and Installing it over the air on your device

This methods teach you how to update to iOS 12 over the air on your device after installing the OTA profile, you need to download the below IPSW files on the device.

Step 1. Navigate to the iOS 12 beta download page linked below on your iPhone, iPod touch or iPad using Safari.
Step 2. Scroll down to ‘Over the Air Profile’ and select the iOS link. On the next page, click ‘Download’
Step 3. You will be prompted to install the ‘iOS Beta Software Profile’. Tap ‘Install’ three times to install the profile on your device, then reboot your device to make sure the profile takes effect.
Once your device has rebooted, open the Settings app and navigate to General>Software Update. In here you should see iOS 12 Beta.
Tap on ‘Download & Install’. iOS 12 beta will now begin to download and install on your iPhone, iPod touch or iPad.

If you never make your iPhone back, the iOS 12 installing process via iTunes will erase all data and settings, so you should backup everything from iPhone to computer at first.

How to Install IPSW File on iPhone with or without iTunes

Related Articles

How to Fix a Disabled iPhone without Data Loss

Extract and Backup Data from Locked/Disabled iPhone

Recover Lost Data on iPhone/iPad after iOS 12 Update

Recover Lost Photos on iPhone/iPad after iOS 12 Update

Fix iPhone Stuck in Recovery Mode afer iOS 12 Update

How to Fix iPhone Stuck on Black Screen after iOS 12 Update

How to Recover Deleted Data from Vivo X21

News about Vivo X21
The Vivo X21 is a flagship smartphone of the Chinese brand. The device has an excellent configuration which helps to deliver a quality performance while running multiple tasks simultaneously. The presence of the dual primary camera will help you to capture mesmerizing images. The Vivo X21 comes with a 6.28-inch Super AMOLED display which has a pixel density of 402 PPI. The Vivo X21 features a 128GB internal memory which is excellent to store ample amount of songs, videos, images, etc,. This new model must be attractive a lot of Android fans.

About Vivo
Vivo is a Chinese multinational technology company that designs, develops, and manufactures smartphones, smartphone accessories, software, and online services. Among them Vivo Mobile offer users with better audio experience and this is one of the prime reasons why it has been liked by users. Vivo mobile has become popular in 2014, especially these hot Vivo models: V5Plus, V5, V5Lite, Y66, Y55, V3Max, V3, Y21, etc,. It has got its own quality & features and it is not expensive.

Nowadays, more and more people get used to take their mobile phone as camera, they would like to take photos wherever and at any time. Except photos, most smartphone users save a large number of personal data on their phone. If you don’t have your files transferred to your computer timely, they may lose for multiple accidents unexpectedly. Losing data can be really frustrating especially if they are important documents, meaningful photos, business messages or necessary contacts. If you unfortunately meet this awkward situation, lost data from your Android phone and feel helpless, holding a professional data recovery software which is qualified to recover lost Android data. This post will take Vivo X21 as an example, to guide you how to restore deleted data from Android with the help of a reliable Android data recovery.

Recover Deleted Data from Vivo X21

U.Fone Android Data Recovery is one of the most reliable & effective software to retrieve any type of deleted files on Android-based devices. With the help this excellent program, you can recover deleted data from Vivo X21 with easy steps. The recoverable of Android files including contacts, text messages, photos, videos, call logs, WhatsApp messages, documents, etc,. It’s capable of recovering deleted data after losing it for any causes, such as, accidental deletion, Android OS update, Android OS root, factory reset restoring, and so on. What’s more, it allow you to preview data before performing recovery. Supports to almost all Android brands, like Vivo, Huawei, Google Pixel, Samsung, HTC, LG, Lenovo, Motorola, Xiaomi, ZTE, OPPO, and so on.

d_win d_mac

How to Recover Deleted Data from Vivo X21

Step 1. Install the Program and Connect Vivo Phone
To get started, please download and install the U.Fone Android Data Recovery on the computer and run it. You can see many different options displayed on the program, select “Android Data Recovery” option to go on.

Android ToolKit home page

Now connect your Vivo X21 to the computer via its USB cable. Make sure USB debugging is enabled on your phone.

connect vivo phone

After this, you should allow the program detect your phone to the computer, then you will get pop up message on your phone, simply tap “OK” and ensure USB debugging on your phone.

allow to detect vivo

Step 2. Select File to Scan
The program will detect all data on your device.You can select the specific files you want and detect them by ticking the “Next” button to go on.

select files to scan

Then you’ll get a window as follow on your device after your phone is detected by the program. Now you must click “Allow” for the program scanning and analyzing the deleted data from Samsung.

allow to scan vivo phone

Please wait patiently when the program scan on your data and contents.

scan deleted vivo data

Step 3. Preview and Recover Deleted Data from Vivo Phone
Last but not least, you could preview all recoverable files in the scan list of program, after the scanning process finished. Select the desired data under file name, to restore it to the computer by clicking “Recover“.

recover deleted data from vivo

d_win d_mac

Related Vivo Data Recovery Guides:

How to Recover Deleted Data from Vivo Phone

How to Restore Deleted Photos from Vivo Phone

How to Recover Deleted WhatsApp Messages from Vivo Phone

How to Recover Deleted Contacts from Vivo Phone

How to Recover Deleted SMS from Vivo Phone

How to Manage Android on Computer

Recover Deleted Data from Vivo X21

Android Data Recovery

Recover Your Lost Data from Android
Now, Even Device Broken

Compatible with Android 8.0 Oreo/7.0, etc.

Recover Lost Data Now